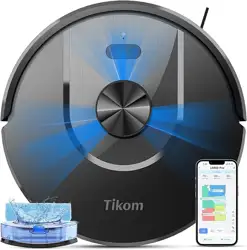
Pure Clean Smart Vacuum Cleaner
Automatic Robot Cleaning Vacuum,
Auto Charge Docking Station
PUCRC675

www.PyleUSA.com
2
All the pictures in the User Manual are for reference only.
Please refer to the actual items in the package.
MENU
1. Wi-Fi Setup Instructions
2. Safety Instructions
3. Product Components
3. 1 Name of Parts
3.2 Products Specications
3.3 Product Characteristics
4. Instructions for Use
4.1 Attention
4.2 Remote Controller Instructions
4.3 Operating Instructions
5. Product Maintenance
5.1 Side Brush Cleaning and Replacement
5.2 Cleaning of Dust Box and Filter
5.3 Maintenance of Water Tank Components
5.4 Maintenance of Rolling Brush Components
5.5 Maintenance of Other Components
6. Common Faults
6.1 Common Faults
6.2 Replaceable Modules

To perfefct the products, we keep the right of updating the APP and the software.
The nal interface is subject to the actual products, thank you.
Figure 2 Figure 3
www.PyleUSA.com
3
WI-FI SETUP INSTRUCTIONS
1. Scan the QR code in Figure 1 to download and install “WeBack” APP,
or download and install from other APP stores.
2. Open App, directly log in if
you have a “WeBack”
account; if not, you can
select “New User” to sign
up, and click on " " after
login.
3. Scan the QR code on the
device or the QR code on
the right side, or manual
input the QR code/Barcode
to conrm the device
model, turn on the “Power
switch” by following APP
instructions and go to the
next step.
Figure 1
Figure 4
www.PyleUSA.com
4
4. When you see the APP enter interface Figure 5, you can start using
APP to control your ROBOT. Tap the device to enter the main interface
of APP (Figure 5), from this interface you can choose dierent cleaning
modes, also to check the cleaning process/status. Tap the “more”
Key (Figure 6) to enter the multi-functional panel (Figure 7).
5. On the device management page, click the button " " (Figure 8), in
the upper right corner of the device to enter the settings page
(Figure 9).
Figure 5
Figure 6 Figure 7
Figure 8 Figure 9
www.PyleUSA.com
5
SAFETY INSTRUCTION
Before using this product, please read the safety instructions below
and follow all the routine safety precautions.
Please read the Instructions carefully and keep them for future
reference. Any operation that does not conform to the instructions
may cause damage to the product.
Safety Considerations of Main Body and Accessories
WARNING
1. Do not disassemble, repair or ret the product without authorization;
otherwise it may damage the product or pose a hazard.
2. Do not use the product in an environment with risk of re or explosion.
3. This product can only use the original power adapter; otherwise the
product may be damaged or catch re.
4. Do not stand or sit on this product; doing so could damage the product
or cause it to fall over.
5. When the metal part of the power plug is dusty, please wipe it with a
dry cloth.
6. The power adapter is applied to a 100-240V AC voltage. Please plug
into the socket properly and keep away from children.
7. Do not wash or soak the main body and electronic accessories in water;
otherwise the product may be damaged by a short circuit.
8. Do not damage, load weight on, heat, pull, or bend it.
9. During cleaning, please pay attention to the safety of toddlers and
elders at home to avoid tripping, and please do not touch the wheel
& side brush to avoid injury. (Please pay special attention to toddlers).
10. This product is for home use. Please do not use it outdoors.
11. Do not allow metal and conductive materials to come in contact with
the battery; doing so may cause a short circuit.
ATTENTION
1. Do not touch the product with wet hands; doing so may cause an
electric shock.
2. Do not place the product in places where it could easily fall, such as
tables, chairs, high platforms in room, etc.
3. The product has a sophisticated design and should be protected from
long-term exposure to sunlight.
www.PyleUSA.com
6
4. Do not use the product in humid environments, such as bath rooms.
5. Do not place the product near cigarette butts, lighters or other open
res.
6. Please clean the product after charging.
7. Turn o the power switch on the side of the robot when the product
is out of service for a long time.
8. Please check carefully to see if the power adapter is connected to the
socket prior to use, to avoid damage to the robot.
9. Before using the product, please remove all vulnerable items on the
oor, such as glass, lamps, and items such as wires and curtains that
may entangle with the side brush and suction passages.
10. When the dust box is full, please empty the garbage before using
again.
11. Please do not use the robot to clean construction waste.
12. The operating temperature of the product ranges from 0 degrees
Celsius to 40 degrees Celsius; please do not use it in a high
temperature environment.
13. Before the product is scrapped, please remove the battery from the
robot. When you remove the battery, please ensure that the product
is not connected to a power supply. Please recycle the battery safely
for environmental protection.
Safety Considerations for Rechargeable Battery
DANGER
1. Always use a dedicated battery adapter to avoid leakage, heating or
rupture.
2. Do not short-circuit the battery or remove the battery; doing so may
cause leakage, heating or rupture.
3. Do not transport or preserve with necklaces, hairpins and other metal
objects; doing so may lead to short circuit, resulting in leakage,
heating or rupture.
4. Do not burn or heat the battery; doing so may cause leakage, heating
or rupture.
www.PyleUSA.com
7
ATTENTION
1. lf abnormal overheating is discovered during charging, stop using it
immediately to avoid leakage, heating or rupture.
2. To prolong the service life of the battery, please remove the battery
and place it in a cool, dry environment if it is out of service for a long
time; this will avoid leakage, heating or rupture.
3. Do not soak it in water or let it come into contact with any liquid;
otherwise it may cause leakage, heating or rupture.
4. Be sure to stop using it immediately in case of any exception
(e.g. discoloration or deformation), to avoid leakage, heating or rupture.
5. Always use tape to insulate the battery's electrode when recycling or
disposing of it.
WARNING
1. When skin or clothing is exposed to the battery electrolyte, immediately
wash with clean water to avoid inammation of skin, etc.
2. Do not use the rechargeable battery on other devices. This battery is
only suitable for smart sweeping robots.
3. If the battery's outer box is found to be deformed and expanded, or
leakage of electrolytes is found, do not charge or continue to use to
avoid danger.
4. Do not throw or inict a strong impact on the battery; doing so may
cause leakage, heating or rupture.
5. Do not disassemble the battery pack; doing so may cause battery
rupture and electrolyte outow, leading to re, explosion and other
dangers.
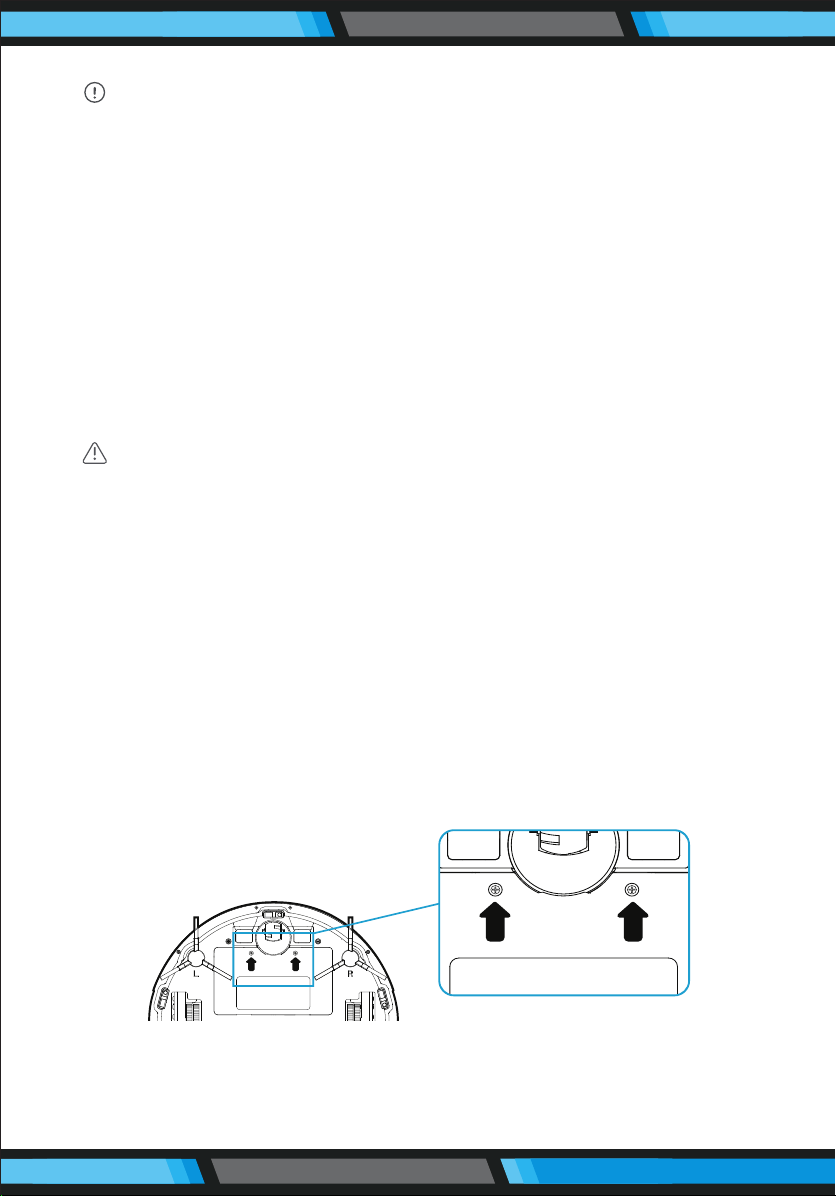
6. How to remove the battery:
1. Take out two screws on the battery cover with a screw driver.
2. Take out the battery cover.
3. Take out the battery and unplug the electric wires to remove the battery.
www.PyleUSA.com
8
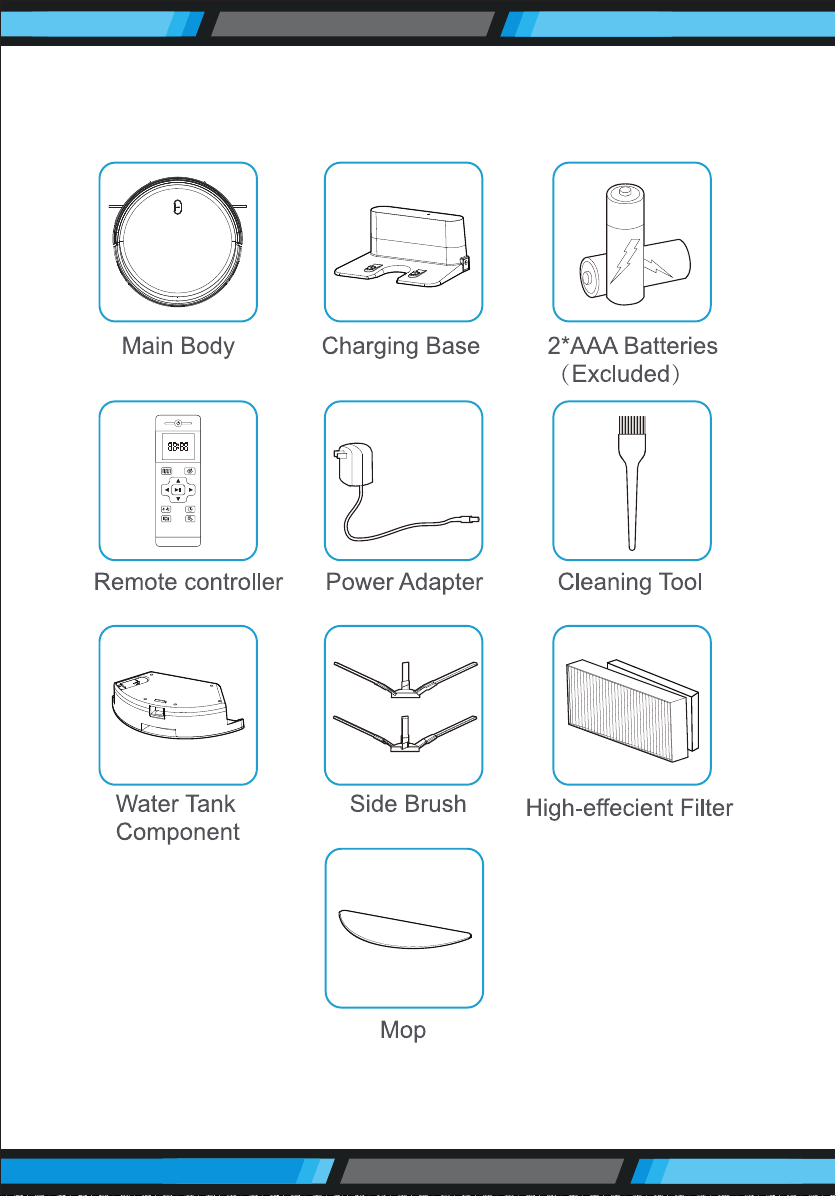
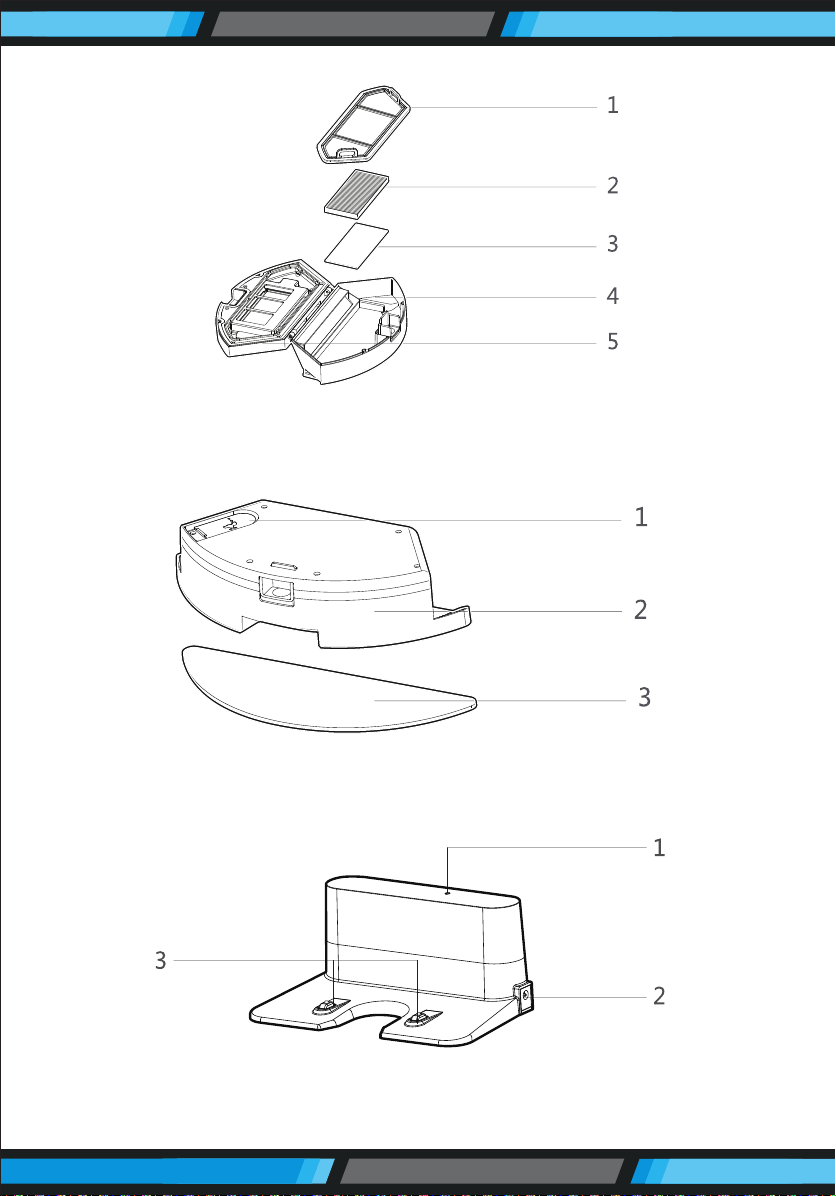
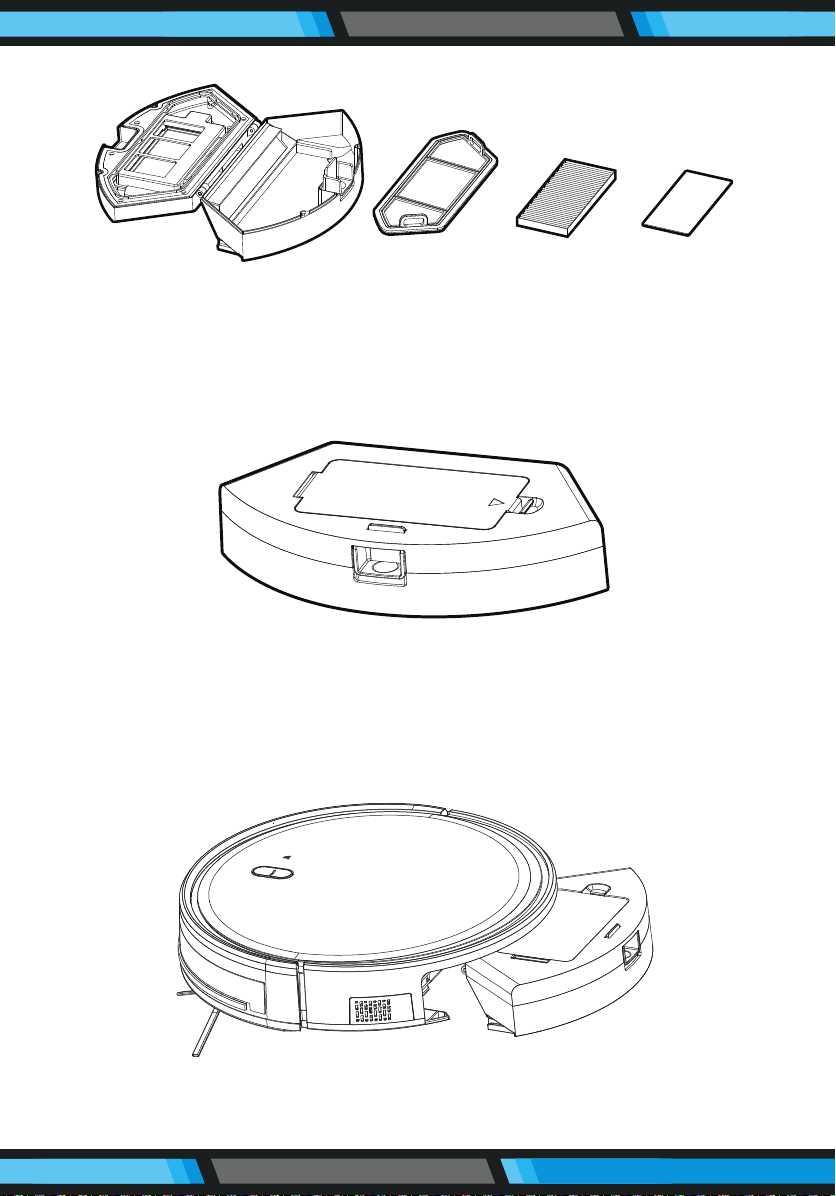
PRODUCT COMPONENTS
3.1 Names of Parts
Accessories of some models may be slightly dierent and they are
subject to the actual received products.
www.PyleUSA.com
9
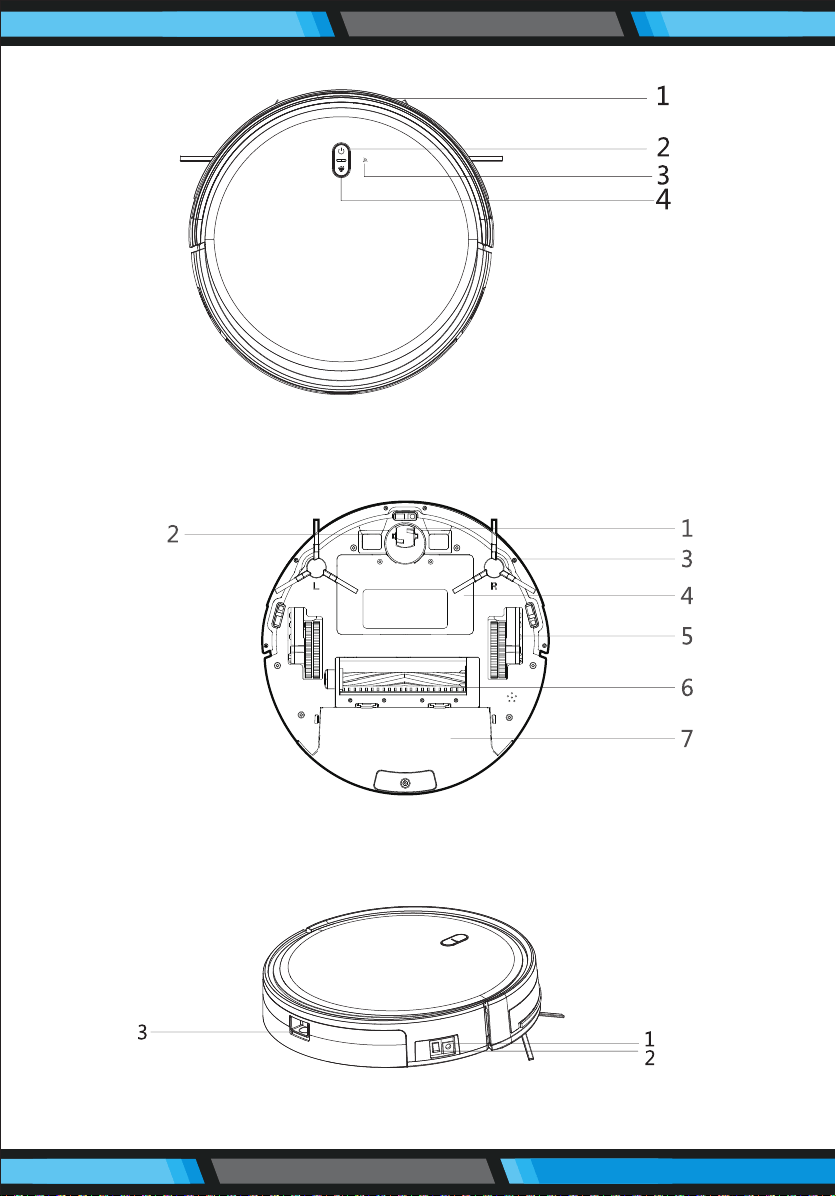
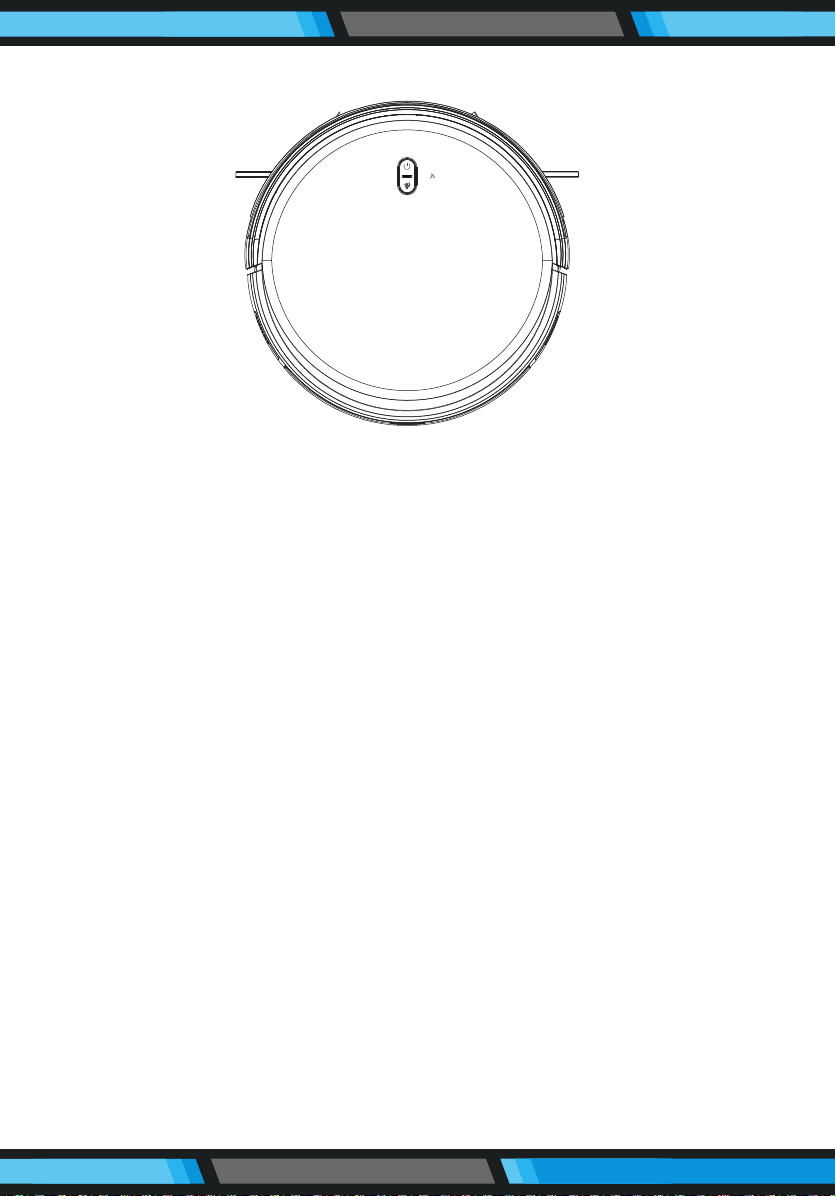
Main Body
1. Bumper 2. Power Button 3. Wi-Fi Indicator 4. Control Button
Main Body
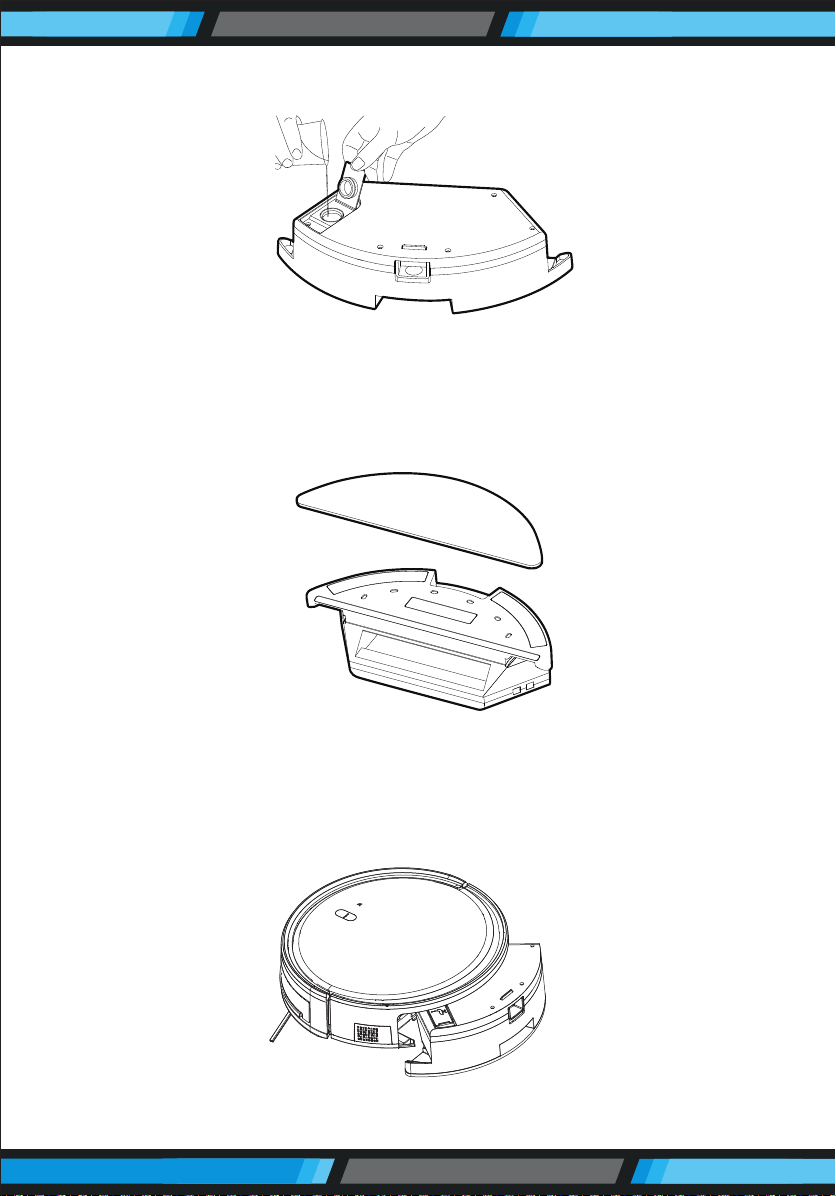
1. Universal wheel 2. Electrode slice 3. Side brush 4. Battery cover
5. Side wheel 6. Rolling brush components 7. Dust box
Main Body
1. DC power jack 2. Power switch 3. Dust box release button
www.PyleUSA.com
10
Dust Box
1. Per-lter 2. High-ecient lter 3. Filter sponge
4. Dust box 5. Dust box cover
Water Tank Component
1. Tank sealing cap 2. Water tank 3. Mop
Charging Base
1. Charging indicator 2. DC power jack 3. Charging terminal

www.PyleUSA.com
11
3.2 Product Specications
Features:
• Keep it Clean: Sweep, Dust & Vacuum
• Versatile & Convenient Floor Clean Ability
• Smart, Self-Programmed Cleaning Path Navigation
• Low-Prole Design Slides Underneath Furniture
• Anti-Fall Stair Sensors & Protective Bumper Housing
• Obstacle Detection Cleans Around Household Objects
• Works on Hardwood, Linoleum, Tile, Low/Hard Carpet Floors
• Convenient Dust Collection Bin Opens for Quick Disposal
• Automatic 'Bag-less' Design for Easy Cleaning
• One Button Operation
• Built-in Rechargeable Battery
• Dual Spinning Side Brush Lifts Debris
• Includes Charging/Power Adapter
• Perfect for the Home or Oce
What’s in the Box:
• Smart Robot Vacuum
• Rechargeable Battery
• Remote Control
• (1) US Plug/Power Adapter
• (2) Mop Cloth
Technical Specs:
• Construction Material: ABS, POM
• Dust Bin Capacity: 0.6L
• Average Charge Time: 4 Hours
• Vacuum Operation Run-Time: 90 Minutes
• Battery Type: 14.8V Li-ion, 2600mAh - 22.2Wh
• Unit Average Power: 25W
• Suction Power: 2700pa
• Power Supply: 120/240V, 19V Power Adapter
• Low Noise: 65 dB
• Power Cable Length: 5.02 ft.
• Remote Control Battery Operated, Requires (2) x ‘AAA’ Batteries
• Dimensions (L x W x H): 11.81’’ x 11.81’’ x 2.91’’ -inches
• (1) Water Tank
• (2) Pairs Side Brush
• (2) HEPA Filter
• (1) Primary Filter
• (1) Charging Station
www.PyleUSA.com
12
3.3 Product Characteristics
Multiple smart cleaning modes
4 cleaning modes are designed to suit dierent needs, which can be
switched by the remote controller and App, greatly improves the cleaning
eciency and saves 30% of the power.
Humanized design
It is simple to operate, pressing the Control Button to start cleaning.
Follow the Voice Prompt and let the robot start working for you.
Dust box can be washed with water
The dust box and the pre-lter can be directly ushed with water without
too much labor, which can avoid secondary pollution caused by dust
ying.
www.PyleUSA.com
13
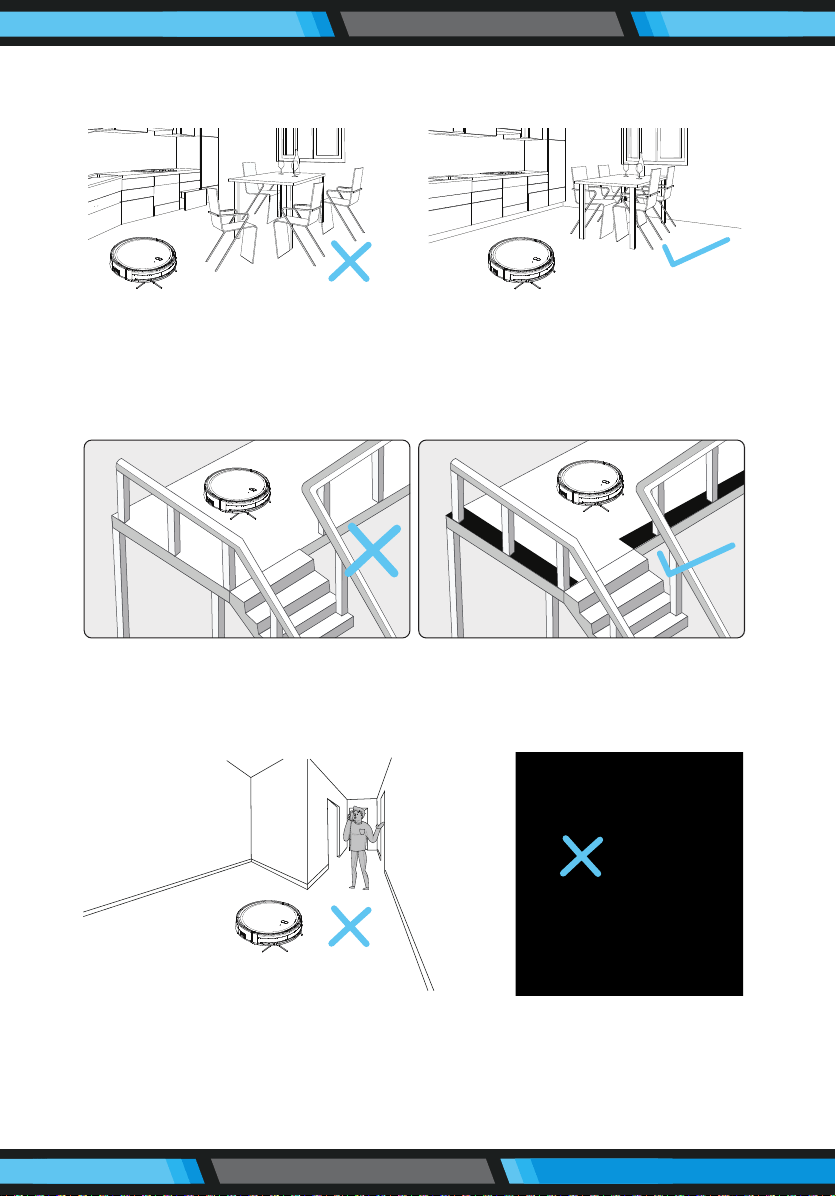
4.1 Attention
When it is working, please help to remove the unfriendly obstacles. Put
the furniture and home appliances such as tables and chairs in the house
neatly, the robot will clean up smoothly to give you a clean new home.
If the robot works at the stairway, the edge of the step, or the entrance to
the narrow area among the furnitures, etc. please place a fence to ensure
it is safe and running smoothly.
Do not stand in narrow places such as thresholds and aisles to avoid
missing sweeping. When the robot is working, please ensure that the
object with the thickness less than 1.8 cm is not placed in the cleaning
area to prevent the machine from climbing and jamming.
www.PyleUSA.com
14
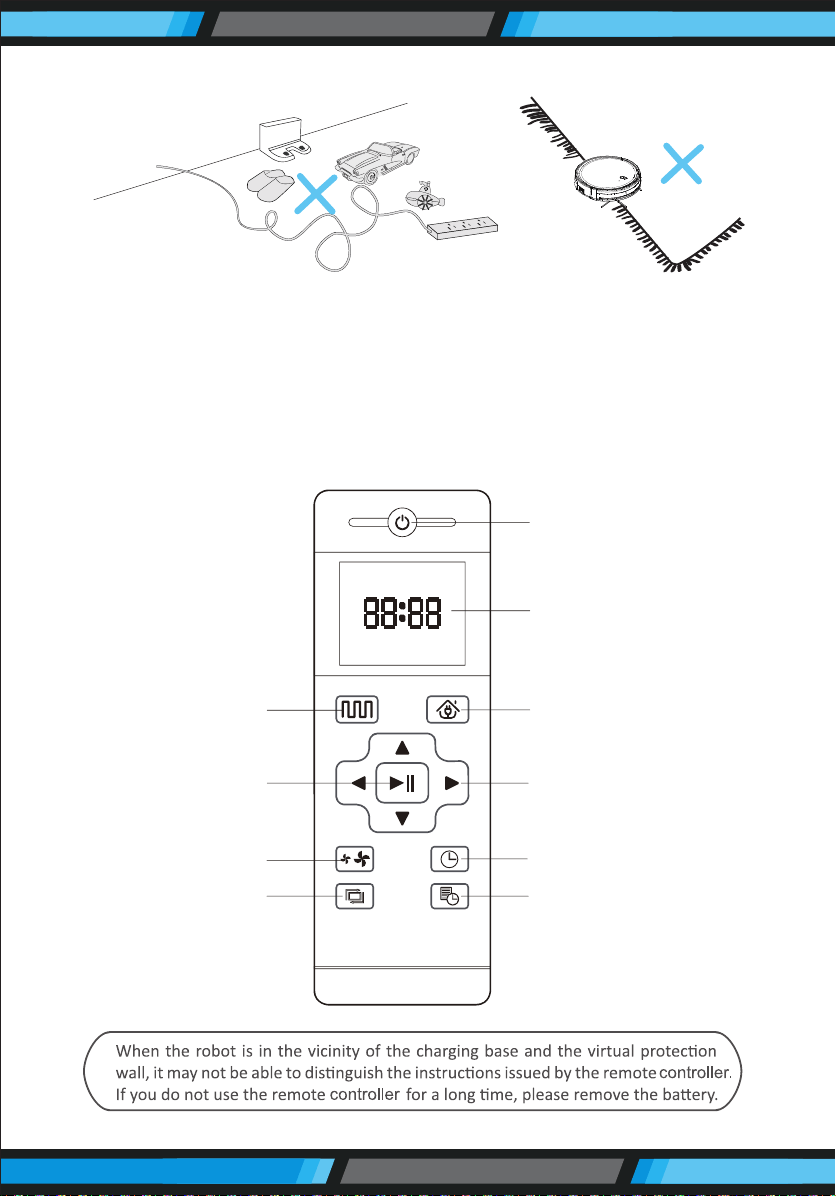
Please pay attention to remove sundries, such as the power cords, toys,
etc, which are scattered on the ground may catch or entangle the Robot.
Do not use the mopping function on the carpet! If there is a carpet in the
house, please roll up the edge of the carpet in advance.
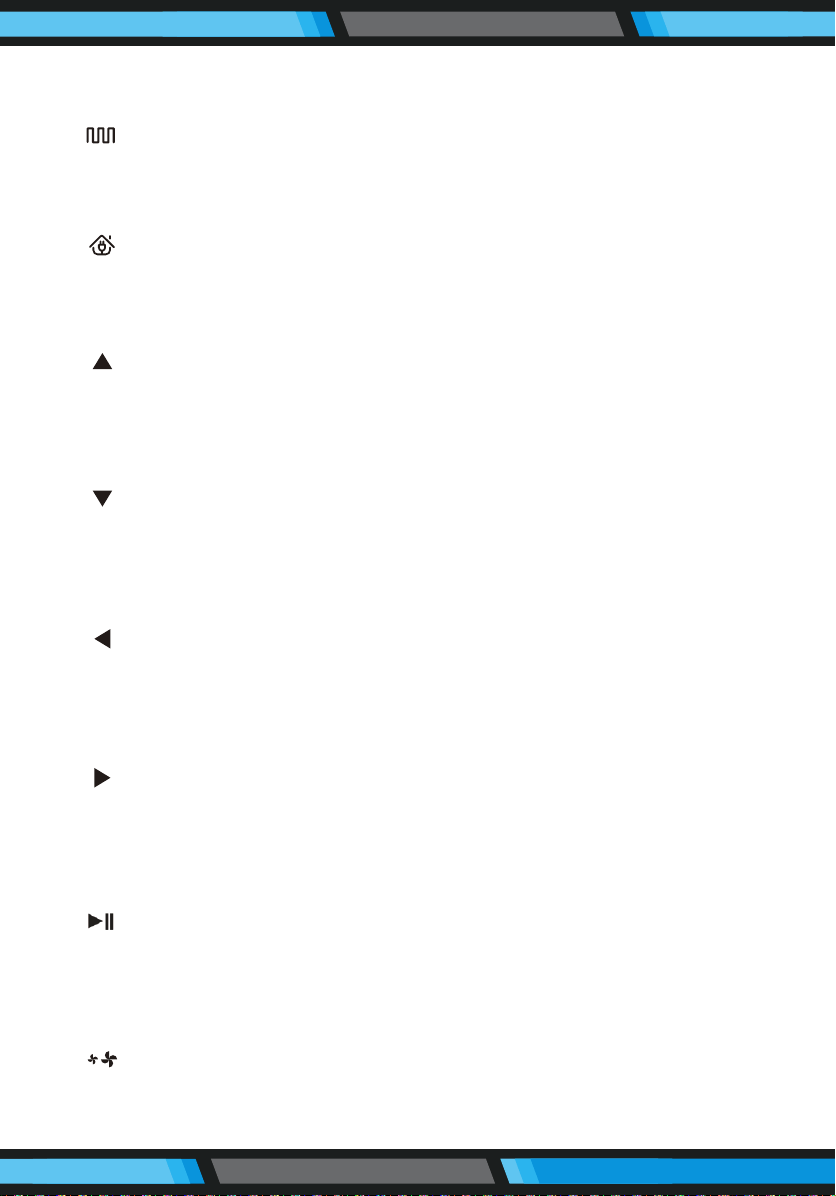
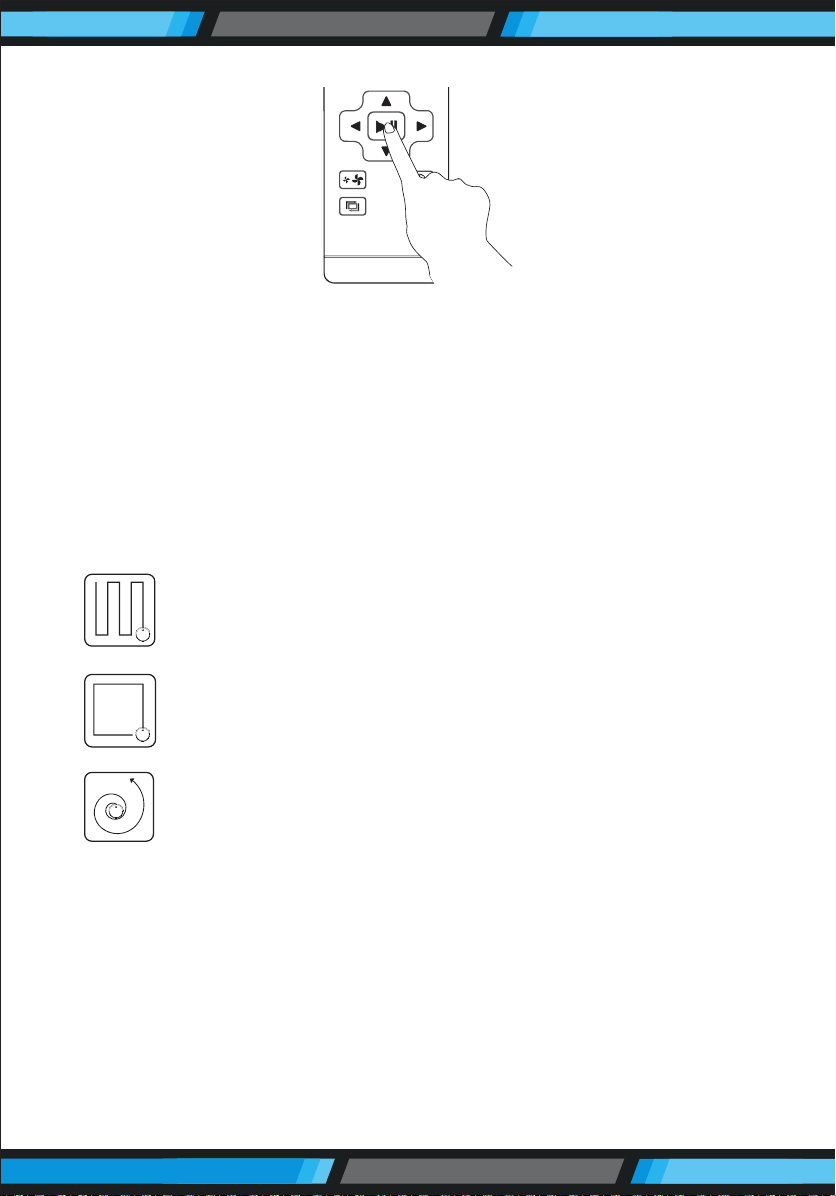
4.2 Remote controller instruction
Power On/O
Display Screen
Return for Auto
Charging
Direction
Clock setting
Edge Cleaning
Plan Cleaning
(Smart Cleaning)
Conrm
Suction setting
Schedule Setting
www.PyleUSA.com
15
INSTRUCTIONS FOR USE
Plan Cleaning button
No matter what mode the robot is in, this button will bring it to the plan
cleaning mode.
Return for Auto Charging
Pressing this button to shift the mode as recharging, and the logo will be
displayed on the screen of the remote controller.
Forward/+
At the standby mode, press this button to continue moving forwards, and
release it to return to standby mode. At the Schedule setting mode, press
this button to increase the number.
Back Button/-
Press this button and robot will rotate 180 degrees in situ. In the modes
of Schedule Setting and Clock Setting, press this button to decrease the
number.
Left Arrow
At the standby mode, press this button to continue turning left, and
release it to return to standby mode. At the Schedule setting mode, press
this button to switch from minute to hour.
Right Arrow
At the standby mode, press this button to continue turning right, and
release it to return to standby mode. At the Schedule setting mode,
press this button to switch from hour to minute.
Conrm button
During operation, press this button to stop the robot, and it is still
working at the pause. In the Schedule setting mode or Clock setting
mode, this button can save all settings.
Suction Setting button
At any cleaning mode, press this button to adjust the suction power.
There are Normal suction and Powerful Suction for your option.
Clock Setting button
Press this button to enter the Clock Setting mode and press the Conrm
button to exit.
Schedule Setting button
At the standby mode, press this button to enter the Schedule Setting
mode, and the display ashes icon . At the Schedule Setting mode,
press this button to save the data and exit the Schedule Setting mode,
and the display will always display the icon . At the Schedule setting
mode, press this button for 3S to cancel the Schedule Setting function,
and the displayed icon wil disappear.
Edge Cleaning button
Press this button to enter the Edge Cleaning mode.
4.3 Operating Instructions
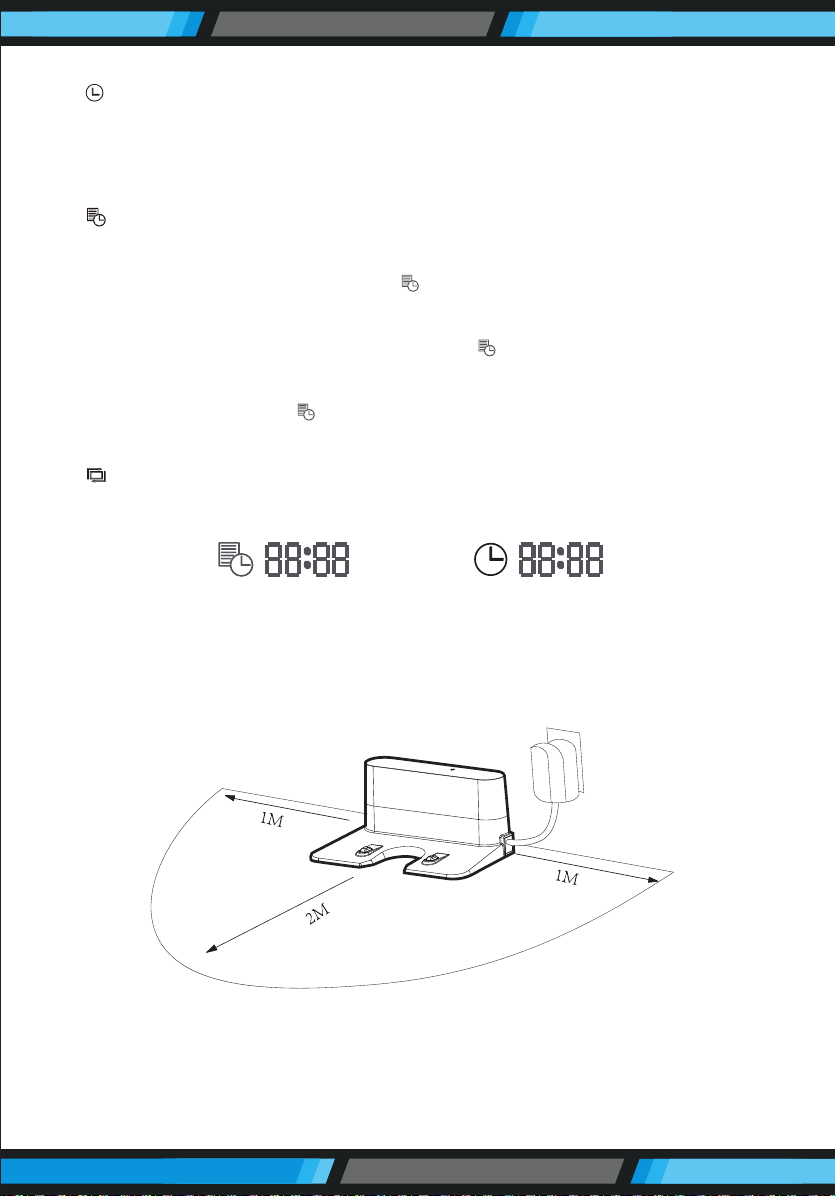
Placement of the Charging Base
Place the charging base against the wall. Do not place any objects within
3.3 ft to the left/right and 6.6 ft to the front, and do not place any mirrors
or other reective objects within this distance.
www.PyleUSA.com
16
Display preset time Display clock time
www.PyleUSA.com
17
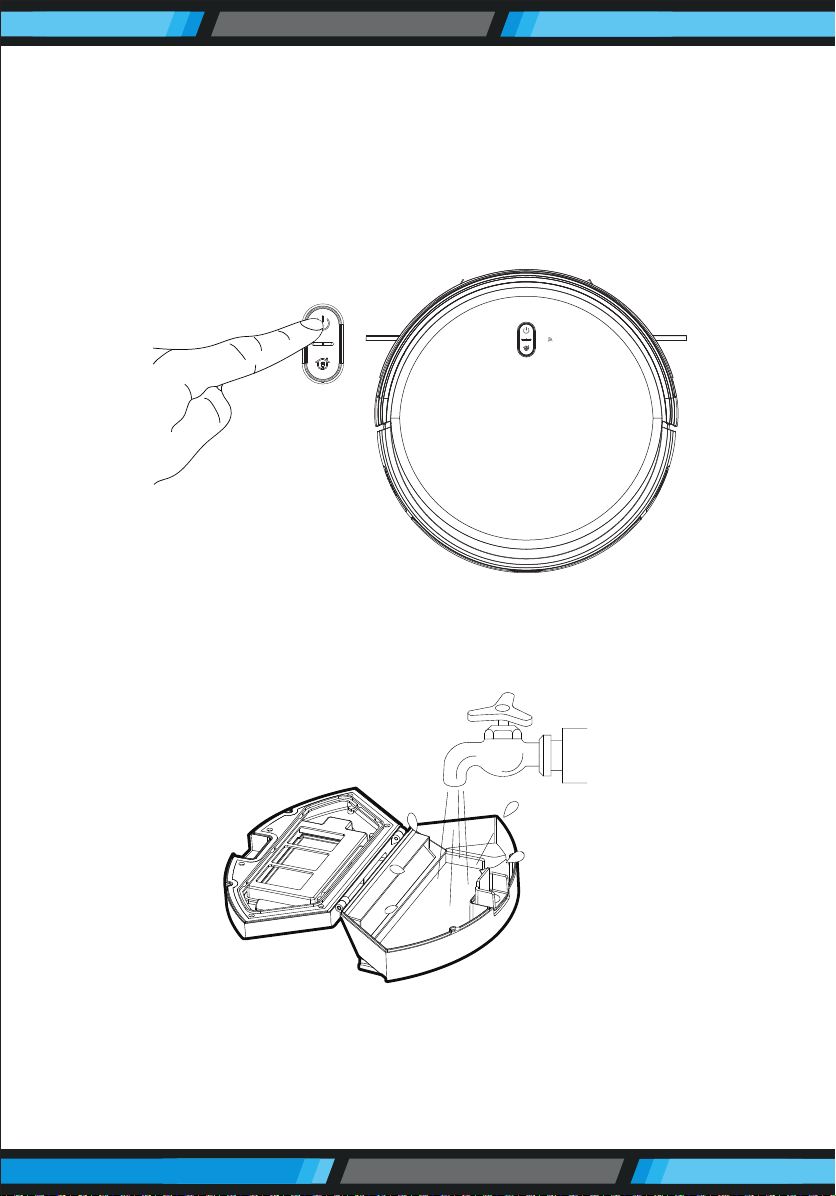
Switch on the robot, which makes the
Control button green, and enter the
Selected mode. If the robot is not
activated within 10 minutes, the robot
will enter Sleep mode.
Charging modes
Please keep the power switch turned on before charging the machine.
Charge mode A: Fix the charging pin into the DC power jack of the
robot and plug in the power supply.
Please keep the power switch turned on before charging the machine.
Charge mode B: Press Return for Auto charging button on the remote
controller or Press Recharge icon on App to auto dock the Robot with
the charging base.
www.PyleUSA.com
18
Automatic charging
• Pressing the Return for Auto Charging on the remote controller to
make the robot return for charging.
• When Cleaning is completed or the battery is too low, the robot will
automatically start nding the charging base to charge itself.
• Keep the charging base energized, otherwise the machine will not be
able to nd the charging base.
Charging lnstructions
1. The battery should be repaired and replaced by the after-sales service
center.
2. For the very rst operation, please let the robot run out of power.
3. When the robot is charged, the LED light of Control button will ash.
4. lf the robot is out of service for a long time, please turn o the power
switch.
5. Please charge the robot as soon as possible after the battery is used up.
6. The product can only use the power adapter and charger provided by
the factory.
7. Please charge the robot for 12 hours for the rst time of operation.
When the charge is done, the Control button light turns o.
www.PyleUSA.com
19
Switching Modes
Startup
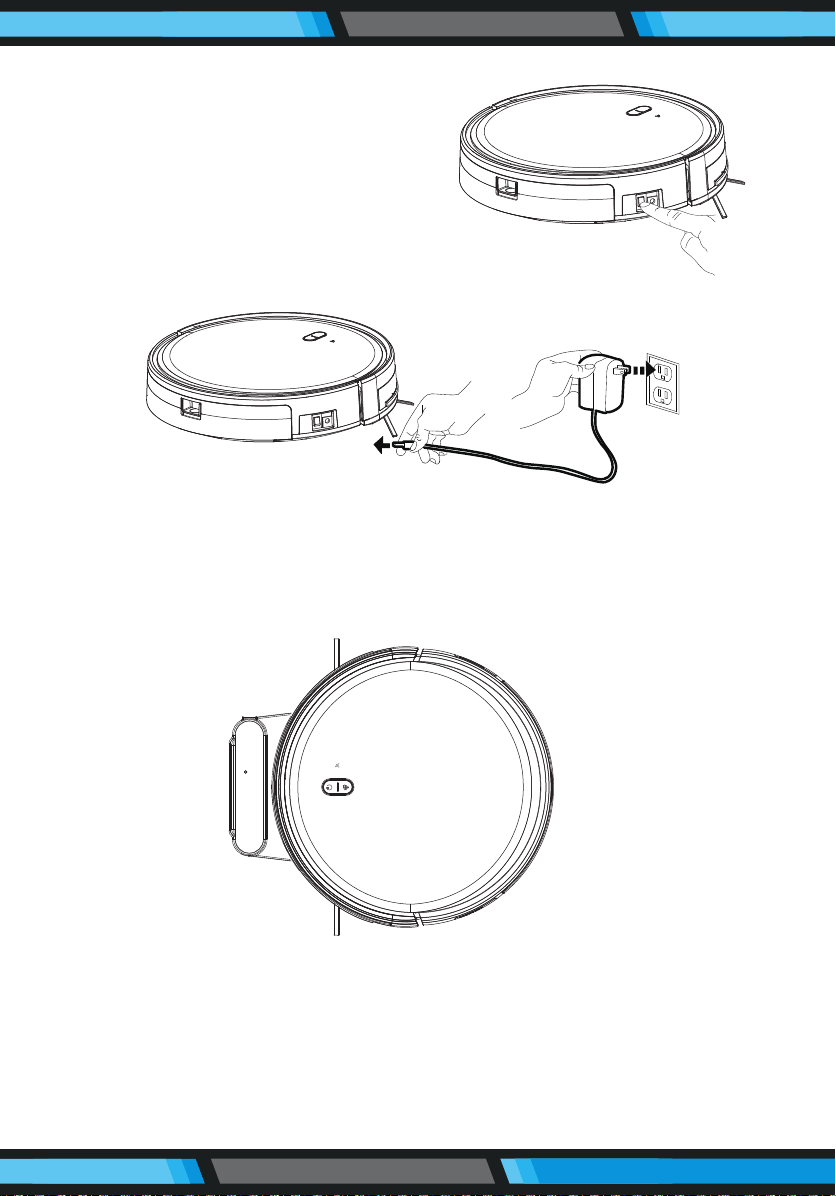
1. Make sure the power switch on the side of the robot is turned on.
2. Press the Control button or the Cleaning mode on the remote controller
to start the robot.
Pause
The pause function is to switch the robot from the operating mode to
the selected mode, and the robot can be paused by the following
operations:
1. Press the Control button on the robot to pause the robot.
2. Press the power on/o button on the remote controller to pause the
robot.
Notice: After the machine is paused, the machine can be reoperated.
Sleep
Sleep mode means that the robot is stopped and the indicator light is
o. If the Robot is not active within 10 minutes, the robot will enter Sleep
mode automatically.
Note:
If the robot is out of service for a long time, please turn o the power
switch.
www.PyleUSA.com
20
Use of Water Tank
When charging, please remove the water tank to avoid danger.
How to add water?
Open the tank sealing cap, ll it with enough water and slowly inject
water into the water tank.
When charging, please remove the water tank to avoid danger.
How to x the microber mop?
Seal the tank sealing cap,then x the microber mop to the velcro on
the bottom of the water tank.
When charging, please remove the water tank to avoid danger.

www.PyleUSA.com
21
How to install the water tank?
Press the release button on the dust box to remove it then install the
water tank.
Schedule Setting Cleaning
You can set the current local time on your robot by pressing the Clock
Setting button on the remote controller, then press Conrm button.
• Once the power switch is turned o, all Schedule will be cancelled.
• Once the schedule setting is succeeded, the robot will start working at
the scheduled time everyday.
Press the "Schedule Setting" button to set the scheduled cleaning time
for the robot.(e.g. Setting 6:30am to the robot, the robot will start
cleaning at 6:30am every day at the standby mode.)
www.PyleUSA.com
22
At the Schedule Setting mode, follow the voice prompts to conrm all
your operations.
1. Press the Schedule Setting button to enter the Schedule Setting mode
and set the schedule on the remote controller or APP.
2. If you need cancel the schedule, just press the Schedule Setting button
for 3 seconds.
Cleaning Modes
Mopping Mode
The Robot will perform the S shape cleaning with mop according to the
room environment.
• Please do not move or remote control the robot while it is working, or
it will replan the cleaning route and repeat cleaning.
• There is a normal phenomenon that the robot will perform with a brief
pause during working. Please be patient, as it is thinking and making
decisions or discovering where to clean.
Plan Cleaning (S shape Cleaning)
The robot will perform the smart plan cleaning in S shape
according to the room environment.
Edge Cleaning
The robot will clean along the longest edge of the room.
Spot Cleaning
The robot will perform the concentrated cleaning on a
special dirty area. (APP controlled only)
www.PyleUSA.com
23
PRODUCT MAINTENANCE
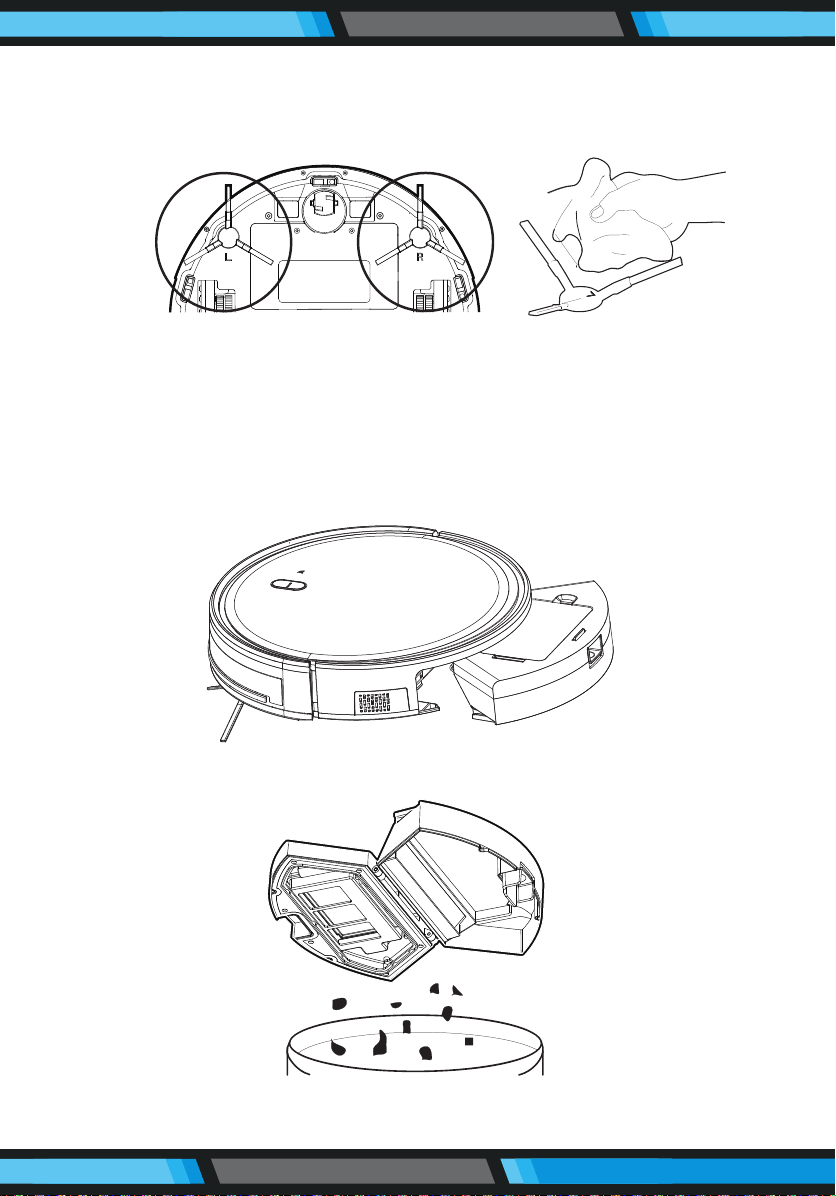
5.1 Side Brush Cleaning and Replacement
Check the side brush's condition frequently to see if it has been damaged
or entangled with other objects. Clean the side brush with a cleaning
tool or cloth. When the side brush is damaged and can not be used,
please replace it as soon as possible. L and R correspond to each other.
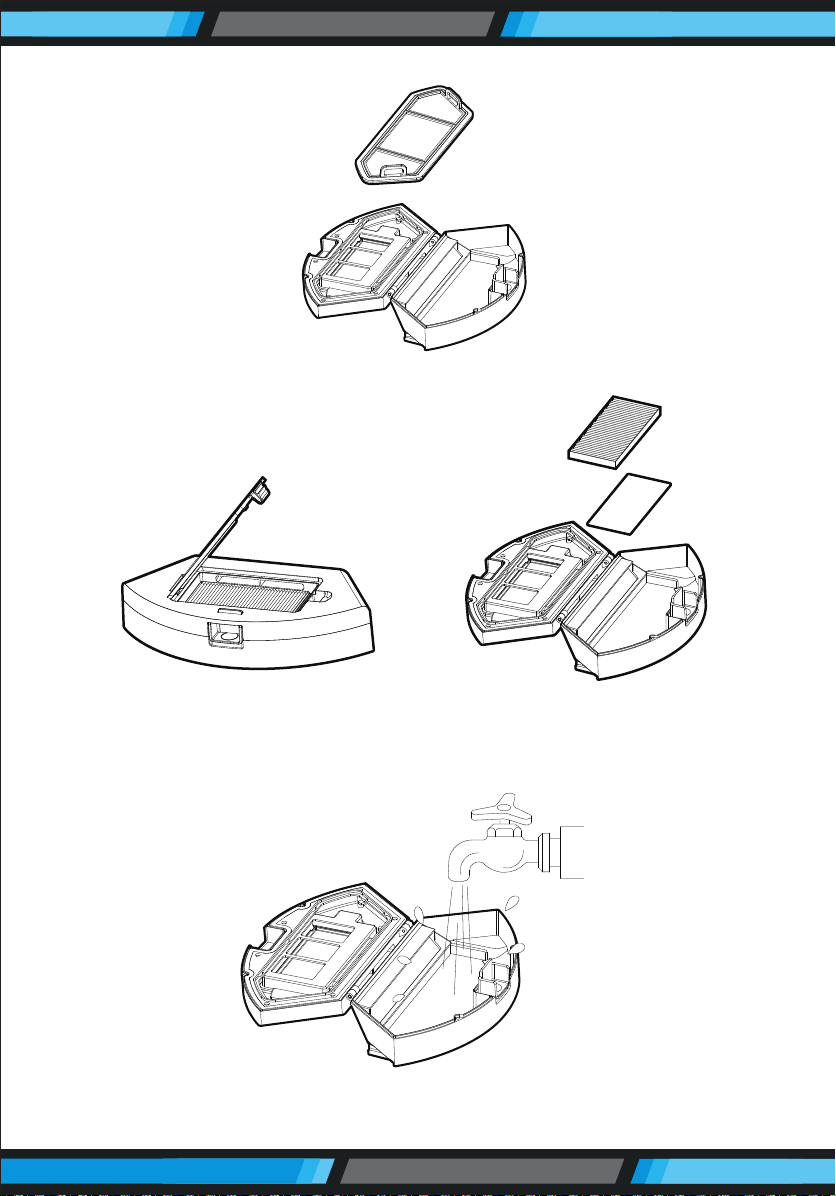
5.2 Cleaning of Dust Box and Filter
Press the release button to take out the dust box.
Dump all debris form the dust box into the garbage.
www.PyleUSA.com
24
Remove the pre-lter.
Open the high-ecient lter cover, and remove the high-ecient lter
and lter sponge. It is not recommended to wash the high-ecient lter
with water. Please pat o the debris carefully.
Wash the dust box and pre-lter.
www.PyleUSA.com
25
1. Dry the dust box and lter components. Keep them dry to ensure a
longer service.
2. After the pre-lter is used for 15~30 days, it should be washed once.
3. The maximum service life of the high-ecient lter is 3 months.
1. Reinstall the pre-lter and high-ecient lter in the dust box.
2. Before installing the lter, make sure that the high-ecient lter and
the pre-lter are dry.
3. Do not expose the high-ecient lter and the pre-lter to sunlight.
Cover the dust box and x it into the main body.
www.PyleUSA.com
26
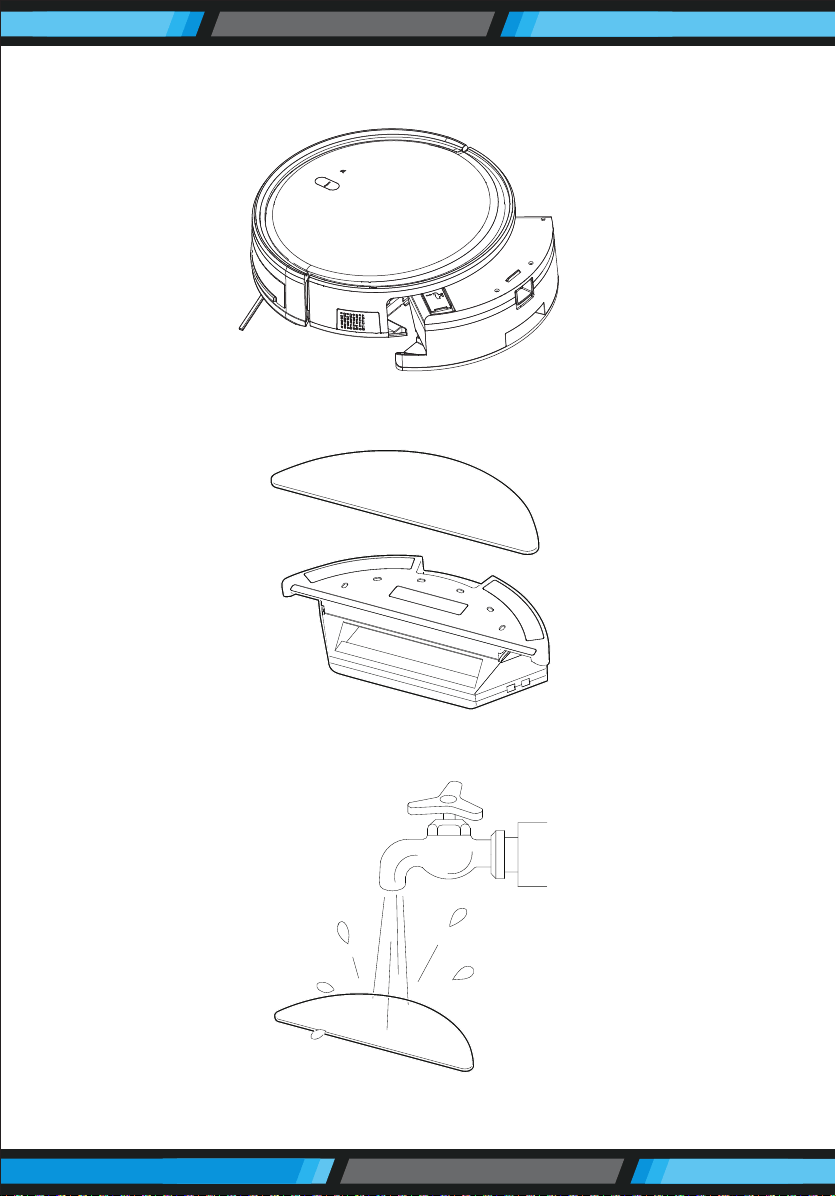
5.3 Maintenance of Water Tank
Press the release button to take out the water tank.
Remove the mop.
Wash and dry the mop.
www.PyleUSA.com
27
Pour out the rest of water from the water tank.
Clean the tank and dry it.
5.4 Maintenance of Rolling Brush Components
Open the rolling brush components.

www.PyleUSA.com
28
Remove the rolling brush and clean o all debris and hair.
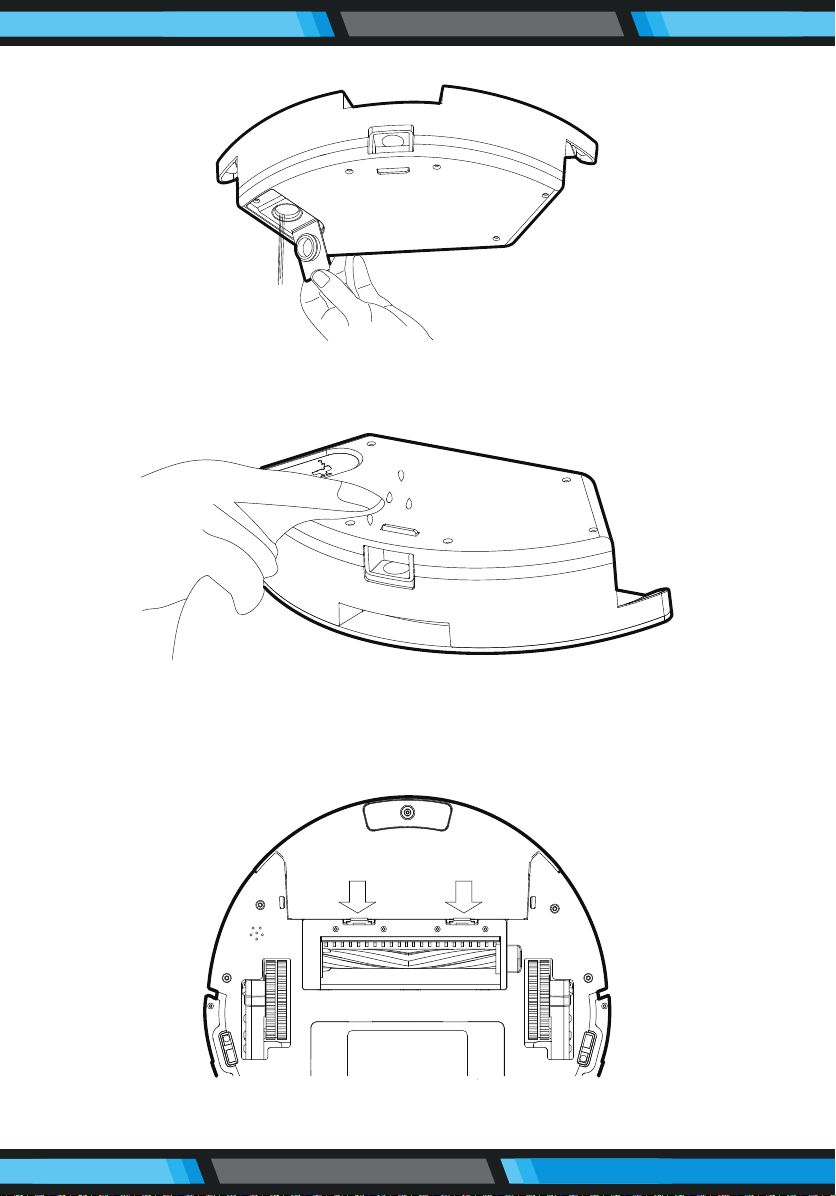
5.5 Maintenance of Other Components
Use the cleaning tools or a dry soft cloth to periodically clean the
electrode slice of robot chassis and the sensor window.
Use a cleaning tool or soft cloth to clean the charging terminal.
Electrode slice
Sensor
www.PyleUSA.com
29
COMMON FAULTS
6.1 Faults Description
FAULTS POSSIBLE REASONS SOLUTIONS
The robot
can not be
charged
The robot is
stuck during
work
The electrodes between the
main body and the charging
base are not contacted
properly.
Make sure that the electrodes
between the main body and
the charging base are properly
contacted.
The charging base is switched
o while the robot is switched
on,which leads to the loss of
power.
Keep charging the robot when
it is not working to better
prepare for next cleaning
assignment.
The robot may be stuck by
wires/cables on the ground,
hanging curtains or obstacles
around the carpets.
The robot will try to get itself
out automatically. However,
please help it manually if it
failed.
The robot
goes back to
recharge
without
nishing the
cleaning
work
The robot detects that the
power may be not enough
and automatically goes back
to recharge.
Charge the robot.
The robot works at dierent
speeds on dierent oor
types. For example, it works
longer on the wood oors
than on carpets.
The length of working time
varies because of the
complexities of room
environments, the amount of
garbage and dierent
cleaning modes.
The robot
does not
perform
cleaning
work
automatically
as scheduled
The robot is not switched on
and the robot can not perform
cleaning work as scheduled
when it is powered o.
Turn on the robot.
The power level of the robot
is too low to work.
Keep charging the robot when
it is not working to better
prepare for next cleaning
assignment.
The robot is stuck or twined
by obstacles.
Turn o the robot and clean
the dust box. Then turn over
the robot to clean its compo-
nents, such as wheels and
side brushes.
www.PyleUSA.com
30
FAULTS POSSIBLE REASONS SOLUTIONS
Remote
control
malfunctions
(eective
range is 5 m)
The remote controller is short
of or out of power.
Change the batteries and
install the batteries correctly.
The robot is short of or out
of power.
Make sure that the robot is
switched on with enough
power for operation
The infrared ray is blocked
because the infrared emitter
on the remotecontroller or
the infrared receiver in the
robot is contaminated.
Wipe the infrared emitter on
the remote controller or the
infrared receiver on the robot
with a clean cotton cloth.
Interference emitted by other
devices that exist nearby.
Avoid using the remote
controller near other infrared
devices
Work on a waxed, polished
oor or smooth oortile,
resulting in reduced friction
between the drive wheel and
the ground.
The wires, slippers, etc.
placed on the ground aect
the normal operation of the
robot.
Before the machine is working,
please arrange the scattered
wires, slippers and other
objects on the ground to
minimize the scattered
objects on the ground.
When the
robot is
working,
there is a
missed
sweep, the
route is
chaotic, the
deviation
is reversed,
and the APP
side cleaning
map shows
irregularities
and is not
neat.
The drive wheel and the
ground may slip due to the
robot climbing small steps,
thresholds and door bars, thus
aecting the its judgment on
the working environment of
the whole house.
It is recommended to close
the door in the area and clean
the area separately. The robot
has the function of self-
identication single room.
It will return to the starting.
It is recommended that you
clean the oor after the wax
is air-dried.
www.PyleUSA.com
31
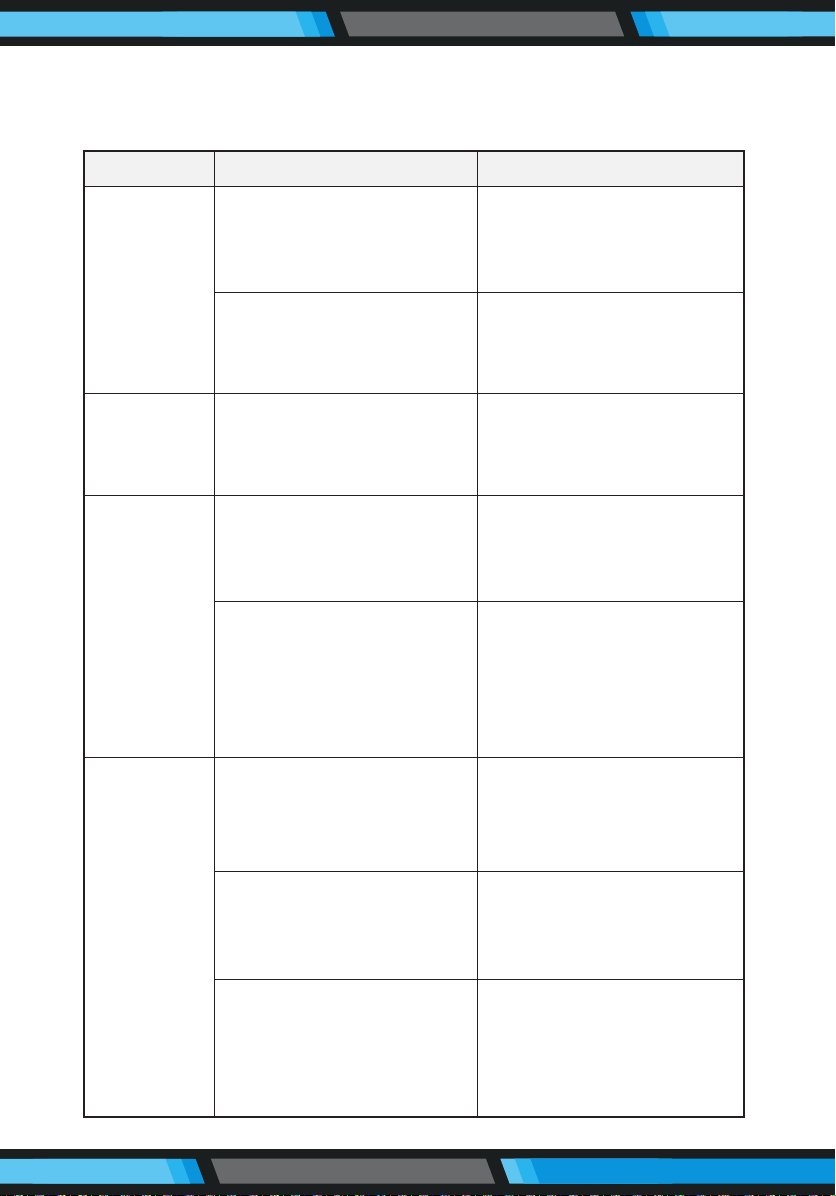
6.2 Replaceable Modules
Application:
The product is suitable for cleaning house, hotel rooms, and small
oces and provides good cleaning for various oors, such as
wooden oor, hard oor, tile oor, and short-pile carpets (short-pile
should be shorten than 1.5cm), etc.
Shell
Side Brush
Components
Left Side Wheel
Component
Left Side Brush
Right Side Brush
Dust Box
Components
Water Tank
Right Side
Wheel Component
Fan Components
Universal Wheel
Components
Rolling Brush
Components
Battery
Battery Cover
Bottom Shell
Glass Panel