Loading ...
Loading ...
Loading ...
16 17
OPERATIONOPERATION
4.Setthecookingdurationyouwantbyusing–or+.
5secondsafterthelastchange,the“cooktime”
indicator I will stop flashing, and the time of day will
be displayed.
Note: Do not forget to add preheating time if necessary.
Setting the cooking end time
1. Check the clock displays the correct time of day.
2.Selectthedesiredovenfunctionandtemperature.
The oven indicator light will glow and the heating
source will come on.
3.Press“mode“untilthe“endtime”indicatorI
begins flashing.
4.enterthetimeofdayyouwanttofinishcooking
bypressing–or+.5secondsafterthelastchange,
the“endtime”indicatorI will stop flashing and the
current time of day will be displayed.
Setting the delayed start cooking time
1. Program the “cook time“ and “end time“ as described
in the relevant sections. Once both the “cook time“ and
“end time“ have been set, the “cook time“ and “end
time”indicatorswillstopflashingandthecurrenttime
of day will be displayed.
To check or cancel settings
1.Tocheckyoursettings,press“mode”untilthesetting
youwantisdisplayed.Aredlightwillflashnexttothe
mode (cook time, end time etc) that is currently on display.
2.Tocancel“delayedstart”press“mode”untilalight
flashesnextto“cooktime”.Pressandhold“–”until
theclocknolongerreverses(“0:00”andyouwillhear
a beep). If you have left the temperature and function
knobs at a setting the oven will start once the “end
time”lightstopsflashing.
3.Tocancel“autooff”press“mode”untilalightflashes
nextto“cooktime”.Pressandhold“–”untiltheclock
nolongerreverses(“0:00”andyouwillhearabeep).
Thisautomaticallycancels“delayedstart”.Ifyou
have left the temperature and function knobs at a setting,
theovenwillstartoncethe“cooktime”lightstops
flashing.Becauseyouhavecancelled“autooff”the
oven will continue to heat until you manually turn it off.
On completion of cooking
Theovenwillturnoff,thetimerwillbeepandthe“endtime”
and/or“cooktime”indicatorswillflash.
1. Turn the function and temperature controls to the off position.
2.Press“+”or“–”or“mode”tostopthetimerfrombeeping.
Touch Control
Setting the time of day
Aftertheappliancehasbeenelectricallyconnectedthe
“setclock”symbol
and “timer arrow
will flash on the
clock display.
1. To set the time of day in hours and minutes press the
–or+.5secondsafterthelastchangethe“timerarrow”
will disappear, confirming the time has been set.
NOTE: The clock has a 24-hour display.
Change the time of day (Daylight saving)
1.Switchofftheappliancebypressing“on/off”.
2.Press“Timer”asmanytimesasnecessaryuntilthe
“setclock”symbol
and “timer arrow
flash on
the clock display.
3.Press“+”or“–”tochangethetime.5secondsafterthe
lastchangethe“setclock”symbol
and “timer arrow
will disappear, confirming the time has been set.
Setting the oven function
1.Switchontheappliancebypressingthe“on/off”.
The oven lights will light.
2.Pressthe“function”asmanytimesasnecessaryuntil
the desired function appears. The suggested cooking
temperature appears in the display and the degrees
symbol“°”flashes.Ifthesuggestedtemperatureisnot
changedwithinapproximately5secondsthedegrees
symbol“°”stopsflashingandtheovenbeginstoheat.
The suggested temperature display is replaced with
the oven centre temperature and a thermometer icon.
The thermometer icon rises slowly, indicating the
degree to which the oven is currently being heated.
Changing the oven temperature
1.Pressthe–or+,todecreaseorincreasethetemperature.
NOTE: The temperature can only be adjusted when
the degrees symbol “°” is flashing. The temperature
setting changes in increments of 5°C. To change the
temperature after the degrees symbol “°” stops flashing,
press the “Function” and then press the – or + to
change the temperature.
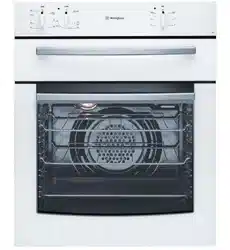
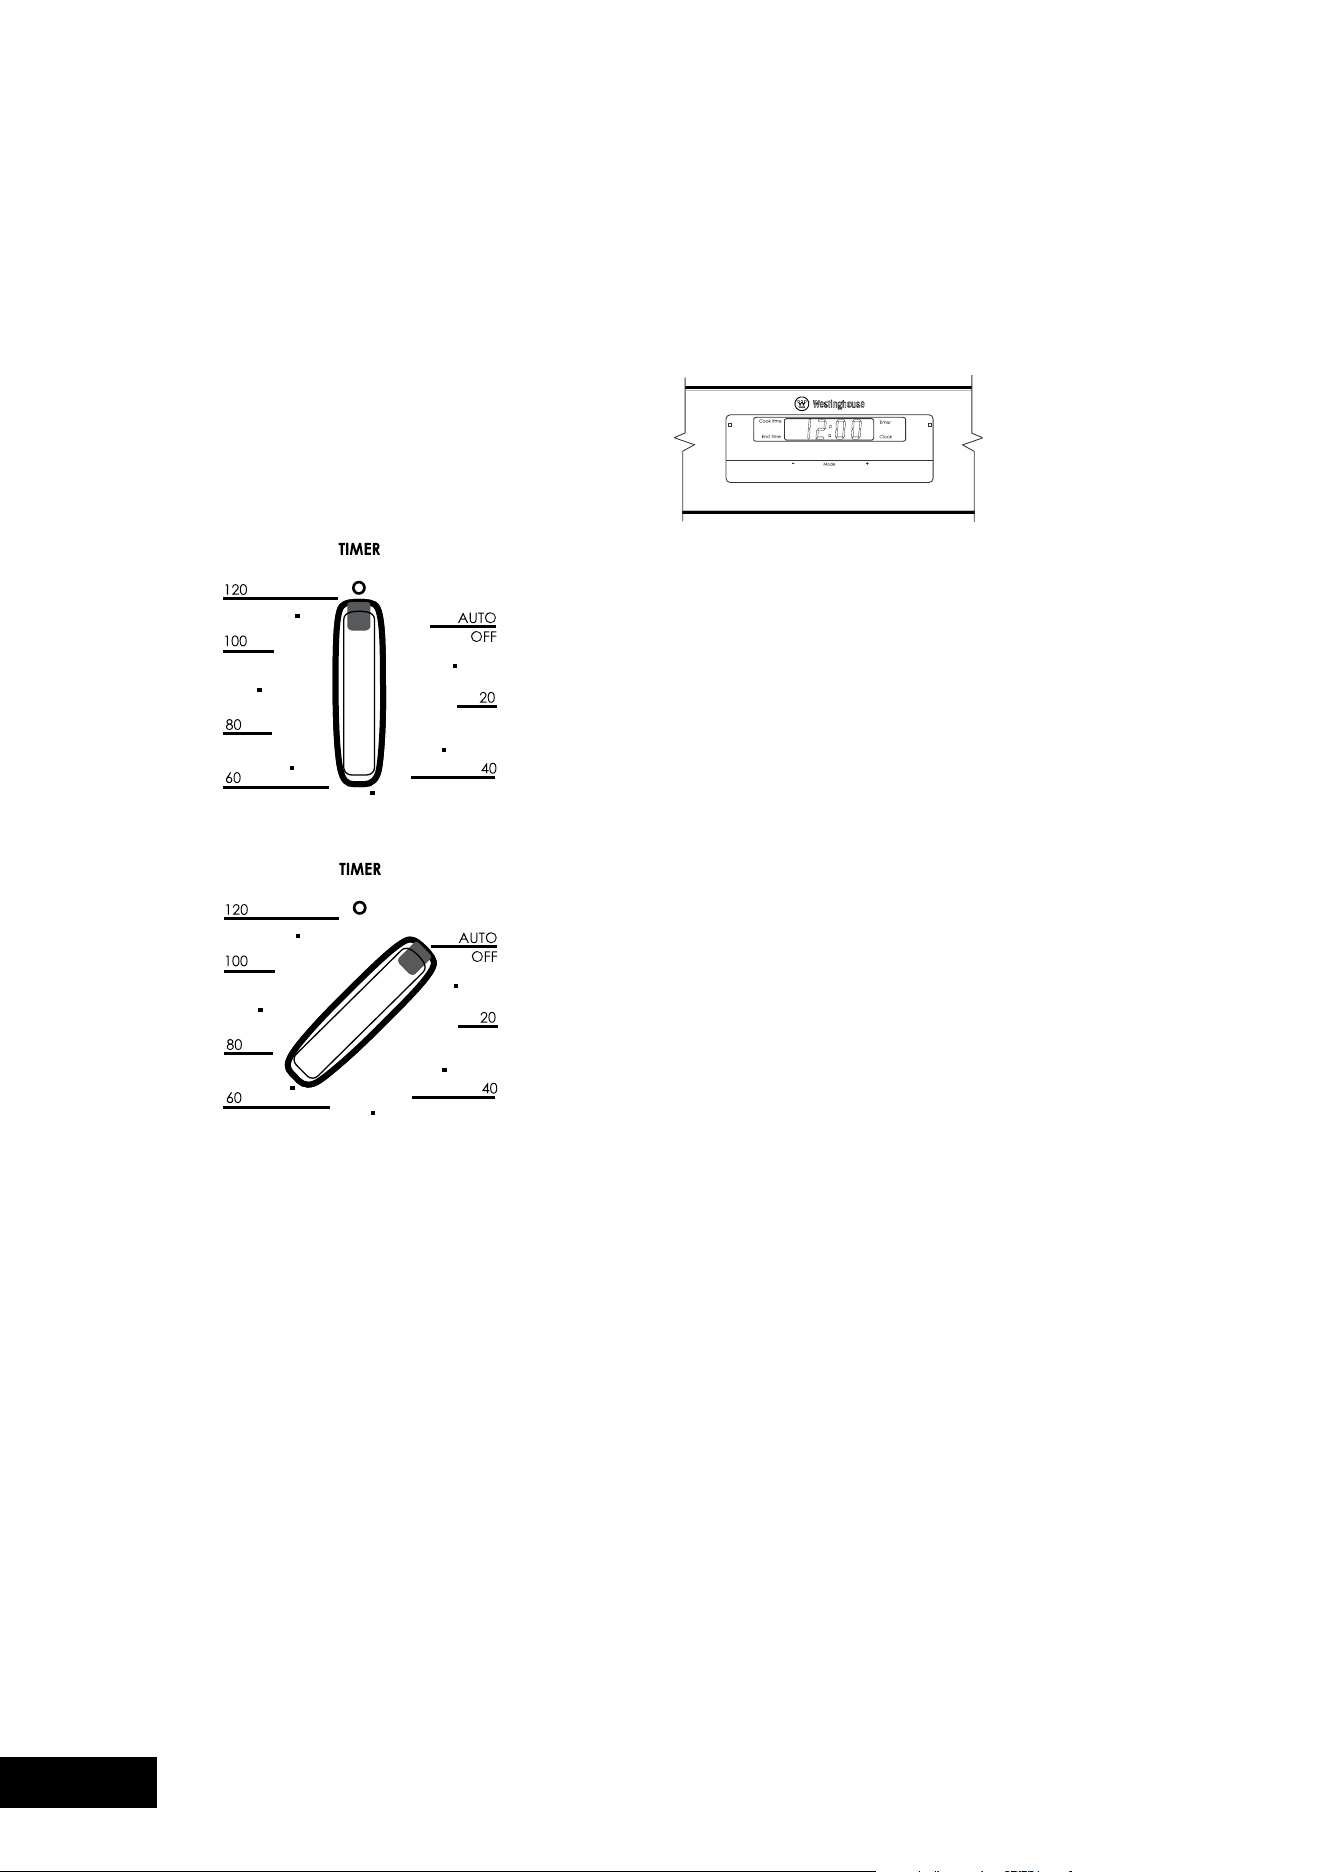
2-hour “Auto Off” timer
The2-hourtimerfeaturesanautomaticoven“cutoff”.
Thismeansthatacookingperiodofupto120minutes
canbeset.Whenthetimerhascountedbackto“Autooff”
a bell will sound and the oven will automatically switch off.
Once automatic baking is complete, return to manual
operation by setting the timer to the ‘Off’ mark.
NOTE: It is not recommended to use this timer for short
durations (e.g. boiling eggs).
ELECTRONIC CLOCK
Touch Control (POR667 and POR668 models only)
General features
Your touch control clock has the following features:
•Timer–allowsyoutosetacountdowntimethatwill
beep when the set time has elapsed.
•Cookingduration–Youcansetacookingduration.
Atimerwillcountdownthepresetcookingtime,beep
when the time has elapsed and turn the oven off.
•endcookingtime–youcansetacookingfinishtime.
Atimerwillcountdownthepresetcookingtime,beep
when the finish time has been reached and turn the
oven off.
•Delayedstartcookingtime–Youcancombinethe
cooking time and stop cooking time to switch the oven
on and off at a specific time during the day.
Note: Your touch control clock only operates with
your main oven.
Setting the time of day
You must set the time of day before you can operate your
appliance.Whenpowerissuppliedtoyouroven“12.00“
willbedisplayedandthe“clock”indicatorI will flash.
1.Tosetthetimeofdayinhoursandminutes,press–or+.
5secondsafterthelastchange,the“clock”indicatorI
will disappear, confirming the time has been set.
Note: The clock has a 24-hour display.
Change the time of day (Daylight saving)
1.Press“mode”untilthe“clock”indicatorI begins flashing.
2.Press–or+tochangethetime.5secondsafterthe
lastchange,the“clock”indicatorI will disappear,
confirming the time has been set.
Setting the timer
1.Press“mode“untilthe“timer”indicatorI begins flashing.
2.Setthecountdowntimeyouwantbyusing–and+.
5secondsafterthelastchangethe“timer”indicatorI
will stop flashing, confirming the timer has been set.
3.Tostopthebeeper,press–,+or“mode”.
Setting the cooking duration
1. Check the clock displays the correct time of day.
2.Selectthedesiredovenfunctionandtemperature.
The oven indicator light will glow and the heating
source will come on.
3.Press“mode“untilthe“cooktime”indicatorI
begins flashing.
OPERATING THE ELECTRONIC CLOCK MODEL POR783 & POR883
PROGRAMMABLE CONTROLLER
COOKING WITH YOUR TIMER
Loading ...
Loading ...
Loading ...