

QRT-501
IE Operation Manual

2
Omni Wi-Fi IP Camera User’s Manual
Log In .....................................................................................................................5
Main Screen ...........................................................................................................6
Task Bar ..................................................................................................................7
Right Panel Control .................................................................................................8
Congure the Camera Sengs ................................................................................9
Device Basic Informaon ......................................................................................10
View the Device Informaon ...................................................................... 10
Change the Device Name ...........................................................................10
Adjust the Date & Time Sengs.................................................................10
View the Record Schedule ..........................................................................11
Format the TF Card ......................................................................... ............11
Alarm Service Sengs .......................................................................................... 12
Congure the Alarm Sengs...................................................................... 12
Congure the Email Sengs ...................................................................... 13
Congure the FTP Sengs .........................................................................13
Network Conguraon ......................................................................................... 14
Congure the Basic Network Sengs ........................................................14
Congure the WLAN Sengs ..................................................................... 15
Congure the DDNS Service Sengs .........................................................15
PTZ Conguraon ................................................................................................. 16
Congure the PTZ Sengs .........................................................................16
User & Device Management ................................................................................ 16
Congure the Users Sengs ......................................................................16
Restore the Default Sengs ....................................................................... 17
Reboot the Device ...................................................................................... 17
Backup the System Conguraons ............................................................. 18
Restore the System Conguraons ............................................................ 18
Update the Device Firmware ...................................................................... 18
Playback ...............................................................................................................19
Contents
Omni Wi-Fi IP Camera User’s Manual
3
Safety Informaon
Warning
This is the symbol for indicang any potenal hazard,
risk or condion requiring special aenon.
The user needs to refer to the important operang
and maintenance or servicing instrucons.
Cauon
The lighng ash with an arrow head symbol, in an
equilateral triangle, is intended to alert the user.
There is dangerous “voltage” presence near by the
product’s enclosure which may be risk of person.
Safety Precauons
1. Read the user manual carefully before aempng
to install the camera and keep the manual for future
reference.
2. Follow all instrucons.
3. Always keep the glass lens clean to obtain the best
picture quality. Clean only with dry cloth.
4. Do not install near water or heat sources such as
radiators or other apparatus that produce heat.
5. Do not install the camera in places with high humidity.
6. Do not install the camera in places highly exposed to
gas or oil.
7. Do not install the camera in places enclosed by metal.
This may shield the electromagnec waves and cause
signal recepon to fail.
8. Do not touch the camera with wet hands.
9. Do not expose the camera to radioacvity or place
near medical equipment with radio waves.
10. Do not service the camera by yourself. Refer all
servicing to authorized personnel.
11. Always handle the device with care.
Warning
To prevent re or shock, DO NOT expose the unit to rain or
moisture.
Cauon
To reduce the risk of electric shock, DO NOT use other power
cables other than the one supplied.
FCC Compliance Statement
This equipment has been tested and found to comply
with the limits for a Class C digital device, pursuant to Part
15 of the FCC Rules. These limits are designed to provide
reasonable protecon against harmful interference when
the equipment is operated in a commercial environment.
This equipment generates, uses and can radiate radio
frequency energy and, if not installed and used in
accordance with the instrucons, may cause harmful
interference to radio communicaons. Operaon of this
equipment in a residenal area is likely to cause harmful
interference in which case the user will be required to
correct the interference at his own expense.
Modicaons not expressly approved by the
manufacturer could void the user’s authority to operate
the equipment under FCC rules.
Copyright
Copyright @All Rights Reserved.
All other trademarks menoned in this manual are
trademarks of their respecve companies.
Limitaon of Liability
• This publicaon is provided “AS IS” without warranty of
any kind, either expressed or implied, including but not
limited to, the implied warranes of merchantability,
tness for any parcular purpose, or non-infringement
of a third party’s rights.
• This publicaon may include technical inaccuracies
or typographical errors. Changes may be made to
the informaon herein, at any me, for publicaon
improvements and/or of the corresponding device(s).
Disclaimer of Warranty
In no event shall the supplier be liable to any party
or any person, except for replacement or reasonable
maintenance of the product, for the cases, including but
not limited to the following:
• Any damage or loss, including but without limitaon,
direct or indirect, special, consequenal or exemplary,
arising out of or relang to the device;
• Personal injury or any damage caused by inappropriate
use or negligent operaon of the user;
• Unauthorized disassemble, repair or modicaon of
the device by the user;
• Any problem, consequenal inconvenience, or loss or
damage, arising out of combining the system with the
devices of a third party;
• Any claim or acon for damages, brought by any
person or organizaon being a photogenic subject, due
to violaon of privacy with the result of pictures from
a surveillance camera, including saved data, for some
reason, becomes public or is used for the purpose
other than for surveillance.
Safety and Regulatory Info
4
Omni Wi-Fi IP Camera User’s Manual
Use Web Client to remotely access the camera and congure the sengs of camera.
NOTE: : Ensure that the computer has a web browser, such as Internet Explorer or Safari, installed.
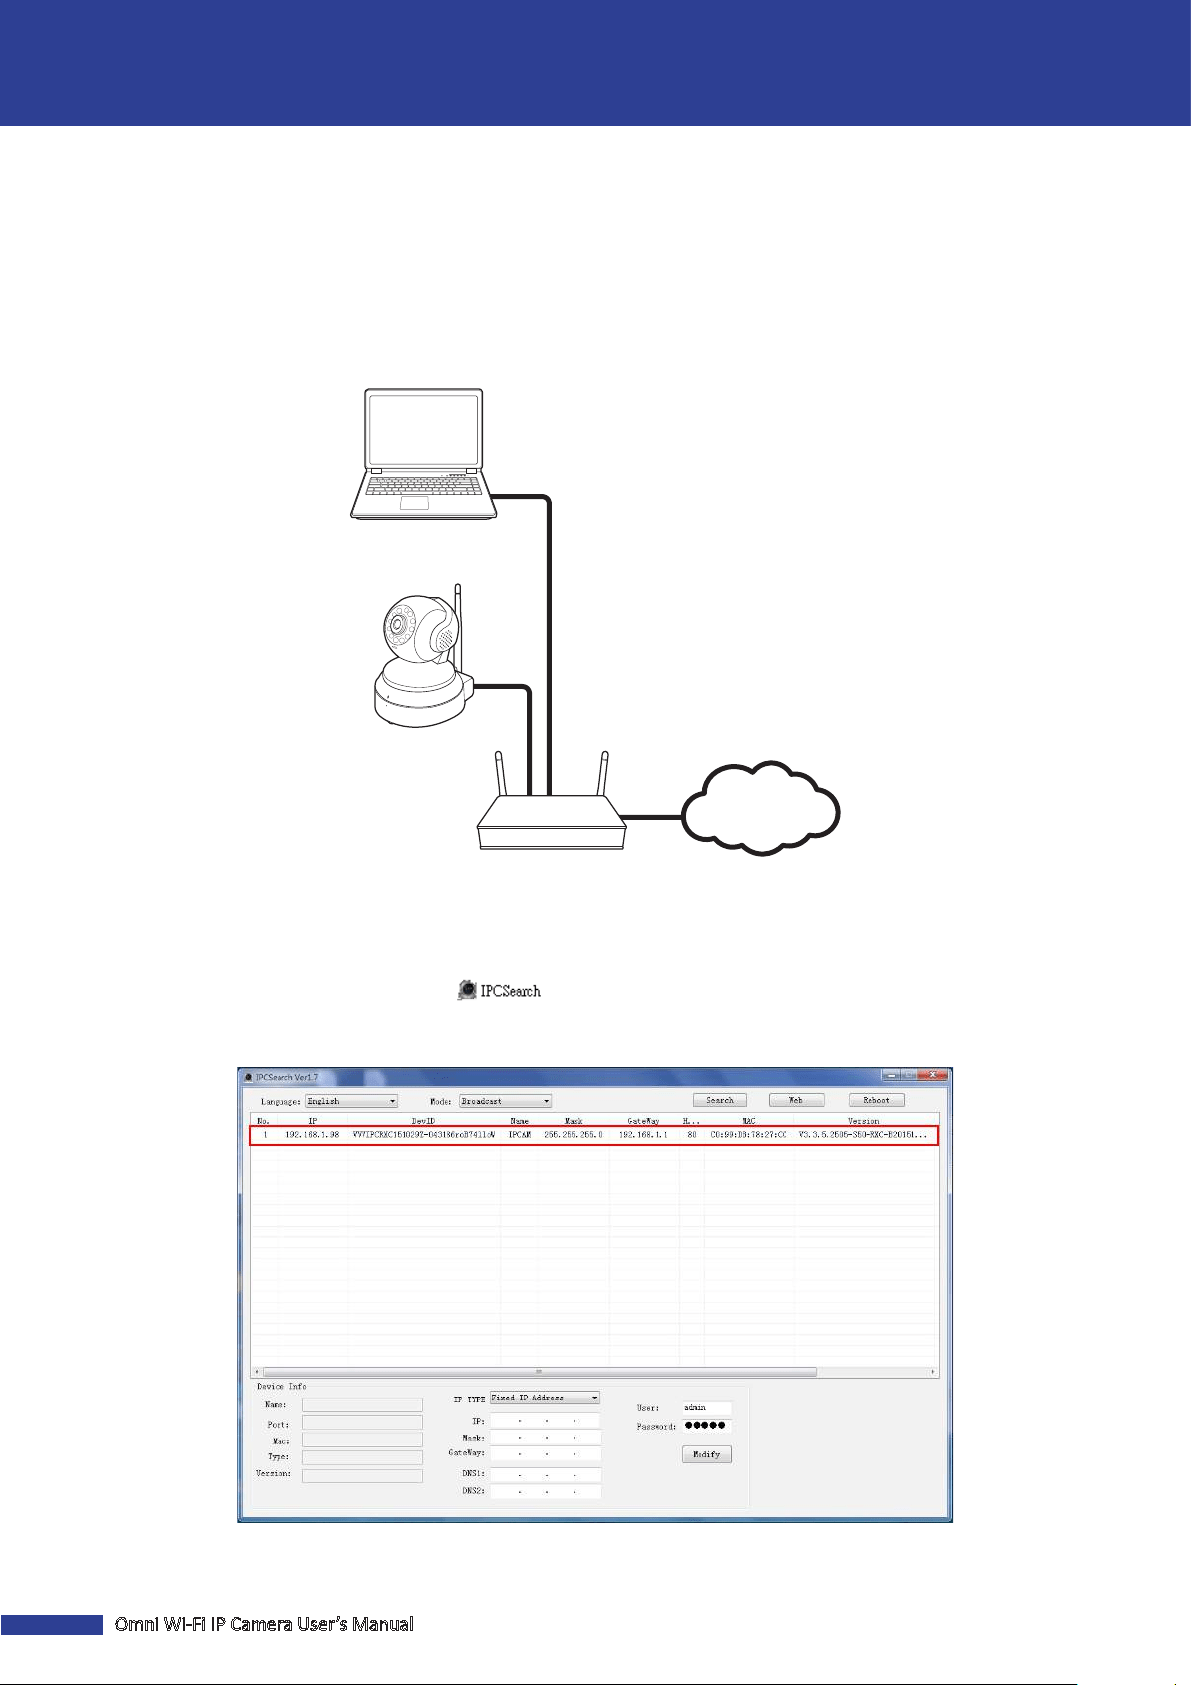
Before accessing Web Client for rst me, you have to establish a connecon from the camera to the wired router in
order to quickly obtain the IP address of your camera. You can also modify the IP address and, if necessary, modify the
default gateway to the new address.
1. Connect the camera to the router using an RJ45 cable. Then connect your notebook to the same router using
another RJ45 cable.
Internet
2. Download and install the IPCSearch soware to your notebook.
NOTE: : The IPCSearch soware is available at hp://www.kguardsecurity.com/global/p/wi--network-
camera-qrt-501/.
3. Double-click the IPCSearch icon ( ) to open the IPCSearch soware.
4. The program lists the camera by IP address. Double-click on the camera IP address eld to open the camera
Web Client on your PC default web browser.
NOTE: : To congure the camera IP address, modify the necessary parameters and click Modify to save the
sengs.
Web Client
Omni Wi-Fi IP Camera User’s Manual
5
Web Client
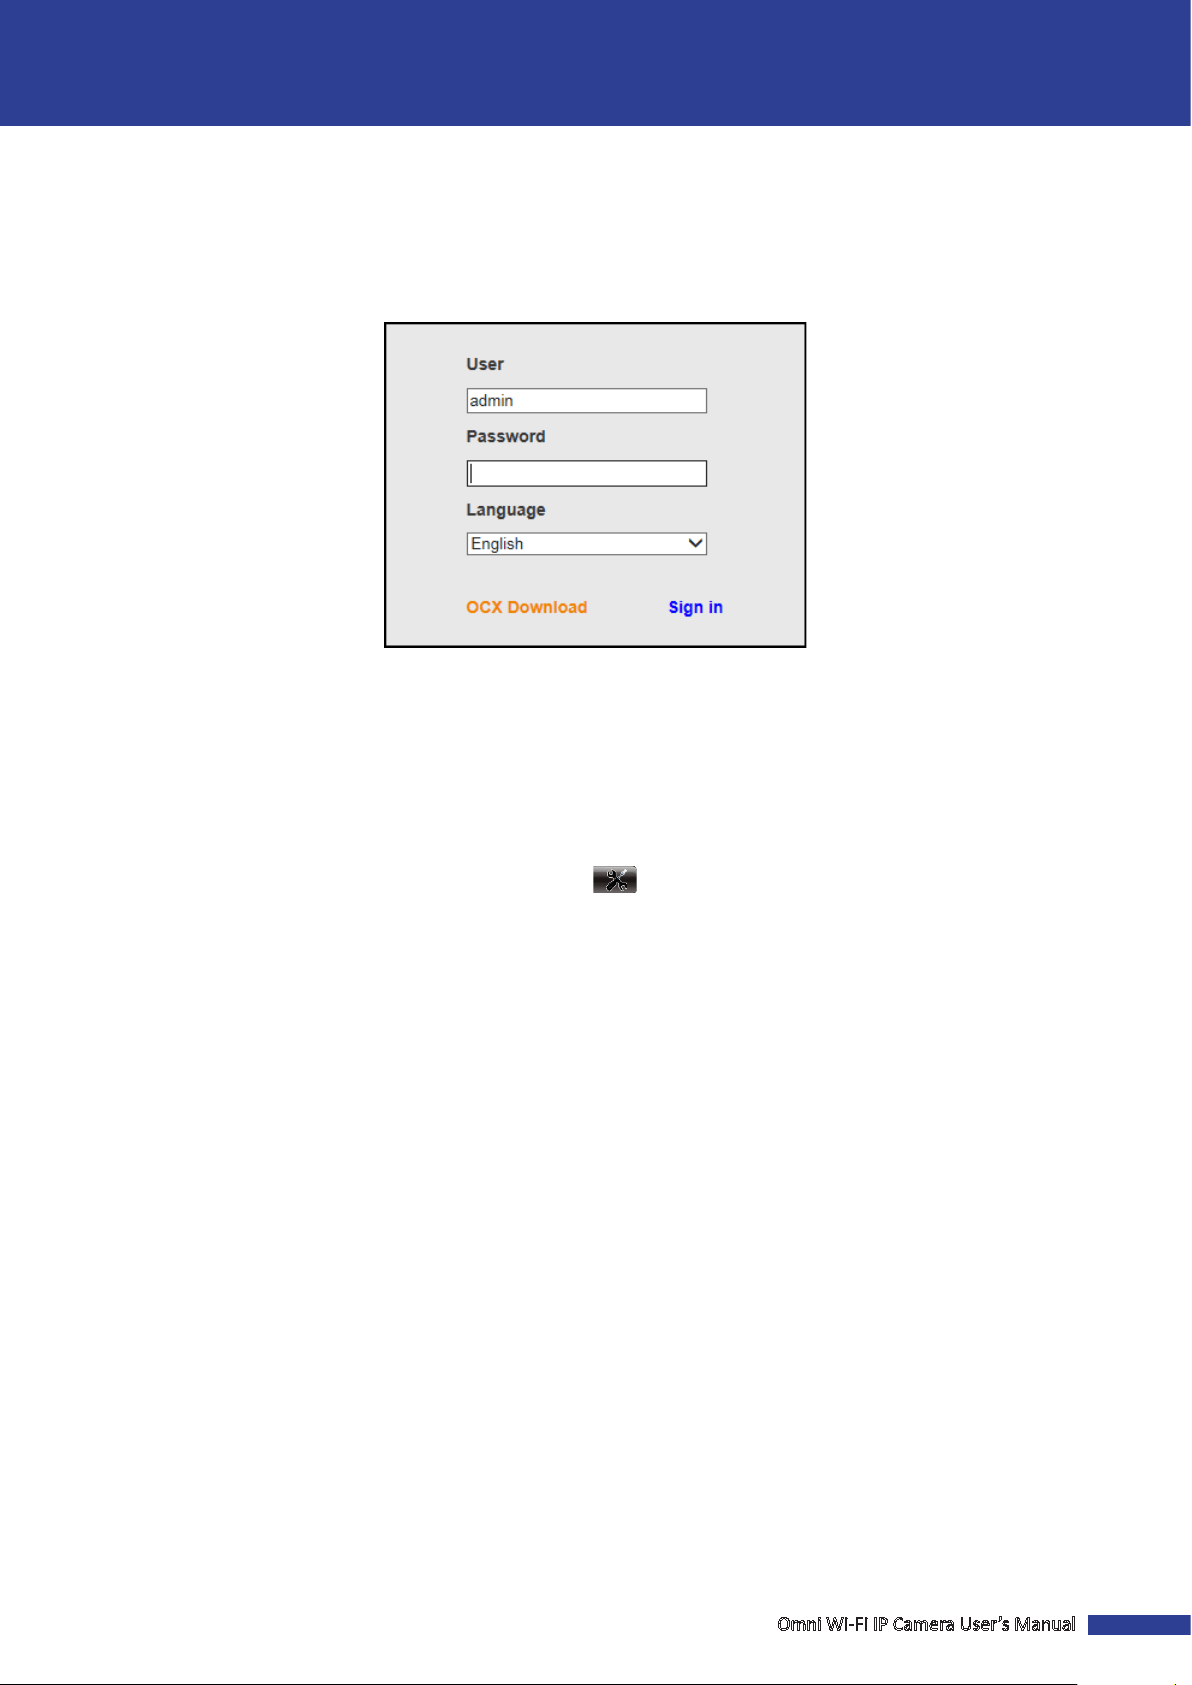
Log In
1. Enter the login name and password.
2. Click Sign in to login.
NOTE:
• The default user name and password are “admin”.
• If you log in IE browser for the rst me or the live view is not properly display on the screen, click OCX Download
to download the OCX soware and then install it on your computer.
IMPORTANT: To access your camera remotely, verify the following:
• Be sure to perform port forwarding rst before browsing using the domain name or designated DDNS address.
• You have set the DDNS address of your IP camera. Go to
> DDNS Service Sengs > DDNS Host.

6
Omni Wi-Fi IP Camera User’s Manual
Web Client
Main Screen
Aer you login to Web Client, click Plugin Mode to enter the Main Screen.
NOTE:
• To view the live view with the quick control panel screen, click Moon-JPEG Mode.
• To search and play the recorded videos, click TF card video playback online. Refer to “Playback” on page 19.
The Live screen appears.
Task BarRight Panel Control Live View
Omni Wi-Fi IP Camera User’s Manual
7
Web Client
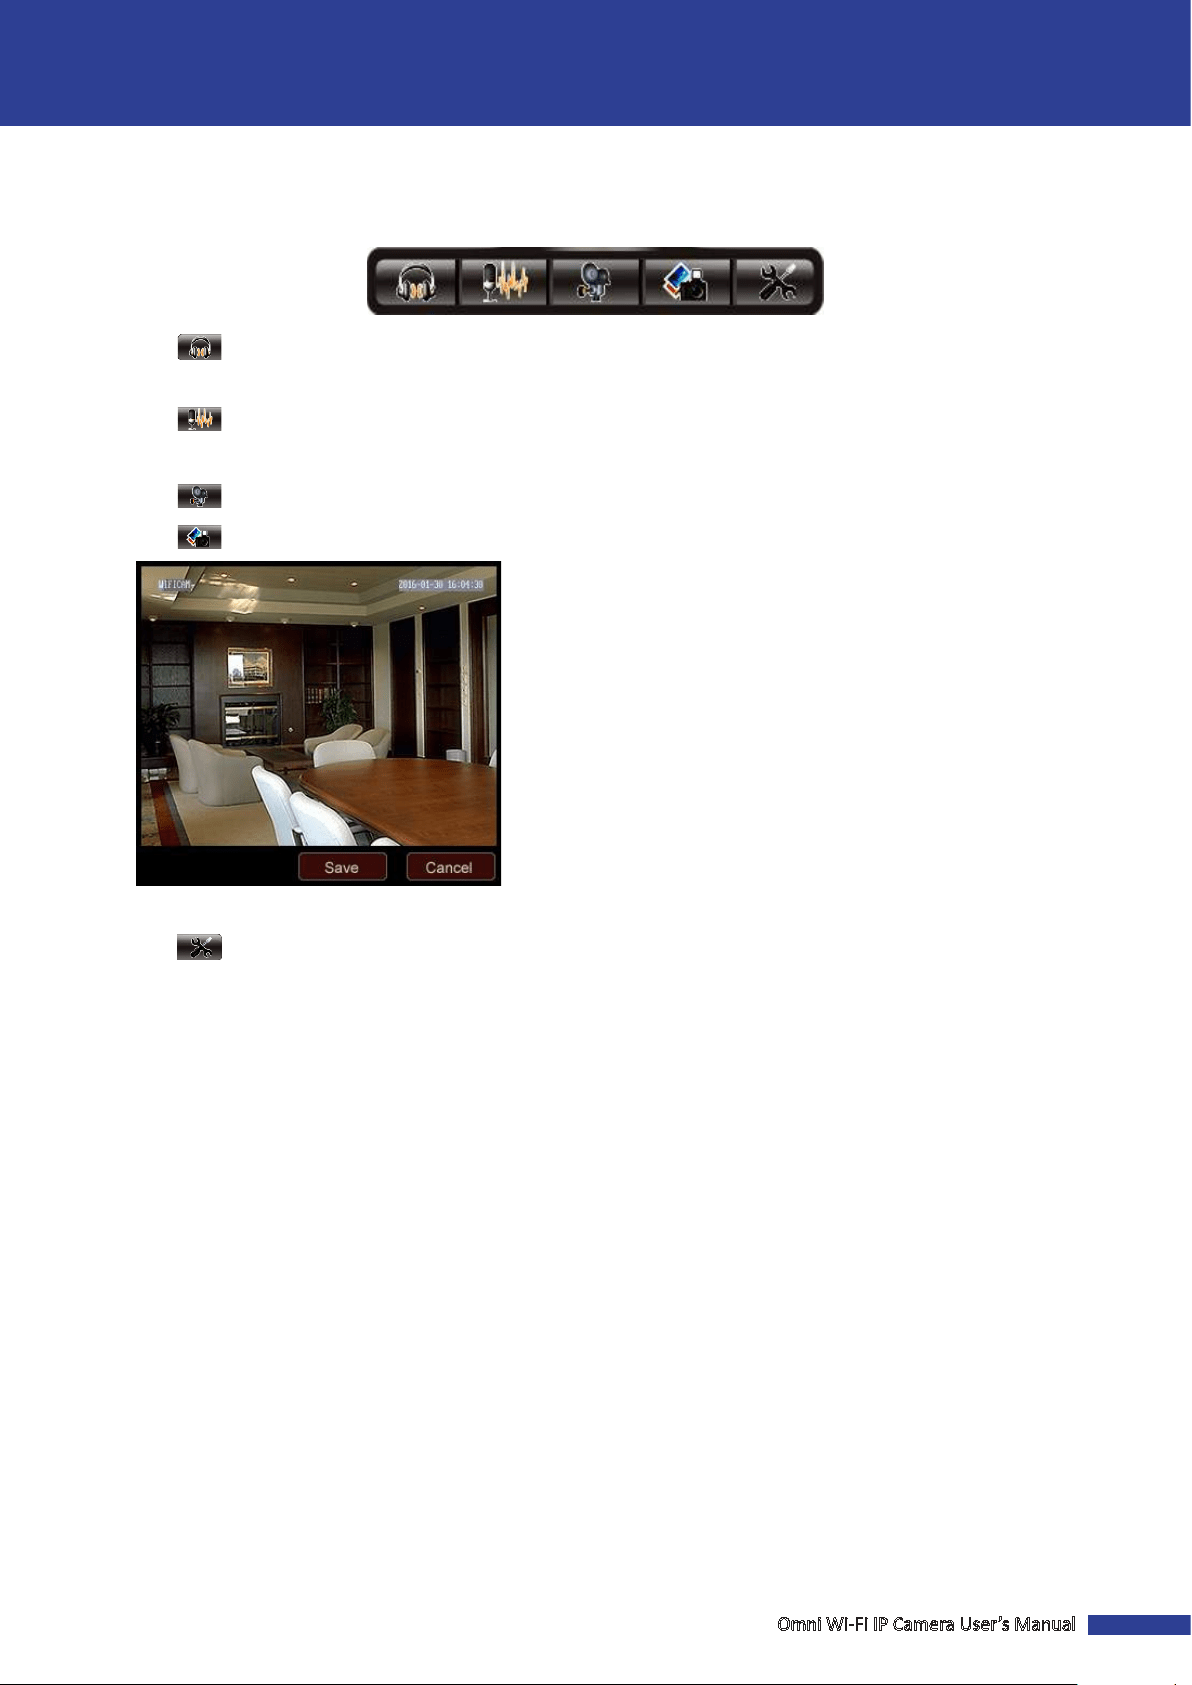
Task Bar
To access the common funcons, click the respecve icon shown on the task bar.
• Click to enable the audio funcon. You can hear the live audio from the camera via PC if the audio seng is
set to ON. Click it again to disable the audio funcon.
• Click
to enable the talk funcon. You can talk between the PC and camera if an audio device connected. Click
it again to stop the talk funcon.
• Click
to start record manually. The video recording starts. Click it again to stop the manual recording.
• Click to take a snapshot.
Click Save to save the captured image into your computer.
• Click to access the Sengs page.
8
Omni Wi-Fi IP Camera User’s Manual
Web Client
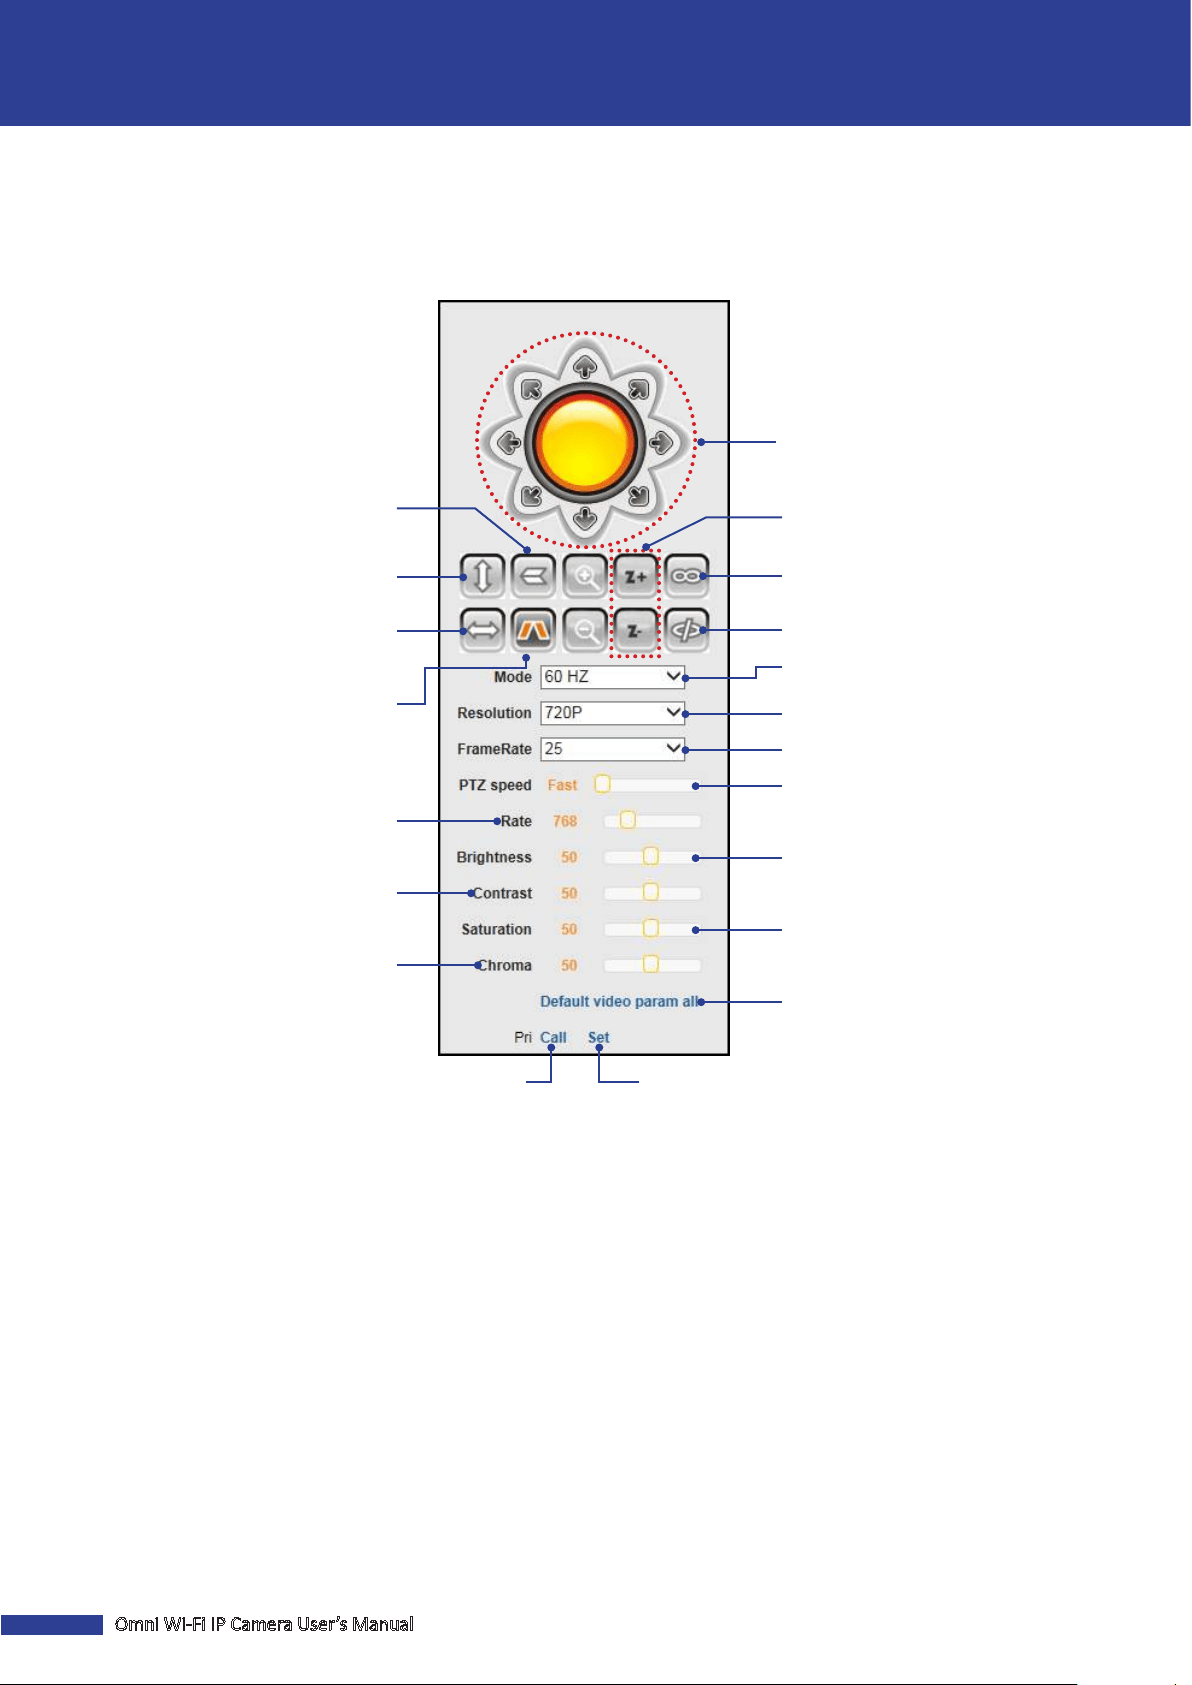
Right Panel Control
You can use the Panel Control to access the PTZ Control panel and customize the display sengs.
Click the direcon arrow to select the
direcon of the PTZ camera.
Start vercal patrol
(camera moves up and down).
Start horizontal patrol
(camera moves le and right).
Enable the I/O output.
Disable the I/O output.
Zoom in/out.*
Set the baud rate of data
transmission.
Adjust the contrast level of the
display.
Adjust the camera speed.
Select the video stream quality.
Select the video stream frame rate.
Reset all parameters to the default
sengs.
See the reverse image
(image is ipped vercally).
See the mirror image
(le and right sides are reversed).
Adjust the chrominance level of the
display.
Set a preset point.
Go to a specic preset point.
Select the video format of your
locaon.
Adjust the brightness level of the
display.
Adjust the saturaon level of the
display.
NOTE: (*) Not supported in QRT-501.
Omni Wi-Fi IP Camera User’s Manual
9
Web Client
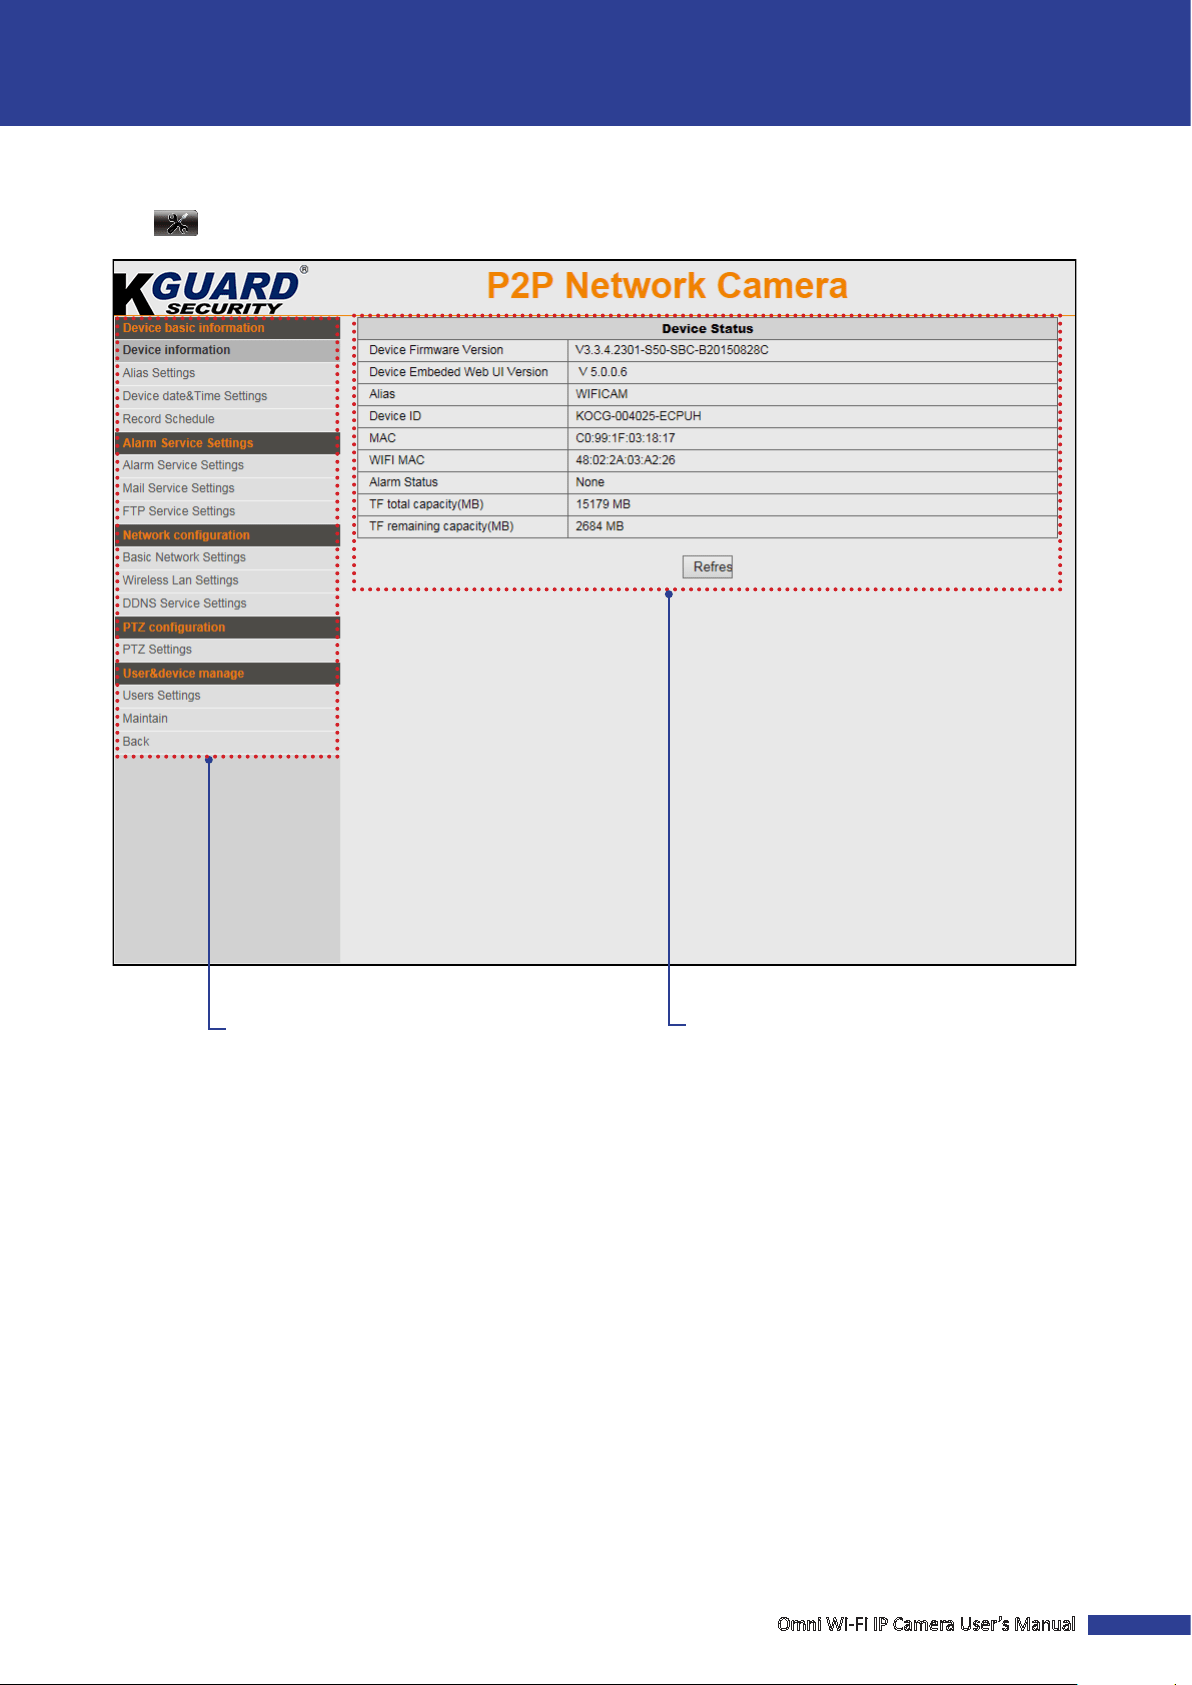
Congure the Camera Sengs
Click tab to congure the camera sengs.
Main menu
Menu opon/seng/status
NOTE: When all sengs are complete, do the following:
• Click Submit to save all the sengs.
• Click Refresh to refresh the sengs.
10
Omni Wi-Fi IP Camera User’s Manual
Web Client
Device Basic Informaon
Select this menu opon to view the device informaon, customize the device name, and congure other general
sengs.
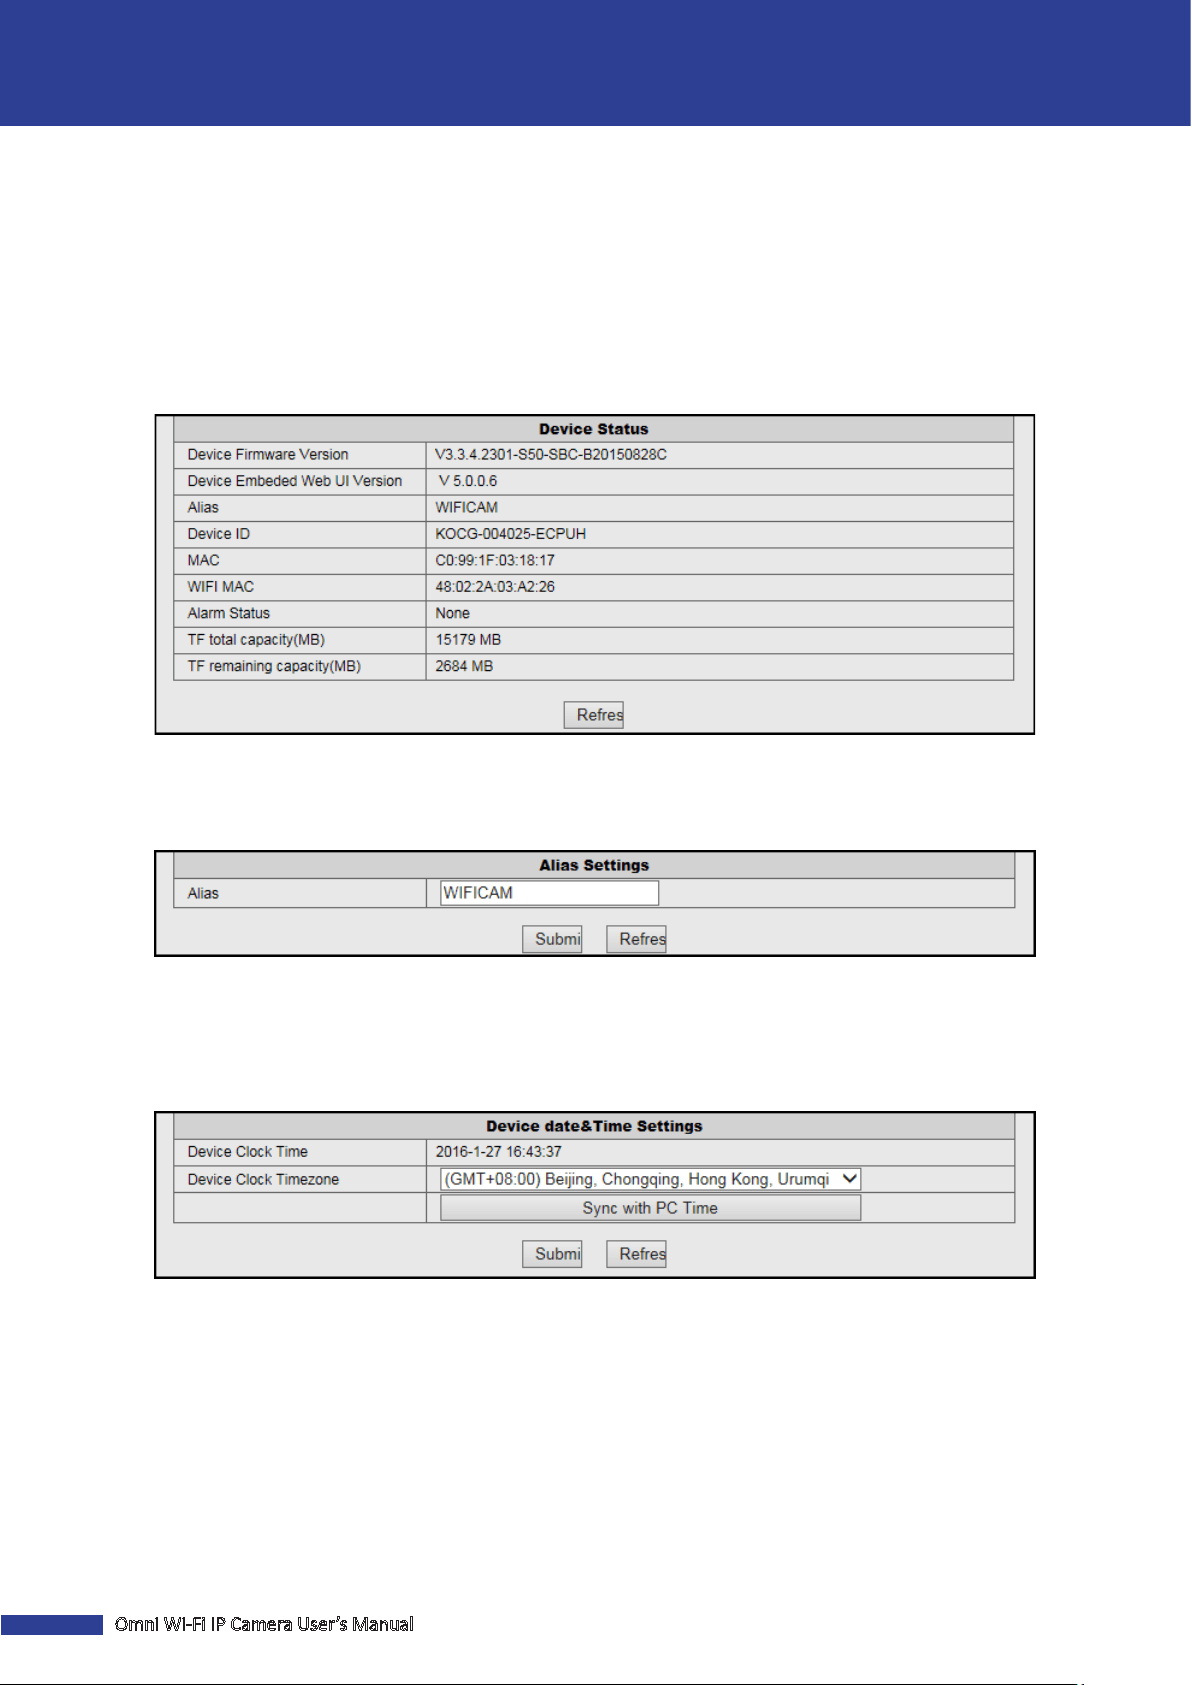
View the Device Informaon
Click Device informaon to view the camera informaon including the rmware version, Web UI version, device name
and ID, MAC address, WIFI MAC address, alarm status, memory card total capacity, and available free space on the
memory card.
Change the Device Name
Click Alias Sengs to customize the camera name. Enter the new name in the Alias eld.
NOTE: The default device name is “WIFICAM”.
Adjust the Date & Time Sengs
Click Device date&Time Sengs to congure the date and me sengs.
Device Clock Time: Display the current date and me.
Device Clock Timezone: Select the me zone in your locaon.
Sync with PC Time: Click to synchronize the date and me sengs with your PC clock.
Omni Wi-Fi IP Camera User’s Manual
11
Web Client
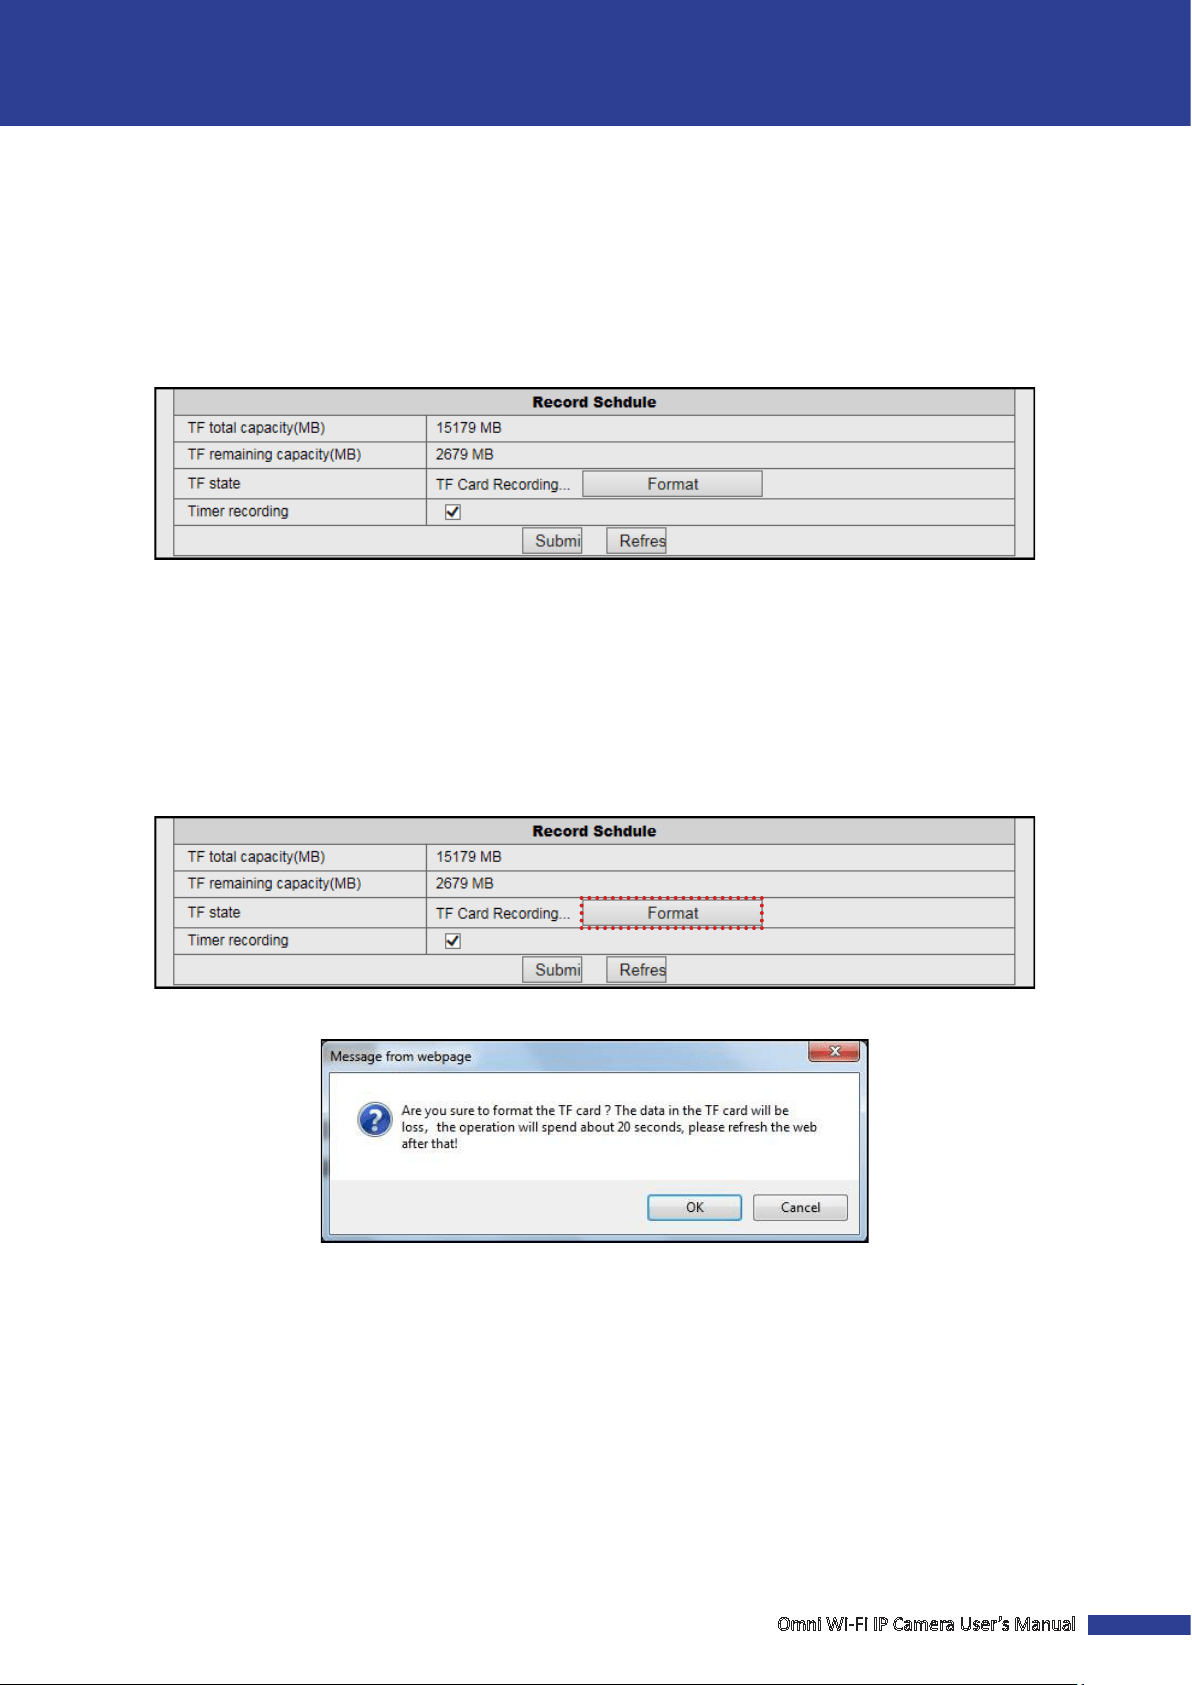
View the Record Schedule
Click Record Schedule to manage the memory card and congure the recording sengs to be stored in the memory
card.
NOTE:
• It is recommended to use a TF card with size of at least 4GB, Class 6.
• The TF card is not included in the package. It is sold separately.
• The device supports up to 64GB TF card.
TF total capacity(MB): Display the total size of the memory card.
TF remaining capacity(MB): Display the available free space on the memory card.
TF state: Display the state of the memory card.
Timer recording: Check the box to record video connuously.
Format the TF Card
Click Record Schedule > Format to format the memory card.
A conrmaon message appears on the screen. Click OK to conrm. All data will be deleted if formaed.
NOTE: Do not remove the memory card while card formang is in progress.
12
Omni Wi-Fi IP Camera User’s Manual
Web Client
Alarm Service Sengs
Select this menu opon to congure alarm, email, and FTP server sengs.
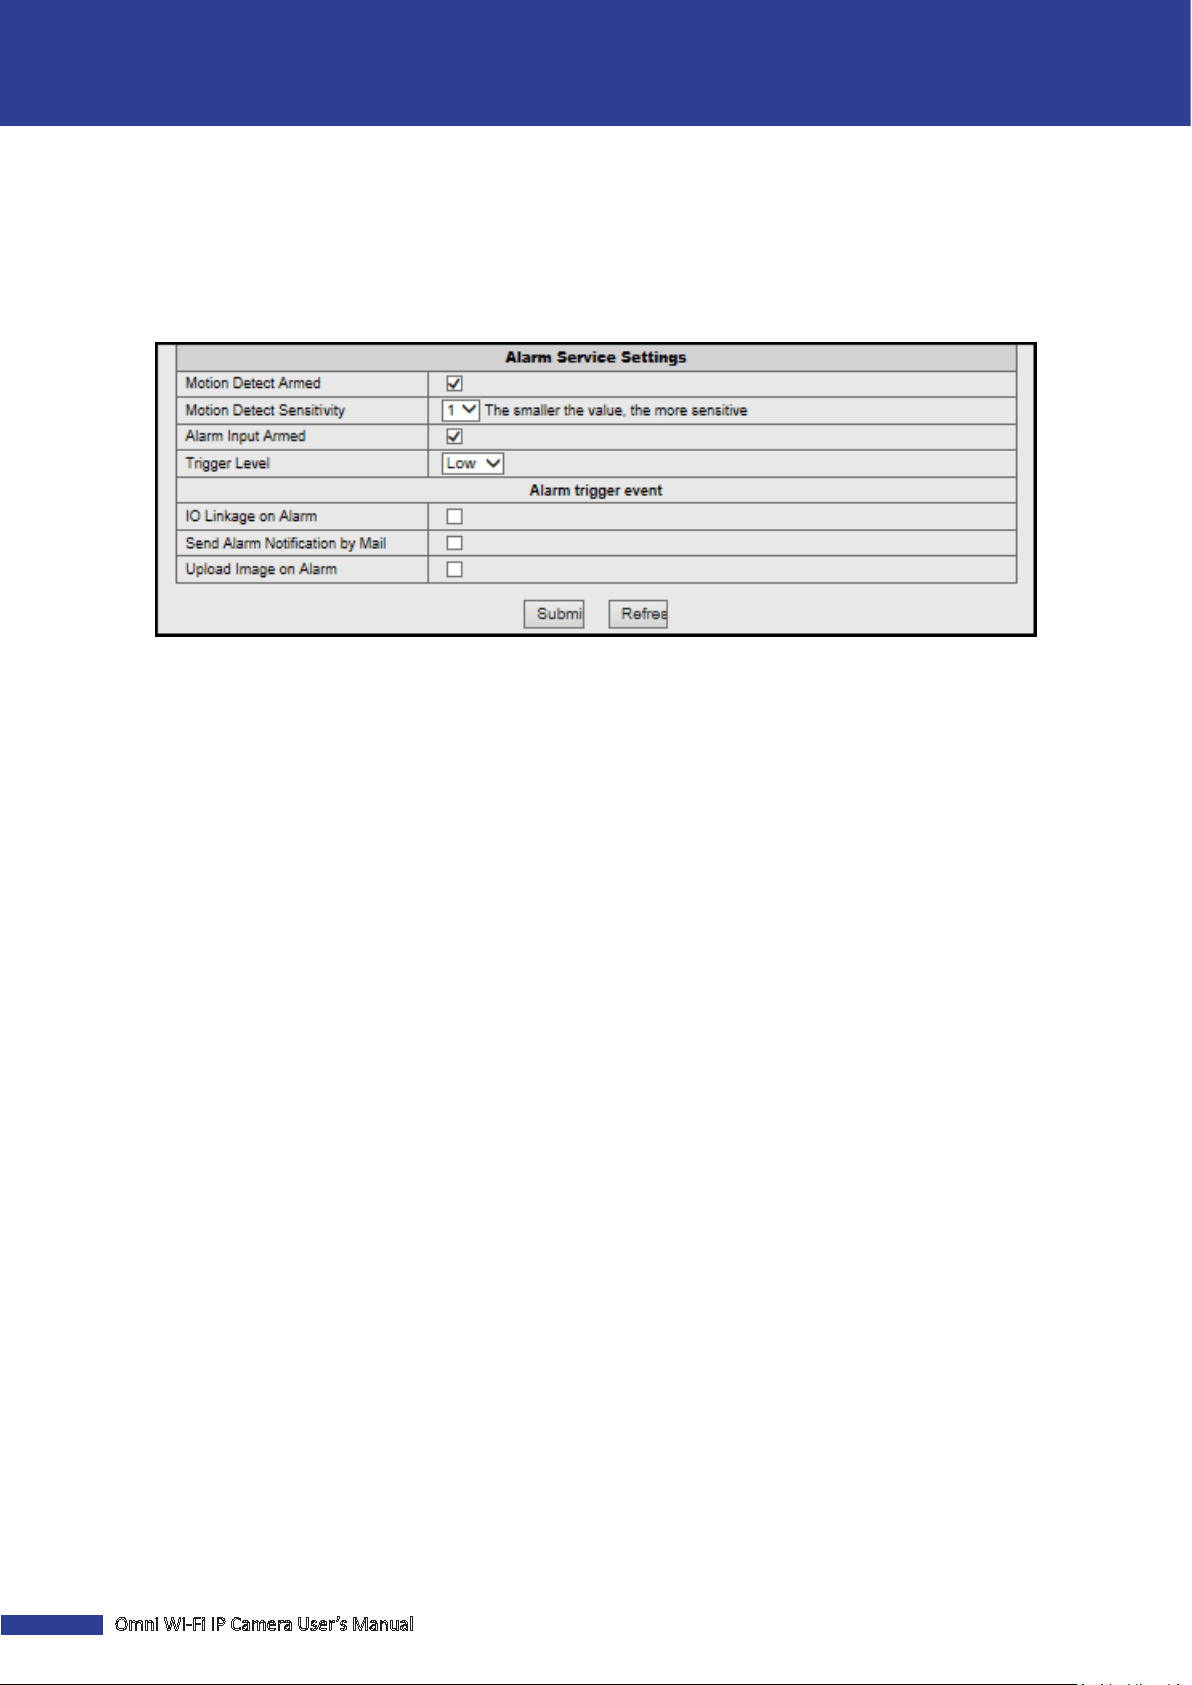
Congure the Alarm Sengs
Click Alarm Service Sengs to customize the alarm sengs.
Moon Detect Armed: Check this box to enable the moon detecon alarm funcon.
Moon Detect Sensivity: Select the moon detecon sensivity rate.
NOTE: This opon is only available when the Moon Detect Armed funcon is enabled.
Alarm Input Armed: Check this box to enable the external alarm funcon.
Trigger Level: Select the alarm trigger level.
NOTE: This opon is only available when the Alarm Input Armed funcon is enabled.
Check this box to acvate the following acon when the moon is detected or the alarm is triggered.
• IO Linkage on Alarm: Check this opon to enable alarm output. You will receive an I/O message nocaon on your
smartphone when the alarm sensor is triggered.
• Send Alarm Nocaon by Mail: Check this opon to send a nocaon email.
• Upload Image on Alarm: Check this opon to upload the snapshots to the FTP server.
Omni Wi-Fi IP Camera User’s Manual
13
Web Client
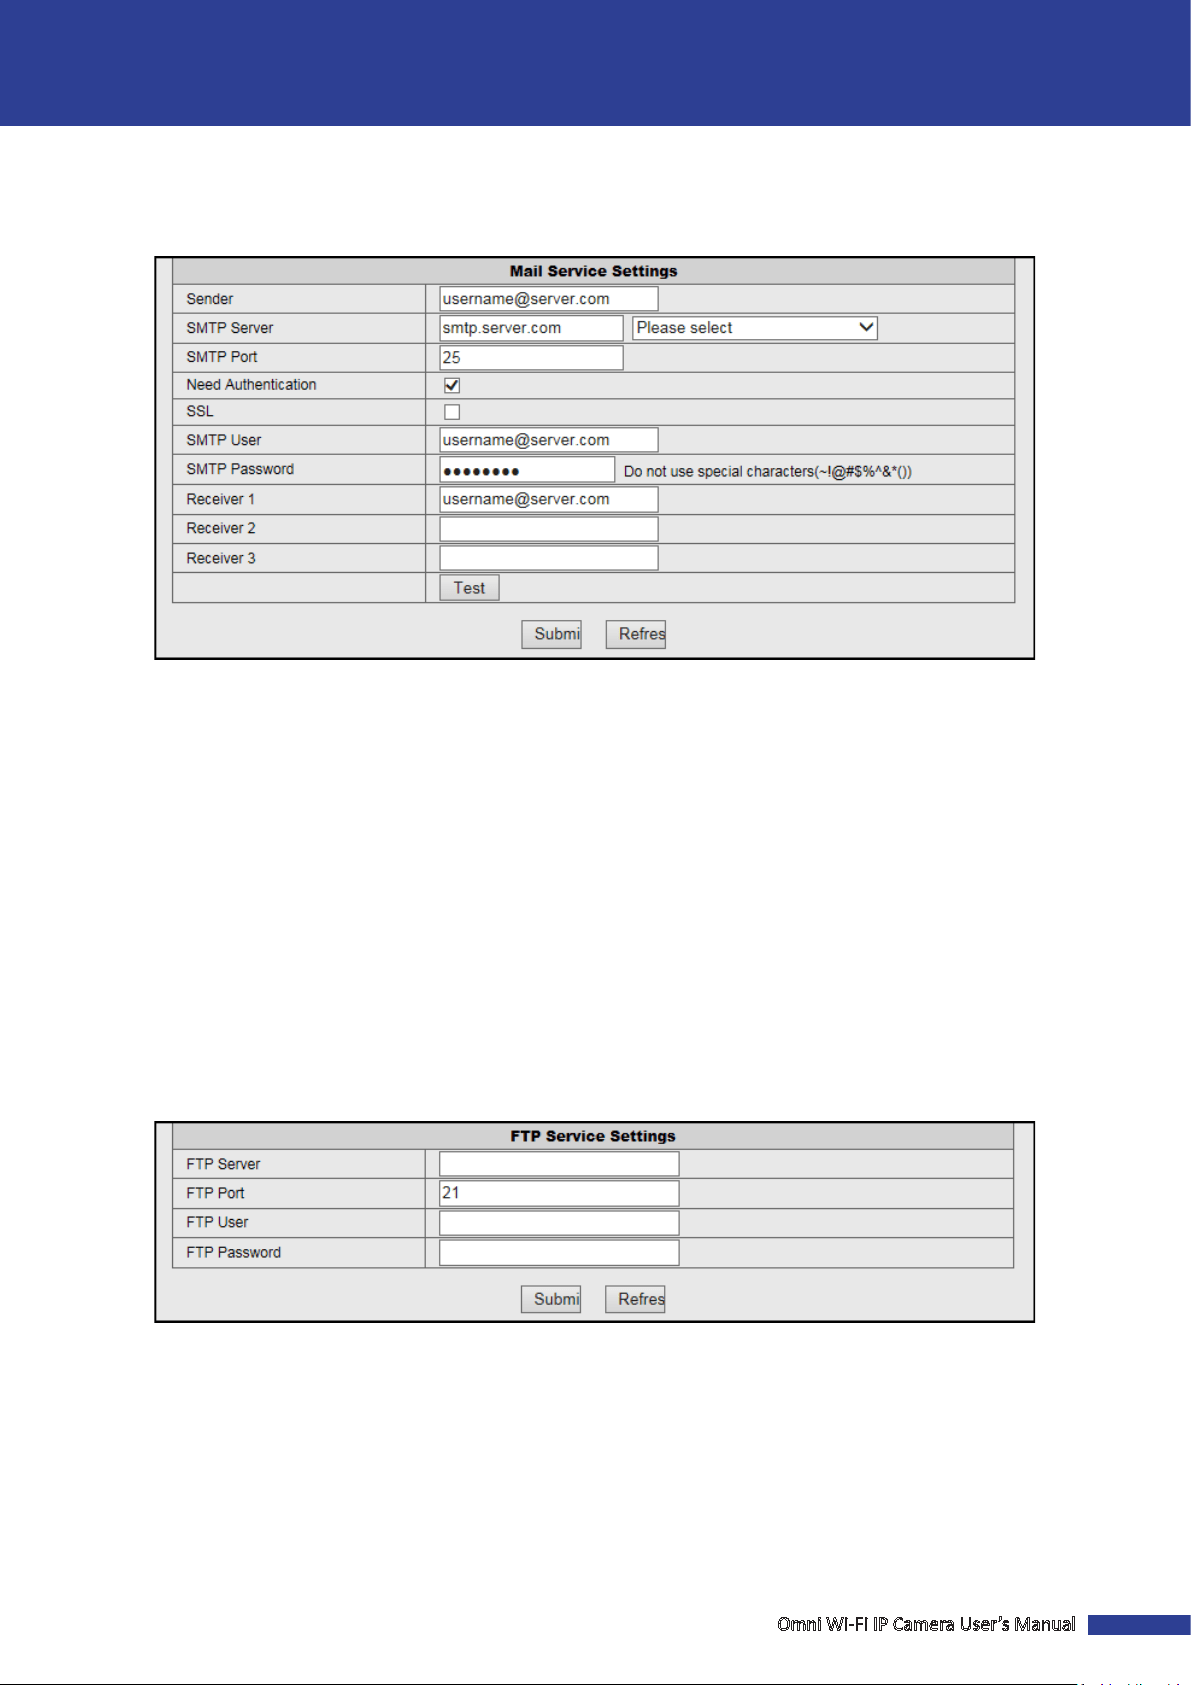
Congure the Email Sengs
Click Mail Service Sengs to congure email sengs. When the email sengs are properly congured, the system
will automacally send a nocaon email when events occur.
Sender: Enter the email address of the sender.
SMTP Server: Enter the SMTP Server of the sending email server.
SMTP Port: Enter the SMTP port of the sending email server.
Need Authencaon: Check the box to verify the user sengs.
SSL: Check the box if your email server needs the SSL vericaon.
SMTP User: Enter the user name of the sender.
SMTP Password: Enter the password of the sender.
Receiver 1/2/3: Enter the email address where the nocaon email is to be sent. You can set up to 3 email addresses.
Test: Click to verify all sengs are correct. The system sends an automated email message to your inbox.
NOTE: If you received the test email, it means the conguraon parameters are correct.
Congure the FTP Sengs
Click FTP Service Sengs to congure the FTP server sengs.
FTP Server: Enter the FTP server address.
FTP Port: Enter the port number of the FTP server.
FTP User: Enter the user name of the FTP server.
FTP Password: Enter the password of the FTP server.
NOTE: Once the alarm is triggered, the system will automacally upload snapshots to the FTP server.

14
Omni Wi-Fi IP Camera User’s Manual
Web Client
Network Conguraon
Select this menu opon to congure the network and DDNS service sengs.
Congure the Basic Network Sengs
Click Basic Network Sengs to congure how the camera connects to the network.
This camera provides two network connecon opons: Stac IP (Stac Address) and DHCP (Dynamic Address).
• Stac IP: Select this connecon if the camera is directly connected to a DSL modem and your ISP has supplied you
with a predened IP for your Internet connecon.
• DHCP: Select this connecon if the camera is connected to a router and DHCP is enabled.
Obtain IP from DHCP Server: Check this box to select DHCP network connecon if the camera is connected to a router
and DHCP is enabled.
IP Addr: Enter the stac IP address.
Subnet Mask: Enter the subnetwork IP address.
Gateway: Enter the gateway IP addresss.
DNS Server1/2: Enter the DNS server address. DNS Server1 is the primary DNS server and DNS Server2 is a backup
DNS server. Usually should be enough just to enter the DNS Server1 server address.
Hp Port: Enter the port number that you will use to log in to the device via the web.
NOTE:
• The IP Addr, Subnet Mask, Gateway, DNS Server1, and DNS Server2 opons are only available when the Obtain IP
from DHCP Server funcon is disabled.
• Obtain these informaon from your network administrator or your Internet Service Provider (ISP).
• If you cannot use the either of the two default media.web ports, 80 or 38401, the specied port may be occupied
by other programs or it is being blocked by your service provider. Enter other port number. In this case, you need
to add the port number aer the IP address. For example, if you set the Web Port as 85, you need to enter the IP
address as “192.168.3.103:85”.
Omni Wi-Fi IP Camera User’s Manual
15
Web Client
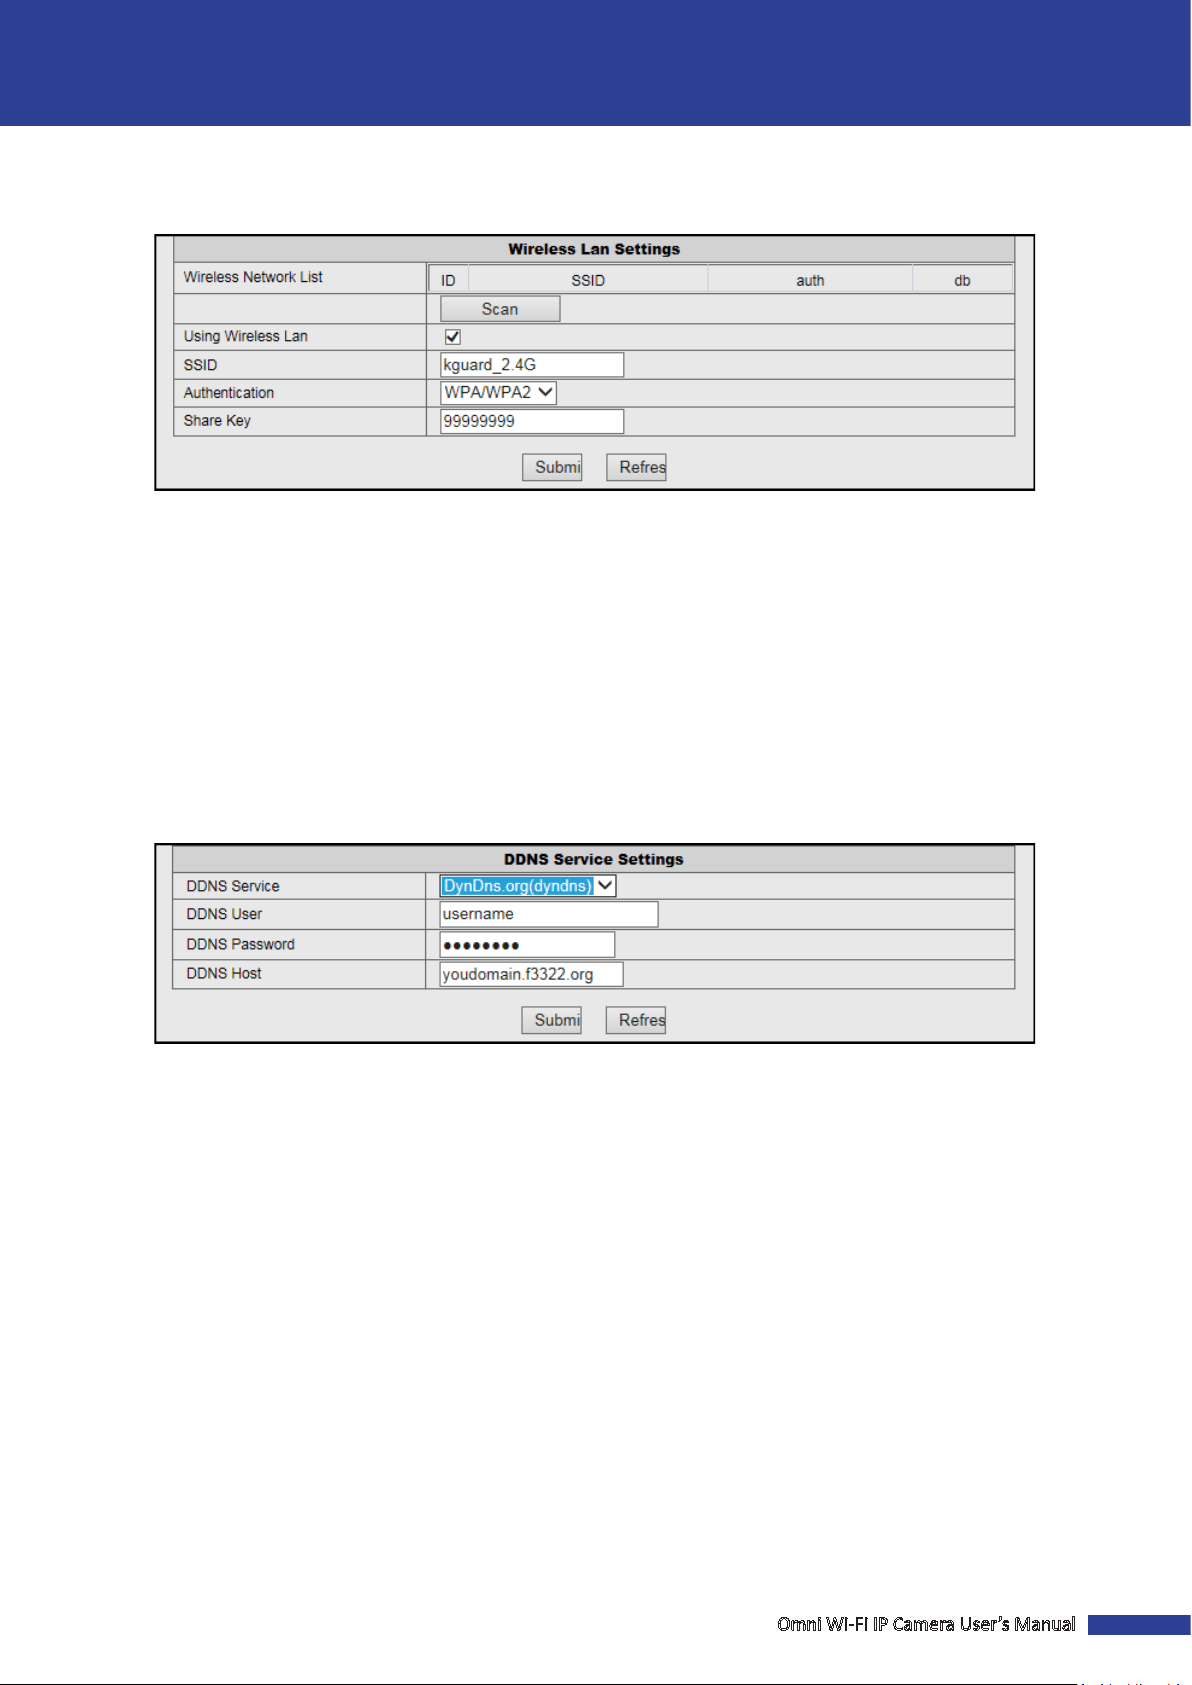
Congure the WLAN Sengs
Click Wireless Lan Sengs to congure the wireless network sengs.
Scan: Click to search for available wireless router(s).
Using Wireless Lan: Check the box to use Wi-Fi funcon.
SSID: Enter the router name.
Authencaon: Select the encrypon type.
Share Key: Enter the password as you set in your router.
Congure the DDNS Service Sengs
DDNS (Dynamic DNS) is a service that registers a domain name and the oang IP address with a DDNS server so that
the domain name can be routed to the IP address even if the IP is changed in a dynamic IP system. Click DDNS Service
Sengs to congure the DDNS service sengs.
DDNS Service: Select DDNS server type.
DDNS User: Enter the user name you registered on DDNS server.
DDNS Password: Enter the password you registered on DDNS server.
DDNS Host: Enter the domain name you registered on DDNS server.
NOTE: To apply a third party DDNS server provider such as a DynDNS domain name, visit hp:dyn.com/dns. Follow the
on-screen instrucons to complete the account setup.

16
Omni Wi-Fi IP Camera User’s Manual
Web Client
PTZ Conguraon
Select this menu opon to congure the PTZ camera sengs.
Congure the PTZ Sengs
Click PTZ Sengs to customize the camera cruise sengs.
PTZ Speed: Specify the moving speed between two preset points.
Cruise Views: Specify the residence me for each preset point.
User & Device Management
Select this menu opon to manage the user and device operaons.
Congure the Users Sengs
Click Users Sengs to change the administrator password and create a new user prole. Only the Administrator can
create an account.
NOTE:
• By default, there is one administrator account. The administrator account user name and password are “admin”.
• We suggest you change the password to protect your privacy.
Each user type has dierent access rights.
• Administrator: Full access rights to congure the camera parameters.
• Operator: Limited camera operaons such as pan/lt control.
• Visitor: View live video only.
NOTE: To create a new user, enter the user name and password. Then click Submit to register the user prole.
Omni Wi-Fi IP Camera User’s Manual
17
Web Client
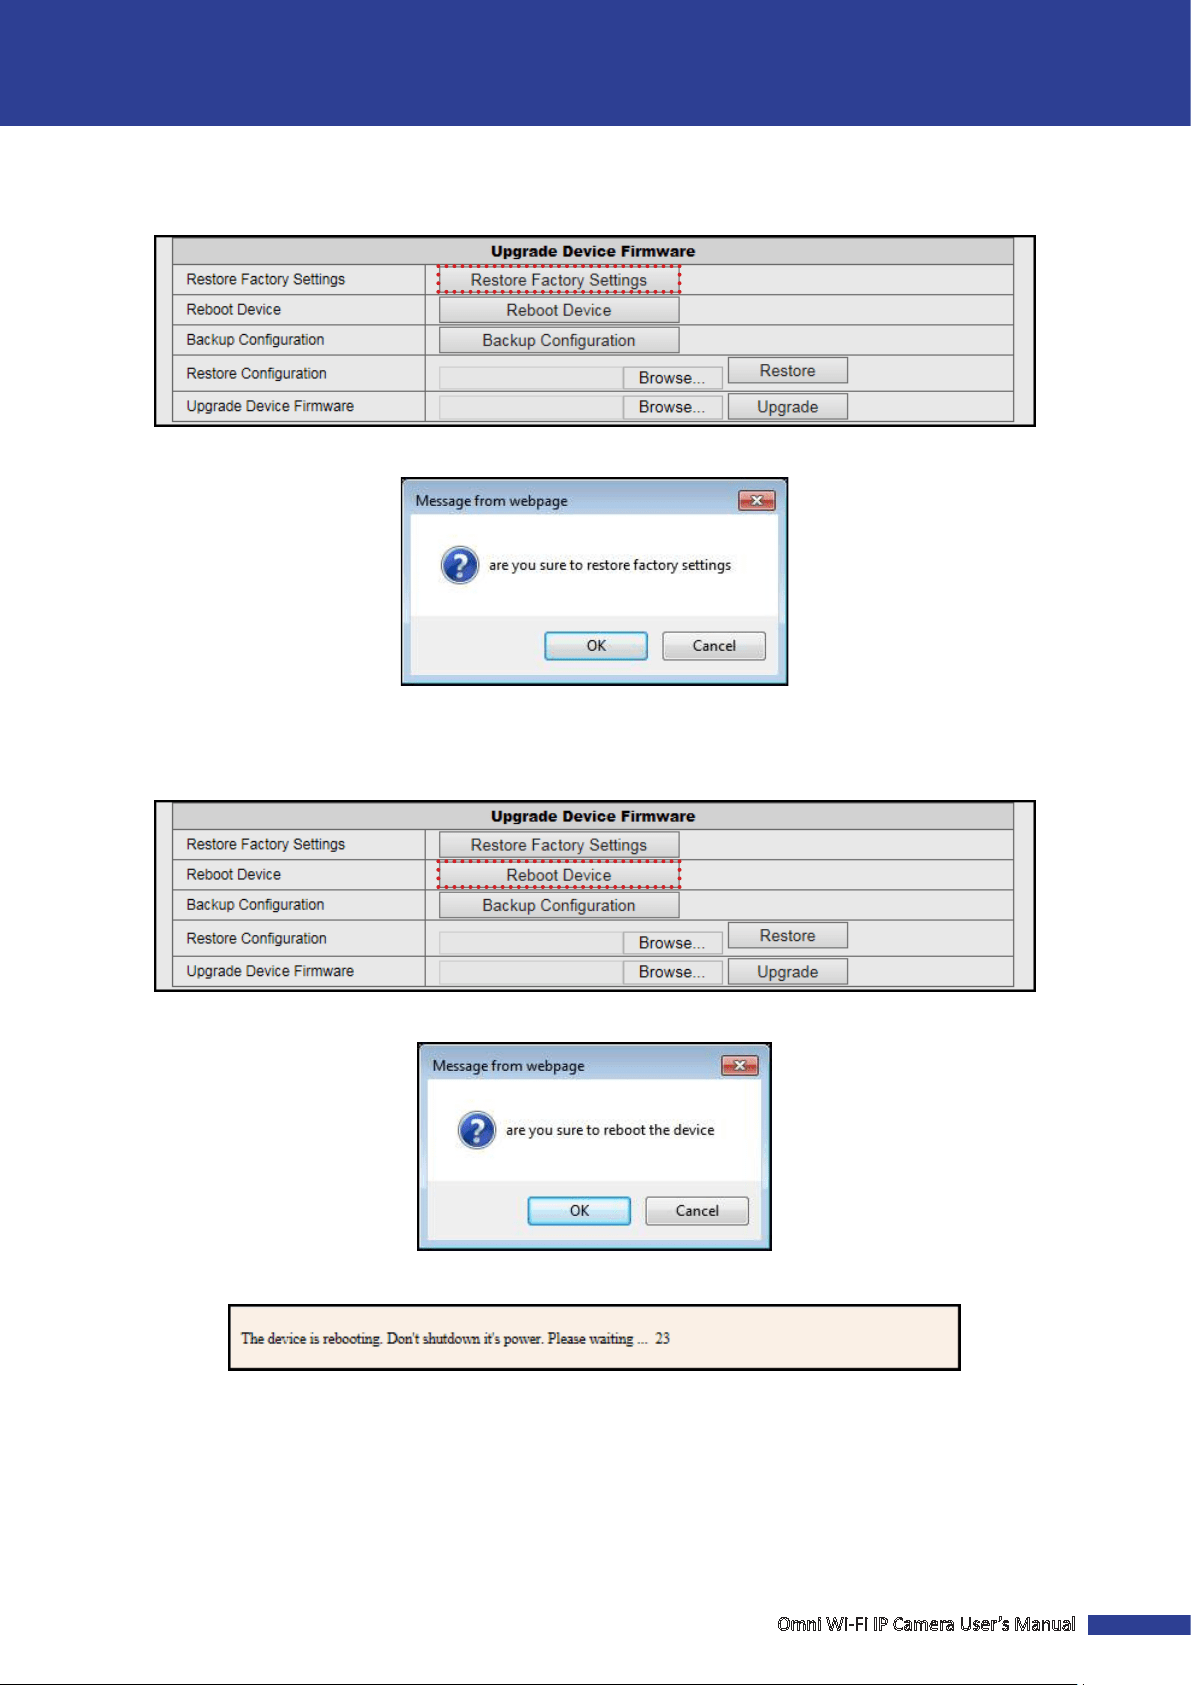
Restore the Default Sengs
Click Maintain > Restore Factory Sengs to restore all parameters to the factory default sengs.
A conrmaon message appears on the screen. Click OK to reset the current parameters to the factory default sengs.
Reboot the Device
Click Maintain > Reboot Device to reset the camera.
A conrmaon message appears on the screen. Click OK to reboot the system.
NOTE: Do not disconnect the device from the power supply during the reboong process.
18
Omni Wi-Fi IP Camera User’s Manual
Web Client
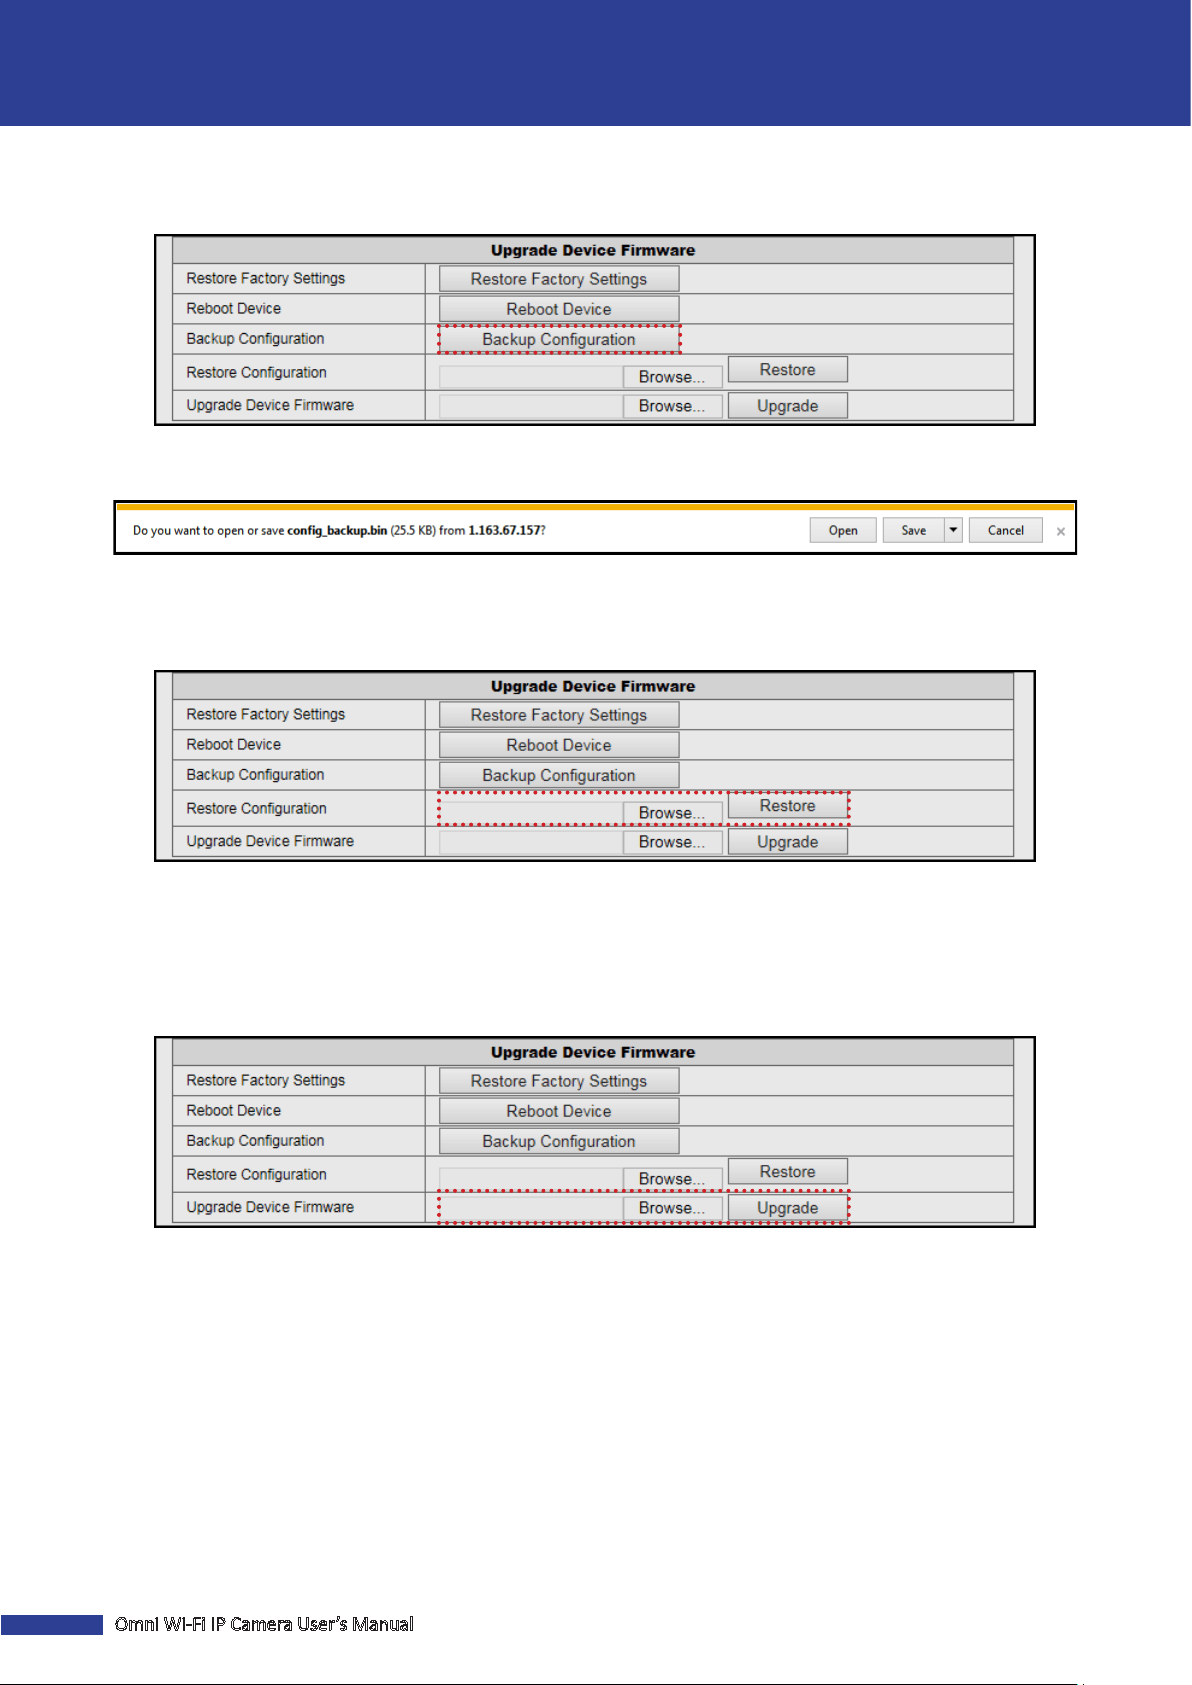
Backup the System Conguraons
Click Maintain > Backup Conguraon to save the current camera conguraons to your computer.
You will be prompted to conrm whether you want to open or save the conguraon le (specify the locaon). The
default lename: cong_backup.bin.
Restore the System Conguraons
Click Maintain > Restore to restore your camera conguraons.
On the Restore Conguraon opon, click the corresponding Browse buon to select the conguraon le to restore
and click Open. The le is displayed on the eld. Then click Restore.
Update the Device Firmware
Click Maintain > Upgrade to reset the camera.
On the Upgrade Device Firmware opon, click the corresponding Browse buon to select the rmware le and click
Open. The le is displayed on the eld. Then click Upgrade and wait unl the upgrade process is complete.
NOTE: Any interrupon of the rmware update may cause permanent damage to your camera.

Omni Wi-Fi IP Camera User’s Manual
19
Web Client
Playback
Aer you login to Web Client, click TF card video playback online to search and play the recorded les stored in the
memory card.
Double-click the le that you want to play. The playback automacally starts.
Click to download the video.
Playback Time Bar
Selected video Playback Screen

KGUARD INFORMATION CO., LTD.
Address: 4F, No.113, Jian 2nd Road,
Jhonghe District, New Taipei City 23585, Taiwan
TEL: +886-2-8228-6080
FAX: +886-2-8221-6857
Email: support@kguardsecurity.com
USA Technical Support Contact
TEL: 1-949-450-0052
Email: support@kworldcomputer.com
Customer Support