User Guide for Air Fryer
Automatic Switch-off
The hot air fryer is fitted with an automatic switch-off. This may activate if the set cooking time has elapsed, causing the timer to sound and the automatic switch-off to activate, turning off the hot air fryer.
Note: If the hot air fryer needs to be turned off before the set cooking time has elapsed, switch off and unplug it from the mains power supply.
Dos and Don’ts
Do:
Check that the non-stick coated cooking basket is securely fitted before use. Not doing so will prevent the hot air fryer from operating.
Only hold the cooking compartment by the cooking basket handle.
Take care when removing the non-stick coated cooking basket, as steam may be emitted.
Don't:
Invert the non-stick coated cooking basket with the cooking compartment still attached, as excess oil may collect at the bottom of the cooking compartment.
Cover the hot air fryer or its air inlets, as this will disrupt the airflow and could affect the cooking results.
Fill the cooking compartment with oil or any other liquid. Press the non-stick coated cooking basket release button whilst shaking the ingredients.
Touch the cooking compartment during or straight after use, as it gets very hot; only hold the cooking compartment by the handle.
Care and Maintenance
Before attempting any cleaning or maintenance, switch off and unplug the hot air fryer from the mains power supply and allow it to fully cool.
STEP 1: Wipe the hot air fryer main unit with a soft, damp cloth and dry thoroughly.
STEP 2: Clean the non-stick coated cooking basket in warm, soapy water, then rinse and dry thoroughly.
Do not immerse the hot air fryer main unit in water or any other liquid.
Never use harsh or abrasive cleaning detergents or scourers to clean the hot air fryer or its accessories, as this could cause damage.
Note: The hot air fryer should be cleaned after each use.
Description of Parts
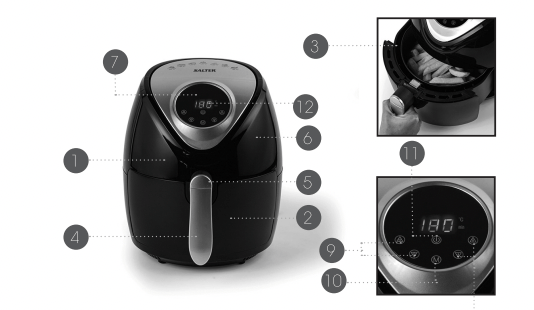
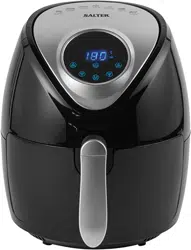
1. 4.5 Litre Digital Air Fryer main unit
2. Cooking compartment
3. Non-stick coated cooking basket
4. Cooking basket handle
5. Cooking basket release button
6. Plastic cover
7. Digital control panel
8. Temperature control buttons
9. Timer control buttons
10. Mode button
11. Power button
12. LED display
Instructions for Use
Before First Use
STEP 1: Before connecting the hot air fryer to the mains power supply, wipe the hot air fryer main unit with a soft, damp cloth and dry thoroughly.
STEP 2: Clean the non-stick coated cooking basket in warm, soapy water, then rinse and dry thoroughly.
STEP 3: Place the hot air fryer main unit onto a stable, heat-resistant surface, at a height that is comfortable for the user.
Note: When using the hot air fryer for the first time, a slight smoke or odour may be emitted. This is normal and will soon subside. Allow for sufficient ventilation around the hot air fryer during use.
It is advised to run the hot air fryer without food for approx. 10 minutes before first use; this will prevent the initial smoke or odour from affecting the taste of the food.
Assembling the 4.5 Litre Digital Air Fryer
STEP 1: Fit the non-stick coated cooking basket into the cooking compartment, until it is seated securely. Slide the plastic release button cover backwards so that it is concealing the release button, to avoid it being pressed during use.
STEP 2: Slide the cooking compartment into the hot air fryer main unit to close it.
Note: The hot air fryer comes preassembled. The cooking compartment should be closed securely before use, as not doing so will prevent it from working.
Using the Digital Control Panel
When the hot air fryer is plugged in and switched on at the mains power supply, the unit will beep and the power button will illuminate to indicate that it is being powered.
Tap the power button to switch on the hot air fryer.
The LED display will alternate between ‘180 °C' and '15 MIN'. These are the default cooking settings; if other settings are required, the time and temperature can now be programmed.
Press the timer control buttons ( or
or ) to change the cooking time, up to a max. of 30 mins.
Press the temperature control buttons (or) to adjust the cooking temperature, between 80-200 °C.
Theor buttons may be held down in order to quickly adjust the time or temperature.
Once time and temperature have been set, tap the power button to begin heating. A red heating icon will appear to indicate that the hot air fryer is heating up, and the rotating LEDs around this icon indicate that the fan is operating. The red light will switch on and off throughout cooking to indicate that the hot air fryer is regulating temperature.
The time and temperature can also be set using the ‘MODE’ button. This will automatically cycle between time and temperature presets for cooking various foods. These presets can then be adjusted using'or to increase or decrease the time or temperature as required.
Once cooking is complete and the preset time has elapsed, the timer will sound and the hot air fryer will switch off. During cooking, the time and temperature can be adjusted at any time usingor
If the cooking compartment is removed during cooking, cooking will be paused; reinsert the cooking compartment to resume the cooking process. The hot air fryer will switch off after 2 hours if the cooking compartment has not been reinserted.
To switch off the hot air fryer, tap the power button again. The red heating icon will no longer be visible and the hot air fryer will switch off after 20 seconds.
Note: The power button will remain illuminated whilst the unit is plugged in.
Using the 4.5 Litre Digital Air Fryer
STEP 1: Plug in and switch on the hot air fryer at the mains power supply; the hot air fryer will beep and the power button will illuminate to indicate that the unit is plugged in.
STEP 2: Tap the power button to switch on the hot air fryer; the LED display will alternate between ‘180 °C' and ‘15 MIN', indicating that the time and temperature are ready to be programmed.
STEP 3: Following the instructions in the section entitled ‘Using the Digital Control Panel', preheat the hot air fryer for approx. 5 minutes. Use or to increase or decrease the time or temperature if required.
STEP 4: Once preheated, remove the cooking compartment by pulling it out of the hot air fryer using the handle. Place the cooking compartment onto a flat, stable, heat-resistant surface. Check that the plastic cover is over the basket release button to avoid it from being released accidentally.
STEP 5: Place the ingredients into the non-stick coated cooking basket and then slide the cooking compartment back into the hot air fryer main unit to close it.
STEP 6: Use the digital control panel to set the cooking time and temperature as required for the ingredients. The time and temperature can also be set using the 'MODE' button. This will automatically cycle between time and temperature presets for cooking various foods. These presets can then be adjusted using or to increase or decrease the time or temperature as required. Then press the power button to begin cooking.
STEP 7: Some ingredients may require shaking halfway through the cooking time. Remove the cooking compartment by pulling the cooking basket handle out of the hot air fryer. The plastic cover must be concealing the cooking basket release button; take care not to release the non-stick coated cooking basket by pressing the cooking basket release button. Shake the cooking compartment gently and then slide it back into the hot air fryer main unit to close it and continue to cook.
STEP 8: Once cooking is complete and the preset time has elapsed, the hot air fryer will beep several times and switch off. Check whether the ingredients are ready by pulling the cooking compartment out from the hot air fryer using the cooking basket handle. If the ingredients are not cooked, close the cooking compartment and replace it back into the hot air fryer main unit. Use the digital control panel to adjust the cooking time accordingly. If the food is cooked, press the cooking basket handle release button to remove the non-stick coated cooking basket from the cooking compartment and then empty the contents into a bowl or onto a plate. Use a pair of heat-resistant tongs (not included) if the food is large or fragile.
Note: Always preheat the hot air fryer before starting to cook or alternatively add approx. 3-5 minutes onto the cooking time. If the cooking time or temperature setting needs to be changed during use, simply use the timer or temperature control buttons as required and the hot air fryer will automatically adjust the settings.
Caution: Do not tip the food directly into a bowl or onto a plate, as excess oil may collect at the bottom of the cooking compartment and leak onto the ingredients or serving bowl. Always remove the non-stick coated cooking basket from the cooking compartment. Exercise caution when opening and closing the cooking compartment during use, as it will become very hot.
Warning: Nominal voltage is still present even when the hot air fryer is switched off. To permanently switch off the hot air fryer, turn it off at the mains power supply.
Using the Non-Stick Coated Cooking Basket
The non-stick coated cooking basket is removable for ease of use.
STEP 1: To remove the non-stick coated cooking basket from the cooking compartment, push forward the plastic cover to reveal the cooking basket release button.
STEP 2: Press and hold the cooking basket release button and carefully lift the cooking basket handle to detach the basket.
STEP 3: Replace the non-stick coated cooking basket by fitting it into the cooking compartment, until it is secure.
STEP 4: Slide the plastic cover back into position so that it conceals the cooking basket release button.
Warning: Never press the cooking basket release button if the cooking compartment is elevated, as this could cause injury; only press it once the cooking compartment has been placed onto a flat, stable surface.
Cooking Guide
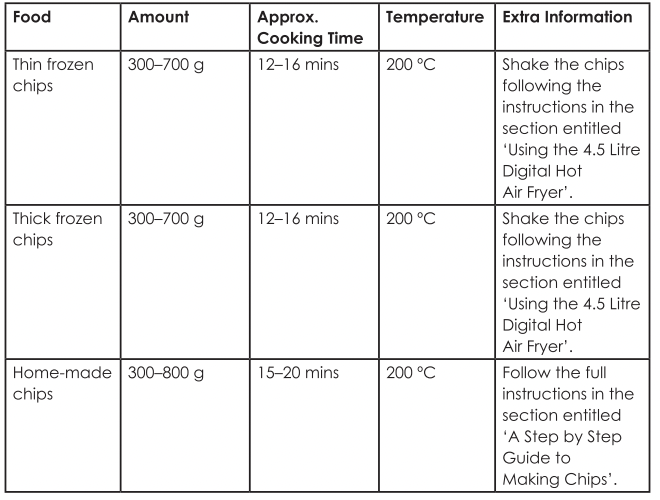
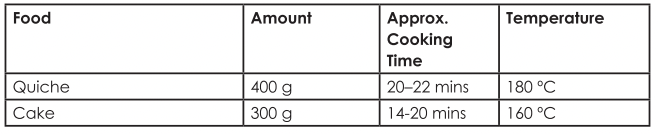
The following is a guideline for cooking certain types of foods with the hot air fryer. This is a guideline only and cooking should always be monitored. Food should always be piping hot before serving.
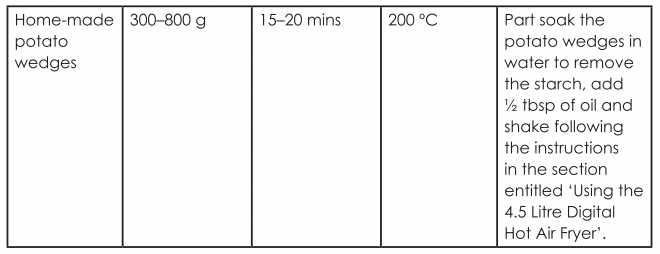
Potatoes and Chips
Meat and Poultry


Snacks and Sides

Bakes and Cakes
A Step by Step Guide to Making Chips Home-made Chips
STEP 1: Cut the potato into chips approx. 1 cm wide.
STEP 2: Place the chopped potatoes into a pan of cold water. Bring water to the boil and parboil the potatoes for approx. 3 minutes.
STEP 3: Preheat the hot air fryer to 200 °C.
STEP 4: Drain the water from the potatoes and dry thoroughly using kitchen towel. STEP 5: Coat the chopped potatoes with 'A tbsp of cooking oil or oil spray and add them to the cooking basket. Check they are fully coated for best results.
STEP 6: Cook at 200 °C for 15-20 minutes.
STEP 7: Shake the chips regularly (approx, every 6 minutes) so that all of the chips cook evenly.
STEP 8: Once cooked through and crispy, remove from the hot air fryer, season and enjoy.
Frozen Chips
STEP 1: Preheat the hot air fryer to 200 °C.
STEP 2: Add 300-700 g of frozen chips into the non-stick cooking basket.
STEP 3: Cook for 12-16 minutes.
STEP 4: Shake the chips regularly (approx, every 6 minutes) to make sure that they cook evenly.
STEP 5: Once cooked through and crispy, remove from the hot air fryer, season and enjoy.
Storage
Check that the hot air fryer is cool, clean and dry before storing in a cool, dry place.
Never wrap the cord tightly around the hot air fryer; wrap it loosely to avoid causing damage.
Connection To The Mains
Please check that the voltage indicated on the product corresponds with your supply voltage.
Important
As the colours in the mains lead of this appliance may not correspond with the coloured markings identifying the terminals in your plug, please proceed as follows:
The wires in the mains lead are coloured in accordance with the following code:
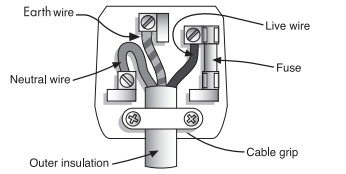
Blue Neutral (N)
Brown Live (L)
Green/Yellow Earth ( )
)
FOR UK USE ONLY - Plug fitting details (where applicable).
The wire coloured BLUE is the NEUTRAL and oute must be connected to the terminal marked N or coloured BLACK.
The wire coloured BROWN is the LIVE wire and must be connected to the terminal marked L or coloured RED.
The wire coloured GREEN/YELLOW must be connected to the terminal marked with the letter E or marked
On no account must either the BROWN or the BLUE wire be connected to the EARTH terminal ().
Always ensure that the cord grip is fastened correctly.
The plug must be fitted with a fuse of the same rating already fitted and conforming to BS 1362 and be ASTA approved.
If in doubt, consult a qualified electrician who will be pleased to do this for you.
Non-Rewireable Mains Plug
If your appliance is supplied with a non-rewireable plug fitted to the mains lead and should the fuse need replacing, you must use an ASTA approved one (conforming to BS 1362 of the same rating).
If in doubt, consult a qualified electrician who will be pleased to do this for you.
If you need to remove the plug, DISCONNECT IT FROM THE MAINS, then cut it off the mains lead and immediately dispose of it safely. Never attempt to reuse the plug or insert it into a socket outlet as there is a danger of an electric shock.