Pou/an
9
Please do not return unit to retailer.
Por favor, no devuelva el aparato al lugar de compra.
Veuillez ne pas retourner I'outil au d_taillant.
1-800-554-6723
www.poulan.com
Instruction Manual
Manual de Instrucciones
Manuel d'lnstructions
1420
1630
0Qus
WARNING:
Read and follow all Safety Rules and Operating Instructions before
using this product. Failure to do so can result in serious injury.
ADVERTENCIA:
Lea el manual de instrucciones y siga todas las advertencias e
instrucciones de seguridad. El no hacerlo puede resultar en lesiones
graves.
AVERTISSEMENT:
Lire le manuel d'instructions et bien respecter tous les avertisse-
ments et toutes les instructionsde s6curit& Tout d_faut de le faire
pourrait entrafner des blessures graves.
Electrolux Home Products, Inc.
250 Bobby Jones Expressway
Augusta, GA 30907
Electrolux Canada Corporation
6150 McLaughlin Road
Mississauga, Ontario L5R 4C2
[_ The Electrolux Group. The world's No.1 choice.
KITCHEN, CLEANING AND OUTDOOR APPLIANCES COMF41NED
Copyright 6>2003 Electrolux Home Products, Inc. 530163981 4/28/03
_kWARNING: When using electric
gardening appliances, basic safety pre-
cautions must always be followed to re-
duce the risk of fire, electric shock, and
serious injury. Read and follow all in-
structions.
_k WARNING: Always disconnect unit
from power source when making repairs,
adjustments, and when changing acces-
sories and attachments such as saw bar,
chain or guards.
Because a chain saw is a high-speed
woodcutting tool, special precautions
must be observed to reduce risk of acci-
dents. Careless or improper use of this
tool can cause serious injury.
PLAN AHEAD
• Restrict the use of your saw to adult
users who understand and can follow
the safety rules, precautions, and op-
erating instructions found in this
manual.
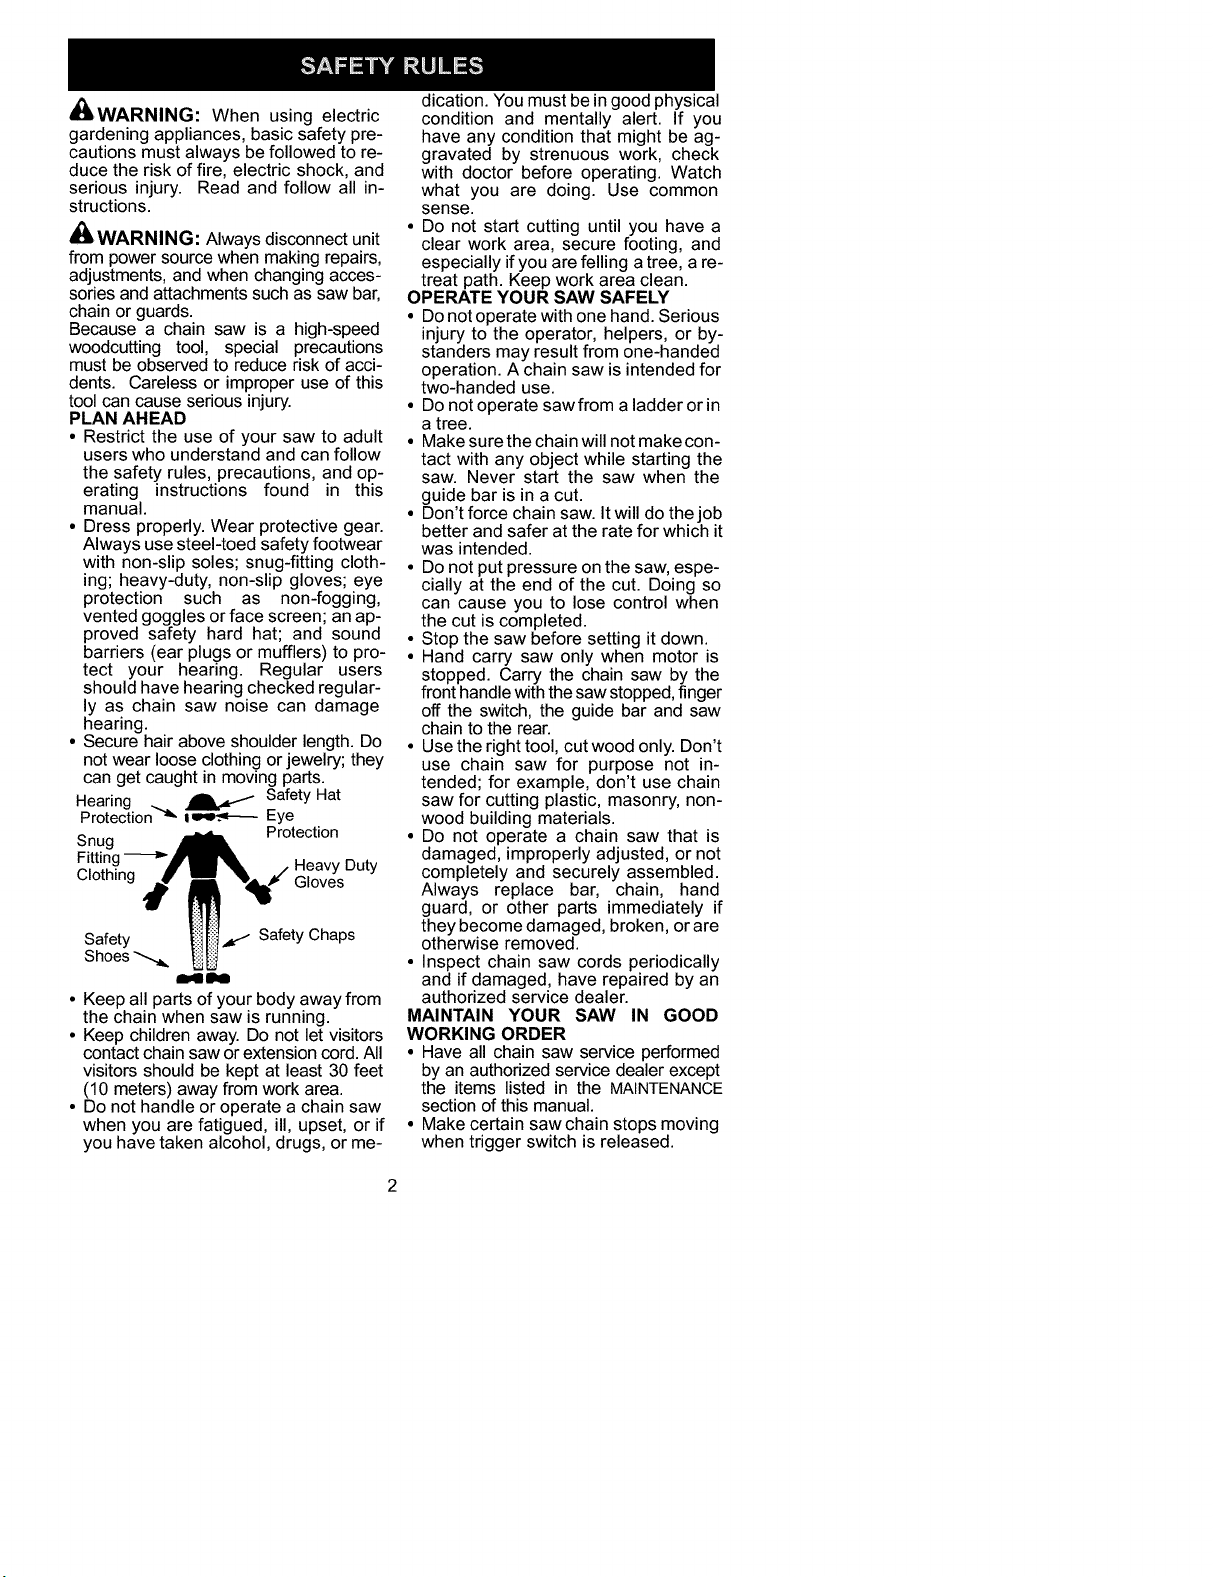
• Dress properly. Wear protective gear.
Always use steel-toed safety footwear
with non-slip soles; snug-fitting cloth-
ing; heavy-duty, non-slip gloves; eye
protection such as non-fogging,
vented goggles or face screen; an ap-
proved safety hard hat; and sound
barriers (ear plugs or mufflers) to pro-
tect your hearing. Regular users
should have hearing checked regular-
ly as chain saw noise can damage
hearing.
• Secure hair above shoulder length. Do
not wear loose clothing or jewelry; they
can get caught in moving parts.
Hearing _ _ Safety Hat
Protection''_ iPe.-q----- Eye
Snug Protection
Fittin Duty
Clothing Gloves
Safety Safety Chaps
Shoes
_lhm
• Keep all parts of your body away from
the chain when saw is running.
• Keep children away. Do not let visitors
contact chain saw or extension cord. All
visitors should be kept at least 30 feet
(10 meters) away from work area.
• Do not handle or operate a chain saw
when you are fatigued, ill, upset, or if
you have taken alcohol, drugs, or me-
dication. You must be in good physical
condition and mentally alert. If you
have any condition that might be ag-
gravated by strenuous work, check
with doctor before operating. Watch
what you are doing. Use common
sense.
• Do not start cutting until you have a
clear work area, secure footing, and
especially if you are felling a tree, a re-
treat path. Keep work area clean.
OPERATE YOUR SAW SAFELY
• Do not operate with one hand. Serious
injury to the operator, helpers, or by-
standers may result from one-handed
operation. A chain saw is intended for
two-handed use.
• Do not operate saw from a ladder or in
a tree.
• Make sure the chain will not make con-
tact with any object while starting the
saw. Never start the saw when the
guide bar is in a cut.
• Don't force chain saw. It will do the job
better and safer at the rate for which it
was intended.
• Do not put pressure onthe saw, espe-
cially at the end of the cut. Doing so
can cause you to lose control when
the cut is completed.
• Stop the saw before setting it down.
• Hand carry saw only when motor is
stopped. Carry the chain saw by the
front handle withthe saw stopped, finger
off the switch, the guide bar and saw
chain to the rear.
• Use the right tool, cutwood only. Don't
use chain saw for purpose not in-
tended; for example, don't use chain
saw for cutting plastic, masonry, non-
wood building materials.
• Do not operate a chain saw that is
damaged, improperly adjusted, or not
completely and securely assembled.
Always replace bar, chain, hand
guard, or other parts immediately if
they become damaged, broken, orare
otherwise removed.
• Inspect chain saw cords periodically
and if damaged, have repaired by an
authorized service dealer.
MAINTAIN YOUR SAW IN GOOD
WORKING ORDER
• Have all chain saw service performed
by an authorized service dealer except
the items listed in the MAINTENANCE
section of this manual.
• Make certain saw chain stops moving
when trigger switch is released.

• Keepthehandlesdryandcleanand
freefromoilandgrease.
• Keepoilcapandfastenerssecurely
tightened.
• Nonconformingreplacementcompo-
nentsortheremovalofsafetydevices
maycausedamagetotheunitandpos-
sibleinjurytotheoperatororbystand-
ers.UseonlyPoulanaccessoriesand
replacementpartsasrecommended.
Nevermodifyyoursaw.
• Maintainchainsawwithcare.
• Keepunitsharpandcleanforbetter
andsaferperformance.
• Followinstructionsforlubricatingand
changingaccessories.
• Unplugthechainsawfromthepower
sourcewhennotinuse,beforeservic-
ing,andwhenchangingaccessories
andattachments,suchassawchain
andguard.
• Checkfordamagedparts.Beforefur-
theruseofthechainsaw,aguardor
otherpartthatisdamagedshouldbe
carefullycheckedtodeterminethatitwill
operateproperlyandperformitsin-
tendedfunction.Checkforalignmentof
movingparts,bindingofmovingparts,
breakageofparts,mountingandany
otherconditionsthatmayaffectitsop-
eration.A guardorotherpartthatis
damagedshouldbeproperlyrepaired
orreplacedbyanauthorizedservice
dealerunlessotherwiseindicatedelse-
whereintheinstructionmanual.
• Whennotinuse,chainsawsshould
bestoredinadry,highorlocked-up
placeoutofthereachofchildren.
• Whenstoringsaw,unplugandusea
barsheathorcarryingcase.
ELECTRICAL SAFETY
_ WARNING: Avoid a dangerous en-
vironment. To reduce the risk of electrical
shock, do not use in rain, in damp or wet
locations, or around swimming pools, hot
tubs, etc. Do not expose tosnow, rain, or
water to avoid the possibilityof electrical
shock. Do not handle extension cord or
plug with wet hands.
• Use a voltage supply as shown on the
nameplate of the unit.
• Avoid dangerous situations. Do not use
in the presence of flammable liquidsor
gases to avoid creating a fire or explo-
sion and/or causing damage to unit.
• To reduce the risk of electrical shock,
this appliance hasa polarized plug(one
bladeiswiderthan the other)and willre-
quire the use of a polarized extension
cord.The appliance plugwillfitintoa po-
larized extension cord only one way. If
the plug does not fit fully into the exten-
sion cord, reverse the plug. If the plug
still does not fit, obtain a correct polar-
ized extension cord. A polarized exten-
sion cord will require the use of a polar-
ized wall outlet. This plug will fit into the
polarized wall outlet only one way. If
plug does not fit fully into the wall outlet,
reverse the plug. If the plug still does not
fit, contact aqualified electrician to install
the proper wall outlet. Donot change the
equipment plug, extension cord recep-
tacle, or extension cord plug in any way.
• To reduce risk of electrical shock, use
extension cords specifically marked as
suitable for outdoor appliances. The
electrical rating of the cord must not be
less than the rating of the unit. The cord
must be marked with suffix "W-A" (in
Canada, "W"). Use a polarized cord.
Make sure your extension cord is in
good condition. Inspect extension cord
before use and replace if damaged. Do
not use a damaged cord. Cord insula-
tion must be intact with no cracks or de-
terioration. Plug connectors must be
undamaged. An undersized extension
cord will cause a drop in line voltage re-
sulting in loss of power and overheating.
If in doubt, use the next heavier gauge.
The lower the gauge number, the heavi-
er the cord (see SELECTAN EXTENSION
CORD in the OPERATIONsection). Do
not use multiple cords.
• Do not abuse cord. Never carry the
unit by the extension cord or yank ex-
tension cord to disconnect unit.
• Secure extension cord to power cord
to prevent disconnection from unit.
• Do not use the unit if the switch does
not turn the unit on and off properly, or
if the lock-out does not work. Repairs
to the switch must be made by an
authorized service dealer.
• Keep extension cord clear of operator
and obstacles at all times. Position
cord so that it will not be caught on
branches. Do not expose cords to
heat, oil, water, or sharp edges.
• To avoid the possibility of electric shock,
avoid body contact with any grounded
conductor, such as metal fences or
pipes.
• Ground Fault Circuit Interrupter
(GFCI) protection should be provided
on circuit or outlet to be used. Recep-
tacles are available having built-in
GFCI protection and may be used for
this measure of safety. Inspect chain
saw cords periodically and if dam-
aged, have repaired by an authorized
service dealer.
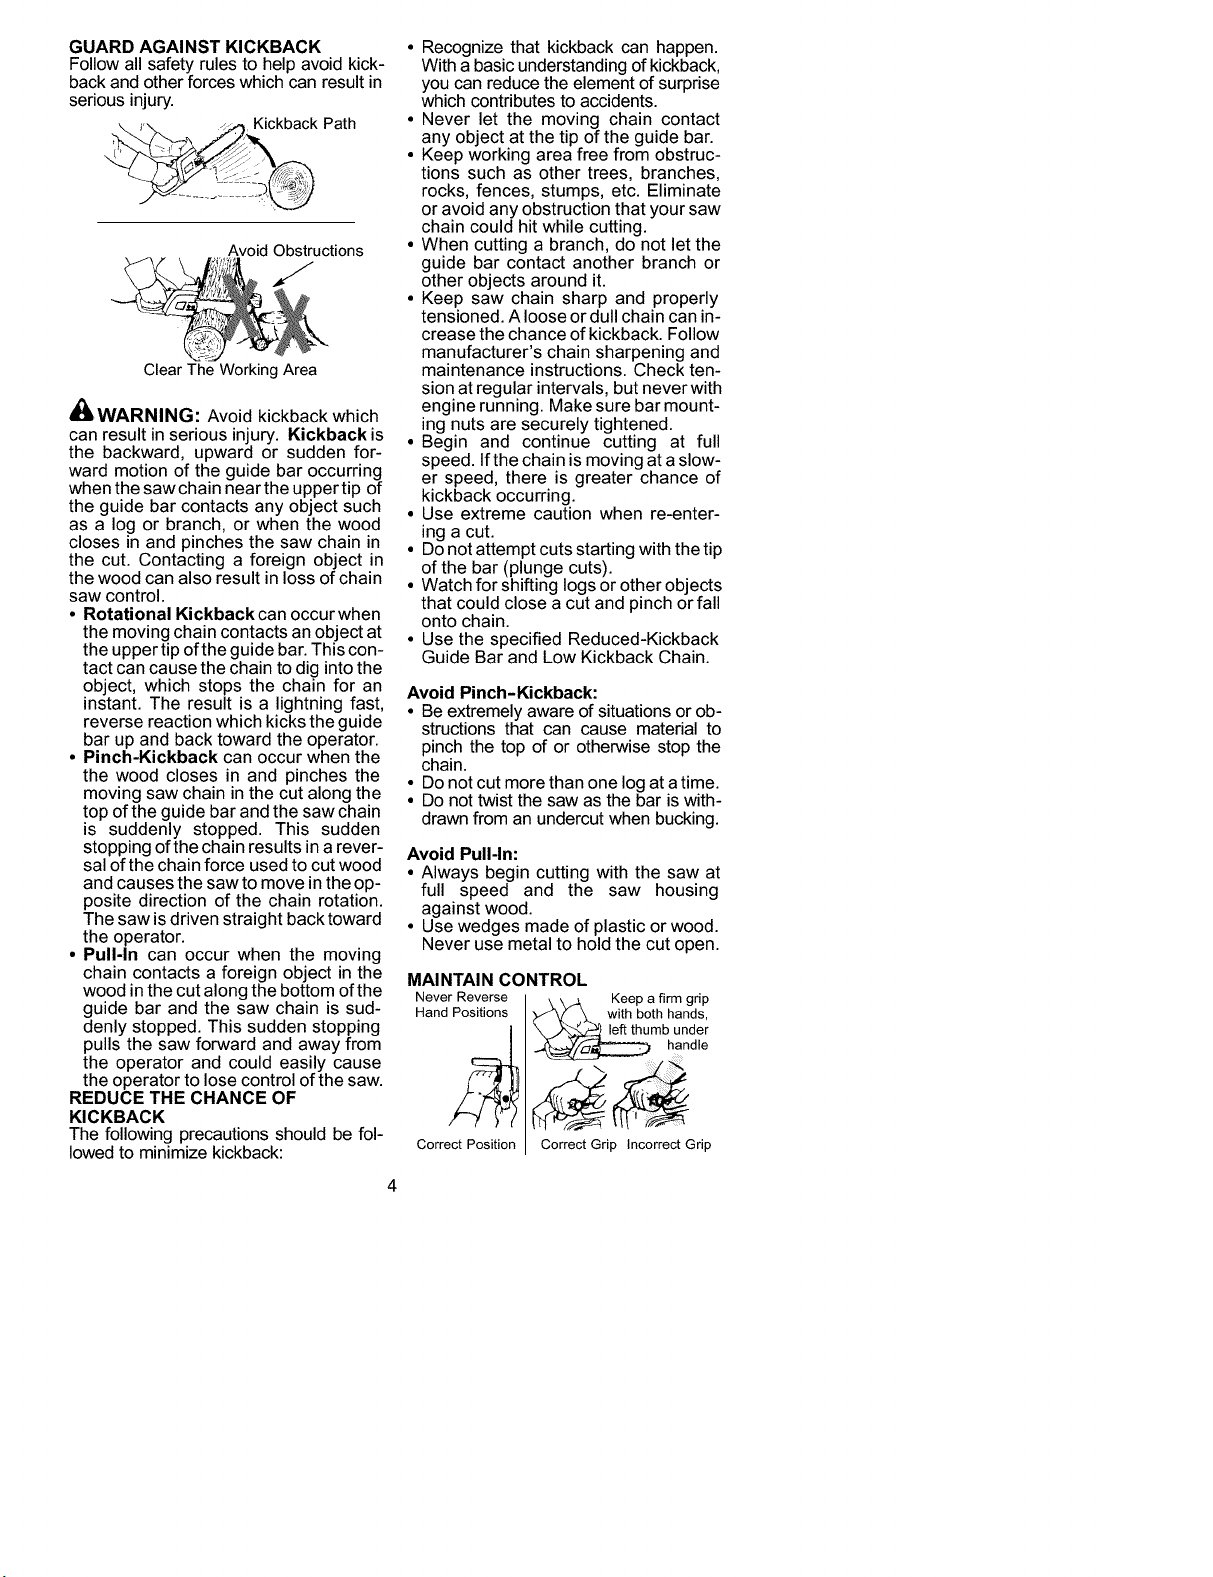
GUARD AGAINST KICKBACK
Follow all safety rules to help avoid kick-
back and other forces which can result in
serious injury.
Kickback Path
Avoid Obstructions
Clear The Working Area
_/LWARNING: Avoid kickback which
can result in serious injury. Kickback is
the backward, upward or sudden for-
ward motion of the guide bar occurring
when the saw chain near the upper tip of
the guide bar contacts any object such
as a log or branch, or when the wood
closes in and pinches the saw chain in
the cut. Contacting a foreign object in
the wood can also result in loss of chain
saw control.
• Rotational Kickback can occurwhen
the moving chain contacts an object at
the upper tip of the guide bar. This con-
tact can cause the chain to dig into the
object, which stops the chain for an
instant. The result is a lightning fast,
reverse reaction which kicks the guide
bar up and back toward the operator.
• Pinch-Kickback can occur when the
the wood closes in and pinches the
moving saw chain in the cut along the
top of the guide bar and the saw chain
is suddenly stopped. This sudden
stopping of the chain results ina rever-
sal of the chain force used to cut wood
and causes the saw to move in the op-
posite direction of the chain rotation.
The saw is driven straight back toward
the operator.
• Pull-In can occur when the moving
chain contacts a foreign object in the
wood in the cut along the bottom of the
guide bar and the saw chain is sud-
denly stopped. This sudden stopping
pulls the saw forward and away from
the operator and could easily cause
the operator to lose control of the saw.
REDUCE THE CHANCE OF
KICKBACK
The following precautions should be fol-
lowed to minimize kickback:
4
• Recognize that kickback can happen.
With a basic understanding of kickback,
you can reduce the element of surprise
which contributes to accidents.
• Never let the moving chain contact
any object at the tip of the guide bar.
• Keep working area free from obstruc-
tions such as other trees, branches,
rocks, fences, stumps, etc. Eliminate
or avoid any obstruction that your saw
chain could hit while cutting.
• When cutting a branch, do not let the
guide bar contact another branch or
other objects around it.
• Keep saw chain sharp and properly
tensioned. A loose or dull chain can in-
crease the chance of kickback. Follow
manufacturer's chain sharpening and
maintenance instructions. Check ten-
sion at regular intervals, but never with
engine running. Make sure bar mount-
ing nuts are securely tightened.
• Begin and continue cutting at full
speed. If the chain is moving at aslow-
er speed, there is greater chance of
kickback occurring.
• Use extreme caution when re-enter-
ing a cut.
• Do not attempt cuts starting with the tip
of the bar (plunge cuts).
• Watch for shifting logs or other objects
that could close a cut and pinch or fall
onto chain.
• Use the specified Reduced-Kickback
Guide Bar and Low Kickback Chain.
Avoid Pinch-Kickback:
• Be extremely aware of situations or ob-
structions that can cause material to
pinch the top of or otherwise stop the
chain.
• Do not cut more than one log at atime.
• Do not twist the saw as the bar is with-
drawn from an undercut when bucking.
Avoid Pull-In:
• Always begin cutting with the saw at
full speed and the saw housing
against wood.
• Use wedges made of plastic or wood.
Never use metal to hold the cut open.
MAINTAIN CONTROL
Never Reverse
Hand Positions
CorrectPosition
Keep a firm grip
with both hands,
mb under
handle
Correct Grip Incorrect Grip
• A good, firm grip on the saw with both
hands will help you maintain control.
Don't let go. Grip the rear handle with
your right hand whether you are right or
left handed. Wrap the fingers of your left
hand over and around the front handle-
bar, and your left thumb under the front
handlebar. Keep your left arm straight
with the elbow locked.
• Position your left hand on the front
handlebar so it is in a straight line with
your right hand on the rear handle
when making bucking cuts. Stand
slightly to the left side of the saw to
keep your body from being in a direct
line with the cutting chain.
• Stand with your weight evenly bal-
anced on both feet.
• Do not overreach. You could be drawn
or thrown off balance and lose control.
• Do not cut above shoulder height. It is
difficult to maintain control of saw
above shoulder height.
KICKBACK SAFETY FEATURES
_/L WARNING: The following features
are included on your sawto help reduce
hazard of kickback; however, such fea-
tures will not totally eliminate this dan-
ger. Do not rely only on safety devices.
• Hand Guard: designed to reduce the
chance of your left hand contacting
the chain if your hand slips offthe front
handlebar.
• Position of front and rear handlebars:
designed with distance between han-
dles and "in-line" with each other. The
spread and "in-line" position of the
hands provided by this design work to-
gether to give balance and resistance
in controlling the pivot of the saw back
toward the operator if kickback oc-
curs.
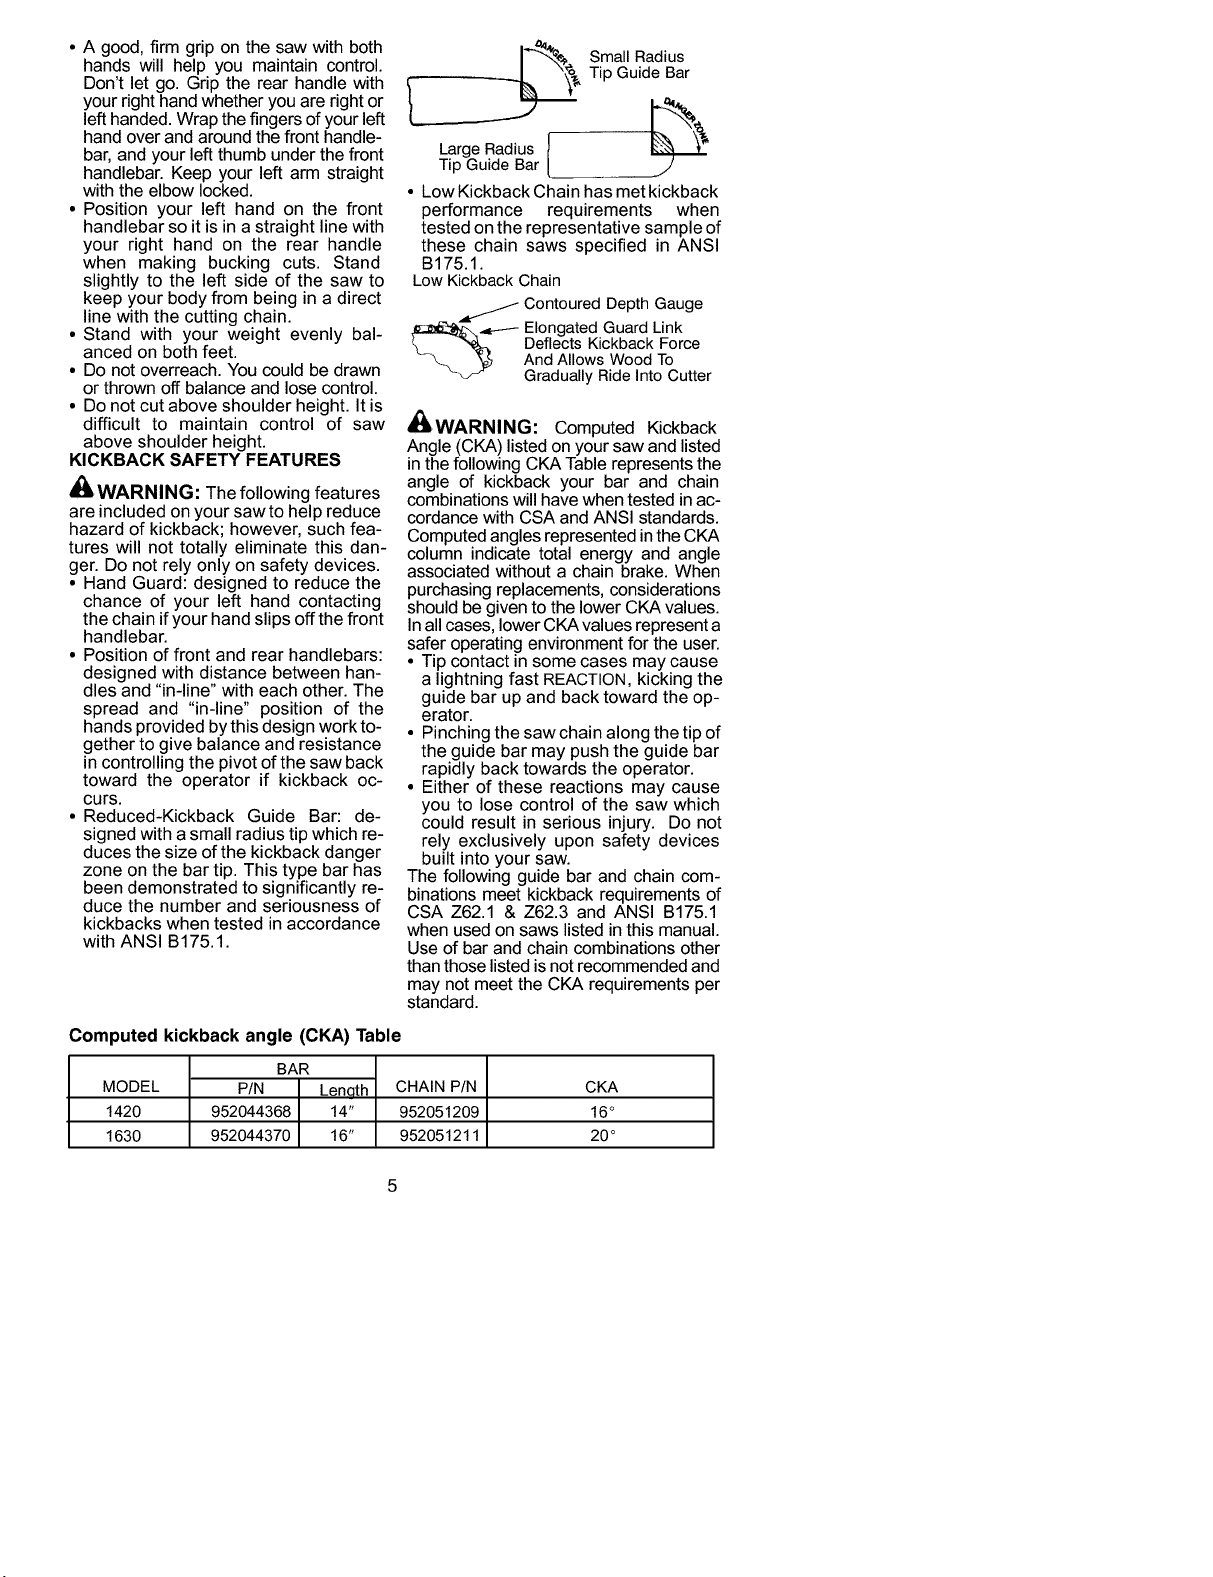
• Reduced-Kickback Guide Bar: de-
signed with a small radius tip which re-
duces the size of the kickback danger
zone on the bar tip. This type bar has
been demonstrated to significantly re-
duce the number and seriousness of
kickbacks when tested in accordance
with ANSI B175.1.
LargeRadius l
Tip Guide Bar
Small Radius
Tip Guide Bar
__J
• Low Kickback Chain has met kickback
performance requirements when
tested on the representative sample of
these chain saws specified in ANSI
B175.1.
Low Kickback Chain
Contoured Depth Gauge
,_:_t_!_-_.,_--- Elongated Guard Link
_ Deflects Kickback Force
-_-. _.5 And Allows Wood To
_-_-_ Gradually Ride Into Cutter
_WARNING: Computed Kickback
Angle (CKA) listed on your saw and listed
in the following CKA Table represents the
angle of kickback your bar and chain
combinations will have when tested inac-
cordance with CSA and ANSI standards.
Computed angles represented inthe CKA
column indicate total energy and angle
associated without a chain brake. When
purchasing replacements, considerations
should be given to the lower CKA values.
Inall cases, lower CKA values represent a
safer operating environment for the user.
• Tip contact in some cases may cause
a lightning fast REACTION, kicking the
guide bar up and back toward the op-
erator.
• Pinching the saw chain along the tip of
the guide bar may push the guide bar
rapidly back towards the operator.
• Either of these reactions may cause
you to lose control of the saw which
could result in serious injury. Do not
rely exclusively upon safety devices
built into your saw.
The following guide bar and chain com-
binations meet kickback requirements of
CSA Z62.1 & Z62.3 and ANSI B175.1
when used on saws listed in this manual.
Use of bar and chain combinations other
than those listed is not recommended and
may not meet the CKA requirements per
standard.
Computed kickback angle (CKA) Table
MODEL
1420
1630
BAR
P/N Lenqth
952044368 14"
952044370 16"
CHAIN P/N
952051209
952051211
CKA
16°
20 °
SAFETY NOTICE: Exposure to vibra-
tions through prolonged use of hand
tools could cause blood vessel or nerve
damage in the fingers, hands, and joints
of people prone to circulation disorders
or abnormal swelling. Prolonged use in
cold weather has been linked to blood
vessel damage in otherwise healthy
people. If symptoms occur such as
numbness, pain, loss of strength,
change in skin color or texture, or loss of
feeling in the fingers, hands, or joints,
discontinue the use of this tool and seek
medical attention. An anti-vibration sys-
tem does not guarantee the avoidance
of these problems. Users who operate
power tools on a continual and regular
basis must closely monitor their physical
condition and the condition of this tool.
DOUBLE INSULATION
CONSTRUCTION
This unit is double insulated to help pro-
tect against electric shock. Double insula-
tion construction consists of two separate
"layers" of electrical insulation instead of
grounding.
Tools built with this insulation system are
not intended to be grounded. No ground-
ing means is provided on this unit, nor
should a means of grounding be added to
this unit. As a result, the extension cord
used with this unit can be plugged into any
polarized 120 volt electrical outlet.
Safety precautions must be observed
when operating any electrical tool. The
double insulation system only provides
added protection against injury resulting
from an internal electrical insulation fail-
ure.
_/L WARNING: All electrical repairs to
this unit, including housing, switch, mo-
tor, etc., must be diagnosed and re-
paired by qualified service personnel.
Replacement parts for a double insu-
lated appliance must be identical to the
parts they replace. A double insulated
appliance is marked with the words
"double insulation" or "double insu-
lated". The symbol [] (square within a
square) may also be marked on the ap-
pliance. Failure to havethe unit repaired
by authorized service personnel can
cause the double insulation construc-
tion to become ineffective and result in
serious injury.
STANDARDS: This product is listed by
Underwriters Laboratories, Inc. in accor-
dance with UL Standard 1662 and CSA
Standards Z62.1 and Z62.3 and ANSI
B175.1.
ANSI B175.1-2000 "American National
Standard for Powered Tools - Safety Re-
quirements"
CSA Z62.3 "Chain Saw Kickback Occu-
pational Health and Safety"
CSA Z62.1 "Chain Saws - Occupational
Health and Safety"
SAVE THESE INSTRUCTIONS
:] IIb'd
•"X _
_WARNING: Before using chain
saw, ensure all fasteners are secure.
CARTON CONTENTS
• Chain Saw (fully assembled)
• Bar Sheath
Examine parts for damage. Do not use
damaged parts.
NOTE: If you need assistance or find
parts missing or damaged, please call
1-800-554-6723.
ASSEMBLY
Your saw is fully assembled; no as-
sembly is necessary.
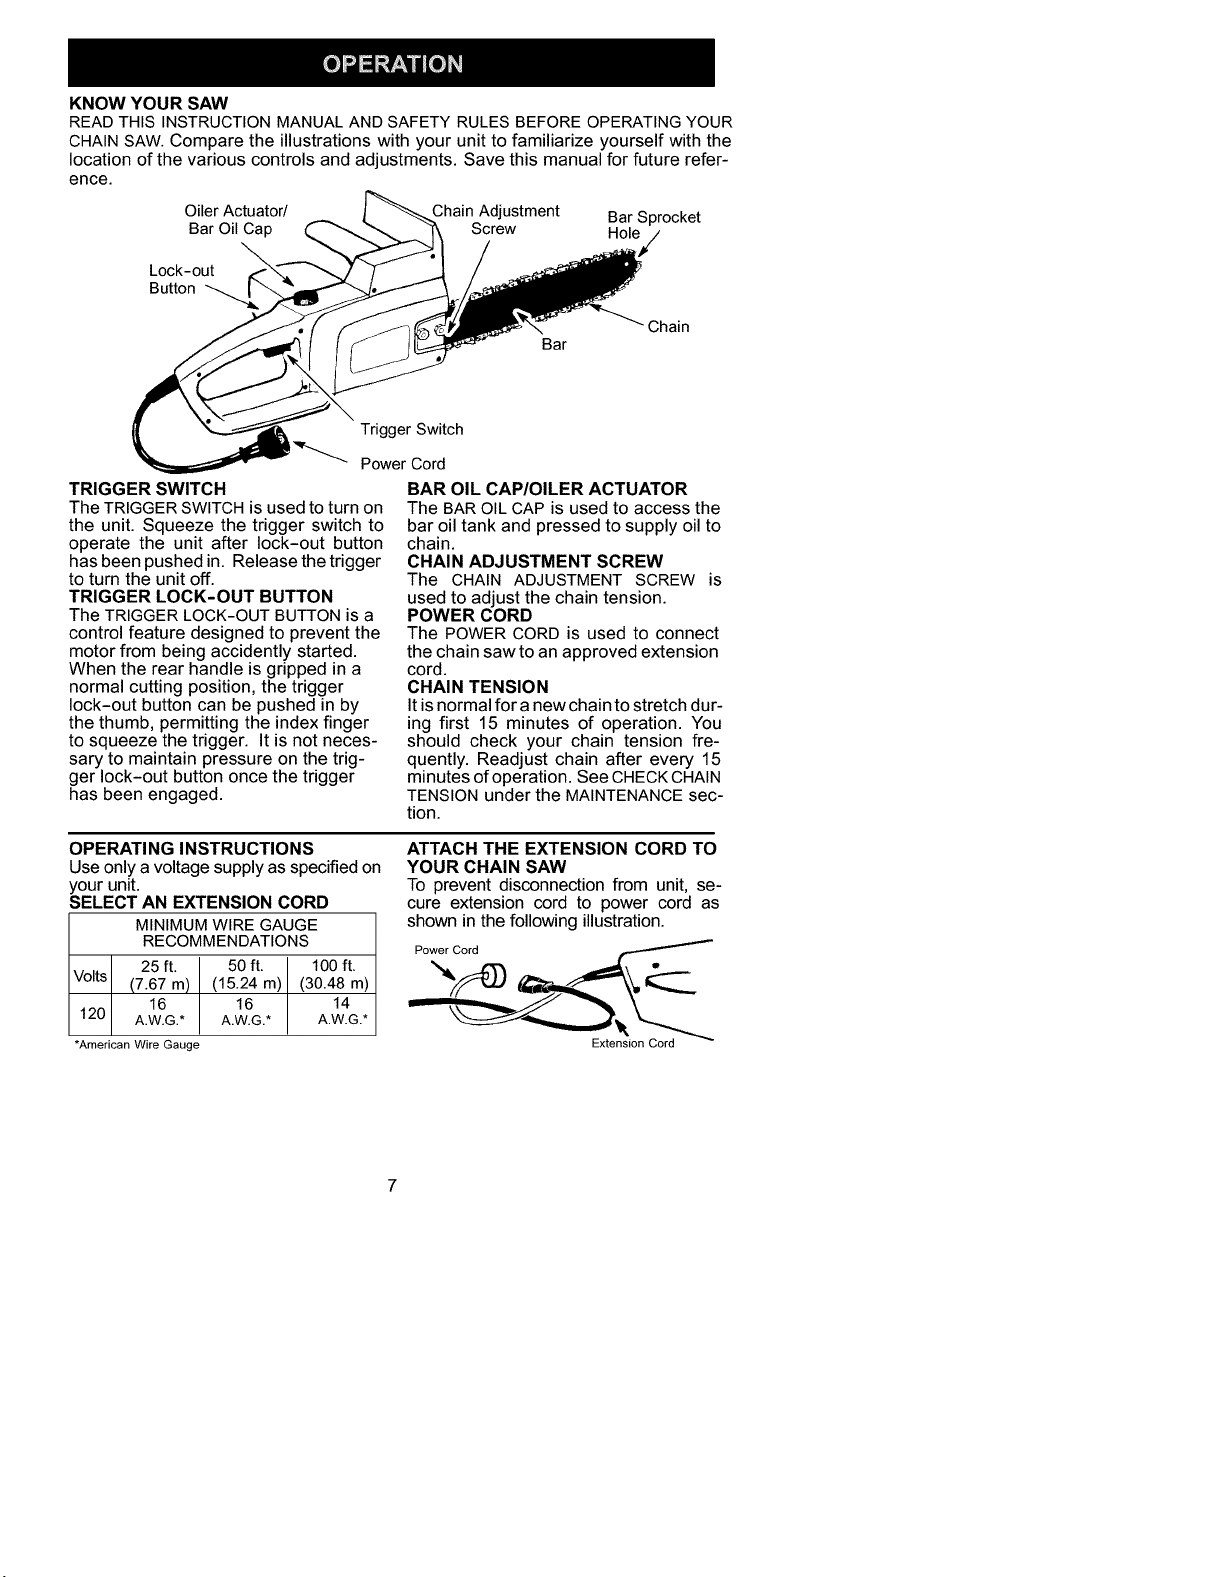
KNOW YOUR SAW
READ THIS INSTRUCTION MANUAL AND SAFETY RULES BEFORE OPERATING YOUR
CHAIN SAW. Compare the illustrations with your unit to familiarize yourself with the
location of the various controls and adjustments. Save this manual for future refer-
ence.
Oiler Actuator/ Chain Adjustment Bar Sprocket
Bar Oil Cap Screw Hole
Lock-out
Button
Chain
Bar
Trigger Switch
Power
TRIGGER SWITCH
The TRIGGER SWITCH is used to turn on
the unit. Squeeze the trigger switch to
operate the unit after lock-out button
has been pushed in. Release the trigger
to turn the unit off.
TRIGGER LOCK-OUT BUTTON
The TRIGGER LOCK-OUT BUTTON is a
control feature designed to prevent the
motor from being accidently started.
When the rear handle is gripped in a
normal cutting position, the trigger
lock-out button can be pushed in by
the thumb, permitting the index finger
to squeeze the trigger. It is not neces-
sary to maintain pressure on the trig-
ger lock-out button once the trigger
has been engaged.
Cord
BAR OIL CAP/OILER ACTUATOR
The BAROIL CAP is used to access the
bar oil tank and pressed to supply oil to
chain.
CHAIN ADJUSTMENT SCREW
The CHAIN ADJUSTMENT SCREW is
used to adjust the chain tension.
POWER CORD
The POWER CORD is used to connect
the chain saw to an approved extension
cord.
CHAIN TENSION
Itis normal for a new chain to stretch dur-
ing first 15 minutes of operation. You
should check your chain tension fre-
quently. Readjust chain after every 15
minutes of operation. See CHECK CHAIN
TENSION under the MAINTENANCE sec-
tion.
OPERATING INSTRUCTIONS
Use only a voltage supply as specified on
your unit.
SELECT AN EXTENSION CORD
Volts
120
*American Wire Gauge
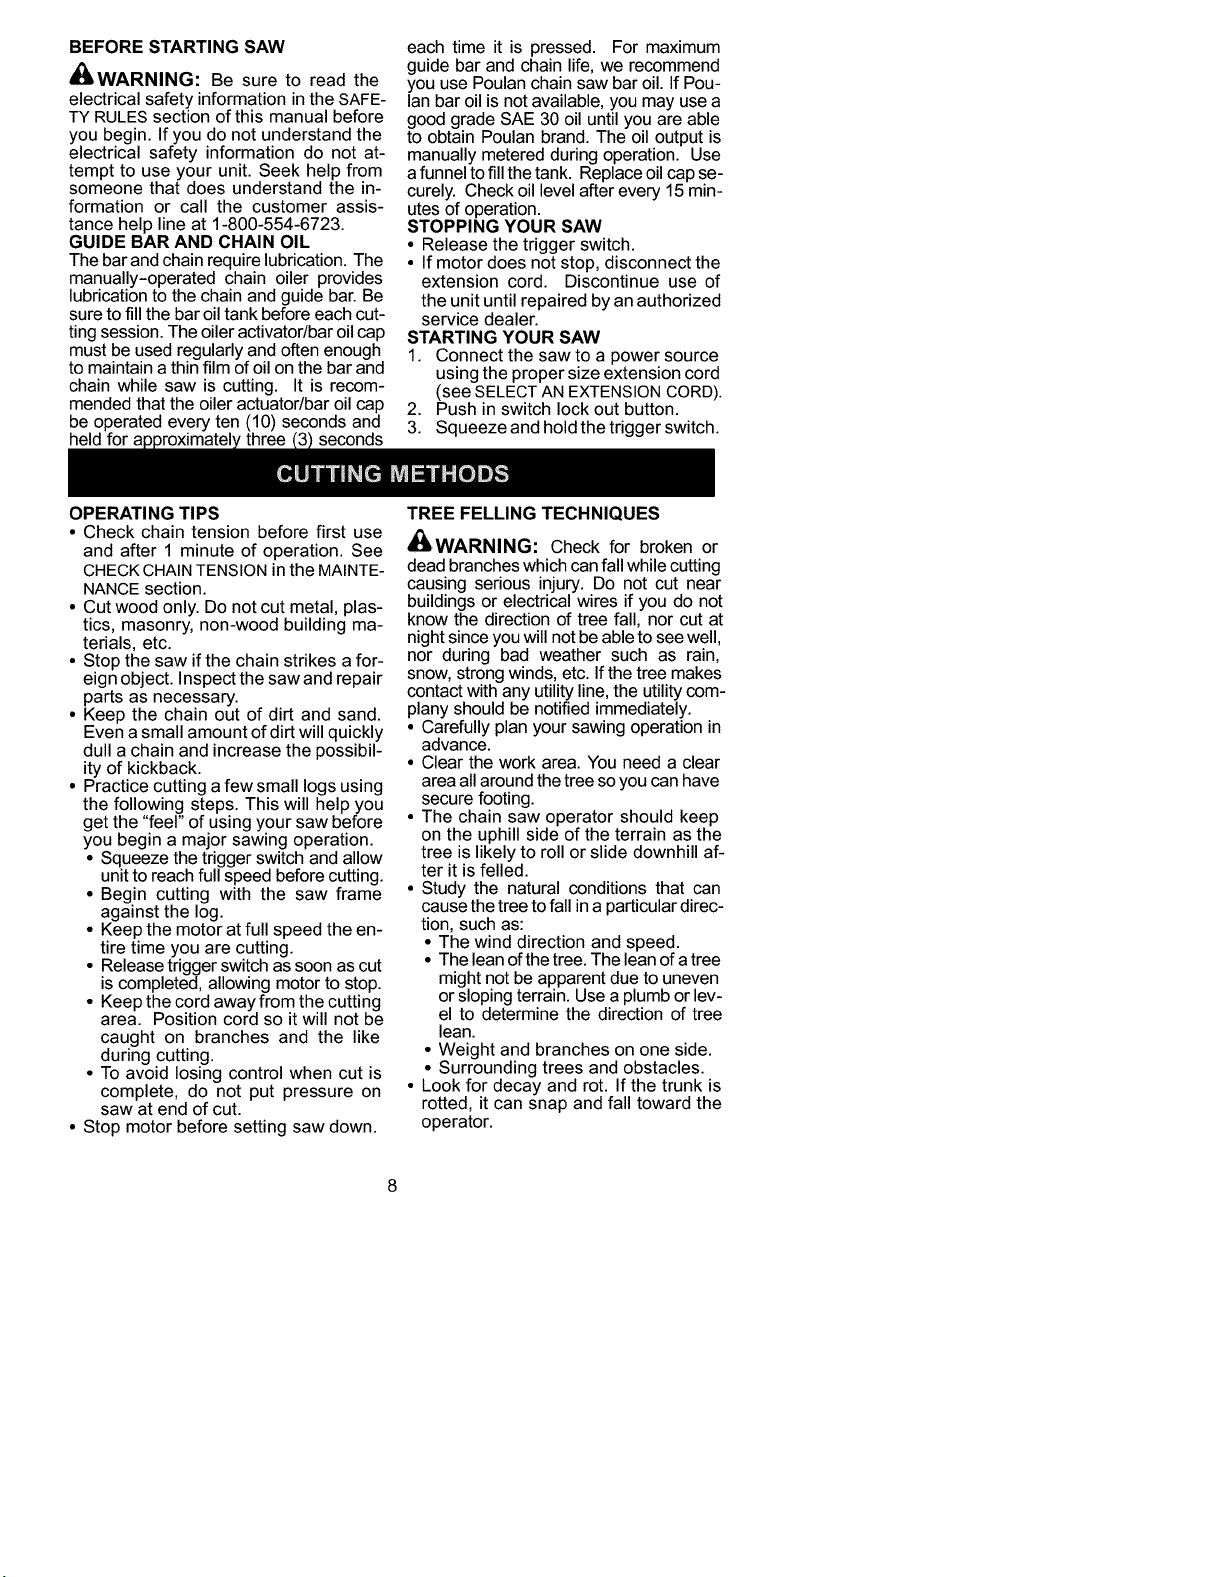
ATTACH THE EXTENSION CORD TO
YOUR CHAIN SAW
To prevent disconnection from unit, se-
cure extension cord to power cord as
MINIMUM WIRE GAUGE shown in the following illustration.
RECOMMENDATIONS
Power Cord
25 ft. 50 ft. 100ft. ___'_ .=.,,_ ____________
(7.67 m) (15.24 m) (30.48m)
16 16
A.W.G.* A.W.G.* A.W.G.* _ __1_
Extension Cord
BEFORE STARTING SAW
_WARNING: Be sure to read the
electrical safety information in the SAFE-
TY RULES section of this manual before
you begin. If you do not understand the
electrical safety information do not at-
tempt to use your unit. Seek help from
someone that does understand the in-
formation or call the customer assis-
tance help line at 1-800-554-6723.
GUIDE BAR AND CHAIN OIL
The bar and chain require lubrication. The
manually-operated chain oiler provides
lubrication to the chain and guide bar. Be
sure to fill the bar oil tank before each cut-
ting session. The oiler activator/bar oil cap
must be used regularly and often enough
to maintain a thin film of oil on the bar and
chain while saw is cutting. It is recom-
mended that the oiler actuator/bar oil cap
be operated every ten (10) seconds and
held for a seconds
each time it is pressed. For maximum
guide bar and chain life, we recommend
you use Poulan chain saw bar oil. If Pou-
lan bar oil is not available, you may use a
good grade SAE 30 oil until you are able
to obtain Poulan brand. The oil output is
manually metered during operation. Use
a funnel to fillthe tank. Replace oil cap se-
curely. Check oil level after every 15 min-
utes of operation.
STOPPING YOUR SAW
• Release the trigger switch.
• If motor does not stop, disconnect the
extension cord. Discontinue use of
the unit until repaired by an authorized
service dealer.
STARTING YOUR SAW
1. Connect the saw to a power source
using the proper size extension cord
(see SELECT AN EXTENSION CORD).
2. Push in switch lock out button.
3. Squeeze gger switch.
OPERATING TIPS
• Check chain tension before first use
and after 1 minute of operation. See
CHECK CHAINTENSION in the MAINTE-
NANCE section.
• Cut wood only. Do not cut metal, plas-
tics, masonry, non-wood building ma-
terials, etc.
• Stop the saw if the chain strikes a for-
eign object. Inspect the saw and repair
parts as necessary.
• Keep the chain out of dirt and sand.
Even a small amount of dirt will quickly
dull a chain and increase the possibil-
ity of kickback.
• Practice cutting a few small logs using
the following steps. This will help you
get the "feel" of using your saw before
you begin a major sawing operation.
• Squeeze the trigger switch and allow
unit to reach full speed before cutting.
• Begin cutting with the saw frame
against the log.
• Keep the motor at full speed the en-
tire time you are cutting.
• Release trigger switch as soon as cut
is completed, allowing motor to stop.
• Keep the cord away from the cutting
area. Position cord so it will not be
caught on branches and the like
during cutting.
• To avoid losing control when cut is
complete, do not put pressure on
saw at end of cut.
• Stop motor before setting saw down.
TREE FELLING TECHNIQUES
_WARNING: Check for broken or
dead branches which can fall while cutting
causing serious injury. Do not cut near
buildings or electrical wires if you do not
know the direction of tree fall, nor cut at
night since you will not be able to see well,
nor during bad weather such as rain,
snow, strong winds, etc. If the tree makes
contact with any utility line, the utility com-
plany should be notified immediately.
• Carefully plan your sawing operation in
advance.
• Clear the work area. You need a clear
area all around the tree soyou can have
secure footing.
• The chain saw operator should keep
on the uphill side of the terrain as the
tree is likely to roll or slide downhill af-
ter it is felled.
• Study the natural conditions that can
cause the tree to fall ina particular direc-
tion, such as:
• The wind direction and speed.
• The lean ofthe tree. The lean of a tree
might not be apparent due to uneven
or sloping terrain. Use a plumb or lev-
el to determine the direction of tree
lean.
• Weight and branches on one side.
• Surrounding trees and obstacles.
• Look for decay and rot. If the trunk is
rotted, it can snap and fall toward the
operator.
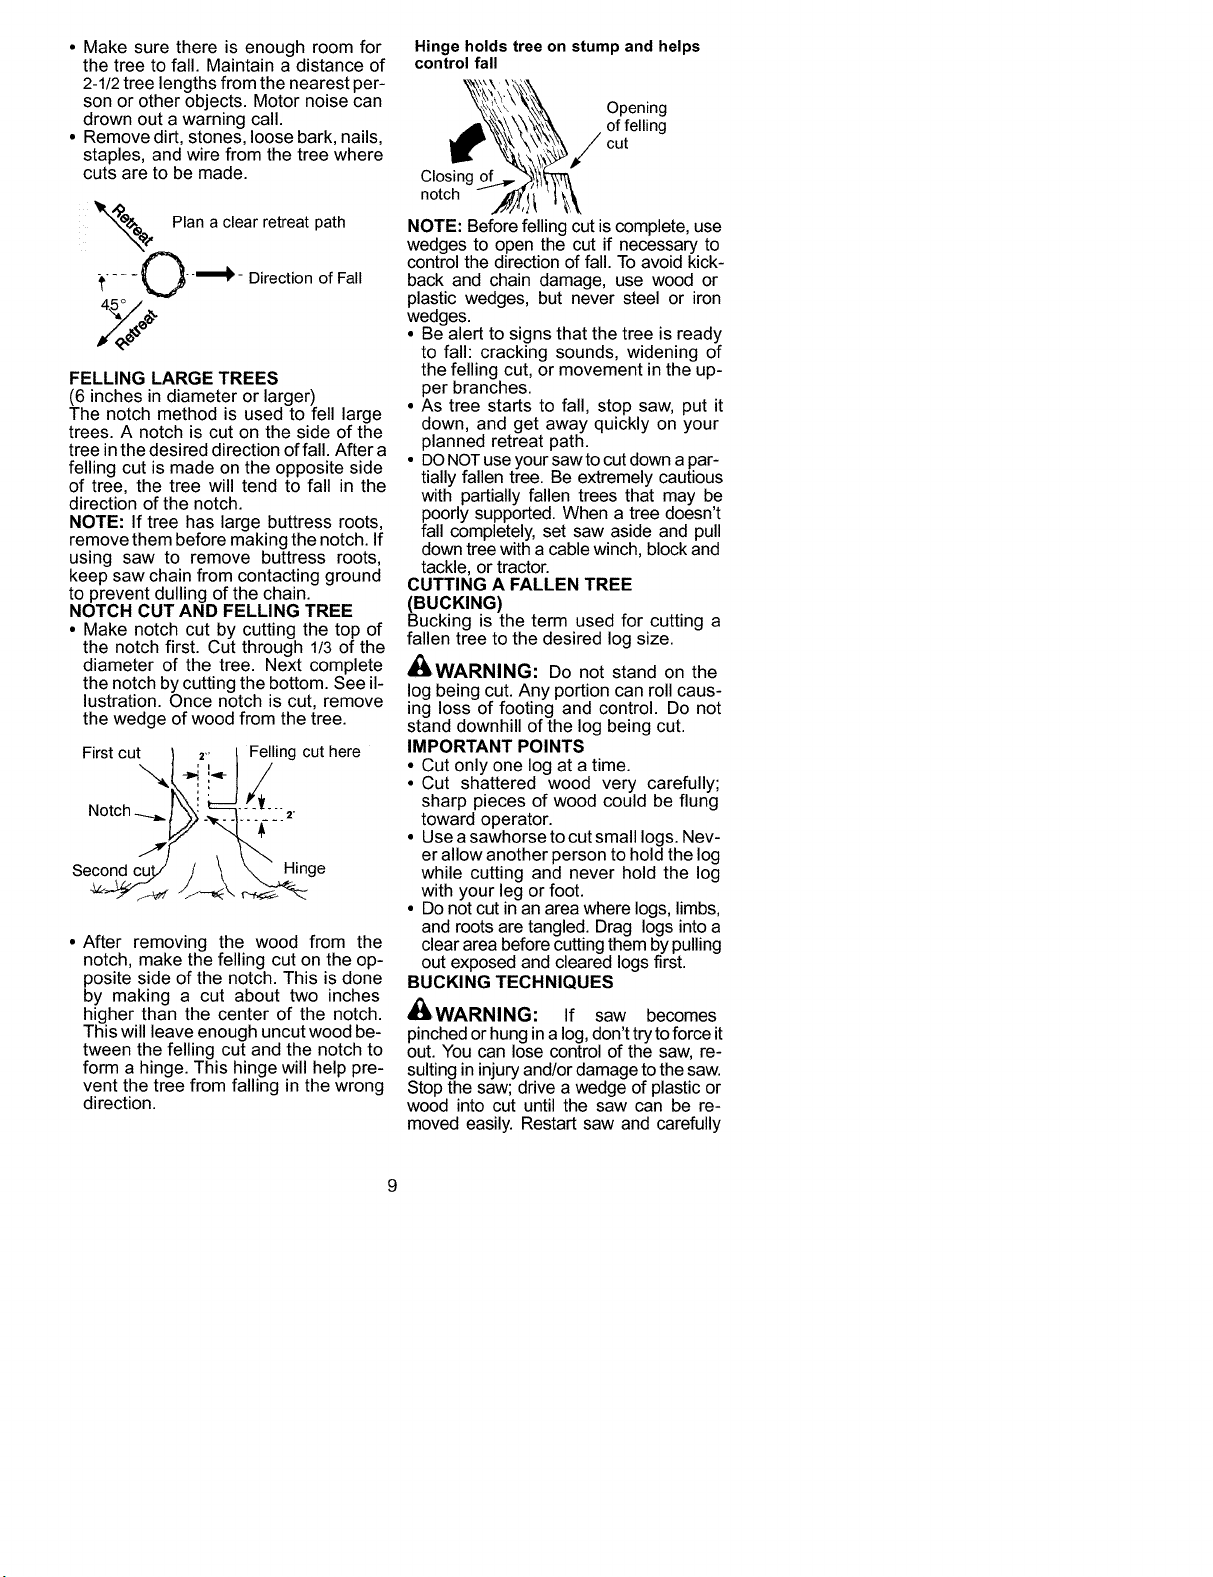
• Makesurethereisenoughroomfor
thetreetofall.Maintainadistanceof
2-1/2treelengthsfromthenearestper-
sonorotherobjects.Motornoisecan
drownoutawarningcall.
• Removedirt,stones,loosebark,nails,
staples,andwirefromthetreewhere
cutsaretobemade.
ee,,,Planaclearretreatpath
:t.... _j_-_- DirectionofFall
45 ° /
FELLING LARGE TREES
(6 inches in diameter or larger)
The notch method is used to fell large
trees. A notch is cut on the side of the
tree in the desired direction of fall. After a
felling cut is made on the opposite side
of tree, the tree will tend to fall in the
direction of the notch.
NOTE: If tree has large buttress roots,
remove them before making the notch. If
using saw to remove buttress roots,
keep saw chain from contacting ground
to prevent dulling of the chain.
NOTCH CUT AND FELLING TREE
• Make notch cut by cutting the top of
the notch first. Cut through 1/3 of the
diameter of the tree. Next complete
the notch by cutting the bottom. See il-
lustration. Once notch is cut, remove
the wedge of wood from the tree.
First cut } 2,,I
Notch -._ __..
Secondcu_r / \
Felling cut here
2o
• After removing the wood from the
notch, make the felling cut on the op-
posite side of the notch. This is done
by making a cut about two inches
higher than the center of the notch.
This will leave enough uncut wood be-
tween the felling cut and the notch to
form a hinge. This hinge will help pre-
vent the tree from falling in the wrong
direction.
Hinge holds tree on stump and helps
control fall
Opening
of felling
cut
Closing
notch
NOTE: Before felling cut is complete, use
wedges to open the cut if necessary to
control the direction of fall. To avoid kick-
back and chain damage, use wood or
plastic wedges, but never steel or iron
wedges.
• Be alert to signs that the tree is ready
to fall: cracking sounds, widening of
the felling cut, or movement in the up-
per branches.
• As tree starts to fall, stop saw, put it
down, and get away quickly on your
planned retreat path.
• DONOTuse your saw to cut down a par-
tially fallen tree. Be extremely cautious
with partially fallen trees that may be
poorly supported. When a tree doesn't
fall completely, set saw aside and pull
down tree with a cable winch, block and
tackle, or tractor.
CUTTING A FALLEN TREE
(BUCKING)
Bucking is the term used for cutting a
fallen tree to the desired log size.
_WARNING: Do not stand on the
log being cut. Any portion can roll caus-
ing loss of footing and control. Do not
stand downhill of the log being cut.
IMPORTANT POINTS
• Cut only one log at a time.
• Cut shattered wood very carefully;
sharp pieces of wood could be flung
toward operator.
• Use asawhorse to cut small logs. Nev-
er allow another person to hold the log
while cutting and never hold the log
with your leg or foot.
• Do not cut in an area where logs, limbs,
and roots are tangled. Drag logs into a
clear area before cutting them by pulling
out exposed and cleared logs first.
BUCKING TECHNIQUES
_WARNING: If saw becomes
pinched or hung in a log, don't try to force it
out. You can lose control of the saw, re-
sulting in injury and/or damage to the saw.
Stop the saw; drive a wedge of plastic or
wood into cut until the saw can be re-
moved easily. Restart saw and carefully
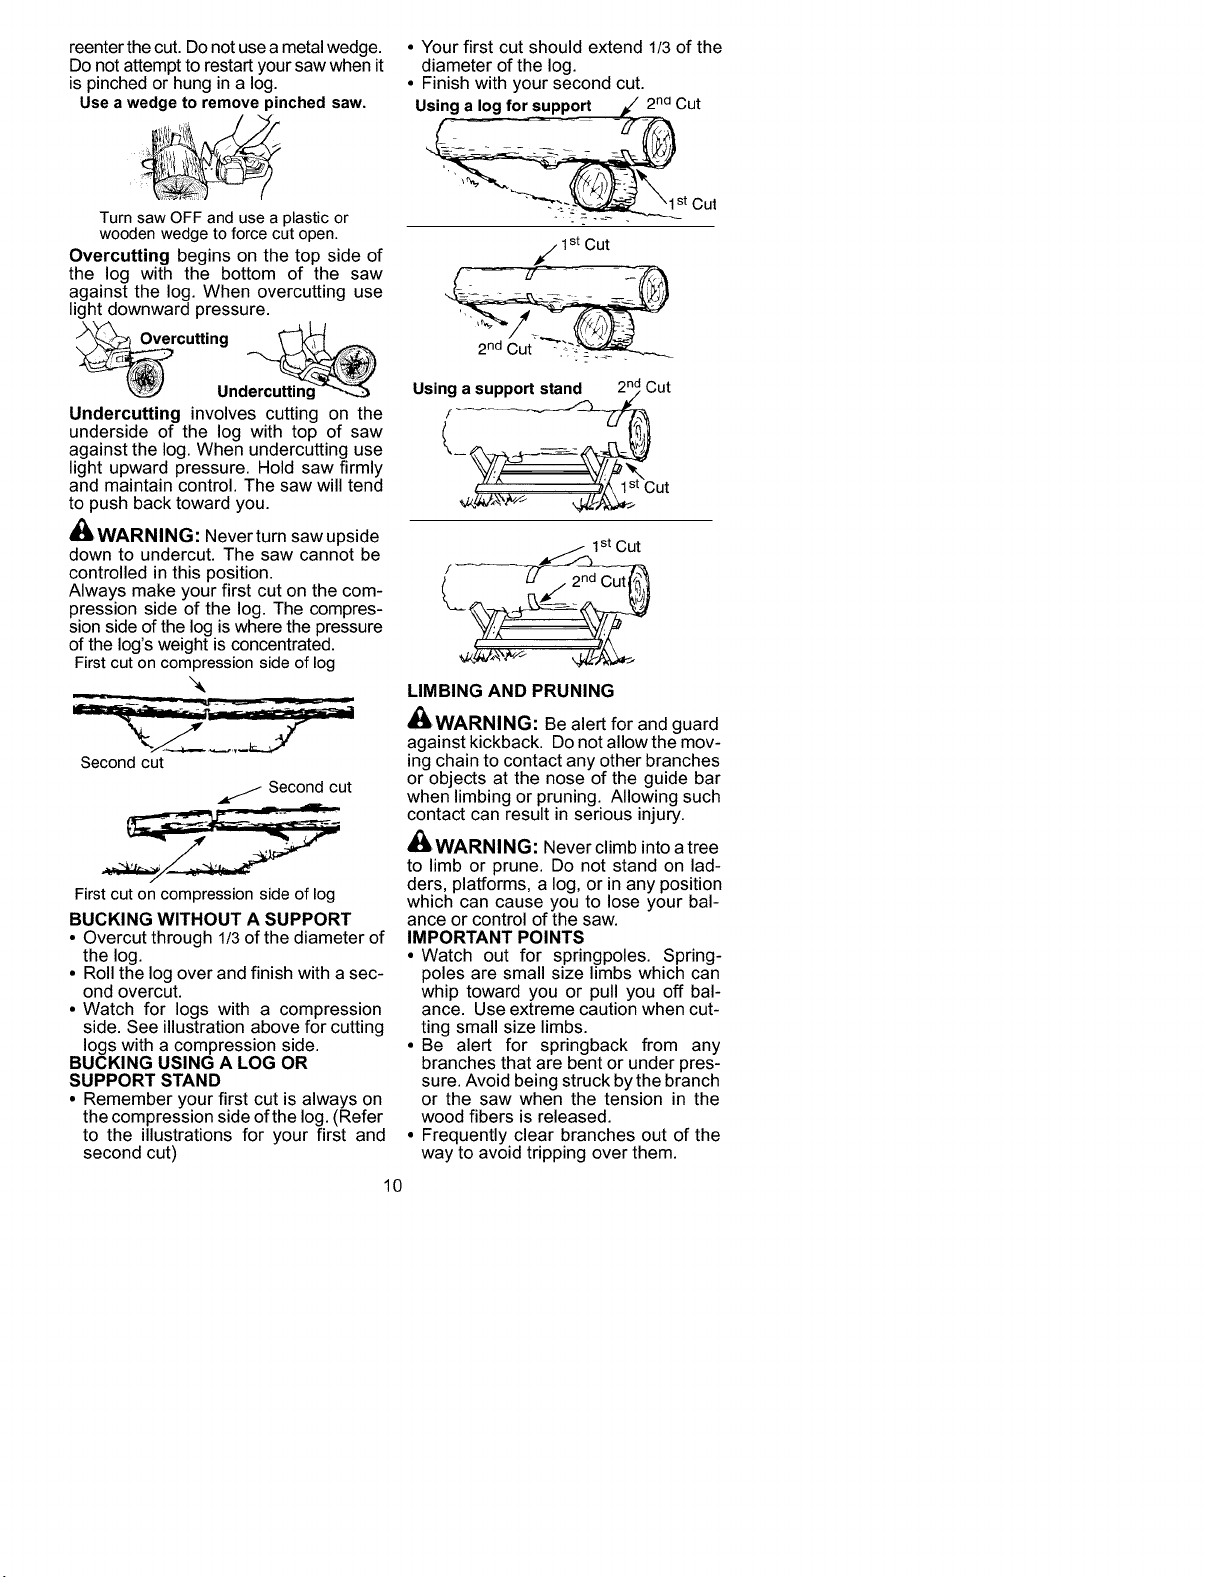
reenterthecut.Donotuseametalwedge.
Donotattempttorestartyoursawwhenit
ispinchedorhunginalog.
Useawedgetoremovepinchedsaw.
TurnsawOFFanduseaplasticor
woodenwedgetoforcecutopen.
Overcuttingbeginsonthetopsideof
thelogwiththebottomofthesaw
againstthelog.Whenovercuttinguse
lightdownwardpressure.
•Yourfirstcutshouldextend1/3ofthe
diameterofthelog.
• Finishwithyoursecondcut.
U_Cut
t Cut
Undercutting involves cutting on the
underside of the log with top of saw
against the log. When undercutting use
light upward pressure. Hold saw firmly
and maintain control. The saw will tend
to push back toward you.
_ WARNING: Never turn saw upside
down to undercut. The saw cannot be
controlled in this position.
Always make your first cut on the com-
pression side of the log. The compres-
sion side of the log is where the pressure
of the log's weight is concentrated.
First cut on compression side of log
Second cut
._.j-Second cut
First cut on compression side of log
BUCKING WITHOUT A SUPPORT
• Overcut through 1/3 of the diameter of
the log.
• Roll the log over and finish with a sec-
ond overcut.
• Watch for logs with a compression
side. See illustration above for cutting
logs with a compression side.
BUCKING USING A LOG OR
SUPPORT STAND
• Remember your first cut is always on
the compression side of the log. (Refer
to the illustrations for your first and
second cut)
10
os, cut
1st Cut
/
LIMBING AND PRUNING
_ WARNING: Be alert for and guard
against kickback. Do not allow the mov-
ing chain to contact any other branches
or objects at the nose of the guide bar
when limbing or pruning. Allowing such
contact can result in serious injury.
WARNING: Never climb into atree
to limb or prune. Do not stand on lad-
ders, platforms, a log, or in any position
which can cause you to lose your bal-
ance or control of the saw.
IMPORTANT POINTS
• Watch out for springpoles. Spring-
poles are small size limbs which can
whip toward you or pull you off bal-
ance. Use extreme caution when cut-
ting small size limbs.
• Be alert for springback from any
branches that are bent or under pres-
sure. Avoid being struck by the branch
or the saw when the tension in the
wood fibers is released.
• Frequently clear branches out of the
way to avoid tripping over them.
LIMBING
• Limbatreeonlyafteritiscutdown.
• Leavethelargerlimbsunderneaththe
felledtreetosupportthetreeasyou
work.
• Startatthebaseofthefelledtreeand
worktowardthetop,cuttingbranches
andlimbs.Removesmalllimbswith
onecut.
• Keepthetreebetweenyouandthe
chain.
• Removelargerbrancheswiththecut-
tingtechniquesdescribedinBUCKING
WITHOUTASUPPORT.
• Alwaysuseanovercuttocutsmall
andfreelyhanginglimbs.Undercut-
tingcouldcauselimbstofallandpinch
thesaw.
CUSTOMER RESPONSIBILITIES
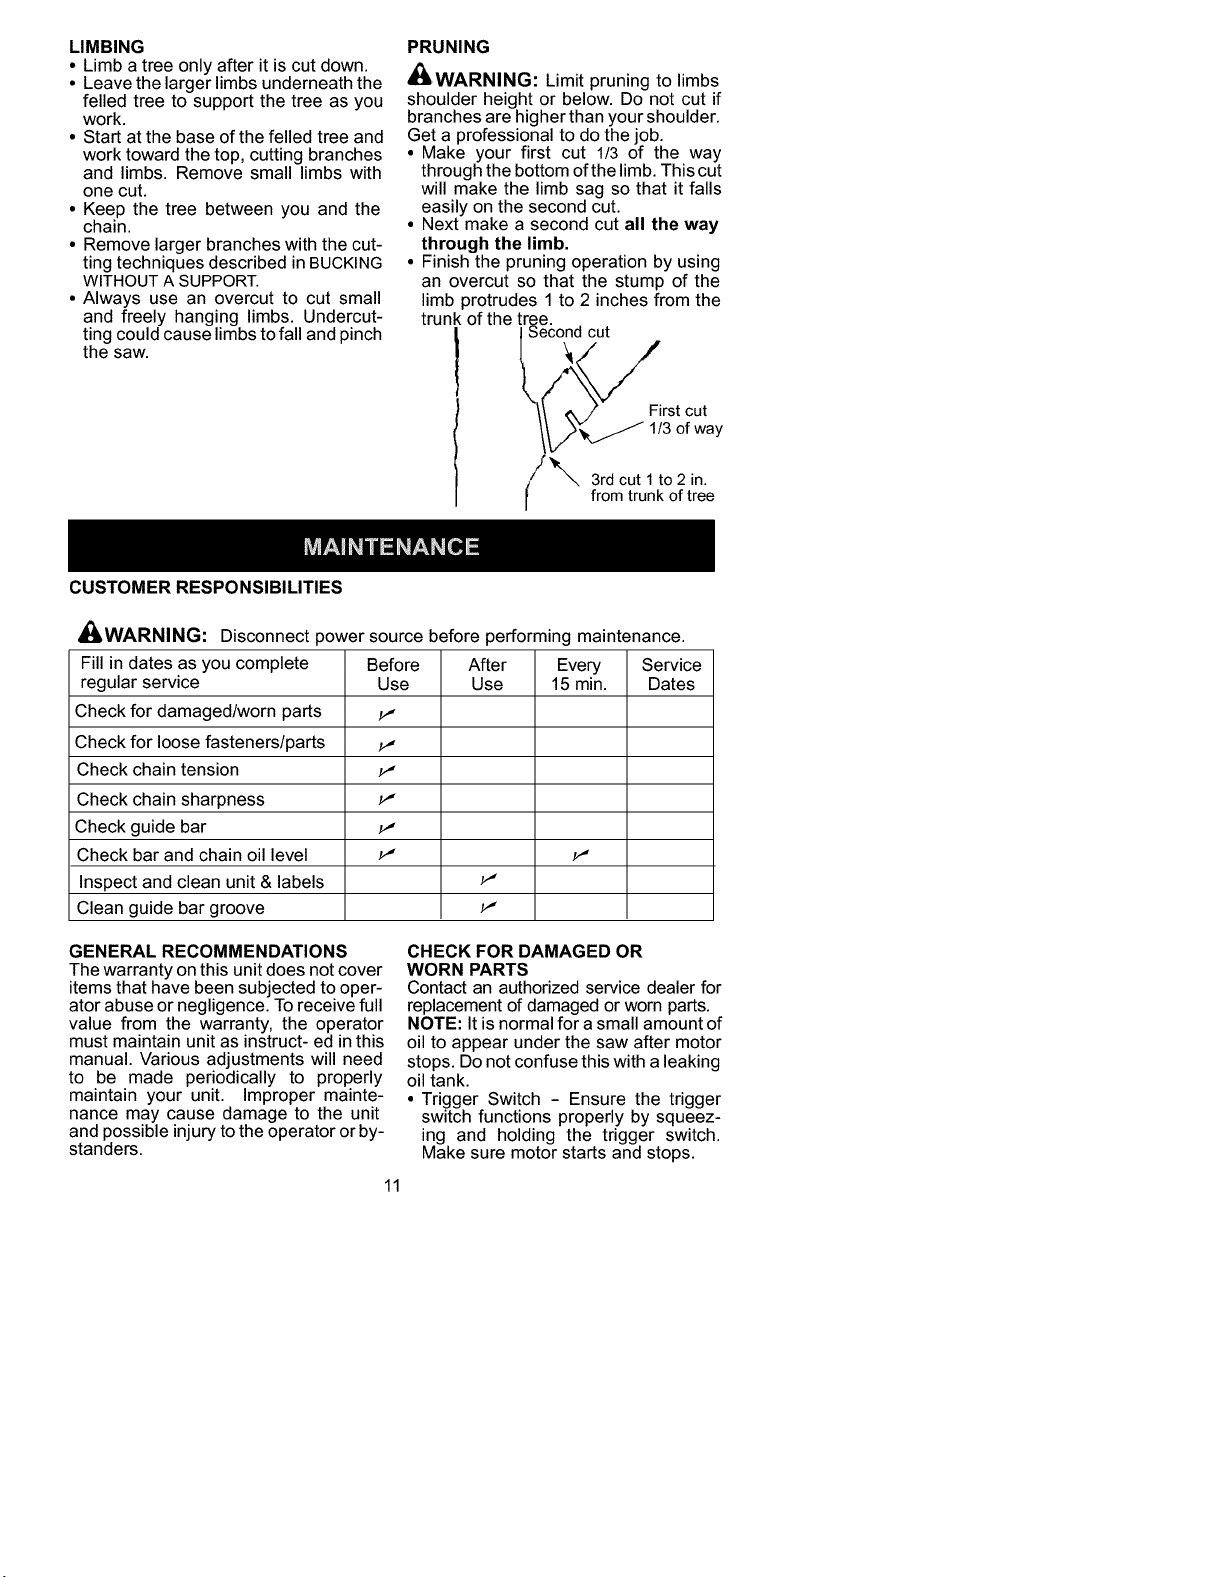
PRUNING
_WARNING: Limit pruning to limbs
shoulder height or below. Do not cut if
branches are higher than your shoulder.
Get a professional to do the job.
• Make your first cut 1/3 of the way
through the bottom of the limb. This cut
will make the limb sag so that it falls
easily on the second cut.
• Next make a second cut all the way
through the limb.
• Finish the pruning operation by using
an overcut so that the stump of the
limb protrudes 1 to 2 inches from the
trunk of the tree.
I Second cut
_/_/__First cut
[[?_./" 113of way
/f_, 3rdcut 1to 2 in.
from trunk of tree
_/LWARNING:
Fill in dates as you complete Before
regular service Use
Check for damaged/worn parts _,
Check for loose fasteners/parts _,
Check chain tension _'
Check chain sharpness _'
Check guide bar _'
Check bar and chain oil level _' _'
Inspect and clean unit & labels _'
Clean guide bar groove _'
Disconnect power source before performing maintenance.
After Every Service
Use 15 min. Dates
GENERAL RECOMMENDATIONS
The warranty on this unit does not cover
items that have been subjected to oper-
ator abuse or negligence. To receive full
value from the warranty, the operator
must maintain unit as instruct- ed in this
manual. Various adjustments will need
to be made periodically to properly
maintain your unit. Improper mainte-
nance may cause damage to the unit
and possible injury to the operator or by-
standers.
CHECK FOR DAMAGED OR
WORN PARTS
Contact an authorized service dealer for
replacement of damaged or worn parts.
NOTE: It is normal for a small amount of
oil to appear under the saw after motor
stops. Do not confuse this with a leaking
oil tank.
• Trigger Switch - Ensure the trigger
switch functions properly by squeez-
ing and holding the trigger switch.
Make sure motor starts and stops.
11
• OilTank- Discontinueuseofchain
sawifoiltankshowssignsofdamage
orleaks.
• PowerCord- Discontinueuseifchain
sawpowercordshowssignsofdam-
ageorwear.
CHECKFORLOOSE
FASTENERSANDPARTS
• BarMountingNut
• Chain
• BarAdjustingScrew
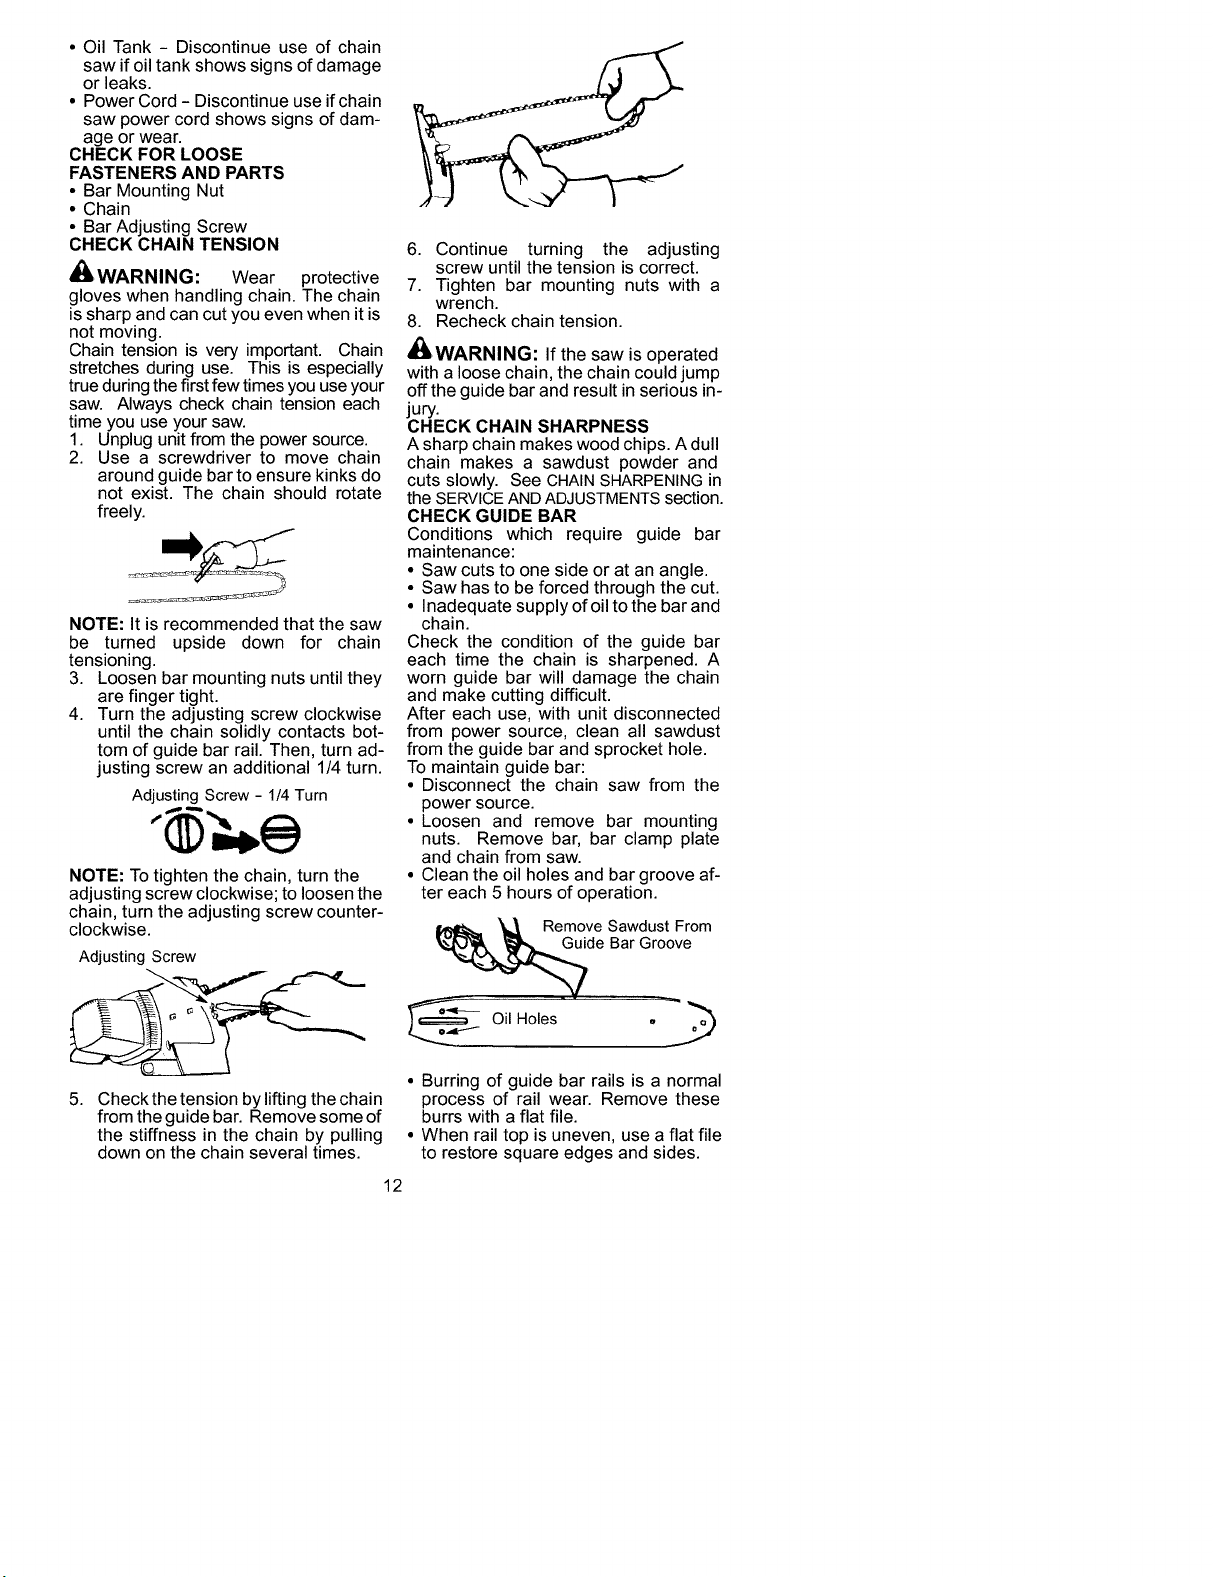
CHECKCHAINTENSION
'_ WARNING: Wear protective
gloves when handling chain. The chain
is sharp and can cut you even when it is
not moving.
Chain tension is very important. Chain
stretches during use. This is especially
true during the first few times you use your
saw. Always check chain tension each
time you use your saw.
1. Unplug unit from the power source.
2. Use a screwdriver to move chain
around guide bar to ensure kinks do
not exist. The chain should rotate
freely.
NOTE: It is recommended that the saw
be turned upside down for chain
tensioning.
3. Loosen bar mounting nuts until they
are finger tight.
4. Turn the adjusting screw clockwise
until the chain solidly contacts bot-
tom of guide bar rail. Then, turn ad-
justing screw an additional 1/4 turn.
Adjusting Screw - 1/4Turn
NOTE: To tighten the chain, turn the
adjusting screw clockwise; to loosen the
chain, turn the adjusting screw counter-
clockwise.
Adjusting Screw
5.
Check the tension by lifting the chain
from the guide bar. Remove some of
the stiffness in the chain by pulling
down on the chain several times.
12
6. Continue turning the adjusting
screw until the tension is correct.
7. Tighten bar mounting nuts with a
wrench.
8. Recheck chain tension.
_ WARNING: If the saw is operated
with a loose chain, the chain could jump
offthe guide bar and result in serious in-
jury.
CHECK CHAIN SHARPNESS
A sharp chain makes wood chips. A dull
chain makes a sawdust powder and
cuts slowly. See CHAIN SHARPENINGin
the SERVICEANDADJUSTMENTSsection.
CHECK GUIDE BAR
Conditions which require guide bar
maintenance:
• Saw cuts to one side or at an angle.
• Saw has to be forced through the cut.
• Inadequate supply of oil to the bar and
chain.
Check the condition of the guide bar
each time the chain is sharpened. A
worn guide bar will damage the chain
and make cutting difficult.
After each use, with unit disconnected
from power source, clean all sawdust
from the guide bar and sprocket hole.
To maintain guide bar:
• Disconnect the chain saw from the
power source.
• Loosen and remove bar mounting
nuts. Remove bar, bar clamp plate
and chain from saw.
• Clean the oil holes and bar groove af-
ter each 5 hours of operation.
Remove Sawdust From
e Bar Groove
Oil Holes o_"._
• Burring of guide bar rails is a normal
process of rail wear. Remove these
burrs with a flat file.
• When rail top is uneven, use a flat file
to restore square edges and sides.
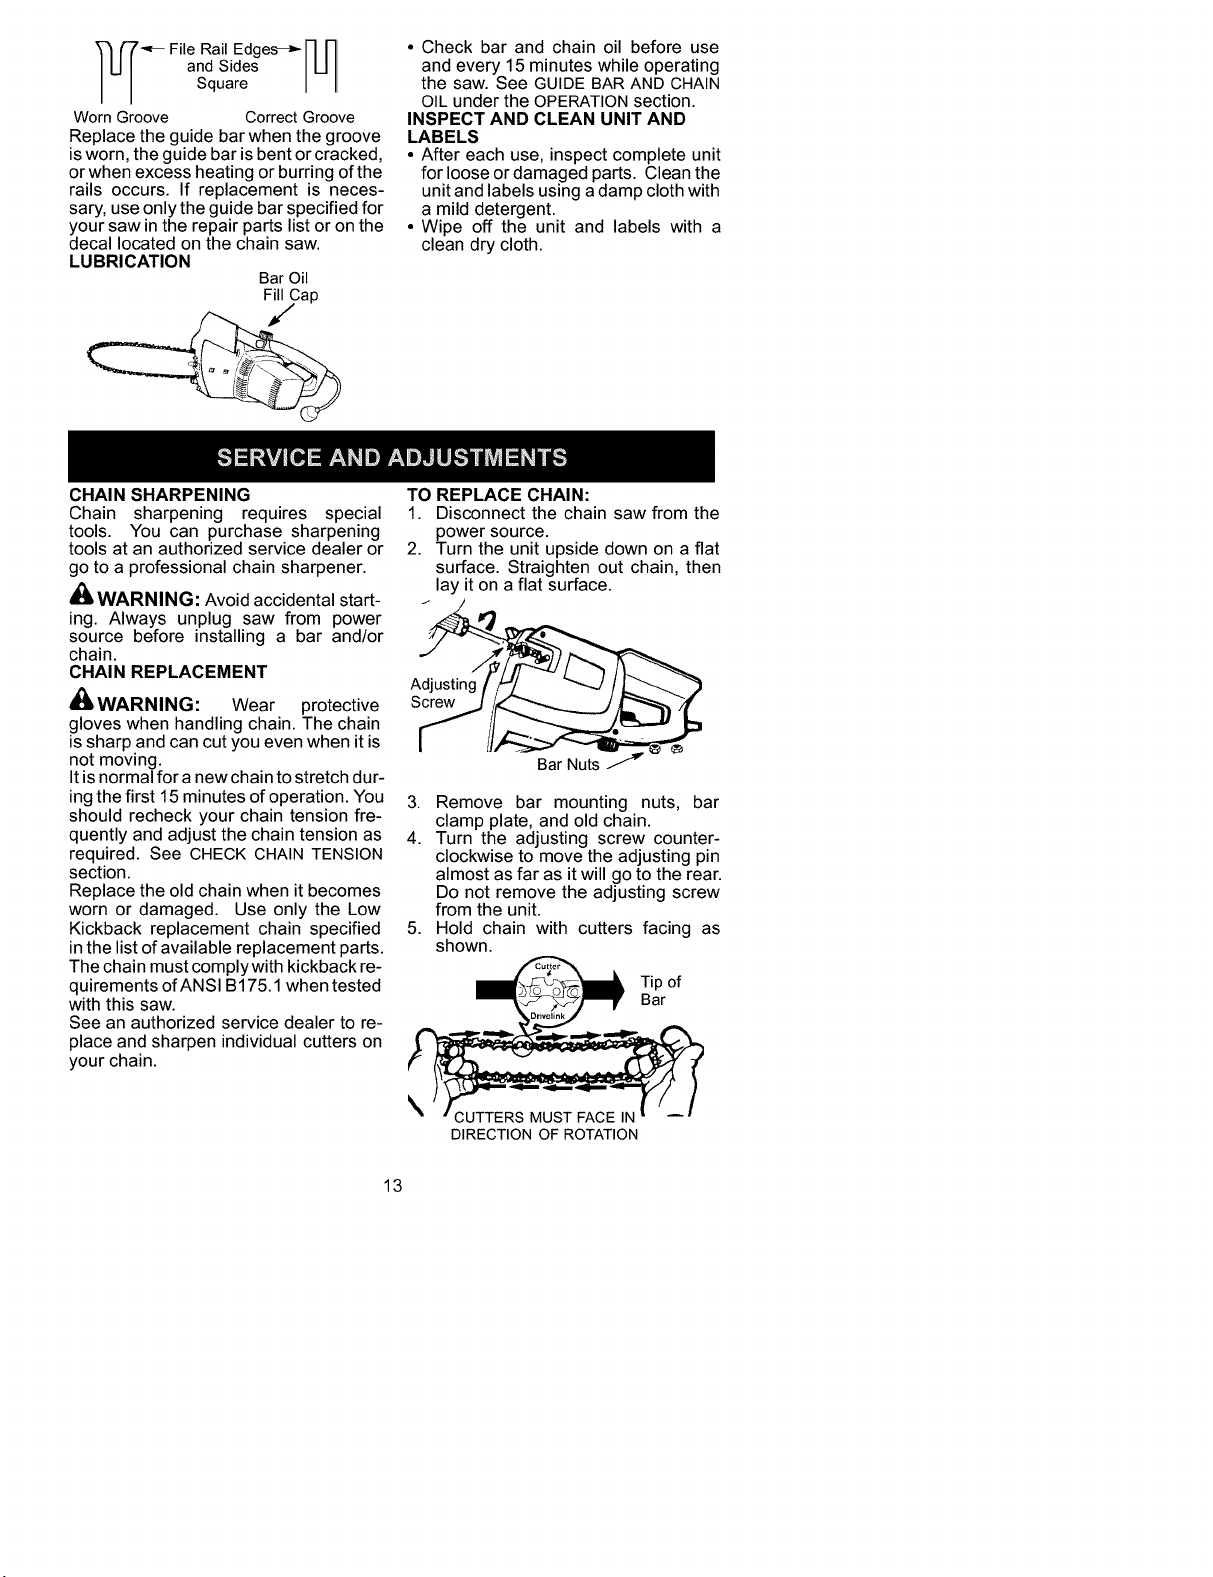
_ ('7"_--File Rail Edges_ 17[-1
I"1
and Sides I U I
Square I I
Worn Groove Correct Groove
Replace the guide bar when the groove
is worn, the guide bar is bent or cracked,
or when excess heating or burring of the
rails occurs. If replacement is neces-
sary, use only the guide bar specified for
your saw in the repair parts list or on the
decal located on the chain saw.
LUBRICATION
Bar Oil
• Check bar and chain oil before use
and every 15 minutes while operating
the saw. See GUIDE BAR AND CHAIN
OIL under the OPERATION section.
INSPECT AND CLEAN UNIT AND
LABELS
• After each use, inspect complete unit
for loose or damaged parts. Clean the
unit and labels using a damp cloth with
a mild detergent.
• Wipe off the unit and labels with a
clean dry cloth.
CHAIN SHARPENING
Chain sharpening requires special
tools. You can purchase sharpening
tools at an authorized service dealer or
go to a professional chain sharpener.
_/L WARNING: Avoid accidental start-
ing. Always unplug saw from power
source before installing a bar and/or
chain.
CHAIN REPLACEMENT
_/L WARNING: Wear protective
gloves when handling chain. The chain
is sharp and can cut you even when it is
not moving.
Itis normal for a new chain to stretch dur-
ing the first 15 minutes of operation. You
should recheck your chain tension fre-
quently and adjust the chain tension as
required. See CHECK CHAIN TENSION
section.
Replace the old chain when it becomes
worn or damaged. Use only the Low
Kickback replacement chain specified
in the list of available replacement parts.
The chain must complywith kickback re-
quirements of ANSI B175.1 when tested
with this saw.
See an authorized service dealer to re-
place and sharpen individual cutters on
your chain.
TO REPLACE CHAIN:
1. Disconnect the chain saw from the
power source.
2. Turn the unit upside down on a flat
surface. Straighten out chain, then
lay it on a flat surface.
3, Remove bar mounting nuts, bar
clamp plate, and old chain.
4. Turn the adjusting screw counter-
clockwise to move the adjusting pin
almost as far as it will go to the rear.
Do not remove the adjusting screw
from the unit.
5. Hold chain with cutters facing as
shown.
@_ ip of
Bar
DIRECTION OF ROTATION
13
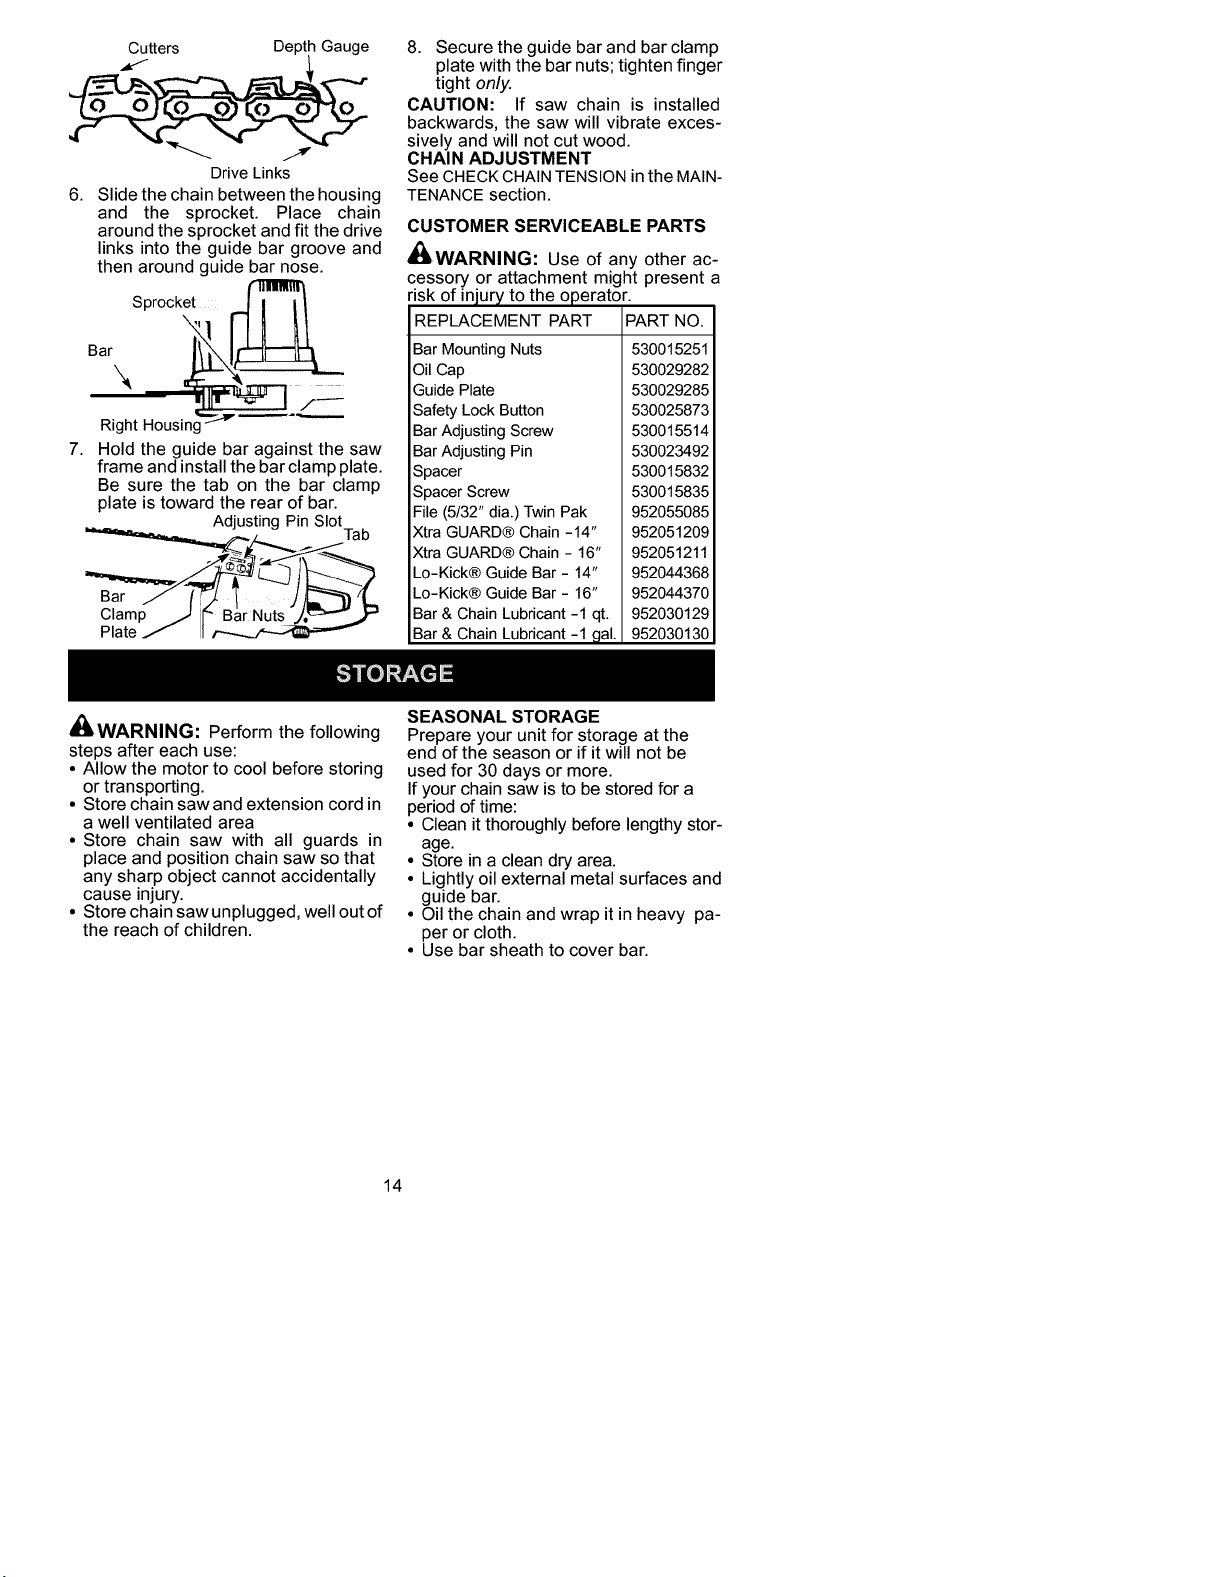
Cutters De 1Gauge
Drive Links
6. Slide the chain between the housing
and the sprocket. Place chain
around the sprocket and fit the drive
links into the guide bar groove and
then around guide bar nose.
Sprocket _J_
Bar\ .,,," ,
Right Housing "-_w
7. Hold the guide bar against the saw
frame and install the bar clamp plate.
Be sure the tab on the bar clamp
plate is toward the rear of bar.
Adjusting Pin Slot
.,'z_L Tab
Clamp J I_"BarNuts.J._'_',)"_
Plate/ I
8. Secure the guide bar and bar clamp
plate with the bar nuts; tighten finger
tight only.
CAUTION: If saw chain is installed
backwards, the saw will vibrate exces-
sively and will not cut wood.
CHAIN ADJUSTMENT
See CHECK CHAINTENSION in the MAIN-
TENANCE section.
CUSTOMER SERVICEABLE PARTS
_/LWARNING: Use of any other ac-
cessory or attachment might present a
risk of injury to the operator.
REPLACEMENT PART
Bar Mounting Nuts
Oil Cap
Guide Plate
Safety Lock Button
Bar Adjusting Screw
Bar Adjusting Pin
Spacer
Spacer Screw
File (5/32" dia.) Twin Pak
Xtra GUARD® Chain -14"
Xtra GUARD® Chain - 16"
Lo-Kick® Guide Bar - 14"
Lo-Kick® Guide Bar - 16"
Bar & Chain Lubricant -1 qt.
Bar & Chain Lubricant -1 gal.
PART NO.
530015251
530029282
530029285
530025873
530015514
530023492
530015832
530015835
952055085
952051209
952051211
952044368
952044370
952030129
952030130
_WARNING: Perform the following
steps after each use:
• Allow the motor to cool before storing
or transporting.
• Store chain saw and extension cord in
a well ventilated area
• Store chain saw with all guards in
place and position chain saw so that
any sharp object cannot accidentally
cause injury.
• Store chain saw unplugged, well out of
the reach of children.
SEASONAL STORAGE
Prepare your unit for storage at the
end of the season or if itwill not be
used for 30 days or more.
If yourchain saw isto be stored for a
period of time:
• Clean itthoroughly before lengthystor-
age.
• Store in a clean dry area.
• Lightly oil external metal surfaces and
guide bar.
• Oil the chain and wrap it in heavy pa-
per or cloth.
• Use bar sheath to cover bar.
14
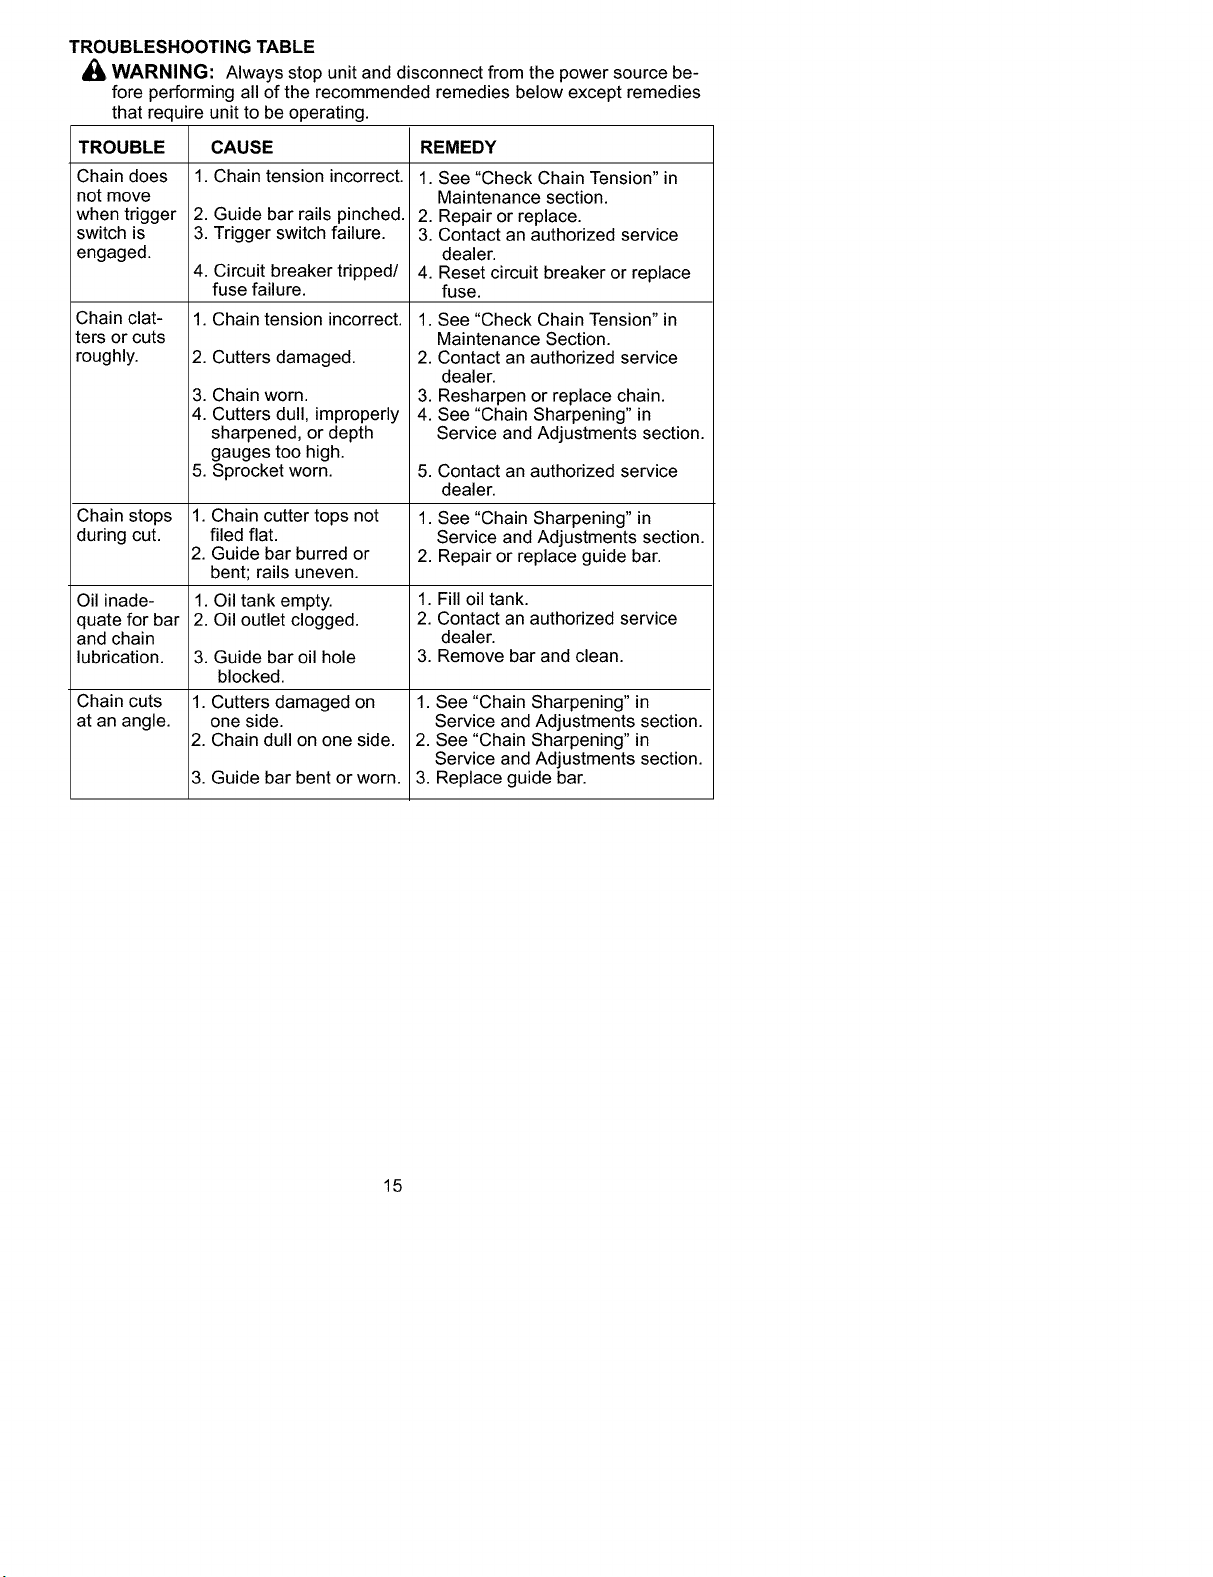
TROUBLESHOOTING TABLE
WARNING: Always stop unitand disconnect from the power source be-
fore performing all of the recommended remedies below except remedies
that require unit to be operating.
TROUBLE CAUSE REMEDY
1. Chain tension incorrect.Chain does
not move
when trigger
switch is
engaged.
Chain clat-
ters or cuts
roughly.
Chain stops
during cut.
Oil inade-
quate for bar
and chain
lubrication.
Chain cuts
at an angle.
2. Guide bar rails pinched.
3. Trigger switch failure.
4. Circuit breaker tripped/
fuse failure.
1. Chain tension incorrect.
2.
3.
4.
5.
Cutters damaged.
Chain worn.
Cutters dull, improperly
sharpened, or depth
gauges too high.
Sprocket worn.
1. Chain cutter tops not
filed flat.
2. Guide bar burred or
bent; rails uneven.
1. Oil tank empty.
2. Oil outlet clogged.
3. Guide bar oil hole
blocked.
1. Cutters damaged on
one side.
2. Chain dull on one side.
3. Guide bar bent or worn.
1. See "Check Chain Tension" in
Maintenance section.
2. Repair or replace.
3. Contact an authorized service
dealer.
4. Reset circuit breaker or replace
fuse.
1. See "Check Chain Tension" in
Maintenance Section.
2. Contact an authorized service
dealer.
3. Resharpen or replace chain.
4. See "Chain Sharpening" in
Service and Adjustments section.
5. Contact an authorized service
dealer.
1.
2.
See "Chain Sharpening" in
Service and Adjustments section.
Repair or replace guide bar.
1. Fill oil tank.
2. Contact an authorized service
dealer.
3. Remove bar and clean.
1. See "Chain Sharpening" in
Service and Adjustments section.
2. See "Chain Sharpening" in
Service and Adjustments section.
3. Replace guide bar.
15

ELECTROLUX HOME PRODUCTS,
INC., warrants to the original purchaser
that each new Poulan brand electric or
cordless product is free from defects in
material and workmanship and agrees to
repair or replace under this warranty any
defective Poulan brand electric product
within one (1) year from the original date of
purchase.
If your Poulan brand electric or cordless
product should fail within the limited war-
ranty period, return it, complete, prepaid,
with proof of purchase, to the dealer from
whom it was purchased for repair or re-
placement at the option of ELECTRO-
LUX HOME PRODUCTS, INC.
This warranty is not transferable and does
not cover damage or liability caused by
improper handling, improper mainte-
nance or the use of accessories and/or at-
tachments not specifically recommended
by ELECTROLUX HOME PRODUCTS,
INC., for this electric product. Additionally,
this warranty does not cover parts that will
wear and require replacement with rea-
sonable use during the warranty period.
This warranty does not cover pre-delivery
setup or normal adjustments explained in
the instruction manual.
THIS WARRANTY GIVES YOU SPE-
CIFIC LEGAL RIGHTS, AND YOU MAY
HAVE OTHER RIGHTS WHICH VARY
FROM STATE TO STATE.
NO CLAIMS FOR CONSEQUENTIAL
OR OTHER DAMAGES WILL BE AL-
LOWED, AND THERE ARE NO OTHER
EXPRESS WARRANTIES EXCEPT
THOSE EXPRESSLY STIPULATED
HEREIN.
SOME STATES DO NOT ALLOW LIMI-
TATIONS ON HOW LONG AN IMPLIED
WARRANTY LASTS OR THE EXCLU-
SION OR LIMITATIONS OF INCIDENTAL
OR CONSEQUENTIAL DAMAGES, SO
THE ABOVE LIMITATIONS OR EXCLU-
SION MAY NOT APPLY TO YOU.
The policy of ELECTROLUX HOME
PRODUCTS, INC., is to continuouslyim-
prove itsproducts. Therefore, ELECTRO-
LUX HOME PRODUCTS, INC., reserves
the right to change, modify, or discontinue
models, designs, specifications, and ac-
cessories of all products at any time with-
out notice or obligation to any purchaser.
16
_IADVERTENCIA: Siempre que se
use cualquier cortador el6ctrico, deben
observarse precauciones b&sicas de se-
guridad para reducir el riesgo de incendio,
choque el6ctrico, y accidentes person-
ales. Lea todas las instrucciones.
_ADVERTENClA: Siempre desco-
necte la sierra de cadena del recurso de
energfa cuando no se encuentre en uso,
antes de efectuar servicio, y al cambiar
accesorios, como Io es la cadena de la
sierra y el protector.
Debido a que las sierra de cadena son
instrumentos para cortar madera a alta
velocidad, deben observarse precau-
ciones de seguridad especiales para re-
ducir el riesgo de accidentes. El uso des-
cuidado o indebido de esta herramienta
puede causar graves heridas.
PIENSE ANTES DE PROCEDER
• Limite el uso de la sierra a aquellos
usuarios adultos que comprendan y
puedan implementar todas las pre-
cauciones, reglas de seguridad e
instrucciones de uso que se encuen-
tran en este manual.
• Vfstase de forma apropiada. Use equi-
po protector. Siempre use calzado de
seguridad con puntas de acero y suelas
anti-deslizantes; ropa ajustada al cuer-
po; guarantes gruesos de uso industrial
anti-desluzantes; protecci6n de ojos ta-
lescomo gafas de seguridad que no se
la cara; casco duro aprobado; y barrera
de sonido (tapones de ofdo u orejeras
anti-sonido) para proteger la audici6n.
Los que usan sierras de fuerza habitual-
mente deber&n hacerse revisar la audi-
ci6n freuentemente ya que el ruido de
las sierras de cadena puede dafiar los
ofdos.
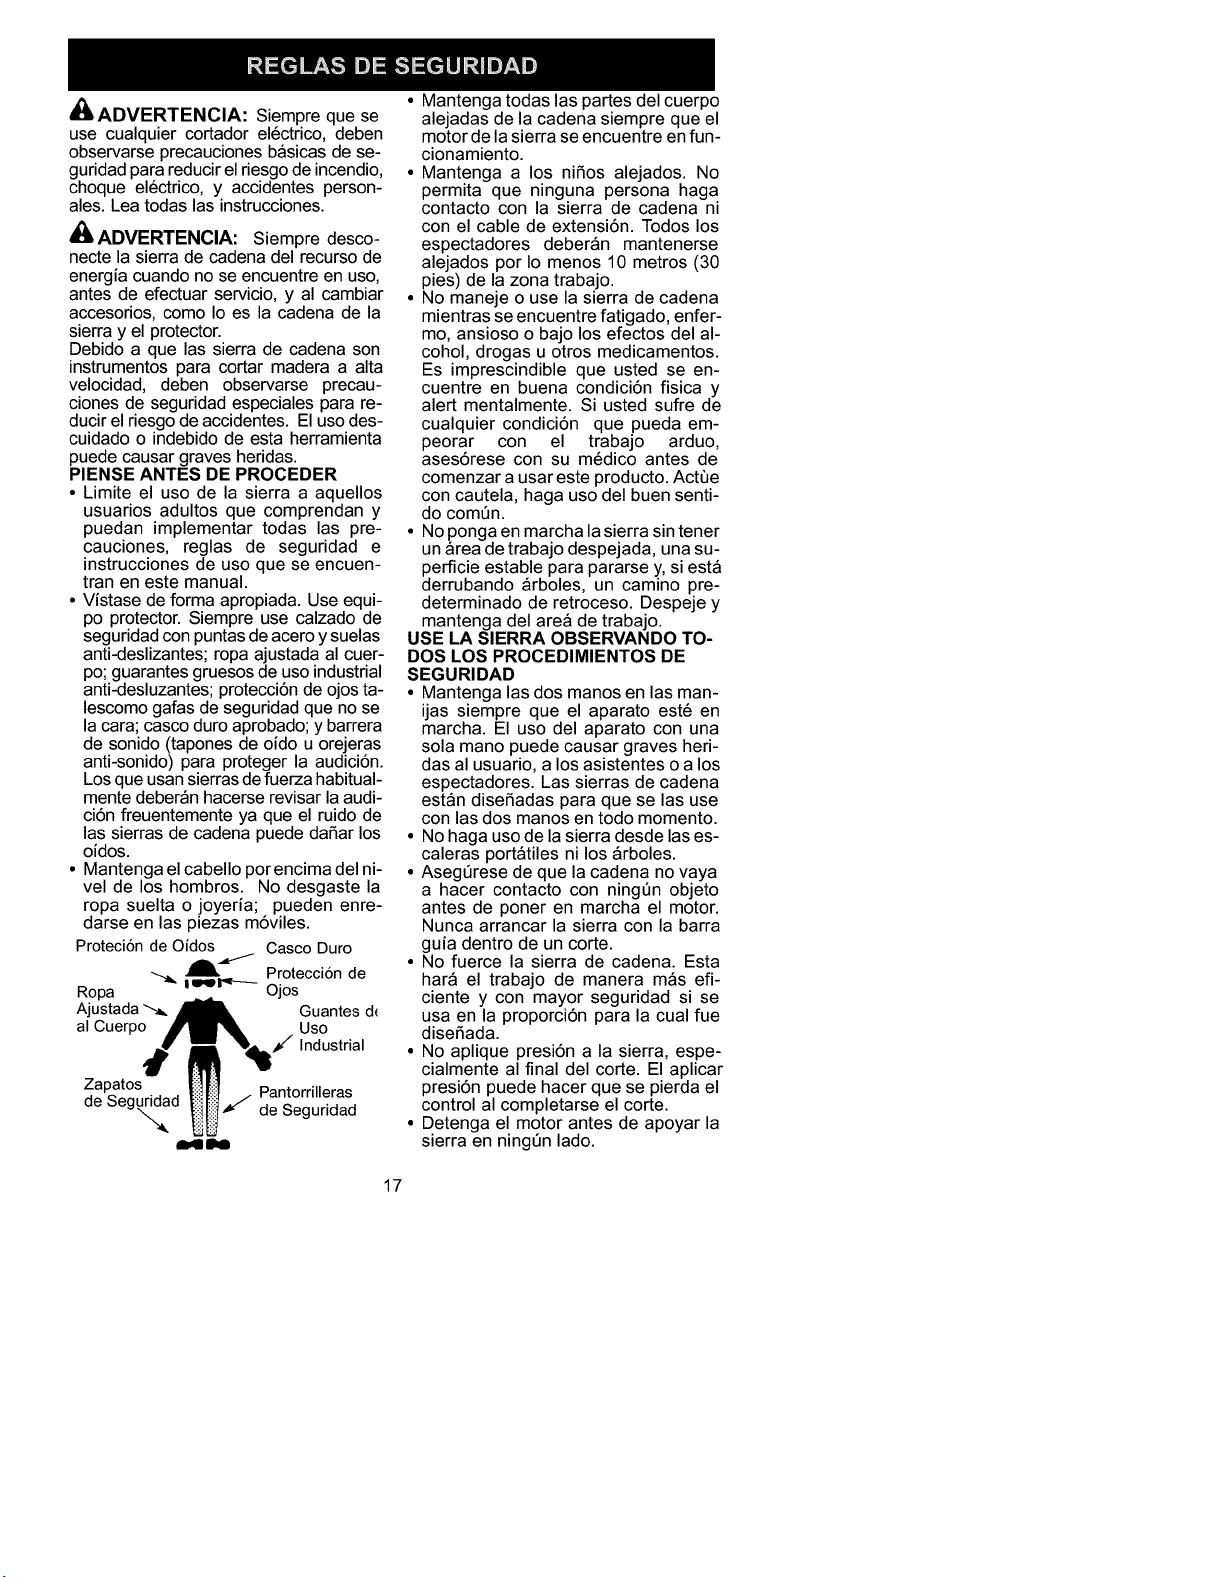
• Mantenga el cabello porencima del ni-
vel de los hombros. No desgaste la
ropa suelta o joyerfa; pueden enre-
darse en las piezas m6viles.
ProteciSnde Ofdos Casco Duro
•_. "d'1_ ProtecciSn de
Ropa iPelrq----- Ojos
Ajustada _ Guantes d(
al Cuerpo Uso
_/ Industrial
Zapatos Pantorfilleras
de Seg_d _'_ de Seguridad
• Mantenga todas las partes del cuerpo
alejadas de la cadena siempre que el
motor de la sierra se encuentre en fun-
cionamiento.
• Mantenga a los nifios alejados. No
permita que ninguna persona haga
contacto con la sierra de cadena ni
con el cable de extensi6n. Todos los
espectadores deber&n mantenerse
alejados por Io menos 10 metros (30
pies) de la zona trabajo.
• No maneje o use la sierra de cadena
mientras se encuentre fatigado, enfer-
mo, ansioso o bajo los efectos del al-
cohol, drogas u otros medicamentos.
Es imprescindible que usted se en-
cuentre en buena condici6n fisica y
alert mentalmente. Si usted sufre de
cualquier condici6n que pueda em-
peorar con el trabajo arduo,
asesSrese con su m6dico antes de
comenzar a usar este producto. Actee
con cautela, haga uso del buen senti-
do comen.
• No ponga en marcha la sierra sin tener
un &rea de trabajo despejada, una su-
perficie estable para pararse y, si est&
derrubando &rboles, un camino pre-
determinado de retroceso. Despeje y
mantenga del are& de trabajo.
USE LA SIERRA OBSERVANDO TO-
DOS LOS PROCEDIMIENTOS DE
SEGURIDAD
• Mantenga las dos manos en las man-
ijas siempre que el aparato est6 en
marcha. El uso del aparato con una
sola mano puede causar graves heri-
das al usuario, a los asistentes o a los
espectadores. Las sierras de cadena
est&n disefiadas para que se las use
con las dos manos en todo momento.
• No haga uso de la sierra desde las es-
caleras port&tiles ni los &rboles.
• Asegerese de que la cadena no vaya
a hacer contacto con ningen objeto
antes de poner en marcha el motor.
Nunca arrancar la sierra con la barra
guia dentro de un corte.
• No fuerce la sierra de cadena. Esta
har& el trabajo de manera m&s eft-
ciente y con mayor seguridad si se
usa en la proporci6n para la cual fue
disefiada.
• No aplique presi6n a la sierra, espe-
cialmente al final del corte. El aplicar
presi6n puede hacer que se pierda el
control al completarse el corte.
• Detenga el motor antes de apoyar la
sierra en ningen lado.
17
• Cuandotrasladelasierraenlamano,
h&galo6nicamenteconelmotorapa-
gado.Muevalasierradecadenapor
elmangodelanteroconelmotorapa-
gado,conlosdedosalejadosdelinter-
ruptor,conlabarraguiaylasierrade
cadenamirandohaciaatr&s.
• Uselaherramientacorrecta,cortemad-
era6nicamente.Nouselasierrade
maderaparaprop6sitosquenosean
otrosquelosprop6sitosparalacualfue
diseSada-porejemplo-nouselasier-
radecadenaparacortarpl&stico,ma-
soneria,omaterialesdeconstrucci6n
quenoseandemadera.
• Nopongaenfuncionamientolasierra
decadenasiest&daSada,incorrecta-
menteajustada,osinoest&armada
completay seguramente.Siempre
cambieelbarre,cadena,protectorde
mano,frenodecadena,oelotraspie-
zasimmediatamentesidaSado,roto,
osesaleporcualquiermotivo.
• Inspeccioneperi6dicamentelos
cablesdelasierradecadenaysi6s-
tosseencuentrandaSados,permita
queseanreparadosporundistribui-
dorautorizadodelservicio.
MANTENGA LA SIERRA EN BUE-
NAS CONDICIONES DE FUNCIONA-
MIENTO
• Lleve la sierra de cadena a un distribui-
dor autorizado del servicio para que
haga todo servicio menos aquellos pro-
cedimientos listados en la secci6n de
MANTENIMIENTOde este manual.
• Aseg6rese de que la cadena se de-
tenga por completo cuando se suelta
el interruptor en forma de gatillo.
• Mantenga las manijas secas, limpias
y libres de aceite o de mezcla de com-
bustible.
• Mantenga las tapas y los fijadores bien
fijos.
• Componentes de repuesto que no
concuerden con las piezas originales
o la remoci6n de dispositivos de segu-
ridad podria causar daSos al aparato y
accidentes al usuario o a especta-
dores. Use exclusivamente los acce-
sorios y repuestos Poulan recomen-
dados. Nunca modifique la sierra.
• Mantenga su sierra de cadena con cui-
dado.
• Mantenga la herramienta afilada y lim-
pia para mejor funcionamiento y may-
or seguridad.
• Siga todas las instrucciones para lu-
bricaci6n y cambio de accesorios.
• Desconecte la sierra de cadena del
recurso de energia cuando no se en-
cuentre en uso, antes de efectuar ser-
vicio, y al cambiar accesorios, como Io
es la cadena de la sierra y el protector.
• Inspeccione todas las piezas por si
hubiera daSos. Antes de continuar
con el uso del aparato; el protector u
otra pieza que se encuentre daSada
deberA ser inspeccionada cuidadosa-
mente para determinar si pueden
usarse de forma apropiada y para
vierificar si puede efectuar el funcio-
namiento para el cueal fue diseSada.
Inspeccione el alineamiento de las
piezas movibles, piezas movibles que
se encuentren atascadas, la ruptura
de piezas, montura y cualquier otra
condici6n que pueda afectar el uso del
aparato. El protector o cualquier otra
pieza que se encuentre daSada deb-
er& ser reparada apropiadamente o
deber& ser reemplazada por un distri-
buidor autorizado del servicio, a no ser
que se indique de otra forma en este
manual de instrucciones.
• AI no encontrarse en uso, las sierras
de cadena deber&n almacenarse en
un lugar seco, en un lugar alto o bajo
Ilave, fuera del alcance de los niSos.
• AI almacenar la sierra, use una funda
o un estuche de carga.
SEGURIDAD ELECTRICA
_i ADVERTENClA: Evite ambientes
peligrosos. Para reducir el riesgo de cho-
que el6ctrico, no use su aparato en lu-
gares h6medos o mojados ni cerca de
piscinas, de los hidromasajes, etc. No ex-
ponga el aparato a la nieve, a la Iluvia ni al
agua para evitar la posibilidad de choque
el6ctrico. No toque el enchufe del cable
de extensi6n ni el del aparato con las
manos mojadas.
• Use el tipo de voltaje que se muestra
en su aparato.
• Evite situaciones peligrosas. No use
en presencia de Ifquidos o gases in-
flamables para evitar crear incendio o
explosi6n y/o causar daSo al aparato.
• Para reducir el riesgo de choque el6c-
trico, este equipo cuenta con un en-
chufe polarizado (una aleta es m&s
ancha que la otra). Este enchufe en-
trar& solamente en una sola posici6n
en un enchufe polarizado del cable de
extensi6n. Aseg6rese de tener un
cable de extensi6n polarizado. A su
vez, el enchufe polarizado del cable
de extensi6n polarizado. A su vez, el
enchufe polarizado del cable de ex-
tensi6n entrar& en el tomacorriente de
una sola forma. Si el enchufe no entra
completamente en el tomacorriente,
18
inviertaelenchufe.Sitodavianoen-
tra,contacteunelectricistaautorizado
paraqueinstaleel tomacorriente
apropiado.Nocambieelenchufede
ningunaforma.
• Parareducirelriesgodechoqueel6ctri-
co,usecablesdeextensi6nespecifica-
mentemarcadoscomocompatibles
paraelusodeaparatosdeexterior,y
quetenganunaclasificaci6nel6ctrica
nomenorquelaclasificaci6ndelapara-
to.Elcabledeber&venirmarcadoconel
sufijo "W-A"("W" en Canada).
AsegQresedequesucabledeexten-
si6nesteenbuenascondicionesde
uso.Inspeccioneelcabledeextensi6n
dem&sbajaclasificaci6n,sepodria
crearunabajaenelvoltajeresultando
enlap6rdidadeelectricidadycalenta-
miento.Siseencuentraenduda,use
uncableconlaclasificaci6nsiguiente
dem&saltaescala.Mientrasm&sbajo
seaelcalibredelcable,m&sgrueso
ser&el cable.(VeaSELECCIONDEL
CABLEDEEXTENSIONenlasecci6n
USO).Noutilicelascablesdeextensi6n
multiples.
• Noabusedelcord6n.Nuncamaneje
elaparatoporelcabledeextensi6no
tiredelmismoparadesconectarel
aparato.
• Amarreelcabledeextensi6nacable
delaparatoparaasievitarquesedes-
conectenelunodelotro.
• Nouseelaparatosielinterruptorno
enciendeoapagaelaparatodeforma
apropiada,osielcierredesalidano
funciona.Reparacionesalinterruptor
deber&nserhechasporundistribui-
dorautorizadodelservicio.
• Mantengaelcabledeextensi6nlibrede
todoobst&culoyalejadodelusuarioen
todomomento.Mantengaelcablede
maneraquenopuedaenredarsecon
lasramas.Noexpongaelcablealcalor,
aceite,aguaobordesconfilo.
• Paraevitarlaposibilidaddechoque
el6ctrico,eviteelcontactodelcuerpo
conelconductoratierra,comoIoson
elmetal,lascercasotuberias.
• Laproteccci6ndelInterruptordeFalla
deCircuitoaTierra(GFCI)deber&ser
provistaenelenchufeocircuitoaser
usados.Vienendisponiblesrecept&cu-
losconelGFCIincluidoyestosdeb-
er&nserusadoscomomedidadesegu-
ridad.Inspeccioneloscablesde la
sierradecadenaperi6dicamenteysi
6stosseencuentrandafiados,permit
queseanreparadosporunafacilidad
deservicioautorizada.
PROTEJASECONTRALAS
RECULADAS
Ud.debeseguirtodaslasprecauciones
einstruccionesdeseguridadparaayu-
daraevitarlasreculadasylasdem&s
fuerzasquepuedencausargravesheri-
das.
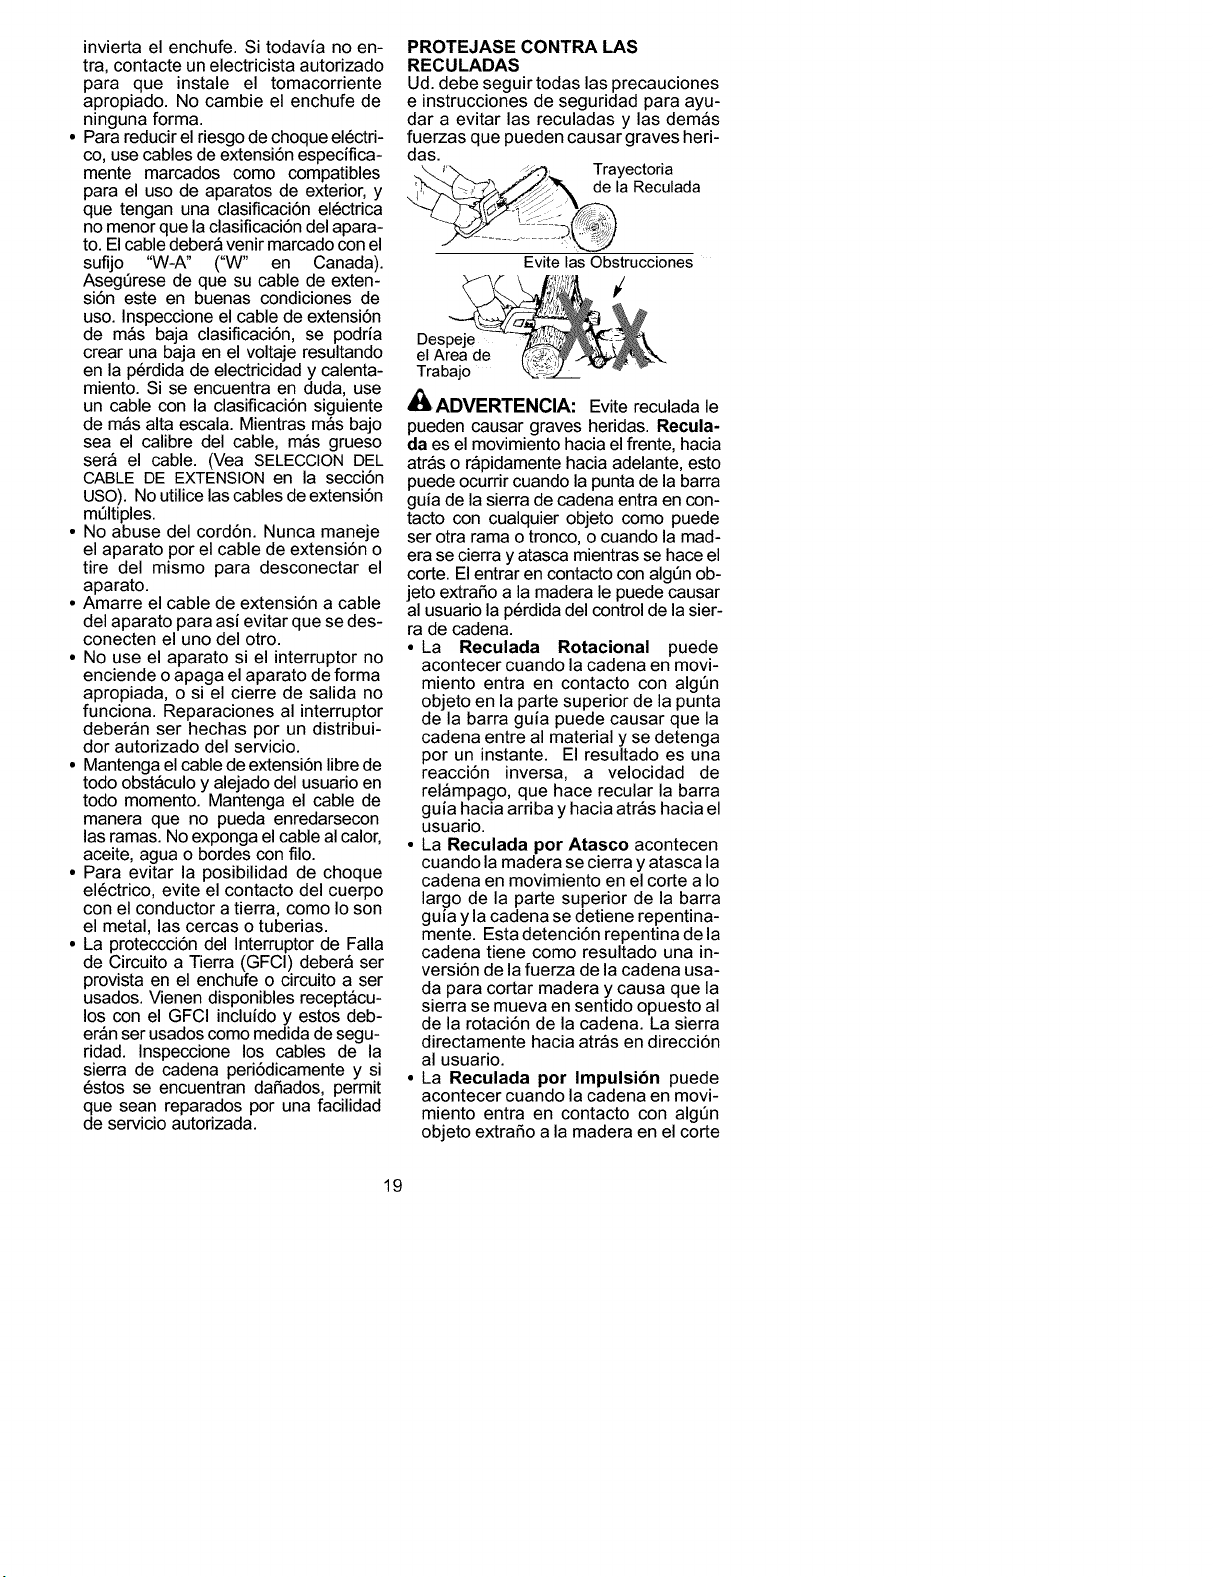
Trayectoria
delaReculada
Evitela-sObstrucciones
Des _l,:_!:_k/
el Area de _._-_:_ __.
Trabajo _t_-v _
_i ADVERTENClA: Evite reculada le
pueden ¢ausar graves heridas. Recula-
da es el movimiento hacia el frente, hacia
atr_s o r_pidamente hacia adelante, esto
puede ocurrir cuando la punta de la barra
guia de la sierra de cadena entra en con-
tacto con cualquier objeto ¢omo puede
ser otra rama o tronco, o cuando la mad-
era se ¢ierra y atasca mientras se hace el
¢orte. El entrar en ¢ontacto con alg_n ob-
jeto extrafio a la madera le puede ¢ausar
al usuario la p6rdida del control de la sier-
ra de cadena.
• La Reculada Rotacional puede
acontecer cuando la cadena en movi-
miento entra en contacto con algQn
objeto en la parte superior de la punta
de la barra guia puede causar que la
cadena entre al material y se detenga
por un instante. El resultado es una
reacci6n inversa, a velocidad de
rel&mpago, que hace recular la barra
guia hacia arriba y hacia atr&s hacia el
usuario.
• La Reculada por Atasco acontecen
cuando la madera se cierra y atasca la
cadena en movimiento en el corte a Io
largo de la parte superior de la barra
guia y la cadena se detiene repentina-
mente. Esta detenci6n repentina de la
cadena tiene como resultado una in-
versi6n de la fuerza de la cadena usa-
da para cortar madera y causa que la
sierra se mueva en sentido opuesto al
de la rotaci6n de la cadena. La sierra
directamente hacia atr&s en direcci6n
al usuario.
• La Reculada por Impulsi6n puede
acontecer cuando la cadena en movi-
miento entra en contacto con algQn
objeto extrafio a la madera en el corte
19
aIolargodelaparteinferiordelabarra
guiaylacadenasedetienerepentina-
mente.Estadetenci6nrepentinadela
cadenatiradelasierraadelanteyle-
josdelusuarioypodriahacerf&cil-
mentealusuarioperderelcontrolde
lasierra.
REDUZCALASPROBABILIDADES
DERECULADA
Lassiguientesprecaucionesdeber&nser
seguidasparaminimizarlasreculadas.
• Est6conscientedelaposibilidadde
reculada.Teniendounabuenacom-
prensi6nb&sicadela reculada,ud.
podr&reducirelelementodesorpresa
quecontribuyealosaccidentes.
• Nuncapermitaquelacadenaenmo-
vimientotoquening6nobjetoenla
puntadelabarraguia.
• Mantengael&readetrabajolibrede
obstruccionescomoporejemplootros
&rboles,ramas,piedras,cercas,to-
cones,etc.Elimineoevitetodaob-
strucci6nescompporejemplootros
&rboles,ramas,piedras,cercas,to-
cones,etc.Elimineoevitetodaob-
strucci6nquelacadenapuedatocar
mientrasest&cortando.
• AIcortarunarama,nodejelabarra
guiaentrarencontactoconotrarama
ootrosobjetosalrededor.
• Mantengalasierraafiladayconlaten-
si6ncorrecta.Lascadenasconpoco
fileoflojasincrementanla probabili-
daddereculada.Sigalasinstruc-
cionesdelfabricanteparaafilaryefec-
tuarmantenimientode la cadena.
Verifiquelatensi6naintervalosregu-
laresconelmotorparado,nuncaen
marcha.Aseg6resedequelastuer-
casdelafrenodecadenaest6npara-
do,nuncaenmarcha.Aseg6resede
quelastuercasdelafrenodecadena
est6nejustadasfirmemente.
• Empieceyefect6elatotalidaddecada
corteconelaceleradorafondo.Silaca-
denaseest&moviendoaunavelocidad
menorquelam&xima,haym&sproba-
bilidaddequelasierrarecule.
• Usecuidadoextremoalentrardenue-
voenuncorteyaempezado.
• Nointentehacercortesempezando
conlapuntadelabarra(cortesdetala-
dro).
• Tengacuidadocontroncosquese
desplazanyconlasdem&sfuerzas
quepodriancerraruncorteyapretar
lacadenaobiencaersobreella.
• UselaBarraGuiaReducidoradeRe-
culadasylaCadenaMinimizadorade
Reculadasrecomendadasparasu
sierra.
Evite la Reculada por Presibn:
• Mant6ngase siempre al tanto de toda
situaci6n u obstrucci6n que pueda
apretar la cadena en la parte superior
de la barra o detener la cadena de cu-
alquier forma.
• No corte m_s de un tronco a la vez.
• AI seccionar troncos con corte ascen-
diente, no tuerza la sierra al sacar la
varra del corte.
Evite la Impulsibn:
• Siempre empiece a cortar con el mo-
tor acelerado a fondo y la caja de la
sierra apoyada en el madera.
• Use cuSas de pl&stico o de madera, no
de metal para mantener abierto elcorte.
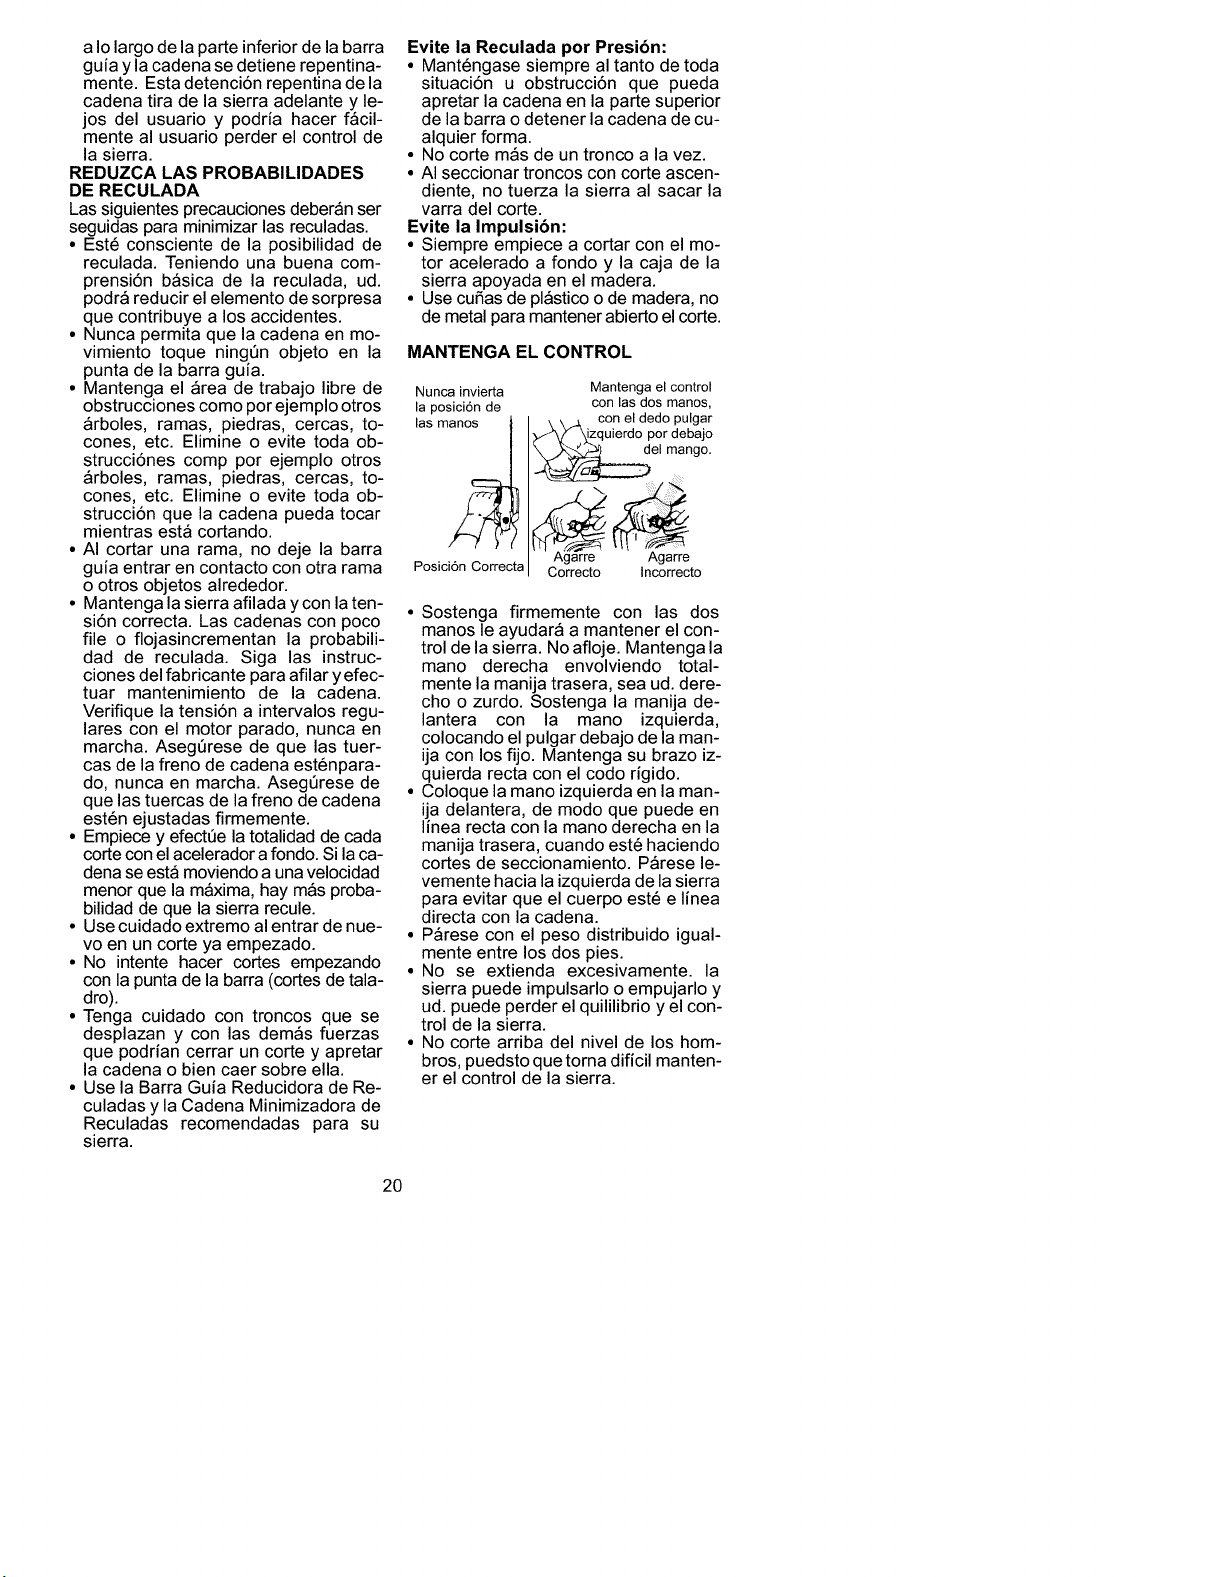
MANTENGA EL CONTROL
Nunca invierta
la posici6n de
las m_
Posici6n Correcta
Mantenga el control
con las dos manos,
con el dedo pulgar
uierdo por debajo
el mango.
g_arre _ Agarre
Correcto Incorrecto
• Sostenga firmemente con las dos
manos le ayudar& a mantener el con-
trol de la sierra. No afloje. Mantenga la
mano derecha envolviendo total-
mente la manija trasera, sea ud. dere-
cho o zurdo. Sostenga la manija de-
lantera con la mano izquierda,
colocando el pulgar debajo de la man-
ija con los fijo. Mantenga su brazo iz-
quierda recta con el codo rigido.
• Coloque la mano izquierda en la man-
ija delantera, de modo que puede en
linea recta con la mano derecha en la
manija trasera, cuando est6 haciendo
cortes de seccionamiento. P&rese le-
vemente hacia la izquierda de la sierra
para evitar que el cuerpo est6 e linea
directa con la cadena.
• P&rese con el peso distribuido igual-
mente entre los dos pies.
• No se extienda excesivamente, la
sierra puede impulsarlo o empujarlo y
ud. puede perder el quililibrio y el con-
trol de la sierra.
• No corte arriba del nivel de los hom-
bros, puedsto que torna dificil manten-
er el control de la sierra.
20
DISPOSITIVIOS DE SEGURIDAD
CONTRA LAS RECULADAS
_/LADVERTENCIA: Los siguientes
dispositivos han sido incluidos en la
sierra para ayudar a reducir el riesgo de
reculadas; sin embargo, tales imple-
mentos no puedn eliminar totalmente
esta reacci6n peligrosa. No se confie
exclusivamente en los dispositivos de
seguridad, ud. debe seguir todas las
precauciones einstrucciones de seguri-
dad para ayudar a evitar las reculadas y
las dem&s fuerzad qaue pueden causar
graves heridas.
• Protector de Mano Delantera, disefia-
do para reducir la probabilidad que su
mano izquierda entre en contacto con
la cadena, si la mano se desprende de
la manija delantera.
• La posici6n de las manijas delantera y
trasera, disefiadas con distancia entre
las manijas y "e linea" la una con la otra.
La separaci6n y la colocaci6n en linea
que este disefio provee se combinan
para dar equilibrio y resistencia para
controlar la propulsi6n de la sierra hacia
el usuario si acontece una reculada.
• Barra Guia Reducidora de Recula-
das, disefiada con punta de radio pe-
quefio que reduce el tamafio de la
zona de peligro en la punta de la barra.
Las barras guias reducidoras de recu-
ladas son aquellas que han demostra-
do que reducen significativamente la
cantidad y la seriedad de las recula-
das cuando han sido examinadas de
acuerdo con los requisitos de seguri-
dad para las sierras de cadena a ga-
solina establecidos por el Patr6n
ANSI (American National Standards
Institute, Inc.) B175.1.
_o?a de
Punta de Radio
Gaande Barra
Gufa
Puntade Radio
Pequeflo Barra
Gufa
J_Zona de
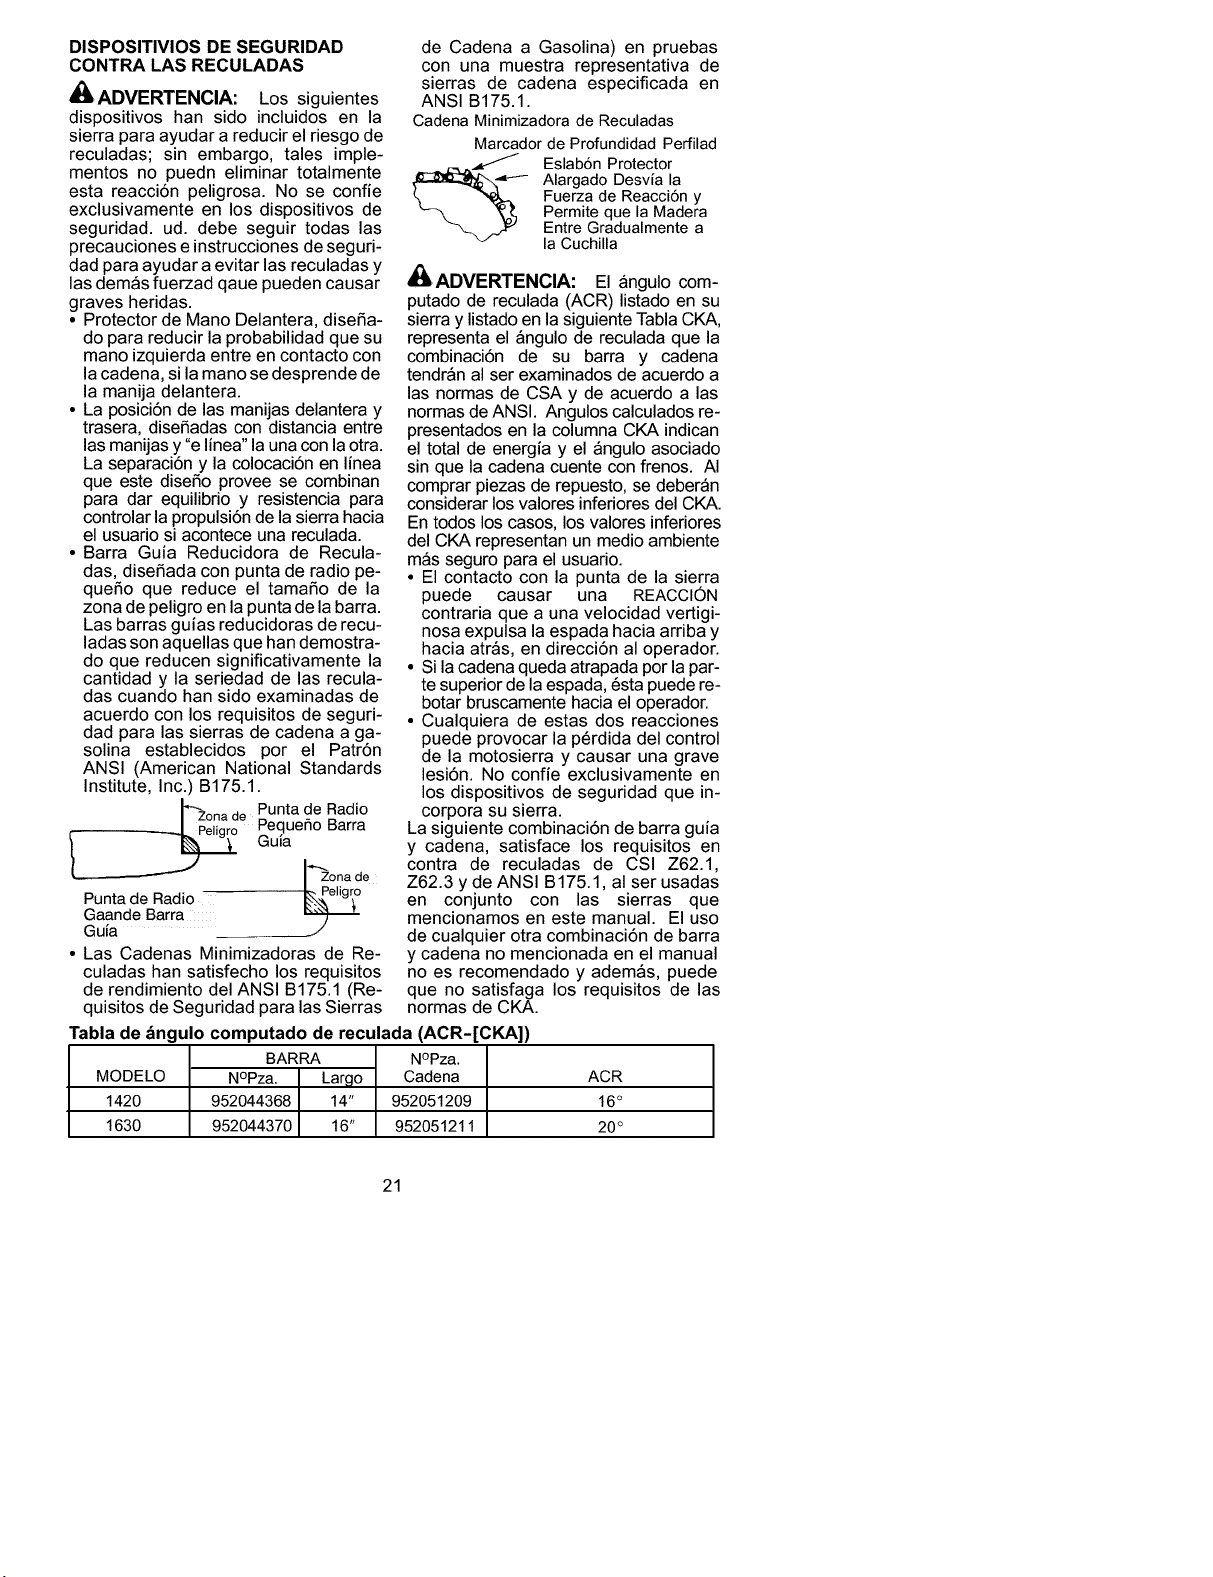
• Las Cadenas Minimizadoras de Re-
culadas han satisfecho los requisitos
de rendimiento del ANSI B175.1 (Re-
quisitos de Seguridad para las Sierras
Tabla de &ngulo computado de reculada (ACR-[CKA])
BARRA NOpza.
MODELO NOpza. Largo Cadena
1420 952044368 14" 952051209
1630 952044370 16" 952051211
de Cadena a Gasolina) en pruebas
con una muestra representativa de
sierras de cadena especificada en
ANSI B175.1.
Cadena Minimizadora de Reculadas
Marcador de Profundidad Perfilad
__4-_ Eslabdn Protector
Alargado Desvia la
Fuerza de Reacci6n y
Permite que la Madera
Entre Gradualmente a
la Cuchilla
_ADVERTENCIA: El &ngulo com-
putado de reculada (ACR) listado en su
sierra y listado en la siguiente Tabla CKA,
representa el &ngulo de reculada que la
combinaci6n de su barra y cadena
tendr&n al ser examinados de acuerdo a
las normas de CSA y de acuerdo alas
normas de ANSI. Angulos calculados re-
presentados en la columna CKA indican
el total de energia y el &ngulo asociado
sin que la cadena cuente con frenos. AI
comprar piezas de repuesto, se deber&n
considerar los valores inferiores del CKA.
En todos los casos, los valores inferiores
del CKA representan un medio ambiente
m&s seguro para el usuario.
• El contacto con la punta de la sierra
puede causar una REACCI6N
contraria que a una velocidad vertigi-
nosa expulsa la espada hacia arriba y
hacia atr&s, en direcci6n al operador.
• Si la cadena queda atrapada por la par-
te superior de la espada, @stapuede re-
botar bruscamente hacia el operador.
• Cualquiera de estas dos reacciones
puede provocar la p@rdidadel control
de la motosierra y causar una grave
lesi6n. No confie exclusivamente en
los dispositivos de seguridad que in-
corpora su sierra.
La siguiente combinaci6n de barra guia
y cadena, satisface los requisitos en
contra de reculadas de CSI Z62.1,
Z62.3 y de ANSI B175.1, al ser usadas
en conjunto con las sierras que
mencionamos en este manual. El uso
de cualquier otra combinaci6n de barra
y cadena no mencionada en el manual
no es recomendado y ademAs, puede
que no satisfaga los requisitos de las
normas de CKA.
ACR
16°
20°
21
AVISODE SEGURIDAD:El estar
expuestoalasvibracionesatrav6sdel
usoprolongadode herramientasde
manospuedecausardaSosalosvasos
sanguineoso a los nerviosde los
dedos,lasmanosylascoyunturasen
aquellas personasque tienen
propensidada los trastornosde la
circulaci6no a las hinchazones
anormales.El uso prolongadoen
tiempofriohasidoasociadocondaSos
alosvasossanguineosdepersonas
queporotraparteseencuentranen
perfectoestadodesalud.Siocurren
sintomas tales como el
entumecimiento,el dolor,la faltade
fuerza,loscambios,enelcoloro la
texturadelapielofaltadesentidoenlos
dedos,lasmanosolasmuSecas,deje
deusarlam&quinainmediatamentey
procureatenci6nm6dica.Lossistemas
deanti-vibraci6nnogarantizanquese
evitentalesproblemas.Losusuarios
quehacenusocontinuoyprolongando
delasherramientasdefuerzadeben
fiscalizaratentamentesuestadofisicoy
elestadodelaparato.
CONSTRUCClONDEDOBLE
AISLAMIENTO
Esteaparatotieneundobleaislamiento
paraayudaraprotegerelmismoencon-
tradechoquesel6ctricos.Laconstruc-
ci6ndedobleaislamientoconsisteendos
"capas"deaislamientoel6ctricoenlugar
detenertomadetierra.
Herramientasyaparatosconstruidoscon
elsistemadedobleaislamientonohan
sidodiseSadosparaquetomentierra.No
sehaprovistoparaestam&quinaning6n
medioparalatomadetierra,ynosedeb-
er&naSadirmediosparalatomadetierra
alamisma.Comoresultado,elcablede
extensi6nusadoconsuaparatopuede
serenchufadoencualquiertomacorriente
el6ctrico de120voltios.
Precaucionesdeseguridaddebenser
observadascuandoseusecualquierher-
ramientael6ctrica.Elsistemadedoble
aislamientos61oproveeprotecci6nadi-
cionalencontradeaccidentescausados
porfallointernodeaislamientoel6ctrico.
_i ADVERTENClA: Toda reparaci6n
el6ctrica hecha a este aparato, incluyen-
do la cubierta, el interruptor, el motor, etc.,
debe ser diagnosticada y reparada por un
personal de servicio cualificado. Las pie-
zas de reemplazo en productos de doble
aislamiento deber&n ser id6nticas alas
piezas que se est&n reemplazando. Los
aparatos de doble aislamiento, vienen
marcados con las palabras DOBLEAISLA-
MIENTO o AISLADO DOBLEMENTE. El
simbolo [] (cuadrado dentro de otro cua-
drado) puede tambi6n aparecer en el
aparato. De no permitir que sea el person-
al de servicio autorizado quien haga las
reparaciones a este aparato, puede cau-
sar que la construcci6n de doble aisla-
miento se convierta ineficaz y resulten ac-
cidentes muy serios.
PATRONES: Este producto est& enlista-
do por Underwriters Laboratories, Inc. de
acuerdo con UL Standard 1662 y ANSI
B175.1.
ANSI B175.1-2000 "Padr6n Estadouni-
dense Nacional para Herramientas de
Fuerza -Sierra de Cadena A Gasolina-
Requisitos de Seguridad"
CSA Z62.1 "Seguridad y Salud Ocupa-
cional en relaci6n con las Sierras de Ca-
dena"
CSA Z62.3 "Seguridad y Salud Ocupa-
cional en relaci6n con Reculadas de
Sierras de Cadena"
GUARDE ESTA INSTRUCCIONES
_ADVERTENClA: Antes de usar la
sierra de cadena, asegure todos los fija-
dores se encuentren bien ajustados.
CONTENIDO DE LA CAJA
• Sierra de Cadena (completamente)
• Protector para la Barra
Verifique que no haya piezas daSadas.
No use piezas daSadas.
AVISO: Si necesita ayuda o encuentra
piezas daSadas o piezas no incluidas
en la caja, favor comunicarse al
1-800-554-6723.
MONTAJE
El aparato viene completamente arma-
do y no hay necesidad de montaje.
22
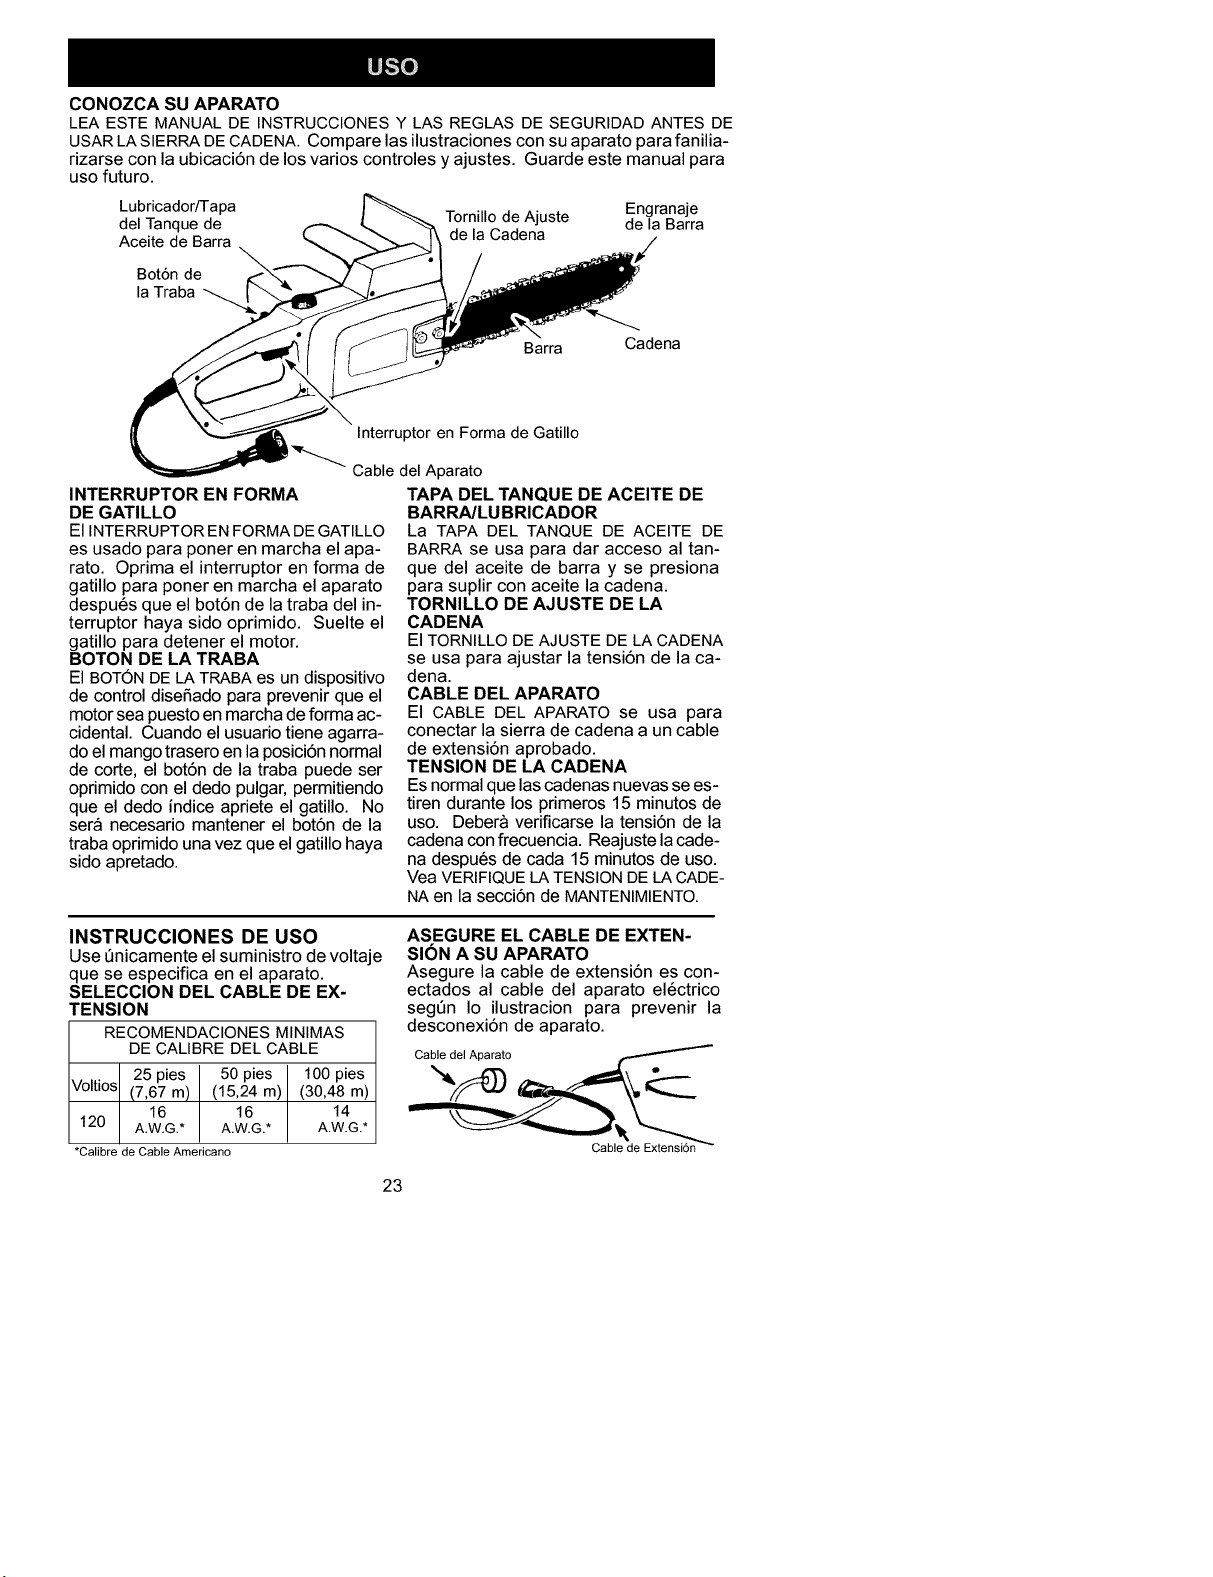
CONOZCA SU APARATO
LEA ESTE MANUAL DE INSTRUCCIONES Y LAS REGLAS DE SEGURIDAD ANTES DE
USAR LA SIERRA DECADENA. Compare las ilustraciones con su aparato para fanilia-
rizarse con la ubicaci6n de los varios controles y ajustes. Guarde este manual para
uso futuro.
Lubricador/Tapa Tornillo de Ajuste Engranaje
del Tanque de de la Barra
Aceite de Barra de la Cadena
Bot6n de
la Traba
Barra Cadena
Interruptor en Forma de Gatillo
Cable del Aparato
INTERRUPTOR EN FORMA
DE GATILLO
El INTERRUPTOREN FORMADE GATILLO
es usado para poner en marcha el apa-
rato. Oprima el interruptor en forma de
gatillo para poner en marcha el aparato
despu6s que el bot6n de la traba del in-
terruptor haya sido oprimido. Suelte el
gatillo para detener el motor.
BOTON DE LA TRABA
El BOT6N DE LATRABA es un dispositivo
de control diseSado para prevenir que el
motor sea puesto en marcha de forma ac-
cidental. Cuando el usuario tiene agarra-
do el mango trasero en la posici6n normal
de corte, el bot6n de la traba puede ser
oprimido con el dedo pulgar, permitiendo
que el dedo indice apriete el gatillo. No
ser& necesario mantener el bot6n de la
traba oprimido una vez que el gatillo haya
sido apretado.
TAPA DEL TANQUE DE ACEITE DE
BARRA/LUBRICADOR
La TAPA DEL TANQUE DE ACEITE DE
BARRA se usa para dar acceso al tan-
que del aceite de barra y se presiona
para suplir con aceite la cadena.
TORNILLO DE AJUSTE DE LA
CADENA
El TORNILLO DE AJUSTE DE LA CADENA
se usa para ajustar la tensi6n de la ca-
dena.
CABLE DEL APARATO
El CABLE DEL APARATO se usa para
conectar la sierra de cadena a un cable
de extensi6n aprobado.
TENSION DE LA CADENA
Esnormal que las cadenas nuevas se es-
tiren durante los primeros 15 minutos de
uso. Deber& verificarse la tensi6n de la
cadena con frecuencia. Reajuste la cade-
na despu6s de cada 15 minutos de uso.
Vea VERIFIQUE LATENSIONDE LA CADE-
NAen la secci6n de MANTENIMIENTO.
INSTRUCClONES DE USO
Use 6nicamente elsuministro de voltaje
que se especifica en el aparato.
SELECClON DEL CABLE DE EX-
TENSION
RECOMENDACIONES MINIMAS
DE CALIBRE DEL CABLE
25 pies 50 pies 100 pies
Voltios (7,67 m) (15,24 m) (30,48 m)
16 16 14
120 A.W.G.* A.W.G.* A.W.G.*
*Calibre de Cable Americano
ASEGURE EL CABLE DE EXTEN-
SION A SU APARATO
Asegure la cable de extensi6n es con-
ectados al cable del aparato el6ctrico
seg6n Io ilustracion para prevenir la
desconexi6n de aparato.
Cable del Aparato
Cable de Extensidn
23
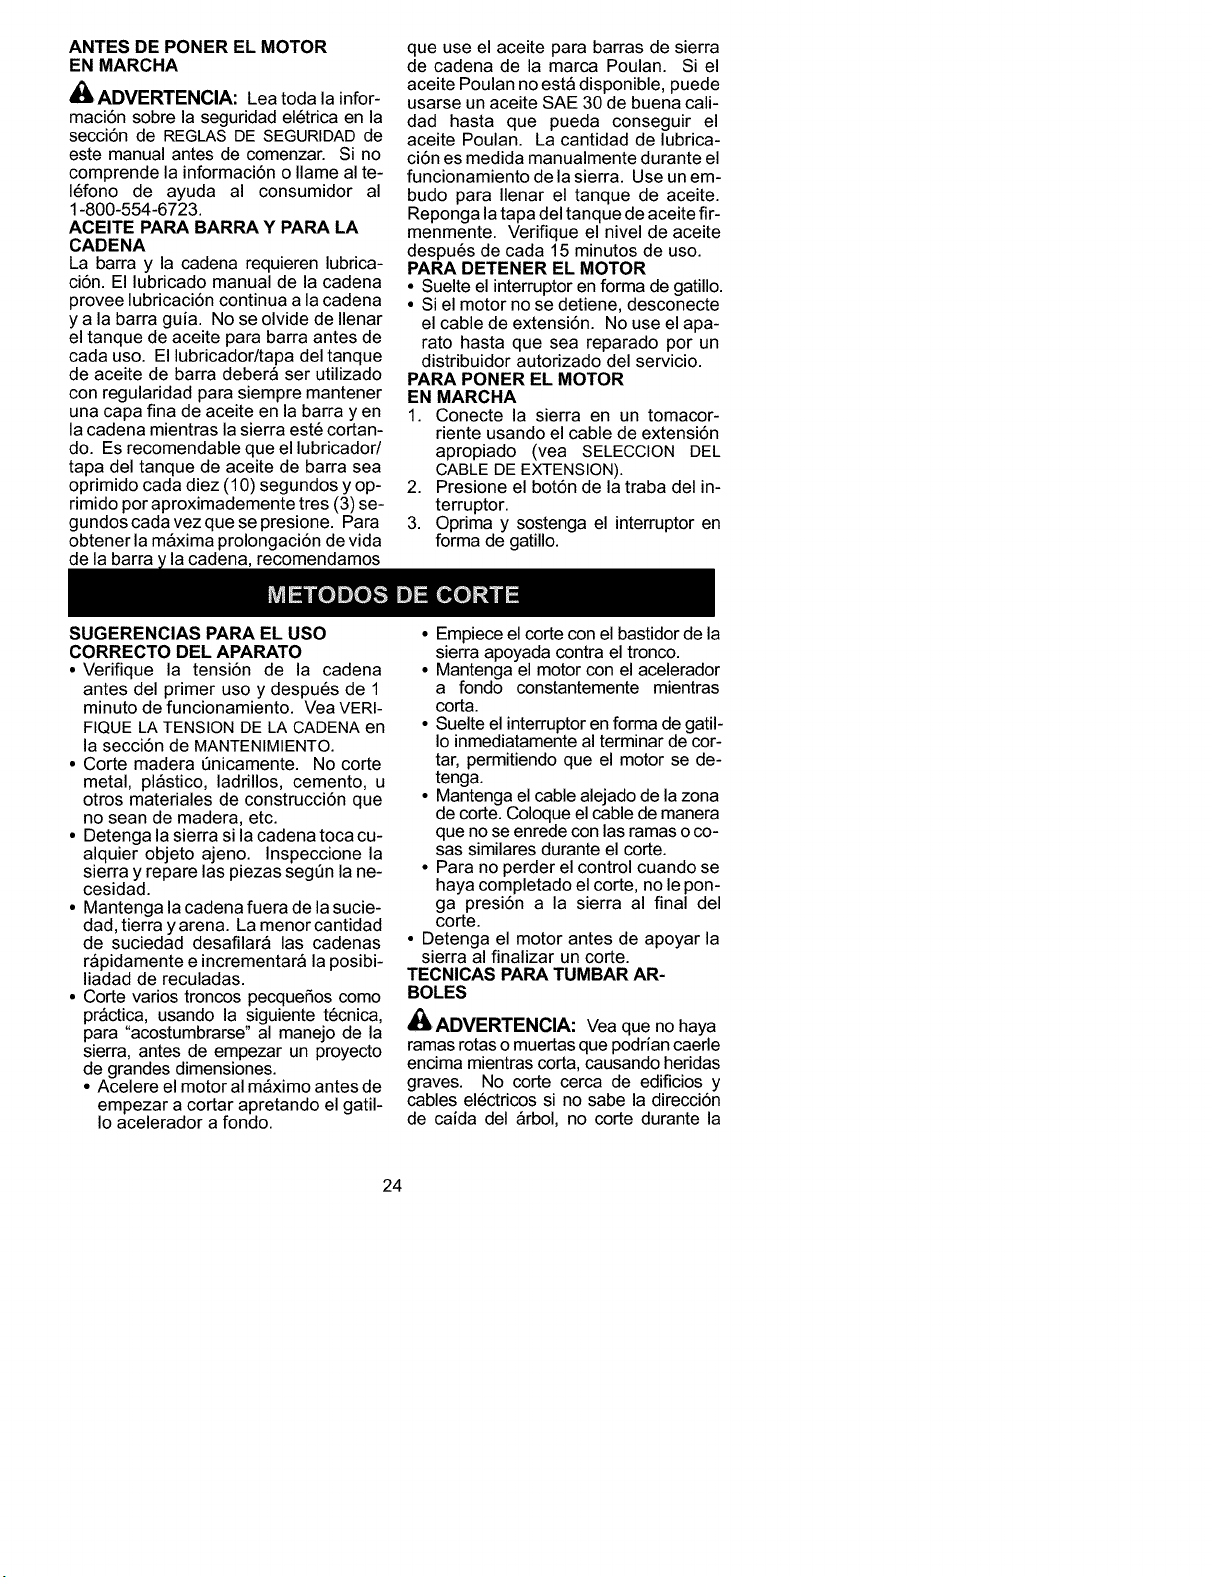
ANTES DE PONER EL MOTOR
EN MARCHA
_ ADVERTENCIA: Lea toda la infor-
maci6n sobre la seguridad el6trica en la
secci6n de REGLAS DE SEGURIDAD de
este manual antes de comenzar. Si no
comprende la informaci6n o Ilame al te-
16fono de ayuda al consumidor al
1-800-554-6723.
ACEITE PARA BARRA Y PARA LA
CADENA
La barra y la cadena requieren lubrica-
ci6n. El lubricado manual de la cadena
provee lubricaci6n continua a la cadena
y a la barra guia. No se olvide de Ilenar
el tanque de aceite para barra antes de
cada uso. El lubricador/tapa del tanque
de aceite de barra deber& ser utilizado
con regularidad para siempre mantener
una capa fina de aceite en la barra yen
la cadena mientras la sierra est6 cortan-
do. Es recomendable que el lubricador/
tapa del tanque de aceite de barra sea
oprimido cada diez (10) segundos y op-
rimido por aproximademente tres (3) se-
gundos cada vez que se presione. Para
obtener la m&xima prolongaci6n de vida
de la barra ! la cadena recomendamos
SUGERENCIAS PARA EL USO
que use el aceite para barras de sierra
de cadena de la marca Poulan. Si el
aceite Poulan no est& disponible, puede
usarse un aceite SAE 30 de buena cali-
dad hasta que pueda conseguir el
aceite Poulan. La cantidad de lubrica-
ci6n es medida manualmente durante el
funcionamiento de la sierra. Use un em-
budo para Ilenar el tanque de aceite.
Reponga la tapa del tanque de aceite fir-
menmente. Verifique el nivel de aceite
despu6s de cada 15 minutos de uso.
PARA DETENER EL MOTOR
• Suelte el interruptor en forma de gatillo.
• Si el motor no se detiene, desconecte
el cable de extensi6n. No use el apa-
rato hasta que sea reparado por un
distribuidor autorizado del servicio.
PARA PONER EL MOTOR
EN MARCHA
1. Conecte la sierra en un tomacor-
riente usando el cable de extensi6n
apropiado (vea SELECCION DEL
CABLE DE EXTENSION).
2. Presione el botSn de la traba del in-
terruptor.
3. Oprima y sostenga el interruptor en
forma de gatillo.
CORRECTO DEL APARATO
• Verifique la tensi6n de la cadena
antes del primer uso y despu6s de 1
minuto de funcionamiento. Vea VERI-
FIQUE LA TENSION DE LA CADENA en
la secci6n de MANTENIMIENTO.
• Corte madera Qnicamente. No corte
metal, pl&stico, ladrillos, cemento, u
otros materiales de construcci6n que
no sean de madera, etc.
• Detenga la sierra si la cadena toca cu-
alquier objeto ajeno. Inspeccione la
sierra y repare las piezas segQn la ne-
cesidad.
• Mantenga la cadena fuera de la sucie-
dad, tierra y arena. La menor cantidad
de suciedad desafilar& las cadenas
r&pidamente e incrementar& la posibi-
liadad de reculadas.
• Corte varios troncos pecquefios como
pr&ctica, usando la siguiente t6cnica,
para "acostumbrarse" al manejo de la
sierra, antes de empezar un proyecto
de grandes dimensiones.
• Acelere el motor al m_ximo antes de
empezar a cortar apretando el gatil-
Io acelerador a fondo.
• Empiece el corte con el bastidor de la
sierra apoyada contra el tronco.
• Mantenga el motor con el acelerador
a fondo constantemente mientras
corta.
• Suelte el interruptor en forma de gatil-
Io inmediatamente al terminar de cor-
tar, permitiendo que el motor se de-
tenga.
• Mantenga el cable alejado de la zona
de corte. Coloque el cable de manera
que no se enrede con las ramas o co-
sas similares durante el corte.
• Para no perder el control cuando se
haya completado el code, no le pon-
ga presi6n a la sierra al final del
corte.
• Detenga el motor antes de apoyar la
sierra al finalizar un corte.
TECNICAS PAR& TUMBAR AR-
BOLES
ADVERTENClA: Vea que no haya
ramas rotas o muertas que podrian caerle
encima mientras corta, causando heridas
graves. No corte cerca de edificios y
cables el6ctricos si no sabe la direcci6n
de caida del &rbol, no corte durante la
24
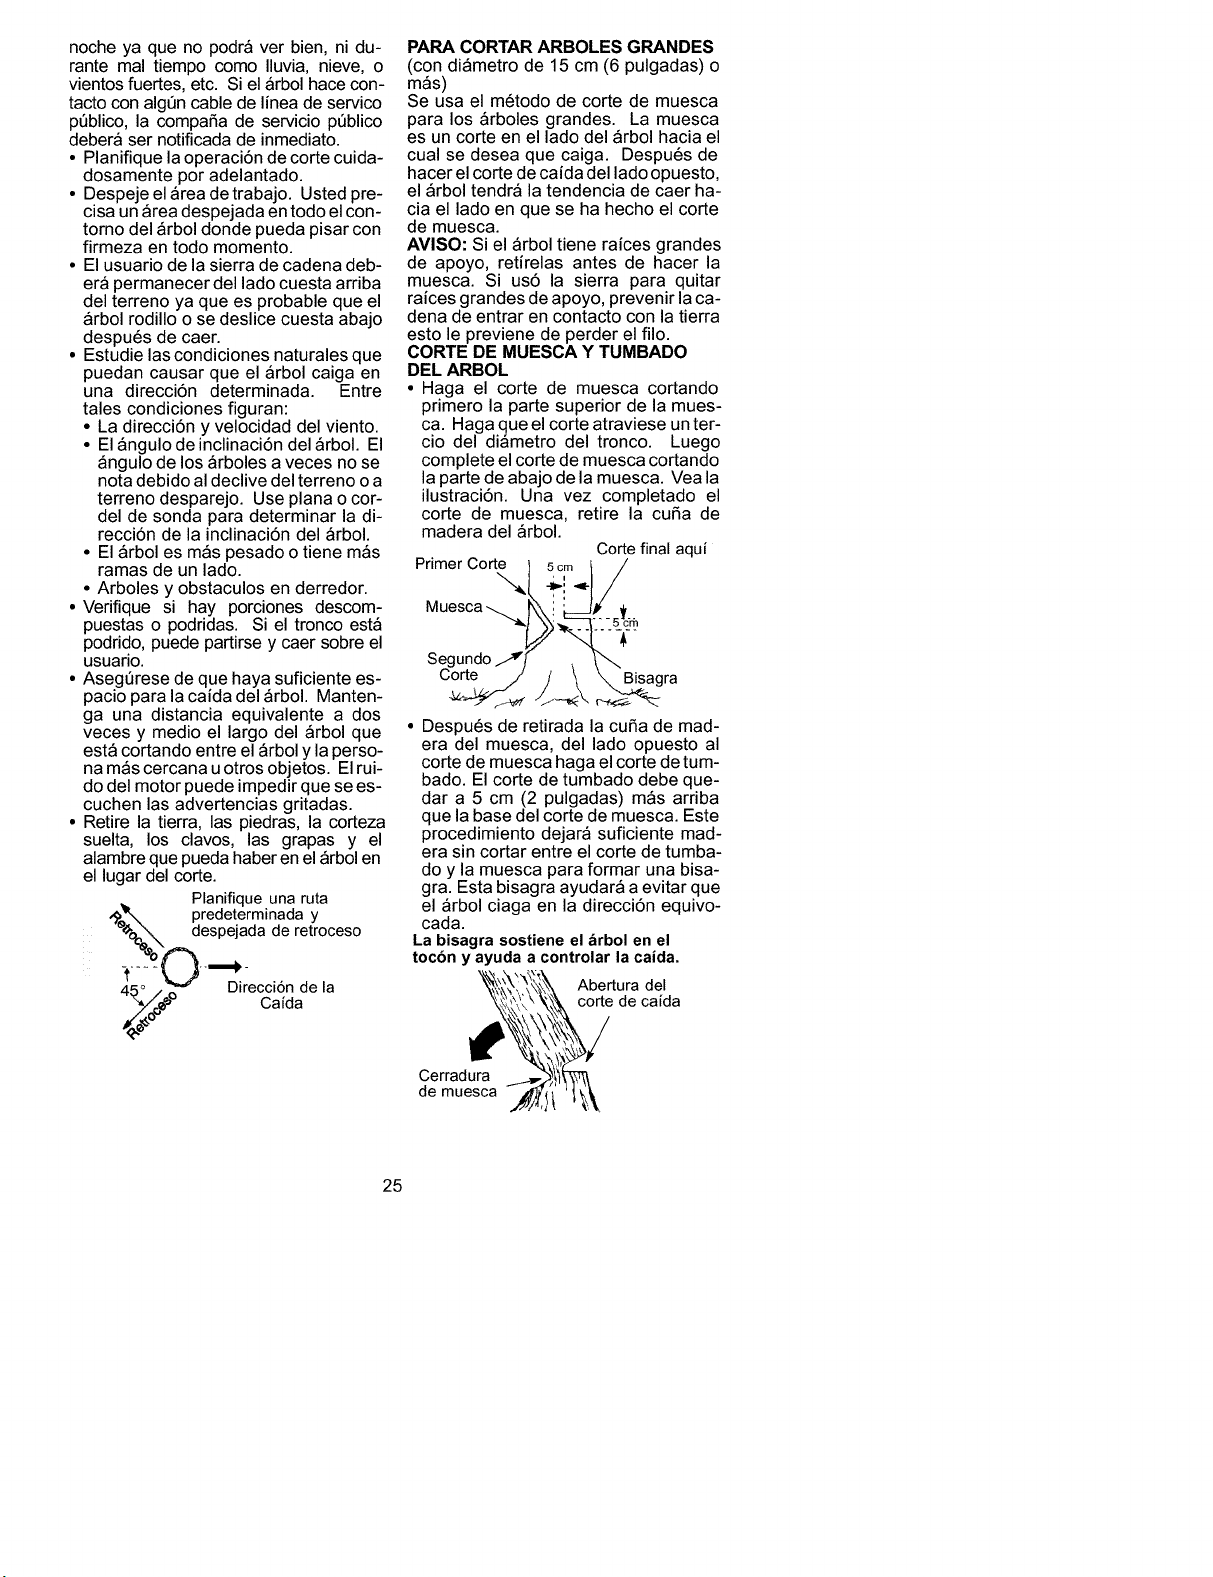
nocheyaquenopodr&verbien,nidu-
rantemaltiempocomoIluvia,nieve,o
vientosfuertes,etc.Siel&rbolhacecon-
tactoconalg6ncabledelineadeservico
p6blico,lacompafiadeserviciop6blico
deber&sernotificadadeinmediato.
• Planifiquelaoperaci6ndecortecuida-
dosamenteporadelantado.
• Despejeel&readetrabajo.Ustedpre-
cisaun&readespejadaentodoelcon-
tornodel&rboldondepuedapisarcon
firmezaentodomomento.
• Elusuariodelasierradecadenadeb-
er&permanecerdelladocuestaarriba
delterrenoyaqueesprobablequeel
&rbolrodilloosedeslicecuestaabajo
despu6sdecaer.
• Estudielascondicionesnaturalesque
puedancausarqueel&rbolcaigaen
unadirecci6ndeterminada.Entre
talescondicionesfiguran:
• Ladirecci6nyvelocidaddelviento.
• El_ngulodeinclinaci6ndel_rbol.El
&ngulodelos&rbolesavecesnose
notadebidoaldeclivedelterrenooa
terrenodesparejo.Useplanaocor-
deldesondaparadeterminarladi-
recci6ndelainclinaci6ndel_rbol.
• El_rbolesm&spesadootienem_s
ramasdeunlado.
•Arbolesyobstaculosenderredor.
• Verifiquesi hayporcionesdescom-
puestasopodridas.Sieltroncoest&
podrido,puedepartirseycaersobreel
usuario.
• Aseg6resedequehayasuficientees-
pacioparalacaidadel&rbol.Manten-
gaunadistanciaequivalenteados
vecesymedioellargodel&rbolque
est&cortandoentreel&rbolylaperso-
nam&scercanauotrosobjetos.Elrui-
dodelmotorpuedeimpedirquesees-
cuchenlasadvertenciasgritadas.
• Retirelatierra,laspiedras,lacorteza
suelta,losclavos,lasgrapasy el
alambrequepuedahaberenel&rbolen
ellugardelcorte.
Planifiqueunaruta
,_. predeterminada y
e_._o_?_,,_..despejada_- de retroceso
t _ Direcci6n de la
5_ _ Caida
PARA CORTAR ARBOLES GRANDES
(con di_metro de 15 cm (6 pulgadas) o
m_s)
Se usa el m6todo de corte de muesca
para los &rboles grandes. La muesca
es un corte en el lado del &rbol hacia el
cual se desea que caiga. Despu6s de
hacer el corte de caida del lado opuesto,
el &rbol tendr& la tendencia de caer ha-
cia el lado en que se ha hecho el corte
de muesca.
AVISO: Si el &rbol tiene raices grandes
de apoyo, retirelas antes de hacer la
muesca. Si us6 la sierra para quitar
raices grandes de apoyo, prevenir la ca-
dena de entrar en contacto con la tierra
esto le previene de perder el filo.
CORTE DE MUESCA Y TUMBADO
DEL ARBOL
• Haga el corte de muesca cortando
primero la parte superior de la mues-
ca. Haga que el corte atraviese un ter-
cio del di&metro del tronco. Luego
complete el corte de muesca cortando
la parte de abajo de la muesca. Vea la
ilustraci6n. Una vez completado el
corte de muesca, retire la curia de
madera del &rbol.
Corte final aqui
Primer Corte 5cm I /
Muesca _._ -_'i "_-I.//
Segundo/._ i_ 5-_
C7,rte_./' .__ _\ _gra
• Despu6s de retirada la curia de mad-
era del muesca, del lado opuesto al
corte de muesca haga el corte detum-
bado. El corte de tumbado debe que-
dar a 5 cm (2 pulgadas) m&s arriba
que la base del corte de muesca. Este
procedimiento dejar& suficiente mad-
era sin cortar entre el corte de tumba-
do y la muesca para formar una bisa-
gra. Esta bisagra ayudar& a evitar que
el &rbol ciaga en la direcci6n equivo-
cada.
La bisagra sostiene el &rbol en el
tocbn y ayuda a controlar la caida.
Abertura del
corte de caida
Cerradura
de muesca
25

AVISO:Antesdecompletareltumbado,
usecutlasparaabrirelcode,sisea
necesario,paracontrolarladirecci6nde
lacaida.Usecutlasdemaderaode
pl&stico,peronuncadeaceroo de
hierro,paraevitarquelasierrareculey
paraevitardafiosalacadena.
• Est6alertaalosindiciosdequeelArbol
est&porcaer:loscrujidos,elensancha-
mientodelcortedecaidaolosmovi-
mientosdelasramassuperiores.
• Enelinstanteenqueel&rbolcomienza
acaer,detengalasierraap6yelaenel
sueloy retrocedar&pidamenteporla
trayectoriaderetrocesoprevista.
• NOcortelos _rbolesparcialmente
caidosconlasierra.Tomeextremapre-
cauci6nconlos&rbolesparcialmente
caidosquecuentanconunapoyopre-
cario.Cuandoel &rbolnocaetotal-
mente,pongalasierradeladoyuseun
montacargasacable,unaparejode
poleasountractorparabajarlo.
CORTE DE ARBOL TUMBADO
(SECCIONAMIENTO)
El t6rmino seccionamiento significa cor-
tar un &rbol tumbado en secciones del
largo deseado.
_i ADVERTENCIA: No se pare sobre
el tronco que est& siendo cortado. Cual-
quier parte del tronco puede rodar hacien-
do que el usuario pierda el equilibrio y el
control. No se posicione cuesta abajo del
tronco que est& siendo cortado.
PUNTOS IMPORTANTES
• Corte Qnicamente un tronco a la vez.
• Corte con sumo cuidado la madera as-
tillada. La sierra puede arrojar pedazos
punteagudos y filosos hacia el usuario.
• Use un caballete para cortar troncos
pequefios. Nunca permita que otra
persona sostenga el tronco mientras
usted coda, ni sostenga el tronco con
la pierna o el pie.
• No corte en lugares donde haya tron-
cos, amas y raices entrelazadas. Ar-
rastre los troncos hasta un lugar des-
pejado antes de corarlos, empezando
por los troncos expuenstos y la retira-
dos.
TECNICAS PARA EL
SECCIONAMIENTO
ADVERTENCIA: Si la sierra queda
apretada o atascada dentro del tronco, no
intente sacarla a la fuerza. Puede perder
el control de la sierra, causando heridas o
dafios al aparato. Pare la sierra, martille
una curia de pl&stico o de madera en el
corte hasta que la sierra salga f&cilmente.
Ponga la sierra de nuevo en marcha y
col6quela cuidadosamente de nuevo en
el corte. Para evitar que la sierra recule y
para evitar dafios a la cadena, no use
cutlas de metal. No intente poner en mar-
cha la sierra de nuevo cuando est& apre-
tada o atascada en un tronco.
Use una curia para sacar lasierra
atascada.
Apague la sierra y use una curia de
plastico o de madera para abrir el tajo.
Corte Descendiente empieza desde el
lado superior del tronco con la parte de
abajo de la sierra apoyada contra el
tronco; haga una leve presi6n hacia
abajo.
Corte descendiente Corte ascendente
Corte Ascendente empieza desde el
lado inferior del tronco con la parte de arri-
ba de la sierra apoyada contra el tronco;
haga una leve fuerza hacia arriba. Sujete
la sierra firmemente para mantener el
control. La sierra tendr& la tendencia de
empujar al usuario hacia atr&s.
'_ADVERTENClA: Nunca invierta
la sierra para hacer cortes ascen-
dentes. No se podr& controlar la sierra
de esta forma.
Haga siempre el primer corte del lado
del tronco que est& bajo compresi6n. El
lado de compresi6n del tronco es donde
la presi6n del peso del tronco se con-
centra.
Primer corte del lado del tronco
bajo compresi6n'.4_
Segundo corte
Segundo corte
Primer corte del lado del tronco
bNo compresi6n
SECCIONAMIENTO SIN APOYO
• Haga elcorte descentiente atravesan-
do un tercio del di&metro del tronco.
26
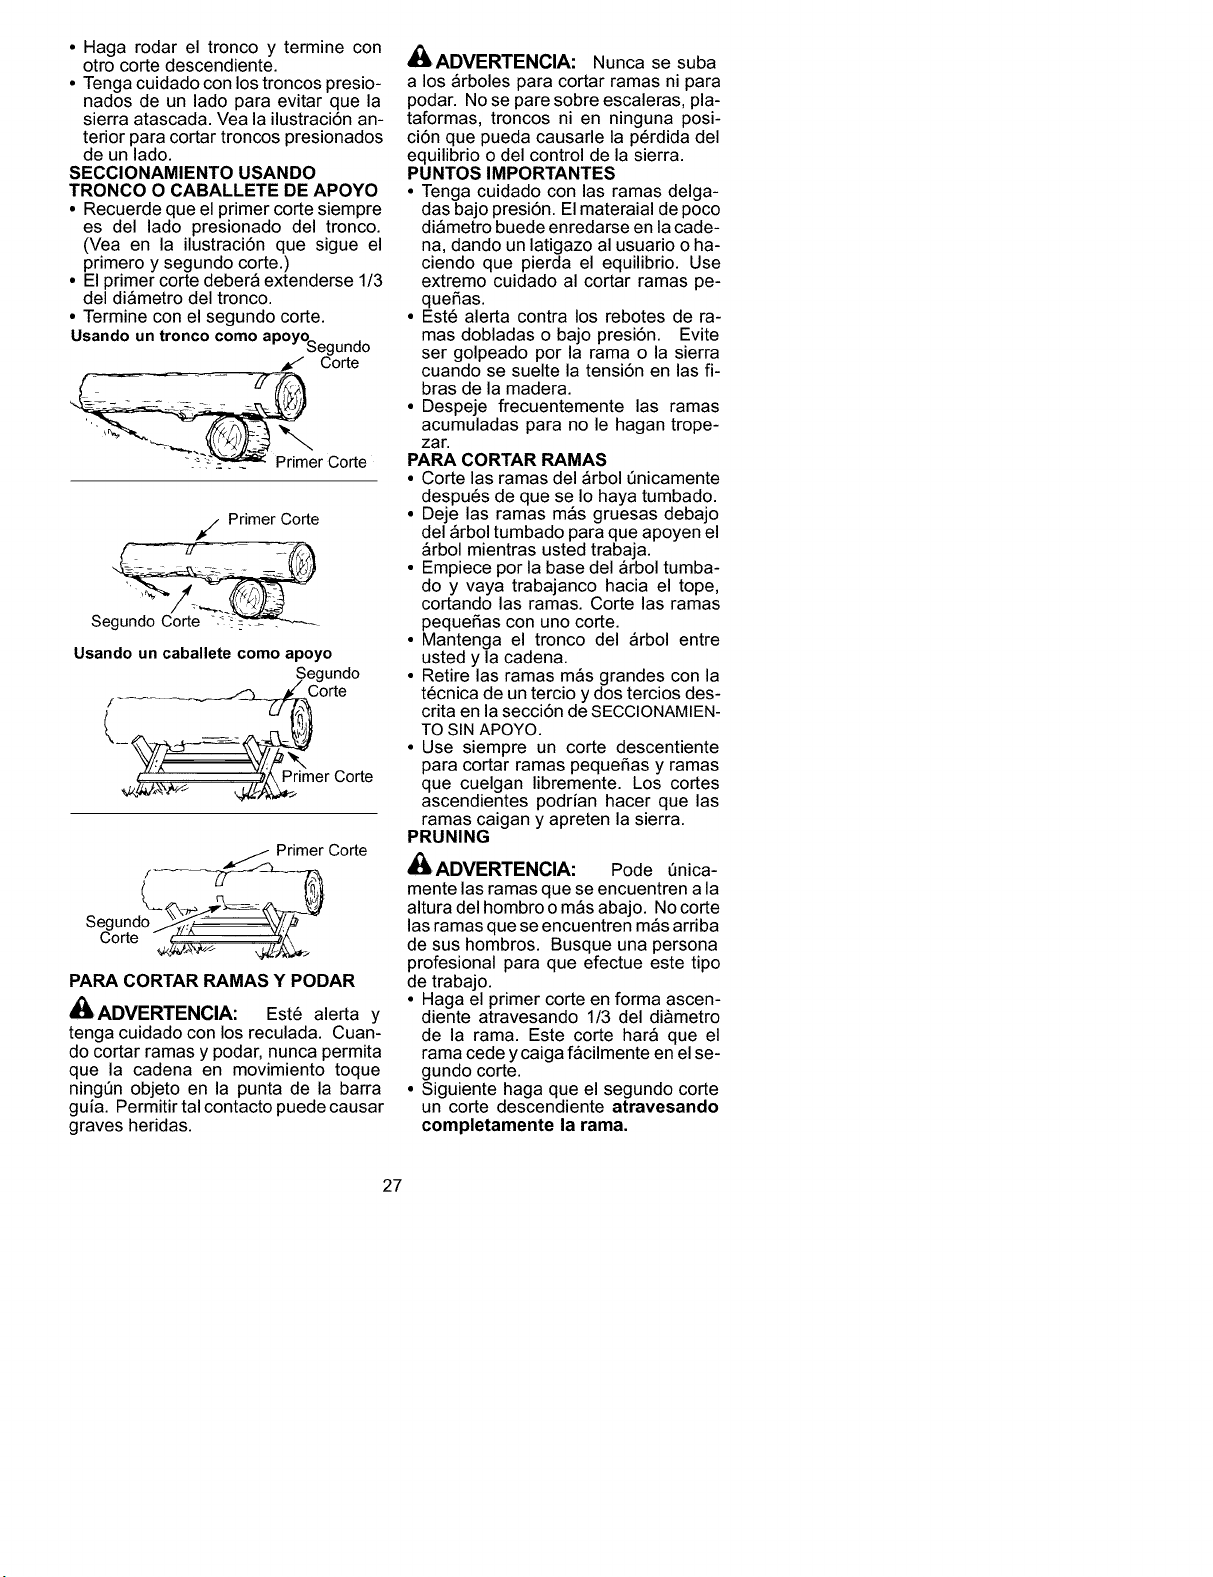
• Hagarodareltroncoy terminecon
otrocortedescendiente.
• Tengacuidadoconlostroncospresio-
nadosdeunladoparaevitarquela
sierraatascada.Vealailustraci6nan-
teriorparacortartroncospresionados
deunlado.
SECCIONAMIENTO USANDO
TRONCO O CABALLETE DE APOYO
• Recuerde que el primer corte siempre
es del lado presionado del tronco.
(Vea en la ilustraci6n que sigue el
primero y segundo code.)
• El primer corte deber_ extenderse 1/3
del di&metro del tronco.
• Termine con el segundo corte.
Usando un tronco como apoyOqegundo
,_ Corte
_/ Primer Corte
Usando un caballete como apoyo
;egundo
Corte
t
t_
Primer Corte
/ _ Primer Corte
Segu do__l_ -
Corte ,1/'^ v#/_
PARA CORTAR RAMAS Y PODAR
_IADVERTENCIA: Est6 alerta y
tenga cuidado con los reculada. Cuan-
do cortar ramas y podar, nunca permita
que la cadena en movimiento toque
ningen objeto en la punta de la barra
guia. Permitir tal contacto puede causar
graves heridas.
nADVERTENCIA: Nunca se suba
a los &rboles para cortar ramas ni para
podar. Nose pare sobre escaleras, pla-
taformas, troncos ni en ninguna posi-
ci6n que pueda causarle la p6rdida del
equilibrio o del control de la sierra.
PUNTOS IMPORTANTES
• Tenga cuidado con las ramas delga-
das bajo presi6n. Elmateraial de poco
di&metro buede enredarse en lacade-
na, dando un latigazo al usuario o ha-
ciendo que pierda el equilibrio. Use
extremo cuidado al cortar ramas pe-
queSas.
• Est6 alerta contra los rebotes de ra-
mas dobladas o bajo presi6n. Evite
ser golpeado por la rama o la sierra
cuando se suelte la tensi6n en las fi-
bras de la madera.
• Despeje frecuentemente las ramas
acumuladas para no le hagan trope-
zar.
PAPA CORTAR PAMAS
• Corte las ramas del &rbol enicamente
despu6s de que se Io haya tumbado.
• Deje las ramas m&s gruesas debajo
del &rbol tumbado para que apoyen el
&rbol mientras usted trabaja.
• Empiece por la base del &rbol tumba-
do y vaya trabajanco hacia el tope,
cortando las ramas. Corte las ramas
pequeSas con uno corte.
• Mantenga el tronco del &rbol entre
usted y la cadena.
• Retire las ramas m&s grandes con la
t6cnica de un tercio y dos tercios des-
crita en la secci6n de SECCIONAMIEN-
TO SIN APOYO.
• Use siempre un corte descentiente
para cortar ramas pequeSas y ramas
que cuelgan libremente. Los cortes
ascendientes podrian hacer que las
ramas caigan y apreten la sierra.
PRUNING
'_ ADVERTENClA: Pode anica-
mente las ramas que se encuentren a la
altura del hombro o m&s abajo. No corte
las ramas que se encuentren m&s arriba
de sus hombros. Busque una persona
profesional para que efectue este tipo
de trabajo.
• Haga el primer corte en forma ascen-
diente atravesando 1/3 del di&metro
de la rama. Este corte har& que el
rama cede y caiga f&cilmente en el se-
gundo corte.
• Siguiente haga que el segundo corte
un corte descendiente atravesando
completamente la rama.
27
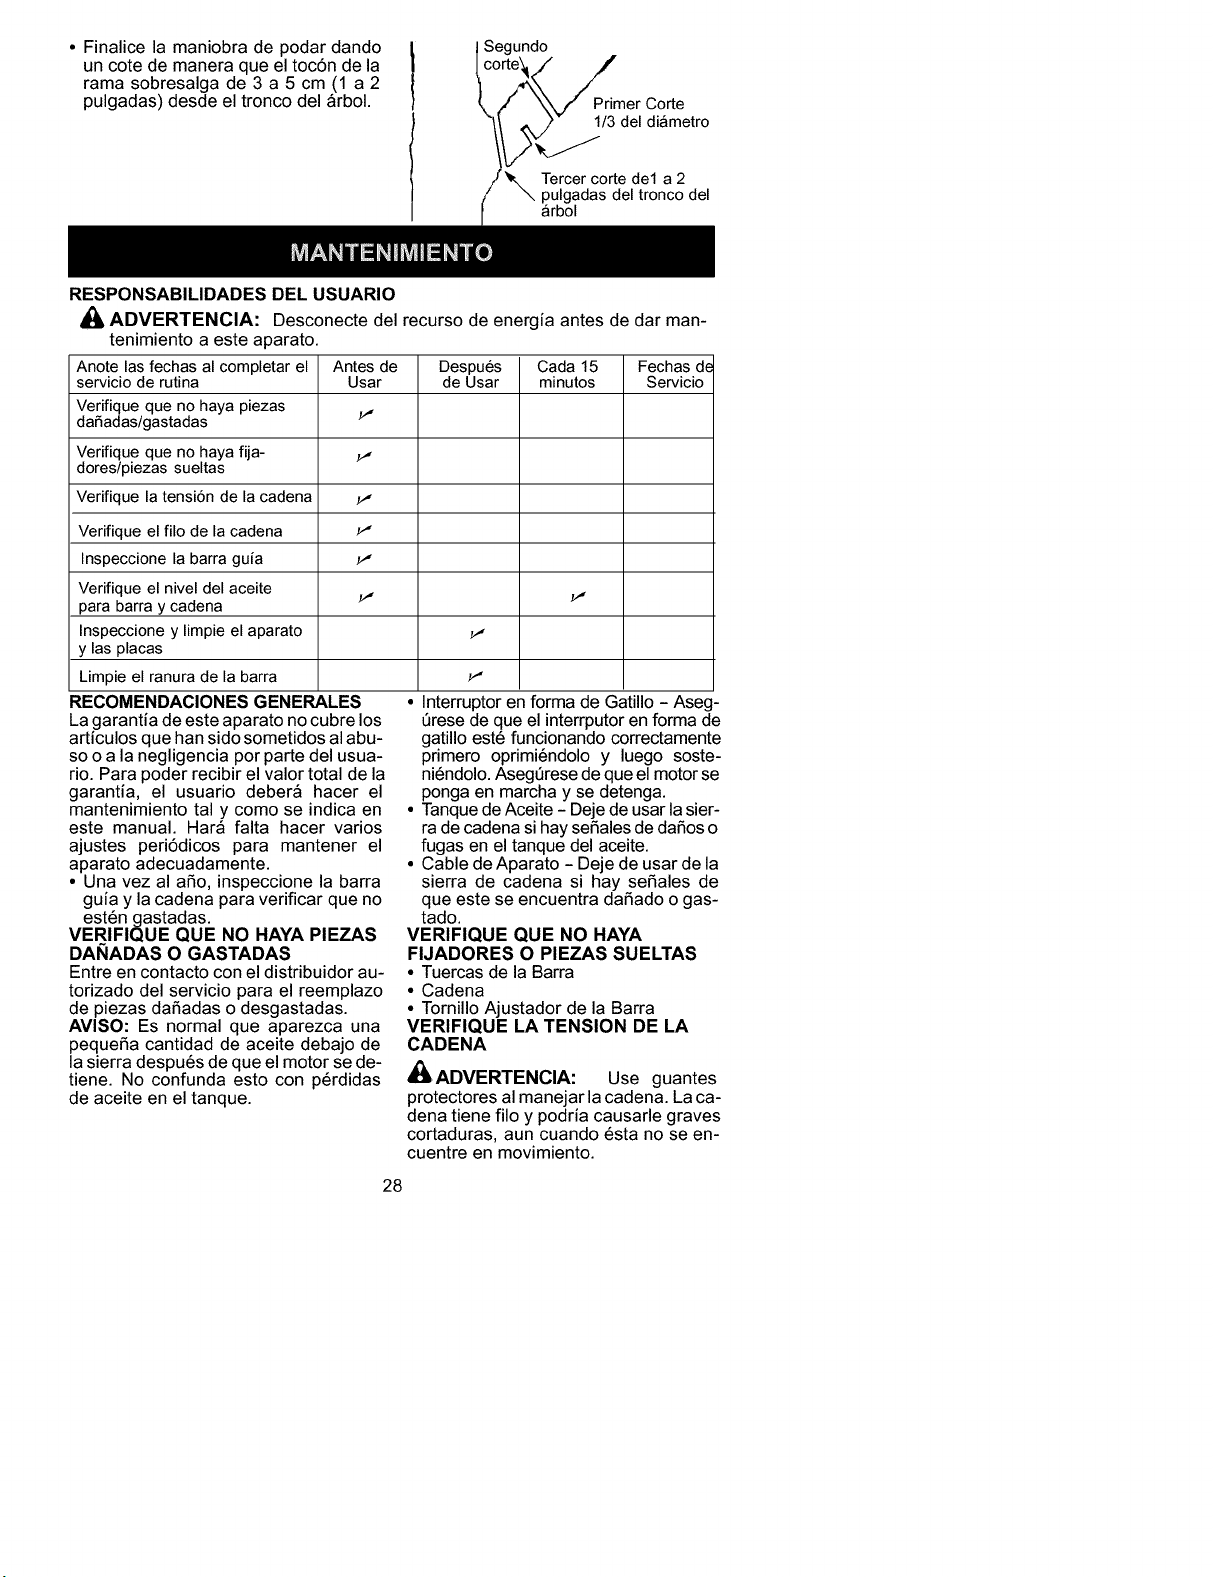
• Finalicelamaniobradepodardando
uncotedemaneraqueeltoc6ndela
ramasobresalgade3a5cm(1a2
pulgadas)desdeeltroncodel&rbol.
Segundo
°rte_k_" /
i/_'_///Primer Corte
/_/_/.1/3 del diamet ro
Tercer corte de1 a 2
pulgadas del tronco del
arbol
RESPONSABILIDADES DEL USUARIO
_i ADVERTENCIA: Desconecte del recurso de energia antes de dar man-
tenimiento a este aparato.
Anote las fechas al completar el Antes de Despues Cada 15 Fechas de
servicio de rutina Usar de Usar minutos Servicio
Verifique que no haya piezas #,,
daSadas/gastadas
Verifique que no haya fija- _,.
dores/piezas sueltas
Verifique la tensi6n de la cadena #,-
Verifique el filo de la cadena #"
Inspeccione la barra guia #,"
Verifique el nivel del aceite
para barray cadena
Inspeccione y limpie el aparato #,-
y las placas
Limpie el ranura de la barra #"
RECOMENDAClONES GENERALES
La garantia de este aparato no cubre los
articulos que han sido sometidos al abu-
so o a la negligencia por parte del usua-
rio. Para poder recibir el valor total de la
garantia, el usuario deber& hacer el
mantenimiento tal y como se indica en
este manual. Har& falta hacer varios
ajustes peri6dicos para mantener el
aparato adecuadamente.
• Una vez al aSo, inspeccione la barra
guia y la cadena para verificar que no
est6n gastadas.
VERIFIQUE QUE NO HAYA PIEZAS
DANADAS O GASTADAS
Entre en contacto con el distribuidor au-
torizado del servicio para el reemplazo
de piezas daSadas o desgastadas.
AVISO: Es normal que aparezca una
pequeSa cantidad de aceite debajo de
la sierra despu6s de que el motor se de-
tiene. No confunda esto con p6rdidas
de aceite en el tanque.
Interruptor en forma de Gatillo - Aseg-
Qresede que el interrputor en forma de
gatillo est6 funcionando correctamente
primero oprimi6ndolo y luego soste-
ni6ndolo. AsegQrese de que el motor se
ponga en marcha y se detenga.
• Tanque de Aceite - Deje de usar la sier-
ra de cadena si hay seSales de daSos o
fugas en el tanque del aceite.
• Cable de Aparato - Deje de usar de la
sierra de cadena si hay seSales de
que este se encuentra daSado o gas-
tado.
VERIFIQUE QUE NO HAYA
FIJADORES 0 PIEZAS SUELTAS
• Tuercas de la Barra
• Cadena
• Tornillo Ajustador de la Barra
VERIFIQUE LA TENSION DE LA
CADENA
'_ ADVERTENClA: Use guantes
protectores al manejar la cadena. La ca-
dena tiene filo y podria causarle graves
cortaduras, aun cuando 6sta no se en-
cuentre en movimiento.
28
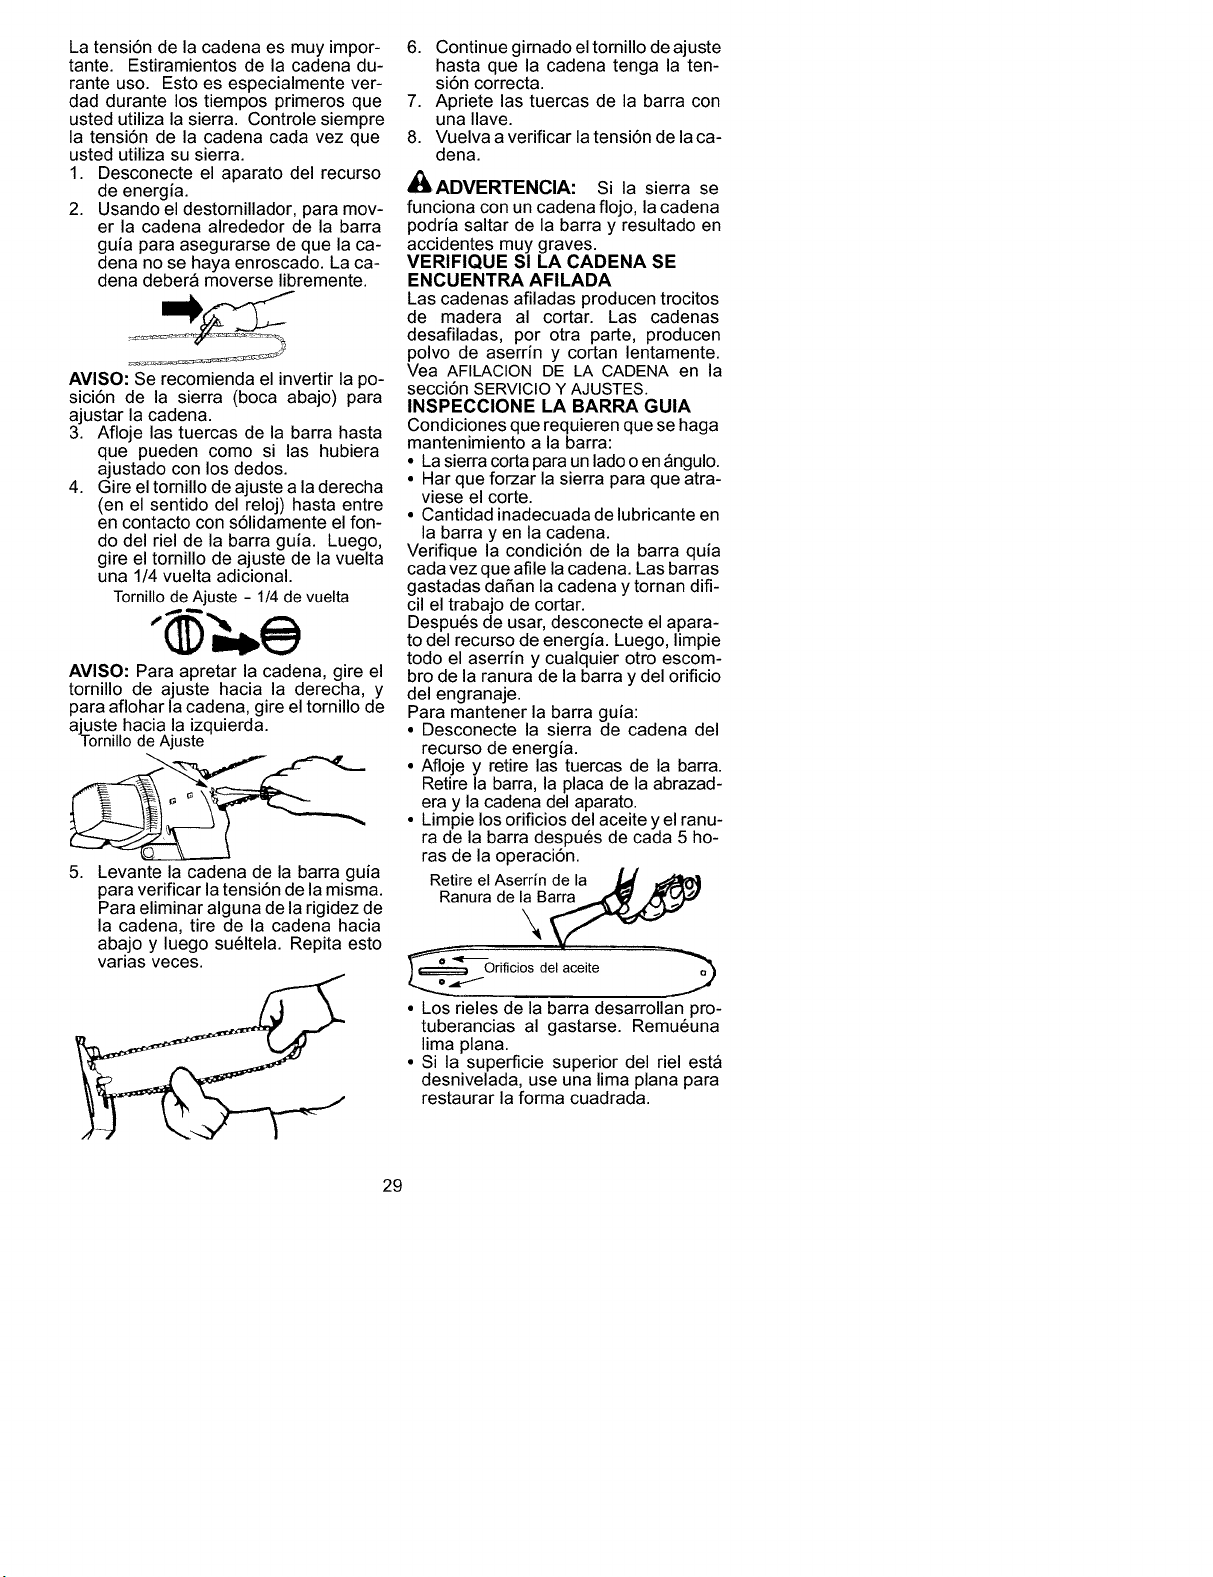
Latensi6ndelacadenaesmuyimpor-
tante.Estiramientosdelacadenadu-
ranteuso.Estoesespecialmentever-
daddurantelostiemposprimerosque
ustedutilizalasierra.Controlesiempre
latensi6ndelacadenacadavezque
ustedutilizasusierra.
1. Desconecteelaparatodelrecurso
deenergfa.
2. Usandoeldestornillador,paramov-
erlacadenaalrededordelabarra
guiaparaasegurarsedequelaca-
denanosehayaenroscado.Laca-
denadeber&moverselibremente.
AVI$O:Serecomiendaelinvertirlapo-
sici6ndela sierra(bocaabajo)para
ajustarlacadena.
3. Aflojelastuercasdelabarrahasta
quepuedencomosi lashubiera
ajustadoconlosdedos.
4. Gireeltornillodeajustealaderecha
(enelsentidodelreloj)hastaentre
encontactocons61idamenteelfon-
dodelrieldelabarraguia.Luego,
gireeltornillodeajustedelavuelta
una1/4vueltaadicional.
TornillodeAjuste-1/4devuelta
AVISO:Paraapretarlacadena,gireel
tornillodeajustehacialaderecha,y
paraafloharlacadena,gireeltornillode
ajustehacialaizquierda.
TornillodeAjuste
5. Levantelacadenadelabarraguia
paraverificarlatensi6ndelamisma.
Paraeliminaralgunadelarigidezde
lacadena,tiredelacadenahacia
abajoyluegosu61tela.Repitaesto
variasveces.
6. Continuegirnadoeltornillodeajuste
hastaquelacadenatengalaten-
si6ncorrecta.
7. Aprietelastuercasdelabarracon
unaIlave.
8. Vuelvaaverificarlatensi6ndelaca-
dena.
_IADVERTENClA: Si la sierra se
funciona con un cadena flojo, la cadena
podria saltar de la barra y resultado en
accidentes muy graves.
VERIFIQUE SI LA CADENA SE
ENCUENTRA AFILADA
Las cadenas afiladas producen trocitos
de madera al cortar. Las cadenas
desafiladas, por otra parte, producen
polvo de aserrin y cortan lentamente.
Vea AFILACION DE LA CADENA en la
secci6n SERVICIO Y AJUSTES.
INSPECClONE LA BARRA GUlA
Condiciones que requieren que se haga
mantenimiento a la barra:
• La sierra corta para un lado o en &ngulo.
• Har que forzar la sierra para que atra-
viese el code.
• Cantidad inadecuada de lubricante en
la barra y en la cadena.
Verifique la condici6n de la barra quia
cada vez que afile la cadena. Las barras
gastadas daSan la cadena y tornan difi-
cil el trabajo de cortar.
Despu6s de usar, desconecte el apara-
to del recurso de energia. Luego, limpie
todo el aserrin y cualquier otro escom-
bro de la ranura de la barra y del orificio
del engranaje.
Para mantener la barra guia:
• Desconecte la sierra de cadena del
recurso de energfa.
• Afloje y retire las tuercas de la barra.
Retire la barra, la placa de la abrazad-
era y la cadena del aparato.
• Limpie los orificios del aceite y el ranu-
ra de la barra despu6s de cada 5 ho-
ras de la operaci6n.
Retire el Aserrin de la _f
Ranura de I_kB_
-Orificios del aceite ._
• Los rieles de la barra desarrollan pro-
tuberancias al gastarse. Remu6una
lima plana.
• Si la superficie superior del riel est&
desnivelada, use una lima plana para
restaurar la forma cuadrada.
29
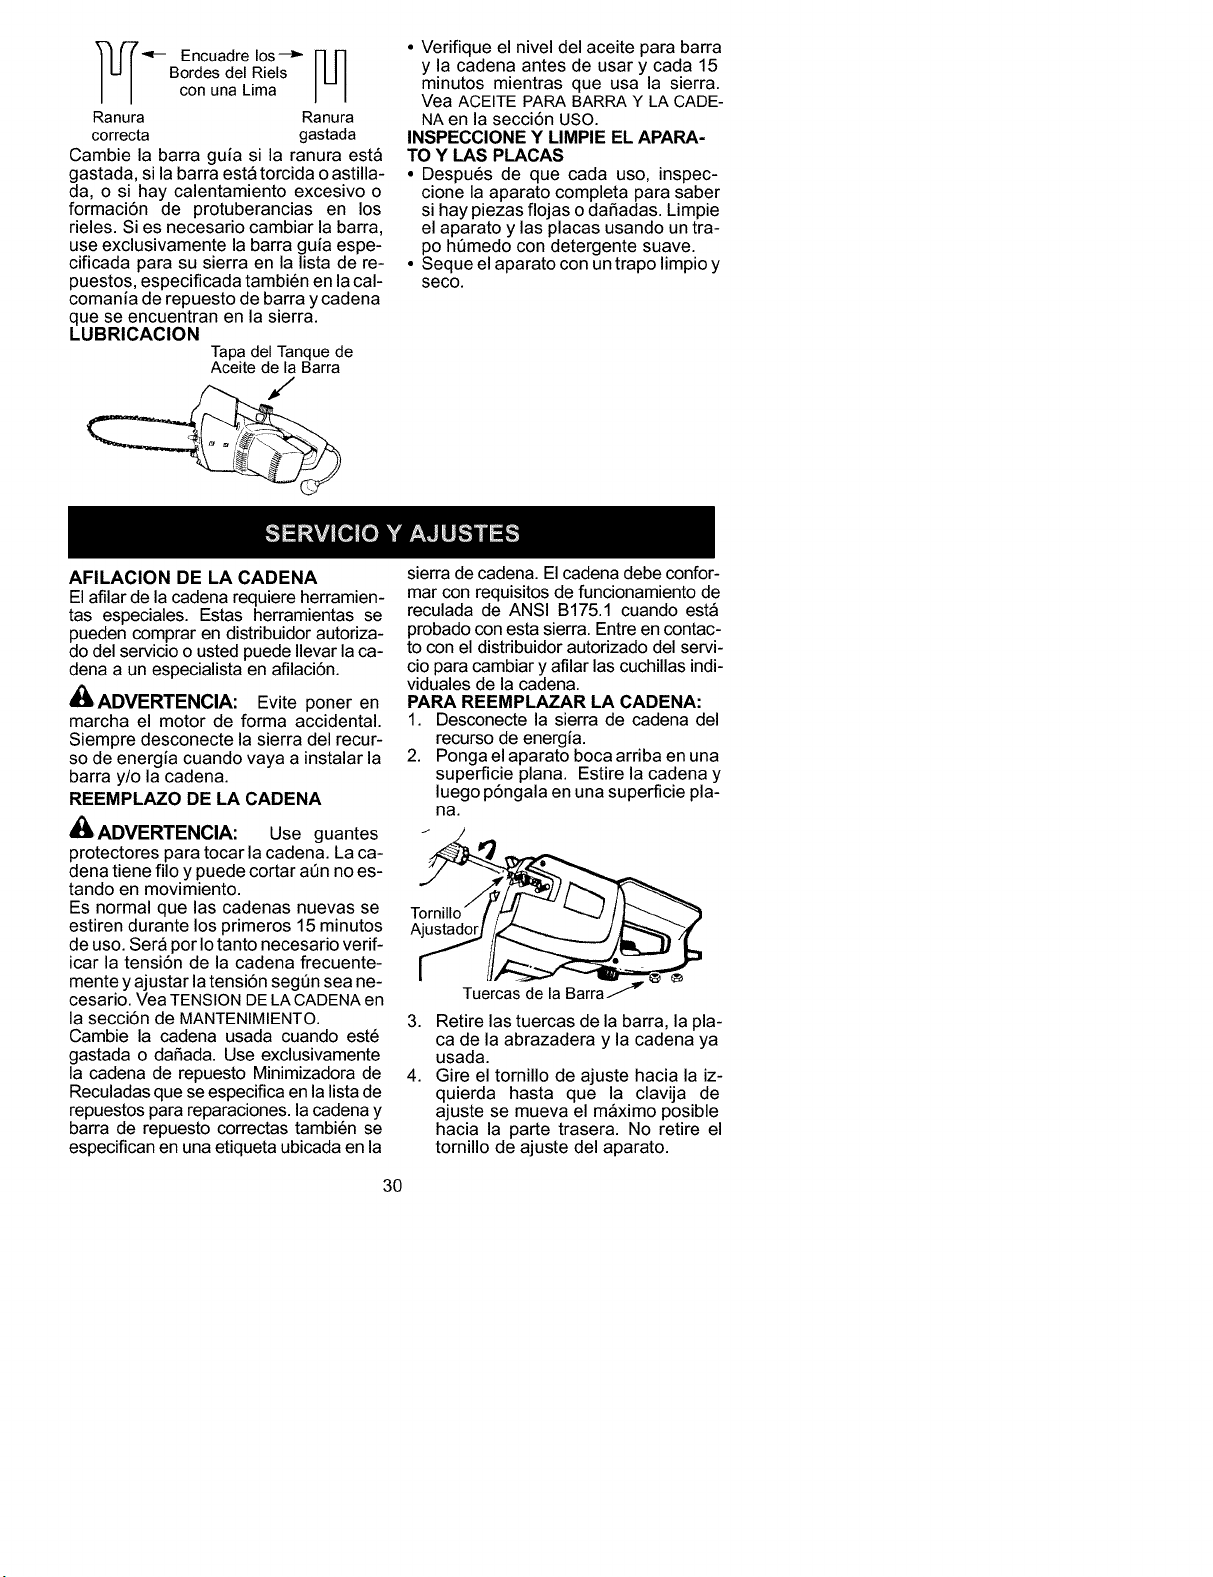
_]-_-*'- Encuadrelos--_ [-L[]
BordesdelRiels
conunaLima
Ranura Ranura
correcta gastada
Cambielabarraguiasilaranuraest&
gastada,silabarraest&torcidaoastilla-
da,osihaycalentamientoexcesivoo
formaci6nde protuberanciasen los
rieles.Siesnecesariocambiarlabarra,
useexclusivamentelabarraguiaespe-
cificadaparasusierraenlalistadere-
puestos,especificadatambi6nenlacal-
comaniaderepuestodebarraycadena
queseencuentranenlasierra.
LUBRICAClON
TapadelTanquede
AceitedelaBarra
AFILACION DE LA CADENA
• Verifique el nivel del aceite para barra
y la cadena antes de usar y cada 15
minutos mientras que usa la sierra.
Vea ACEITE PARA BARRA Y LA CADE-
NA en la secci6n USO.
INSPECClONE Y LIMPIE EL APARA-
TO Y I_AS PLACAS
• Despu6s de que cada uso, inspec-
cione la aparato completa para saber
si hay piezas flojas o daSadas. Limpie
el aparato y las placas usando un tra-
po h6medo con detergente suave.
• Seque el aparato con un trapo limpio y
seco.
El afilar de la cadena requiere herramien-
tas especiales. Estas herramientas se
pueden comprar en distribuidor autoriza-
do del servicio ousted puede Ilevar la ca-
dena a un especialista en afilaci6n.
_i_IADVERTENCIA: Evite poner en
marcha el motor de forma accidental.
Siempre desconecte la sierra del recur-
so de energfa cuando vaya a instalar la
barra y/o la cadena.
REEMPLAZO DE LA CADENA
'_ ADVERTENCIA: Use guantes
protectores para tocar la cadena, ka ca-
dena tiene filo y puede cortar a6n no es-
tando en movimiento.
Es normal que las cadenas nuevas se
estiren durante los primeros 15 minutos
de uso. Ser& por Iotanto necesario verif-
icar la tensi6n de la cadena frecuente-
mente y ajustar la tensi6n seg6n sea ne-
cesario. Vea TENSION DELA CADENAen
la secci6n de MANTENIMIENTO.
Cambie la cadena usada cuando est6
gastada o daSada. Use exclusivamente
la cadena de repuesto Minimizadora de
Reculadas que se especifica en la lista de
repuestos para reparaciones, la cadena y
barra de repuesto correctas tambi6n se
especifican en una etiqueta ubicada en la
30
sierra de cadena. El cadena debe confor-
mar con requisitos de funcionamiento de
reculada de ANSI B175.1 cuando est&
probado con esta sierra. Entre en contac-
to con el distribuidor autorizado del servi-
cio para cambiar y afilar las cuchillas indi-
viduales de la cadena.
PARA REEMPLAZAR LA CADENA:
1. Desconecte la sierra de cadena del
recurso de energfa.
2. Ponga el aparato boca arriba en una
superficie plana. Estire la cadena y
luego p6ngala en una superficie pla-
ha.
3.
4.
Retire las tuercas de la barra, la pla-
ca de la abrazadera y la cadena ya
usada.
Gire el tornillo de ajuste hacia la iz-
quierda hasta que la clavija de
ajuste se mueva el m&ximo posible
hacia la parte trasera. No retire el
tornillo de ajuste del aparato.
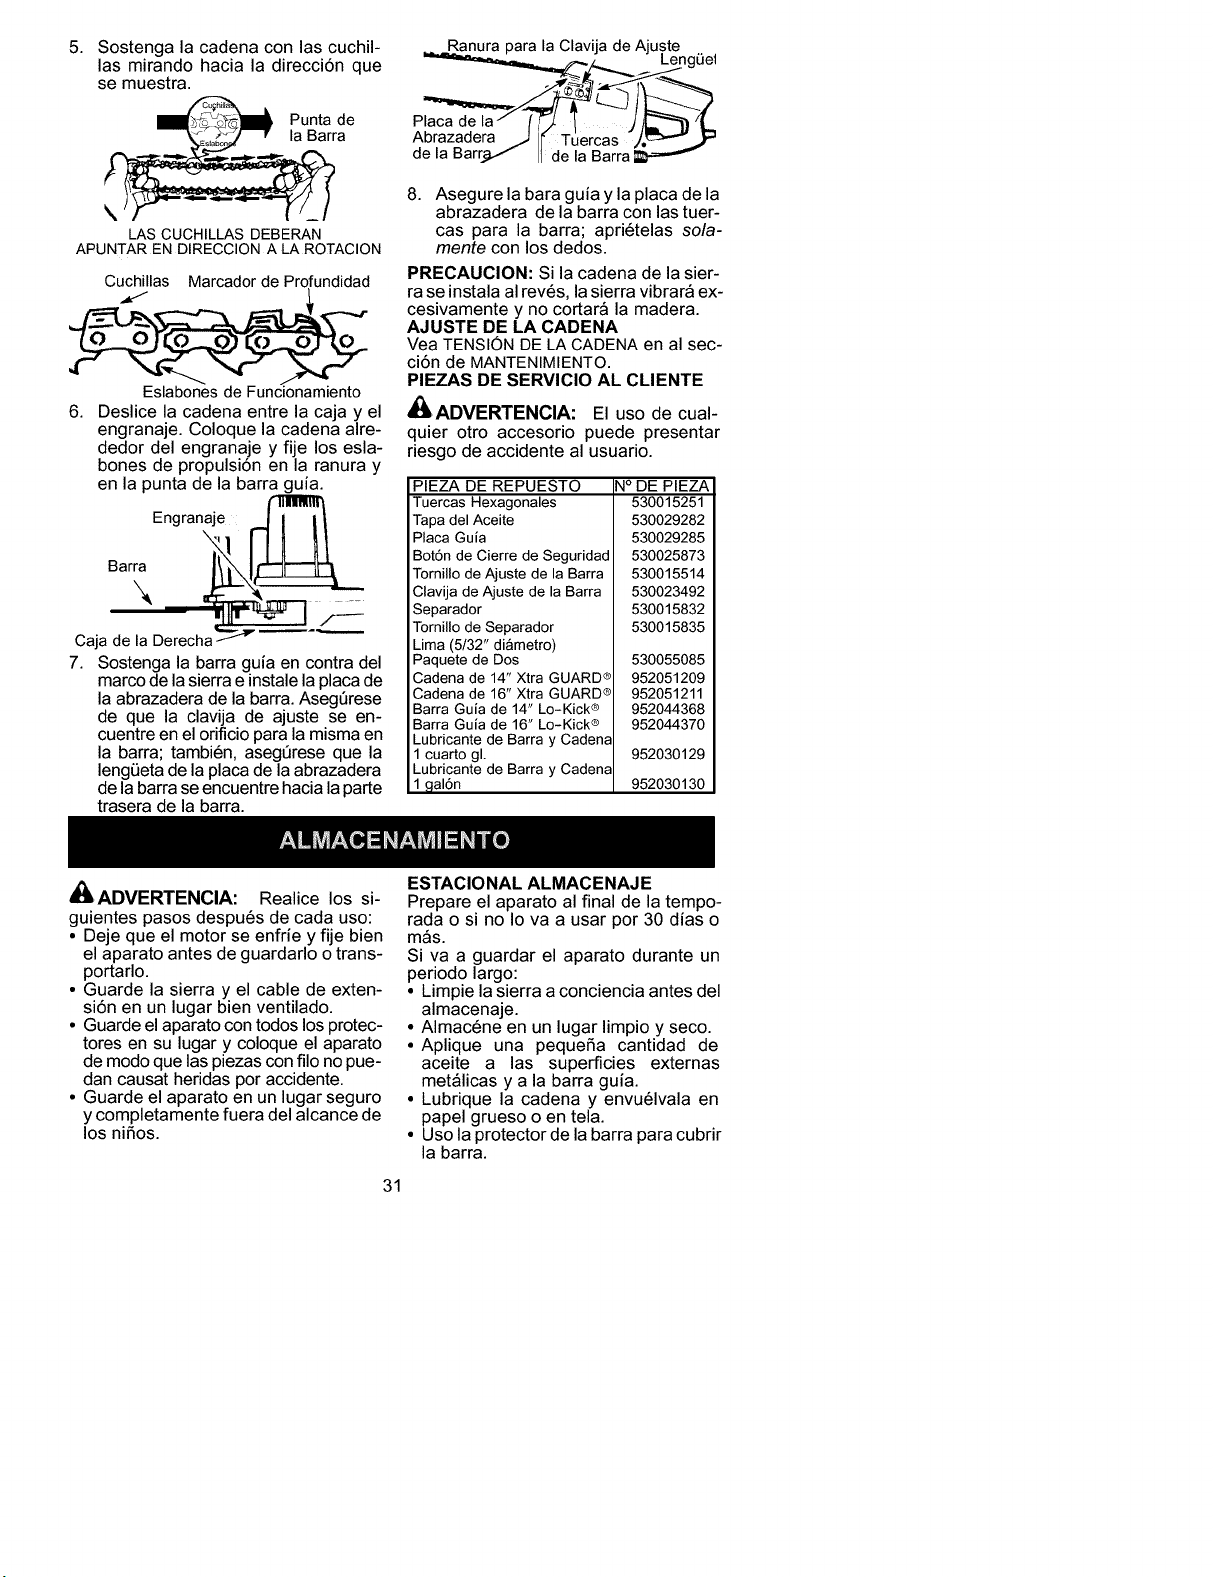
5. Sostengalacadenaconlascuchil-
lasmirandohacialadirecci6nque
semuestra.
_ unta de
la Barra
LAS CUCHILLAS DEBERAN
APUNTAR EN DIRECCION A LA ROTACION
Cuchillas Marcador de Profundidad
Eslabones de Funcionamiento
6. Deslice la cadena entre la caja y el
engranaje. Coloque la cadena alre-
dedor del engranaje y fije los esla-
bones de propulsi6n en la ranura y
en la punta de la barra guia.
Engranaje _J_
\ 11t_ I/_
Caja de la Derecha J
7. Sostenga la barra gufa en contra del
marco de la sierra e instale la placa de
la abrazadera de la barra. AsegQrese
de que la clavija de ajuste se en-
cuentre en el orificio para la misma en
la barra; tambi6n, asegQrese que la
lengLieta de la placa de la abrazadera
de la barra se encuentre hacia la parte
trasera de la barra.
Ranura para la Clavija de Ajuste ,
giJel
Placadela/ If'-€ I J_!L
Abrazadera i J _" Tuercas ",/,_"_;;_
de la Barrj_q,,,f I de la Barra
8.
Asegure la bara guia y la placa de la
abrazadera de la barra con las tuer-
cas para la barra; apri6telas sola-
mente con los dedos.
PRECAUClON: Si la cadena de la sier-
ra se instala al rev6s, lasierra vibrar& ex-
cesivamente y no cortar& la madera.
AJUSTE DE LA CADENA
Vea TENSION DE LA CADENA en al sec-
ci6n de MANTENIMIENTO.
PIEZAS DE SERVIClO AL CLIENTE
_IADVERTENClA: El uso de cual-
quier otro accesorio puede presentar
riesgo de accidente al usuario.
PIEZA DE REPUESTO
Tuercas Hexagonales
Tapa del Aceite
Placa Guia
Bot6n de Cierre de Seguridad
Tornillo de Ajuste de la Barra
Clavija de Ajuste de la Barra
Separador
Tornillo de Separador
Lima (5/32" di&metro)
Paquete de Dos
Cadena de 14" Xtra GUARD ®
Cadena de 16" Xtra GUARD ®
Barra Guia de 14" Lo-Kick ®
Barra Guia de 16" Lo-Kick ®
Lubricante de Barra y Cadena
1 cuarto gl.
Lubricante de Barra y Cadena
1 ,qal6n
N° DE PIEZA
530015251
530029282
530029285
530025873
530015514
530023492
530015832
530015835
530055085
952051209
952051211
952044368
952044370
952030129
952030130
_IADVERTENClA: Realice los si-
guientes pasos despu6s de cada uso:
• Deje que el motor se enfrfe y fije bien
el aparato antes de guardarlo o trans-
portarlo.
• Guarde la sierra y el cable de exten-
si6n en un lugar bien ventilado.
• Guarde el aparato con todos los protec-
tores en su lugar y coloque el aparato
de modo que las piezas con filo no pue-
dan causat heridas por accidente.
• Guarde el aparato en un lugar seguro
y completamente fuera del alcance de
los nifios.
31
ESTAClONAL ALMACENAJE
Prepare el aparato al final de la tempo-
rada o si no Io va a usar por 30 dfas o
m_s.
Si va a guardar el aparato durante un
periodo largo:
• Limpie la sierra a conciencia antes del
almacenaje.
• Almac6ne en un lugar limpio y seco.
• Aplique una pequefia cantidad de
aceite a las superficies externas
met&licas y a la barra guia.
• Lubrique la cadena y envu61vala en
papel grueso o en tela.
• Uso la protector de la barra para cubrir
la barra.
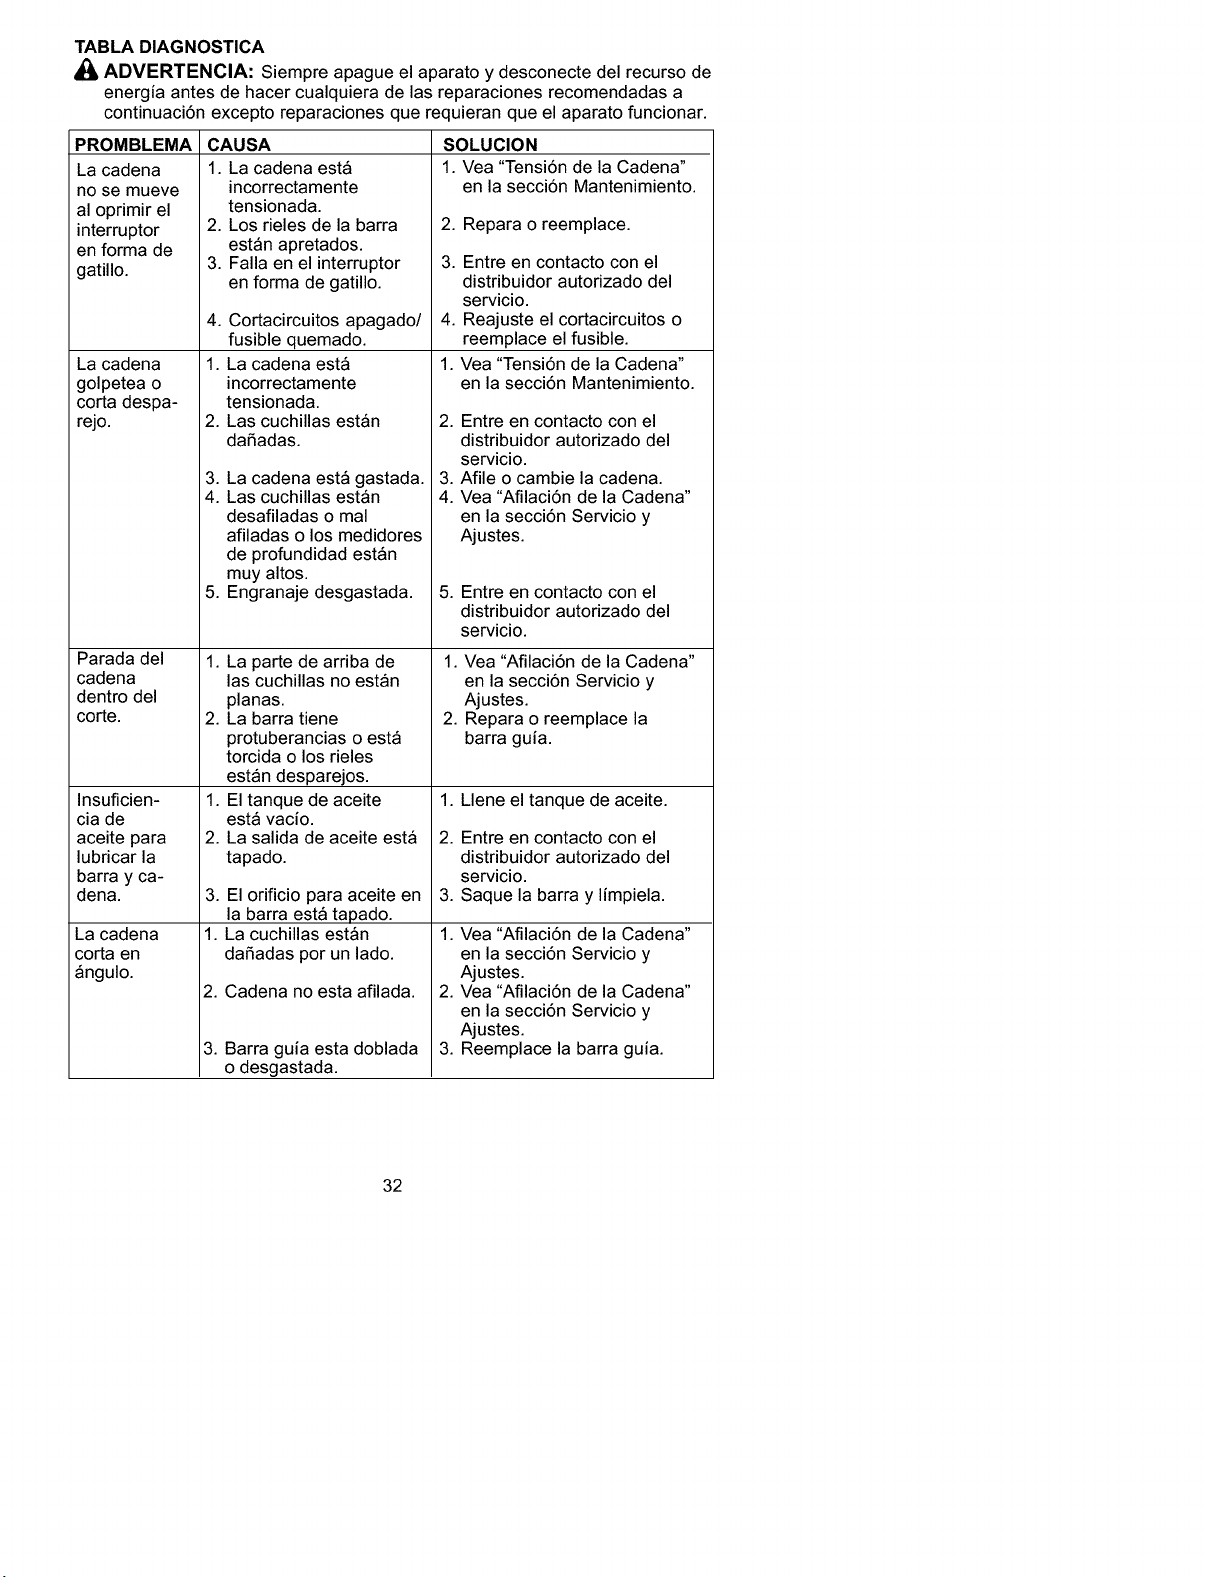
TABLA DIAGNOSTICA
ADVERTENCIA: Siempre apague el aparato y desconecte del recurso de
energia antes de hacer cualquiera de las reparaciones recomendadas a
continuaci6n excepto reparaciones que requieran que el aparato funcionar.
PROMBLEMA
La cadena
no se mueve
al oprimir el
interruptor
en forma de
gatillo.
La cadena
golpetea o
corta despa-
Parada del
cadena
dentro del
corte.
Insuficien-
cia de
aceite para
lubricar la
barra y ca-
dena.
La cadena
corta en
&ngulo.
CAUSA
1. La cadena est&
incorrectamente
tensionada.
2. Los rieles de la barra
est&n apretados.
3. Falla en el interruptor
en forma de gatillo.
4. Cortacircuitos apagado/
fusible quemado.
1. La cadena est&
incorrectamente
tensionada.
2. Las cuchillas est&n
daSadas.
3. La cadena est& gastada.
4. Las cuchillas est&n
desafiladas o mal
afiladas o los medidores
de profundidad est&n
muy altos.
5. Engranaje desgastada.
1. La parte de arriba de
las cuchillas no est&n
planas.
2. La barra tiene
protuberancias o est&
torcida o los rieles
est&n desparejos.
1. El tanque de aceite
est& vacio.
2. La salida de aceite est&
tapado.
3. El orificio para aceite en
la barra est& tapado.
1. La cuchillas est&n
daSadas por un lado.
2. Cadena no esta afilada.
3. Barra guia esta doblada
o desgastada.
SOLUCION
1. Vea "Tensi6n de la Cadena"
en la secci6n Mantenimiento.
2.
3.
4.
1.
Repara o reemplace.
Entre en contacto con el
distribuidor autorizado del
servicio.
Reajuste el cortacircuitos o
reemplace el fusible.
Vea "Tensi6n de la Cadena"
en la secci6n Mantenimiento.
2. Entre en contacto con el
distribuidor autorizado del
servicio.
3. Afile o cambie la cadena.
4. Vea "Afilaci6n de la Cadena"
en la secci6n Servicio y
Ajustes.
5. Entre en contacto con el
distribuidor autorizado del
servicio.
1. Vea "Afilaci6n de la Cadena"
en la secci6n Servicio y
Ajustes.
2. Repara o reemplace la
barra guia.
1. Llene el tanque de aceite.
2. Entre en contacto con el
distribuidor autorizado del
servicio.
3. Saque la barra y limpiela.
1. Vea "Afilaci6n de la Cadena"
en la secci6n Servicio y
Ajustes.
2. Vea "Afilaci6n de la Cadena"
en la secci6n Servicio y
Ajustes.
3. Reemplace la barra guia.
32
ELECTROLUX HOME PRODUCTS,
INC., garantiza al comprador original
que cada producto el6ctrico oinal&mbri-
co marca Poulan nuevo ser& libre de
defectos de materiales y de mano de
obra y que se compromete a reparar o
reemplazar, bajo las condiciones de
esta garantfa, todo producto el6ctrico o
inal&mbrico marca Poulan defectuoso
dentro del perfodo de un (1) aSo a partir
de la fecha de compra original.
Si su producto el6ctrico o inal&mbrico de
las marca Poulan fallara dentro del perfo-
do de garantfa, devu61valo, completo, sal-
dado y con recibo de compra al agente al
que le fue comprado para reparaci6n ore-
emplazo a opci6n de ELECTROLUX
HOME PRODUCTS, INC.
Esta garantfa no estransferible y no cubre
daSos y responsabilidad causados por el
manejo inapropiado, mantenimiento in-
apropiado, o el uso de accesorios y/o pie-
zas no especificamente recomendadas
por ELECTROLUX HOME PRODUCTS,
INC., para el uso de esta herramienta. En
adici6n, esta garantfa no cubre las piezas
que se deterioren y requieran ser reem-
plazadas por el uso razonable durante el
perfodo de garantfa. Esta garantfa no
cubre planes de acuerdo de entrega o
ajustes normales explfcitos en el manual
de instrucciones.
ESTA GARANTIA CONFIERE DERECHOS
LEGALES ESPECIFICOS AL PROPIETARIO,
QUE TAL VEZ TENGA ASIMISMO OTROS
DERECHOS QUE VARIAN ENTRE ESTA-
DOS.
NO SE PERMITIRAN RECLAMACIONES
POR CONSECUENCIA O POR OTROS
DAI_IOS,Y NO HAY OTRAS GARANTIAS EX-
PRESADAS EXCEPTUANDO LAS QUE AQUI
SE ESTIPULAN.
ALGUNOS ESTADOS NO PERMITEN LIMI-
TACIONES EN CUANTO AL PERIODO DE
TIEMPO QUE UNA GARANTIA PUEDE DU-
RAR O LA RESTRICCION O LIMITACION DE
DAI_IOS INCIDENTES O CONSECUENTES,
LO QUE IMPLICA QUE LO DICHO ANTE-
RIORMENTE PUEDE QUE NO TENGA NIN-
GUNA VALIDEZ EN EL ESTADO EN DONDE
USTED RESIDE.
La norma de ELECTROLUX HOME
PRODUCTS, INC., es la de mejorar sus
productos de una forma continua. Por Io
tanto, ELECTROLUX HOME PRO-
DUCTS, INC., se reserva el derecho a
cambiar, modificar o descontinuar mode-
los, diseSos, especificaciones y acceso-
rios de todos sus productos, en cualquier
momento y sin previo aviso u obligaci6n
para con ning6n comprador.
33