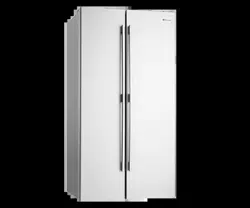
User manual Refrigerator for Westinghouse WSE6100SF
INSTALLATION
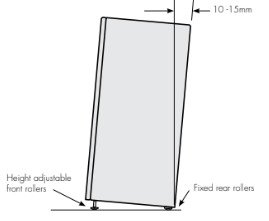
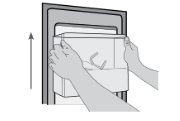
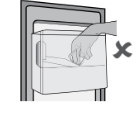
The refrigerator should arrive with the front rollers wound down We recommend that the appliance be tilted backwards by about 10 to 15 millimetres, this will allow the doors to self close providing a consistent door seal To do this follow the instructions below:
When you want to install your appliance, take the following steps
- Roll the refrigerator into it’s final position.
- If the refrigerator is not tilted back you can adjust the two front rollers by adjusting the large plastic roller nut (refer page 11) You may need two people, one to adjust rollers and one to tilt the refrigerator slightly back to take the weight of the appliance off the front rollers This will increase or decrease the height of the rollers One turn of the nut will change the tilt of the refrigerator by approximately 5mm
- If the cabinet is level, then the side walls should be plumb or vertical If the cabinet is built in or partly built in check the alignment of the cabinet side against the cupboard
ADJUSTING DOOR ALIGNMENT
Each door is independently adjustable in the vertical direction by turning the adjustable bolts under the hinges using the spanner provided.

The doors can be adjusted up or down Depending on the amount of adjustment required it may be sufficient to adjust only one door (refer to following diagrams).
Note: When the height of the rollers and adjusting bolts are correctly adjusted the refrigerator will stand firmly on the floor and the doors will be in line with one another.
Ice & water installation
THE EXTERNAL WATER FILTER KIT
- An external water filter and connection kit has been supplied for use with your Ice & Water refrigerator The external filter design allows more space within the refrigerator and provides double the life of previous filters reducing the cost of replacement
- The filter is designed to significantly reduce chlorine, taste, odour, heavy metals, turbidity (cloudiness) and scale build up The included plastic water tube allows quick connection to the filter and is designed for high durability and kink resistance
- This filter is designed only to be used with a potable water supply It should not be used on water that is micro biologically unsafe or with water of unknown quality The filter should be replaced every 12 months The service life of the filter may be reduced in water supplies that contain an excess of particles or other impurities. Reduced flow rate is an indication that a new filter is required Failure to replace the filter when required can affect the function of the ice maker Service calls caused by a failure to replace the filter are not covered by warranty
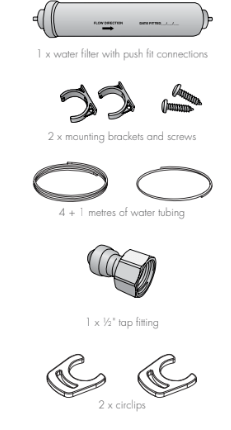
CONTENTS OF KIT – INSTALL KIT WITH PRESSURE REDUCING VALVE.
Water supply and Plumbing
- A drinkable water supply to suit a 1⁄2’ tap fitting is required adjacent to the refrigerator It is recommended that a licensed plumber install a new water supply outlet nearer to the appliance should the tubing supplied not be long enough It is not recommended that the tubing be extended as this could adversely affect the flow of water to the ice maker or water dispenser
- The water dispenser and automatic ice maker require a drinkable water supply with a pressure range of between 206kPa and 689kPa (30PSI and 100PSI) If the water supply pressure is below 206kPa (30PSI) then a separate pump will need to be installed
- It is recommended that a Noise Reduction Valve also be fitted in the water supply line This will reduce water hammer and its effects from quick action house hold taps and fast acting valves on appliances The refrigerator water valve is pre-fitted with a push-fit connector for inserting the water tube Where the tap connection is other than 1/2’, adapters can be purchased from plumbing supply stores or good hardware stores.
Water Filter
- Locate the water filter within 1 metre of the water supply tap, in a vertical orientation where possible The filter will need to be replaced every 12 months to prevent excess filtered micro-organism build-up, and thus ensure continuous purified water and ice supply for you and your family. Replacement water filters are available from Electrolux Home Products Spare Parts Centres and can be posted to you for your convenience (refer to back page for contact details)
INSTALLING YOUR ICE & WATER FILTER
Check for water leaks at all water connection points in the first 2 to 3 hours after installation, and correct it in case of any water leak. Recheck after 24 hours; if leak still occurs, it is recommended to contact a licensed plumber for advice
INSTALLATION
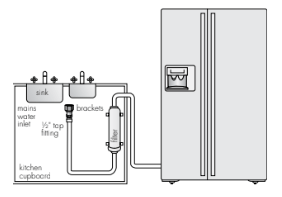
Water is to be connected as per diagram below
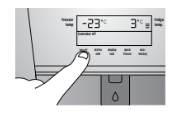
Step 1 Ensure that the Ice Maker is switched OFF.
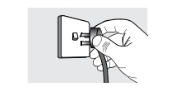
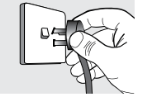
Step 2 Disconnect refrigerator from power supply.
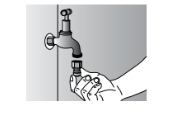
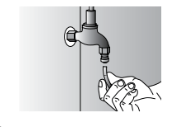
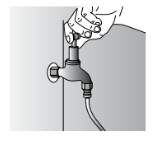
Step 3 Connect tap fitting to water supply tap Tap must be close
to the refrigerator.
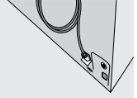
Step 4 Install brackets for filter within 1 metre of tap.
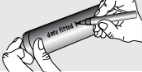
Step 5 Write date on filter The filter will need to be replaced
every 12 months.
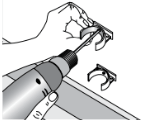
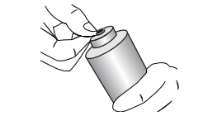
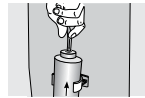
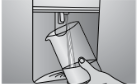
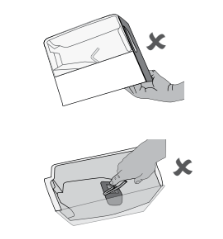
Step 6 Extend the red collar and clip a circlip around the collar
at both ends of the filter.
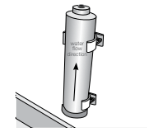
Step 7 Fit filter to brackets with water flow arrow pointing up.
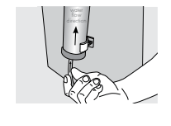
Step 8 Push shorter tube into tap fitting past insertion mark.
Step 9 Push other end into filter inlet.
Step 10 Connect remaining tube length to filter outlet.
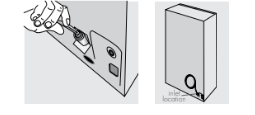
Step 11 Connect other end of remaining tube length to inlet on bottom right hand side of refrigerator back. Ensure black circlip is fitted to the valve on the rear of the fridge when making this connection.
Step 12 Turn on water and check all joints and tubes for leaks.
Step 13 Reconnect the power.
Step 14 Move the refrigerator back into place being careful not to
kink or split the tubing.
Step 15
Using a large container run the water dispenser to clear air from lines This may take a few minutes Purge and dispense a minimum of 2 litres of water or until the water runs clear Initial water may be black in colour This is residual carbon dust from the filter and is non-toxic If the water is slow to shut off or the dispenser is dripping, air may still be in the lines Either purge more water through the system to remove this air or allow some time for the air to be removed over subsequent dispensing.
Step 16 Switch ON Ice Maker, touch and hold ‘cubed/crushed ice’ button for 5 seconds.
Step 17 After 24 hours remove ice bin and dispose of first few batches of ice to ensure that impurities have been flushed from the system.

Tips and Useful information
- Ensure that taps are turned off when replacing and fitting filters. Remember to turn the taps back on when filter fitting is complete
- Always fit filter as per manufacturer’s instructions, paying special attention to water flow direction
- If you need to replace water tube, only use approved water quality piping that meets the pressure requirements
- Do not allow the water tubing to become kinked or trapped under the refrigerator when moving the refrigerator back into position
- Make sure your refrigerator is level to avoid uneven or oversize cubes Uneven ice cubes may lead to the dispenser chute becoming blocked
- After installation, run the water dispenser for a few minutes to ensure that all air bubbles have been purged from the tubing Dripping may occur if air bubbles remain in the tube
- Replace filter at suggested intervals to avoid water/ice reduction and irregularities in taste
- Remove and clean ice bin once a month, discarding unused ice cubes This will ensure fresh, clean ice and smooth operation of your ice maker
- Clean and empty the dispenser drip tray regularly to avoid overflow
- As the water/ice cut off is not instant, leave glass under dispenser briefly until water or ice has stopped flowing to avoid spills
- Always place ice in glass before filling with water to avoid splashing
- When dispensing ice hold the container close to the chute to avoid spray or spills
ICE & WATER INSTALLATION
Connect to potable water supply only Do not put fingers into ice crusher Surfaces there may be sharp
INITIAL START-UP
REFRIGERATOR/FREEZER OPERATION
A light frosting will occasionally occur on the interior of the freezer when the door is opened frequently This is normal and will disappear after a few days in most climates
Make sure you fully close the freezer door after you load or remove food If the door is left partly open, a heavy frost will coat the inside of the freezer If a frost develops, remove it Take care to properly close the door and the frost will not reoccur
Your new energy efficient appliance uses a high-speed compressor and other energy efficient components which may produce different noises to your old appliance
These sounds are normal and include:
- Compressor running noise.
- Air movement noise from the small fan motor.
- Occasional gurgling, similar to water boiling.
- A popping noise, heard during automatic defrosting.
- A clicking noise, just prior to the compressor starting up.
- A motorised air baffle used to adjust airflow.
These noises are normal and not cause for alarm
It is normal for the rear, sides and centre divider of the appliance to feel warm These areas are warm because the appliance transfers heat from the food placed inside to the outside air
There is a cooling coil located behind the rear wall of the freezer section This coil cools and removes moisture from the air A fan at the rear of the freezer section then circulates cold, dry air throughout the refrigerator The air circulation means that foods are refrigerated far more quickly than in refrigerators where there is less air circulation
Avoid placing food against air outlets as this will affect air circulation
USING YOUR REFRIGERATOR – GENERAL
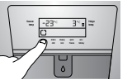
TEMPERATURE SENSORS
Avoid loading food against your freezer temperature sensor Doing so may adversely affect freezer temperatures If warm food is inadvertently loaded against the sensor, it may also set off the freezer temperature alarm for up to 50 minutes after the food is loaded against the sensor.
Note: Product illustrations demonstrate features that may not be completely in line with all current products.
ICE & WATER DISPENSER
How the water dispenser works
- The water dispenser water tank is located behind the upper crisper bin in the refrigerator compartment
- After the refrigerator is connected to water fill the water tank by holding a large container against the dispenser paddle to run the water and clear air from lines This may take a few minutes Purge and dispense a minimum of 2 litres of water Initial water may be black in colour This is residual carbon dust from the filter and is non toxic If the water is slow to shut off or the dispenser is dripping air may still be in the lines Either purge more water through the system to remove the air or allow some time for the air to be removed over subsequent dispensing The tank will automatically refill as you dispense water
How the ice dispenser works
- The ice maker is located in the top section of the freezer compartment After installation, switch the ice maker on at the controls on the door to begin making ice A full tray of ice may not be created for the first few batches, due to air in the refrigerator’s new plumbing lines. The first batches of ice cubes may be discoloured or have an odd flavour, due to the refrigerator’s new plumbing connections. Discard this ice until batches are free of discolouration or taste problems The ice maker turns off automatically when the ice container is full To stop ice production, turn the ice maker off at the electronic display on the door.
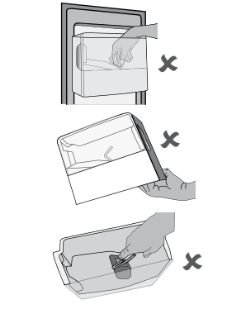
CLEANING THE ICE DISPENSER
Clean the dispenser and ice container at regular intervals, particularly before you take a holiday or move, also clean the dispenser if it sticks
To clean the dispenser:
- Remove the ice container by lifting it up and out. Empty and carefully clean the container with mild detergent. Rinse carefully ensuring no traces of detergent remain Do not use harsh or abrasive cleaners Allow the ice container to dry completely before replacing it in the freezer If ice has accumulated on the surface, remove with a warm, damp cloth or allow to defrost Do not use sharp instruments to remove ice
- Remove ice chips from the shelf and chute that support the ice container; clean these areas
- Replace the ice container.
WARNING
- Do not put fingers up the ice chute Surfaces there may be sharp.
CAUTION
- When removing or replacing the ice bin do not rotate the ice stirrer in the ice bin If the ice stirrer is accidentally turned, you may need to realign the ice stirrer until the ice bin fits into place with the drive mechanism
- When refitting the ice bin make sure it is fully seated on the door panel.
Remove and empty the ice storage bin if:
- An extended power failure (one hour or longer) causes ice cubes in the ice storage bin to melt and freeze together and jam the dispenser mechanism.
- If the ice dispenser is not used frequently, ice cubes will freeze together in the bin and jam the dispenser mechanism If this happens remove the ice storage bin and dispose of the ice.
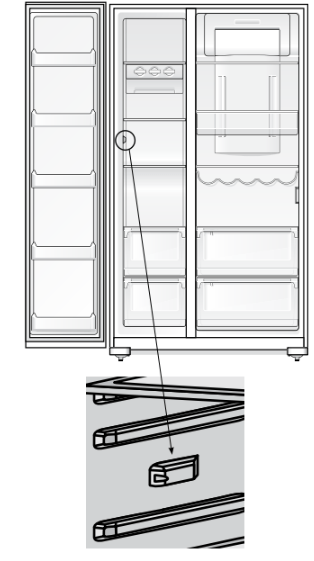
CHANGING THE LIGHT BULB
REFRIGERATOR LIGHT
- Switch off the power at the power point and remove the refrigerator’s power cord from the power point. Check the temperature settings and write them down.
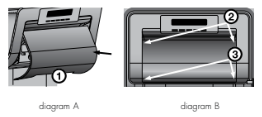
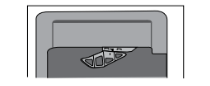
- Unclip the light lens by inserting your fingers at point 1 in diagram A.
- Lift the light lens until it is clear of the housing and unscrew the light bulb.
- Unscrew the light bulb and replace it with a bulb that is the same as the original If, when you remove the light bulb the small rubber ‘O’ ring comes out with the bulb, fit the ‘O’ ring over the new bulb and screw bulb into the socket (see diagram at the right of the page).
- Replace the light lens by inserting the tab on the lens at point 2 and pushing in the lens with both hands at point 3, see diagram B.
- Turn the refrigerator back on.
TROUBLESHOOTING
When your appliance is not operating
- Check that the power cord is plugged into the power outlet properly and that the outlet is switched ‘ON’.
- Try running another appliance from the power outlet. If no power is coming from the outlet you may have blown a fuse or tripped a circuit of your household power supply
- Try adjusting the temperature control to a slightly ‘colder’ position.
- It is normal for the freezer fan NOT to operate during the automatic defrost cycle, or for a short time after the appliance is switched on
When there is refrigerator/freezer noise
Modern refrigerators/freezers with increased storage capacity use high speed compressors These can provide a seemingly high level of sound which is quite normal Normal operational sounds include:
- Occasional gurgling, similar to water boiling.
- Air flow noise (air circulates because of a small fan).
- A popping noise heard during automatic defrost.
- A clicking noise heard just before the compressor starts (this is merely the automatic switching action of the temperature control, turning the compressor on or off)
Other strange sounds may mean that you need to check and take action
For example, noises may mean that:
- The cabinet is not level.
- The floor is uneven or weak.
- Bottles are badly placed and rattling.
- There are vibrations from an object on top of or behind or beside the refrigerator.
- The back of the refrigerator cabinet is touching the wall.
If there are odours inside the appliance
- The interior may need cleaning.
- Some foods produce odours.
- Some containers and wrapping can cause odours.
- Did the odour begin about the same time you started storing something unusual or with a strong smell?
When the motor seems to run more than expected
Your new appliance provides you with large capacities in both the refrigerator section and the separate freezer It is normal for the motor to operate frequently
However, to keep operation to a minimum, check the following:
- Are doors kept open too long or too often?
- Are controls set too cold? Refer to ‘Controlling the temperature’.
- Have large amounts of warm food just recently been stored? Summer, festive seasons and holidays usually mean a lot more work for your appliance.
- If the day is hot or the room is very warm, the appliance will need to run more than normal.
- The appliance will run more than normal just after you install it or when it has been turned off for a long time.
If the temperature in the refrigerator is too warm
- Check that the appliance has enough clearance at the sides, back and top. Refer to the installation Instructions at the front of this booklet.
- Refer to ‘Controlling the temperature’.
- You may have kept the door open too long or too frequently.
- Food containers or packaging may be holding a door open.
If the temperature in the refrigerator is too cold
- Refer to ‘Controlling the temperature’.
- Increase the temperature to avoid high energy consumption.
If heavy frosting occurs in the freezer
- Make sure you fully close the freezer and fridge doors. If the doors are left partly open a heavy frost will coat the inside of the freezer If a frost develops, remove it Take care to properly close the doors and the frost will not reoccur
- Doors should close automatically from 45° open, if not adjust cabinetry (refer to cabinet alignment).
If water drips on the floor
- The defrost water tray, (located at the back or underneath of the cabinet), may not be properly positioned, or the drain tube may not be properly positioned to direct water into this tray You may need to pull the refrigerator away from the wall to check the tray and tube.
- A door may have been left open, check that the doors are closed correctly.
Fridge does not exit vacation mode
- Turn appliance off at the powerpoint. Leave off for five (5) minutes for the memory to clear, then turn back on.
If your electronic display does not respond
- If no buttons have been pressed for approximately 60 seconds there may be a delay of up to 2 seconds before the display reacts This is normal and is to prevent accidental changes to the settings.
Door opens when other is closed
- It is normal for a freezer or fridge door to momentarily pop open when the other door is closed, if the cabinet is adjusted properly the door will re-close quickly.
ICE + WATER TROUBLESHOOTING
Automatic ice-maker
The ice maker is not making any ice
- Ice maker is in the OFF position
See Ice maker section in user manual: turn switch to ON position
Turn on the water tap
- The freezer is not cold enough
See the Problem section: ‘If the temperature in the refrigerator is too warm’
- The water dispenser may not be dispensing water
If it isn’t, the ice & water filter cartridge may be clogged or restricted by foreign material, and will need to be replaced.
Check and/or change filter.
The ice-maker is not making enough ice
- The ice maker is producing less ice than you expect
The ice maker should produce approximately 0 5-1 kilogram of ice every 24 hours
- The freezer is not cold enough
See section ‘Controlling temperatures’
- Household water tap is not open
Open the household water tap
- The water dispenser is dispensing slower than normal
Replace the water filter cartridge
Ice cubes are too small or too big
- Restricted water flow to the ice maker
- Water pressure may be too low
- Water pressure may be too high
- Appliance not levelled correctly
Replace the filter cartridge, as the water filter cartridge may be clogged
Check water supply hose for kinks
Check water pressure meets minimum and maximum requirement (see install instructions)
If all of the above is OK adjust ice cube size (refer to ‘Adjusting ice cube size on page 27)
The ice has a bad odour and taste
- The ice has picked up odour or flavour from strongly flavoured food stored in the refrigerator or freezer
Cover foods tightly. Discard stale ice. The ice maker will produce a fresh supply
Change ice monthly
- The water running into the ice maker has poor taste or colour
Add or replace water filter to water supply. Consult a water purifying company
- Ice not used frequently enough
Discard stale ice monthly.
ICE DISPENSER
The dispenser will not dispense ice
- The ice storage container is empty
- The ice chute is blocked
Refer ‘the ice maker is not making any ice’ section above.
The first supply of ice may take up to 4 hours after power up, try the dispenser after ice is made
Remove ice bin to gain access to chute underneath and remove any ice causing the blockage Dry the surface of the chute with a paper towel or similar and replace the ice bin ensuring it is fully seated on the door
The ice dispenser is jammed
- Ice has melted and frozen around the stirrer or in the crusher due to infrequent use, temperature fluctuations and/or power outages
Remove the ice bin and empty its contents. Use warm water to melt any ice in the bin and crusher. Leave to dry completely so water does not refreeze in the bin causing a further blockage and refit Make sure the bin is fully seated on the door When new ice is made the dispenser should operate
- Ice cubes are hollow or smaller than normal
The water filter cartridge could be clogged. Cartridge may need replacing
Water leaking from ice dispenser
- Ice trapped and melting in ice chute
Clear ice chute of ice
- Ice cubes too small and falling into ice dispenser
Check ice cube size (refer to the ‘Adjusting ice cube size’ section)
The flap on the ice dispenser does not close properly
- Ice cubes are preventing the flap from closing properly
Remove ice bin to gain access to the ice chute and remove ice cubes from chute.