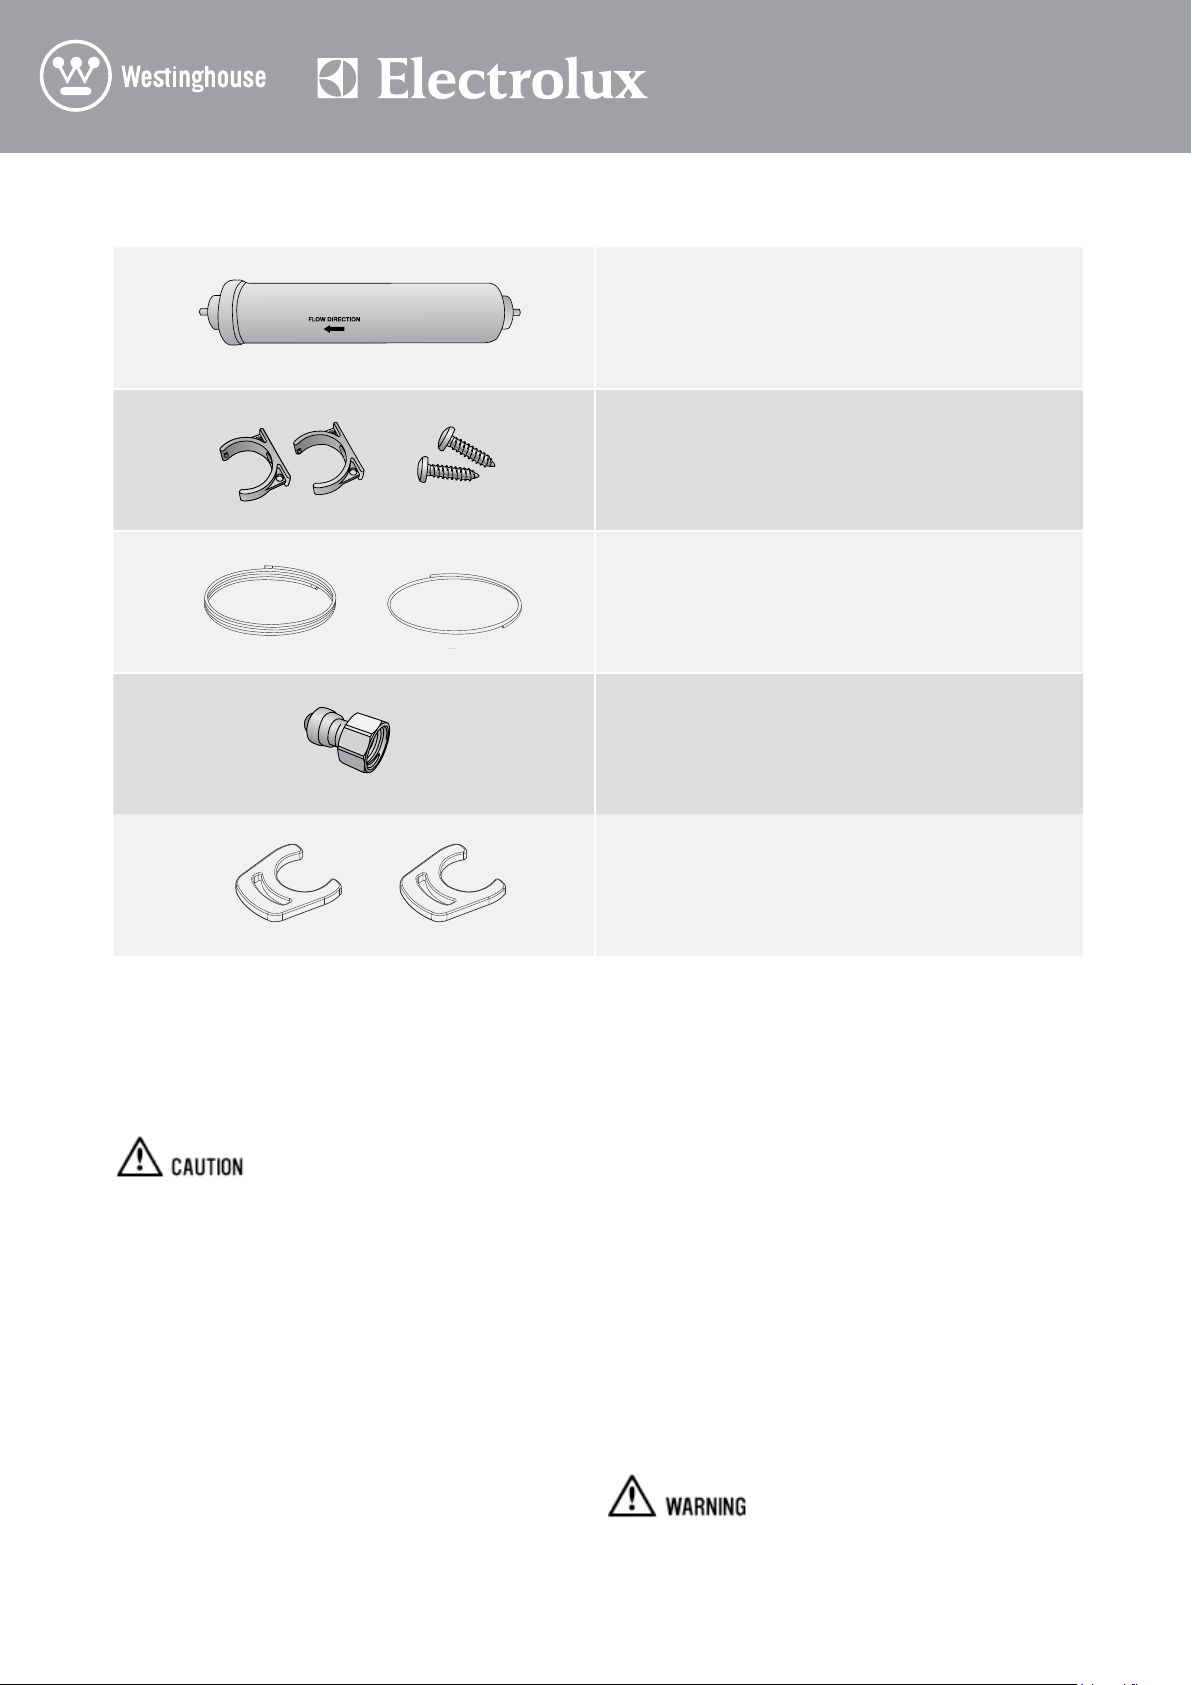
1 x water lter with push t connections
2 x mounting brackets and screws
4 + 1 metres of water tubing
1 x ½” tap tting
2 x circlips
DATE FITTED___/___/___
DATE FITTED___/___/___
CONTENTS OF KIT
INSTALLATION INSTRUCTIONS
WATER FILTER KIT
This will reduce water hammer and its effects from quick
action household taps and fast acting valves on appliances.
Where the tap connection is other than 1/2”, adapters
can be purchased from plumbing supply stores or good
hardware stores.
Water Filter
Locate the water filter within 1 metre from the water supply
tap, in a vertical position where possible. The filter will
need to be replaced every 12 months to prevent excess
filtered micro-organism build-up, and thus ensure continuous
purified water and ice supply for you and your family.
Replacement water filters are available from Electrolux
Home Products Spare Parts Centres and can be posted
to you for your convenience (refer to back page for
contact details).
If the appliance is not connected to a water supply
ensure that the ice maker is switched OFF (refer to STEP 1
overleaf). If you don’t do this a loud buzzing noise will be
heard intermittently.
This refrigerator is designed to be installed by a
qualified/licensed tradesman. Please provide them
with these instructions.
Your warranty may be voided by an incorrect installation
Water Supply and Plumbing
A drinkable water supply to suit a ½” tap fitting is required
adjacent to the refrigerator. It is recommended that a licensed
plumber install a new water supply outlet nearer to the
appliance should the tubing supplied not be long enough.
It is not recommended that the tubing be extended as this
could adversely affect the flow of water to the ice maker or
water dispenser.
The water dispenser and automatic ice maker require a
drinkable water supply with a pressure range of between
206kPa and 689kPa (30PSI and 100PSI). If the water
supply pressure is below 206kPa (30PSI) then a separate
pump will need to be installed. If the water supply pressure
exceeds 689kPa (100PSI) a pressure limiting valve must
be fitted in the water supply line. It is recommended that a
Noise Reduction Valve also be fitted in the water supply line.
bEFORE bEgINNINg INSTALLATION, PLEASE READ:
DATE FITTED___/___/___
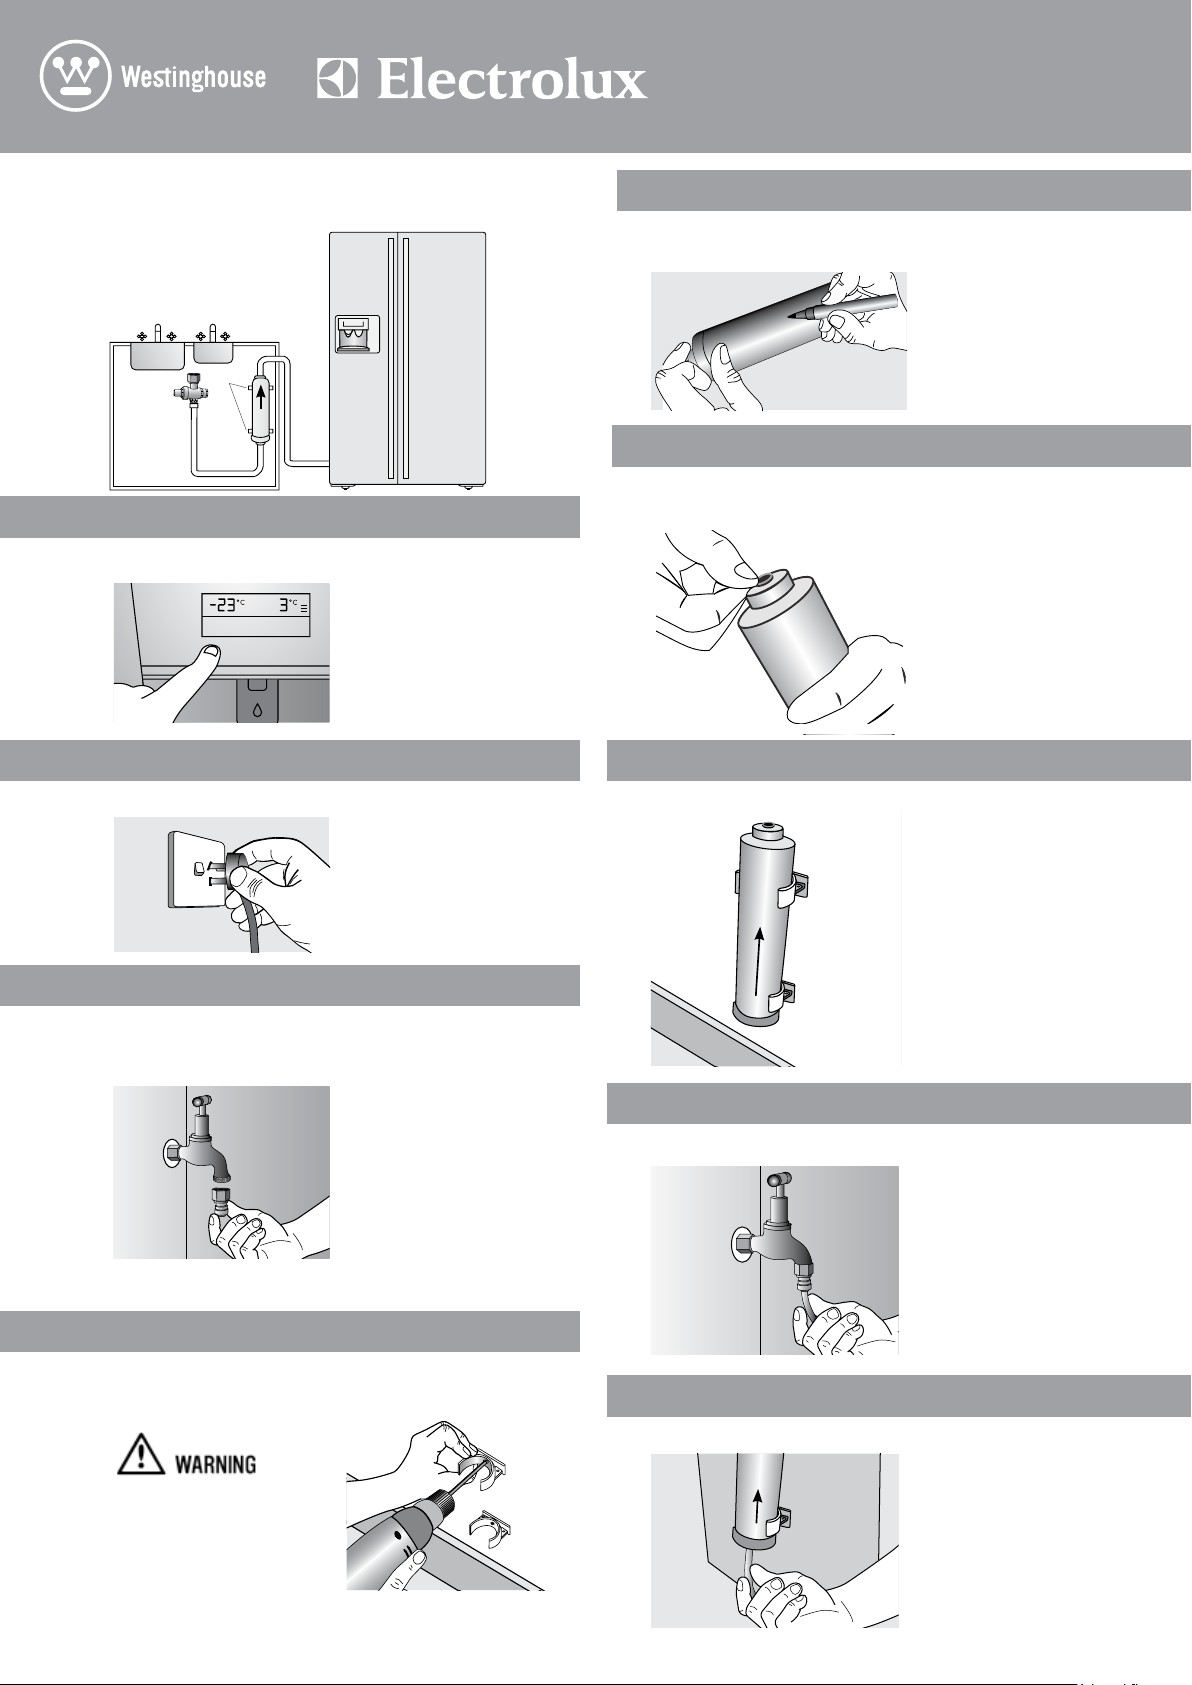
Water is to be connected as per diagram below.
INSTALLATION
STEP 1
STEP 5
STEP 2
STEP 6
STEP 7
STEP 3
STEP 4
sink
brackets
mains
water inlet
kitchen
cupboard
½" tap
fitting
filter
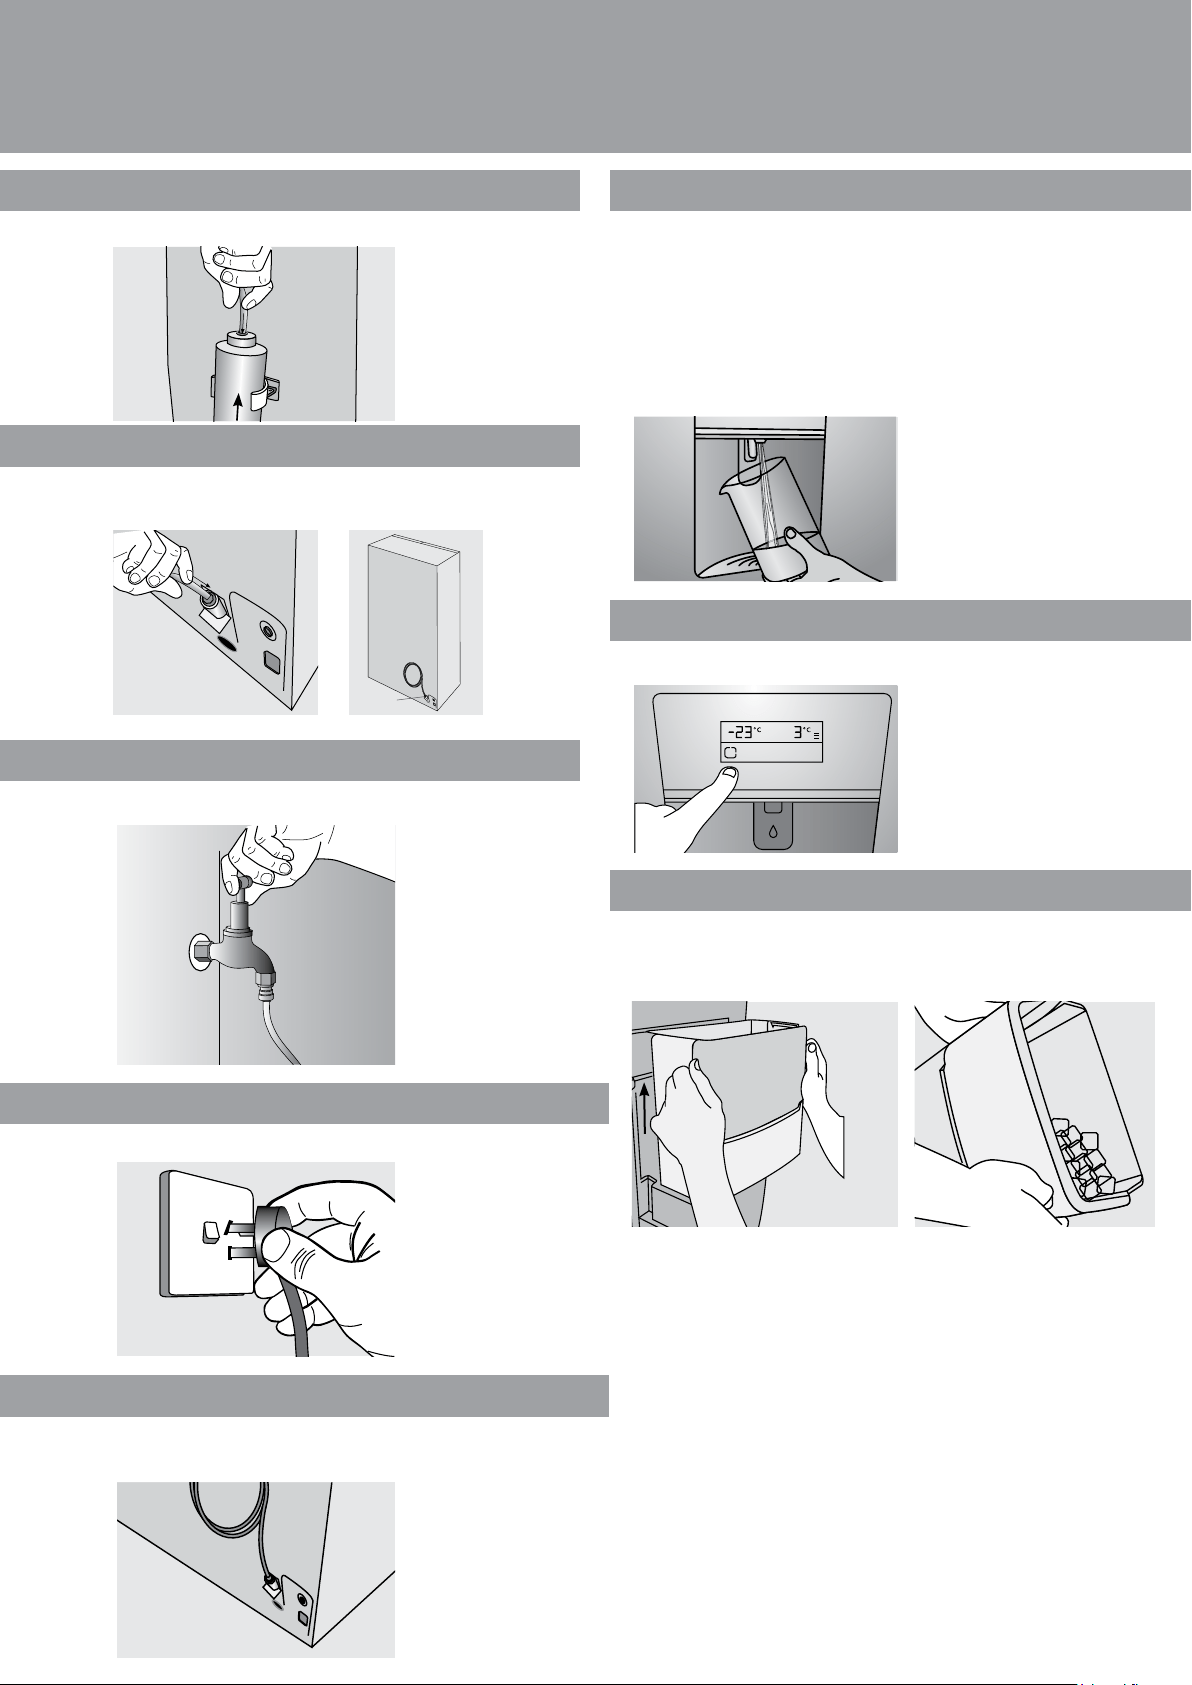
Write date on filter. The filter will need to be replaced
every 12 months.
Extend the red collar and clip a circlip around the collar at
both ends of the filter.
Fit filter to brackets with water flow arrow pointing up.
water
flow
direction
Install the brackets within 1 metre from the water supply
tap, in a vertical orientation where possible, using the
screws provided.
Do not screw the brackets
into the refrigerator as this
may void your warranty
and permanently damage
the refrigerator.
date fitted 1
Disconnect refrigerator from power supply.
Connect tap fitting to water supply tap. Tap must
be close to the refrigerator.
Push other end into filter INLET.
STEP 8
STEP 9
water
flow
direction
Ensure that the Ice Maker is switched OFF.
Icemaker off
hold off
freezer
temp
fridge
temp.
eco/
holiday
quick
freeze
display
lock
drinks
chill
Push shorter tube into tap fitting past insertion mark.
INSTALLATION INSTRUCTIONS
WATER FILTER KIT
Reconnect the power.
Move the refrigerator back into place being careful not to
kink or split the tubing.
Using a large container run the water dispenser to clear air
from lines. This may take a few minutes. Purge and dispense
a minimum of 2 litres of water. Initial water may be black
in colour. This is residual carbon dust from the filter and is
non-toxic. If the water is slow to shut off or the dispenser is
dripping, air may still be in the lines. Either purge more water
through the system to remove this air or allow some time for
the air to be removed over subsequent dispensing.
Connect remaining tube length to filter OUTLET.
STEP 13
STEP 14
STEP 15
STEP 16
STEP 17
STEP 10
Turn on water and check all joints and tubes for leaks.
STEP 12
Connect other end of remaining tube length to inlet
on bottom right hand side of refrigerator back.
STEP 11
inlet
location
Switch ON Ice Maker.
freezer
temp
fridge
temp.
eco/
holiday
quick
freeze
display
lock
drinks
chill
After 24 hours remove ice bin and dispose of first few
batches of ice to ensure that impurities have been flushed
from the system.
Important Notice
Before calling a Service Technician please check carefully the operating instructions,
service booklet and the warranty terms and conditions.
FOR SERVICE
or to find the address of your nearest
state service centre in Australia
PLEASE CALL 13 13 49
For the cost of a local call (Australia only)
SERVICE AUSTRALIA
ELECTROLUX HOME PRODUCTS
www.electrolux.com.au
FOR SPARE PARTS
or to find the address of your nearest
state spare parts centre in Australia
PLEASE CALL 13 13 50
For the cost of a local call (Australia only)
FOR SERVICE
or to find the address of your nearest
authorised service centre in New Zealand
FREE CALL 0800 10 66 10
(New Zealand only)
SERVICE NEW ZEALAND
ELECTROLUX HOME PRODUCTS
www.electrolux.co.nz
FOR SPARE PARTS
or to find the address of your nearest
state spare parts centre in New Zealand
FREE CALL 0800 10 66 20
(New Zealand only)
© 2011 Electrolux Home Products Pty Ltd ABN 51 004 762 341
Print code: EWI&WINSTALL Issue Date: Nov11
Part Number: 1457137
INSTALLATION INSTRUCTIONS
WATER FILTER KIT
Date replaced Next replacement due
Ensure that taps are turned off when replacing and fitting filters. Remember to turn the taps back on when filter
fitting is complete.
Ensure that the water pressure has been checked prior to installation as high or low water pressure can cause
problems with the Ice & Water dispenser. Water pressure problems can be easily rectified by your qualified installer.
Always fit filter as per manufacturer’s instructions, paying special attention to water flow direction.
If you need to replace water tube, only use approved water quality piping that meets the pressure requirements.
Do not allow the water tubing to become kinked or trapped under the refrigerator when moving the refrigerator
back into position.
Make sure your refrigerator is level to avoid uneven ice cubes.
After installation, run the water dispenser for a few minutes to ensure that all air bubbles have been purged from
the tubing. Dripping may occur if air bubbles remain in the tube.
Replace filter at suggested intervals to avoid water/ice reduction and irregularities in taste.
Remove and clean ice bin once a month, discarding unused ice cubes. This will ensure fresh, clean ice and
smooth operation of your ice maker.
Clean and empty the dispenser drip tray regularly to avoid overflow.
As the water/ice cut off is not instant, leave glass under dispenser briefly until water or ice has stopped flowing
to avoid spills.
Always place ice in glass before filling with water to avoid splashing.
WATER FILTER REPLACEMENT RECORD
TIPS & USEFUL INFORMATION