Documents: Go to download!
User Manual
- Owner's manual - (English)
- LARGE SIDE BY SIDE WITH STANDARD FEATURES
- COMPACT SIDE BY SIDE WITH ICE & WATER FEATURES
- USING YOUR REFRIGERATOR
- ICE & WATER FEATURES
- Cleaning your refrigerator
- TROUBLESHOOTING
- ICE + WATER TROUBLESHOOTING
Table of contents
LARGE SIDE BY SIDE WITH STANDARD FEATURES
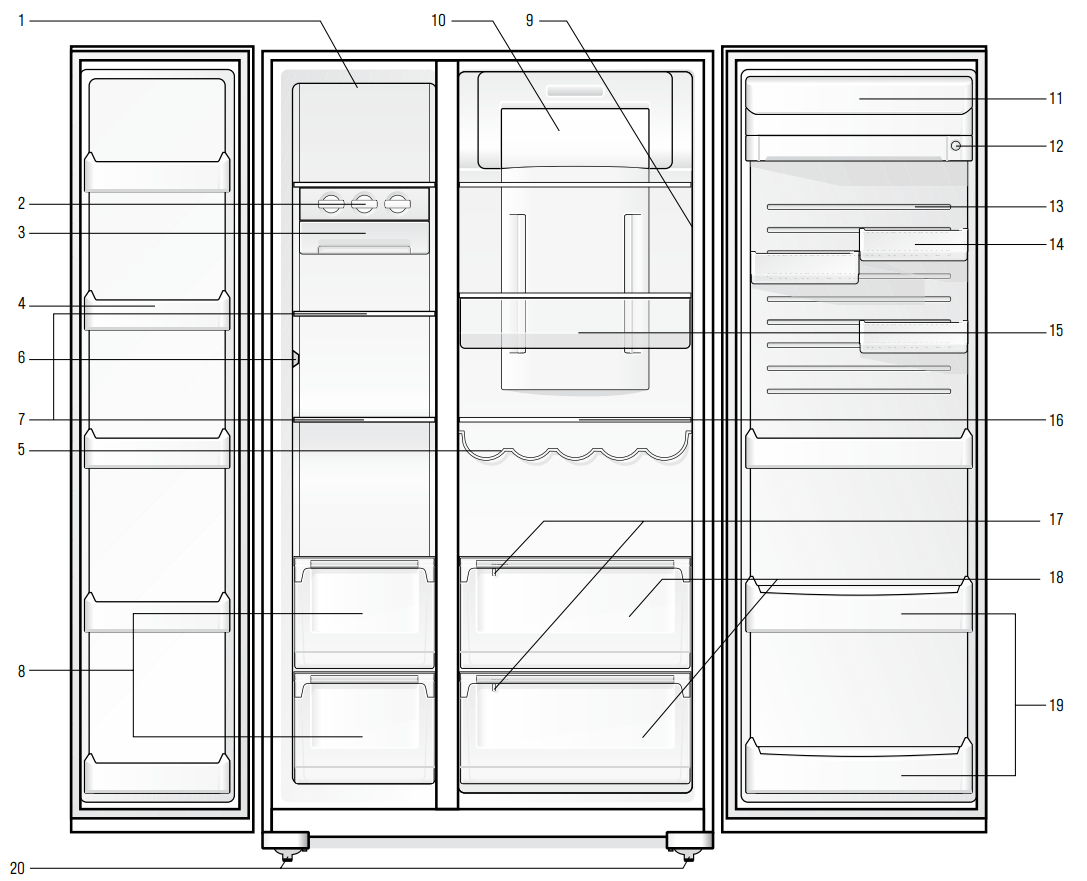
| 1. Freezer light | 8. Telescopic freezer bins | 14. Door bins |
| 2. Twist ice & serve | 9. Fridge & freezer temperature control | 15. Deli bins |
| 3. Ice cube storage bin | 16. Adjustable glass shelves | |
| 4. Freezer door bins | 10. Light lens | 17. Humidity controls |
| 5. Wine rack | 11. Dairy compartment | 18. Telescopic crisper bins |
| 6. Sensors | 12.Storesafe™ bin (lockable) | 19. Bottle bins |
| 7. Glass shelves | 13. Flexi-door door liner | 20. Adjustable rollers |
COMPACT SIDE BY SIDE WITH ICE & WATER FEATURES
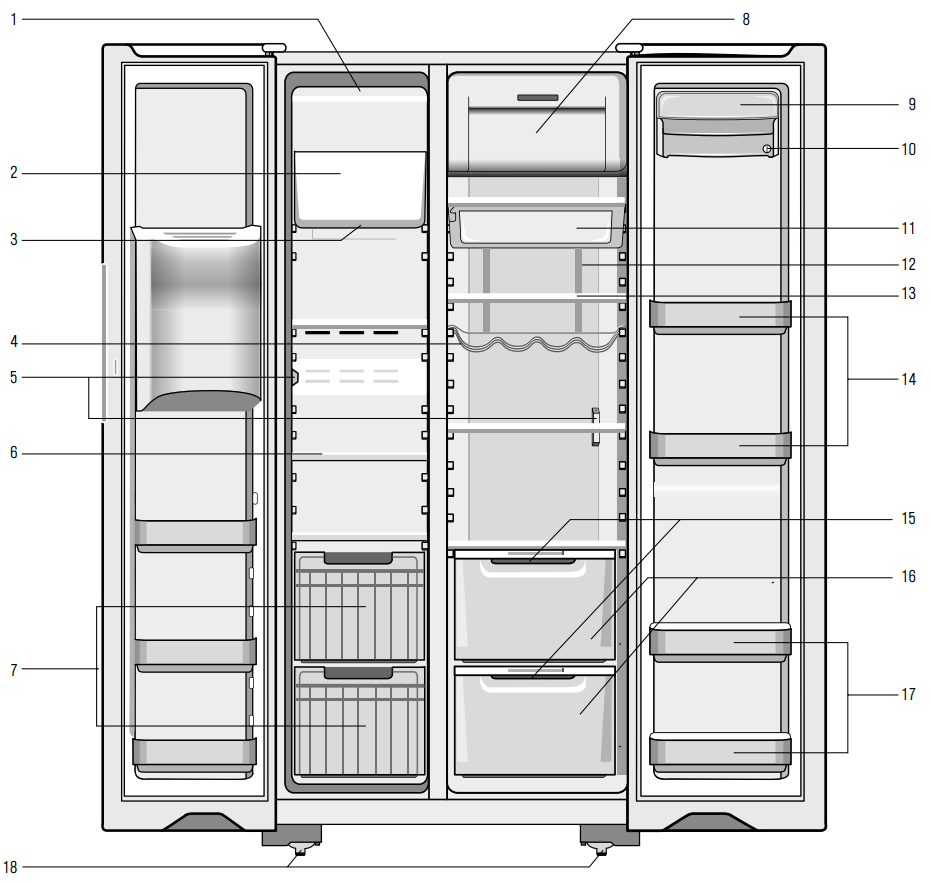
| 1. Ice cream shelf | 7. Roll out baskets | 13. Adjustable glass shelves |
| 2. Ice maker unit | 8. Light lens | 14. Adjustable door bins |
| 3. Lighting | 9. Dairy compartment | 15. Humidity controls |
| 4. Wine rack | 10. Storesafe™ bin (lockable | 16. Crisper bins |
| 5. Sensors | 11. Deli bin | 17. Bottle bins |
| 6. Glass shelves | 12. Multiflow duct (with blue feature lighting) | 18. Adjustable rollers |
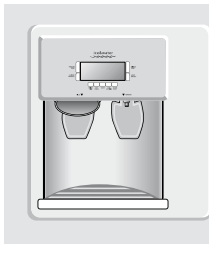
Ice & Water Door Dispenser
USING YOUR REFRIGERATOR
Electronic display panel
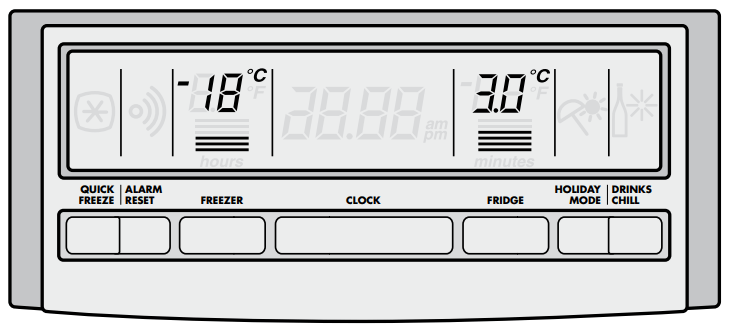
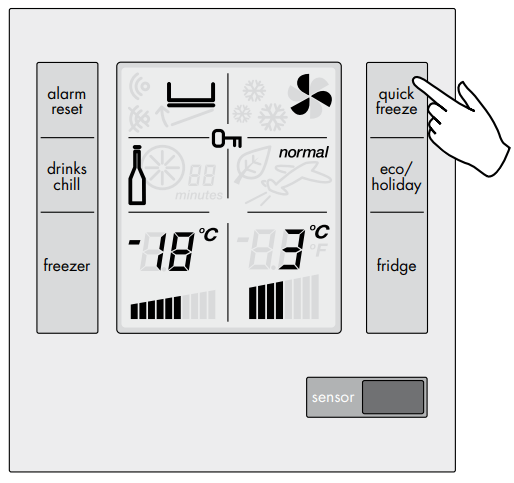
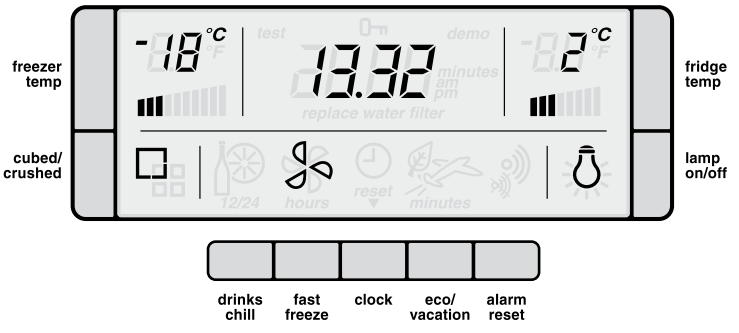
The internal electronic display panel is located on the inside front right of the fridge liner in side by sides and at the top rear in the fridges compartment of compact side by sides. It consists of an LCD display with blue lighting and buttons.
Electronic Display Panel - Compact Side by Side
Electronic Display Panel - Ice & Water Display
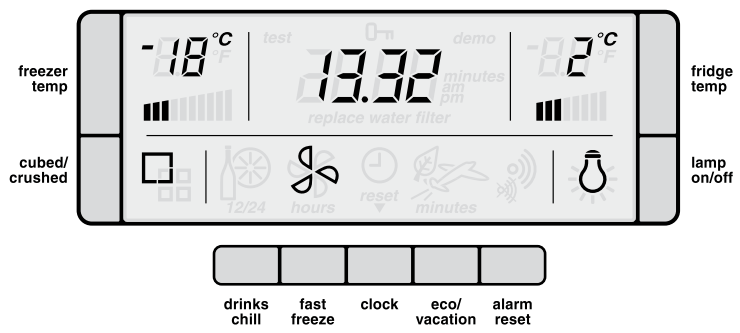
NOTE: The Electronic Display Panel varies according to the model of refrigerator purchased. The above and following diagrams are only representative of the different types of panels available. Not all models will have all features listed.
Turning the clock on and off
Press the clock button to turn the clock display on or off.
NOTE: The clock still works while the display is off.
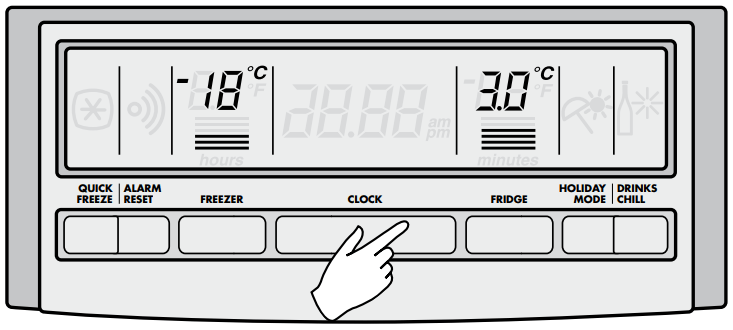
Setting the clock
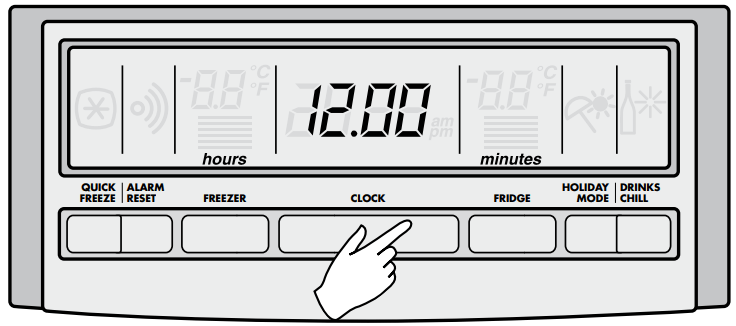
.1. Press and hold the clock button for two seconds. Hours and minutes will then appear on the display.
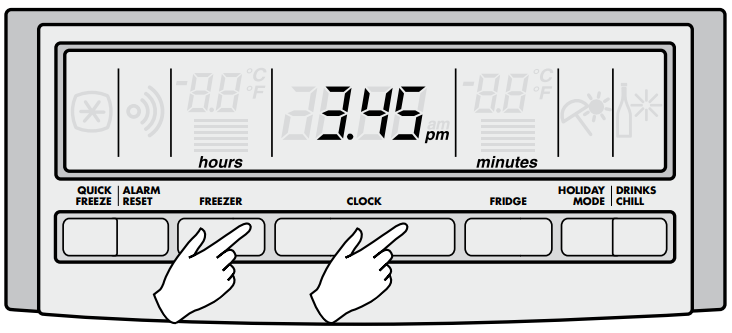
.2. While holding down the clock button, press the freezer button to advance the hours. Hold the freezer button down for continuous and fast advance. After the first 12 hours the pm indicator will appear.
3. While holding down the clock button, press the fridge button to advance the minutes. Hold the fridge button down for continuous and fast advance.
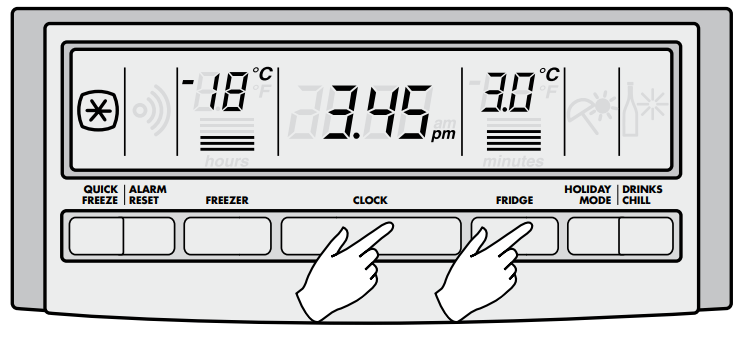
.4. When the correct time is displayed release the clock button.
Adjusting temperatures
We recommend that when you start your refrigerator for the first time, the temperature for the refrigerator is set to 3°C and the freezer to -18°C. If you want to change the temperatures, use the instructions below. You should make only small adjustments and wait 24 hours to see whether further changes are required.
NOTE: The set temperature for the refrigerator is an average temperature for the whole refrigerator cabinet. Temperatures inside each compartment may vary depending on how much food you store and where you place it. High or low room temperature may also affect the actual temperature inside the refrigerator.
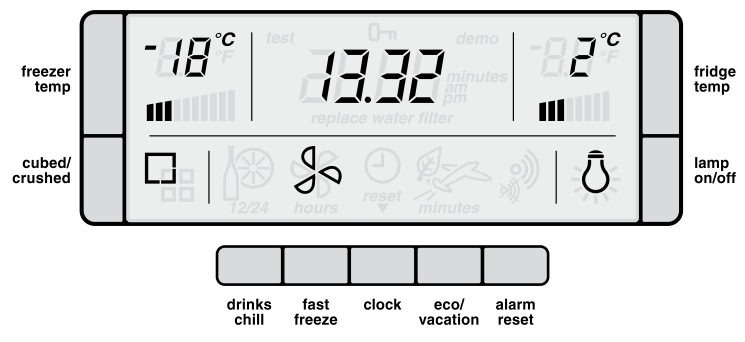
Changing the freezer temperature
Press the freezer button to make the freezer colder in 1°C steps. Once -23°C is reached the display will return to -14°C with the next button press. You'll notice that the bar graph gets smaller with colder freezer settings. If you set -14°C, the bar graph will flash continuously to warn that it is not cold enough for long term storage of frozen food.
Changing the refrigerator temperature
Press the fridge button to make the fridge colder in 1°C steps. Once 0.0°C is reached the display will return to 7°C with the next button press. The bar graph gets smaller with colder freezer settings.
NOTE: Testing ice cream is a good way to check the freezer. Testing drinking water is a good way to check the refrigerator compartment temperature.
Quick freeze function
Use the quick freeze function when you add a large amount of food to the freezer compartment. This freezes the food quickly but does not affect the temperature in the refrigerator compartment.
To use this function, press the quick freeze button once.
An animated icon above the button will light up. The quick freeze function will now operate for 90 minutes. If you want to turn the quick freeze function off before 90 minutes have passed, simply press the quick freeze button again. The icon will disappear and the refrigerator will return to normal operation.
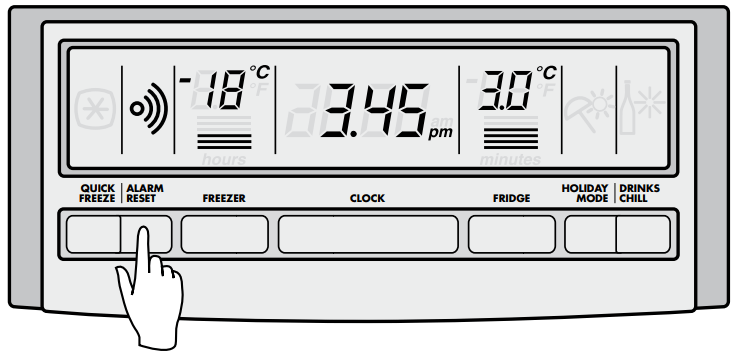
Door alarm
If the refrigerator door is left open for longer than 2 minutes a buzzer will sound and the icon above the alarm reset button will flash. The refrigerator temperature settings and bar graph will also flash. If you want to leave the door open while you load the fridge, you can turn the alarm off for 8 minutes by pressing the alarm reset button.
If the alarm is sounding for no apparent reason, check whether anything is holding the door open. Closing the door resets the alarm for a further 2 minutes.
Freezerfemperature alarm
If the freezer becomes too warm, a buzzer will sound and the icon above the Alarm Reset button, the freezer temperature and the bar graph will flash until the Alarm Reset button is pressed. After the Alarm Reset button has been pressed the freezer temperature setting and the bar graph will flash until normal operating temperatures are reached.
Check that the freezer door has not been left open or warm food has not been placed too close to the temperature sensor in the freezer. See diagram on page 9 for the sensor location. If the freezer is still too warm the alarm will sound again in 50 minutes, indicating that something may be wrong with your refrigerator.
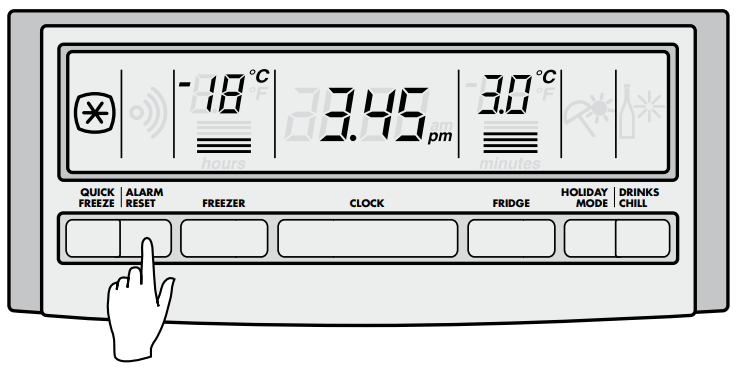
NOTE: The freezer temperature alarm can be reset for 12 hours by pressing the alarm reset button continuously for 10 seconds.
Drinks chill timer
If you set the drinks chill timer it will sound an alarm to remind you that you have left drinks in your freezer for quick chilling. Suggested chilling times:
- 10 minutes for cans of drinks
- 20 minutes for bottles of wine
- 30minutes for bottles of soft drink
To use the timer, press the drinks chill button. An animated icon appears above the drinks chill button and the clock display is replaced by the countdown timer. Press the button once to set a 10 minute time limit, twice for 20 minutes and three times for 30 minutes. Press four times to turn the timer off. The timer will count down in 1 minute increments; you can change the timer or turn the timer off even after the countdown has started. When the countdown has finished a buzzer will sound and the icon above the alarm will flash until the alarm reset button is pressed. To stop the alarm and turn off the drinks chill timer, press the Alarm Reset button. If your drink is chilled, take it out of the freezer. If it is not cold enough, reset the drink chill function bearing in mind that the drink is already partially chilled.
Child lock
To activate the child lock on ice & water models, press and hold the lamp on/off and cubed/crushed buttons together. This will disable the display to prevent accidental changes to settings. The key icon will appear on the electronic display when child lock is activated. To turn off the child lock press and hold the lamp on/off and cubed/crushed buttons together.
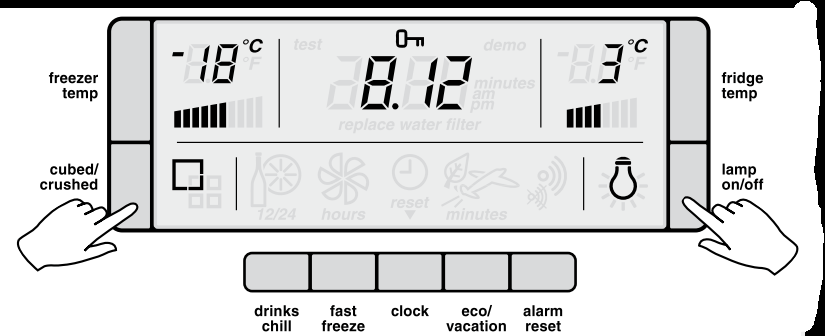
For standard models activate the child lock by pressing the fridge and freezer buttons at the same time for 3 seconds. Repeat to unlock.
Energy efficiency
Your appliance has been designed with energy efficiency in mind and can operate in any of three modes (normal, eco, vacation), depending on the level of efficiency sought.
Normalmode
This is the mode which is entered automatically when the appliance is first turned on. Normal mode is the mode most suitable when the refrigerator door is opened often.
Ecomode
Eco mode is a more efficient mode than normal mode and can be entered in two ways. Either by manually pressing the eco/vacation button once when in normal mode, or automatically after 30 hours if the refrigerator door has not been opened. The leaf icon will appear on the electronic display when eco mode is activated.
If eco mode is entered automatically, the appliance will revert to normal mode once the refrigerator door is opened. If eco mode is entered manually, door openings will not cause the display to revert to normal mode. To exit eco mode, press the eco/vacation button twice (or until there are no icons displayed).
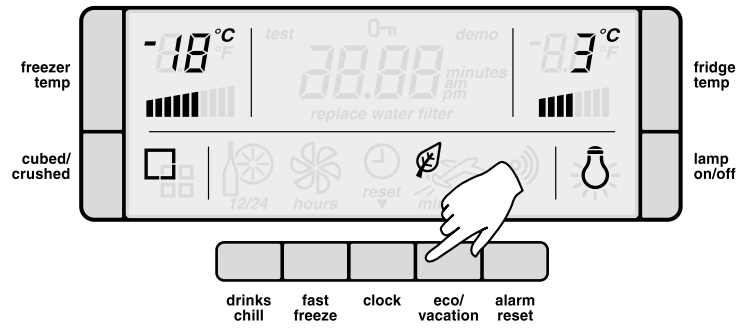
CAUTION: Eco mode is designed to operate with minimum door opening (e.g. if used as a long term storage fridge). If turned on manually, it won't switch off automatically and frequent door opening in eco mode could lead to food spoilage. If frequent door opening is likely to occur switch back to normal mode.
Vacation (holiday) mode
Vacation mode is suitable if you will be away from your appliance for an extended period. To take advantage of maximum efficiency press the eco/vacation button twice in succession just before you leave - do this while in normal mode. The appliance will then enter vacation mode, as indicated by the aeroplane symbol. Press eco/vacation button again to cycle between 'normal', 'eco' and 'vacation' modes. If in eco mode a single button press is all that is required to enter vacation mode.
Vacation mode is exited automatically once the refrigerator door is opened and normal mode resumes.
ENVIRONMENT TIPS
Eco and vacation modes minimise defrosting to save energy, while maintaining your temperature settings.
NOTE: Opening the freezer door has no effect on the operation of Eco and Vacation Modes
Other electronic features
Your refrigerator
- Controls the compressor and fan independently to provide the best performance
- Provides extra cooling depending on the number of door openings
- Automatically defrosts during periods when the door is not being opened frequently
TIPS & INFORMATION
If you find that the display malfunctions, this may be due to brief power supply interruptions. If this is the problem, you simply need to turn the refrigerator off at the power point and wait 5 minutes, then turn the refrigerator on again at the power point.
Food compartment features
Door storage bins
Both the refrigerator and freezer have door storage bins. You can adjust the door bins to meet different storage needs. All the door bins are completely removable for cleaning.
If you want to remove or adjust a bin in all freezers and in the fridge of the compact side by side, lift it over the support lugs on the inner door panel. Push the bin down over the support lugs to lock it in place.
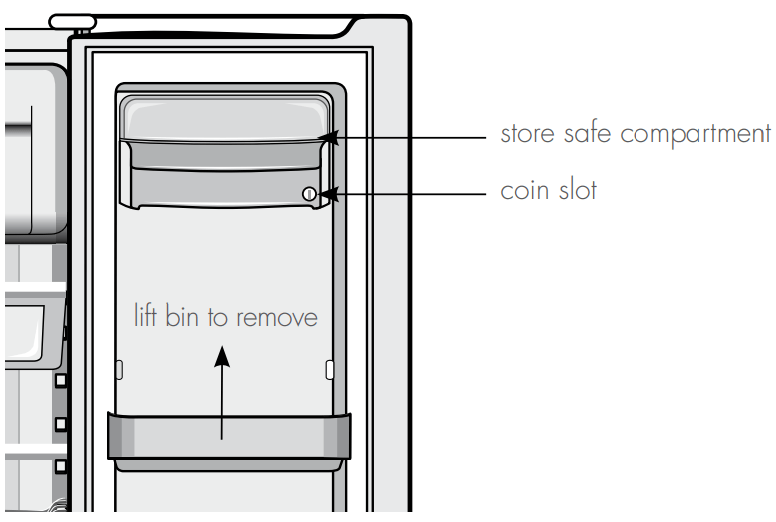
Door storage bins (shelves)
Flexi-door shelving is used on the door of the 690/700L side by side. If you want to remove or adjust a bin, lift and tilt to remove. To replace, fit top and push bin down until support lugs to lock it in place.
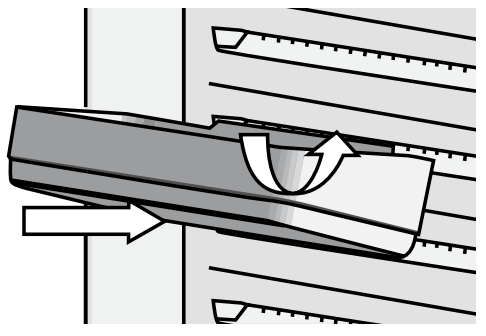
Dairy compartment
Use the dairy compartment to store foods like butter, margarine and cheeses. The compartment is slightly warmer than the rest of the refrigerator compartment, while the lid provides protection against odours.
Store safe compartment (see top diagram)
The store safe compartment is a coin-lockable compartment. To lock, rotate the coin slot anti-clockwise until the slot is horizontal. To unlock, turn the coin slot clockwise until the slot is vertical.
To open the drawer, push the tab down with your thumb and pull the drawer forward.
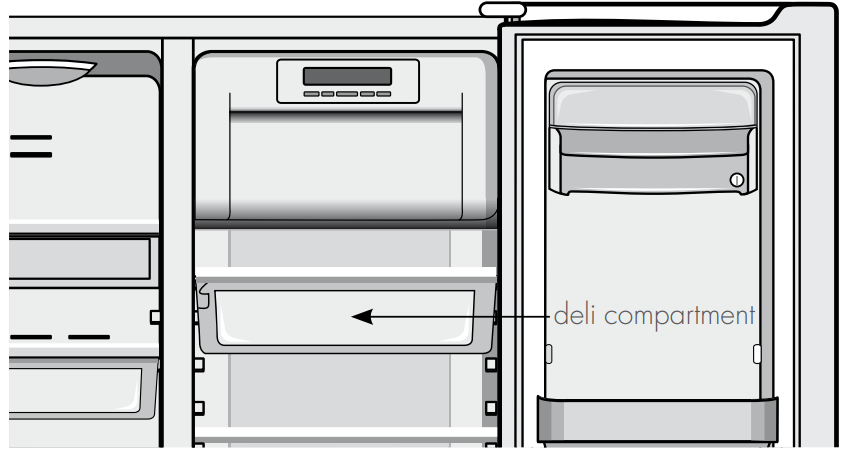
Deli compartment
The deli compartment is an ideal place to keep deli items, such as cold meats. Additional cold air is directed into the deli compartment, keeping the contents fresher for longer. It can also be used for faster chilling of food or drinks. To remove the deli compartment, pull forward, then up and forward.
Slide out glass shelves
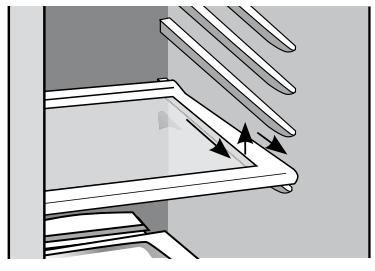
To make access to your food easier, both the refrigerator and freezer compartments are fitted with glass shelves.
To remove the shelves
- Gently pull them forward until the shelf comes to a stop.
- Lift the shelf slightly to clear the stop.
- Continue pulling the shelf forward.
To return the shelf, make sure there is nothing behind it that may obstruct movement and gently push the shelf into the cabinet. It should slide back over the stops into its original position.
Freezer baskets
Freezer basket and freezer shelves are fitted 600/610 L freezer compartments. Wire baskets are used to provide easy visibility of the contents in the compact side by side.
All the baskets and the shelves pull out for easy access and have a stop to prevent the baskets and shelves being pulled out too far.
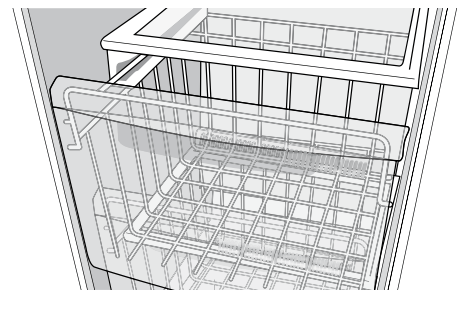
To remove the basket, pull it out until it hits the stop then lift the front to unhook the stop while continuing to pull forward, until the basket is free of the runners under the shelf.
Telescopic freezer bins and crispers
For 690/700L side by sides with telescopic freezer bins and crispers you can replace the draw as follows:
1. With the telescopic slides pushed in all the way.
2. Slide the drawer into place over the slides and push the bin in until it stops. The bin will not be closed all the way.
3. Open the bin to access the finger tabs at the ends of the telescopic slides, on each side of the bin. Using your thumb and forefinger, lift the bin over the end of the slide and clip in place. If the drawer is not fully engaged on the slide, its possible the drawer won't stay on the slide if fully extended.
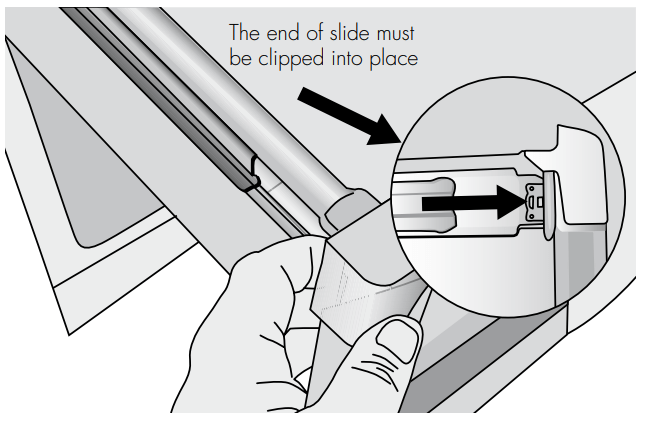
4. Fully close the bin.
When replacing the drawers after cleaning, we recommend fitting the lower drawer first.
Crisper bin(s)
- Storing vegetables
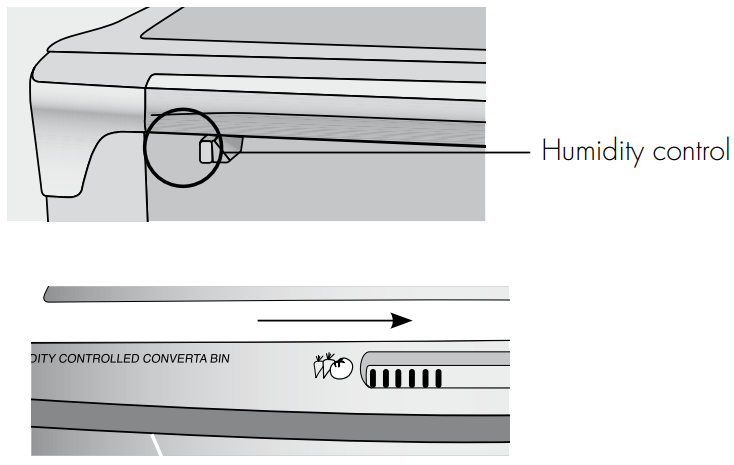
You can use the crisper bin to store vegetables, fruit or smallgoods. You can change the humidity inside the bin by sliding the humidity control.
- Storing fruit & smallgoods
You can also store fruit & smallgoods in the crisper bin remembering to set the humidity control to less humid (open).
CAUTION:
Never close the door while the telescopic slides are extended. It may damage the slide and/or the refrigerator or cause the slide to become disengaged from the refrigerator.
To clean a crisper cover with telescopic extension slides, simply wipe with a damp cloth and warm soapy water. Never immerse the cover in water, as this could affect the operation of the slide.
ICE & WATER FEATURES
TWIST ICE & SERVE
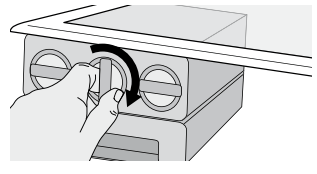
To use, remove the tray, fill with water and place back in the freezer. Once ice has formed (approximately 3 hours) simply twist the knob at the front clockwise until the ice drops into the bin below.
ICE & WATER DISPENSER FEATURES
The ice and water dispenser conveniently dispenses cool, filtered water and ice cubes or crushed ice. To operate the ice dispenser, select an ice option using the electronic display.
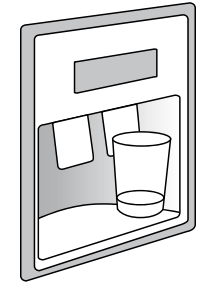
Press a glass against the dispensing paddle. Hold the top of the glass as close as possible to the ice outlet, so that you will catch all the ice. To stop dispensing ice, pull the glass away from the dispensing paddle. Do not remove the glass until the ice has finished coming out
To operate the water dispenser, press a glass against the dispensing paddle. To stop dispensing water, pull the glass away from the dispensing paddle. A drip tray located at the base of the dispenser (see diagram above) will catch small spills and allow them to evaporate. The drip tray is removable and dishwasher safe.
CAUTION: Do not pour water or excess cubes into the drip tray because it is not connected to a drain.
Dispenser lamp
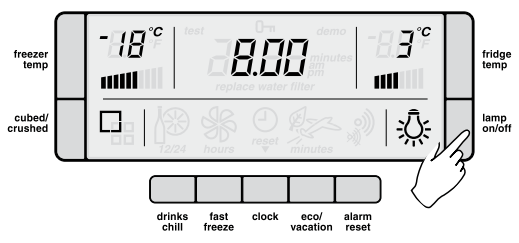
The dispenser has a light which can be turned on and off by pressing the Lamp button on the electronic display (see diagram below). The lamp is also activated for 6 seconds whenever a dispensing paddle is pressed. The light comes from 6 ultra bright LEDs (light emitting diodes), which are part of the electronic display. These are not customer replaceable. The same technology is used in the interior multiflow duct (blue strip lights).
HOW THE WATER DISPENSER WORKS
After the refrigerator is connected to the water supply, fill the water tank by holding a glass against the dispenser paddle. You may need to hold the glass against the paddle for up to 2 minutes before water begins to flow. Continue to draw water for a further 3 minutes to rid the tank and plumbing connections of any impurities, the tank will automatically refill as you dispense water.
CAUTION: Remember, do not drink this water as it may have impurities in it!
TIPS & INFORMATION
The water connection to your ice and water product should only be done by a licensed refrigeration mechanic, plumber or electrician.
The water dispenser water tank is located behind the upper crisper bin in the refrigerator compartment.
Normal Operation - For cool water, add ice.
To provide the convenience of filtered water in the same location as the ice dispenser, it is necessary to route the tubes from the refrigerator compartment. This means the first half glass of water will not be quite as cold as the following 3 or 4 glasses. If you require cool water from the first glass, we recommend that you first add crushed or cubed ice to your glass then the water. In times of high use, water may be dispensed before it has time to cool. Once this occurs, the dispensed water temperature will be similar to that of your normal tap water until the tank has had a chance to re-cool. The addition of cubed or crushed ice will allow you to still enjoy cool water should this occur.
CAUTION: Chemicals from a malfunctioning softener can damage the ice maker. If the ice maker is connected to soft water, ensure that the softener is maintained and working properly.
HOW THE ICE DISPENSER WORKS
The ice maker and ice container are located in the top of the freezer compartment. After the refrigerator is installed properly and has cooled for several hours, the ice maker can begin making ice and the first batch will be ready within 24 hours. A full tray of ice may not be created for the first few batches, due to air in the refrigerator's new plumbing lines. To begin ice production, switch the switch to the ON position. If no ice is dispensed it will take about 2 days to fill the storage container. The ice maker turns off automatically when the ice container is full. To stop ice production, turn the switch to the OFF position (see diagram on page 8). The first batches of ice cubes may be discoloured or have an odd flavour, due to the refrigerator's new plumbing connections. Discard this ice until batches are free of discolouration or taste problems.
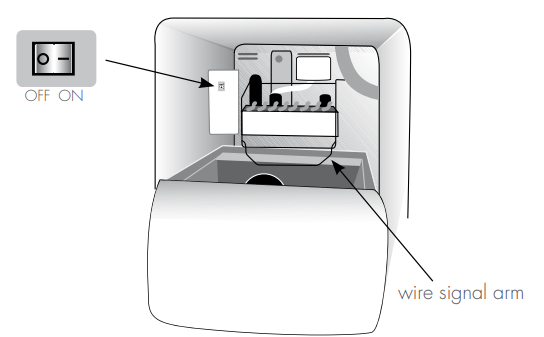
NOTE: If the water filter is not in place or suitably by-passed, the ice maker will not produce any ice.
TIPS & INFORMATION
- Ice cubes stored too long may develop an odd flavour. Remove the ice container and discard the ice cubes. When replacing the tray, ensure that the wire signal arm (see diagram below left) sits within the ice cube container. The ice maker will then start producing ice.
- Occasionally shake the ice container to keep ice separated.
- After you take delivery of the refrigerator, keep the ice maker switch in the OFF position until the refrigerator is connected to the water supply. The switch should also be kept in the OFF position whenever the water supply is turned off.
CAUTION: If the dispensing paddle is pushed for more than 4 minutes, the dispenser motor may overload and stop. The overload protector will reset automatically after 3 or 4 minutes.
- If a large quantity of ice is needed at one time, it is best to remove cubes directly from the ice cube container
- When the ice maker is operating, it is normal to hear the sound of:
The motor running.
Ice dropping into the ice container.
The water valve opening or closing.
Ice loosening in the tray.
Running water.
CLEANING THE ICE DISPENSER
Clean the dispenser and ice container at regular intervals, particularly before you take a vacation or move, also clean the dispenser if it sticks.
To clean the dispenser:
- Switch the ice maker off by putting the wire signal arm in the horizontal position.
- Remove the ice container by lifting it up and out. Empty and carefully clean the container with mild detergent. Rinse carefully ensuring no traces of detergent remain. Do not use harsh or abrasive cleaners. Allow the ice container to dry completely before replacing it in the freezer.
- Remove ice chips from the shelf and chute that support the ice container; clean these areas.
- Replace the ice container.
- Turn the ice maker on by moving the wire signal arm.
WARNING: Do not use the ice chute as a handle when removing or replacing the ice storage bin. Do not put fingers up the ice chute. Surfaces there may be sharp.
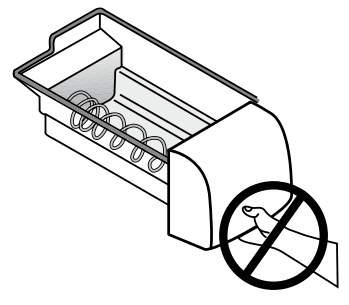
CAUTION: When removing or replacing the ice bin do not rotate the auger in the ice bin. If the auger is accidentally turned, you must realign the auger by turning it in 90° turns until the ice bin fits into place with the drive mechanism.
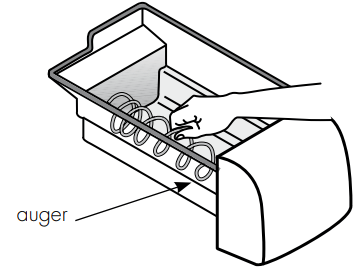
Remove and empty the ice storage bin if:
- An extended power failure (one hour or longer) causes ice cubes in the ice storage bin to melt and freeze together and jam the dispenser mechanism.
- If the ice dispenser is not used frequently, ice cubes will freeze together in the bin and jam the dispenser mechanism. If this happens remove the ice storage bin and shake it to loosen the cubes.
CAUTION: NEVER use an ice pick or similar sharp instrument to break up the ice. This could damage the ice storage bin and dispenser mechanism.
Other electronic features of your standard and Ice & water refrigerator
Your refrigerator:
- Controls the compressor and fan independently to provide the best performance
- Provides extra cooling depending on the number of door openings
- Automatically defrosts during periods when the door is not being opened frequently
- Has blue feature lighting activated by opening the refrigerator door (ice and water models only)
NOTE: If you find that the display malfunctions, this may be due to brief power supply interruptions. If this occurs you simply need to turn the refrigerator off at the power point and wait 5 minutes for the refrigerator pressure to equalise then turn the refrigerator on again at the power point.
Cleaning your refrigerator
Cleaning the exterior
WARNING:
BEFORE CLEANING: Turn the refrigerator off at the power point and unplug the cord to prevent any chance of electrocuting yourself.
An occasional wipe over with a clean, damp cloth will help remove finger marks. You should only clean the doors with lukewarm, soapy water and a soft cloth. Rinse with clean water and then wipe the surface with a soft, clean cloth to remove any soapy residue.
Note: Only wash plastic parts or decorative trim with warm (not hot) water using an unscented detergent.
Doors- Painted
Clean as described above for the cabinet.
Doors- Stainless Steel
Your stainless steel appliance is manufactured from a mark resistant stainless steel. This stainless steel has a special advanced protective coating that helps ease the removal of marks such as finger prints or water spots. To keep your stainless steel refrigerator looking its best, you should clean it regularly. You should only clean the stainless steel doors with lukewarm soapy water and a soft cloth. Rinse with clean water and then wipe the surface with clean water and a soft, clean cloth to remove any soap residue.
Do not use abrasive pads or other cleaners as they are likely to scratch the surface. Damage to this product after installation is not covered by your warranty.
Note: It is important to wipe in the direction of the grain of the stainless steel to avoid any undue marking of the surface.
Drip tray
Water may accumulate in the sump located under the drip tray. If this occurs the sump can be sponged out to prevent water overflowing down the front of the door.
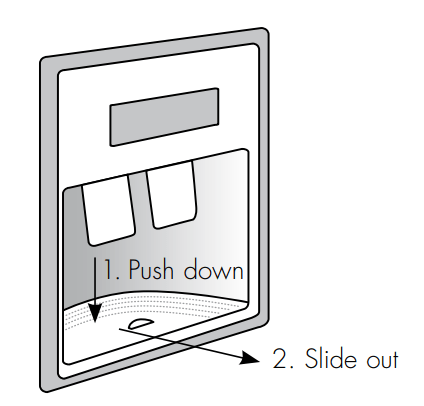
For cleaning, remove the tray as described below:
- Press down at the back of the drip tray with the tips of your fingers.
- Pull the tray forward.
- To refit, slide the drip tray back into position and push into place (see Diagram below).
Cleaning the interior
You should clean the refrigerator interior regularly. It will be easiest to clean when the food supply is low. Wash the interior with a soft cloth and use an unscented mild soap with lukewarm water. Thoroughly dry all surfaces and removable parts. Avoid getting water on refrigerator controls. If you have taken out any removable parts, replace them and switch the power on before restocking the refrigerator with food. You should keep the interior of your refrigerator hygienic by promptly and thoroughly wiping up any food spills.
Keep door seals clean
Take care to keep door seals clean. Sticky food and drink can cause seals to stick to the cabinet and tear when you open the door. Wash the seal with a mild detergent and warm water. Rinse thoroughly with clean water and dry.
CAUTION: Never use hot water, solvents, commercial kitchen cleaners, aerosol cleaners, metal polishes, caustic or abrasive cleaners, or scourers to clean your refrigerator. Many commercially available cleaning products and detergents contain solvents that will damage your refrigerator. Use only a soft cloth with an unscented mild soap and lukewarm water.
If your refrigerator has telescopic extension slides, simply wipe them with a damp cloth to clean them and never immerse them in water.
TROUBLESHOOTING
| PROBLEM | SOLUTION |
When your appliance is not operating | Check that the power cord is plugged into the power outlet properly and that the outlet is switched 'ON'. |
| Try running another appliance from the power outlet. If no power is coming from the outlet you may have blown a fuse or tripped a circuit of your household power supply. | |
| Try adjusting the temperature control to a slightly "colder" position. | |
| It is normal for the freezer fan NOT to operate during the automatic defrost cycle, or for a short time after the appliance is switched on. | |
When there is refrigerator/freezer noise | Modern refrigerators/freezers with increased storage capacity use high speed compressors. These can provide a seemingly high level of sound which is quite normal. Normal operational sounds include:
|
Other strange sounds may mean that you need to check and take action. For example, noises may mean that:
| |
| Remember it is quite normal for noise to seem louder just after the refrigerator starts operating. | |
If there are odours inside the appliance | The interior may need cleaning. |
Some foods produce odours. | |
| Some containers and wrapping can cause odours. | |
| Ask yourself if the odour started about the same time you started storing something unusual. | |
| When the motor seems to run more than expected | Your new appliance provides you with large capacities in both the refrigerator section and the separate freezer. It is normal for the motor to operate frequently. However, to keep operation to a minimum, check the following:
|
| If the day is hot or the room is very warm, the appliance will need to run more than normal. | |
| The appliance will rin more that normal just after you install it or when it has been turned off for a long time. | |
| If the temperature in the refrigerator is too warm | Check that the appliances has enough clearance at the sides, back and top. Refer to the installation Instructions at the front of this booklet. |
| Adjusting temperature | |
| You may have kept the door open too long or too frequently | |
| Food containers or packaginf may be holding a door open. | |
| If the temperature in the refrigerator is too cold | Increase the temperature to advoid high energy consumption. |
| If heavy frosting occurs in the freezer | Make sure you fully close the freezer and fridge doors. If the doors are left partly open a heavy frost will coat the inside of the freezer. If a frost develops, remove it. Take care to properly close the doors and the frost will not reoccur. |
| If water drips on the floor | The defrost water tray, (located at the back or underneath of the cabinet) may not be properly positioned, or the drain tube may not be properly positioned to direct water into this tray. You may need to pull the refrigerator away from the wall to check the tray and tube. |
| Fridge does not exit vacation mode | Turn appliance off at the powerpoint. ,Leave off for three (3) minutes for the memory to clear, then turn back on. |
ICE + WATER TROUBLESHOOTING
| PROBLEM | POSSIBLE CAUSE | SOLUTION |
| AUTOMATIC ICE-MAKER | ||
| The ice maker is not making any ice | Ice maker is in the OFF position | Put switch in the ON position |
| Water tap is turned off | Turn on the water tap | |
| The freezer is not cold enough | See troubleshooting section “If the temperature in the refriegator is too warm” | |
| The water dispenser may not be dispensing water | If it isn't, the ice &water filter cartridge may be clogged or restricted by foreign material, and will need to be replpace | |
| Filter may be blocked | Check and/or charge filter | |
| The ice-maker is not making enough ice | The ice maker is producing less ice than you ecpect | The ice maker should produce approximately 2-3 kilograms of ice every 24 hours |
| The freezer is not cold enough | Adjusting Temperature | |
| Household water line valve is not open | Open the household water line valve | |
| The water dispenser is dispensing slower than normal | Replace the water filter cartridge | |
| Ice cubes are hollow or smaller than normal | Restricted water flow to the ice maker | Repalce the filter cartridge, as the water filter cartridge may be clogged |
| The ice has a bad odour and taste | The ice has picked up odour or flavour from strongly flavoured food stored in the refrigerator or freezer | Cover foods tightly. Discard stale ice. The ice maker will produce a fresh supply Change ice monthly |
| The water running into the ice maker has poor taste or colour | Add a filter to water supply line. Consult a water purifying company | |
| Ice not used frequently enough | Discard atale ice monthly | |
| ICE DISPENSER | ||
| The dispenser will not dispense ice | The ice storage container is empty | When the first supply of ice drops into the container, the dispenser should operate |
| Household water tap is not open | Open the household water tap. Allow sufficient time for the ice to be made. When ice is made the dispenser should operate | |
| The wire signal arm is either held or jammed | Remove jam or free arm | |
| Ice maker switch is in OFF position | Turn switch to ON position | |
| The ice dispenser is jammed | Ice had melted and frozen around the auger due to infrequent use, temperature fluctuations, and/or power outages | Remove the ice container and empty it's contents. Clean and dry the container and replace to its proper position. When new ice is made, the dispenser should operate |
| Ice cubes are jammed between the ice maker and back of ice container | Remmove ice cubes that are jamming dispenser | |
| Ice cubes are frozen together | Use the dispenser often so that cubes do not freeze together Discard ice monthly | |
| Ice cubes are hollow or smaller than normal | The water filter cartridge could be clogged. Cartridge may need replacing | |
See other models: WBE4300SB WHI944BA PSP632W WRI700SB DSP635W
