No: 341307 3/21
Catalog Number(s) • Numéro(s) de Catalogue • Les Numéros de Catalogue: WNP20
radiant
®
WNP20 Plug-In Tru-Universal Smart Dimmer with Netatmo; Incandescent:
300W; CFL: 300W; Magnetic Low Voltage: 300VA; LED: 1A
Gradateur intelligent enchable Tru-Universal radiant
®
WNP20 avec Netatmo ;
Incandescente : 300 W; LFC: 300 W; magnétique à basse tension : 300 VA; DEL : 1A
Regulador inteligente enchufable Tru-Universal radiant
®
WNP20 con Netatmo;
Incandescente: 300 W; CFL: 300 W, bajo voltaje magnético: 300 VA; LED: 1A
Installation Instructions • Directives D’installation • Directives D’installation
WNP20
radiant
®
Plug-In Smart Dimmer
REGULATORY INFORMATION
FCC NOTICE: This device complies with Part 15 of the FCC rules.
Operation is subject to the following two conditions: (1) this device
may not cause harmful interference, and (2) this device must accept
any interference received, including interference that may cause
undesirable operation.
This equipment has been tested and found to comply with the limits
for a Class B digital device, pursuant to Part 15 of the FCC Rules.
These limits are designed to provide reasonable protection against
harmful interference in a residential installation. This equipment
generates, uses, and can radiate radio frequency energy and, if not
installed and used in accordance with the instructions, may cause
harmful interference to radio communications. However, there is no
guarantee that interference will not occur in a particular installation.
If this equipment does cause harmful interference to radio or
television reception, which can be determined by turning the
equipment o and on, the user is encouraged to try to correct the
interference by one or more of the following measures:
• Reorient or relocate the receiving antenna
• Increase the separation between the equipment and receiver
• Connect the equipment into an outlet on a circuit dierent from
that to which the receiver is connected
• Consult the dealer or an experienced radio/TV technician for help
This equipment complies with FCC radiation exposure limits set
forth for an uncontrolled environment. This equipment should be
installed and operated with a minimum distance of 10 mm between
the transmitter’s radiating structure(s) and the body of the user or
nearby persons.
NOTE: Any changes or modications to this device that are not
expressly approved by the manufacturer will void the warranty and
the user’s authority to operate the equipment.
Contains FCC ID: 2AU5D982057
IC NOTICE: This device complies with Industry Canada license-
exempt RSS standards. Operation is subject to the following two
conditions: (1) this device may not cause interference; and (2) this
device must accept any interference, including interference that may
cause undesired operation of the device.
RF EXPOSURE STATEMENT: This equipment meets the SAR
evaluation limits given in RSS-102 Issue 5 requirements at the
minimum separation distance of 10 mm to the human body. Note:
Any changes or modi cations to this device that are not expressly
approved by the manufacturer, will void the warranty and the user’s
authority to operate the equipment.
IC: 25764-982057
HVIN: 982057
BEFORE YOU START
Review this guide in its entirety. Consult an electrician with any questions or if you are
unsure of your abilities.
CAUTION: To reduce the risk of injury and/or overheating and damage to other equipment:
• For dry, indoor use only.
• Connect the Smart Plug-In Dimmer to a 120 VAC, 60 Hz power source ONLY
• This Smart Plug-In Dimmer is intended for lamps with dimmable bulbs ONLY.
• To reduce the risk of electrical shock, this equipment has a grounding type plug that has
a third (grounding) pin. If the plug does not t in outlet, contact a qualied electrician to
install the proper outlet.
Visit www.legrand.us/radiant/smart-lighting/support for Support.
INSTALLATION & SETUP
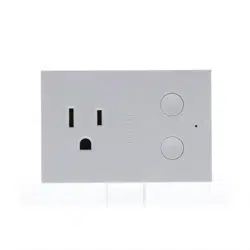
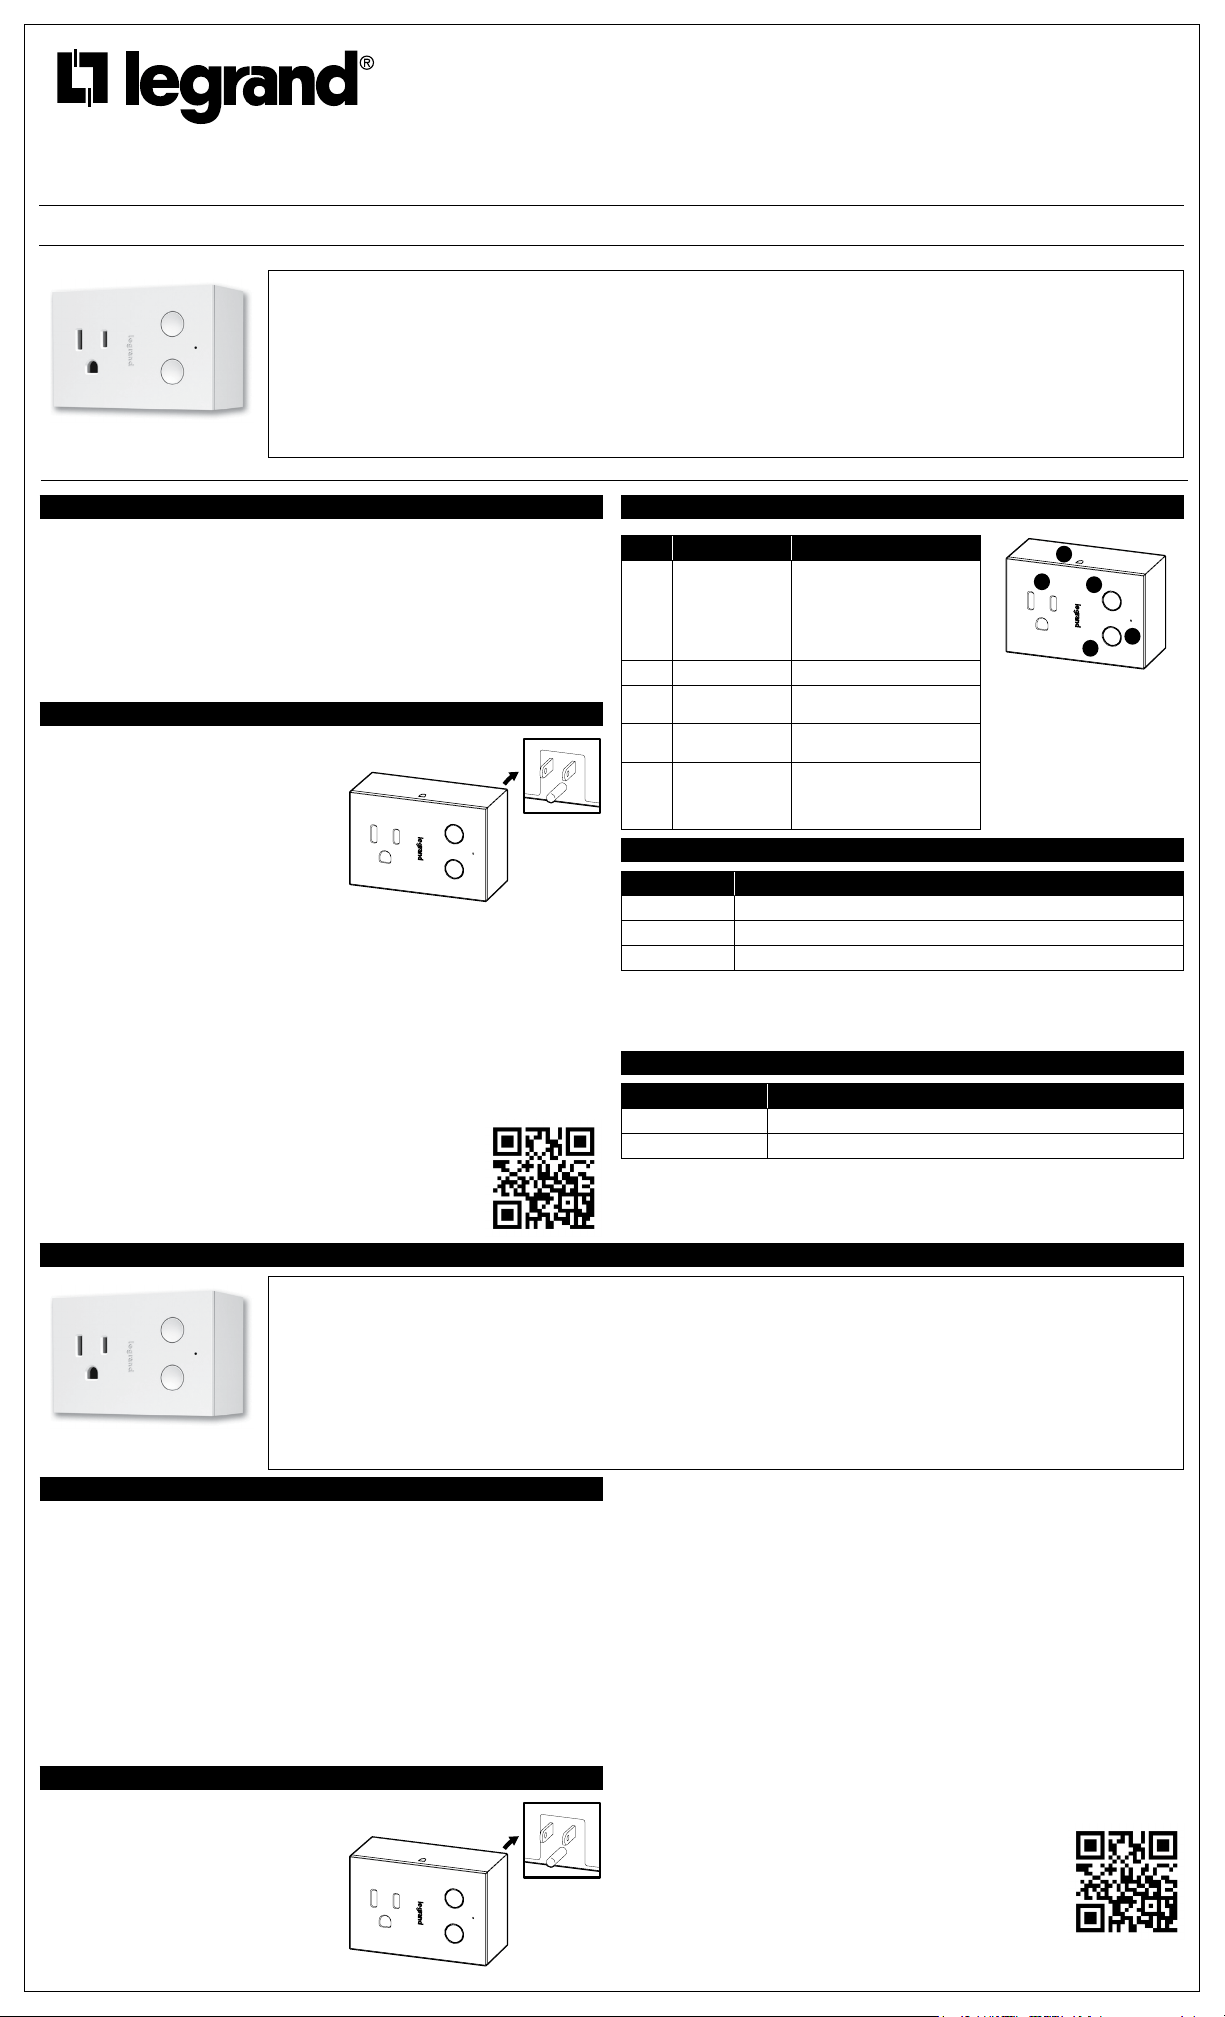
1. Plug in the smart plug-in dimmer
Insert the lamp or device to be controlled into the
outlet on the Smart Plug-In Dimmer.
The Smart Dimmer up/down buttons can be
reversed for use in outlets with the ground plug
up:
• Hold the bottom button while plugging in your
dimmer. The dimmer automatically adjusts
the orientation.
2. Test the smart plug-in dimmer
a. With the lamp or device on, press the
button on the Smart Plug-In Dimmer to turn your device on.
b. Hold the bottom button to decrease the light level.
c. Hold the top button to increase the light level.
d . Press the buttom button to turn your device o.
TROUBLESHOOTING TIP: If the device is not responding to the dimmer, conrm that the
outlet is powered and that the device is functional.
This radiant
®
device is designed to work with a radiant
®
Smart Gateway with Netatmo.
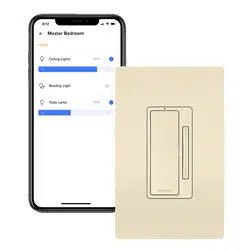
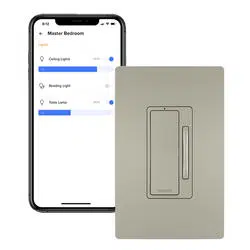
3. Set Up Your System
a. Download and launch the Legrand Home + Control app. The app is
available on the App Store or on Google Play.
b. Press the EZ button for 1 second, the LED indicator will blink magenta to indicate set up
mode. Follow the instructions in the app to nish setting up the device.
If the device is connected successfully, the LED will stop blinking.
c. Use the app to control your smart device.
For the most recent instruction sheets or more information on this product,
please see this link or scan the QR code: https://www.legrand.us/p/wnp20
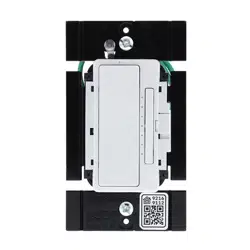
GETTING TO KNOW YOUR PLUG-IN
Item Name Description
1 Top Button Press to turn the light on or
double-tap to raise the dimming
percentage to 100%.
Press and hold ANY button to
quickly change the dimming
percentage by 20% per second.
2 Bottom Button Press to turn the device o.
3 LED Power
Indicator
Lit when load is o.
4 Outlet Plug your dimmable device into
the outlet.
5 EZ Button/ LED Press to start setup. Indicates
the current state of the device.
Refer to the “LED Light
Explanations” for details.
LED LIGHT EXPLANATIONS
State of Light Explanation
Solid Red Factory reset, not in network.
Blinking Green Device is attempting to connect to the network.
Solid Green Device in network, temporarily open.
Reset to Factory Default:
Deleting a device from the app will reset it to factory defaults. To manually reset the device
to factory defaults, press and hold the EZ button for 10 seconds until you see the LED blink
red then release. The LED will change to solid red when the reset is complete.
SPECIFICATIONS
Load Rating
Incandescent/CFL 300W
LED 1A
Legrand reserves the right to change specications without notice.
NOTE: The dimmer ships in forward phase mode to accommodate most load types.
Refer to the app to enter reverse phase.
3
4
1
2
5
RENSEIGNEMENTS SUR LA RÉGLEMENTATION
AVIS DE LA FCC : Ce dispositif est conforme à la section 15 des règlements de
la FCC. On peut s’en servir sous réserve des deux conditions suivantes : 1) ce
dispositif ne provoque pas d’interférences nuisibles; 2) ce dispositif doit être en
mesure d’accepter toute interférence reçue, y compris les interférences qui peuvent
causer un fonctionnement indésirable.
Ce matériel a été mis à l’essai et a été jugé conforme aux limites d’un dispositif
numérique de classe B, conformément à la section 15 des règlements de la FCC.
Ces limites visent à offrir une protection raisonnable contre les interférences
nuisibles dans une installation résidentielle. Ce matériel génère, utilise et peut
émettre des radiofréquences et, s’il n’est pas installé ou utilisé conformément aux
directives, peut causer des interférences nuisibles aux communications radio.
Toutefois, il n’existe aucune garantie contre la possibilité d’interférences au sein
d’un milieu précis.
Si ce matériel cause des interférences nuisibles à la réception des téléviseurs et des
radios, ce qui peut être déterminé en mettant à l’arrêt, puis en remettant en marche
le matériel, l’utilisateur est encouragé à tenter de corriger ces interférences par l’une
ou plusieurs des mesures suivantes :
• réorienter ou déplacer l’antenne de réception;
• augmenter la distance entre le matériel et le récepteur;
• brancher le matériel dans une prise de courant appartenant à un circuit électrique
différent de celui sur lequel le récepteur est branché;
• demander de l’aide au fournisseur ou à un technicien spécialisé en radio/télévision.
Ce matériel est conforme aux limites d’exposition aux radiations de la FCC
énoncées pour un environnement non contrôlé. Ce matériel doit être installé et
fonctionner à une distance minimale de 10 mm entre la structure rayonnante du
transmetteur et l’utilisateur ou les personnes se trouvant à proximité.
REMARQUE : Les changements ou les modications apportés à ce dispositif qui
ne sont pas expressément approuvés par le fabricant pourraient annuler la garantie
ainsi que l’autorisation de l’utilisateur à se servir du matériel.
Contient le n° d’ident. de la FCC : 2AU5D9820570
AVIS DE L’IC : Ce dispositif est conforme aux normes CNR pour les appareils
exempts de licence d’Industrie Canada. On peut s’en servir sous réserve des
deux conditions suivantes : 1) ce dispositif ne provoque pas d’interférences;
2) ce dispositif doit être en mesure d’accepter toute interférence, y compris les
interférences qui peuvent causer un fonctionnement indésirable.
ÉNONCÉ RELATIF À L’EXPOSITION AUX RADIOFRÉQUENCES : Ce dispositif
est conforme aux limites d’évaluation du DAS énoncées dans les exigences
CNR 102, 5e édition à la distance de séparation minimale de 10 mm de l’humain.
Remarque : Les changements ou les modications apportés à ce dispositif qui ne
sont pas expressément approuvés par le fabricant pourraient annuler la garantie
ainsi que l’autorisation de l’utilisateur à se servir du matériel.
IC: 25764-982057
HVIN: 982057
WNP20
INSTRUCTIONS EN FRANÇAIS
AVANT DE COMMENCER
Passer l’ensemble de ce guide en revue. En cas de question ou d’incertitude concernant
ses capacités, consulter un électricien.
MISE EN GARDE : Passer l’ensemble de ce guide en revue. En cas de question ou
d’incertitude concernant ses capacités, consulter un électricien.
• Pour usage intérieur dans un endroit sec seulement.
• Connecter le gradateur intelligent enchable UNIQUEMENT dans une source
d’alimentation de 120 V c. a., 60 Hz.
• Ce gradateur intelligent enchable est conçu UNIQUEMENT pour des lampes utilisant
des ampoules à intensité réglable.
• Ce dispositif comporte une che de type mise à la terre dotée d’une troisième broche
de mise à la terre pour réduire les risques de décharge électrique. Si la che ne
convient pas à la prise, communiquer avec un électricien qualié pour installer une prise
appropriée.
Consulter le site www.legrand.us/radiant/smart-lighting/support pour obtenir du soutien.
installation et conguration
INSTALLATION ET CONFIGURATION
1. Brancher le gradateur intelligent
enchable
Insérer la lampe ou le dispositif à contrôler dans
la prise du gradateur intelligent enchable.
Il est possible d’inverser les boutons haut et
bas du gradateur intelligent pour une utilisation
dans les prises qui sont installées avec la che
de mise à la terre vers le haut :
• Tenir le bouton inférieur en branchant le gradateur. Le gradateur ajuste automatiquement
l’orientation.
2. Mettre le gradateur intelligent enchable à l’essai
a. Lorsque la lampe ou le dispositif est sous tension, appuyer sur le bouton du gradateur
intelligent enchable pour mettre le dispositif sous tension.
b. Tenir enfoncé le bouton inférieur pour réduire le niveau de luminosité.
c. Tenir enfoncé le bouton supérieur pour augmenter le niveau de luminosité.
d. Appuyer sur le bouton inférieur pour mettre le dispositif hors tension.
CONSEIL DE DÉPANNAGE : Si le dispositif ne répond pas au gradateur, vérier que la
prise est alimentée et que le dispositif est fonctionnel.
Ce dispositif radiant
®
est conçu pour fonctionner avec une passerelle intelligente radiant
®
avec Netatmo.
3. Congurer votre système
a. Télécharger l’application Home + Control de Legrand et la lancer. L’application est oerte
sur l’App Store ou sur Google Play.
b. Appuyez sur le bouton EZ pendant 1 seconde, l’indicateur LED clignotera magenta pour
indiquer le mode de mise en place. Suivez les instructions de l’application pour terminer
la conguration de l’appareil. Si l’appareil est connecté avec succès, la LED cessera de
clignoter.
c. Utiliser l’application pour contrôler le dispositif intelligent.
Pour les ches d’instructions les plus récentes ou plus d’informations sur
ce produit, veuillez consulter ce lien ou numériser le code QR :
https://www.legrand.us/p/wnp20
800.223.4185
1.877.BY.LEGRAND
www.legrand.us
www.legrand.ca
341307 3/21
© Copyright 2021 Legrand All Rights Reserved.
© Copyright 2021 Tous droits réservés Legrand.
© Copyright 2021 Legrand Todos los derechos reservados.
QUESTIONS? WE’RE HERE TO HELP
PHONE: 1-877-833-3303 • 8:00 a.m. to 8:00 p.m. EST (M-F)
EMAIL: [email protected]
CHAT: https://www.legrand.us/radiant/smart-lighting.aspx
(Click on the chat icon to open a dialogue box)
VOUS AVEZ DES QUESTIONS? NOUS SOMMES LÀ POUR VOUS
AIDER
TÉLÉPHONE : 1 877 833-3303 • 8 h à 20 h (HNE) (lundi au vendredi)
COURRIEL : [email protected]
CLAVARDAGE : https://www.legrand.us/radiant/smart-lighting.aspx
lighting.aspx (Cliquer sur l’icône de clavardage pour ouvrir une
boîte de dialogue)
¿TIENE PREGUNTAS? ESTAMOS A SU DISPOSICIÓN PARA
AYUDARLE
TELÉFONO: 1-877-833-3303 • 8:00 a.m. a 8:00 p.m. EST (MF)
CORREO ELECTRÓNICO: [email protected]
CHAT https://www.legrand.us/radiant/smart-
lighting.aspx (Haga clic en el icono de chat para abrir un
cuadro de diálogo)
ANTES DE COMENZAR
Revise esta guía completamente. Consulte a un electricista si tiene dudas o no está
seguro de sus capacidades.
PRECAUCIÓN: Para reducir el riesgo de lesiones o sobrecalentamiento y daños en otro
equipo:
• Solo para uso en áreas interiores secas.
• Conecte el regulador enchufable inteligente a una fuente de alimentación de 120 VCA,
60 Hz SOLAMENTE
• Este regulador enchufable inteligente está previsto SOLO para lámparas con bombillas
regulables.
• Para reducir el riesgo de descarga eléctrica, este equipo tiene un enchufe de conexión
a tierra que tiene una tercera clavija (conexión a tierra). Si el enchufe no encaja en el
tomacorriente, comuníquese con un electricista calicado para instalar el tomacorriente
adecuado.
Para obtener asistencia, visite www.legrand.us/radiant/smart-lighting/support.
INSTALACIÓN Y CONFIGURACIÓN
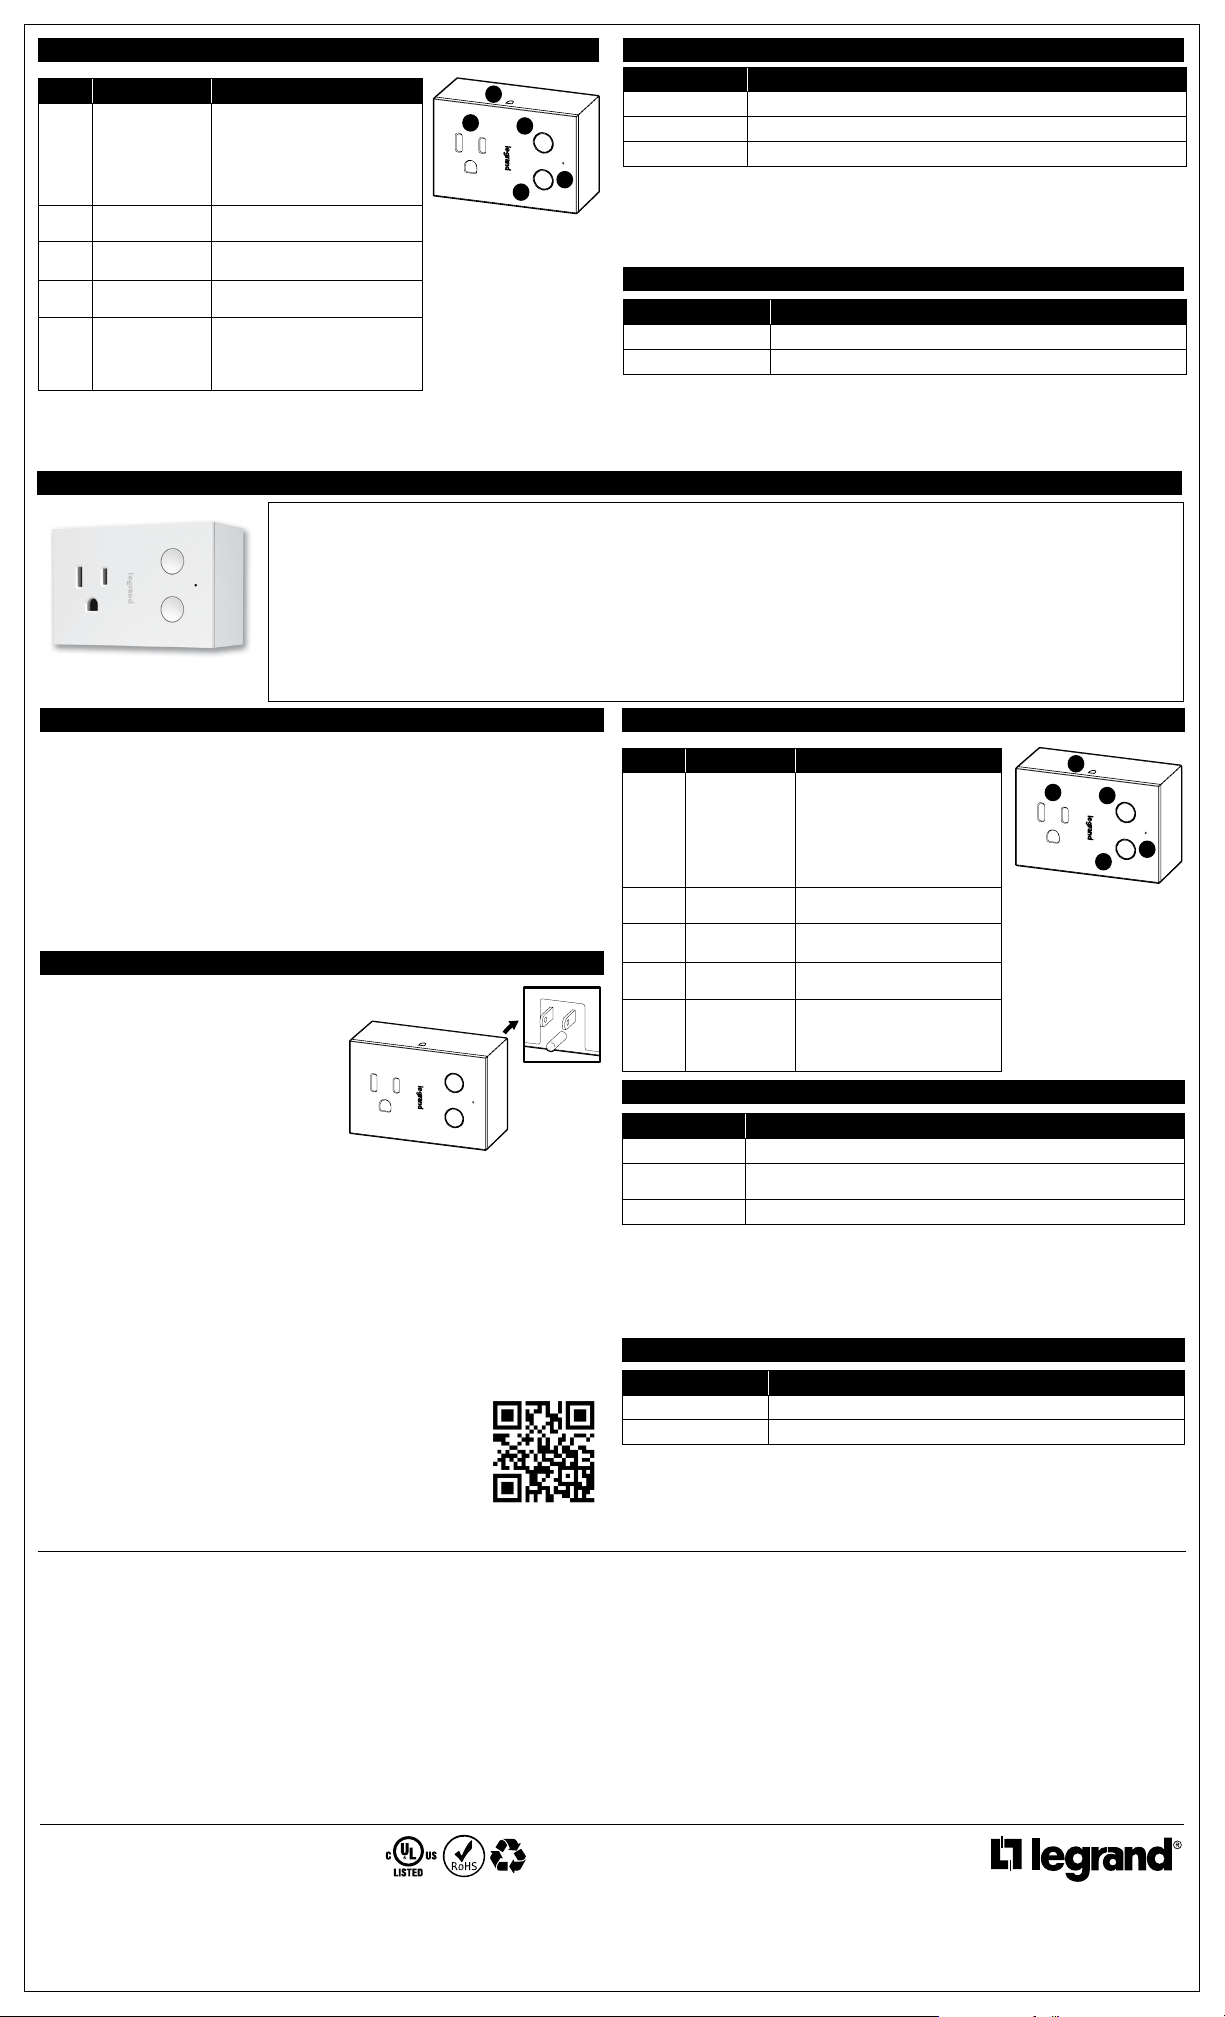
1. Enchufe el regulador enchufable inteligente
Inserte la lámpara o dispositivo a controlar en
el tomacorriente del Regulador enchufable
inteligente.
Los botones arriba/abajo del regulador inteligente
se pueden invertir para su uso en tomas con
enchufe a tierra:
• Mantenga presionado el botón inferior
mientras conecta el regulador. El regulador
ajusta automáticamente la orientación.
2. Pruebe el regulador enchufable inteligente
a. Con la lámpara o el dispositivo encendido,
presione el botón del regulador
enchufable inteligente para encender el dispositivo.
b. Mantenga presionado el botón inferior para reducir la intensidad de la luz.
c. Mantenga presionado el botón superior para aumentar la intensidad de la luz.
d. Presione el botón para apagar el dispositivo.
CONSEJO PARA SOLUCIONAR PROBLEMAS: Si el dispositivo no responde al
regulador, conrme que el tomacorriente reciba alimentación y que el dispositivo funcione.
Este dispositivo radiant
®
está diseñado para funcionar con una Puerta de enlace
inteligente radiant
®
con Netatmo.
3. Congure el sistema
a. Descargue e inicie la aplicación Legrand Home + Control. La aplicación está disponible
en la App Store o en Google Play.
b. Pulse el botón EZ durante 1 segundo, el indicador LED parpadeará magenta para
indicar el modo de conguración. Siga las instrucciones de la aplicación para nalizar
la conguración del dispositivo. Si el dispositivo está conectado correctamente, el LED
dejará de parpadear.
c. Use la aplicación para controlar su dispositivo inteligente.
Para las hojas de instrucciones más recientes o más información sobre
este producto, consulte este enlace o escanee el código QR:
https://www.legrand.us/p/wnp20
INFORMACIÓN SOBRE SU DISPOSITIVO ENCHUFABLE
Artículo Nombre Descripción
1 Botón superior Presiónelo para encender la luz o
tóquelo dos veces para aumentar
el porcentaje de regulación a
100%.
Mantenga presionado CUALQUIER
botón para cambiar rápidamente
el porcentaje de regulación en un
20% por segundo.
2 Botón inferior Presione para apagar el
dispositivo.
3 Indicador LED de
alimentación
Está encendido cuando la carga
está apagada.
4 Tomacorriente Conecte su dispositivo regulador al
tomacorriente.
5 Botón EZ/LED Presione para iniciar la
conguración. Indica el estado
actual del dispositivo. Consulte las
“Explicaciones de la luz LED” para
obtener más detalles.
EXPLICACIONES DE LA LUZ LED
Estado de la luz Explicación
Rojo jo Restablecimiento de fábrica, no en red.
Parpadea
en verde
El dispositivo está intentando conectarse con la red.
Verde jo Dispositivo en red, abierto temporalmente.
Restablecer a los valores predeterminados de fábrica:
Eliminar un dispositivo de la aplicación lo restablecerá a la conguración de fábrica.
Para restablecer manualmente el dispositivo a los valores predeterminados de fábrica,
mantenga presionado el botón EZ durante 10 segundos hasta que vea que el indicador
LED parpadea en rojo y luego, suelte el botón. El LED cambiará a rojo jo cuando se
complete el restablecimiento.
ESPECIFICACIONES
Carga Clasicación
Incandescente/CFL 300W
LED 1A
Legrand se reserva el derecho de cambiar las especicaciones sin previo aviso.
NOTA: El regulador se envía en modo de fase directa para acomodar la mayoría de los
tipos de carga.
Consulte la aplicación para ingresar a la fase inversa.
INSTRUCCIONES EN ESPAÑOL
3
4
1
2
5
APPRENDRE À CONNAÎTRE VOTRE DISPOSITIF ENFICHABLE
Article Nom Description
1 Bouton supérieur Appuyer sur le bouton pour allumer
ou appuyer deux fois pour faire
passer le niveau de gradation à
100 %.
Appuyer et tenir enfoncé UN bouton
pour changer rapidement le niveau
de gradation de 20 % par seconde.
2 Bouton inférieur Appuyer sur le bouton pour mettre le
dispositif hors tension.
3 Voyant
d’alimentation DEL
Allumé lorsque la charge est éteinte.
4 Prise Brancher le dispositif à intensité
réglable dans la prise.
5 Bouton EZ/DEL Appuyer sur le bouton pour
démarrer la mise en service. Indique
l’état actuel du dispositif. Se reporter
à la section « Explications du voyant
DEL » pour plus de détails.
EXPLICATIONS DU VOYANT DEL
État du voyant Explication
Rouge xe Réinitialisation des paramètres d’usine, pas dans le réseau.
Clignotant vert Le dispositif tente de se connecter au réseau.
Vert xe Dispositif dans le réseau, allumé temporairement.
Réinitialisation pour rétablir les paramètres par défaut établis en usine :
La suppression d’un dispositif de l’application entraînera une réinitialisation pour rétablir
les paramètres par défaut établis en usine. Pour réinitialiser manuellement le dispositif
an de rétablir les paramètres par défaut établis en usine, appuyer sur le bouton EZ et le
maintenir enfoncé pendant 10 secondes jusqu’à ce que le voyant DEL clignote, puis le
relâcher. Le voyant DEL deviendra rouge xe lorsque la réinitialisation sera terminée.
CARACTÉRISTIQUES TECHNIQUES
Charge Valeur nominale
Incandescent/LFC 300 W
DEL 1 A
Legrand se réserve le droit de modier les caractéristiques techniques sans préavis
REMARQUE : Le gradateur est livré en mode de phase d’avancement an de convenir à la
plupart des types de charges.
Se reporter à l’application pour entrer en mode de phase de retour.
INFORMACIÓN NORMATIVA
AVISO DE LA FCC: Este dispositivo cumple con la Parte 15 de las reglas de la
FCC. La operación está sujeta a las siguientes dos condiciones: (1) este dispositivo
no debe provocar interferencia perjudicial, y (2) este dispositivo debe aceptar
cualquier interferencia recibida, incluso interferencia que pueda provocar una
operación no deseada.
Este equipo ha sido probado y cumple con los límites para un dispositivo digital
Clase B, conforme con la Parte 15 de las Reglas de la FCC. Estos límites están
diseñados para proporcionar una protección razonable contra interferencias
perjudiciales en una instalación residencial. Este equipo genera, utiliza y puede
irradiar energía de radiofrecuencia y, si no se instala y utiliza de acuerdo con las
instrucciones, puede causar interferencias perjudiciales en las comunicaciones de
radio. Sin embargo, no existe garantía de que no se produzcan interferencias en
una instalación especíca.
Si este equipo causa interferencias perjudiciales en la recepción de radio o
televisión, lo que puede determinarse apagando y encendiendo el equipo, se
recomienda al usuario que intente corregir la interferencia mediante una o más de
las siguientes medidas:
• Reoriente o reubique la antena receptora
• Aumente la separación entre el equipo y el receptor
• Conecte el equipo a un tomacorriente en un circuito diferente al que alberga la
conexión
del receptor
• Consulte al distribuidor o a un técnico experimentado de radio/TV para
obtener ayuda.
Este equipo cumple con los límites de exposición a la radiación de la FCC
establecidos para un entorno no controlado. Este equipo debe instalarse y operarse
con una distancia mínima de 10 mm entre la(s) estructura(s) radiante(s) del
transmisor y el cuerpo del usuario o de personas cercanas.
NOTA: cualquier cambio o modicación a este dispositivo que no esté
expresamente aprobado por el fabricante anulará la garantía y la autoridad del
usuario para operar el equipo.
Contiene FCC ID:
2AU5D982057
AVISO de IC: Este dispositivo cumple con los estándares RSS exentos de licencia
de Industry Canada. La operación está sujeta a las siguientes dos condiciones:
(1) este dispositivo no debe provocar interferencia perjudicial, y (2) este dispositivo
debe aceptar cualquier interferencia recibida, incluso interferencia que pueda
provocar una operación no deseada del dispositivo.
DECLARACIÓN DE EXPOSICIÓN A RF: Este equipo cumple con los límites de
evaluación SAR establecidos en los requisitos de RSS-102 Tema 5 a una distancia
mínima de separación de 10 mm al cuerpo humano. Nota: Cualquier cambio o
modicación en este dispositivo que no estén expresamente aprobados por el
fabricante anularán la garantía y la autoridad del usuario para operar el equipo.
IC: 25764-982057
HVIN: 982057
WNP20
3
4
1
2
5
LIMITED ONE YEAR WARRANTY
Legrand will remedy any defect in workmanship or material in Legrand products which may develop under
proper and normal use within ONE year from date of purchase by a consumer:
(1) by repair or replacement, or, at Legrand’s option, (2) by return of an amount equal to consumer’s
purchase price. Such remedy is IN LIEU OF ANYAND ALL EXPRESSED OR IMPLIED WARRANTIES
OF MERCHANTABILITY OR FITNESS FOR A PARTICULAR PURPOSE. Such remedy by Legrand
does not include or cover cost of labor for removal or reinstallation of the product. ALL OTHER
FURTHER ELEMENTS OF DAMAGE (INCIDENTAL OR CONSEQUENTIAL DAMAGES) FOR
BREACH OF ANYAND ALL EXPRESSED OR IMPLIED WARRANTIES INCLUDING WARRANTIES
OF MERCHANTABILITY OR FITNESS FOR A PARTICULAR PURPOSE ARE EXCLUDED HEREBY.
(Some states do not allow disclaimers or exclusion or limitation of incidental or consequential damages,
so the above disclaimer and limitation or exclusion may not apply to you.) ANY IMPLIED WARRANTIES
INCLUDING WHERE REQUIRED WARRANTIES OF MERCHANTABILITY OR FITNESS FOR A
PARTICULAR PURPOSE SHALL BE LIMITED TO THE ONE YEAR PERIOD SET FORTH ABOVE.
(Some states do not allow limitations on how long an implied warranty lasts, so the above limitation may
not apply to you.)
To ensure safety, all repairs to Legrand products must be made by Legrand, or under its specic direction.
Procedure to obtain performance of any warranty obligation is as follows: (1) Contact Legrand, Syracuse,
New York 13221, for instructions concerning return or repair; (2) return the product to Legrand, postage paid,
with your name and address and a written description of the installation or use of the Legrand product, and
the observed defects or failure to operate, or other claimed basis for dissatisfaction. This warranty gives you
specic legal rights and you may also have other rights which vary from state to state.
GARANTIE LIMITÉE DE UNE ANNÉE
Legrand remédiera à tout défaut de fabrication ou matériel des produits Legrand qui peuvent survenir dans
le cadre d’une utilisation correcte et normale dans les une année de la date d’achat par un consommateur :
(1) par la réparation ou le remplacement, ou, au choix de Legrand, (2) le remboursement d’un montant
équivalent au prix d’achat du consommateur. Ledit recours REMPLACE TOUTES LES GARANTIES
EXPLICITES OU IMPLICITES DE QUALITÉ MARCHANDE OU D’APTITUDE À SATISFAIRE UNE
FONCTION PARTICULIÈRE. Ledit recours par Legrand n’inclut pas ni ne couvre le coût de la main-
d’œuvre pour le démontage ou la réinstallation du produit. TOUS AUTRES DOMMAGES (DIRECTS OU
INDIRECTS) EN CAS DE VIOLATION DE TOUTE GARANTIE EXPLICITE OU IMPLICITE Y COMPRIS
LES GARANTIES DE QUALITÉ MARCHANDE OU D’APTITUDE À SATISFAIRE UNE FONCTION
PARTICULIÈRE SONT EXCLUS PAR LES PRÉSENTES. (Certains États n’autorisent pas les dénégations
de responsabilité, les exclusions ou la limitation des dommages directs ou indirects; il se peut donc
que la dénégation de responsabilité et la limitation ou l’exclusion ci-dessus ne s’appliquent pas à vous.)
TOUTE GARANTIE IMPLICITE, Y COMPRIS LES GARANTIES DE QUALITÉ MARCHANDE OU DE
CONVENANCE À UN USAGE PARTICULIER DOIT ÊTRE LIMITÉE À LA PÉRIODE DE UNE ANNÉE
ÉTABLIE CI-DESSUS. (Certains États n’autorisent pas les limitations de durée d’une garantie implicite; les
limitations ci-dessus peuvent donc ne pas s’appliquer à vous.)
Pour assurer la sécurité, toutes les réparations des produits Legrand doivent être effectuées par Legrand ou
sous sa direction spécique. Voici la marche à suivre pour obtenir l’exécution de toute obligation de garantie
: (1) Communiquer avec Legrand, Syracuse, New York, 13221, pour obtenir des directives concernant
le remboursement ou la réparation; (2) retourner le produit à Legrand, par un envoi en port payé, en
indiquant votre nom et votre adresse ainsi qu’une description écrite de l’installation ou de l’utilisation du
produit Legrand, et indiquer les défauts ou la défaillance de fonctionnement constatés ou tout autre motif
d’insatisfaction. Cette garantie vous donne des droits légaux particuliers, mais vous pouvez également avoir
d’autres droits, selon l’État où vous résidez.
GARANTÍA LIMITADA DE UNO AÑO
Durante un plazo de uno año a partir de la fecha de compra del consumidor, Legrand compensará cualquier
defecto de fabricación o material en los productos Legrand que se detecte a través de un uso adecuado
y normal:
(1) con reparación/reemplazo o, a opción de Legrand, (2) con devolución de una cantidad equivalente al
precio de compra del consumidor. Este recurso SUSTITUYE TODAS Y CADA UNA DE LAS GARANTÍAS
EXPRESAS O IMPLÍCITAS DE COMERCIABILIDAD O IDONEIDAD PARA UN PROPÓSITO EN
PARTICULAR. Este recurso de Legrand no incluye ni cubre el costo de la mano de obra requerida para el
retiro o reinstalación del producto. POR MEDIO DEL PRESENTE SE EXCLUYEN TODOS LOS DEMÁS
DAÑOS (EMERGENTES O INDIRECTOS) POR INCUMPLIMIENTO DE TODAS O CUALQUIERA DE
LAS GARANTÍAS EXPRESAS O IMPLÍCITAS, INCLUIDAS LAS GARANTÍAS DE COMERCIABILIDAD
O IDONEIDAD PARA UN PROPÓSITO EN PARTICULAR. (Algunos estados no permiten las exenciones
de responsabilidad o la exclusión o limitación de daños emergentes o indirectos; por lo tanto, la exención
de responsabilidad y la limitación o exclusión anteriores podrían no aplicarse en su caso). CUALQUIER
GARANTÍA IMPLÍCITA, INCLUYENDO LAS GARANTÍAS DE COMERCIABILIDAD O IDONEIDAD PARA
UN PROPÓSITO EN PARTICULAR QUE SEAN NECESARIAS, SE LIMITARÁ AL PERÍODO DE UNO
AÑO ESTABLECIDO ANTERIORMENTE. (Algunos estados no permiten limitar la duración de una garantía
implícita, por lo que la limitación anterior podría no aplicarse en su caso).
Para garantizar la seguridad, todas las reparaciones de los productos Legrand deben ser realizadas
por Legrand o bajo su dirección especíca. El procedimiento para lograr el cumplimiento de cualquier
obligación de garantía es el siguiente: (1) Póngase en contacto con Legrand, Syracuse, Nueva York 13221,
para obtener instrucciones respecto a la devolución o reparación; (2) devuelva el producto a Legrand,
con franqueo pagado, junto con su nombre, dirección y una descripción escrita de la instalación o uso
del producto Legrand, así como los defectos o fallas de funcionamiento que se observaron o cualquier
otra situación no satisfactoria que desee declarar. Esta garantía le otorga derechos legales especícos y
también puede tener otros derechos según el estado.