

PWA207
GPW 3000
(1 OPERATOR MANUALPRESSURE WASHER
(6 MANUAL DEL OPERADORLAVADORA A PRESIÓN

!"
# $
% &
' ##
( )! #
* +,#
#
-,) %
.%
. %
.)%
# .'
% .'
' .'
&)'
- (
& (
/*
)
# )
% 0)
)
# 1)
# )
! "#$
$
% &'
( )* +
)$
),
)-./0,
01/0-)
0)2!2
!22,22
3)22
)!435*4&6
2)/2)3
1
2
3
4
5
6
7
8
9
10
11
12
16
-
7
8,
!
7
%
&)
(
9
9,
3&.
:!
7
!
95
6
%
;,"
(
&
0,
-
<
=
),)/4&03)/&
-45)634/,,-
7/+>.>
7!!
2?
0)@A)"
56
),)/4&03)/&-45)6
34/,,-
B 0)!5
62)
!2,$,2
!
!!
&!
B <)C)
D!
)
B >)
))
B 8
22)
B 822,2E
0)
B +!!",))
,/
7
)
B 8C!:
!)
B &,,!+)!E
,2!,222
!!))
B /)8F$
:,
B =2
&!!22
2!E
D
B 8F
)&)./.4&-45)6
34/,,-
B 3&.53&.6
!5656!
B 8)!
)
B -$
-
$
$)$!
)8!$
:
)/
$)!
)$
B 8)
)22
2
)$
),

B .G$!
B 0,2,
8
B 8!>
):
)222)
+)))8)
,,
B .$
):22)
0/)--1/)34-7)/-45)6
34/,,-
B +!
B 0,E2
B :!
G,=)
B H
B 8
B :
B 8!:
!)
B 3)
)
B 0
!)
2
)
B +,EEH8
)
B :))))!
D)
B :22)
/>!,
22)"!2
7/+>.>
0,2,
8
/1,541&./.1
,)//10)/0/).,
0""
53&.6!"
0),
, )
!)2)
3&.
-)/2.,5418&)9
,-1&4)400&4,.)
B .!"2)
>)
!"2
)!
!"G$)
,)2!!
G+)
!")!
/!),
@8-=<.> -</0.>A@8-=<
.> -</08A
):),-,./-
B -$
0$!),
@/!I
A-$
8)$$)
$!)8
!$,
:)
/$)
!)$
! .7&-45)6
0
B :,
!
B 8
)&
)
))!
!
B 2)
,
B -$)!2
2!22!E)!
)
)
)$
),
0/0-,
7/+>.>
0),
&2!
) )!2
222
),2!
) )$))
?
B <)"!I
B &)!,)
)I
B /)))))!
J,$)
,0
$)2,"2
,G)2
),)
-+$"
% -68&-,7)0/1.
))!)!
))
)!
!
-'# )*
0,E2)
F)"
!
8$
)
/
2"
2"
0,E"
E2)"
!)<,"
!
EE8
0,E)
,,!,2"
!)"
3
!
,
-'# )*
3$
!
7K>"
)2)2)!2
"
/!
,)
!,
,2"
D>
,)
:)
,
( /-;&)2)&-
0)
$,
-69
8&
-,4& )4,,
8/>+ .))D"
22
2
E
7/+>.> .D"
22
2
E
&/-0.> .D"
22
2))
)E
&/-0.> 57 / )"
!6.
))"
,-4&&4,
)&)./.4&.,,).,
0)!).
!*L2#*9D2/&
568)
58&6/!
)!
#
)$
),
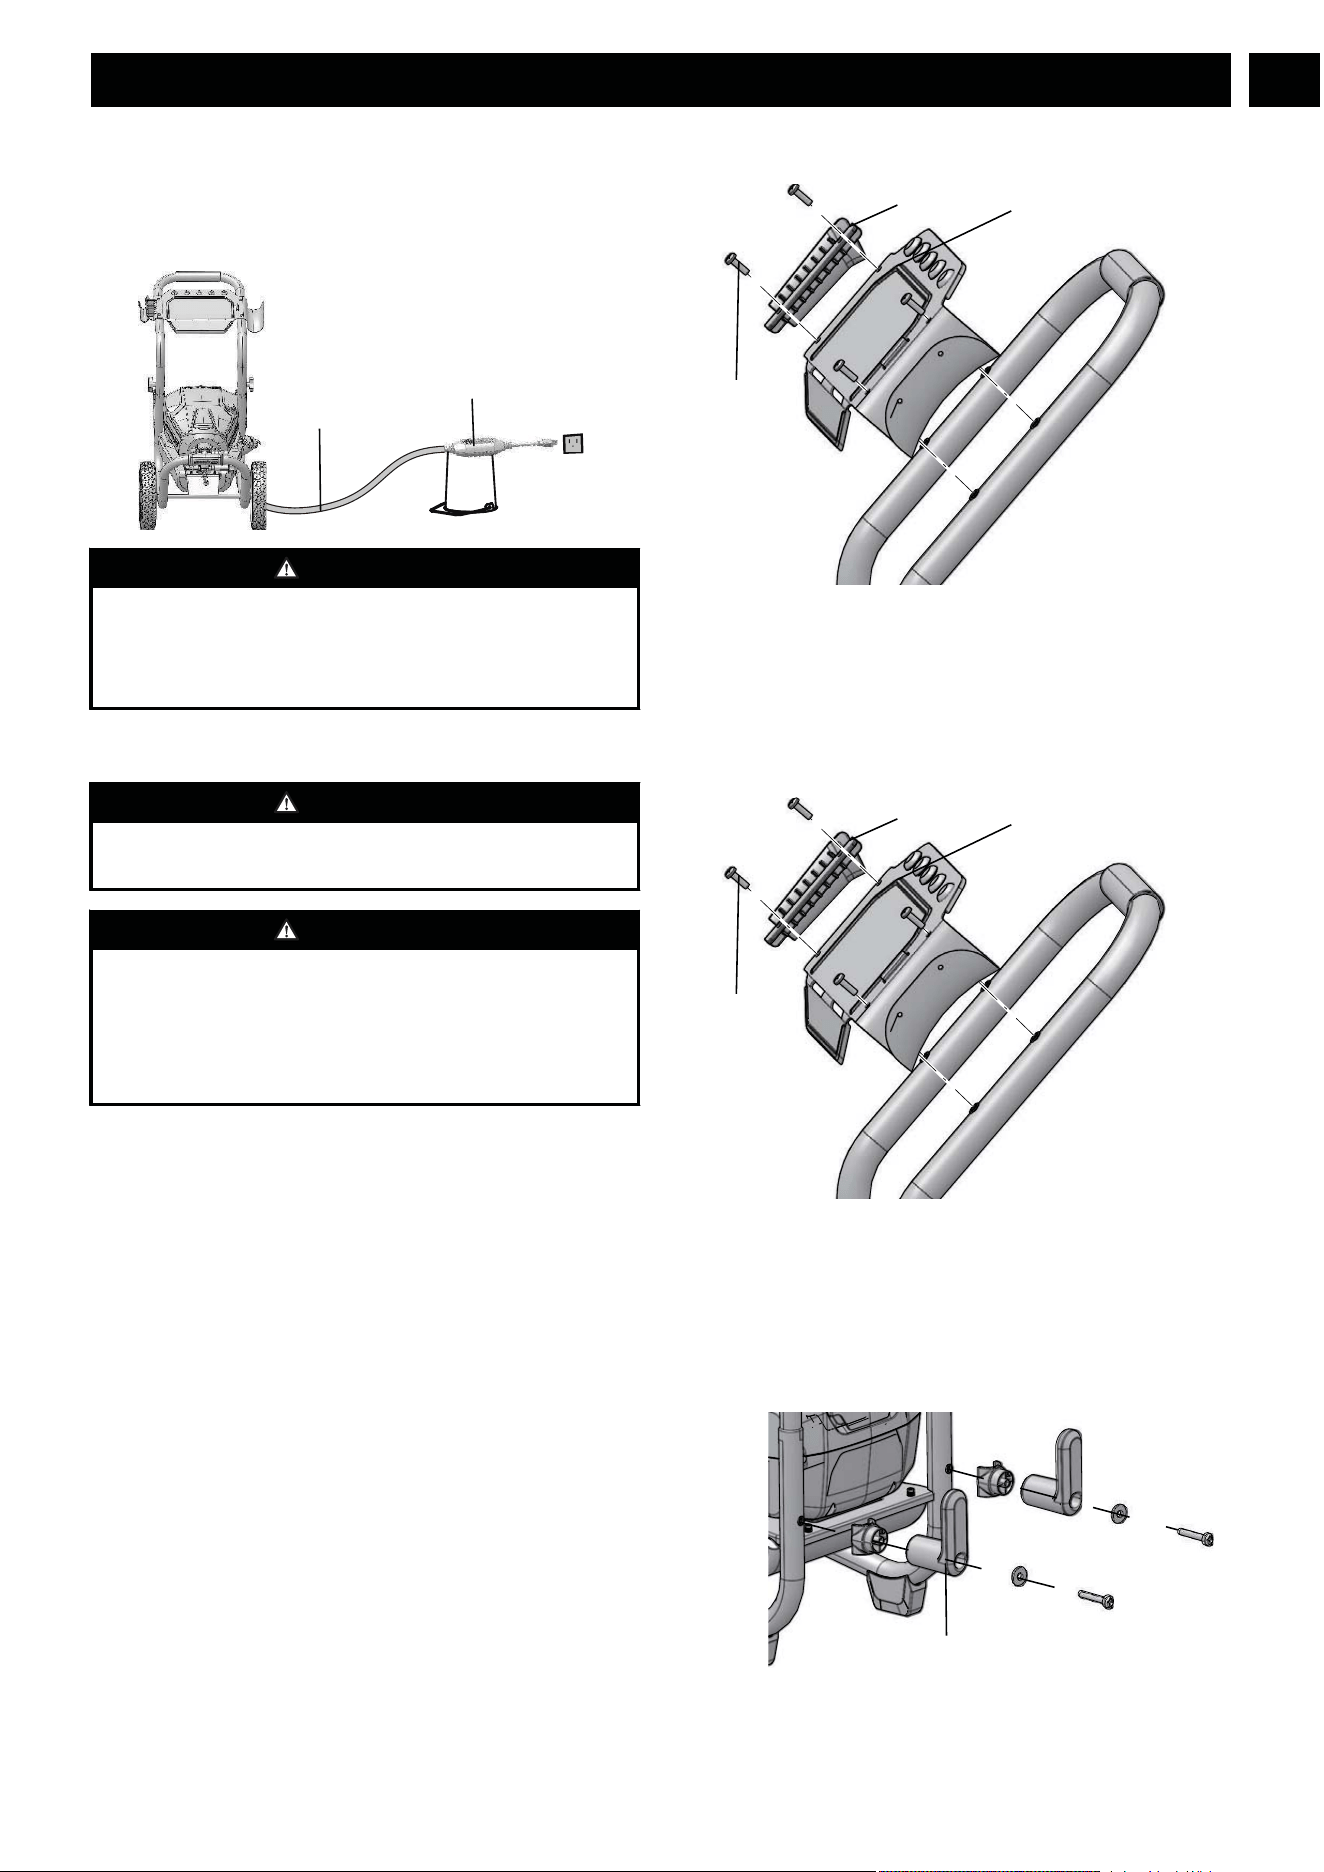
3.1.1 PREPARE A DRIP LOOP
Recommend the use of a drip loop as below so the water can
not run along the power cord even possibly reach the
electrical outlet and plug.
7
14
WARNING
Keep the extension cord clear of the working area. Position
the cord so that it will not get caught on lumber, tools, or
other obstructions while you are working with a power tool.
Failure to do so can result in serious personal injury.
3.2 UNPACK THE MACHINE
WARNING
Make sure that you correctly assemble the machine before
use.
WARNING
• If the parts are damaged, do not use the machine.
• If you do not have all the parts, do not operate the
machine.
• If the parts are damaged or missing, speak to the service
center.
1. Open the package.
2. Read the documentation in the box.
3. Remove all the unassembled parts from the box.
4. Remove the machine from the box.
5. Discard the box and package in compliance with local
regulations.
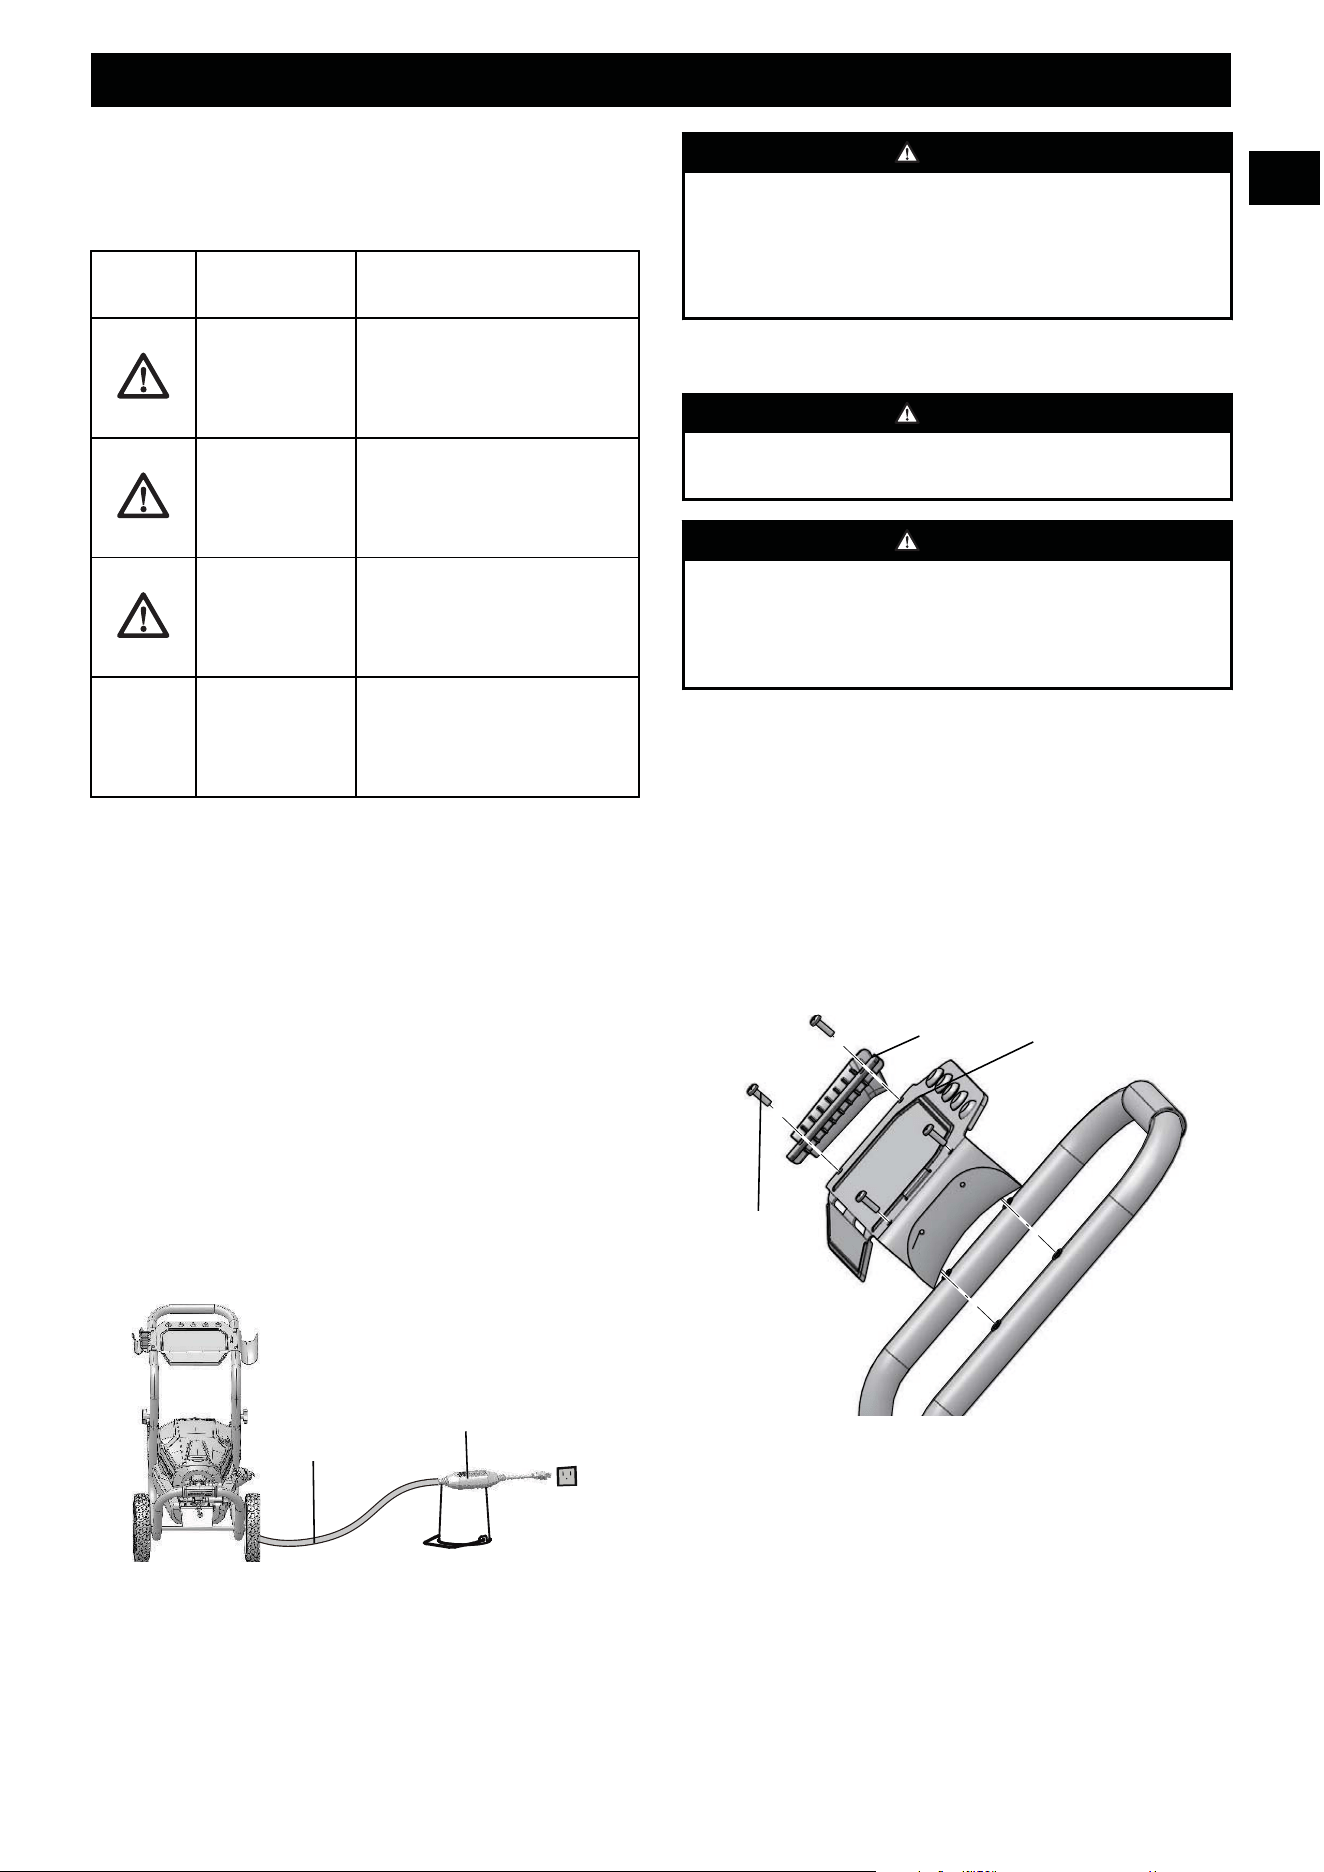
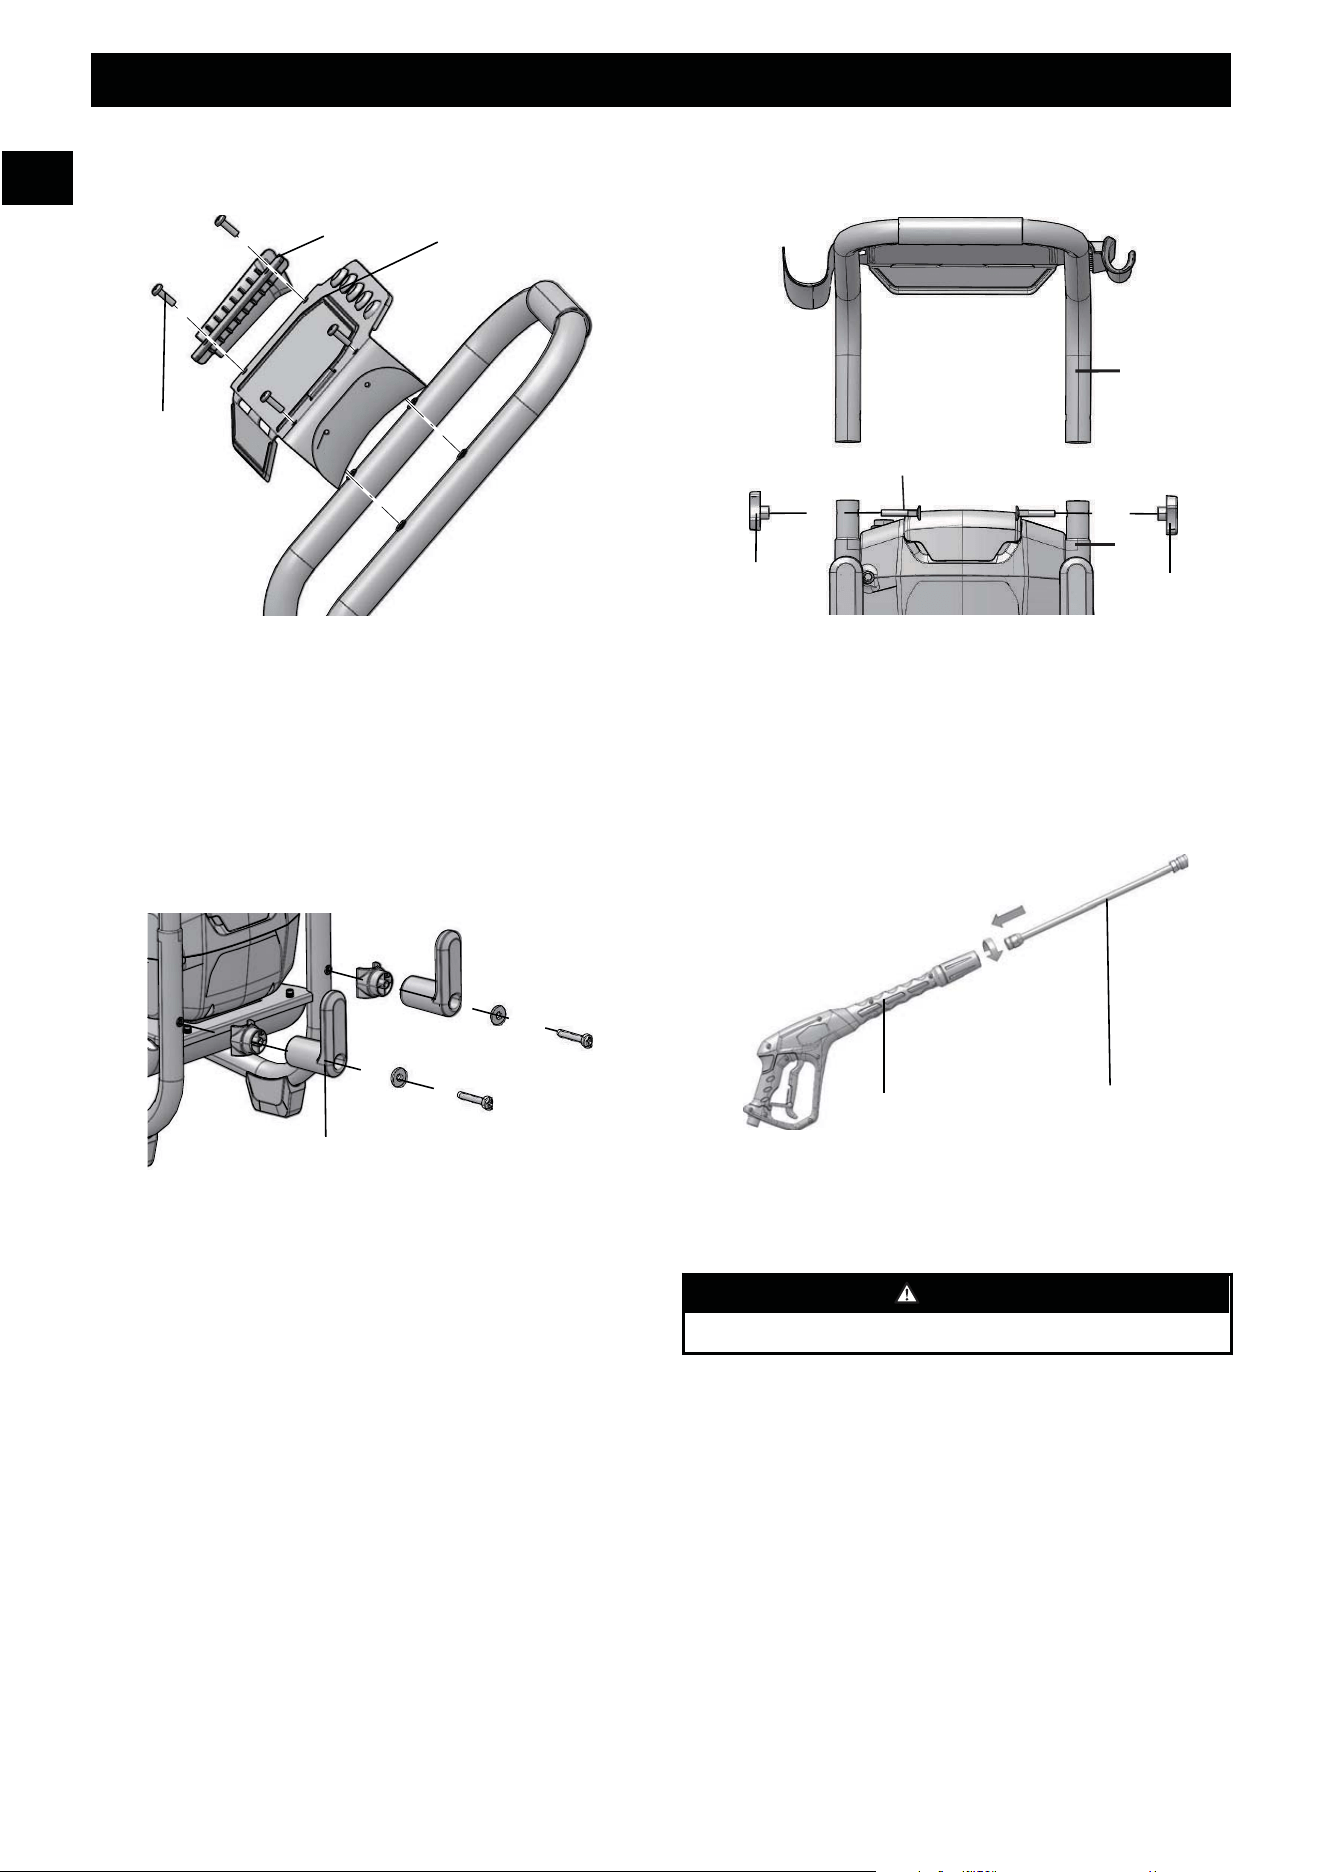
3.3 INSTALL THE UPPER PANEL
2
13
3
1. Aligh the screw sleeves of the front panel (2) with the
screw holes on the upper handle.
2. Tighten them with a Phillips screwdriver (not included).
3.4 INSTALL THE SPRAY GUN
HOLDER
2
13
3
1. Aligh the screw sleeves of the spray gun holder (3) with
the screw holes on the upper handle.
2. Tighten them with a Phillips screwdriver (not included).
3.5 INSTALL THE POWER CORD
STORAGE ARMS
9
7
English
EN
1. Attach each of the power cord storage arms (9) into the
two separate positions on the lower handle of the fixture.
2. Align the screw (13) with the holes in each of the two
power cord storage arms (9).
3. Push the screw (13) through and tighten both power cord
storage arms (9) with a Phillips head screw driver (not
included).
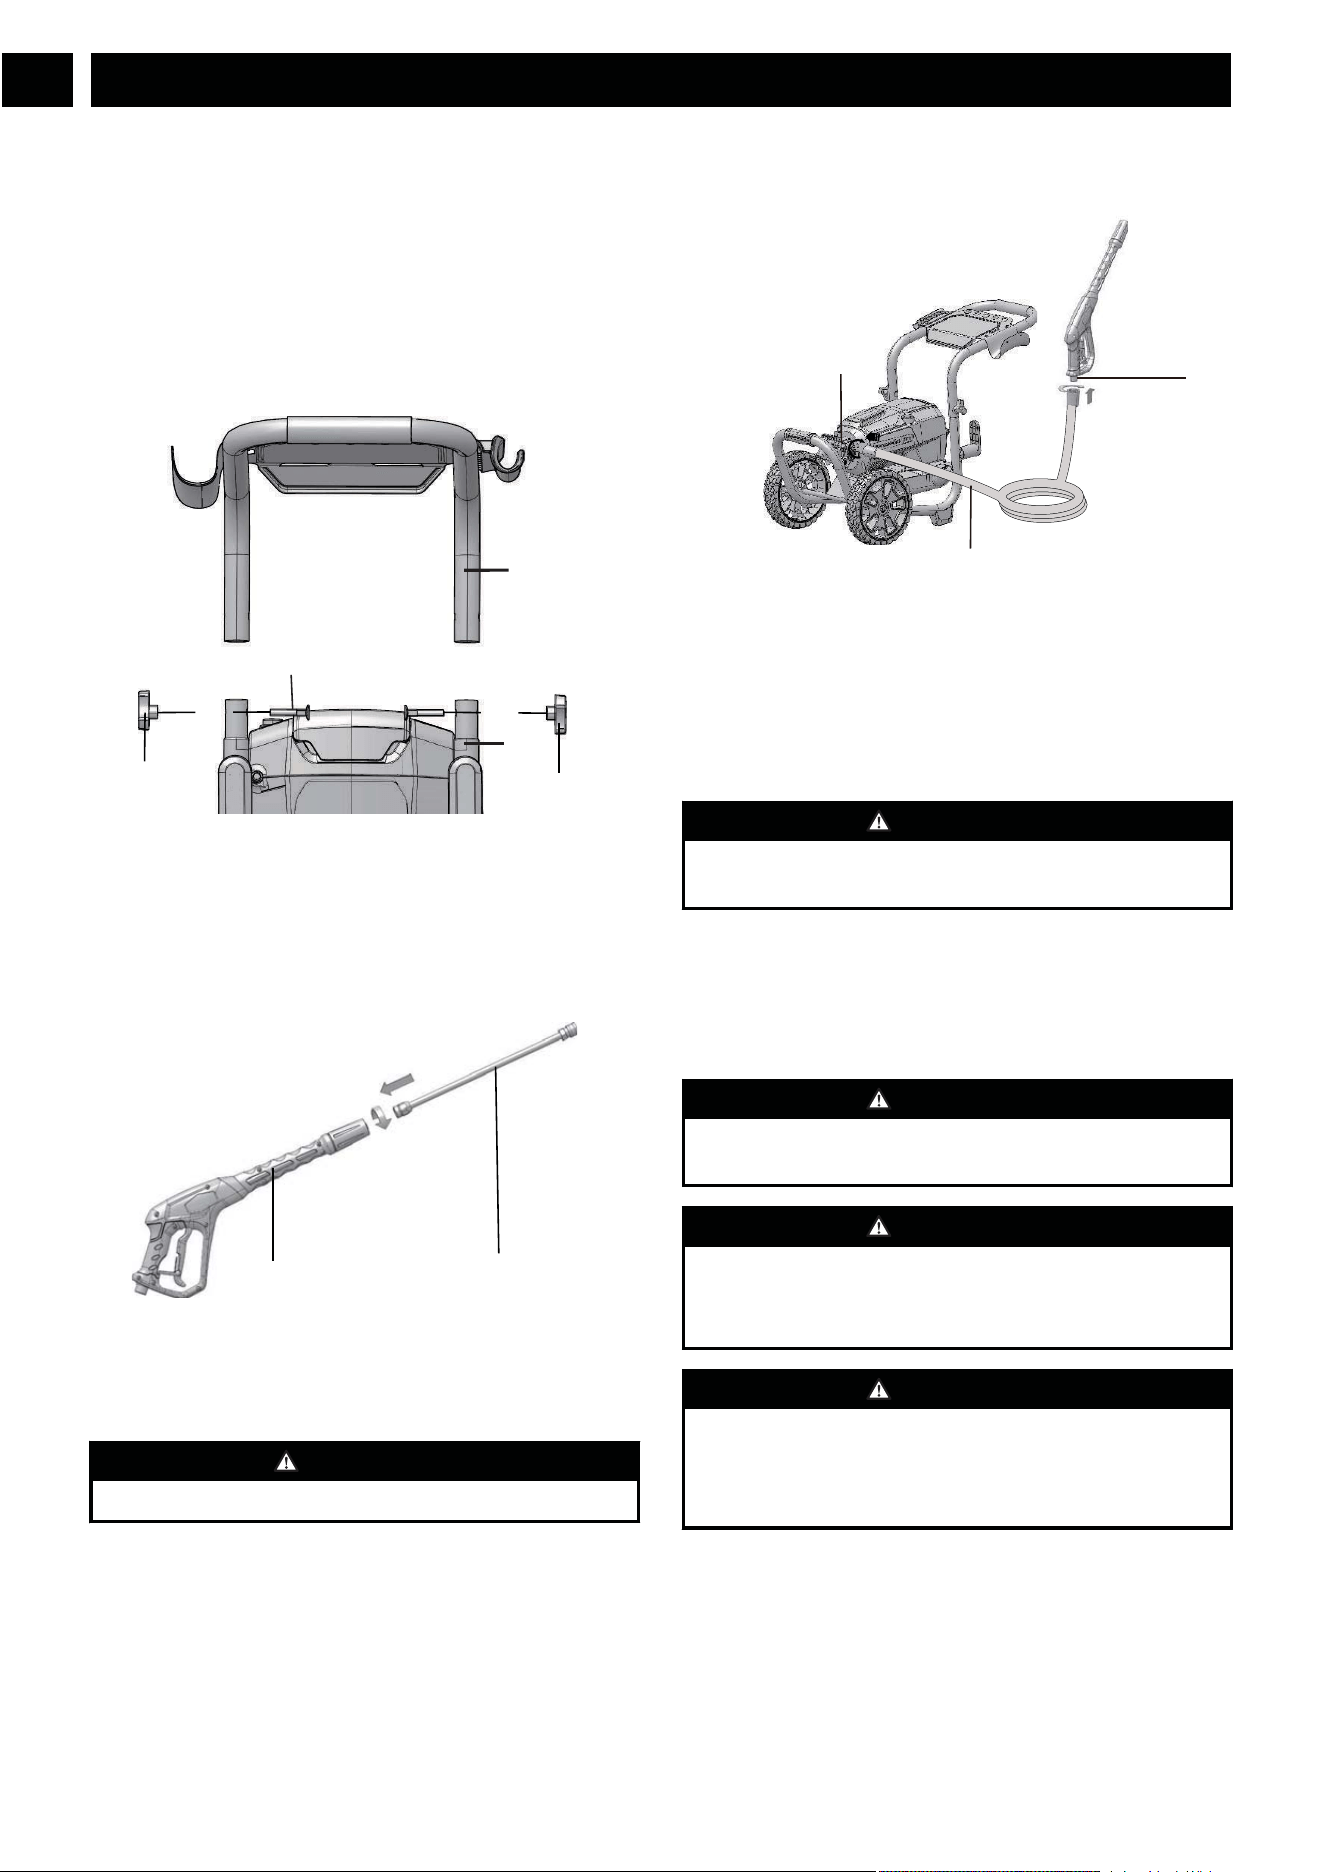
3.6 INSTALL THE UPPER HANDLE
15
1
5
23
24
25
1. Align the holes on the upper handle (23) and the lower
handle (24).
2. Insert the handle bolts (25) and use the handle knobs (15)
to tighten them.
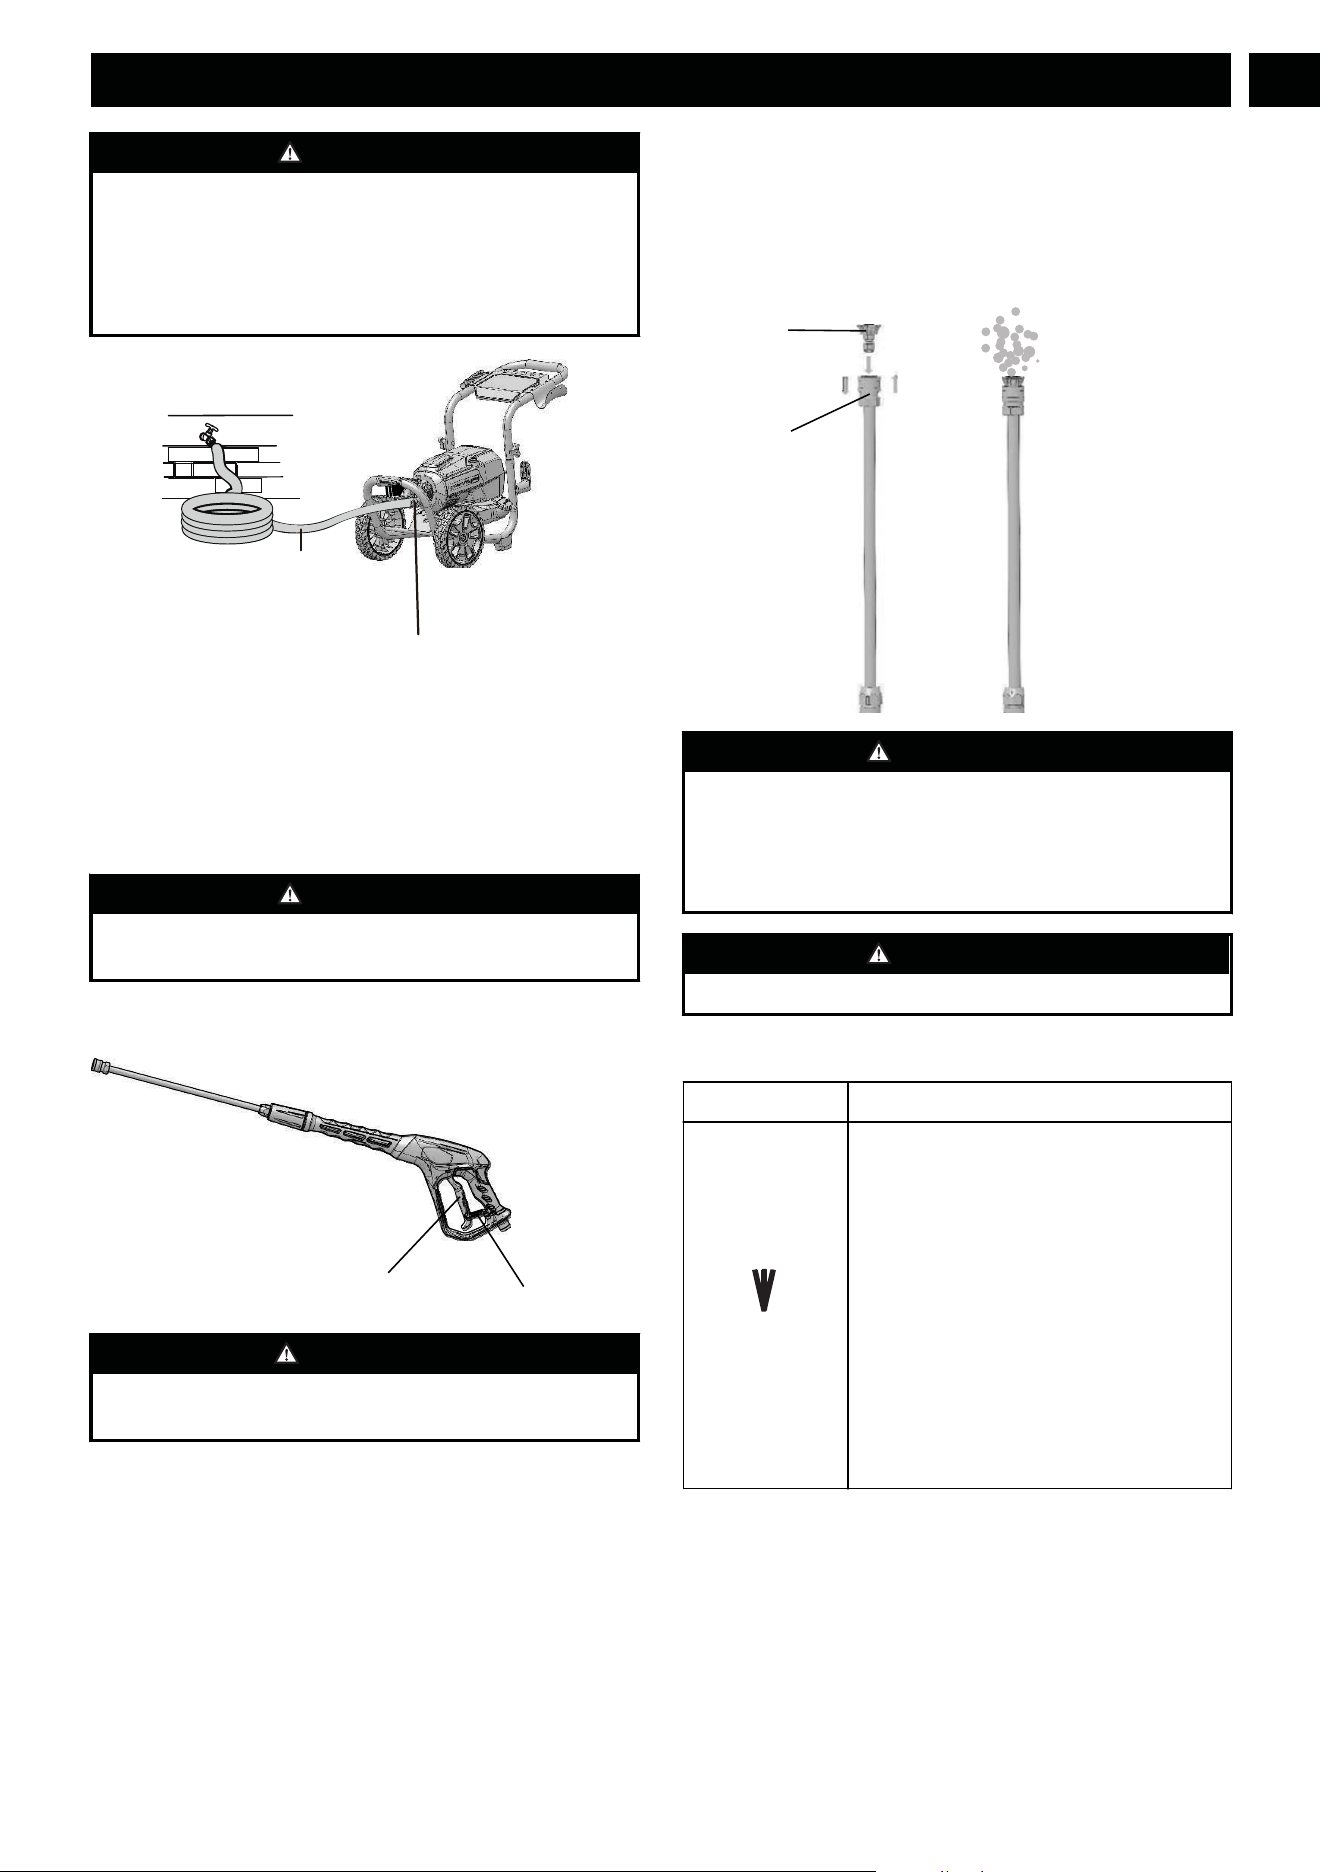
3.7 INSTALL THE SPRAY WAND
1
4
1. Push the end of the spray wand (4) into the trigger handle
(1) and rotate clockwise to secure.
2. Pull on the spray wand (4) to be certain it is properly
secured.
WARNING
Make sure that the connection has no leakage.
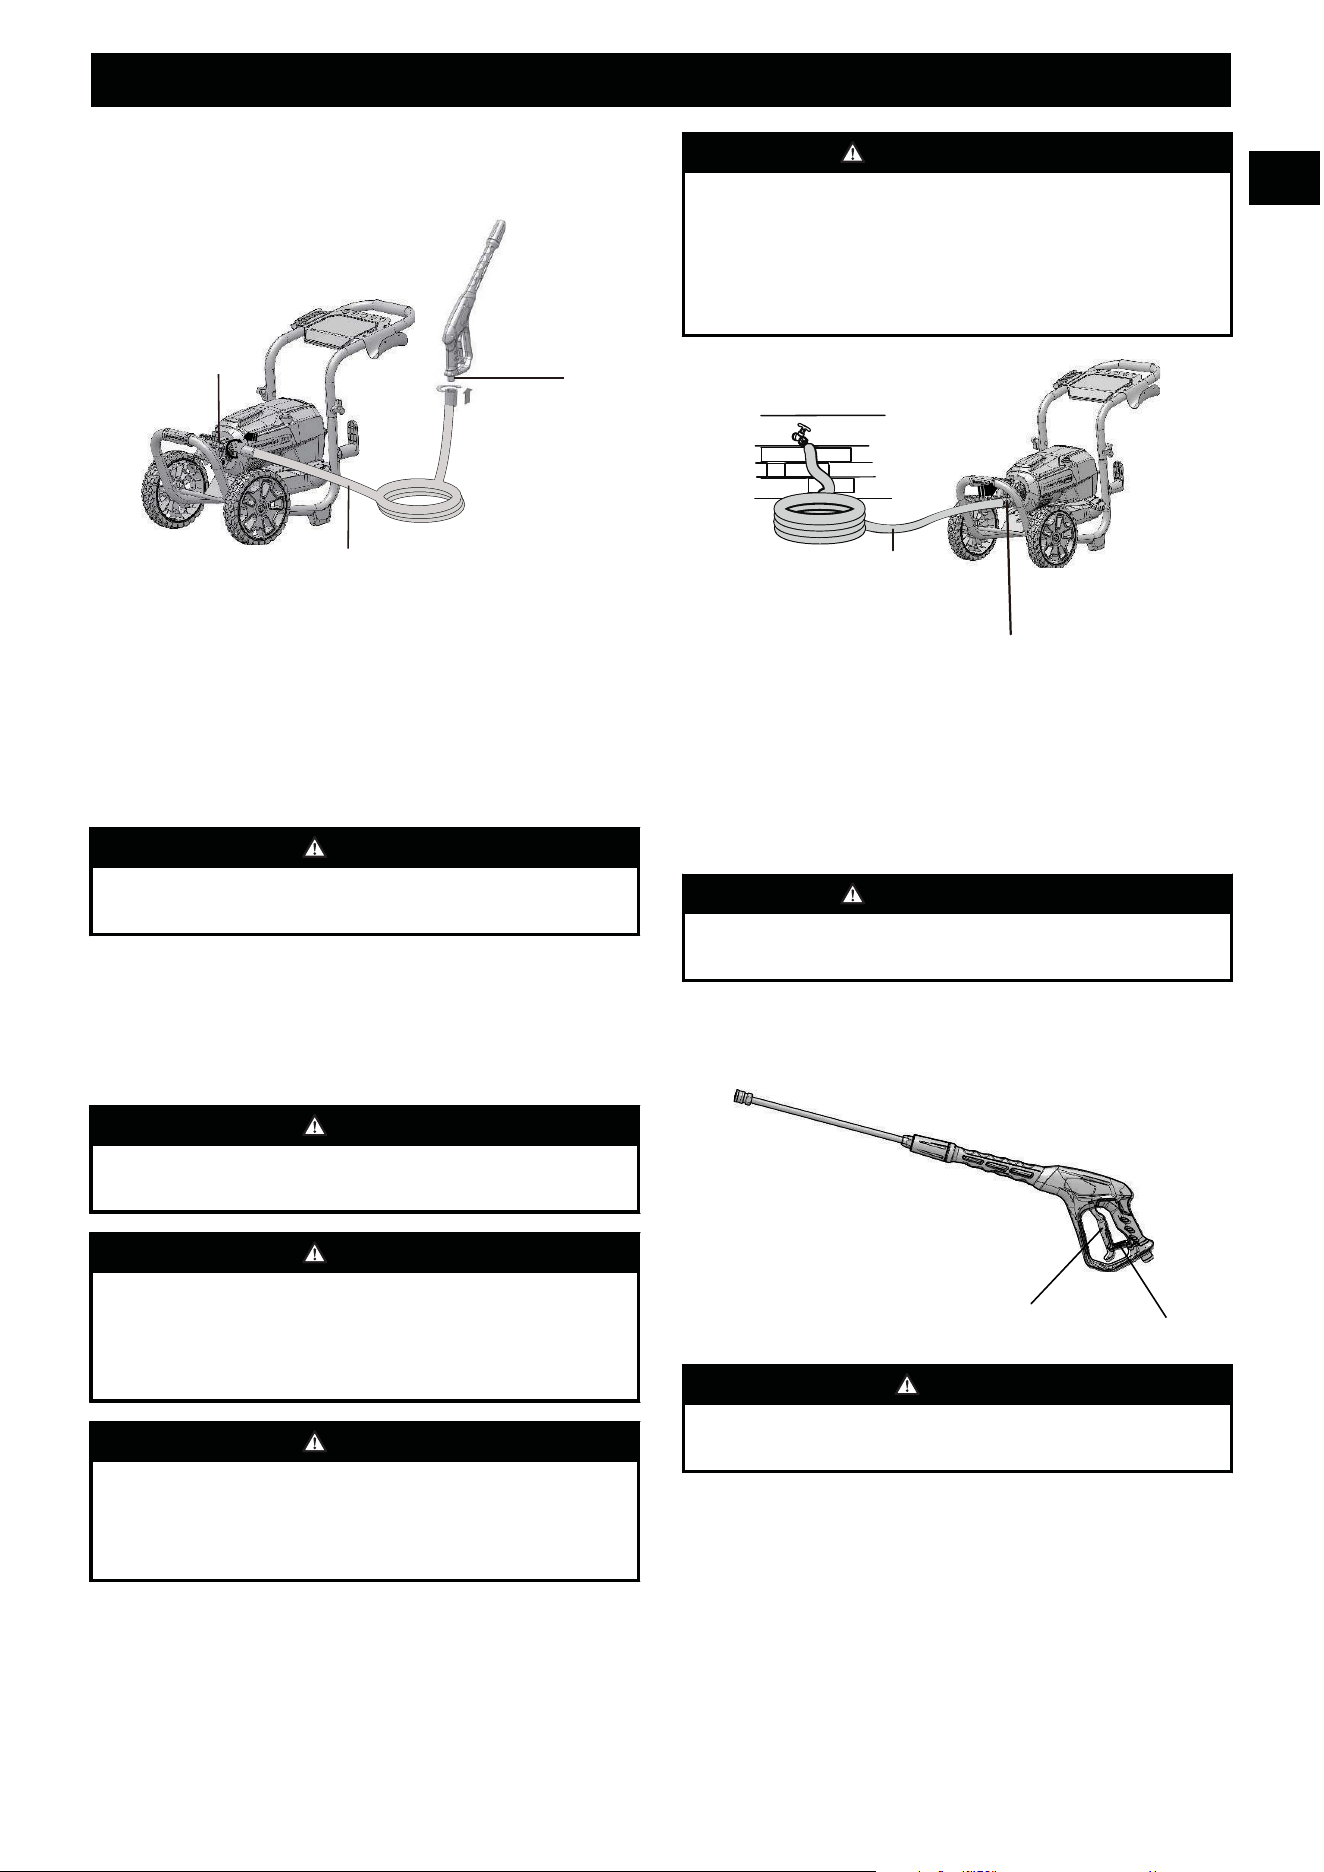
3.8 INSTALL THE HIGH PRESSURE
HOSE
8
11
16
1. Push and turn clockwise one end of the high pressure
hose (11) into the inlet coupler (8).
2. Install and tighten the other end of the high pressure hose
onto the water outlet (16) coupler.
4 OPERATION
WARNING
Make sure that all the connections are tight and have no
leakage before operation.
4.1 CONNECT THE WATER SUPPLY
TO THE MACHINE
For easy operation, please use a self-coiling garden hose (not
provided).
WARNING
When you operate the self-coiling hose, make sure that the
hose has no blockage.
WARNING
• The water supply must come from the water main
• Do not use hot water
• Do not use water from ponds or lakes
WARNING
Always observe all the local regulations when you connect
the garden hose to the water supply. Direct connection
through a receiver tank or backflow preventer is usually
permitted.
8
English
EN
&/-0.>
.!
B .)2)
B .2
17
8
-5%6
<5%6*
0
.5%6
5'6
&/-0.>
0)!)))*!
1-)7)-0/461,
22
21
7/+>.>
32,
)
B 56
)
B +56
1,&.;7)-0/461,/)/
B ,"56,
&.;7)-0/461,/)/
B ,"56C
.74,)7)-0/460
18
19
7/+>.>
=?
,"
)
7/+>.>
8C
,XX&)60)
-0/460 400&.4,
15
O
69,Z[\
B 0"
"
+
2!"
G))
2!)"
)0
@"
A!
0
(
)$
),

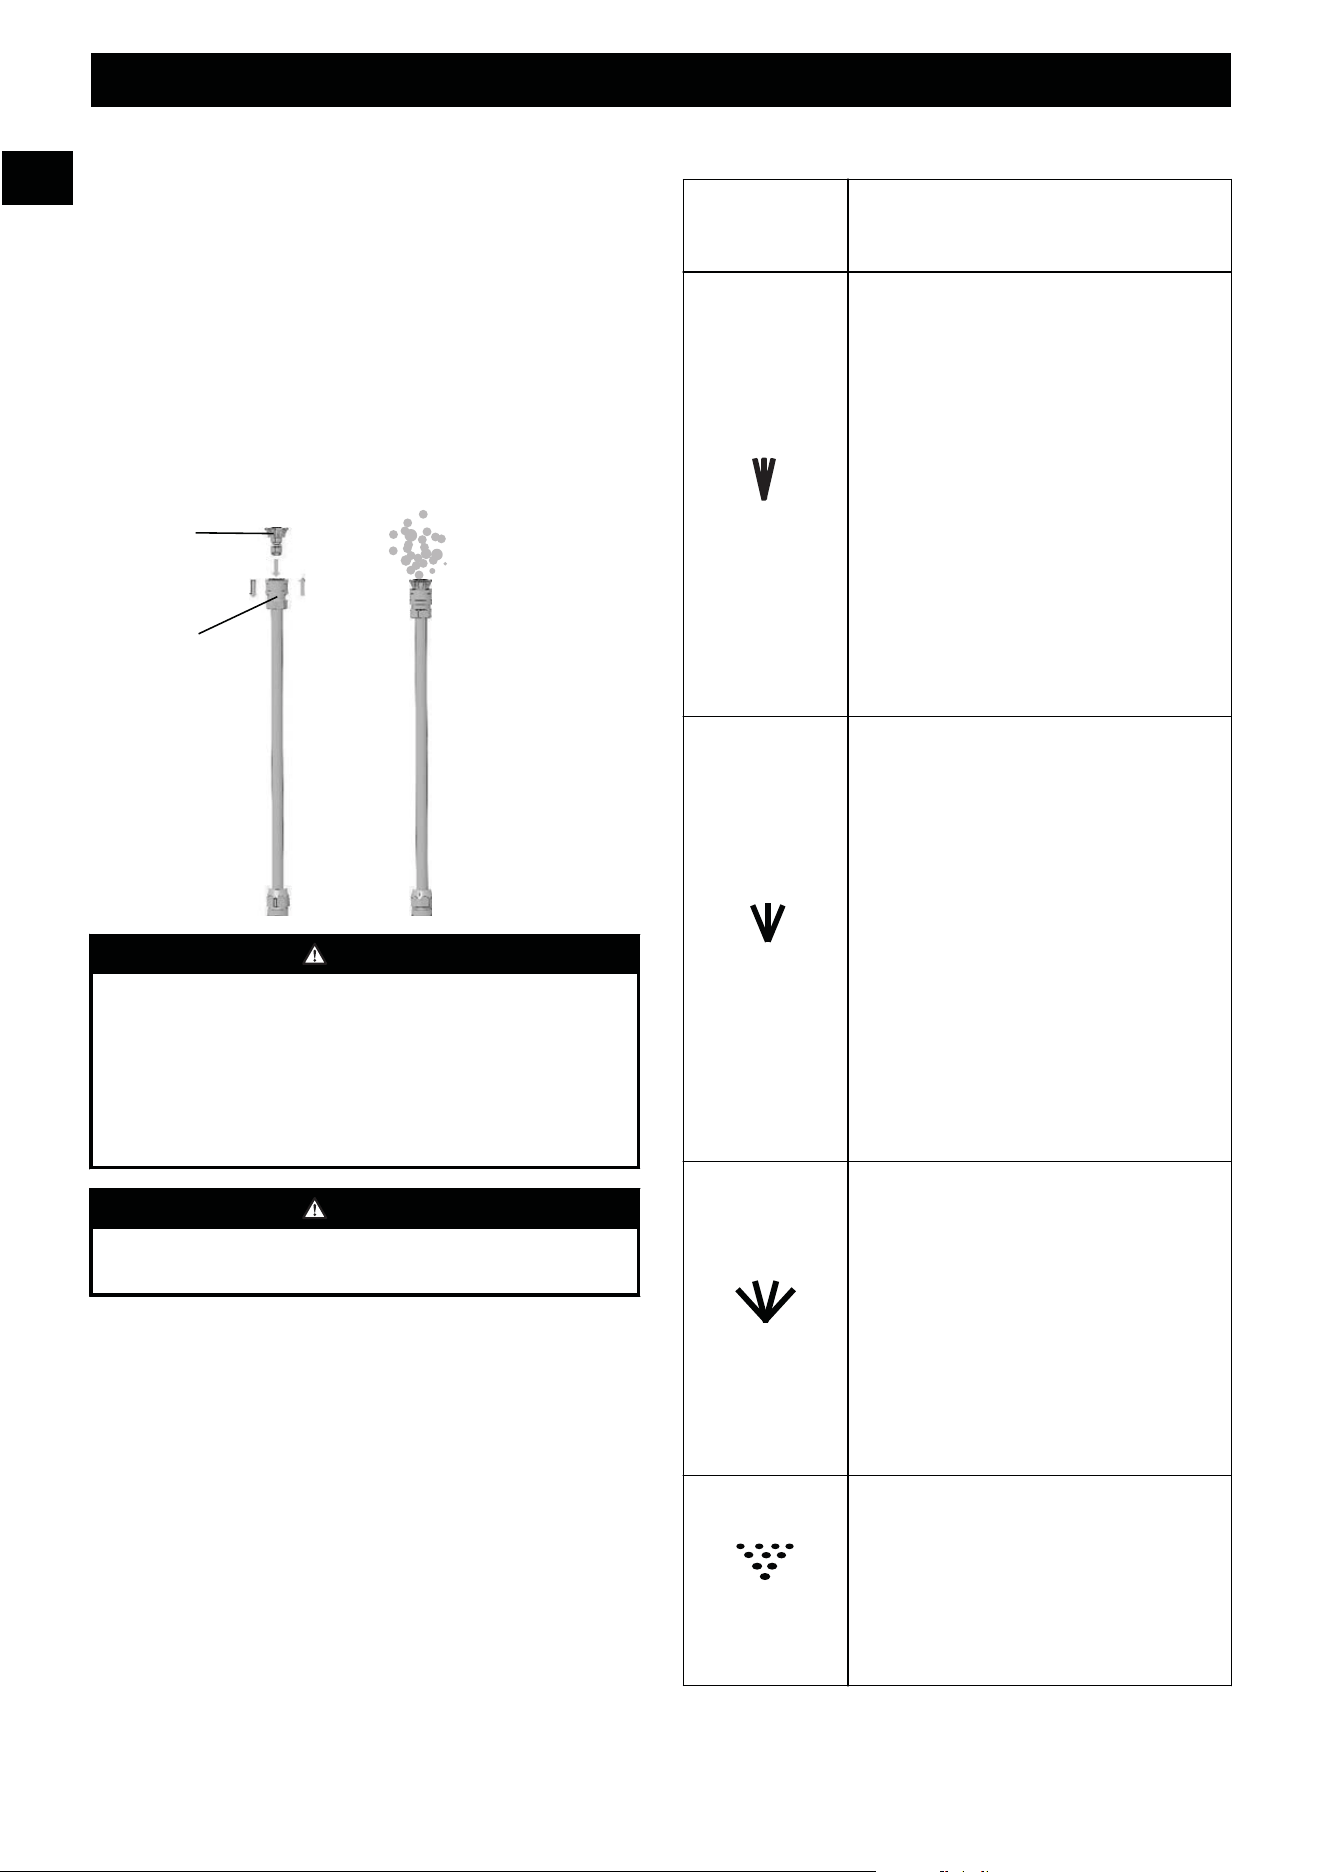
SPRAY TIP APPLICATION
25
O
Green - Narrow fan tip (25° )
• The green pressure washer tip pro-
vides high versatility with its 25 de-
gree angle tip. Referred to as the
washing tip, because it provides ade-
quate pressure to remove dirt from
surfaces, but is designed to not dam-
age many surfaces. This pressure
washer tip is designed for “sweep-
ing” foliage or debris given its wide
angle. This tip is versatile due to its
wide area of cleaning and strong
pressure application.
40
O
White - Wide fan tip (40° )
• The white 40 degree tip, referred to
as the “fan” tip creates the widest
area of cleaning with relatively low
pressure. This pressure washer tip is
best used for light or delicate clean-
ing applications. It is recommended
for light cleaning on wood decks and
other soft or delicate surfaces.
SOAP
Black - Soap spray tip
• The black soap spray tip, is used for
soap application. Soap is applied un-
der low pressure high volume for op-
timum performance. Soap cannot be
applied under high pressure with this
machine.
Turbo nozzle tip
• The nozzle rotates in a zero to 15 de-
gree spray pattern in a circular mo-
tion to break down tough dirt and
grime. The spray pattern can cover
area of 4 to 8 inches wide, depending
on a distance between the tip and the
surface being cleaned.
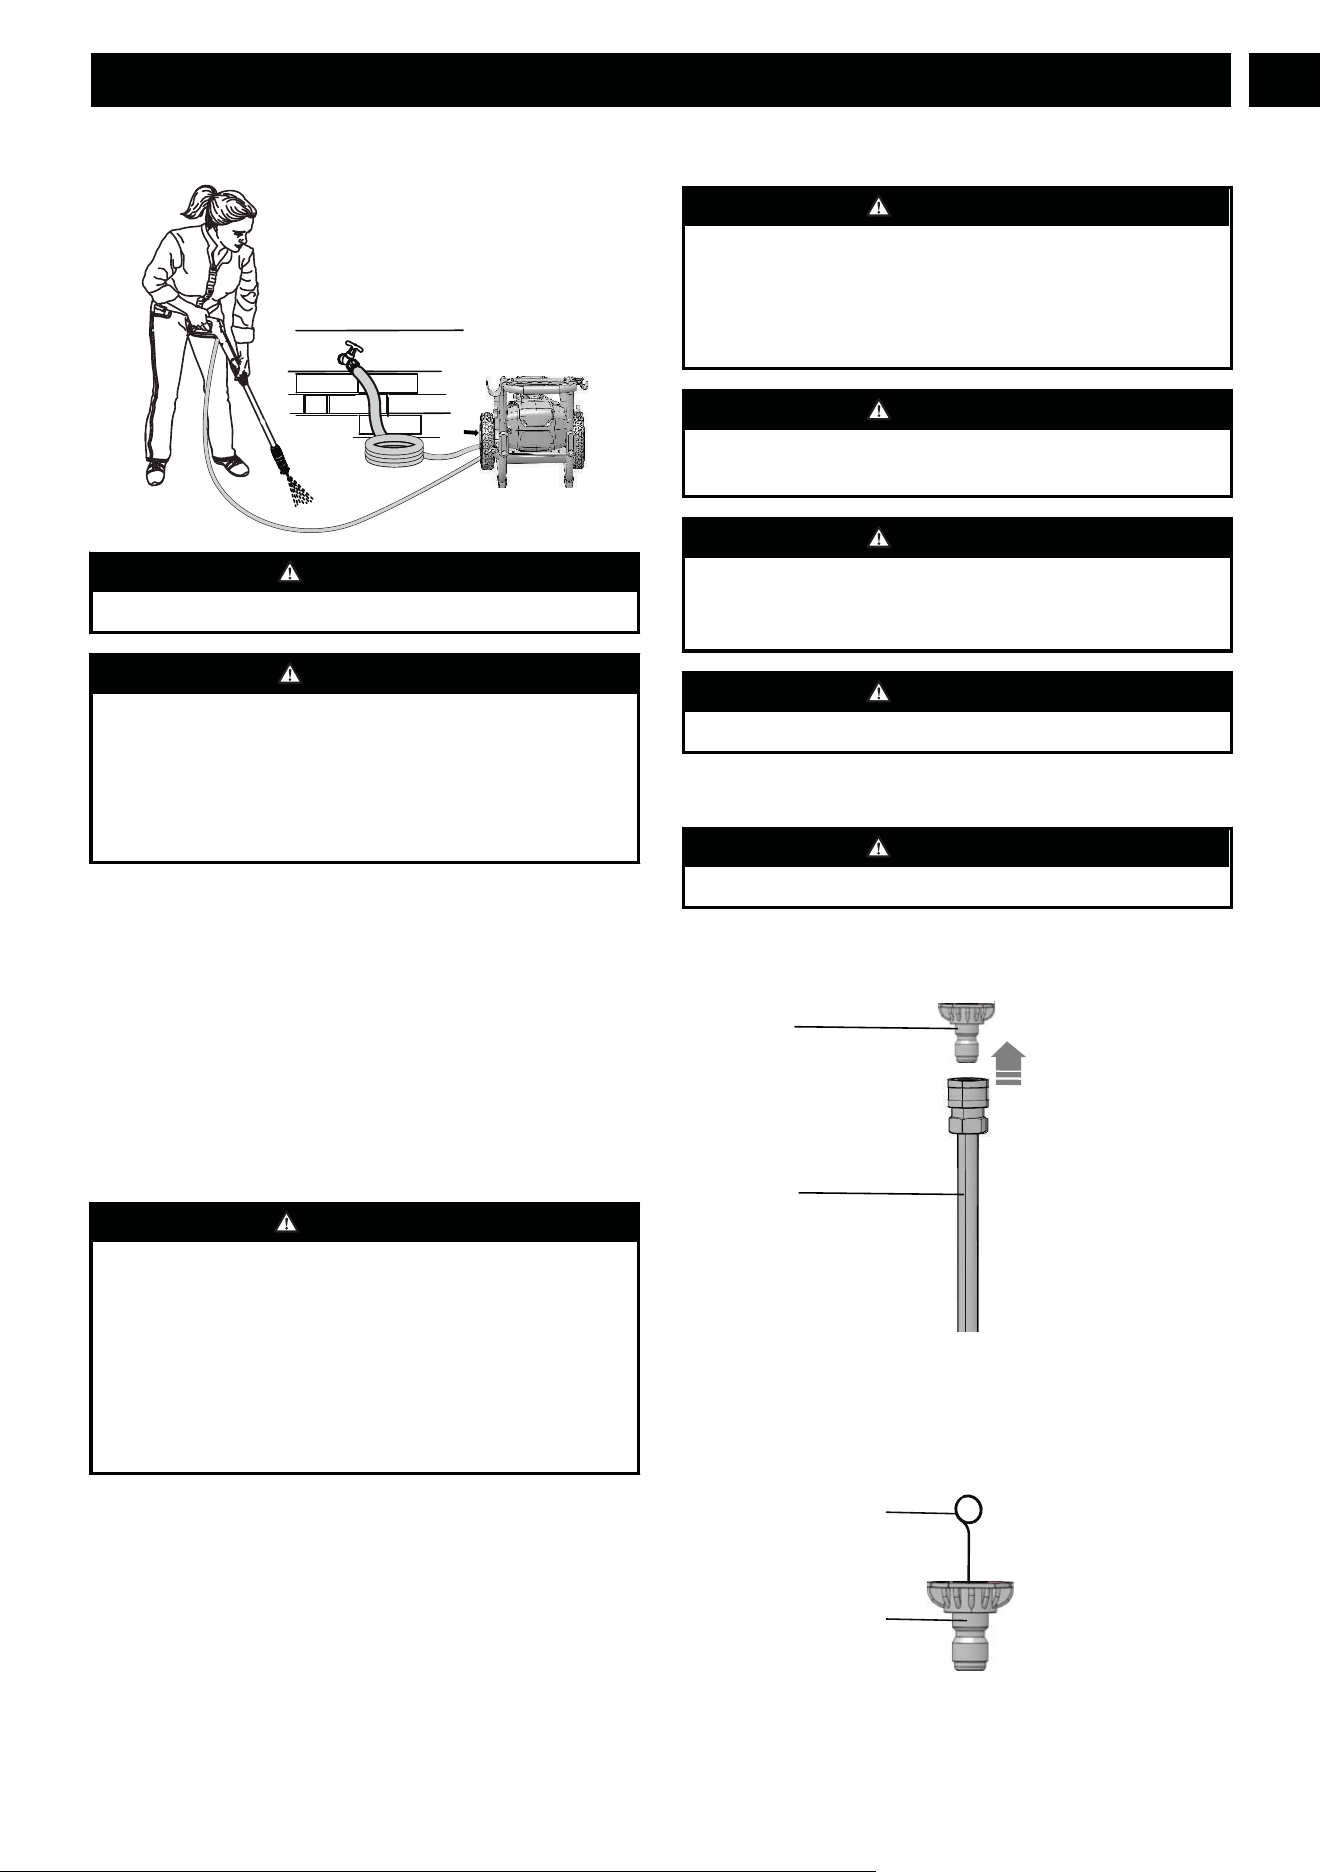
4.3.2 INSTALL THE SPRAY TIP
1. Pull back the quick-connect collar (19) on the spray wand
(4).
2. Insert the spray tip (18) onto the spray wand (4).
3. Release the quick-connect collar (19) to attach the spray
tip (18).
4. Pull on spray tip (18) to ensure it is properly installed and
does not pull out.
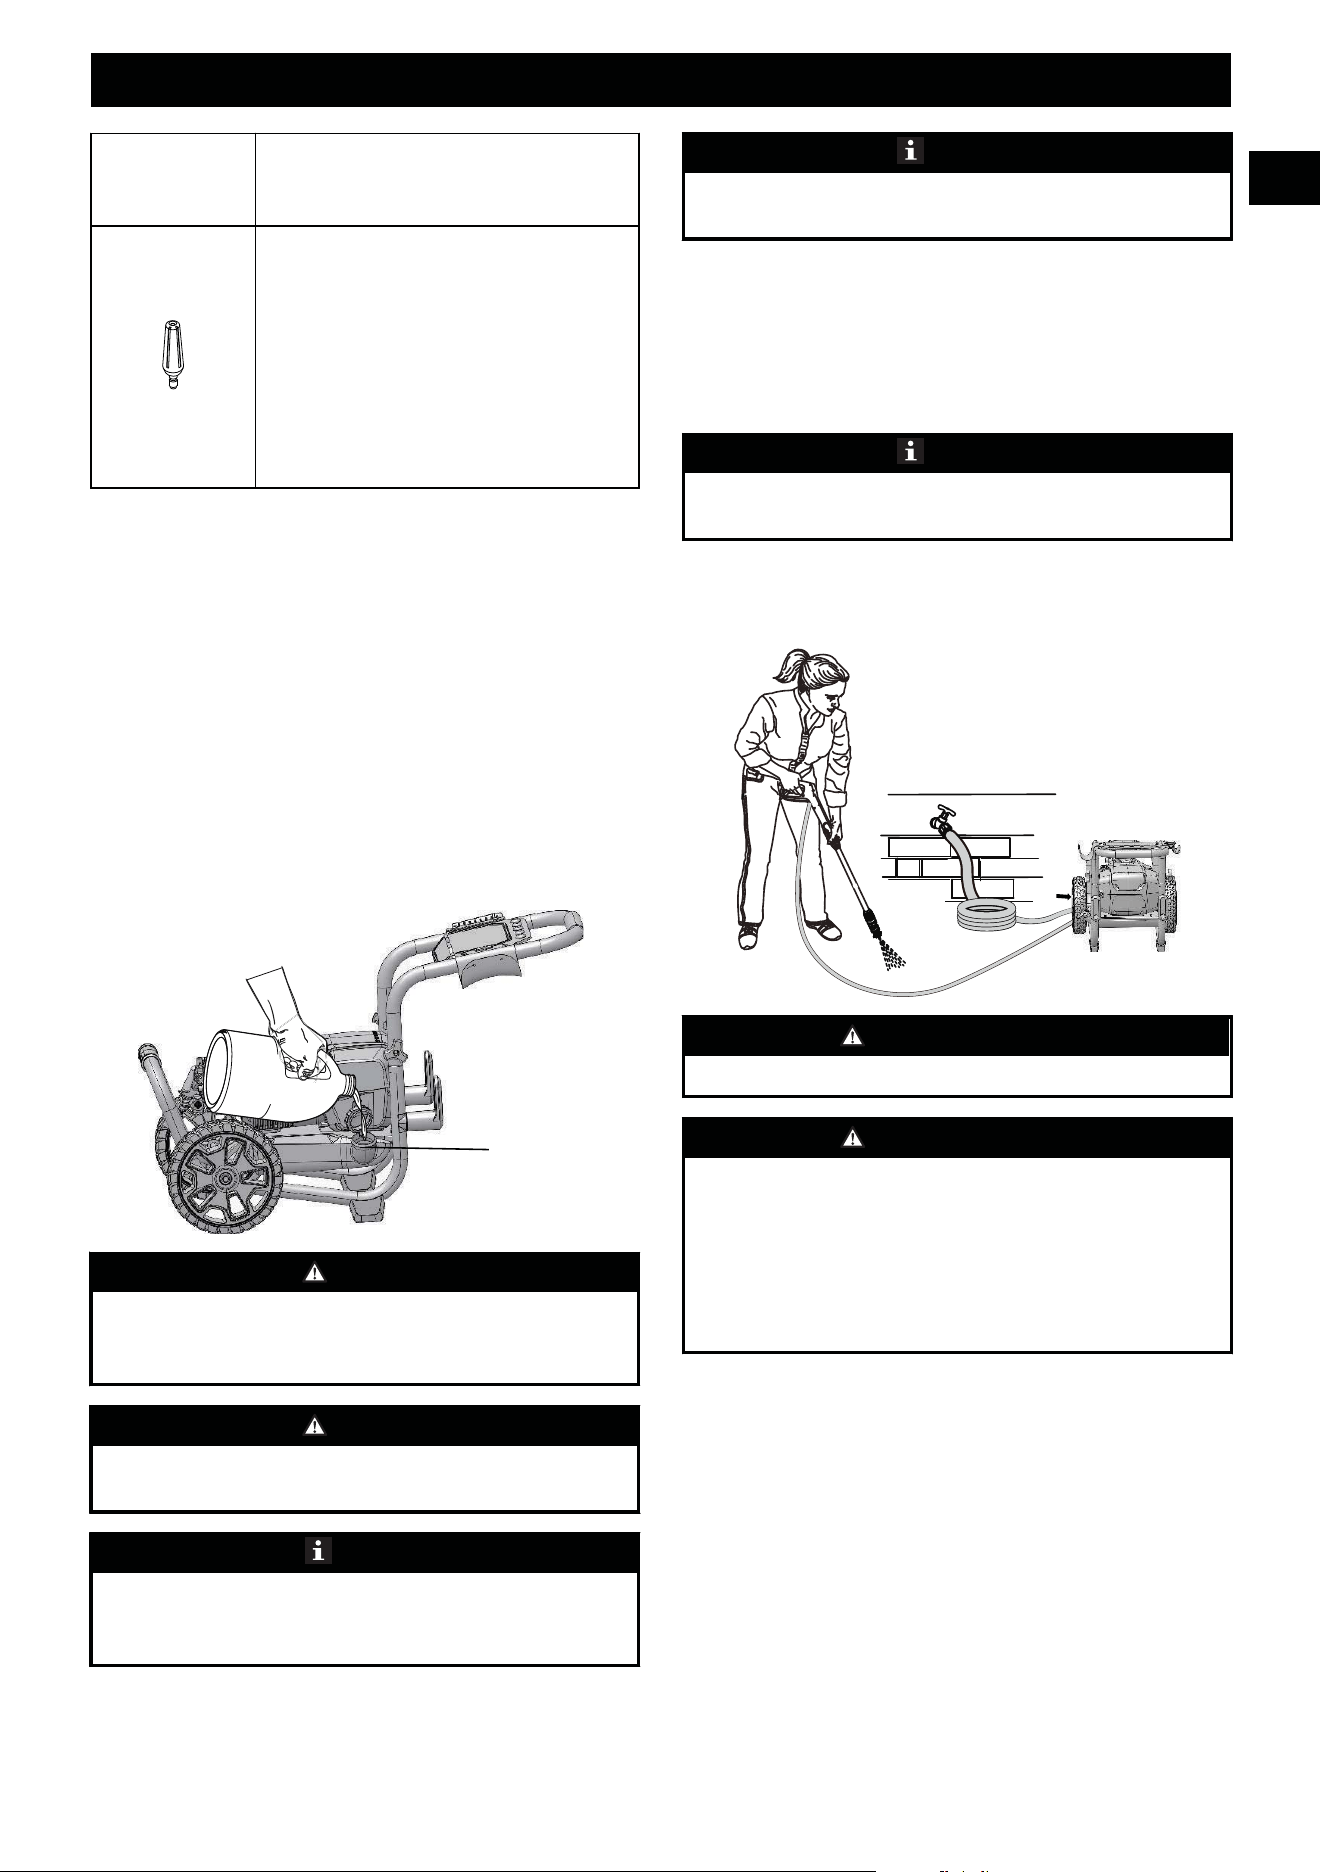
4.4 ADD DETERGENT
6
WARNING
Do not use household detergents, acids, alkalines, bleaches,
solvents, flammable material, or industrial grade solutions,
which can do damage to the pump.
WARNING
Read the instructions on the solution bottle to prepare
detergent.
NOTE
If it is necessary, use a funnel to prevent the spill of
detergent. Clean and dry the spilled detergent when you fill
the tank.
NOTE
Soap/detergent can only be applied with this machine when
the black nozzle(75 degree) is installed.
1. Place the pressure washer upright on a flat surface.
2. Open the cap on the detergent tank (6).
3. Pour detergent into tank (6).
4. Reinstall cap.
NOTE
Do not let detergent dry on the surface to prevent streaks.
10
English
EN
4.5 START THE MACHINE
CAUTION
Do not operate without the water supply connected.
CAUTION
Before you start the machine:
1. Turn the water supply on.
2. Pull the gun trigger to release air pressure.
3. If a stable stream of water come into view, release the
spray gun trigger.
1. Connect the machine to the power supply.
2. Press down on the ON/OFF switch once to set the power
switch to the "ON" ( | ) position.
3. Turn the water supply on.
4. Pull the spray gun trigger.
4.6 STOP THE MACHINE
1. Release the spray gun trigger.
2. Press down on the ON/OFF switch, once again, to set the
power switch to the "OFF" (O) position.
WARNING
If you do not use the machine㸸
• Stop the machine.
• Turn the water supply off.
• Disconnect the power cord from the outlet.
• Pull the spray gun trigger to release the remaining
pressure from the machine.
• Engage the trigger safety lock-out on the spray gun.
4.7 THERMAL RELIEF VALVE
FUNCTION
The thermal relief valve is a thermal protector for the pressure
washer pump. This pump feature will prevent water
temperatures from reaching harmful levels by releasing a
small amount of water. Opening temperature is 140°F. The
valve will reset automatically once the pump relives.
5 MAINTENANCE
WARNING
Before maintenance, make sure that you
• Stop the machine.
• Wait until all the moving parts stop.
• Disconnect the plug from the power source.
WARNING
Do not use strong solvents or detergents on the plastic
housing or components.
WARNING
Do not let brake fluids, gasoline, petroleum-based materials
touch the plastic parts. Chemicals can cause damage to the
plastic, and make the plastic unserviceable.
WARNING
Replace the power cord by an approved service center.
5.1 SPRAY TIP MAINTENANCE
WARNING
Never point the spray wand at your face.
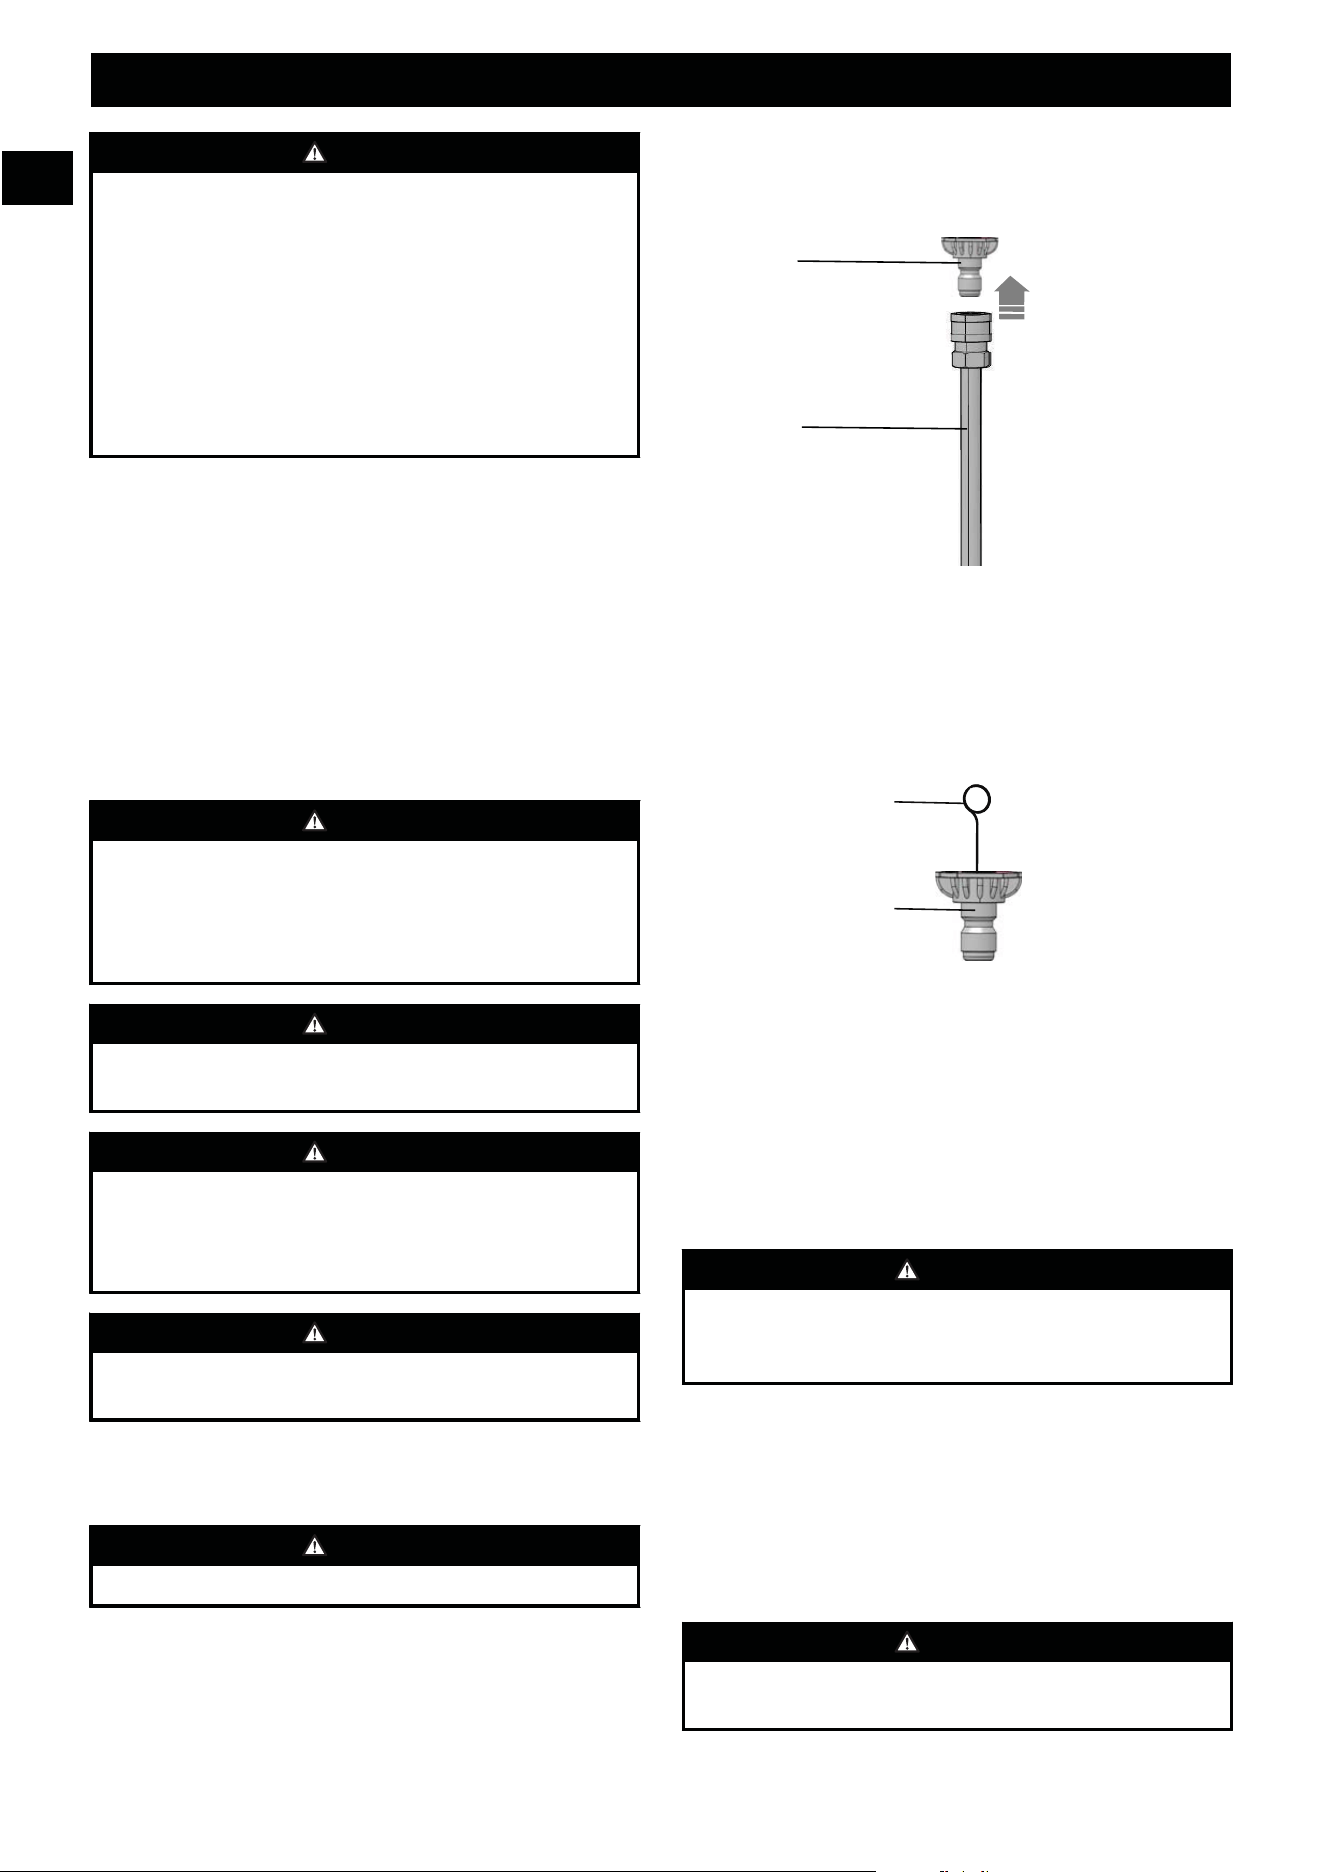
5.1.1 REMOVE THE SPRAY TIP
18
4
1. Pull back the quick-connect collar (19) on the spray wand
(4).
2. Remove the spray tip (18) from the spray wand (4).
5.1.2 CLEAN THE SPRAY TIP
20
18
1. Use a straight paper clip or cleaning tool (20) to clean the
spray tip.
11
English
EN

3)
5'65%6
.5'6!,
56
/4,-0/4,4,
-/4)
7/+>.>
8!
2)7)4.7,)
B
B )
-/)7)4.7,)
7/+>.>
1,2
)
7/+>.>
1,)
>0
-)))
)
B 8))
B 7
B &))
B 1,)
).2
?
B +)
B 0!
B .2))!
5)!6
B )2"
! /18&)-7,
0/8&) 0--8&)
.41-)
-&1,
0)
0!
33
56
@>A56"
0
&
0"
0!,
<2
)
0
2!
0)
0)
)
+A
5))6'A
5#))6
7"
&,
,,2,2
!,
0
!
.
0,
+)
)"
)$
),

PROBLEM POSSIBLE
CAUSE
SOLUTION
The output pres-
sure varies high
and low.
The water supply
is not sufficient.
Open water supply
fully. Check gar-
den hose for kinks,
leaks, or blockage.
The pump is draw-
ing in air.
1. Make sure that
the hoses and
fitting are air-
tight.
2. Turn "OFF"
machine.
3. Purge pump
by squeezing
trigger gun un-
til a stead flow
of water
comes out the
spray tip.
The water intake
filter is clogged.
Remove the filter
and Rinse in warm
water.
The supply volt-
age is low.
Make sure that on-
ly the pressure
washer is running
on the circuit.
The gun, hose or
nozzle are calci-
fied.
Run distilled vine-
gar through deter-
gent tank.
PROBLEM POSSIBLE
CAUSE
SOLUTION
The motor buzzes,
but the machine
does not start.
The supply volt-
age is low.
Make sure that on-
ly the pressure
washer is running
on the circuit.
The pump system
has residual pres-
sure.
1. Turn "OFF"
the machine.
2. Pull the spray
gun trigger on
spray wand to
release pres-
sure.
3. Turn the ma-
chine "ON".
Voltage loss due to
use of an improper
extension cord.
Disconnect the ex-
tension cord, and
connect the ma-
chine directly into
the outlet.
Pressure washer
not used for long
periods.
Call customer
service.
Residual friction
among compo-
nents. Unit might
emit a humming
noise.
1. Disconnect the
water supply.
2. Power "ON"
the machine
for 2 to 3 sec-
onds.
3. Repeat the
above step a
couple of
times or until
the motor
starts.
There is no water. The water supply
is off.
Turn the water
supply on.
The garden hose is
kinked..
Remove kink in
garden hose.
8 TECHNICAL DATA
Universal Motor 120V~ 60 Hz, 14 Amps
Max. Pounds Per Square Inch
Pressure
3000 PSI
Rated Gallons Per Minute 1.1 GPM
Maximum Inlet Water Temper-
ature
104 °F (40 °C)
Cleaning Units 3300 C.U.
Weight 47.0 lbs. (21.3 kg)
13
English
EN

Double-insulated construc-
tion.
9 LIMITED WARRANTY
Greenworks hereby warranties this product, to the original
purchaser with proof of purchase, for a period of three (3)
years against defects in materials, parts or workmanship.
Greenworks, at its own discretion will repair or replace any
and all parts found to be defective, through normal use, free
of charge to the customer. This warranty is valid only for
units which have been used for personal use that have not
been hired or rented for industrial/commercial use, and that
have been maintained in accordance with the instructions in
the owners’ manual supplied with the product from new.
ITEMS NOT COVERED BY WARRANTY:
1. Any part that has become inoperative due to misuse,
commercial use, abuse, neglect, accident, improper
maintenance, or alteration; or
2. The unit, if it has not been operated and/or maintained in
accordance with the owner's manual; or
3. Normal wear, except as noted below;
4. Routine maintenance items such as lubricants, blade
sharpening;
5. Normal deterioration of the exterior finish due to use or
exposure.
HELPLINE:
Warranty service is available by calling our toll-free helpline,
at 1-855-345-3934.
TRANSPORTATION CHARGES:
Transportation charges for the movement of any power
equipment unit or attachment are the responsibility of the
purchaser. It is the purchaser’s responsibility to pay
transportation charges for any part submitted for replacement
under this warranty unless such return is requested in writing
by Greenworks.
USA address:
Greenworks Tools
P.O. Box 1238
14
English
EN
Mooresville, NC 28115
YEAR/AÑOS
MOTOR WARRANTY
YEAR/AÑOS
LIMITED
WARRANTY
GARANTÍA
LIMITADA
10
GARANTÍA
MOTOR

10 EXPLODED VIEW
15
English
EN
ITEM NO. PART NO. DESCRIPTION QTY
1 31208363 Turbo Nozzle 1
2 C1102283-00 40°spray Tip 1
3 C1105300-00 15°spray Tip 1
4 C1102282-00 25°spray Tip 1
5 34139319 Soap Tip 1
6 C4100577-00 Spray Gun Holder 1
7 C3200440-00 Upper Handle 1
8 C3200441-00 Nozzle Storage Panel Assembly 1
9 3410835-3 Nut 2
10 341013231 Power Cord Storage 2
11 C4200043-00 Frame Food Pad 2
12 342011635 Detergent Tank Cap 1
13 C4100486-00 Detergent Tank 1
14 C4102173-00 Wheel Assembly 2
15 C3200440-00 Lower Handle 2
16 C4100493-00 Lower Housing 2
17 C1101044-00 Motor Assembly 1
18 C4100491-00 Upper Housing 1
19 C6200015-00 Power Switch 1

16
English
EN
20 C1101065-00 PCB Board 1
21 C1101554-00 Spray Wand 1
22 C1104426-00 Spray Gun 1
23 311311635 High Pressure Hose 1

|
3 '
'
4 +
" $'
}
/
) '
/(
/
)(
(
0!
)(
# &!(
% *
' # *
( )! *
* >
|
&$
8)!E)¡G
.
.
D
.!D
))!)
# .
% .D
' .)
5"'
&$)
)¡G
-D
&)!D
/
))¡G
# 8)¡G
% 3¡)#
'
1)D#
''
# 0)¡G#
# /)))¡G #
! -"| #' !
}
% ~' %
( 2 (
%
)
)-

)-./0.,
5,4&4
<)¡GD)2!2
22D2D
.)2
))
435*4&6
0)/-0).24),)/4&
1
2
3
4
5
6
7
8
9
10
11
12
16
D
D
LD
+
8
!
&!
)
%
=D
))
!
(
.
1
)
0
3&.
1
!
1E
56
D
%
&$
¡
(
9)
)D
=G
D
/
/
42)/),.4-),)/4&)-
)-)1/404/4
7)//4),4-
)&./.4-
/L.
&2!)
!¡2?
)@)A)
)
)5!6
42)/),.4-),)/4&)-)
-)1/404/4
7)//4),4-)&./.4-
B <)¡G!D5¢
62)2
G$)2)
G!!
!
)¢G
E
B )¡
))¡G2)
)
B >)¡G!
¢
B >!E2
G))
B >22!E
GD)
B ))D
D!E!<)!
E!<
DGE)E
!D
B >!!!
1))
G!
B &)!D!E+
!E2)2D22
)!G
)¡G
B >$
1!)D!E
B /G)D2
<D)!
!2E2)!$
!EG
B >
)G)
'
)
)-

42)/),.4-)-)1/4
)&./.4-
B 8!)
53&.6
)GD¡
B 8))
D))
B -£)!G
$¢
$-£)!G
)$)!
£¡¢>!!
£!
1!E!
8)!
¡!
B >!)D
)))¢2E2
2)2
B <!
B 2)
$E>)E
!))E
B >!!>!
)1!E2
2!D)
))!¢<!¢
)
B .)!
£¡¢12
)
42)/),.4-)-)1/4
04/4&04/)-40/)-,
B <D
B 2
D
¢
B 8!!)
¡)3)!
B 1H!G¡
B >!E
B 1E
!E
B >!!!
1))!
G!
B ))
)
B )
!
)
!2£)D
B +H>E
B 1)E))!
)
B 12)
)D)¢)
>G22
!G)
/L.
2)
$E>)E!
))E
0/)..,),)//10/
)./.1)54&&4
)//4
)
53&.6!
)
G!2
£)DG
3&.
4/)4-)-)/2.),1,
404/4.,8&)
4-&4),
B !)2
))D)>
)!)2
!¢)))<
!)$
$)!))
£)!D
<D
!)!DG
-!)¡
)!8=</. </1.>0
8=<1>0/. </8
.48&)-4&4/4/)-
B -£)!G
¢$!
)/!
D$I)
)-£)
!G
)>
!¢$)!
£¡¢>!
(
)
)-
!£!
1!E
!8)!
¡
!
! -)1/4,54,&
¡
¢
B 1¢D!E!E
!
B >)G¢)¢
)¡G<¢¢)!
)
)G)
!!)
B 1)¡G¢
GD!E
B 0)G2
2!2¡!!EG
¢G
)¡G
0/01)-4
/L.
G)
&)¡2
)¢
E22)2
G)G!G
¡2)¢
/E)G)?
B )!)I
B )
!¢I
B /))G))
$G)
£G!E
$G)2
!ED!!EG
!2))¡2G
)¢
)
.+"
% -8&-),)&0/1.
)D
)!<)G
<)!
)¡)E))E))¡
-~'# )*|
2
!)"
D
>$
)
<)
E
22"
)
2E
)2G
<)
)!
>E
)
2E))D
)!))¡G
D
¡2
"
)!!$"
G)"
)
¤/K>"
2)2
)¡G2)"
G
$!
"
E
-))D£"
)!
D>"
))D
)D)D
)
1)E"
))D
))
)
*
)
)-
2.10 NIVELES DE RIESGO
Las siguientes indicaciones y significados tienen como fin
explicar los niveles de riesgo asociados a este producto.
SÍMBO-
LO
INDICACIÓN SIGNIFICADO
PELIGRO Indica una situación de peli-
gro inminente que, de no evi-
tarse, provocará lesiones
graves o incluso la muerte.
ADVERTEN-
CIA
Indica una situación de peli-
gro potencial que, de no evita-
rse, podría provocar lesiones
graves o incluso la muerte.
PRECAUCIÓN Indica una situación de peli-
gro potencial que, de no evita-
rse, puede provocar lesiones
leves o moderadas.
PRECAUCIÓN (Sin símbolo de alerta sobre
seguridad) Indica una situa-
ción que puede provocar da-
ños materiales.
3 INSTALACIÓN
3.1 CONEXIÓN ELÉCTRICA
Esta máquina tiene un motor eléctrico fabricado con
precisión. Debe conectarse a una fuente de alimentación de
120V, 60 Hz, únicamente CA (doméstica). No utilice esta
máquina con corriente continua (CC). Una caída de tensión
considerable provocará una pérdida de potencia y el motor se
sobrecalentará.
3.1.1 PREPARACIÓN DE UN BUCLE DE
GOTEO
Recomendamos la utilización de un bucle de goteo como se
muestra a continuación para que el agua no corra a lo largo
del cable de alimentación, ya que incluso podría llegar a la
toma eléctrica y al enchufe.
7
14
AVISO
Mantenga el cable alargador alejado de la superficie de
trabajo. Coloque el cable de manera que no quede atrapado
en madera, herramientas u otras obstrucciones mientras
trabaja con una herramienta eléctrica. De no hacerlo podrían
producirse lesiones personales graves.
3.2 DESEMBALAJE DE LA MÁQUINA
AVISO
Asegúrese de montar correctamente la máquina antes del
uso.
AVISO
• Si las piezas presentan daños, no utilice la máquina.
• Si no tiene todas las piezas, no utilice la máquina.
• Si faltan piezas o hay piezas dañadas, hable con el
centro de servicio.
1. Abra el embalaje.
2. Lea la documentación que se encuentra en la caja.
3. Retire todas las piezas sin montar de la caja.
4. Retire la máquina de la caja.
5. Deseche la caja y el embalaje de conformidad con los
reglamentos locales.
3.3 INSTALACIÓN DEL PANEL
SUPERIOR
2
13
3
1. Alinee los manguitos de los tornillos del panel delantero
(2) con los orificios de tornillo del asa superior.
2. Apriete los tornillos con un destornillador Phillips (no
incluido).
21
Español
ES
3.4 INSTALACIÓN DEL SOPORTE DE
LA PISTOLA PULVERIZADORA
2
13
3
1. Alinee los manguitos de los tornillos del soporte de la
pistola pulverizadora (3) con los orificios de tornillo del
asa superior.
2. Apriete los tornillos con un destornillador Phillips (no
incluido).
3.5 INSTALACIÓN DE LOS BRAZOS
DE ALMACENAMIENTO DEL
CABLE DE ALIMENTACIÓN
9
1. Conecte cada uno de los brazos de almacenamiento del
cable de alimentación (9) en las dos posiciones separadas
del asa inferior del accesorio.
2. Alinee el tornillo (13) con los orificios en cada uno de los
brazos de almacenamiento del cable de alimentación (9).
3. Introduzca el tornillo (13) y apriete ambos brazos de
almacenamiento del cable de alimentación (9) con un
destornillador Phillips (no incluido).
3.6 INSTALACIÓN DEL ASA
SUPERIOR
15
1
5
23
24
25
1. Alinee los orificios del asa superior (23) y el asa inferior
(24).
2. Inserte los pernos del asa (25) y utilice los mandos del asa
(15) para apretarlos.
3.7 INSTALACIÓN DE LA VARILLA
PULVERIZADORA
1
4
1. Introduzca el extremo de la varilla pulverizadora (4) en el
asa del gatillo (1) y gire en sentido horario para fijar.
2. Tire de la varilla pulverizadora (4) para asegurarse de que
está bien fijada.
AVISO
Asegúrese de que la conexión no tenga fugas.
22
Español
ES
3.8 INSTALACIÓN DE LA MANGUERA
DE ALTA PRESIÓN
8
11
16
1. Introduzca un extremo de la manguera de alta presión
(11) en el acoplamiento de entrada (8) y gire en sentido
horario.
2. Instale y apriete el otro extremo de la manguera de alta
presión en el acoplamiento de salida de agua (16).
4 FUNCIONAMIENTO
AVISO
Asegúrese de que todas las conexiones estén apretadas y no
tengan fugas antes del funcionamiento.
4.1 CONEXIÓN DEL SUMINISTRO DE
AGUA A LA MÁQUINA
Para un fácil funcionamiento, utilice una manguera de jardín
autoenrollable (no incluida).
AVISO
Cuando utilice la manguera autoenrollable, asegúrese de
que esta no tenga obstrucciones.
AVISO
• El suministro de agua debe provenir de la red de
abastecimiento de agua
• No utilice agua caliente
• No utilice agua de estanques o lagos
AVISO
Respete siempre los reglamentos locales cuando conecte la
manguera de jardín al suministro de agua. Normalmente se
permite la conexión directa a través de un depósito receptor
o un dispositivo de prevención de reflujo.
PRECAUCIÓN
Inspeccione el filtro en el conector de entrada de agua antes
de conectar la manguera de jardín
• Si el filtro está dañado, no utilice la máquina hasta que
sustituya el filtro.
• Limpie el filtro si está sucio.
17
8
1. Desenrolle la manguera de jardín (17).
2. Deje que el agua fluya por la manguera de jardín (17)
durante 30 segundos.
3. Desconecte el suministro de agua.
4. Instale y apriete el extremo de la manguera de jardín (17)
en el conector de entrada de agua (8).
PRECAUCIÓN
Debe haber un mínimo de 10 pies (3 m) de manguera libre
entre la entrada de agua y el suministro de agua.
4.2 USO DE LA PISTOLA
PULVERIZADORA
22
21
AVISO
Para un control seguro, mantenga las manos en la pistola
pulverizadora en todo momento.
• Apriete y mantenga apretado el gatillo de la pistola
pulverizadora (21) para poner en marcha la máquina.
• Suelte el gatillo de la pistola pulverizadora (21) para
detener el flujo de agua por la punta de pulverización.
23
Español
ES
)-8&1))&4&&)&4
0-&401&2)/X4/4
B )E!G56
!EGE
8&1))&4&&)&4
0-&401&2)/X4/4
B )E!G56
!
.48)&401,4)
01&2)/X4.,
18
19
/L.
/)!D?
/D!
/!G
D
8)¡G
/L.
>D
0)81&&4
01,4)
01&2)/X49
.,
40&.4.,
15
O
4'90"#$
Z[\
B <))
¡
)2"
G
)"
2¢
¢)
)
¢!E
)¡
¡)
D)D
25
O
2 90"#$
Z[\
B <)"
¡
)2G
)"
2¢"
¢)
)¢"
!E"
)¡
¡)
D)D
40
O
890"#$Z([\
B <!*2"
)!2
D)¡))D
)!E
)"
)D"
)
)D!)"
"
SOAP
0""+#|
B <DE!
DE!
E!)
!E)"
)>E!
)¡G
)
)-
PUNTA DE
PULVERIZA-
CIÓN
APLICACIÓN
Punta de boquilla turbo
• La boquilla gira en un patrón de pul-
verización de cero a 15 grados en un
movimiento circular para soltar la su-
ciedad difícil y la mugre. El patrón de
pulverización puede cubrir una super-
ficie de 10 a 20 cm de ancho, en fun-
ción de la distancia entre la punta y la
superficie que se limpia.
4.3.2 INSTALACIÓN DE LA PUNTA DE
PULVERIZACIÓN
1. Tire hacia atrás del collarín de conexión rápida (19) de la
varilla pulverizadora (4).
2. Instale la punta de pulverización (18) en la varilla
pulverizadora (4).
3. Suelte el collarín de conexión rápida (19) para fijar la
punta de pulverización (18).
4. Tire de la punta de pulverización (18) para asegurarse de
que esté instalada correctamente y no se salga.
4.4 ADICIÓN DE DETERGENTE
6
AVISO
No utilice detergentes domésticos, ácidos, alcalinos, lejías,
disolventes, materiales inflamables o soluciones para uso
industrial que puedan dañar la bomba.
AVISO
Lea las instrucciones de la botella de solución para preparar
el detergente.
NOTA
En caso necesario, utilice un embudo para evitar el derrame
de detergente. Limpie y seque el detergente derramado
cuando llene el depósito.
NOTA
Solo puede aplicarse jabón/detergente con esta máquina
cuando la boquilla negra (75 grados) está instalada.
1. Coloque el limpiador a presión en posición vertical sobre
una superficie plana.
2. Abra la tapa del depósito de detergente (6).
3. Vierta detergente en el depósito (6).
4. Vuelva a instalar la tapa.
NOTA
No deje que el detergente se seque sobre la superficie para
evitar trazas.
4.5 PUESTA EN MARCHA DE LA
MÁQUINA
PRECAUCIÓN
No utilice sin el suministro de agua conectado.
PRECAUCIÓN
Antes de poner en marcha la máquina:
1. Conecte el suministro de agua.
2. Apriete el gatillo de la pistola para liberar la presión de
aire.
3. Cuando observe un chorro de agua estable, suelte el
gatillo de la pistola pulverizadora.
1. Conecte la máquina al suministro de alimentación.
2. Pulse el interruptor de encendido/apagado una vez para
situar el interruptor en la posición de encendido ( | ).
3. Conecte el suministro de agua.
4. Apriete el gatillo de la pistola pulverizadora.
4.6 DETENCIÓN DE LA MÁQUINA
1. Suelte el gatillo de la pistola pulverizadora.
2. Pulse de nuevo el interruptor de encendido/apagado para
situar el interruptor en la posición de apagado (O).
25
Español
ES
AVISO
Si no utiliza la máquina:
• Detenga la máquina.
• Desconecte el suministro de agua.
• Desconecte el cable de alimentación de la toma de
pared.
• Apriete el gatillo de la pistola pulverizadora para liberar
la presión restante de la máquina.
• Acople el bloqueo de seguridad del gatillo en la pistola
pulverizadora.
4.7 FUNCIÓN DE VÁLVULA DE
DESCARGA TÉRMICA
La válvula de descarga térmica es un protector térmico para la
bomba del limpiador a presión. Esta función de la bomba
evitará que las temperaturas del agua alcancen niveles
perjudiciales liberando una pequeña cantidad de agua. La
temperatura de apertura es de 60°C (140°F). La válvula se
restablecerá automáticamente cuando la bomba se descargue.
5 MANTENIMIENTO
AVISO
Antes del mantenimiento, asegúrese de
• Detener la máquina.
• Esperar hasta que se detengan todas las piezas móviles.
• Desconectar el enchufe de la fuente de alimentación.
AVISO
No utilice disolventes o detergentes fuertes en la carcasa o
los componentes de plástico.
AVISO
No permita que líquidos de frenos, gasolina y otros
derivados del petróleo toquen las piezas de plástico. Las
sustancias químicas pueden dañar el plástico y hacer que
quede inservible.
AVISO
El cable de alimentación debe ser sustituido por un centro
de servicio autorizado.
5.1 MANTENIMIENTO DE LA PUNTA
DE PULVERIZACIÓN
AVISO
Nunca apunte la varilla pulverizadora hacia su propia cara.
5.1.1 RETIRADA DE LA PUNTA DE
PULVERIZACIÓN
1. Tire hacia atrás del collarín de conexión rápida (19) de la
varilla pulverizadora (4).
2. Retire la punta de pulverización (18) de la varilla
pulverizadora (4).
5.1.2 LIMPIEZA DE LA PUNTA DE
PULVERIZACIÓN
1. Utilice un clip de papel recto o la herramienta de limpieza
(20) para limpiar la punta de pulverización.
2. Elimine y limpie los materiales no deseados de la punta
de pulverización (18) con la manguera de jardín (17).
3. Instale la punta de pulverización limpia (18) en la varilla
pulverizadora (4). [Véase 4.3.2]
6 TRANSPORTE Y
ALMACENAMIENTO
AVISO
Desconecte el cable de alimentación y la manguera de
suministro de agua antes del transporte y el
almacenamiento.
6.1 TRASLADO DE LA MÁQUINA
• Apunte la varilla pulverizadora en una dirección segura.
• Sujete la máquina únicamente por la empuñadura.
6.2 ALMACENAMIENTO DE LA
MÁQUINA
AVISO
Asegúrese de que la pistola de pulverización, la manguera
de alta presión y la bomba estén secas.
26
Español
ES
4
20
18
18

/L.
/£G)¡G
¢
>0/
-!)!)
¢))
B 8)E)¡G
B !))
B <))¡
¢£)
B /£G)¡GD
¢ 2
?
B D¢
B /
B 2)£)
5£)
G6!
B /))¡G2
! -&1.,)0/8&)4-
0/8&)4 0-8&).419
-4
-&1.,
)
)
!"
¡
"
56
£
"
56
!"
)
&!
)"
)
<)
.)
8EG
))¡"
G
¡"
2
"
D
/
"
D
0/8&)4 0-8&).419
-4
-&1.,
<)¡G"
D
¡)
)E"
)
G¢
)E"
A5))6
'A5#))6
)
¡!"
&)!
)E"
!2
£!"
G
)
"
/!)
)
<"
D
"
)
D"
.
D"
$"
)
)"
¡
+
¡
)
%
)
)-

PROBLEMA POSIBLE CAU-
SA
SOLUCIÓN
La presión de sali-
da varía entre alta
y baja.
El suministro de
agua es insufi-
ciente.
Abra totalmente el
suministro agua.
Compruebe si la
manguera de jar-
dín tiene dobleces,
fugas o algún blo-
queo.
La bomba está as-
pirando aire.
1. Asegúrese de
que las man-
gueras y los
racores sean
estancos.
2. Apague la má-
quina.
3. Purgue la
bomba apre-
tando el gatillo
de la pistola
hasta que sal-
ga un flujo
constante de
agua por la
punta de pul-
verización.
El filtro de admi-
sión de agua está
atascado.
Retire el filtro y
lávelo con agua
templada.
La tensión de su-
ministro es baja.
Asegúrese de que
solo el limpiador a
presión esté fun-
cionando en el cir-
cuito.
La pistola, la man-
guera o la boquilla
están calcificadas.
Haga pasar vina-
gre destilado por
el depósito de de-
tergente.
PROBLEMA POSIBLE CAU-
SA
SOLUCIÓN
El motor zumba,
pero la máquina
no se pone en
marcha.
La tensión de su-
ministro es baja.
Asegúrese de que
solo el limpiador a
presión esté fun-
cionando en el cir-
cuito.
El sistema de
bombeo tiene pre-
sión residual.
1. Apague la má-
quina.
2. Apriete el ga-
tillo de la pis-
tola pulveriza-
dora en la var-
illa pulveriza-
dora para lib-
erar la presión.
3. Encienda la
máquina.
Pérdida de tensión
debido al uso de
un cable alargador
incorrecto.
Desconecte el ca-
ble alargador y
conecte la máqui-
na directamente en
la toma.
El limpiador a pre-
sión no se utiliza
durante periodos
prolongados.
Avise al servicio
de atención al cli-
ente.
Fricción residual
entre los compo-
nentes. La unidad
puede emitir un
zumbido.
1. Desconecte el
suministro de
agua.
2. Encienda la
máquina du-
rante 2 o 3 se-
gundos.
3. Repita el paso
anterior un par
de veces o
hasta que ar-
ranque el mo-
tor.
No hay agua. El suministro de
agua está desco-
nectado.
Conecte el sumi-
nistro de agua.
La manguera de
jardín está dobla-
da.
Elimine el doblez
de la manguera de
jardín.
8 DATOS TÉCNICOS
Motor universal 120V~ 60 Hz, 14 Amps
Máx. presión libras por pulga-
da al cuadrado
3000 PSI
Galones nominales por minuto 1.1 GPM
28
Español
ES

Temperatura máxima de agua
de entrada
104 °F (40 °C)
Unidades de limpieza 3300 C.U.
Peso 47.0 lbs. (21.3 kg)
Estructura con doble aisla-
miento.
9 GARANTÍA LIMITADA
Por la presente Greenworks garantiza este producto, al
comprador original con el comprobante de compra, durante
un periodo de tres (3) años frente a defectos en materiales,
piezas o mano de obra. A su entera discreción Greenworks
reparará o sustituirá cualquiera y todas las piezas que resulten
ser defectuosas, con un uso normal, sin coste alguno para el
cliente. Esta garantía es válida únicamente para unidades que
se hayan utilizado para uso personal que no han sido
arrendadas o alquiladas para uso industrial/comercial y cuyo
mantenimiento se ha realizado de acuerdo con las
instrucciones del manual del propietario suministrado con el
producto nuevo.
ARTÍCULOS NO CUBIERTOS POR LA GARANTÍA:
1. Cualquier pieza que no funcione debido a mal uso, uso
comercial, abuso, negligencia, accidente, mantenimiento
inadecuado o alteración; o
2. La unidad, si no ha sido utilizada o mantenida de acuerdo
con el manual del propietario; o
3. Desgaste normal, excepto en lo indicado a continuación;
4. Artículos de mantenimiento de rutina tales como
lubricantes, afilado de cuchillas;
5. Deterioro normal del acabado exterior debido al uso o la
exposición.
LÍNEA DE ASISTENCIA TELEFÓNICA:
Puede contactar con el servicio de garantía llamando a
nuestra línea de asistencia telefónica gratuita, a
1-855-345-3934.
COSTES DE TRANSPORTE:
Los costes de transporte por el desplazamiento de cualquier
unidad o accesorio de equipos eléctricos son responsabilidad
del comprador. Es responsabilidad del comprador pagar los
costes de transporte de cualquier pieza enviada para su
sustitución bajo esta garantía, a menos que dicha devolución
sea solicitada por escrito por Greenworks.
Dirección en EE.UU.:
Greenworks Tools
P.O. Box 1238
Mooresville, NC 28115
29
Español
ES
YEAR/AÑOS
MOTOR WARRANTY
YEAR/AÑOS
LIMITED
WARRANTY
GARANTÍA
LIMITADA
10
GARANTÍA
MOTOR

10 VISTA DESPIEZADA
30
Español
ES
Nº ARTÍCULO Nº PIEZA DESCRIPCIÓN CANT.
1 31208363 Boquilla turbo 1
2 C1102283-00 Punta de pulverización de 40° 1
3 C1105300-00 Punta de pulverización de 15° 1
4 C1102282-00 Punta de pulverización de 25° 1
5 34139319 Punta de jabón 1
6 C4100577-00 Soporte de pistola pulverizadora 1
7 C3200440-00 Asa superior 1
8 C3200441-00 Conjunto de panel de almacenamiento de boquillas 1
9 3410835-3 Tuerca 2
10 341013231 Almacenamiento de cable de alimentación 2
11 C4200043-00 Almohadilla para pies del bastidor 2
12 342011635 Tapa del depósito de detergente 1
13 C4100486-00 Depósito de detergente 1
14 C4102173-00 Conjunto de las ruedas 2
15 C3200440-00 Asa inferior 2
16 C4100493-00 Carcasa inferior 2
17 C1101044-00 Conjunto del motor 1
18 C4100491-00 Carcasa superior 1
19 C6200015-00 Interruptor de encendido 1

31
Español
ES
20 C1101065-00 Placa de circuitos impresos 1
21 C1101554-00 Varilla pulverizadora 1
22 C1104426-00 Pistola pulverizadora 1
23 311311635 Manguera de alta presión 1
