

40V CORDLESS POLE SAW AND HEDGE
TRIMMER
Read all safety rules and instructions carefully before operating this tool.
Owner’s Manual
TOLL-FREE HELPLINE: 1-888-90WORKS (888.909.6757)
www.GreenWorksTools.com
PSPH40B00

2
CONTENTS
Contents .............................................................................................................................. 2
Product Specications ......................................................................................................... 3
Important Safety Instructions ............................................................................................... 4
Symbols ............................................................................................................................. 10
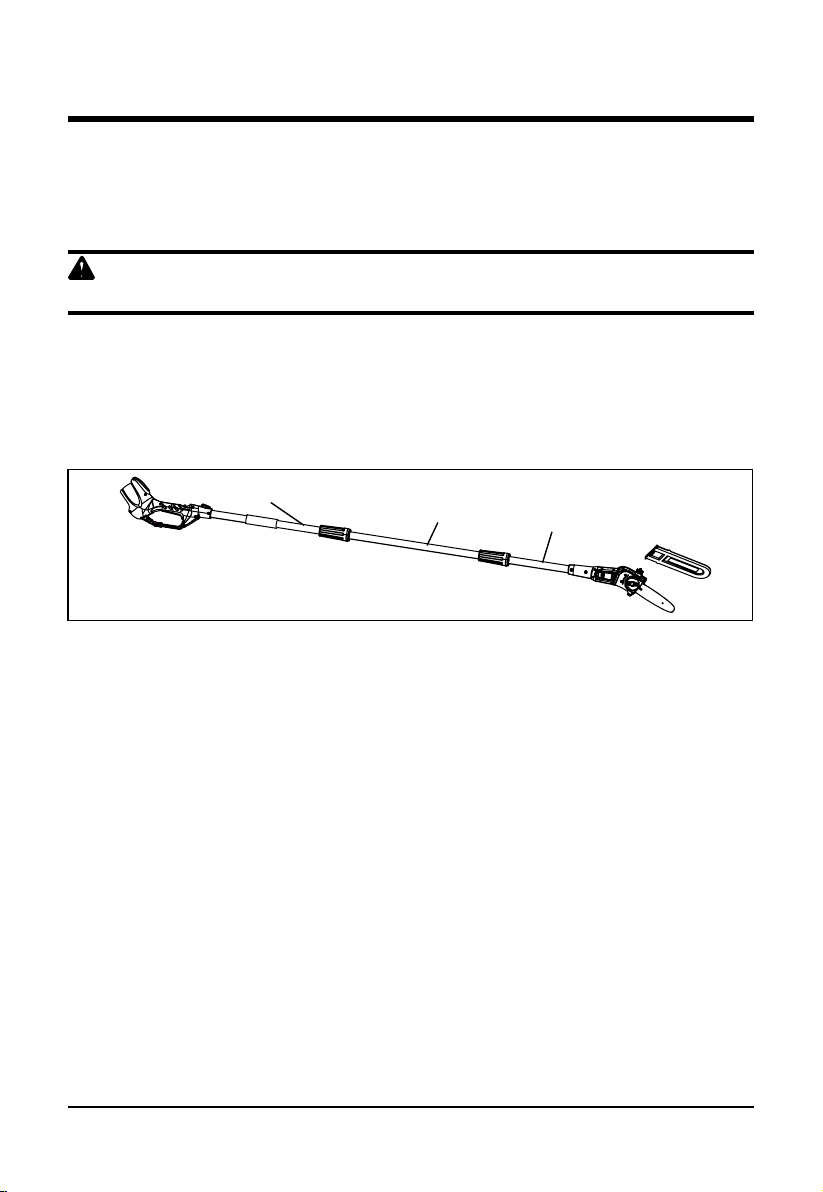
Know Your Pole Saw and Hedge Trimmer ......................................................................... 12
Assembly ........................................................................................................................... 13
Operation ........................................................................................................................... 18
Battery Charger ................................................................................................................. 22
Maintenance ...................................................................................................................... 24
Environmentally Safe Battery Disposal .............................................................................. 25
Troubleshooting ................................................................................................................. 26
Limited Warranty ................................................................................................................ 27
Exploded View ................................................................................................................... 28
Parts List............................................................................................................................ 30

3
PRODUCT SPECIFICATIONS
POLE SAW
Input Voltage .............................................................................................................40 V DC
No-load Chain Speed .......................................................................................9.9 ±10% m/s
Max Cutting Length .................................................................................................................8"
Chain Oil Tank Capacity ....................................................................................................50 ml
Chain Type .................................................................................................................91PJ033X
Guide Bar Type ....................................................................................................080NDEA318
Weight (without battery) .................................................................................8.38 Ibs (3.8 kg)
POLE HEDGE TRIMMER
Input Voltage .............................................................................................................40 V DC
No-Load Speed.....................................................................................................2,800 SPM
Blade Length .........................................................................................................................18"
Cutting Capacity ...............................................................................................................3/4"
Weight (without battery) .................................................................................9.57 lbs (4.34 kg)

4
IMPORTANT SAFETY INSTRUCTIONS
WARNING
Read all safety warnings and all instructions. Failure to follow the warnings and instructions
may result in electric shock, re, and/or serious injury.
Save all warnings and instructions for future reference.
The term “power tool” in all of the warnings listed below refers to your mains-operated (corded)
power tool or battery-operated (cordless) power tool.
1. WORK AREA SAFETY
• Keep work area clean and well lit. Cluttered or dark areas invite accidents.
• Do not operate power tools in explosive atmospheres, such as in the presence of
ammable liquids, gases or dust. Power tools create sparks which may ignite the dust or
fumes.
• Keep children and bystanders away while operating a power tool. Distractions can
cause you to lose control.
2. ELECTRICAL SAFETY
• Avoid body contact with earthed or grounded surfaces such as pipes, radiators,
ranges and refrigerators. There is an increased risk of electric shock if your body is earthed
or grounded.
• Do not expose power tools to rain or wet conditions. Water entering a power tool will
increase the risk of electric shock.
• If operating a power tool in a damp location is unavoidable, use a residual current
device (RCD) protected supply.
3. PERSONAL SAFETY
• Stay alert, watch what you are doing and use common sense when operating a power
tool. Do not use a power tool while you are tired or under the inuence of drugs,
alcohol or medication. A moment of inattention while operating power tools may result in
serious personal injury.
• Use personal protective equipment. Always wear eye protection. Protective equipment
such as dust mask, non-skid safety shoes, hard hat, or hearing protection used for
appropriate conditions will reduce personal injuries.
• Prevent unintentional starting. Ensure the switch is in the off-position before
connecting to battery pack, picking up or carrying the tool. Carrying power tools with
your nger on the switch or energising power tools that have the switch on invites accidents.
• Remove any adjusting key or wrench before turning the power tool on. A wrench or a
key left attached to a rotating part of the power tool may result in personal injury.
• Do not overreach. Keep proper footing and balance at all times. Proper footing and
balance enable better control of the tool in unexpected situations.
• Dress properly. Do not wear loose clothing or jewelry. Keep your hair,clothing and
gloves away from moving parts. Loose clothes, jewelry, or long hair can be caught in
moving parts.
• If devices are provided for the connection of dust extraction and collection facilities,
ensure these are connected and properly used. Use of these devices can reduce dust-

5
IMPORTANT SAFETY INSTRUCTIONS
related hazards.
4. POWER TOOL USE AND CARE
• Do not force the power tool. Use the correct power tool for your application. The
correct power tool will do the job better and safer at the rate for which it was designed.
• Do not use the power tool if the switch does not turn it on and off. Any power tool that
cannot be controlled with the switch is dangerous and must be repaired.
• Disconnect the battery pack from the power tool before making any adjustments,
changing accessories, or storing power tools. Such preventive safety measures reduce
the risk of starting the power tool accidentally.
• Store idle power tools out of the reach of children and do not allow persons unfamiliar
with the power tool or these instructions to operate the power tool. Power tools are
dangerous in the hands of untrained users.
• Maintain power tools. Check for misalignment or binding of moving parts, breakage of
parts and any other condition that may affect the power tool’s operation. If damaged,
have the power tool repaired before use. Many accidents are caused by poor maintenance.
• Keep cutting tools sharp and clean. Properly maintained cutting tools with sharp cutting
edges are less likely to bind and are easier to control.
• Use the power tool, accessories and tool bits etc. in accordance with these
instructions, taking into account the working conditions and the work to be performed.
Use of the power tool for operations different from those intended could result in a hazardous
situation.
5. BATTERY TOOL USE AND CARE
• For use only with battery 29462, 29472.
• For use only with charger 29482.
• Ensure the switch is in the off position before inserting battery pack. Inserting the
battery pack into power tools that have the switch on invites accidents.
• Recharge only with the charger specied by the manufacturer. A charger that is suitable
for one type of battery pack may create a risk of re when used with another battery pack.
• Use power tools only with specically designated battery packs. Use of any other
battery packs may create a risk of injury and re.
• When battery pack is not in use, keep it away from other metal objects like paper clips,
coins, keys, nails, screws, or other small metal objects that can make a connection
from one terminal to another. Shorting the battery terminals together may cause burns or a
re.
• Under abusive conditions, liquid may be ejected from the battery; avoid contact. If
contact accidentally occurs, ush with water. If liquid contacts eyes, additionally seek
medical help. Liquid ejected from the battery may cause irritation or burns.
• Do not use a battery pack or appliance that is damaged or modied. Damaged or
modied batteries may exhibit unpredictable behavior resulting in re, explosion or
risk of injury.
• Do not expose a battery pack or appliance to re or excessive temperature. Exposure
to re or temperature above 130°C (266°F) may cause explosion. The temperature of
130°C (266°F) can be replaced by the temperature of 129°C (265°F).

6
• Follow all charging instructions and do not charge the battery pack or appliance
outside of the temperature range specied in the instructions. Charging improperly or
at temperatures outside of the specied range may damage the battery and increase
the risk of re.
• Have servicing performed by a qualied repair person using only identical
replacement parts. This will ensure that the safety of the product is maintained.
• Do not modify or attempt to repair the appliance or the battery pack (as applicable)
except as indicated in the instructions for use and care.
6. FOR ALL APPLIANCES
• Avoid dangerous environment. Don’t use appliances in damp or wet locations.
• Don’t use in rain.
• Keep children away. All visitors should be kept at a distance from work area.
• Dress properly. Do not wear loose clothing or jewelry. They can be caught in moving
parts. Use of rubber gloves and substantial footwear footwear is recommended when
working outdoors. Wear protective hair covering to contain long hair.
• Use safety glasses. Always use face or dust mask if operation is dusty.
• Use right appliance. Do not use appliance for any job except that for which it is
intended.
• Don’t grasp the exposed cutting blades or cutting edges when picking up or holding
the appliance.
• Don’t force appliance. It will do the job better and with less likelihood of a risk of injury
at the rate for which it was designed.
• Stay alert. Watch what you are doing. Use common sense. Do not operate appliance
when you are tired.
• Store idle appliances indoors. When not in use, appliances should be stored indoors
in dry, and high or locked–up place – out of reach of children.
• Maintain appliance with care. Keep cutting edge sharp and clean for best performance
and to reduce the risk of injury. Follow instructions for lubricating and changing
accessories. Inspect appliance cord periodically, and if damaged, have it repaired
by an authorized service facility. Inspect extension cords periodically and replace if
damaged. Keep handles dry, clean, and free from oil and grease.
• Check damaged parts. Before further use of the appliance, a guard or other part that
is damaged should be carefully checked to determine that it will operate properly
and perform its intended function. Check for alignment of moving parts, binding of
moving parts, breakage of parts, mounting, and any other condition that may affect
its operation. A guard or other part that is damaged should be properly repaired or
replaced by an authorized service center unless indicated elsewhere in this manual.
7. SERVICE
• Have your power tool serviced by a qualied repair person using only identical
replacement parts. This will ensure that the safety of the power tool is maintained.
POLE HEDGE TRIMMER SAFETY WARNINGS
• Keep all parts of the body away from the cutter blade. Do not remove cut material or
IMPORTANT SAFETY INSTRUCTIONS

7
hold material to be cut when blades are moving. Make sure the switch is off when
clearing jammed material. Blades coast after turn off. A moment of inattention while
operating the hedge trimmer may result in serious personal injury.
• Carry the hedge trimmer by the handle with the cutter blade stopped. Proper handling
of the hedge trimmer will reduce possible personal injury from the cutting blades.
• When transporting or storing the hedge trimmer always t the cutting device cover.
• Hold the power tool by insulated gripping surfaces only, because the cutting blade
may contact hidden wiring or its own cord. Cutting blades contacting a “live” wire may
make exposed metal parts of the power tool “live” and could give the operator an electric
shock.
• Use both hands when operating the hedge trimmer. Using one hand could cause loss
of control and result in serious personal injury.
• Before starting the hedge trimmer, make sure the blade is not in contact with any
object.
• Stop the unit, remove the battery pack, and make sure the blade has stopped before
setting the unit down.
• Always stop the motor when cutting is delayed or when walking from one cutting
location to another.
• Keep unit clean of grass clippings and other materials. They may become lodged in the
cutting blades.
• Store the unit inside in a dry place, either locked up or up high to prevent unauthorized
use or damage. Keep out of the reach of children or untrained individuals.
• DANGER – Keep hands away from blade.
• Replace blade cover when unit is not in use.
• Never douse or squirt the unit with water or any other liquid. Keep handles dry, clean,
and free from debris. Clean after each use; see storage instructions.
• Secure the unit while transporting.
• Battery operated units do not have to be plugged into an electrical outlet; therefore,
they are always in operating condition. Be aware of possible hazards even when unit
is not operating.
• Only use with handle and guard properly assembled to hedge trimmer. The use of the
hedge trimmer without the proper guard or handle provided may result in serious personal
injury.
• Keep cable away from cutting area. During operation the cable may be hidden in shrubs
and can be accidentally cut by the blade.
POLE SAW SAFETY WARNINGS
• Kickback is a dangerous reaction that can lead to serious injury. Kickback may occur
when the moving chain contacts an object at the upper portion of the tip of the guide
bar or when the wood closes in and pinches the chain in the cut. Contact at the upper
portion of the tip of the guide bar can cause the chain to dig into the object and stop the chain
for an instant. The result is a lightning-fast, reverse reaction which kicks the guide bar up
and back toward the operator. If the chain is pinched along the top of the guide bar, the guide
bar can be driven rapidly back toward the operator, which can cause loss of control and may
IMPORTANT SAFETY INSTRUCTIONS

8
result in serious injury. Do not rely exclusively upon the safety devices built into the product.
With a basic understanding of kickback, you can reduce or eliminate the element of surprise.
Sudden surprise contributes to accidents.
• Do not operate near electrical power lines. The unit has not been designed to provide
protection from electric shock in the event of contact with overhead electric lines. Consult
local regulations for safe distances from overhead electric power lines and ensure that the
operating position is safe and secure before operating the pole saw.
• Use pole saw for cutting wood only. Do not use for cutting non-wood items.
• Make sure that the area in which you are cutting is free from obstructions. Do not let
the nose of the guide bar contact a log, branch, fence, or any other obstruction while you are
operating the unit. Have a planned retreat path.
• Keep all parts of the body away from the saw chain. Make sure the switch is off when
clearing jammed material. Saw chain continues to move after the switch is turned off. A
moment of inattention while operating the pole saw may result in serious personal injury.
• Carry the pole saw by the handle with the saw chain stopped. When transporting or
storing the pole saw, always t the saw chain device cover. Proper handling of the pole
saw will reduce possible personal injury from the saw chain.
• Hold the power tool by insulated gripping surfaces only, because the cutter blade
may contact hidden wiring or its own cord. A saw chain contacting a “live” wire may make
exposed metal parts of the pole saw “live” and could give the operator an electric shock.
• Keep cable away from cutting area. During operation the cable may be hidden in shrubs
and can be accidentally cut by the saw chain.
• Do not use the pole saw in bad weather conditions, especially when there is a risk of
lightning. This decreases the risk of being struck by lightning.
• To reduce the risk of electrocution, never use near any electrical power lines. Contact
with or use near power lines may cause serious injury or electric shock resulting in death.
• Always use two hands when operating the pole saw. Hold the pole saw with both hands
to avoid loss of control.
• Always use head protection when operating the pole saw overhead. Falling debris can
result in serious personal injury.
• Do not grasp the exposed cutting blades or cutting edges when picking up or holding
the product.
• To protect yourself from electrocution, do not operate within 50 feet of overhead
electrical lines.
• Before starting the motor, make sure the chain is not contacting any object.
• To protect yourself from falling branches, do not stand directly under the branch or
limb being cut. This unit should not be held at an angle over 60° from ground level.
• Turn off the motor and make sure cutting attachment has stopped before setting unit
down.
• Do not operate the saw with one hand! Serious injury to the operator, helpers,
bystanders, or any combination of these persons may results from one hand
operation. This saw intended for two-handed use.
IMPORTANT SAFETY INSTRUCTIONS

9
• Use extreme caution when cutting small-sized brush and saplings because slender
material may catch the saw chain and be whipped toward you or pull you off balance.
• When cutting a limb that is under tension, be alert for spring back so that you will not
be struck when the tension in the wood bers is released.
• To avoid accidental starting, never carry plugged in product with nger on switch. Be
sure switch is off when plugging in.
WARNING
Only use with handle and guard properly assembled to hedge trimmer. The use of the hedge
trimmer without the proper guard or handle provided may result in serious personal injury.
WARNING (PROPOSITION 65)
Some dust created by power sanding, sawing, grinding, drilling, and other construction activities
contains chemicals known to cause cancer, birth defects or other reproductive harm. Some
examples of these chemicals are:
Your risk of exposure to these chemicals varies depending on how often you do this type of
work. To reduce your exposure to these chemicals, work in a well-ventilated area, and work with
approved safety equipment, such as dust masks that are specially designed to lter out microscopic
particles.
IMPORTANT SAFETY INSTRUCTIONS
SAVE THESE INSTRUCTIONS
• Lead from lead-based paints
• Crystalline silica from bricks and cement and other masonry products, and
• Arsenic and chromium from chemically treated lumber.
10
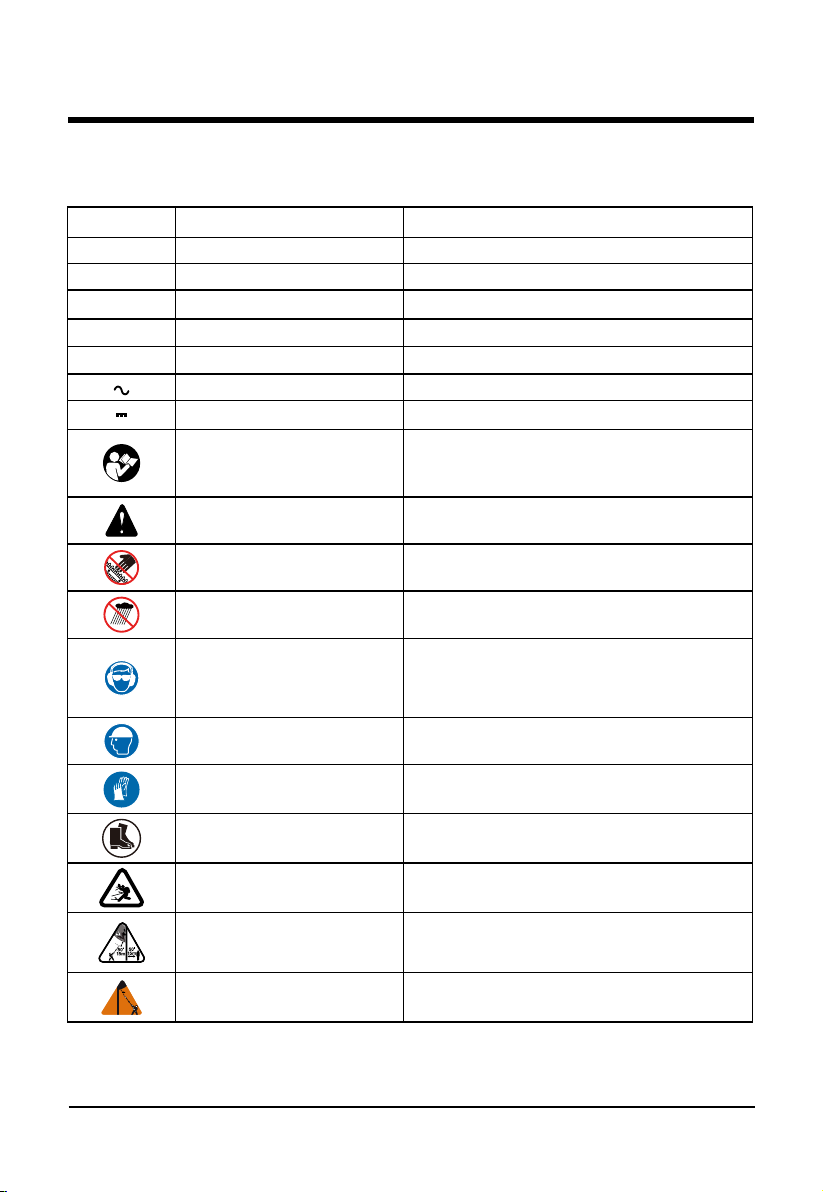
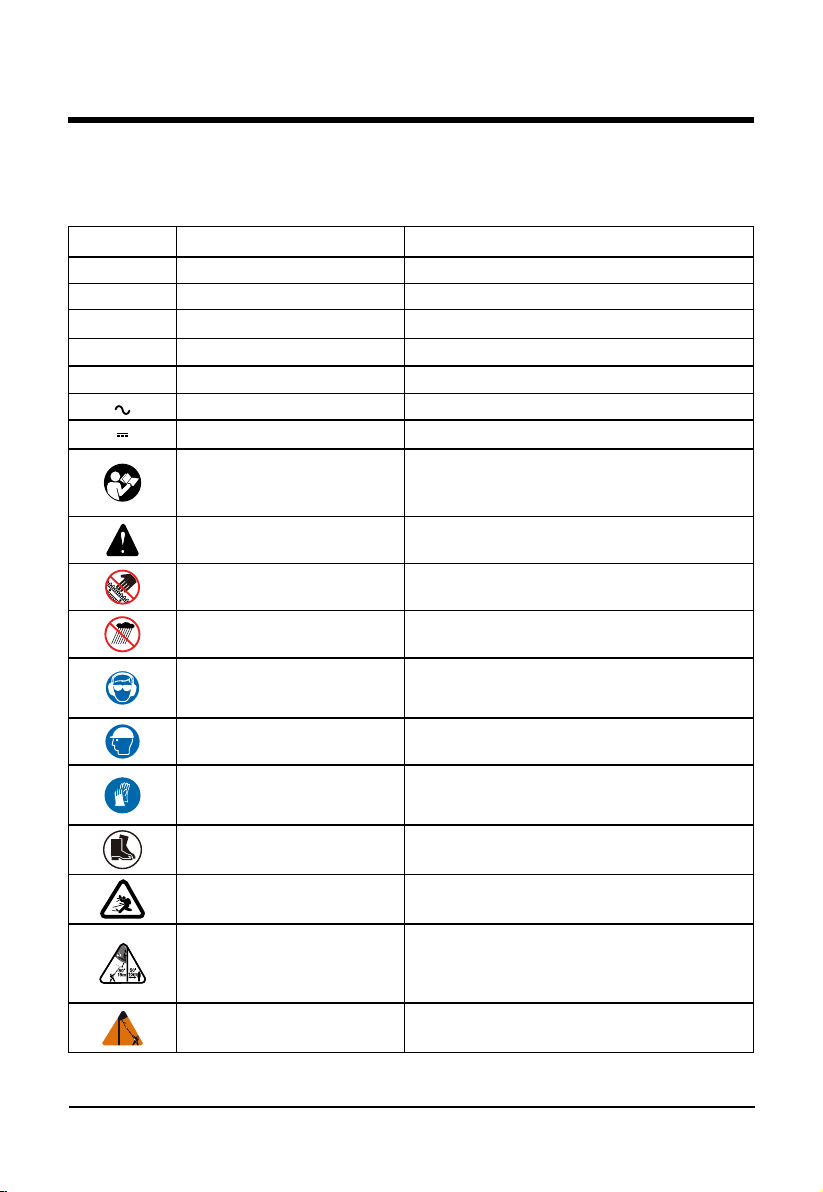
Some of the following symbols may be used on this product. Please study them and learn their
meaning. Proper interpretation of these symbols will allow you to operate the product better and safer.
SYMBOL NAME DESIGNATION/EXPLANATION
V Volts Voltage
A Amperes Current
Hz Hertz Frequency (cycles per second)
W Watt Power
min Minutes Time
Alternating Current Type of current
Direct Current Type or a characteristic of current
Read The Operator’s Manual
To reduce the risk of injury user must read and
understand operator’s manual before using
this product.
Safety Alert Precautions that involve your safety.
Sharp Blade Keep hands away from sharp, moving blades.
Wet Conditions Alert Do not expose to rain or use in damp locations.
Wear eye protection and ear
protection
Wear eye protection with side shields that
are marked to comply with ANSI Z87.1 when
operating this equipment, as well as hearing
protection.
Wear Head Protection
Wear an approved safety hard hat to protect
your head.
Gloves
Wear non-slip, heavy-duty protective gloves
when handling the pole saw and the blade.
Safety Footwear
Wear non-slip safety footwear when using this
equipment.
Ricochet
Thrown objects can ricochet and result in
personal injury or property damage.
Keep Tool Away from
Electrical Lines/Keep
Bystanders Away
DANGER! Risk of electrocution! Keep tool
50 feet away from electrical lines. Keep all
bystanders at least 50 ft. away.
Electrocution hazard Keep at least 10 m away from overhead lines.
SYMBOLS
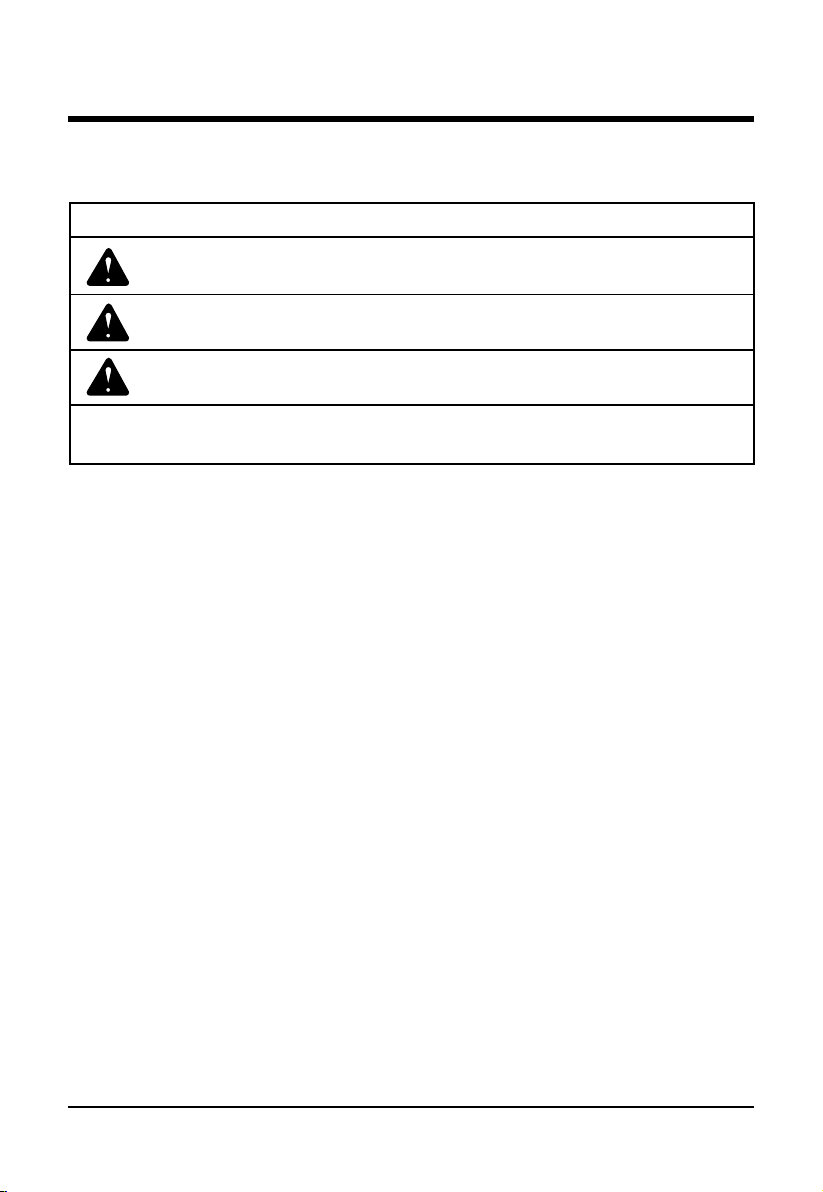
The following signal words and meanings are intended to explain the levels of risk associated
with this product.
DANGER Indicates an imminently hazardous situation, which, if not
avoided, will result in death or serious injury.
WARNING Indicates a potentially hazardous situation, which, if not avoided,
could result in death or serious injury.
CAUTION Indicates a potentially hazardous situation, which, if not avoided,
may result in minor or moderate injury.
CAUTION (Without Safety Alert Symbol) Indicates a situation that may
result in property damage.
SYMBOLS
11
SYMBOL SIGNAL MEANING
12
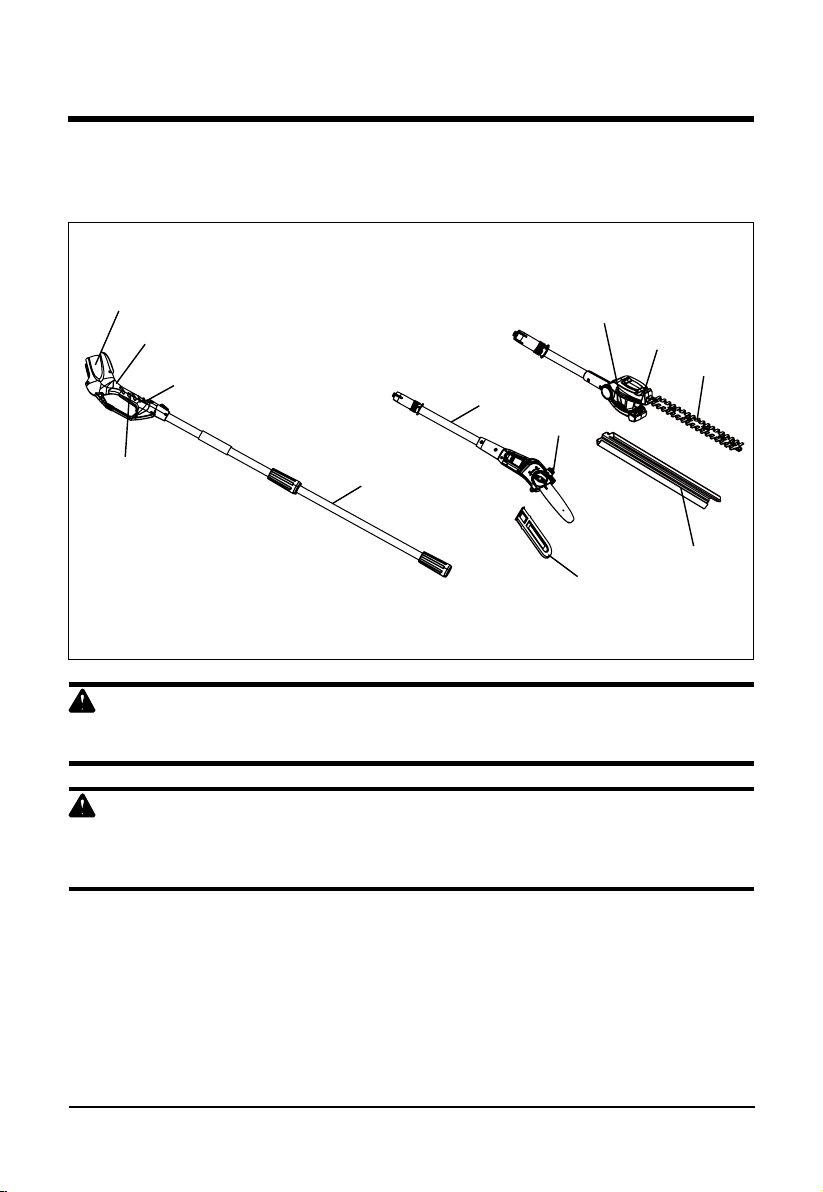
KNOW YOUR POLE SAW AND HEDGE TRIMMER
The safe use of this product requires an understanding of the information on the product and in
this operator’s manual as well as a knowledge of the project you are attempting. Before use of
this product, familiarize yourself with all operating features and safety rules.
WARNING
If any parts are damaged or missing, do not operate this product until the parts are replaced.
Using a product with damaged or missing parts could result in serious personal injury.
WARNING
Do not attempt to modify this product or create accessories not recommended for use with this
product. Any such alteration or modication is misuse and could result in a hazardous condition
leading to possible serious personal injury.
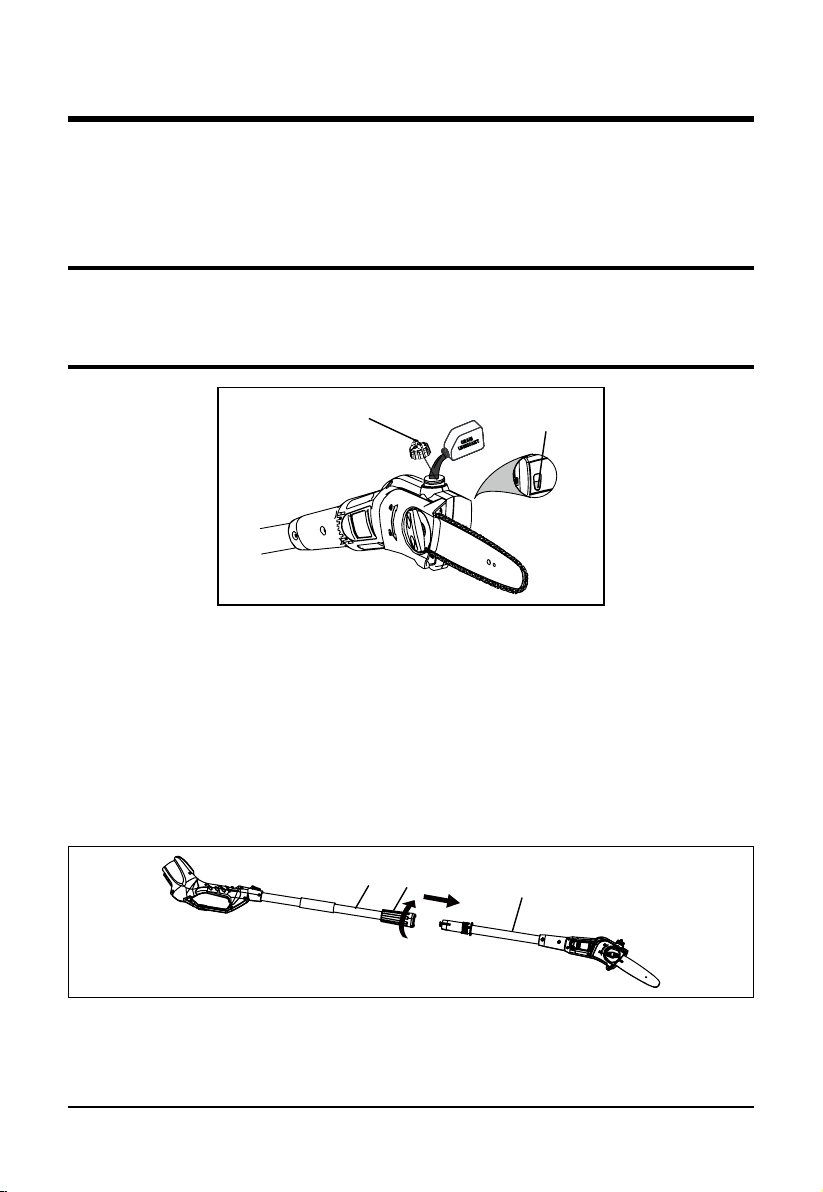
On/Off
Switch
Lock-Out
Button
Main
Handle
Saw
Head
Scabbard
Extension
Tube
Oil Tank
Trimmer
Head
Blade
Blade
Sheath
FIG.1
Battery
Compartment
Pivot
Button

13
WARNING
Before assembly, remove the battery from the tool.
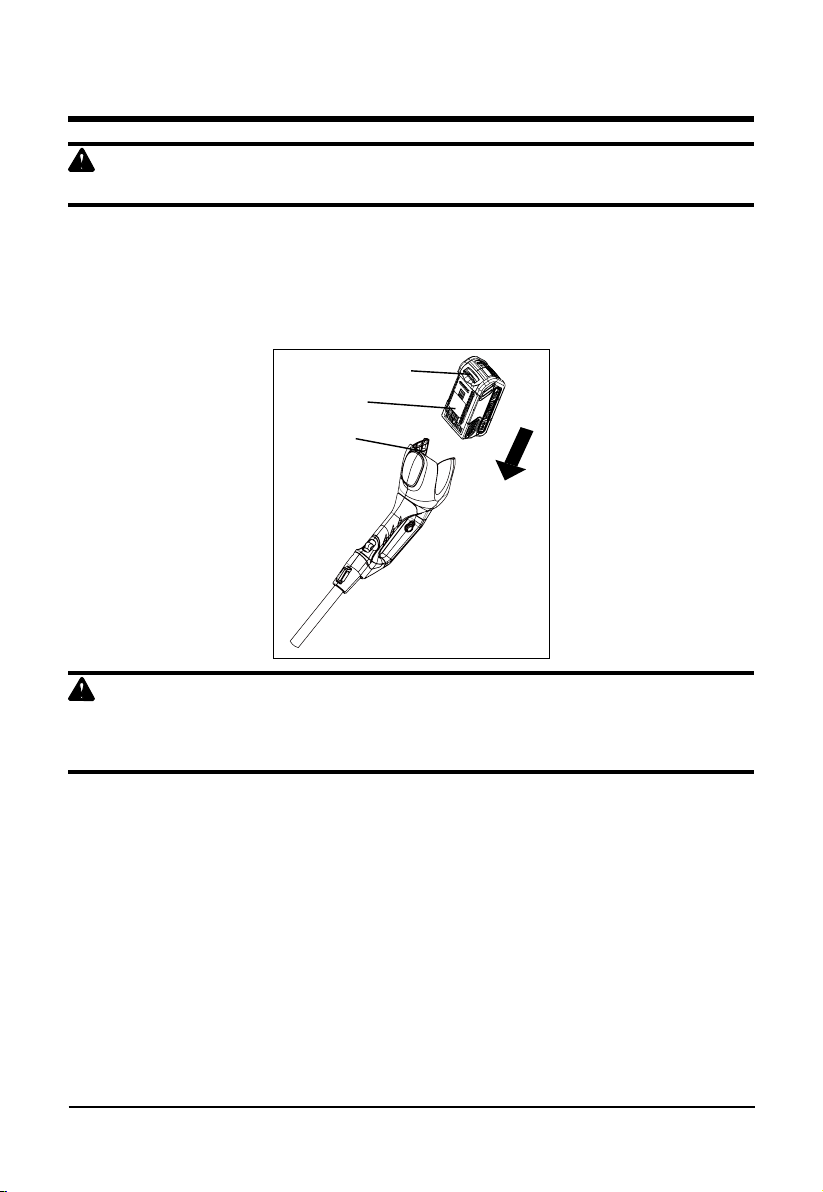
FITTING AND REMOVING THE BATTERY (FIG.2)
• To insert the battery (1), line it up with the battery compartment (3) on the tool. Slide the
battery into the battery compartment and push until the battery snaps into place.
• To remove the battery, push the release button (2) while at the same time pulling the battery
out of the battery compartment.
WARNING
To prevent accidental operation, ensure that the battery is removed and that the scabbard is in
place on the saw chain before performing the following operations. Failure to do this could result in
serious personal injury.
ADDING BAR AND CHAIN LUBRICANT (FIG.3)
Use a bar and chain lubricant (not included) with this product. It is designed for chains and chain
oilers, and is formulated to perform over a wide temperature range with no dilution required.
• Remove oil cap.
• Carefully pour the bar and chain oil into the tank.
• Wipe off excess oil. Replace oil cap.
• Check and ll the oil tank when quick view oil indicator is below the second to last indicator
line.
• Repeat as needed.
NOTE: This pole saw comes from the factory with no bar and chain oil added. Level should
also be checked after every 20 minutes of use and relled as needed. Do not use dirty, used or
ASSEMBLY
1
FIG.2
2
3
14
ASSEMBLY
otherwise contaminated oils. Damage may occur to the bar or chain. It is normal for oil to seep
from the saw when not in use. To prevent seepage, empty the oil tank after each use, then run
for one minute. When storing the unit for a long period of time (three months or longer), be sure
the chain is lightly lubricated; this will prevent rust on the chain and bar sprocket.
WARNING
To preserve natural resources, please recycle or dispose of oil properly. Consult your local waste
authority for information regarding available recycling and/disposal options.
I
C
C
I
R
Oil Reservoir
Cap
Quick View
Oil Indicator
FIG.3
POLE SAW
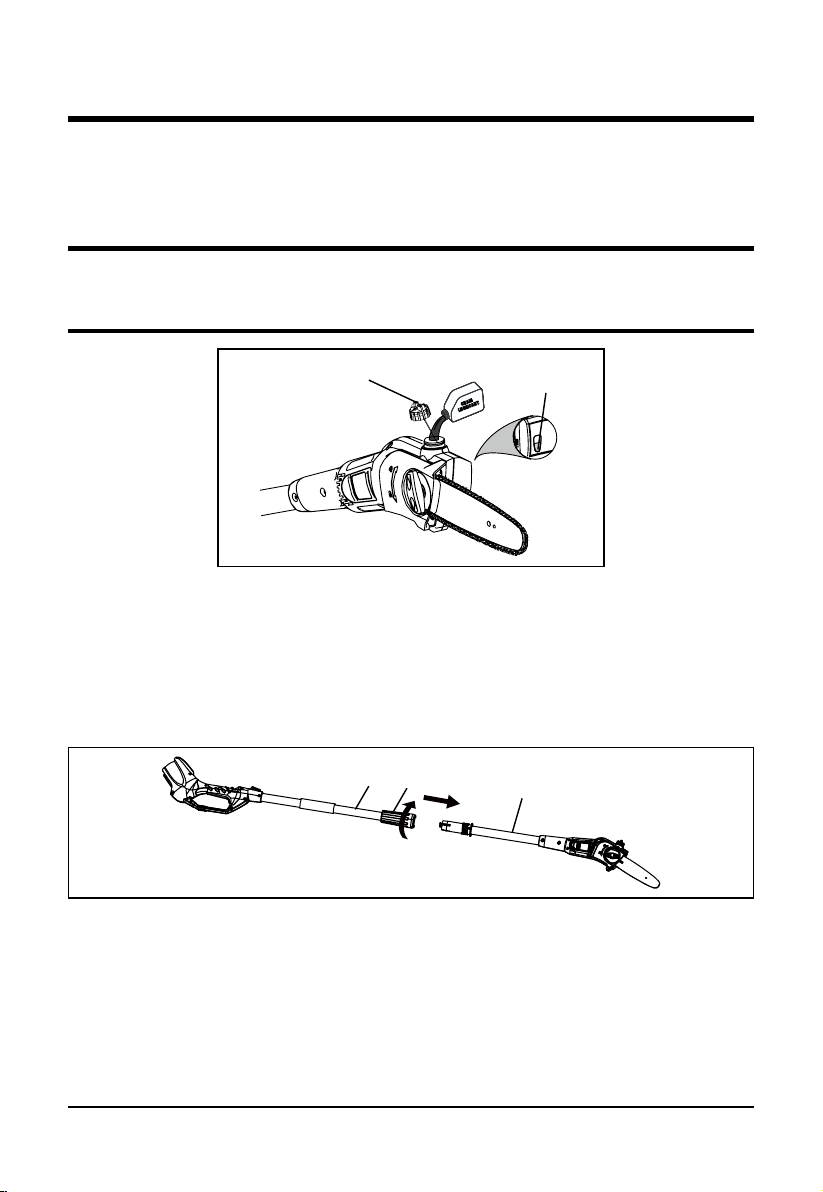
FITTING THE SAW HEAD (FIG.4)
The saw head can be tted directly to the handle in order to achieve standard reach.
• Align the groove on the outside of the coupling end of the handle (4) with the tongue on the
inside of the coupling end of the saw head (5). Push the saw head (5) onto the handle (4).
• Slide the collar (6) upwards and rotate it counterclockwise until it is fully tightened.
EXTENDING THE SAW HEAD (FIG.5)
The maximum reach can be achieved by tting the extension tube (9) between the saw head (8)
and the handle (7).
• Align the groove on the outside of the coupling end of the handle (7) with the tongue on the
inside of the coupling end of the extension tube (9).
• Push the extension tube (9) onto the handle (7).
• Slide the collar upwards and rotate it counterclockwise until it is fully tightened.
FIG.4
5
6
4
15
ASSEMBLY
• Align the groove on the outside of the coupling end of the extension tube (9) with the tongue
on the inside of the coupling end of the saw head (8).
• Push the saw head (8) onto the extension tube (9).
• Slide the collar upwards and rotate it counterclockwise until it is fully tightened.
WARNING
Periodically check the couplers to ensure that they are tightened securely.
REMOVE THE SAW HEAD (FIG.5)
If the extension tube (9) is tted, the saw head must be removed rst.
• To remove the saw head (8), rest the handle (7) on the ground, loosen the collar and take off
the saw head.
FIG.5
7
8
9
ASSEMBLY
16
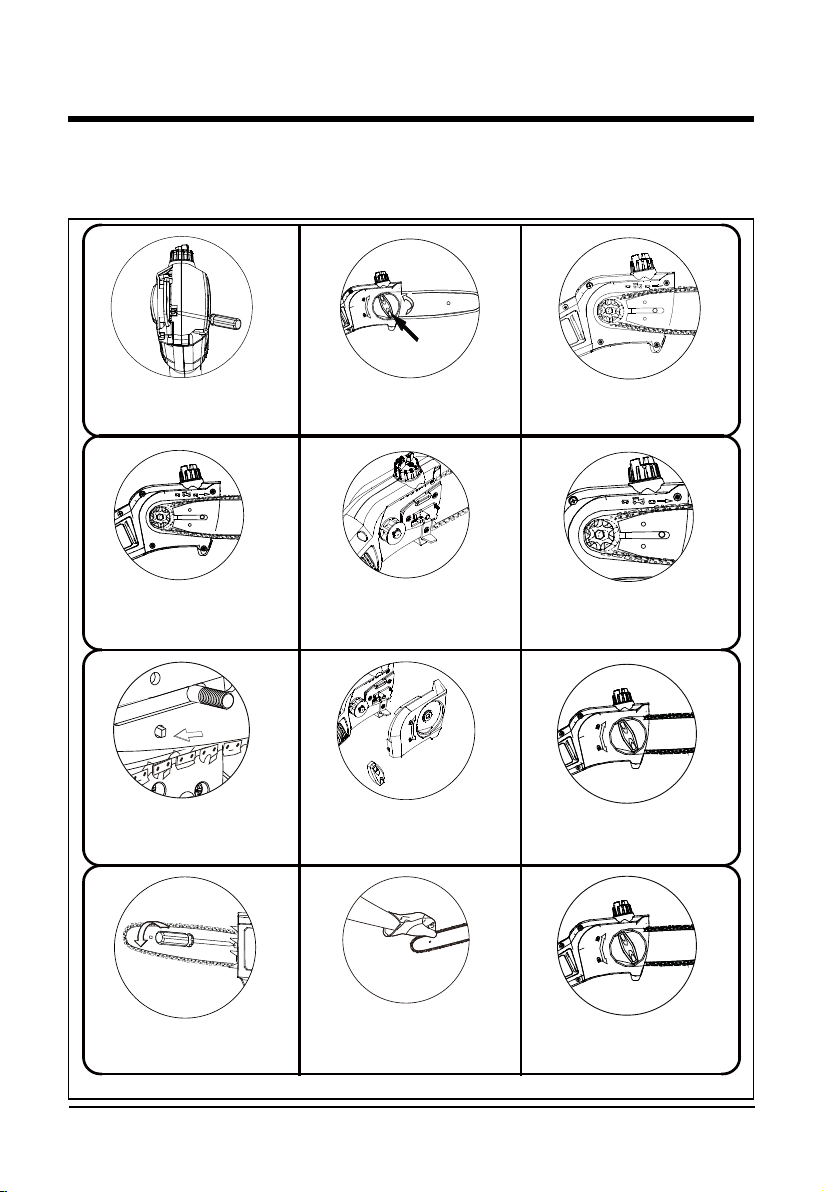
CHAIN TENSION (FIG.6)
Chains stretch with use, check and tension often. Never tension a warm chain before storing, as
chains shrink when cool; this can damage chain, bar and saw.
LOCKING KNOB
ADJUSTING
BLOCK
1. Release chain tension by turning
the tensioning screw, located behind
the chain bar, counter-clockwise.
2. Unscrew the locking knob. 3.Remove the cover.
4. The bar and chain can now be
removed by lifting it away from the
main body of the saw and releasing
the chain from the sprocket.
5. The pole saw can now be cleaned
with a brush and or rag to remove
sawdust and oil.
6.To replace the bar and chain, loop
the chain over the drive pulley and
place the bar against the center
alignment groove.
7. Ensure that the adjusting block is
located in the tensioning hole on the
chain bar.
8. Until that the rubber block and chain
bar are free from oil, as this helps to
keep tension on the chain.
9. Replace the side cover and locking
knob, but do not tighten.
10. Using a screwdriver on the
tensioning screw, turn clockwise.
11. Tighten until there is enough play
that the chain can be pulled away
from the bar, but not so much that
the runners can be pulled out of
the bar.
12. Once you have the correct tension,
fully tighten the locking knob.
FIG.6
ASSEMBLY
17
POLE HEDGE TRIMMER
FITTING THE TRIMMER HEAD (FIG.7)
• Align the arrow on the end of main handle (10) with the arrow on the trimmer head (11).
• Push the trimmer head (11) onto the handle (10).
• Fasten the trimmer head coupler (12).
WARNING
Periodically check the connections to ensure that they are tightened securely.
REMOVING THE TRIMMER HEAD (FIG.7)
Rest the handle (10) on the ground, loosen the trimmer head cam lock and push lock button,
then take off the trimmer head (11).
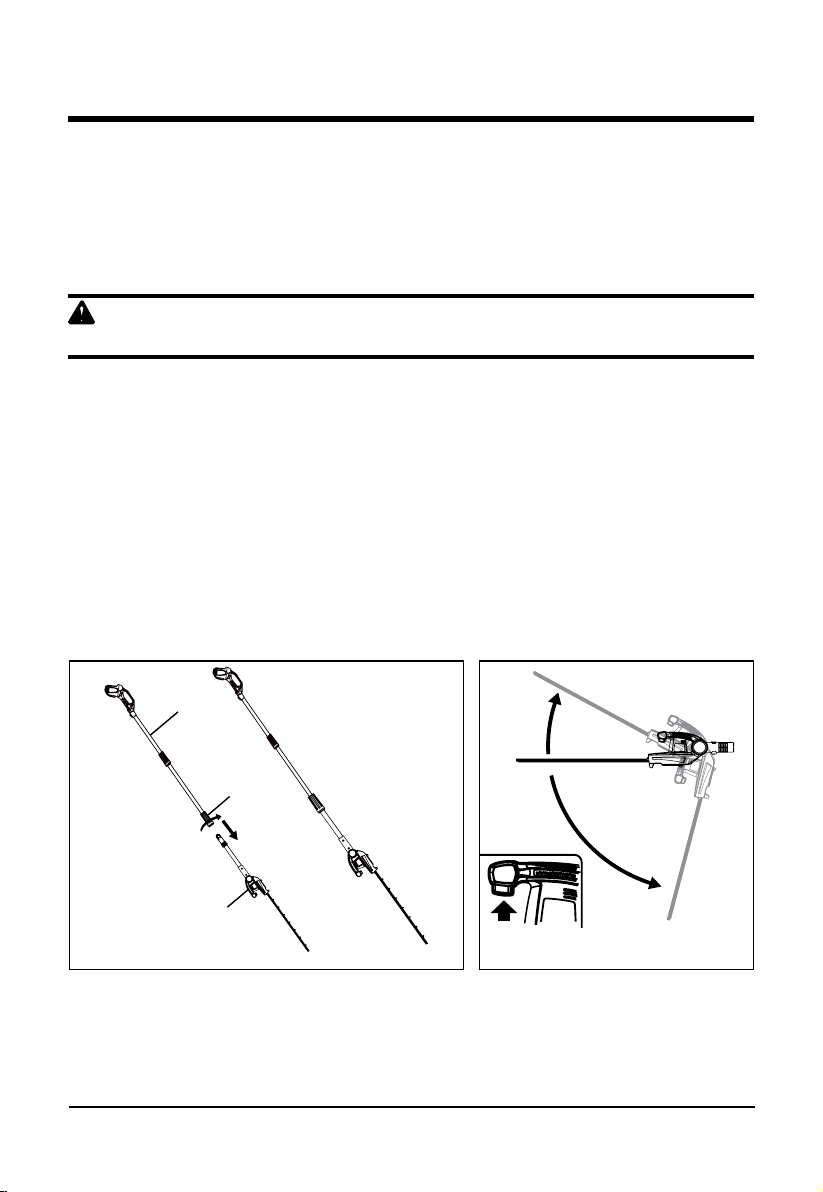
ADJUSTING THE TRIMMER HEAD ANGLE (FIG.8)
The trimmer head pivots 105° and can be locked into 7 positions within that range.
• Squeeze the Adjustment Button.
• While squeezing the Adjustment Button, move the head forward or backward.
• Release the Adjustment Button once the trimmer head is in the desired position.
-30º
0º
75º
FIG.7
FIG.8
10
11
12
Adjustment
Button

OPERATION
18
WARNING
Let the tool work at its own pace. Do not overload.
CHARGING THE BATTERY
The battery needs to be changed before rst use and whenever it fails to produce sufcient
power on jobs that were easily done before.The battery may become warm while charging; this
is normal and does not indicate a problem.
WARNING
Do not charge the battery at ambient temperatures below 45°F or above 104°F. Recommended
charging temperature: approx. 75°F.
NOTE: The charger will not charge a battery if the cell temperature is below approximately 45°F
or above 104°F. The battery should be left in the charger and the charger will begin to charge
automatically when the cell temperature warms up or cools down.
SWITCH ON AND OFF (FIG.9)
For your safety, this tool is equipped with a double switching system. This system prevents
starting the tool inadvertently.
SWITCHING ON
• Pull the lock-off button (14) backward using your thumb and at the same time squeeze the on/
off switch (13).
• Release the lock-off button (14).
SWITCHING OFF
• Release the on/off switch (13).
WARNING
Never attempt to lock a switch in the on position.
FIG.9
13
14
OPERATION
19
OPERATING THE POLE SAW
PREPARATION FOR CUTTING
• Wear non-slip gloves for maximum grip and protection.
• Maintain a proper grip on the unit whenever the motor is running. Use your right hand to rmly
grip the rear handle while your left hand has a rm grip on the pole shaft.
• Hold unit rmly with both hands. Always keep your left hand on the pole shaft and your right
hand on the rear handle, so your body is to the left of the chain line. Never use a left-handed
(cross-handed) grip, or any stance that places your body or arm across the chain line.
• Never stand directly under the limb you are cutting.
• Be certain the collars are fully tightened before operating equipment; check them periodically
for tightness during use to avoid serious injury.
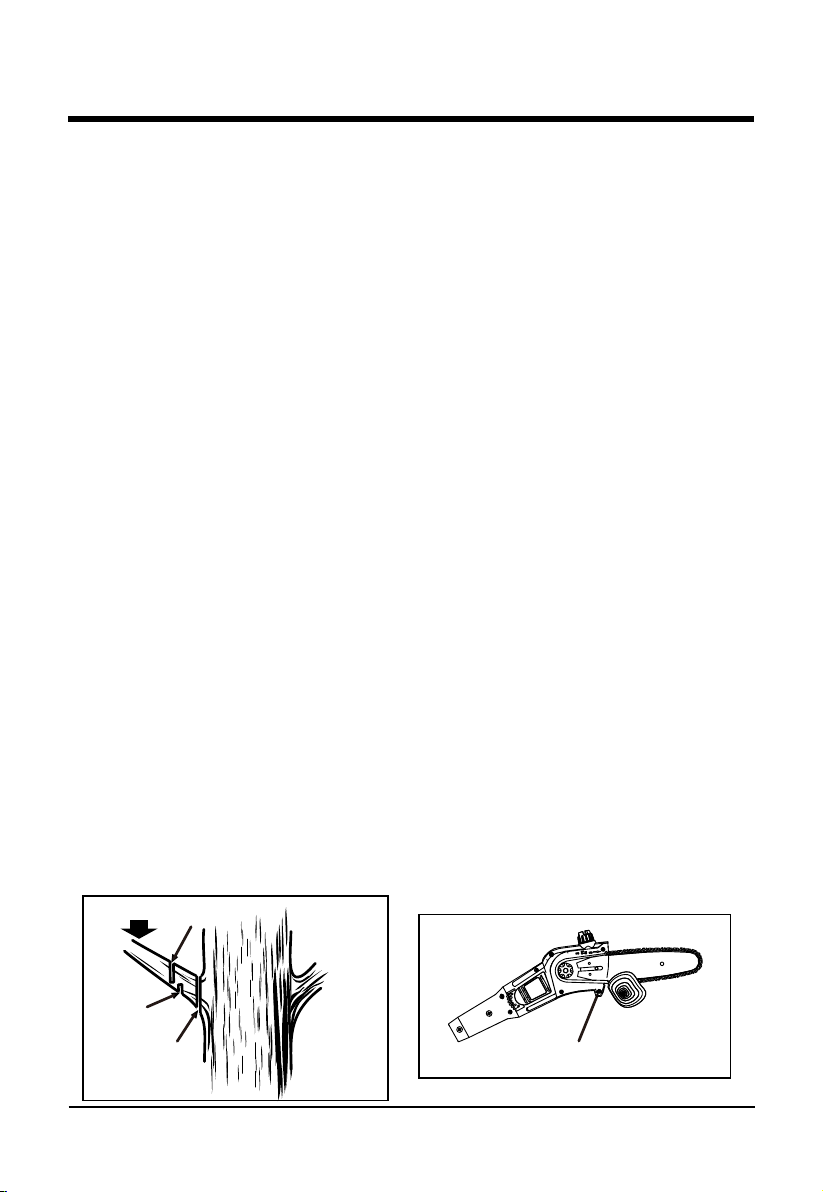
BASIC CUTTING PROCEDURE (FIG.10&11)
Follow the steps below to prevent damage to tree or shrub bark. Do not use a back-and-forth
sawing motion.
• Make a shallow rst cut (1/4 of limb diameter) on the underside of the limb close to the main
limb or trunk.
• Make a second cut from the top side of the limb outboard from the rst cut. Continue the cut
through the limb until the limb separates from the tree. Be prepared to balance the weight of
the tool when the limb falls.
• Make a nal cut close to trunk.
NOTE: For second and nal cuts (from top of limb or branch), hold front cutting guide against the
limb being cut. This will help steady the limb and make it easier to cut. Allow chain to cut for you;
exert only light downward pressure. If you force the cut, damage to the bar, chain, or motor can
result.
• Release the trigger as soon as the cut is completed.
Failure to follow proper cutting procedures will result in the bar and chain binding and becoming
pinched or trapped in the limb. If this should happen:
• Stop the motor and disconnect from power supply.
• If the limb can be reached from the ground, lift the limb while holding the saw. This should
release the “pinch” and free the saw.
• If the saw is still trapped, call a professional for assistance.
FIG.10
FIG.11
LOAD
Second Cut
First Cut
1/4 Diameter
Final Cut
Cutting Guide
OPERATION
20
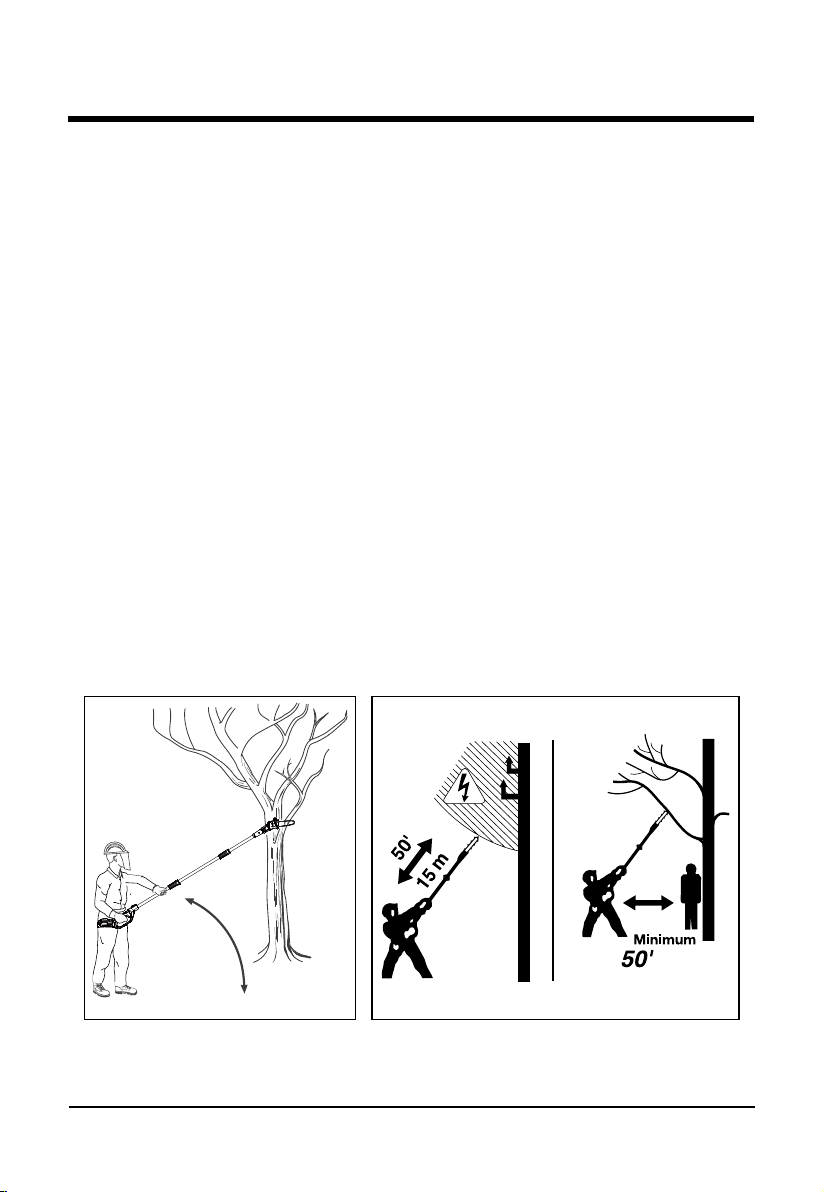
LIMBING AND PRUNING (FIG.12&13)
This unit is designed for trimming small branches and limbs up to 6” (15.2 cm) in diameter. For
best results, observe the following precautions.
• Plan the cut carefully. Be aware of the direction in which the branch will fall.
• Branches may fall in unexpected directions. Do not stand directly under the branch being cut.
• The most typical cutting application is to position the unit at an angle of 60° or less, depending
on the specic situation, as shown. As the angle of the pole saw shaft to ground increases, the
difculty of making the rst cut (from the underside of limb) increases.
• Remove long branches in several stages.
• Cut lower branches rst to allow the top branches more room to fall.
• Work slowly, keeping both hands on the saw with a rm grip. Maintain secure footing and
balance.
• Keep the tree between you and the chain while limbing. Cut from side of tree opposite branch
you are cutting.
• Do not cut from a ladder; this is extremely dangerous. Leave this operation for professionals.
• Do not make the ush cut next to the main limb or trunk until you have cut off the limb further
out to reduce the weight. Following proper cutting procedures will prevent stripping the bark
from the main member.
• Do not use the pole saw for felling or bucking.
• To prevent electrocution, do not operate within 50’ (15 m) of overhead electrical lines.
• Keep bystanders at least 50’ (15 m) away.
(15 m)
FIG.12 FIG.13
60° MAXIMUM
OPERATION
21
OPERATING THE POLE HEDGE TRIMMER
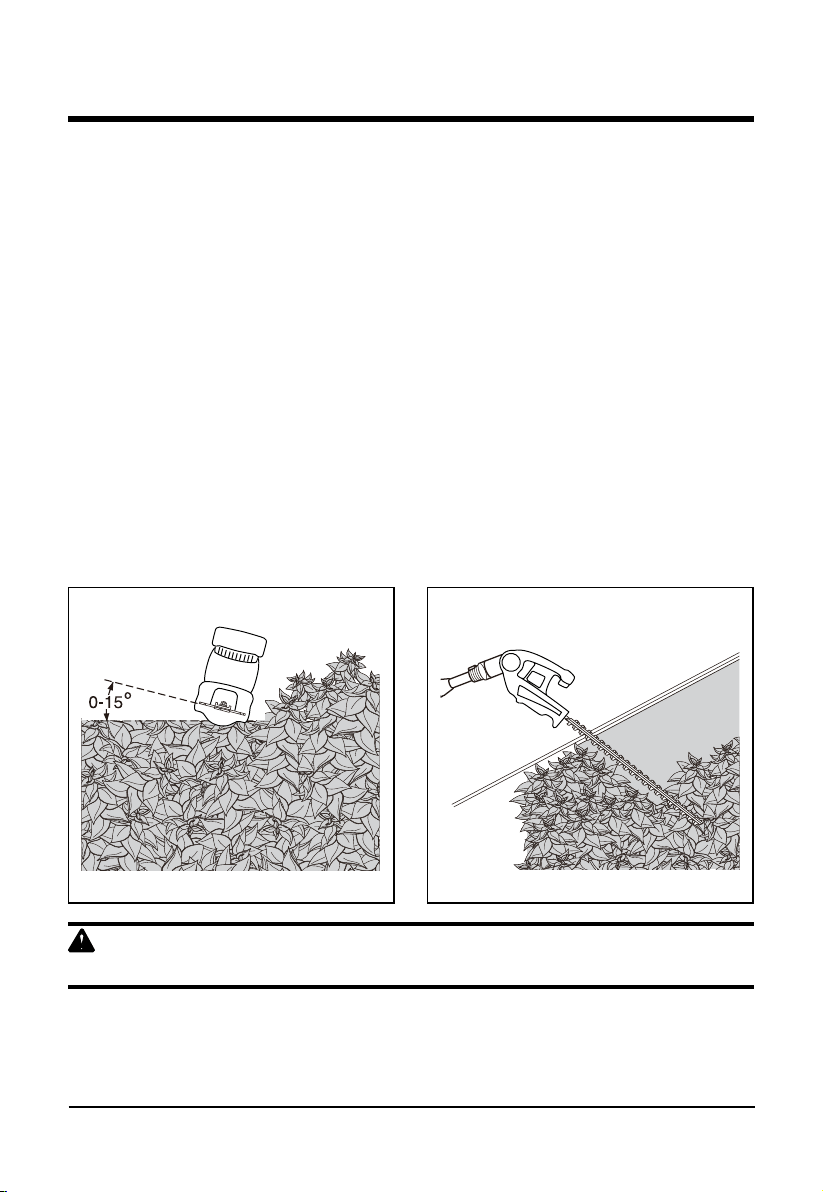
TIPS FOR OPTIMUM USE
• Start by trimming the top of the hedge. Slightly tilt the tool (up to 15° relative to the line of cut)
so that the blade tips point slightly towards the hedge (FIG.14). This will cause the blades to
cut more effectively. Hold the tool at the desired angle and move it steadily along the line of cut.
The doublesided blade allows you to cut in either direction.
• In order to obtain a very straight cut, stretch a piece of string along the length of the hedge at
the desired height. Use the string as a guideline, cutting just above it.
• In order to obtain at sides, cut upwards with the growth. Younger stems move outwards when
the blade cuts downwards, causing shallow patches in the hedge (FIG.15)
• Take care to avoid any foreign objects. Especially avoid hard objects such as metal wire and
railings, as these could damage the blades.
• Regularly oil the blades.
• Trim hedges and shrubs with seasonal leaves (new leaves every year) in June and October.
• Trim evergreens in April and August.
• Trim conifers and other fast growing shrubs every six weeks from May until October.
• Trim hedges and shrubs with seasonal leaves (new leaves every year) in December and
March.
WARNING
Keep hands away from blade. Contact with blade will result in serious personal injury.
FIG.14 FIG.15
BATTERY CHARGER
22
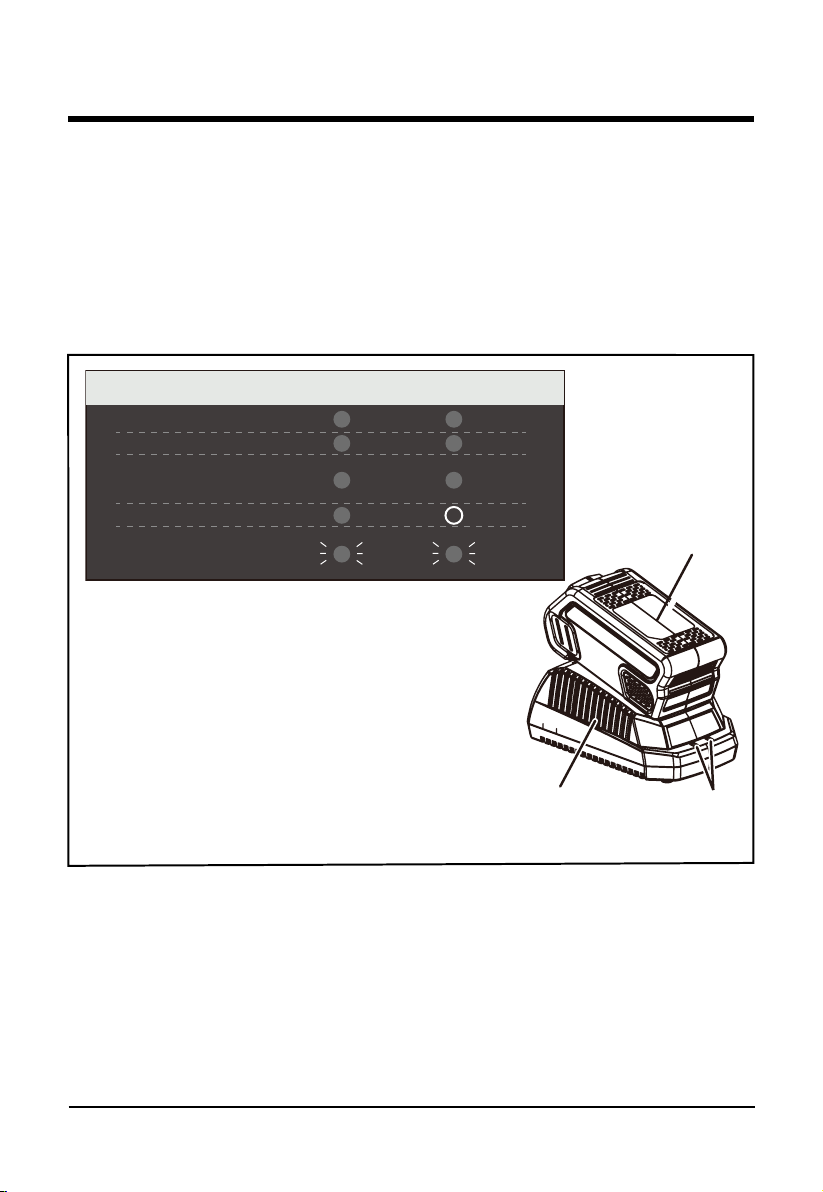
CHARGING PROCEDURE (See Figure 16.)
NOTE: The battery is not shipped fully charged. It is recommended to fully charge before rst
use to ensure that maximum run time can be achieved. This lithium-ion battery will not develop a
memory and may be charged at any time.
1. Plug the charger into an AC power outlet.
2. Insert the battery pack (1) into the charger (2).
This is a diagnostic charger. The Charger LED Lights (3) will illuminate in specic order to
communicate the current battery status. They are as follows:
False Defect Note:
When the battery is inserted into the charger, and the
status LED ashes, remove the battery from the charger
for 1 minute, then reinsert. If the status LED indicates
normal than the battery pack is good. If the status LED
is still blinking, remove the battery pack and unplug the
charger. Wait 1 minute and plug the charger back in and
reinsert the battery pack. If the status LED indicates
normal than the battery pack is good. If the status LED is
still blinking then the battery pack is defective and needs
to be replaced.
FIG.16
CHARGING PROCEDURE (LED INDICATOR)
BATTERY IS CHARGING:
FULLY CHARGED:
BATTERY IS TOO WARM:
(REMOVE FOR APPROX. 30
MINUTES TO ALLOW TO COOL)
DEFECTIVE BATTERY:
(REMOVE AND REPLACE WITH
NEW BATTERY IF THIS OCCURS)
NO BATTERY PRESENT
RED
GREEN
ORANGE
OFF
RED
RED
RED
RED
BLINKING
RED
BLINKING
3
1
2
RED
BATTERY CHARGER
23
CHECKING THE CHARGE
If the battery pack does not charge properly:
• Check the current at the power outlet with another tool . Make sure that the outlet is not turned
off.
• Check that the charger contacts have not been shorted by debris or foreign material.
• If the air temperature is above 104ºF or below 45ºF, move the charger and battery pack to a
room temperature location.
WARNING
If the battery is inserted into the charger when warm or hot, the CHARGING LED indicator light
on the charger may switch on and illuminate RED. If this occurs allow the battery to cool inside of
the charger for up to 30 minutes. Charging should automatically start once battery has cooled.
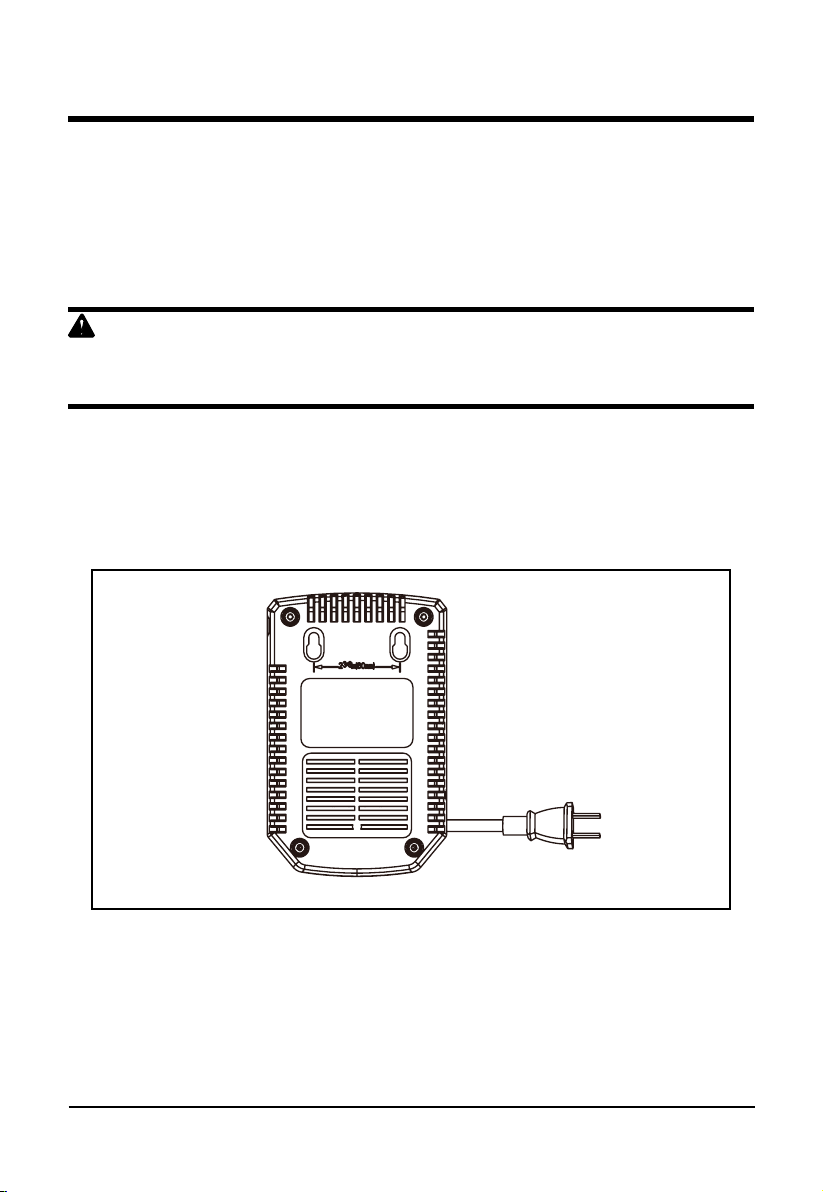
CHARGER MOUNTING (See Figure 17.)
1. This charger can be installed hanging on a wall using two screws (not supplied).
2. Locate the placement for the charger to be wall mounted.
3. If fastening to wood studs use 2 wood screws.
4. Drill two holes 2 3/8” (6 cm) on center ensuring they are level.
5. If fastening to drywall use wall anchors and screws to secure the charger to the wall.
NOTE: If the battery and the charger won’t be used for a long time, please remove the battery
from the charger and pull out the AC power plug.
FIG.17

MAINTENANCE
24
CLEANING MAINTENANCE AND STORAGE
Your tool has been designed to operate over a long period of time with a minimum of
maintenance. Continuous satisfactory operation depends upon proper tool care and regular
cleaning.Your charger does not require any maintenance apart from regular cleaning.
WARNING
Before performing any maintenance on the tool, remove the battery from the tool. Unplug the
charger before cleaning it.
After use and before storage
• After use, carefully clean the blades. After cleaning, apply a lm of light machine oil to prevent
the blades from rushing.
• Regularly clean the ventilation slots in your tool using a soft brush or dry cloth.
• Regularly clean the motor housing using a damp cloth. Do not use any abrasive or solvent
based cleaner.
• Make sure all switches are free of debris before and after use.
STORAGE
When storing or transporting the chain saw, always place the protective cover over the chain saw
blade. When the tool will not be used for several months, ideally leave the battery connected to
the charger. Otherwise proceed as follows:
• Fully charge the battery.
• Remove the battery from the tool.
• Store the tool and battery in a secure and dry location. The storage temperature must always
remain in the range of 50°F to 104°F. Place the battery on a level surface. Before using the
tool after prolonged storage, fully charge the battery again.

25
ENVIRONMENTALLY SAFE BATTERY DISPOSAL
The following toxic and corrosive materials are in the batteries used in this string trimmer battery
pack: Lithium-Ion, a toxic material.
WARNING
All toxic materials must be disposed of in a specified manner to prevent contamination of the
environment. Before disposing of damaged or worn out Lithium-Ion battery packs, contact your
local waste disposal agency, or the local Environmental Protection Agency for information and
specific instructions. Take the batteries to a local recycling and/or disposal center, certified for
lithium-ion disposal.
WARNING
If the battery pack cracks or breaks, with or without leaks, do not recharge it and do not use.
Dispose of it and replace with a new battery pack. DO NOT ATTEMPT TO REPAIR IT!
To avoid injury and risk of re, explosion, or electric shock, and to avoid damage to the
environment:
• Cover the battery's terminals with heavy-duty adhesive tape.
• DO NOT attempt to remove or destroy any of the battery pack components.
• DO NOT attempt to open the battery pack.
• If a leak develops, the released electrolytes are corrosive and toxic. DO NOT get the
solution in the eyes or on skin, and do not swallow it.
• DO NOT place these batteries in your regular household trash.
• DO NOT incinerate.
• DO NOT place them where they will become part of any waste landll or municipal solid
waste stream.
• Take them to a certied recycling or disposal centre.

26
TROUBLESHOOTING
POLE HEDGE TRIMMER
PROBLEM POSSIBLE CAUSE SOLUTION
Tool will not start Battery not installed properly Check the battery installation
Battery discharged Fully charge the battery by
following the instructions in the
charger manual.
Lock-off button not actuated Pull back on the lock-off button
before engaging the On/Off
switch.
Pole connections not properly
tightened
Check the connections
POLE SAW
PROBLEM POSSIBLE CAUSE SOLUTION
Bar and chain running hot
and smoking.
Check chain tension for
overtightened condition. Bar
and chain oil reservoir empty.
Tension chain. Refer to Chain
Tension earlier in this manual.
Check bar and chain oil reservoir.
Motor runs, but chain is not
rotating.
Chain tension too tight. Check
guide bar and chain assembly.
Check guide bar and chain for
damage.
Loosen chain. Refer to Chain
Tension earlier in this manual.
Refer to Replacing the Bar and
Chain earlier in this manual.
Inspect guide bar and chain for
damage.

27
LIMITED WARRANTY
GREENWORKS™ hereby warranties this product, to the original purchaser with proof of
purchase, for a period of four (4) years against defects in materials, parts or workmanship.
GREENWORKS™, at its own discretion will repair or replace any and all parts found to be
defective, through normal use, free of charge to the customer. This warranty is valid only for
units which have been used for personal use that have not been hired or rented for industrial/
commercial use, and that have been maintained in accordance with the instructions in the
owners’ manual supplied with the product from new.
ITEMS NOT COVERED BY WARRANTY:
1. Any part that has become inoperative due to misuse, commercial use, abuse, neglect,
accident, improper maintenance, or alteration; or
2. The unit, if it has not been operated and/or maintained in accordance with the owner's
manual; or
3. Normal wear, except as noted below;
4. Routine maintenance items such as lubricants, blade sharpening;
5. Normal deterioration of the exterior nish due to use or exposure.
GREENWORKS HELPLINE (1 888 90WORKS):
Warranty service is available by calling our toll-free helpline, at 1-888-909-6757
(1-888-90WORKS).
TRANSPORTATION CHARGES:
Transportation charges for the movement of any power equipment unit or attachment are the
responsibility of the purchaser. It is the purchaser’s responsibility to pay transportation charges
for any part submitted for replacement under this warranty unless such return is requested in
writing by GREENWORKS.
28
EXPLODED VIEW
POLE HEDGE TRIMMER
29
EXPLODED VIEW
POLE SAW

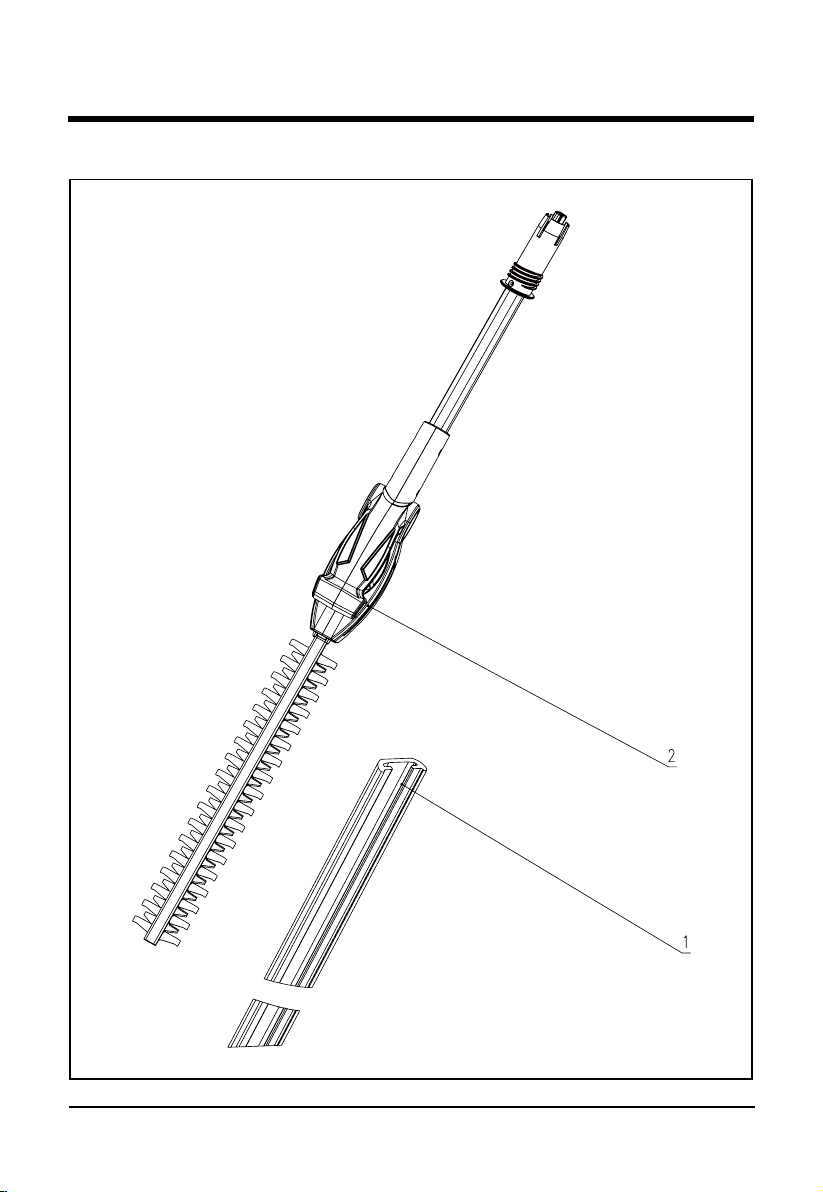
30
PARTS LIST
Item No. Part No. Description QTY
1 34110648 Blade Cover 1
2 31104258 Hedger 1
POLE HEDGE TRIMMER

31
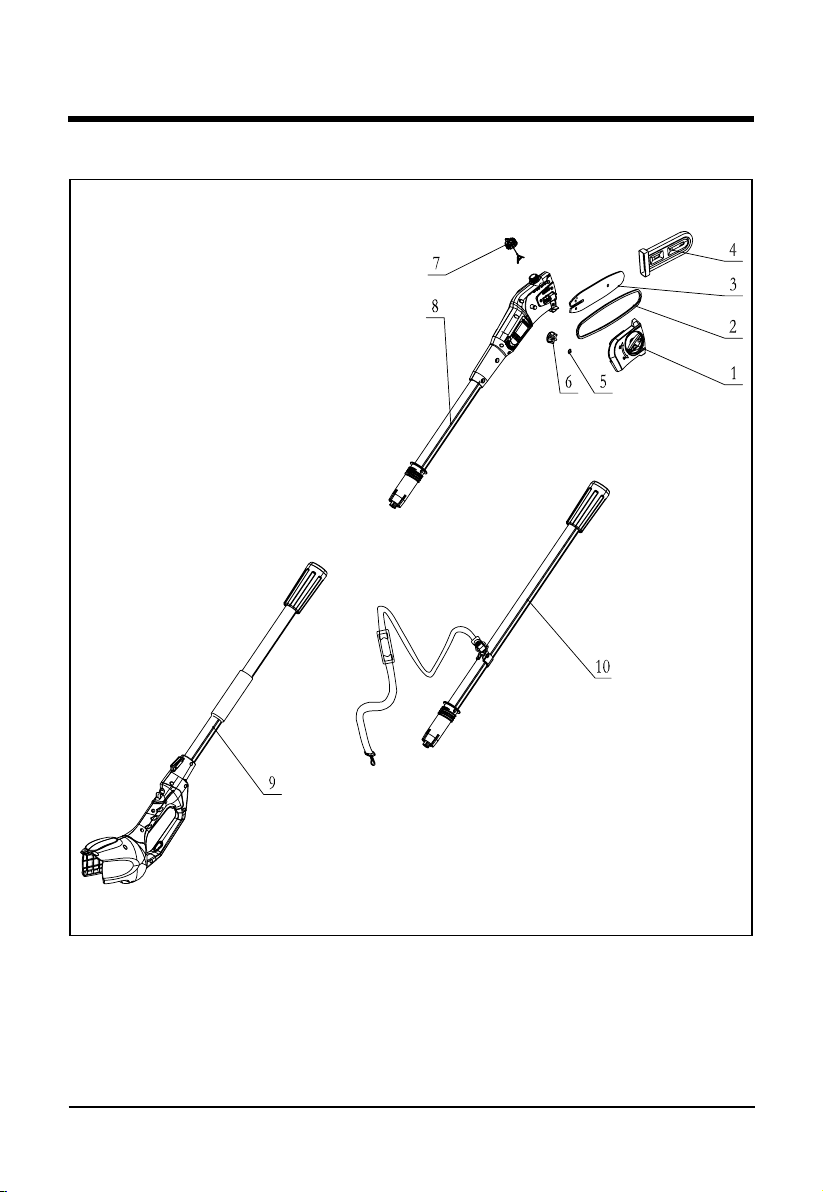
PARTS LIST
POLE SAW
Item No. Part No. Description QTY
1 31111258 Side Cover Assembly 1
2 32901320 8” Chain 1
3 32902320-7 8” Guide Bar 1
4 34112320-2 Scabbard 1
5 3290875 Spring Φ10 1
6 33902102-2 Sproket 1
7 31112258 Oil Tank Cap 1
8 31113258 Upper Pole Assembly 1
9 31103258 Handle Assembly 1
10 31102257 Middle Pole Assembly 1

TOLL-FREE HELPLINE: 1-888-90WORKS (888.909.6757)
Rev: 00 (01-11-16) Printed in China on 100% Recycled Paper
Greenworks Tools
P.O. Box 3130
Mooresville, North Carolina 28117

PODADORA DE ALTURA Y CORTASETOS
INALÁMBRICO DE 40V
Manual Del Propietario
LÍNEA GRATUITA LÍNEA DE AYUDA: 1-888-90WORKS (888.909.6757)
www.GreenWorksTools.com
Antes de hacer funcionar esta herramienta, lea cuidadosamente todas las
reglas de seguridad y las instrucciones.
PSPH40B00

2
CONTENIDOS
Contenidos........................................................................................................................... 2
Especicaciones .................................................................................................................. 3
Instrucción De Seguridad Importante .................................................................................. 4
Símbolos .............................................................................................................................11
Conozca Su Cortasetos Y Podadora De Altura ................................................................. 13
Armado .............................................................................................................................. 14
Funcionamiento ................................................................................................................. 19
Cargador De Pilas.............................................................................................................. 23
Mantenimiento ................................................................................................................... 25
Eliminación Segura De La Batería ..................................................................................... 26
Solución De Problemas ..................................................................................................... 27
Garantía Limitada .............................................................................................................. 28
Plano De Despiece ............................................................................................................ 29
Lista De Piezas .................................................................................................................. 31

3
ESPECIFICACIONES
DISPOSITIVO DE PODA
Tensión De Entrada ..................................................................................................40 V DC
Velocidad De La Cadena Sin Carga .................................................................9.9 ±10% m/s
Longitud Máxima De Corte .....................................................................................................8"
Capacidad Del Depósito De Aceite De La Cadena ...........................................................50 ml
Sierra De Cadena ......................................................................................................91PJ033X
Barra Guía ............................................................................................................080NDEA318
Peso (sin batería) ..............................................................................................8.38 Ibs (3.8 kg)
DISPOSITIVO CORTASETOS
Tensión De Entrada ..................................................................................................40 V DC
Velocidad Sin Carga .............................................................................................2,800 SPM
Longitud De La Cuchilla ........................................................................................................18"
Distancia Entre Cuchillas ....................................................................................................3/4"
Peso (sin batería) ............................................................................................9.57 lbs (4.34 kg)

4
INSTRUCCIÓN DE SEGURIDAD IMPORTANTE
ADVERTENCIA
Lea todas las advertencias de seguridad y todas instrucciones. El incumplimiento de las
advertencias e instrucciones puede ocasionar descarga eléctrica, fuego o lesiones graves.
Guarde todas las advertencias e instrucciones para futuras consultas.
El término “herramienta eléctrica” empleado en todos los avisos de advertencia enumerados
abajo se reere a las herramientas eléctricas de cordón (alámbricas) y de baterías
(inalámbricas).
1. SEGURIDAD EN EL ÁREA DE TRABAJO
•Mantenga limpia y bien iluminada el área de trabajo. Un área de trabajo mal despejada o
mal iluminada propicia accidentes.
•No utilice herramientas motorizadas en atmósferas explosivas, como las existentes
alrededordelíquidos,gasesypolvosinamables. Las herramientas eléctricas generan
chispas que pueden encender el polvo y los vapores inamables.
•Mantenga alejados a los niños y circunstantes al maniobrar una herramienta eléctrica.
Toda distracción puede causar pérdida del control de la herramienta.
2. SEGURIDAD ELÉCTRICA
•Eviteelcontactodelcuerpoconlassuperciesdeobjetosqueesténhaciendotierra
o estén conectados a ésta, como tuberías, radiadores, estufas y refrigeradores. Existe
un mayor riesgo de descargas eléctricas si el cuerpo está haciendo tierra.
•No exponga las herramientas eléctricas a la lluvia ni a condiciones de humedad.
La introducción de agua en una herramienta eléctrica aumenta el riesgo de descargas
eléctricas.
•Si l’utilisation d’un outil électrique dans un endroit humide ne peut être évitée, utilisez
une alimentation protégée par un dispositif différentiel à courant résiduel (RCD).
3. SEGURIDAD PERSONAL
•Permanezca alerta, preste atención a lo que esté haciendo y aplique el sentido común
al utilizar herramientas eléctricas. No utilice la herramienta eléctrica si está cansado
o se encuentra bajo los efectos de alguna droga, alcohol o medicamento. Un momento
de inatención al utilizar una herramienta eléctrica puede causar lesiones corporales serias.
•Use equipo de seguridad. Siempre póngase protección ocular. El uso de equipo de
seguridad como mascarilla para el polvo, calzado de seguridad, casco y protección para los
oídos en las circunstancias donde corresponda disminuye el riesgo de lesiones.
•Evite un arranque accidental de la unidad. Asegúrese de que el interruptor esté en
la posición de apagado antes de conectar la herramienta. Portar las herramientas
eléctricas con el dedo en el interruptor, o conectarlas con el interruptor puesto, propicia
accidentes.
•Retire toda llave o herramienta de ajuste antes de encender la herramienta eléctrica.
Toda llave o herramienta de ajuste dejada en una pieza giratoria de la herramienta eléctrica
puede causar lesiones.
•No realice sobreesfuerzos. Mantenga un equilibro adecuado en todo momento. En
situaciones inesperadas, si está en una supercie nivelada podrá tener un mayor control de
la herramienta.

5
INSTRUCCIÓN DE SEGURIDAD IMPORTANTE
•Vístase adecuadamente. No vista ropas holgadas ni joyas. Mantenga el cabello, la
ropa y los guantes alejados de las piezas móviles. Las ropas holgadas, las joyas y el
cabello largo pueden engancharse en las piezas móviles.
•Si se suministran dispositivos para conectar mangueras de extracción y captación
de polvo, asegúrese de que éstas estén bien conectadas y se usen correctamente. La
utilización de captador de polvo puede disminuir los peligros relacionados con el polvo.
4. EMPLEO Y CUIDADO DE LA HERRAMIENTA ELÉCTRICA
•No fuerce la herramienta eléctrica. Utilice la herramienta eléctrica adecuada para
cada trabajo. La herramienta eléctrica adecuada efectúa mejor y de manera más segura el
trabajo, si además se maneja a la velocidad para la que está diseñada.
•No utilice la herramienta si el interruptor no enciende o no apaga. Cualquier herramienta
eléctrica que no pueda controlarse con el interruptor es peligrosa y debe repararse.
•Desconecte la clavija del suministro de corriente o retire el paquete de baterías de
la herramienta eléctrica, según sea el caso, antes de efectuarle cualquier ajuste,
cambiarle accesorios o guardarla. Tales medidas preventivas de seguridad reducen el
riesgo de poner en marcha accidentalmente la herramienta.
•Guarde las herramientas eléctricas desocupadas fuera del alcance de los niños y
no permita que las utilicen personas no familiarizadas con las mismas o con estas
instrucciones. Las herramientas eléctricas son peligrosas en manos de personas no
capacitadas en el uso de las mismas.
•Preste servicio a las herramientas eléctricas. Revise para ver si hay desalineación
o atoramiento de piezas móviles, ruptura de piezas o cualquier otra condición que
pueda afectar el funcionamiento de la herramienta. Si está dañada la herramienta
eléctrica, permita que la reparen antes de usarla. Numerosos accidentes son causados
por herramientas eléctricas mal cuidadas.
•Mantengalasherramientasdecortealadasylimpias. Las herramientas de corte bien
cuidadas y con bordes bien alados, tienen menos probabilidad de atascarse en la pieza de
trabajo y son más fáciles de controlar.
•Utilice la herramienta eléctrica, los accesorios y brocas, hojas y cuchillas de corte,
ruedas de esmeril, etc. de conformidad con estas instrucciones, tomando en cuenta
las condiciones de trabajo y la tarea por realizar. Si se utiliza la herramienta eléctrica
para operaciones diferentes de las indicadas podría originar una situación peligrosa.
5. EMPLEO Y CUIDADO DE LA HERRAMIENTA DE BATERÍAS
•Para uso solamente con la batería 29462, 29472.
•Para uso solamente con el cargador 29482.
•Asegúrese de que el interruptor está en posición de apagado antes de insertar la
batería. Insertar la batería en herramientas encendidas puede provocar accidentes.
•Sólocargueelpaquetedebateríasconelcargadorespecicadoporelfabricante. Un
cargador adecuado para un tipo paquete de baterías puede signicar un riesgo de incendio si
se emplea con un paquete de baterías diferente.
•Utilicelasherramientaseléctricassóloconlospaquetesdebateríasespecícamente
indicados. El empleo de paquetes de baterías diferentes puede presentar un riesgo de
incendio.
•Cuando no esté utilizándose el paquete de baterías, manténgalo lejos de otros objetos

6
metálicos, como clips, monedas, llaves, clavos, tornillos o otros objetos metálicos,
pequeños que puedan establecer conexión entre ambas terminales. Establecer una
conexión directa entre las dos terminales de las baterías puede causar quemaduras o
incendios.
•Si se maltratan las baterías, puede derramarse líquido de las mismas; evite todo
contacto con éste. En caso de contacto, lávese con agua. Si el líquido llega a tocar los
ojos, además busque atención médica. El líquido de las baterías puede causar irritación y
quemaduras.
•Noutiliceunabateríaoapartadodañadoomodicado.Lasbateríasdañadaso
modicadaspuedencomportarsedemodoimprevistoquepuedecausarincendio,
explosión o riesgo de lesión.
•No exponga ni las baterías ni el aparato al fuego ni a altas temperaturas. La
exposición a temperaturas superiores a 130ºC (266°F) puede provocar una explosión.
La temperatura de 130 ºC (266°F) equivale a 129°C (265°F).
•Siga todas las instrucciones de carga y no cargue la batería o aparato fuera del rango
de temperaturas mencionado en las instrucciones. Cargar de forma inadecuada o
contemperaturasfueradelrangoespecicadospuededañarlabateríayaumentarel
riesgo de incendio.
•Suproductodeberíaserreparadoporpersonascualicadas,quedeberíanutilizar
únicamente piezas de repuesto idénticas. Esto garantizará la seguridad a la hora de
utilizar el producto.
•Nomodiqueynointenterepararelaparatoolabatería(segúnproceda)exceptolo
indicado en las instrucciones para uso y mantenimiento.
6. PARA TODOS LOS APARATOS
•Evite los ambientes peligrosos. No utilice herramientas en lugares húmedos o
mojados.
•No use a la lluvia.
•Mantenga a los niños alejados. Todos los visitantes deberán permanecer a una
distancia prudencial de la zona de trabajo.
•Vístase adecuadamente. No use ropa holgada o joyas. Podrían quedar atrapados en
las piezas móviles. Se recomienda el uso de guantes de goma y calzado sólido cuando
se trabaje al aire libre. Use un protector que cubra el cabello para agarrarlo.
•Utilice gafas de seguridad. Utilice siempre una careta o mascarilla si se encuentra en
una zona con mucho polvo.
•Uso correcto del aparato. No use el aparato para trabajos que no sean aquéllos para
los que está diseñada.
•Notoquelashojasdecorteexpuestasniloslosdelashojascuandoagarreo
sostenga el accesorio. (solo para cizallas para cortar la hierba y aparatos similares)
•No forzar el aparato. La tijera podadora hará un trabajo mejor y con menos
probabilidad de riesgo de daños a la tasa para la que ha sido diseñada.
•Manténgase alerta. Esté atento siempre a lo que está haciendo. Utilice el sentido
común. No utilice el aparato cuando esté cansado.
•Almacene el aparato sin utilizar en interiores. Cuando no esté en uso, los aparatos
INSTRUCCIÓN DE SEGURIDAD IMPORTANTE

7
deben guardarse en un lugar seco interior, bajo llave, fuera del alcance de los niños.
•Démantenimientoconcuidadoaleproducto.Mantengaaladoellodecortey
límpielo para lograr un desempeño óptimo de la unidad y para reducir el riesgo
de lesiones. Siga las instrucciones correspondientes al cambio y lubricación de
accesorios. Inspeccione periódicamente el cordón de la producto, y si está dañado,
permita que lo reparen en un establecimiento de servicio autorizado. Inspeccione
periódicamente los cordones de extensión y reemplácelos si están dañados.
Mantenga los mangos secos, limpios y sin aceite ni grasa.
•Compruebe que no haya piezas dañadas. Antes de utilizar el aparato, la protección
o cualquier pieza que esté dañada debería comprobarse cuidadosamente para
determinar que funciona correctamente y que realiza sus funciones. Compruebe la
alineación y el acoplamiento de las piezas móviles, la rotura de piezas, el montaje y
cualquier otro problema que pueda afectar a su funcionamiento. Un protector u otra
pieza que esté dañada debería ser reparada o reemplazada por un Centro de servicio
autorizado a menos que se indique otra cosa en el manual.
7. SERVICIO
•Permitaqueuntécnicodereparacióncalicadopresteservicioalaherramienta
eléctrica, y sólo con piezas de repuesto idénticas. De esta manera se mantiene la
seguridad de la herramienta eléctrica.
ADVERTENCIAS DE SEGURIDAD DEL CORTASETOS DE ALTURA
•Mantenga todas las partes del cuerpo alejadas de la hoja de corte. No retire material
cortado ni sujete material por cortar mientras estén moviéndose las hojas. Asegúrese
de apagar la máquina cuando retire el material atascado. La hoja de corte continúa
girando por inercia después de apagarse la unidad. Un momento de inatención al utilizar
una podadora de setos puede causar lesiones corporales serias.
•Transporte la podadora de setos del mango con la hoja de corte apagada. Un manejo
apropiado de la podadora de setos reduce la posibilidad de que haya lesiones producidas por
las hojas de corte.
•Cuando transporta o almacena la podadora de setos siempre coloque la cubierta
sobre la hoja de la máquina.
•Coloquelamáquinaencendidaensuperciesrmesyaisladasúnicamente,porque
la hoja de corte puede entrar en contacto con cables ocultos o con el cable propio.
Las hojas de corte que entren en contacto con un cable “con carga” puede hacer que la
electricidad se transmita a las piezas metálicas expuestas de la herramienta eléctrica y
puede provocar una descarga eléctrica en el operador.
•Utilice ambas manos para trabajar con la podadora de setos. Si utiliza una sola mano
puede perder el control y terminar en lesiones corporales serias.
•Antes de encender la podadora de setos, asegúrese de que la hoja no esté en contacto
con ningún objeto.
•Apague la unidad, retire el paquete de baterías y asegúrese de que se haya detenido la
hoja antes de poner en reposo la unidad.
•Siempre detenga el motor al retardar un corte o al caminar de un lugar donde esté
cortando a otro.
•Mantenga la unidad libre de recortes de césped y otros materiales. Pueden alojarse en
las hojas de corte.
INSTRUCCIÓN DE SEGURIDAD IMPORTANTE

8
•Guarde la unidad dentro de un lugar seco, ya sea bajo llave o en lo alto para evitar el
uso no autorizado y daños a la misma. Mantenga la unidad fuera del alcance de los
niños y de personas sin capacitación.
•PELIGRO - Garder les mains à l’écart des lames.
•Coloque de nuevo la cubierta de la hoja cuando no tenga en uso la unidad.
•Nunca moje ni rocíe con agua ni con ningún otro líquido la unidad. Mantenga secos,
limpios y sin basura los mangos. Limpie la unidad después de usarla; vea el apartado
Instrucciones para guardar la unidad.
•Mantenga asegurada la unidad mientras la transporta.
•Las herramientas de baterías no necesitan conectarse a una toma de corriente; por
lo tanto, siempre están en condiciones de funcionamiento. Esté consciente de los
posibles peligros incluso si no está encendida la unidad.
•Sólo uso con mango y protección ensamblado apropiadamente podadora de setos. El
uso del podadora de setos sin el protección o el mango apropiados proporcionados puede
tener como resultado herida personal grave.
•Mantenga la cable alejadas de las hojas. Durante el funcionamiento el cable puede ser
ocultado en arbustos y puede ser cortado accidentalmente por la hoja.
ADVERTENCIAS DE SEGURIDAD DE LA PODADORA DE ALTURA
•El contragolpe es una reacción peligrosa de la herramienta que puede ocasionar
lesiones serias. El contragolpe ocurre cuando la cadena en movimiento hace contacto
con un objeto en la parte superior de la punta de la barra, o cuando la madera se
cierra y pellizca la cadena en el punto de corte. El contacto de la parte superior de la
punta de la barra con la madera puede causar que la cadena se clave en el material y se
detenga instantáneamente. El resultado es una reacción súbita en dirección inversa, la cual
lanza la barra guía hacia arriba y hacia atrás, en la dirección donde se encuentra el operador.
Si resulta pellizcada la cadena en la parte superior de la barra guía, ésta puede impulsarse
rápidamente hacia atrás, hacia el operador, lo cual puede causar una pérdida de control
y posibles lesiones graves. No dependa exclusivamente de los dispositivos de seguridad
incorporados en el producto. Con un conocimiento básico del contragolpe de la sierra,
puede reducir o incluso eliminar el elemento sorpresa. La sorpresa súbita contribuye a los
accidentes.
•No utilizar cerca de tendidos eléctricos. Esta unidad no ofrece protección contra
descargas eléctricas en caso de contacto con tendidos eléctricos aéreos. Consulte las
normativas locales para conocer las distancias de seguridad con respecto a tendidos
eléctricos aéreos y asegúrese de que el lugar de trabajo es seguro antes de utilizar la
podadora de altura.
•La sierra de pértiga sólo debe emplearse para cortar madera. Nunca utilice para cortar
de materiales de construcción que no sean madera.
•Asegúrese de que no haya obstrucciones en el área donde esté cortando. No permita
que la punta de la barra guía entre en contacto con ningún tronco, rama, cerca, o cualquier
otra obstrucción al estar operando la sierra. Tenga un sendero planeado de la retirada.
•Mantenga todo el cuerpo alejado de la motosierra. Asegúrese de que el interruptor
está apagado cuando limpie el material atascado. La sierra de cadena sigue moviéndose
después de apagar el interruptor. Un momento de descuido mientras se utiliza la podadora
en altura puede provocar lesiones corporales graves.
INSTRUCCIÓN DE SEGURIDAD IMPORTANTE

9
INSTRUCCIÓN DE SEGURIDAD IMPORTANTE
•Traslade la podadora en altura por el asa con la sierra de cadena detenida. Al
transportar o almacenar la podadora en altura, coloque siempre la cubierta de la
sierra de cadena. Un manejo adecuado de la podadora en altura reducirá las posibles
lesiones corporales provocadas por la sierra de cadena.
•Sostengalapodadoraenalturasolamenteconlassuperciesaisladas,yaquela
motosierra puede tener cables ocultos en su propio cable. Si la sierra de cadena entra
en contacto con un cable bajo tensión podría transmitir esa tensión a las piezas metálicas
expuestas de la podadora en altura y el operario podría recibir una descarga eléctrica.
•Mantenga el cable fuera de la zona de corte. Durante la operación, el cable puede estar
oculto en los arbustos, lo que podría provocar que la sierra lo cortase de forma accidental.
•No utilice la podadora en altura con condiciones meteorológicas adversas,
especialmente si existe riesgo de caída de rayos. Así se reduce el riesgo de alcance por
rayo.
•Para reducir el riesgo de electrocución, nunca debe ser utilizado cerca de líneas de
electricidad. El contacto o la proximidad de redes eléctricas puede causar lesiones graves,
descargas eléctricas e incluso la muerte.
•Emplee siempre ambas manos cuando utilice la podadora en altura. Para evitar una
pérdida de control, la podadora de altura se debe sujetar con las dos manos.
•Emplee siempre protección de la cabeza cuando utilice la podadora en altura por
encima de la misma. La caída de restos puede provocar lesiones corporales graves.
•Alrecogerosostenerlaunidadnosujetelashojasdecorteexpuestasniloslosde
corte.
•Para protegerse de una posible electrocución, no trabaje a menos de 15 metros (50
pies) de cables eléctricos aéreos.
•Antes de arrancar el motor, asegúrese de que no esté tocando ningún objeto la
cadena.
•Para protegerse contra ramas que caen, no se pare directamente debajo de la rama
que se esté cortando. Esta unidad no debe sostenerse a un ángulo superior a 60°
sobre el nivel del suelo.
•Apague el motor y asegúrese de que el aditamento de corte se haya detenido antes de
dejar la unidad en reposo.
•No opere el vio con una mano! La herida grave al operario, a los ayudantes, a los
espectadores, o a cualquier combinación de estas personas puede los resultados de
una operación de mano. Esto vio destinado para el uso a dos manos.
•Tenga extrema precaución al cortar broza pequeña y árboles jóvenes, ya que el
material delgado puede atraparse en la cadena de la sierra y puede latiguear hacia
usted o desequilibrarlo.
•Al cortar una rama que esté bajo tensión, esté alerta al impulso de regreso de la
misma,demaneraquenolepeguecuandoseliberelatensiónpresenteenlasbras
de la madera.
•Para evitar un arranque accidental, nunca traslade la sierra de setos con el dedo en
el interruptor mientras esté conectada. Asegúrese de que el interruptor esté en la
posición de apagado antes de conectar la clavija.

10
INSTRUCCIÓN DE SEGURIDAD IMPORTANTE
GUARDAR ESTAS INSTRUCCIONES
ADVERTENCIA
Use solamente con el mango y la protección adecuadamente montados en el cortasetos.
El uso del cortasetos sin la protección adecuada o el mango puede resultar en lesiones
graves.
ADVERTENCIA(PROPUESTA 65)
Algo del polvo provocado por las lijas, sierras, trituradoras y taladros eléctricos, y otras actividades
de construcción Contiene químicos reconocidos como causantes de cáncer y defectos congénitos
u otros daños en el aparato reproductivo. Algunos ejemplos de estos químicos son:
• Lplomo de pinturas con base de plomo
• Sílice cristalina de ladrillos, cemento y otros productos de mampostería
• Arsénico y cromo de madera tratada con químicos.
El riesgo que corre a la exposición de estos químicos varía dependiendo de la frecuencia con
que realiza estos tipos de trabajos. Para reducir la exposición a estos químicos: trabaje en un
área bien ventilada y con el equipamiento de seguridad aprobado, como por ejemplo máscaras
especialmente diseñadas para ltrar las partículas microscópicas.
11
Es posible que se empleen en este producto algunos de los siguientes símbolos. Le suplicamos
estudiarlos y aprender su signicado. Una correcta interpretación de estos símbolos le permitirá utilizar
mejor y de manera más segura el producto.
SÍMBOLO NOMBRE DENOMINACIÓN/EXPLICACIÓN
V Volts Voltaje
A Amperios Corriente
Hz Hertz Frecuencia (ciclos por segundo)
W Watt Potencia
min Minutos Tiempo
Corriente alterna Tipo de corriente
Corriente continua Tipo o característica de corriente
Lea el manual del operador
Para reducir el riesgo de lesiones, el usuario
debe leer y comprender el manual del
operador antes de usar este producto.
Alerta de seguridad Precauciones para su seguridad.
Cuchillas con lo
Mantenga las manos alejadas de las hojas
aladas móviles.
Alerta de condiciones
húmedas
No exponga la unidad a la lluvia ni la use en l
ugares húmedos.
Utilice protección ocular y
auditiva
Cuando use este equipo, utilice protección
ocular que cumpla con la norma ANSI Z87.1,
así como protección auditiva.
Portez protection pour la tête
Portez un casque de sécurité approuvé pour
protéger votre tête.
Guantes
Cuando maneje la sierra y la hoja de corte,
póngase guantes protectores no deslizantes
para uso pesado.
Calzado de seguridad
Cuando utilice este equipo póngase calzado
de seguridad antideslizante.
Rebote
Cualquier objeto lanzado puede rebotar y
producir lesiones personales o daños físicos.
Evite las cables eléctricos/
Mantenga alejadas a las
personas presentes
¡PELIGRO! ¡Riesgo de electrocución! No
trabaje a menos de 15 m (50 pies) de cables
eléctricos. Mantenga a los circunstantes a una
distancia mínima de 15 m (50 pies)
Peligro de electrocución
Mantener una distancia de seguridad de al
menos 10 m con los cables aéreos.
SÍMBOLOS

Las siguientes palabras de señalización y sus signicados tienen el objeto de explicar los niveles
de riesgo relacionados con este producto.
SÍMBOLOS
12
PELIGRO Indica una situación peligrosa inminente, la cual, si no se evita,
causará la muerte o lesiones serias.
ADVERTENCIA Indica una situación peligrosa posible, la cual, si no se evita,
podría causar la muerte o lesiones serias.
PRECAUCIÓN Indica una situación peligrosa posible, la cual, si no se evita,
podría causar lesiones menores o leves.
PRECAUCIÓN (Sin el símbolo de alerta de seguridad) Indica una situación que
puede producir daños materiales.
SÍMBOLO SEÑAL SIGNIFICADO

13
CONOZCA SU CORTASETOS Y PODADORA DE ALTURA
L’utilisation sécuritaire de ce produit exige une compréhension des renseignements gurant sur
l’outil et contenus dans ce manuel d’utilisation ainsi qu’une bonne connaissance du projet que
vous entreprenez. Avant d’utiliser ce produit, familiarisez-vous avec toutes ses caractéristiques
et les règles de sécurité.
ADVERTENCIA
Si falta o está dañada alguna pieza, no utilice este producto hasta tenerlas todas completas.
Le fait d’utiliser ce produit même s’il contient des pièces endommagées ou s’il lui manque des
pièces peut entraîner des blessures graves.
ADVERTENCIA
No intente modificar este producto ni hacer accesorios no recomendados para la misma.
Cualquier alteración o modificación constituye maltrato, el cual puede causar una condición
peligrosa, y como consecuencia posibles lesiones corporales serias.
FIG.1
Interruptor
On/Off
Botón de
bloqueo
Empuñadura
principal
Cabezal
de sierra
Funda de
la cadena
Asta de
prolongación
Depósito
de aceite
Cabezal
cortasetos
Cuchilla
Funda de
la cuchilla
Ranura
Botón
14
ADVERTENCIA
Antes del montaje, extraiga la batería de la herramienta.
MONTAJE Y DESMONTAJE DE LA BATERÍA (FIG.2)
• Para montar la batería (1), alinéela con la ranura (3) de la herramienta. Deslice la batería por
la ranura y encájela en su alojamiento.
• Para desmontar la batería, presione el pulsador de desenganche (2) y tire para extraerla de
la ranura.
ADVERTENCIA
Para evitar la puesta en marcha involuntaria, desmonte la batería y compruebe que la funda de la
cadena esté montada en la sierra antes de iniciar cualquier tipo de operación. El incumplimiento de
esta norma puede causar lesiones graves.
ABASTECIMIENTO DE LUBRICANTE PARA LA BARA Y LA CADENA (FIG.3)
Use lubricante para barra y cadena. Está diseñado para las cadenas y los sistemas de
lubricación de las mismas, y está formulado para desempeñarse en una amplia gama de
temperaturas sin requerir ninguna dilución.
• Retire la tapa del tanque de aceite de la cadena.
• Cuidadosamente vierta el aceite para la barra y la cadena en el tanque correspondiente.
• Limpie el aceite sobrante.
• Revise el tanque de aceite y llénelo si no tiene aceite.
• Repita el proceso según sea necesario.
NOTA: Esta podadora de altura no trae añadido de fábrica el aceita para la barra y la cadena.
También hay que comprobar el nivel cada 20 minutos de uso y rellenar cuando sea necesario.
No use aceite sucio, usado o contaminado de ninguna forma. Puede dañarse la barra o la
ARMADO
1
FIG.2
2
3
15
ARMADO
cadena. Es normal que el aceite se escurra de la sierra cuando no está ésta en uso. Para evitar
el escur- rimiento, vacíe el tanque de aceite cada vez después de usar la unidad y después
póngalo a funcionar du-rante un minuto. Al guardar la unidad durante un largo período de tiempo
(tres meses o más), asegúrese de lubricar ligeramente la cadena; de esta manera se evita la
oxidación de la cadena y de la rueda dentada de la barra.
ADVERTENCIA
Para conservar los recursos naturales, recicle o deseche apropiadamente el aceite. Pida a
la agencia local de desechos información acerca de las opciones disponibles para reciclaje y
desecho.
I
C
C
I
R
Tapa del tanque
de aceite
Indicador de
nivel de aceite
FIG.3
DISPOSITIVO DE PODA
MONTAJE DEL DISPOSITIVO DE PODA (FIG.4)
El cabezal de la sierra se puede montar directamente en la empuñadura para alcanzar el radio
de acción estándar.
• Alinee la ranura de la parte externa del extremo de acoplamiento de la empuñadura (4) con la
lengüeta de la parte interna del extremo de acoplamiento del cabezal de la sierra (5). Encaje
el cabezal de la sierra (5) en la empuñadura (4).
• Deslice el collarín (6) hacia arriba y gírelo hacia la izquierda para apretarlo a fondo. ¡Atención!
Controle de manera periódica el apriete de los empalmes.
PROLONGACIÓN DE LOS DISPOSITIVOS DE PODA Y CORTASETOS (FIG.5)
La longitud máxima se puede alcanzar introduciendo el asta de prolongación (9) entre el cabezal
de la sierra (8) y el mango (7).
15
FIG.4
5
6
4
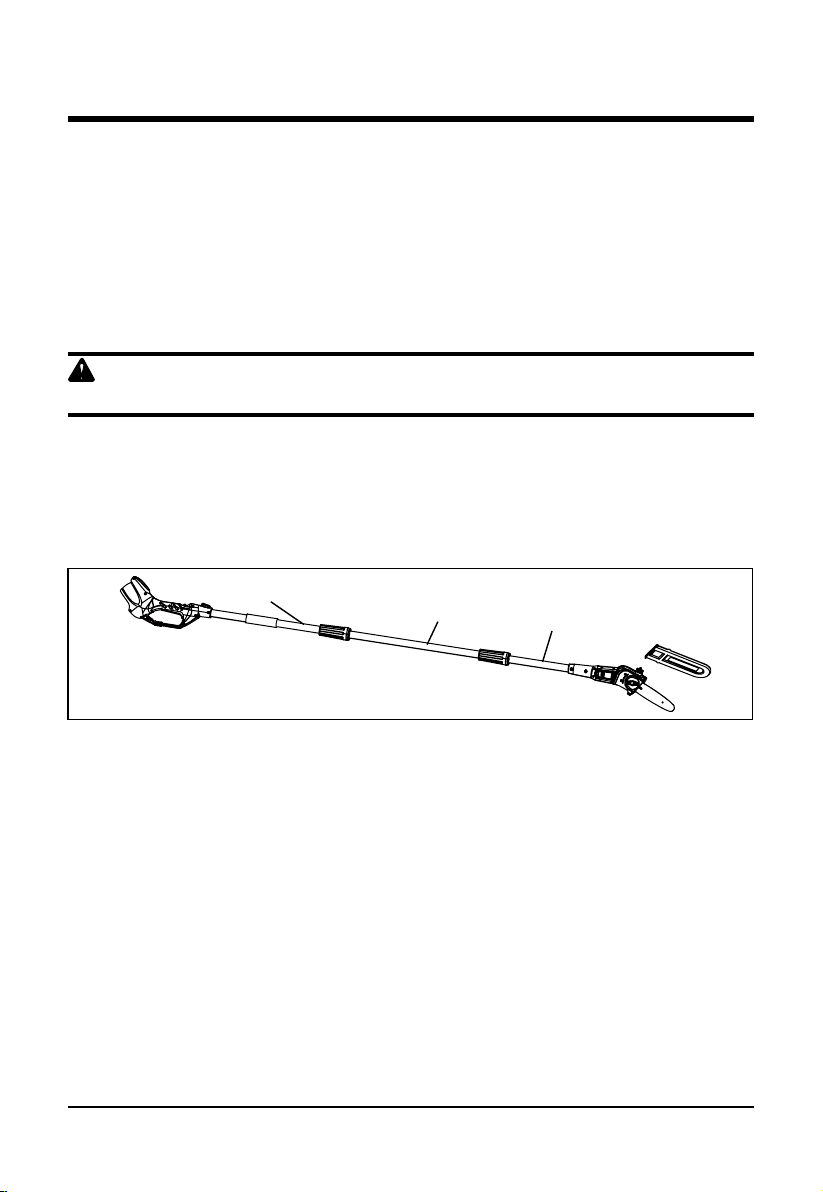
16
ARMADO
• Alinee la ranura de la parte externa del extremo de acoplamiento de la empuñadura (7) con
la lengüeta de la parte interna del extremo de acoplamiento del asta de prolongación (9).
• Encaje el asta de prolongación (9) en la empuñadura (7).
• Deslice el collarín hacia arriba y gírelo hacia la izquierda para apretarlo a fondo.
• Alinee la ranura de la parte externa del extremo de acoplamiento del asta de prolongación (9)
con la lengüeta de la parte interna del extremo de acoplamiento del cabezal de la sierra (8).
• Encaje el cabezal de la sierra (8) en el asta de prolongación (9).
• Deslice el collarín hacia arriba y gírelo hacia la izquierda para apretarlo a fondo.
ADVERTENCIA
Controle de manera periódica el apriete de los empalmes.
DESMONTAJE DEL DISPOSITIVO DE PODA (FIG.5)
Cuando el asta de prolongación (9) está instalada, es necesario desmontar en primer lugar el
dispositivo de poda.
• Para desmontar el dispositivo de poda (8), apoye la empuñadura (7) en el suelo, aoje el
collarín y desmonte el cabezal.
16
FIG.5
7
8
9

ARMADO
17
TENSIÓN DE LA CADENA (FIG.6)
La cadena se alarga durante el uso, compruebe con frecuencia la tensión y restablézcala si es
necesario. No tense la cadena si está calienta ya que las cadenas se acortan al enfriarse; si lo
hace, la cadena, la barra y la sierra pueden dañarse.
PERILLA DE
BLOQUEO
BLOQUE DE
AJUSTE
1. Libere la tensión de la cadena
girando el tornillo de ajuste de
tensión, situado detrás de la barra
de cadena, hacia la izquierda.
2. Aoje la perilla de bloqueo.
3.Retire la cubierta.
4. Ahora puede retirar la barra y la
cadena levantándolas del cuerpo
principal de la sierra y soltando la
cadena del piñón.
5. Ahora puede limpiar la sierra de
pértiga con un cepillo y/o un trapo o
eliminar el serrín y el aceite.
6.Para volver a colocar la barra y
la cadena, forme un bucle con la
cadena sobre el piñón y coloque la
barra en contra la ranura central de
alineación.
7. Asegúrese de que el bloque de
ajuste se encuentra en el oricio de
tensado de la barra de cadena.
8. Hasta que el bloque de goma y la
barra de la cadena no tienen aceite,
puesto que esto ayuda a mantener
la tensión en la cadena.
9. Vuelva a colocar la cubierta lateral
y la perilla de bloqueo, pero no la
apriete.
10. Gire el tornillo de ajuste de
tensión hacia la derecha con un
destornillador.
11. Apriete hasta que haya suciente
juego para que pueda retirarse la
cadena de la barra, pero no tanto
como para que las guías puedan
salirse de la barra.
12. Una vez tenga la tensión correcta,
apriete completamente el botón de
bloqueo.
FIG.6
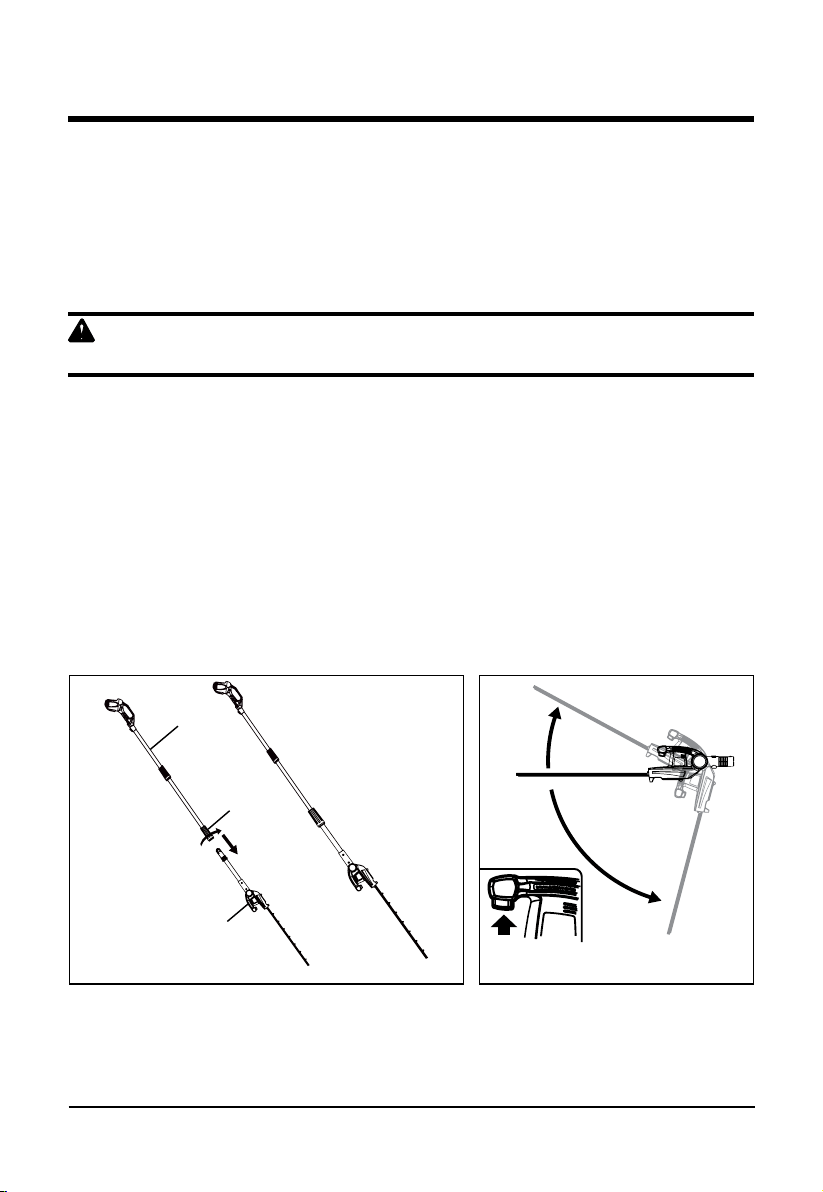
ARMADO
18
DISPOSITIVO CORTASETOS
MONTAJE DEL DISPOSITIVO CORTASETOS (FIG.7)
• Alinee la echa del extremo de la empuñadura principal (10) con la echa del cabezal
cortasetos (11).
• Encaje el cabezal cortasetos (11) en la empuñadura (10) de manera que alcance la línea roja.
• Apriete el bloqueo de la leva del cabezal cortasetos.
ADVERTENCIA
Controle de manera periódica el apriete de los empalmes.
DESMONTAJE DEL DISPOSITIVO CORTASETOS (FIG.7)
Apoye la empuñadura (10) en el suelo, aoje el bloqueo de la leva del dispositivo cortasetos,
presione el pulsador de bloqueo y extraiga el dispositivo cortasetos (11).
REGULACIÓN DEL ÁNGULO DEL DISPOSITIVO CORTASETOS (FIG.8)
El dispositivo cortasetos se puede girar 105° y bloquear en 7 posiciones distintas.
• Pulse el botón regulador.
• Mientras pulsa el botón regulador, mueva el cabezal hacia delante o hacia atrás.
• Una vez que el cabezal esté en la posición pretendida, suelte el botón regulador.
-30º
0º
75º
FIG.7
FIG.8
Botón
Regulador
11
12
10
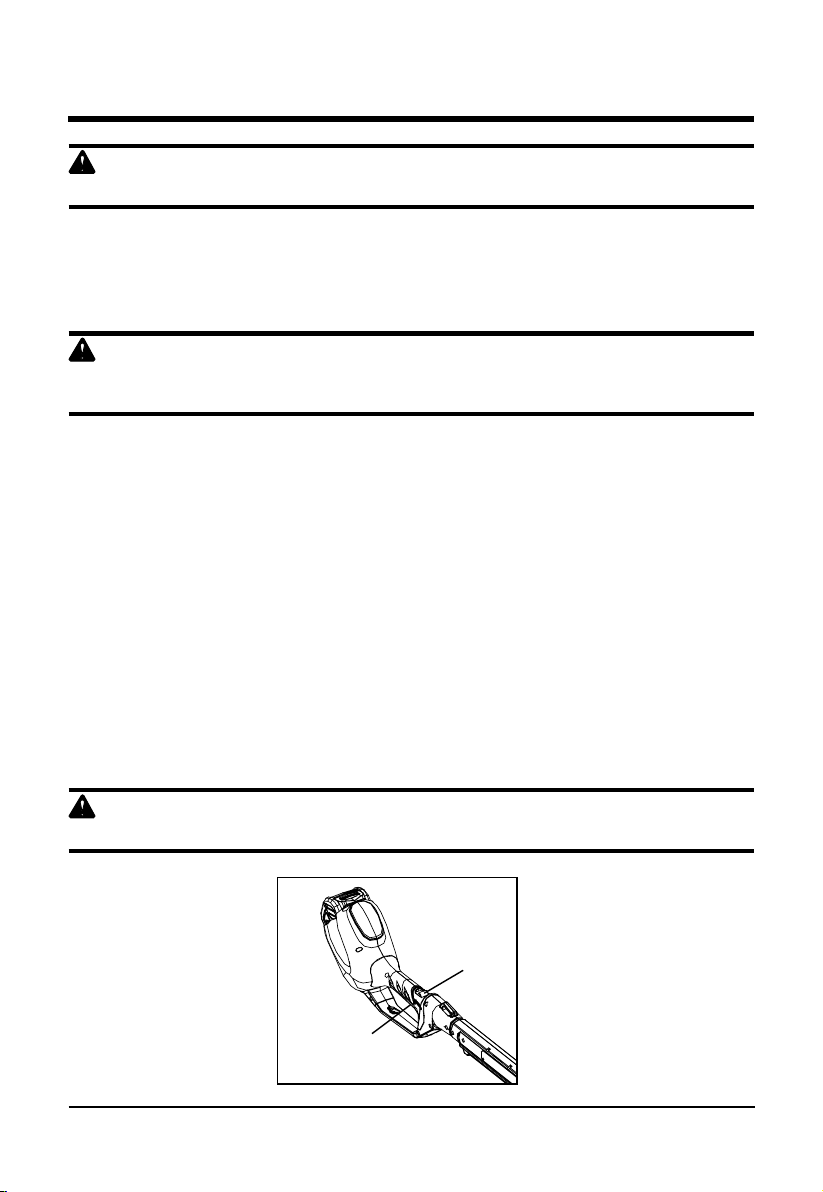
FUNCIONAMIENTO
19
ADVERTENCIA
Deje funcionar la herramienta al régimen de velocidad adecuado. No ejerza excesiva fuerza.
CARGA DE LA BATERÍA
Cargue la batería antes de utilizarla por primera vez y siempre que no genere la potencia
suciente para que la herramienta efectúe los mismos cortes que antes completaba con
facilidad. La batería se puede calentar durante el proceso de carga y no es indicio de anomalía.
ADVERTENCIA
No cargue la batería cuando la temperatura ambiente no alcance los 45 °F o supere los 104 °F. La
temperatura ideal de carga es 75 °F aproximadamente.
NOTA: El cargador no carga la batería si la temperatura de la celda no alcanza los 45 °F o
supera los 104 °F. Es necesario dejar la batería montada en el cargador para que el proceso de
carga se inicie en automático cuando la celda alcanza una temperatura incluida en el campo de
valores especicados.
ENCENDIDO Y APAGADO (FIG.9)
Para garantizar una mayor seguridad, esta herramienta incorpora un sistema doble de
encendido. Este sistema impide el encendido involuntario de la herramienta.
ENCENDIDO
• Desplace hacia atrás el pulsador de bloqueo (14) con el pulgar y al mismo tiempo presione el
interruptor on/off (13).
• Suelte el pulsador de bloqueo (14).
APAGADO
• Suelte el interruptor on/off (13).
ADVERTENCIA
No intente bloquear el interruptor en la posición de encendido.
FIG.9
13
14
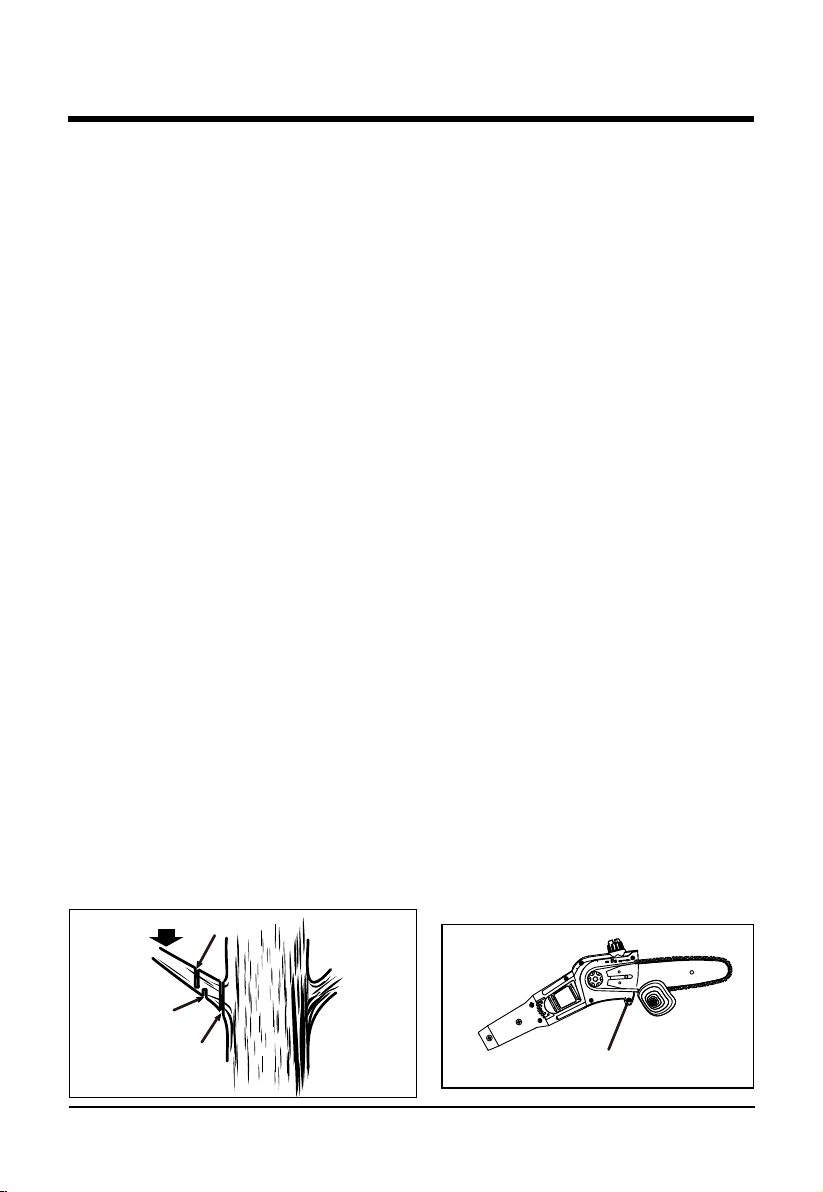
FUNCIONAMIENTO
20
FUNCIONAMIENTO DE LA PODADORA DE ALTURA
PREPARACIÓN PARA EL CORTE
• Póngase guantes antideslizantes para lograr la máxima capacidad de sujeción y protección.
• Mantenga una sujeción adecuada de la sierra siempre que esté funcionando el motor. Con
la mano derecha sujete rmemente el mango posterior mientras sujeta rmemente el mango
delantero con la izquierda.
• Sujete la sierra rmemente con ambas manos. Siempre mantenga la mano izquierda en el
mango del frente y la mano derecha en el mango posterior, de manera que su cuerpo quede
a la izquierda del plano de la cadena. Nunca use sujete la unidad a zurdas (con la posición de
las manos intercambiada), ni con el cuerpo en ninguna postura que pueda colocar el mismo o
el brazo a través del plano de la cadena.
• Nunca se pare directamente abajo de la rama que va a cortar.
• Asegúrese de que esté bien apretada la casquillos antes de utilizar el equipo; verique
periódicamente el aprieta de los mismas durante el uso para evitar lesiones graves.
PROCEDIMIENTO BÁSICO DE CORTE (FIG.10&11)
Siga los pasos descritos abajo para evitar dañar la corteza del árbol o arbusto. No realice un
movimiento de vaivén como en el aserrado.
• Primero efectúe un corte supercial (1/4 del diámetro de la rama) en el lado inferior de la rama,
cerca de la rama progenitora o del tronco.
• Realice el segundo corte en el lado superior de la rama, por el lado exterior del primer corte
con respecto al tronco. Continúe el corte a través de la rama, hasta que se separe del árbol.
Esté preparado para equilibrar el peso de la herramienta cuando se caiga la rama.
• Efectúe el corte nal cerca del tronco.
NOTA: Para los cortes segundo y nal (por la parte superior de la rama), sostenga la guía de
corte del frente contra la rama que se está cortando. Esto ayuda a evitar que se mueva la rama
y facilita el corte. Permita que la cadena efectúe el corte; sólo aplique una leve presión hacia
abajo. Si fuerza el corte, puede dañares la barra, la cadena o el motor.
• Suelte el gatillo tan pronto como se termine el corte.
Si no se sigue el procedimiento correcto de corte, la barra y la cadena se atoran y quedan
pellizcadas o atrapadas en la rama. Si sucede esto:
• Apague el motor y desconecte la clavija de la fuente de corriente.
• Si la rama se puede alcanzar desde el suelo, levante la rama mientras se sostiene el sierra. De
esta manera se aoja el “pellizcamiento” y se libera la sierra.
• Si la sierra aún sigue atorada, solicite la ayuda de un profesional.
FIG.10
FIG.11
CARGA
SEGUNDO CORTE
CORTE FINAL
GUÍA DE CORTE
PRIMER CORTE
1/4 DEL DIÁMETRO
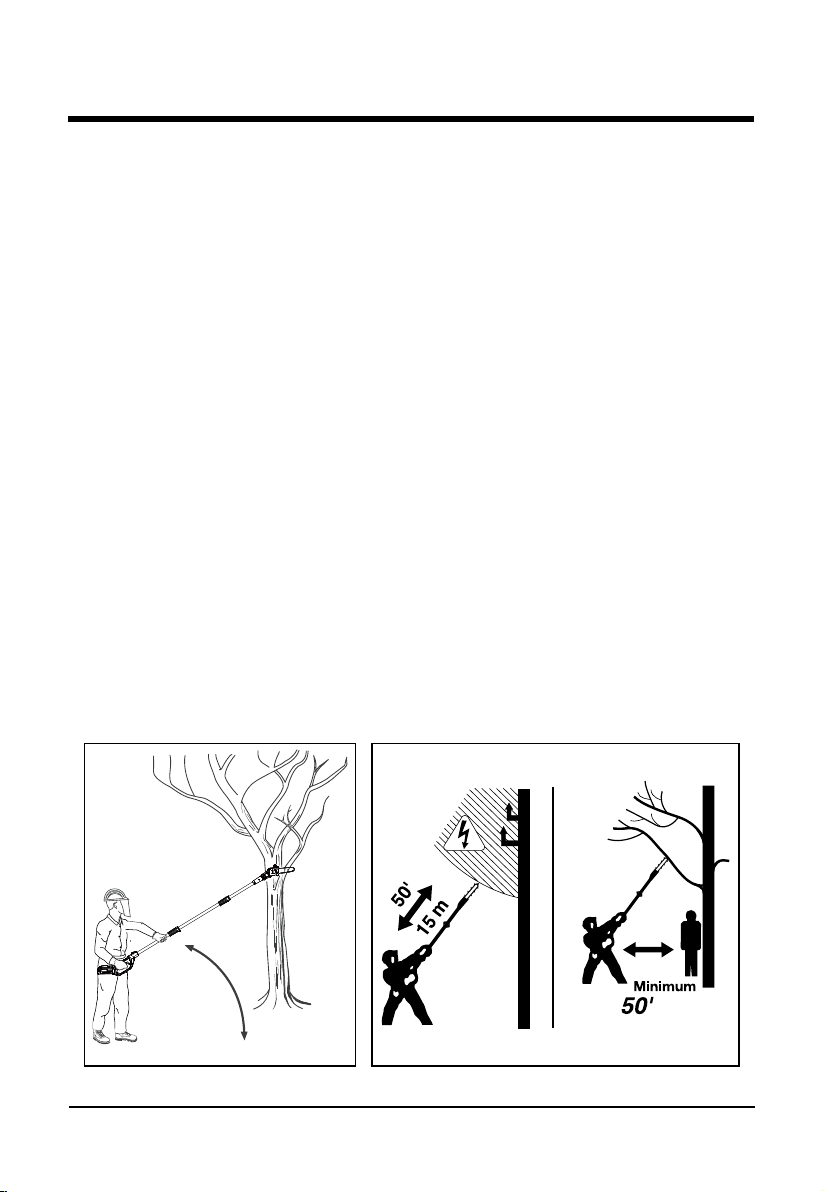
FUNCIONAMIENTO
21
DESRAMADO Y PODA (FIG.12&13)
Esta unidad se diseñó para podar pequeñas ramas hasta de 152 mm (6 pulg.) de diámetro. Para
obtener mejores resultados, observe las siguientes precauciones.
• Planique cuidadosamente el corte. Tenga en cuenta la dirección en que caerá la rama.
• Las ramas pueden caer en direcciones inesperadas. No se pare directamente bajo la rama que
esté cortando.
• El corte más común es colocando la unidad a un ángulo de 60° o menos, según cada situación
en particular, como se demuestra. Conforme aumenta el ángulo del brazo de la sierra con
respecto al suelo, aumenta la dicultad para efectuar el primer corte (por la parte inferior de la
rama).
• Corte en varias etapas las ramas largas.
• Corte primero las ramas inferiores para dar más espacio para la caída de las ramas superiores.
• Trabaje lentamente, manteniendo ambas manos en la sierra y sujetándola rmemente.
Mantenga bien apoyados los pies y bien equilibrado el cuerpo.
• Mantenga el árbol entre usted y la cadena mientras realice el desramado. Corte la rama desde
el lado opuesto del árbol.
• No realice tareas de corte subido en una escalera, ya que es extremadamente peligroso. Deje
tal operación a los profesionales.
• No realice el corte de una rama junto a la rama o tronco de donde sale, sino hasta que haya
recortado la primera para reducir el peso de la misma. Si se siguen los procedimientos de corte
correctos se evita desprender la corteza del miembro progenitor.
• No utilice la sierra para tala ni para tronzar.
• Para protegerse de una posible electrocución, no trabaje a menos de 15 m (50 pies) de cables
eléctricos aéreos.
• Mantenga a los circunstantes a una distancia mínima de 15 m (50 pies).
(15 m)
FIG.12 FIG.13
60° MAXIMUM
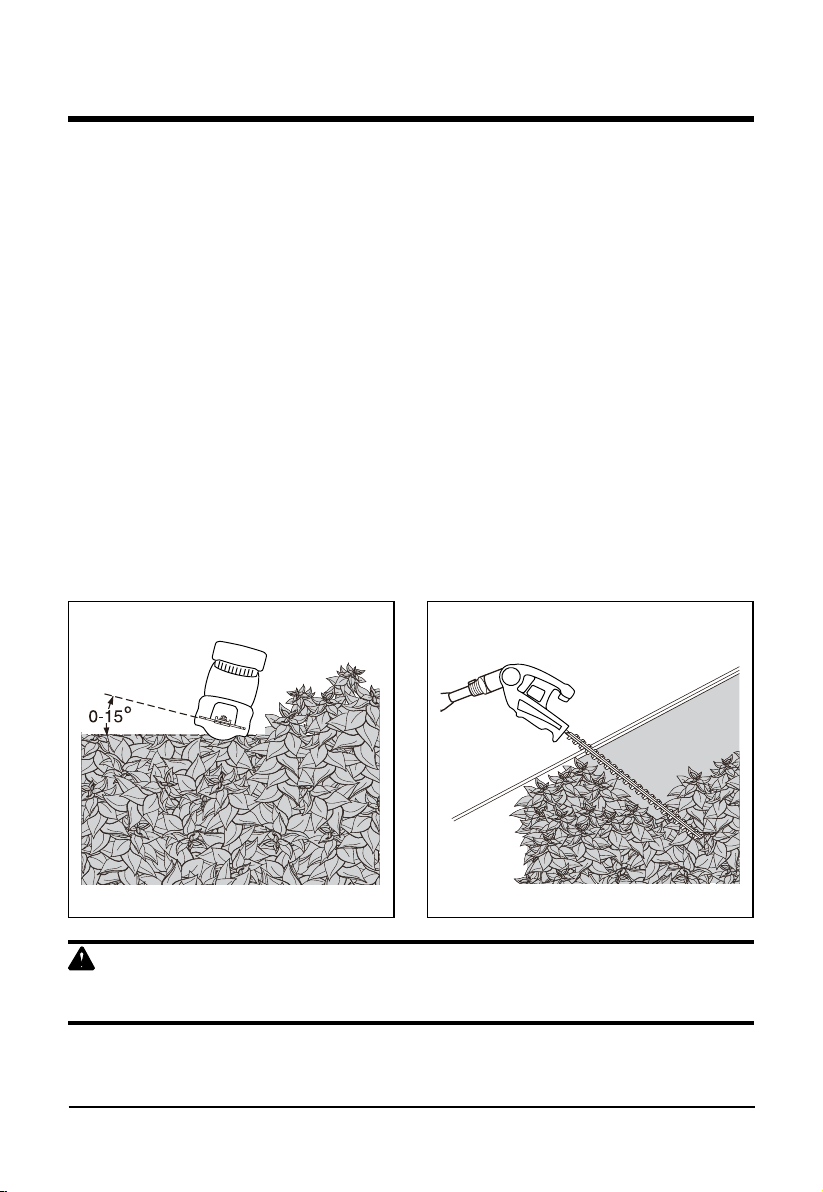
FUNCIONAMIENTO
22
EL FUNCIONAMIENTO DE LA PODADORA DE ALTURA
CONSEJOS DE USO
• Empiece a cortar por la parte superior del seto. Incline ligeramente la herramienta
(aproximadamente 15° en relación de la línea de corte) de manera que la punta de las
cuchillas esté orientada hacia el seto (FIG.14). De esta forma, las cuchillas efectuarán el corte
de manera más ecaz. Sujete la herramienta con la inclinación deseada y desplácela a lo largo
de la línea de corte. Las cuchillas de ambos lados permiten cortar en ambos sentidos.
• Para obtener un corte recto, extienda una cuerda a lo largo del seto a la altura deseada. Utilice
la cuerda como guía para cortar el seto a unos centímetros por encima de ella.
• Para obtener lados uniformes, corte hacia arriba en la dirección del crecimiento. Los brotes se
desplazan hacia el exterior si la cuchilla corta hacia abajo y ello genera zonas vacías en el seto
(FIG.15).
• Evite los objetos extraños. Evite el contacto con objetos duros como, por ejemplo, hilos
metálicos y barandillas, ya que pueden dañar las cuchillas.
• Lubrique las cuchillas de manera periódica.
• Pode los setos y los arbustos de hoja caduca en junio y octubre.
• Pode los setos y los arbustos de hoja perenne en abril y agosto.
• Pode las coníferas y los arbustos de crecimiento rápido cada seis semanas de mayo a octubre.
• Pode los setos y los arbustos de hoja caduca en diciembre y marzo.
ADVERTENCIA
Mantenga las manos alejadas de la hoja. Si entra en contacto con la hoja se pueden
producir lesiones personales graves.
FIG.14 FIG.15
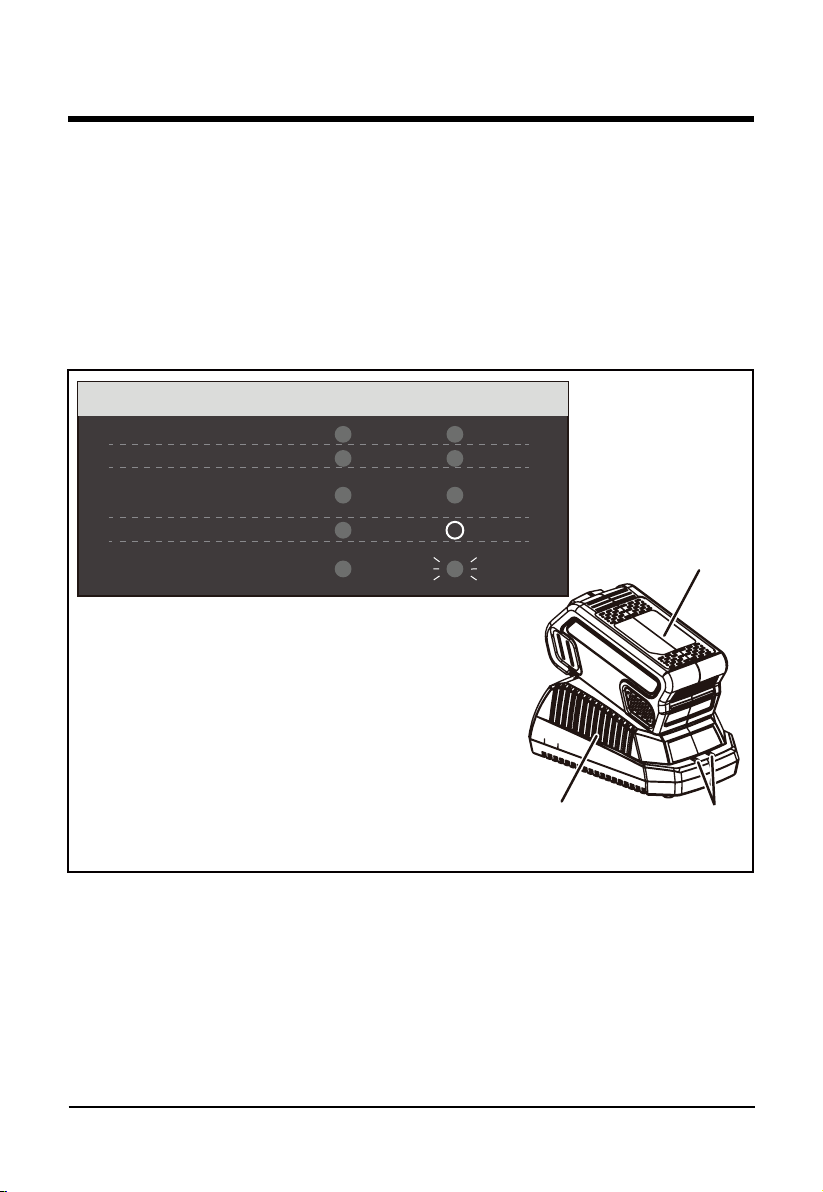
CARGADOR DE PILAS
23
PROCEDIMIENTO DE CARGA ((Ver Imagen 16.)
NOTA: L a batería no se suministra completamente cargada. Se recomienda cargar totalmente
antes de la primera utilización para garantizar que se pueda alcanzar el tiempo máximo de
funcionamiento. Esta batería de litio-ión no tiene memoria y se puede recargar en cualquier
momento.
1. Enchufe el cargador en un tomacorriente de CA.
2. Coloque el paquete de baterías (1) en el cargador (2).
Este es un cargador con diagnóstico. Las lámparas LED (3) del cargador se iluminan de acuerdo
a un orden especíco para indicar el estado actual de la batería. Ellos son los siguientes:
Nota de defecto falso:
Cuando la batería esté insertada en el cargador y el
LED de estado parpadee, retire la batería del cargador
durante 1 minuto y luego vuelva a insertarla. Si el LED
de estado i ndica normal, la batería está en correcto
estado. Si el LED de estado sigue parpadeando, retire
la batería y desenchufe el cargador. Espere 1 minuto,
vuelva a enchufar el cargador de nuevo y, a continuación,
reinserte la batería. Si el LED de estado indica normal,
la batería está en correcto estado. Si el LED de estado
sigue parpadeando, signica que la batería es defectuosa
y necesita reemplazarse.
3
1
2
PROCEDIMIENTO PARA CARGAR (INDICADOR LED)
LA BATERÍA SE ESTÁ CARGANDO: ROJO ROJO
VERDE
APAGADO
VERDE
PARPADEANDO
ANARANJADO
ROJO
ROJO
ROJO
ROJO
COMPLETAMENTE CARGADA:
NO HAY BATERÍA PRESENTE:
LA BATERÍA ESTÁ MUY CALIENTE:
MINUTOS PARA PERMITIR QUE SE ENFRÍE
BATERÍA DEFECTUOSA:
(SI ESTO PASA QUÍTELA Y REEMPLÁCE
LA POR UNA NUEVA)
FIG.16
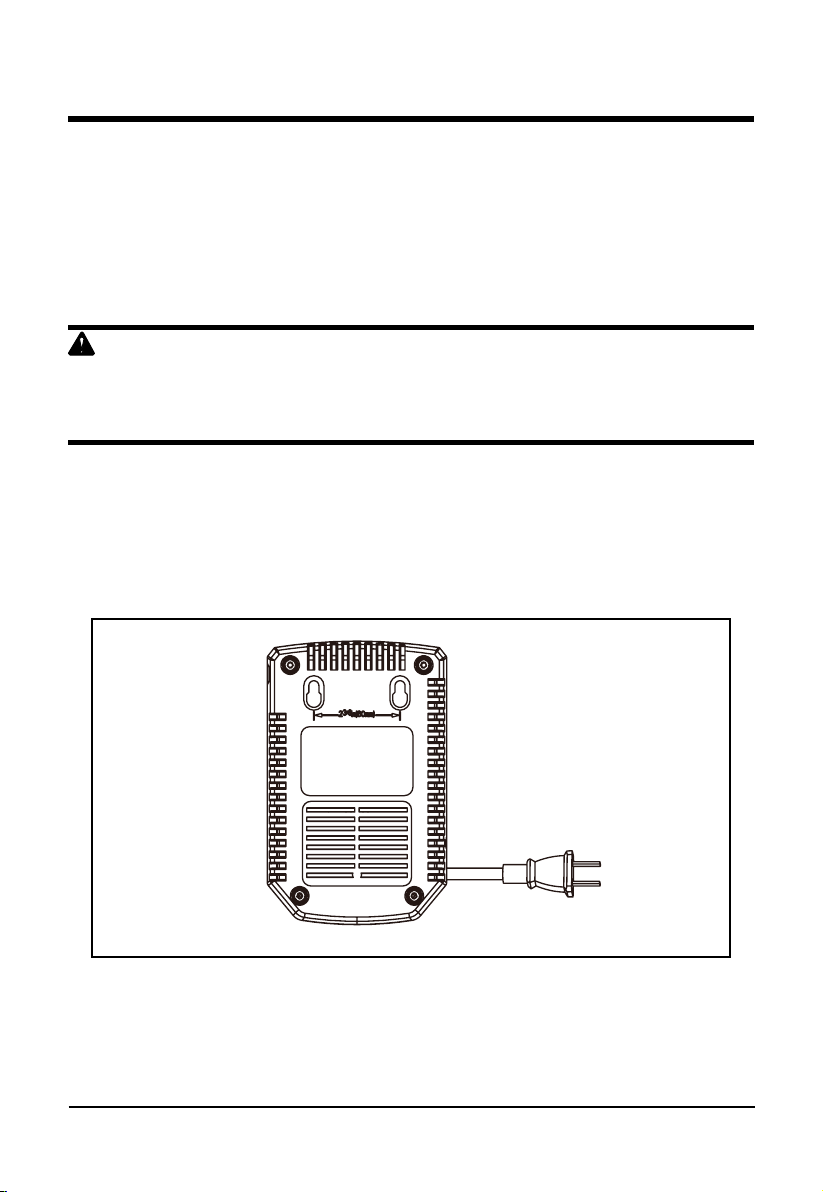
CARGADOR DE PILAS
24
COMPROBACIÓN DE LA CARGA
Si la batería no se recarga adecuadamente:
• Compruebe la corriente de la toma con otro aparato eléctrico. Asegúrese de que la toma está
encendida.
• Compruebe que no haya residuos ni elementos extraños interriendo en las conexiones del
cargador.
• Si la temperatura del aire es mayor que 100°F (37.77°C) o menor que 45°F (7.2°C), coloque
el cargador y la batería en un lugar que esté a temperatura ambiente.
ADVERTENCIA
Si se inserta la batería en el cargador estando caliente, se enciende la luz LED del indicador
de CARGA del cargador y se pone ROJO. Si esto su cede, deje enfriar la batería dentro del
cargador durante aproximadamente 30 minutos. La batería empezará a cargar una vez que esté
a temperatura ambiente.
MONTAJE DEL CARGADOR (Ver Imagen 17.)
1. Este cargador se puede instalar en una pared atornillándolo con dos tornillos (no incluidos).
2. Localice el lugar en el que quiere colgar el cargador.
3. Si la pared es de madera, utilice dos tornillos especiales para madera.
4. Perfore dos agujeros a unos 6 cm del centro asegurándose de que están al mismo nivel.
5. Si la pared es de yeso, utilice anclajes y tornillos especiales para colgarlo.
NOTA: Si no va a utilizar la batería y el cargador durante un periodo largo de tiempo, retire la
batería del cargador y desenchufe el cable de alimentación de CA.
FIG.17

MANTENIMIENTO
25
LIMPIEZA, MANTENIMIENTO Y ALMACENAMIENTO
Su herramienta se ha diseñado para poder ser utilizada durante periodos de tiempo prolongados
con un mantenimiento mínimo. Para garantizar un funcionamiento óptimo y prolongado, es
necesario limpiarla de manera regular y cuidarla con atención. El cargador de batería no
necesita mantenimiento; sólo es necesario limpiarlo con regularidad.
ADVERTENCIA
Antes de iniciar cualquier tipo de operación de mantenimiento, desmonte la batería de la
herramienta. Desconecte el cargador de baterías antes de limpiarlo, tras el uso y antes del
almacenamiento.
Al terminar de utilizar la herramienta
• Al terminar de utilizar la herramienta, limpie a fondo las cuchillas. Una vez limpias, aplique
una película de grasa para máquinas con objeto de evitar que las cuchillas se oxiden.
• Limpie de manera periódica las rejillas de ventilación de la herramienta con un cepillo suave
o un paño seco.
• Limpie con regularidad el cárter del motor con un paño húmedo. No utilice detergentes
abrasivos que contengan disolventes.
• Antes y después del uso, compruebe que los residuos no hayan bloqueado los interruptores.
ALMACENAMIENTO
Antes de almacenar o transportar la sierra de cadena, coloque siempre la funda de protección
en la cuchilla de la sierra. Si no va a utilizar la herramienta durante algunos meses, deje la
batería conectada al cargador. En caso contrario, realice las siguientes operaciones:
• Cargue completamente la batería.
• Desmonte el grupo de la batería de la herramienta.
• Guarde la herramienta y la batería en un lugar seguro y seco. La temperatura de
almacenamiento debe estar comprendida entre 50 y 104 °F. Coloque la batería sobre una
supercie horizontal. Antes de utilizar la herramienta tras un largo periodo de inactividad,
cague la batería al máximo.

26
ELIMINACIÓN SEGURA DE LA BATERÍA
Las baterías utilizadas en esta herramienta contienen los siguientes materiales tóxicos y
corrosivos: Litio-ión, un material tóxico.
ADVERTENCIA
Todos los materiales tóxicos deben ser desechados de forma especíca para evitar contaminar
el medio ambiente. Antes de desechar una batería de litio-ión estropeada o gastada, póngase en
contacto con el organismo encargado del tratamiento de residuos más próximo o con su agencia
de protección medioambiental para informarse y solicitar instrucciones específicas. Recicle las
baterías en un centro o dispositivo adecuado, autorizado para el tratamiento de ión-litio.
ADVERTENCIA
Si la batería se agrieta o se rompe, con o sin escapes, no la recargue ni la utilice.
Deséchela y sustitúyala por una batería nueva. ¡NO INTENTE REPARARLA!
Para evitar lesiones y riesgos de incendio, explosión o shock eléctrico, así como dañar el medio
ambiente:
• Cubra los terminales de la cubierta de la batería con cinta adhesiva resistente.
• NO intente retirar ni destruir componentes de la batería.
• NO intente abrir la batería.
• Si aparece una grieta, los electrolitos que se liberan son corrosivos y tóxicos. NO permita
que la solución entre en contacto con los ojos o la piel y no la ingiera.
• NO tire estas baterías a la basura.
• NO las incinere.
• NO las ponga donde puedan acabar en el basurero o en una línea de tratamiento de
residuos municipal.
• Llévelas a un centro ocial de reciclaje o recogida de desechos.

27
SOLUCIÓN DE PROBLEMAS
DISPOSITIVO CORTASETOS
PROBLEMA CAUSAS POSIBLES SOLUCIÓN
La herramienta no se pone
en marcha
Batería mal instalada. Controle la instalación de la
batería.
Batería descargada. Cargue totalmente la batería
siguiendo las instrucciones del
Manual del cargador.
Pulsador de bloqueo no
activado.
Antes de pulsar el botón de on/
off, libere el bloqueo del botón.
Conexiones entre los polos mal
apretadas.
Controle las conexiones.
DISPOSITIVO DE PODA
PROBLEMA CAUSAS POSIBLES SOLUCIÓN
La cadena se recalienta en
la parte nal de la barra y
genera humo.
Compruebe que la cadena no
esté excesivamente tensada.
Depósito de aceite lubricante
vacío.
Vuelva a tensar la cadena.
Consulte el capítulo "Cómo
tensar la cadena" de este
manual. Controle el depósito de
aceite lubricante de la barra.
El motor funciona pero la
cadena no gira.
La cadena está excesivamente
tensada. Controle la barra de
guía y el grupo de la cadena.
Controle si la barra de guía y la
cadena están dañadas.
Vuelva a tensar la cadena.
Consulte el capítulo "Cómo tensar
la cadena" de este manual.
Consulte el capítulo "Sustitución
de la barra y la cadena" de este
manual. Controle si la barra de
guía y la cadena están dañadas.

28
GARANTÍA LIMITADA
Por este medio y por un período de cuatro años GREENWORKS™ garantiza este producto
contra defectos en materiales, piezas o mano de obra al comprador original que cuente con
una prueba de compra . GREENWORKS™, a su propio criterio, reparará o reemplazará todas
y cada una de las piezas que estén defectuosas, mediante un u so normal, sin cargo alguno
para el cliente. Esta garantía sólo es válida para las unidades que se hayan utilizado para uso
personal que no hayan sido contratadas o alquiladas para uso industrial/comercial, y que se
hayan mantenido de acuerdo con las instrucciones del manual de propietario suministrado con
el producto nuevo.
ARTÍCULOS NO CUBIERTOS POR LA GARANTÍA AL CONSUMIDOR:
1. Cualquier pieza que haya resultado inoperativa debido al mal uso, abuso, negligencia,
accidente, mantenimiento inadecuado, o modicación, o
2. La unidad, si no se ha utilizado y/o mantenido de acuerdo con el manual de propietario, o
3. Desgaste normal, excepto como se indica a continuación;
4. Elementos de mantenimiento rutinario tales como lubricantes, alado de cuchillas;
5. El deterioro normal del acabado exterior debido al uso o la exposición.
LÍNEA TELEFÓNICA PARA AYUDA DE GREENWORKS (1 888 90WORKS):
Se puede obtener servicio relacionado con la garantía llamando de lunes a viernes el
1-888-909-6757 (1-888-90WORKS).
GASTOS DE TRANSPORTE:
Los gastos de transporte para el movimiento de cualquier unidad de equipos motorizados o
accesorio son responsabilidad del comprador. Es responsabilidad del comprador pagar los
gastos de transporte para cualquier pieza enviada para reemplazo bajo esta garantía a menos
que GREENWORKS solicite dicha devolución por escrito.

29
PLANO DE DESPIECE
DISPOSITIVO CORTASETOS

30
PLANO DE DESPIECE
DISPOSITIVO DE PODA

31
LISTA DE PIEZAS
ELEMENTO Nº PIEZA Nº DESCRIPCIÓN QTY
1 34110648 Cubie rta de la cuchilla 1
2 31104258 Cortasetos 1
DISPOSITIVO CORTASETOS

32
LISTA DE PIEZAS
DISPOSITIVO DE PODA
ELEMENTO Nº PIEZA Nº DESCRIPCIÓN QTY
1 31111258 Conjunto de cubierta lateral 1
2 32901320 Cadena de 8" 1
3 32902320-7 Barra guía de 8” 1
4 34112320-2 Funda 1
5 3290875 Resorte Φ10 1
6 33902102-2 Rueda dentada 1
7 31112258 Tapón del depósito de aceite 1
8 31113258 Asamblea de poste superior 1
9 31103258 Asamblea de mango 1
10 31102257 Asamblea de poste media 1

LÍNEA GRATUITA LÍNEA DE AYUDA: 1-888-90WORKS (888.909.6757)
Rev: 00 (01-11-16) Impreso en China en papel reciclado de 100%
Greenworks Tools
P.O. Box 3130
Mooresville, North Carolina 28117
