Instruction Sheet W10408722 Rev B 2/13
INSTALLATION AND WIRING INSTRUCTIONS
for Pluggable Motor Replacement
1
Kit Contains:
NOTE TO THE INSTALLER: This motor kit is an authorized FSP service replacement part for your application. The motor in this
kit may or may not be identical to your original motor. If your original motor had the pluggable motor switch (See Figures 2B
and 2C), replace with the service motor in the same manner as you removed the defective motor. If the defective motor has the
switch where the wire leads from the main harness connect to the motor switch individually, follow instructions below.
1. Unplug the dryer or disconnect power.
2. Remove failed motor using standard motor removal
procedures.
NOTE: If the pulley is supplied with the replacement motor,
proceed to step 4.
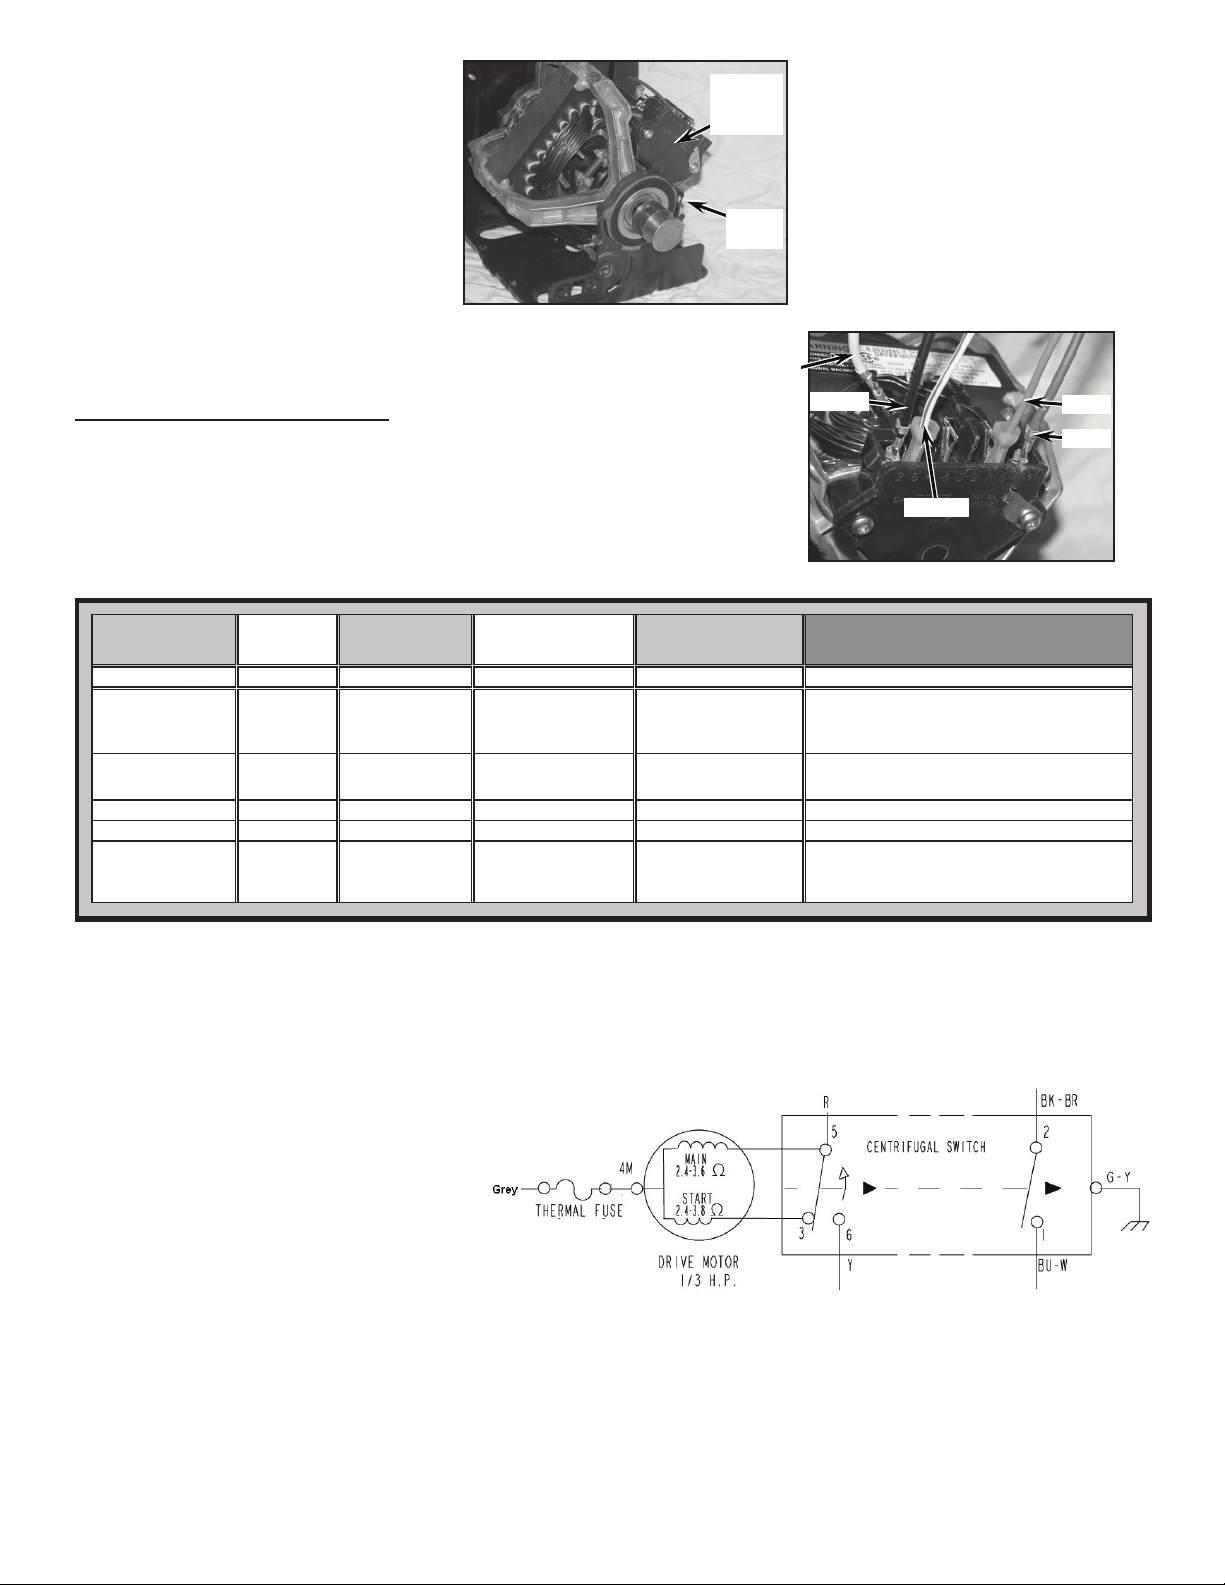
3. A drum belt pulley may not be supplied with the new
replacement motor. With a hex key, remove the pulley from
the failed motor and install it on the replacement motor. Be
sure to push the pulley onto the motor shaft, align with idler,
and tighten the setscrew securely in place. See Figure 1.
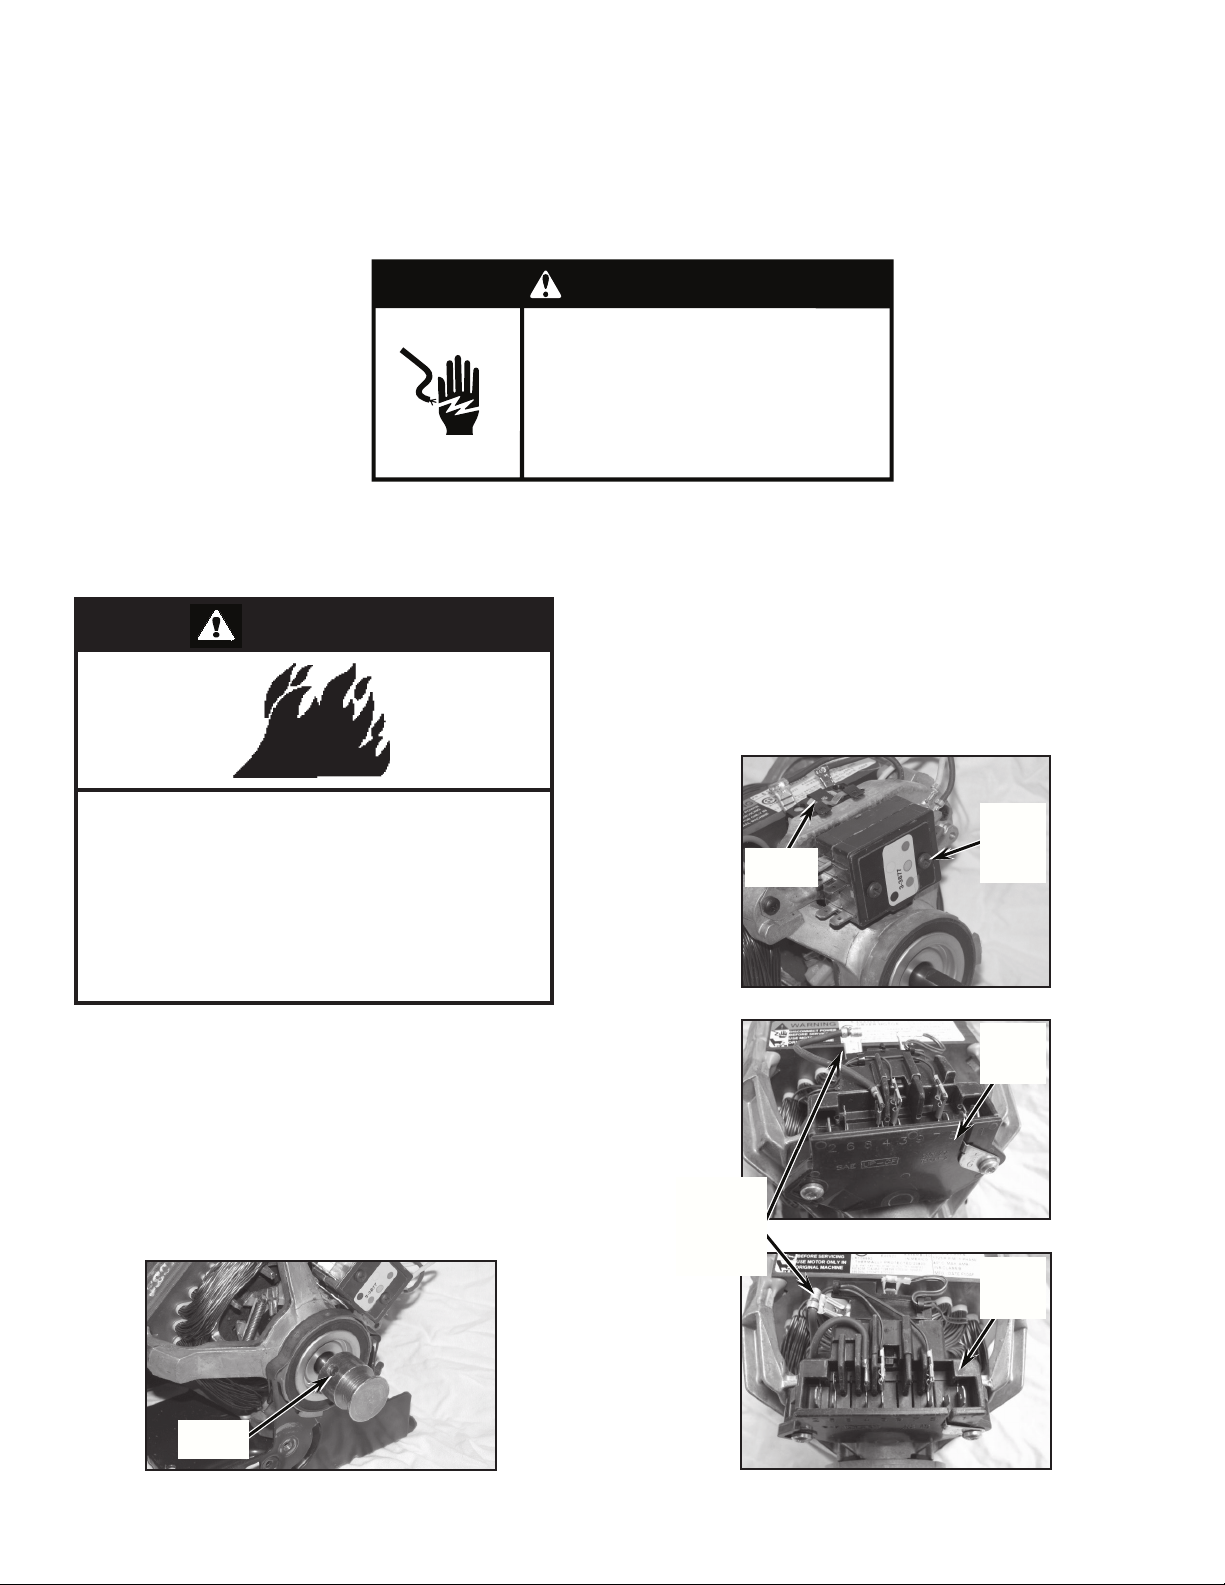
4. Compare and note difference between the motor switch
of the failed motor and the switch of the new replacement
motor. See Figures 2A, 2B, & 2C. If the switches are the
same, simply install the motor in reverse order of removing
the defective motor. If not, proceed to step 5.
NOTE: Overload protector is part of the pluggable switch on the
replacement motor and separate on the old motor switch.
1 Motor Assembly
2 1/8” Female Terminals (Insulated)
1 Instruction Sheet
Fire Hazard
Do not under any circumstances attempt to remove
or replace the motor switch from this pluggable
service motor. The switch is a non-serviceable
component.
Failure to do so can result in death, serious injury,
or re.
WARNING
WARNING
Electrical Shock
Hazard
Disconnect power before servicing.
Failure to do so can result in death
or electrical shock.
Replace all parts and panels before
operating.
FIGURE 1
PULLEY
SETSCREW
(continued)
FIGURE 2B (REPLACEMENT MOTOR)
FIGURE 2C (REPLACEMENT MOTOR)
FIGURE 2A (FAILED MOTOR)
OLD PLUG
DISCRETE
CONNECT
SWITCH
NEW PLUG
CONNECT
SWITCH
NEW PLUG
CONNECT
SWITCH
NOTE: 2
POSSIBLE 1/4”
OVERLOAD
PROTECTOR
TAB LOCATIONS
OVERLOAD
PROTECTOR
2
5. Position motor as show in Figure 3. Align
the tab of the motor to the slot of the motor
bracket. Note the location of the motor
switch (switch orientation may vary).
WIRING INSTRUCTIONS
6. Follow Figure 4 and the chart below to assure proper installation of replacement
motor.
NOTE: When reterminating connections, cut lead wire as close to the terminal as
possible and strip wires back approximately 1/4”. Using barrel crimpers, crimp the
1/8” insulated female terminals, supplied with the motor, onto the appropriate leads.
FIGURE 3
NOTE
SWITCH
LOCATION
MOTOR
CLAMP
W10408722B
GAS or ELECTRIC DRYERS
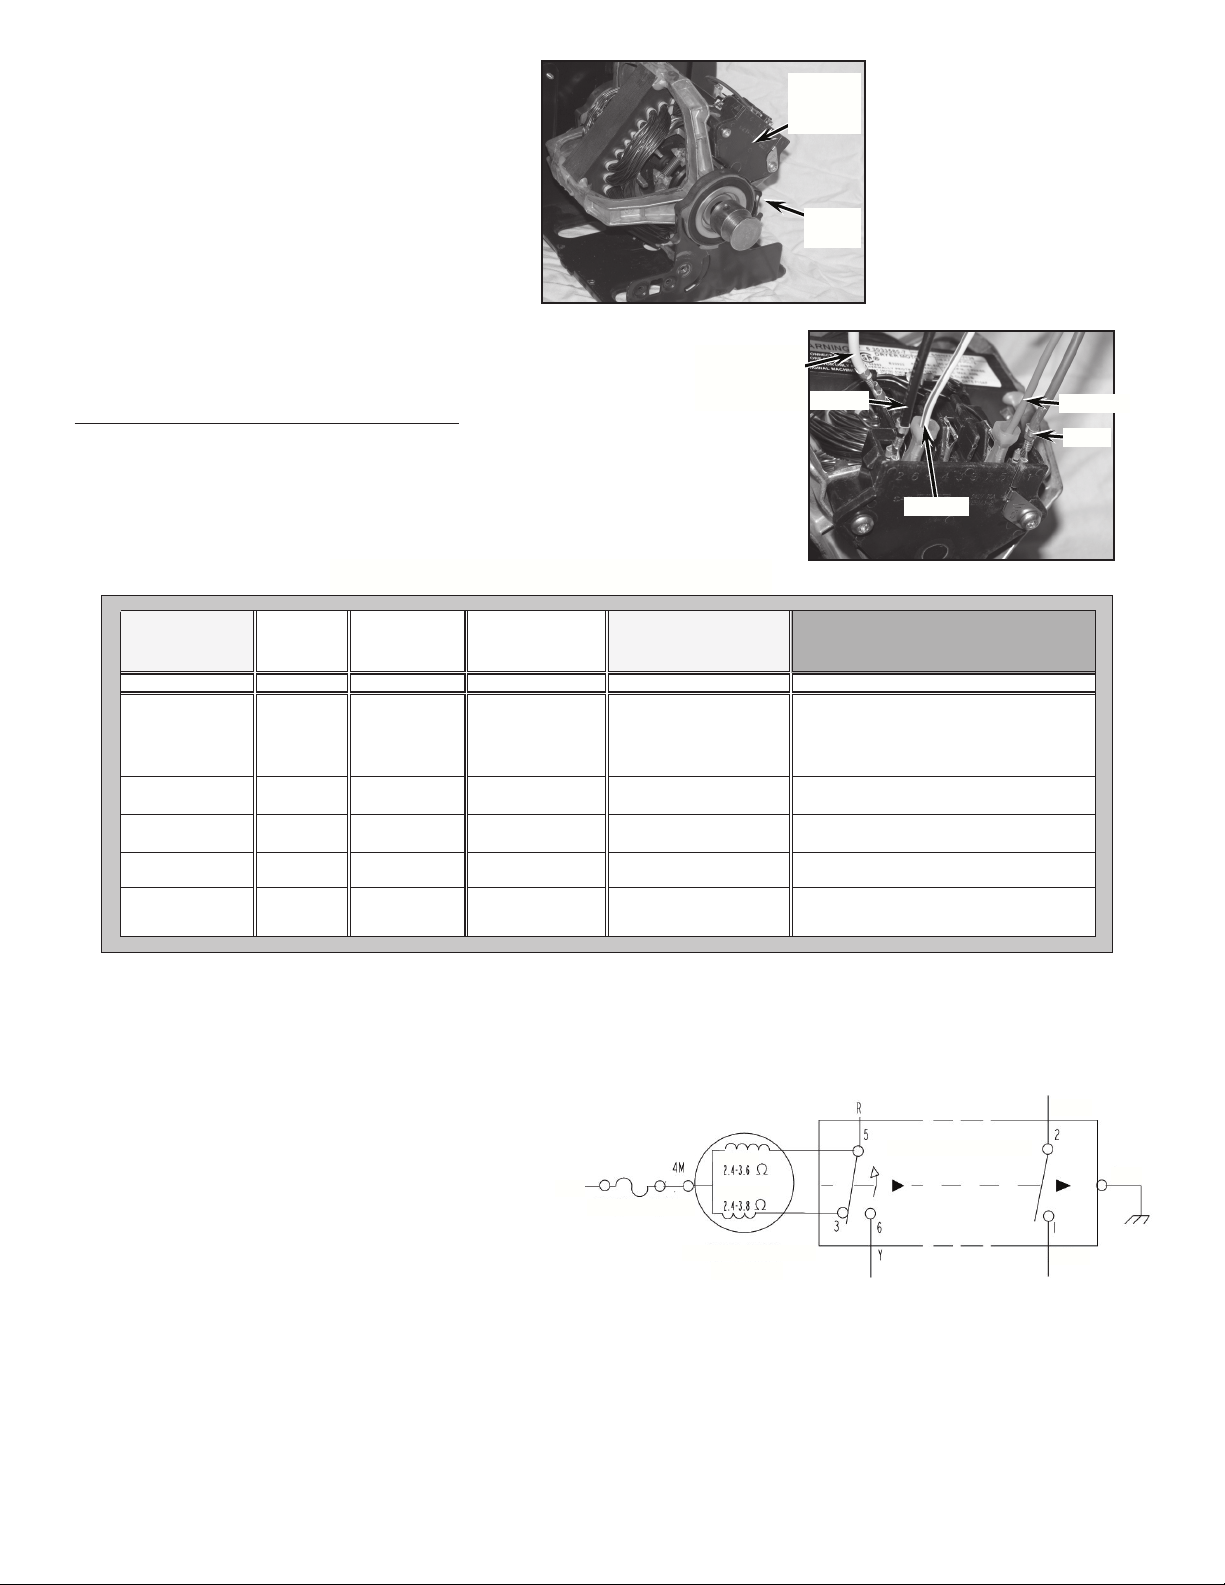
FIGURE 4
YELLOW (6)
GREY (1/4”
PROTECTOR
TAB)
RED (5)
BLUE (1)
BLACK (2)
EET, JAJ & MWM Electric
Old Motor Discrete
Connect Switch
Exisng Machine
Harness
New Service Motor Plug-
Connect Switch
Acon
Terminal No. Funcon Color Code Comments Terminal Number
Grey L1 Grey
1/4" Thermal Protector
Tab
Remove and discard Blue Jumper Lead between
Switch Terminal 4 and 1/4" Protector Tab,
connect Grey Harness lead to 1/4" Protector Tab
5deRlartueNdeR
Reterminate Red Lead with 1/8" Insulated
Terminal and Connect to Switch Tab 5
tcennoC1eulBretaeH*Blue (& White) to 1/4" Tab 1
tcennoC2kcalBretaeH**Black (& Brown) to 1/4" Tab 2
***Yellow PushToStart Yellow
Oponal (not present in
machines with
Electronic Controls)
6
Reterminate Yellow Lead with 1/8" Insulated
Terminal and Connect to Switch Tab 6
EET, JAJ & MWM Gas
Old Motor Discrete
Connect Switch
Exisng Machine
Harness
New Service Motor Plug-
Connect Switch
Acon
Terminal No. Funcon Color Code Comments Terminal Number
Grey L1 Grey
1/4" Thermal Protector
Tab
Remove Blue Jumper Lead between Switch
Terminal 4 and 1/4" Protector Tab , connect Grey
Harness lead to 1/4" Protector Tab
5deRlartueNdeR
1eulBretaeHeulB
tcennoC2kcalBretaeHkcalB to 1/4" Tab 2
Yellow PushToStart Yellow
Oponal (not present in
machines with
Electronic Controls)
6
Reterminate Yellow Lead
with 1/8" Insulated
Terminal and Connect to Switch Tab 6
Reterminate Red and Blue Leads in the same 1/8"
Insulated Terminal and Connect to Switch Tab 5.
Connect the Blue Lead to 1/4" Tab 1.
* Some model dryers will have a white wire joined with the blue wire. Leave them connected and connect to the same terminal.
** Some model dryers will have a brown wire joined with the black wire. Leave them connected and connect to the same terminal.
*** Dryer models with a Push-To-Start Switch will have a yellow wire. If there is no yellow wire leave this terminal without a connection.
7. Reconnect ground wire.
8. Allleadconnectionsarenishedatthispoint,nishreassemblingdryer.
9. Replace all parts and panels.
© Whirlpool Corporation 2013
(All Rights Reserved)
New Replacement Motor Wiring:
1. Switch connection #5 is a direct connection to the main/run winding and to the centrifugal switch common.
2. Switch connection #3 is a direct connection to the phase/ start winding and to the normally closed contact of the centrifugal switch.
3. Switch connection #6 is the centrifugal switch normally open contact.
4. Switch connections #1 and #2 are the normally open heater contacts.
5. Switch connection #4 is simply a junction point, not connected to anything.

INSTRUCTIONS D’INSTALLATION ET DE CÂBLAGE
Pour remplacement de moteur enchable
Fiche d’instructions W10408722 Rev B 2/13
3
Risque de choc électrique
Déconnecter la source de courant
électrique avant l'entretien.
Le non-respect de ces instructions peut
causer un décès ou un choc électrique.
Replacer pièces et panneaux avant de
faire la remise en marche.
AVERTISSEMENT
Contenu de la trousse :
1 ensemble moteur
2 cosses femelles 1/8” (isolées)
1 che d’instructions
NOTE À L’INSTALLATEUR : Cet ensemble moteur est une pièce de rechange FSP agréée pour votre application. Le moteur de
cet ensemble peut être identique ou différent du moteur d’origine. Si le moteur d’origine était équipé d’un contacteur de moteur
enchable (voir Figures 2B et 2C), remplacer le moteur de rechange dans l’ordre inverse de la dépose du moteur défectueux.
Si le moteur défectueux possède un contacteur dont les conducteurs du faisceau principal se branchent individuellement au
contacteur du moteur, suivre les instructions ci-dessous.
1. Débrancher la sécheuse ou déconnecter la source de courant
électrique.
2. Déposer le moteur défectueux en suivant les procédures
standard de dépose du moteur.
REMARQUE : Si la poulie est fournie avec le moteur de rechange,
passer à l’étape 4.
3. Il se peut qu’aucune poulie pour courroie de tambour ne
soit fournie avec le moteur de rechange neuf. À l’aide
d’une clé à tête hexagonale, ôter la poulie du moteur
défectueux et la monter sur le moteur de rechange. Veiller
à pousser la poulie sur l’arbre du moteur, l’aligner avec la
poulie de tensionnement et bien serrer la vis de blocage.
Voir Figure 1.
4. Comparer et noter les différences entre le contacteur du
moteur défectueux et le contacteur du moteur de rechange
neuf. Voir les Figures 2A, 2B et 2C. Si les contacteurs sont
identiques, monter simplement le moteur dans l’ordre inverse
de dépose du moteur défectueux. Si tel n’est pas le cas,
passer à l’étape 5.
REMARQUE : Le limiteur de surcharge fait partie du contacteur
enchablesurlemoteurderechange,alorsqu’ilestàpartsurle
contacteur de l’ancien moteur.
Risque d’incendie
Ne tenter en aucune circonstance de démonter ou
remplacer le contacteur de ce moteur de rechange
enchable. Le contacteur est un composant non
réparable.
Le non-respect de cette instruction peut causer un
décès, une blessure grave ou un incendie.
AVERTISSEMENT
FIGURE 1
VIS DE BLOCAGE
DE LA POULIE
FIGURE 2B (MOTEUR DE RECHANGE)
FIGURE 2C (MOTEUR DE RECHANGE)
FIGURE 2A (MOTEUR DÉFECTUEUX)
AANCIEN
CONTACTEUR À
CONNECTEURS
MÂLES NON
INTÉGRÉ
NOUVEAU
CONTACTEUR À
CONNECTEURS
MÂLES
NOUVEAU
CONTACTEUR À
CONNECTEURS
MÂLES
REMARQUE : 2 POSSIBLE
1/4” OVERLOAD
PROTECTOR TAB
LOCATIONS = 2
POSITIONS POSSIBLES
POUR LES COSSES
DU LIMITEUR DE
SURCHARGE DE 1/4”
(à suivre)
LIMITEUR DE
SURCHARGE
© Whirlpool Corporation 2013
(Tous droits réservés)
W10408722B
4
5. Placer le moteur comme indiqué en Figure 3. Aligner
la languette du moteur sur la fente du support moteur.
Noter la position du contacteur du moteur (l’orientation
du contacteur peut varier).
INSTRUCTIONS DE CÂBLAGE
6. Consulter la Figure 4 et le tableau ci-dessous pour installer correctement le moteur de
rechange.
REMARQUE : Pour le sertissage des nouvelles cosses, couper le conducteur le plus près
possibledel’anciennecosseetdénuderleld’environ1/4”.Àl’aided’unepinceàsertir,sertir
les cosses femelles isolées de 1/8” fournies avec le moteur sur les conducteurs appropriés.
FIGURE 3
NOTER LA
POSITION DU
CONTACTEUR
BRIDE DU
MOTEUR
SÉCHEUSES À GAZ OU ÉLECTRIQUES
FIGURE 4
JAUNE (6)
GRIS (COSSE MÂLE
DE PROTECTION
DE 1/4”)
ROUGE (5)
BLEU (1)
NOIR (2)
7. Reconnecter le conducteur de terre.
8. Touteslesconnexionsdelssontterminéesàcestade.
Terminer le remontage de la sécheuse.
9. Réinstaller l’ensemble des pièces et panneaux.
Ancien contacteur à
connecteurs mâles
non intégré
Faisceau existant
de la machine
Contacteur à connecteurs
mâles du moteur de
rechange neuf
Acon
Broche Foncon Code de couleur Commentaires N° de cosse
Gris L1 Gris
Cosse mâle de protecon
thermique de 1/4"
Rerer et jeter le fil de raccordement entre la
cosse 4 du contacteur et la cosse mâle de
protecon de 1/4", connecter le fil gris du
faisceau à la cosse mâle de protecon de 1/4"
Rouge Neutre Rouge 5
Serr sur le fil rouge la cosse isolée de 1/8" et
connecter à la cosse mâle 5 du contacteur
*Bleu (et blanc)
Élément
chauffant
Bleu
1 Connecter à la cosse mâle 1 de 1/4"
**Noir (et marron)
Noir 2 Connecter à la cosse mâle 2 de 1/4"
***Jaune
t
eur de mise en
Jaune
Oponnel (absent
des machines à com-
mandes électroniques)
6
Serr sur le fil jaune la cosse isolée de 1/8" et
connecter à la cosse mâle 6 du contacteur
Élément
chauffant
Nouveau câblage du moteur de rechange :
1. La connexion n°5 du contacteur est un raccordement direct au bobinage principal/en régime permanent et au commun du contacteur
centrifuge.
2. La connexion n°3 du contacteur est un raccordement direct au bobinage de phase/démarrage et au contact normalement fermé du
contacteur centrifuge.
3. La connexion n°6 du contacteur est le contact normalement ouvert du contacteur centrifuge.
4. Les connexions n°1 et n°2 du contacteur sont les contacts normalement ouverts de l’élément chauffant.
5. La connexion n°4 du contacteur est seulement un point de jonction non connecté.
* Certains modèles de sécheuse sont dotés d’un conducteur blanc joint au conducteur bleu. Les laisser connectés entre eux et les
brancher à la même cosse.
** Certains modèles de sécheuse sont dotés d’un conducteur marron joint au conducteur noir. Les laisser connectés entre eux et les
brancher à la même cosse.
*** Les modèles de sécheuse équipés d’un interrupteur de mise en marche par bouton poussoir sont dotés d’un conducteur jaune. En
l’absence de conducteur jaune, laisser cette borne sans connexion.
CONTACTEUR CENTRIFUGE
N-MAR
BL-BLC
VT-JN
PRINCIPAL
MOTEUR D’ENTRAÎNEMENT
FUSIBLE THERMIQUE
GRIS
DÉMARRAGE
1/3 CV