allLJUra
CDStereoSystem
XR-EM20
lrll r_
DIGITALAUDIO
Owner'srecord
For yourconvenience,recordthe model numberandserial
number(youwillfind themontherearofyourset)inthespace
providedbelow.Pleaserefer1othem whenyou contactyour
Aiwadealerincaseofdifficulty.
Model No. SerialNo.(LotNo.)
Forassistanceand information
call toll free 1-800-BUY-AIWA
(United Statesand PuertoRico)
8C-CL7-903-01
011228ACK-H-BF
2
Readthe Operating Instructions carefully and completely before
operatingthe unit, Besure to keepthe OperatingInstructions for
future reference, All warnings and cautions in the Operating
Instructions and on the unit should bestrictly followed, aswell as
the safetysuggestions below.
Warning
Topreventelectricshock or injury,these safetyinstructions should
be followed in the installation, use andservicing theunit,
Installation
Attachments - Do not useattachmentsnotrecommendedby the
unit manufacturerastheymayresultin therisk offire,electricshock
or ir_uryto persons,
Water and Moisture - Do not use this unit nearwater - for
example,neara bathtub,washbowl,kitchensink, or laundrytub, in
awet basement,or neara swimming pool, andthe like,
Heat- Donot use this unitnearsourcesofheat,including heating
vents,stoves,or otherappliancesthat generateheat,It alsoshould
not be placedin temperatureslessthan 5C (41°F)or greaterthan
35C (95F).
Mounting surface- Placethe unit ona flat, evensurface.
Accessories - Do not placethis unit on anunstable cart,stand,
tripod, bracket,or table. Theunit mayfall, causing serious ir_ury
to a child or an adult, andserious damageto the appliance. Use
only with a cart,stand, tripod, bracket, or table recommendedby
the manufacturer, or sold with the unit, Any mounting of the
applianceshould follow themanufacturer'sinstructions,andshould
use amounting accessoryrecommendedbythe manufacturer.
Portable cart - An appliance and cart
combination should bemovedwith care,Quick
stops,excessiveforce,andunevensurfacesmay
causethe appliance and cart combination to
overturn,
Ventilation - The unit should be situated with adequatespace
around it sothat proper heat ventilation is assured. Allow 10 cm
clearancefrom the rear andthe top of the unit, and 5 cmfrom the
eachside.
Slots and openings in the cabinet and the back or bottom are
providedfor ventilation, andtoensurereliable operationoftheunit
and to protect it from overheating,these openings must not be
blocked or covered, The openings should never be blocked by
placing the unit on a bed, sofa,rug or other similar surface.This
unit shouldnotbeplacedinabuilt-in installationsuchasabookcase
unless proper ventilation is provided.
Object and Liquid Entry - Neverpush objectsof any kind into
this unit through the cabinet slots asthey may touch dangerous
voltage points or short-circuit parts that could result in a fire or
electric shock. Neverspill liquid ofany kind on the unit.
ElectricPower
Power Sources - Thisunit shouldbeoperatedonly fromthetype
of powersourceindicatedon themarking label. Ifyou arenot sure
of thetype of power supply to your home,consult your appliance
dealeror local powercompany,Tooperateunit on batterypower,or
other sources,referto the operatinginstructions.
Grounding or Polarization -Thisunit isprovidedwith apolarized
alternating-current line plug (a plug having one blade wider than
the other), This plug will fit into the power outlet only one way.
This is asafetyfeature.Ifyou areunableto inserttheplug fully into
the outlet, try reversingthe plug, If the plug should still fail tofit,
contactyour electriciantoreplaceyourobsoleteoutlet,Do notdefeat
the safetypurposeof the polarizedplug,
Power-Cord Protection - Power-supplycords should berouted
so that they are not likely to be walked on or pinched by items
placed uponor againstthem,paying particularattentionto cordsat
plugs, conveniencereceptacles,andthe pointwheretheyexit from
the product,
Overloading - Do not overload wall outlets, extension cords,
integral conveniencereceptaclesasthis can resultin a risk of fire
or electric shock,
OutdoorAntenna
Power lines - An outside antennasystemshould not be located
in thevicinityof overheadpowerlinesor otherelectriclight orpower
circuits, orwhereit canfall into suchpowerlines orcircuits. When
installing an outsideantennasystem,extremecareshould betaken
to keepfrom touching such powerlines or circuits ascontact with
them might befatal.
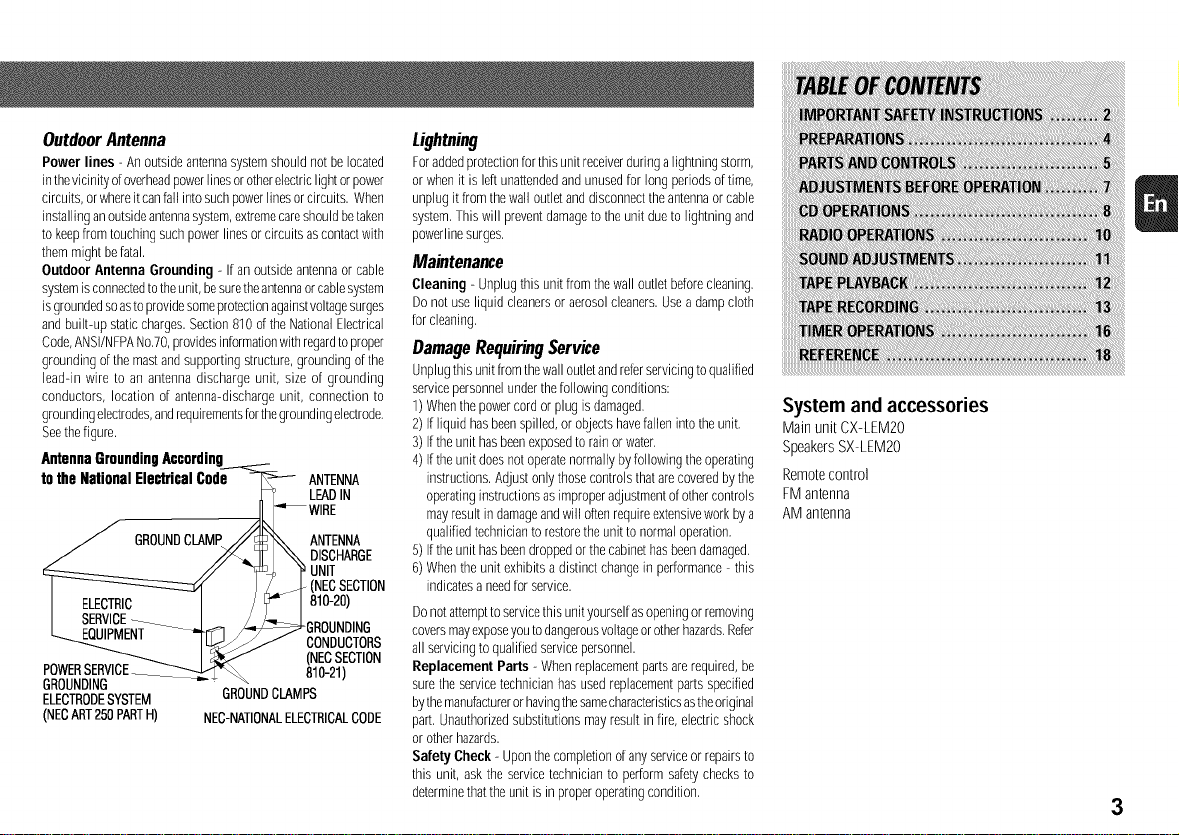
Outdoor Antenna Grounding - If an outside antennaor cable
systemis connectedto theunit, besuretheantennaorcable system
isgroundedso asto providesomeprotectionagainstvoltagesurges
andbuilt-up staticcharges. Section810 ofthe National Electrical
Code,ANSWNFPANo,70,providesinformationwith regardtoproper
grounding ofthe mastand supporting structure,grounding of the
lead-in wire to an antenna discharge unit, size of grounding
conductors, location of antenna-discharge unit, connection to
groundingelectrodes,andrequirementsforthegrounding electrode.
Seethefigure.
Antenna Grounding According_
to the National Electrical Code _ ANTENNA
r_ _ LEADIN
/ GROUNDCLAMP//_'-_ ANTENNA
//_ _ DISCHARGE
l _ J J._ (NECSECTION
I I / 181°-2°'
L FRiiip_¥NT__ /_GROUNDING
.... IUJ_ CONDUCTORS
(NECSECTION
POWERSERVI_ 810-21)
GROUNDING -- " "
ELECTRODESYSTEM GROUNDCLAMPS
(NECART250PARTH) NEC-NATIONALELECTRICALCODE
Lig*ming
Foraddedprotectionfor this unit receiverduringa lightning storm,
or when it is leftunattendedandunused for long periods of time,
unp]ug it from thewall out]etanddisconnect the antennaor cab]e
system, This will preventdamageto the unit dueto lightning and
powerline surges,
Maintenance
Cleaning - Unplug this unit from thewall outlet beforecleaning,
Do not use liquid cleaners or aerosolcleaners. Usea dampcloth
for cleaning,
DamageRequiringService
Unplugthis unit from thewall outlet aridreferservicing toqualified
servicepersonnelunder the following conditions:
1) Whenthe power cord or plug is damaged,
2) If liquid has beenspilled,or objectshavefallen into the unit,
3) If the unit hasbeenexposedto rain or water.
4) If the unit does not operatenormally by following the operating
instructions. Adjust onlythose controls thatare coveredby the
operatinginstructions as improper adjustmentof othercontrols
mayresult indamageandwill oftenrequire extensivework by a
qualified technicianto restorethe unit to normal operation,
5) If the unit hasbeendropped orthe cabinethas beendamaged.
6) When the unit exhibits a distinct change in performance - this
indicates a needforservice.
Do notattempttoservicethis unit yourself asopeningor removing
coversmayexposeyou todangerousvoltageor otherhazards.Refer
all servicing to qualified servicepersonnel.
Replacement Parts - When replacementparts arerequired, be
sure the service technician has used replacementparts specified
bythemanufactureror havingthesamecharacteristicsastheoriginal
part, Unauthorizedsubstitutions may result infire, electricshock
or other hazards.
Safety Cheek - Upon thecompletion of any serviceor repairs to
this unit, ask the servicetechnician to perform safetychecks to
determinethatthe unit is in properoperating condition,
System and accessories
Main unit CX-LEM20
Speakers SX-LEM20
Remote control
FM antenna
AM antenna
3
PREPARATIONS
Connection
Plugin theACpower cord to theACoutlet after all other
connectionsaremade.
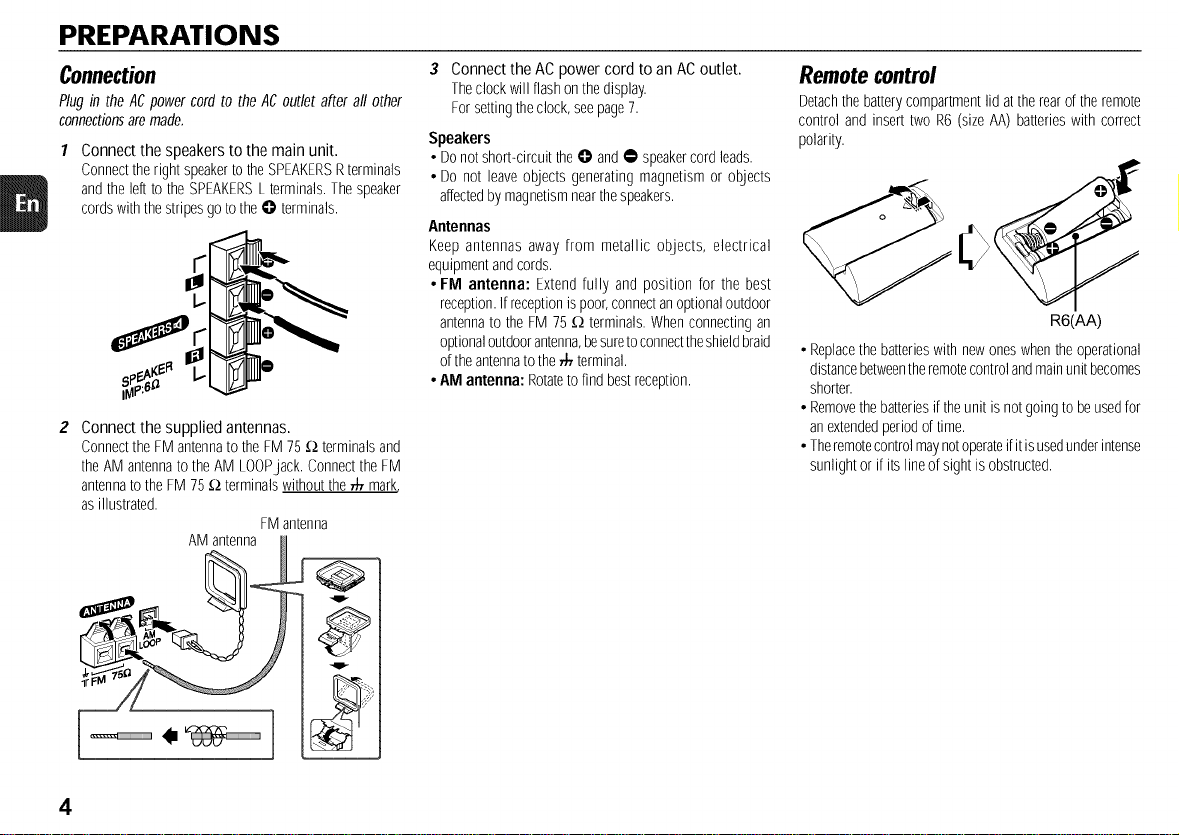
Connect the speakers to the main unit.
Connecttheright speakertotheSPEAKERSRterminals
andthe leftto the SPEAKERSLterminals.Thespeaker
cordswith thestripesgoto the@ terminals.
Connect the supplied antennas.
ConnecttheFM antennatothe FM75_;2terminalsand
theAM antennato theAM LOOPjack. ConnecttheFM
antennatothe FM 75_;2terminalswithoutthe• mark,
as illustrated.
FMantenna
AM antenna H
3 Connect the AC power cord to an AC outlet.
Theclockwillflashonthedisplay.
Forsettingtheclock,seepage7.
Speakers
• Donotshort<ircuit theO and• speakercordleads.
• Do not leaveobjects generatingmagnetismor objects
affectedbymagnetismnearthespeakers.
Antennas
Keep antennas away from metallic objects, electrical
equipmentandcords.
• FM antenna: Extendfully and position for the best
reception.Ifreceptionis poor,connectanoptionaloutdoor
antennato the FM 75 _;2terminals.Whenconnectingan
optionaloutdoorantenna,besuretoconnecttheshieldbraid
oftheantennato the• terminal.
• AM antenna: Rotateto find bestreception.
Remote control
Detachthe batterycompartmentlid attherearof theremote
control and insert two R6 (sizeAA)batterieswith correct
polarity.
R6(AA)
• Replacethebatterieswith newoneswhentheoperational
distancebetweentheremotecontrolandmainunitbecomes
shorter.
• Removethebatteriesif theunit is notgoingto beusedfor
anextendedperiodoftime.
• Theremotecontrolmaynotoperateifitisusedunderintense
sunlightor if itslineofsight isobstructed.
4
PARTS AND CONTROLS
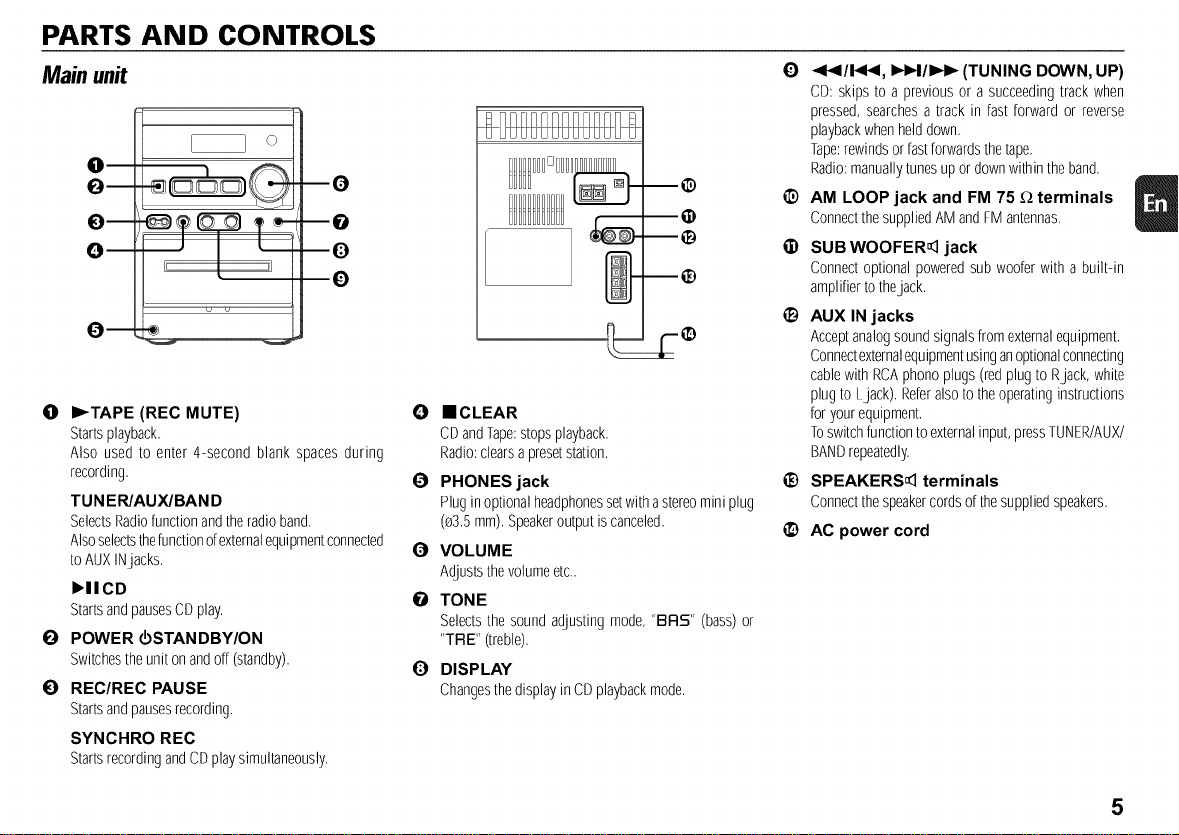
Main unit
m
Q
--0
--0
--O
0
0 I_TAPE (REC MUTE)
Startsplayback.
Also used to enter 4-second blank spaces during
recording.
TUN ER/AUX/BAN D
SelectsRadiofunctionandtheradio band.
Alsoselectsthefunctionofexternalequipmentconnected
toAUXINjacks.
),IICD
StartsandpausesCDplay.
O POWER _STANDBY/ON
Switchestheuniton andoff(standby).
0 REC/REC PAUSE
Startsandpausesrecording.
SYNCHRO REC
StartsrecordingandCDplaysimultaneously.
m®
@
--®
--@
O ==CLEAR
CDandTape:stopsplayback.
Radio:clearsapresetstation.
€) PHONES jack
Plugin optionalheadphonessetwith astereominiplug
(e3.5mm).Speakeroutput iscanceled.
O VOLUME
Adjuststhevolumeetc..
O TONE
Selectsthe sound adjustingmode, "BRS" (bass)or
"TRE" (treble).
O DISPLAY
ChangesthedisplayinCDplaybackmode.
O
®
6)
®
®
®
_1_1/!,9t_1, I_l_l/lIH_ (TUNING DOWN, UP)
CD: skips to a previousor a succeedingtrack when
pressed,searchesa track in fast forward or reverse
playbackwhenhelddown.
Tape:rewindsor fastforwardsthetape.
Radio:manuallytunesupor downwithintheband.
AM LOOP jack and FM 75 _ terminals
ConnectthesuppliedAMandFMantennas.
SUB WOOFER_ jack
Connectoptionalpoweredsub wooferwith a built-in
amplifiertothejack.
AUX IN jacks
Acceptanalogsoundsignalsfromexternalequipment.
Connectexternalequipmentusinganoptionalconnecting
cablewith RCAphono plugs(redplugto Rjack, white
plug to Ljack). Referalsoto theoperatinginstructions
foryour equipment.
Toswitchfunctiontoexternalinput,pressTUNER/AUX/
BANDrepeatedly.
SPEAKERS_ terminals
Connectthespeakercordsof thesuppliedspeakers.
AC power cord
5

Remote control
0
Q--
0
Q
0
m
000
000
000
D_
0
--0
--®
Buttonswith the sameor similar nameson the main unit
basicallyhavethesamefunction.
0 POWER
E) 0-10, +10
CD:selectsatrackofthespecifiednumber.
Radio: tunes in the station with the specifiedpreset
number.
Thenumberedbuttonstakeonthesefunctionswhenpressedwith
SHIFThelddown:
CLOCK
Selectsclockmode.
TUNER MODE
Switchesbetweenstereoor monauralFM reception.
6
DISPLAY
PROGRAM
SelectsprogrammedCDplaybackmode.
TIMER
Selectstimer mode.
SLEEP
Selectssleep-timermode.
RANDOM/REP
Selectsrandomor repeatCDplaybackmode.
CD EDIT/CHECK
SelectseditedCDrecording,
I_) REC/REC PAUSE
Startsandpausesrecordingwhenpressedwith SHIFT
helddown.
REC MUTE
Enters4-secondblankspacesduring recording,
O I_llCD
AUX
Selectthefunction of externalequipmentconnectedto
AUXINjacks.
I_TAPE
TUN ER/BAN D
SelectsRadiofunctionandtheradioband.
• CLEAR
1_ SET
Determinesthe mode.
Storesthereceivedstationto preset.
0 SHIFT
Holddownwhenpressinganumberedbuttonto change
itsfunctiontothatprintedabovethenumber.
I_ FUNCTION
Switchestheactivefunction amongTAPE,TUNER,AUX
andCD.
O PRESET +,-
Tunesinapresetstation.
<1</!,4t<, IH_I / I,,-I_
@ VOLUME +,--
(i) TONE
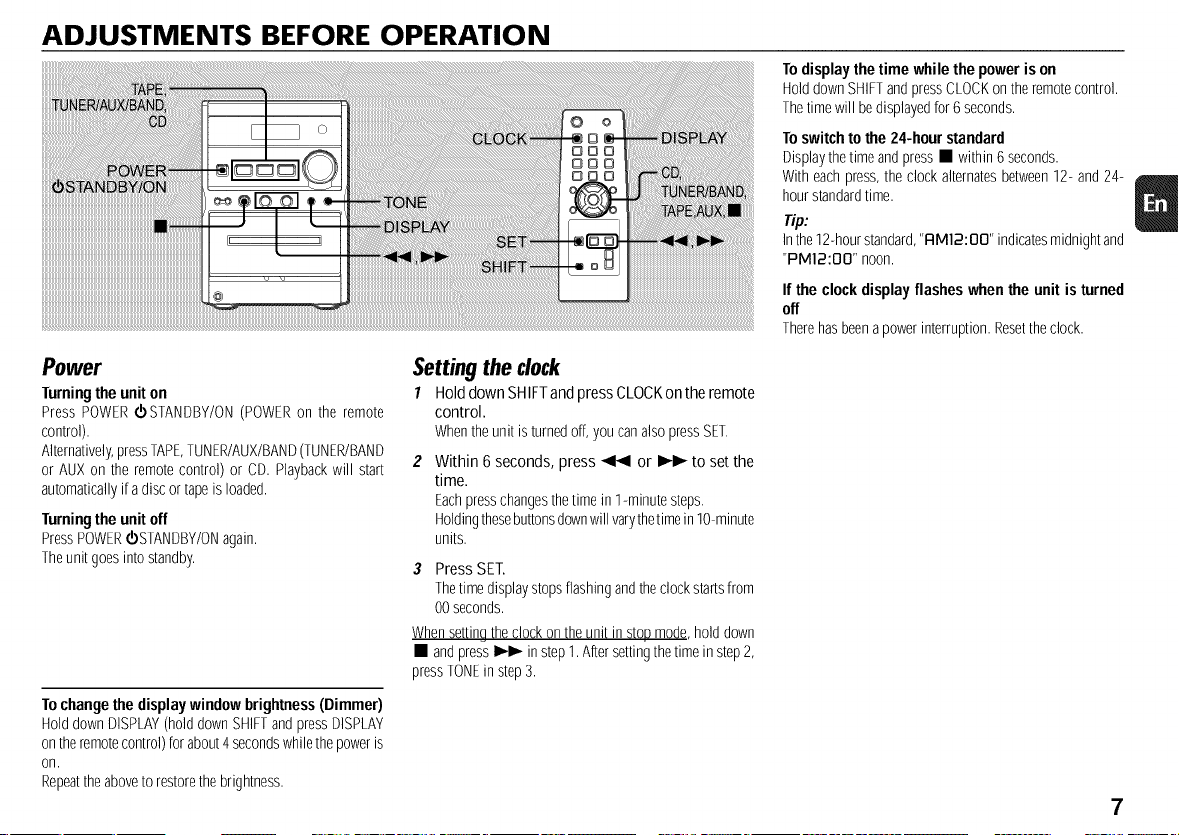
ADJUSTMENTS BEFORE OPERATION
To displaythe time while the power is on
HolddownSHIFTandpressCLOCKontheremotecontrol.
Thetimewill bedisplayedfor6 seconds.
To switchto the 24-hour standard
Displaythetime andpress• within6 seconds.
With eachpress,theclock alternatesbetween12- and24-
hourstandardtime.
Tip:
Inthe12-hourstandard,"FIM12:BB" indicatesmidnightand
"PM12:OO" noon.
If the clock display flashes when the unit is turned
off
Therehasbeenapowerinterruption.Resettheclock.
Power
Turningthe unit on
Press POWERd)STANDBY/ON(POWERon the remote
control).
Alternatively,pressTAPE,TUNER/AUX/BAND(TUNER/BAND
or AUX on the remotecontrol) or CD. Playbackwill start
automaticallyif adiscor tapeis loaded.
Turningthe unit off
PressPOWERd)STANDBY/ONagain.
Theunitgoesinto standby.
To change the displaywindow brightness(Dimmer)
HolddownDISPLAY(holddownSHIFTandpressDISPLAY
ontheremotecontrol)forabout4secondswhilethepoweris
on,
Repeattheaboveto restorethe brightness.
Setting the clock
1 Hold down SHIFTandpress CLOCKon the remote
control.
Whentheunit isturnedoff,you canalsopressSET.
Within 6 seconds, press _ or I_ to set the
time.
Eachpresschangesthetimein 1-minutesteps.
Holdingthesebuttonsdownwill varythetimeinlO-minute
units,
3 Press SE£
Thetimedisplaystopsflashingandthe clocksta_sfrom
00seconds.
Whensettin9the clockontheunit instopmode,hold down
• and press_ instep1.Aftersettingthe timein step2,
pressTONEin step3.
7
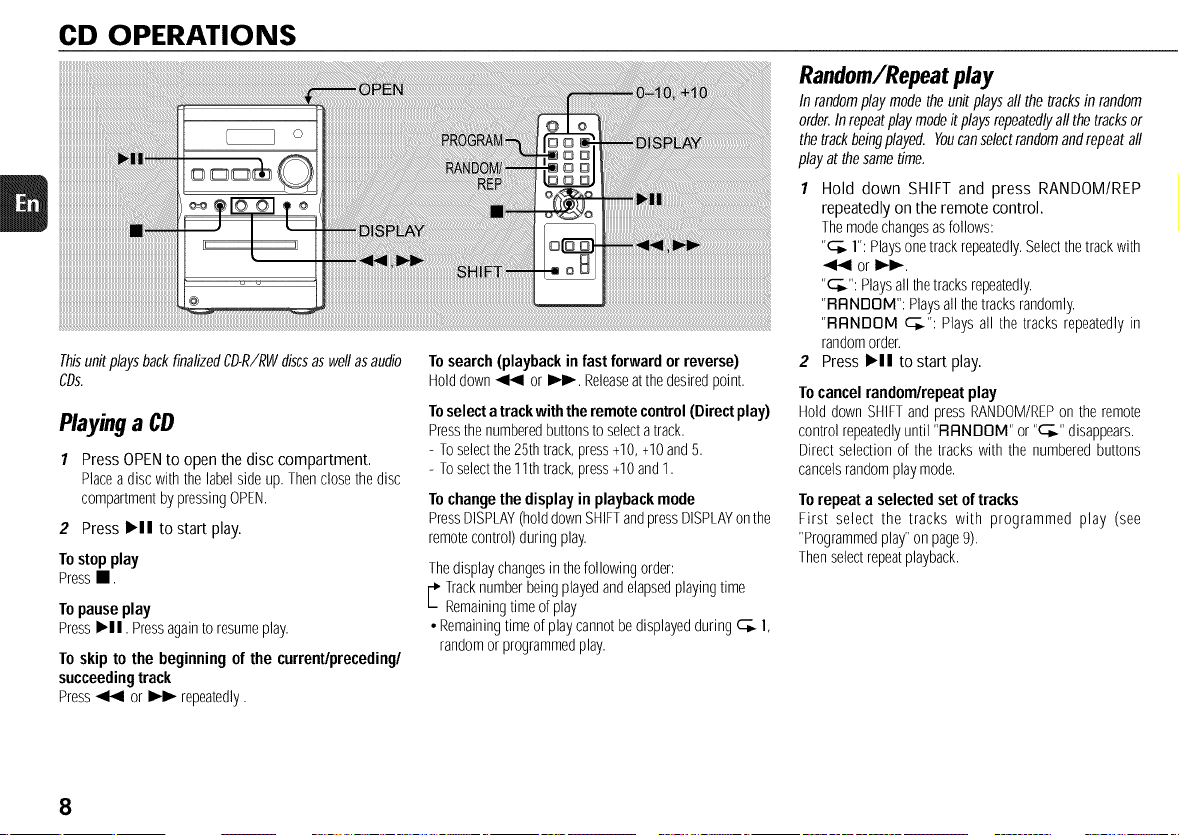
CD OPERATIONS
ThisunitplaysbackfinalizedCD-R/RWdiscsaswellasaudio
CDs.
Playinga CD
1 Press OPEN to open the disc compartment.
Placeadisc withthe labelsideup. Thenclosethedisc
compartmentby pressingOPEN.
2 PressI_11tostart play.
Tostopplay
Press,.
Topauseplay
PressI_11.Pressagaintoresumeplay.
Toskip to thebeginningofthecurrent/preceding/
succeedingtrack
Press_ or _ repeatedly.
Tosearch(playbackin fastforwardorreverse)
Holddown_ or I_1_-.Releaseatthedesiredpoint.
Toselect a trackwith theremote control(Directplay)
Pressthenumberedbuttonstoselectatrack.
- Toselectthe25thtrack,press+10,+10and5.
- Toselectthe11thtrack,press+10and1.
To changethedisplay in playback mode
PressDISPLAY(holddownSHIFTandpressDISPLAYonthe
remotecontrol)during play.
Thedisplaychangesin thefollowingorder:
,. racknumberbeingplayedandelapsedplayingtime
Remainingtimeofplay
• Remainingtimeof playcannotbedisplayedduring c_. l,
randomor programmedplay.
Random/Repeatplay
In randomplaymodetheunitplaysall the tracksin random
order.Inrepeatplaymodeitplaysrepeatedlyallthetracksor
thetrackbeingplayed. Youcanselectrandomandrepeatall
playat thesametime.
1 Hold down SHIFT and press RANDOM/REP
repeatedly on the remote control.
Themodechangesasfollows:
"c_. 1":Playsonetrackrepeatedly.Selectthetrackwith
or I_1_-.
"_--_":Playsallthetracks repeatedly.
"RRNDOM": Playsallthetracks randomly.
"RRNDOM c_.": Plays all the tracks repeatedlyin
randomorder.
2 Press I_11 tostart play.
To cancel random/repeat play
Hold down SHIFTandpressRANDOM/REPon the remote
controlrepeatedlyuntil 'RRNDOM" or"c_." disappears.
Directselection of the trackswith the numberedbuttons
cancelsrandomplaymode.
To repeat a selected set oftracks
First select the tracks with programmed play (see
"Programmedplay"on page9).
Thenselectrepeatplayback.
8
Programmedplay
Playsbackupto 30selectedtracksin programmedorder.
1 Hold down SHIFT and press PROGRAM on the
remote control in stop mode.
'PRGM" flashesonthe display.
Press the numbered buttons on the remote
control to program a track.
-Toselectthe25thtrack,press+10,+10and5.
-Toselectthe11thtrack,press+10and1.
Theselectedtracknumberlightsuponthedisplay.
3 Repeat step 2 to program other tracks.
Thetotalnumberofselectedtracksandtotalplayingtime
will bedisplayed.
4 Press HI tostart play.
Thetrack numberfor thecurrent trackflashes on the
display.
• Duringprogrammedplay,youcannotselectatrackwiththe
numberedbuttons."ERN'T USE" isdisplayedwhenyou
tryto selectatrack.
• Ifthetotalplayingtimeof theprogramexceeds99minutes
and59seconds,or ifatrackwithatracknumberexceeding
30 is programmed, the playing time is displayed as
.:
• You cannot program more than 30 tracks. "FULL" is
displayed.
1o checkthe program
Press_ or _ repeatedlyin stop mode.The track
numberandprogramnumberaredisplayedinsuccession.
1"oclearthe program
Press• instopmode."PRGM"disappearsfromthedisplay.
To add trackstothe program
Repeatstep2 beforestartingplayback.Thetracksareadded
totheend oftheprogram.
1"ochangethe programmed tracks
Cleartheprogramandrepeatall thestepsagain.
• Donotplacemorethanonedisc.
• Donottilt the unit withadisc loaded.
• Theunit maynotplayCD-R/RWdiscsrecordedonpersonal
computersor certainkindsof CD-R/RWrecorders.
• Do not attach adhesive label to either side of
CD-R/RWdiscs,as doingso maycausemalfunction.
• DonotloadanunrecordedCD-R/RWdisc.Thediscmaybe
damaged.
• Donotuseirregular-shapedCDs.
9
RADIO OPERATIONS
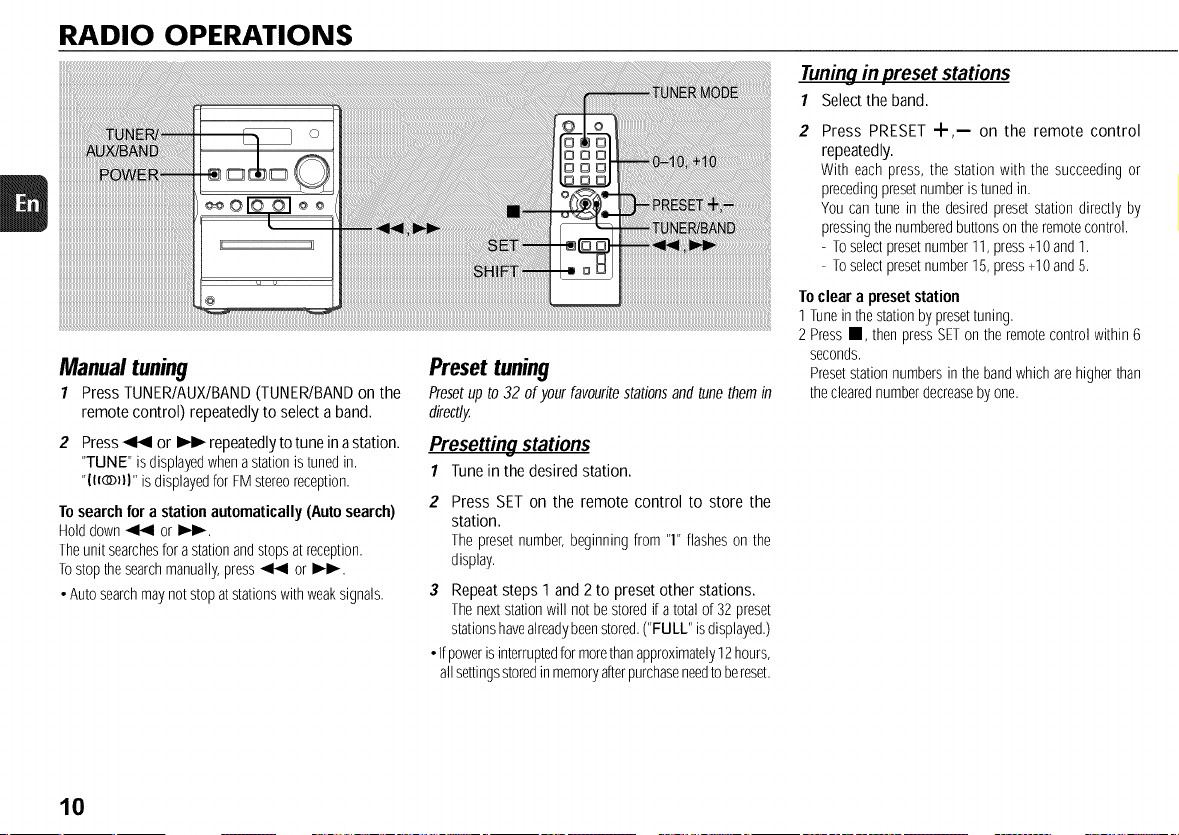
Manual tuning
7 Press TUNER/AUX/BAND (TUNEPJBAND on the
remote control) repeatedly to select a band.
2 Press _ or _ repeatedly to tune in astation.
"TUNE" isdisplayedwhena stationistunedin.
"II_DII" isdisplayedfor FMstereoreception.
To searchfor a station automatically (Auto search)
Holddown_ or I_I_.
Theunit searchesfora stationandstopsatreception.
Tostop thesearchmanually,press_ or I_.
• Autosearchmaynot stopatstationswithweaksignals.
Preset tuning
Presetup to32 of yourfavoufitestationsandtunethemin
directly.
Presetting stations
1 Tune in the desired station.
2 Press SET on the remote control to store the
station.
The presetnumber,beginning from "1"flasheson the
display.
3 Repeat steps 1 and 2 to preset other stations.
Thenextstationwill not bestoredif atotal of 32preset
stationshavealreadybeenstored.("FULL" isdisplayed.)
• Ifpoweris interruptedformorethanapproximately12hours,
allsettingsstoredinmemoryafterpurchaseneedtobereset.
Tuningin preset stations
1 Select the band.
Press PRESET +,-- on the remote control
repeatedly.
With each press, the station with the succeedingor
precedingpresetnumberistunedin.
You can tune in the desiredpresetstation directly by
pressingthenumberedbuttonsontheremotecontrol.
- Toselectpresetnumber11,press+10and1.
- Toselectpresetnumber15,press+10and5.
Toclear a preset station
1 Tunein thestationby presettuning,
2 PressII, thenpressSETon theremotecontrolwithin6
seconds.
Presetstationnumbersinthe bandwhicharehigherthan
theclearednumberdecreaseby one.
10
Adjustments
Toswitch tomonaural FM reception
Hold downSHIFTand pressTUNERMODEon theremote
controlso that"MONO" isdisplayed.
Tocancel, repeattheabovesothat"STEREO" isdisplayed.
Tip:
WhenFM stereoreceptionis poor,switchingto monaural
reducesnoise.
Toswitch the AM tuning interval
ThedefaultsettingoftheAMtuningintervalis 10kHz/step.If
you usethis unit in anareawherethefrequencyallocation
systemis9 kHz/step,changethe tuninginterval.
HolddownTUNER/AUX/BANDandpressPOWERonthemain
unit.
_lp:
WhentheAMtuning intervalis changed,all presetstations
arecleared.
SOUND ADJUSTMENTS
:!!!!ji!i! iiiiiiiiiiiiiiiiiiiiiiiiiiiiiiii ii
iiiiiiiiiiiiiiiiiiiiiiiiiiiii i i i i i i i i i i i i i i i i i i i i i i i i i i i i i i i iI iiiiiiiiiiiiiiiiiiiiiiiiiiiiiiiiiiiiiiiiiiiiiiiiiiiiiiiiiiiiiiiiiiiiiiiiiiiiiiiiiiiiiiiiiiiiiiiiiiiiiiiiiiiiiiiiiiiiiiiiiiiiiiiiiiiiiiiiiiiii ! i
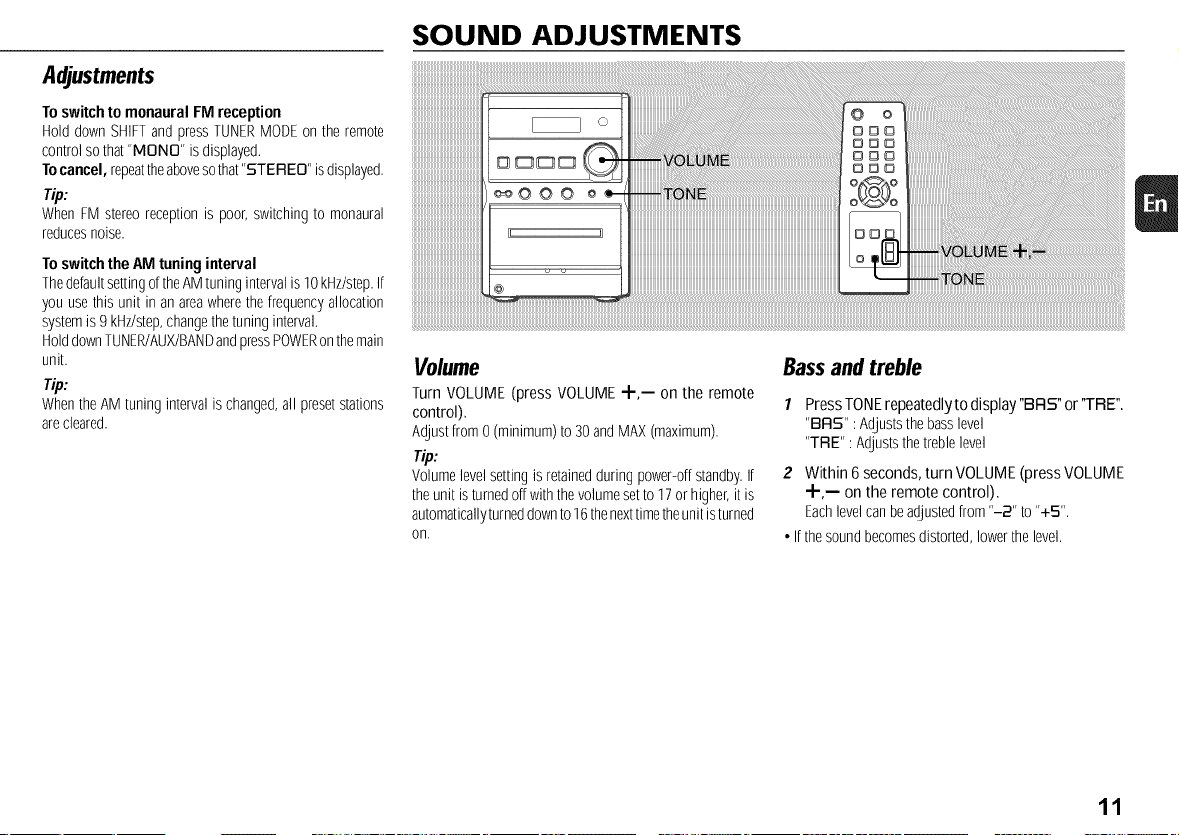
Volume
Turn VOLUME (press VOLUME 4-,-- on the remote
control).
Adjustfrom0 (minimum)to 30andMAX(maximum).
Tip:
Volumelevelsettingis retainedduringpower-offstandby.If
theunit isturnedoffwiththe volumesetto 17or higher,itis
automaticallyturneddownto16thenexttimetheunitisturned
on,
Bassand treble
1 PressTONErepeatedly to display"BRS" or'TRE".
"BFIS" : Adjuststhebasslevel
"TRE" :Adjuststhetreble level
2 Within 6seconds, turn VOLUME (press VOLUME
"Jr-,-- on the remote control).
Eachlevelcanbeadjustedfrom"-2" to "+5".
• Ifthe soundbecomesdistorted,lowerthelevel.
11
TAPE PLAYBACK
• Use of 120-minuteor longertapesis not recommended
since they are extremely thin and easily deformedor
damaged.
• Windupanyslackin thetapewitha pencilor similartool
beforeuse.Slacktapemayjam inthemechanism.
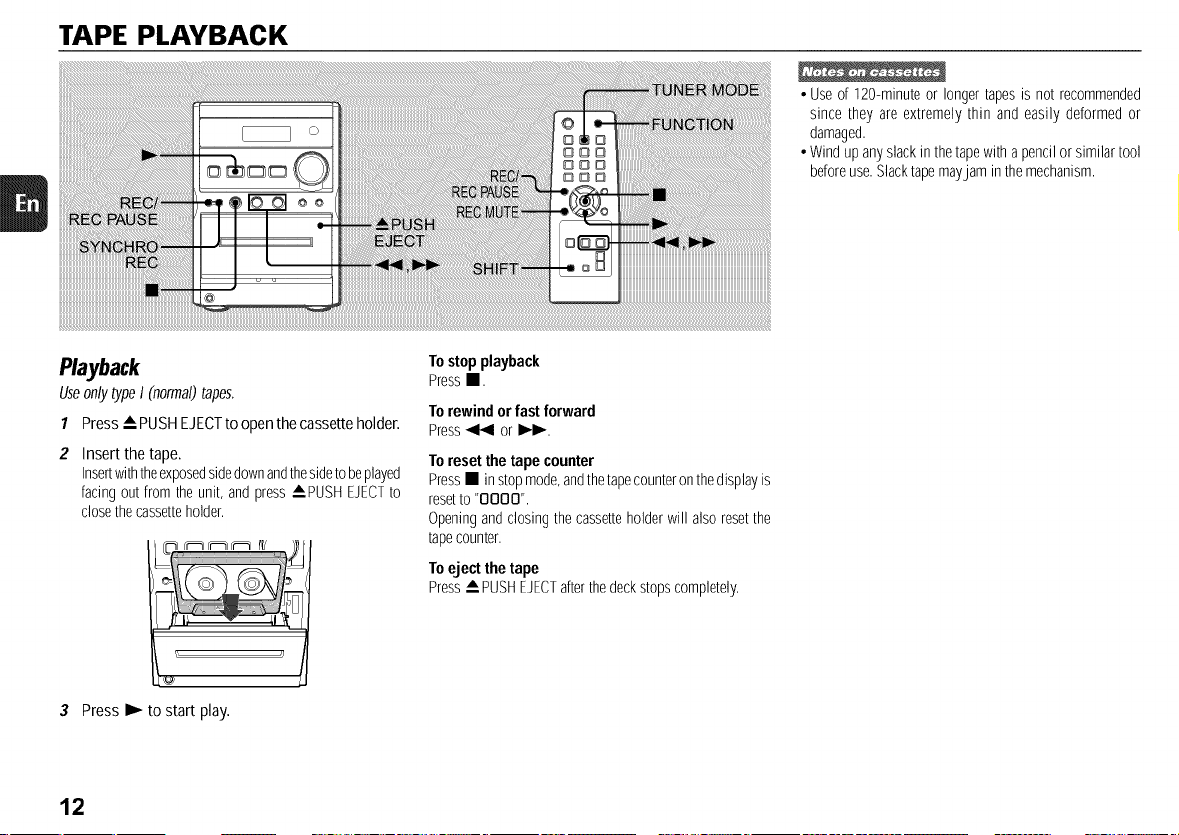
Playback
UseonlytypeI (normal)tapes.
1 Press • PUSH EJECTto open the cassette holder.
Insert the tape.
Insertwiththeexposedsidedownandthesidetobeplayed
facingout from theunit, andpress APUSH EJECTto
closethecassetteholder.
To stopplayback
Press•.
To rewindor fast forward
Press_ or I_1_-.
To resetthe tape counter
Press• in stopmode,andthetapecounteronthedisplayis
resetto "OOOO".
Openingandclosingthe cassetteholder will alsoresetthe
tapecounter.
To eject the tape
Press_PUSH EJECTafterthedeckstopscompletely.
3 Press I_ to start play.
12
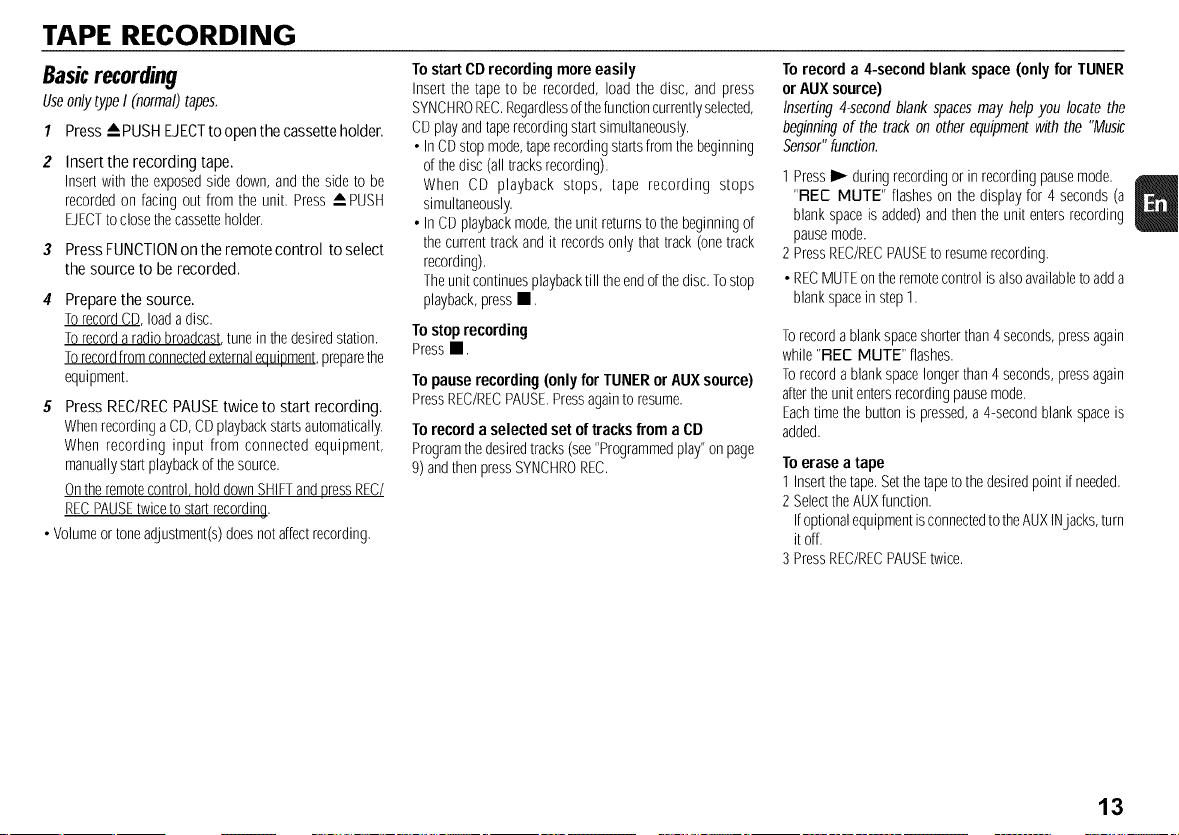
TAPE RECORDING
Basicrecording
UseonlytypeI (normal)tapes.
1 Press -- PUSHEJECTto openthe cassette holder.
Insert the recording tape.
Insert with the exposedside down,andthe sideto be
recordedon facing out from the unit. Press_ PUSH
EJECTtoclosethecassetteholder.
3 PressFUNCTIONontheremotecontrol toselect
the sourceto berecorded.
Prepare the source.
TorecordCD, loadadisc.
Torecorda radiobroadcast,tune in thedesiredstation.
Torecordfromconnectedexternalequipment,preparethe
equipment.
5 Press REC/RECPAUSE twice to start recording.
WhenrecordingaCD,CDplaybackstartsautomatically.
When recording input from connected equipment,
manuallystartplaybackofthesource.
Ontheremotecontrol holddownSHIFTandpressREC/
RECPAUSEtwiceto startrecording.
• Volumeor toneadjustment(s)doesnotaffectrecording.
To start CDrecording more easily
Insert the tapeto be recorded, load the disc, and press
SYNCHROREC.Regardlessofthefunctioncurrentlyselected,
CDplayandtaperecordingstartsimultaneously.
• InCDstop mode,taperecordingstartsfromthebeginning
of thedisc (all tracksrecording).
When CD playback stops, tape recording stops
simultaneously.
• InCDplaybackmode,theunitreturnsto thebeginningof
thecurrenttrackandit recordsonly thattrack(onetrack
recording).
Theunitcontinuesplaybacktill theendofthedisc.Tostop
playback,pressII.
Tostoprecording
Pressm.
Topauserecording(onlyfor TUNERorAUXsource)
PressREC/RECPAUSE.Pressagaintoresume.
To recorda selected set of tracksfrom a CD
Programthedesiredtracks(see"Programmedplay"onpage
9) andthenpressSYNCHROREC.
To record a 4-second blank space (only for TUNER
or AUXsource)
Inserting4-secondblankspacesmay help you locatethe
beginningof thetrack on otherequipmentwith the "Music
Sensor"function.
1 PressI_ duringrecordingor in recordingpausemode.
"FLEE MUTE" flasheson the displayfor 4 seconds(a
blankspaceis added)andthenthe unit entersrecording
pausemode.
2 PressREC/RECPAUSEto resumerecording.
• RECMUTEontheremotecontrolisalsoavailabletoadda
blankspacein step1.
Torecordablankspaceshorterthan4 seconds,pressagain
while"FLEEMUTE" flashes.
Torecordablankspacelongerthan4seconds,pressagain
aftertheunit entersrecordingpausemode.
Eachtimethebuttonis pressed,a 4-secondblankspaceis
added.
To erase a tape
1 Insertthetape.Setthetapeto thedesiredpoint ifneeded.
2 SelecttheAUXfunction.
IfoptionalequipmentisconnectedtotheAUXINjacks,turn
it off.
3 PressREC/RECPAUSEtwice.
13
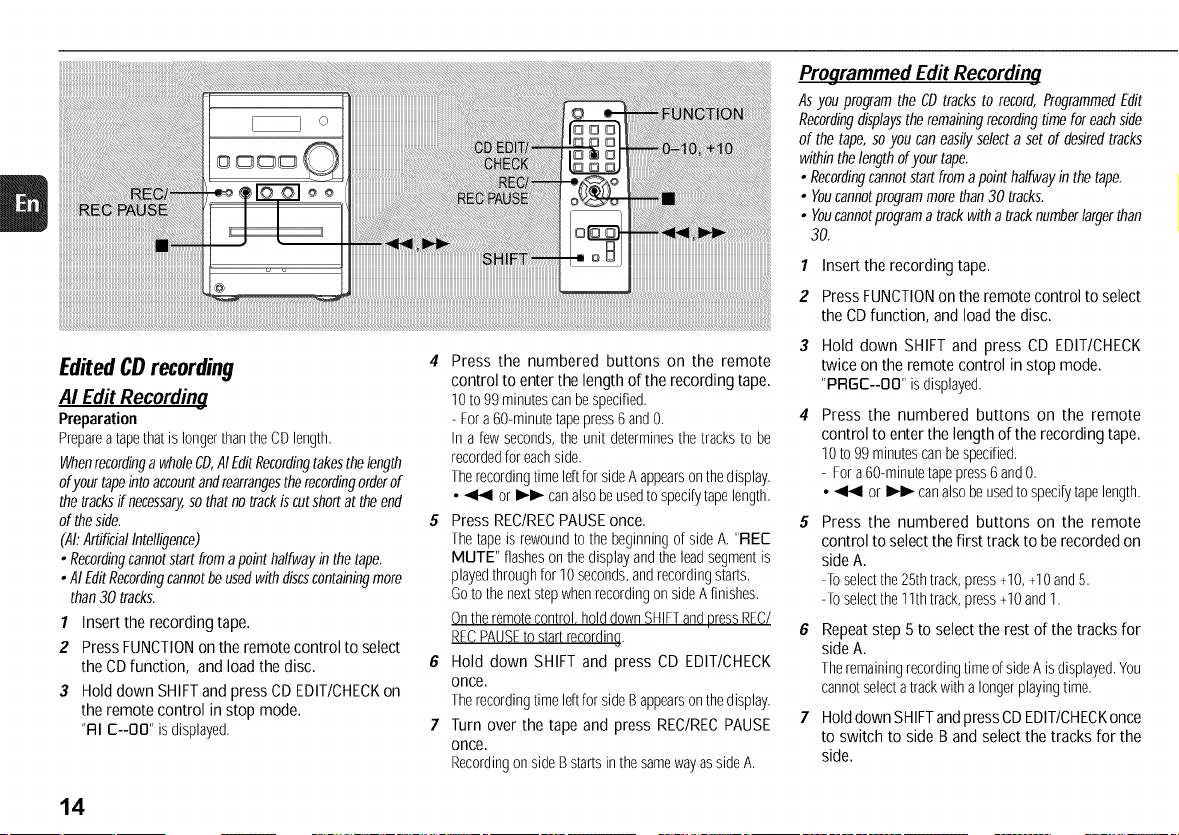
Edited CDrecording
AI Edit Recording
Preparation
PrepareatapethatislongerthantheCDlength.
WhenrecordingawholeCD,AIEditRecordingtakesthelength
ofyourtapeintoaccountandrearrangestherecordingorderof
thetracksif necessary,sothatnotrackiscutshortattheend
oftheside.
(,41:ArtificialIntelligence)
• Recordingcannotstartfromapointhalfwayinthetape.
•AIEditRecordingcannotbeusedwithdiscscontainingmore
than30 tracks.
1 Insertthe recordingtape.
2 PressFUNCTIONonthe remotecontrolto select
the CDfunction, andloadthe disc.
3 Holddown SHIFTandpressCDEDIT/CHECKon
the remotecontrol in stopmode.
"RI E--OO"isdisplayed.
4 Press the numbered buttons on the remote
control to enter the length of the recording tape.
10to 99minutescanbespecified.
- Fora60-minutetapepress6and0. 4
In a fewseconds,theunit determinesthetracksto be
recordedfor eachside.
Therecordingtime Idt forsideA appearsonthedisplay.
• _ or I_ canalsobeusedtospedfytape length.
5 Press REC/RECPAUSE once. 5
Thetapeis rewoundtothe beginningof side A."REE
MUTE" flashesonthedisplayandtheleadsegmentis
playedthroughfor 10seconds,andrecordingstarts.
Goto thenextstepwhenrecordingon sideAfinishes.
Ontheremotecontrol,holddownSHIFTandpressREC/
RECPAUSEto startrecording. 6
6 Hold down SHIFT and press CD EDIT/CHECK
once.
Therecordingtime Idt forsideB appearsonthedisplay.
7 Turn over the tape and press REC/RECPAUSE 7
once.
RecordingonsideBstartsinthesamewayassideA.
Programmed Edit Recording
AsyouprogramtheCDtrackstorecord,ProgrammedEdit
Recordingdisplaystheremainingrecordingtimeforeachside
of thetape,soyoucaneasilyselectasetofdesiredtracks
withinthelengthofyourtape.
• Recordingcannotstartfromapointhalfwayinthetape.
• Youcannotprogrammorethan30tracks.
• Youcannotprogramatrackwithatracknumberlargerthan
30.
1 Insertthe recordingtape.
2 PressFUNCTIONontheremotecontrolto select
the CDfunction, andloadthe disc.
Hold down SHIFTand press CD EDIT/CHECK
twice on the remotecontrol instop mode.
"PRGE--OO"isdisplayed.
Press the numbered buttons on the remote
controlto enterthe lengthoftherecordingtape.
10to99minutescanbespecified.
- Fora60-minutetapepress6and0.
• _ or I_ canalsobeusedtospecifytapelength.
Press the numbered buttons on the remote
controltoselectthefirst trackto berecordedon
sideA.
-Toselectthe25thtrack,press+10,+10and5.
-Toselectthe11thtrack,press+10and1.
Repeatstep 5to selectthe restofthetracksfor
sideA.
TheremainingrecordingtimeofsideAisdisplayed.You
cannotselectatrackwithalongerplayingtime.
HolddownSHIFTandpressCDEDIT/CHECKonce
to switch to sideBandselectthe tracksfor the
side.
14
8 HolddownSHIFTandpressCDEDIT/CHECKonce
to switch backto sideA.
Press REC/RECPAUSEonce.
Thetapeis rewoundto thebeginningof sideA. "REC
MUTE" flasheson thedisplayandtheleadsegmentis
playedthroughfor 10seconds,andrecordingstarts.
GotothenextstepwhenrecordingonsideAfinishes.
Ontheremotecontrol holddownSHIFTandpressREC/
RECPAUSEtostartrecording.
10HolddownSHIFTandpressCDEDIT/CHECKonce
to switchto sideB.
11 Turn over the tape and press REC/REC PAUSE
once.
RecordingonsideBstartsin thesamewayassideA.
Tostoprecording
Press•. RecordingandCDplaybackstopsimultaneously.
To checkthe program
1Before recording, hold down SHIFT and press
CD EDIT/CHECKontheremotecontrolto selectsideAor
B.
2 Press_ or _ repeatedly.Thetrack numberand
programnumberaredisplayedin succession.
To changethe program of each side
HolddownSHIFTandpressCDEDIT/CHECKontheremote
controltoselectsideAorB,andpress• tocleartheprogram
fortheselectedside.Then,selecttracksagain.
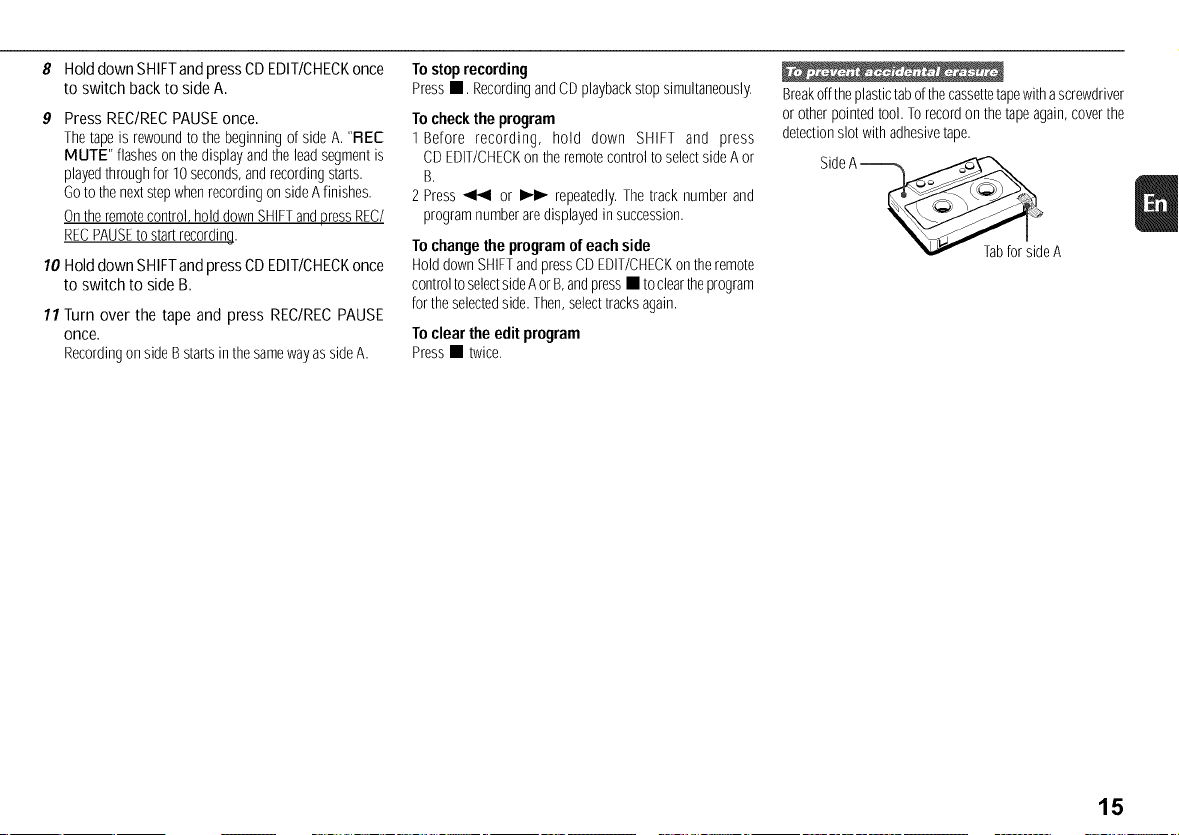
To clear the edit program
Press• twice.
Breakofftheplastictabofthecassettetapewithascrewdriver
or otherpointedtool. Torecordon thetapeagain,coverthe
detectionslotwith adhesivetape.
SideA_e A
15
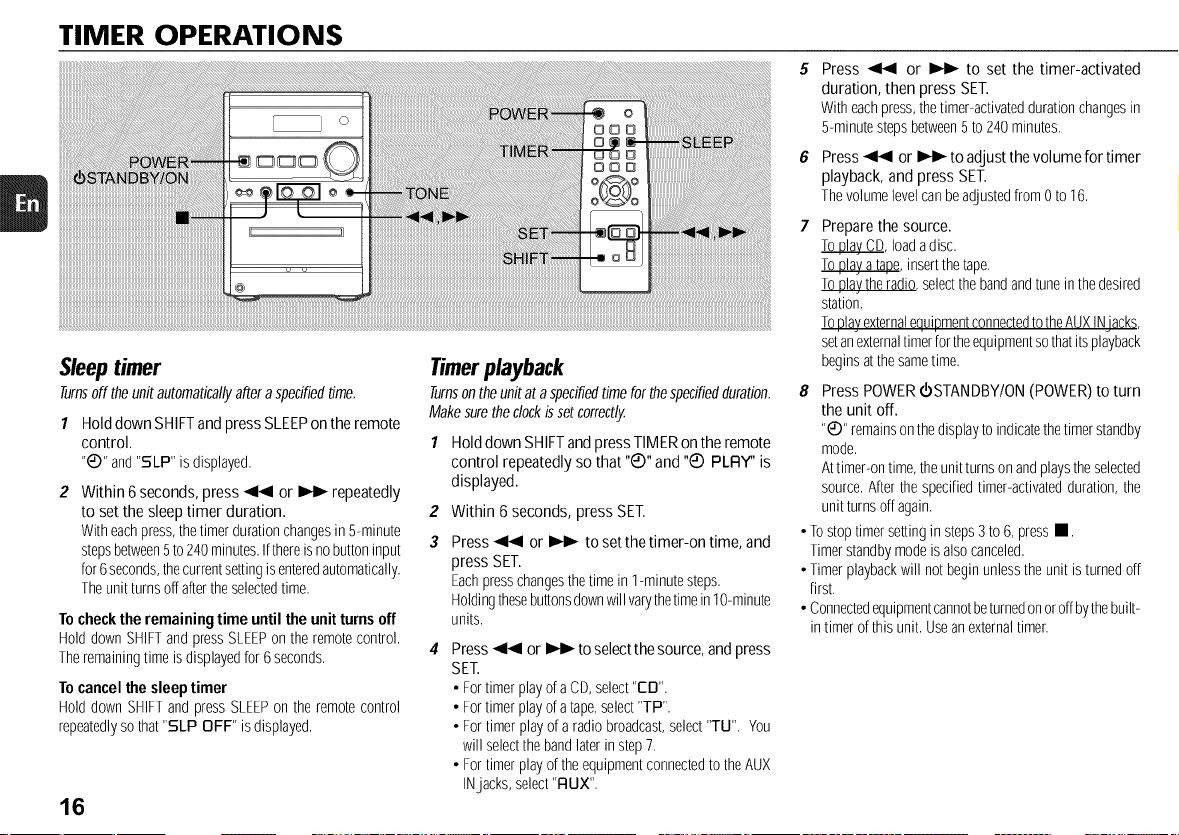
TIMER OPERATIONS
Sleep timer
Turnsoff theunitautomati:allyafteraspedfiedtime.
1 Hold down SHIFTand press SLEEPon the remote
control.
"_)" and"SLP" isdisplayed.
Within 6seconds, press _ or _ repeatedly
to set the sleep timer duration.
Witheachpress,thetimerdurationchangesin 5-minute
stepsbetween5to240minutes.Ifthereis nobuttoninput
for6seconds,thecurrentsettingisenteredautomatically.
Theunitturnsoffaftertheselectedtime.
To checkthe remaining time until the unit turns off
Hold downSHIFTandpressSLEEPon theremotecontrol.
Theremainingtimeis displayedfor 6seconds.
To cancelthe sleep timer
Hold down SHIFTandpressSLEEPonthe remotecontrol
repeatedlyso that"SLP OFF" is displayed.
16
Timerplayback
Turnsontheunitat aspecifiedtimeforthespecifiedduration.
Makesuretheclockissetcorrectly.
1 HolddownSHIFTandpressTIMERontheremote
control repeatedlyso that"Q" and "Q PLFIY"is
displayed.
2
3
Within 6 seconds, press SET.
Press _ or _ to set the timer-on time, and
press SET.
Eachpresschangesthetimein 1-minutesteps.
Holdingthesebuttonsdownwillvarythetimein10-minute
units.
Press _ or _ to select thesource, andpress
SET.
• FortimerplayofaCD,select"ED".
• Fortimerplayofatape,select"TP".
• For timer playof aradiobroadcast,select"TU". You
will selectthebandlaterin step7.
• For timerplayoftheequipmentconnectedto theAUX
INjacks, select"FLUX".
Press _ or _ to set the timer-activated
duration, then press SET.
With eachpress,thetimer-activateddurationchangesin
5-minutestepsbetween5 to240minutes.
6 Press _ or _ to adjust the volume for timer
playback, and press SET.
Thevolumelevelcanbeadjustedfrom0 to16.
Prepare the source.
_, loadadisc.
Toplayatape,insertthetape.
Toplaythe radio,selectthebandandtunein thedesired
station.
ToplayexternalequipmentconnectedtotheAUXINiacks,
setanexternaltimerfortheequipmentsothatitsplayback
beginsatthesametime.
8 Press POWER €STANDBY/ON (POWER) to turn
the unit off.
"_" remainsonthedisplaytoindicatethetimerstandby
mode.
Attimer-ontime,theunitturns onandplaystheselected
source.Afterthespecifiedtimer-activatedduration,the
unitturns offagain.
• Tostoptimer settingin steps3to 6,pressI1.
Timerstandbymodeis alsocanceled.
• Timerplaybackwill not beginunlesstheunit isturnedoff
first.
• Connectedequipmentcannotbeturnedonoroffbythebuilt-
in timer ofthisunit. Useanexternaltimer.
Timerrecording
Timerrecordingisavailableonlyfor TUNERandAUX(withan
externaltimer)sources.
1
2
3
HolddownSHIFTandpressTIMERonthe remote
control repeatedlysothat"Q REE"isdisplayed.
Within 6seconds,pressSET.
Press _ or _ to set the timer-on time, and
press SET.
Eachpresschangesthetimein 1-minutesteps.
Holdingthesebuttonsdownwill varythetimein10-minute
units.
Press_ or _ to select the source, and press
SET.
• Fortimerrecordingof aradiobroadcast,select"TU".
Youwill selectthebandlaterin step7.
• Fortimerrecordingoftheequipmentconnectedto the
AUXINjacks, select"RUX".
Press _ or _ to set the timer-activated
duration, then press SET.
Witheachpress,thetimer-activateddurationchangesin
5-minutestepsbetween5to240minutes.
Press_ or _ to adjustthevolumefortimer
recording,and pressSET.
Thevolumelevelcanbeadjustedfrom0to16.
Prepare the source.
Torecordtheradio,selectthebandandtuneinthedesired
station.
To recordexternalequipmentconnectedto theAUXIN
_, setanexternaltimer fortheequipmentso thatits
playbackbeginsatthesametime.
8 Insert the recording tape and then turn the unit
off.
"C) REC" remainson thedisplayto indicatethetimer
standbymode.
Attimer-ontime,theunitturnsonandrecordstheselected
source.Afterthe specifiedtimer-activatedduration,the
unit turnsoffagain.
• Tostoptimersetting in steps3to6, pressm.
Timerstandbymodeisalsocanceled.
• Connectedequipmentcannotbeturnedonoroffbythebuilt-
in timerofthis unit. Useanexternaltimer.
When setting the timer onthe unit
Holddown • andpress_ instop mode.
Repeattheaboveto selecttimerplayback,timer recordingor
timeroff mode,anduseTONEinsteadofSETontheremote
controlin thefollowing steps.
To checkthe timer setting
Hold down SHIFTandpressTIMERon the remotecontrol
repeatedlysothat "_ PLRY" or"_ REC" appearsonthe
display.
Thetimer-ontime,thesourceandthetimer-activatedduration
aredisplayedfor 6seconds.
To changethe timer setting
Resetthetimer again.
To cancelthe timer
Hold down SHIFTandpressTIMERon the remotecontrol
repeatedly until "C) OFF" is displayed. "C)" or
"_ REC" disappearsfromthedisplay.
Tip:
Yourtimer settingis retainedevenifthetimer is canceled.
Nexttimethetimer isactivated,youcanchangeyourprevious
setting,orsimply usethesamesetting again.
17
REFERENCE
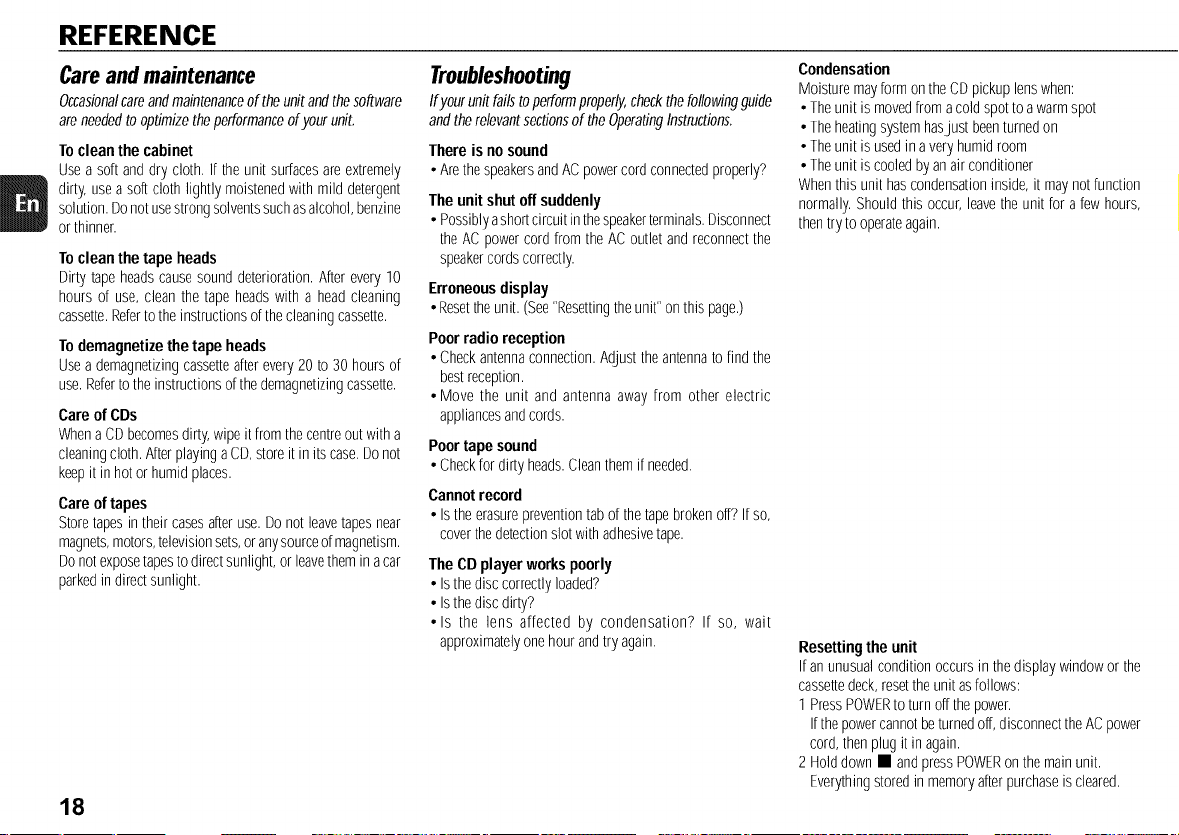
Careandmaintenance
Occasionalcareandmaintenanceof theunit andthesoftware
areneededtooptimizetheperformanceofyour unit.
To clean the cabinet
Usea soft anddry cloth. If theunitsurfacesare extremely
dirty, useasoft cloth lightly moistenedwith mild detergent
solution.Donotusestrongsolventssuchasalcohol,benzine
or thinner.
To clean the tape heads
Dirtytapeheadscausesound deterioration.Afterevery10
hours of use, cleanthe tape headswith a headcleaning
cassette.Refertotheinstructionsofthecleaningcassette.
To demagnetize the tape heads
Usea demagnetizingcassetteafterevery20to 30 hoursof
use.Refertothe instructionsof thedemagnetizingcassette.
Care of CDs
WhenaCD becomesdirty,wipeit fromthecentreoutwith a
cleaningcloth.AfterplayingaCD,storeitin its case.Donot
keepit inhotor humidplaces.
Care of tapes
Storetapesin theircasesafteruse.Do notleavetapesnear
magnets,motors,televisionsets,oranysourceofmagnetism.
Donotexposetapestodirectsunlight,or leavetheminacar
parkedin directsunlight.
18
Troubleshooting
Ifyourunitfailstoperformproperly,checkthefollowingguide
andtherelevantsectionsof theOperatingInstructions.
There is no sound
• Arethe speakersandACpowercord connectedproperly?
The unit shutoff suddenly
• Possiblyashortcircuitinthespeakerterminals.Disconnect
theACpowercordfrom theACoutletand reconnectthe
speakercordscorrectly.
Erroneousdisplay
• Resettheunit. (See"Resettingtheunit"onthis page.)
Poor radio reception
• Checkantennaconnection.Adjusttheantennato find the
bestreception.
• Move the unit and antenna away from other electric
appliancesandcords.
Poortapesound
• Checkfordirtyheads.Cleanthemif needed.
Cannotrecord
• Is theerasurepreventiontabof thetapebrokenoff? Ifso,
coverthedetectionslot withadhesivetape.
The CD player works poorly
• Isthedisccorrectlyloaded?
• Isthediscdirty?
• Is the lens affected by condensation? If so, wait
approximatelyonehourandtry again.
Condensation
MoisturemayformontheCDpickuplenswhen:
• Theunit is movedfrom acoldspottoawarmspot
• Theheatingsystemhasjust beenturnedon
• Theunit is usedin avery humidroom
• Theunit is cooledbyanairconditioner
Whenthis unit hascondensationinside,it maynotfunction
normally.Shouldthis occur,leavetheunit for a fewhours,
thentryto operateagain.
Resetting the unit
Ifanunusualconditionoccursin thedisplaywindowor the
cassettedeck,resetthe unitasfollows:
I PressPOWERto turnoffthepower.
Ifthepowercannotbeturnedoff,disconnecttheACpower
cord,then plugit in again.
2 Holddown• andpressPOWERonthe mainunit.
Everythingstoredinmemoryafterpurchaseis cleared.
Specifications
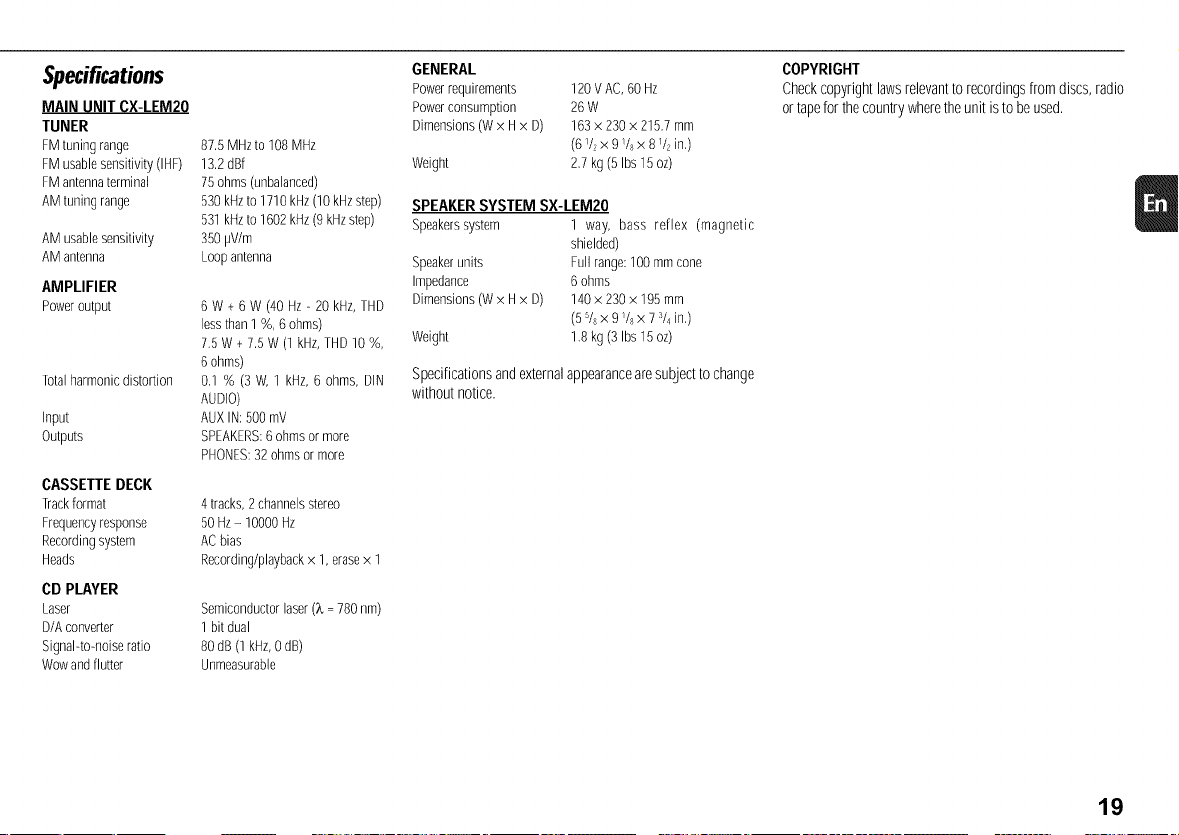
MAIN UNIT CX-LEM20
TUNER
FM turfingrange
FM usablesensitivity (IHF)
FM antennaterminal
AMtuning range
AMusablesensitivity
AMantenna
AMPLIFIER
Poweroutput
Totalharmonic distortion
input
Outputs
CASSETTE DECK
Trackformat
Frequencyresponse
Recordingsystem
Heads
CD PLAYER
Laser
D/Aconverter
Signal-tomoise ratio
Wowandflutter
87.5 MHzto 108 MHz
13.2 dBf
75 ohms (unbalanced)
530 kHzto 1710 kHz(10 kHz step)
531 kHzto 1602 kHz(9 kHzstep)
350 pV/m
Loop antenna
8 W + 6 W (40 Hz - 20 kHz,THD
less than1%, 8 ohms)
7.5 W + 7.5 W (1 kHz,THD 10 %,
6 ohms)
0,1% (3 W, 1 kHz, 6 ohms, DiN
AUDIO)
AUX IN: 500mV
SPEAKERS:6 ohms or more
PHONES:32 ohmsor more
4tracks,2channelsstereo
50Hz- 10000Hz
ACbias
Recording/playbackx 1,erasex 1
Semiconductorlaser(X- 780nm)
1bit dual
80dB(1kHz,0dB)
Unmeasurable
GENERAL
Powerrequirements 120 VAC,60 Hz
Powerconsumption 26 W
Dimensions (W x Hx D) 163 x 230x 215,7 mm
(6 V?x 9/8 x 8 _/2in,)
Weight 2,7 kg (5 Ibs15 oz)
SPEAKERSYSTEM SX-LEM20
Speakerssystem 1 way, bass reflex (magnetic
shielded)
Speakerunits Fullrange:100mmcone
Impedance 6ohms
Dimensions(Wx Hx D) 140x 230x 195mm
(55/sx 9/s x 7s/4in,)
Weight 1.8kg(3 Ibs15oz)
Specificationsandexternalappearancearesubjecttochange
withoutnotice.
COPYRIGHT
Checkcopyrightlawsrelevanttorecordingsfromdiscs,radio
ortapefor thecountrywheretheunit istobeused.
19
NOTE
Thisequipmenthasbeentestedandfoundtocomplywiththe
limitsfor aClass Bdigital device,pursuanttoPart15ofthe
FCCRules.Theselimits aredesignedto providereasonable
protection against harmful interference in a residential
installation.
This equipment generates,uses, and can radiate radio
frequencyenergyand,if notinstalledandusedinaccordance
withtheinstructions,maycauseharmfulinterferencetoradio
communications. However,there is no guarantee that
interferencewill notoccurin aparticularinstallation.Ifthis
equipment does cause harmful interferenceto radio or
televisionreception,whichcanbedeterminedbyturningthe
equipmentoffandon,theuserisencouragedtotrytocorrect
theinterferenceby oneor moreof thefollowingmeasures:
- Reorientor relocatethereceivingantenna.
- Increasetheseparationbetweentheequipmentandreceiver.
- Connectthe equipmentinto an outleton circuit different
fromthattowhichthereceiverisconnected.
- Consult thedealeror anexperiencedradio/TVtechnician
for help.
CAUTION
Modificationsor adjustmentstothis product,whicharenot
expresslyapprovedbythe manufacturer,mayvoidtheuser's
rightorauthorityto operatethis product.
REMAROUE
Cetappareila ereteste etjuge conformeaux limites des
appareilsnumeriquesdeClasseB,conformementala Partie
15 desReglesFCC.Ceslimitessont concuespour fournir
uneprotectionraisonnablecontrelesinterferencesndastes
dansuneinstallationresidentielle.
Cetappareilproduit, utiliseetpeut rayonneruneenergiede
frequence radio et, s'il n'est pas installe et utilise
conformement aux instructions, peut provoquer des
interferencesgenantespourlescommunicationsradio.Mais
riennegarantitqu'unetelle interferencenese produirapas
dansuneinstallationparticuliere.Si cetappareilproduitdes
interferencesgenantespourlareceptionradiooudetelevision,
cequi peutsedeterminerenallumanteteteignantI'appareil,
il estrecommandea I'utilisateurd'essayerdecorriger cette
interferenceenappliquantuneou plusieursdes mesures
suivantes:
- ReorientationoudeplacementdeI'antennereceptrice.
- EloignementdeI'appareildurecepteur.
- RaccordementdeI'appareilauneprised'uncircuitdifferent
decelui durecepteur.
- Consultezle revendeurou untechnicienradio/television
experimente.
PRECAUTION
Les modifications ou ajustements de ce produit, non
expressementapprouvesparlefabricant,peuventinvaliderle
droitouI'autoritedeI'utilisateurautiliserce produit.
CAUTION
TO PREVENTELECTRIC SHOCK DO NOT USE THIS
(POLARIZED) PLUG WITH AN EXTENSION CORD,
RECEPTACLEOROTHEROUTLETUNLESSTHEBLADESCAN
BEFULLYINSERTEDTOPREVENTBLADEEXPOSURE.
This Class B digital apparatuscomplies with Canadian
ICES-003.
OnlyforCmodels.
ATTENTION
POUR PREVENIRLES CHOCS ELECTRIQUESNE PAS
UTILISER CETTE FICHE POLARISEE AVEC UN
PROLONGATEUR,UNEPRISEDECOURANTOUUNEAUTRE
SORTIEDECOURANT,SAUFSI LESLAMESPEUVENTETRE
INSEREESA FONDSANSENLAISSERAUCUNEPARTIEA
DECOUVERT.
CetappareilnumeriquedelaclasseBestconformealanorme
NMB-003duCanada.
PourlesmodelesC uniquement.
Printed in China
AIWA CO.,LTD.