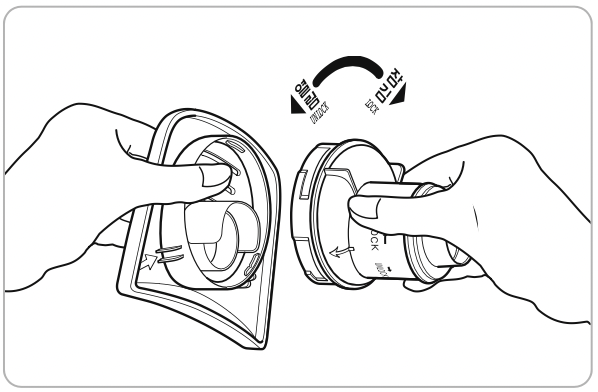
To reassemble your steam cap, hold the steam cap as shown in the image above and follow the arrows to lock it.
After assembling the steam cap, place it back on top of the lid as seen in the image above.
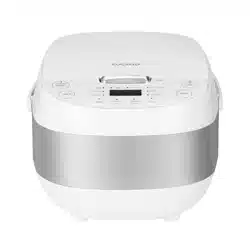
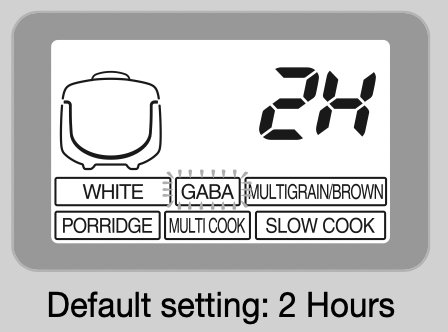
CONTROL PANEL DETAILS
* There may be a slight difference in appearance between The device and the picture (Default Panel image is for CR 0632F). * Press the buttons until you hear a buzzer sound. The design of this template may differ from the actual product.
Error Alerts
Error alert will appear if your rice cooker encounters a problem.
When the inner pot is not placed correctly into the unit.
Temperature sensor problem. (Contact our service center or dealer)
When the cooking cycle takes longer than expected. (Contact our service center or dealer)
This occurs when the timer has been set for longer than 13 hours. Please keep the preset time within 13 hours.
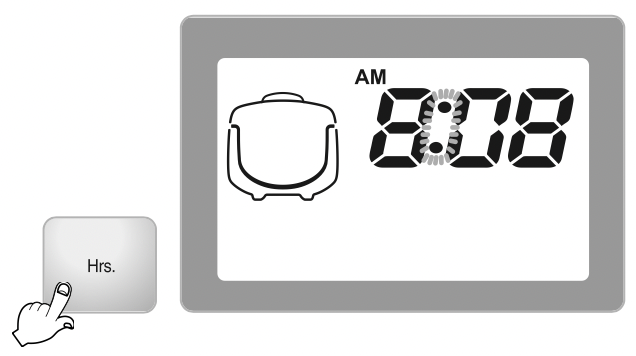
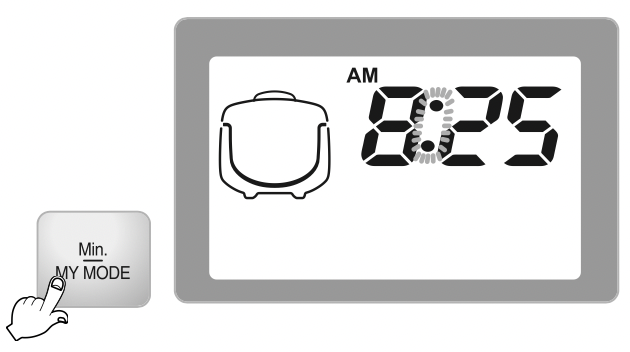
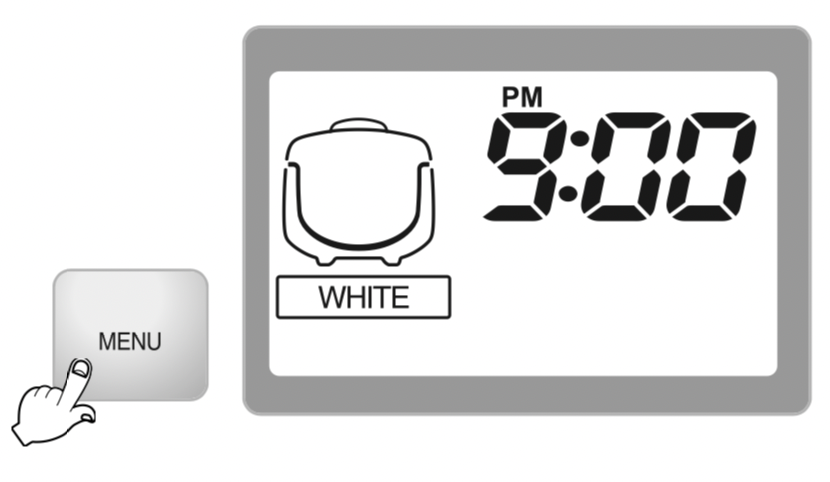
HOW TO SET THE TIME
Connect the power plug
Press the “Hrs”, “Min/My Mode” button for more than 1 second.
Set the current time using the “Hrs”, “Min/My Mode” button. Press the button longer than 1 second. Each time you press “Hrs” button, the time increases in 1 hour increments. Each time you press “Min/My Mode” button, the time increases in 1 minute increments. In case of 12:00 at noon, it will be displayed 12:00 P.M.
The time will automatically be set after 7 seconds. Once time is set, the colon (:) will stop blinking and a buzzer will go off.
How to set up the current time during ‘Keep Warm’
If you want to change the current time during ‘Keep Warm’, press “Cancel” button and then set up the current time.
When finish setting the current time, press “Heat/Reheat” button. At the time ‘ ’sign is displayed.
About lithium battery
This product contains lithium battery for improving blackout compensation and time. Lithium battery lasts for about 3 years depending on the use of the unit.
When the current time is no longer being displayed on the screen, the battery may be depleted.
What is blackout compensation
This product recognizes the condition of the unit. After blackout, it will operate immediately.
If blackout happens during cooking, the cooking time will be delayed depending on blackout time.
If the rice became cold because of blackout, warming will be cancelled.
BEFORE USING YOUR MACHINE
Clean the inner pot and remove any moisture. Clean the inner pot with a dishcloth. Using a rough sponge to clean the inner pot may cause the non-stick coating to peel. Please use a non-abrasive material to clean the inner pot.
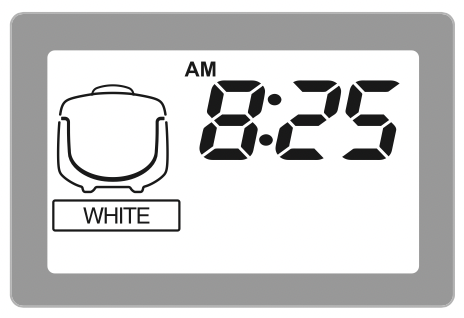
Measure the rice correctly with a measuring cup. Rice filled to the top of the cup is considered one serving. (Example: 3 persons for 3 cups, 6 persons for 6 cups)
Clean the rice thoroughly in a separate container and rinse until the rice water is clear.
Adjust the water amount in accordance with the menu selected. Place the inner pot on a flat surface and adjust the water amount up to the water level line. The water level line is marked on the inside of the inner pot. Adjustment of water height White : Adjust water based on ‘White’ water level line. Max.6 persons for White are available Multigrain/Brown, GABA: Adjust water base on “Multigrain/Brown, GABA water level line. Max.4 persons for Multigrain/Brown and GABA are available Porridge: Adjust water base on “Porridge” water level line. Max. 1.5 persons for porridge are available
FOR TASTY RICE
How to Cook Tasty Rice
Read the following instructions for tasty rice:
HOW TO COOK
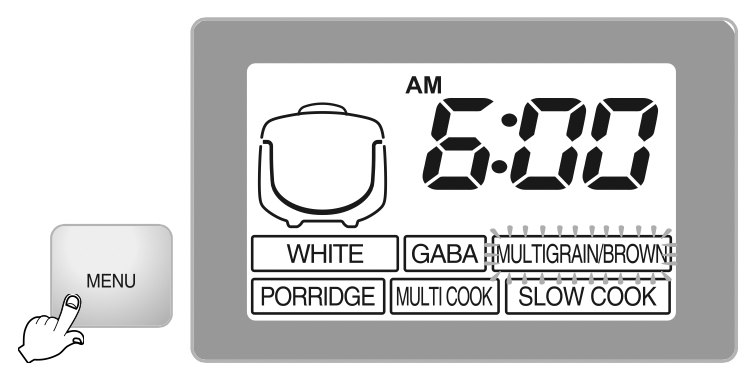
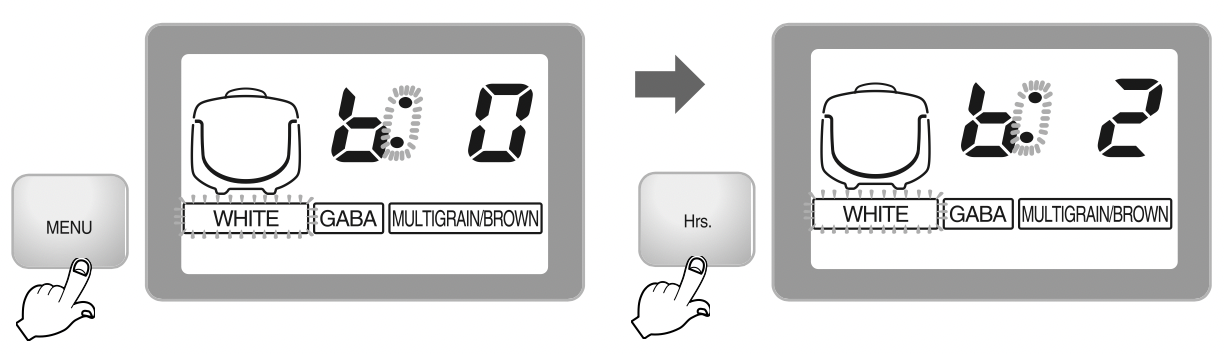
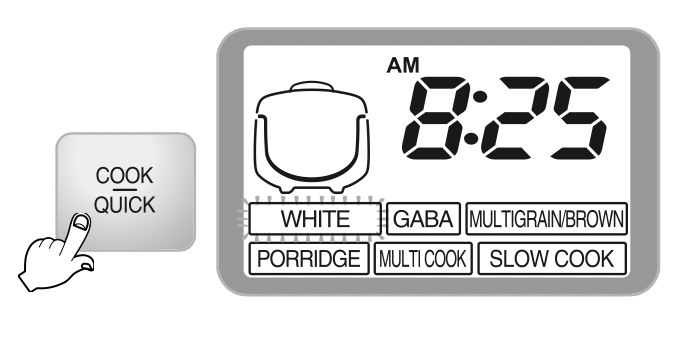
Press the MENU button continuously to select your desired menu option When pressing the “Menu” button, the menu is changed in sequence From White, GABA, Multigrain/Brown, Porridge, Multi Cook, Slow cook.
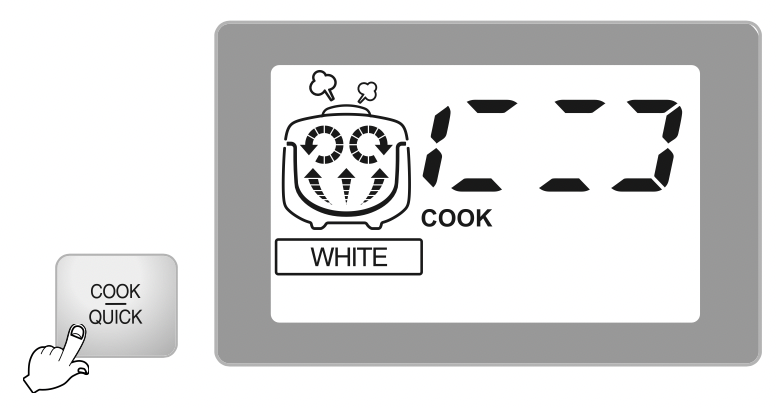
Press the COOK/QUICK button to start cooking. For CR-0631F model, Cook/Turbo button is applied
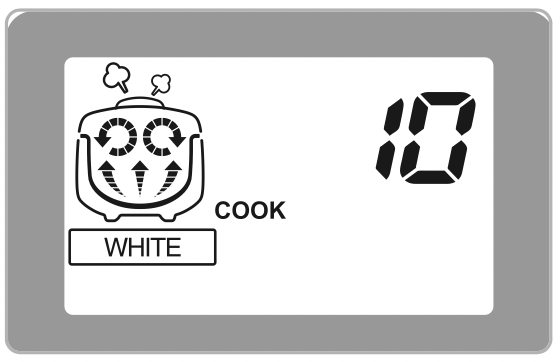
Steaming and remaining time When a number appears on the display, that is the remaining time left in the cooking cycle. If you are cooking rice it means your rice is in the steaming process.
Completion When the cooking is completed, a beeping sound will turn on and the Keep Warm function will start. When rice is cooked, quickly stir the rice. Do not press the “CANCEL” when cooking finishes or the KEEP WARM function will be canceled.
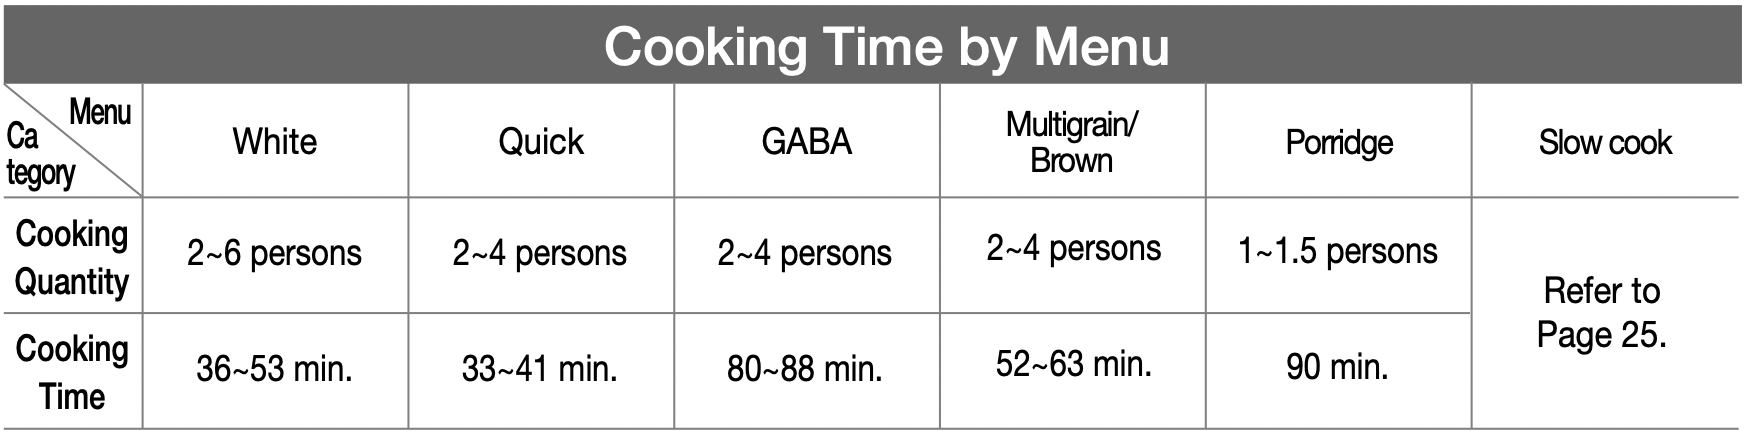
Cooking Time by Menu
If you cook rice after using the MULTI COOK menu option, an odor may develop. (Clean the lid referring to Page 10.)
The cooking time by menu may vary depending on the operating environment.
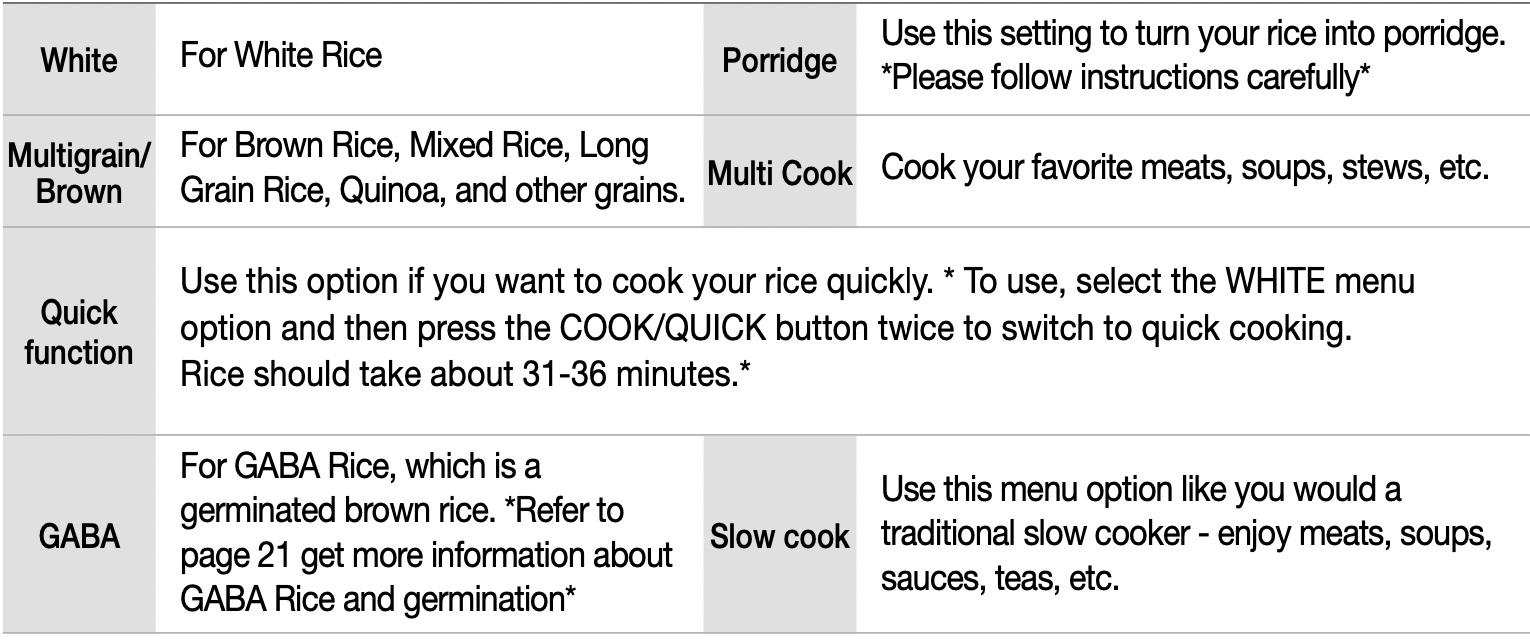
Menu Descriptions
Maillard Reaction
Please note that your rice can become light yellow at the bottom of the inner pot sometimes.
This is due to the maillard reaction and is completely safe to consume.
Some settings may cause this to occur more often than others.
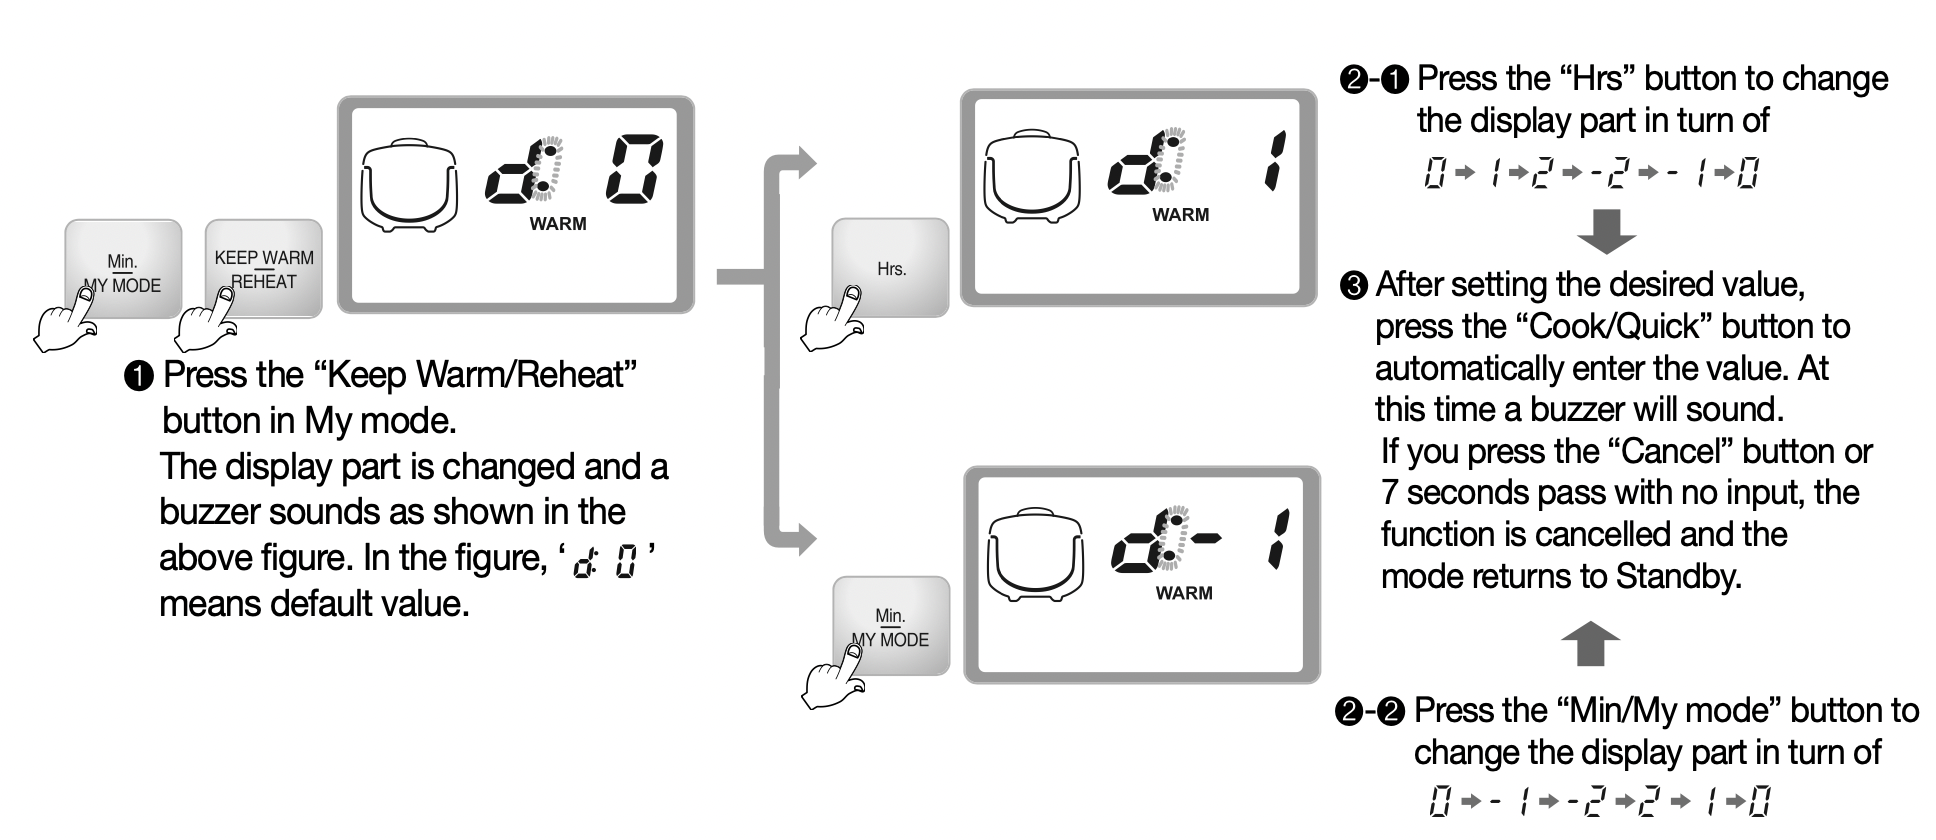
HOW TO USE “MY MODE”
What is “MY MODE”?
With My Mode, you can customize the texture and flavor of your rice to make the perfect rice for you and your family.
MY MODE Function
SOAKING: Soaking controls the rice's texture. The longer the soak time, the softer and stickier your rice will become. There are 4 levels of soaking for you to choose from.
HEATING: Heat determines the rice's flavor. The longer the heating time, the more developed your rice flavor will become.
There are 4 levels of heating for you to choose from. *Please note that the Maillard reaction may occur during this process*
Both HEATING and SOAKING can be selected individually or in tandem.
How to use “MY MODE”
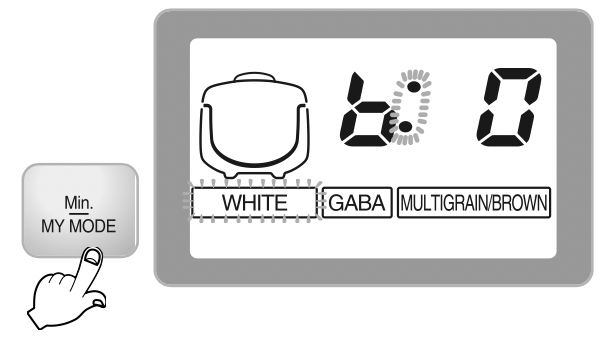
When the rice cooker is in standby mode, press the "Min./MY MODE" button to enter into MY MODE. Once the rice cooker enters MY MODE, the screen should look like the image on the right.
Adjusting the soaking time in MY MODE. First, select the menu option you would like to use. Choose between WHITE, GABA, MULTIGRAIN/BROWN. To adjust the soaking time, press the Hrs. button repeatedly until desired soaking time appears. The default soaking times are 0, 2, 4, and 6. 6 being the longest soaking time. * Please note that soaking times are levels not minutes. Soaking refers to the time rice is soaking without any additional heat.
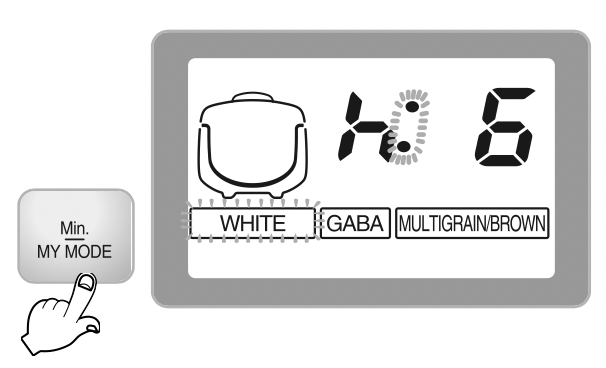
Adjusting the heating time in MY MODE. To adjust the heating time, press the Min./MY MODE button repeatedly until desired heating time appears. Default heating times are 0, 6, 8, and10. 10 being the longest heating time. * Please note that heating times are levels not minutes. After selecting your desired heating and soaking times, press the COOK/QUICK button to save your settings and then press the COOK/QUICK button again to start cooking. Heating refers to the length of the cooking process.
Insight
MY MODE may change the quality of the rice and may cause scorching. * Default settings for both SOAK and HEAT are 0.
Using MY MODE may cause longer cooking times depending on settings selected.
By increasing the HEAT, scorching may occur at the bottom on the inner pot.
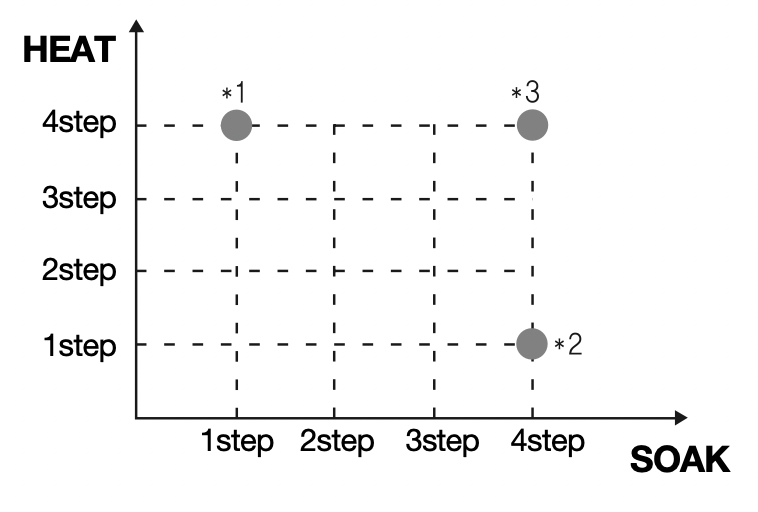
16 different flavor and texture combinations with MY MODE.
*1. The rice becomes firm and sticky.
*2. The rice becomes soft and mild.
*3. The rice becomes soft and sticky.
CUSTOMIZED TEMPERATURE CONTROL
Customized Temperature Control
You can adjust the cooking temperature level on your rice cooker according to your preference.
High Temperature Levels : for cereals, old rice and soft-boiled rice.
Low Temperature Levels : for newly harvested rice.
To adjust the temperature level, please follow the steps below:
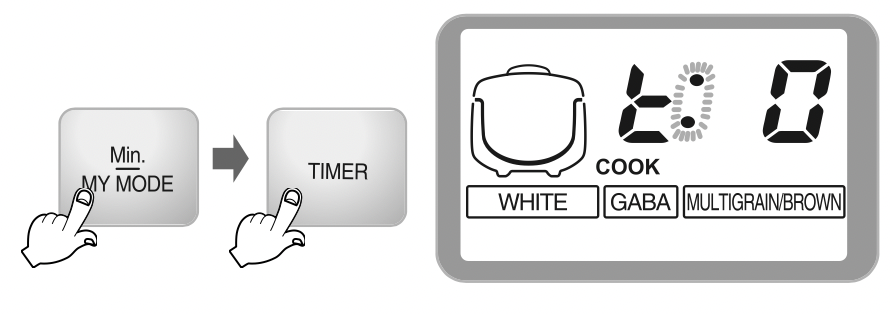
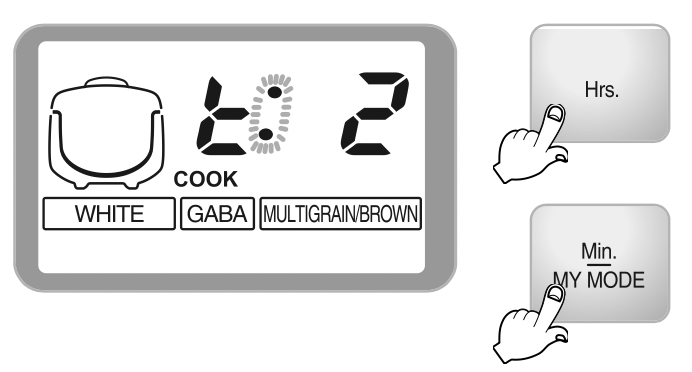
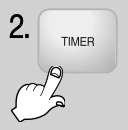
Entering into temperature control While the rice cooker is in standby mode, press the Min./MY MODE button and then the TIMER button to enter into temperature control.
Adjusting the Temperature Level Press the Hrs button to increase temperature level *Please note that maximum temperature level is 2. Press the Min./MY MODE button to decrease the temperature level. *Please note that minimum temperature level is -2.
Saving your Temperature Level After selecting your desired temperature level, press the Cook/Quick button to save you temperature setting.
Reset Function (Customization/Function)
This function is used to reset all setting values such as customized rice taste, customized cooking, customized warming and keep warm during sleep.
Press the Cancel button for 5 seconds in standby mode.
The current time is initialized at 12:00. For the setting of the current time, refer to Page 13.
HOW TO USE “GABA”
What is GABA Rice?
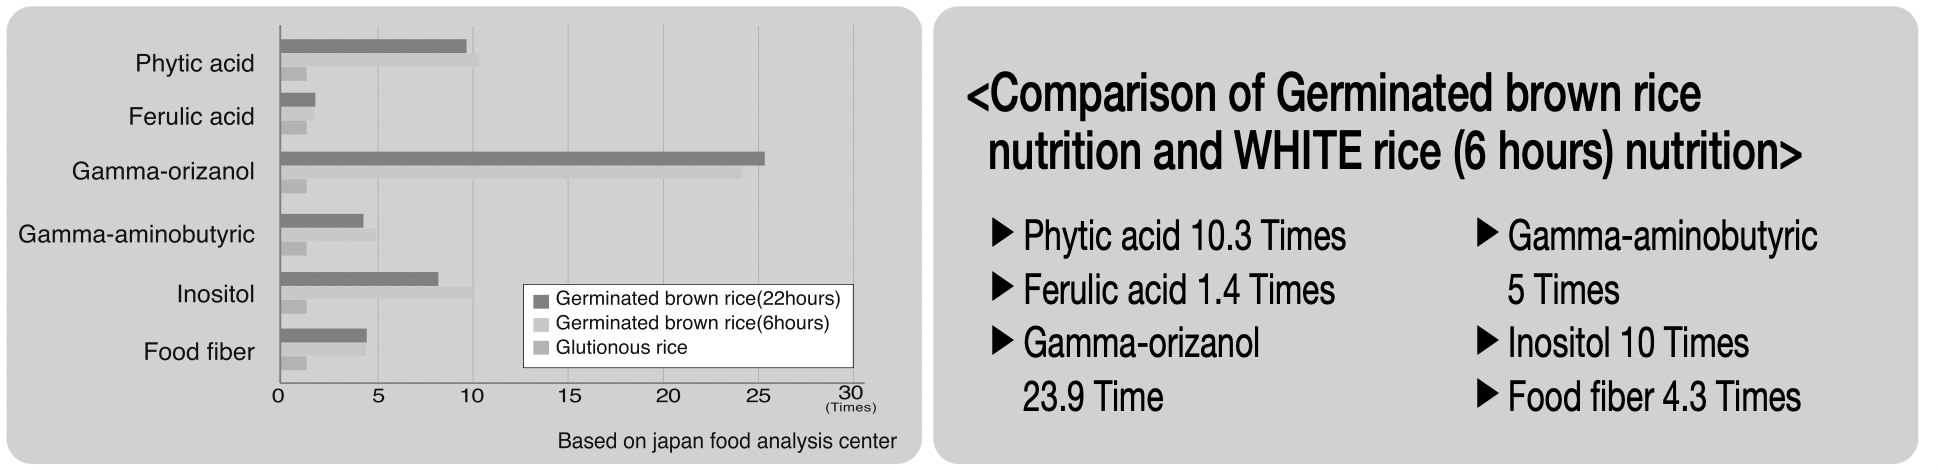
GABA is a nickname given to the amino acid found in brown rice called gamma-aminobutyric acid. This amino acid is said to have a range of health benefits – it said to promote the metabolism in your brain cells, liver and kidneys, suppress neutral fats, and lower blood pressure.
Germinated Brown Rice differs from regular brown rice in that it still has the germ attached to the brown rice and has more of this amino acid present.
Cuckoo's GABA rice menu option helps boost the amino acid (GABA) found in brown rice by cooking it at a lower temperature for a longer period of time - making it more digestible and healthier to eat.
Tips to Buy Quality Brown Rice
Check the dates of harvest and pounding. The dates should be within 1year of harvest, 3 months from pounding.
Check your rice. Check if the embryo is alive Rice surface should be light yellow and glazing. Whitely stirred up surface, or darkish colored Brown rice is not suitable for a germination
Features of Germinated Brown Rice
Using “GABA” Menu
In order to promote germination, we recommend soaking brown rice for 16 hours in water. Method of Pre-germination Put washed brown rice in an appropriate container, pour sufficient water to soak the rice. Pre-germination should not exceed 16 hours. Make sure to wash rice clean with flowing water before using “GABA” menu. Be ca When pre-germination has been completed, wash the rice and put in the inner pot. Pour appropriate amount of water, and use “GABA” menu.
Press “Menu” button to select “GABA”. When the “GABA” is selected,“2H” it is indicated on the display.
Press “Hrs and Min/My Mode “buttons to set time. Pressing “Hrs” button increases germination time by 2 hour. Pressing “Min/My Mode” button decreases germination time by 2 hour. “GABA”time can be set-up by 0, 2, 4, 6 hours. If “GABA” time is set “0” hours, pressing Pressure Cook/Quick button will start cooking immediately. To cook without germination or cooking germinated Brown rice, set the time at “0”.
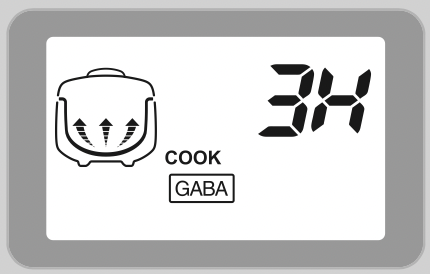
Press Pressure “Cook/Quick” button. Pressing Pressure “Cook/Quick” button will begin the “GABA” process immediately. During “GABA” mode, “Cook” indicator will be lit together with the germination time.
Precautions for “GABA” Cooking (no cooking presset time allowed)
If smaller germination is preferred, omit pre-germination process. Select “GABA” menu, set-up appropriate germination time, and start cooking (nutrient ingredients do not vary significantly by the size of germ).
GABA function cooks for up to 6 people.
Tap water can be used for germination. However, spring water is recommended. Germination may not be properly performed in hot or boiled water even after cooling.
Germination rate, germ growth may differ by the Brown rice type, condition or period of storing, etc.
Germinated brown rice is sprouted brown rice. Germination rate and growth may differ by the brown rice brand.
The brown rice should be within 1 year from harvest.
In GABA mode, preset on 4H, 5H, 6H may not be possible. If you want to preset the GABA, set up “ ”
HOW TO USE “MULTI COOK”
How to use the MULTI COOK menu and Timer
Press the “Menu” button and select Multi Cook menu. If the MULTI COOK menu is selected, the display shows ‘20 min’.
Press the “Hrs” and “Min/My mode” buttons to set the desired time. 1. If you press the “Hrs” button, the MULTI COOK time increases by 5 minutes. 2. If you press the “Min/My mode” button, the MULTI COOK time reduces by 5 minutes. 3. The MULTI COOK time can be configured up to 10 ~ 60 minutes.
Press the “Cook/Quick” button to start the Multi Cook menu. If the MULTI COOK function starts, the cooking status is marked and the remaining time is shown on the display.
How to preset the MULTI COOK function 1. Check if the current time is correct. 2. Press the “Timer” button. 3. Set the Preset time by pressing the “Hr/Min” buttons. 4. Press the “Menu” button to select the Multi Cook menu. 5. Press the “Hr/Min” buttons to set the MULTI COOK time. 6. Press the “Timer button” or the “Cook/Quick” button.
HOW TO USE “SLOW COOK”
How to use Slow cook function and preset time
Press the “Menu” button and select Slow cook menu. If the Slow cook menu is selected, the display shows ‘3 hours’.
Press the “Hrs” and “Min/My mode” buttons to set the desired time. 1. If you press the “Hrs” button, the Slow cook time increases by 5 minutes. 2. If you press the “Min/My mode” button, the Slow cook time reduces by 5 minutes. 3. The Slow cook time can be configured up to 10 ~ 60 minutes.
Press the “Cook/Quick” button to start the Slow cook menu. If the Slow cook function starts, the cooking status is marked and the remaining time is shown on the display.
How to preset the Slow cook function 1. Check if the current time is correct. 2. Press the “Timer” button. 3. Set the Preset time by pressing the “Hr/Min” buttons. 4. Press the “Menu” button to select the Slow cook menu. 5. Press the “Hr/Min” buttons to set the Slow cook time. 6. Press the “Timer button” or the “Cook/Quick” button.
How to use Slow cook
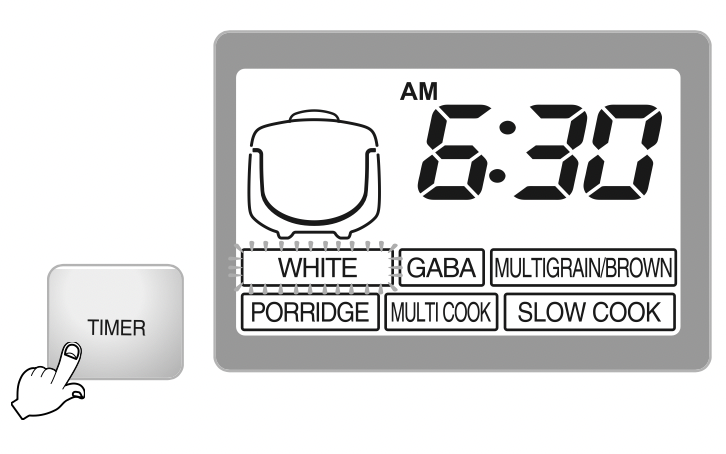
HOW TO SET THE TIMER
How to use
Check if the current time and the menu are correct. Refer to page 10 for the time setting method. If the current time is not set correctly, the preset time may also be incorrect.(Make sure not to change A.M. and P.M.) If the menu is incorrect, press the “Menu” button and select the desired menu.
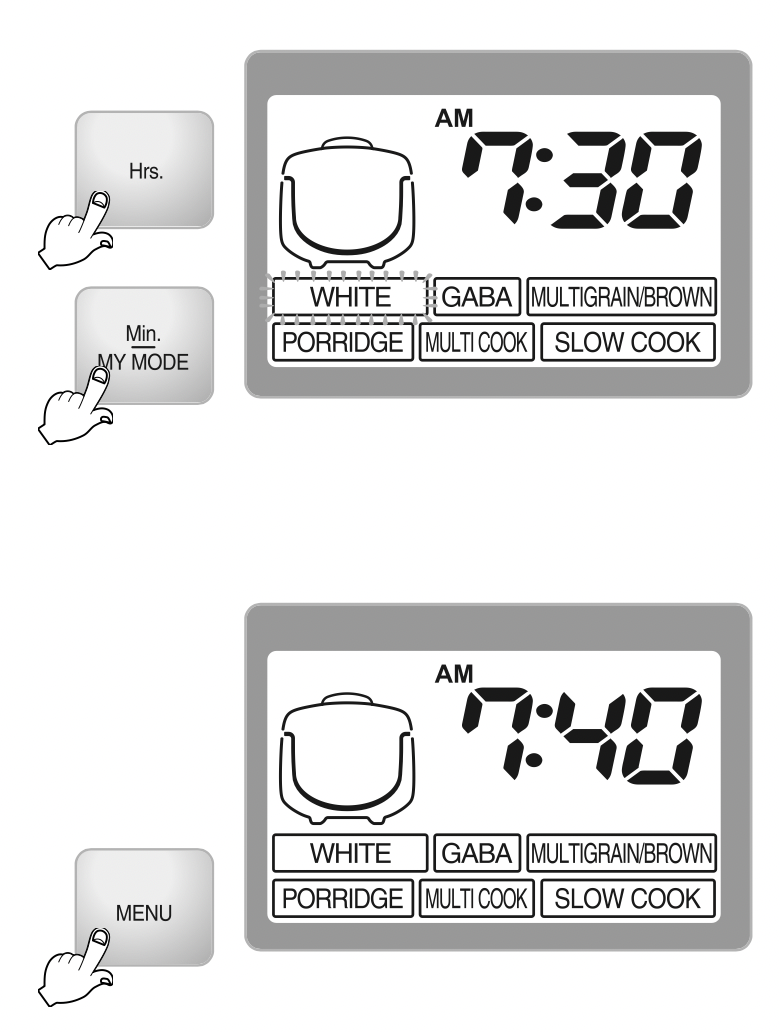
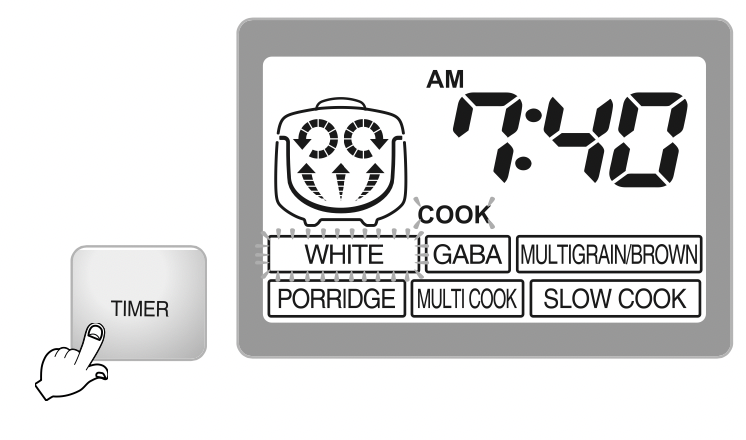
Press the “Timer” button. The default for set time is 6: 30 A.M. If you press “Timer” button, the previous inputted preset time is displayed and the timer lamp will be on. By using “Hrs”, “Min/My mode” buttons, set the cooking end time. ※ Set the preset time within 7 seconds after pressing Timer button.
Set the preset time. Set the preset time with the “Hrs” and “Min/My mode” button. ※ If the preset time is already correct, you do not need to set the time again. Example: When you want to eat rice at 7:30A.m. Press the “timer” button and then press the “min/my mode” button, set time at 7 hours. And press the “min/my mode” button, set time at 30 minutes. (the unit for the “hrs” button is 1 hour and the unit for the “min/my mode” button is 1 minute.)
Press the “Timer” button. When preset is set completely, the time lamp will be on. The preset time will be stored.If you want to cook the rice to the preset time previously entered, press the “Timer” button
Precautions for preset cooking
If you want to change the preset time If you want to change the preset time, press cancel button and start over.
If setup time is shorter than the preset time If setup time is shorter than preset time, the cooking starts immediately.
If setup time exceeds 13 hours Preset time will be changed automatically and displays “ ” when setup time exceeds 13hours. Ex) If you want to finish cooking at 7AM, 14 hours after from now, the finishing cooking time will be changed to 6AM, 13 hours after from now. At this time, “ ” sign is displayed. ※If you want to finish cooking at 12:00 at noon, set time 12:00 PM. ※Use preset mode to finish cooking from 1 hour later to 13 hours later. ※If you want to check current time, press Hrs or Min button. Current time will be displayed for 2 seconds.
Using range of Time cook for each menu
TO KEEP RICE WARM AND TASTY
For a Meal
If you want to warm the rice, press the Keep “Warm/Reheat” button to start the reheating process. After 9 minutes, the rice should taste fresh.
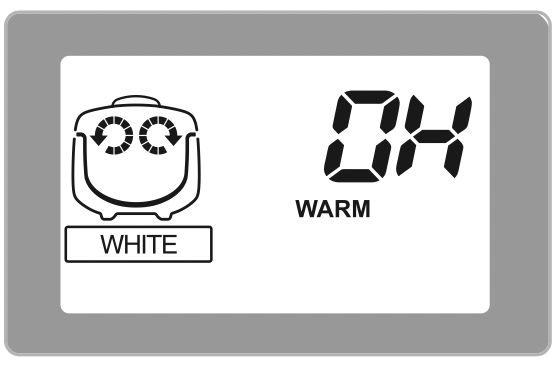
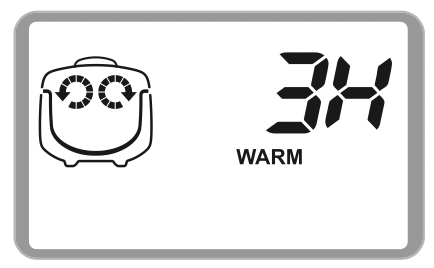
On Keeping Warm ‘ ’ on the display indicates that the cooked rice is kept warm for 3 hours. If you press the Hr. button while keeping rice warm, the elapsed time is shown on the display. pressing the “Min/My mode” button, the current time is displayed.
On Reheating The ‘ ’ mark turns round and round while reheating.
Completion of Reheating After reheating, the Keep Warm function restarts and the elapsed warm time is displayed.
※ Once the display status is set, the status is memorized until it is changed. Therefore, you may not set the status at every warming.
※ After cooking, the temperature of the cooked rice may be higher than the configured warming temperature.
The frequent use of the Reheat function may cause the cooked rice to be discolored or dried. Use it once or twice per day.
If a separate heating appliance or gas burner is used to cook rice, put the cooked rice into the cooker and press the “Warm/Reheat” button to keep the rice warm. At this time, ' ' is shown on the display. (Like this, transferring hot rice to a cold cooker may cause the rice to be discolored or develop an odor.
24 hours after keeping the cooked rice warm, the passed time blinks on the display to give the long time warning.
How to Adjust the Warm Temperature
Odor may develop from water drops or discolored rice from frequent use. The warm temperature may be incorrect. Adjust the temperature.
To adjust the warm temperature while keeping rice warm, press the “Keep Warm” button for over 5 seconds and adjust the warm temperature.
A stale smell develops and water drops are formed: The warm temperature is low. Raise the temperature by 1 ~ 2°C.
The cooked rice turns yellow, the rice gets dry and an odor develops: The warm temperature is too high. Lower the temperature by 1 ~ 2°C.
How to Adjust the Customized Warm Function
This function is used in case the water runs when you open the inner lid while keeping warm or the cooked rice is swelled.
If water runs out when you open the lid: Press the “Hrs” button to raise the setting mode by 1 or 2 stages.
If the cooked rice is swollen around the edge of the rice: Press the “Min/My mode” button to lower the setting mode by 1 or 2 stages.
How to set Keep Warm Mode during Sleep mode
When cooked rice is kept warm for a long time, the rice quality deteriorates (discoloration, drying and odor). To prevent deterioration, set the warm temperature as low temperature during sleeping time ( 10:00pm ~ 04:00am) as needs arise.
How to Set
Press the “Keep Warm” button twice in My mode to enter 'Keep Warm during Sleep' mode.
Press the “Hrs” button in the 'Keep Warm during Sleep' mode and press the “Cook” button to set the function when the ' ' letters are fixed on the display.
If you press the “Cancel” button or 7 seconds pass with no input in 'Keep Warm during Sleep' mode, the function is cancelled and the mode returns to Standby mode.
How to Cancel
Press the “Keep Warm” button twice in Customized Rice Taste mode to enter 'Keep Warm during Sleep' mode.
Press the “Min” button in the 'Keep Warm during Sleep' mode and press the “Cook” button to cancel the function when the ' ' letters blink on the display.
If you press the “Cancel” button or 7 seconds pass with no input in 'Keep Warm during Sleep' mode, the function is cancelled and the mode returns to Standby mode.
If this function is set, the warm temperature is kept at a low temperature in sleep mode. If you want to keep warm, do not activate this function.
In summer, cooked rice may be discolored or develop an odor. Do not activate the 'Keep Warm during Sleep' mode if possible.
Odor Develops While Keeping Warm
Clean the cooker frequently. Not cleaning the lid may develop an odor while keeping warm because bacteria could develop.
Even though the product is clean, bacteria can be present. If strong odors develop, boil water to sterilize. Fill water up to the plain rice water level line for 2 persons and add a big spoonful of ginger. After that, close the lid and press the Cook/Quick button to boil the water. Press the Cancel button 30 ~ 40 minutes after boiling. After boiling, always clean the inner pot.
If you keep the cooked rice warm without cleaning the inner pot after steaming food, an odor may penetrate the rice.
'KEEP WARM' TIPS
Cautions for Keeping Warm
It is recommended to evenly stir the cooked rice after cooking. The rice taste will improved. (For a small quantity of rice, pile up the rice in the center area of the inner pot to keep warm)
Keeping rice warm for a long time may cause the rice to be discolored or develop an odor. So, it is recommended to keep warm for less than 12 hours. 24 hours after keeping the cooked rice warm, the passed time will blink on the display.
Do not keep the rice scoop in the inner pot while keeping the cooked rice warm.
For MULTIGRAIN/BROWN rice we recommend not warming. The rice on the edge of the inner pot or the bottom of the steam outlet may turn plain and swollen. In this case, stir and mix the rice.
Do not mix small quantity of rice or leftovers with the rice under keeping warm. Doing so may develop an odor. (Use a microwave oven for the cold rice.)
CLEANING AND MAINTENANCE
Not cleaning your rice cooker frequently can cause bad odors. Please clean your rice cooker frequently. (Make sure the rice cooker is unplugged and wait until the unit cools down.)
Wipe the main body and the lid with a dry dishcloth. Do not use benzene or thinners.
Liquid left in the inner lid or in the inner pot may form a starch film but it is harmless.
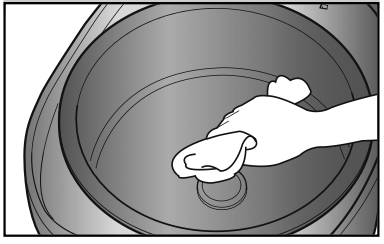
Inner Pot
Wipe any materials and moisture from the outer and the bottom of the inner pot.
Using a rough sponge, brush or abrasive may result in peeling of the coating.
Use dishwashing detergent and a soft cloth or sponge.
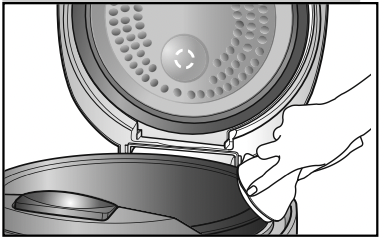
Inner Lid
If moisture remains on the inner lid, wipe the lid with a dry dishcloth.
Since the edge of the lid is made of metal, clean it with care.
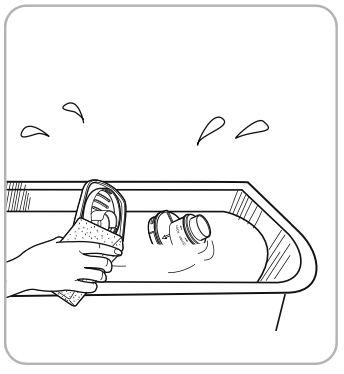
Pot Water Groove
Moisture generated while cooking is designed to be collected in the dew dish.
After cooking, clean it with a dry dishcloth.
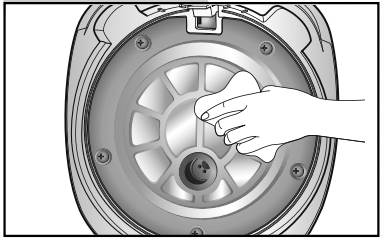
Inside the main body
If any material sticks to the temperature detector, remove the material without damaging the metal plate.
Wipe materials or moisture from the thermal plate.
How to clean
Never use hazardous chemicals. (ex : benzene, varnish and so on)
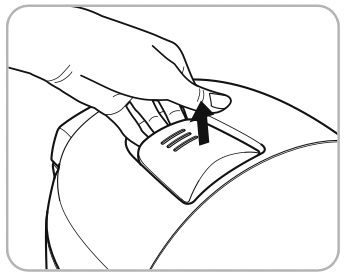
The steam cap
Remove the steam cap by simply pulling it off from the lid after every use.
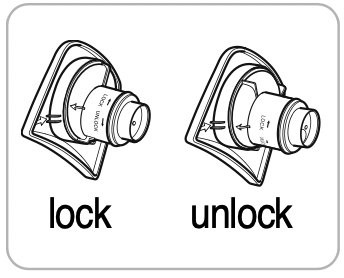
Separate the steam cap into 2 parts and soak them in lukewarm water. Wash with a sponge or a soft cloth.
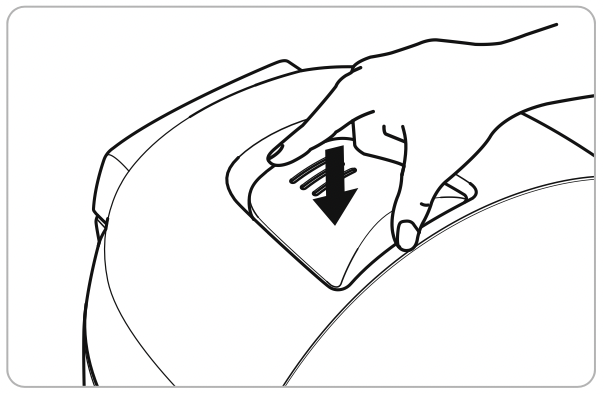
Assemble the 2 parts by snapping them together.
Attach the steam cap firmly to the lid and rotate in both directions to ensure that it is locked properly.
TROUBLESHOOTING
If there is a problem with your cooker, check the following details before requesting service to your dealer. Sometimes the cooker may not operate as desired if used incorrectly.
Case
Check points
Do The Following
When the rice is not cooked.
“Cook/Quick” button is pressed?
Is there power cut while in cooking?
Press the “Cook/Quick”button once. And check “ ” sign on the display.
Re-press the “Cook/Quick”button
When the rice is not well cooked.
Did you use the measuring cup to measure your rice?
Did you measure the water properly?
Did you clean the rice before cooking?
Was the rice sitting in water for a long time?
Is the rice old or dry?
Refer to page 14~15.
Insert some more water (about half of 1 level)
Beans and other grains half cooked?
Is the bean (other grains) too dry?
Beans should be soaked for-to-minutes or steamed for-to-minutes prior to cooking, depending on your taste.
Rice is too watery or stiff.
Did you select the correct menu?
Did you measure the water properly?
Did you open the top cover before cooking was finished?
Selected the correct menu.
Measure the proper water.
Open the top cover after cooking finished.
When the water overflow.
Did you use the measuring cup?
Did you measure the water properly?
Did you open the top cover before cooking was finished?
Refer to page 14~15.
When you smell something while warming.
Did you close the top cover.
Please check if the power cord is inserted properly.
Did it warm over 12 hours?
Is there any other substances in the unit?
Close the top cover perfectly.
Alway be keep the power on while warming.
As possible as warming time is within 12 hours.
Don’t warm rice with other substance.
" " sign is appeared.
The temperature sensor may have a problem
Please contact to dealer or service center.
During warm, “time”display shine
Did “Warm” time spend over 24hrs?
The shining display announces that “Warm” time is over 24hrs.
During warm, rice is cold or wet
Did you set “sleep warm” mode?
You can change the mode or set the warm temperature.
When the button cannot operate with " ".
Is the inner pot inserted correctly?
Do you use 220V?
Please insert inner pot.
This product only uses 120V.
rice is too watery or stiff.
Did you select the menu correctly?
Did you measure the water properly?
Select the correct menu.
Measure the proper water.
When the time cannot be preset.
Is the current time correct?
Is it right A.M. or P.M.?
Did you set the reservation time over 13 hours?
Set the current time.(refer to page 13)
Check the A.M., P.M.
Maximum reservation time is 13 hours.
When you smell after and before cooking?
Did you clean it after cooking?
Please clean it after cooking.
When “tick, tick” sounds occurs while cooking and warming.
Is it the sound of cooking relay?
Did you wipe the moisture of bottom of inner pot?
It is normal that the “tick, tick”sound of relay is an on and off operation.
The moisture of the bottom of the inner pot may cause “tick, tick” sound. Please wipe the moisture.
When the operation don’t finish for a long time and " " display
#1 How can I turn off the beep sounds? When I have a timer set to cook in the morning, the sounds it makes when it's finished wake us up.
You are able to lower the volume of the unit by using mode button.
#2 How to set the clock? The buttons only show even number for hours but neither the hour or minute button works.
Please follow these steps in order to set the clock on your device: 1. Connect the power plug. 2. Press the ““Hrs”, “Min/My Mode” button for more than 1 second. 3. Set the current time using the “hrs”, “min/my mode” button. Press the button longer than 1 second: - Each time you press “Hrs” button, the time increases in 1 hour increments. - Each time you press “Min/My Mode” button, the time increases in 1 minute increments. - In case of 12:00 at noon, it will be displayed 12:00 P.M. 4. The time will automatically be set after 7 seconds. Once time is set, the colon (:) will stop blinking and a buzzer will go off.


 When the inner pot is not placed correctly into the unit.
 Temperature sensor problem. (Contact our service center or dealer)
 When the cooking cycle takes longer than expected. (Contact our service center or dealer)
 This occurs when the timer has been set for longer than 13 hours. Please keep the preset time within 13 hours.
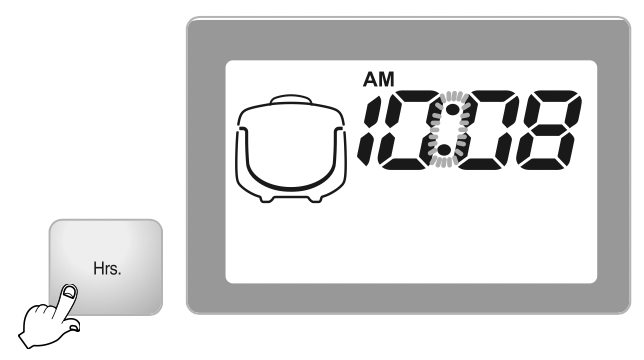
 ’sign is displayed.
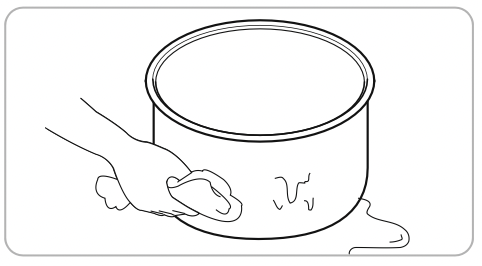


 ”
”
 If you press the “Hrs” button, the MULTI COOK time increases by 5 minutes.
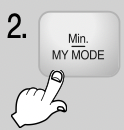 If you press the “Min/My mode” button, the MULTI COOK time reduces by 5 minutes.
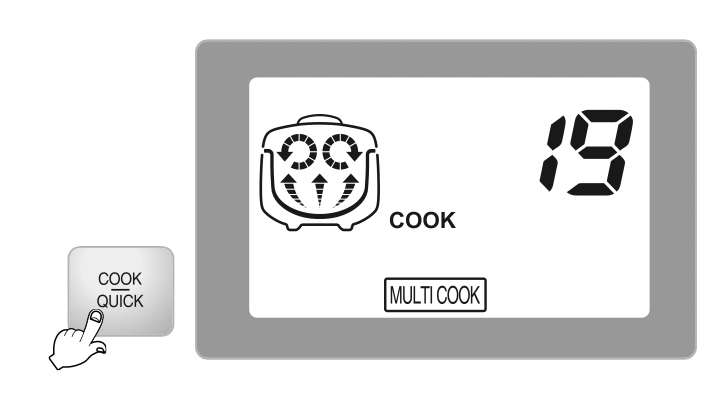
 Press the “Timer” button.
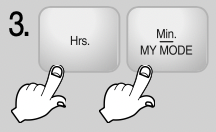 Set the Preset time by pressing the “Hr/Min” buttons.
 Press the “Menu” button to select the Multi Cook menu.
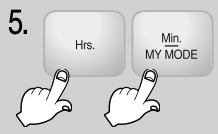 Press the “Hr/Min” buttons to set the MULTI COOK time.
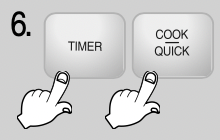 Press the “Timer button” or the “Cook/Quick” button.
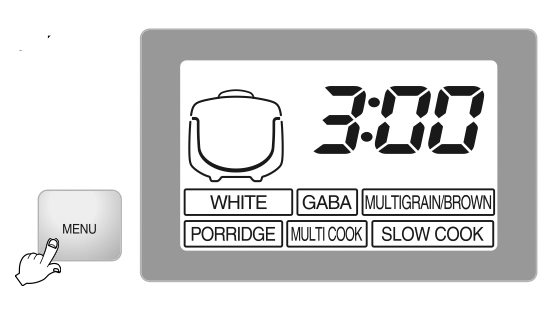
 If you press the “Hrs” button, the Slow cook time increases by 5 minutes.
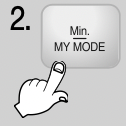 If you press the “Min/My mode” button, the Slow cook time reduces by 5 minutes.
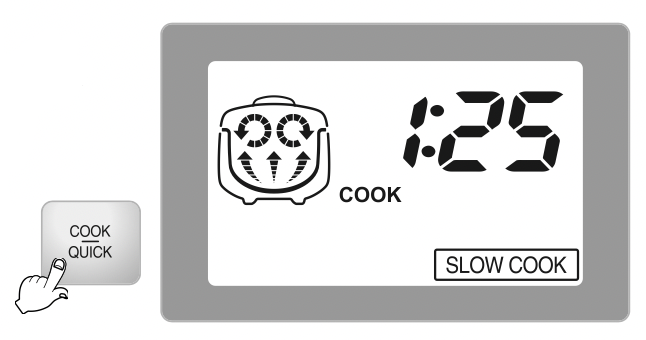
 Press the “Timer” button.
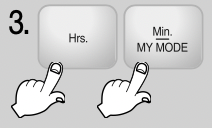 Set the Preset time by pressing the “Hr/Min” buttons.
 Press the “Menu” button to select the Slow cook menu.
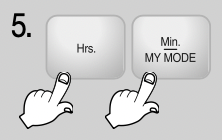 Press the “Hr/Min” buttons to set the Slow cook time.
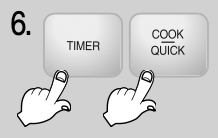 Press the “Timer button” or the “Cook/Quick” button.
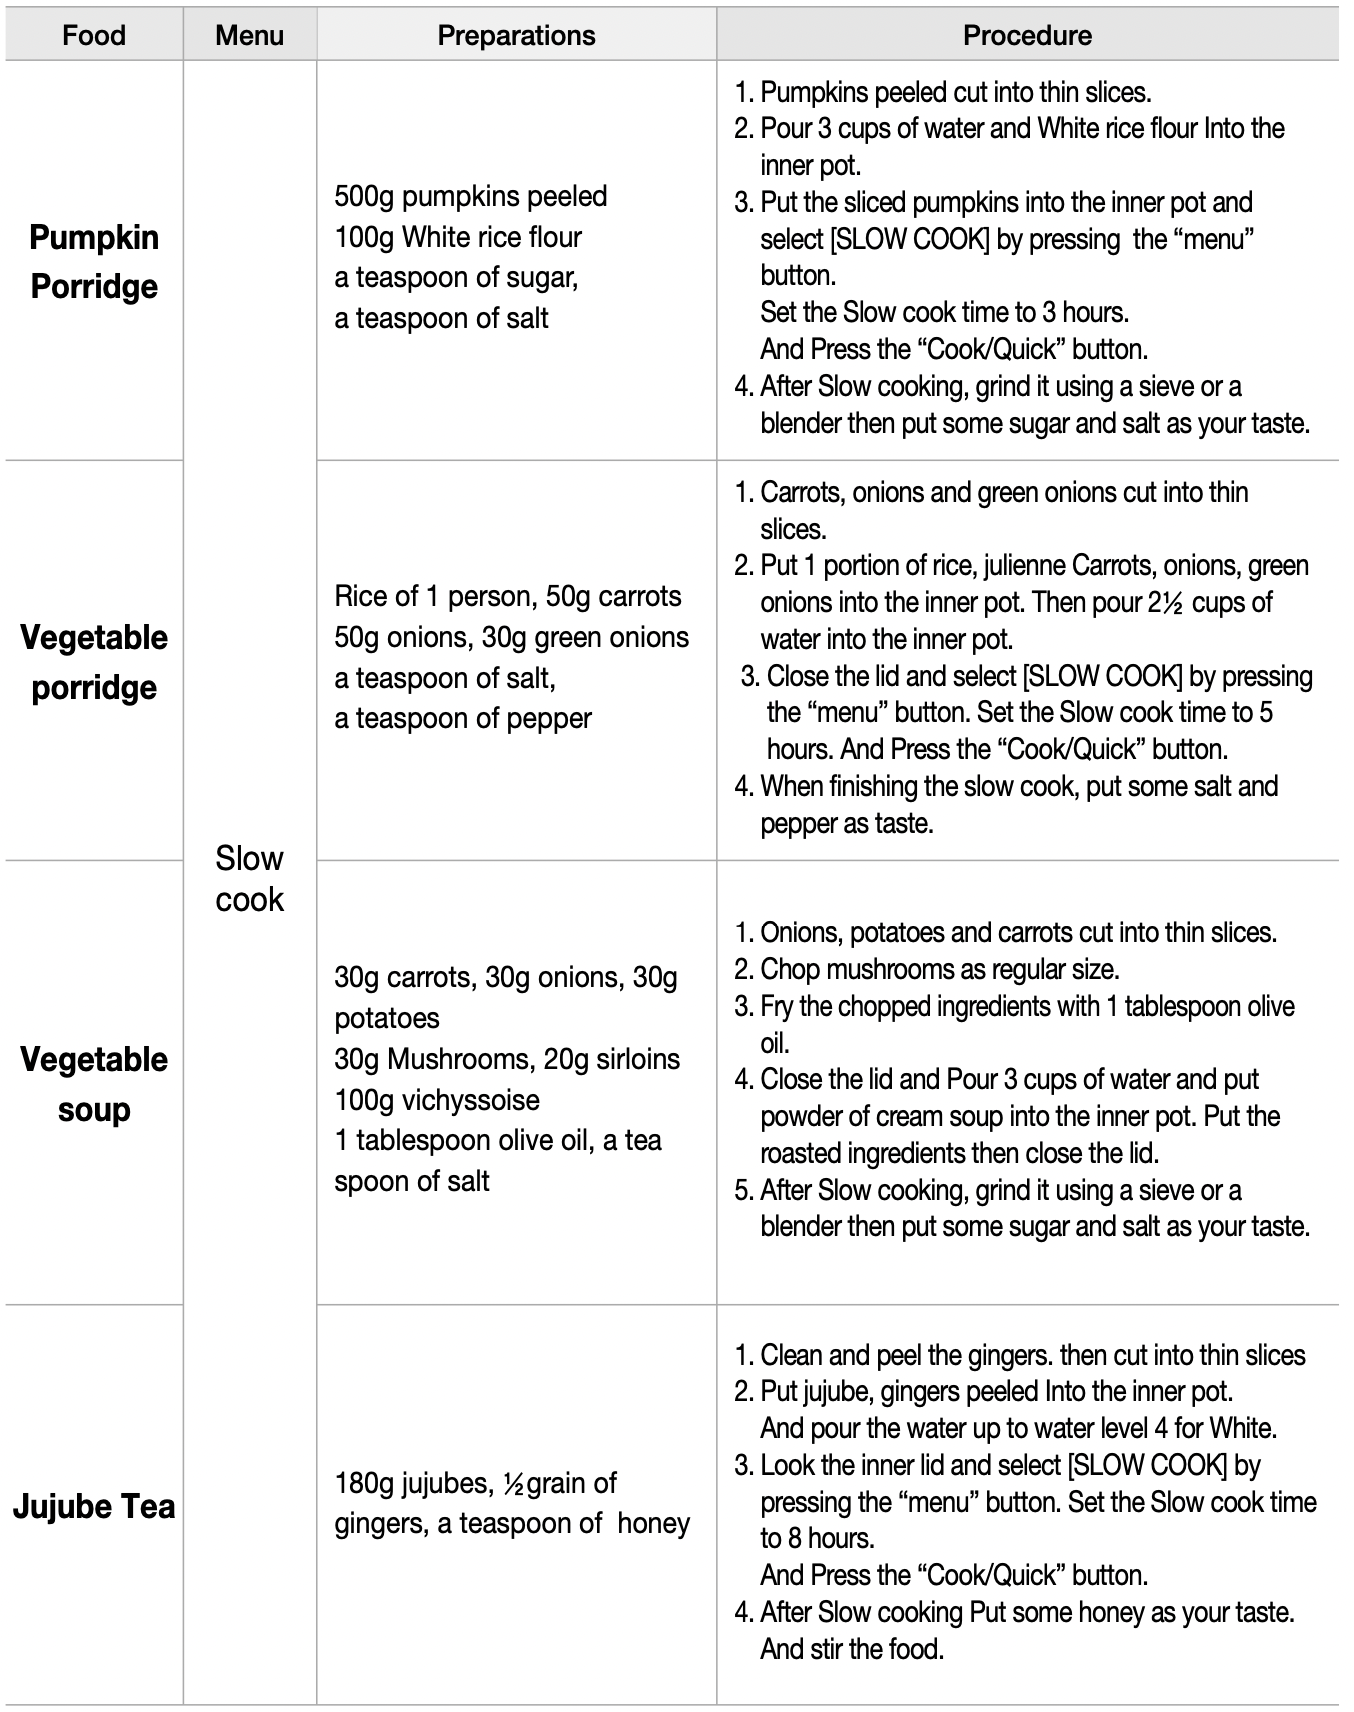
 ” when setup time exceeds 13hours.
 ” sign is displayed.
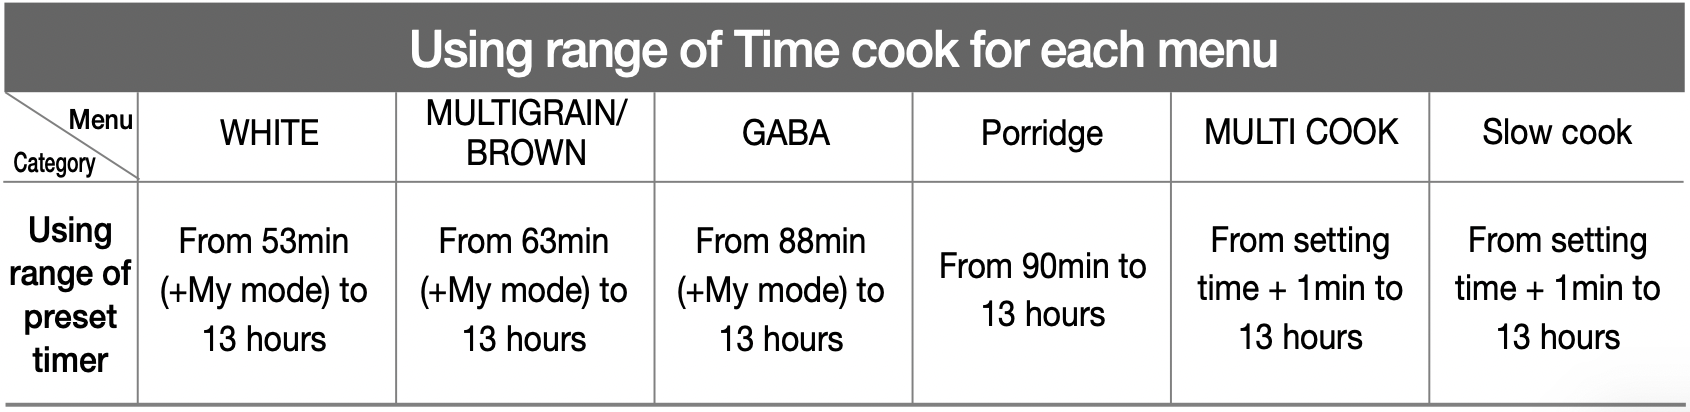
 ’ on the display indicates that the cooked rice is kept warm for 3 hours.
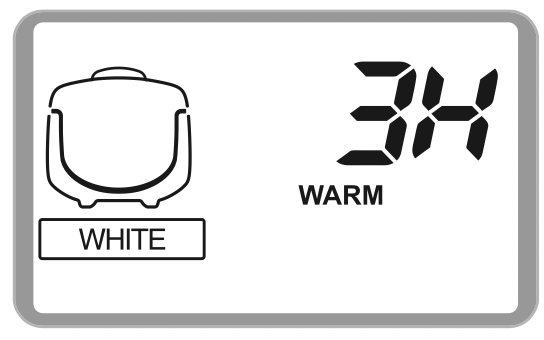
 ’ mark turns round and round while reheating.
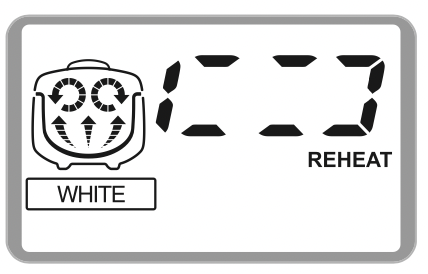
 ' is shown on the display. (Like this, transferring hot rice to a cold cooker may cause the rice to be discolored or develop an odor.
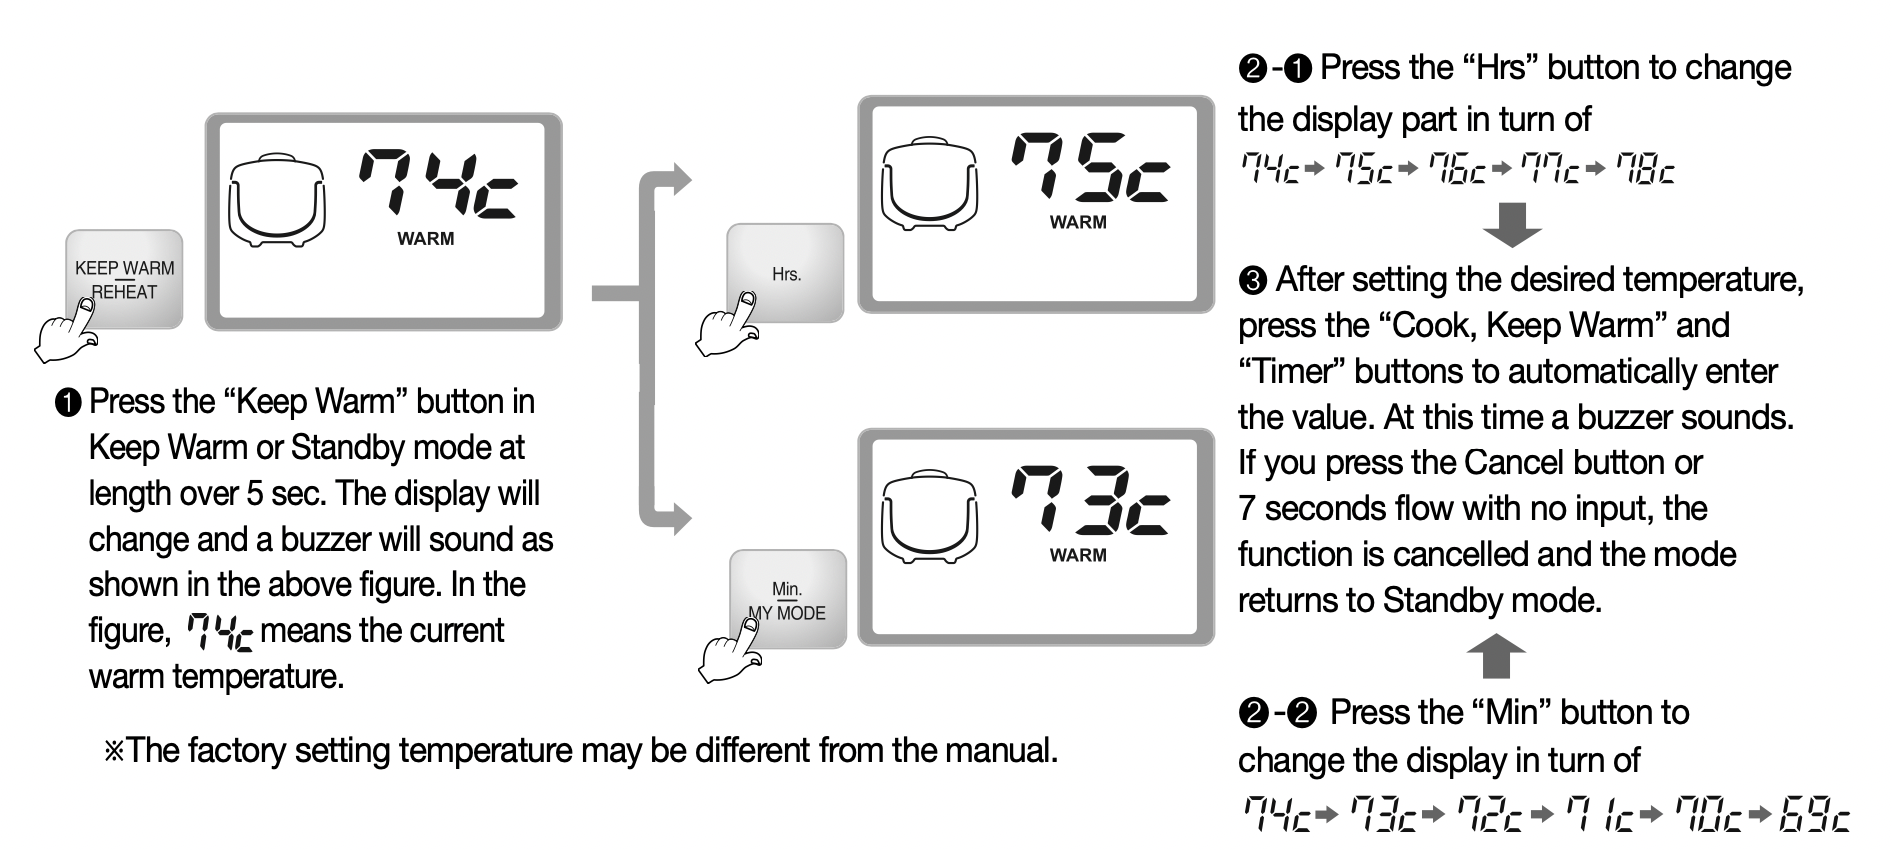

 ' letters are fixed on the display.
 ' letters blink on the display.
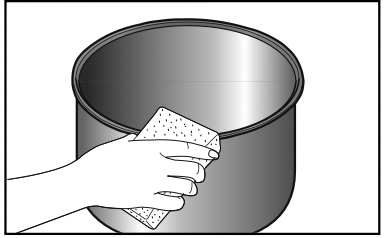


 " sign is appeared.
 ".
". " display