Loading ...
Loading ...
Loading ...
Installing the Camera(s)
3
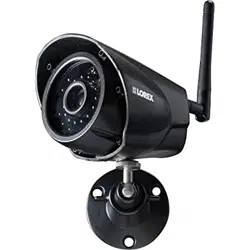
CAUTION
Cameras are suitable for outdoor installa-
tion, but are weather resistant, not weath-
erproof. Cameras are not intended for
direct exposure to rain or snow. For
outdoor applications, install under shelter
protected from the elements, such as be-
neath roof eaves. The diagram to the right
shows an example of an ideal location for
outdoor placement.
3.1 Installation Tips
• Before you install the camera, plan where and how it will be positioned,
and where you will route the cable that connects the camera to the power
adapter.
• Before starting permanent installation, check the camera image on the re-
ceiver when camera is positioned in the same place it will be permanently
installed.
• It is recommended to ensure a clear line-of-sight between the camera and
receiver and to limit the amount of obstructions, such as walls and tree
branches, between the camera and receiver. Walls made of heavy building
materials such as brick or concrete will significantly reduce signal range.
• If the signal will have to pass through a wall, placing the receiver or camera
next to a window will improve the signal strength.
• Do not install the camera pointing out of a window. The nighttime picture
will be unusable due to reflection from the night vision LED’s.
• The cameras are pre-paired so they work out of the box. Each camera has
a channel number sticker indicating what channel they are paired to. If you
have purchased additional cameras, you will need to pair them to the re-
ceiver, see 11 Pairing Additional Cameras, page 53.
3.2 Mounting Positions
You may mount your cameras on a wall or counter. See the images below for
recommended configurations of the camera stand and antenna.
#LX400030; r. 2.0/22135/22135; en-US
4
Loading ...
Loading ...
Loading ...