Nature's Generator
User Manual

Nature's Generator
Contents
Warning
Unpack Your Nature's Generator
Get to Know Your Nature's Generator
Using Your Nature's Generator
How to Recharge Your Nature's Generator
How to Use Your Nature's Generator
How to Read the LCD Display
How to Use Your Nature's Generator Smart Key
Limited Warranty
The Nature’s Smartest, Infinitely Expandable
Generator System
How to Expand the Capacity of Your Nature's Generator
How to Maintain and Store Your Nature's Generator
1
1
2
3
3
4
6
6
7
8
9
9
9
16
17
18
How to Install the Cart to Your Nature's Generator
10
ESPAÑOL
21
FRANÇAIS
41

1
Important Safety Instrucons
3. Take care of all warnings.
5. Do not use this apparatus near water.
heat.
Warning
Electric Shock Hazard
Keep away from children. Nature's Generator
Explosion Hazard
Lightning Hazard
and power line surges.
Energy and Burn Hazard
Nature's Generator
Visit Naturesgenerator.com for More Information

2
Replacement Parts
Cauon
Damage Requiring Service
Stop using the Nature's Generator
Nature's Generator.
• If your Nature's Generator has been exposed to rain or water.
• If your Nature's Generator has been dropped or damaged in any way.
• When your Nature's Generator
Cold Weather
Cold temperatures can impact Nature's Generator performance. If you are in area that will be
Nature's Generator in an insulated
Recycling and Disposal
Your Nature's Generator may contain materials that are regulated for environmental reasons. Your
Nature's Generator also contains materials that can be recycled and reused. To help protect the
Nature's Generator.
Safety Check
safety checks to determine that your Nature's Generator
Servicing
Visit Naturesgenerator.com for More Information
3
Introducon
Nature's Generator
Nature's Generator
the issues.
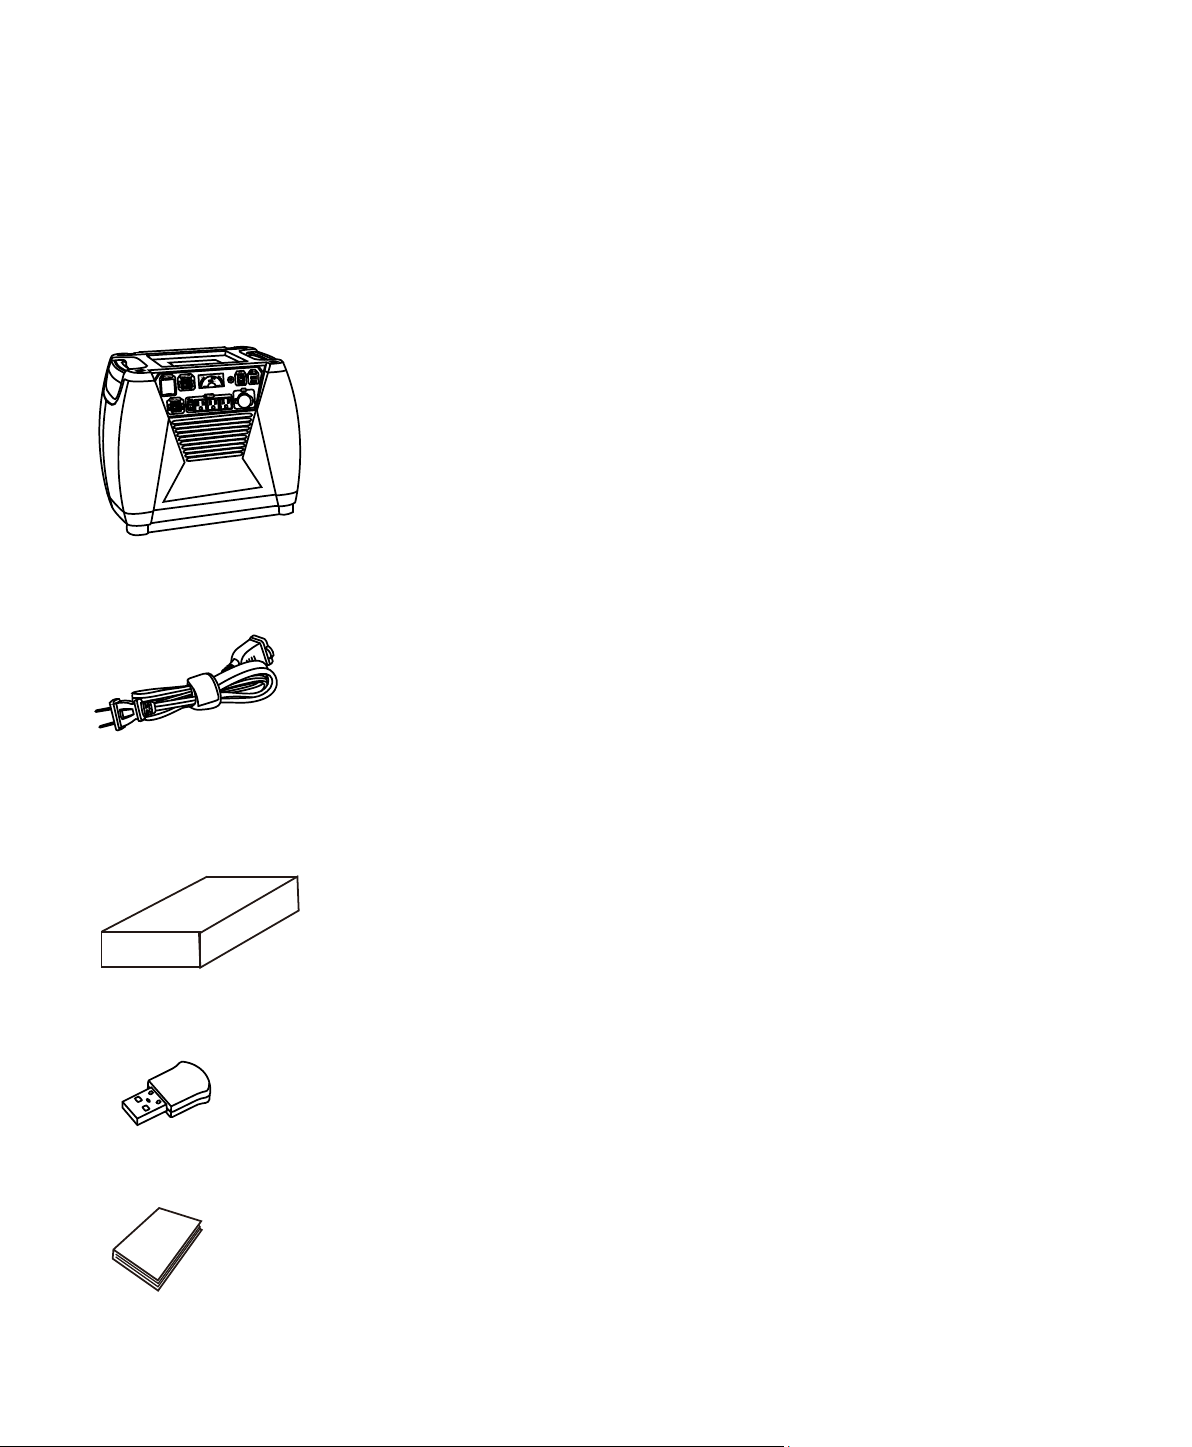
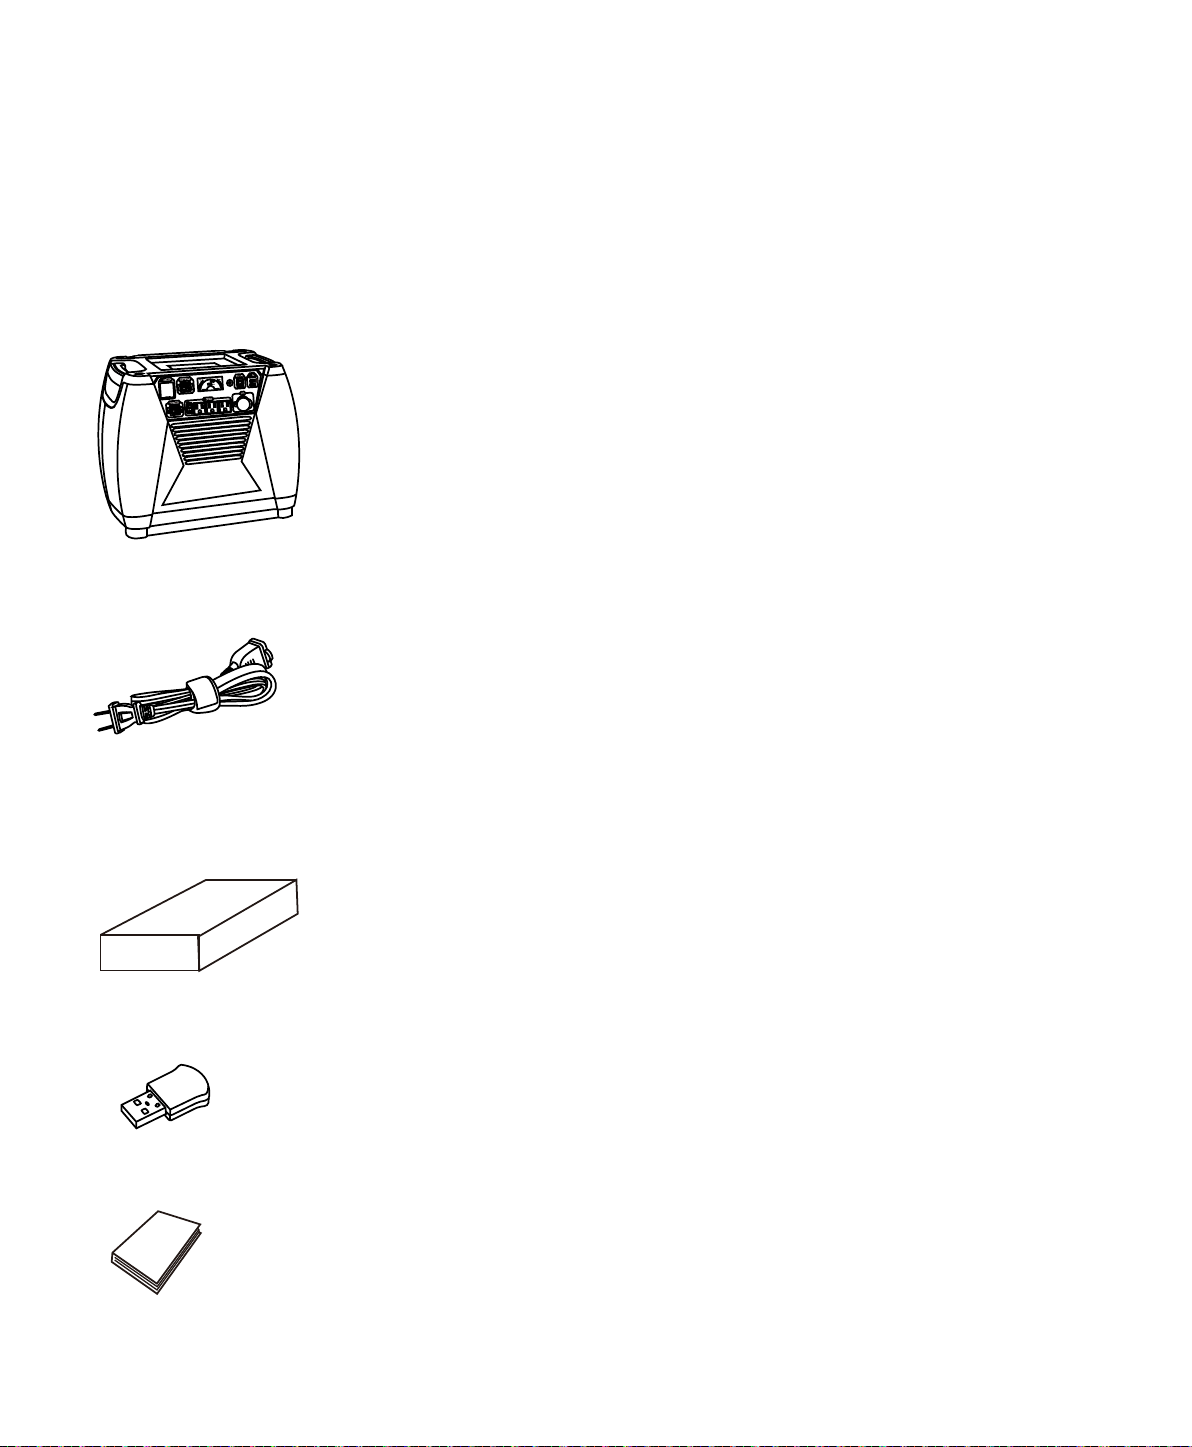
Unpacking Your Nature’s Generator
1. Nature's Generator
2. AC Power Cord ( In the rear storage compartment)
5. This User Guide
4. Smart Key
Visit Naturesgenerator.com for More Information
3. Cart Box

4
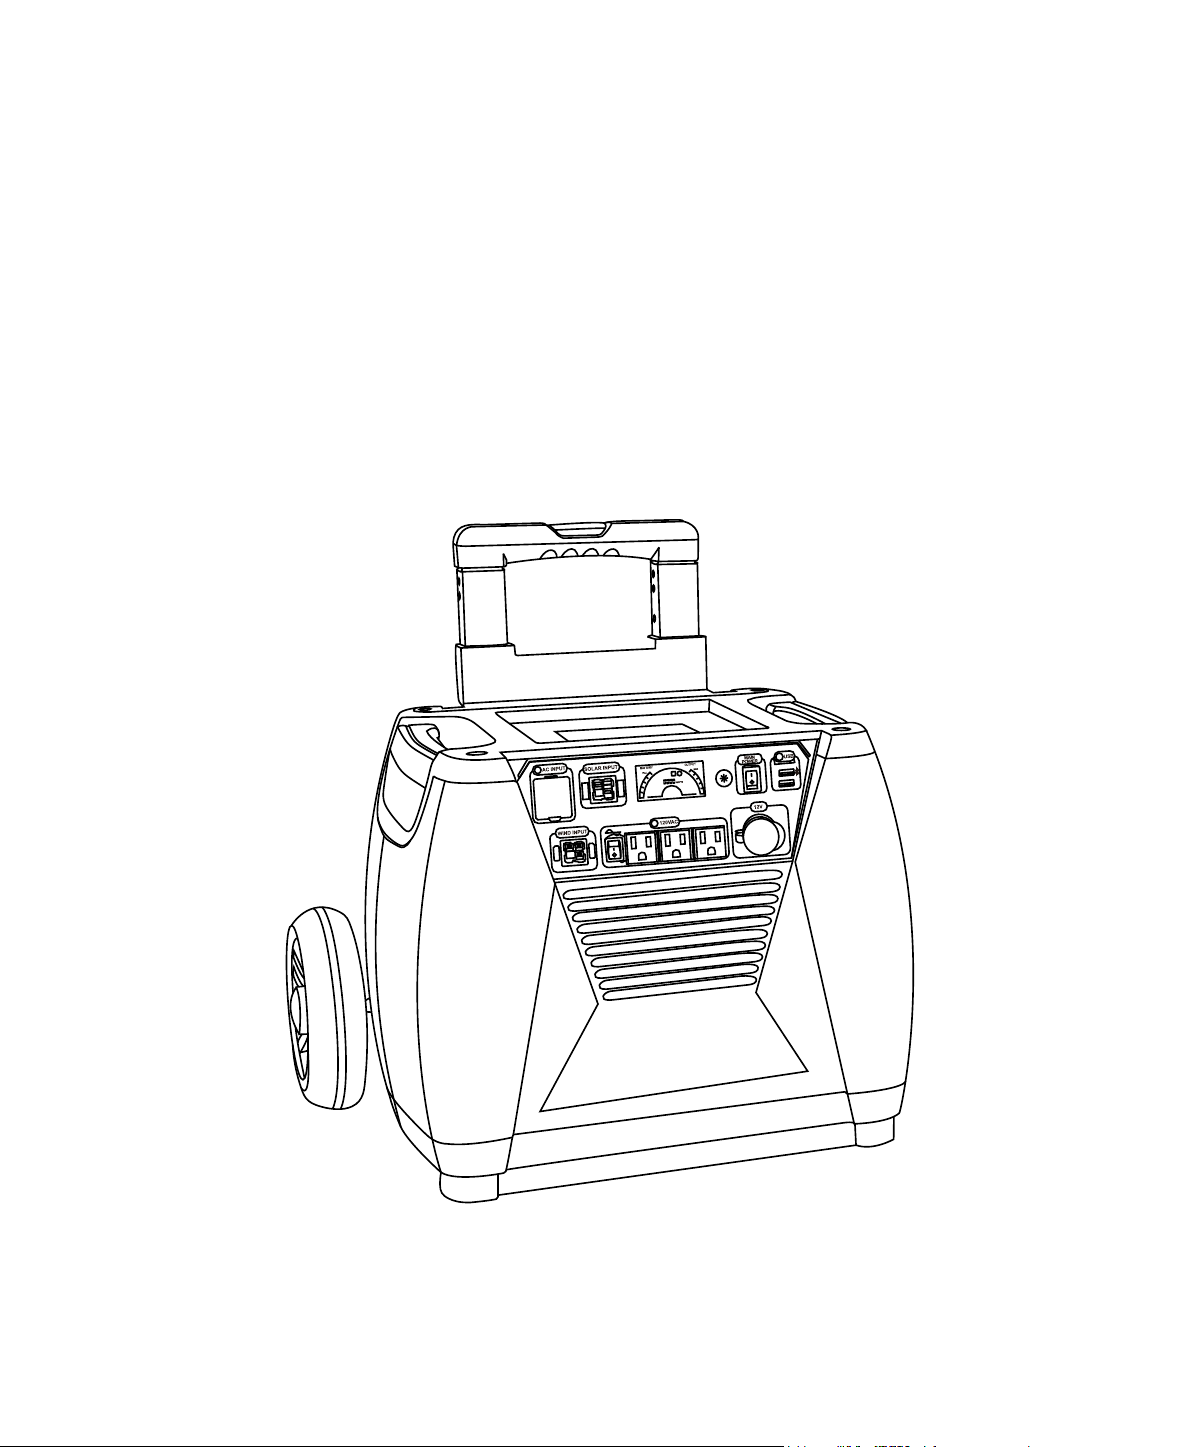
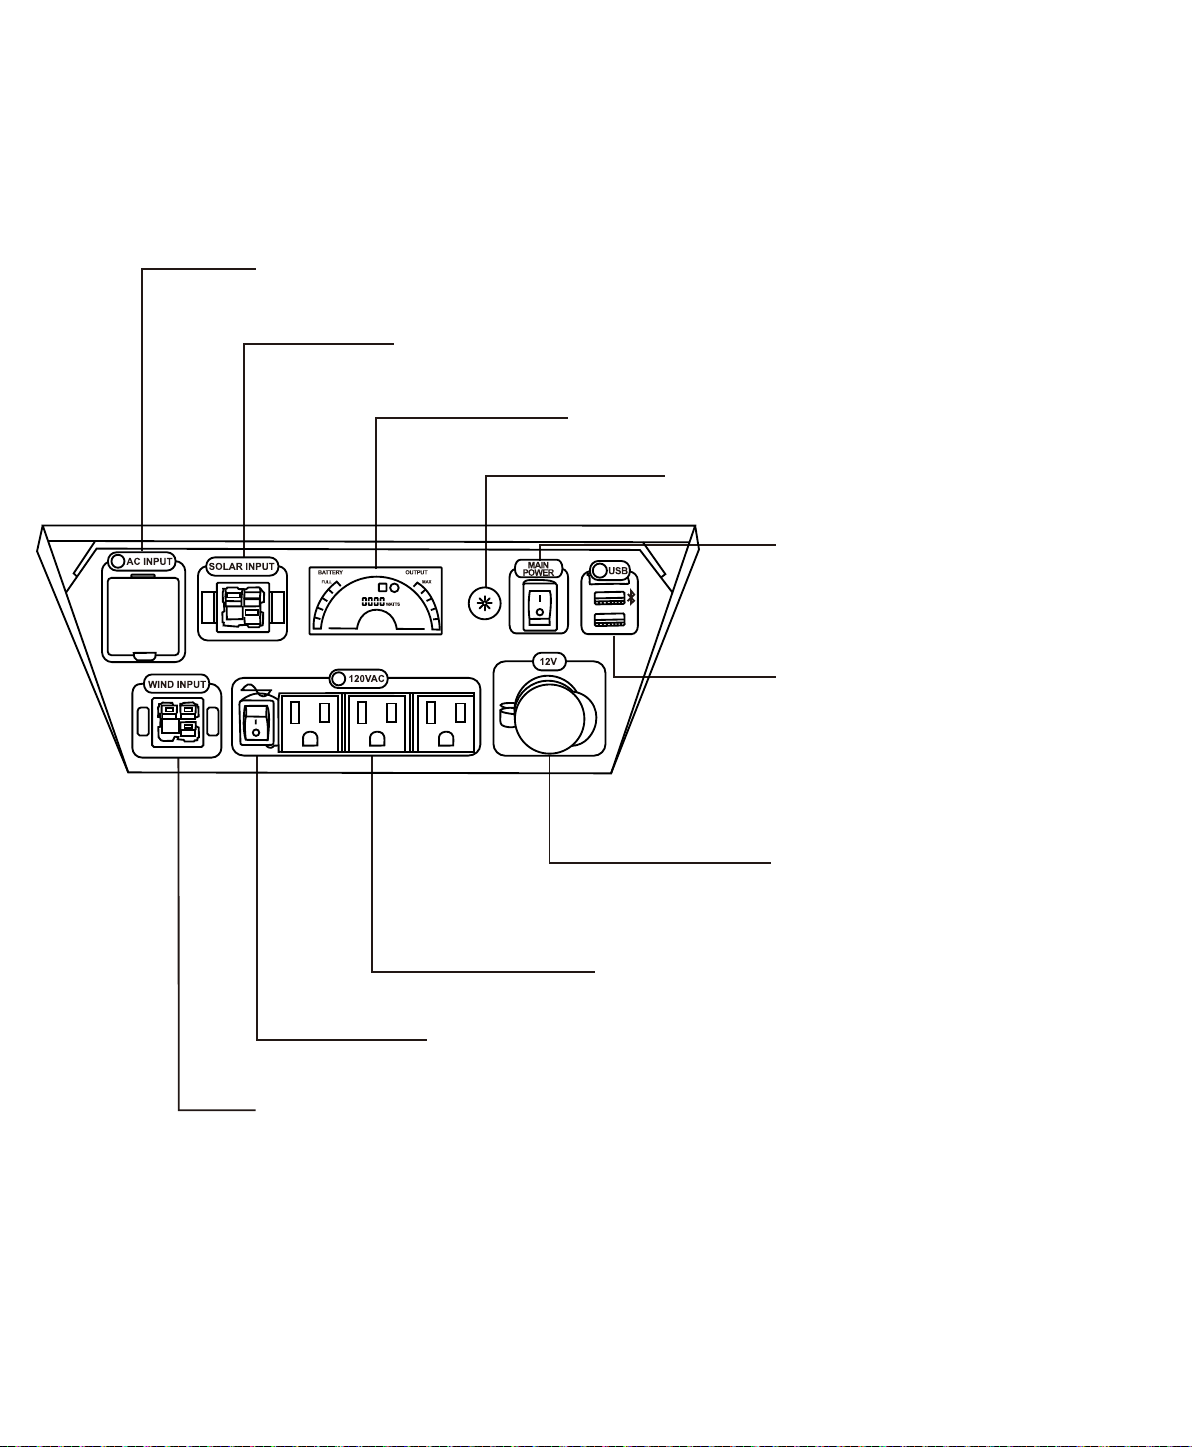
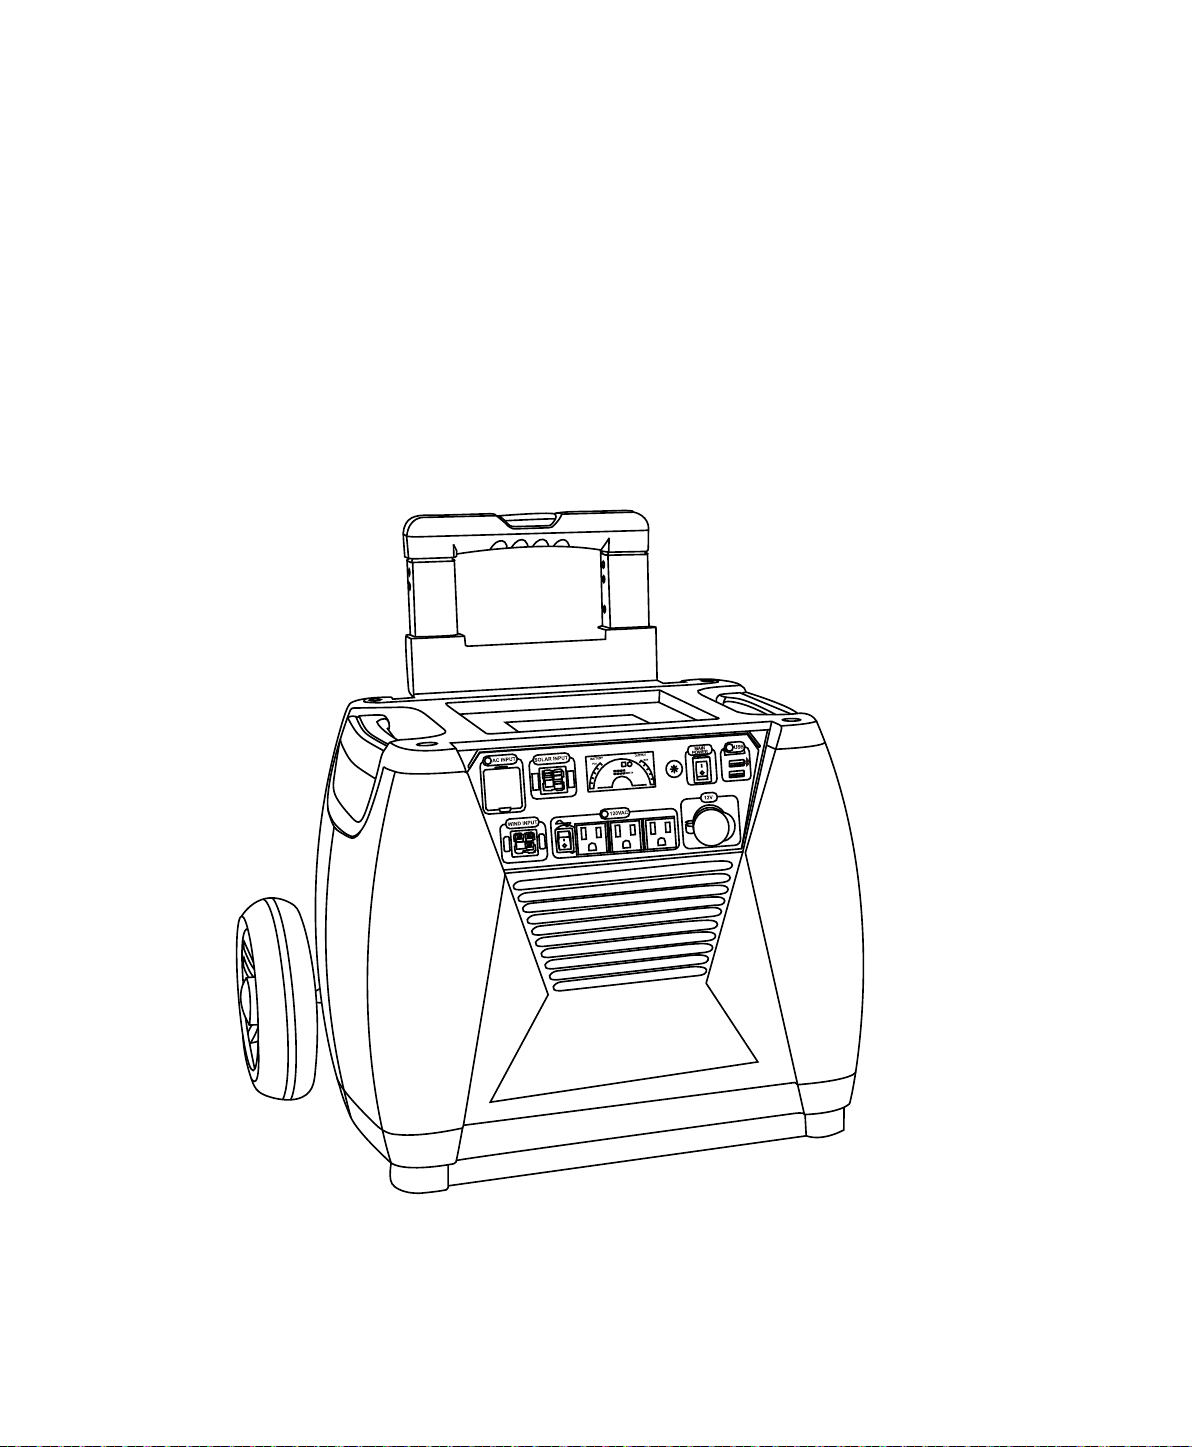
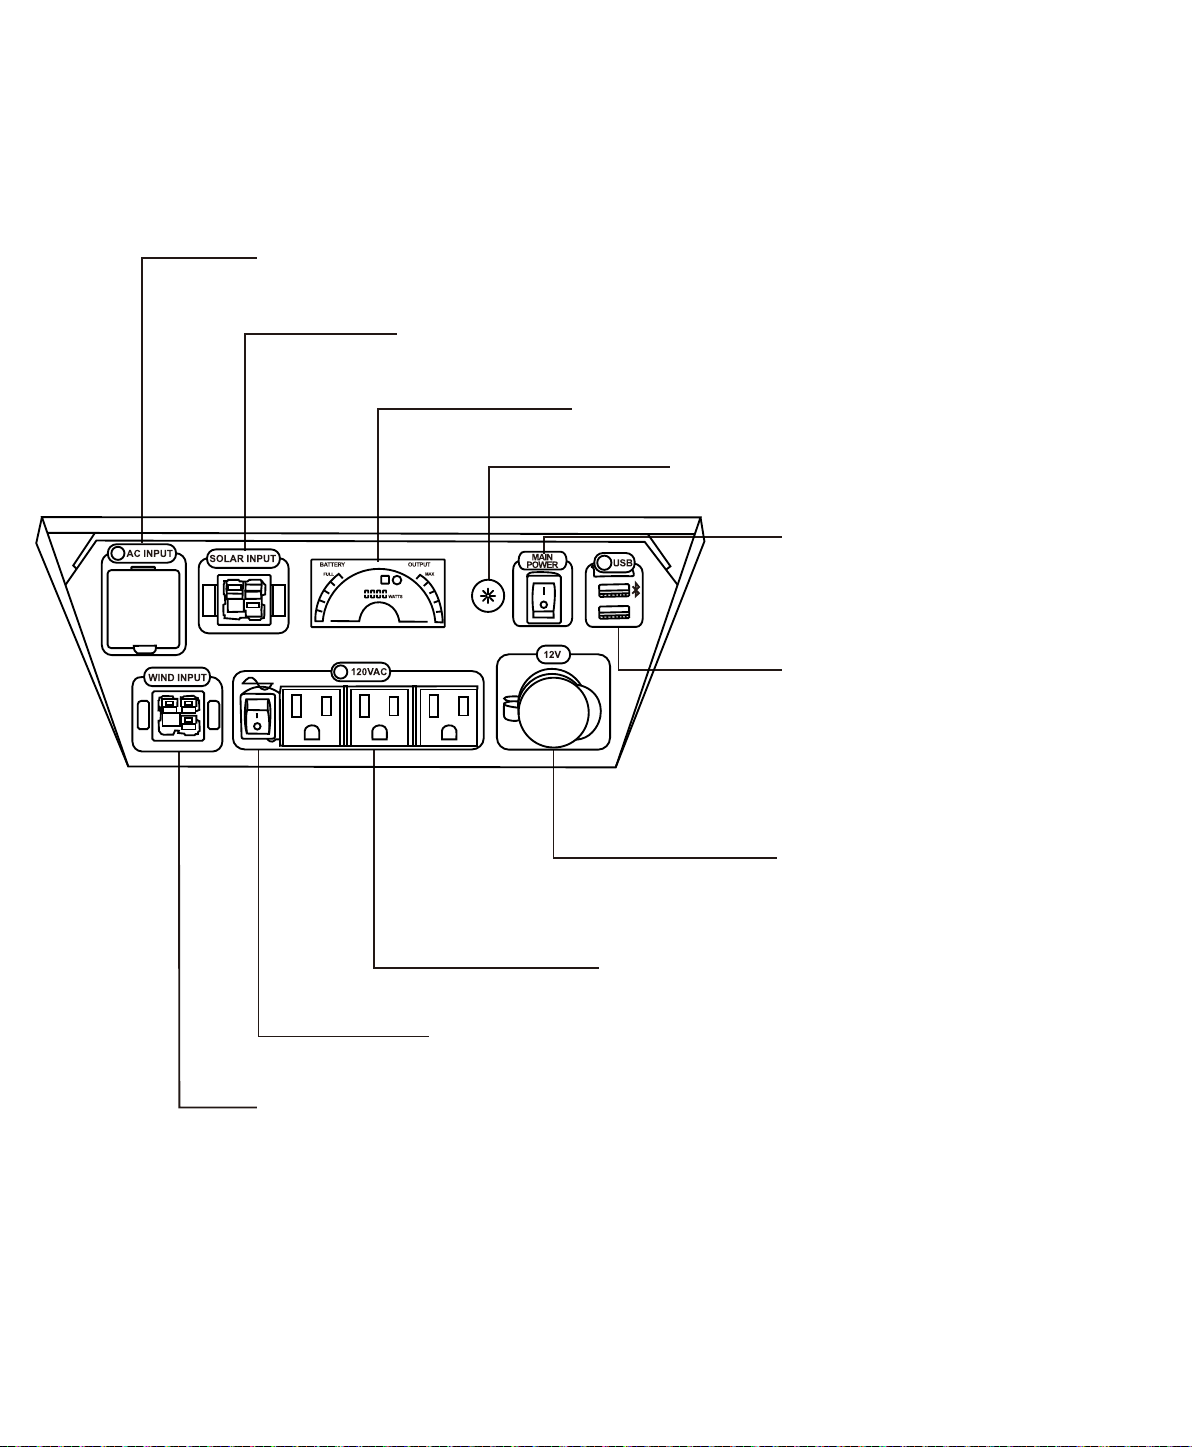
Get to Know Your Nature’s Generator
Front Panel
AC Outlet Ports: Three pure sine wave AC outlets.
12V Port: 12V DC port is designed to
AC Input
power extension cord.
Solar Input: To connect with solar panel(s). This Anderson port is designed to
Wind Input: To connect with the wind turbine. This Anderson port is designed to be used
LCD Display:
LCD Display Buon: Press it to light up LCD display
for 30 seconds.
Main Power Switch:
main power to your Nature's Generator.
USB Ports: Both USB ports can recharge
the smart phones or other mobiles
devices that are powered by USB.
Top USB port with Bluetooth icon is
Key.
AC Outlets Switch:
Visit Naturesgenerator.com for More Information
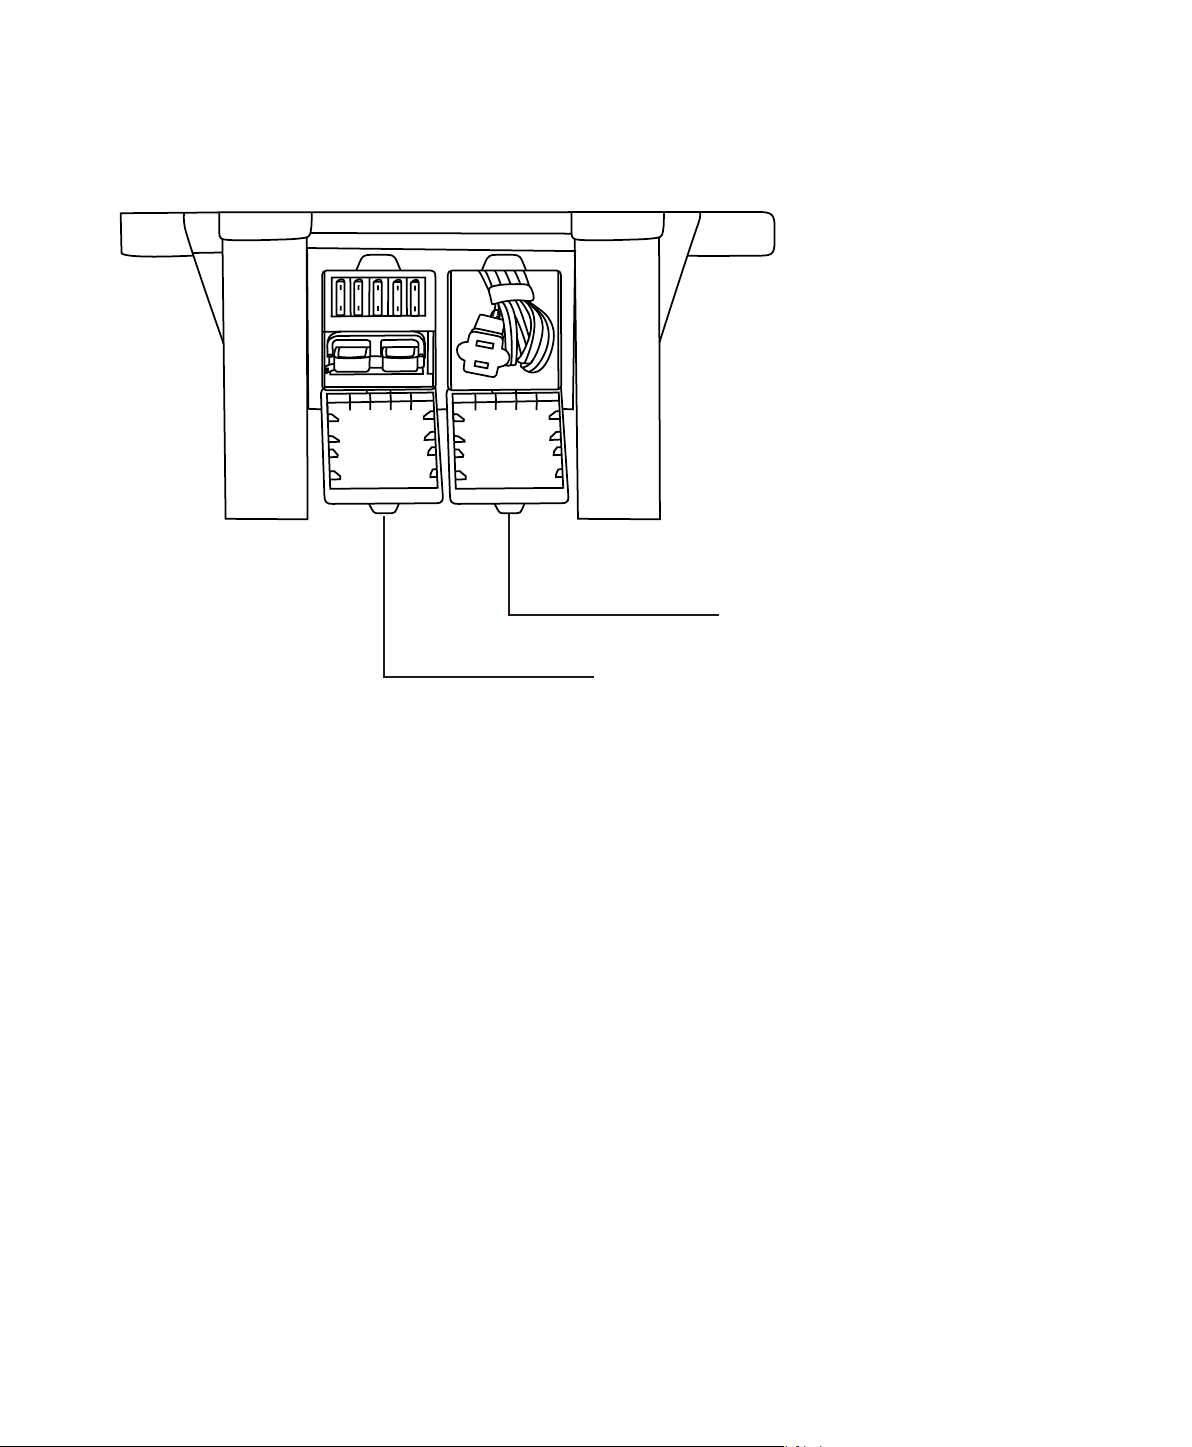
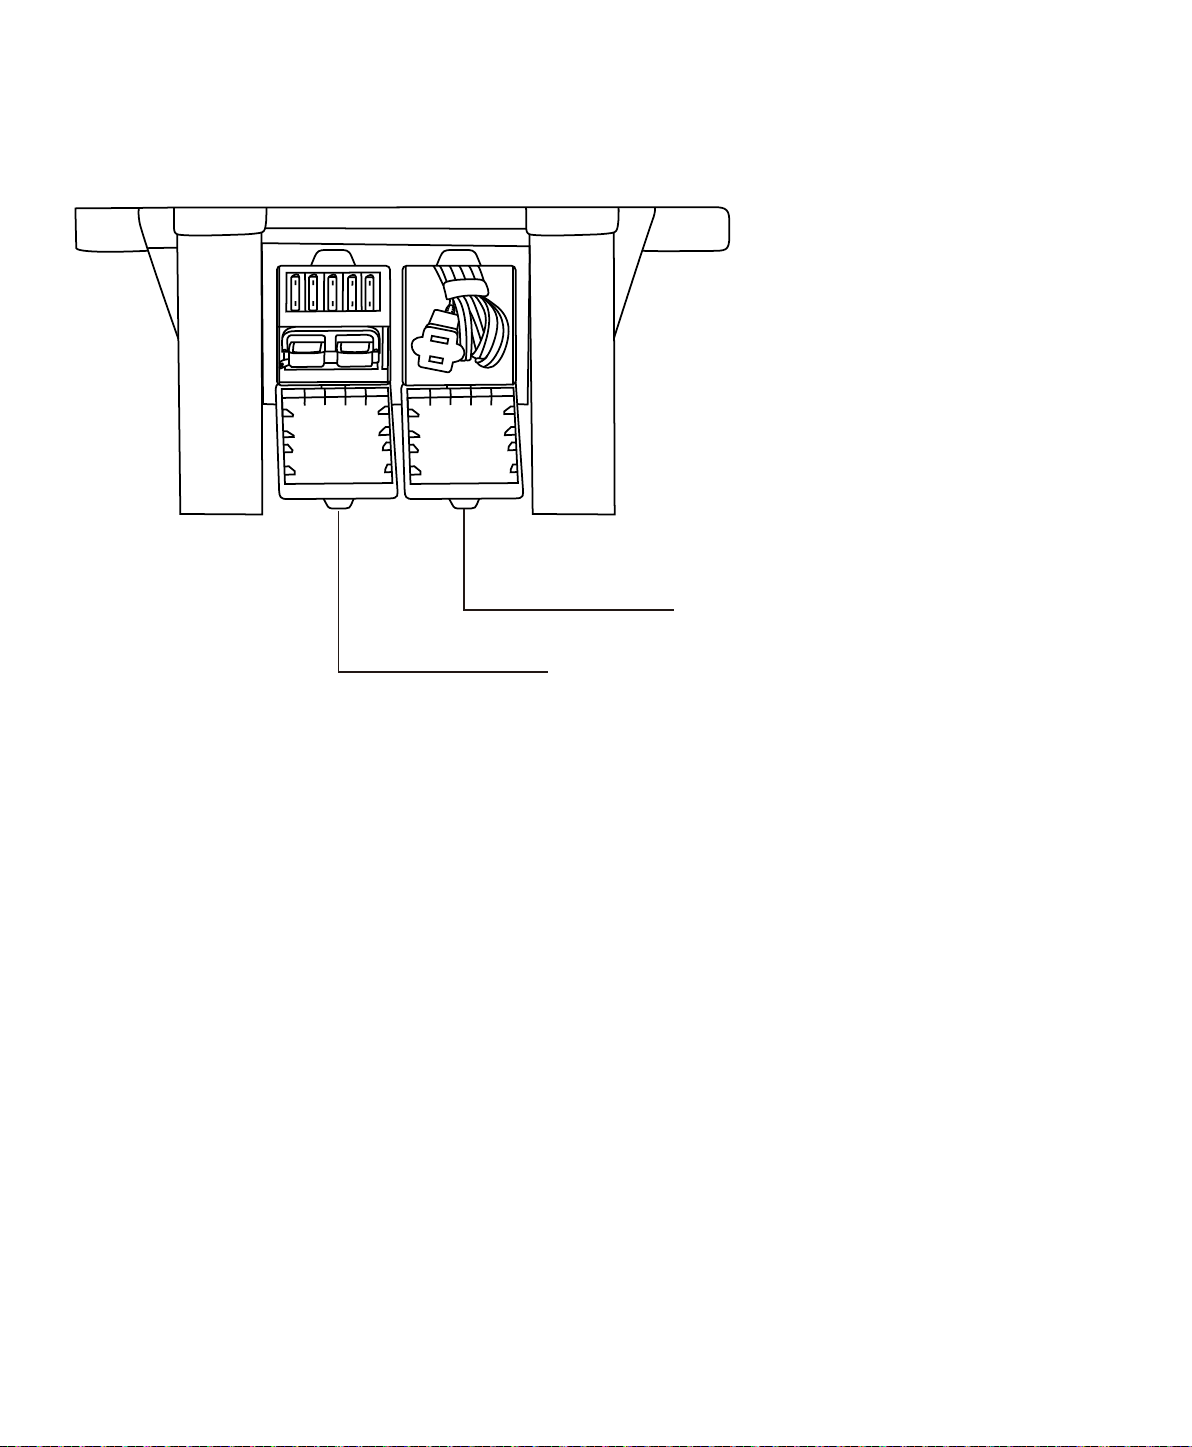
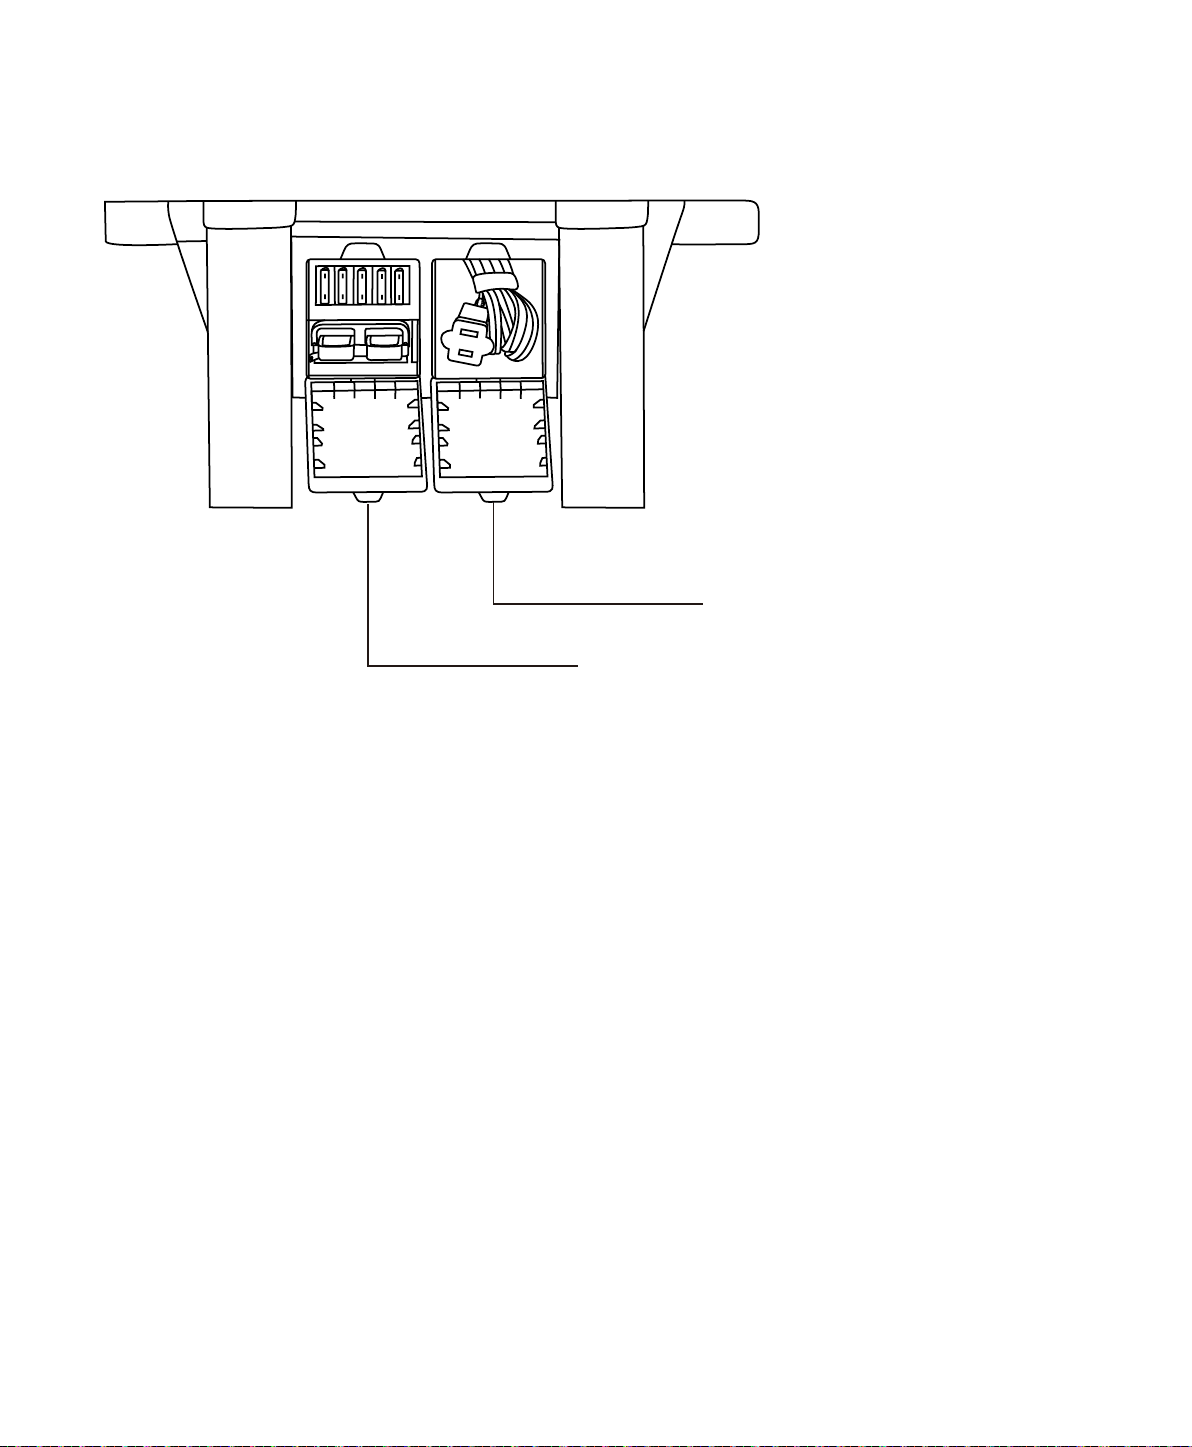
Back Panel
Expansion cord:
Daisy chaining fuses and Daisy chain connector.
For use with Nature's Generator Power Pod.
Storage: For storing the power cord.
5
Visit Naturesgenerator.com for More Information

How to Recharge Your Nature’s Generator
Recharging from Solar Panels
1. Place your solar panel where it will get as much direct sunlight as possible. While direct sunlight
skies.
2. Insert solar panel plug into Solar Input port on the front of your Nature's Generator. You will know
not enough power from solar panel.
3. It takes about 10 to 15 hours to recharge Nature's Generator
also depends on the the strength of the sunlight.
Naturesgenerator.com for
Recharging from the Wind Turbine
1. Place your wind turbine where it will get as much wind as possible.
2. Insert wind turbine plug into Wind Input port on the front of your Nature's Generator. You will
there is not enough power from wind turbine.
Naturesgenerator.com for
Recharging from AC Power
1. Locate the power cord in the rear storage compartment on the back of the Nature's Generator.
2. Insert the power cord to the AC Input Port on the front of the Nature's Generator.
3. Plug the other end of the power cord into the wall outlet. You will know it is recharging when LCD
Using Your Nature’s Generator
6
Visit Naturesgenerator.com for More Information

7
How to Use Your Nature’s Generator
1. Press the Main Power Switch to turn on your Nature's Generator. USB ports will be on
3. You’ll know the port is turned on when the icon is illuminated on the LCD display.
4. Plug in any of your devices for power.
Uninterrupted Power Supply (UPS) Mode
1. You can recharge your Nature's Generator
2. If you recharge your Nature's Generator
Nature's
Generator will already be running and ready to supply power to your connected AC devices.
3. LCD display shows UPS when it is in UPS mode.
Visit Naturesgenerator.com for More Information
8
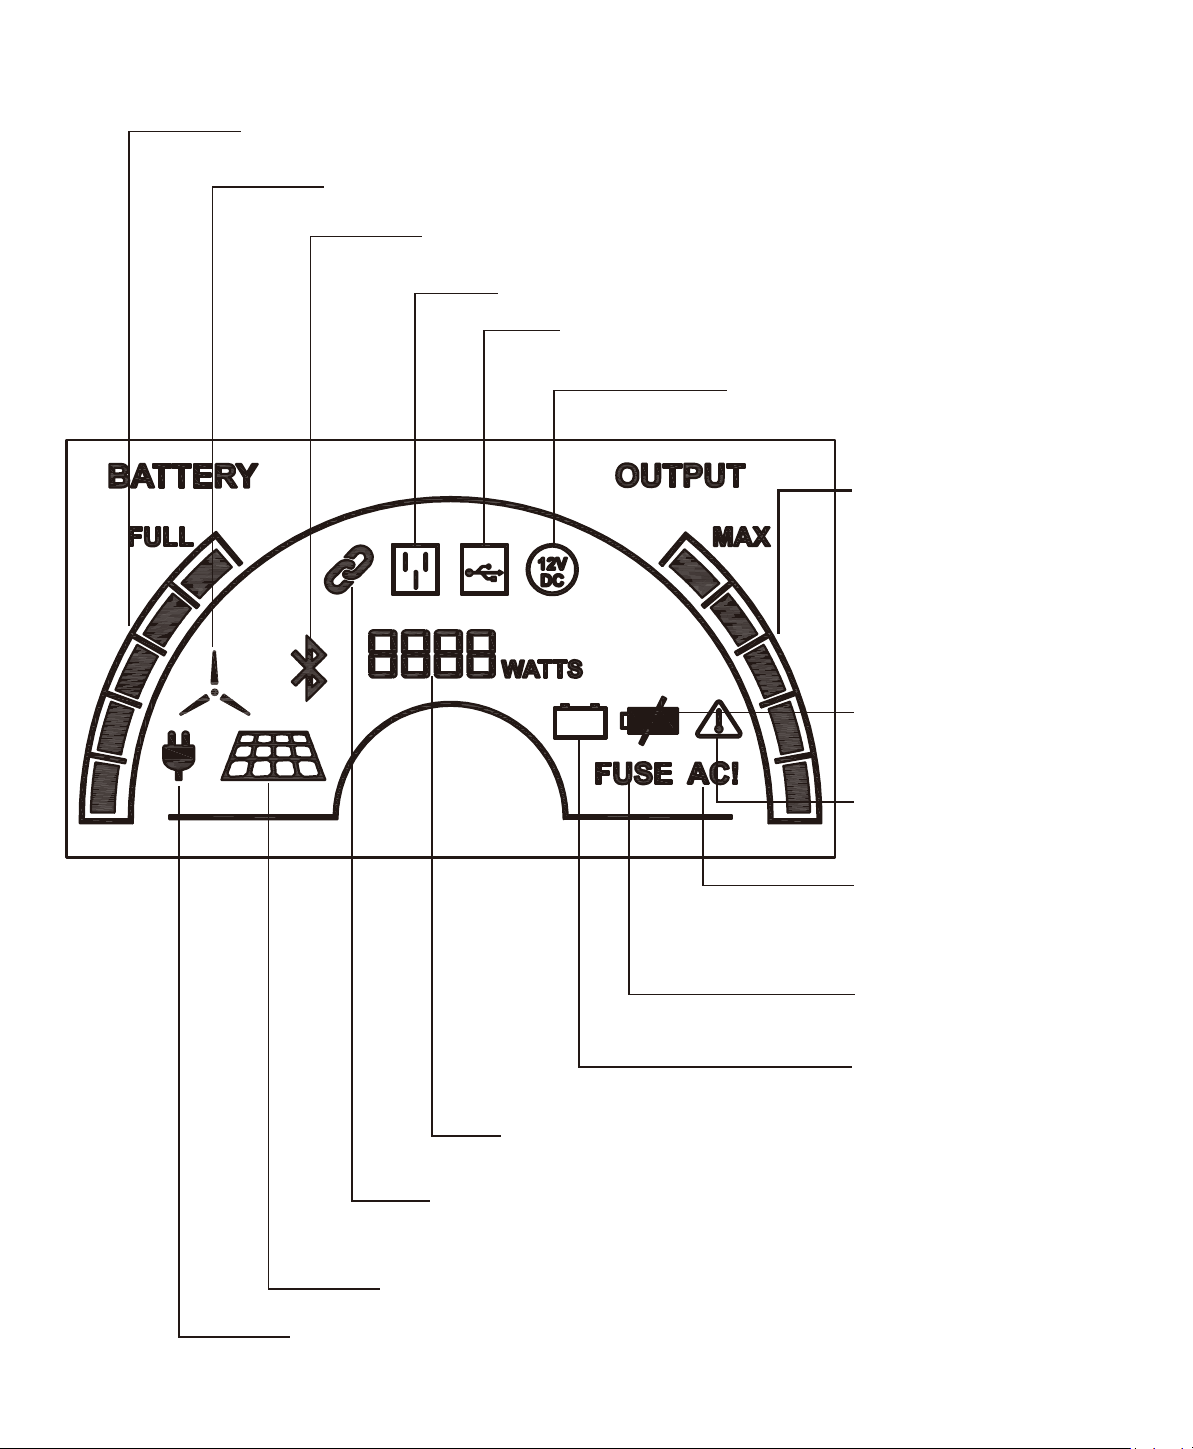
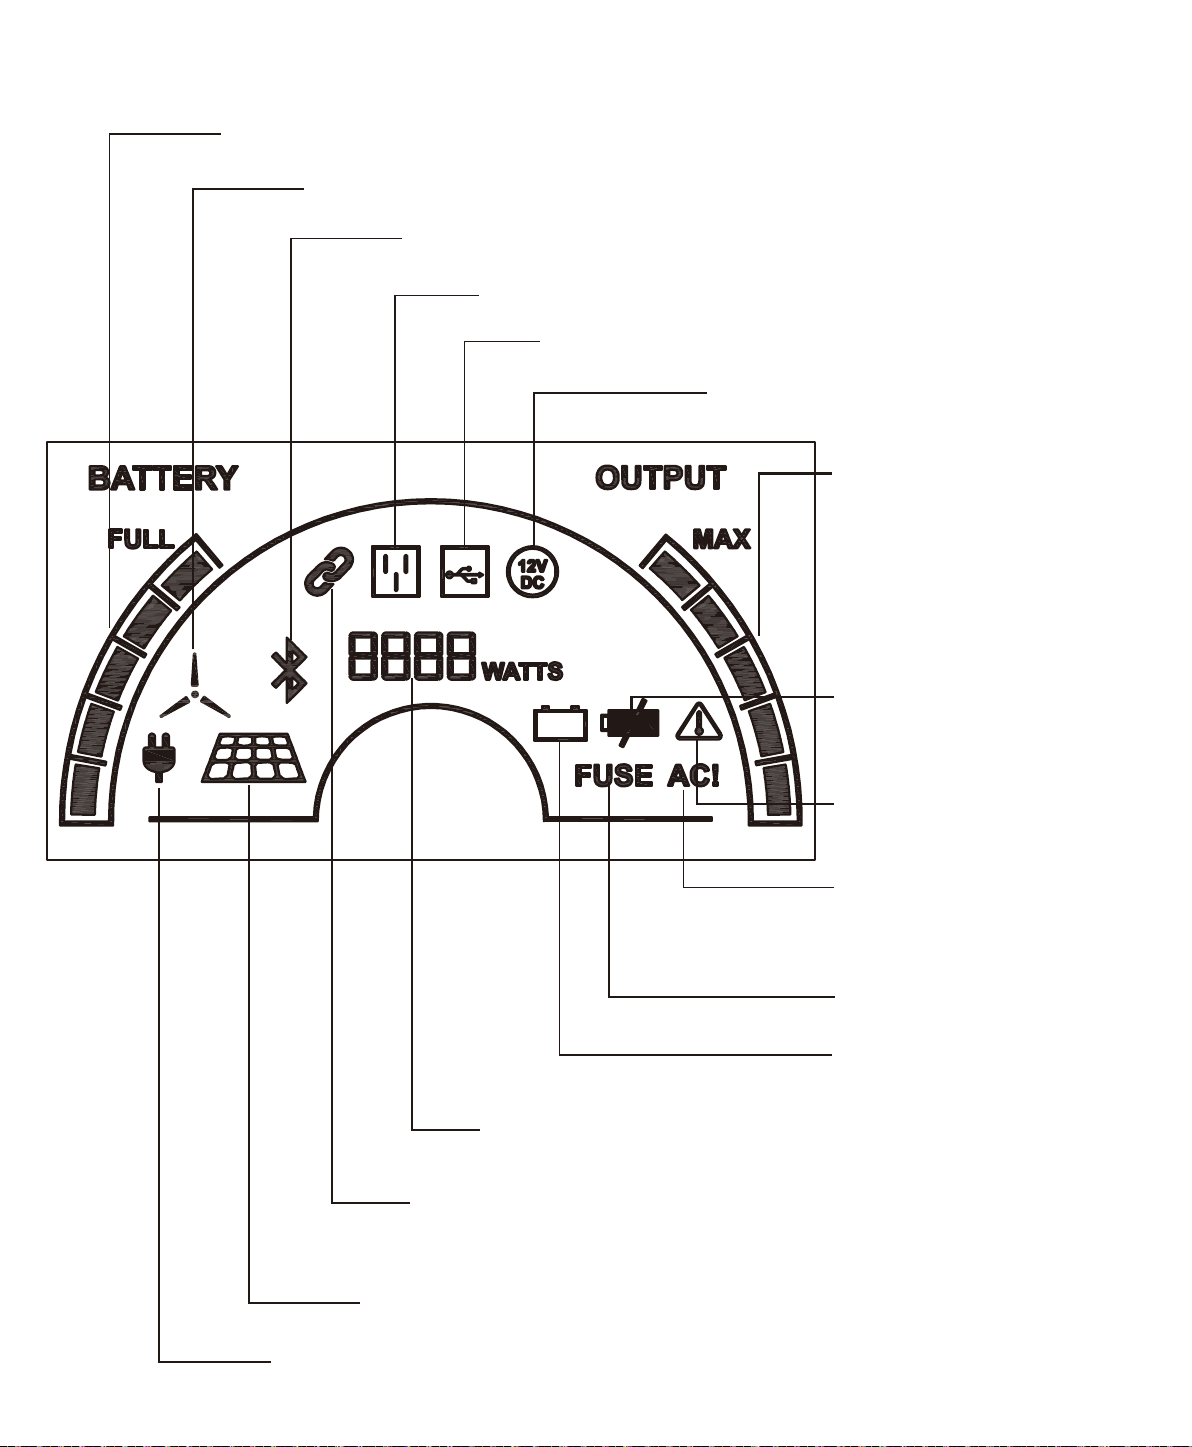
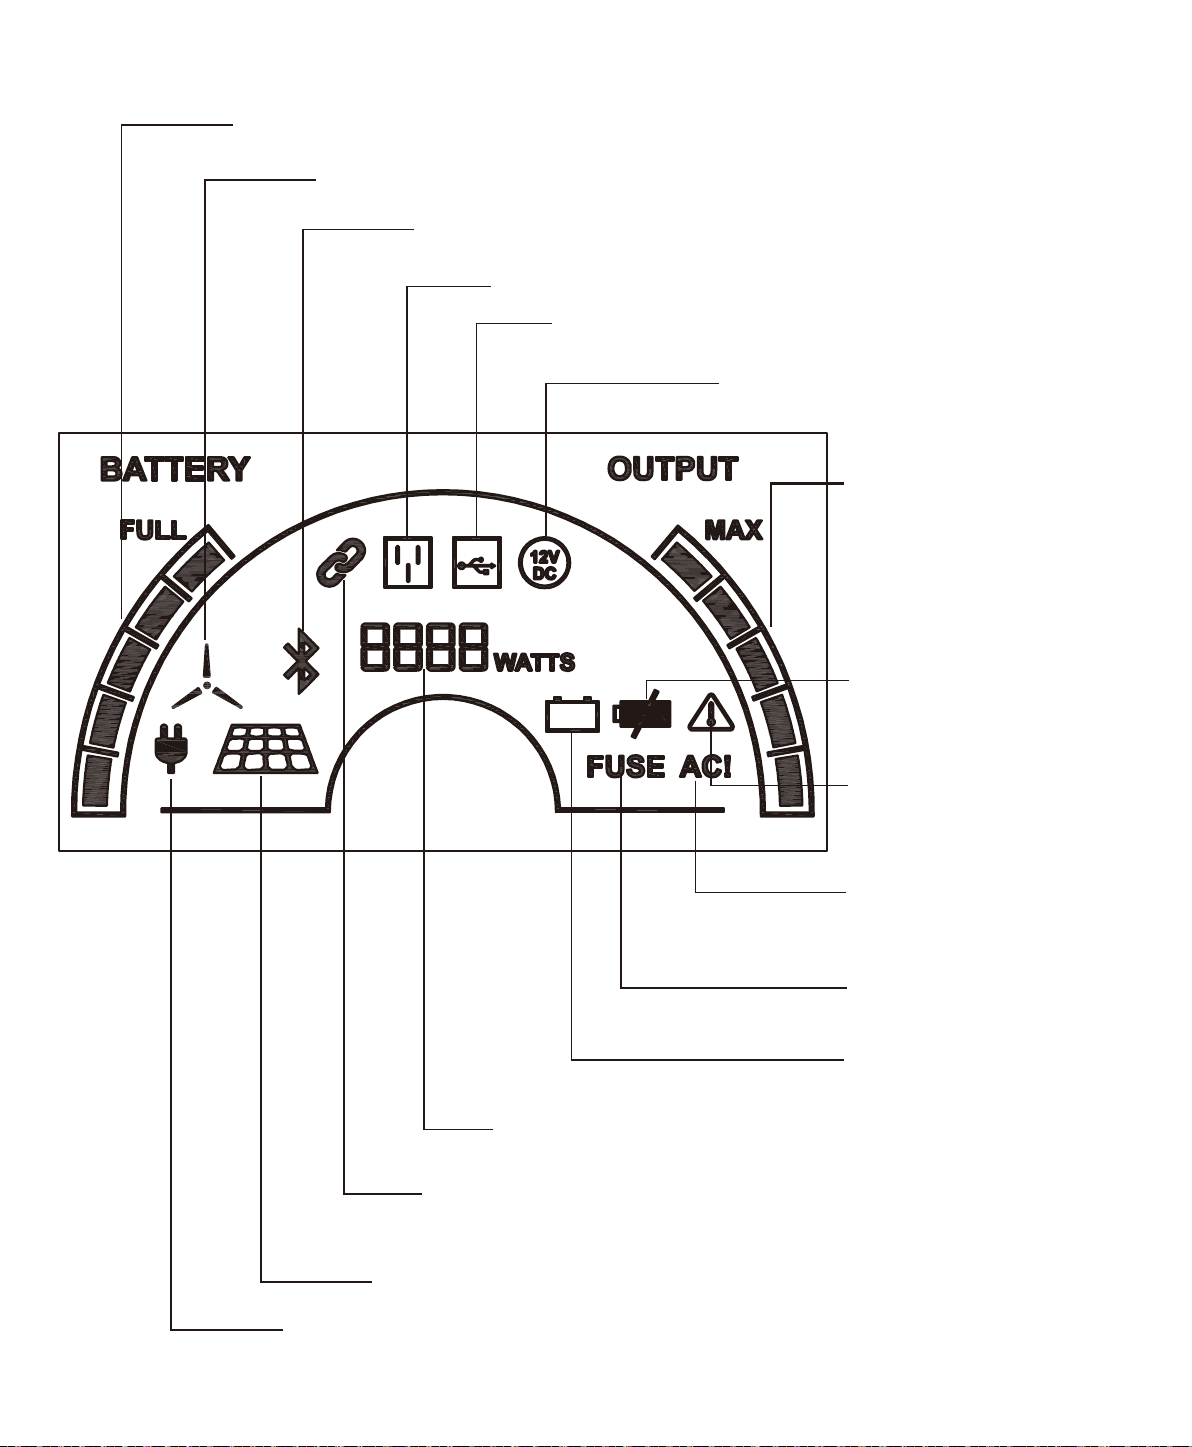
How to Read the LCD Display
Baery Bar:
Wind Turbine Icon: Indicates that your Nature’s Generator is being recharged by
the wind turbine.
Solar Panel Icon: Indicates that your Nature’s Generator is recharged by
solar panel(s).
AC Input Icon: Indicates that your Nature’s Generator is recharged by the wall.
Bluetooth Icon: Indicates that your Nature’s Generator is paired with
your smart phone by the Nature’s Generator Smart Key.
Expansion (Chain Link) Icon: Indicates when your Nature’s Generator is
daisy chained to the Nature's Generator Power Pod by the expansion port.
Visit Naturesgenerator.com to purchase the Nature's Generator Power Pod.
AC Outlet Icon: Indicates when the AC outlet switch is turned on.
Waage Display: Indicates how much power is being used.
USB Icon: Indicates when your Nature’s Generator is
turned on and the USB port is in use.
12V DC Icon: Indicates when your
Nature’s Generator
is turned on and 12V
DC port is in use.
Ba�ery Fail Icon: Indicates
replacement.
Baery Low Icon: Indicates
is low.
Temperature Warning Icon:
Indicates when the internal
temperature is too high.
FUSE Icon: Indicates when
the fuse is blown.
AC! Icon: It is illuminated
when the AC inverter is
being protected and stops
working.
Output Bar: 5
increment
output bar indicates the
usage of the power. The
increments run from the
medium heavy and heavy
power usage.
Visit Naturesgenerator.com for More Information

9
How to Use Your Nature’s Generator Smart Key
1. Turn on the main power switch of your Nature's Generator.
2. Plug your Nature's Generator Smart Key to the top USB port with Bluetooth icon on its right side.
4. Search “Nature’s Pulse” app and install it.
before you can log into the home page.
Nature's Generator Smart
Nature's Generator.
tracking and many other features.
How to Expand the Capacity of Your Nature’s Generator
Nature's GeneratorNature's Generator
Power Pod. Visit naturesgenerator.com to purchase a Nature's Generator Power Pod.
1. Open the top cover of the Nature's Generator
the expansion cable out of Nature's Generator Power Pod through the opening on the back of the
Nature's Generator Power Pod.
2. Locate Expansion Port on the back of your Nature's Generator and open the rubber cover.
3. Connect the expansion cable to the expansion port.
4. The Expansion (Chain Link) Icon will be illuminated on the LCD display to indicate it is connected.
Nature's
Generator Nature's Generator Power Pods and
Nature's Generator Power Pods.
How to Maintain and Store Your Nature’s Generator
Please recharge your Nature's Generator
Nature's Generator
Nature's Generator by these steps can
Please clean your Nature's GeneratorNature's Generator is
Nature's Generator.
Visit Naturesgenerator.com for More Information
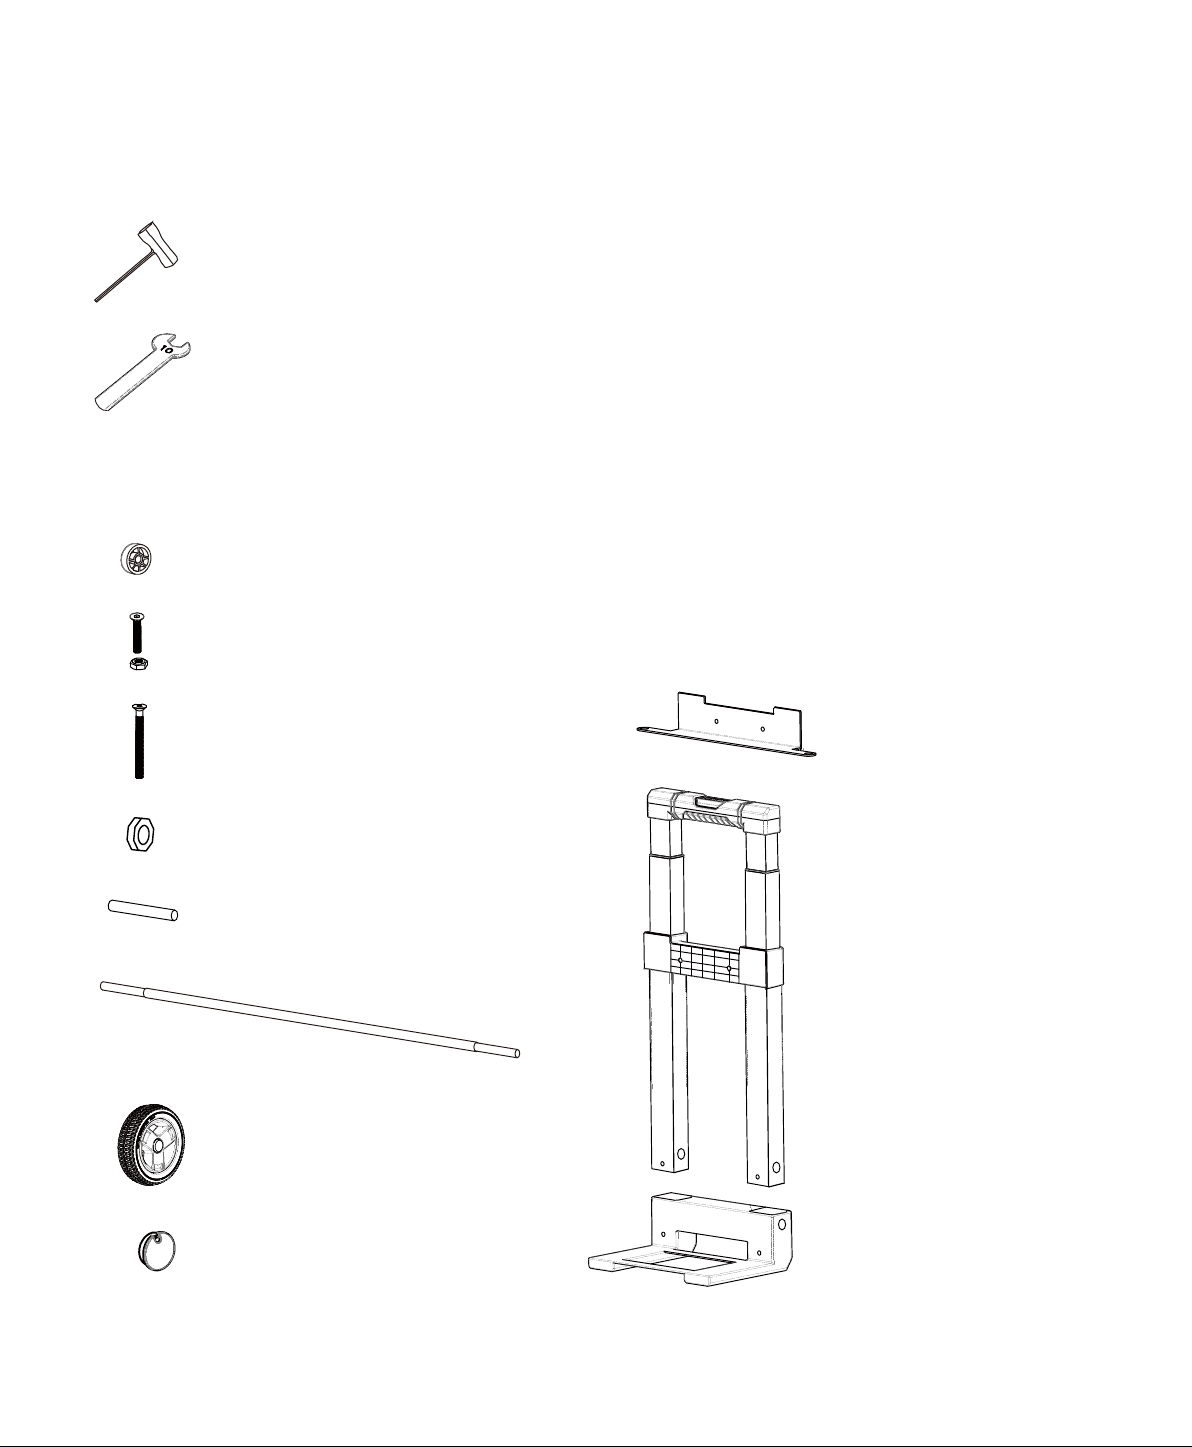
Cart Parts
Spacer × 2pcs
M6 30mm Bolt and Nut × 2pcs
M6 100mm Bolt × 2pcs
Socket Wrench × 2pcs
10mm Wrench × 1pc
Generator Bracket
Axle Bushing × 2pcs
Locknut × 2pcs
Wheel × 2pcs
Hub Cap × 2pcs
Axle Base
Handle Assembly
Tools
Visit Naturesgenerator.com for More Information
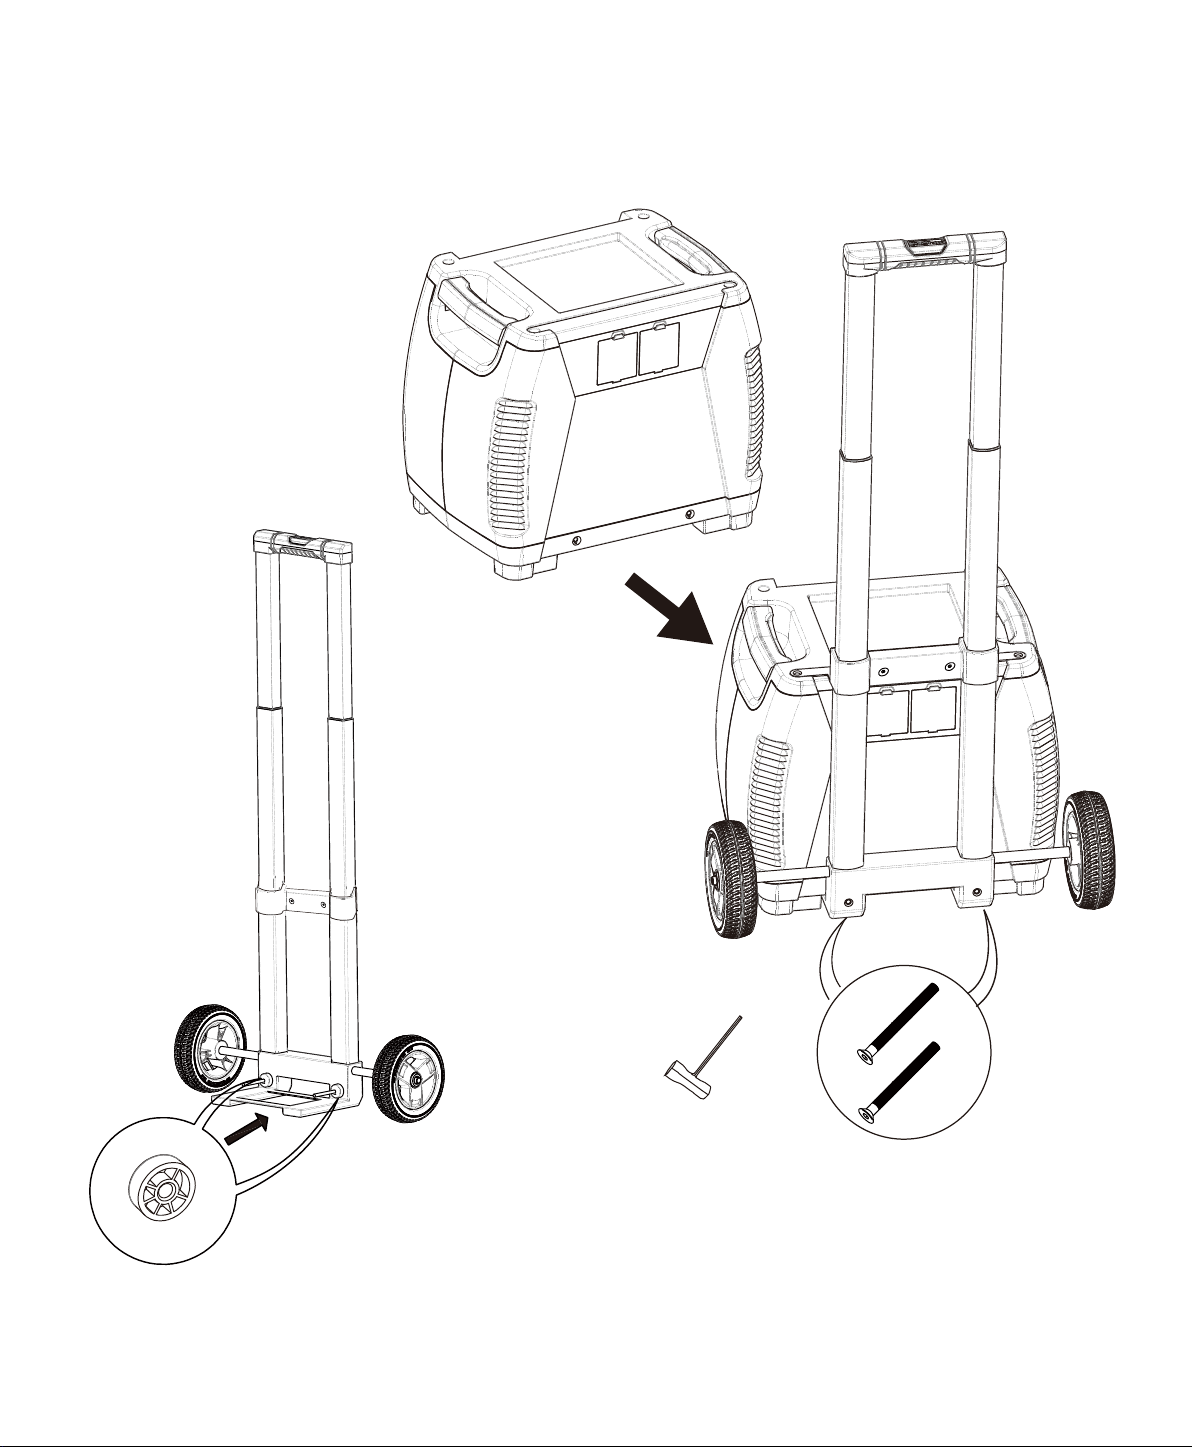
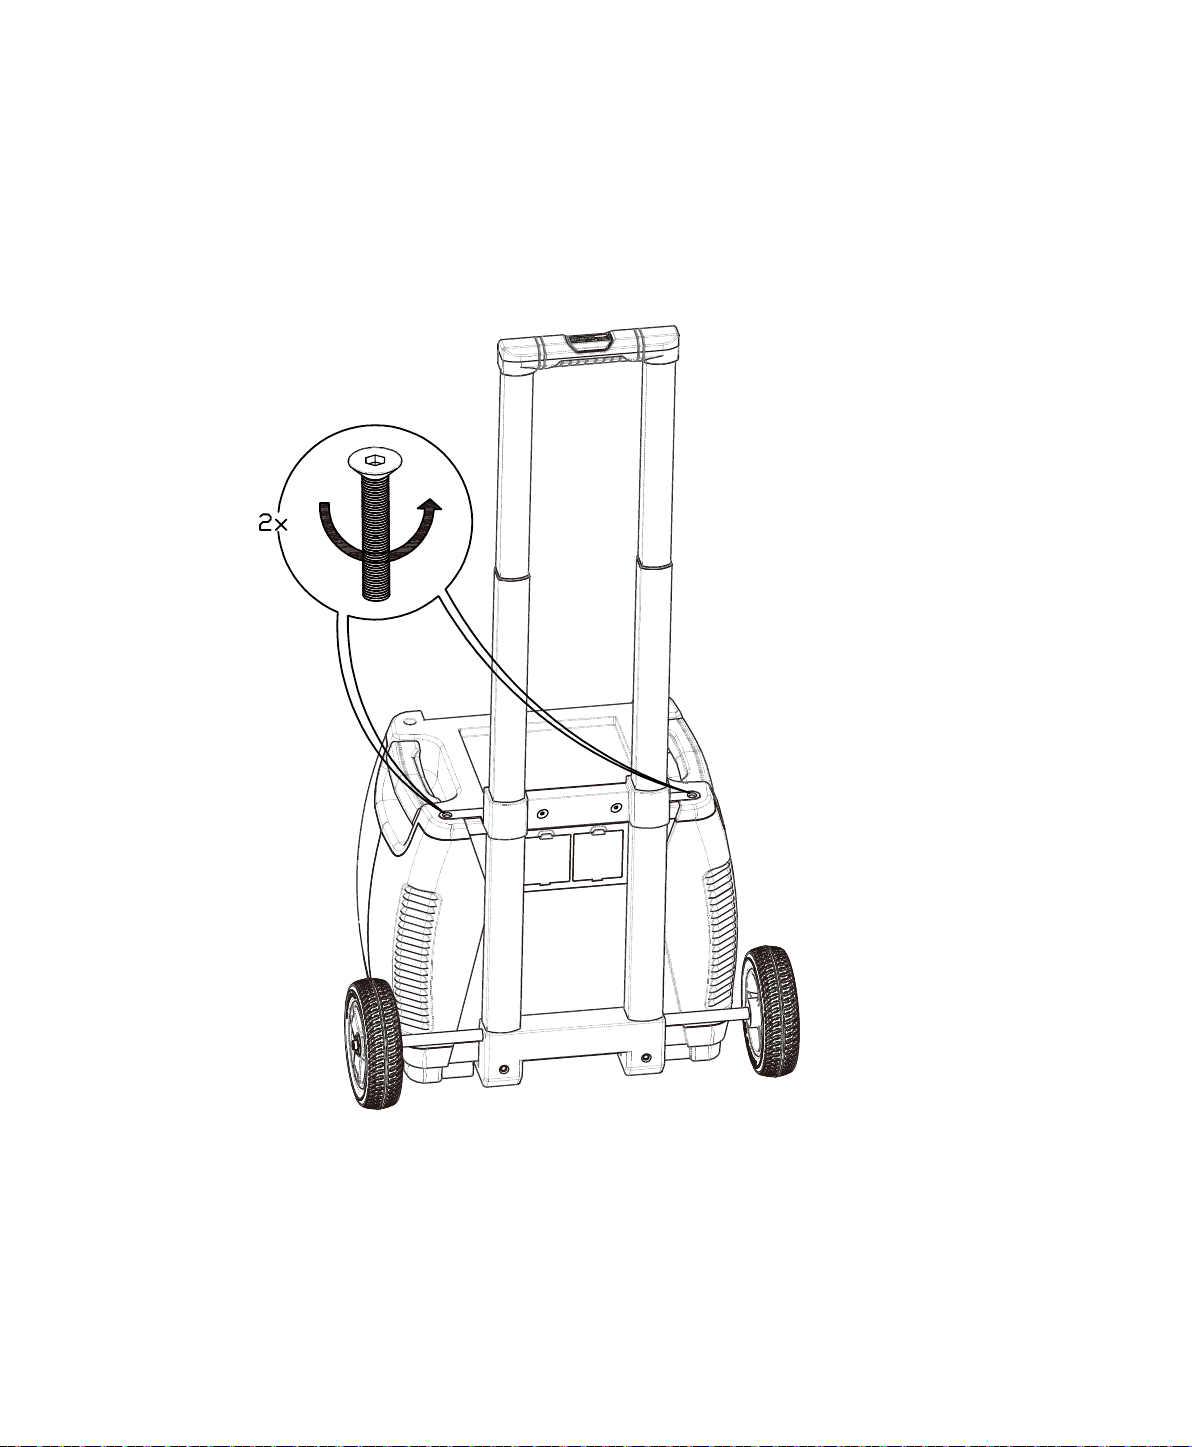
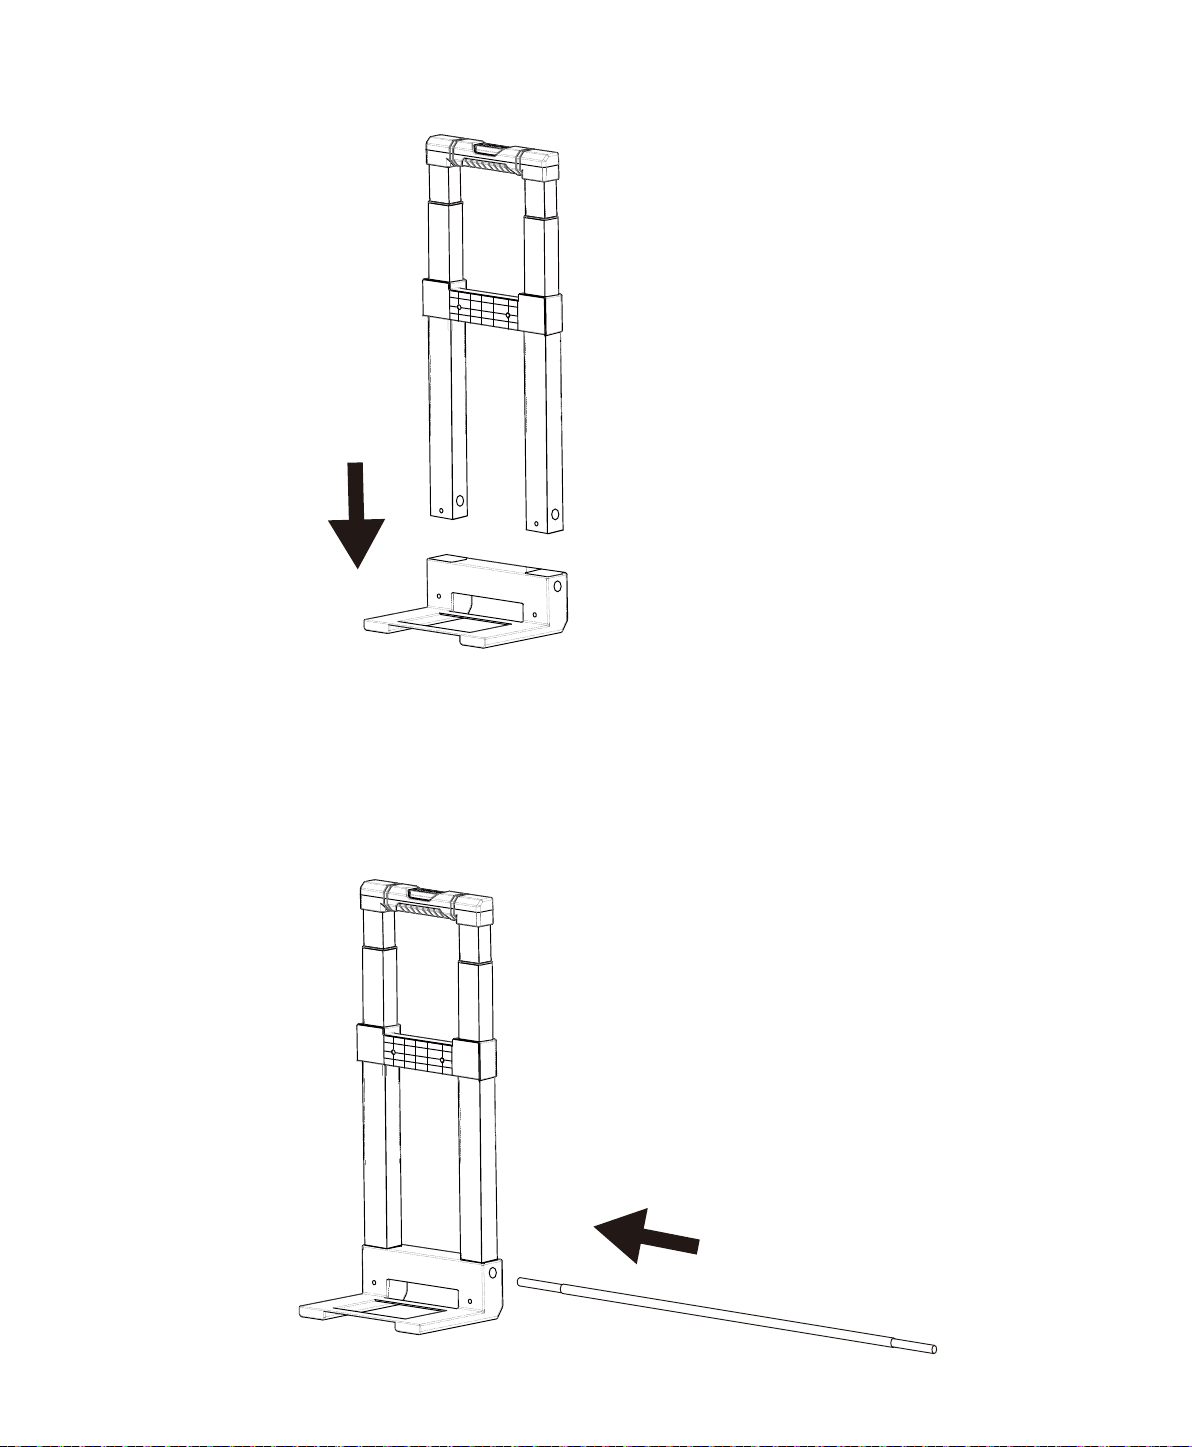
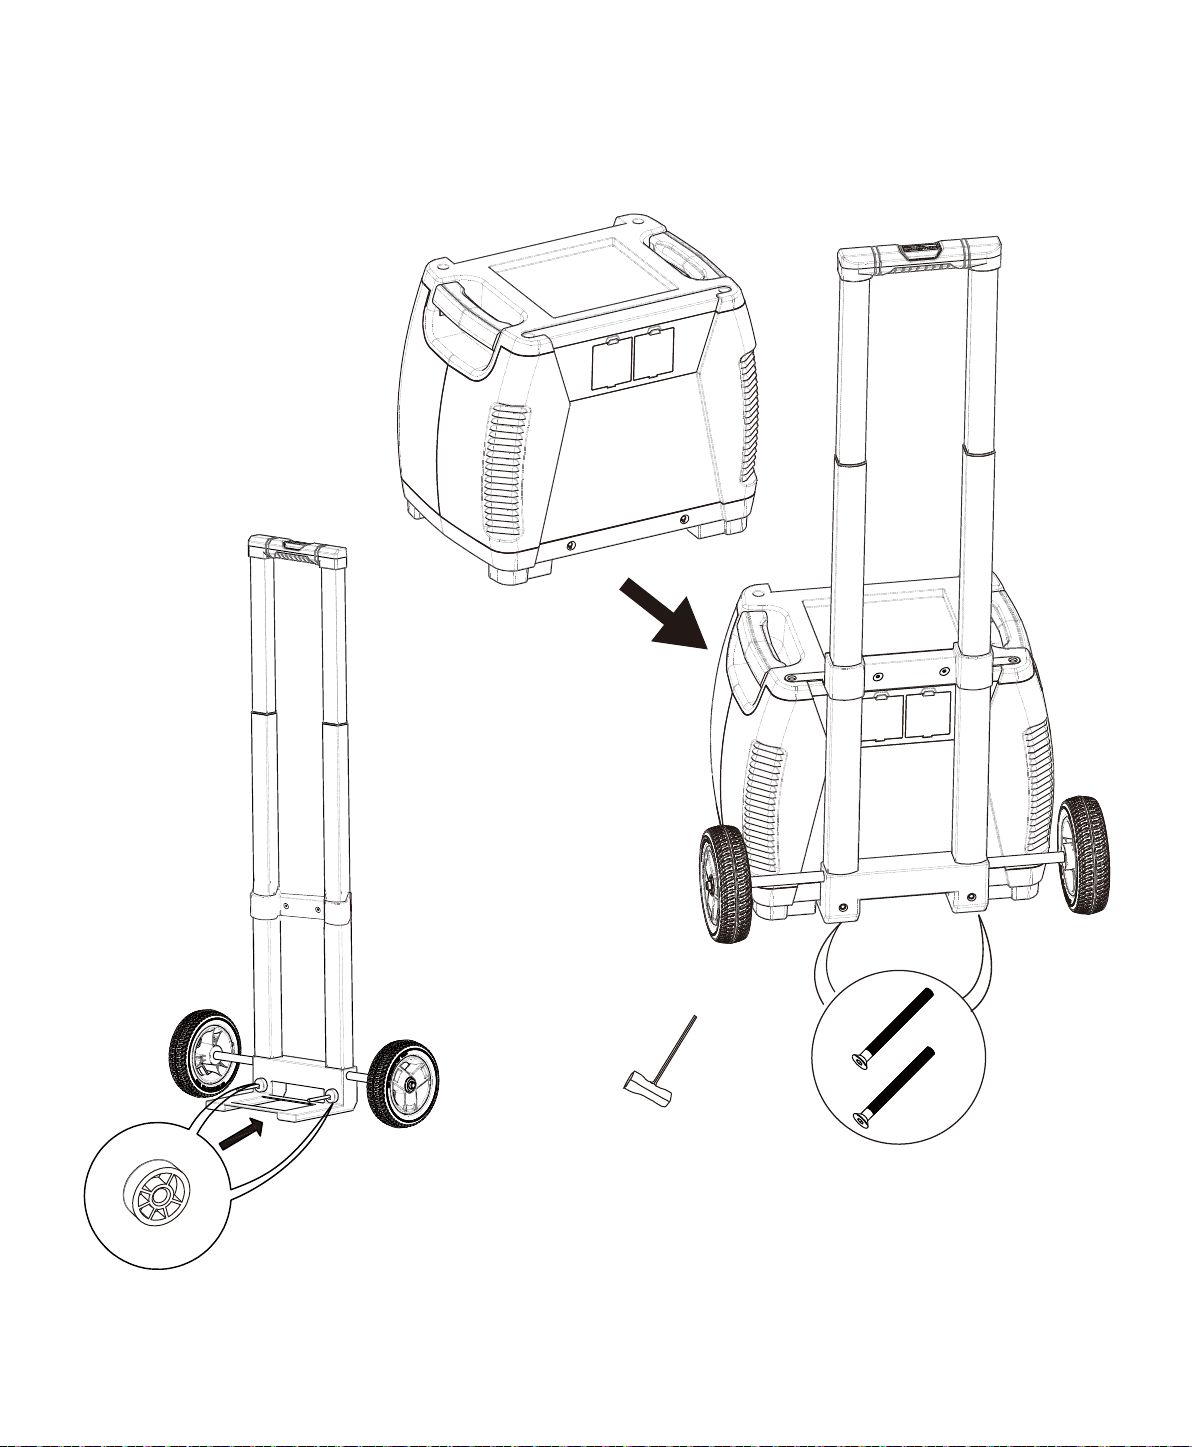
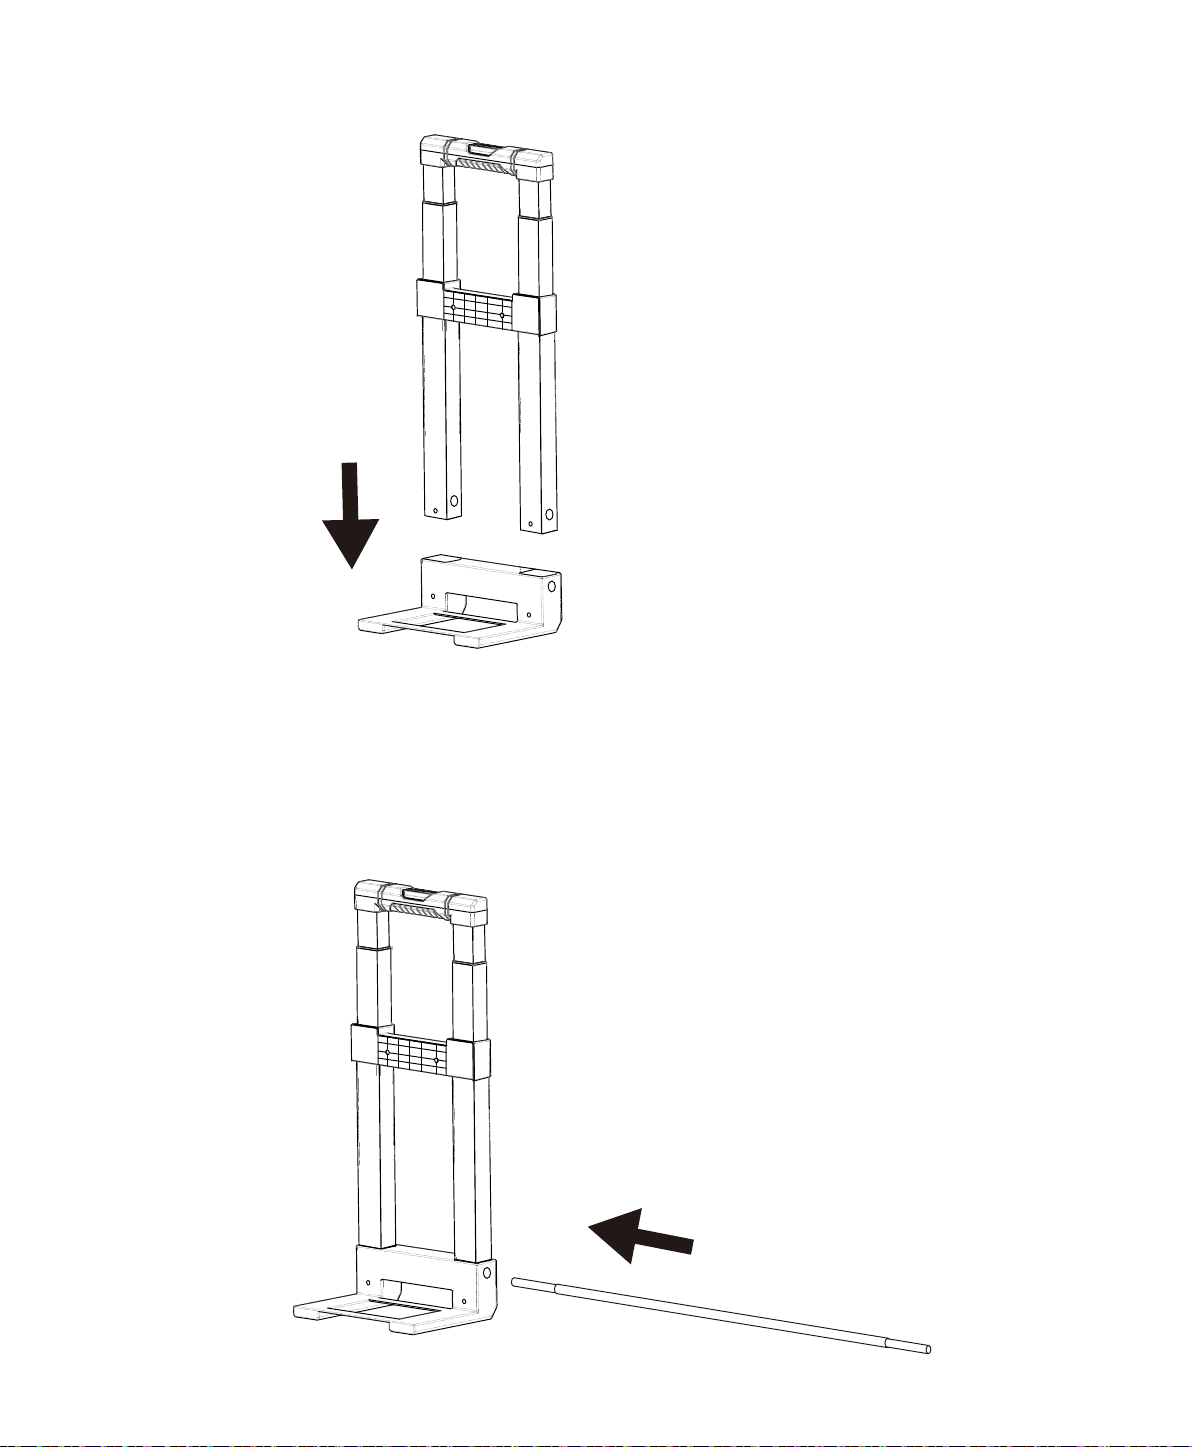
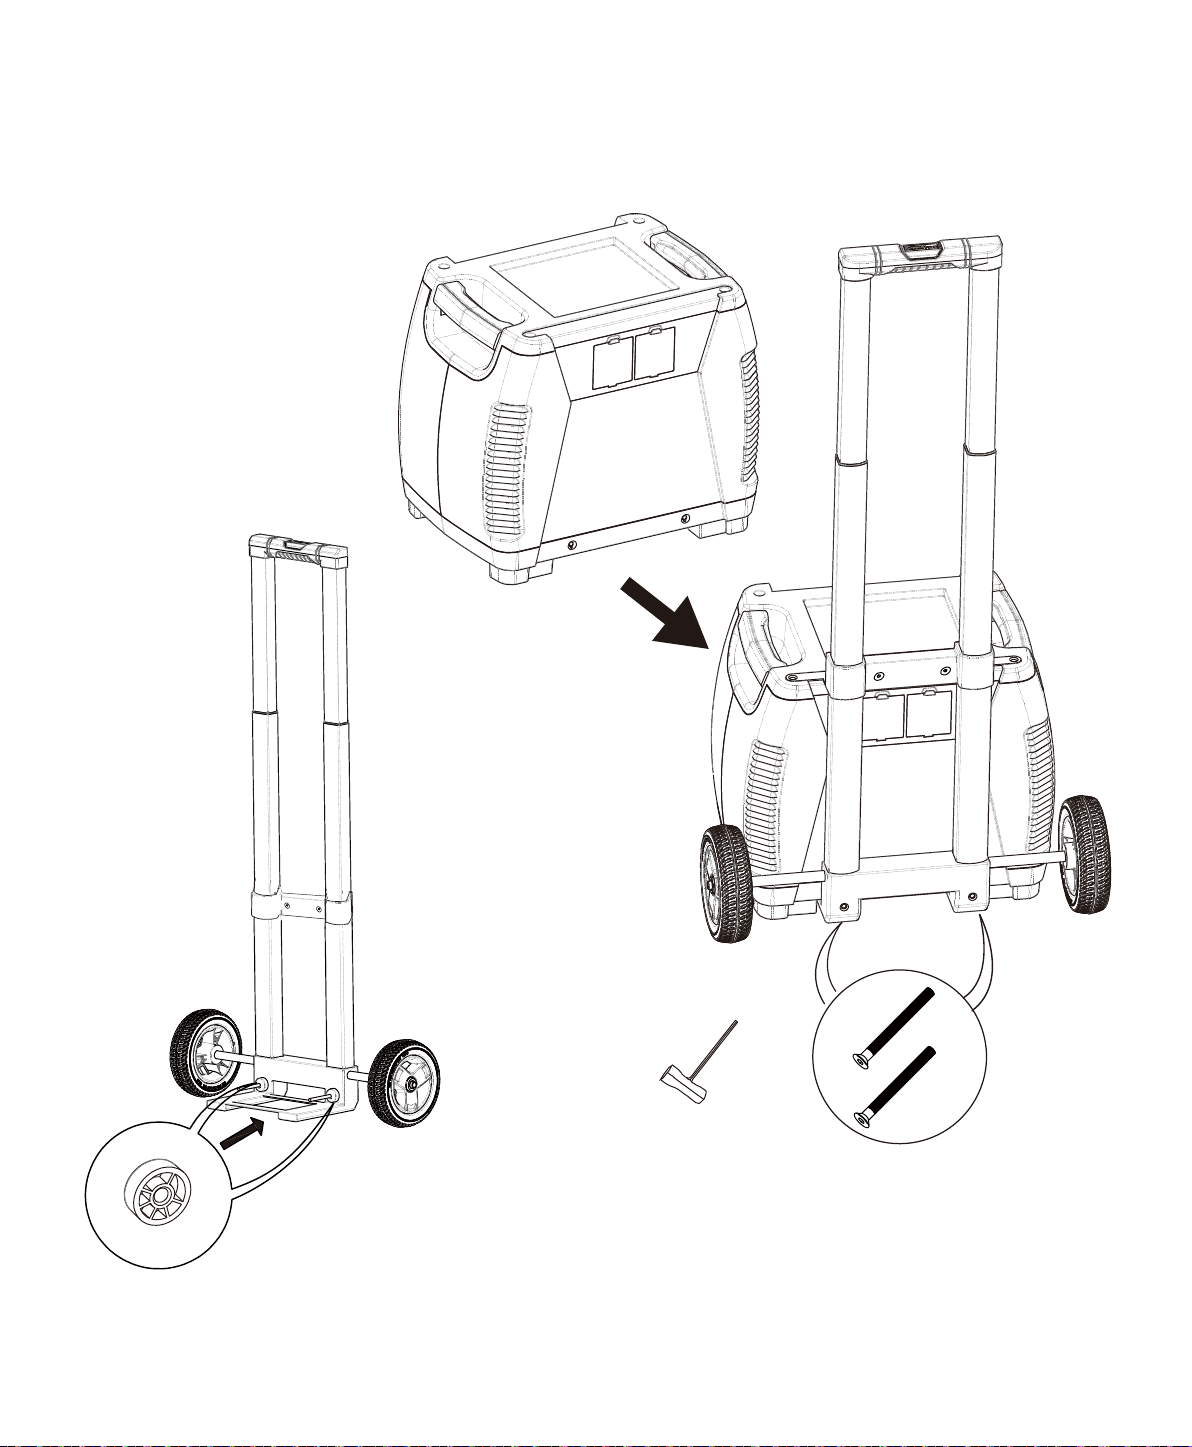
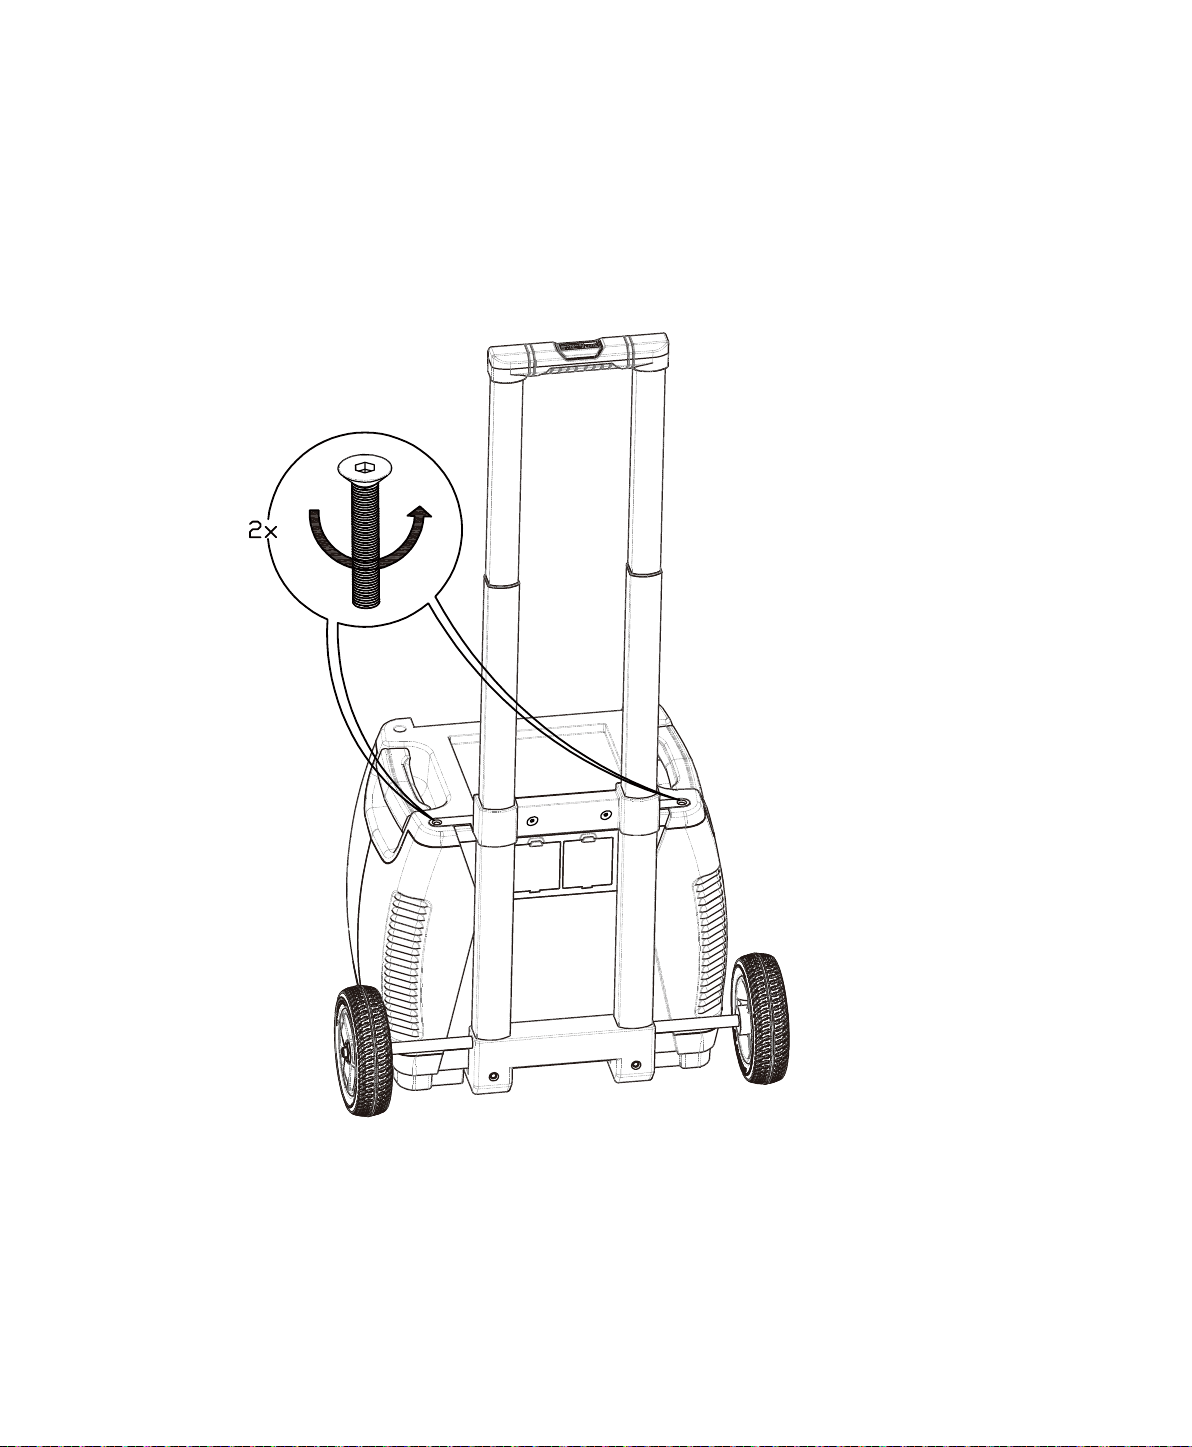
How to Install the Cart to Your Nature’s Generator
10
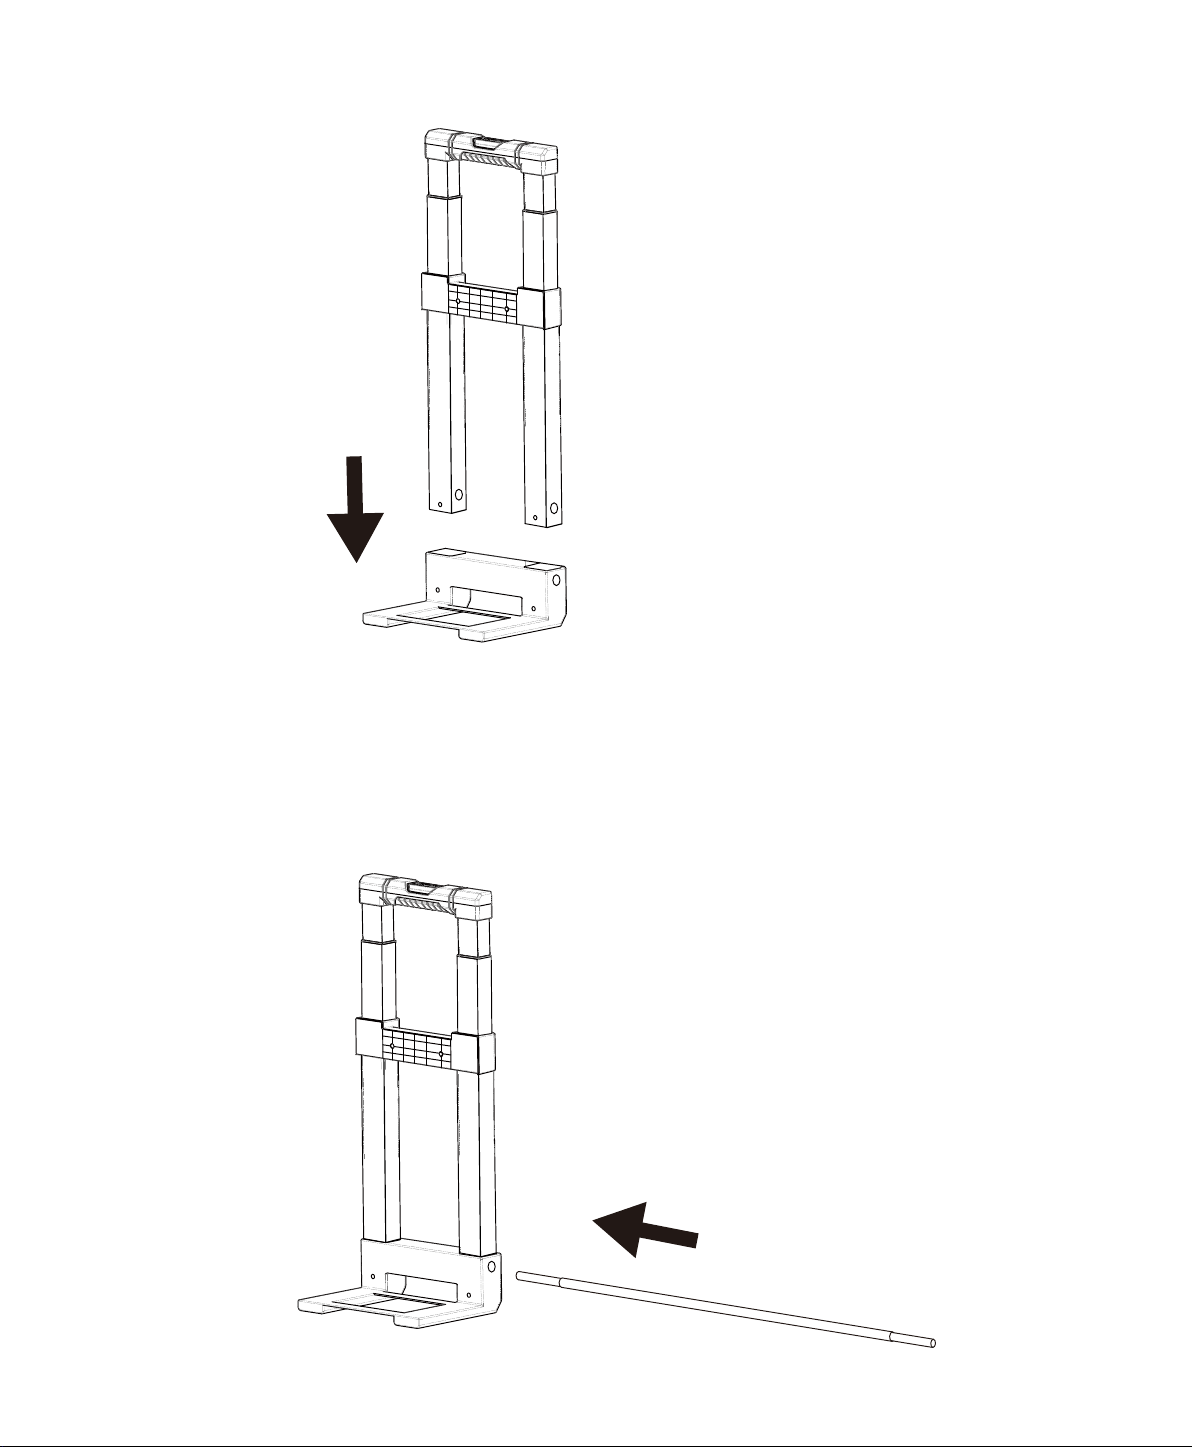
Axle Base
Handle Assembly
Visit Naturesgenerator.com for More Information
11
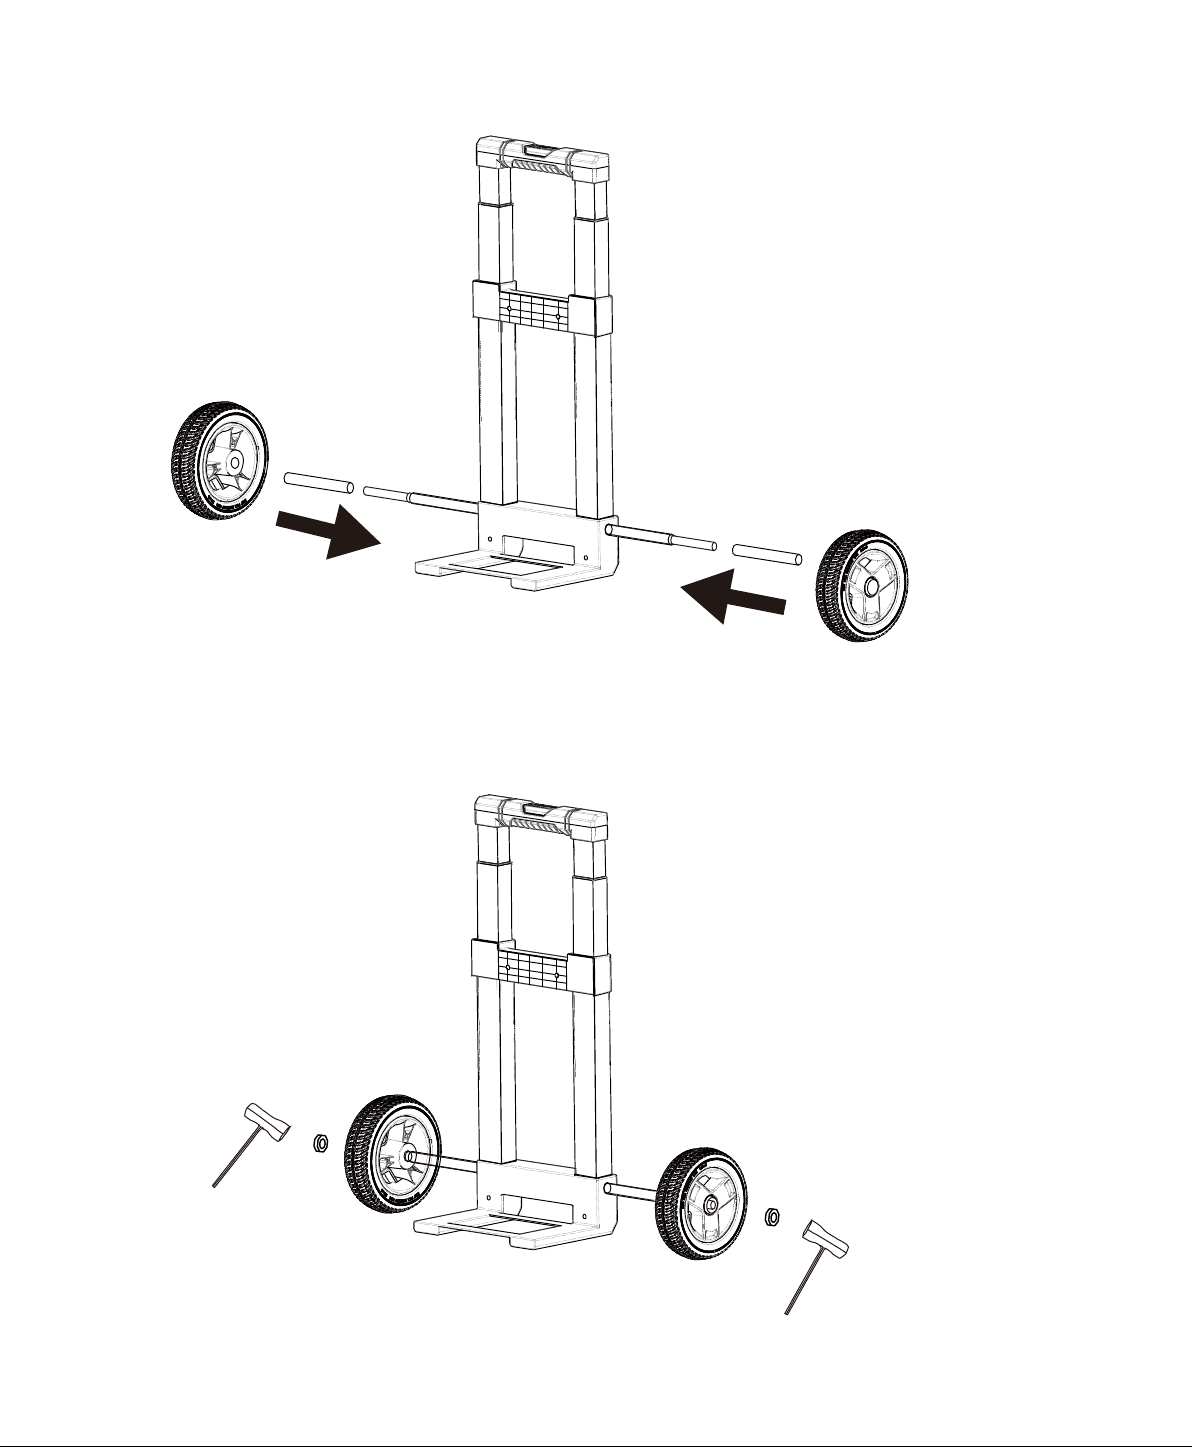
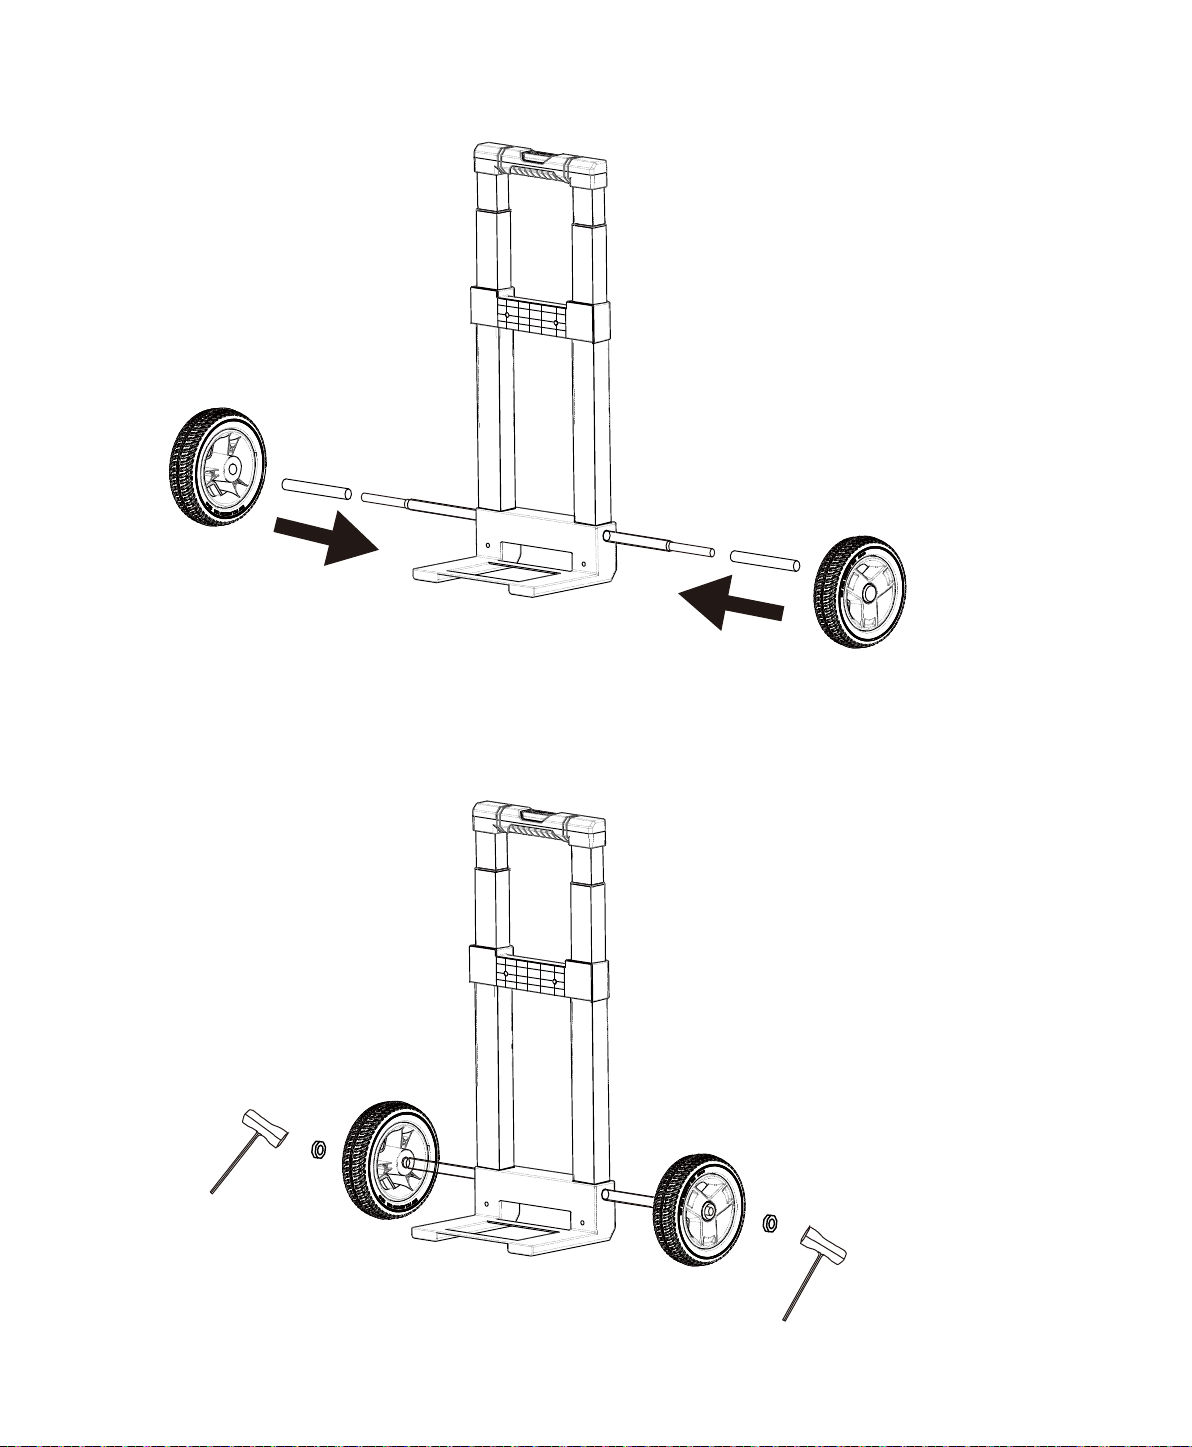
Wheel × 2pcs
Axle Bushing × 2pcs
Socket Wrench × 2pcs
Locknut x 2pcs
Visit Naturesgenerator.com for More Information
12
Spacer x 2pcs
M6 100mm Bolt x 2pcs
Socket Wrench × 1pc
Visit Naturesgenerator.com for More Information
13
Visit Naturesgenerator.com for More Information
14
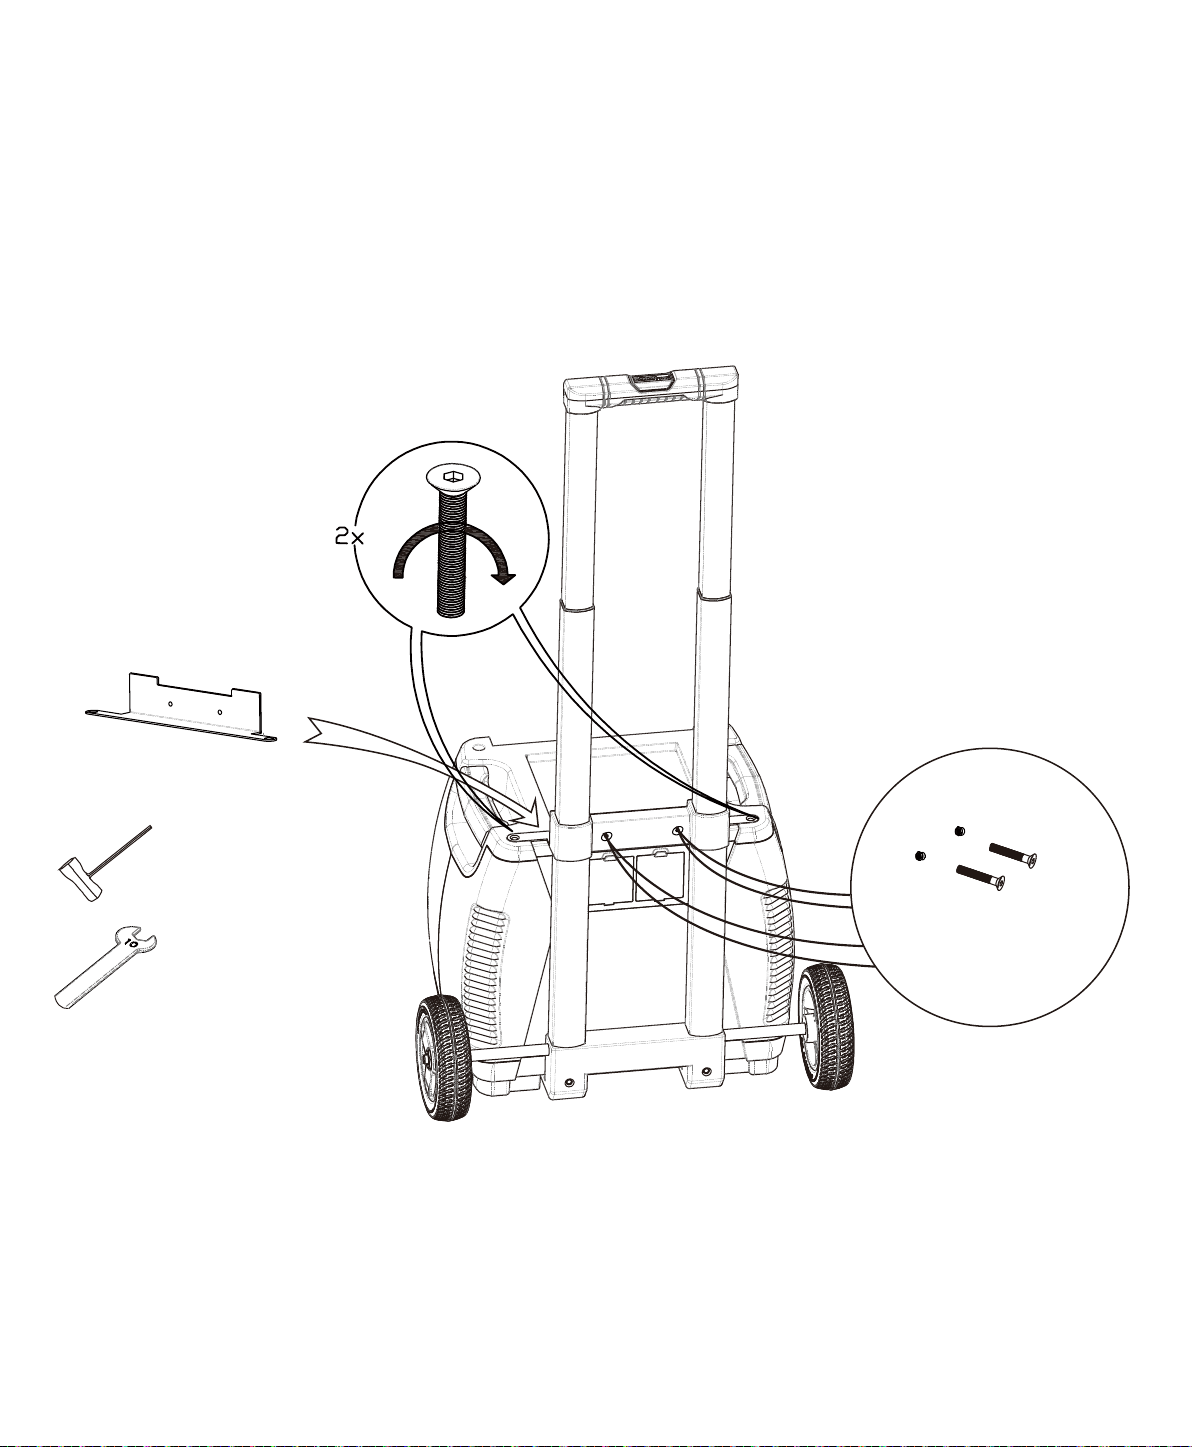
Step 6:
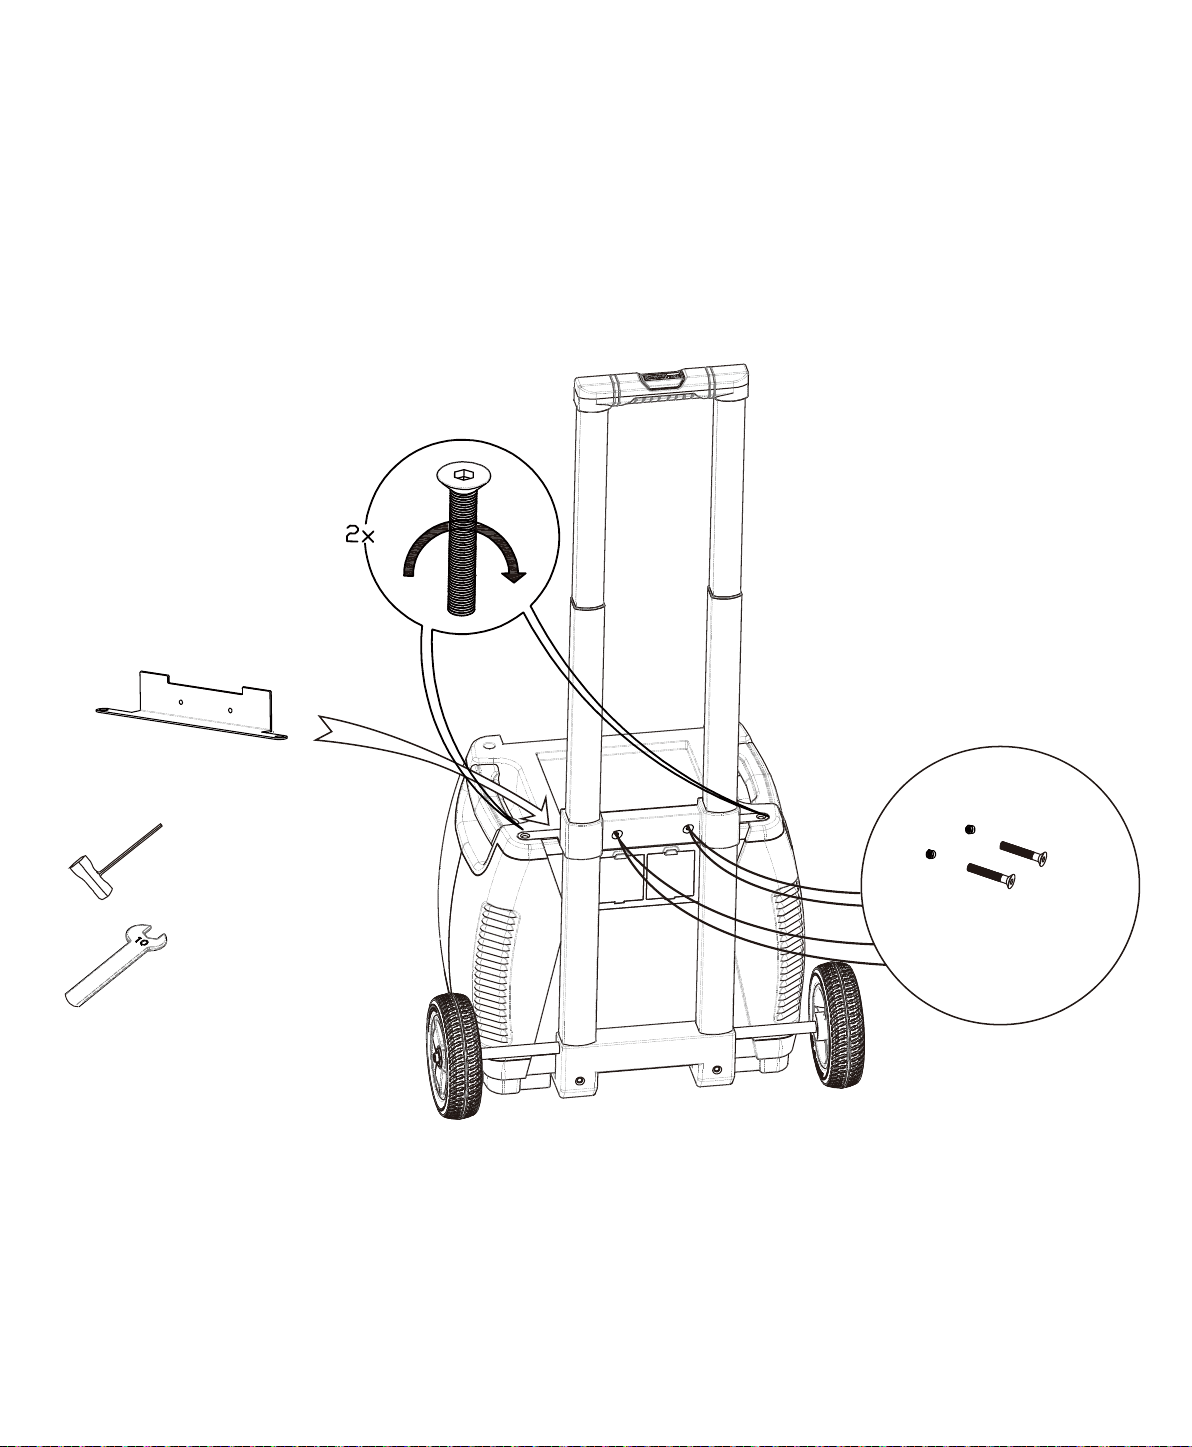
M6 30mm Bolt
and Nut × 2pcs
Socket Wrench × 1pc
10mm Wrench × 1pc
Generator Bracket
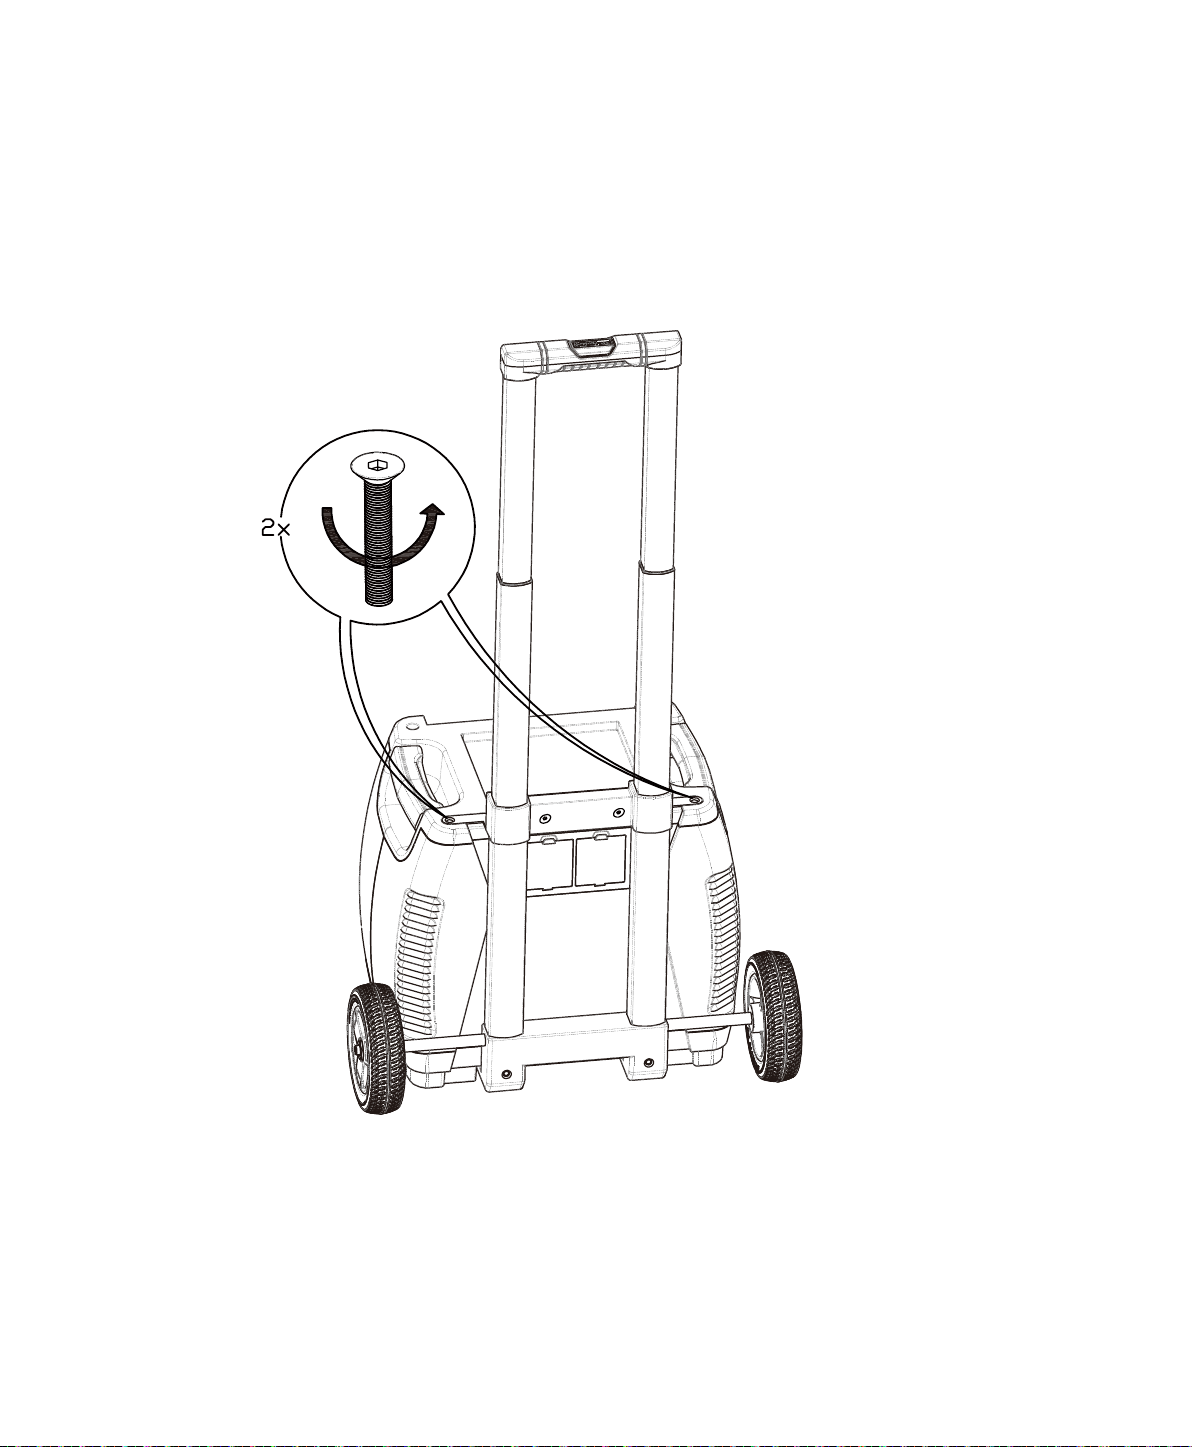
Step 7:
Visit Naturesgenerator.com for More Information
15
Please reinsert the bolts once Generator Bracket is in place.

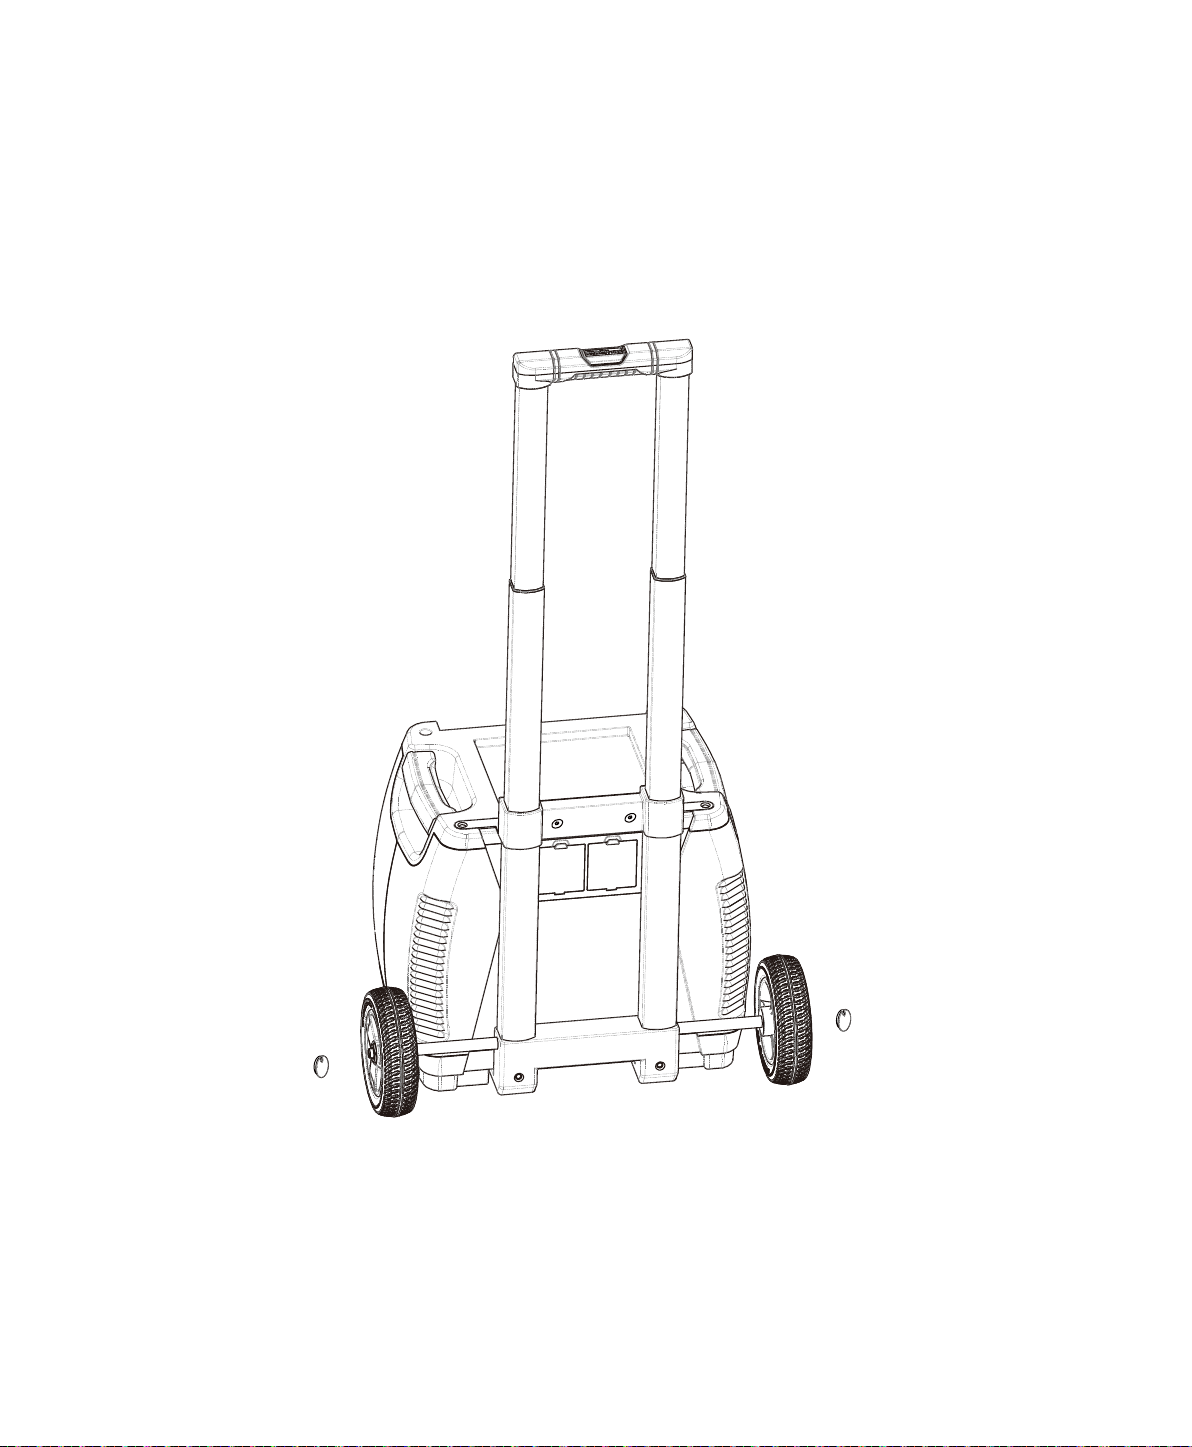
on the wheels.
Visit Naturesgenerator.com for More Information
16
Hub Cap x 2pcs

17
Troubleshoong
My Nature’s Generator won’t charge when I connect my solar panel to it.
Please follow these steps.
Nature's Generator and make sure it is properly connected.
fully recharged by the solar panel or the solar panel does not have high enough voltage to recharge
the Nature's Generator.
My AC device(s) are not powering up from my Nature’s Generator.
1. Verify your device is suitable for use with your Nature's Generator. The Nature's Generator AC
2. Make sure the Main Power Switch is turned on.
Nature's Generator.
Some AC devices draw large amounts of power and it is recommended to recharge your Nature's
Generator full before heavy use.
4. Make sure the AC outlet switch is turned on. The LED light should be green.
trying to use again.
and back on to try it again.
My Nature’s Generator baery drains fast.
Please follow these steps.
Nature's Generator to conserve
power. The AC outlets consume a considerable amount of power while being in standby mode.
3. When Nature's Generator
Visit Naturesgenerator.com for More Information

Baery:
Inverter:
Ports:
Charges:
General:
23 × 17 × 22 in ( 57 × 42 × 55 cm) with cart
(37.6 kg)
Technical Specificaons
Visit Naturesgenerator.com for More Information
18

19
Limited Warranty
One Year Limited Warranty
Huntkey USA Inc.
shall be free of defects in the original manufacture of the material or workmanship for a period
of one (1) year from the original date of your purchase of the product (“Warranty Period”).
statement. This warranty does not cover refurbished product.
What does this Warranty Cover?
Huntkey USA Inc. will (at its sole
with new or rebuilt comparable products or parts. Products and parts replaced under this warranty
become the property of Nature's Generator and are not returned to you. If service of products or
warranty lasts as long as you own your product during the Warranty Period. Warranty coverage
terminates if you sell or otherwise transfer the product.
How to Obtain Warranty Service?
3130 Paseo Mercado Suite 106
phone number and address with the product inside the box.
Where is the Warranty Valid?
Canada and Mexico).
Visit Naturesgenerator.com for More Information

20
• Accident
• Misuse
• Abuse
• Negligence
• Commercial use
Huntkey USA Inc. to service the
product
• Products sold as is or with all faults
• Products where the factory applied serial number has been altered or removed
REPAIR REPLACEMENT AS PROVIDED UNDER THIS WARRANTY IS YOUR EXCLUSIVE REMEDY. HUNTKEY
USA INC. SHALL NOT BE LIABLE FOR ANY INCIDENTAL OR CONSEQUENTIAL DAMAGES FOR THE
IMPLIED WARRANTIES OF AND CONDITIONS OF MERCHANTABILITY AND FITNESS FOR A PARTICULAR
STATE TO STATE OR PROVINCE TO PROVINCE.
3130 Paseo Mercado Suite 106
What does the Warranty not Cover?
Visit Naturesgenerator.com for More Information

Nature's Generator
Manual del Usuario

Nature's Generator
Contenido
Instrucciones de Seguridad Importantes
Advertencia
Precaución
Introducción
Desempaca tu Nature's Generator
Conoce tu Nature's Generator
Usando tu Nature's Generator
Cómo Recargar tu Nature's Generator
Cómo Usar tu Nature's Generator
Cómo Leer la Pantalla LCD
Cómo Usar la Llave Inteligente de tu Nature's Generator
Solución de Problemas
El Sistema Generador más Inteligente e Infinitamente
Expandible de la Naturaleza
Cómo Expandir la Capacidad de tu Nature's Generator
Cómo Mantener y Almacenar tu Nature's Generator
21
21
22
23
23
24
26
26
27
28
29
29
29
36
37
38
Cómo Instalar el Carrito en tu Nature's Generator
30

21
Instrucciones de Seguridad Importantes
1. Lee estas instrucciones.
2. Guarda estas instrucciones.
3. Ten cuidado con todas las advertencias.
4. Sigue todas las instrucciones.
5. No uses este aparato cerca del agua.
Advertencia
Peligro de Descarga Eléctrica
Peligro de Explosión
Peligro de Rayos
toma de corriente y desconecta los cables. Esto ayuda a prevenir daños a la propiedad y lesiones
Riesgo de Energía y Quemaduras
quemadura debido a un cortocircuito.
Visita naturesgenerator.com para obtener más información

22
Piezas de repuesto
personales u otros peligros.
Precaución
Daños que requieren servicio
• Si su Nature's Generator ha sido expuesto a la lluvia o el agua.
• Cuando su Nature's Generator muestra un cambio notable en el rendimiento.
Clima frío
Nature's Generator en un lugar aislado y conectado a un panel solar.
Reciclaje y eliminación
su Nature's Generator.
Verificación de seguridad
Servicio
Visita naturesgenerator.com para obtener más información
23
Introducción
hacer seguimiento del uso y comunicar los problemas.
Desempacando Nature's Generator
1. Nature's Generator
4. Llave Inteligente
Visita naturesgenerator.com para obtener más información
24
Conoce tu Nature's Generator
Panel Frontal
Puertos de salida de CA: Tres salidas de CA de onda
sinusoidal pura.
Puerto de 12V: El puerto de 12 V CC
Entrada de CA
alimentación incluido o cualquier cable de extensión para el hogar.
Entrada solar:
Entrada de Viento:
Pantalla LCD: La pantalla LCD muestra la información del
sistema.
Botón de pantalla LCD: Presiónalo para encender
la pantalla LCD durante 30 segundos.
Interruptor de alimentación principal:
Enciende o apaga la alimentación
principal de su Nature's Generator.
Puertos USB: Ambos puertos USB
que funcionan con USB. El puerto USB
llave inteligente.
Interruptor de salidas de CA: enciende o apaga las salidas de CA.
Visita naturesgenerator.com para obtener más información
Panel posterior
ECable de expansión:
Para usar con el Power Pod de Nature's Generator.
Almacenamiento: Para almacenar el
cable de alimentación.
25
Visita naturesgenerator.com para obtener más información

Cómo Recargar tu Nature's Generator
Cargando con Páneles Solares
a tu unidad mientras se encuentre en cielos nublados.
2. Inserta el enchufe del panel solar en el puerto de Entrada Solar en la parte frontal de su Nature's
3. Se tarda entre 10 y 15 horas en recargar el Nature's Generator si se usa un panel solar de 100
Cargando con la Turbina Eólica
2. Inserta el enchufe de la turbina eólica en el puerto de entrada de viento en la parte frontal de tu
del aerogenerador.
Cargando con Alimentación de CA
posterior del Nature's Generator.
2. Inserta el cable de alimentación en el puerto de entrada de CA en la parte frontal del Nature's
Generator.
Cómo usar el Nature's Generator
26
Visita naturesgenerator.com para obtener más información

27
Cómo usar tu Nature's Generator
1. Presiona el interruptor de alimentación principal para encender tu Nature's Generator. Los
encendido.
2. Presiona el interruptor de salida de CA para encender las salidas de CA. Cuando no uses los
Modo de fuente de alimentación ininterrumpida (UPS)
Visita naturesgenerator.com para obtener más información
28
Cómo leer la pantalla LCD
Barra de la Batería:
Icono de turbina eólica:
la turbina eólica.
Icono de Panel Solar:
Icono de entrada de CA:
Icono de Bluetooth:
Icono de expansión (eslabón de la cadena): Indica cuando el Nature's
por el puerto de expansión. Visita naturesgenerator.com para comprar el
Power Pod del Nature's Generator.
Icono de salida de CA: Indica cuando el interruptor de salida de CA
Visualización de Vataje:
Icono USB:
Icono de 12V DC: Indica cuando tu Nature's
Icono de Fallo de la Batería:
Icono de batería baja: Indica
Ícono de advertencia de
temperatura: Indica cuando
la temperatura interna es
demasiado alta.
Icono de FUSIBLE: Indica
Icono ¡C.A!: Se ilumina
Barra de salida: La barra de
salida de 5 incrementos indica
el uso de la potencia. Los
la parte inferior a la parte
pesado y pesado.
Visita naturesgenerator.com para obtener más información

29
Cómo usar la Llave Inteligente de su Nature Generator
1. Enciende el interruptor de alimentación principal de tu Nature's Generator.
Bluetooth en su lado derecho.
AndroidTM.
Cómo expandir la capacidad del Nature's Generator
Nature's Generator. Visita naturesgenerator.com para comprar un Power Pod del Nature's Generator.
parte posterior del Nature's Generator Power Pod.
de goma.
3. Conecta el cable de expansión al puerto de expansión.
conectado.
Cómo Mantener y Almacenar el Nature's Generator
exprime el exceso de humedad del paño y luego limpia el gabinete con el paño. Usa un paño limpio
para secar tu Nature's Generator.
Visita naturesgenerator.com para obtener más información

M6 100mm Perno × 2 unidades
Llave de 10mm × 1pc
Soporte de Generador
Rueda × 2pcs
Tapa del cubo × 2pcs
Herramientas
Cómo Instalar el Carro en el Generador de su Naturaleza
30
Visita naturesgenerator.com para obtener más información
31
Visita naturesgenerator.com para obtener más información

32
Visita naturesgenerator.com para obtener más información
Llave de vaso × 1pc
33
Visita naturesgenerator.com para obtener más información
34
Visita naturesgenerator.com para obtener más información
paso 7.

Perno y tuerca M6
Llave de vaso × 1pc
Llave de 10mm × 1pc
Soporte de generador
Paso 7:
35
Visita naturesgenerator.com para obtener más información

las ruedas.
36
Visita naturesgenerator.com para obtener más información

37
Solución de problemas
El Nature's Generator no se carga cuando le conecto mi panel solar.
Por favor sigue estos pasos.
sombra.
conectado.
recargar el Nature's Generator.
Mis disposivos de CA no se están obteniendo poder del Nature's Generator.
Nature's Generator por completo antes de un uso intenso.
interruptor de la toma de CA y vuelve a encenderlo para volver a intentarlo.
La batería de Mi Nature's Generator se agota rápidamente.
Por favor sigue estos pasos.
Visita naturesgenerator.com para obtener más información

Batería:
Inversor:
Puertos:
Cargas:
General:
23 × 17 × 22 in (57 × 42 × 55 cm) con carro
(37.6 kg)
Especificaciones técnicas
38
Visita naturesgenerator.com para obtener más información

39
Garana limitada
Garana limitada de un año
¿Qué cubre esta garana?
el producto.
¿Cómo obtener servicio de garana?
3130 Paseo Mercado Suite 106
¿Dónde es válida la garana?
Visita naturesgenerator.com para obtener más información

40
• Accidentes
• Uso inapropiado
• Abuso
• Negligencia
• Uso comercial
• Daño debido al uso o mantenimiento inapropiado
reparar el Producto
• Productos vendidos tal cual (en el estado en que se encuentran) o con todas sus fallas
O DE PROVINCIA A PROVINCIA.
3130 Paseo Mercado Suite 106
¿Qué es lo que no cubre la garana?
Visita naturesgenerator.com para obtener más información
Manuel d'utilisation de
Nature's Generator

Nature's Generator
Contenu
Apprendre à connaître votre Nature's Generator
Comment recharger votre Nature's Generator
Aide en cas de problème
Le système de générateur infiniment
expansible le plus intelligent
Comment entretenir et entreposer votre Nature's Generator
41
41
42
43
43
44
46
46
47
48
49
49
49
57
58
59
Comment installer le panier à votre Nature's Generator
50

41
Instrucons de sécurité importantes
dût à un renversement.
Averssement
Danger de choc électriques
Danger d'exploser
Danger d'éclair
Danger d'énergie et de brulure
cas de court circuit.
Visitez naturesgenerator.com pour plus d'informations

42
Pièces de remplacement
Aenon
Dommages demandant une réparaon
Temps froid
Recyclage et disposion
Vérificaon de sécurité
Entreen
Visitez naturesgenerator.com pour plus d'informations

43
Introducon
Déballer votre Nature's Generator
1. Nature's Generator
Visitez naturesgenerator.com pour plus d'informations
3. Boîte de panier pour panneau solaire
44
Apprendre à connaître le panneau avant de votre Nature's Generator
Front Panel
Prise de courant AC: Trois prise de courant à tension à
ondes sinusoïdales.
Port 12V:
puissance.
Entrée AC
Entrée Solaire: Pour connecter avec votre panneau solaire. Ce port Anderson
Entrée éolienne:
Écran LCD:
Bouton écran LCD:
Interrupteur de l'alimentaon
principale:
Nature's Generator
Ports USB: Les deux ports USB
intelligents et d'autres appareils
Le port USB du haut avec l'icône
Interrupteurs des sores AC:
Visitez naturesgenerator.com pour plus d'informations
Panneau arrière
Câble d'extension:
Entreposage:
45
Visitez naturesgenerator.com pour plus d'informations

Comment recharger votre Nature’s Generator
Recharger à parr de votre panneau solaire
Recharger à parr de l'éolienne
Recharger à parr d'une prise AC
Uliser votre Nature’s Generator
46
Visitez naturesgenerator.com pour plus d'informations

47
Comment ulisez votre Nature's Generator
Mode électricité sans interrupon (UPS)
mode.
Visitez naturesgenerator.com pour plus d'informations
48
Comment lire l'écran LCD
Barre de baerie:
Icône d'éolienne:
Icône de panneau solaire:
par un ou des panneaux solaires.
Icône d'entrée AC:
Icône Bluetooth:
Icône d'expansion (lien en chaine): Indique lorsque votre Nature's
Icône de sore AC:
Puissance:
Icône USB: Indique lorsque votre Nature's Generator est
Icône 12V DC: Indique que le port 12V
Nature's Generator.
Icône d'échec de ba�erie:
Icône de baerie basse:
Indique lorsque le voltage
Icône d'averssements de
température: Indique
Icone de fusible: Indique
Icône AC:
Barre de sore:
Visitez naturesgenerator.com pour plus d'informations

49
Comment ulisé la clé intelligente de votre Nature's Generator
sur votre cellulaire Android.
enregistrer votre compte avant de vous connecter à la page d'accueil.
intelligente Nature's Generator et trouveras votre Nature's Generator.
Comment améliorer la capacité de votre Nature's Generator
caoutchouc.
Comment maintenir et entreposer votre Nature's Generator
Visitez naturesgenerator.com pour plus d'informations

Pièces du panier
Entraineur × 2pcs
M6 100mm Boulons × 2pcs
Brosse a essieu × 2pcs
Roue × 2pcs
Chapeau de moyeu × 2pcs
Base d'essieu
Visitez naturesgenerator.com pour plus d'informations
Comment installer le panier à votre Nature’s Generator
50
Axle Base
Visitez naturesgenerator.com pour plus d'informations51
Roue x 2pcs
Brosse d'essieu × 2pcs
Visitez naturesgenerator.com pour plus d'informations 52
M6 100mm Bolt x 2pcs
Visitez naturesgenerator.com pour plus d'informations53
Visitez naturesgenerator.com pour plus d'informations
54
:
M6 30mm Boulon
:
Visitez naturesgenerator.com pour plus d'informations55
chapeau de Moyeu sur les roues.
Visitez naturesgenerator.com pour plus d'informations
56
Chapeau de moyeu x 2pcs.

57
Aide en cas de problème
Mon Nature's Generator ne charge pas lorsque je le connecte à mon panneau solaire.
Mes appareils AC ne fonconnent pas à parr de mon Nature's Generator.
La baerie de mon Nature’s Generator baisse rapidement.
Visitez naturesgenerator.com pour plus d'informations

Baerie:
Conversseur:
Ports:
Charges:
Général:
23 × 17 × 22 in ( 57 × 42 × 55 cm) avec panier
(37.6 kg)
Spécificaons techniques
Visitez naturesgenerator.com pour plus d'informations
58

59
Garane limité
Garane limité d'un an
Que couvre la garane?
Comment obtenir un service de garane?
3130 Paseo Mercado Suite 106
Où la garane est-elle valide?
Visitez naturesgenerator.com pour plus d'informations

60
• les accidents
• les consommables tels que les fusibles ou les piles
CONSTITUENT LE SEUL RECOURS DE L’ACHETEUR. HUNKTEY USA INC. NE SAURAIT ÊTRE TENU POUR
PERTE DE PROFITS. HUNKTEY USA INC. PRODUCTS N’OCTROIE AUCUNE AUTRE GARANTIE EXPRESSE
3130 Paseo Mercado Suite 106
Ce qui n’est pas couvert par cee garane limitée
Visitez naturesgenerator.com pour plus d'informations

V1.0 ESPAÑOL
V2.0 ENGLISH
V1.0 FRANÇAIS
