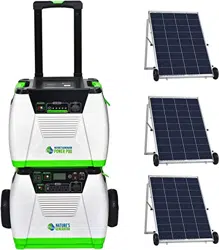
Nature's Generator Elite
User Manual


Nature's Generator Elite
Contents
Warning
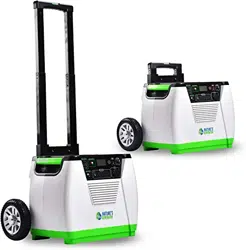
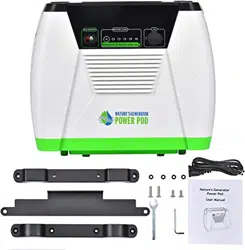
Unpack Your Nature's Generator Elite
Get to Know Your Nature's Generator Elite
Using Your Nature's Generator Elite
How to Recharge Your Nature's Generator Elite
How to Use Your Nature's Generator Elite
How to Read the LCD Display
Limited Warranty
How to Expand the Capacity of Your Nature's Generator Elite
How to Maintain and Store Your Nature's Generator Elite
1
1
2
3
3
4
6
6
7
8
9
9
16
17
18
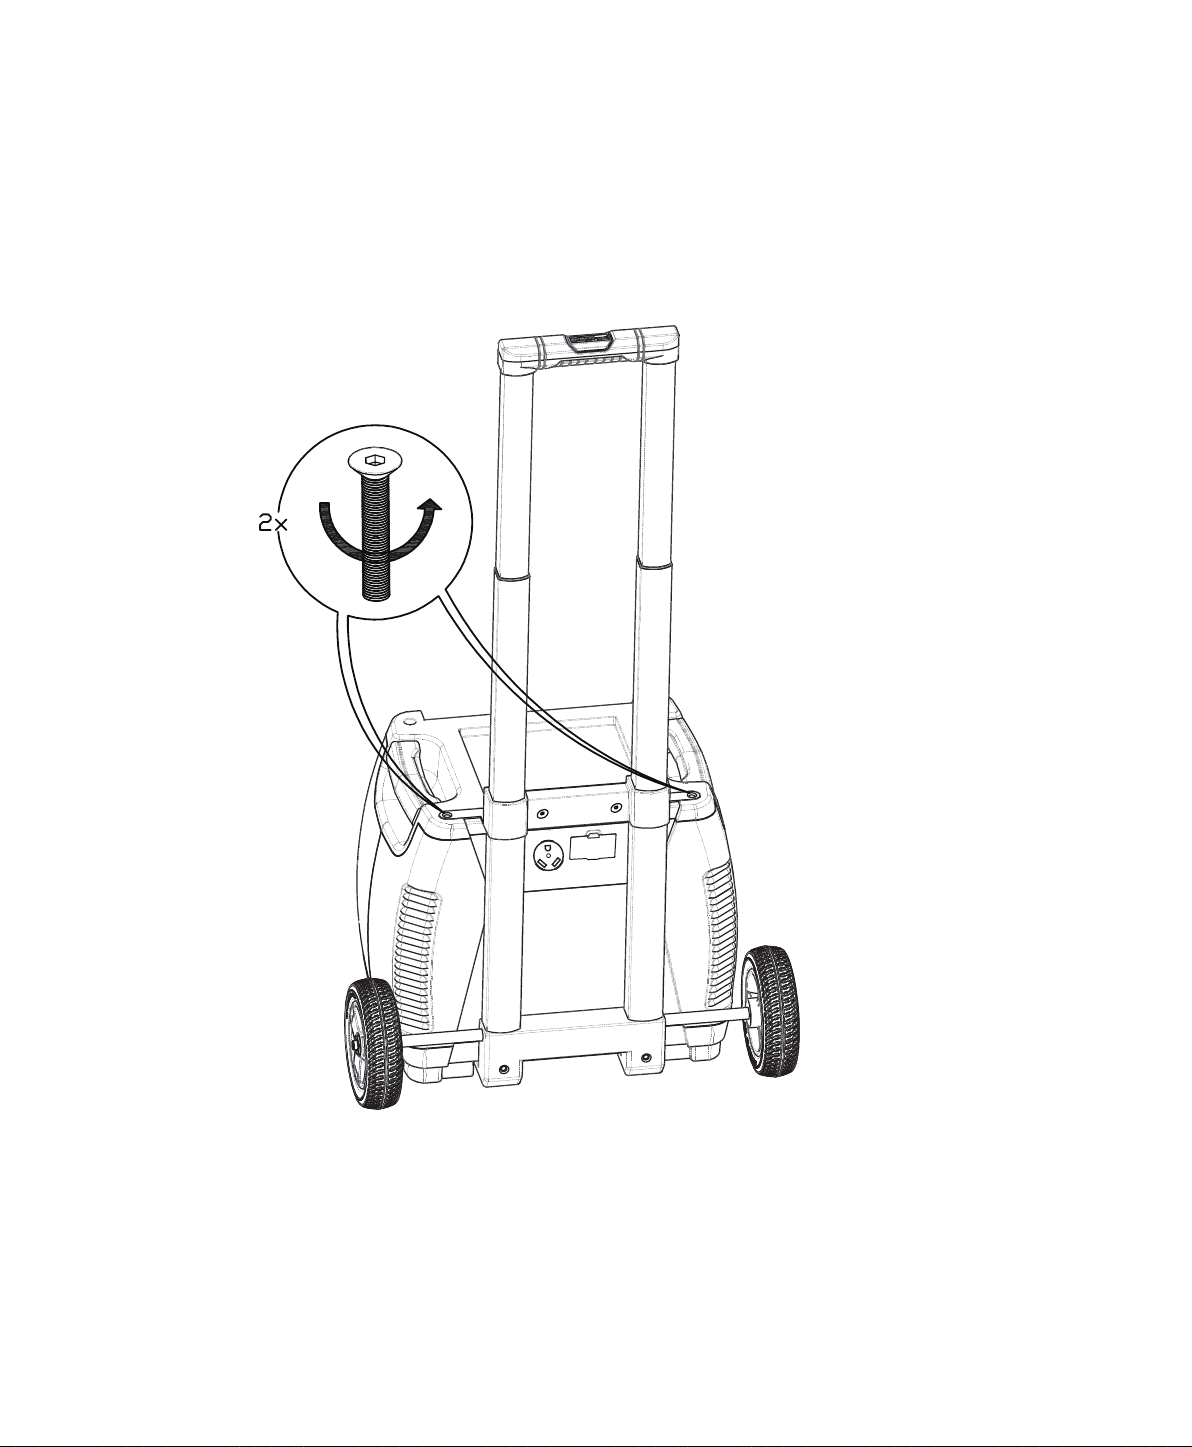
How to Install the Cart to Your Nature's Generator Elite
10

1
Important Safety Instrucons
3. Take care of all warnings.
5. Do not use this apparatus near water.
heat.
9. Use only with the cart approved by the manufacturer, or sold with the equipment. When a cart is
does not operate normally, or has been dropped.
liquids, such as vases, should be placed on the equipment.
Warning
Electric Shock Hazard
Keep away from children. Nature's Generator Elite
Explosion Hazard
Lightning Hazard
and power line surges.
Energy and Burn Hazard
Nature's Generator Elite
Visit Naturesgenerator.com for More Information

2
Replacement Parts
When replacement parts are required, make sure that the service technician uses replacement parts
Cauon
Damage Requiring Service
Stop using the Nature's Generator Elite
Nature's Generator Elite.
• If your Nature's Generator Elite has been exposed to rain or water.
• If your Nature's Generator Elite has been dropped or damaged in any way.
• When your Nature's Generator Elite
Cold Weather
Cold temperatures can impact Nature's Generator Elite performance. If you are in area that will be
Nature's Generator Elite in an insulated
Recycling and Disposal
Your Nature's Generator Elite may contain materials that are regulated for environmental reasons.
Your Nature's Generator Elite also contains materials that can be recycled and reused. To help
Nature's Generator Elite.
Safety Check
safety checks to determine that your Nature's Generator Elite
Servicing
Visit Naturesgenerator.com for More Information

3
Introducon
Nature's Generator Elite
Unpacking Your Nature’s Generator Elite
1. Nature's Generator Elite
4. This User Guide
Visit Naturesgenerator.com for More Information
3. Cart Box
4
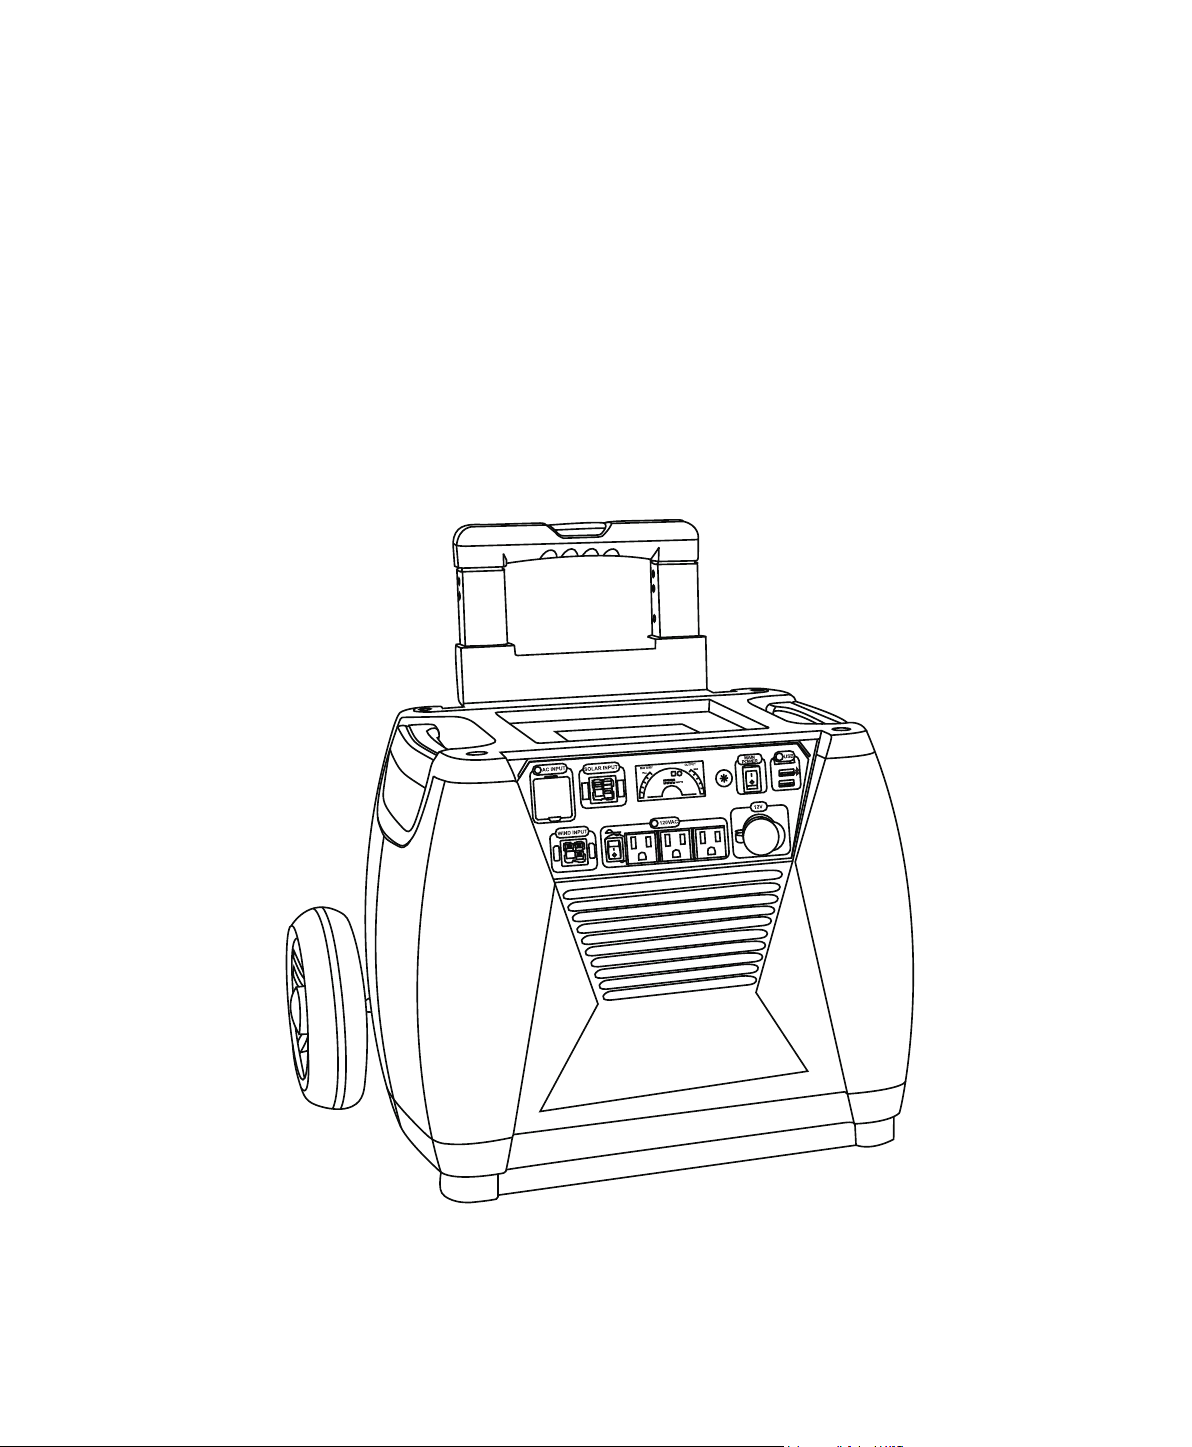
Get to Know Your Nature’s Generator Elite
Front Panel
AC Outlet Ports:
12V Port: 12V DC port is designed to
AC Input
power extension cord.
Solar Input:
Wind Input:
LCD Display:
LCD Display Buon:
for 30 seconds.
Main Power Switch:
main power to your Nature's Generator
Elite.
USB Ports: Both USB ports can recharge
the smart phones or other mobiles
devices that are powered by USB.
Top USB port with Bluetooth icon is
Key.
AC Outlets Switch:
outlet on the back of the generator.
Visit Naturesgenerator.com for More Information
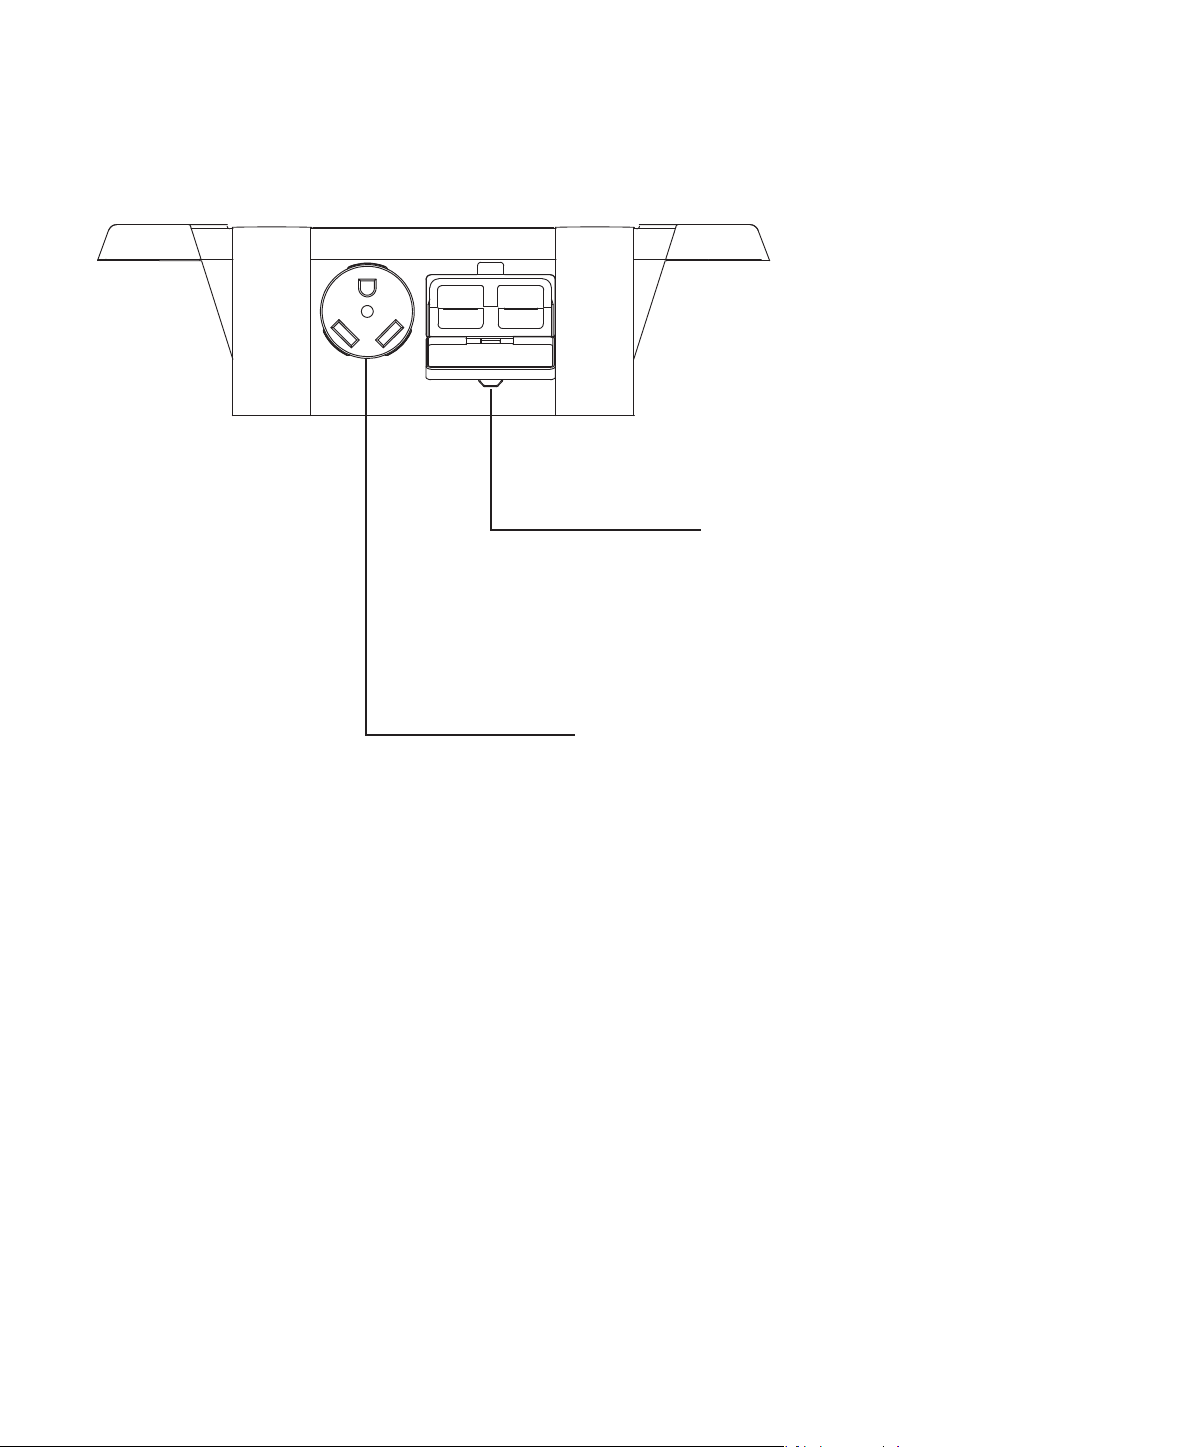
Back Panel
30amp AC Outlet Port:
5
Visit Naturesgenerator.com for More Information
Expansion cord:
Daisy chaining fuses and daisy chain
connector. For use with Nature's

How to Recharge Your Nature’s Generator Elite
Recharging from Solar Panels
skies.
2. Insert solar panel plug into Solar Input port on the front of your Nature's Generator Elite. You
or there is not enough power from solar panel.
3. It takes about 15 to 20 hours to recharge Nature's Generator Elite
and also depends on the the strength of the sunlight.
formore information about the solar panel.
Recharging from the Wind Turbine
2. Insert wind turbine plug into Wind Input port on the front of your Nature's Generator Elite. You
full or there is not enough power from wind turbine.
Naturesgenerator.com for
Recharging from AC Power
Elite.
red to green.
Using Your Nature’s Generator Elite
6
Visit Naturesgenerator.com for More Information

7
How to Use Your Nature’s Generator Elite
Nature's Generator Elite. USB ports will be on
3. You’ll know when the port is turned on when the icon is illuminated on the LCD display.
Uninterrupted Power Supply (UPS) Mode
1. You can recharge your Nature's Generator Elite
2. If you recharge your Nature's Generator Elite
Elite
Nature's
Generator Elite
Visit Naturesgenerator.com for More Information
8
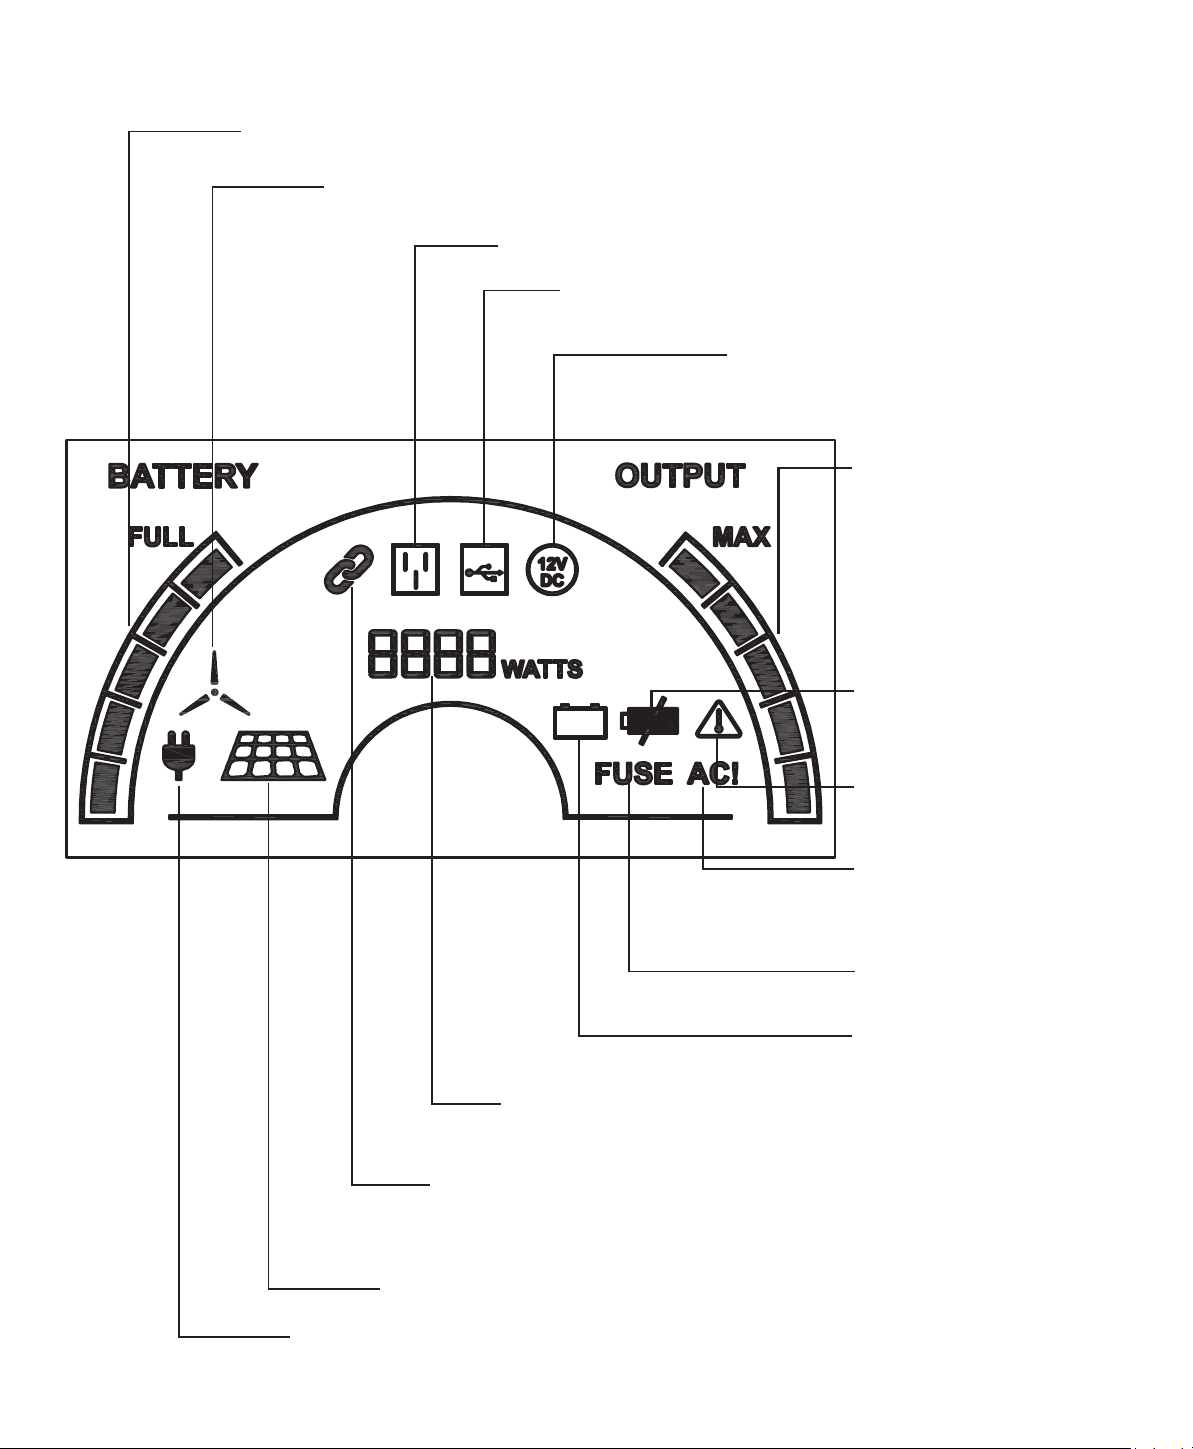
How to Read the LCD Display
Baery Bar:
Generator
Wind Turbine Icon: Indicates that your Nature’s Generator Elite is being recharged
by the wind turbine.
Solar Panel Icon: Indicates that your Nature’s Generator Elite is recharged by
solar panel(s).
AC Input Icon: Indicates that your Nature’s Generator Elite is recharged by the wall.
Expansion (Chain Link) Icon: Indicates when your Nature’s Generator Elite
AC Outlet Icon:
Waage Display: Indicates how much power is being used. If in
USB Icon: Indicates when your Nature’s Generator Elite is
turned on and the USB port is in use.
12V DC Icon: Indicates when your
Nature’s Generator Elite
is turned on
and 12V DC port is in use.
Ba�ery Fail Icon: Indicates
replacement.
Baery Low Icon: Indicates
is low.
Temperature Warning Icon:
Indicates when the internal
temperature is too high.
FUSE Icon: Indicates when
the fuse is blown.
AC! Icon: It is illuminated
being protected and stops
working.
Output Bar: 5
increment
output bar indicates the
usage of the power. The
increments run from the
light, medium light, medium,
medium heavy and heavy
power usage.
Visit Naturesgenerator.com for More Information

9
How to Expand the Capacity of Your Nature’s Generator Elite
Nature's Generator Elite Nature's
. Visit naturesgenerator.com to purchase a Nature's Generator
.
1. Open the top cover of the Nature's Generator Elite, locate the expansion cable, and
run the expansion cable out of Nature's Generator Elite through the opening on the
Elite.
Nature's Generator Elite and open the rubber cover.
3. Connect the expansion cable to the expansion port.
4. The Expansion (Chain Link) Icon will be illuminated on the LCD display to indicate it is connected.
Nature's Generator Elite,
Nature's Generator Elites Nature's
Generator Elites.
How to Maintain and Store Your Nature’s Generator Elite
Nature's Generator Elite
Nature's Generator Elite to a power source,
Nature's Generator Elite by
Nature's Generator Elite Nature's Generator
Elite
excess moisture from the cloth, then wipe the cabinet with the cloth. Use a clean cloth to dry your
Nature's Generator Elite.
Visit Naturesgenerator.com for More Information
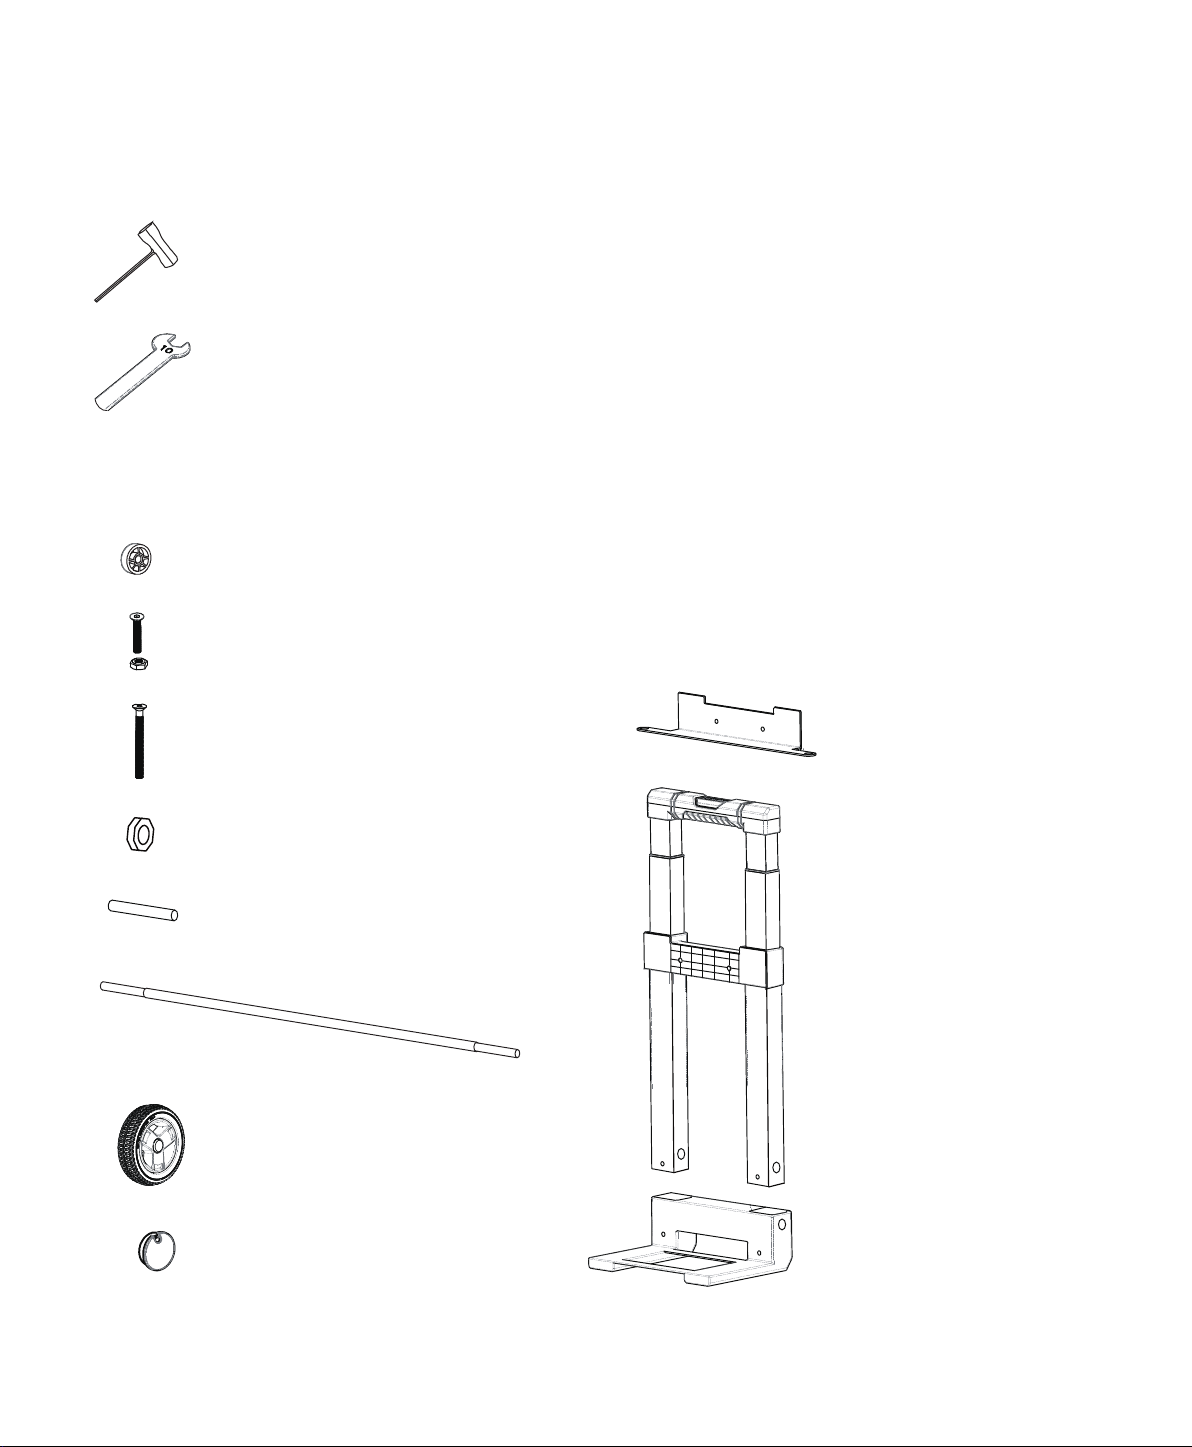
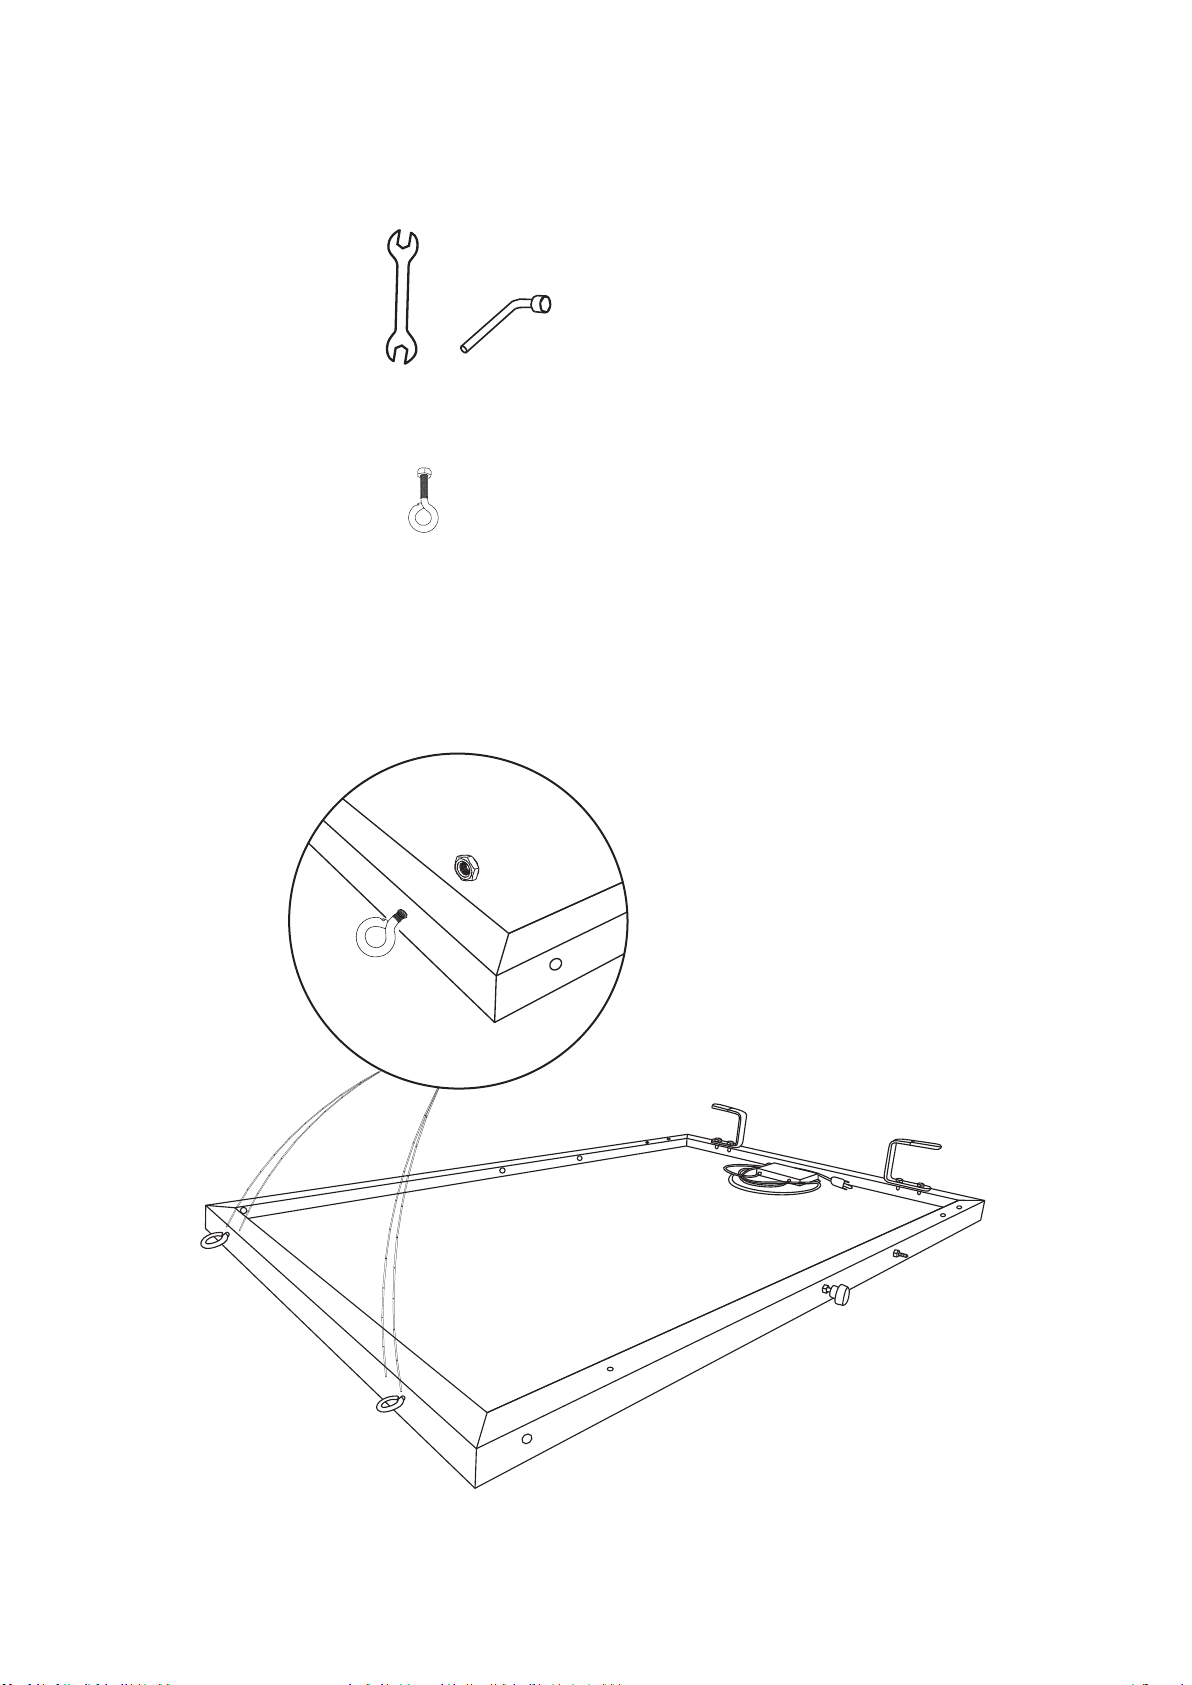
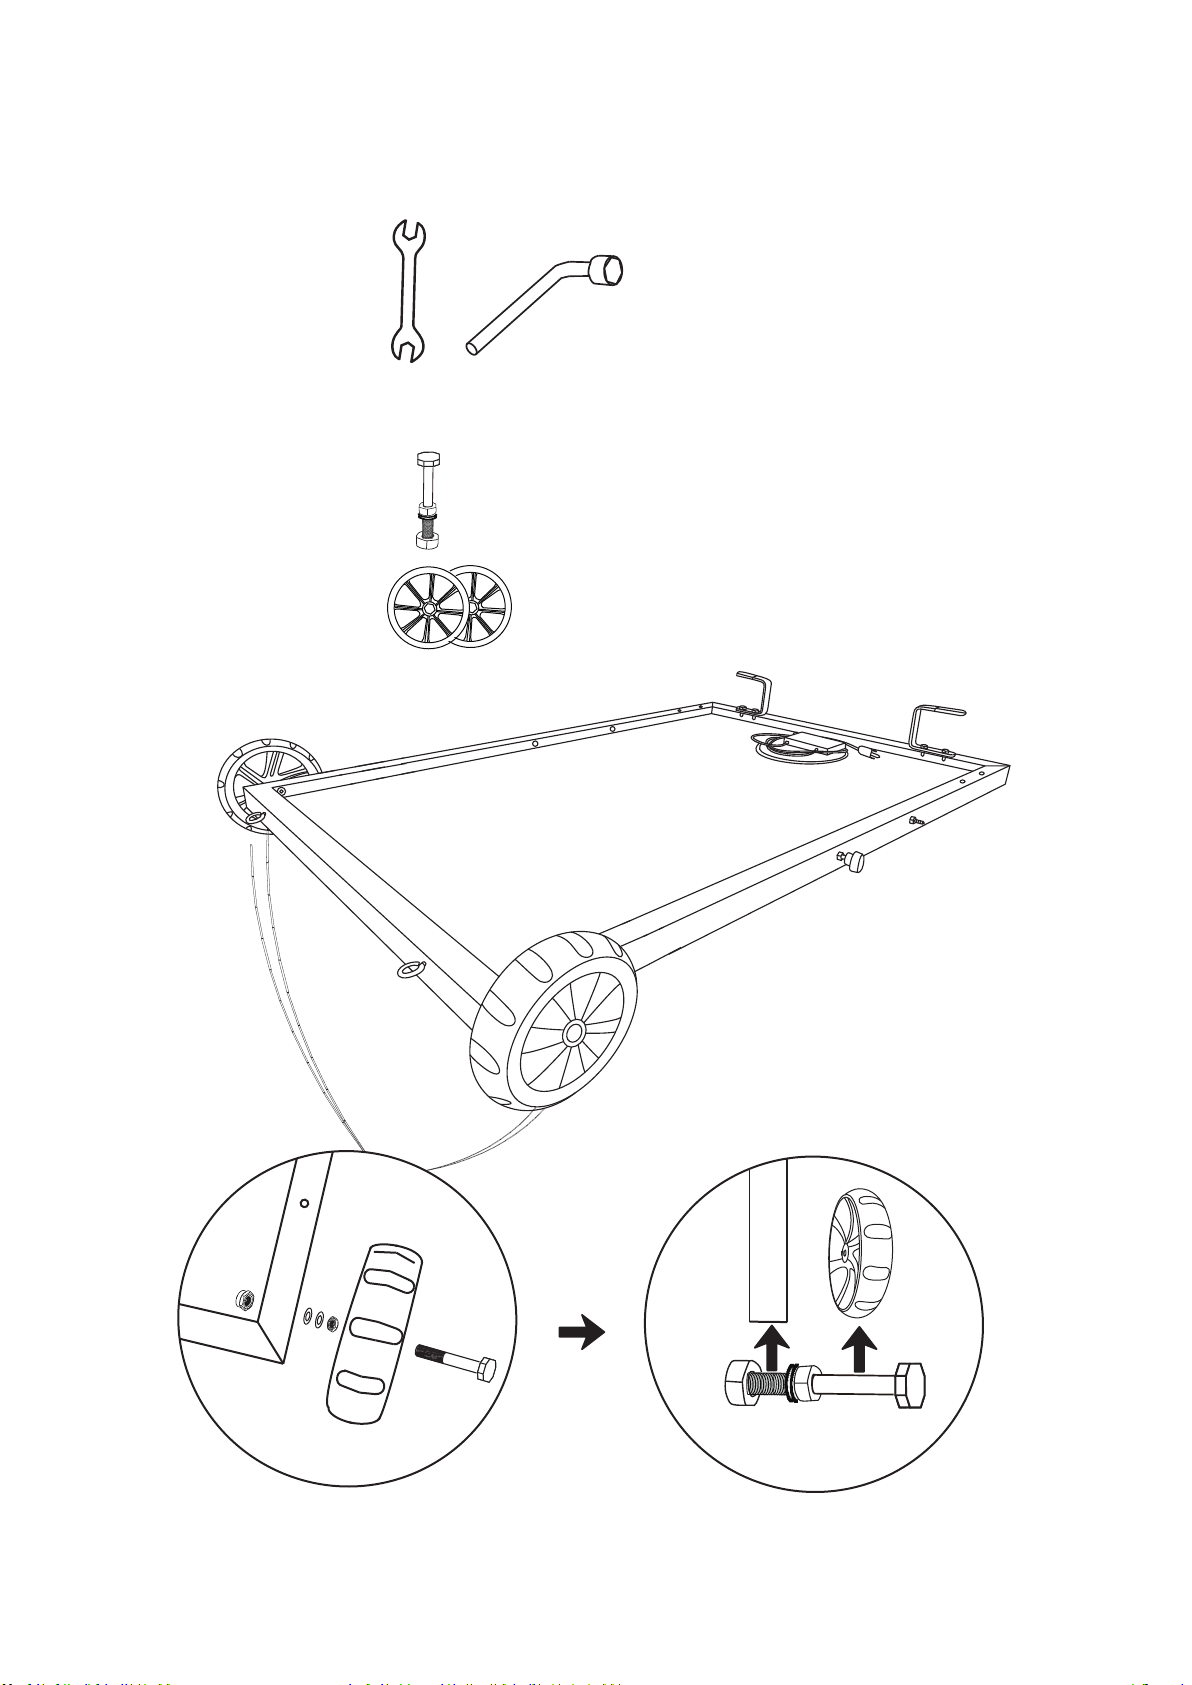
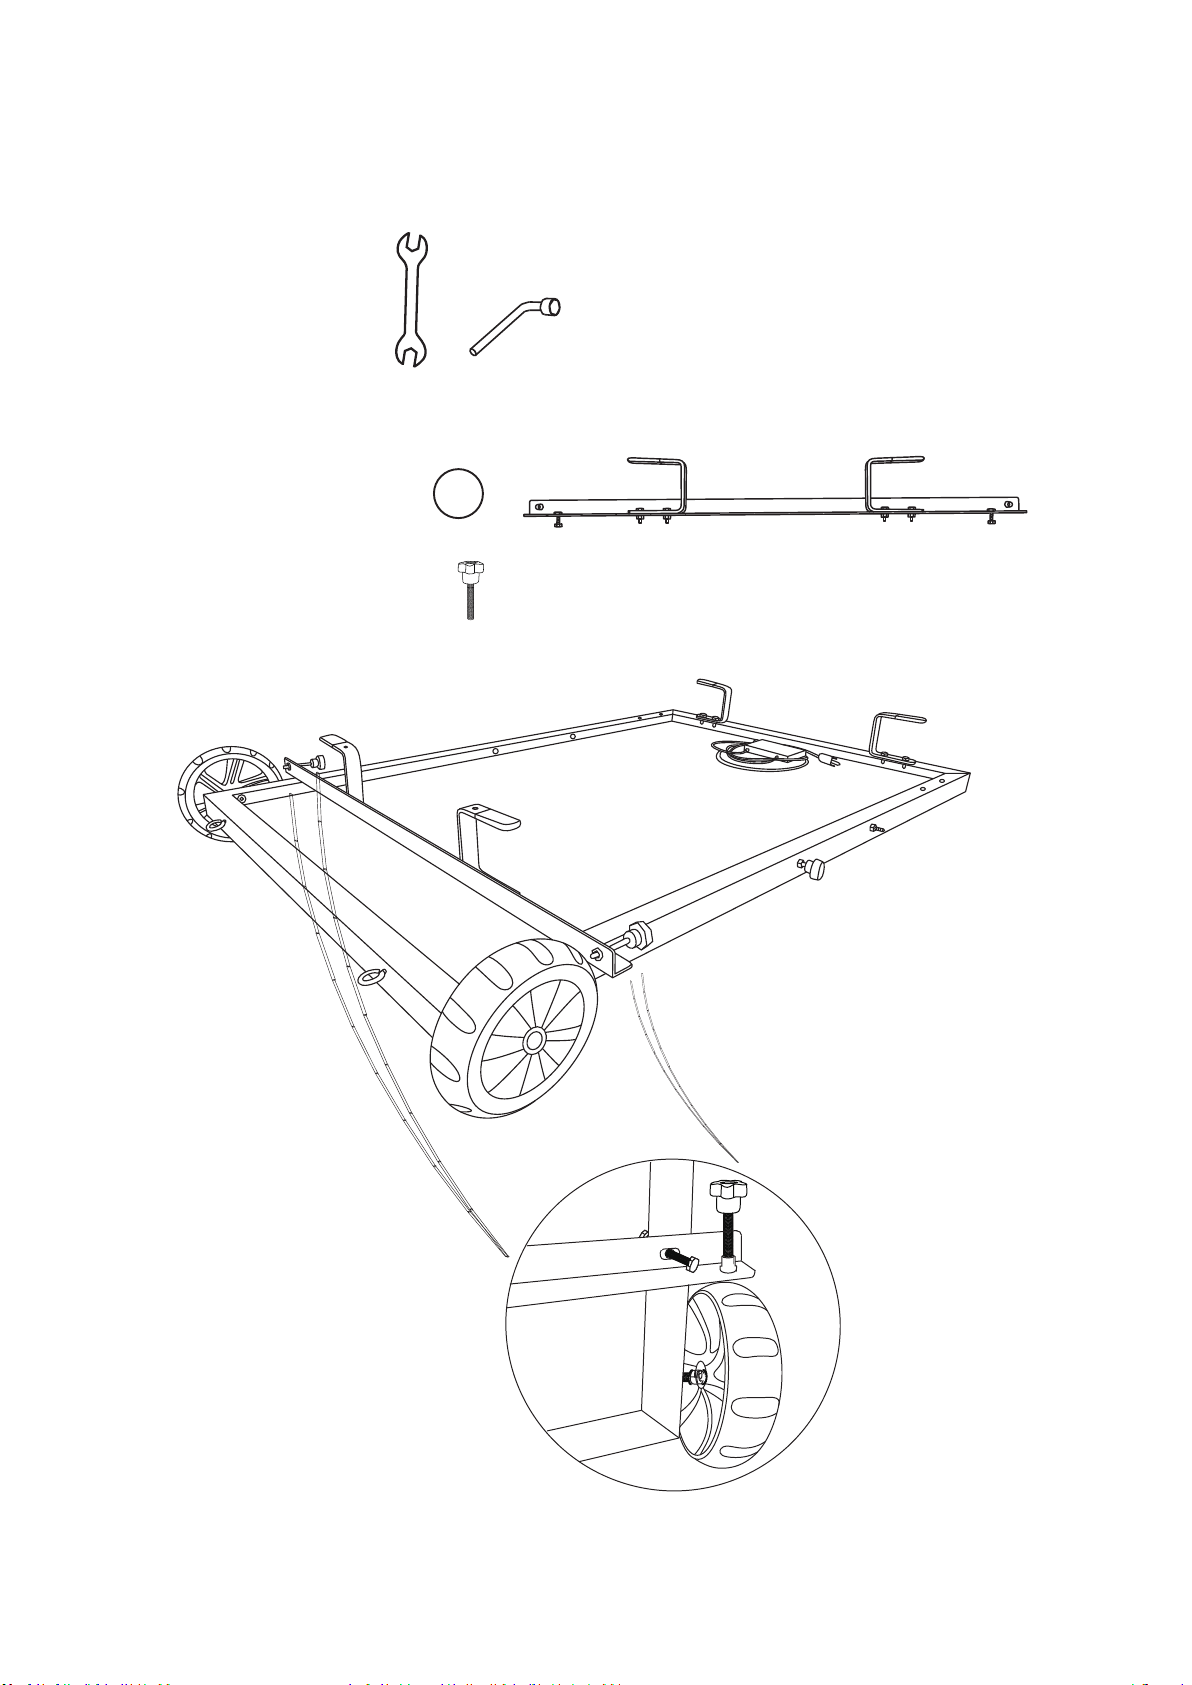
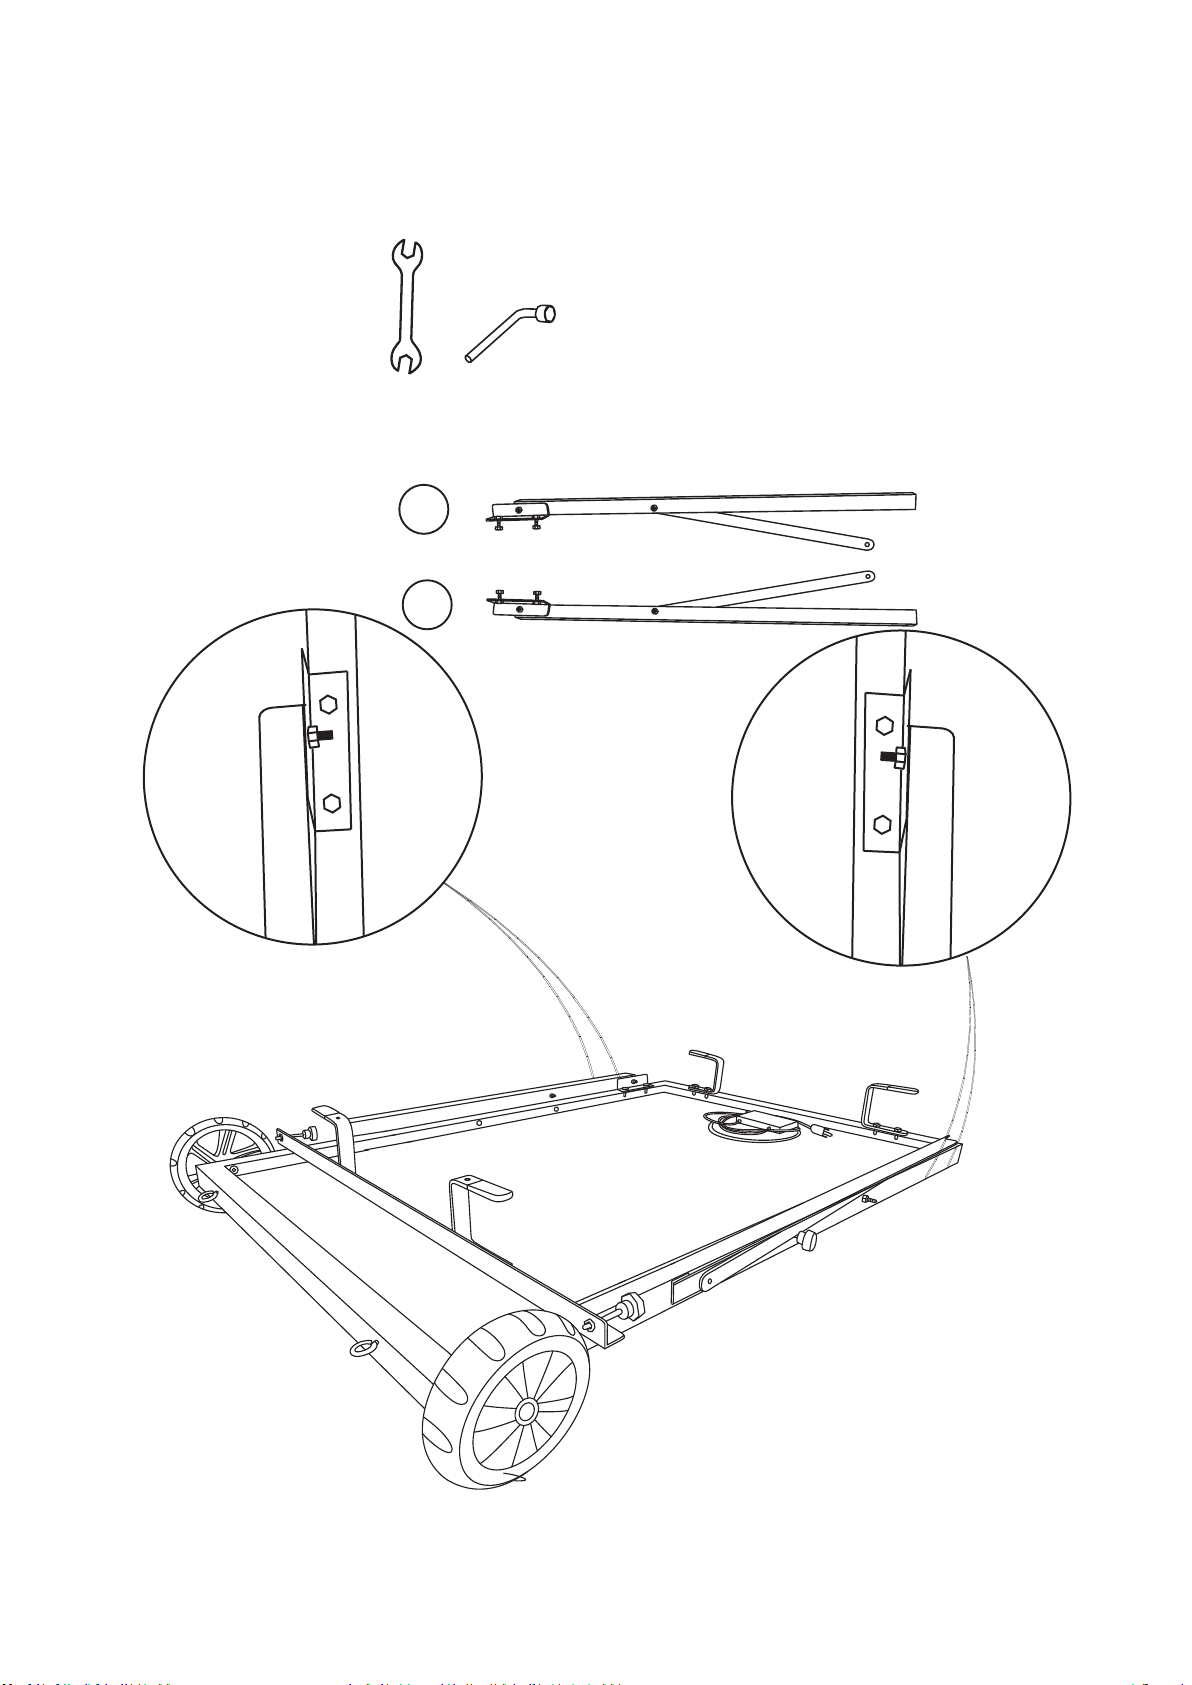
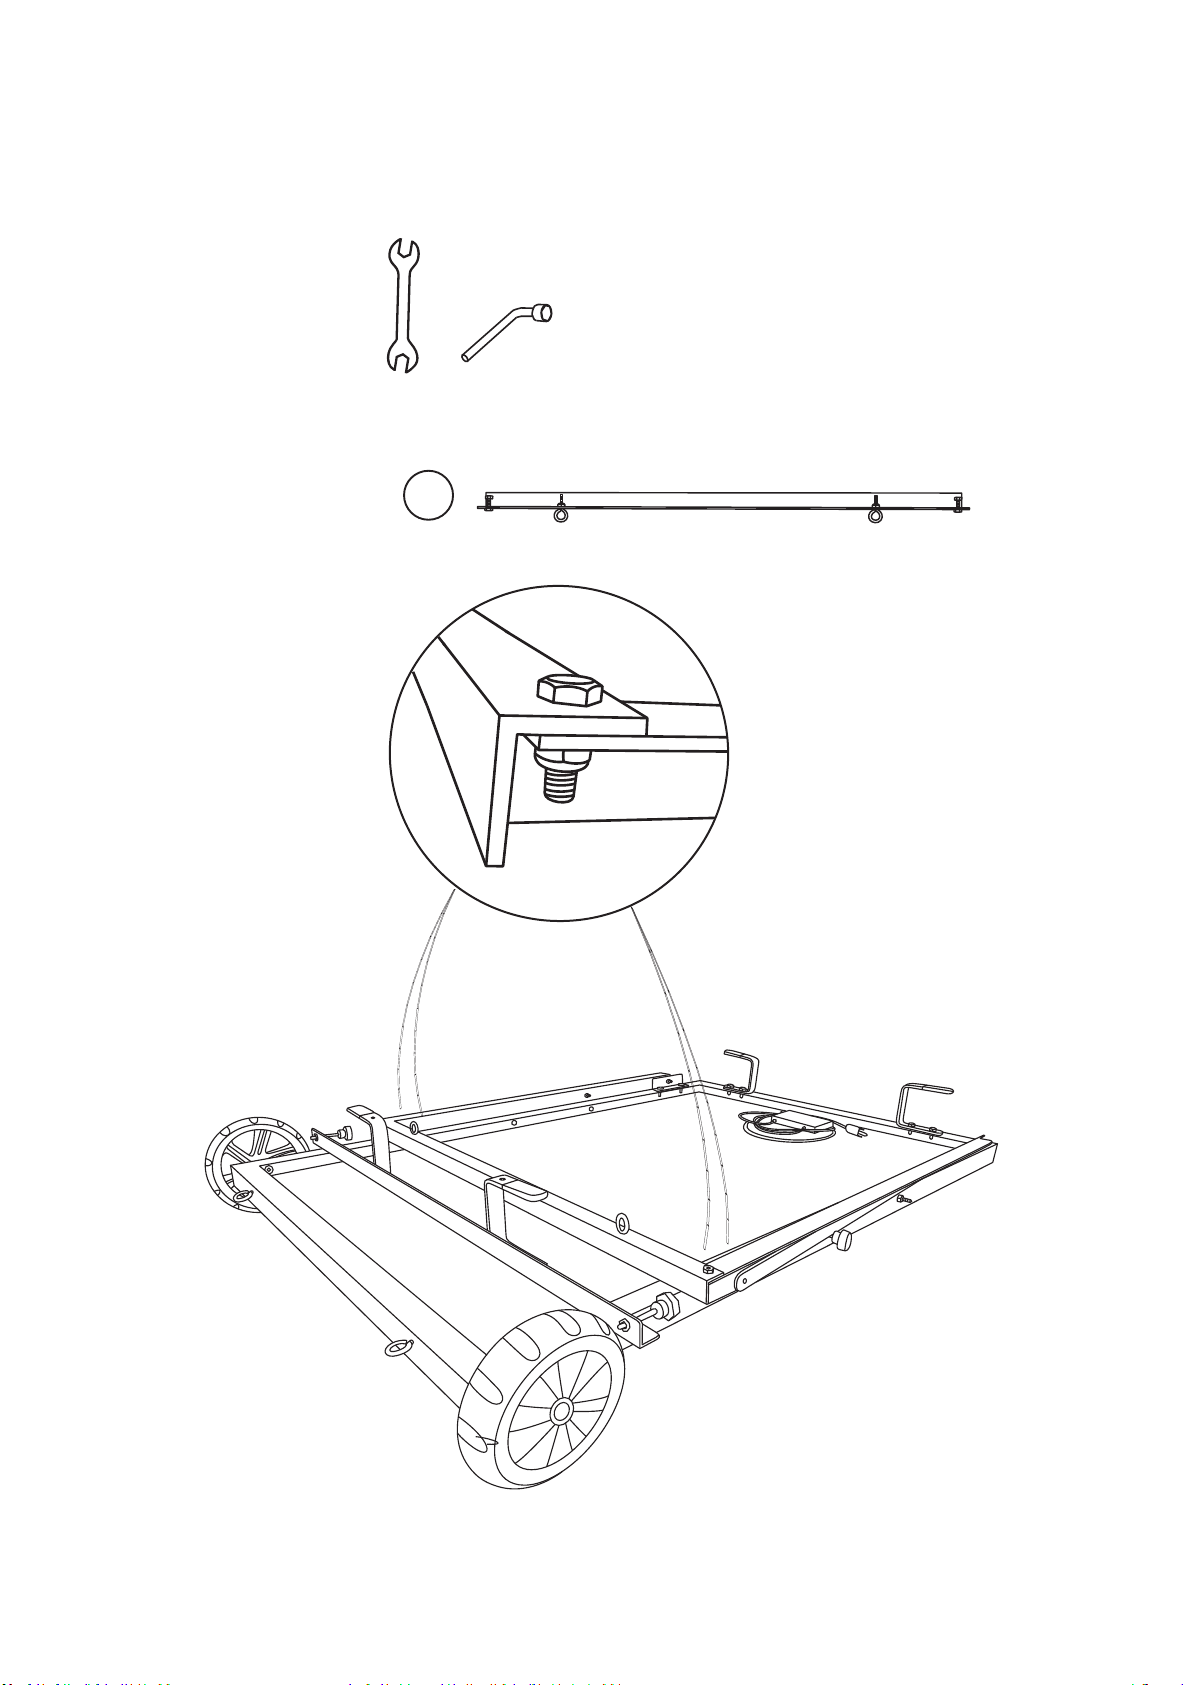
Spacer × 2pcs
M6 30mm Bolt and Nut × 2pcs
M6 100mm Bolt × 2pcs
Socket Wrench × 2pcs
10mm Wrench × 1pc
Generator Bracket
Locknut × 2pcs
Wheel × 2pcs
Hub Cap × 2pcs
Tools
Visit Naturesgenerator.com for More Information
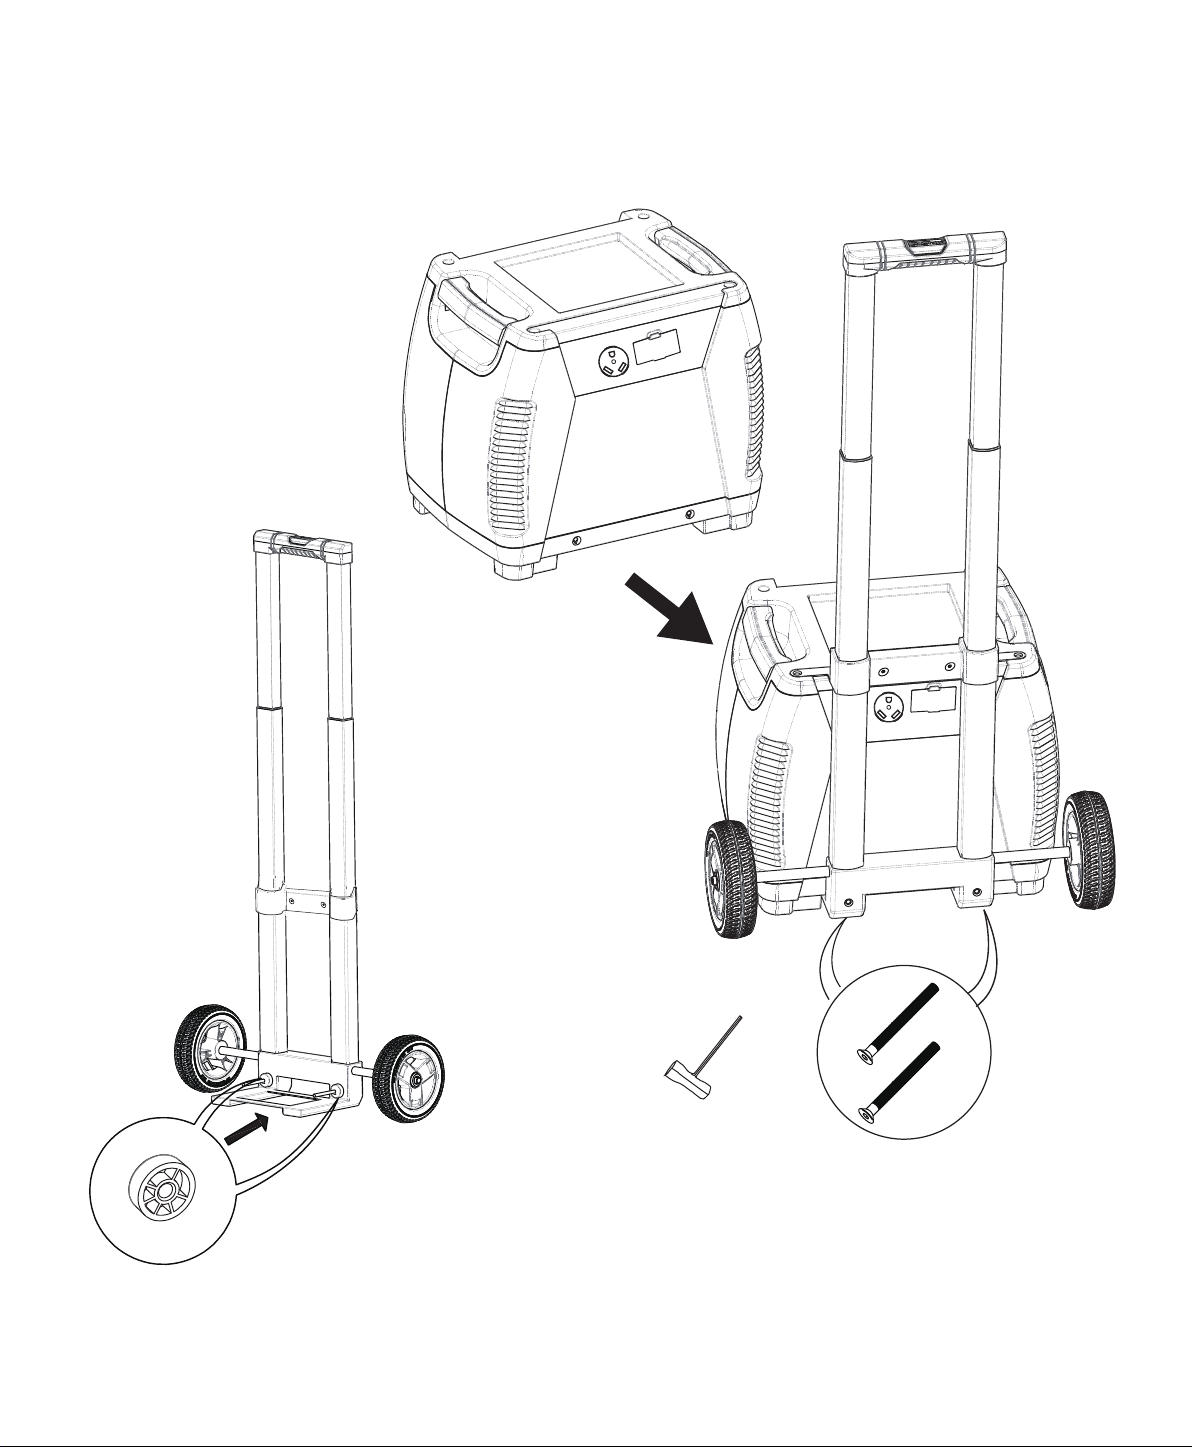
How to Install the Cart to Your Nature’s Generator Elite
10
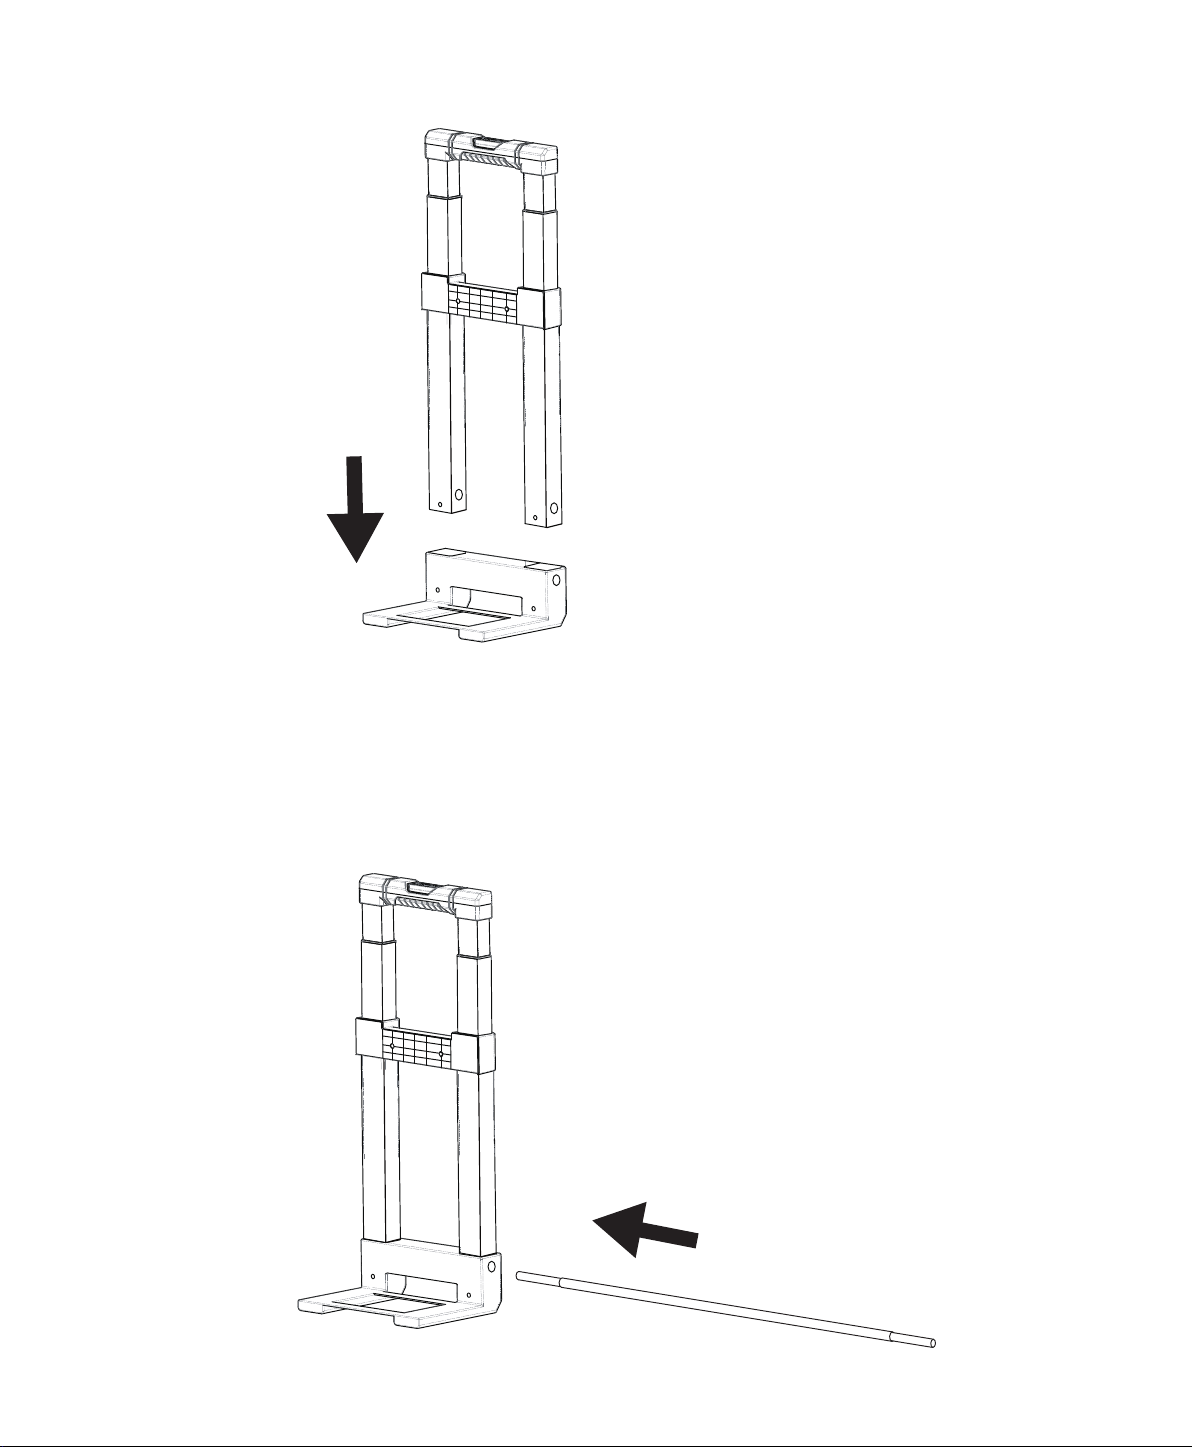
Visit Naturesgenerator.com for More Information
11
Wheel × 2pcs
Socket Wrench × 2pcs
Locknut x 2pcs
Visit Naturesgenerator.com for More Information
12
Spacer x 2pcs
M6 100mm Bolt x 2pcs
Socket Wrench × 1pc
Visit Naturesgenerator.com for More Information
13
Visit Naturesgenerator.com for More Information
14
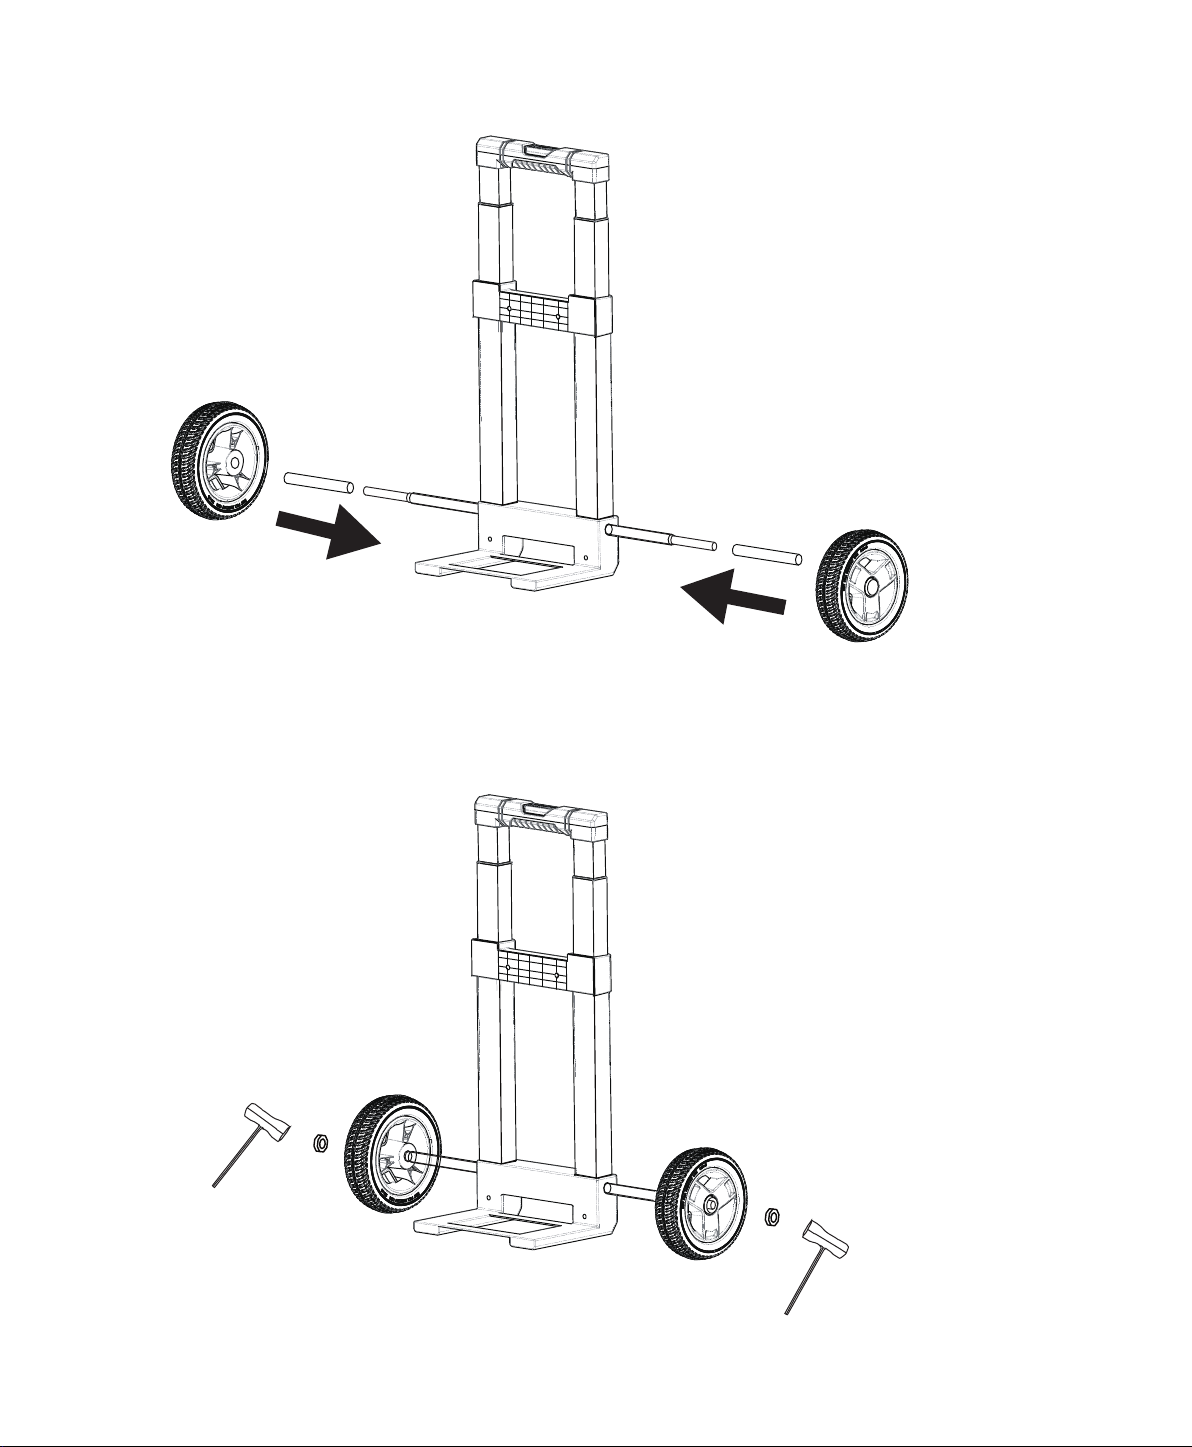
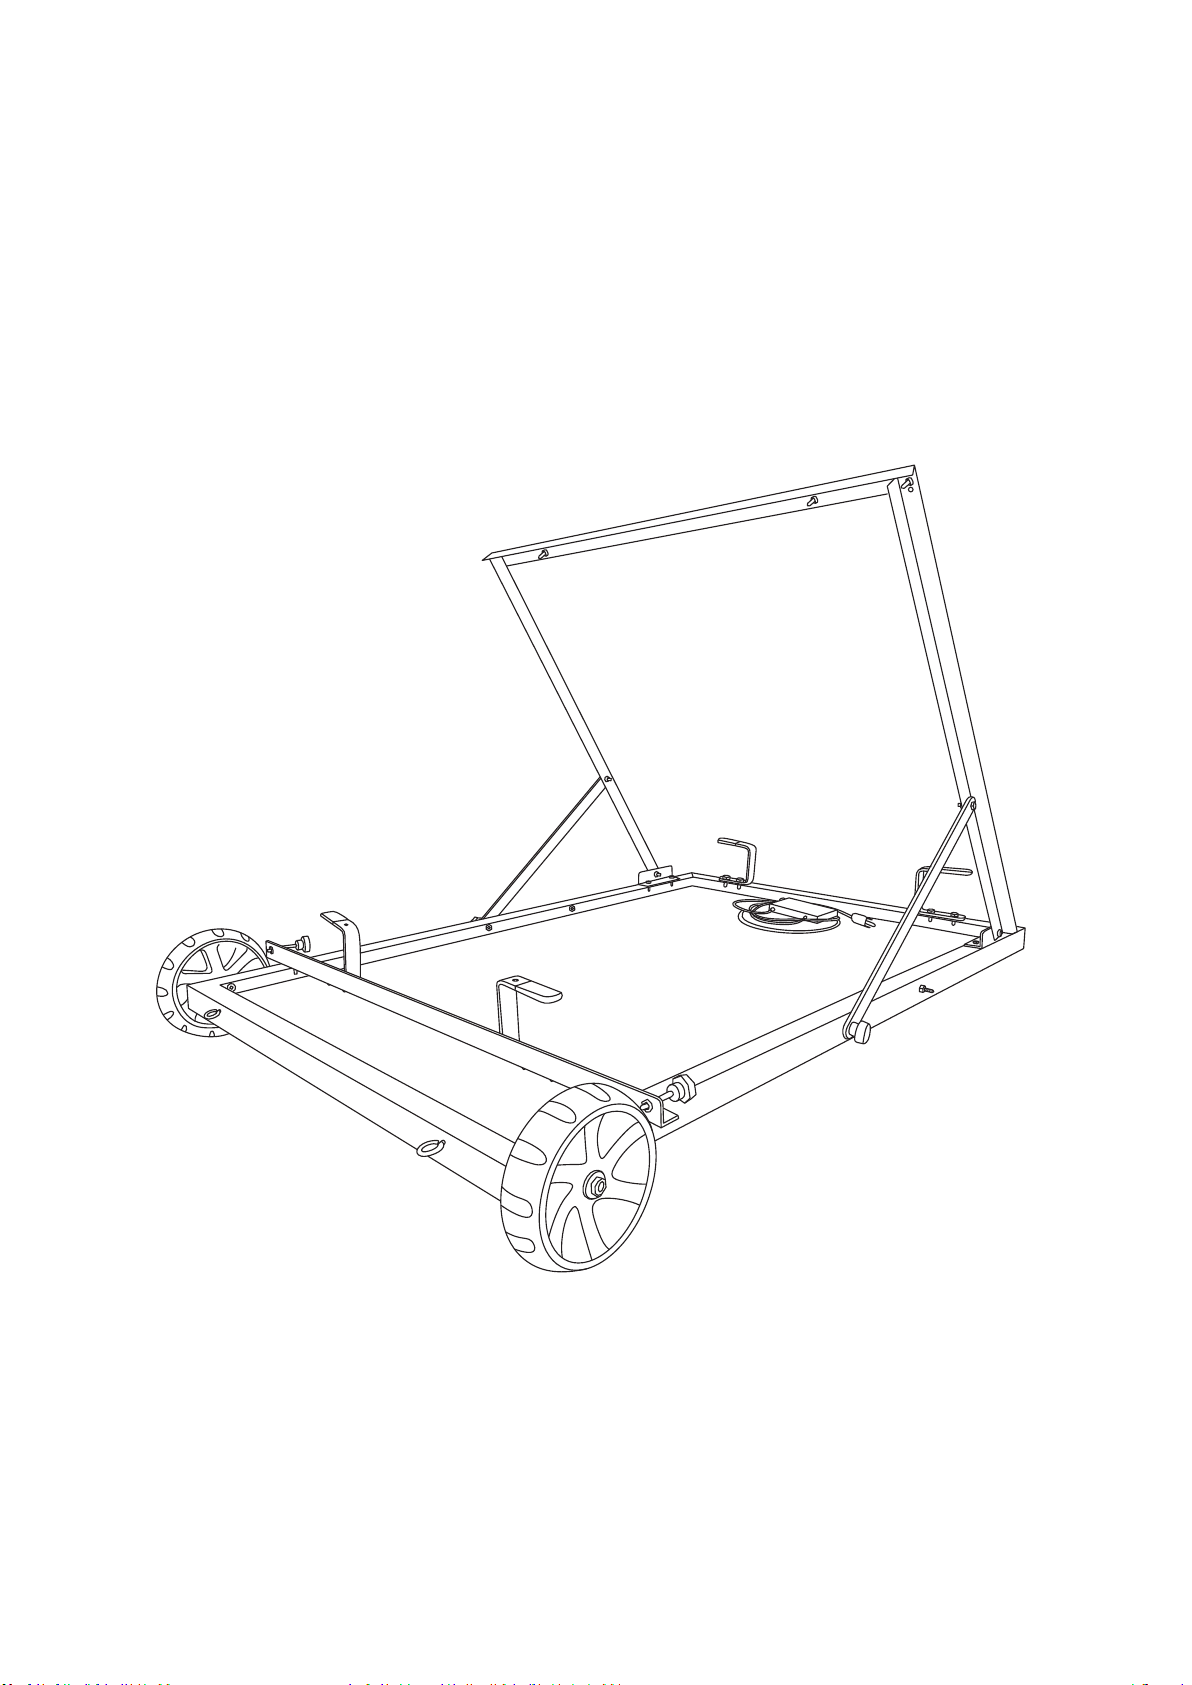
Step 6:
in Step 7.
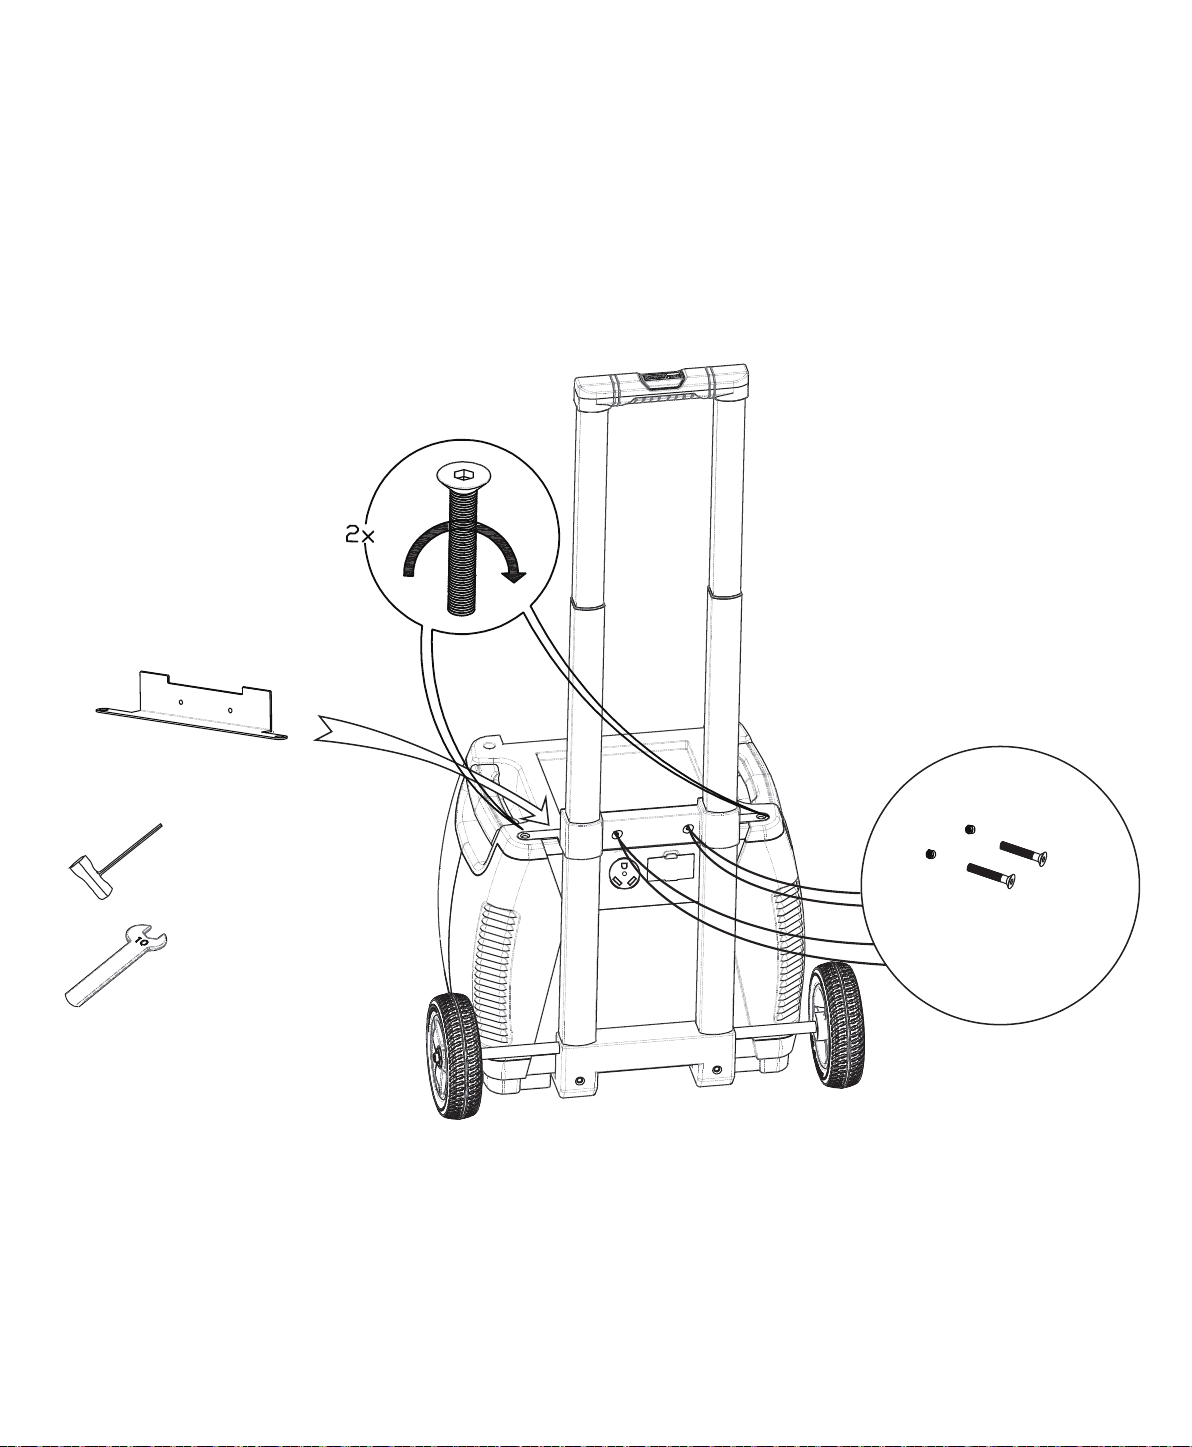
M6 30mm Bolt
and Nut × 2pcs
Socket Wrench × 1pc
10mm Wrench × 1pc
Generator Bracket
Step 7:
Visit Naturesgenerator.com for More Information
15
Insert the bolts once Generator Bracket is in place.
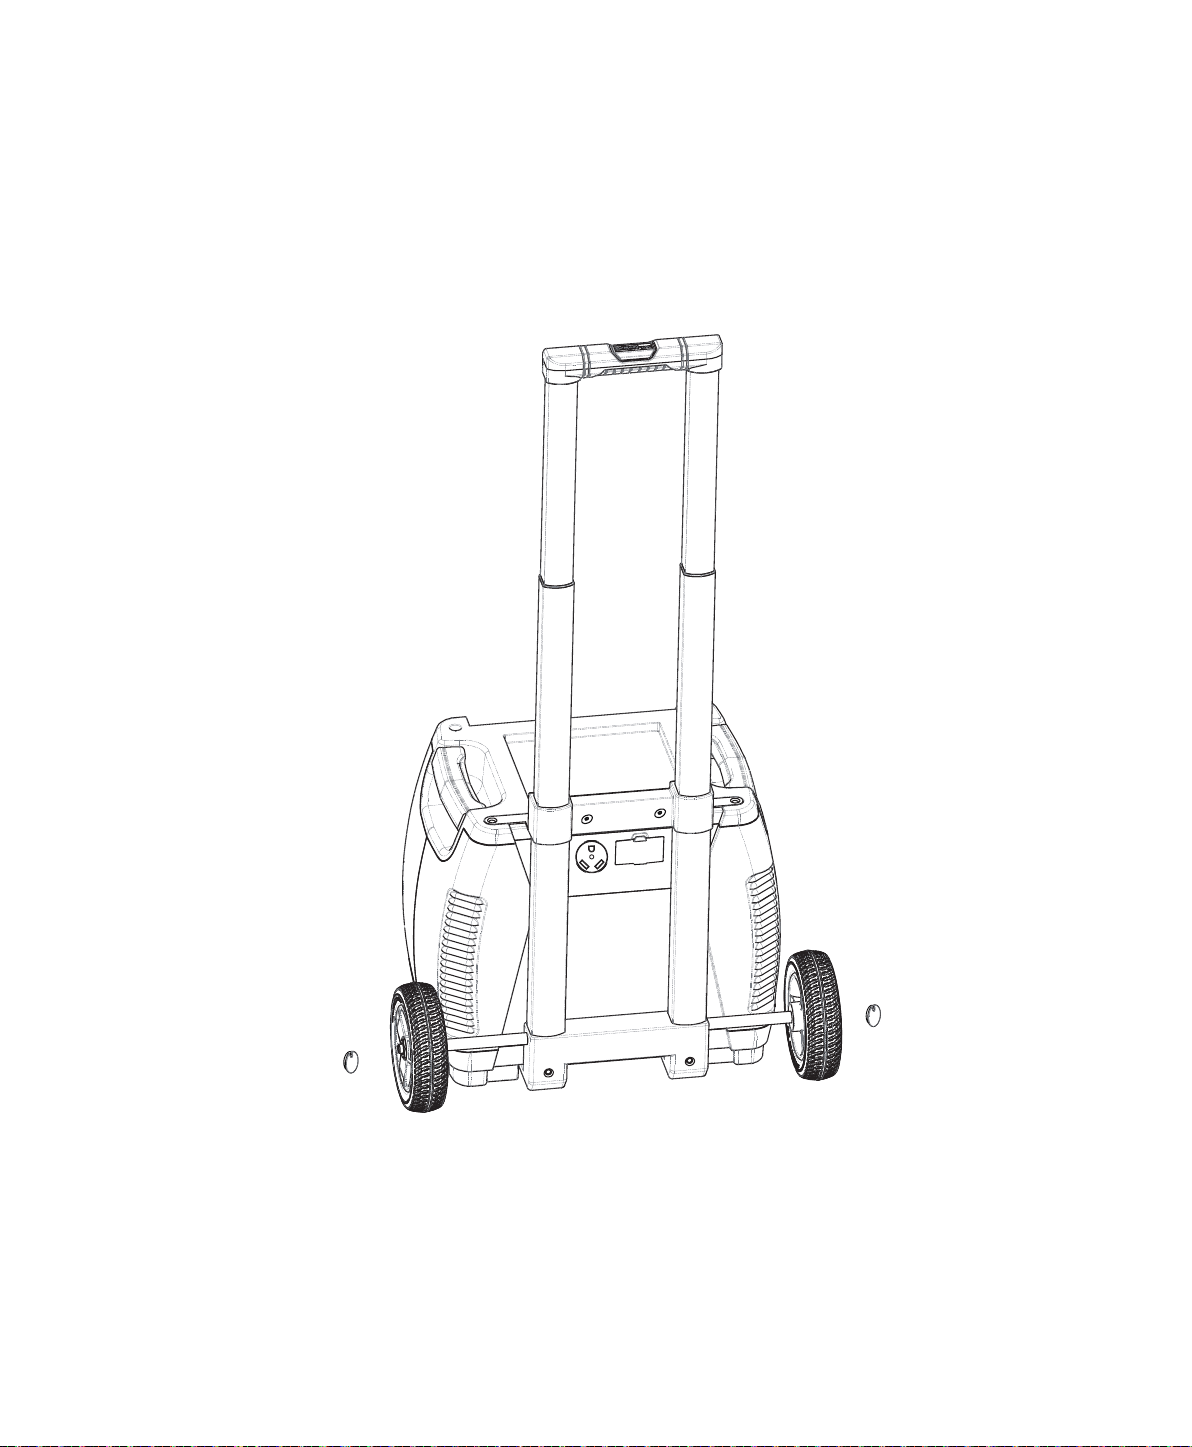
Elite, please put the hub caps
on the wheels.
Visit Naturesgenerator.com for More Information
16
Hub Cap x 2pcs

17
Troubleshoong
My Nature’s Generator Elite won’t charge when I connect my solar panel to it.
Nature's Generator Elite and make sure it is properly connected.
Elite has
been fully recharged by the solar panel or the solar panel does not have high enough voltage to
recharge the Nature's Generator Elite.
My AC device(s) are not powering up from my Nature’s Generator Elite.
1. Verify your device is suitable for use with your Nature's Generator Elite. The Nature's Generator
Elite
Nature's Generator Elite.
Nature's
Generator Elite full before heavy use.
5. If LED light is red, please check the failure icons on the LCD display.
trying to use again.
and back on to try it again.
My Nature’s Generator Elite baery drains fast.
Nature's Generator Elite to conserve
3. When Nature's Generator Elite
Visit Naturesgenerator.com for More Information

Baery:
Inverter:
Ports:
Charges:
General:
23 × 17 × 22 in ( 57 × 42 × 55 cm) with cart
(54.4 kg)
Technical Specificaons
Visit Naturesgenerator.com for More Information
18

19
Limited Warranty
One Year Limited Warranty
warrants to you, the original purchaser of this new product, that the product
shall be free of defects in the original manufacture of the material or workmanship for a period
statement. This warranty does not cover refurbished product.
What does this Warranty Cover?
will (at its sole
become the property of Nature's Generator Elite and are not returned to you. If service of products
terminates if you sell or otherwise transfer the product.
How to Obtain Warranty Service?
phone number and address with the product inside the box.
Where is the Warranty Valid?
and Canada).
Visit Naturesgenerator.com for More Information

20
• Misuse
• Negligence
• Commercial use
to service the
product
What does the Warranty not Cover?
Visit Naturesgenerator.com for More Information

V1.0 ENGLISH
Nature’s Generator
Power Panel
User Manual

Nature’s Generator
Power Panel
Contents
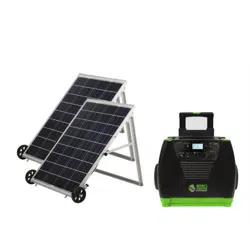
Unpack Your Nature's Generator Power Panel
Unpack Your Solar Panel Accessory Box
Assemble Your Solar Panel Cart
Using Your Nature's Generator Power Panel
Use Your Power Panel
Daisy Chain Your Power Panel
-
-
-
-
-
-
1
15
14
13
12
12
1
2
3
Limited Warranty
16

Introducon
Generator (sold separately) or Power Pod (sold separately)
from the sun.
Unpack Your Nature's Generator Power Panel
What are included:
2. Solar panel accessory box
3. Solar cable (for some models)
6. This Manual
4. MC4 branch connector (for some models)
5. Wheels
1
Visit Naturesgenerator.com for More Information
Unpack Your Solar Panel Accessory Box
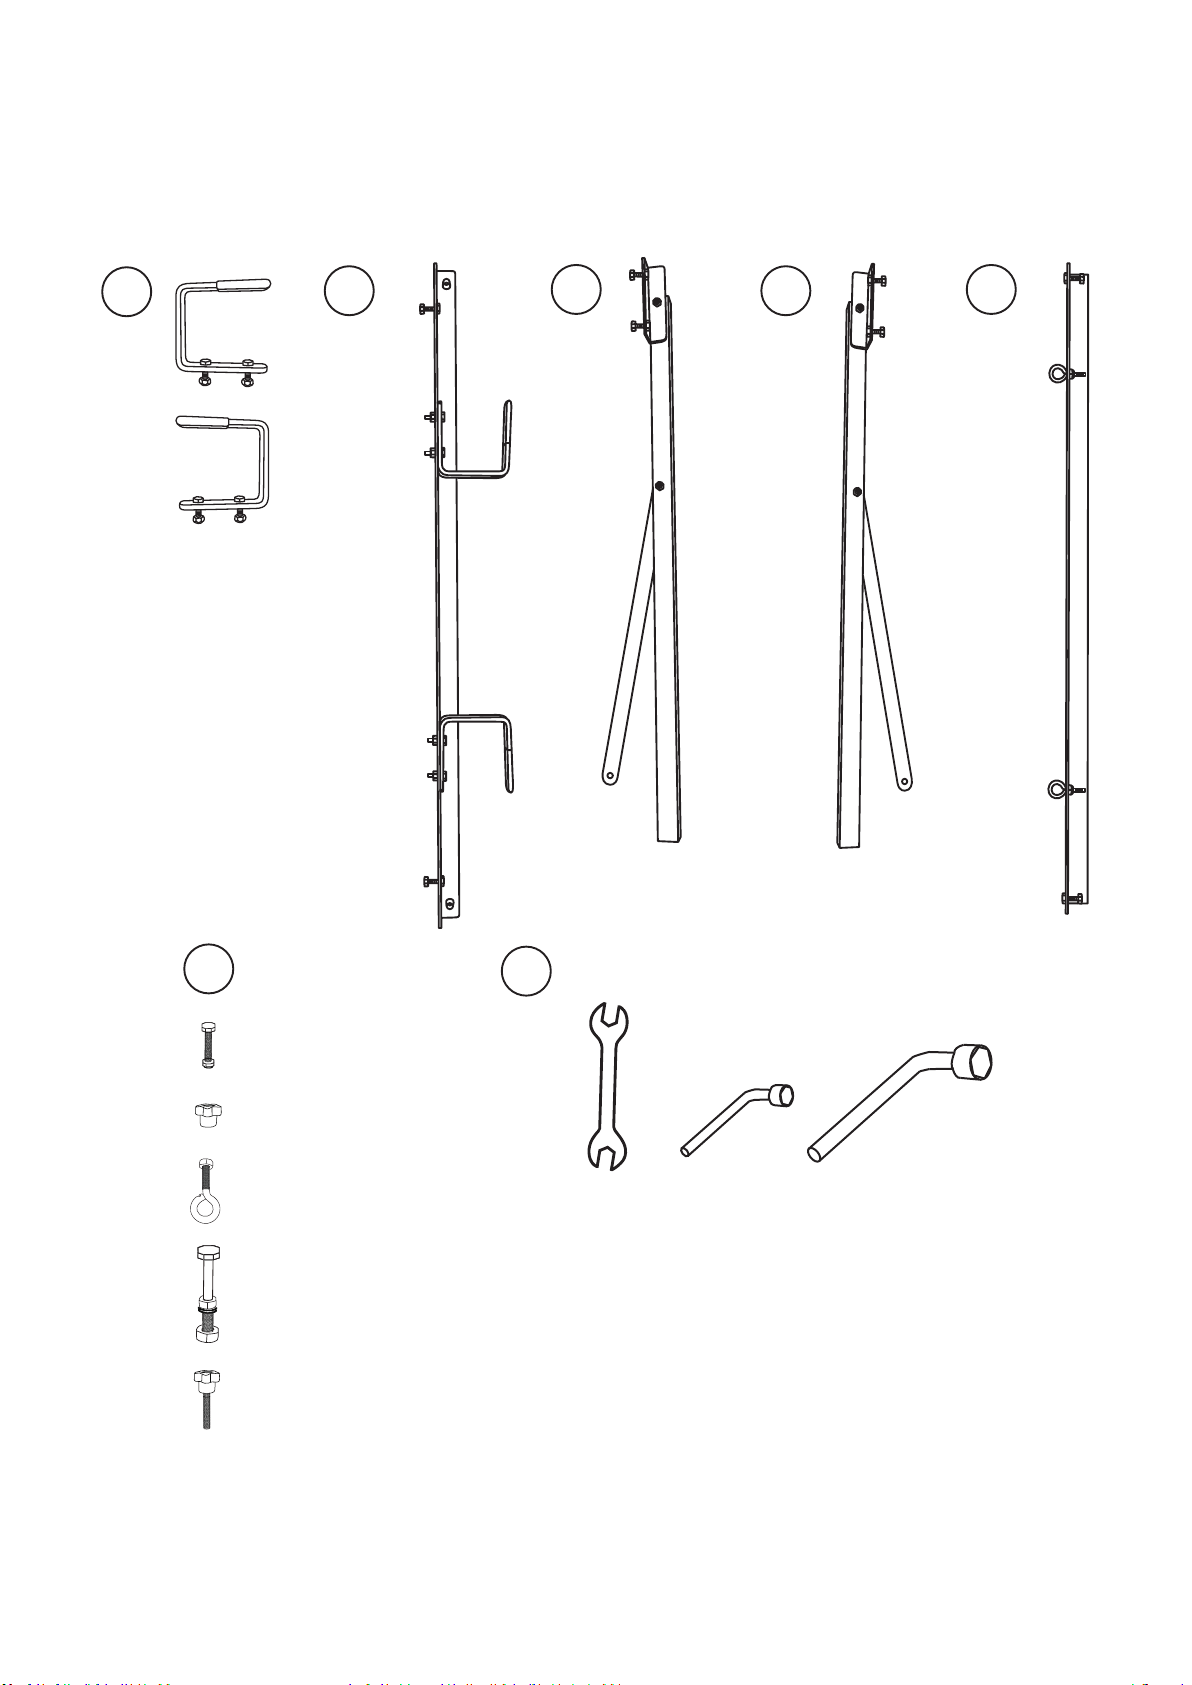
What are included:
C
D
E
B
A
F
T
F-4 x 2 pcs
F-5 x 2 pcs
F-2 x 2 pcs
F-3 x 2 pcs
F-1 x 4 pcs
T-1 T-3T-2
2
Visit Naturesgenerator.com for More Information
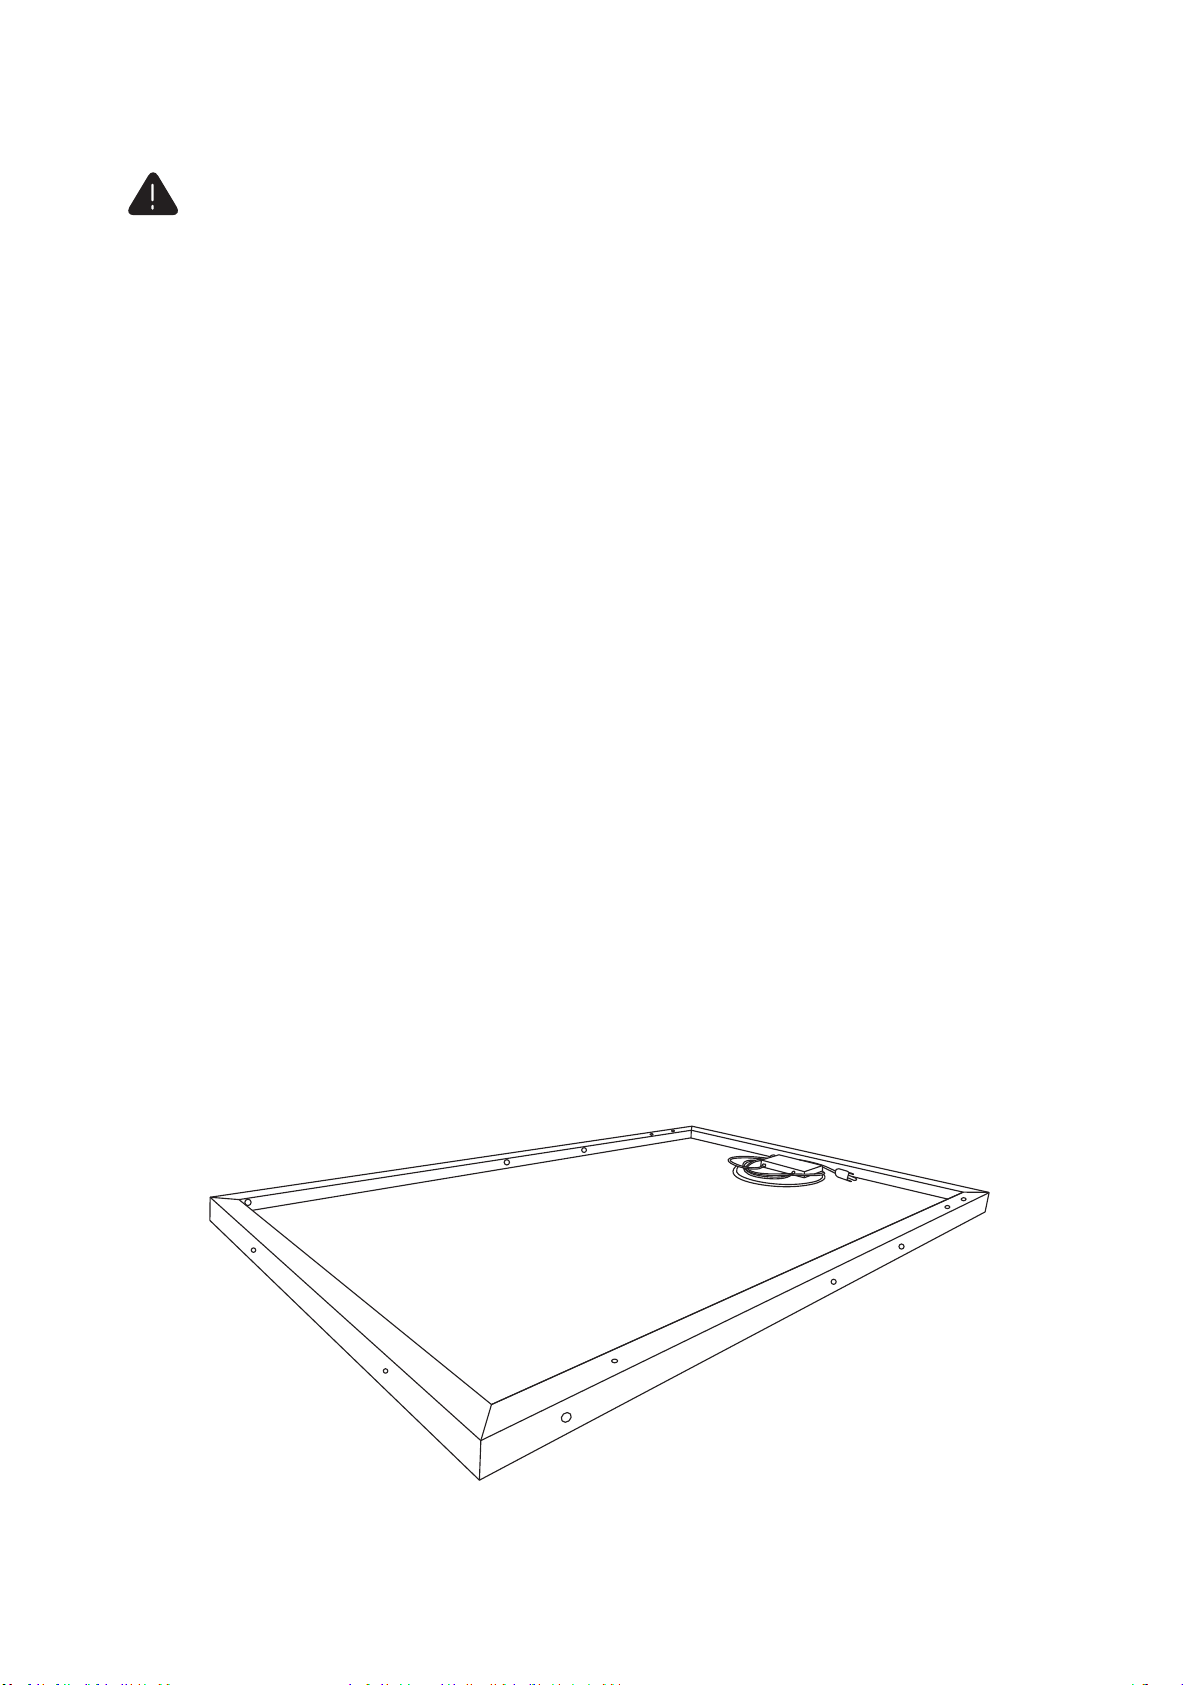
Step 1:
3
Assemble Your Solar Panel Cart
! CAUTION
support@naturesgenerator.com
Visit Naturesgenerator.com for More Information
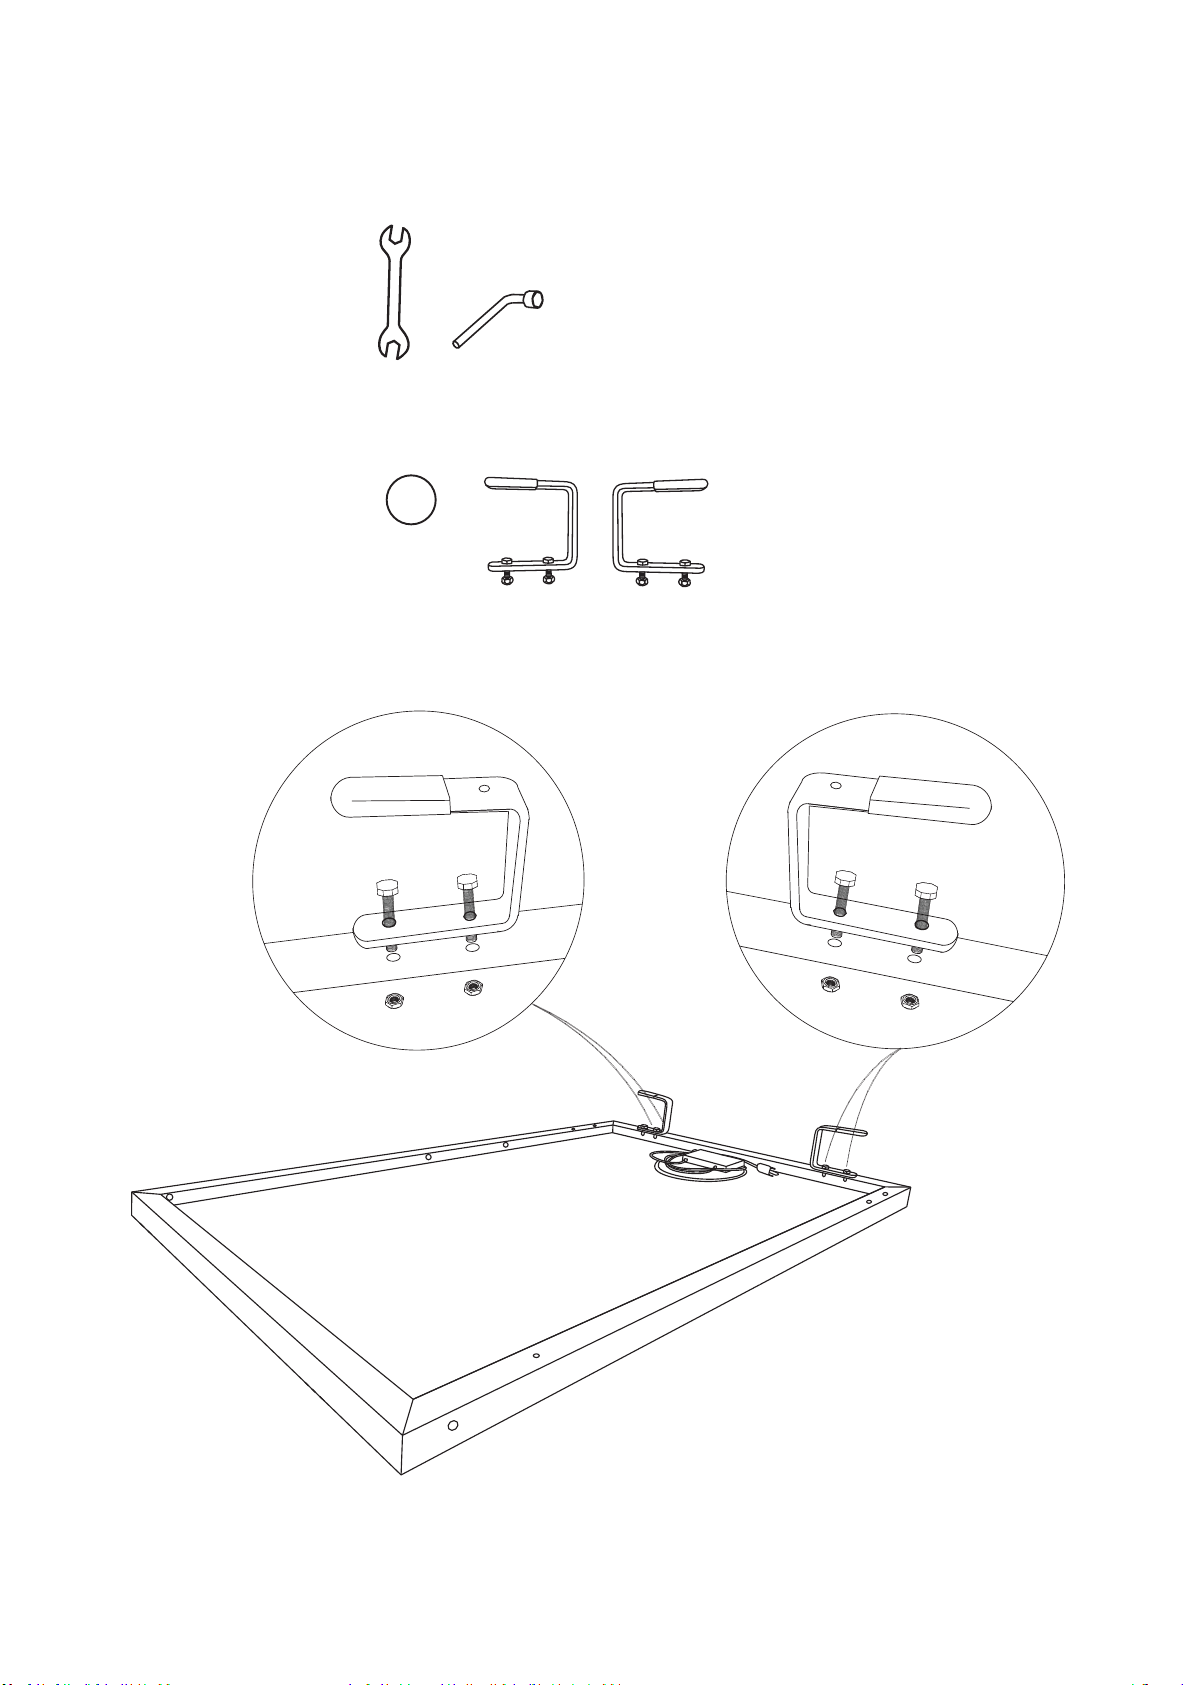
Step 2:
4
Visit Naturesgenerator.com for More Information
T-1 T-2
A
Step 3:
5
Visit Naturesgenerator.com for More Information
T-1 T-2
F-2 x 2 pcs
F-1 x 4 pcs
Step 4:
6
Visit Naturesgenerator.com for More Information
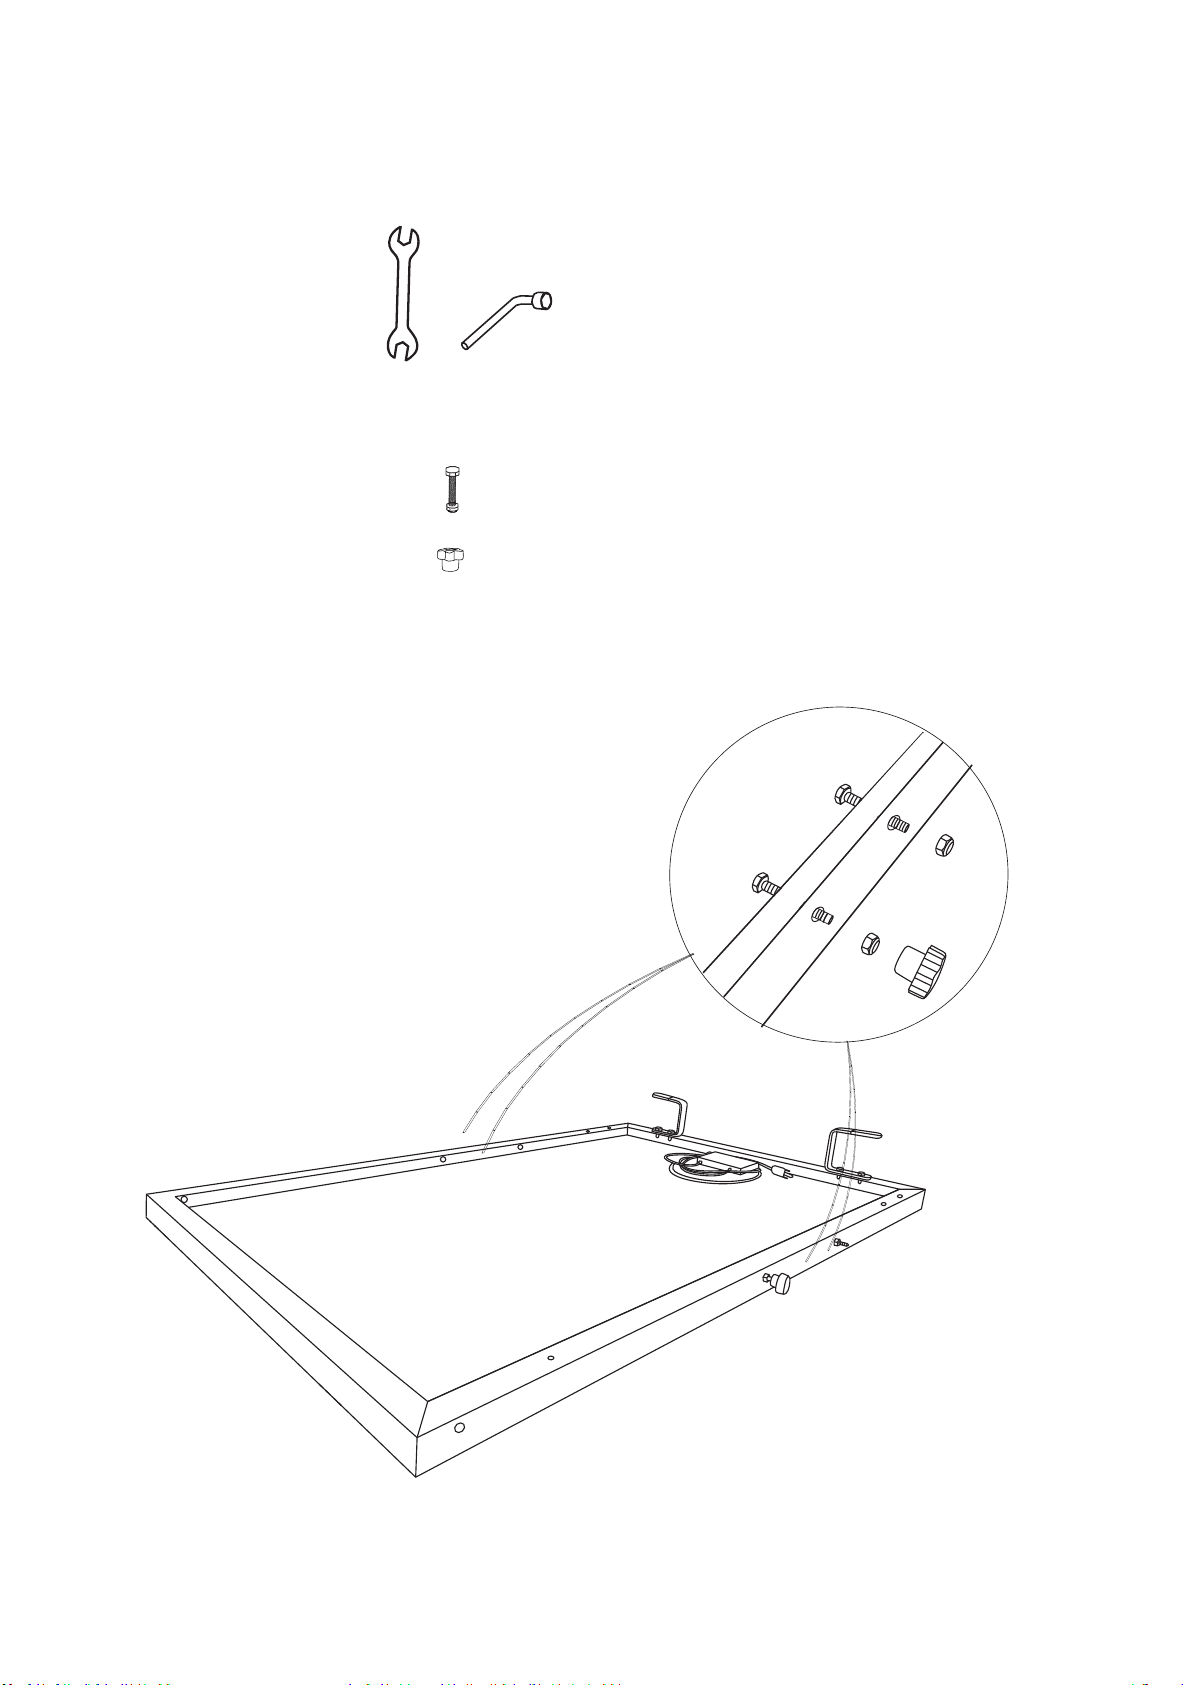
T-1 T-2
F-3 x 2 pcs
Step 5:
Visit Naturesgenerator.com for More Information
T-1 T-3
F-4 x 2 pcs
Wheels
Aluminum
frame
Step 6:
8
Visit Naturesgenerator.com for More Information
T-1 T-2
F-5 x 2 pcs
B
D
C
Visit Naturesgenerator.com for More Information
T-1 T-2
C
D
Step 8:
Visit Naturesgenerator.com for More Information
T-1 T-2
E
8. Finish
11
Visit Naturesgenerator.com for More Information
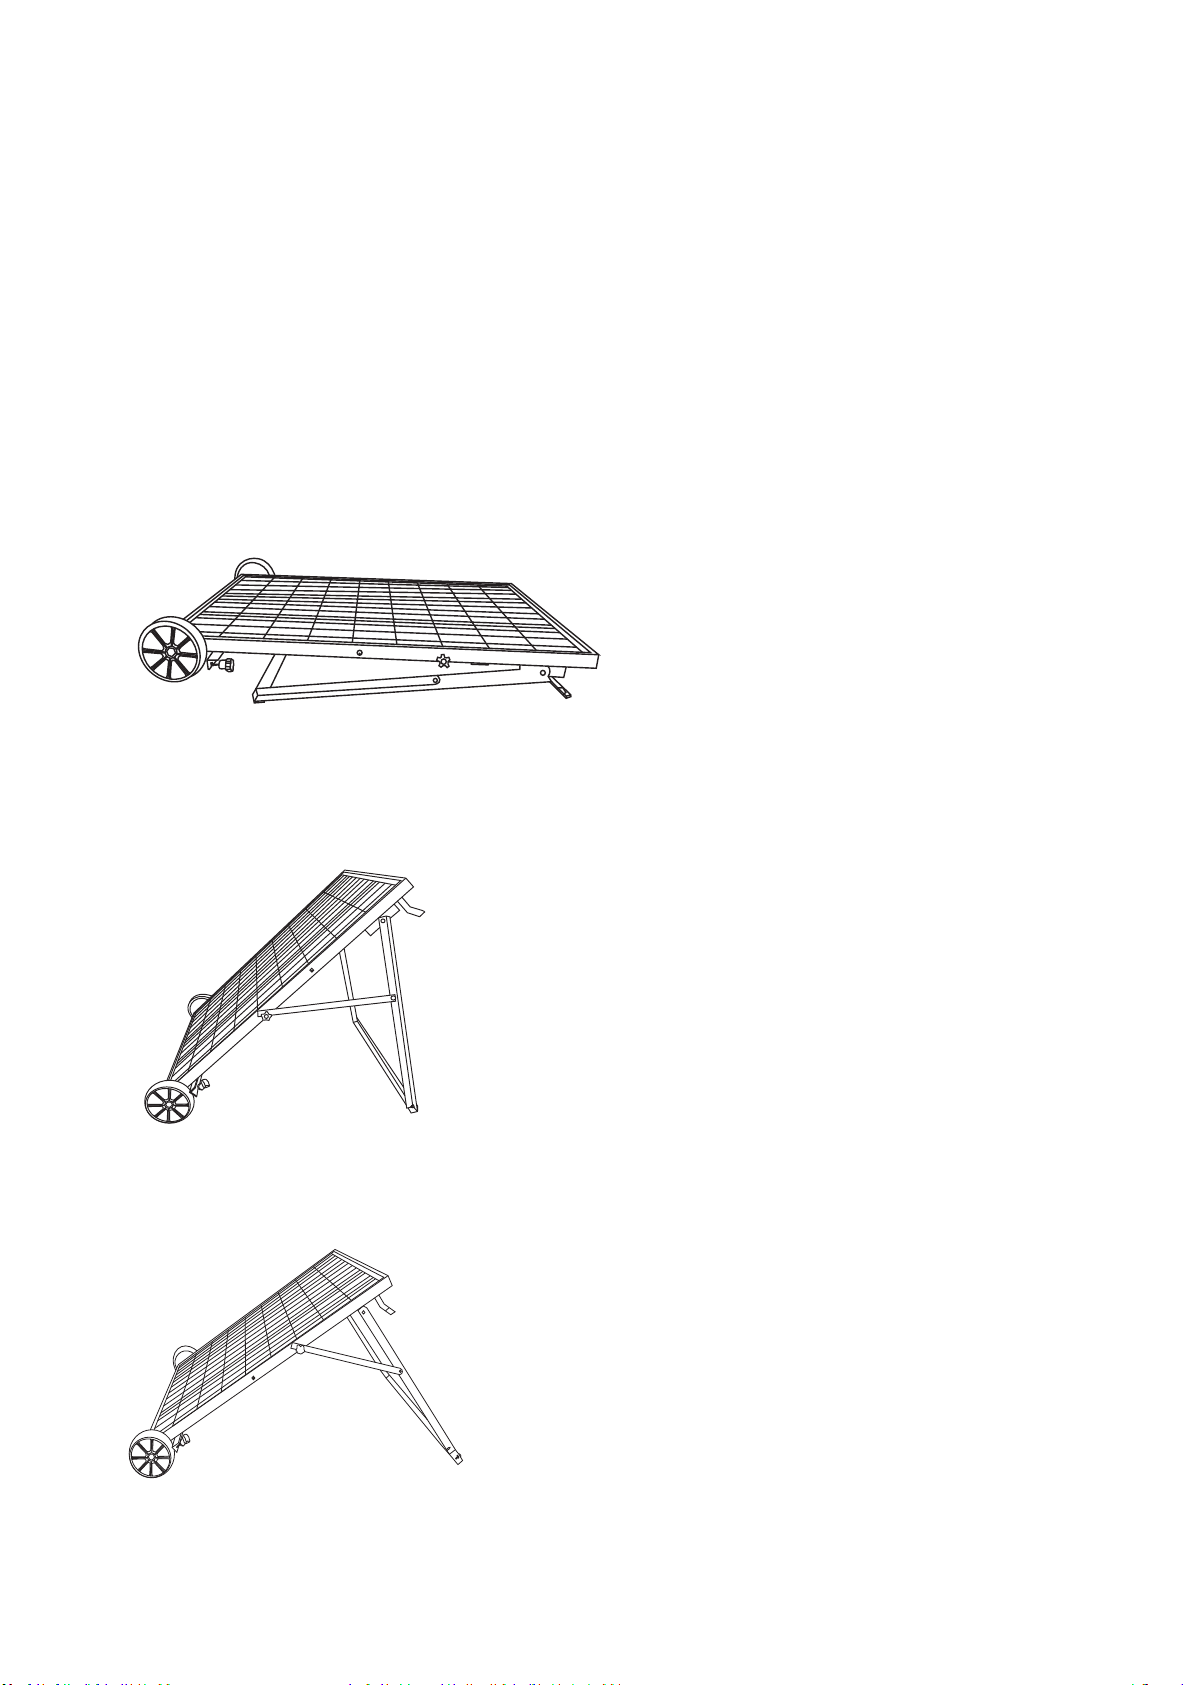
To mount the solar panel semi-permanently or during
Posion Your Power Panel
Please place your power panel where it will get as much direct
Using Your Nature's Generator Power Panel
12
Visit Naturesgenerator.com for More Information

Use Your Power Panel
Connect the solar panel cable
to the solar input port.
You can use the four eyebolts to
anchor the solar panel to the ground.
You can use handles for cable
management and predrilled 6mm
You can turn star knob clockwise
to stop the wheel or countercolockwise
to release.
13
Visit Naturesgenerator.com for More Information

Daisy Chain Your Power Panel
method.
Power Panel
Power Panel
Solar Cable
(sold separately)
14
(sold separately)
Visit Naturesgenerator.com for More Information

Technical Specificaons
Cell: Polycrystalline
15
Visit Naturesgenerator.com for More Information

16
Visit Naturesgenerator.com for More Information
Limited Warranty
One Year Limited Warranty
product shall be free of defects in the original manufacture of the material or
workmanship for a period of one (1) year from the original date of your purchase of
the product (“Warranty Period”). This product must be purchased from an authorized
refurbished product.
the product at no charge with new or rebuilt comparable products or parts. Products
and parts replaced under this warranty become the property of Nature's Generator
terminates if you sell or otherwise transfer the product.
Please call
Please include the RMA number prominently displayed on the shipping box and

Visit Naturesgenerator.com for More Information
What does the Warranty not Cover?
• Accident
• Misuse
• Abuse
• Negligence
• Commercial use
• Products sold as is or with all faults
REPAIR REPLACEMENT AS PROVIDED UNDER THIS WARRANTY IS YOUR EXCLUSIVE
REMEDY. HUNTKEY USA INC. SHALL NOT BE LIABLE FOR ANY INCIDENTAL OR
CONSEQUENTIAL DAMAGES FOR THE BREACH OF ANY EXPRESS OR IMPLIED
AND JURISDICTIONS DO NOT ALLOW LIMITATIONS ON HOW LONG AN IMPLIED
Contact Huntkey USA Inc:

How to Position the Power Panel
Flat Position
You can use the
four eyebolts to
anchor the power
panel to the
ground.
Summer Position
Connect the power
panel cable to
the solar input
port.
You can use
handles for cable
management and
predrilled 6mm
holes for optional
mounting.
Optional: To Double Charging Speed, Use the Parallel Connection Method
You can turn star
knob clockwise
to stop the wheel
or countercolockwise
to release.
How to Use the Power Panel
Winter Position
NATURE
’
S GENERATOR
POWER PANEL
visit NaturesGenerator.com for more information
Specifications:
Rated Power: 100W
Fuse Rating: 8A
Cell: Polycrystalline
Certifications:
Voltage: 17V ~ 22V
Designed and Packaged in USA
Huntkey USA, Inc
support@naturesgenerator.com
800.975.7909
For use with
Nature’s
Generator
For use with
Nature’s
Generator
Power Pod
Power Panel
Power Panel
Or
Solar cable
Please place your power panel where it will get as much direct sunlight as possible. There are three positions as follows:
To mount the power panel semi-permanently
or during travel.