Loading ...
Loading ...
Loading ...
12 13
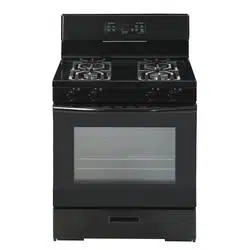
ELECTRONIC OVEN CONTROLS (continued) ELECTRONIC OVEN CONTROLS (continued)
CANCEL/OFF
The Cancel/Off pad stops all functions of the oven except the Timer and Control Lock.
OVEN LIGHT
When the oven door is closed or open, press the “Oven Light” pad to turn the lights on or off.
START
The “Start” Pad begins the oven function. If the “Start” pad is not pressed within 30 seconds
after pressing a function pad, the display will begin to flash for 30 seconds, then 5 reminder
tones will sound, and “PUSH" icon and “On” icon will begin to flash alternately on the dis-
play for 30 seconds. If the “Start” pad is not pressed the oven function will be canceled and
the display will return to showing the clock time.
TIMER
The timer can be set in hours or minutes up to 11 hours and 59 minutes (in the 12-hour time
mode; 23 hours and 59 minutes in the 24-hour time mode), and counts down the set time
programmed into the system. The timer does not start or stop the oven.
HOW TO SET THE TIMER:
1) To set the Timer, press the “Timer On/Off” pad.
2) Next, the display will begin to flash, to set the desired hour or minutes, press the
“+ or -” pad.
3) Then press the “Timer On/Off” pad to begin the Timer.
4) When the set time ends, the end-of-cycle tones will sound.
5) Press the “Timer On/Off” pad to stop the timer and the reminder tones.
NOTE: If you would like to stop the Timer at any time, press the “Timer On/Off” pad once.
CONTROL LOCK
The Control Lock function locks the control panel pads from being used to avoid any un-
intended use of the cook functions. When the control panel is locked, none of the control
panel functions will work.
TO LOCK/UNLOCK CONTROL PANEL:
1) To lock the control panel, press the “Lock Controls” pad and hold for three seconds,
then “LOC” will appear on the display and begin to flash. Your panel is now locked.
2) To unlock the control panel, press the “Lock Controls” pad and hold for three seconds,
then “OPN” will appear on the display. Once “OPN” disappears and the display returns
to the clock time, your control panel is now unlocked.
CONTROL LOCK FUNCTION
CONTROL LOCK FUNCTION DOES NOT LOCK THE OVEN
DOOR.
OVEN TEMPERATURE FORMAT
• The default temperature scale setting for the oven is set to Fahrenheit.
• When using the oven, the oven temperature on the display will appear in Fahrenheit (F).
• However, if you would like to change the temperature scale to Celsius (C), please see
directions below.
HOW TO CHANGE THE OVEN TEMPERATURE SCALE TO CELSIUS:
1) To change the oven temperature scale to Celsius (C), press the “Bake” pad and hold for
3 seconds.
2) Next, the letter “C” will appear on the display for a few seconds.
3) The “C” will disappear from the display, and the clock time will reappear on the display
indicating the oven temperature scale has been switched.
4) When using the Bake function, the oven temperature will now display the letter “C” next
to the temperature.
HOW TO CHANGE THE OVEN TEMPERATURE SCALE BACK TO FAHRENHEIT:
• To change the oven temperature scale back to Fahrenheit (F), repeat above steps 1-3.
However, during the adjustment the letter “F” will appear on the display instead of a “C.”
DELAY TIME
The delay time function is available in the Bake or Broil mode.
HOW TO SET THE DELAY TIME:
1) To set the Delay Time, press the “Delay Time” pad, and the display will begin to flash.
2) Next, press the “+ or –” pad to set the time to when you would like your cooking time to
begin.
3) Once you have set your desired delay time, press the “Delay Time” pad again to lock in
the set time.
4) Next, press the “Bake” OR “Broil Hi/Lo” pad.
a. If the “Bake” pad has been pressed, press the “+ or –” pad to adjust to the desired
oven temperature.
b. If the “Broil Hi/Lo” pad has been pressed, the “HI” will automatically appear on dis-
play. Press the “Broil Hi/Lo” pad twice to set the “LO.”
5) Next, press the “Start” pad to begin the delay time and the set time will appear on the
display indicating that your Delay Time mode has been start.
6) When your delay time has been programmed, the Automatic Oven indicator will light up.
7) If you would like to cancel the Delay Time function, press the “Cancel/Off” pad.
DISPLAY SLEEP MODE
Display sleep mode can be used to turn off the display function. The oven controls can still
be used in display sleep mode. To enter display sleep mode, press and hold the “Timer” pad
for 3 seconds. To exit display sleep mode, press and hold the “Timer” pad for 3 seconds.
Loading ...
Loading ...
Loading ...