
CEG5331X
01M-8910703200-4220-01
Fully Automatic
Espresso Machine
User Manual
EN

CONTENTS
ENGLISH 12-38
17
13
16
18
14
15
1
2
3
4
5
7
8
9
10
11
12
6


Please read ths user manual frst!
Dear Customers,
Thank you for selectng a Beko product. We hope that you get the best results
from your product whch has been manufactured wth hgh qualty and state-of-
the-art technology. Therefore, please read ths entre user manual and all other
accompanyng documents carefully before usng the product and keep t as a
reference for future use. If you handover the product to someone else, gve the
user manual as well. Follow all warnngs and nformaton n the user manual.
Meanngs of the symbols
Followng symbols are used n the varous secton of ths manual:
Important nformaton or useful hnts
about usage.
DANGER:
Warnng for hazardous
stuatons wth regard to lfe and
property.
WARNING:
Warnng ndcates a
potentally dangerous stuaton.
CAUTION:
Warnng ndcates
potental materal damage.
Materals are ntended to be n contact
wth food.
Comples wth the WEEE Drectve. It does not contan PCB.
Ths product has been produced n envronmentally frendly, modern facltes

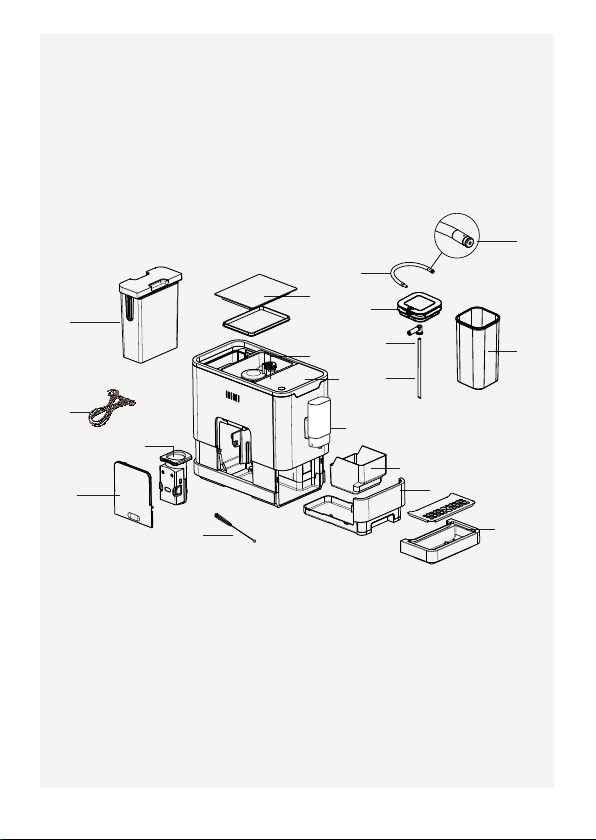
1. External Drp Tray
2. Internal Drp Tray
3. Coffee Grounds Contaner
4. Adjustable coffee spout
5. Control Panel
6. Coffee Bean compartment
7. Coffee Beans Contaner Cover
8. Water Tank
9. Power cord
10. Brewer
11. Servce Door
12. Cleanness brush
13. Mlk contaner
14. Mlk contaner ld
15. Connecton mlk tube
16. Contaner mlk tube
17. Mlk tube connector
18. Connecton rubber
Techncal data
Power supply:
220-240 V~, 50-60 Hz
Power:
1350 W
Technical and design
modifications reserved.
All declared values on the product and on the prnted leaflets
are pcked up after laboratory measurements performed
accordng to related standarts. These values may dffer
upon usage and ambent condtons.

1 Important nstructons for
safety and envronment
14 / EN
Fully Automatc Coffee Machne / User Manual
This section includes the safety instructions that will
help providing protection against personal injury and
material loss risks. Failure to follow these instruc-
tions invalidates the granted warranty.
1.1 Danger of electrc current
Danger to life by electric current!
Contact with live wires or components could lead to
serious injury or even death!
Observe the following safety precautions to avoid
electric shocks:
• Do not use the coffee machine if the connecting
cable or mains plug are damaged.
• Before reusing the coffee machine, the mains cable
must be renewed by a qualified electrician.
• Do not open the housing of the coffee machine.
Danger of electric shock if live connections are
touched and/or the electrical and mechanical
configuration is changed.

1 Important nstructons for
safety and envronment
15 / EN
Fully Automatc Coffee Machne / User Manual
• Before cleaning the bean container, pull the mains
plug of the appliance out of the socket. Danger
from rotating coffee mill!
1.2 Danger of burnng or scaldng
Parts of the coffee machine can become very hot
during operation! Dispensed drinks and escaping
steam are very hot!
Observe the following safety precautions to avoid
burning/scalding yourself and/or others:
• Do not touch either of the metal sleeves on both
coffee spouts.
• Avoid direct contact of the skin with escaping
steam or hot rinsing, cleaning and descaling water.
1.3 Fundamental safety
precautons
Observe the following safety precautions to ensure
safe handling of the coffee machine:
• Never play with packaging material. Risk of
suffocation.

1 Important nstructons for
safety and envronment
16 / EN
Fully Automatc Coffee Machne / User Manual
• Inspect the coffee machine for visible signs of
damage before use. Do not use a damaged coffee
machine.
• If the connecting cable is damaged, it should only
be replaced by a service agent recommended by
the manufacturer in order to prevent any danger!
Please contact the manufacturer or his customer
service.
• Repairs to the coffee machine must only be carried
out by an authorised specialist or by the works
customer service. Unqualified repairs can lead to
considerable danger for the user. They will also void
the warranty.
• Repairs to the coffee machine during the warranty
period may only be carried out by service centres
authorised by the manufacturer, otherwise
the warranty will become void in the event of
subsequent damage.
• Defective parts may only be replaced with original
spare parts. Only original spare parts guarantee
that the safety requirements are met.

1 Important nstructons for
safety and envronment
17 / EN
Fully Automatc Coffee Machne / User Manual
• This appliance can be used by children from the
age of 8 up as well as by persons with reduced
physical, sensory or mental abilities or with lacking
experience and/or knowledge, if these persons are
supervised or have been instructed how to use the
appliance in a safe way and have understood the
hazards which could arise from using it. Children
must not play with the appliance. Cleaning and user
maintenance shall not be made by children unless
they are older than 8 and supervised.
• This appliance is intended to be used in household
and similar applications such as:
- staff kitchen areas in shops, offices and other
working environments,
- farm houses,
- by clients in hotels, motels and other residential
type environments,
- bed and breakfast type environments.
• Protect the coffee machine against the effects of
weather such as rain, frost and direct sunlight. Do
not use the coffee machine outdoors.

1 Important nstructons for
safety and envronment
18 / EN
Fully Automatc Coffee Machne / User Manual
• Never immerse the coffee machine itself, the mains
cable or the mains plug into water or other liquids.
• Do not clean the coffee machine or accessories in a
dish washer.
• Do not pour any other liquids apart from water or
place foodstuffs into the water tank.
• Do not fill the water tank beyond the maximum mark
(lower edge of the filling hole) (1.4 litres).
• Only operate the machine when the coffee grounds
container, drip tray and the cup grate are fitted.
• Do not pull the cable to remove the plug from the
mains socket or touch with wet hands.
• Do not hold the coffee machine with the mains
cable.
• Keep the appliance and its cord out of reach of
children aged less than 8 years.
• Do not operate the hot water function continuously
for more than one tank of water.

1 Important nstructons for
safety and envronment
19 / EN
Fully Automatc Coffee Machne / User Manual
1.4 Intended use
The fully automatic coffee machine Beko is intended for use in homes
and similar applications, for instance in staff kitchens, shops, offices and
similar areas or by customers in bed & breakfast, hotels, motels and other
living accommodation. This coffee machine is not intended for commercial
use. The machine is only intended for preparing coffee and heating milk
and water. Any other use other than previously stated is considered as im-
proper use.
Danger resultng from mproper use!
If not used for its intended purpose or used in any other way, the coffee
machine may be or become a source of danger.
A
WARNING:
Therefore, the coffee
machine may only be used for its
intended purpose.
A
WARNING:
Observe the proce-
dures described in this user manual.
No claims of any kind will be accepted for damage or injury resulting from use
of the coffee machine for other than its intended purpose.
The risk has to be borne solely by the machine owner.
1 Important nstructons for
safety and envronment
20 / EN
Fully Automatc Coffee Machne / User Manual
1.5 Lmtaton of lablty
All technical information, data and instructions on installation, operation
and maintenance of the coffee machine contained in these operating in-
structions represent the current status at the time of printing and are
based on the best possible knowledge gained by experience and knowhow.
No claims can be derived from the information, illustrations and descrip-
tions in this user manual.
The manufacturer assumes no liability for damage or injury resulting from
failure to observe the user manual, use for other than the intended pur-
pose, unprofessional repairs, unauthorised modifications or use of non-
approved spare parts.
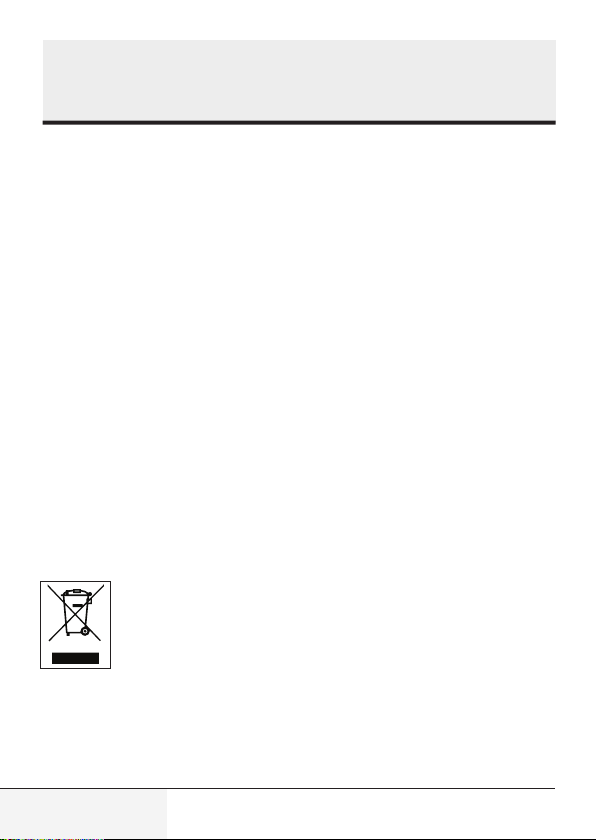
1.6 Complance wth the WEEE Drectve and
Dsposng of the Waste Product:
This product complies with EU WEEE Directive (2012/19/EU). This prod-
uct bears a classification symbol for waste electrical and electronic equip-
ment (WEEE).
This symbol indicates that this product shall not be disposed
with other household wastes at the end of its service life. Used
device must be returned to offical collection point for recycling
of electrical and electronic devices. To find these collection
systems please contact to your local authorities or retailer
where the product was puchased. Each househol performs important role
in recovering and recycling of old appliance. Appropriate disposal of used
appliance helps prevent potential negative consequences fort he environ-
ment and human health.
1 Important nstructons for
safety and envronment
21 / EN
Fully Automatc Coffee Machne / User Manual
1.7 Complance wth RoHS Drectve
The product you have purchased complies with EU RoHS Directive
(2011/65/EU). It does not contain harmful and prohibited materials speci-
fied in the Directive.
1.8 Package nformaton
Packaging materials of the product are manufactured from re-
cyclable materials in accordance with our National Environment
Regulations. Do not dispose of the packaging materials togeth-
er with the domestic or other wastes. Take them to the packag-
ing material collection points designated by the local authorities.
22 / EN
Fully Automatc Coffee Machne / User Manual
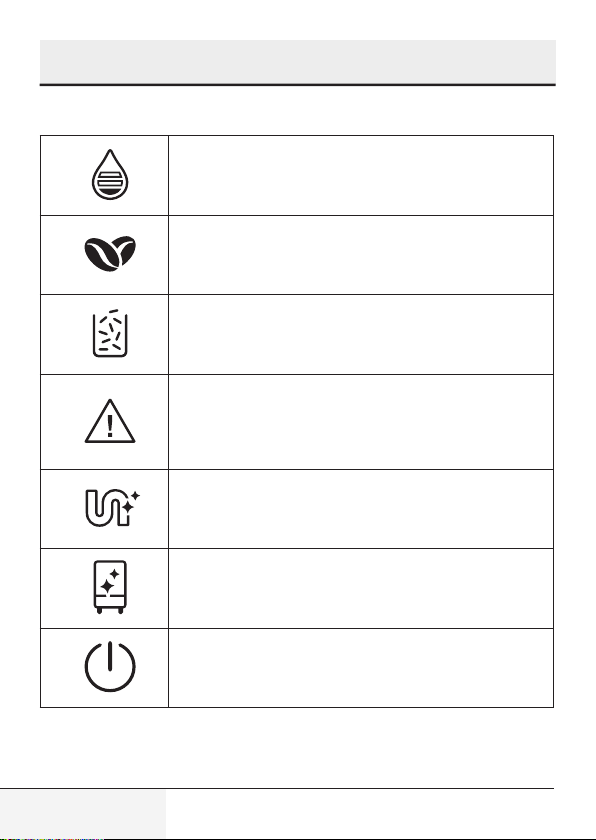
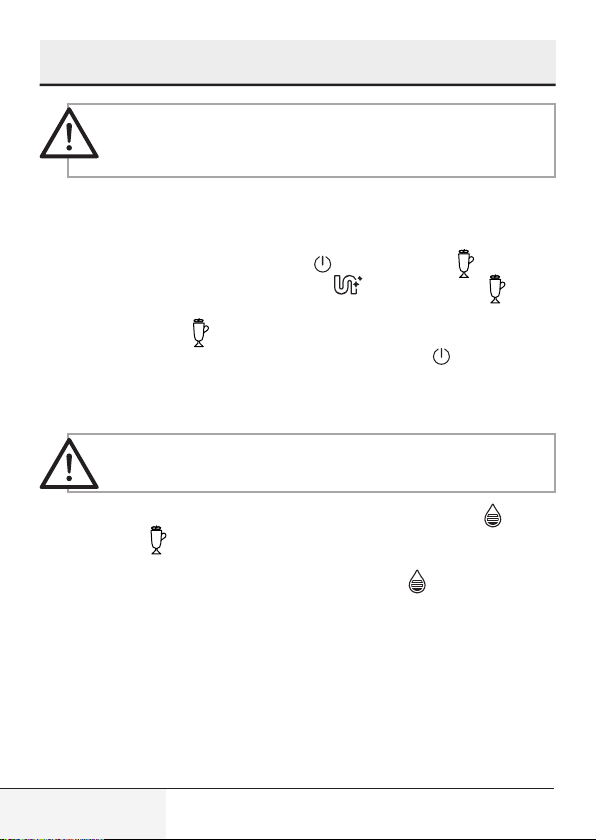
2.1 Control Panel
Flashng: Low water level/ Water tank mssng
Lack of bean
Lghts up stably: coffee grounds contaner s full
Flashng: Internal Drp Tray/coffee grounds
contaner s mssng
Lghts up stably: Brewer s mssng/ nstalled
mproperly
Flashng: Servce door s opened / nstalled
mproperly
Lights up stably: Requires to do descaling
Flashing: Descaling is under process
Empty System Function is running
Power ON/OFF Button
2
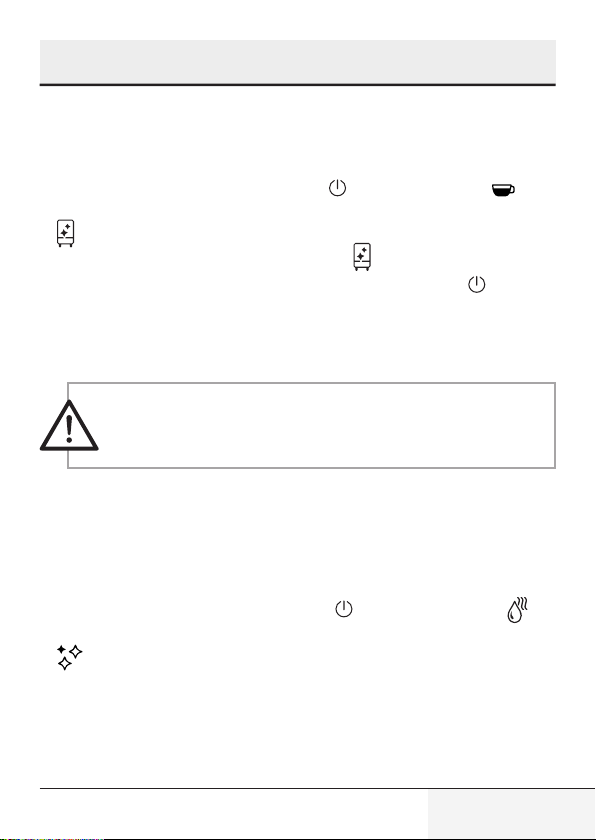
Dsplay
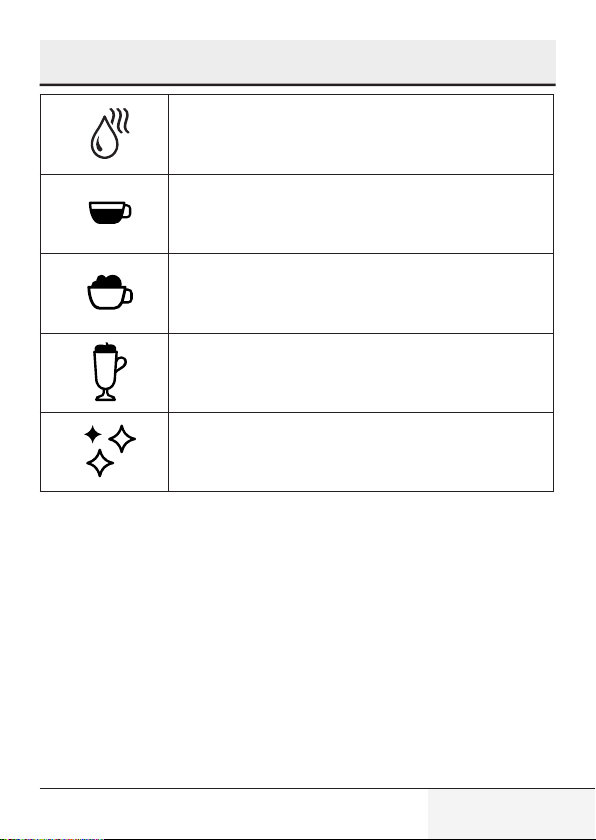
23 / EN
Fully Automatc Coffee Machne / User Manual
Hot Water Button
Espresso Button
Cappuccino
Latte Macchiato
One tme: Quck clean
Two tme: Mlk frother functon
2
Dsplay
24 / EN
Fully Automatc Coffee Machne / User Manual
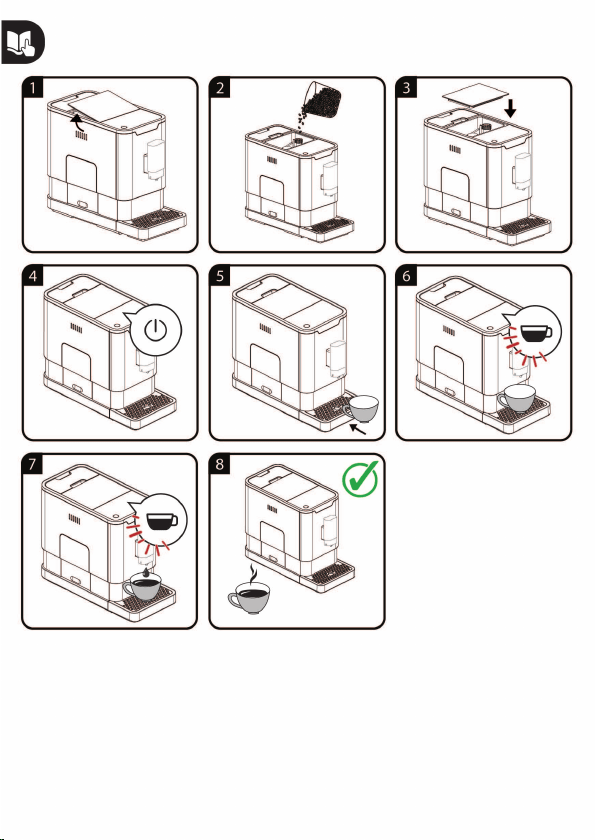
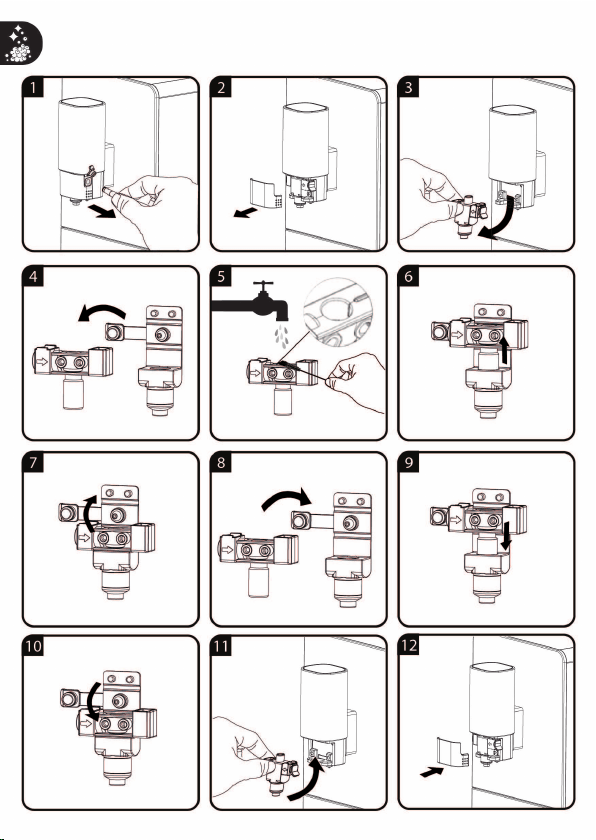
3.1 Installation
Remove any protective films, stickers and any other packing
material on the appliance.
3.2 Fllng the water tank
About the protect program:
If the water tank is not
fully placed into the machine, a protection mode will be acti-
vated in 15 seconds during brewing process. Hot water button
will lights on control panel.
1. Make sure that the water tank is fully inserted into the ma-
chine.
2. Press the hot water button. After the hot water is dis-
pensed, the machine will be in standby condition.
WARNING:
When is flashing, the water tank is in low
water level and requires filling the water tank.
To prevent overflow of water from the water tank, do not add
water directly into the appliance with another container.
WARNING:
Never fill the water tank with warm, hot, spar-
kling water or any other liquid which might damage the water
tank and the machine.
3
Preparaton
25 / EN
Fully Automatc Coffee Machne / User Manual
WARNING:
Never do the grinding adjustment when the
grinder is not operating. It may damage the grinder.
The dots on the adjuster knob indicate the fineness of the grind.
When is flashing, the appliance needs to be filled with cof-
fee bean.
WARNING:
Fill the coffee bean container only with coffee
beans. Grounded coffee, instant coffee, caramelized coffee
and any other objects may damage the machine.
Press the hot water button to clean inside of the coffee maker
before first use.
The Appliance is equipped with auto-shut off. Depending on the
mode you have selected the appliance will have different auto-
shut off timing.
3
Preparaton
26 / EN
Fully Automatc Coffee Machne / User Manual
4.1 Adjusting The Volume Of Your Coffee/
Hot Water
You can memorze your desred volume of coffee for espresso and also
the hot water from 25ml to 250ml.
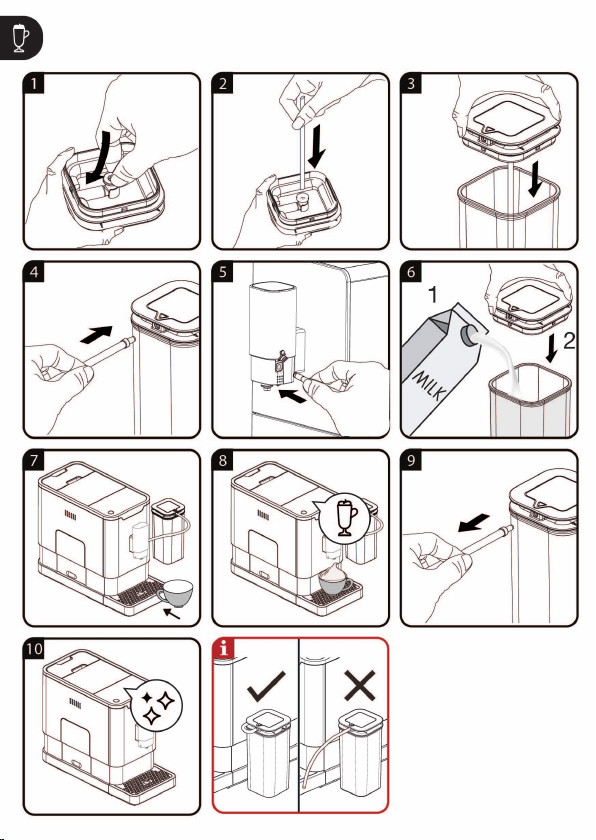
There is a protective cover for the milk tube connector inlet, just
take it off when you need to insert the milk tube connector.
Cleaning the automatic milk froth system before first use.
Use cold milk (at a temperature of approximately 5°C/41°F) with
a protein content of at least 3% to ensure an optimal frothing
result
After use, press button once to perform quick cleaning the
system. See chapter “Daily Cleaning of the appliance”, section
cleaning the automatic milk froth system).
4.2 Hot Water
The appliance can dispense hot water by simply pressing the hot water
button. The hot water button and the illumination will lights up indicates
that the appliance is heating up the water. When the hot water button
and the illumination turn off, the water is ready to serve.
4.3 Mode Selection
The machne has two dfferent settng: default settng, ECO mode and
speed mode. In ECO mode, the applance helps to save more energy. In
speed mode, the user can make ther coffee faster than n default set-
tng.
4
Operaton
27 / EN
Fully Automatc Coffee Machne / User Manual
4
Operaton
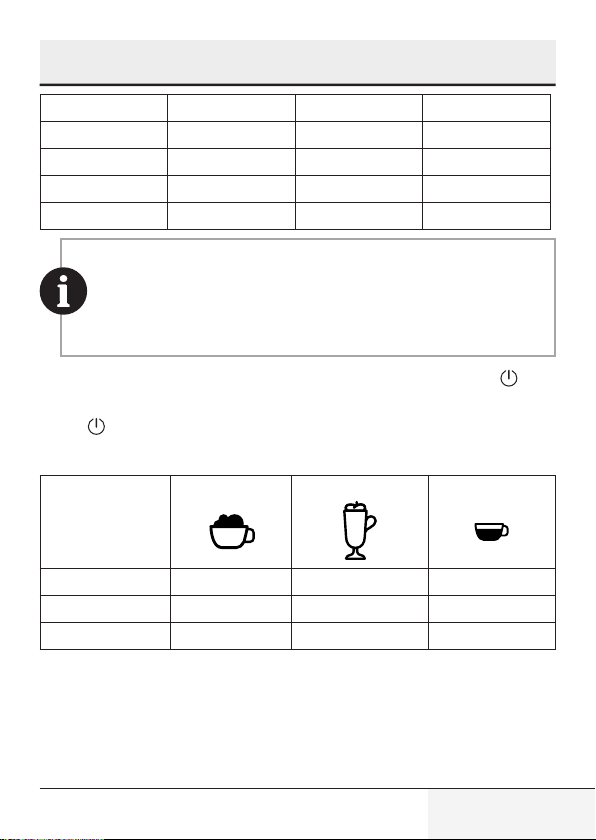
ECO Mode Speed Mode Default Settng
Illumnaton Lght No Yes Yes
Pre-brewng* Yes No Yes
Auto shut off tme 10mns 30mns 20mns
Cup Volume memory Yes Yes Yes
The pre-brewing function moistens the grounded beans in the
brewer with a small amount of water before full extraction. This
expands the coffee grounds to build up a greater pressure in the
brewer which help extraction of all the oils and full flavor from
the grounded beans.
1. When the machne s n standby condton, press and holds the for
5 seconds.
2. The
wll then be flashng and the followng button wll have the fol-
lowng ndcatons for dfferent settngs:
Cappuccno button
Latte button Espresso button
In ECO Mode Lghts ON Flashng Flashng
In Speed Mode Flashng Lghts On Flashng
In Default Settng Flashng Flashng Lghts On
3. Press the Cappuccno button for ECO mode, Latte button for speed
mode and Espresso button for default settng.Two Beep sound wll
be heard ndcates that the mode s beng selected. (Note: If you are
pressng the relatve lghts on button for each mode, the machne wll
not response).

28 / EN
Fully Automatc Coffee Machne / User Manual
4. If you would lke to reman the settng unchanged, press agan or
wat for 5 seconds for the machne to return to the standby condton
4
Operaton
29 / EN
Fully Automatc Coffee Machne / User Manual
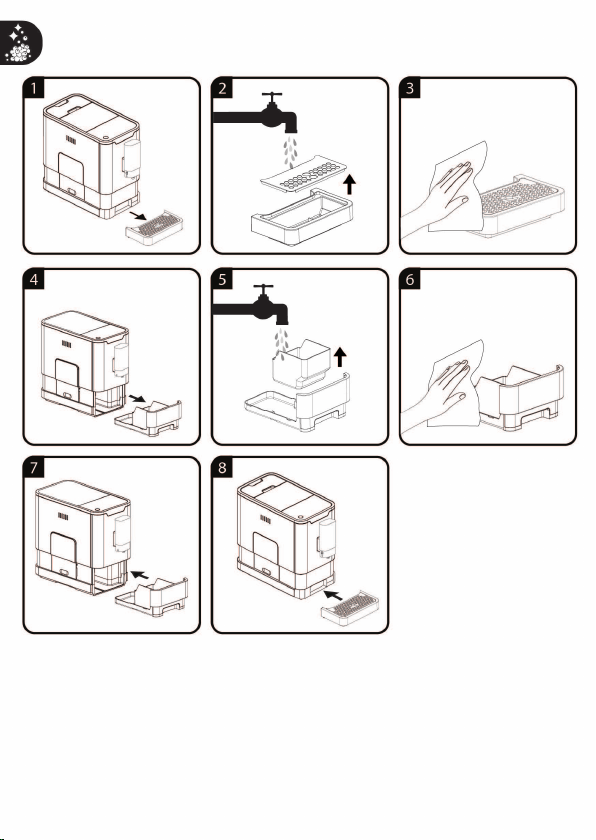
5.1 Cleanng of the applance
WARNING:
Never use any abrasive, vinegar or descaling
agents not included in the box to clean the appliance.
When lights up, the coffee grounds container needs to be
empty.
When lights up stably, it indicates that the brewer is missing
/ installed improperly. When is flashing, it indicates that the
service door is missing/installed improperly.
It is important to do this step daily to make sure the function of
automatic milk frother running in good condition.
5.2 Self-Cleanng
WARNING:
Please wat for fnshng the self cleanng pro-
cess and then swtch off the machne.
When s flashng, t ndcates that the applance needs to undergo
self-cleanng. The applance wll reman n the best condton f ths func-
ton s performed at least once a month or more regularly dependng on
the hardness of water used. It s also suggested that to
1. Fully fll the water tank.
2. Addng one pack of cleanng agent ncluded n the box to the water
tank.
5
Cleanng
30 / EN
Fully Automatc Coffee Machne / User Manual
WARNING:
Do not use vnegar or other cleanng agent to
do self-cleanng of ths applance. The cleanng agent mght
damage the applance.
3. Plug n the applance.
4. Place a suffcent large contaner under the coffee spout.
5. In standby condton, press and hold and Latte button for 5 se-
conds. A beep sound wll be heard wth and Latte button
wll be
flashng.
6. Press Latte button
to confrm undergong the self-cleanng pro-
cess. To resume back to the standby condton, press .
7. Wll be flashng ndcates that the applance s undergong the self-
cleanng process.
WARNING:
Keep skn/body away from the hot water.
8. When all the water n the water tank s beng dspensed out, and
Latte button wll be flashng. Remove all the remanng soluton n
the water tank and fll the tank wth normal tap water untl the max
poston. When water s flled nto the water tank, wll goes off.
Then the applance wll contnue the self-cleanng process.
9. When the self-cleanng process s completed, the applance wll swtch
off automatcally.
5
Cleanng
31 / EN
Fully Automatc Coffee Machne / User Manual
5.3 Empty System Function
The empty system functon s recommended to be used before long perod
of non-use, frost protecton and before talkng to repar agent.
1. In standby condton, press and hold the
and Espresso button to-
gether for 5 seconds.
2.
wll then be flashng.
3. Remove the water tank from the applance.
wll lght up stably nd-
cates that the empty system s under process. You can press before
removng the water tank to resume back to the standby condton.
4. When the empty system functon s completed, the applance wll
swtch off automatcally.
WARNING:
After perform EMPTY SYSYEM FUNCTION; press
the hot water button untl water can come out from spout
when the coffee maker s reused agan.
5.4 Manual Rnsng
You can perform a manual rnsng cycle to clean the coffee nozzle after
use. It s also suggested to perform a manual rnsng f the applance has
not been used for a long perod of tme.
1. In standby condton, press and hold the
and hot water button
together.
2. wll flashng. The coffee nozzle will then dispense a small amount
of water which is used for the rinising.
5
Cleanng
32 / EN
Fully Automatc Coffee Machne / User Manual
WARNING:
Water comes out of the coffee nozzle is hot and
is collected in the drip tray underneath. Avoid contact with
splashes of water.
3. After rinsing, the appliance will return to the standby condition.
5.5 Further Setting
5.5.1 Adjusting The Quantity Of Your Coffee/ Hot
Water
The machine can memorize your desired volume of coffee and hot water.
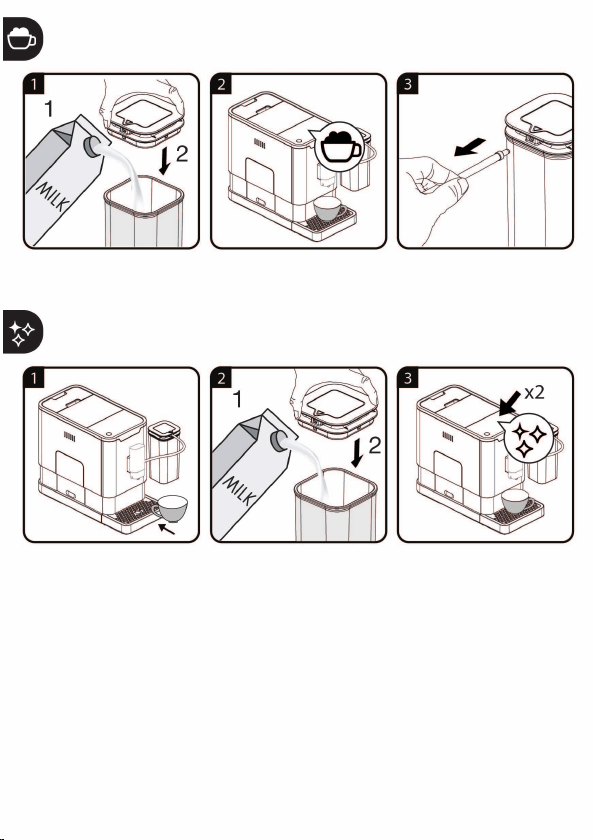
Preparing quantity for Latte Macchiato /Cappuccino/Coffee
1. Place a cup under the spout
2. Swtch on the machne, all buttons lghts on.
3. Press Latte/Cappuccno / Coffee button, only your desred one llumnates.
4. If machne dspenses mlk, press and hold the button to contnue and relea-
se the button when mlk froth reaches your desred volume. Mlk froth stops
wth two beep sounds and the volume s now stored.
5. If machne dspenses coffee, touch and hold the button to contnue and re-
lease the button when coffee reaches your desred volume. Coffee stops
wth two beep sounds and the volume s now stored.
Preparing quantity for Hot Water
1. Place a cup under the spout
2. Swtch on the machne, all buttons lghts on.
3. Press Hot Water button, the button llumnates only.
5
Cleanng

33 / EN
Fully Automatc Coffee Machne / User Manual
5
Cleanng
4. The machne dspenses hot water. Touch and hold the button; release the
button when t reaches your desred volume. Dspensng stops now and the
volume s now stored
The Latte/Cappuccino/Coffee/Hot water button is programmed: every time it’s
pressed, the machine will brew the same amount set.
34 / EN
Fully Automatc Coffee Machne / User Manual
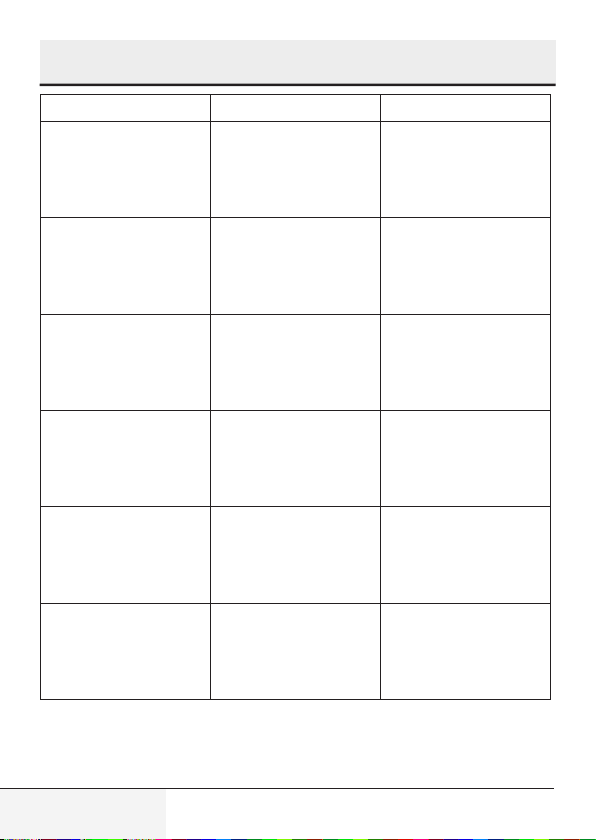
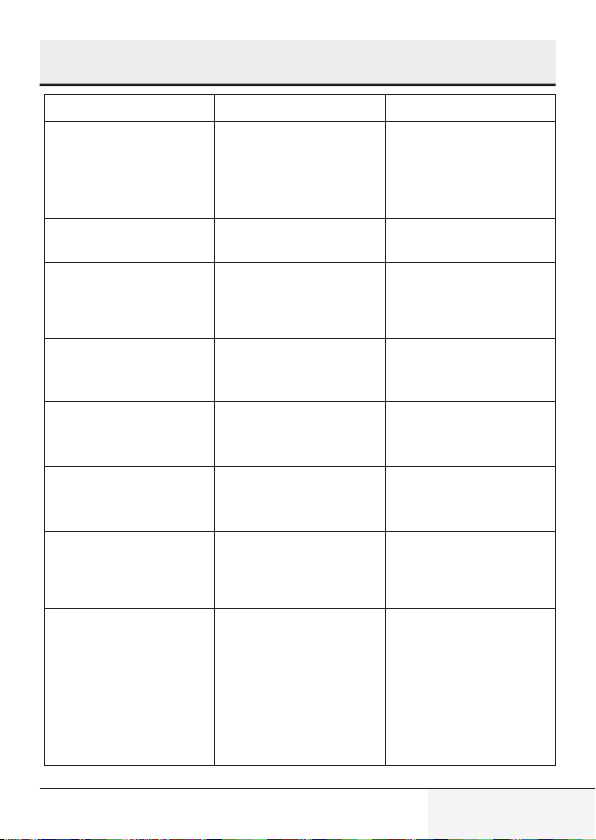
Problem Cause Solution
The applance does not work. The applance s not connected
to the mans.
- Plug n and press the swtch.
- Check the cable and the Plug
No or delayed response n
several trals of pressng on
functon key on the panel
- Applance s under an
electromagnetc nterference
- Drt over the panel
Unplug the applance. Restart
after few mnutes Clean the
panel wth the cloth provded
The coffee s not hot enough. - The cups have not been
preheated.
- The brewng unt s too cold.
Rnse the applance at least
3 tmes before makng the
coffee.
The coffee cannot come out
from spout.
Empty system functon maybe
used before.
Press the hot water button
untl water can come out from
spout.
The frst cup of coffee s poor
qualty.
The frst run of grnder does
not pour suffcent quantty
coffee power nto the brewng
unt.
Throw the coffee away. The
other coffees wll always be of
good qualty.
Coffee has no cream. - Coffee bean s not fresh. Change or usng approprate
brand of coffee bean.
6
Troubleshootng
35 / EN
Fully Automatc Coffee Machne / User Manual
6
Troubleshootng
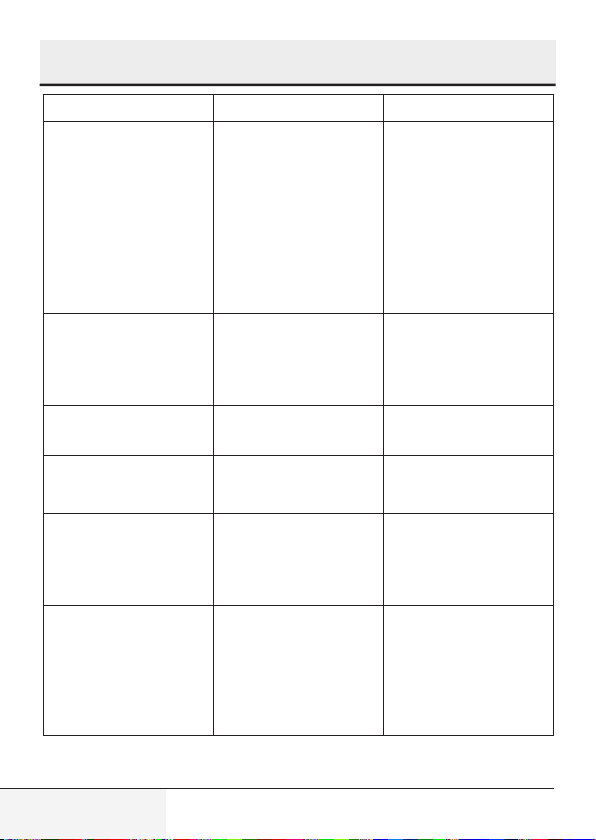
Problem Cause Solution
The touch buttons are not
senstve
Not pressng the touch button
from the front drecton of the
applance
Press the lower bottom part of
the con of the touch button
from the front drecton of the
applance.
The applance takes too long
tme to warm up.
Excessve scale has bult up. Descale the applance.
The water tank s removed /
the water level s very low n
the water tank but have no
alert.
The area near the water tank
connector s wet.
Wpe the water around the
water tank connector
Internal drp tray s flled wth a
lot of water.
Coffee powder too fne whch
block the water to come out.
Adjust the coffee fneness
to bgger dot durng grnder
operaton.
Coffee s delvered too slowly
or a drop at a tme.
Coffee powder too fne whch
block the water to come out.
Adjust the coffee fneness
to bgger dot durng grnder
operaton.
Lack of bean ndcator flashes
but there s stll a lot of coffee
bean nsde the contaner.
Internal coffee powder outlet
s blocked.
Follow the steps n Cleanng
the coffee powder outlet.
No mlk foam out from the
machne
The automatc mlk frother
s drty or not assembled or
nstalled correctly
Clean the automatc mlk
frother and make sure t
s correctly assembled or
nstalled.
No mlk foam out from the
machne
The hole of Mlk tube connector
s blocked by mlk resdues
Refer to secton “Daly Cleanng
of the applance” ,follow
“cleanng the mlk contaner
and connecton mlk tube”,
Clean the connector and
make sure all the hole on the
connector s clean, use needle
or brstle of brush to clean the
hole.
36 / EN
Fully Automatc Coffee Machne / User Manual
Problem Cause Solution
The hole of Mlk tube connector
s blocked by mlk resdues
whch hardly to be cleaned
The mlk tube connector not be
cleaned for a long tme
Soakng the connecton mlk
tube nto warm water for an
hour, follow the “cleanng the
mlk contaner and connecton
mlk tube” n secton “Daly
Cleanng of the applance”,
keep usng frothng mlk
functon to clean untl
water come from dspenser
smoothly. Use needle or brstle
of brush to clean the hole
The mlk froth s of poor qualty The type of mlk used s not
sutable for frothng
Dfferent types of mlk result n
dfferent amounts of froth and
dfferent forth qualtes. Sem-
skmmed or full-fat cow’s mlk
gves good results.
The temperature of the mlk s
too hgh
No mlk foam out from the
machne
Mlk spray out the table Mlk dspensng tube s not put
n place
Mlk foam spray out from
dspenser
Descalng ndcator keep
flashng even after the
descalng process
Decalng process s not
completed
Please be patent and wat
for the process fnsh. The
machne wll auto shut off
automatcally , don’t swtch off
the machne manually
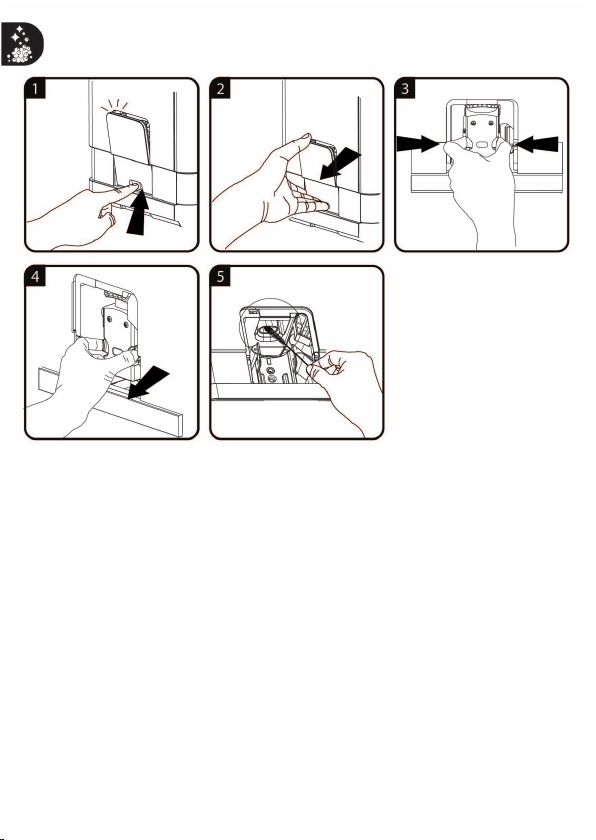
The applance no longer
performs the rnsng cycle
when swtched on or off.
Improper handlng when
servcng the applance may be
the cause.
1. When the applance s on,
remove the coffee group
access door.
2. Press and hold the on/off
button untl you hear 2 beeps.
3. Replace the coffee group
access door.
6
Troubleshootng

55 Blanck Street, Ormeau Q 4208
P O Box 354, Ormeau Q 4208
p : 5549 3146 f : 5549 3546
ABN : 49 152 055 162
Sensitivity: Public
ORIGINAL MANUFACTURER’S WARRANTY
ADVICE FORM
BEKO COFFEE MACHINE
24 months warranty, full parts and labour warranty only.
WARRANTY CONDITIONS
The following conditions apply only in relations to the warranty expressly given on this Warranty Advice Form supplied with the product. This
warranty only applies to appliances purchased and used in Australia or New Zealand and is in addition to (and does not exclude, restrict or
modify in any way) other rights and remedies under a law to which the appliances relate, including any non-excludable statutory guarantees in
Australia and New Zealand. It applies to the original purchaser and for appliances used in domestic applications only.
1. This warranty does not apply:
(a) if the identification number attached to the appliance has been altered, rendered illegible or removed;
(b) to light globes;
(c) to paint and vitreous enamel finishes and glass;
(d) to surfaces damaged by use of aerosols or cleaners;
(e) if the appliance has been –
(i) subject to misuse, abuse, negligence, accident, fire or floods;
(ii) connected or improper, inadequate or faulty electricity, gas, water or drainage services or intake or exhaust
ducts or flues, or operated using incorrect or contaminated fuels or lubricants;
(iii) installed, maintained or operated otherwise than in accordance with the instructions furnished by Beko including the
improper use of detergents, bleaches, cleaners or other additives;
(iv) damaged by foreign objects in the appliance;
(v) serviced, repaired or altered otherwise than by Beko authorised service agents of Beko, or using other than Beko
approved replacement parts.
2. The purchaser shall be responsible for any expenses involved in making the appliances readily accessible for servicing, the purchaser
shall be responsible for any costs of transporting the appliance or parts thereof to and from the nearest Beko authorised service agent.
3. This warranty is the only expressed warranty given by Beko.
4. Beko reserves the right to determine whether or not the fault is caused by faulty workmanship or material or that any part is defective.
5. Where permitted by law, this warranty shall not apply to loss suffered through or resulting from the non-operation or the ineffective
operation of the appliance or any part of the appliance.
6. The purchaser must produce proof of the date of purchase together with this Warranty Advise Form when making a claim.
7. Subject to your statutory rights as to the merchantable quality of the product or accessory. In the event of a product or accessory being
replaced during the guarantee, the guarantee on the replacement will expire at the original date, i.e., 24 months from the original
purchase date.
8. Australia: For Appliances and services provided by Beko in Australia, Beko goods come with a guarantee by Beko that cannot be
excluded under the Australian Consumer Law. You are entitled to a replacement or refund for a major failure and for compensation for
any other reasonably foreseeable loss or damage. You are also entitled to have the Appliance repaired or replaced if the Appliance
fails to be of acceptable quality and the failure does not amount to a major failure. ‘Acceptable quality’ and ‘major failure’ have the
same meaning as referred to in the Australian Consumer Law.
9. New Zealand: For Appliances and services provided by Beko in New Zealand, the Appliances come with a guarantee by Beko
pursuant to the provisions of the Consumer Guarantees Act, the Sales of Goods Act and the Fair Trading Act. Where the Appliance
was purchased in New Zealand for commercial purposes the Consumer Guarantee Act does not apply.
These Warranty Conditions supersedes and excludes all other representations, conditions and warranties, except those implied
by legislation previously referred to.
For Service or Spare Parts: Aust 1300 282 356 NZ 0800 692 356

Arçelk A.Ş.
Karaağaç Cad. No: 2-6 Sütlüce,
34445, İstanbul, Türkye
www.beko.com.au