
01M-8919263200-1525-02
CEG 7302 B
Fully Automatic
Espresso Machine
User Manual
EN

CONTENTS
ENGLISH 3-37

Please read this user manual first!
Dear Customer,
Thank you for selecting this Beko product. We hope that you get
the best results from your product, which has been manufactured
to a high quality with state-of-the-art technology. Please read
this entire user manual and all other accompanying documents
carefully before using the product and keep them as a reference
for future use. If you pass on the product to someone else, please
give them the user manual as well. Please take into consideration
all warnings and information in the user manual.
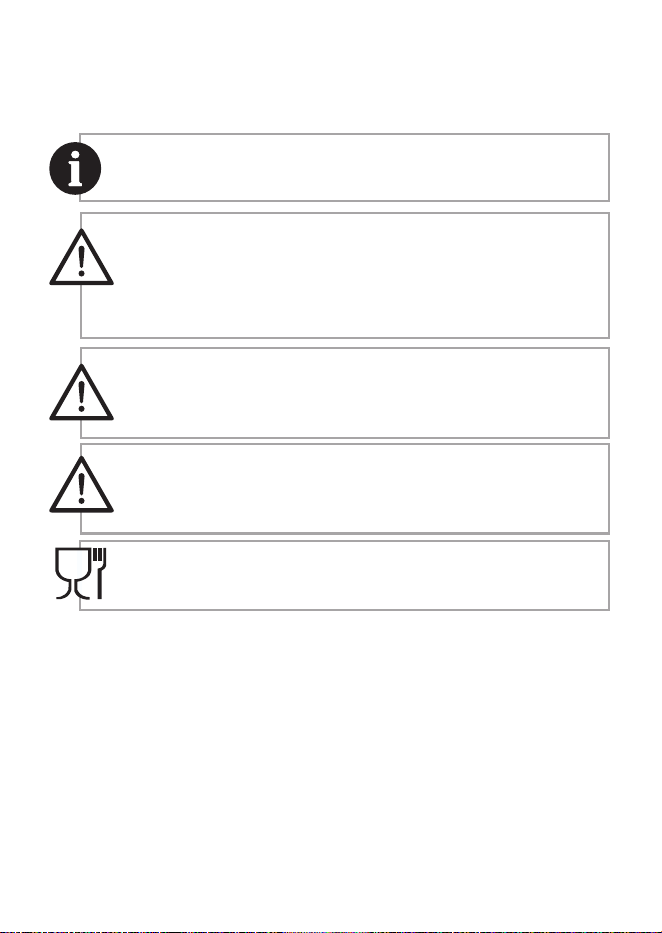
Explanation of symbols
The following symbols are used in the various section of this manual:
Important information or useful hints about usage.
DANGER: This warning for dangerous
situations with regard to life and
property.
WARNING: This warning indicates
potentially dangerous
situations.
CAUTION: This warning indicates the
potential for material damage.
Materials are suitable for food contact

1 Important instructions for safety
and environment
5 / EN
Fully Automatic Coffee Machine / User Manual
This section includes the safety instructions
that will help provide protection against risks of
personal injury and material loss. Failure to follow
these instructions invalidates any warranty.
1.1 Danger of electric current
Danger to life due to electric current!
Contact with live wires or components could lead
to serious injury or even death!
Observe the following safety precautions to avoid
electric shocks:
• Do not use the product if the power cable or
the appliance itself is damaged. Contact the
authorised service.
• Do not open the housing of the coffee
machine. There is a risk of electric shock if live
connections are touched and/or the electrical
and mechanical configuration is changed.
• Before cleaning the bean container, unplug the
appliance from the mains socket. Danger from
the coffee grinder rotating!

1 Important instructions for safety
and environment
6 / EN
Fully Automatic Coffee Machine / User Manual
1.2 Danger of burning or scalding
Parts of the coffee machine can become very hot
during operation! Dispensed drinks and escaping
steam are very hot!
Observe the following safety precautions to avoid
burning/scalding yourself and/or others:
• Do not touch either of the metal sleeves on both
coffee spouts.
• Avoid direct contact of the skin with steam
escaping the machine or hot rinsing, cleaning
or descaling water.
1.3 Basic safety precautions
Observe the following safety precautions to
ensure safe handling of the coffee machine:
• Never play with packaging ma terial. There is a
risk of suffocation. Keep all packaging materials
away from children.
• Inspect the coffee machine for visible signs
of damage before use. Do not use a damaged

1 Important instructions for safety
and environment
7 / EN
Fully Automatic Coffee Machine / User Manual
coffee machine. Contact the authorised service.
• If the connecting cable is damaged, it should only
be replaced by a service agent recommended
by the manufacturer in order to prevent any
danger! Please contact the manufacturer or
their customer service.
• Repairs to the coffee machine must only be
carried out by an authorised specialist or
customer service representative. Repairs by
unauthorized persons can lead to considerable
danger for the user. These actions will also void
the warranty.
• Repairs to the coffee machine during the
warranty period may only be carried out by
service centres authorised by the manufacturer,
otherwise the warranty will become void in the
event of subsequent damage.
• Defective parts may only be replaced with
original spare parts. Only original spare parts
guarantee that the safety requirements are met.

1 Important instructions for safety
and environment
8 / EN
Fully Automatic Coffee Machine / User Manual
• This appliance can be used by children over
the age of 8 as well as by persons with reduced
physical, sensory or mental abilities or those
lacking experience and/or knowledge provided
that these persons are supervised or have been
instructed as to how to use the appliance in
a safe way and have understood the hazards
that could arise from using it. Children must
not play with the appliance. Cleaning and user
maintenance shall not be carried out by children
unless they are over the age of 8 and supervised.
• This appliance is intended to be used in
household and similar applications such as:
- staff kitchen areas in shops, offices and other
working environments,
- farm houses,
- by customers in hotels, motels and other
residential type environments,
- bed and breakfast type environments.

1 Important instructions for safety
and environment
9 / EN
Fully Automatic Coffee Machine / User Manual
• Protect the coffee machine against the effects
of weather such as rain, frost and direct sunlight.
Do not use the coffee machine outdoors.
• Never immerse the coffee machine itself, the
mains cable or the mains plug in water or other
liquids.
• Do not clean the coffee machine or accessories
in a dishwasher.
• Do not pour any liquids other than water or
place foodstuffs into the water tank.
• Do not fill the water tank beyond the maximum
mark.
• Only operate the machine when the waste
container, drip tray and the cup tray are fitted.
• Do not pull the cable to remove the plug from
the mains socket or touch with wet hands.
• Do not hold the coffee machine by the mains
cable.
• Keep the appliance and its cord out of reach of

1 Important instructions for safety
and environment
10 / EN
Fully Automatic Coffee Machine / User Manual
children aged 8 or under.
• The appliance can only be used to prepare
coffee.
• Children should be super vised to ensure that
they do not play with the appliance.
• Unplug the appliance before each clean and
when the appliance is not in use.
• Place the appliance in a way that the plug is
always accessible.
• Always use the appliance on a stable, flat, clean,
dry and non-slip surface.
• The appliance is not an integrated coffee
machine and is not designed use inside a
cabinet. The coffee maker shall not be place in
a cabinet while in use.
• Do not squeeze or bend the power cord and do
not rub it on sharp edges in order to prevent any
damage to the power cord. Keep the power cord
away from hot surfaces and naked flames.

1 Important instructions for safety
and environment
11 / EN
Fully Automatic Coffee Machine / User Manual
• Ensure that the mains power supply complies
with the information supplied on the rating plate
of the appliance.
• Use the appliance only with a grounded socket.
• Do not use the appliance with an extension cord.
• Do not touch the appliance or its plug with wet
or damp hands when the appliance is plugged
in.
• -CAUTION: In order to avoid a hazard due to
inadvertent resetting of the thermal cut-out,
this appliance must not be supplied through an
external switching device, such as a timer, or
connected to a circuit that is regularly switched
on and off by the utility.
-Warning: avoid spillage on the connector.
-Do not misuse the appliance to avoid potential
injury.
• And removed below one because this product is
detachable power cord.

1 Important instructions for safety
and environment
12 / EN
Fully Automatic Coffee Machine / User Manual
- If the supply cord is damaged, it must be
replaced by the manufacturer or its agent or
similarly qualified person in order to avoid hazard.
1.4 Intended use
The Beko fully automatic coffee machine is intended for use in homes and
similar applications, such as in staff kitchens, shops, offices and similar
areas or by customers in bed & breakfast, hotels, motels and other living
accommodation. This coffee machine is not intended for commercial use.
The machine is only intended for preparing coffee and heating milk and
water. Any other use other than previously stated is considered as improper
use.
Danger resulting from improper use!
If the coffee machine is not used for its intended purpose, it may become a
source of danger.
A
Consequently, the coffee machine must only be used for its
intended purpose.
A
Follow the procedures described in this user manual.
No claims of any kind will be accepted for damage or injury resulting from
the use of the coffee machine for purposes other than its intended use.
The risk must have been borne solely by the machine owner.

1 Important instructions for safety
and environment
13 / EN
Fully Automatic Coffee Machine / User Manual
1.5 Limitation of liability
All technical information, data and instructions on installation, operation and
maintenance of the coffee machine contained in these operating instructions
represent the current status at the time of printing and are based on the best
possible knowledge gained by experience and knowhow.
No claims/demands can be inferred from the information, illustrations and
explanations in this user manual.
The manufacturer assumes no liability for damage or injury resulting from
failure to observe the user manual, use of the product for purposes other
than the intended use, unprofessional repairs, unauthorised modifications
or use of non-approved spare parts.

1 Important instructions for safety
and environment
14 / EN
Fully Automatic Coffee Machine / User Manual
1.6 Compliance with the WEEE Directive and
Disposing of the Waste Product:
This product complies with EU WEEE Directive (2012/19/EU). This product
bears a classification symbol for waste electrical and electronic equipment
(WEEE).
This symbol indicates that this product shall not be disposed with
other household waste at the end of its service life. The used
device must be returned to an offical collection point for the
recycling of electrical and electronic devices. To find these
collection points, please contact your local authority or retailer
where the product was purchased. Each household performs an important
role in the restoring and recycling of old appliances. The appropriate disposal
of used appliance helps prevent potential negative consequences for the
environment and human health.
1.7 Compliance with RoHS Directive
The product you have purchased complies with EU RoHS Directive (2011/65/
EU). It does not contain harmful and prohibited materials specified in the
Directive.
1.8 Package information
The packaging materials of the product were manufactured from
recyclable materials in accordance with our National Environment
Regulations. Do not dispose of the packaging materials together
with domestic or other waste. Take them to the packaging
materials collection points designated by local authorities.
15 / EN
Fully Automatic Coffee Machine / User Manual
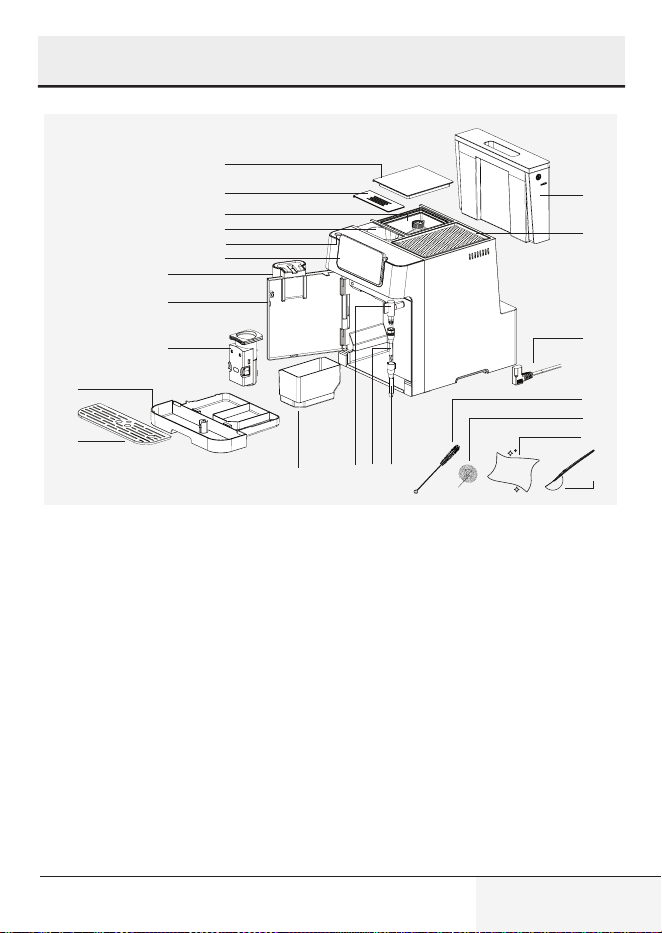
1. Coffee Bean Container Cover
2. Pre-ground Coffee Container Cover
3. Coffee Bean Container
4. Pre-ground Coffee Container
5. Power On/Off Button
6. Digital Control Panel
7. Adjustable Coffee Spout
8. Front Cover
9. Brewing Unit
10. Drip Tray
11. Cup Tray
1
3
2
4
6
7
8
9
11
10
5
13 14 15
17
18
16
19
20
21
22
12
12. Coffee Ground (Residual) Container
13. Steam Nozzle
14. Nozzle Cover
15. Metal Tube
16. Power Cord
17. Cup Holder
18. Water Tank
19. Cleaning Brush
20. Cleaning Needle
21. Cleaning Cloth
22. Pre-ground Coffee Spoon
2 Your Fully Automatic Coffee Machine

16 / EN
Fully Automatic Coffee Machine / User Manual
Technical data
Power supply:
220-240 V~, 50-60 Hz
Power:
1350 W
The right to make technical and
design changes is reserved.
All declared values on the product
and on the printed leaflets
were obtained from laboratory
measurements performed
according to the relevant standards.
These values may differ depending
on usage and ambient conditions.
2 Your Fully Automatic Coffee Machine
Product Dimensions:
27,5 cm (Width) x 35,9 cm (Height) x
41,2 cm (Depth)
Weight: 9.68±0.5kg
Cable Length: 95±5 cm
Ground Coffee Weight (Bean Mode)
Standard: 8±2g
Intense: 10±2g
Drip Tray Capacity: Up to 0.6 L
Coffee Ground (residual) Container
Capacity: Up to 10 cups
Water Tank Capacity: 2.0±5%L
Coffee Bean Container Capacity:
250±5%g
Machine Pre-heating time: <50s
Volume of coffee (Default settings):
Espresso: 30±10ml
Double: 60±10ml
Americano: 150±20ml
Ristretto: 20±5ml
Lungo: 60±10ml
17 / EN
Fully Automatic Coffee Machine / User Manual
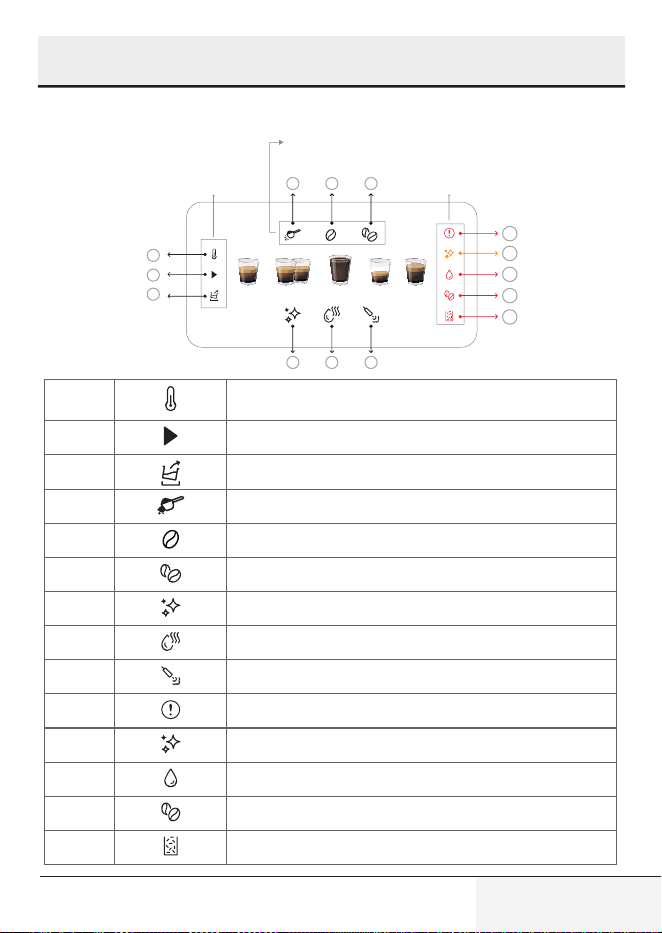
DoubleEspresso LungoRistrettoAmericano
1
2
3
10
11
12
13
14
4 5 6
7 8 9
1
Lit During Pre-Heating
2
Lit During Ongoing Procces
3
Water Emptying Indicator
4
Used for selecting "Ground Coffee" option.
5
Used for selecting "Standard Bean Coffee" option.
6
Used for selecting "Intense Bean Coffee" option.
7
Used for initiating cleaning and descaling functions.
8
Used for receiving hot water from steam nozzle.
9
Used for steam nozzle function.
10
General Error
11
Descale Warning
12
No Water Error
13
No Coffee Bean Error
14
Residual Container Full Error
3.1 Control Panel
Indicator
LEDs
Error / Warning
LEDs
Coffee Prefence Buttons
3 Display
18 / EN
Fully Automatic Coffee Machine / User Manual
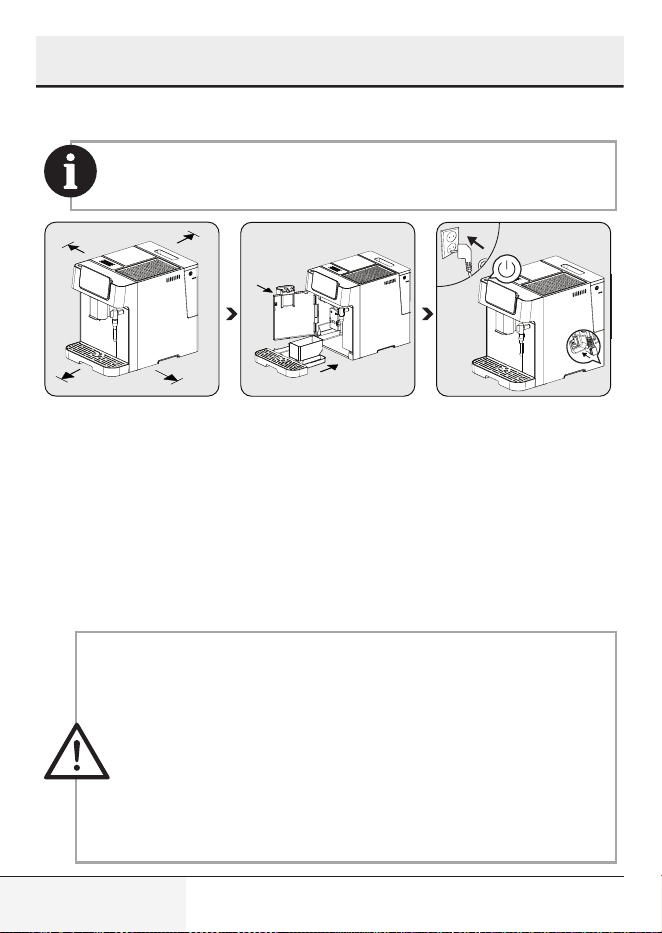
4.1 Installation
Remove any protective films, stickers and any other packaging
material from the appliance.
150mm
150mm
150mm
.
150mm
2
1
3
1
2
Choose a safe and stable
surface with an easily reac-
hable power supply and al-
low the minimum distance
from the sides of the mac-
hines.
Insert the drip tray. Make
sure it is inserted correctly
and close the front cover.
Unwind and straighten the
power cord and insert the
plug into the socket located
under the machine. Insert the
other end of the power cord
into a wall socket with the
suitable power voltage. Press
the on/off button to turn on
the machine.
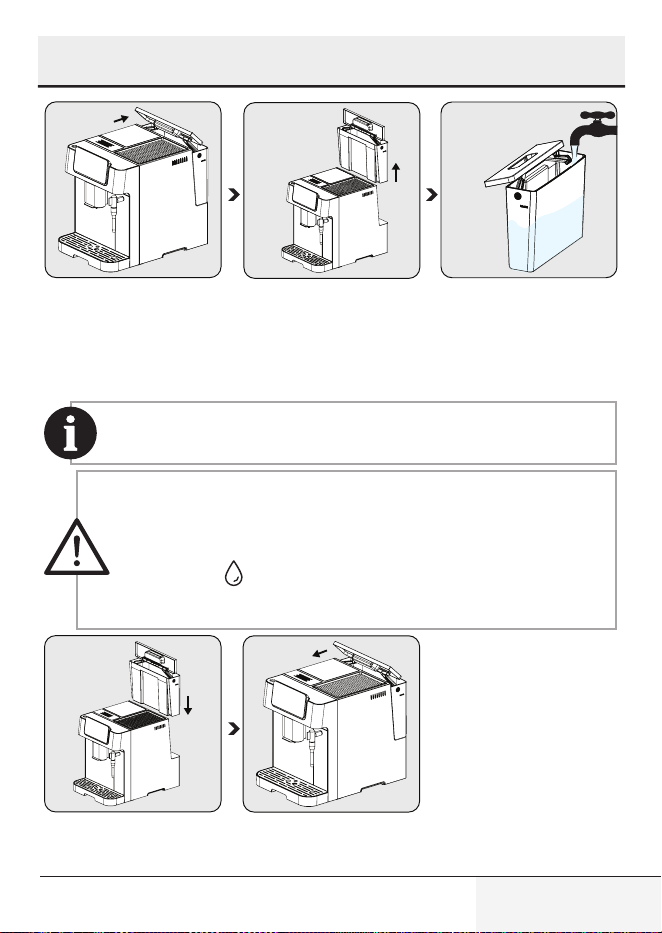
4.2 Filling the water tank
About the protect program: If the water tank is not fully placed
into the machine, a protection mode will be activated 15
seconds into the brewing process. The hot water button will
light up on the control panel.
1. Make sure that the water tank is fully inserted into the
machine.
2. Press the hot water button. After the hot water is dispensed,
the machine will be in idle.
4 Preparation
19 / EN
Fully Automatic Coffee Machine / User Manual
Lift the water tank by using
the lid as the handle.
Take the water tank out. Rinse the water tank with
fresh water and then fill the
tank to the Max level and pla-
ce it back into the machine.
Make sure it is fully inserted.
To prevent water overflowing from the water tank, do not add
water directly into the appliance from another container.
• Never fill the water tank with warm or hot water, sparkling
water or any other liquid that might damage the water tank
and the machine.
• When " " is lit, the water tank is at a low water level and
requires filling.
.
Place the water tank back in
by using the lid as the handle.
Close the water tank by using
the lid.
4 Preparation
20 / EN
Fully Automatic Coffee Machine / User Manual
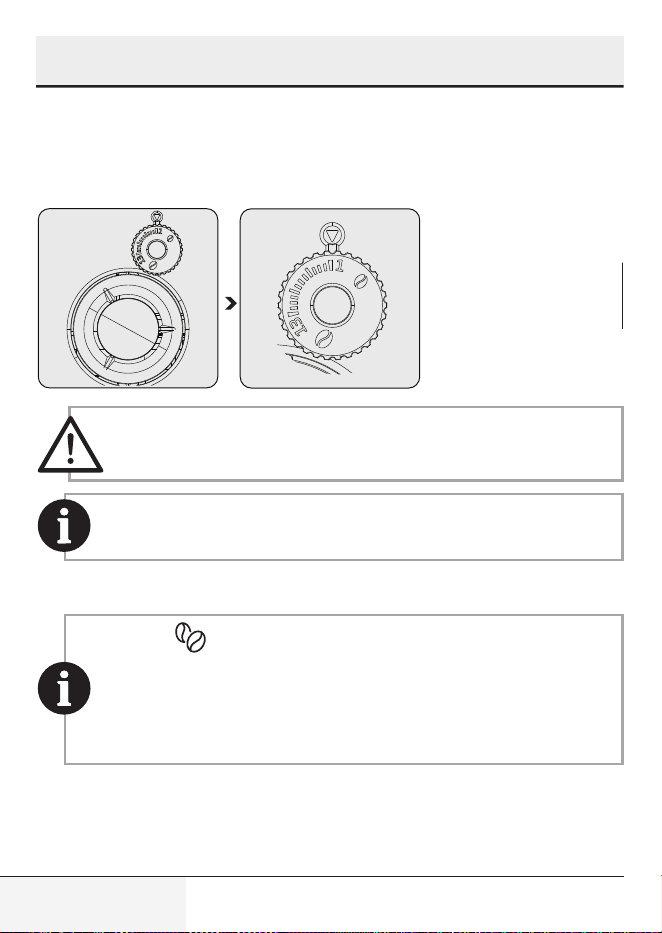
5.1 Grinding Adjustment
You can adjust the grinding coarseness by turning the adjustment knob on
the bean container:
Never do the grinding adjustment when the grinder is not
operating. It may damage the grinder.
The lines on the adjustment knob indicate the coarseness of the
grind. Bigger number means coarser grind level.
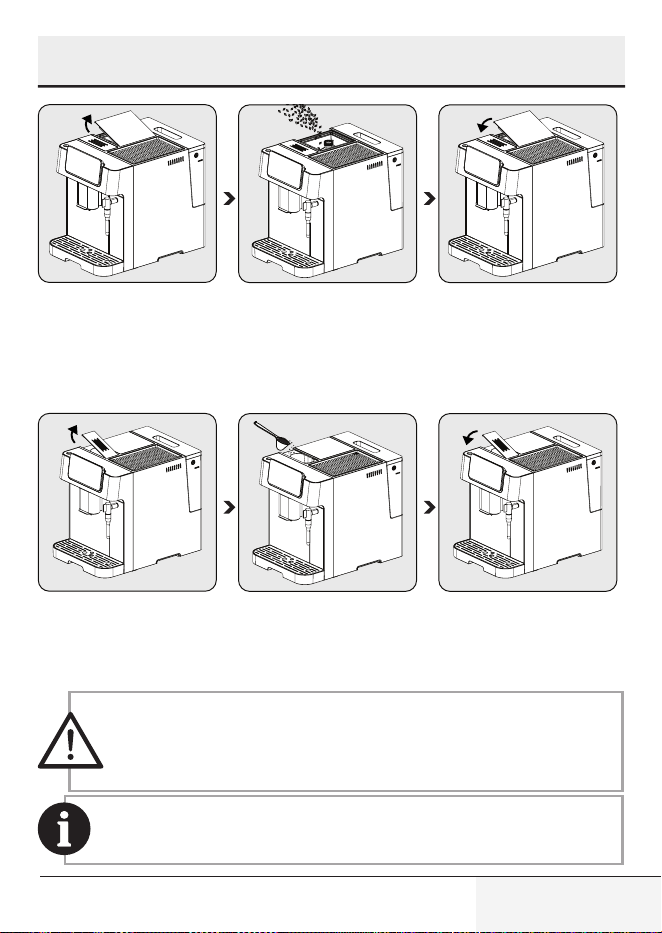
5.2 Filling the bean containers
• When " " is flashing, the appliance needs to be filled with
coffee beans.
• Storing bean in its original vacuum pack is better to ensure
longer lasting freshness. Do not use the coffee bean container
for storage purposes for better results.
5 Operation
21 / EN
Fully Automatic Coffee Machine / User Manual
Remove the bean contai-
ner lid.
Slowly pour in the coffee be-
ans.
Place the container lid back
on.
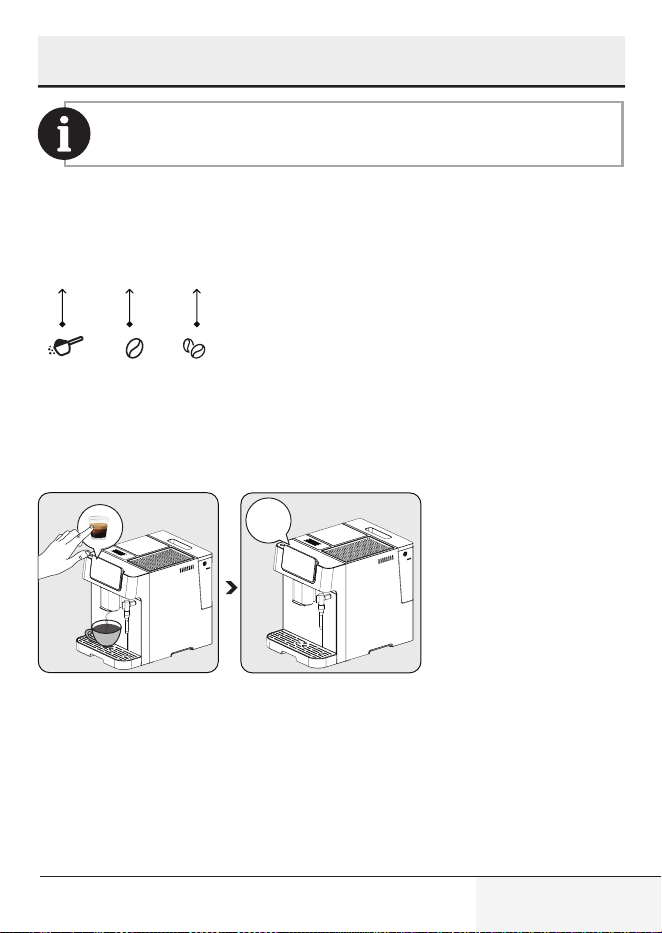
5.3 Using the pre-ground coffee container
Remove the pre-ground cof-
fee container lid.
Slowly put the pre-ground
coffee in the pre-ground cof-
fee container.
Place the container lid back
on.
Pre-ground coffee container is not a storage unit, it offers a one-
time usage (max 12g). Measurement spoon accessory can be
used for suggested amount of ground coffee.
Ground coffee button should be pressed and selected from the
screen in order to activate this setting.
5 Operation
22 / EN
Fully Automatic Coffee Machine / User Manual
5.4 Using the Cup Warmer
Cups should be placed upside
down to ensure internal sur-
face is kept warm and clean
(This function uses the inter-
nal heat of the machine).
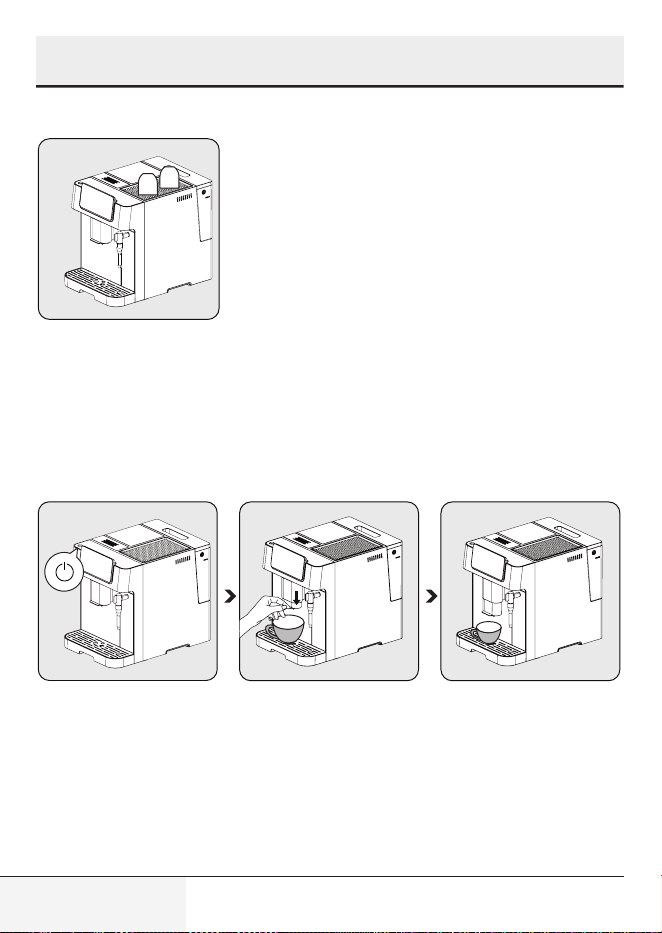
5.5 Preparing Your Coffee
Switch on the appliance by
pressing the power on/off
button. The appliance turns
on, starts pre-heating and au-
to-cleaning. It is ready for use
in idle mode in which all icons
are lit.
Place a cup under the cof-
fee spout and adjust the he-
ight of the spout according
to the cup.
Select your coffee by pres-
sing button and the cup ligh-
ter will turn on indicating that
the appliance is preparing a
cup of coffee. When the app-
liance returns to idle, the cof-
fee is ready to serve.
5 Operation
23 / EN
Fully Automatic Coffee Machine / User Manual
Press the espresso, americano, ristretto or lungo button depending
on your preference.
5.6 Adjusting The Strength of Your Coffee
If bean coffee is being used press the "standart
bean" or "intense bean" button to adjust the
strength of your beverage. If ground coffee is
being used, press the "ground coffee" option.
5.7 Adjusting The Volume of Your Coffee / Hot Water
You can save the volume of your desired coffee for all beverages types as
well as hot water from 25ml to 250ml. (x2 for double)
2x
beep!
While making your coffee
(espresso, doppio, americano,
ristretto or lungo), press and
hold the button of the coffee
you have selected. The app-
liance will continue to make
the cup of coffee for as long
as you hold down the button.
When the volume of coffee
meets your desired volume,
release the button. If you hear
two beeps, that indicates the
machine has saved this volu-
me of coffee.
5 Operation
Ground
Coffee
Standard
Bean
Coffee
Intense
Bean
Coffee
24 / EN
Fully Automatic Coffee Machine / User Manual
Water adjustment can be made during ongoing coffee preparation
(after grinding is completed).
To reset all
beverages to
default/factory
settings;
In order to reset to the
default settings of all
beverage and hot water
volume selection saved to
memory;
• Press power on/off
button and bean button all
together for 3 seconds.
To reset single beverage to default/factory settings;
In order to reset to the default settings of any coffee or hot water volume
individually;
• Press power on/off button and beverage button (which is desired to be
reset) all together for 3 seconds.
5.8 Preparing Frothy Milk for Coffee
As the temperature of steam is higher than the temperature of
espresso, the espresso should be prepared before making frothy
milk. Otherwise, the espresso may burn.
5 Operation
25 / EN
Fully Automatic Coffee Machine / User Manual
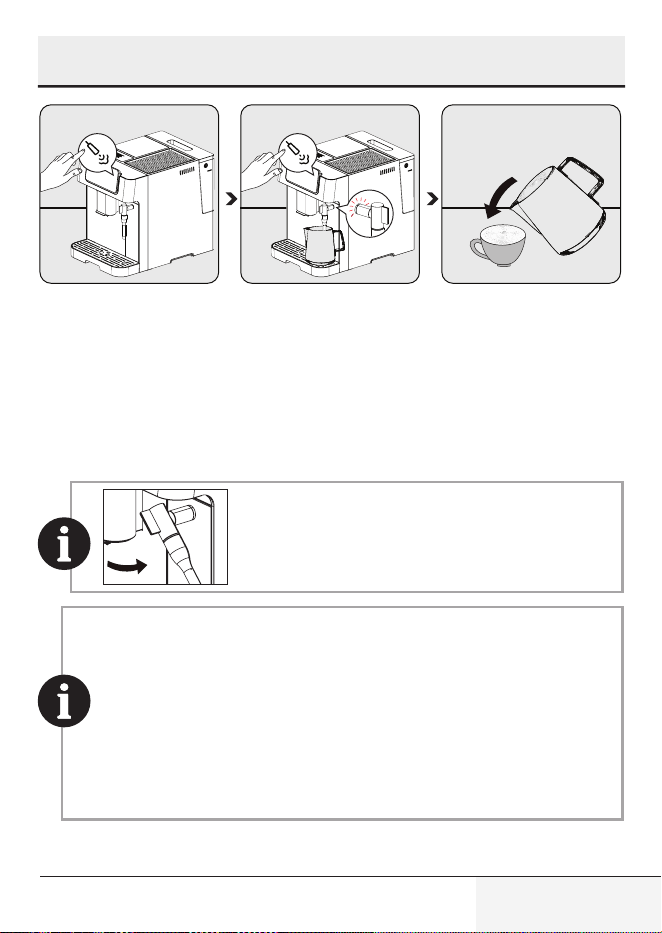
2
1
Press steam nozzle icon and
wait for steam nozzle to be
ready. While steam nozzle
is pre-heating, the indicator
lights will flash.
When the indicator lights
are still, steam nozzle is re-
ady for use. Place a milk fil-
led cup or pitcher under the
steam nozzle. Press the ste-
am nozzle button again for
starting the milk frothing, and
stop by pressing again.
Pour the hot frothy milk onto
the espresso. You can now
enjoy your coffee!
• After using the steam nozzle, please clean the nozzle of milk
residue by wiping the nozzle with the wet cloth.
• It is recommended to remove any milk residue that may
accumulate on the tip of the nozzle by activating the hot water
function from the nozzle.
• After steam nozzle is ready, if steam nozzle is not used for a
certain amount of time; the screen will revert back to idle stage.
5 Operation
Steam nozzle can be rotated towards the right
for easier handling purposes.
26 / EN
Fully Automatic Coffee Machine / User Manual
• Steam nozzle outlet projection should be over drip tray to
prevent water/milk spillage.
• Considering the milk frothing inside the cup/pitcher, do not
fill it entirely.
• Be aware that the cup/pitcher can get hot during milk
frothing.
• Do not pull away the cup/pitcher without stopping the
frothing process.
5.9 Hot Water
The appliance can dispense hot water by simply pressing the hot water
button " " . Press again to stop.
This function can be used to heat up the cup before coffee
preparation. First fill the cup with hot water, then pour away the
water and use this cup for preparing coffee.
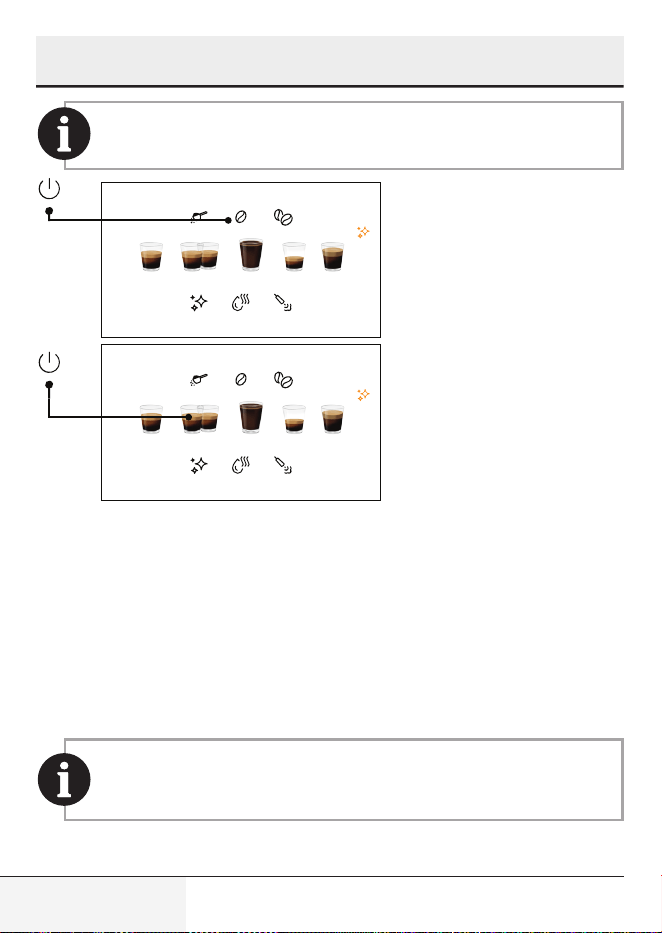
5.10 Mode Selection
The machine has three different settings: the default setting, ECO mode and
speed mode. In ECO mode, the appliance saves more energy. In speed mode,
the user can make their coffee faster than when in the default settings.
ECO Mode Speed Mode Default Settings
Cup Lighter & Steam Noz-
zle Indicator Lights
Off On On
Pre-brewing* Yes No Yes
Auto-shut off time 10mins 30mins 20mins
5 Operation

27 / EN
Fully Automatic Coffee Machine / User Manual
The pre-brewing function moistens the coffee inside the brewing
unit with a small amount of water before full extraction. This
expands the coffee grounds to build up greater pressure in the
brewer, which helps extract all the oils and bring out the full flavour
of the beans.
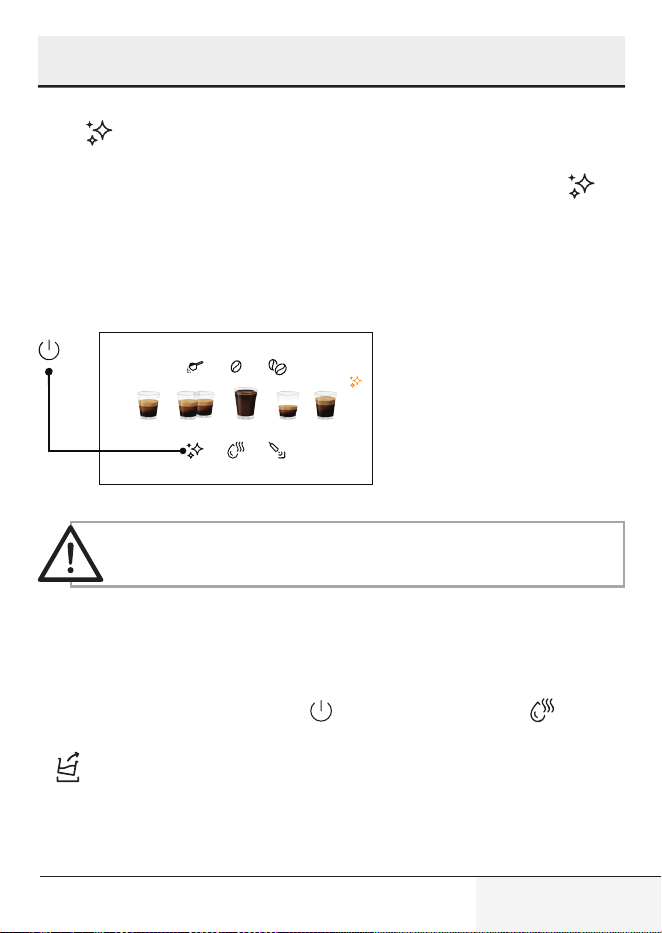
1. When the machine is on idle, press and hold the for 5 seconds.
1. The will then flash and the following buttons will will light up to
indicate different settings:
In ECO Mode
In Speed Mode
In Default Settings
2. Press the "Powder Coffee Button" for ECO mode, the "Standart Bean
Coffee Button" for Speed Mode and the "Intense Bean Coffee Button" for
Default settings. You’ll hear two beeps when the mode has been selected.
3. If you would like the setting to remain unchanged, press again or wait
for 5 seconds for the machine to return to idle mode.
5.11 Cancelling
On-off button should be pressed once to cancel any
running process. Additionally, pressing over a selected
beverage once again after preparation started will also
cancel the operation.
Pressing the on/off button 2 times will force-shut down the
device.
5 Operation

28 / EN
Fully Automatic Coffee Machine / User Manual
6.1 Cleaning the appliance
1. Disconnect the power cord from the mains supply outlet.
2. Pour away all the water/coffee residual inside the drip tray and coffee
residual container.
3. Use a damp cloth or non-scratching cleaning agent to clean the liquid
stains on the appliance.
Never use any abrasive, vinegar or descaling agents not included
in the box to clean the appliance.
Timely cleaning and maintenance of the appliance is highly important in
prolonging its life.
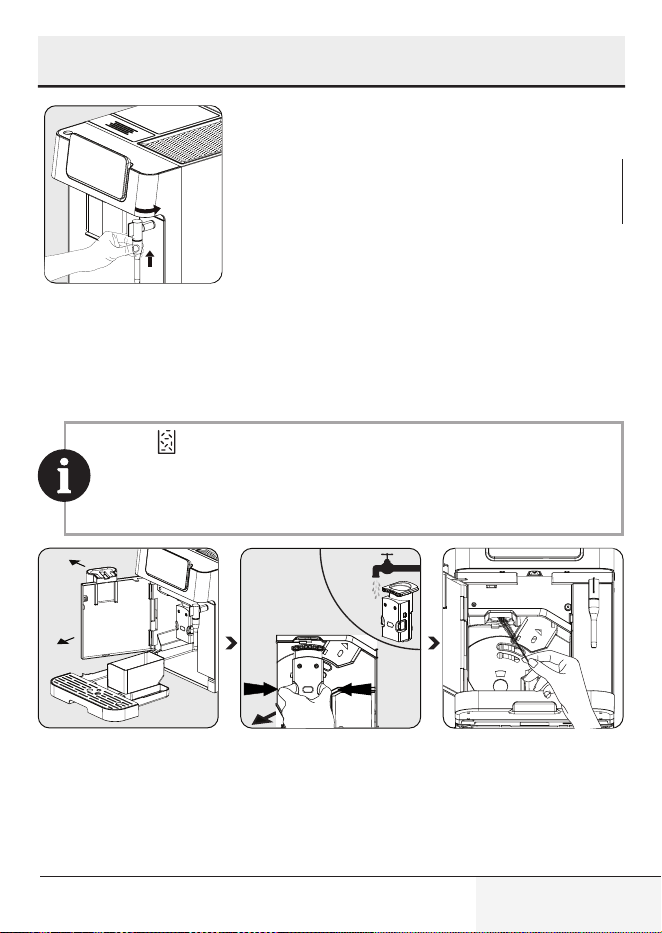
1
2
Open the front cover. Remo-
ve the drip tray and the cof-
fee residual container.
Remove the metal tube by
pulling it down. Then remo-
ve the nozzle cover by tur-
ning it to the left to disas-
semble the nozzle cover and
metal tube.
Empty the coffee residual con-
tainer and the drip tray. Wash
the metal tube with warm run-
ning water and use the need-
le or the bristles of the brush
to clean the hole. Wash the
nozzle cover with warm run-
ning water and use the need-
le or the bristles of the brush
to clean the hole. Dry them af-
terwards.
6 Cleaning
29 / EN
Fully Automatic Coffee Machine / User Manual
2
1
Attach the metal tube back to
the nozzle cover. Then push it
upward to put the nozzle cover
back in its place and turn it to
the right to lock it.
When lights up, the coffee residual container needs to be
emptied. This icon will light up after every 10 coffee brews. Clean
the container to fix the error. If the container is clean, remove the
container and put it back in its place.
Hold the adjustable coffee
spout and pull back slowly to
open the front cover.
Remove the brewing unit.
Wash with water and dry af-
terwards.
Clean the coffee outlet line
with brush.
6 Cleaning
30 / EN
Fully Automatic Coffee Machine / User Manual
• The drip tray should be emptied when the floating indicator
is visible.
• Powder coffee funnel should be cleaned after each use with
the cleaning brush.
When lights up, it indicates that the brewing unit is missing /
incorrectly installed.
When is flashing, it indicates that the front cover is not closed.
6.2 Descaling Function
• Descale is required after predefined brewing cycle.
• Do not use vinegar or other cleaning agents for the self-
cleaning of this appliance. Other cleaning agents may damage
the appliance.
• Keep the skin/body away from hot water.
When lights up, it indicates that the appliance needs to undergo
descaling. The appliance will remain in the best condition if this function
is performed at least once a month or more regularly depending on the
hardness of water used.
To start descaling:
1. Fill the water tank until "Descaling Level ".
2. Add one pack of cleaning agent included in the box to the water tank.
3. Place a sufficiently large container under the coffee spout and nozzle.
4. When on idle, press and hold for 3 seconds. You'll hear a beep and
the will flash until water tank is empty.
6 Cleaning
31 / EN
Fully Automatic Coffee Machine / User Manual
5. Fill the water tank once again until "descale level" with water, and press
the button once again to start the second cycle of descaling. If the
water tank is removed and placed back, the appliance will detect this
action and automatically start the second cycle (without pressing
again).
6. Once the water tank is emptied, the screen will go back to idle condition.
Descaling is completed. Fill the water tank with fresh water to start
preparing coffee.
To reset descale
warning status;
In order to reset descale
warning status;
• Press power on/off
button and descale button all
together for 3 seconds.
Resetting descaling warning status is not suggested for
maintaining the best condition of the appliance.
6.3 Empty System Function
Use the empty system function before a long period of non-use and for frost
protection.
1. When on idle, press and hold the and the hot water button together
for 3 seconds.
2. will then light up.
3. Remove the water tank from the appliance, process will start automatically.
4. When the empty system function is completed, the appliance will switch
off automatically.
6 Cleaning
32 / EN
Fully Automatic Coffee Machine / User Manual
When the appliance is reused again for the first time after empty
system function is used; press the hot water button until water
comes out of the spout.
6.4 Manual Cleaning / Rinsing Function
You can manually clean / rinse the coffee nozzle before or after use. When
in idle, press once.
• After cleaning / rinsing, the appliance will return to idle.
• The water that comes out of the coffee nozzle is hot and
is collected in the drip tray underneath. Avoid contact as it
splashes around.
• If the appliance has not been used for a long period of time,
this function is suggested to be used.
Using this function before coffee preparation will also ensure
hotter coffee.
Deactivating the auto-clean mode
Your appliance cleans itself automatically before and after each brewing
operation. You may follow the steps below to deactivate the auto-clean
mode.
• Turn on the appliance by pressing the power on/off button and wait until
it goes into idle mode.
• Open the front cover.
• Press the power on/off button for 5 seconds and a beep will sound.
• Close the front cover.
• The auto-clean operation has been cancelled.
6 Cleaning

33 / EN
Fully Automatic Coffee Machine / User Manual
We recommend that you use the auto-clean mode actively for
healthy use.
To cancel auto-clean for once;
Press on/off button while machine is turning on or off to bypass this
function.
6 Cleaning
34 / EN
Fully Automatic Coffee Machine / User Manual
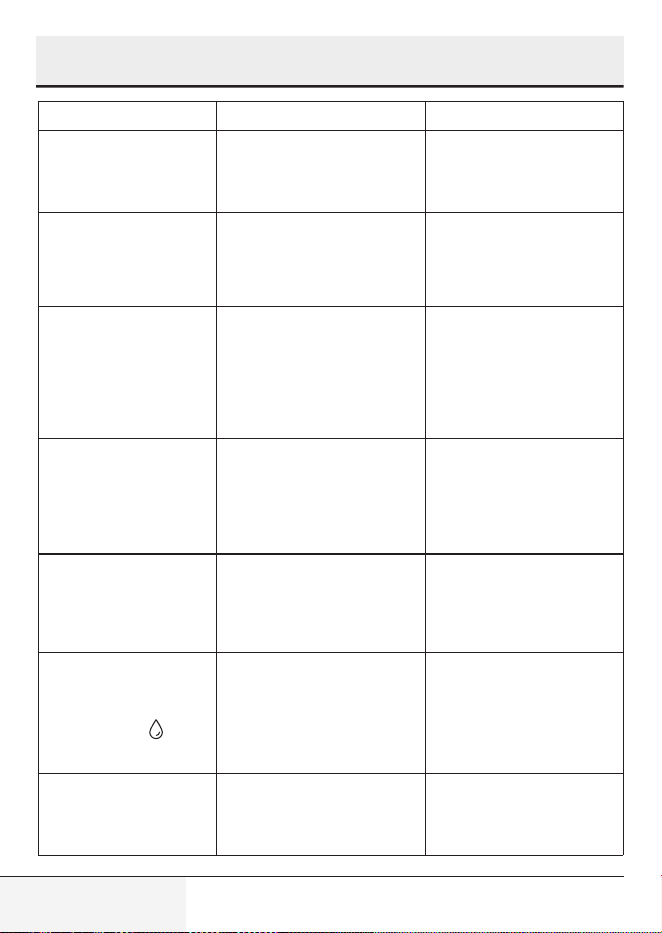
Problem Cause Solution
The appliance does not
work.
The appliance is not connected
to the mains.
Plug in and press the switch.
Check the cable and the plug.
No or delayed response
in several attempts of
pressing a function key
on the panel
Appliance is under electro-
magnetic interference. The
panel is dirty.
Unplug the appliance. Re-
start after a few minutes
Clean the panel with the
cloth provided.
The coffee is not hot
enough.
The cups have not been pre-
heated.
The brewing unit is too cold.
Place your cup on the cup
warmer facing down or rinse
the cup with hot water.
Make sure that the water
in the water tank is not too
cold.
Coffee is not coming out
of the coffee spout.
The empty system function may
have been used previously.
The coffee spout may not have
been cleaned and is blocked by
coffee residues.
Press the hot water button
until water comes out of the
spout.
Clean the coffee spout.
The first cup of coffee is
of poor quality.
The first running of the grinder
does not place a sufficient
quantity of coffee into the
brewing unit.
Throw the coffee away. The
next cups
will be better.
The water tank is re-
moved / the water level is
very low in the water tank
but there is no " " alert.
The area near the water tank
connector could be wet.
Wipe off the water around
the water tank connector.
The internal drip tray is
filled with a lot of water.
The ground coffee is too fine,
which blocks the water from
coming out.
Adjust the coffee fineness to
larger grains for the grinding
process.
7 Troubleshooting
35 / EN
Fully Automatic Coffee Machine / User Manual
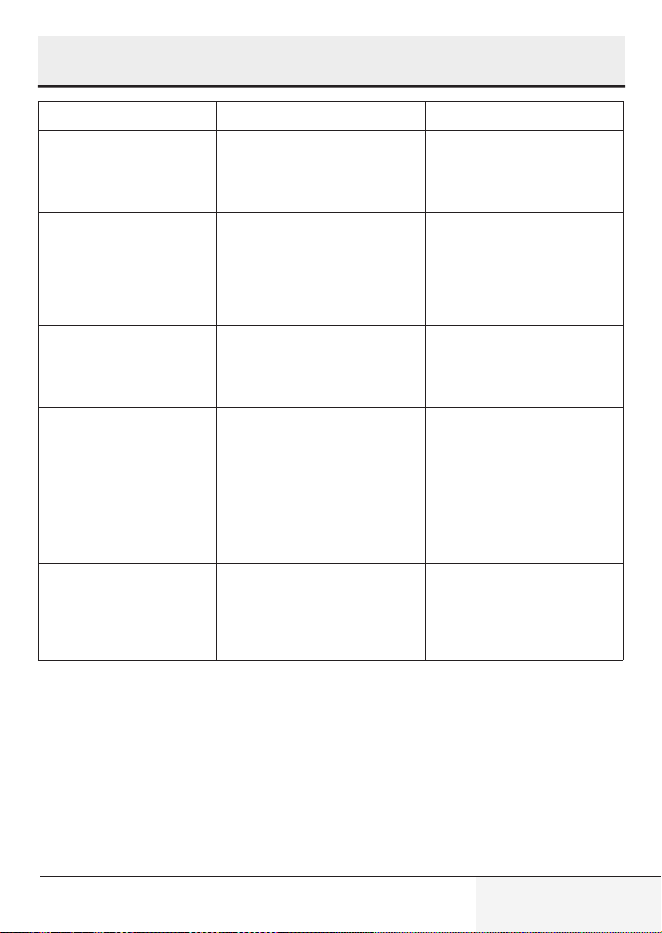
Problem Cause Solution
Coffee is delivered too
slowly or a drop at a time.
Coffee grounds are too fine,
which blocks the water from
coming out.
Adjust the coffee fineness to
larger grains for the grinding
process.
The indicator flashes to
inform that there’s not
enough coffee beans, but
there are plenty inside the
container.
The internal coffee grounds
outlet is blocked.
Follow the steps described
for cleaning the coffee
grounds outlet.
The brewer or the coffee
ground tray is impossible
to remove.
The appliance did not finish the
self-cleaning process and was
switched off .
Please switch on the ma-
chine again and let it finish
its auto cleaning process.
The appliance no longer
performs the rinsing cycle
when switched on or off.
Improper handling when ser-
vicing the appliance may be
the cause.
1. When the appliance is in
idle condition, open the front
cover.
2. Press and hold the on/
off button until you hear 2
beeps.
3. Close the front cover.
The touch buttons are not
sensitive.
Not pressing the touch button
from the front of the appliance.
Press the lower bottom part
of the symbol of the touch
button from the front of the
appliance.
7 Troubleshooting
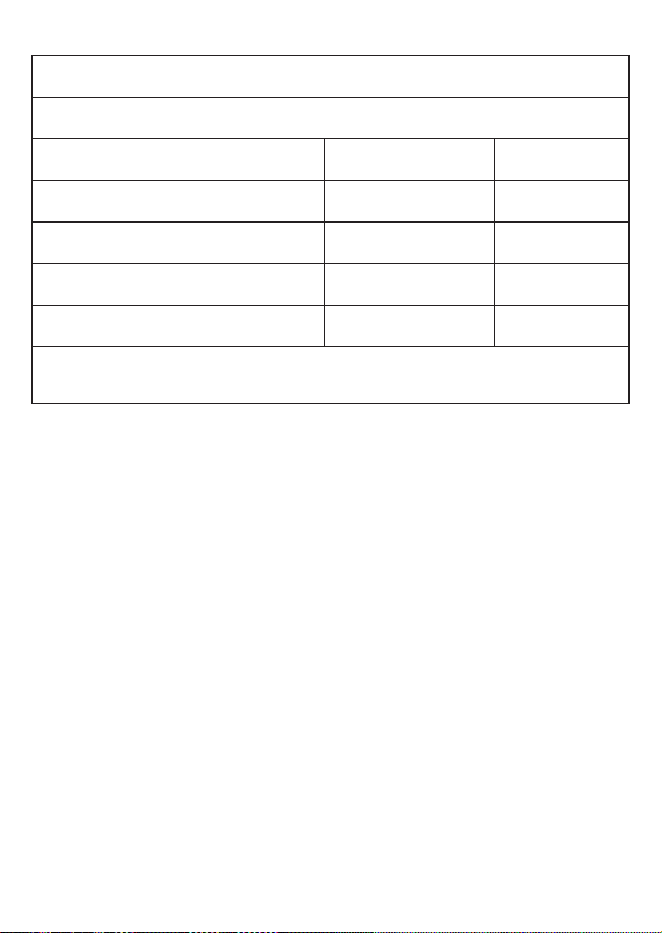
EN-Additional Information for User Manual:
Technical information on the operating Low Power Modes pursuant to EU Regulation 2023/826
Mode POWER CONSUMPTION(WATT) PERIOD(MINUTES)*
Off 0,3 20
Standby - -
Standby Mode with information or status display - -
Networked Standby - -
*:The period after which the equipment reaches automatically standby mode, off mode or networked standby in minutes
and rounded to the nearest minute.

55 Blanck Street, Ormeau Q 4208
P O Box 354, Ormeau Q 4208
p : 5549 3146 f : 5549 3546
ABN : 49 152 055 162
Sensitivity: Public
ORIGINAL MANUFACTURER’S WARRANTY
ADVICE FORM
BEKO COFFEE MACHINE
24 months warranty, full parts and labour warranty only.
WARRANTY CONDITIONS
The following conditions apply only in relations to the warranty expressly given on this Warranty Advice Form supplied with the product. This
warranty only applies to appliances purchased and used in Australia or New Zealand and is in addition to (and does not exclude, restrict or
modify in any way) other rights and remedies under a law to which the appliances relate, including any non-excludable statutory guarantees in
Australia and New Zealand. It applies to the original purchaser and for appliances used in domestic applications only.
1. This warranty does not apply:
(a) if the identification number attached to the appliance has been altered, rendered illegible or removed;
(b) to light globes;
(c) to paint and vitreous enamel finishes and glass;
(d) to surfaces damaged by use of aerosols or cleaners;
(e) if the appliance has been –
(i) subject to misuse, abuse, negligence, accident, fire or floods;
(ii) connected or improper, inadequate or faulty electricity, gas, water or drainage services or intake or exhaust
ducts or flues, or operated using incorrect or contaminated fuels or lubricants;
(iii) installed, maintained or operated otherwise than in accordance with the instructions furnished by Beko including the
improper use of detergents, bleaches, cleaners or other additives;
(iv) damaged by foreign objects in the appliance;
(v) serviced, repaired or altered otherwise than by Beko authorised service agents of Beko, or using other than Beko
approved replacement parts.
2. The purchaser shall be responsible for any expenses involved in making the appliances readily accessible for servicing, the purchaser
shall be responsible for any costs of transporting the appliance or parts thereof to and from the nearest Beko authorised service agent.
3. This warranty is the only expressed warranty given by Beko.
4. Beko reserves the right to determine whether or not the fault is caused by faulty workmanship or material or that any part is defective.
5. Where permitted by law, this warranty shall not apply to loss suffered through or resulting from the non-operation or the ineffective
operation of the appliance or any part of the appliance.
6. The purchaser must produce proof of the date of purchase together with this Warranty Advise Form when making a claim.
7. Subject to your statutory rights as to the merchantable quality of the product or accessory. In the event of a product or accessory being
replaced during the guarantee, the guarantee on the replacement will expire at the original date, i.e., 24 months from the original
purchase date.
8. Australia: For Appliances and services provided by Beko in Australia, Beko goods come with a guarantee by Beko that cannot be
excluded under the Australian Consumer Law. You are entitled to a replacement or refund for a major failure and for compensation for
any other reasonably foreseeable loss or damage. You are also entitled to have the Appliance repaired or replaced if the Appliance
fails to be of acceptable quality and the failure does not amount to a major failure. ‘Acceptable quality’ and ‘major failure’ have the
same meaning as referred to in the Australian Consumer Law.
9. New Zealand: For Appliances and services provided by Beko in New Zealand, the Appliances come with a guarantee by Beko
pursuant to the provisions of the Consumer Guarantees Act, the Sales of Goods Act and the Fair Trading Act. Where the Appliance
was purchased in New Zealand for commercial purposes the Consumer Guarantee Act does not apply.
These Warranty Conditions supersedes and excludes all other representations, conditions and warranties, except those implied
by legislation previously referred to.
For Service or Spare Parts: Aust 1300 282 356 NZ 0800 692 356

Beko A&NZ Pty Ltd
55 Blanck Street , Ormeau QLD, 4208
AUSTRALIA
www.beko.com.au
