
1
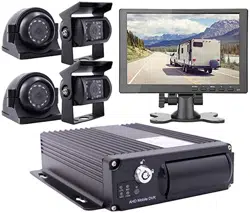
Mobile DVR
Instructions

2
Contents
Mobile DVR ............................................................................................................................ 1
Contents ................................................................................................................................... 2
1 Specification.......................................................................................................................... 3
2.Feature .................................................................................................................................. 5
2.1Remote control application............................................................................................ 5
2.2 MDVR interface .......................................................................................................... 6
3. Power ................................................................................................................................... 7
4 System User login .................................................................................................................. 7
5 Main Menu ............................................................................................................................ 8
5.1 Record Search ............................................................................................................. 9
5.2 Record Setup ............................................................................................................... 9
5.3 Basic Setup ........................................................................................................ 10
5.3.1 Alarm Setup .................................................................................................... 11
5.3.2 PTZ Setup ....................................................................................................... 12
5.3.3 Time Setup ...................................................................................................... 12
5.3.4 HD Management ............................................................................................. 13
5.3.5 System Maintain.............................................................................................. 14
5.3.6 Network Setup ................................................................................................ 14
5.3.7 System Setup .................................................................................................. 15
5.4 System Info ............................................................................................................... 16
5.5 Vehicle Info ............................................................................................................... 17
5.5.1 Basic Setup ..................................................................................................... 17
5.5.2 ACC Setup ...................................................................................................... 18
5.5.3 ON/OFF Setup ................................................................................................ 19
5.5.4 Wireless Setup ................................................................................................. 20
5.5.5 Wi-Fi Setup ..................................................................................................... 20
5.5.6 GPS Setup....................................................................................................... 21
5.6 Display Setup ............................................................................................................ 22
5.7 Password Setup ......................................................................................................... 22
6 I/O Interface ........................................................................................................................ 23
7 Check Networking(Online) Status......................................................................................... 24
8 CMSV6 Installation Instruction ............................................................................................ 25
9 FAQ .................................................................................................................................... 26
10 Contact .............................................................................................................................. 28
3
1 Specification
FEATURES:
Built-in high performance Hisilicon chipsets, coded with H.264 standard, high compression
rate and image quality
4CH AV Inputs with AHD 1080p/720P/960H/D1/CIF optional, 1CH synchronized AV output,
1CH VGA output
4CH (or 8CH) local recording with 1080p (1080N) resolution in real time
Power:
Professional In-Vehicle power design,8-36V DC Wide Voltage Range
Multi protection circuits like under-voltage, short, reversed plug-in
Smart power management system, shutdown under low voltage, low consumption
Data Storage:
Special file management system to encrypt and protect the data
Proprietary technology to detect the bad track of the hard drive which can make sure the
continuity of video and long service life of the hard drive
Built-in ultra-capacitor, avoid data loss and SD card damage caused by sudden outage
Support 2.5 inch HDD/SSD, maximum 2TB
Support 2 SD card storage, each SD supports maximum 256GB
Support hard disk heating
Transmission Interface:
Support 3G/4G transmission, LTE/HSUPA/HSDPA/WCDMA/EVDO/TD-SCDMA
Support GPS/BD optional, high sensitivity, fast positioning
Support wireless download by WiFi, 802.11b/g/n, 2.4GHz
MDVR Specification
Technical parameter:
Item
Device parameter
Performance
System
Main processor
Hi3520DV300
Operating system
Embedded Linux OS
Operating language
Chinese/English
Operating interface
GUI, support mouse
Password security
User password/Admin password
Audio
&
Video
Video standard
PAL/NTSC
Video compression
H.264
Image resolution
1080P/1080N/720P/960H/D1/CIF
Playback quality
1080P/1080N/720P/960H/D1/CIF
Compound mode
A variety of ways
Decoding ability
1ch 1080p (1080N )real time
Recording quality
Class 1-6 optional

4
Image display
Single/QUAD display optional
Audio Compression
G.726
Audio recording
Audio & Video synchronized recording
Recording
& Playback
Recording mode
Manual/Alarm
Video bit rate
Full frame 4096Mbps,6 classes image quality optional
Audio bit rate
8KB/s
Storage media
SD card + HDD/SSD storage
Video inquiry
Inquiry by channel/Recording type
Local playback
Playback by file
Firmware
upgrading
Upgrading mode
Manual/Automatically/Remote/Emergency Recovery
Upgrading method
USB disk/Wireless network/SD card
Interface
AV input
4ch (or 8ch) aviation interface
AV output
1ch VGA video output, 1ch aviation AV output
Alarm input
4 digital inputs (4 Positive/Negative trigger)
HDD/SSD
1 HDD/SSD (up to 2TB, support hot plug/unplug)
SD card
2 SDXC High speed card (up to 256GB)
USB interface
1 USB 2.0 (support U disk/mouse)
Ignition input
1 ACC signal
UART
1 LVTTL Level
LED Indication
PWR/RUN
Disk /SD card lock
1
Debug port
1
Function
extention
GPS/BD
Support detecting antenna Plug in/Unplug/Short circuit
3G/4G
Supports CDMA/EVDO/GPRS/WCDMA/FDD
LTE/TDD LTE
WIFI
802.11b/g/n, 2.4GHz
Others
Power input
8~32V DC
Power consumption
Standby 3mA
Maximum consumption 30W @12V 2.5A @24V
1.25A
Working temperature
-20 --- 70℃
Storage
1080P 1.5G/h/channel
1080N 1.2G/h/channel
720P 1G/h/channel
960H 750M/h/channel
Dimension
148mm*188mm*60mm (Hard disk MDVR)
147mm*180mm*41mm (SD card MDVR)
Project
Spe.
Feature

5
Power Input
8—36V
DC+8V~+36V,if lower than 8V,or higher than 36V,the
MDVR will be shutdown, into protect status
Power Output
12V
Output :12V(+/-0.2V), max 2A。
Key Signal
≤4V
Key off。
≥5V
Key on。
Video Input(Ω)
75Ω
75Ω/CH。
Video Output
2Vp-p
One 2Vp-p CVBS One 75Ω
I/O
0—4V
Low voltage alarm
>4V
High voltage alarm
SD Card Slot
SD Card
Support SD Card up to 512G, Support two SD Card
Support upgrade MDVR software
Temperature
-40℃-80℃
-40℃-80℃ with good environment
2.Feature
2.1Remote control application
Picture.3 Remote control
Key Function:
1.”Info”: view network status
2.”Login”: main menu
3.Number:
【0-9】:Under the configuration mode, 0~9 stand
for numbers; under the playback mode, 1, 2, 3 and
4 are for switching between related single channel,
4.“↑↓”: up,down;
“←→”: left,right;
NOTE: The remote controller does not
contain battery. Please buy the battery in local
market. Battery Model: CR2025.
6
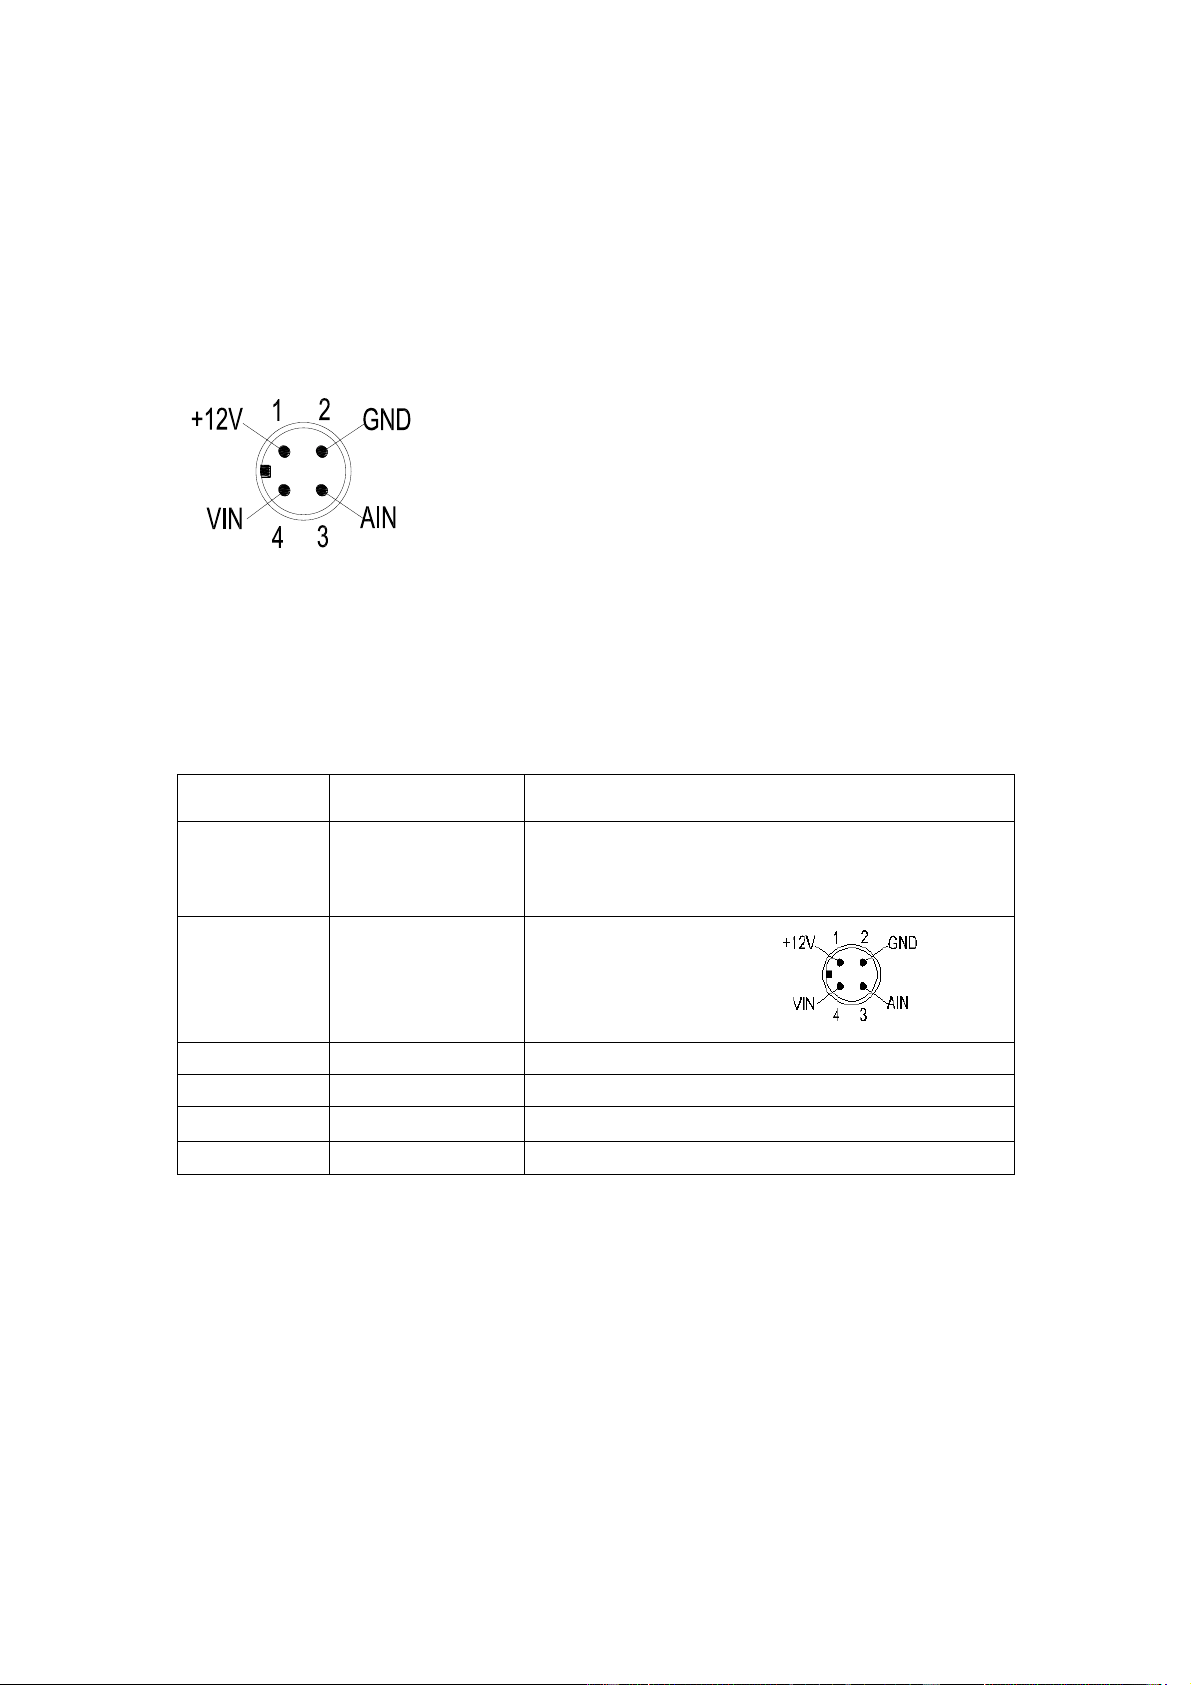
2.2 MDVR interface
Picture.4 MDVR interface
Back Panel
Back Panel
Interface
item
Feature
Power
DC8-36V
Power inpute(red for positive,black is for negative,
yellow is connect to ignition cable, when switch mode
set up in ignition mode)
Video/Audio
input
CAM1-4
(AV1-AV4)
Video/Audio Input interface
Video output
VOUT
Video output
Audio output
AOUT
Audio output
IO/ALARM
IO/ALARM
IO/ALARM
USB
USB
Mouse
1、12V:For camera and voice record,2、Negative,3、AIN:
For Audio;4、VIN:For Video
7
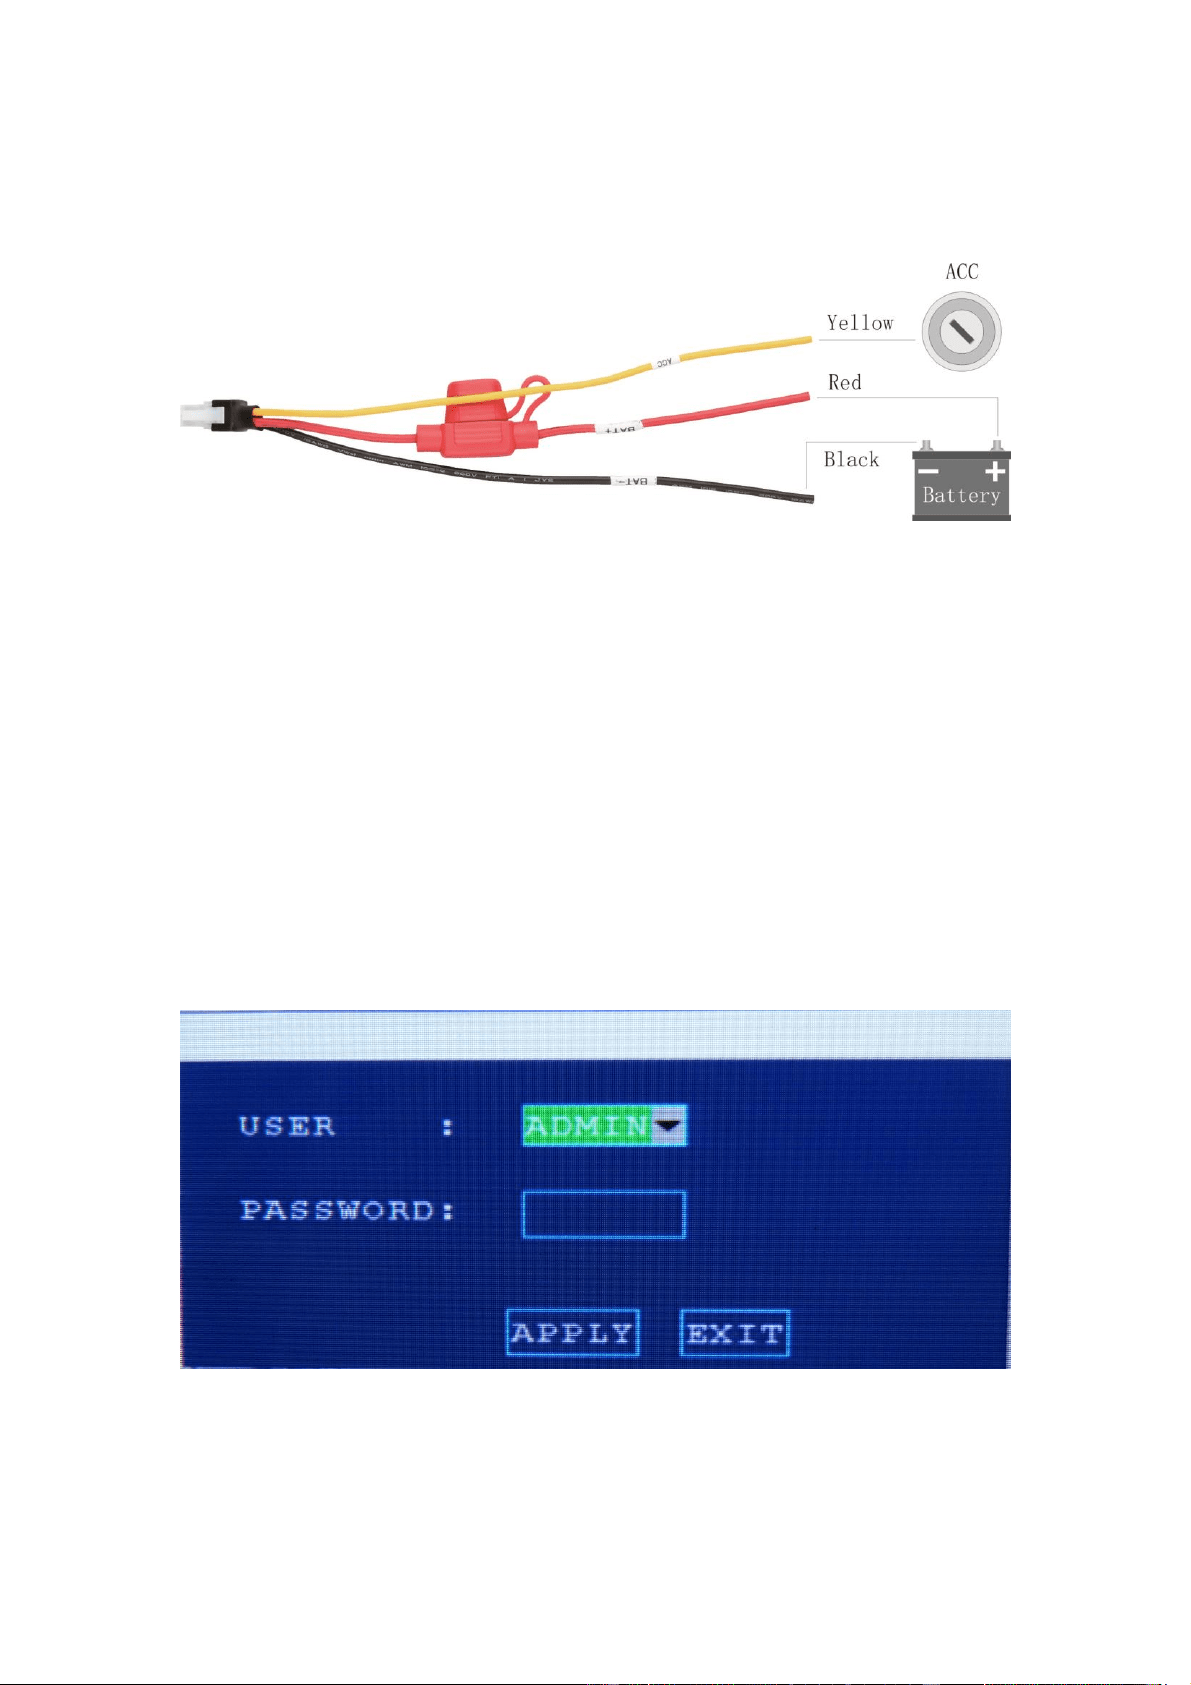
3. Power
Picture.5 Power
Make sure the volt is 8-36V before you connect with the battery , or the MDVR will be
burn up
Yellow cable must to connect with the ACC , or the DMVR can not be delay shut down,
the video will be lose.
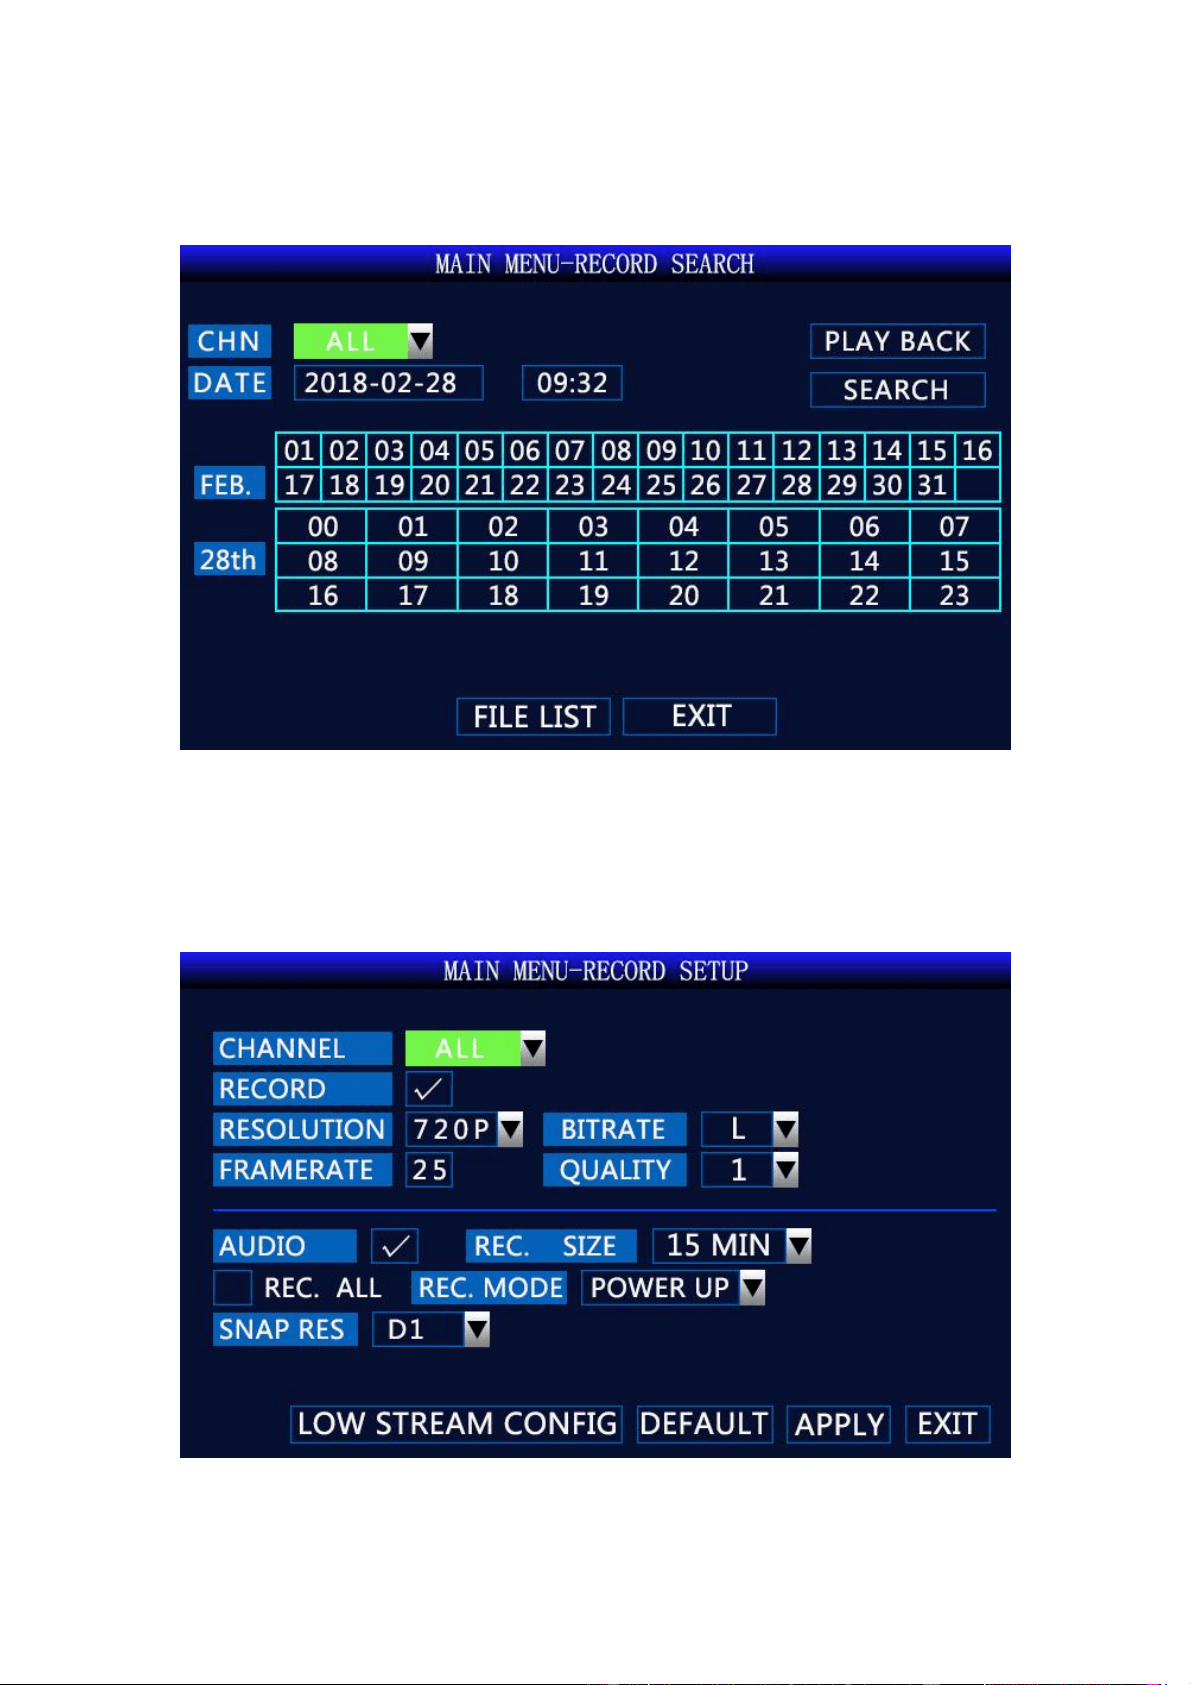
4 System User login
After connect the power, press “Login” to login without password. (There is no password before
you setup). USER account can not change settings. Only ADMIN account can change menu.
Picture.6 Login

8
5 Main Menu
Picture 7 Main Menu
< SEARCH>: Search for video files stored in the hard disk/SD card and perform playback
operations;
<RECORD>:Set the audio and video parameters, working mode, etc.;
<BASIC>:Set alarms, ptz, time, network, disk, system, etc.;
<INFO>:Display device serial number, version number, SIM card, GPS module, WIFI, MAC
address, etc.;
<VEHICLE>:Set vehicle number, switch settings, wireless settings, WIFI settings, etc.;
<DISPLAY>:Set monitor screen and video data content, channel name, time overlay, boot
preview screen, etc.;
<PASSWORD>:Set menu password.
9
5.1 Record Search
Picture.8 Record Search
Record Search: Search, playback, and backup of video files on disk
5.2 Record Setup
Picture.9 Record Setup
10
<RECORD>: You can select on/off to select whether the channel is recording;
<RESOLUTION>: D1 / HD1 / CIF / 720P / 1080N / 1080P resolution optional;
<BITRATE>: High / medium / low optional;
<FRAMERATE>: 1 to 25 (or 30)optional;
<QUALITY>: 1 to 6 optional; the smaller the value, the better the image quality;
<AUDIO>: Optional on/off;
<REC. SIZE>: 3minutes / 15 minutes / 30 minutes / 45 minutes / 60 minutes optional;
<REC.MODE>: Optional boot recording / timer recording;
<SNAP RES>: D1/CIF/HD1/960H/720P/1080P optional.
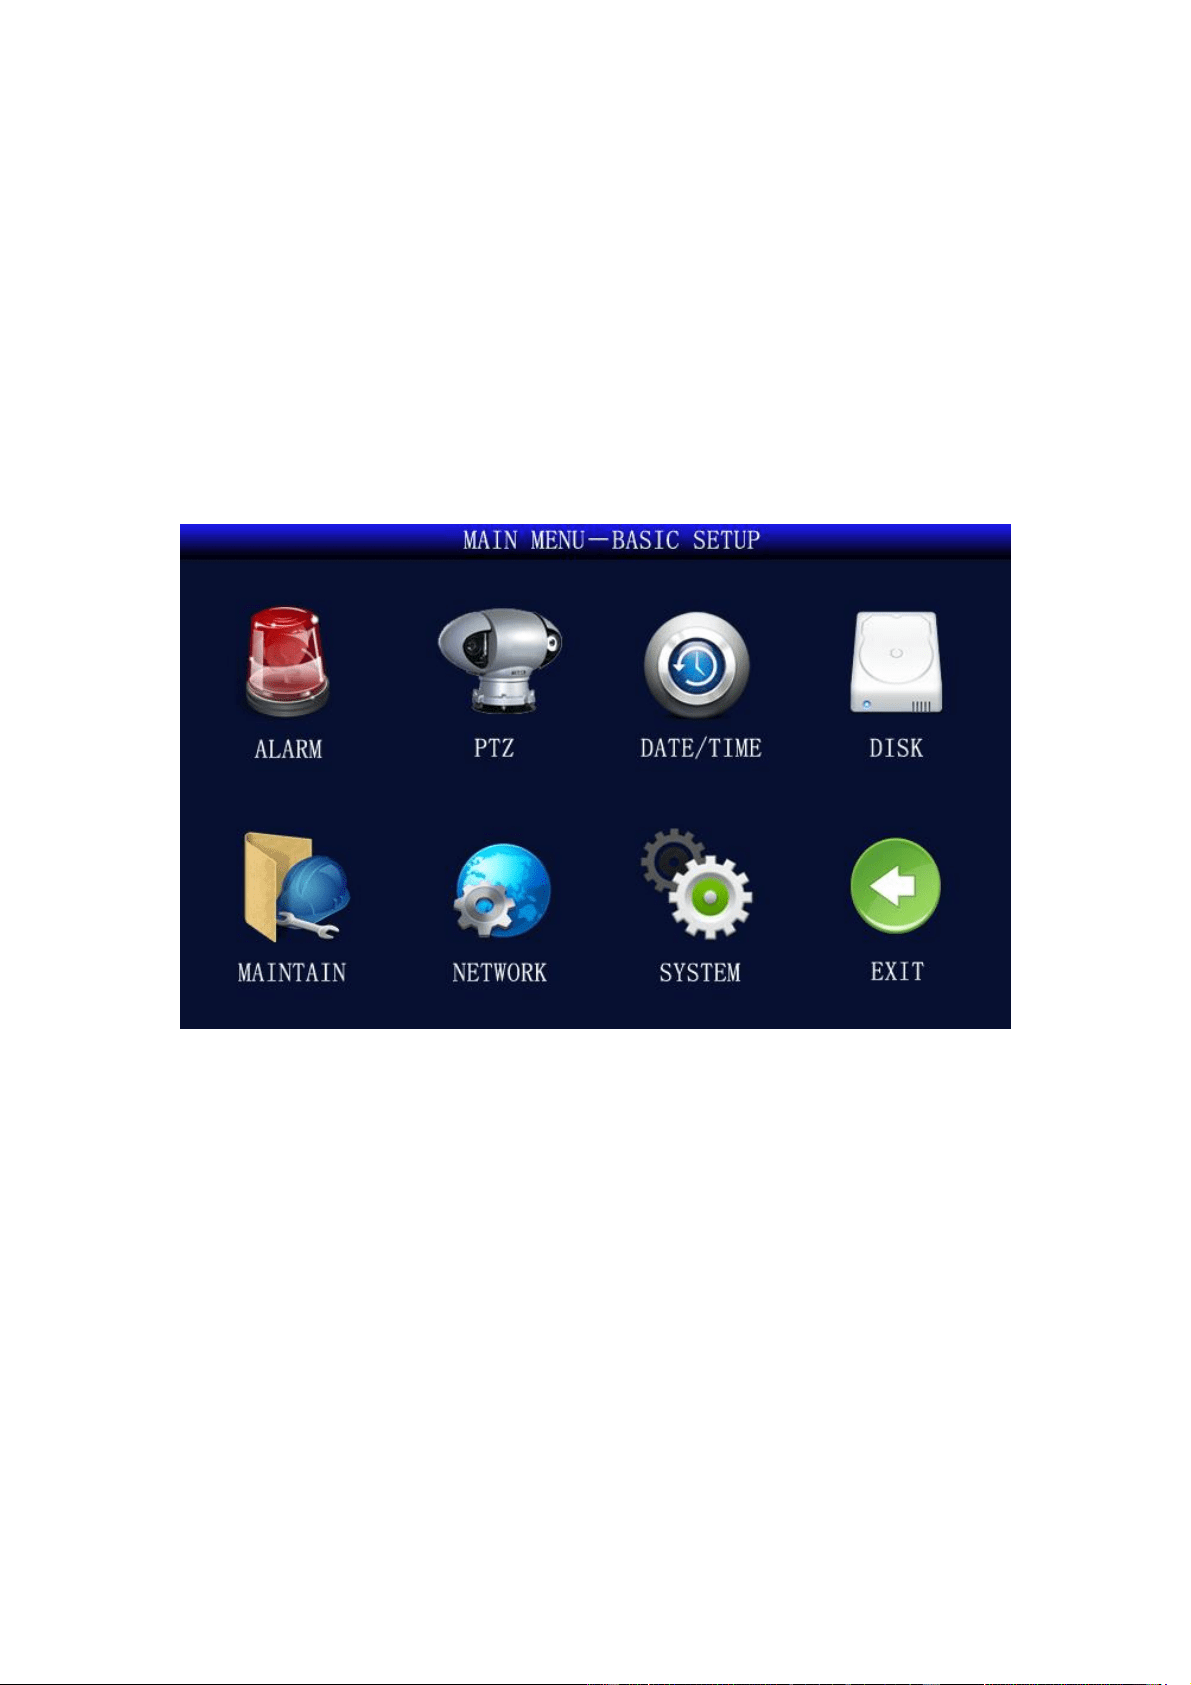
5.3 Basic Setup
Picture.10 Basic Setup
<Alarm>: Set the switches and parameters of various alarm inputs;
<PTZ>: Set the PTZ parameters;
<Date/Time>: Set system time, daylight saving time;
<Disk>: Display disk status, provide hard disk, SD card, U disk formatting function;
<Maintain>: Set automatic restart, system upgrade, factory reset;
<Network>: Set network, server IP;
<System>: Set system language, camera format, output resolution, camera type.
11
5.3.1 Alarm Setup
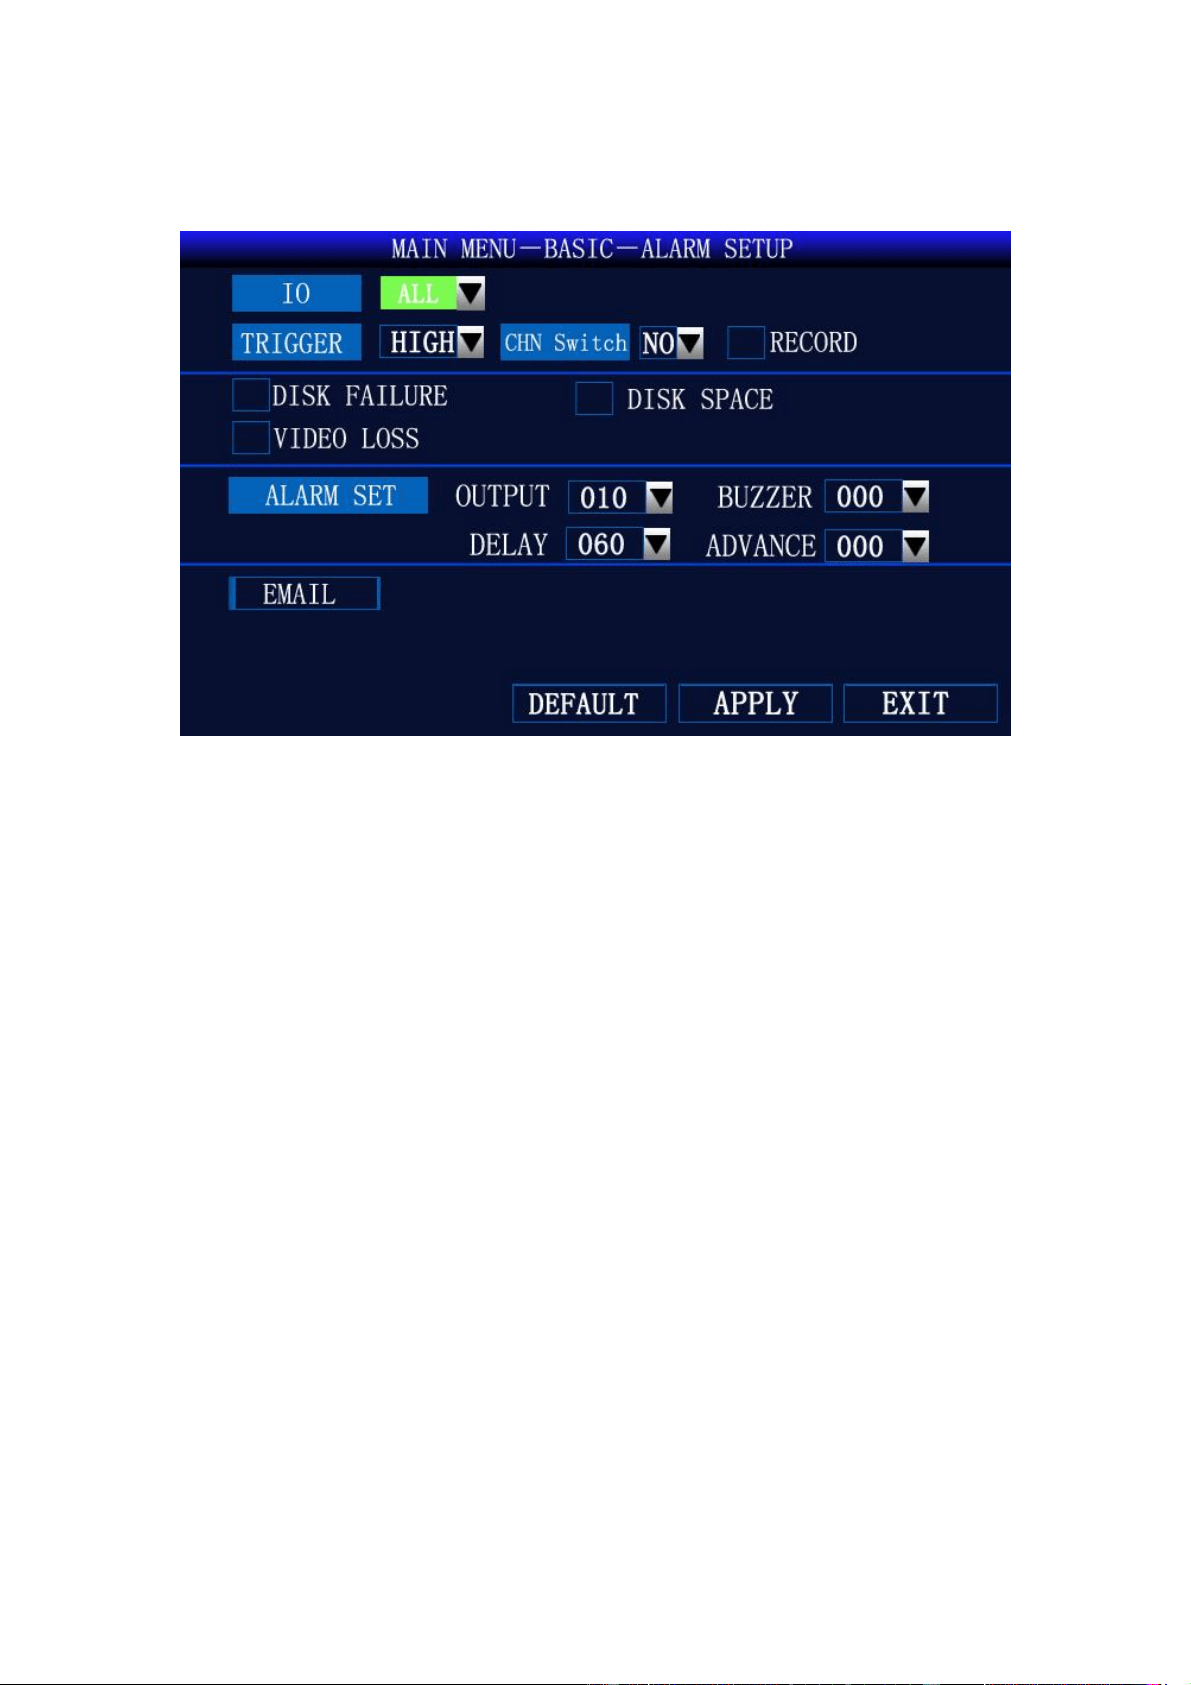
Picture.11 Alarm Setup
<IO>: Select interface;
<Trigger>: High and low optional;
<CHN Switch>: “YES/NO”: switch or not when level is triggered;
<Disk Failure>: Alarm when there is no disk or the device does not recognize the disk;
<Disk Space>: Alarm when the disk is out of memory;
<Video Loss>: Alarm when there is no video input.
12
5.3.2 PTZ Setup
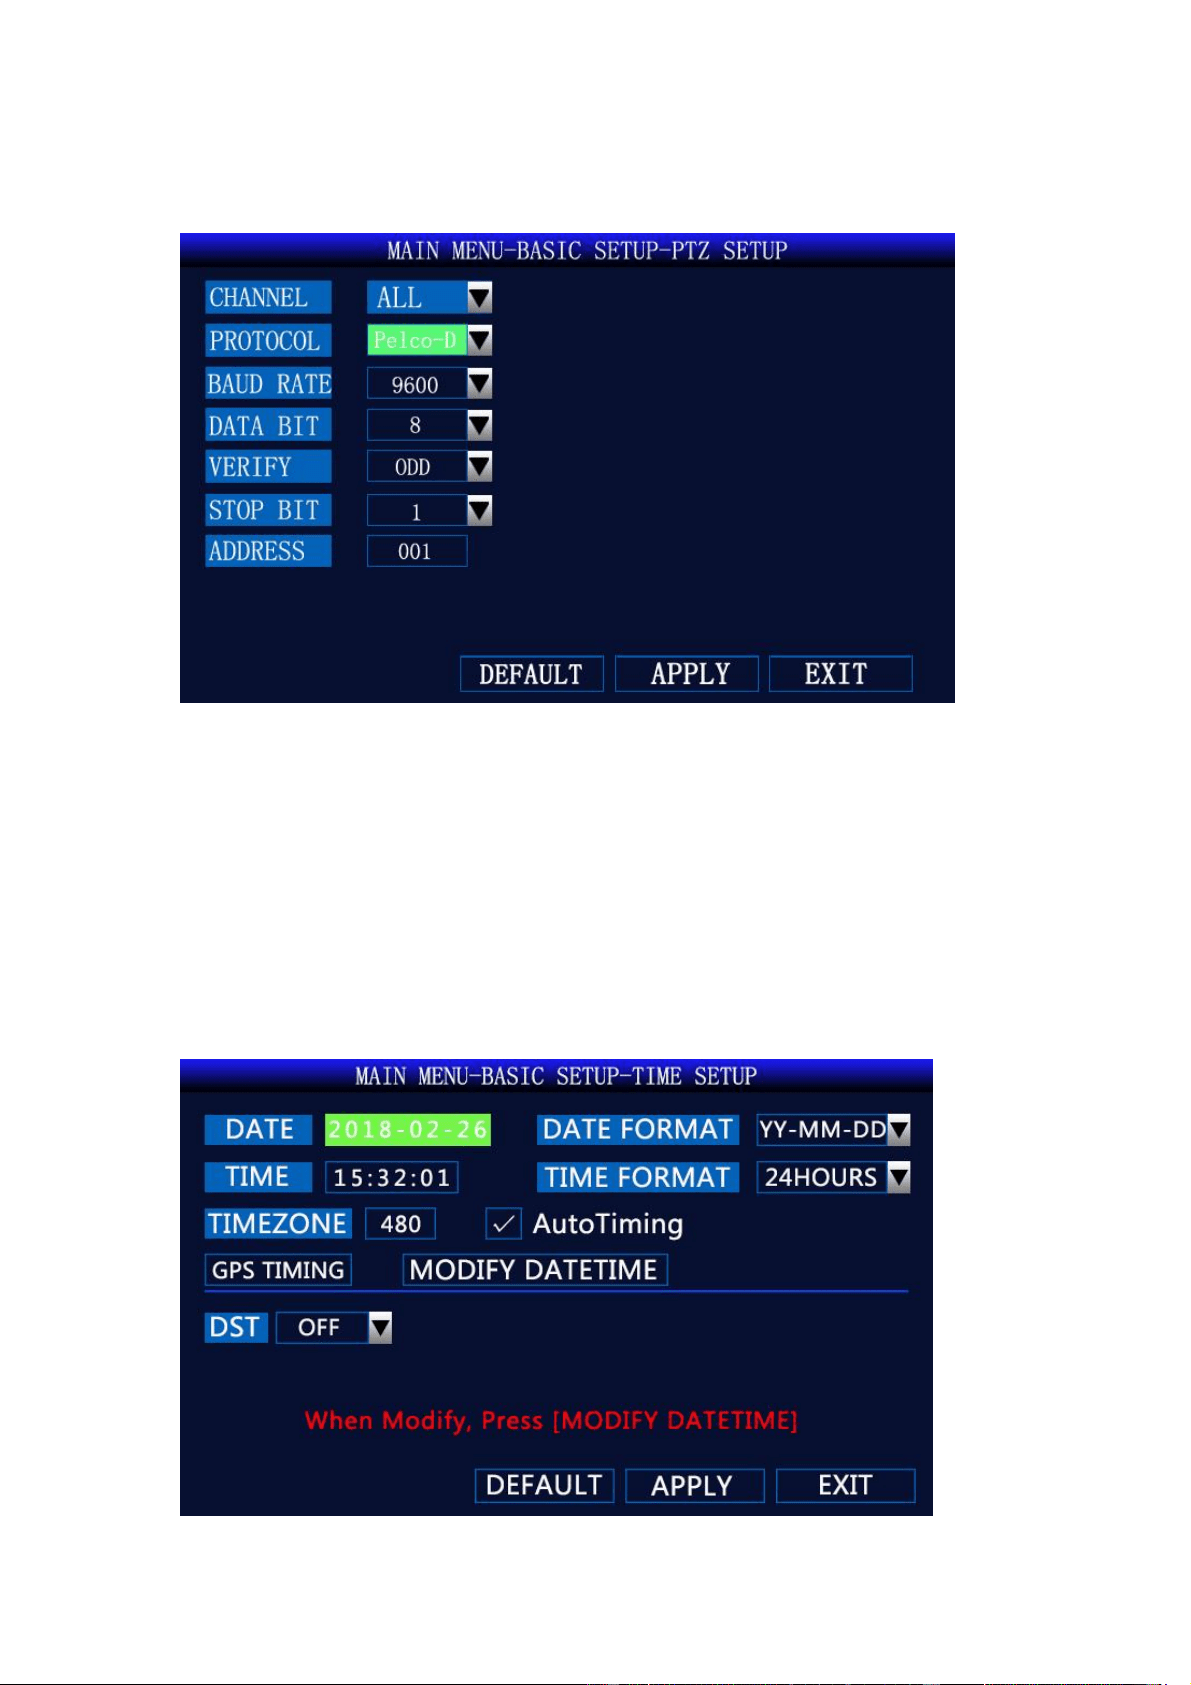
Picture.12 PTZ Setup
<Protocol>: Support PELCO-D and PELCO-P;
<Baud Rate>: 1200/2400/4800/9600 bps optional;
<Data Bit>: 5,6,7,8 optional;
<Verify>: Odd/Even/Mark/Spac/None optional;
<Stop Bit>: 1/1.5/2 optional;
<Address>: 001~255.
5.3.3 Time Setup
13
Picture.13 Time Setup
<Date>: Set year, month, day;
<Time>: Set hour, minute, second;
<Date Format>: MM/DD/YY or YY-MM-DD;
<Time Format>: 12-hour system or 24-hour system;
<Auto Tining>: Automatically synchronize with GPS satellite time; please do not check it,
<Modify Datetime>: After modifying the time, select “Modify Datetime” to take effect.
5.3.4 HD Management
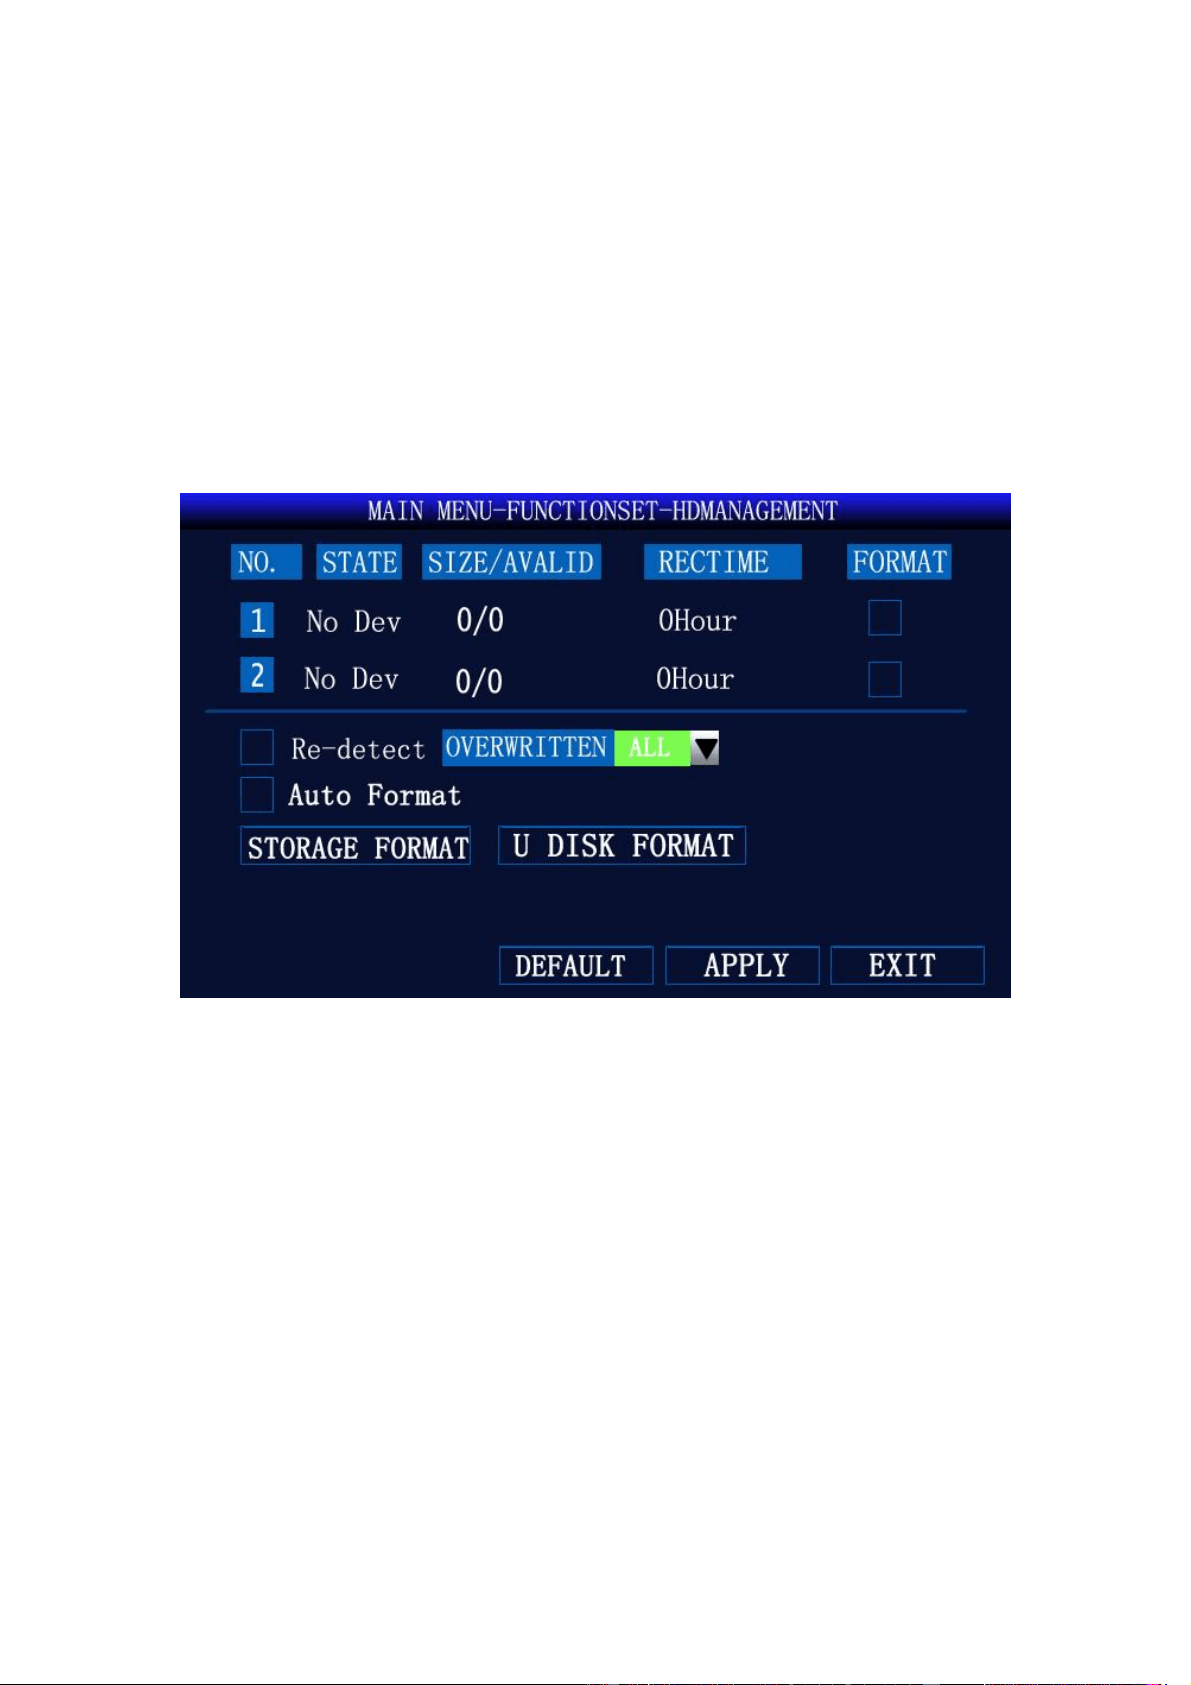
Picture.14 HD Management
<Auto Format>: Automatically formatted when a new hard disk or SD card is powered on;
<Overwritten>: Automatically overwrite the oldest video file when it is full.
14
5.3.5 System Maintain
Pictures.15 System Maintain
<System Update>:
1. Copy the files to be upgraded to the update DVR directory of the SD card.
2. Insert the SD card into the device.
3. Click the <System Upgrade> button.
5.3.6 Network Setup
15
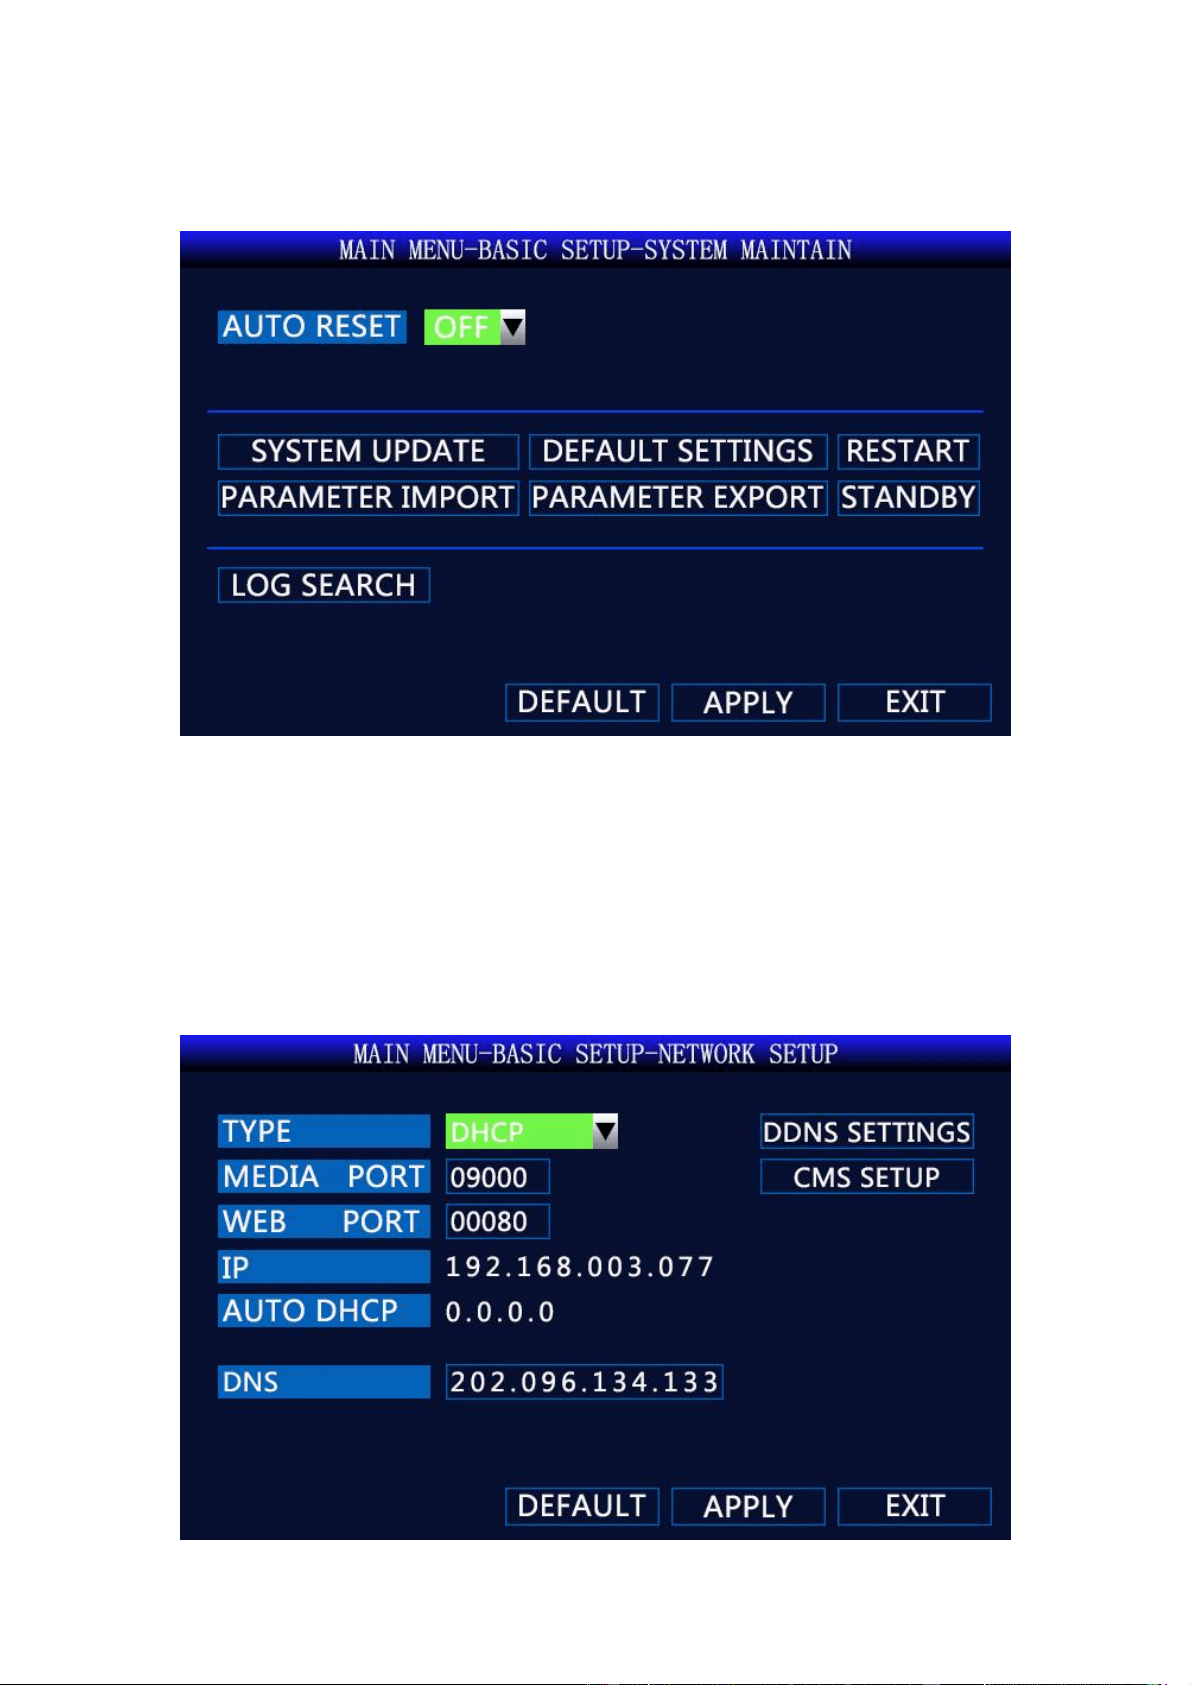
Picture.16 Network Setup
<Media Port>: Generally not modified
<WEB Port>: Generally not modified
<CMS Setup>: Set the server IP address, port
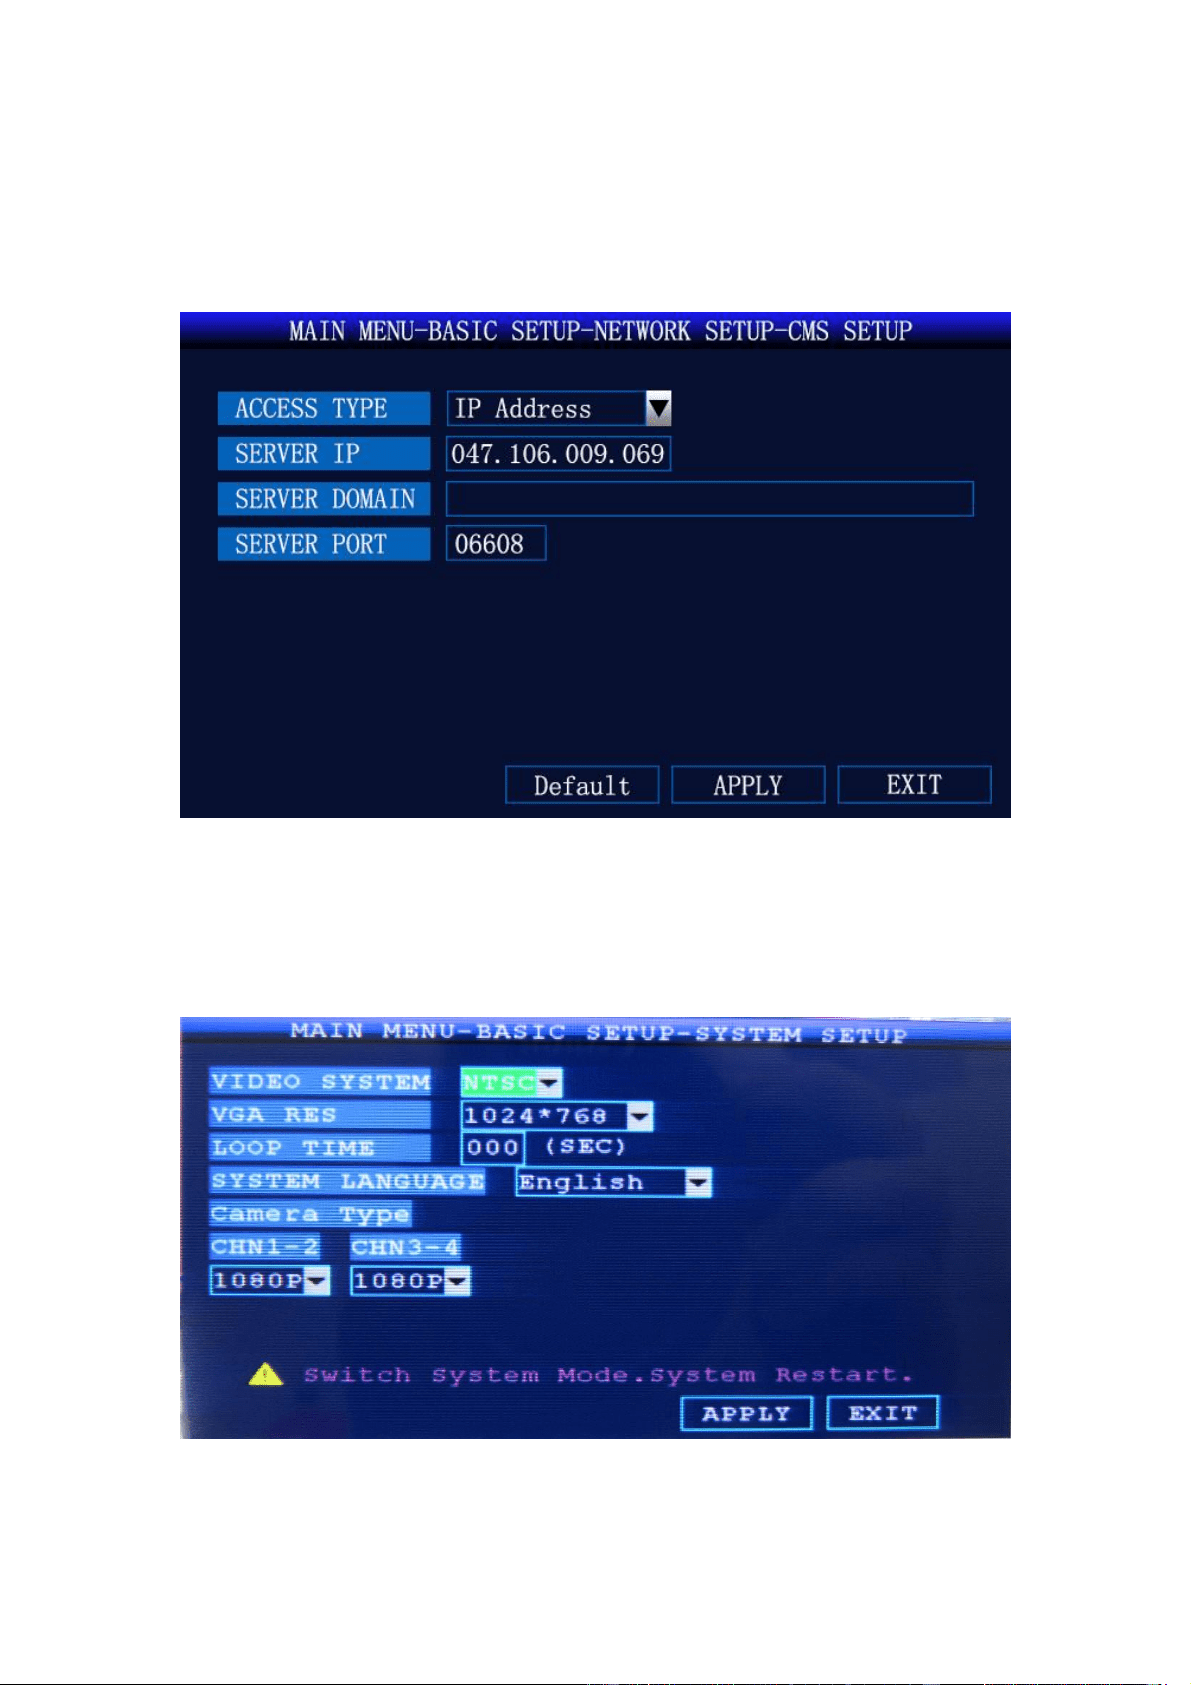
Picture.17 CMS Setup
<Access Type>: select ”IP Address”
<Server IP>:47.106.9.69 (Configure according to your own server IP)
5.3.7 System Setup
Picture.18 System Setup
<Video System>: PAL/NTSC (DEFAULT)
16
<VGA RES>: VGA output display resolution
<Camera Type>: “SD” stands for analog camera, ”720P” stands for AHD 720P camera,
“1080N/1080P” stands for AHD 2 megapixel camera, Select the corresponding camera type to
display properly
<System Language>: Set system language, including Chinese, English, and Traditional Chinese
Note: Switch system mode, system restart
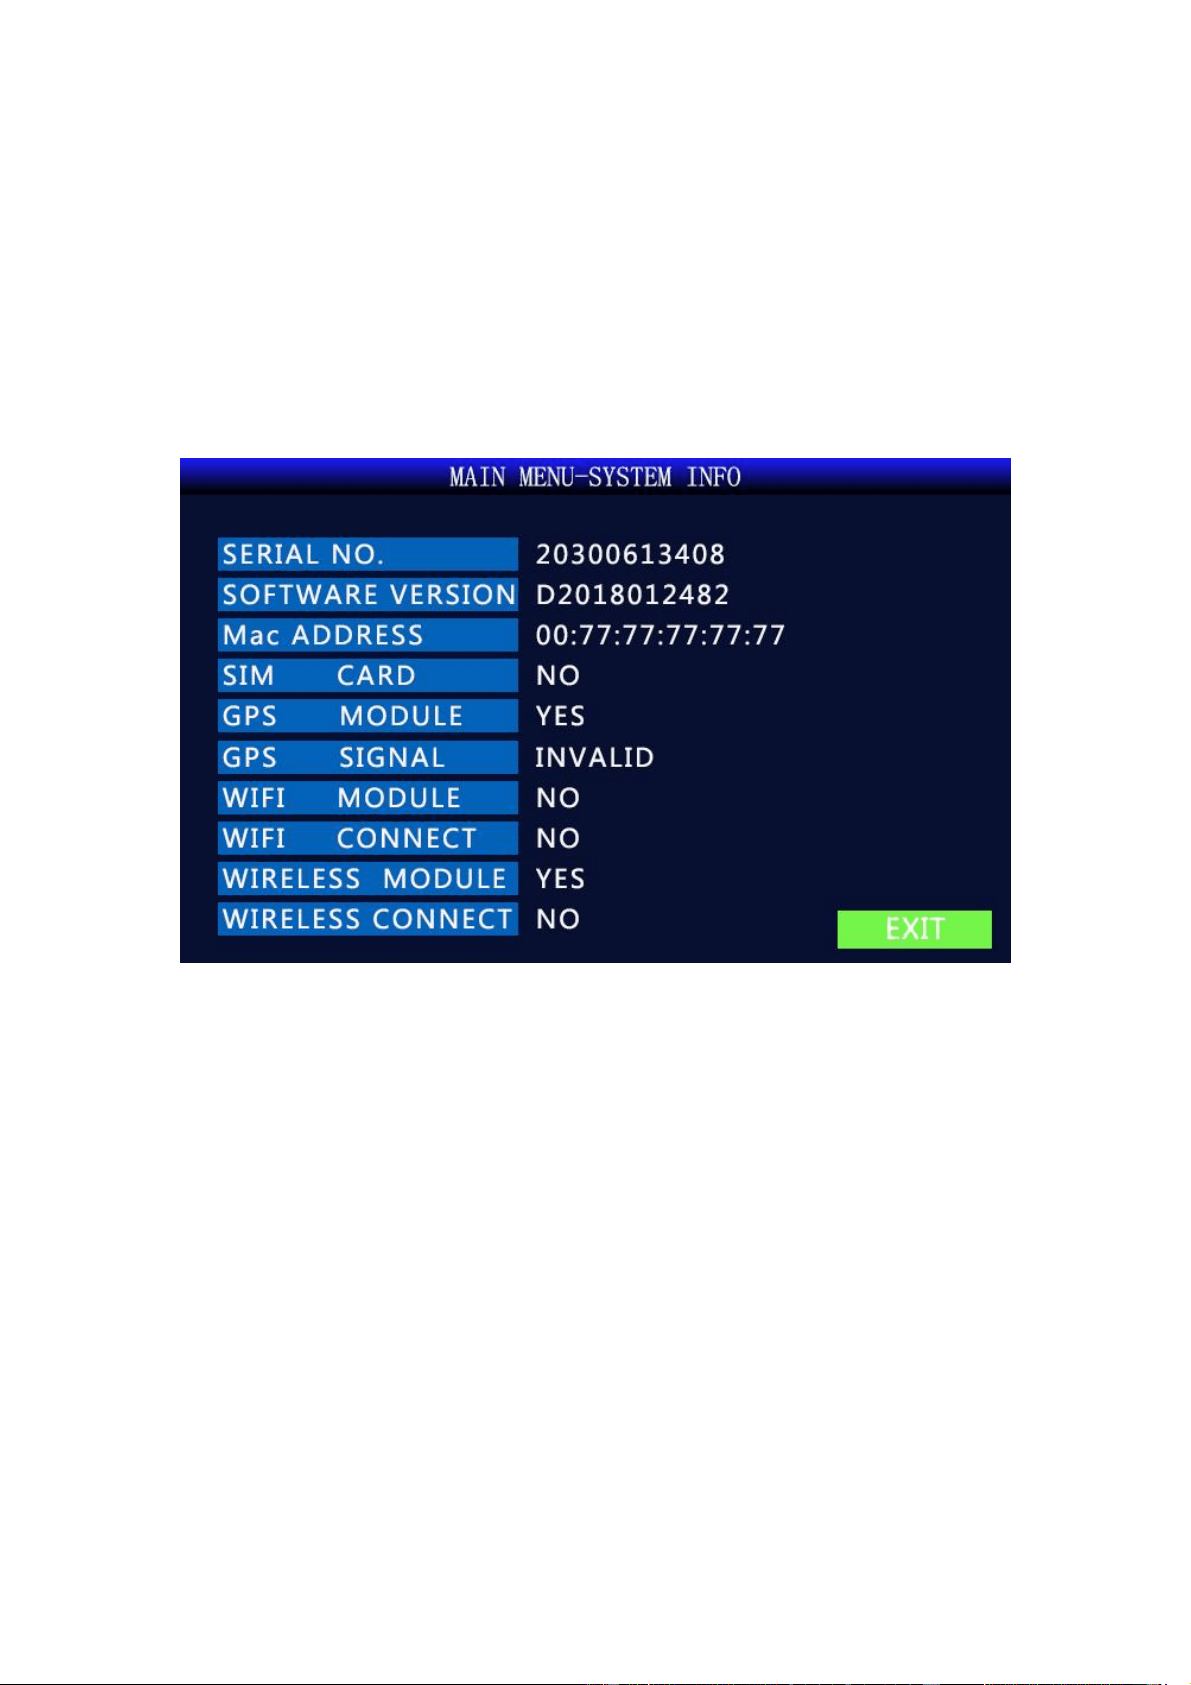
5.4 System Info
Picture.19 System Info
<SIM Card>: “Yes” means the SIM card is recognized, “NO” means not
<GPS Module>: “Yes” means the GPS module is recognized, “NO” means not
<GPS Signal>: “INVADLID” indicates that there is a signal
<Wi-Fi Module>:“Yes” means the Wi-Fi module is recognized, “NO” means not
<Wi-Fi Connect>:”Yes” means successful networking, ”NO” means not
<Wireless Module>: “Yes” means the 3G/4G module is recognized, “NO” means not
<Wireless Connect>:”Yes” means successful networking, ”NO” means not
17
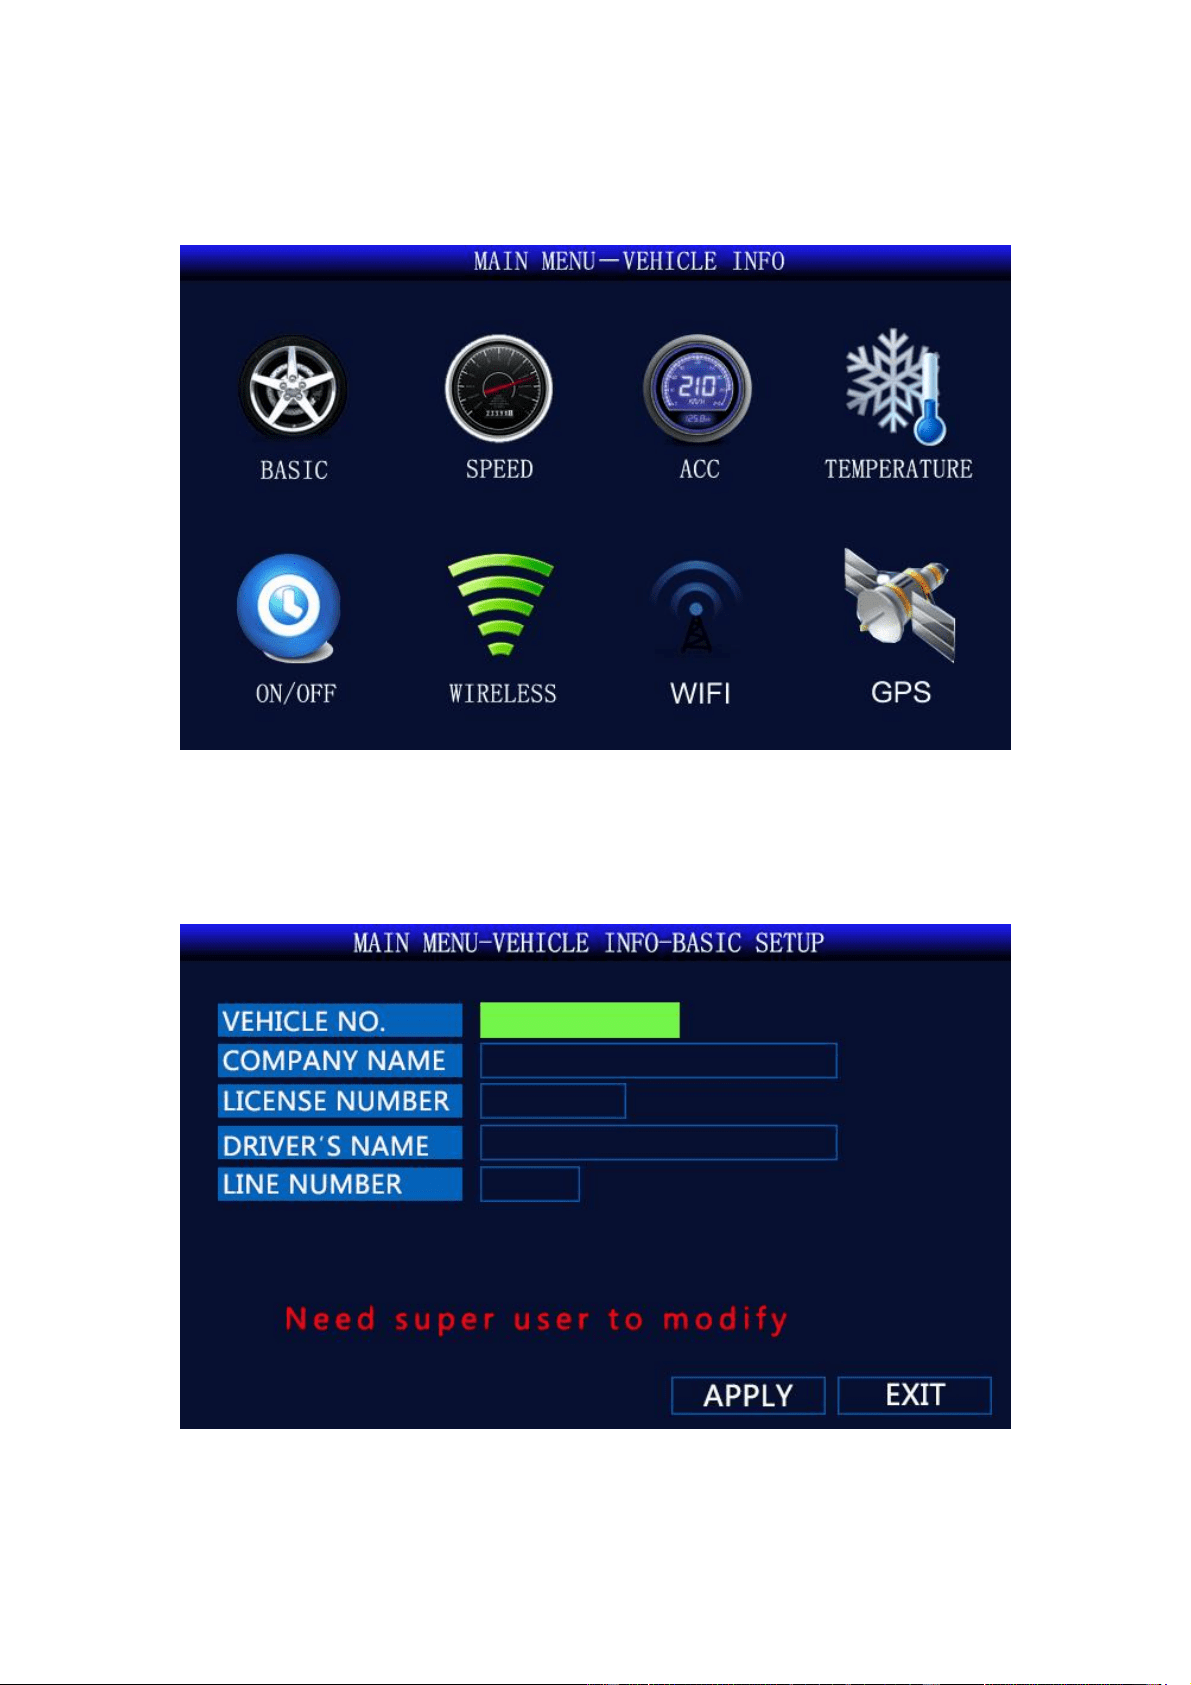
5.5 Vehicle Info
Picture .20 Vehicle Info
5.5.1 Basic Setup
Picture.21 Basic Setup
<Vehicle NO.>: Set the number of the machine (3G\4G function device requires super
18
administrator setting). PLEASE DO NOT CHANGE UNLESS USE YOUR OWN SERVER.
<Company Name>: Enter your company’s name;
<License Number>: Enter license number of the car;
<Driver’s Name>: Enter driver’s name;
<Line Number>: Enter line number.
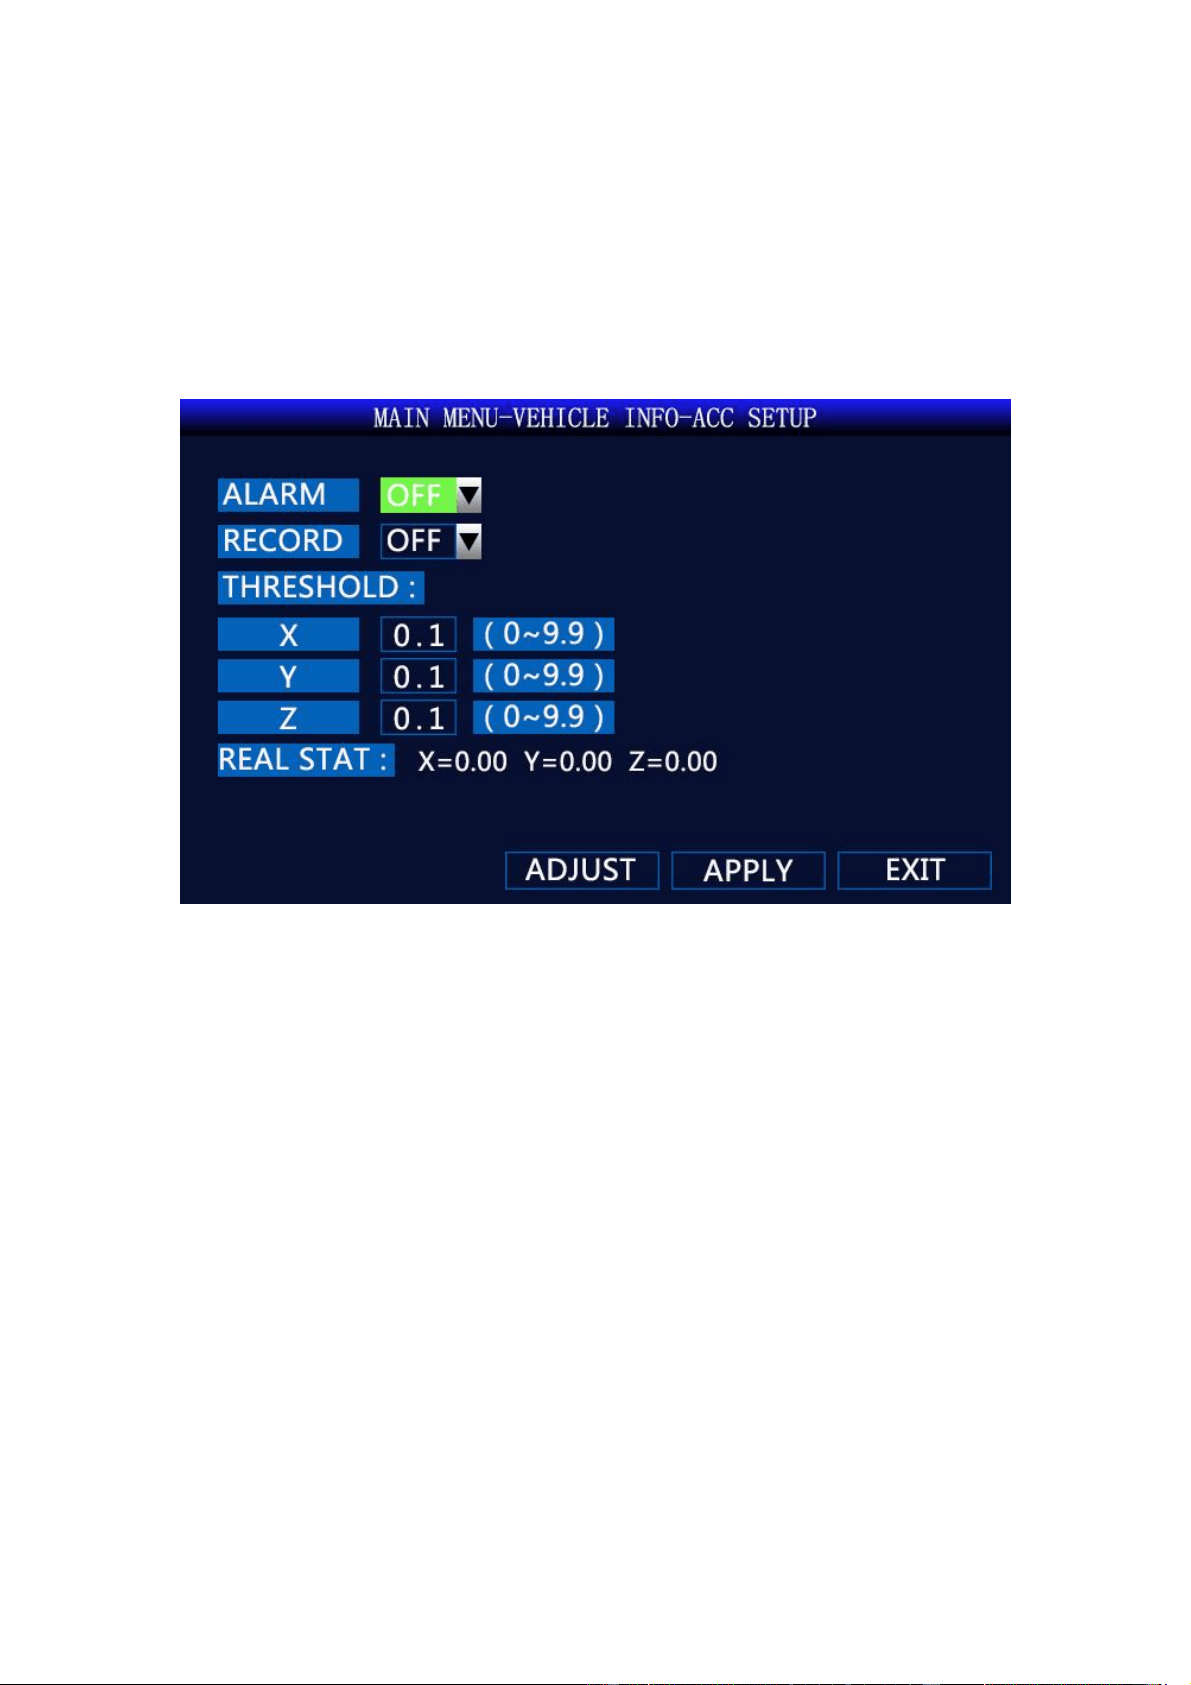
5.5.2 ACC Setup
Picture.22 ACC Setup
19
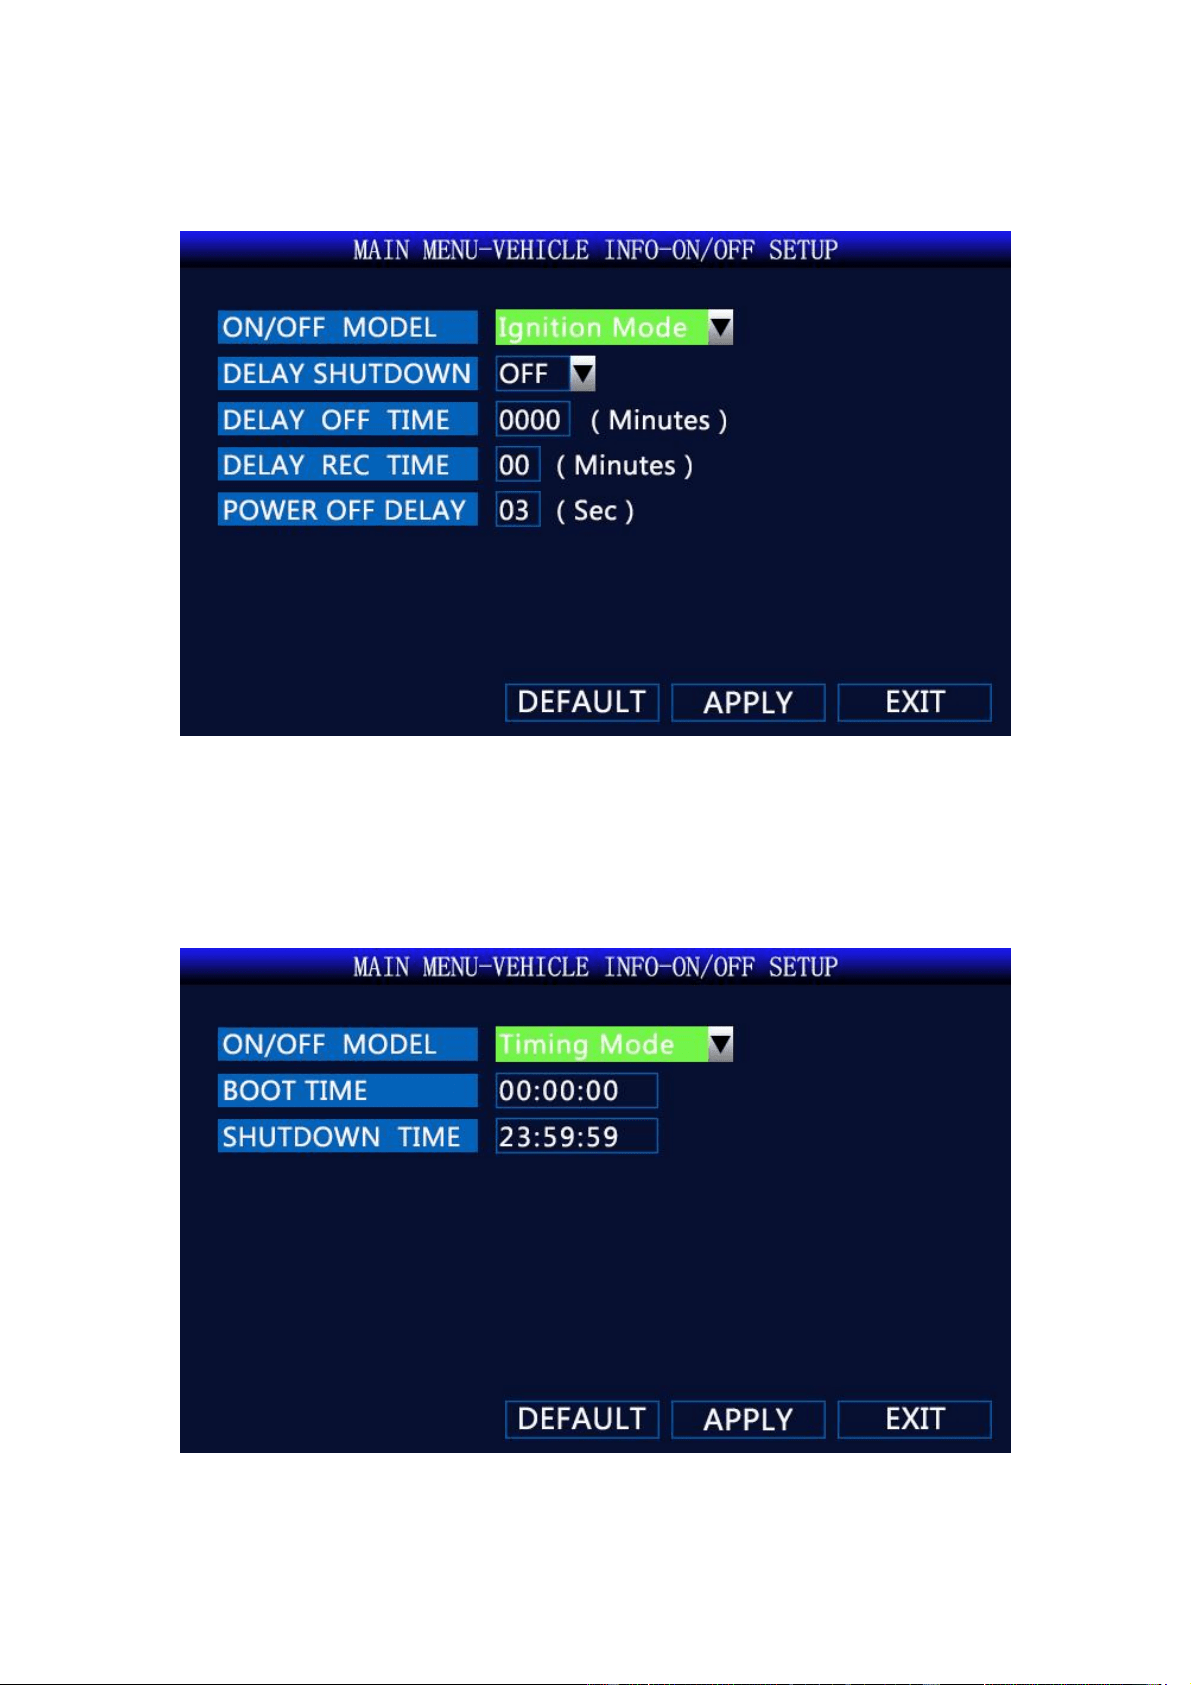
5.5.3 ON/OFF Setup
Pictures.23 ON/OFF Setup
<ON/OFF Model>:Ignition Mode / Timing Mode(In the ignition mode, the MDVR will
automatically turn on after the car is started, and in the timing mode, the MDVR will be turned on
at the time set by the user.)
<Delay off Time>:1~1440 minutes (Effective after restarting)
Pictures.24 Timing Model
20
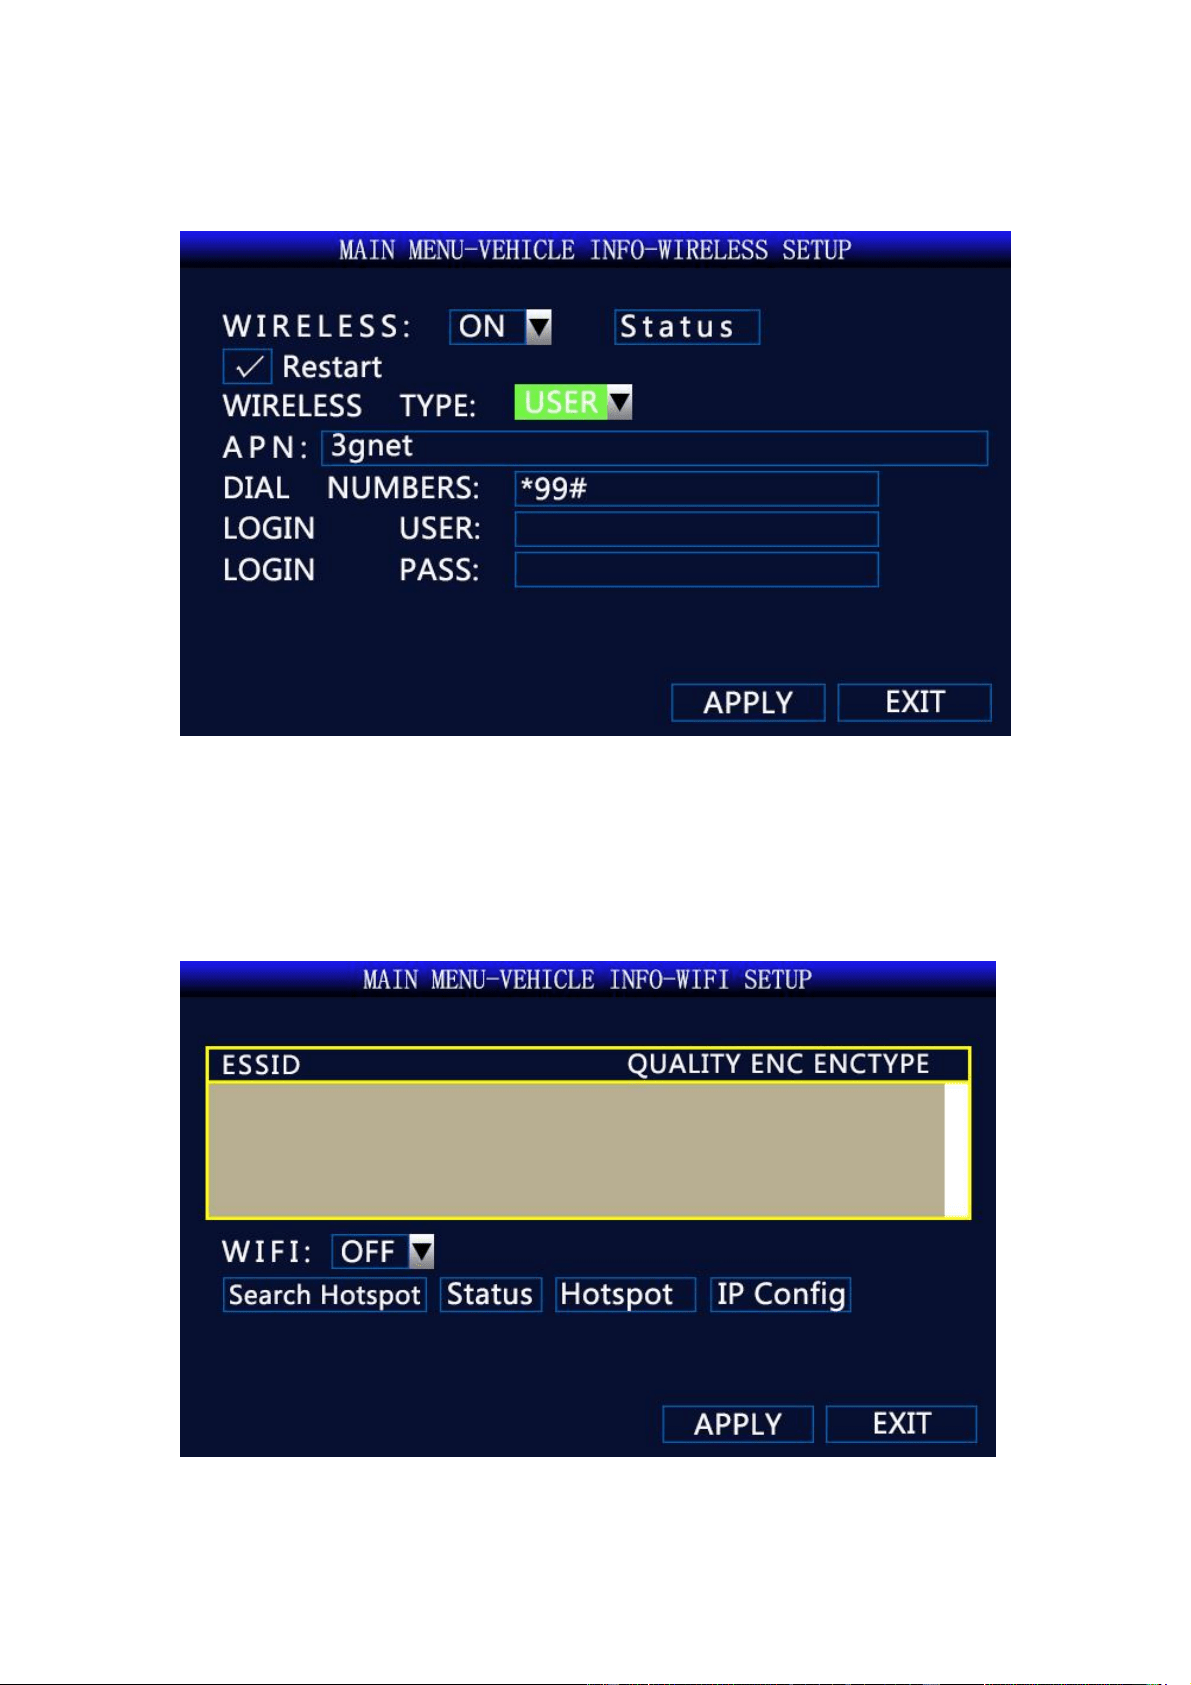
5.5.4 Wireless Setup
Picture.25 Wireless Setup
<Restart>: When the module cannot be reconnected after disconnection, the module will
automatically power off and reset.
APN: Please input according to the 4G SIM card you use.
5.5.5 Wi-Fi Setup
Picture.26 Wi-Fi Setup
<Search Hotspot>: Search for nearby WiFi hotspots
21
< Status>: View WiFi connection status, IP address and other information
<Hotspot>:It can configure 5 WiFi hotspots
<IP Config>: Set to AUTO
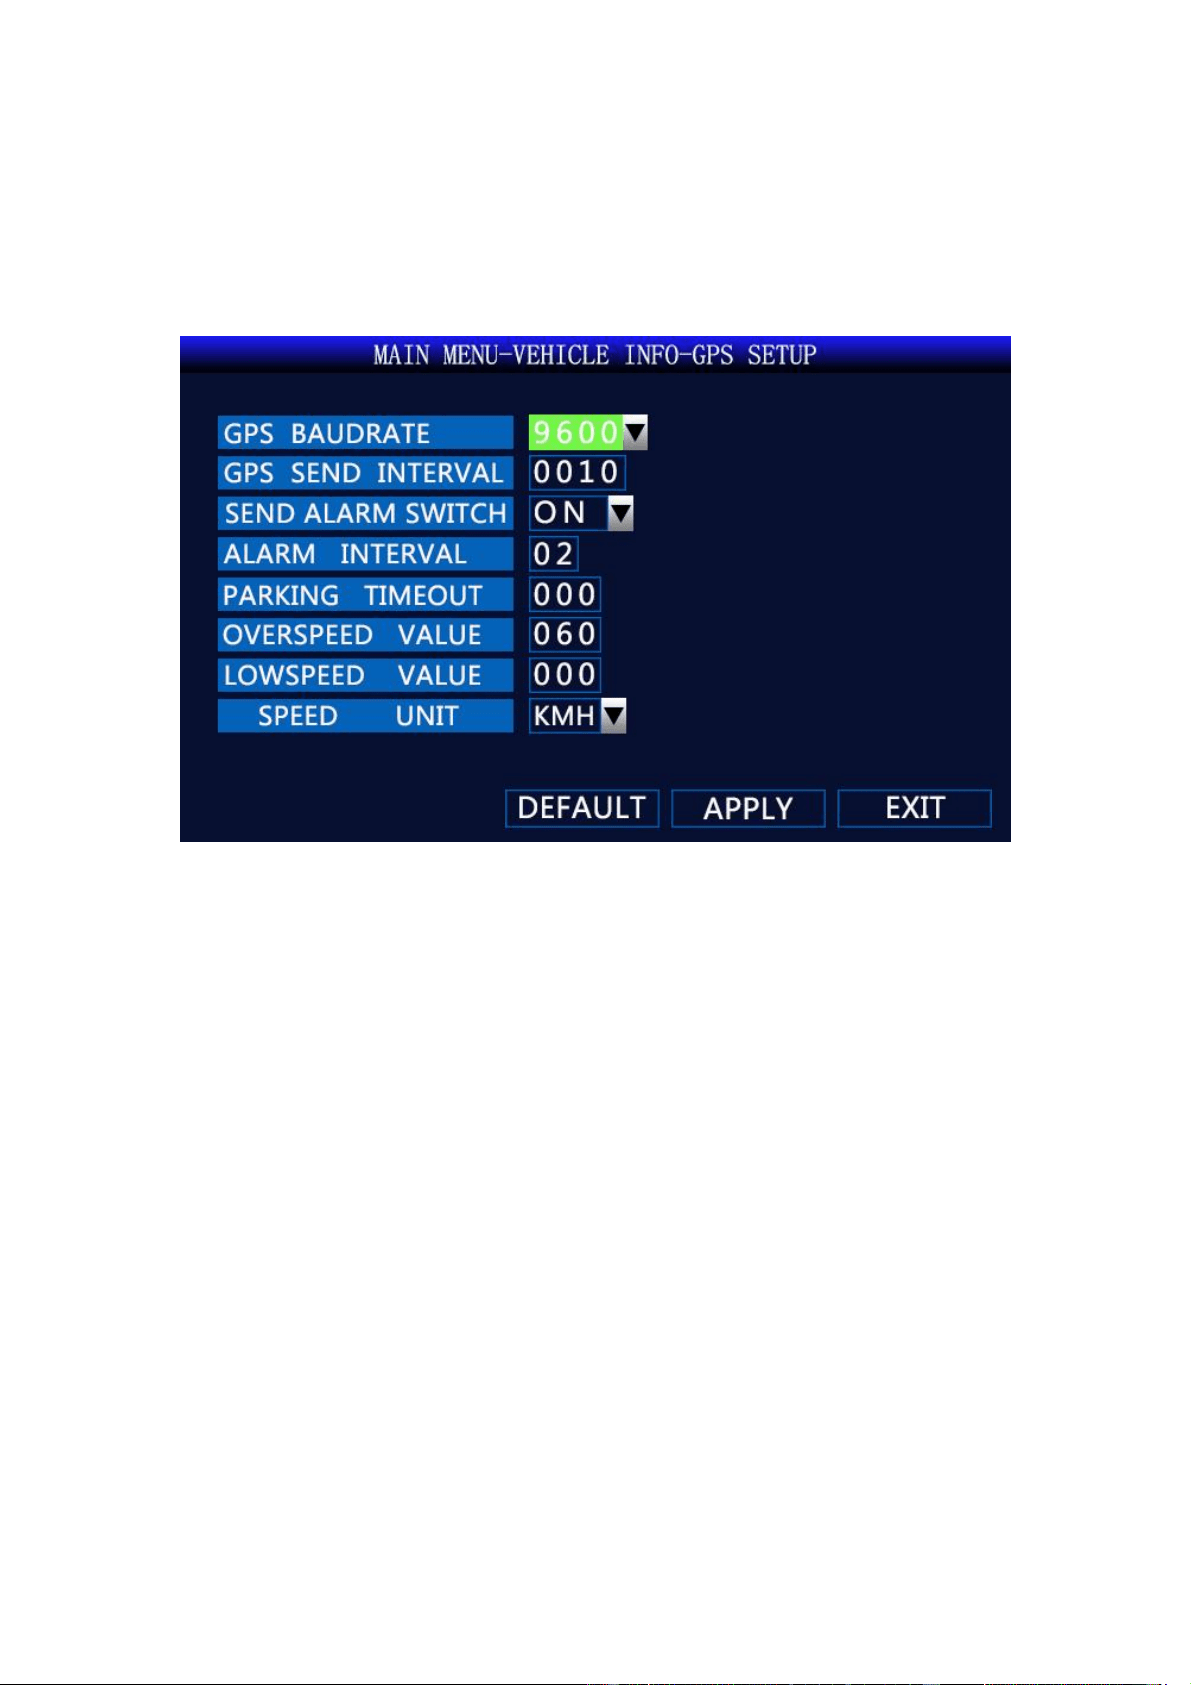
5.5.6 GPS Setup
Picture.27 GPS Setup
<Overspeed Value>: Above the set speed, the device will alarm
<Lowspeed Value>: Below the set speed, the device will alarm
22
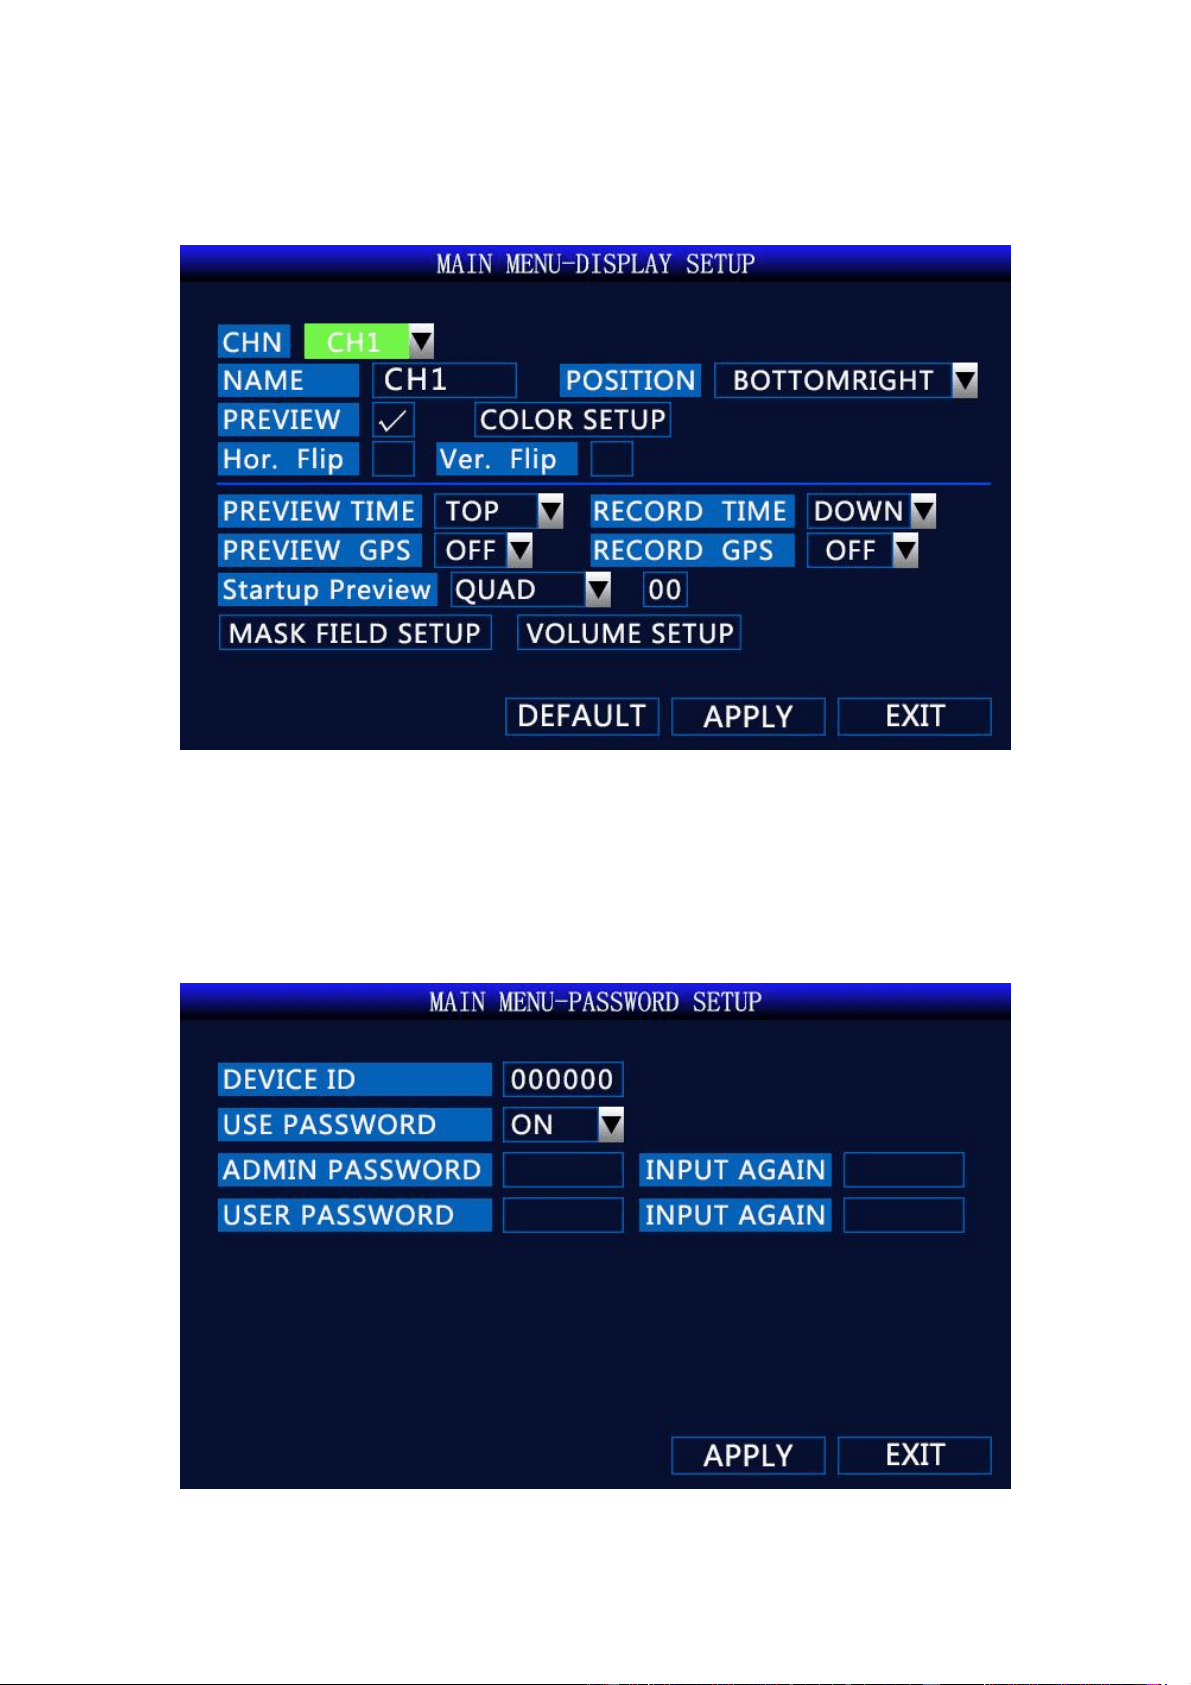
5.6 Display Setup
Picture.28 Display Setup
<Hor. Flip>: Flip the video image horizontally
<Ver. Flip>: Flip the video image vertically
5.7 Password Setup
Picture.29 Password Setup
23
Only “Admin” can set “Admin Password” and “User Password”
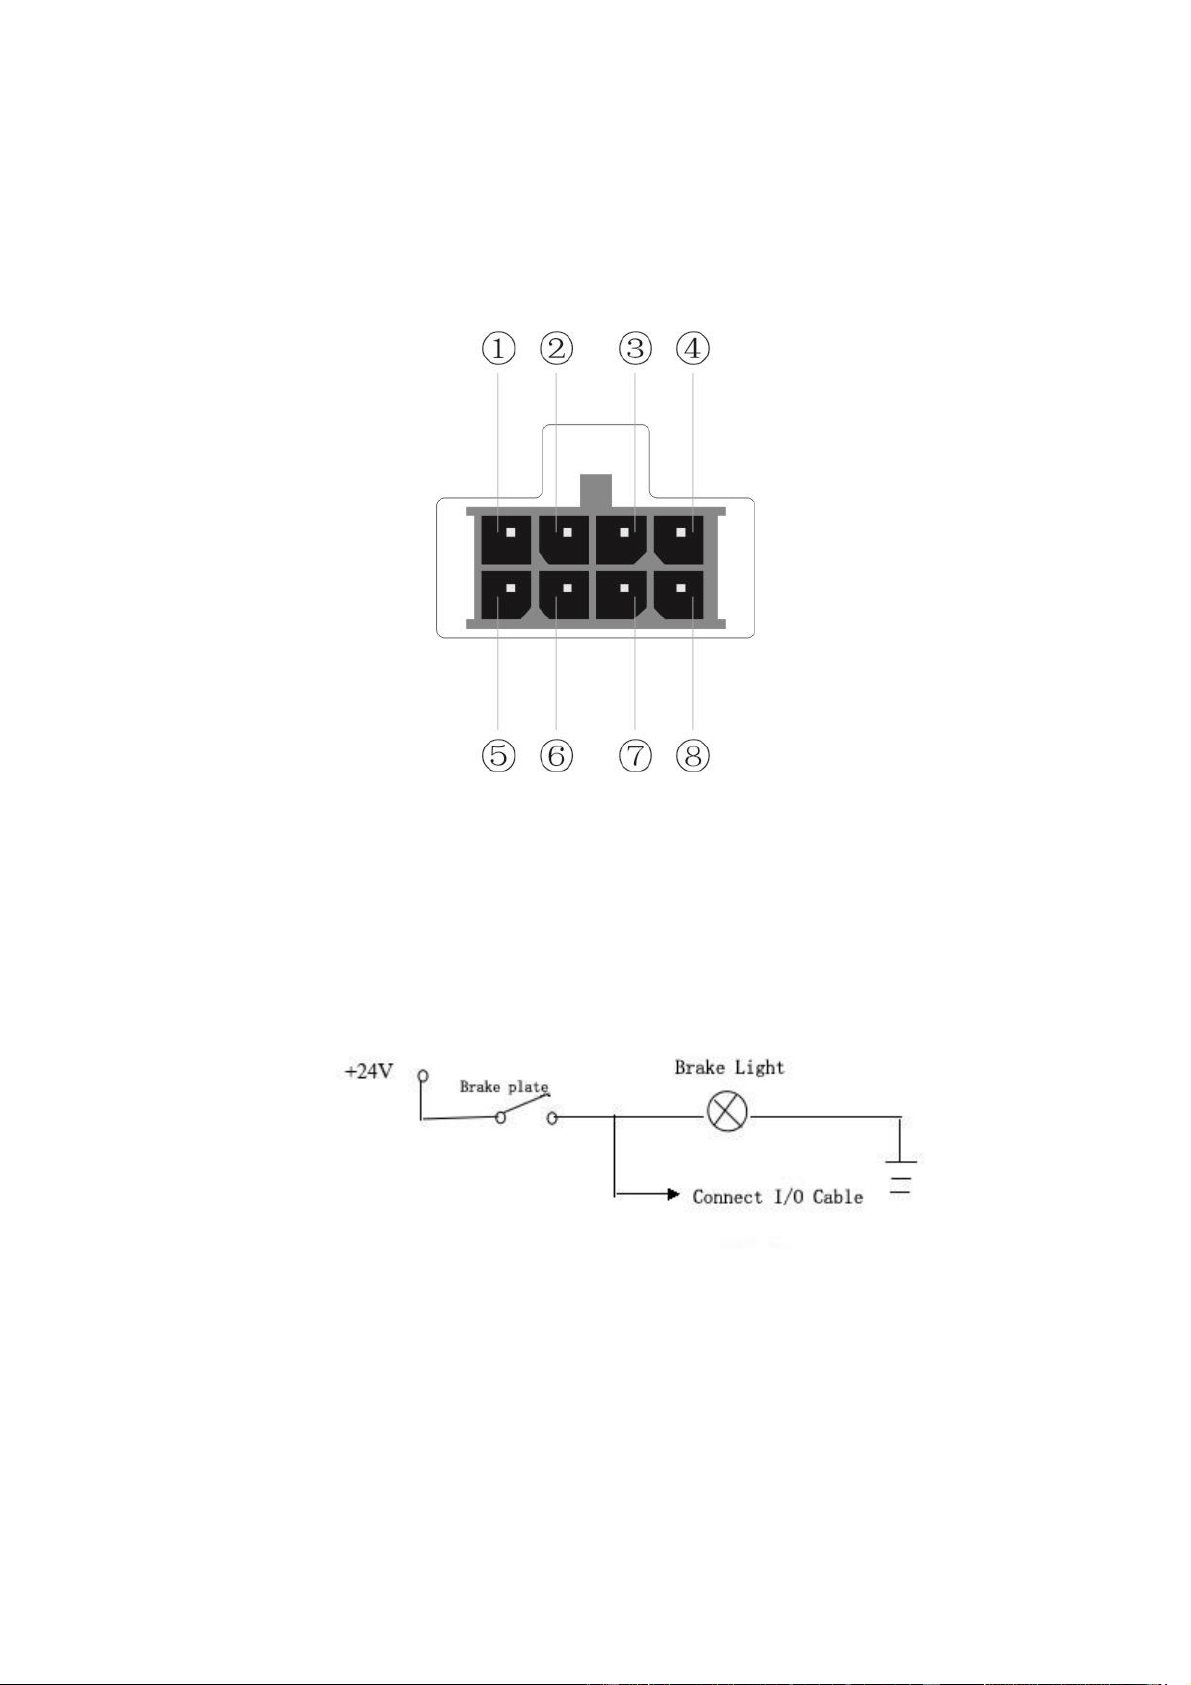
6 I/O Interface
Picture.30 IO Interface
① Alarm-2 ② Alarm-4 ③Alarm Output ④ 485B
⑤ Alarm-1 ⑥ Alarm-3 ⑦GND ⑧ 485A
There is 4 alarm input,2 alarm output. Alarm input detection are voltage; can be accessed by
variety of vehicles driving status, such as brakes, steering ,horn and so on. Brake testing schematic
shown below, when the brake pedal is depressed, MDVR able to detect high or low voltage.
Picture.31 Brake testing schematic
Alarm outputs are voltage output. Drive capability of 200mA, if you want large power devices,
must be externally relays. Alarm output photoelectric schematic shown below.
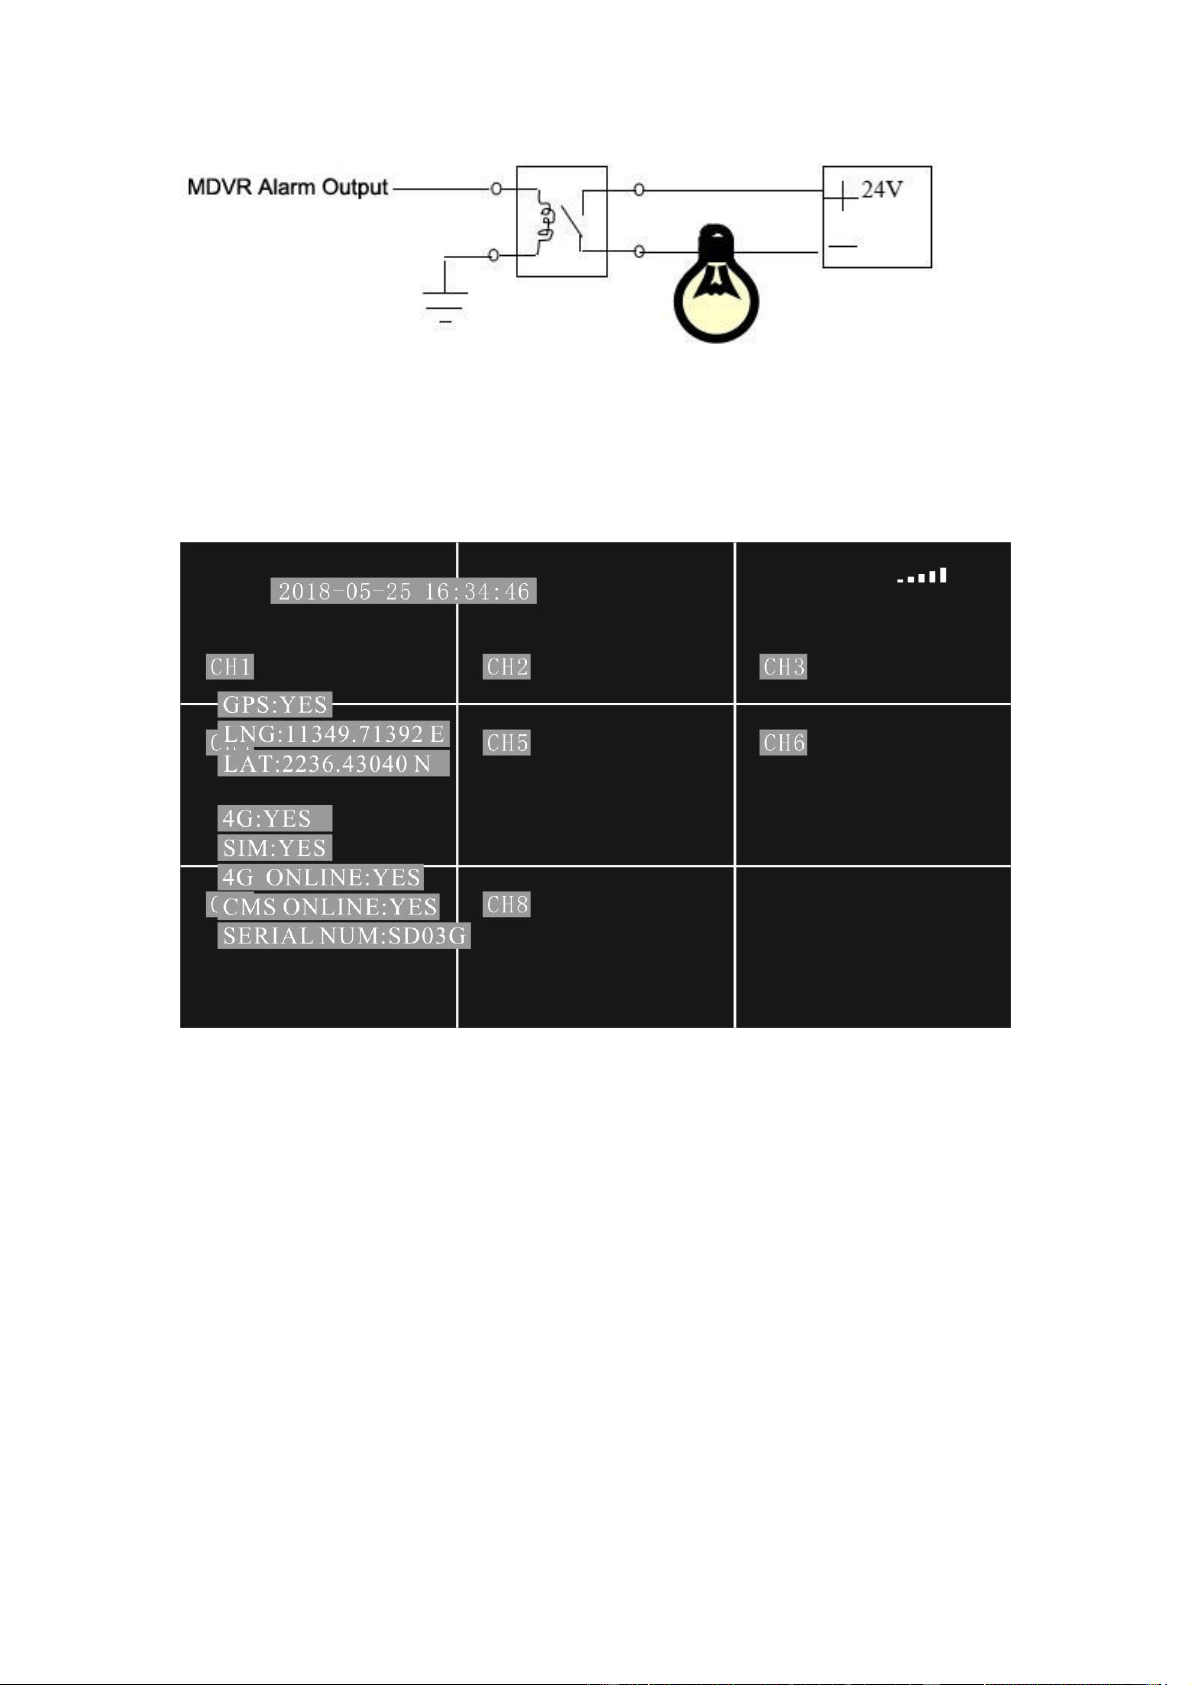
24
Picture.32 Alarm Schematic
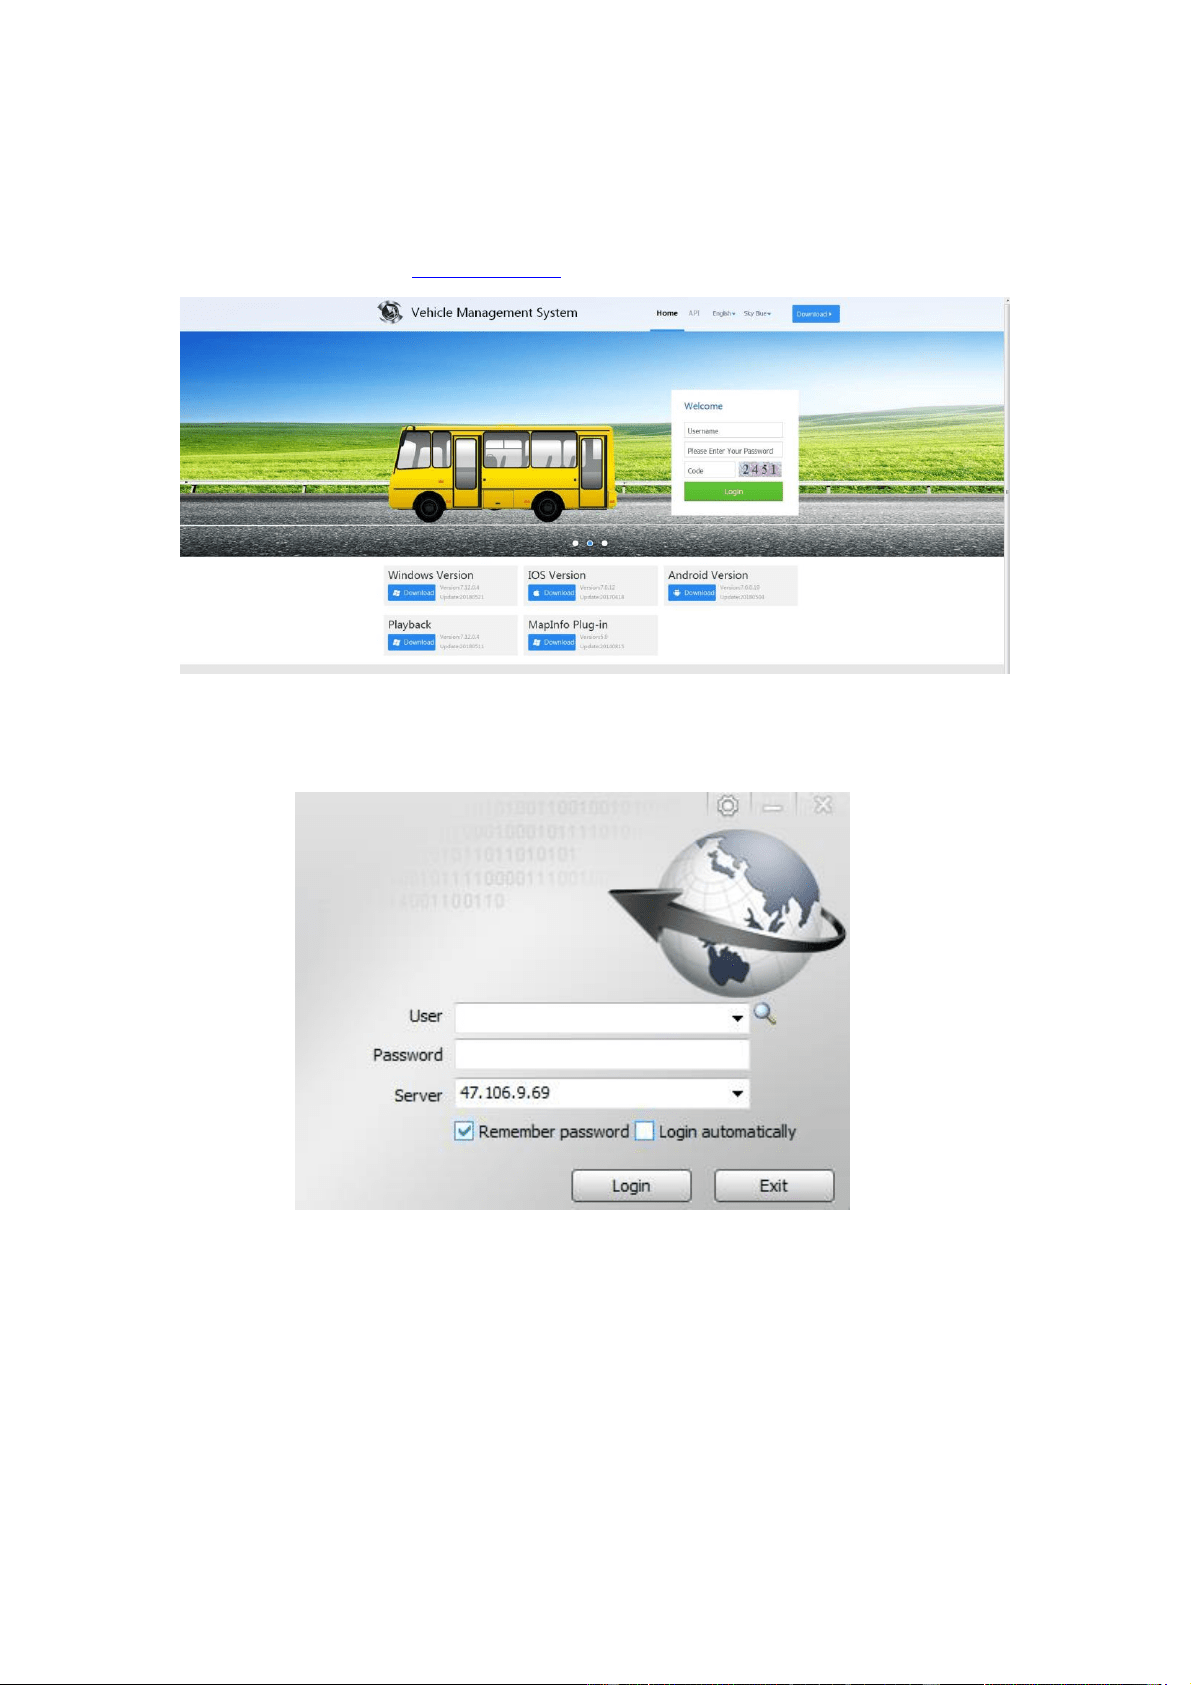
7 Check Networking(Online) Status
Picture.33 Check Networking(Online) Status
Press the button “Info” on remote control, will be showed the online information.
GPS:YES means recognize the GPS module; GPS:NO means not recognize GPS module
LNG:11349.71392 E Display longitude, 0.0 means GPS not working
LAT:2236.43040 N Display latitude, 0.0 means GPS not working
4G:YES means recognize module, 4G:NO means not recognize module
SIM:YES means recognize the SIM card, SIM:NO means not recognize the SIM card
4G ONLINE:YES means networked, 4G ONLINE:NO means no connecting network
CMS ONLINE:YES means connected the server, CMS ONLINE:NO means not connect the
server
26
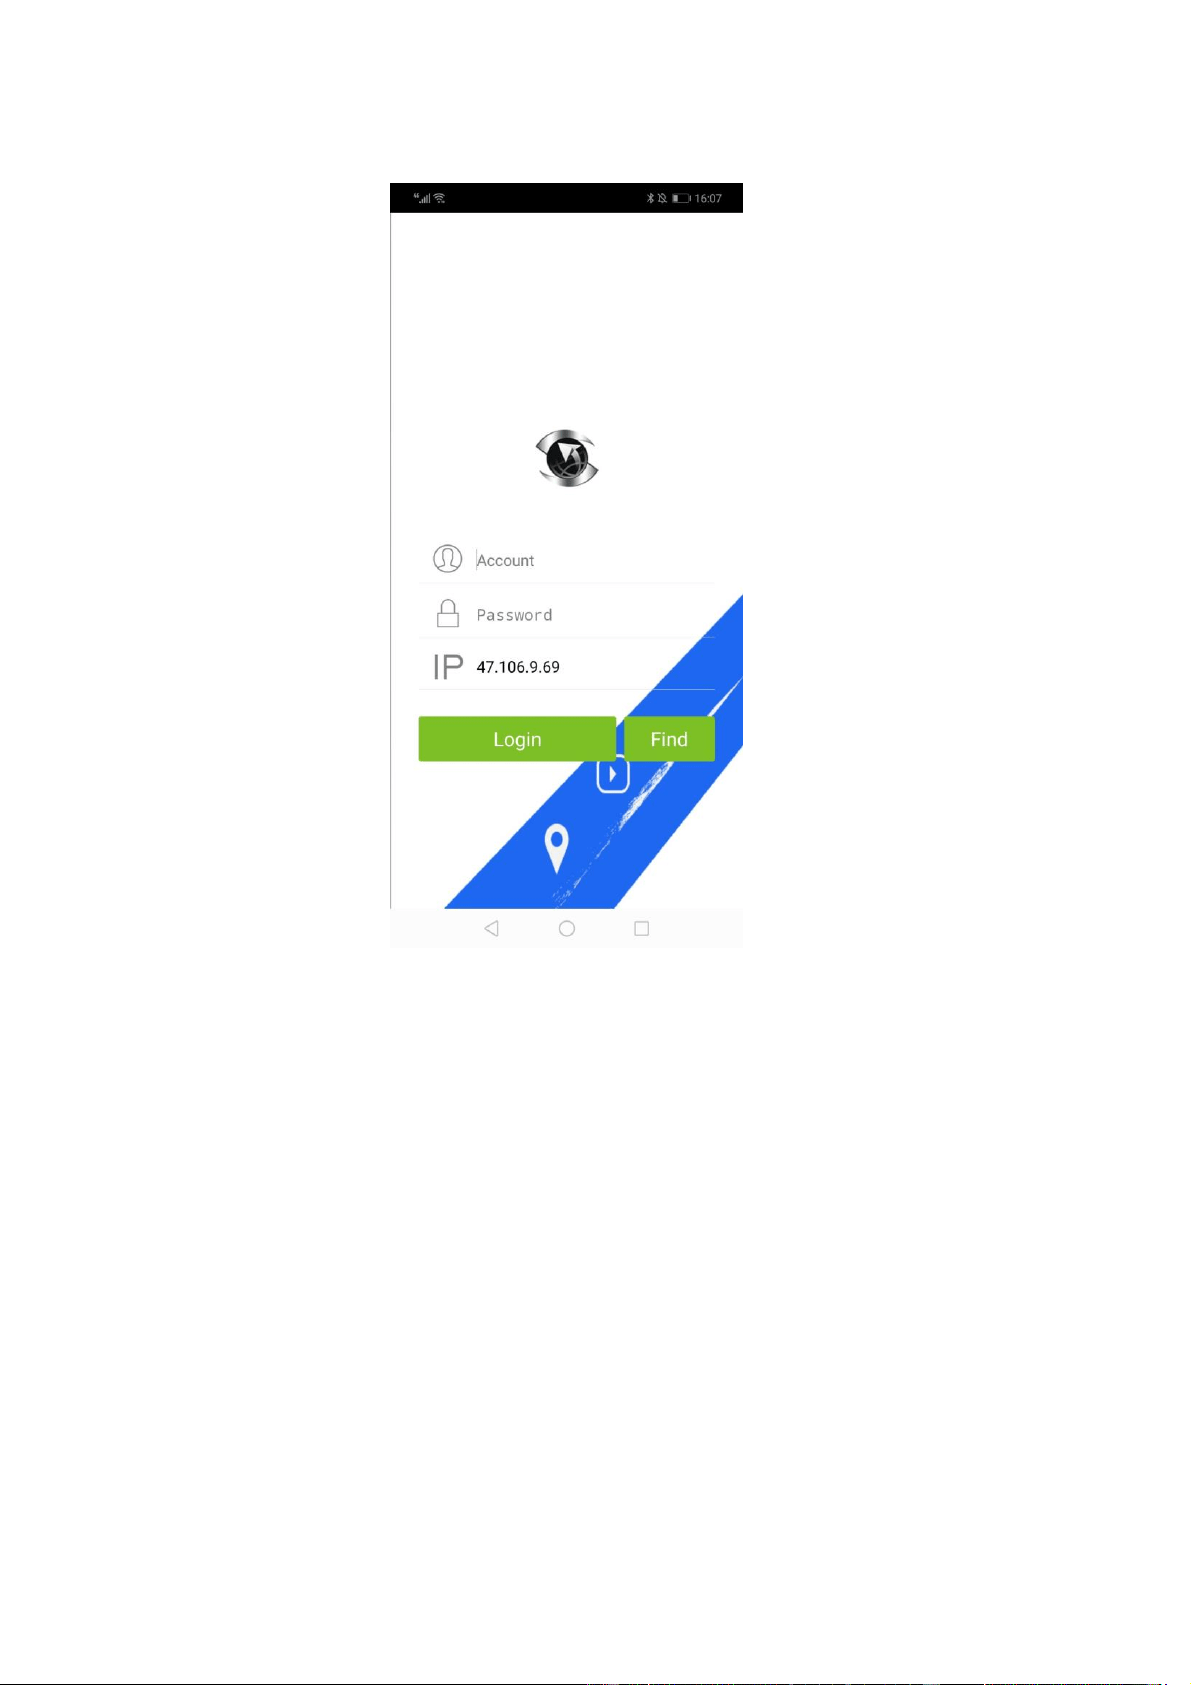
2. For smart phone, search “CMSV6” in the app store and download.
Picture.36 login interface on phone
Account (User): Mark on the device label
Password: Default :000000
Server (IP): Enter IP :47.106.9.69
NOTE: The remote controller does not contain battery. Please buy the battery in local
market. Battery Model: CR2025.
9 FAQ
Q: Why MDVR don’t power on?
A: Please make sure the SD card door is locked.
B: Please make sure the YELLOW ACC wire gets power too.
C: Please take out the SD or HDD out to test.
Q: How to set rearview image of camera?

27
Enter OSD menu via Admin account.
Operation->Display-> Check Horizontal Flip
Q: How to do when system shows “HDD ERR” after insert a SD card?
It needs to format the SD card when use the SD card first time. Please check the video. If it still
shows “HDD ERR” after formatting the SD card, please change to use another SD card.
Enter OSD menu via Admin account.
Main->Basic-> Disk. Select the SD and Click “Format”.
Q: How to do when MDVR turns on and off automatically all the time?
Please remove the SD card or change another SD card. Bad SD card will lead to this issue.
Q: How to set up recording resolution?
Please enter OSD menu via Admin account, default password is empty.
Main->Record->Resolution (it can set CIF/HD1/D1/960H/720P).
Q: How to connect and use the IO cable?
It supports 4 channel alarm input.
Please refer to section 6 I/O interface in this manual.
Q: Where to download the APP, CMSV6 software and PC playback software?
Please check below link to download the software.
http://47.106.9.69/808gps/login.html
Q: How to configure 4G?
Kindly remind you that it needs to input APN according to your 4G SIM card.
MAIN->VEHICLE->WIRELESS->USER setup APN.
Q: How to change vehicle name on CMSV6?
Please log in CMSV6 client software or webpage.
Enter Operation->Vehicle->Edit.->Plate NO. then save.
If you want to change the company name, please contact us, we will create your company name
and allocate your mdvr under your company. Our server is free.
Note: It cannot change the vehicle ID. Actually, it does not need to change the vehicle ID, please
just change the plate NO. then it will show the new name on CMSV6 platform.
Q: Why cannot use Google map?
Google map service is not free. The fee of google map per year is much more expensive than the
full Mdvr kit. Baidu map is free now, and it shows English language on map. Most of our
customers use Baidu map, and if you want to use google map, it have to build up your own server,
and put the Mdvr on your own server. Then you can bug google map API key and replace the API
key on your server,
Q: Why can not show video remotely?
First, please make sure the mdvr is online. Make sure it connects with 4G or wifi successfully.

28
1. APP: Please click search button, and select the mdvr, then back to Video page will show the
videos,
2. Webpage: Please install flash and enable it runs on webpage.
Q: How to build up my own server?
A PC with a fixed IP can install the CMSV6 server. Please contact us, we will send the latest
CMSV6 server software to you.
Sincerely,
JOINLGO Customer Service Team
10 Contact
Website: www.joinlgo.com
Email: service@joinlgo.com