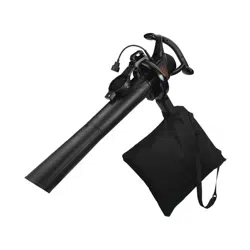
[email protected] BECKER®
INSTRUCTION
MANUAL
DATE CODE
Catalog Number BV4000
iF YOU SHOULD EXPERIENCE A PROBLEM
WiTH YOUR BLACK & DECKER PRODUCT,
CALL 1-800-54-HOW=TO (544-6986).
BEFORE YOU CALL, HAVE THE FOLLOWING iNFORMATiON
AVAILABLE, CATALOG NO., TYPE NO., AND DATE CODE.
iN MOST CASES, A BLACK & DECKER REPRESENTATIVE CAN RESOLVE
YOUR PROBLEM OVER THE PHONE. iF YOU HAVE A SUGGESTION OR
COMMENT, GiVE US A CALL. YOUR FEEDBACK iS VITAL T0 BLACK & DECKER.
• DO NOT unplug by pulling on cord. To unplug, grasp the plug, not the cord.
• DO NOT put any objects into openings. Do not use with any opening blocked; keep free of
dust, lint, hair and everything that may reduce air flow.
• KEEP hair, loose clothing, fingers, and all parts of body away from openings and moving
parts.
• TURN OFF all controls before unplugging.
• DO NOT vacuum water, other liquids, or wet objects such as leaves. Never immerse any part
of the toot in liquid.
• DO NOT handle plug or appliance with wet hands.
• KEEP CHILDREN, BYSTANDERS AND ANIMALS AWAY from the work area a minimum
of 30 feet (10 meters) when starting or operating the toot.
• INSPECT THE AREA before using the toot. Remove all debris and hard objects such as
rocks, glass, wire, etc. that can ricochet, be thrown, or otherwise cause injury or damage
during operation. As a vacuum, the toot is designed to pick up dry materiat such as leaves,
grass, small twigs, and bits of paper. Do not vacuum stones, gravel, metal, broken glass, etc.
Z_WARNING: To reduce the risk of electrical shock; do not expose to rain, do not use on wet
surfaces. Store indoors.
z_ WARNING: Turn off and unplug unit, then wait until fan stops or at least 10 seconds
before removing the blower or vacuum tube assemblies.
SAVE THESE INSTRUCTIONS
Servicing of Double Insulated Appliances
Your BlowerNac is double-insulated to give you added safety. In a double insulated
appliance, two systems of insulation are provided instead of grounding. No grounding
means is provided on a double insulated appliance, nor should a means for grounding be
added to the appliance. Servicing a double insulated appliance requires extreme care and
knowledge of the system and should be done only by qualified service personnel.
Replacement parts for a double insulated appliance must be identical to the parts they
replace. A double insulated appliance is marked with the words double insulated or "double
insulation". The symbol (square within a square) may also be marked on the appliance.
zLSafetv Rules and Instructions: Extension Cords
Double in°sulated tools have 2-wire cords and can be used with 2-wire or 3-wire extension
cords. Only round jacketed extension cords should be used, and we recommend that they be
listed by Underwriters Laboratories (U.L) (C.S.A. in Canada). If the extension will be used
outside, the cord must be suitable for outdoor use. Any cord marked as outdoor can also be
used for indoor work.
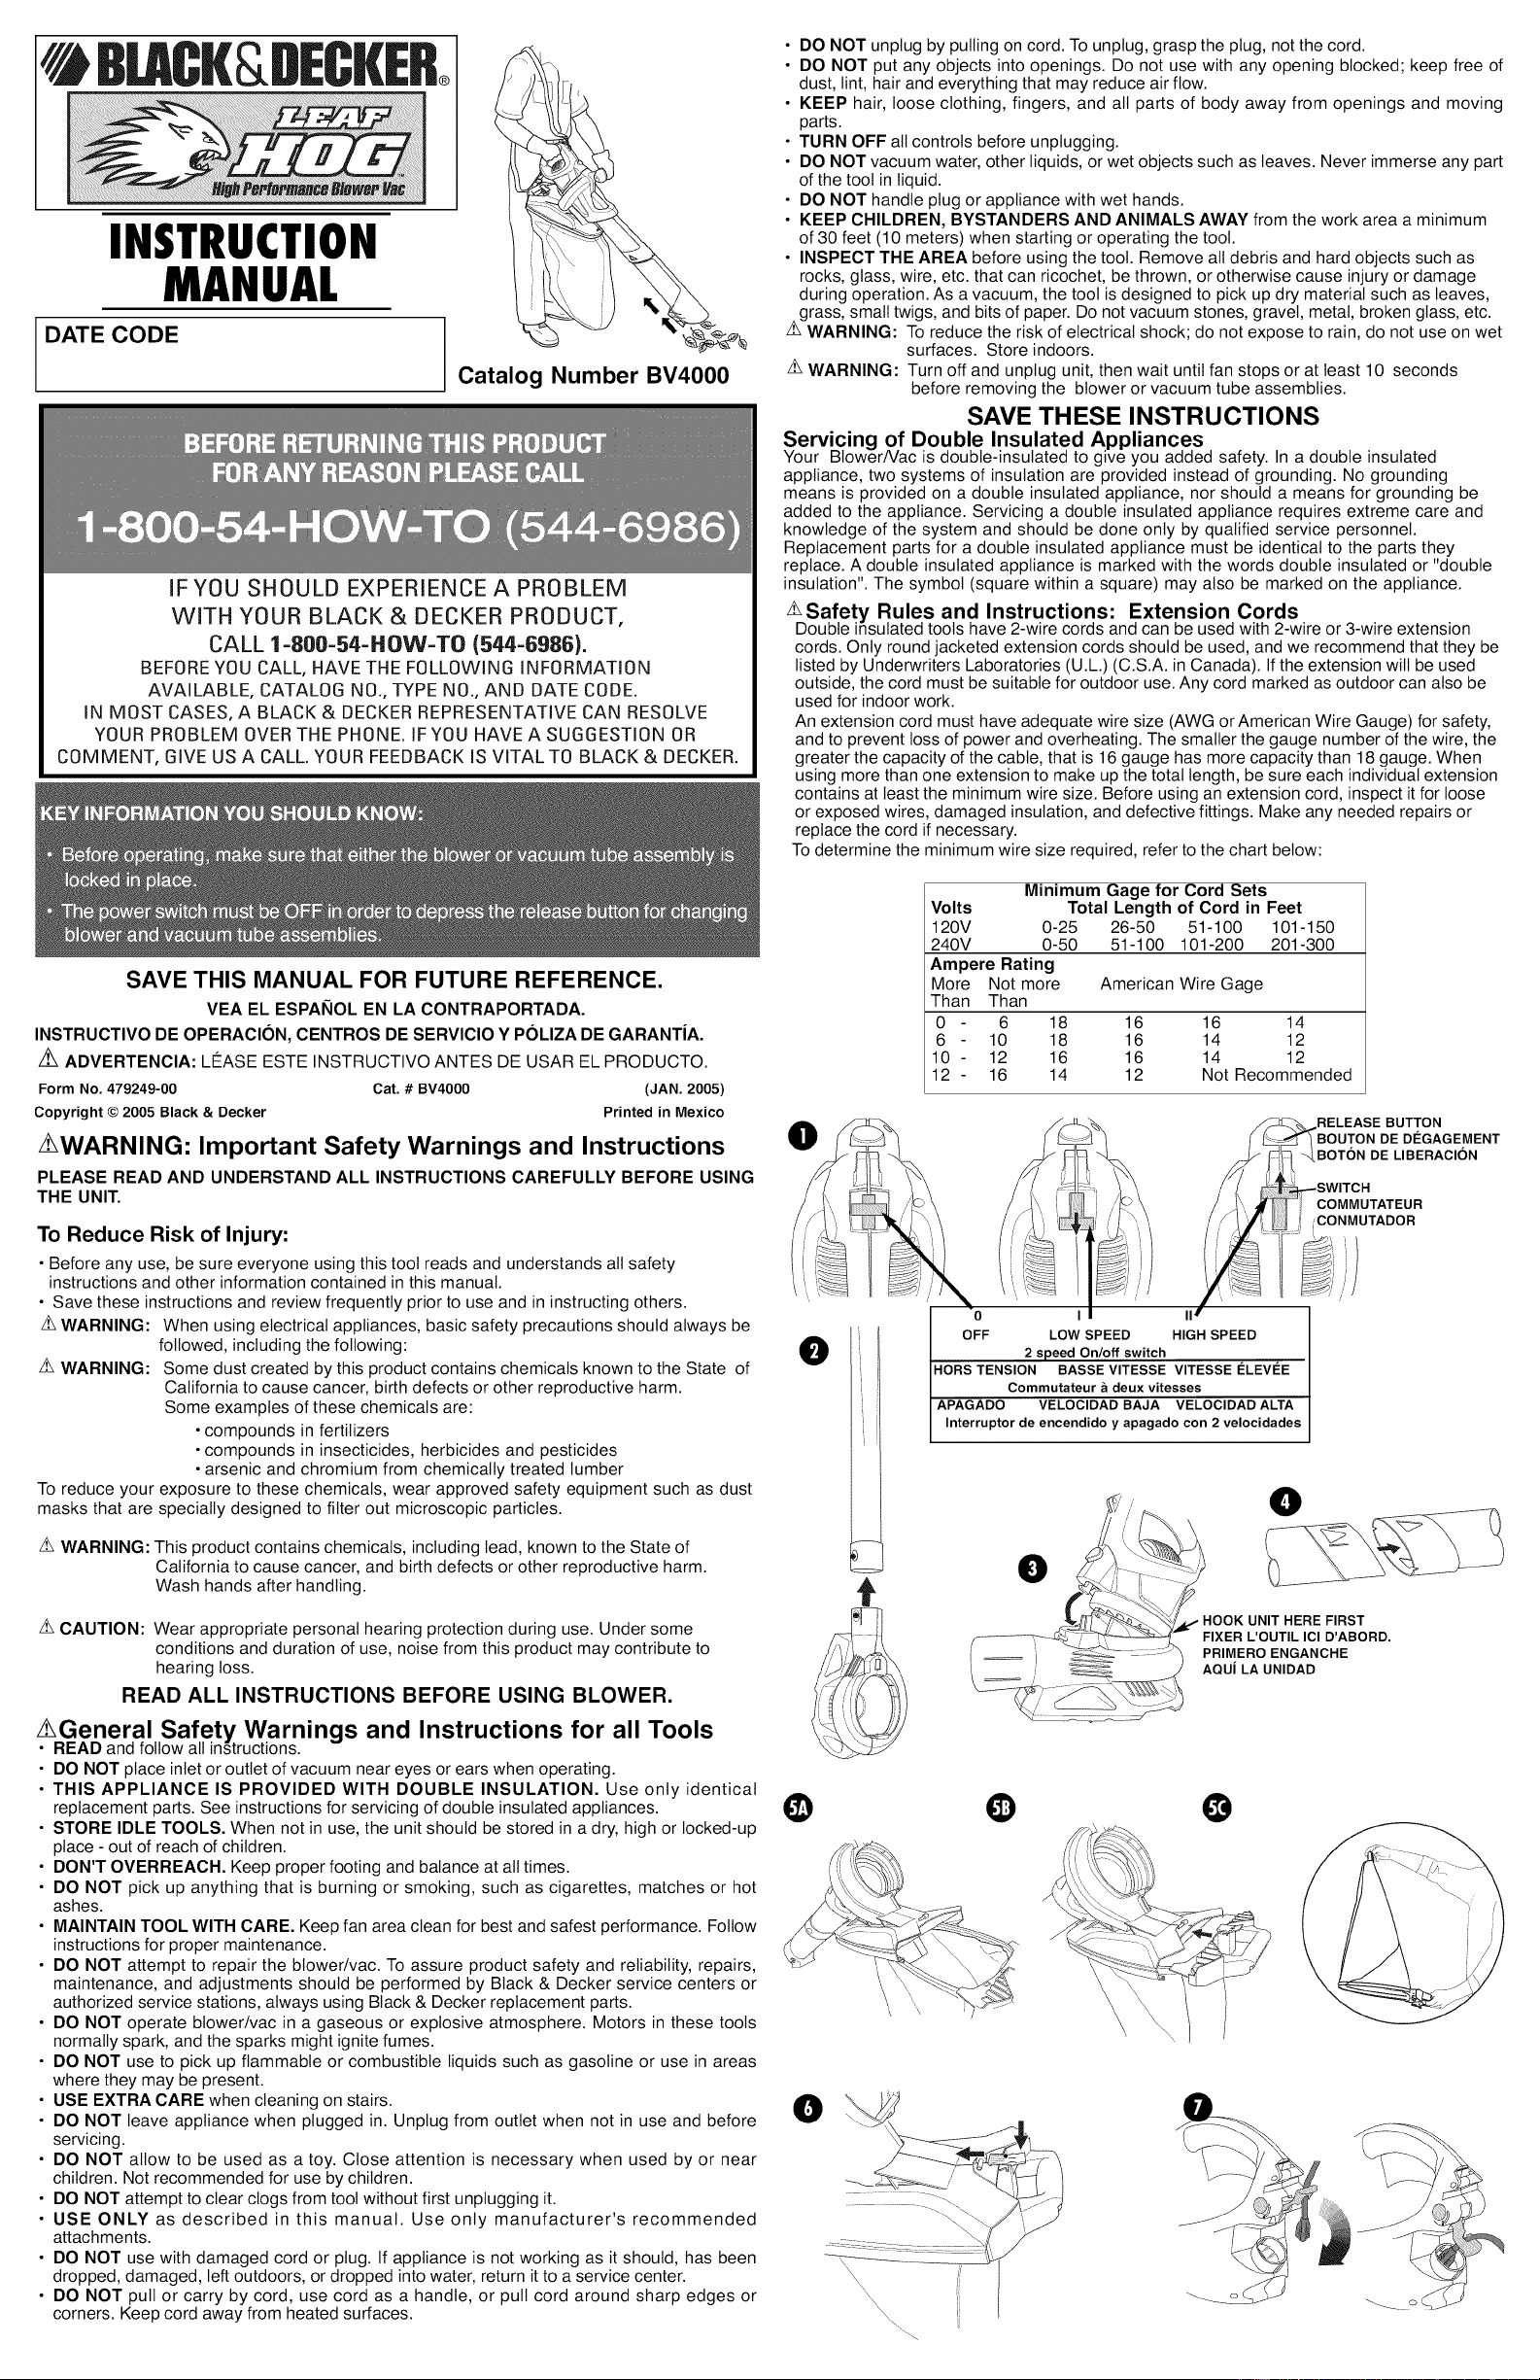
An extension cord must have adequate wire size (AWG or American Wire Gauge) for safety,
and to prevent loss of power and overheating. The smaller the gauge number of the wire, the
greater the capacity of the cable, that is 16 gauge has more capacity than 18 gauge. When
using more than one extension to make up the totat length, be sure each individual extension
contains at least the minimum wire size. Before using an extension cord, inspect it for loose
or exposed wires, damaged insulation, and defective fittings. Make any needed repairs or
replace the cord if necessary.
To determine the minimum wire size required, refer to the chart below:
SAVE THIS MANUAL FOR FUTURE REFERENCE.
VEA EL ESPAI_iOL EN LA CONTRAPORTADA.
INSTRUCTIVO DE OPERACION, CENTROS DE SERVICIO Y POLIZA DE GARANTIA.
/_ ADVERTENCIA: LEASE ESTE INSTRUCTIVO ANTES DE USAR EL PRODUCTO.
Form No. 479249-00 Cat. # BV4000 (JAN. 2005)
Copyright © 2005 Black & Decker Printed in Mexico
AXWARNING: Important Safety Warnings and Instructions
PLEASE READ AND UNDERSTAND ALL INSTRUCTIONS CAREFULLY BEFORE USING
THE UNIT.
To Reduce Risk of Injury:
• Before any use, be sure everyone using this toot reads and understands all safety
instructions and other information contained in this manual.
• Save these instructions and review frequently prior to use and in instructing others.
z_WARNING: When using electrical appliances, basic safety precautions should always be
followed, including the following:
z_ WARNING: Some dust created by this product contains chemicals known to the State of
California to cause cancer, birth defects or other reproductive harm.
Some examples of these chemicals are:
• compounds in fertilizers
• compounds in insecticides, herbicides and pesticides
• arsenic and chromium from chemically treated lumber
To reduce your exposure to these chemicals, wear approved safety equipment such as dust
masks that are specially designed to filter out microscopic particles.
ZLWARNING: This product contains chemicals, including lead, known to the State of
California to cause cancer, and birth defects or other reproductive harm.
Wash hands after handling.
ZLCAUTION: Wear appropriate personal hearing protection during use. Under some
conditions and duration of use, noise from this product may contribute to
hearing toss.
READ ALL INSTRUCTIONS BEFORE USING BLOWER.
/ General Safety Warnings and Instructions for all Tools
• READ and follow all instructions.
• DO NOT place inlet or outlet of vacuum near eyes or ears when operating.
• THIS APPLIANCE IS PROVIDED WITH DOUBLE INSULATION. Use only identical
replacement parts. See instructions for servicing of double insulated appliances.
• STORE IDLE TOOLS. When not in use, the unit should be stored in a dry, high or locked-up
place - out of reach of children.
• DON'T OVERREACH. Keep proper footing and balance at all times.
• DO NOT pick up anything that is burning or smoking, such as cigarettes, matches or hot
ashes.
• MAINTAIN TOOL WITH CARE. Keep fan area clean for best and safest performance. Follow
instructions for proper maintenance.
• DO NOT attempt to repair the blower/vac. To assure product safety and reliability, repairs,
maintenance, and adjustments should be performed by Black & Decker service centers or
authorized service stations, always using Black & Decker replacement parts.
• DO NOT operate btower/vac in a gaseous or explosive atmosphere. Motors in these tools
normally spark, and the sparks might ignite fumes.
• DO NOT use to pick up flammable or combustible liquids such as gasoline or use in areas
where they may be present.
• USE EXTRA CARE when cleaning on stairs.
• DO NOT leave appliance when plugged in. Unplug from outlet when not in use and before
servicing.
• DO NOT allow to be used as a toy. Close attention is necessary when used by or near
children. Not recommended for use by children.
• DO NOT attempt to clear clogs from toot without first unplugging it.
• USE ONLY as described in this manual. Use only manufacturer's recommended
attachments.
• DO NOT use with damaged cord or plug. If appliance is not working as it should, has been
dropped, damaged, left outdoors, or dropped into water, return it to a service center.
• DO NOT pull or carry by cord, use cord as a handle, or putt cord around sharp edges or
corners. Keep cord away from heated surfaces.
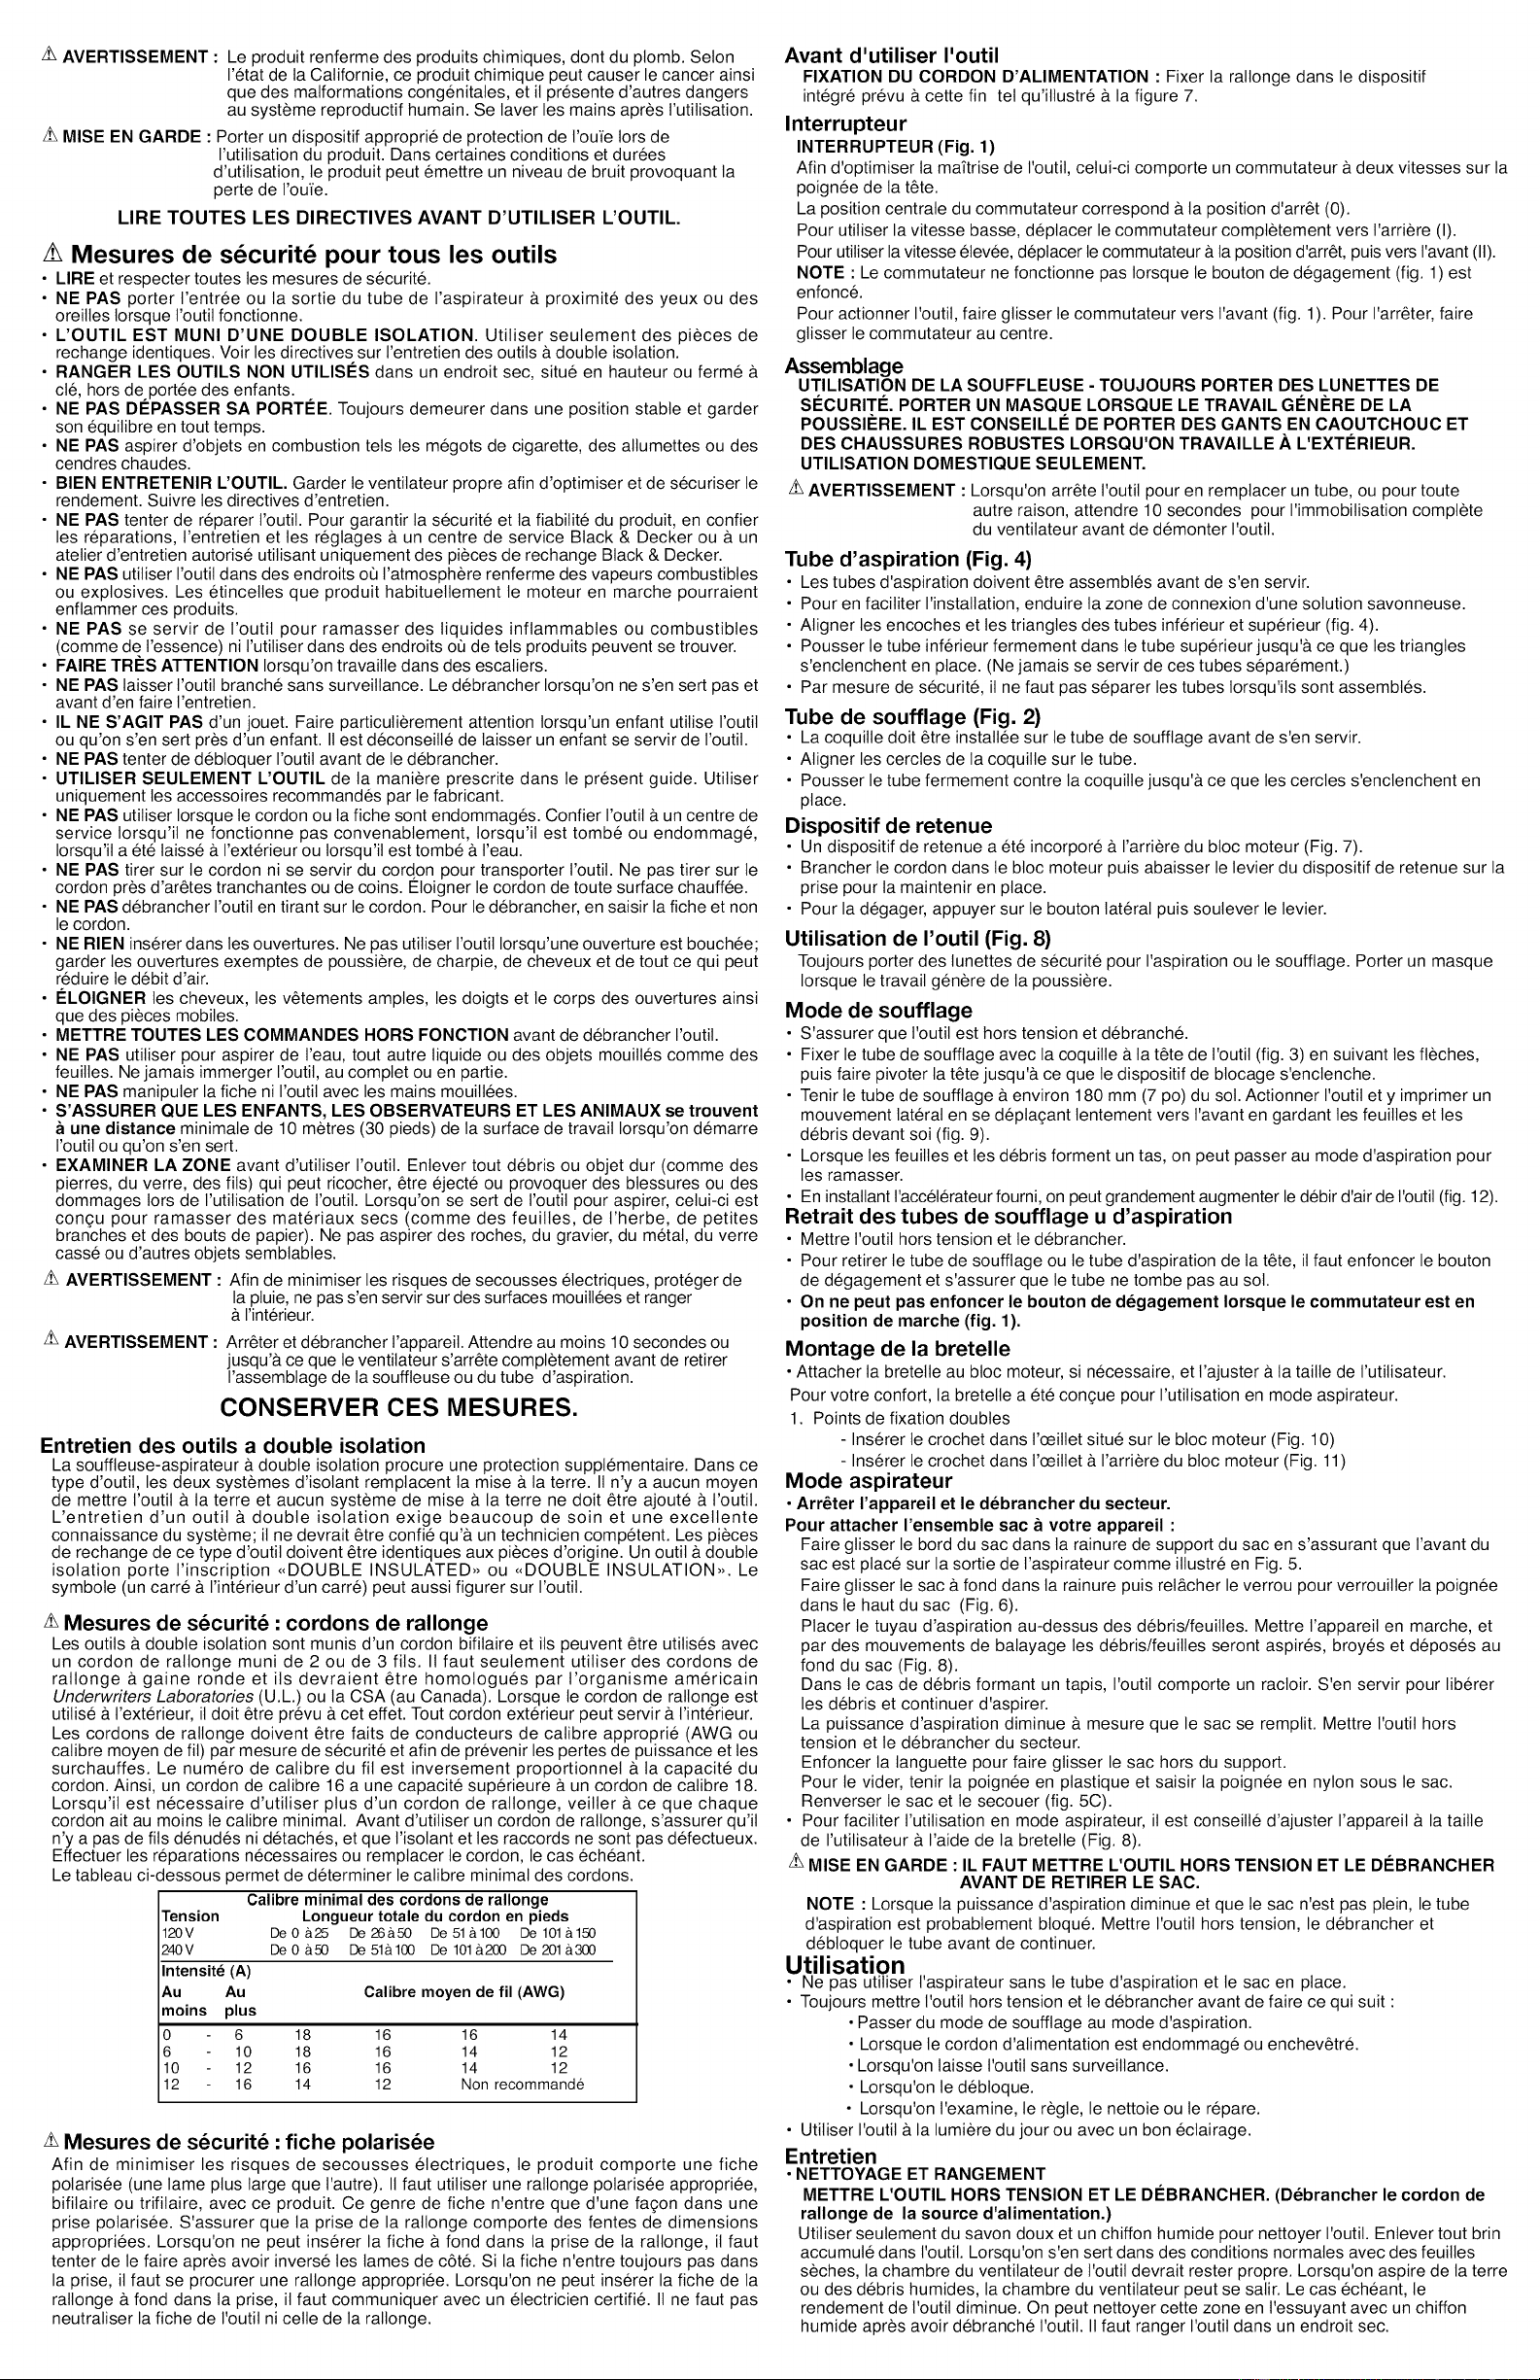
O
t
Volts
120V 0-25
240V 0-50
Ampere Rating
More Not more
Than Than
0 6 18
6 10 18
10 - 12 16
12 - 16 14
Minimum Gage for Cord Sets
Total Length of Cord in Feet
26-50 51-100 101-150
51-100 101-200 201-300
American Wire Gage
0 I
OFF LOW SPEED
2 speed On/off switch
16 16 14
16 14 12
16 14 12
12 Not Recommended
,/
HIGH SPEED
HORS TENSION BASSE VITESSE VITESSE LeLEVI_E
Commutateur a deux vitesses
APAGADO VELOCIDAD BAJA VELOCIDAD ALTA
Interruptor de encendido y apagado con 2 velocidades
O
RELEASE BUTTON
BOUTON DE DEGAGEMENT
BOTON DE LIBERACION
SWITCH
COMMUTATEUR
_ i CONMUTADOR
@ @ @
O
O
HOOK UNIT HERE FIRST
FIXER L'OUTIL ICl D'ABORD.
PRIMERO ENGANCHE
AQUl LA UNIDAD
/
/
z_Safety Rules and Instructions: Polarized Plug
To reduce the risk of electric shock, this equipment has a polarized plug (one blade is wider
than the other). This equipment must be used with a suitable polarized 2 wire or 3 wire
extension cord. Polarized connections wilt fit together only one way. Make sure that the
receptacle end of the extension cord has large and small blade slot widths. If the plug does
not fit fully into the extension cord, reverse the plug. If it still does not fit, obtain a suitable
extension cord. If the extension cord does not fit fully into the outlet, contact a qualified electri-
cian to install the proper outlet. Do not change the toot plug or extension cord in any way.
Before Operating
SECURING POWER SUPPLY CORD - Secure the extension cord in the tool's built-in cord
retainer as shown in Figure 7.
Switch
On/Off Switch (Fig. 1)
For extra control, your blow vac is fitted with a two speed switch located on the handle of the
powerhead.
The switch has a central off. Position 0.
To use in low speed, move the switch fully to the rear. Position I.
To change to high speed push the switch back to the off position and then fully forward.
Position II.
NOTE: The switch wilt not operate if the release button, shown in Figure 1, is depressed.
To turn the toot ON, slide the switch forward, as shown in Figure 1. To turn toot OFF, slide
switch to the middle position.
Assembly
USE AS A BLOWER: ALWAYS WEAR SAFETY GLASSES, WEAR A FILTER MASK IF
THE OPERATION IS DUSTY. USE OF RUBBER GLOVES AND SUBSTANTIAL
FOOTWEAR IS RECOMMENDED WHEN WORKING OUTDOORS. FOR HOUSEHOLD
USE ONLY.
z_WARNING: When turning the tool off for tube installation or any other reason, wait 10
seconds for the fan to stop rotating before disassembly.
Vacuum Tube Assembly (Fig. 4)
• Vacuum tubes must be assembled together before use.
• To ease assembly apply soapy water solution to joint area.
• Align the notches and the triangles on upper and lower tubes. (Fig. 4)
• Push the lower tube firmly into the upper tube, until the triangles click into place. (Never
operate apart).
• In the interests of safety, it is not intended for the tubes to be separated once assembled.
Blow Tube Assembly (Fig. 2)
• Blow tube must be assembled to the blow clamshell before use.
• Align the circles on the clamshell and the tube.
• Push the tube firmly onto the clamshell until the circles click into place.
Cord Retainer
• A cord retainer is incorporated into the rear of the powerhead. (Fig 7)
• Insert the cord into the powerhead and flip the cord retainer lever against the plug to hold it in
position.
• To release, depress the side button and then pull up lever.
Using Your Product (Fig. 8)
When using as a blower or vacuum, always wear safety glasses. If using in dusty conditions,
wear a filter mask as well.
Blow Mode
• Ensure your product is switched off and disconnected from the main power supply.
• Attach the blow clamshell and tube to the powerhead (Fig. 3) by locating the blower as
indicated by arrow, then pivot about this point until the locking/release catch is fully engaged.
• Hold the blow tube approximately 180mm (7") above the ground, switch your product on and
using a sweeping motion from side to side, advance slowly keeping the accumulated
debris/leaves in front of you (Fig. 9).
• Once you have blown the debris/leaves into a pile, you can convert to vacuum mode to
collect the debris.
• Installing the concentrator will help remove matted debris and leaves (Fig. 12).
Removing Blow/Vacuum Tube
• Switch off your product and disconnect from power supply.
• To disconnect the blow clamshell or vacuum tube from the powerhead, depress the release
button, ensuring the tube does not fall to the ground.
• The release button will not depress if the power switch is in the "on" position. (Fig. 1)
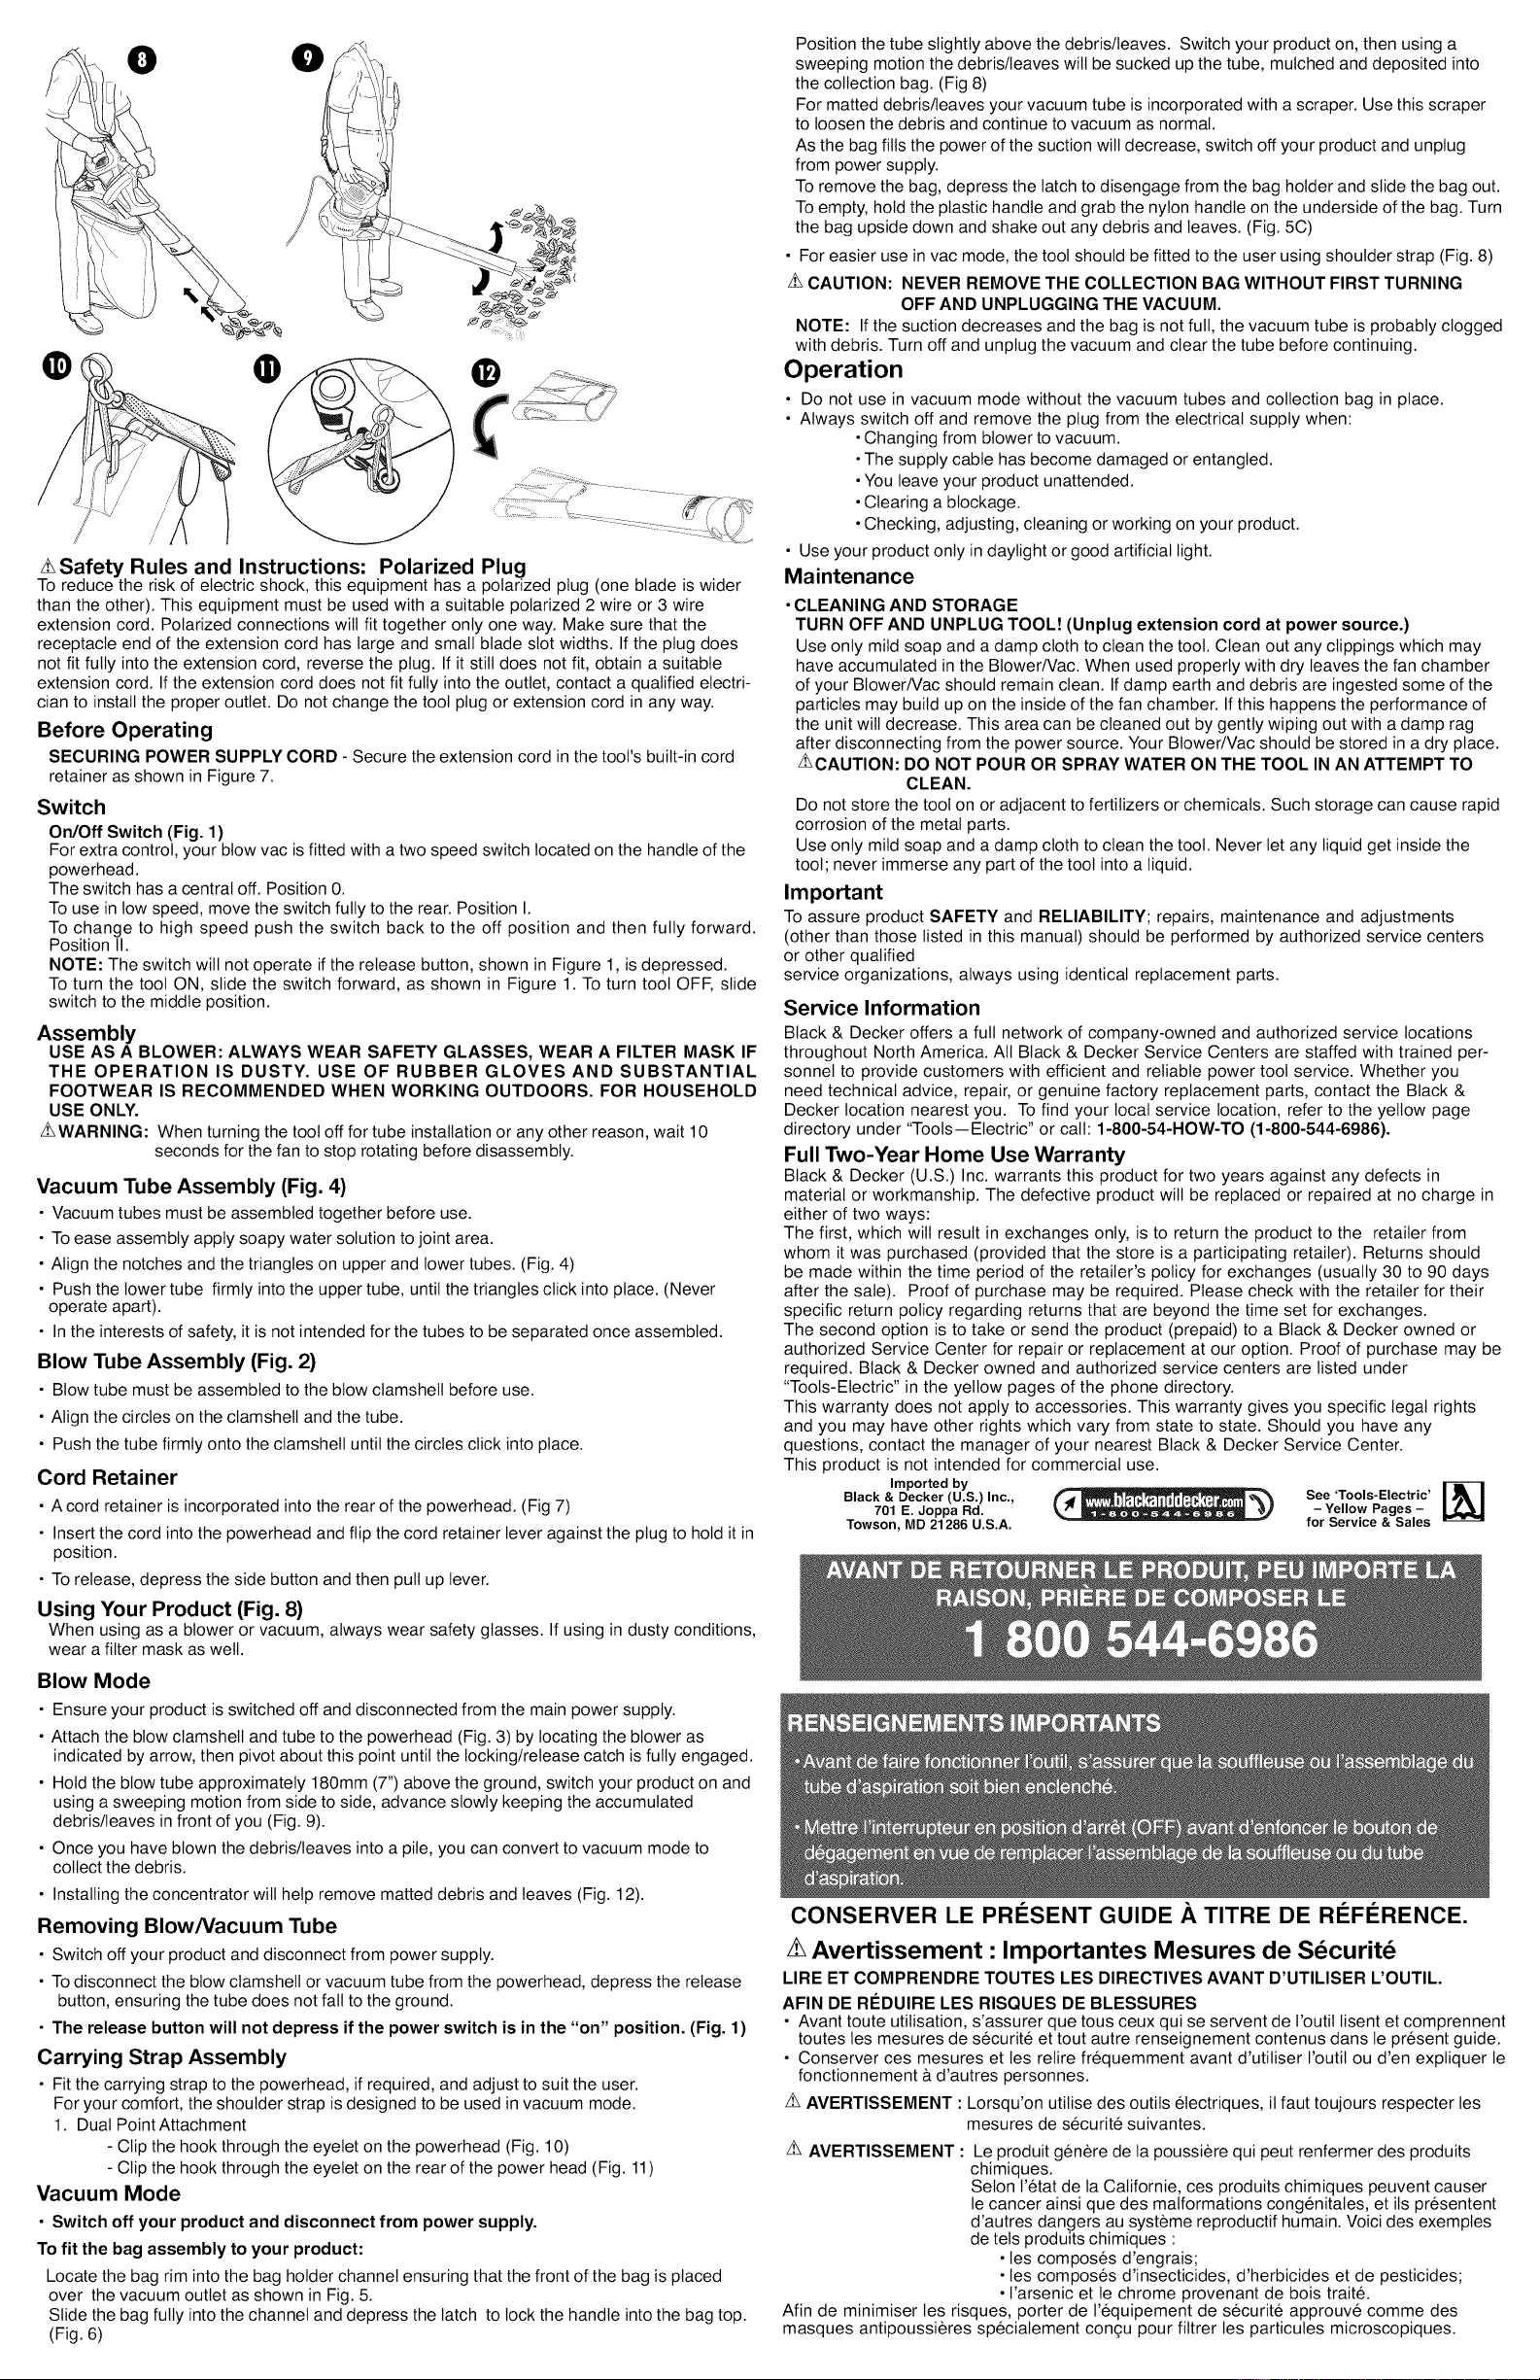
Carrying Strap Assembly
• Fit the carrying strap to the powerhead, if required, and adjust to suit the user.
For your comfort, the shoulder strap is designed to be used in vacuum mode.
1. Dual Point Attachment
- Clip the hook through the eyelet on the powerhead (Fig. 10)
- Clip the hook through the eyelet on the rear of the power head (Fig. 11)
Vacuum Mode
• Switch off your product and disconnect from power supply.
To fit the bag assembly to your product:
Locate the bag rim into the bag holder channel ensuring that the front of the bag is placed
over the vacuum outlet as shown in Fig. 5.
Slide the bag fully into the channel and depress the latch to lock the handle into the bag top.
(Fig. 6)
Position the tube slightly above the debris/leaves. Switch your product on, then using a
sweeping motion the debris/leaves will be sucked up the tube, mulched and deposited into
the collection bag. (Fig 8)
For matted debris/leaves your vacuum tube is incorporated with a scraper. Use this scraper
to loosen the debris and continue to vacuum as normal.
As the bag fills the power of the suction will decrease, switch off your product and unplug
from power supply.
To remove the bag, depress the latch to disengage from the bag holder and slide the bag out.
Toempty, hold the plastic handle and grab the nylon handle on the underside of the bag. Turn
the bag upside down and shake out any debris and leaves. (Fig. 5C)
• For easier use in vac mode, the toot should be fitted to the user using shoulder strap (Fig. 8)
Z_CAUTION: NEVER REMOVE THE COLLECTION BAG WITHOUT FIRST TURNING
OFF AND UNPLUGGING THE VACUUM.
NOTE: If the suction decreases and the bag is not full, the vacuum tube is probably clogged
with debris. Turn off and unplug the vacuum and clear the tube before continuing.
Operation
• Do not use in vacuum mode without the vacuum tubes and collection bag in place.
• Always switch off and remove the plug from the electrical supply when:
•Changing from blower to vacuum.
•The supply cable has become damaged or entangled.
•You leave your product unattended.
•Clearing a blockage.
•Checking, adjusting, cleaning or working on your product.
• Use your product only in daylight or good artificial light.
Maintenance
•CLEANING AND STORAGE
TURN OFF AND UNPLUG TOOL! (Unplug extension cord at power source.)
Use only mild soap and a damp cloth to clean the toot. Clean out any clippings which may
have accumulated in the BlowerNac. When used properly with dry leaves the fan chamber
of your BlowerNac should remain clean. If damp earth and debris are ingested some of the
particles may build up on the inside of the fan chamber. Ifthis happens the performance of
the unit wilt decrease. This area can be cleaned out by gently wiping out with a damp rag
after disconnecting from the power source. Your Btower/Vac should be stored in a dry place.
Z_CAUTION: DO NOT POUR OR SPRAY WATER ON THE TOOL IN AN ATTEMPT TO
CLEAN.
Do not store the tool on or adjacent to fertilizers or chemicals. Such storage can cause rapid
corrosion of the metal parts.
Use only mild soap and a damp cloth to clean the toot. Never let any liquid get inside the
toot; never immerse any part of the toot into a liquid.
Important
To assure product SAFETY and RELIABILITY; repairs, maintenance and adjustments
(other than those listed in this manual) should be performed by authorized service centers
or other qualified
service organizations, always using identical replacement parts.
Service Information
Black & Decker offers a full network of company-owned and authorized service locations
throughout North America. All Black & Decker Service Centers are staffed with trained per-
sonnel to provide customers with efficient and reliable power toot service. Whether you
need technical advice, repair, or genuine factory replacement parts, contact the Black &
Decker location nearest you. To find your local service location, refer to the yellow page
directory under "TootsiElectric '' or call: 1-800-54-HOW-TO (1-800-544-6986).
Full Two-Year Home Use Warranty
Black & Decker (U.S.) Inc. warrants this product for two years against any defects in
material or workmanship. The defective product will be replaced or repaired at no charge in
either of two ways:
The first, which will result in exchanges only, is to return the product to the retailer from
whom it was purchased (provided that the store is a participating retailer). Returns should
be made within the time period of the retailer's policy for exchanges (usually 30 to 90 days
after the sale). Proof of purchase may be required. Please check with the retailer for their
specific return policy regarding returns that are beyond the time set for exchanges.
The second option is to take or send the product (prepaid) to a Black & Decker owned or
authorized Service Center for repair or replacement at our option. Proof of purchase may be
required. Black & Decker owned and authorized service centers are listed under
"Toots-Electric" in the yellow pages of the phone directory.
This warranty does not apply to accessories. This warranty gives you specific legal rights
and you may have other rights which vary from state to state. Should you have any
questions, contact the manager of your nearest Black & Decker Service Center.
This product is not intended for commercial use.
Imported by
Black & Decker (U.S.) Inc., See 'Tools-Electric'
701 E. Joppa Rd. - Yellow Pages -
Towson, MD 21286 U.S.A. for Service & Sales
CONSERVER LE PRI_SENT GUIDE ._ TITRE DE RI_FI_RENCE.
Avertissement • Importantes Mesures de S curit
LIRE ET COMPRENDRE TOUTES LES DIRECTIVES AVANT D'UTILISER L'OUTIL.
AFIN DE REDUIRE LES RISQUES DE BLESSURES
• Avant toute utilisation, s'assurer que tous ceux qui se servent de t'outil lisent et comprennent
toutes les mesures de securit6 et tout autre renseignement contenus dans le present guide.
• Conserver ces mesures et tes retire frequemment avant d'utitiser I'outil ou d'en expliquer le
fonctionnement b.d'autres personnes.
z_ AVERTISSEMENT : Lorsqu'on utitise des outils etectriques, itfaut toujours respecter les
mesures de securit6 suivantes.
Z_AVERTISSEMENT : Le produit genGre de la poussiere qui peut renfermer des produits
chimiques.
Seton I'etat de la Californie, ces produits chimiques peuvent causer
le cancer ainsi que des malformations congenitales, et ils presentent
d'autres dangers au systeme reproductif humain. Voici des exemptes
de tels produits chimiques :
• les composes d'engrais;
• les composes d'insecticides, d'herbicides et de pesticides;
• t'arsenic et le chrome provenant de bois traite.
Afin de minimiser tes risques, porter de I'equipement de securit6 approuve comme des
masques antipoussieres specialement congu pour filtrer les particutes microscopiques.
z_AVERTISSEMENT: Leproduitrenfermedesproduitschimiques,dontduplomb.Selon
I'etatdetaCatifornie,ceproduitchimiquepeutcauserlecancerainsi
quedesmalformationscongenitales,etilpresented'autresdangers
ausystemereproductifhumain.Selaverlesmainsaprest'utitisation.
z_MISEENGARDE:Porterundispositifappropriedeprotectiondet'ou'ieIorsde
I'utitisationduproduit.Danscertainesconditionsetdurees
d'utitisation,teproduitpeutemettreunniveaudebruitprovoquantla
pertedel'ouYe.
LIRE TOUTES LES DIRECTIVES AVANT D'UTILISER L'OUTIL.
Mesures de s curit pour tous les outils
• LIRE et respecter toutes les mesures de securit0.
• NE PAS porter t'entree ou la sortie du tube de I'aspirateur & proximite des yeux ou des
oreittes torsque I'outil fonctionne.
L'OUTIL EST MUNI D'UNE DOUBLE ISOLATION. Utitiser seutement des pieces de
rechange identiques. Voir les directives sur I'entretien des outils a double isolation.
RANGER LES OUTILS NON UTILISC:S darts un endroit sec, situe en hauteur ou ferme
cle, hors de portee des enfants.
NE PAS DEPASSER SA PORTC:E. Toujours demeurer darts une position stable et garder
son equitibre en tout temps.
NE PAS aspirer d'objets en combustion tels les megots de cigarette, des allumettes ou des
cendres chaudes.
BIEN ENTRETENIR L'OUTIL. Garder le ventilateur propre afin d'optimiser et de securiser le
rendement. Suivre les directives d'entretien.
NE PAS tenter de reparer l'outil. Pour garantir la securit0 et la fiabilite du produit, en confier
les reparations, l'entretien et les reglages a un centre de service Black & Decker ou a un
atelier d'entretien autorise utilisant uniquement des pieces de rechange Black & Decker.
• NE PAS utiliser I'outil darts des endroits oQ t'atmosphere renferme des vapeurs combustibles
ou explosives. Les etincelles que produit habitueltement le moteur en marche pourraient
enfiammer ces produits.
• NE PASse servir de l'outil pour ramasser des liquides inflammables ou combustibles
(comme de l'essence) ni I'utiliser darts des endroits oQde tels produits peuvent se trouver.
• FAIRE TRES ATTENTION Iorsqu'on travailte darts des escaliers.
• NE PAS laisser t'outil branche sans surveillance. Le debrancher Iorsqu'on ne s'en sert pas et
avant d'en faire I'entretien.
• IL NE S'AGIT PAS d'un jouet. Faire particulierement attention torsqu'un enfant utilise l'outil
ou qu'on s'en sert pros d'un enfant. Itest deconseitt0 de laisser un enfant se servir de l'outil.
• NE PAS tenter de debtoquer I'outil avant de le debrancher.
• UTILISER SEULEMENT L'OUTIL de la maniere prescrite darts le present guide. Utitiser
uniquement tes accessoires recommandes par le fabricant.
• NE PAS utiliser Iorsque le cordon ou la fiche sont endommages. Confier I'outil a un centre de
service lorsqu'il ne fonctionne pas convenabtement, lorsqu'il est tombe ou endommage,
Iorsqu'il a et0 laisse a I'exterieur ou lorsqu'it est tombe a I'eau.
• NE PAS tirer sur le cordon ni se servir du cordon pour transporter t'outil. Ne pas tirer sur te
cordon pros d'ar0tes tranchantes ou de coins. €:toigner le cordon de toute surface chauffee.
• NE PAS debrancher I'outit en tirant sur le cordon. Pour le debrancher, en saisir la fiche et non
le cordon.
• NE RIEN inserer dans les ouvertures. Ne pas utiliser I'outil Iorsqu'une ouverture est bouchee;
garder les ouvertures exemptes de poussiere, de charpie, de cheveux et de tout ce qui peut
reduire te debit d'air.
• €:LOIGNER tes cheveux, les v6tements amples, les doigts et le corps des ouvertures ainsi
que des pieces mobiles.
• METTRE TOUTES LES COMMANDES HORS FONCTION avant de debrancher I'outil.
• NE PAS utitiser pour aspirer de l'eau, tout autre liquide ou des objets mouiltes comme des
feuilles. Ne jamais immerger I'outil, au comptet ou en partie.
• NE PAS maniputer la fiche ni I'outil avec les mains mouillees.
• S'ASSURER QUE LES ENFANTS, LES OBSERVATEURS ET LES ANIMAUX se trouvent
b une distance minimale de 10 metres (30 pieds) de la surface de travail Iorsqu'on demarre
I'outil ou qu'on s'en sert.
• EXAMINER LA ZONE avant d'utiliser I'outit. Entever tout debris ou objet dur (comme des
pierres, du verre, des ills) qui peut ricocher, 0tre eject0 ou provoquer des blessures ou des
dommages lors de I'utilisation de t'outit. Lorsqu'on se sert de l'outit pour aspirer, celui-ci est
congu pour ramasser des materiaux secs (comme des feuiltes, de t'herbe, de petites
branches et des bouts de papier). Ne pas aspirer des roches, du gravier, du metat, du verre
casse ou d'autres objets semblabtes.
z_ AVERTISSEMENT : Afin de minimiser les risques de secousses electriques, proteger de
la ptuie, ne pas s'en servir sur des surfaces mouillees et ranger
I'interieur.
z_ AVERTISSEMENT : Arr0ter et debrancher t'appareil. Attendre au moins 10 secondes ou
jusqu'a ce que le ventilateur s'arr0te comptetement avant de retirer
I'assembtage de la souffteuse ou du tube d'aspiration.
CONSERVER CES MESURES.
Entretien des outils a double isolation
La souffteuse-aspirateur a double isolation procure une protection supptementaire. Darts ce
type d'outil, les deux systemes d'isotant remptacent la mise b.la terre. It n'y a aucun moyen
de mettre l'outil a ta terre et aucun systeme de mise a la terre ne dolt 0tre ajoute a l'outil.
L'entretien d'un outit a double isolation exige beaucoup de soin et une exceltente
connaissance du systeme; il ne devrait 6tre confie qu'a un technicien competent. Les pieces
de rechange de ce type d'outit doivent 6tre identiques aux pieces d'origine. Un outil a double
isolation porte I'inscription ,,DOUBLE INSULATED,, ou ,,DOUBLE INSULATION,,. Le
symbote (un carre a I'interieur d'un carre) peut aussi figurer sur I'outil.
Mesures de securite : cordons de rallonge
Les outils a.double isolation sont munis d'un cordon bifilaire et ils peuvent 6tre utilises avec
un cordon de rallonge muni de 2 ou de 3 fils. It faut seulement utiliser des cordons de
ratlonge a gaine ronde et ils devraient 0tre homotogues par l'organisme americain
Underwriters Laboratories (U.L.) ou la CSA (au Canada). Lorsque le cordon de ratlonge est
utilise a I'exterieur, il dolt 6tre prevu b.cet effet. Tout cordon exterieur peut servir a I'interieur.
Les cordons de rallonge doivent _tre faits de conducteurs de calibre approprie (AWG ou
calibre moyen de ill) par mesure de securit0 et afin de prevenir les pertes de puissance et tes
surchauffes. Le numero de calibre du fit est inversement proportionnet a ta capacite du
cordon. Ainsi, un cordon de calibre 16 a une capacite superieure a un cordon de calibre 18.
Lorsqu'il est necessaire d'utitiser plus d'un cordon de rallonge, veitler ace que chaque
cordon ait au moins te calibre minimal. Avant d'utiliser un cordon de ratlonge, s'assurer qu'il
n'y a pas de ills denud0s ni detach0s, et que l'isotant et les raccords ne sont pas defectueux.
Effectuer les reparations necessaires ou remptacer le cordon, le cas ech0ant.
Le tableau ci-dessous permet de determiner le calibre minimal des cordons.
Calibre minimal des cordons de rallonge
Tension Longueur totale du cordon en pieds
120V
240V
Intensite (A)
Au Au
moins plus
0 6
6 10
10 12
12 16
De 0 &25 De 26&50 De 51 &100 De 101&150
De 0 &50 De 51&100 De 101&200 De 201 &300
Calibre moyen de fil (AWG)
18 16 16 14
18 16 14 12
16 16 14 12
14 12 Non recommande
Mesures de securite : fiche polarisee
Afin de minimiser les risques de secousses electriques, le produit comporte une fiche
potarisee (une lame plus large que t'autre). It faut utiliser une raltonge potarisee appropriee,
bifilaire ou trifilaire, avec ce produit. Ce genre de fiche n'entre que d'une fa(_on dans une
prise potarisee. S'assurer que la prise de la ratlonge comporte des fentes de dimensions
appropriees. Lorsqu'on ne peut inserer la fiche a fond dans la prise de la ratlonge, it faut
tenter de le faire apres avoir inverse les lames de c6te. Si la fiche n'entre toujours pas dans
la prise, il faut se procurer une rattonge appropriee. Lorsqu'on ne peut inserer la fiche de la
ratlonge b.fond dans ta prise, it faut communiquer avec un electricien certifie. It ne faut pas
neutraliser la fiche de I'outit ni celle de la rallonge.
Avant d'utiliser I'outil
FIXATION DU CORDON D'ALIMENTATION : Fixer la raltonge dans le dispositif
integr0 prevu &cette fin tel qu'itlustre & la figure 7.
Interrupteur
INTERRUPTEUR (Fig. 1)
Afin d'optimiser ta maTtrise de I'outil, celui-ci comporte un commutateur &deux vitesses sur la
poignee de ta tote.
La position centrale du commutateur correspond a.la position d'arr0t (0).
Pour utiliser la vitesse basse, deplacer le commutateur comptetement vers t'arriere (I).
Pour utiliser la vitesse elev0e, deptacer le commutateur & la position d'arr0t, puis vers t'avant (11).
NOTE : Le commutateur ne fonctionne pas Iorsque le bouton de degagement (fig. 1) est
enfonc&
Pour actionner I'outit, faire glisser te commutateur vers l'avant (fig. 1). Pour I'arr0ter, faire
glisser le commutateur au centre.
Assemblage
UTILISATION DE LA SOUFFLEUSE - TOUJOURS PORTER DES LUNETTES DE
SI_CURITI_. PORTER UN MASQUE LORSQUE LE TRAVAIL GI_NI_RE DE LA
POUSSII_RE. IL EST CONSEILLI_ DE PORTER DES GANTS EN CAOUTCHOUC ET
DES CHAUSSURES ROBUSTES LORSQU'ON TRAVAILLE A L'EXTI_RIEUR.
UTILISATION DOMESTIQUE SEULEMENT.
z_AVERTISSEMENT : Lorsqu'on arr0te I'outil pour en remptacer un tube, ou pour toute
autre raison, attendre 10 secondes pour I'immobitisation comptete
du ventilateur avant de demonter I'outil.
Tube d'aspiration (Fig. 4)
• Les tubes d'aspiration doivent 6tre assembles avant de s'en servir.
• Pour en faciliter I'instattation, enduire ta zone de connexion d'une solution savonneuse.
• Aligner les encoches et les triangles des tubes inferieur et superieur (fig. 4).
• Pousser le tube inferieur fermement dans te tube superieur jusqu'a ce que les triangles
s'enclenchent en place. (Ne jamais se servir de ces tubes separ0ment.)
• Par mesure de securit0, il ne faut pas separer les tubes Iorsqu'its sont assembles.
Tube de soufflage (Fig. 2)
• La coquille dolt 6tre instattee sur le tube de soufftage avant de s'en servir.
• Aligner les cercles de la coquille sur le tube.
• Pousser le tube fermement contre la coquille jusqu'b, ce que les cercles s'enclenchent en
place.
Bispositif de retenue
• Un dispositif de retenue a et0 incorpore a I'arriere du bloc moteur (Fig. 7).
• Brancher le cordon dans le bloc moteur puis abaisser le levier du dispositif de retenue sur la
prise pour la maintenir en place.
• Pour la degager, appuyer sur le bouton tateral puis soulever le levier.
Utilisation de I'outil (Fig, 8}
Toujours porter des tunettes de securit0 pour I'aspiration oute soufftage. Porter un masque
Iorsque le travail gen0re de la poussiere.
Mode de soufflage
• S'assurer que l'outil est hors tension et debranch0.
• Fixer le tube de soufftage avec la coquille b.la t_te de l'outil (fig. 3) en suivant les fleches,
puis faire pivoter la tote jusqu'a ce que te dispositif de blocage s'enctenche.
• Tenir le tube de soufftage b.environ 180 mm (7 pc) du sot. Actionner I'outil et y imprimer un
mouvement laterat en se d0pla(_ant lentement vers l'avant en gardant les feuilles et les
debris devant sol (fig. 9).
• Lorsque les feuilles et les debris forment un tas, on peut passer au mode d'aspiration pour
les ramasser.
• En instaltant t'accel0rateur fourni, on peut grandement augmenter le debir d'air de I'outil (fig. 12).
Retrait des tubes de soufflage u d'aspiration
• Mettre t'outil hors tension et te debrancher.
• Pour retirer te tube de soufftage ou le tube d'aspiration de la tote, il faut enfoncer le bouton
de degagement et s'assurer que le tube ne tombe pas au sot.
• On ne peut pas enfoncer le bouton de ddgagement Iorsque le commutateur est en
position de marche (fig. 1).
Montage de la bretelle
• Attacher la bretetle au bloc moteur, si necessaire, et l'ajuster a la taitte de l'utitisateur.
Pour votre confort, la bretelle a et0 con(_ue pour I'utilisation en mode aspirateur.
1. Points de fixation doubles
- Inserer le crochet dans l'ceillet situe sur le bloc moteur (Fig. 10)
- Inserer le crochet dans t'ceillet b.I'arriere du bloc moteur (Fig. 11)
Mode aspirateur
• Arr_ter I'appareil et le d_brancher du secteur.
Pour attacher I'ensemble sac b votre appareil :
Faire glisser le bord du sac dans ta rainure de support du sac en s'assurant que I'avant du
sac est ptace sur la sortie de l'aspirateur comme illustre en Fig. 5.
Faire glisser le sac a fond dans ta rainure puis rel&cher le verrou pour verrouilter la poignee
dans le haut du sac (Fig. 6).
Placer le tuyau d'aspiration au-dessus des debris/feuilles. Mettre I'appareil en marche, et
par des mouvements de balayage les debris/feuilles seront aspires, broyes et depos0s au
fond du sac (Fig. 8).
Dans le cas de debris formant un tapis, I'outit comporte un racloir. S'en servir pour liberer
les debris et continuer d'aspirer.
La puissance d'aspiration diminue b.mesure que le sac se remplit. Mettre l'outit hors
tension et le debrancher du secteur.
Enfoncer la tanguette pour faire glisser le sac hors du support.
Pour le vider, tenir la poignee en ptastique et saisir la poignee en nylon sous le sac.
Renverser te sac et le secouer (fig. 5C).
• Pour faciliter t'utilisation en mode aspirateur, il est conseille d'ajuster I'appareit b.la taille
de I'utitisateur b.I'aide de la bretelte (Fig. 8).
MISE EN GARDE : IL FAUT METTRE L'OUTIL HORS TENSION ET LE DI_BRANCHER
AVANT DE RETIRER LE SAC.
NOTE : Lorsque la puissance d'aspiration diminue et que te sac n'est pas plein, le tube
d'aspiration est probabtement btoque. Mettre l'outil hors tension, le debrancher et
debtoquer le tube avant de continuer.
Utilisation
• Ne pas utitiser I'aspirateur sans le tube d'aspiration et le sac en place.
• Toujours mettre l'outil hors tension et te debrancher avant de faire ce qui suit :
• Passer du mode de soufftage au mode d'aspiration.
• Lorsque te cordon d'alimentation est endommage ou enchev_tr0.
• Lorsqu'on laisse I'outit sans surveillance.
• Lorsqu'on le debtoque.
• Lorsqu'on l'examine, le regle, le nettoie ou le repare.
• Utiliser I'outil b.la lumiere du jour ou avec un bon eclairage.
Entretien
• NETTOYAGE ET RANGEMENT
METTRE L'OUTIL HORS TENSION ET LE DI_BRANCHER. (D_brancher le cordon de
rallonge de la source d'alimentation.)
Utiliser seutement du savon doux et un chiffon humide pour nettoyer I'outil. Entever tout brin
accumule dans l'outil. Lorsqu'on s'en sert dans des conditions normates avec des feuilles
seches, la chambre du ventilateur de l'outil devrait rester propre. Lorsqu'on aspire de la terre
ou des debris humides, la chambre du ventilateur peut se satir. Le cas ech0ant, le
rendement de l'outit diminue. On peut nettoyer cette zone en l'essuyant avec un chiffon
humide apres avoir debranch0 I'outil. IIfaut ranger I'outil dans un endroit sec.
z_MISE EN GARDE : NE PAS VERSER DE L'EAU SUR L'OUTIL NI LE VAPORISER POUR
LE NETTOYER.
Ne pas ranger t'outit sur des produits chimiques ni sur des engrais, ou pros de ceux-ci, au
risque de provoquer ta corrosion rapide des pieces metalliques de l'outit.
Utitiser seulement du savon doux et un chiffon humide pour nettoyer I'outit. Ne taisser aucun
liquide s'infiltrer dans I'outil et ne jamais immerger celui-ci, comptetement ou en partie.
Important
Pour assurer la SI_CURITI_ D'EMPLOI et ta FIABILITI_ de l'outil, n'en confier la
reparation, t'entretien et les rajustements (autres que ceux specifi6s dans le present guide)
qu'a un centre de service ou a un atelier d'entretien autorise n'utilisant que des pieces de
rechange identiques.
Renseignemens relatifs au service
Black & Decker exptoite un reseau complet de centres de service et d'atetiers d'entretien
autorises par toute l'Amerique du Nord. Le personnel de tousles centres de service
Black & Decker a re(_ula formation voulue pour assurer t'entretien efficace et fiable des
outits electriques. Pour obtenir des renseignements d'ordre technique, des conseils retatifs
aux reparations ou des pieces de rechange d'origine, communiquer avec le centre de
service Black & Decker de ta region. On peut trouver t'adresse du centre de service de la
region darts l'annuaire des Pages Jaunes a la rubrique -Outils 61ectriques,_ ou en composant
le numero suivant : 1 800 544-6986.
Garantie complete de deux ans pour utilisation domestique
Black & Decker garantit le produit pour une periode de deux ans contre les vices de matiere
ou de fabrication. Le produit defectueux sera r6pare ou remptace sans frais conformement
I'une des conditions suivantes.
Pour echanger I'outil, il suffit de le retourner au detaillant (si te detailtant participe au
programme d'echange rapide Black & Decker). Le retour doit 6tre effectue dans les delais
impartis par la politique de retour du detaillant (habituellement entre 30 et 90 jours suivant la
date d'achat). Le detailtant peut exiger une preuve d'achat. Priere de verifier la potitique de
retour du detaittant au-dela des detais impartis.
On peut egatement retourner I'outil (port paye) & un centre de service Black & Decker ou
tout autre atelier d'entretien accr6dite pour y 6tre remptace ou repar6, & notre gre. On peut
exiger une preuve d'achat. Les adresses des centres de service Black & Decker se trouvent
la rubrique ,,Outils 61ectriques,, des Pages Jaunes.
La presente garantie ne vaut pas pour les accessoires. Les modalites de la presente garantie
donnent des droits legaux specifiques. L'utilisateur peut egatement se prevaloir d'autres droits
selon t'etat ou ta province qu'it habite. Pour obtenir de plus amptes renseignements,
communiquer avec le directeur du centre de service Black & Decker de la region.
Le produit n'est pas con(_u pour une utitisation commerciate.
Importe par
Black & Decker Canada Inc.
100 Central Ave.
Brockville (Ontario) K6V 5W6
Voir la rubrique "Outils electriques"
des Pages jaunes
pour le service et les ventes.
CONSERVE ESTE MANUAL PARA FUTURAS REFERENCIAS
_ADVERTENCIA: ADVERTENCIAS E INSTRUCCIONES
POR FAVOR LEA CUIDADOSAMENTE TODAS LAS INSTRUCCIONES ANTES DE USAR
LA UNIDAD.
Para reducir el riesgo de lesiones:
•Antes de cualquier uso, asegt3rese que cualquier persona que vaya a utilizar esta
herramienta lea y comprenda todas las instrucciones de seguridad y la informacion
contenida en este manual.
• Conserve estas instrucciones y repaselas con frecuencia antes de usar la herramienta e
instruir a otras personas.
z_ADVERTENCIA: Siempre que utilice herramientas electricas debe seguir ciertas
precauciones bb.sicas de seguridad, a fin de reducir los riesgos de
incendio, choque etectrico y lesiones personales, entre las que se
encuentran tas siguientes.
z_ADVERTENCIA: Parte del potvo originado por este producto contiene quimicos queen
el Estado de California se consideran como causantes de cancer,
defectos congenitos u otros da5os reproductivos. Atgunos ejemptos de
estos quimicos son:
•compuestos en fertilizantes
•compuestos en insecticidas, herbicidas y pesticidas
• arsenico y cromo de madera tratada quimicamente
Para reducir su exposicion a estos quimicos, utitice equipo de seguridad aprobado como
mascaras contra potvo dise5adas especificamente para fittrar particutas microscopicas.
z_ADVERTENCIA: Este producto contiene quimicos, inctuyendo ptomo, queen el Estado
de California se consideran como causantes de cb.ncer y defectos
congenitos u otros da5os reproductivos. Lave sus manos despues de
manejarlo.
z_ PRECAUCI(SN: Emptee la proteccion personal y auditiva adecuada durante el uso de
este producto. Bajo ciertas condiciones y duracion de uso, el ruido
producido por este producto puede contribuir a la perdida auditiva.
LEA TODAS LAS INSTRUCClONES ANTES DE USAR EL SOPLADOR
Advertencias e instrucciones generales de seguridad
para todas las herramientas
• LEA y siga todas las instrucciones.
• NO cotoque ta entrada o la salida de la aspiradora cerca de sus ojos u oidos cuando este
en operacion.
• ESTE APARATO CUENTA CON DOBLE AISLAMIENTO. Sotamente utilice refacciones
identicas. Consutte las instrucciones sobre el servicio a aparatos con doble aislamiento.
• GUARDE LAS HERRAMIENTAS QUE NO EMPLEE. Cuando no utilice la herramienta,
esta deberb, guardarse en un lugar seco y elevado o bajo llave, fuera del atcance de los
niSos.
• NO SE SOBREEXTIENDA. Conserve siempre bien apoyados los pies asi como el equilibrio.
• NO recoja objetos en combusti6n o humeantes, tales como cigarrillos, cerillos o cenizas
calientes.
• CUlDE LA HERRAMIENTA. Conserve limpia la zona del ventilador para que funcione
mejor y de manera mas segura. Siga las instrucciones para el mantenimiento apropiado.
• NO intente reparar el soptador/aspiradora. Para garantizar la seguridad y la confiabitidad
del producto, las reparaciones el mantenimiento y los ajustes deben ser realizados
por centros de servicio Black & Decker u otras organizaciones de servicio
autorizado, que utiticen siempre refacciones Black & Decker.
• NO opere et soptador/aspiradora en atm6sferas gaseosas o exptosivas. Los motores en
estas unidades producen chispas en condiciones normales, y estas chispas pueden
originar la ignici6n de los vapores.
• NO se utilice para recoger liquidos combustibles o inflamables como gasotina, ni se utilice
en areas en las que puedan estar presentes.
• TENGA MUCHO CUlDADO cuando limpie en escatones.
• NO deje el aparato cuando este conectado. Desconectelo de la toma de corriente
cuando no este en uso y antes de darle servicio.
• NO permita que se utilice como juguete. Se requiere atencion cercana cuando se utilice
por ni5os o cerca de ellos. No se recomienda para ser usada por ni_os.
• NO intente limpiar la unidad sin antes desconectarta.
• 0SESE SOLAMENTE como se describe en este manual. Sotamente utilice los
dispositivos recomendados por el fabricante.
• NO se use si el cable o ta clavija estan da5ados. Si el aparato no funciona como debiera,
si se ha caido o da5ado, si se ha dejado a la intemperie o se dejado bajo el agua, envielo
a un centro de servicio.
• NO tire del cable ni cargue la herramienta por este, no Io utilice como asa ni Io cotoque
sobre bordes o aristas afilados. Atejelo de superficies catientes.
• NO desconecte tirando det cable. Para desconectar, tire de la clavija, no del cable.
• NO cotoque ningun objeto en las aberturas. No se use con ninguna abertura bloqueada;
conservelas libres de potvo, pelusas y cualquier objeto que pueda reducir el flujo de aire.
• CONSERVE cabetto, cabetlo, ropas flojas, dedos y demas partes del cuerpo alejados de
aberturas y partes moviles.
• APAGUE todos los controles antes de desconectar la unidad.
• NO aspire agua, otros liquidos ni objetos mojados como hojas. Nunca sumerja ninguna
parte de la herramienta en ningun liquido.
• NO maneje la ctavija niotra parte de la unidad con tas manos ht3medas.
• CONSERVE A LOS NINOS, ESPECTADORES Y ANIMALES ALEJADOS del b.rea de
trabajo, a un minimo de 10 metros cuando encienda u opere la unidad.
• REVISE EL AREA antes de usar la unidad. Etimine todos los objetos duros como rocas,
vidrios,alambres, etc., que puedan satir despedidos y por consiguiente, causar lesiones
durante la operaci6n. Como aspiradora, la unidad esta diseSada para recoger materiates
secos como hojas, pasto, pequeSas varas y trozos de papel. No aspire piedras, grava,
metales, trozos de vidrio, etc.
Z_ADVERTENClA: Para reducir et riesgo de choque etectrico; no se exponga a la Ituvia, no
se utilice sobre superficies mojadas. Guardese bajo techo.
Z_ADVERTENClA: Apague y desconecte la unidad, despues, espere a que el ventilador se
detenga o al menos 10 segundos antes de desmontar los
subensambtes de aspirado o del soptador.
CONSERVE ESTAS INSTRUCClONES
Servicio a aparatos con doble aislamiento
Su Soptador/Aspiradora cuenta con dobte aistamiento para brindarle proteccion a_adida. En
los aparatos con doble aistamiento, se cuenta con dos sistemas de aistamiento en tugar de
conexion a tierra. No se proporciona ningun medic de aterrizaje en un aparato con doble
aislamiento, ni se requiere a5adirle ninguno. Et servicio a aparatos con doble aislamiento
requiere de cuidado extremo y de conocimiento del sistema, y debe ser efectuado
solamente por personal de servicio catificado. Las piezas de repuesto para aparatos con
dobte aislamiento deben ser identicas alas que reemptazan. Los aparatos con dobte
aislamiento estan marcados con tas patabras "dobte aislamiento". Et simbolo (un cuadro
dentro de otro) puede estar tambien marcado en el aparato.
Reglas e instrucciones de seguridad: Cables de extension
Las herramientas con doble aislamiento tienen cables con dos lineas y pueden utilizarse
con extensiones de 2 o de 3 lineas. Solamente deben usarse extensiones con cubierta
cilindrica, y le recomendamos que esten aprobadas por Underwriters Laboratories (U.L.)
(NOM en Mexico). Si la extension se empteara a la intemperie, debera ser adecuada para
etlo. Cualquier extension destinada para uso a la intemperie se puede utitizar para trabajar
bajo techo.
Una extension debe contar con el calibre adecuado (AWG o American Wire Gauge) por
seguridad, y para evitar perdida de potencia y sobrecalentamiento. Mientras menor sea el
nt3mero, mayor sera ta capacidad det cable, por ejemplo, un cable de calibre 16 tiene
mayor capacidad que uno de calibre 18. Cuando emptee mas de una extension para atcan-
zar la Iongitud total, asegurese que cada extension contenga por 1omenos el calibre mini-
mo requerido. Antes de utilizar un cable de extension, reviselo en busca de atambres fiojos
o expuestos, aislamiento da5ado y uniones defectuosas. Haga las reparaciones necesarias
o reemptace el cable en caso necesario.
Para determinar el calibre minimo requerido para el cable, consutte la tabla que sigue:
Calibre minimo para cables de extension
Volts Longitud total del cordon en metros
120V 0-7.62 7.63-15,24 15,25_30,48 30,4,9-45.72
240V 0-15.24 15.25-30.48 30.49-60.96 60.97-91.44
AMPERAJE
MAs No mas Calbre del cable AWG
de de
0 6 18 16 16 14
6 10 18 16 14 12
10 12 16 16 14 12
12 16 14 12 No Recomendado
z_Advertencias e instrucciones de seguridad: Clavija polarizada
Este equipo cuenta con una ctavija potarizada (con una pata mas ancha que la otra) para
reducir el riesgo de choque electrico. El equipo debe utitizarse con una extension adecuada
de 2 o 3 cables. Las conexiones polarizadas sotamente ajustan de una manera. Asegurese
que la conexion hembra de ta extension tenga una ranura grande y una mas peque5a. Si la
clavija no se ajusta completamente a ta extension, inviertala. Si aun asi no ajusta, consiga
una extension adecuada. Si la extension no se ajusta por compteto a la toma de corriente
comuniquese con un electricista calificado para que le instate ta toma de corriente adecua-
da. Por ningun motivo cambie la clavija en la herramienta o en la extension de ninguna
manera.
Anted de operar
ASEGURE EL CABLE DE ALIMENTACI()N - Asegure et cable de extension en el
reten integrado en la herramienta, como se muestra en la Figura 7.
Interruptor
INTERRUPTOR DE ENCENDIDO Y APAGADO (FIG. 1)
Para mayor control, su soplador aspiradora cuenta con un interruptor de dos velocidades
que se encuentra en el mango de la cabeza de poder.
El interruptor tiene apagado central, posicion 0.
Para usarto en baja velocidad, mueva el interruptor completamente hacia la
posicion trasera I.
Para cambiar a vetocidad atta, devuelva el interruptor a la posicion de apagado y
despues hacia adetante a la posicion II.
NOTA: El interruptor no funcionara si el boton de liberacion, figura 1, esta
oprimido. Para ENCENDER la herramienta, deslice el interruptor hacia adetante,
como se ilustra en la figura 1. Para APAGAR la herramienta, destice el interruptor a la
posicion media.
Ensamblje
USO COMO SOPLADOR: SIEMPRE UTILICE GAFAS DE SEGURIDAD, UTILICE UNA
MASCARILLA SI LA OPERACI(_N PRODUCE POLVO, SE RECOMIENDA EL EMPLEO
DE GUANTES DE GOMA Y CALZADO GRUESO CUANDO TRABAJE A LA
INTEMPERIE. UNICAMENTE PARA USO DOMI_STICO.
Z_ADVERTENCIA: Cuando apague ta unidad para instatar el tubo o por cuatquier otro
motivo, espere 10 segundos a que el ventilador se detenga
antes de desensamblar.
Ensamblaje del tubo de aspirado (Fig. 4)
• Los tubos de aspirado deben ensamblarse entre si antes de usarse.
• Para facilitar el ensambtaje aplique una sotucion de agua con jabon a la zona de la
articutacion.
• Alinearlasmuescasylostriangulosdeltubosuperioreinferior(Fig.4).
• Hagacoincidirtasmuescasylostriangutosenlostubossuperioreinferior.(Nuncaopere
sinhabertosensamblado.)
• Enarasdetaseguridad,lostubosnoestanhechosparasepararseunavezquesehan
ensambtado.
Ensmblaje del tubo de soplado (Fig. 2}
• Et tubo de soptado debe ensamblarse a la coraza de soplado antes de usarse.
• Haga coincidir los circulos en la coraza y et circulo.
• Empuje et tubo con firmeza en la coraza hasta escuchar que los circutos hacen un
chasquido.
Dispositivo de retencion del cable
• La parte posterior de la unidad de potencia tiene un dispositivo incorporado para la
retencion del cable. (Fig. 7)
• Inserte el cable a la unidad de potencia y cotoque la patanca de retencion del cable
contra el enchufe para retenerto.
• Para sottarlo, presione el boton lateral y tire de la patanca hacia arriba.
Usando su producto (Fig. 8}
Siempre que utilice su unidad, ya sea como soptador o como aspiradora, use gafas de
seguridad. Si se utiliza en condiciones de mucho potvo, utitice tambien una mascarilta.
Modo de soplador
• Asegt3rese que la unidad este APAGADA y desconectada de ta toma de corriente.
• Instate la coraza y el tubo de soptado en la cabeza de poder (Fig. 3) cotocando el
soptador como indica ta flecha, despues gire hasta este punto hasta que el mecanismo
de cerrado/liberacion se accione.
• Sujete el tubo a aproximadamente 18 cm (7") det sueto, haciendo un movimiento de
barrido de lado a lado, avance lentamente y conserve las hojas y desechos acumulados
frente a usted (Fig. 9)
• Una vez que haya hecho una pila con los deshechos y hojas, puede cambiar la unidad al
modo de aspirado para recotectar los desechos.
• La instalacion del concentrador ayudara a eliminar desechos y hojas triturados (Fig. 12).
Remocion del tubo de soplado/aspirado
• Apague su producto y desconectelo de ta toma de corriente.
• Para desconectar ta coraza de soptado o el tubo de aspirado de ta cabeza de poder,
oprima el boton de liberacion, asegurese de que el tubo no caiga a tierra.
• No podr_ oprimir el boton de liberacion si el interruptor est& en posicion de "encendido"
(Fig. 1).
Unidad de correa para transporte
• Instale la correa para transporte en la unidad de potencia, si se requiere, y ajt3stela
para acomodarta at usuario.
Para su comodidad, ta correa ha sido disefiada para ser utilizada cuando la unidad esta
en modalidad de aspirado.
1. Ajuste en dos puntos
- Inserte el gancho por et ojete de la unidad de potencia (Fig. 10).
- Inserte el gancho por el ojete de la parte posterior de la unidad de potencia (Fig. 11).
Modalidad de aspirado
• Apague su producto y descon_ctelo de la toma de corriente.
Para instalar la unidad de bolsa en su producto:
Ponga et borde de ta botsa en et canal de sujecion de la botsa, asegurandose que la
parte delantera de la botsa este puesta encima de la toma de la aspiradora, como 1o
muestra la Fig. 5.
Deslice la bolsa completamente en el canal y presione el seguro para btoquear el mango
en ta parte superior de la botsa. (Fig. 6)
Ponga et tubo encima de basuras/hojas. Encienda su producto. Luego, haciendo un
movimiento de barrido, succione con el tubo las basuras/hojas. Estas seran trituradas y
depositadas en ta bolsa de coteccion. (Fig 8)
Para hojas y desechos aplastados, et tubo de su aspirador incorpora un rastrillo. Utitice
este rastritto para aflojar los desechos y contint_e aspirando con normalidad.
At tlenarse la botsa, el poder de succion disminuira, apague su producto y desconectelo
de la toma de corriente.
Para sacar la botsa, oprima el seguro para desengancharla de del sujetador de la botsa y
deslizar la botsa hacia fuera.
Para vaciarla, sujete el asa de plastico y tome el mango de nylon que se encuentra en la
parte inferior de la botsa. Voltee ta botsa de cabeza y sacuda hojas y desperdicios. (Fig. 5C)
• Para una mayor facilidad de uso en ta modatidad de aspirado, la herramienta deberia ser
ajustada al usuario con ta correa para el hombro (Fig. 8).
Z_PRECAUCION: NUNCA RETIRE LA BOLSA DE RECOLECCION SIN ANTES HABER
APAGADO Y DESCONECTADO LA ASPIRADORA.
NOTA: Si la succion disminuye y la botsa no esta ltena, et tubo de aspirado esta
probablemente tapado con desechos. Apague y desconecte la aspiradora y limpie el tubo
antes de continuar.
Operacibn
• No se use en el modo de aspirado sin los tubos de aspirado y sin la botsa de recoteccion
en su tugar.
• Apague y desconecte la ctavija de la toma de corriente cuando:
• Cambie de modo de soptador a aspiradora.
• El cable de alimentacion se haya dafiado o enredado.
• Vaya a dejar su producto desatendido.
• Vaya a limpiar una obstruccion.
• Revise, ajuste limpie o trabaje en su producto.
• Use su producto t3nicamente con luz de dia o con buena luz artificial.
Mantenimiento
• LIMPIEZA Y GUARDADO
iAPAGUE Y DESCONECTE LA HERRAMIENTA (desconecte el cable de extension de
la toma de corriente).
Utilice t3nicamente jabon suave y un trapo ht3medo para timpiar la herramienta. Limpie
todos los desechos y recortes que se hayan acumutado en su BtowerNac. Cuando
la unidad se utitiza apropiadamente con hojas secas, la cb,mara del ventilador debe
permanecer limpia. Si se trabaja con tierra y desechos ht3medos, algunas de tas
particulas se pueden acumular en el interior de la camara del ventilador. Si esto ocurre,
el rendimiento de la unidad bajara.
Esta zona puede limpiarse frotando con un trapo ht3medo despues de
desconectar la unidad.
Su soplador aspiradora BtowerNac debe guardarse en un lugar seco.
Z_PRECAUCION: NO VACiE O ROCiE AGUA EN LA HERRAMIENTA EN UN INTENTO
POR LIMPIARLA.
No guarde la herramienta sobre fertilizantes o productos quimicos ni junto a ellos.
Dicho almacenaje puede ocasionarte una rapida corrosion alas partes metaticas.
Utitice t3nicamente jabon suave y un trapo humedo para limpiar la herramienta.
Nunca permita que se introduzcan tiquidos en la herramienta; nunca sumerja
ninguna parte de la herramienta en ningun liquido.
Important
Para garantizar ta SEGURIDAD y la CONFIABILIDAD det producto; las reparaciones, et
mantenimiento y los ajustes (diferente de los mencionados en este manual) deberan ser
efectuados por centros de servicio autorizado u otras organizaciones de servicio calificadas
que utiticen siempre refacciones identicas.
Informacion de servicio
Black & Decker ofrece una red completa de centros de servicio propiedad de la compafiia y
franquiciados a traves de toda Norteamerica. Todos los centros de servicio Black & Decker
cuentan con personal capacitado para proporcionar el servicio a herramientas mas eficiente
y confiable.
Siempre que necesite consejo tecnico, reparaciones o partes de repuesto genuinas,
comuniquese con el centro Black & Decker mas cercano a usted.
Para encontrar su centro de servicio local, consutte la seccion amaritla bajo "Herramientas
electricas", o Ilame ah (55)5326-7100
Garantia completa para uso domestico por dos ahos
Black & Decker (U.S.) garantiza este producto por dos afios comptetos contra cuatquier
fatla originada por materiates o mano de obra defectuosos. El producto defectuoso sera
reemptazado o reparado sin cargo alguno en cuatquiera de las siguientes dos maneras:
La primera, que resulta t3nicamente en cambios, es regresar el producto al vendedor at que
se compro (en la suposicion que es un distribuidor participante). Las devotuciones deberan
hacerse dentro det tiempo estipulado por la politica de cambios del distribuidor (usualmente
de 30 a 90 dias despues de la venta). Se puede requerir prueba de compra. Por favor veri-
fique con el vendedor tas potiticas especificas de devotucion relacionadas a las devotu-
clones en tiempo posterior at estiputado para cambios.
La segunda opcion es tlevar o enviar el producto (con porte pagado) a los centros de servi-
cio Black & Decker propios o autorizados, para que ta reparemos o reemplacemos a nues-
tra opcion. Se puede requerir prueba de compra. Los centros de servicio Black & Decker
propios y autorizados estan enlistados bajo "Herramientas electricas" en la seccion amaritla
det directorio telefonico.
Este producto no esta disefiado para uso comercial.
ESPECIFICACIONES
Tension de alimentacion: 120 V AC
Potencia nominal: 700 W
Frecuencia de operacion: 60 Hz
Consumo de corriente: 6,6 A
Para reparacion y servicio de sus herramientas electricas, favor de dirigirse
al Centro de Servicio mas cercano:
CULIACAN, SIN
Av. Nicolas Bravo #1063 Sur
(667) 7 12 42 11
Col. Industrial Bravo
GUADALAJARA, JAL
Av. La Paz #1779
(33) 3825 6978
Cot. Americana Sector Juarez
MEXICO, D.F.
Eje Central Lazaro Cardenas
No. 18
(55) 5588 9377
Local D, Cot. Obrera
MERIDA, YUC
Calle 63 #459-A
(999) 928 5038
Cot. Centro
MONTERREY, N.L.
Av. Francisco I. Madero
No.831
(81) 8375 2313
Col. Centro
PUEBLA, PUE
17 Norte #205
(222) 246 3714
Col. Centro
QUERETARO, QRO
Av. Madero 139 Pte.
(442) 214 1660
Cot. Centro
SAN LUIS POTOSI, SLP
Av. Universidad 1525
(444) 814 2383
Cot. San Luis
TORREON, COAH
Blvd. Independencia, 96 Pte.
(871) 716 5265
Cot. Centro
VERACRUZ, VER
Protongacion Diaz Miron #4280
(229)921 7016
Cot. Remes
VILLAHERMOSA, TAB
Constitucion 516-A
(993) 312 5111
Cot. Centro
PARA OTRAS LOCALIDADES LLAME AL: (55) 5326 7100
Para servicio y ventas consulte
"HERRAMIENTAS ELECTRICAS"
SECC_N
en la seccion amarilla. AMARILLA
IMPORTADOR: BLACK & DECKER S.A. DE C,V.
BOSQUES DE CIDROS ACCESO RADIATAS NO, 42
BOSQUES DE LAS LOMAS, 05120 MEXICO, D.F.
(55) 5326W100