TEANDE
GASOLINE HIGH PRESSURE WASHER
USER MANUAL

2
Page
2
2
3
4-5
6
7
8
9-14
16
17-19
20
21
CONTENTS
Section
Contents
Suggested Applications
Introduction
General Safety Instructions
Specific Safety Instructions
Fuel & Oil Information
Components & Cont rols
Operating Instructions
Cleaning & Storing
Maintenance
Trouble shooting
Service Log
Pressure washer........................... AMD005227_1_US
Water inlet pressure..........................................0.4MPa
Water inlet temp.................................................... 35ºC
Engine................................................ HP 4 stroke OHV
Fuel volume............................................................. 3.6L
Oil....................................................... SAE10W-30
Oil quantit y...........................................................600mL
Nett weight.........................................................28.6 kg
UNLEADED 91
PETROL ONLY
NO ETHANOL
SUGGESTED APPLICATIONS
These are some suggested articles which could be
cleaned by this p ressure washer:
• Concrete driveway
• Paved areas
• Outdoor furniture
• Car
• Push bike
• Motor bike
• Garden features
SPECIFICATIONS

3
INTRODUCTION
Dear Customer,
Thank you for purchasing this pressure washer which
has passed through our extensive quality assurance
processes. Every care has been taken to ensure that it
reaches you in perfect condition. However, in the unlikely
event that you should experience a problem, or if you
require any assistance please do not hesitate to contact
us;
If you have a problem, do not return this pressure
washer to the place of
purchase.
Note: For convenience we suggest taking a photocopy of
your purchase receipt as the original may fade.
Due to continual product development, the actual
product may differ slightly from the product pictured.
What is covered
• Manufacturing fault or defect.
What is not covered
• Commercial use of pressure washer.
• Use of pressure washer for hire.
• Use of pressure washer in a commercial premises.
• Damage caused by incorrect oil.
• Damage caused by incorrect fuel or use of E10
ethanol fuel.
• Damage or deterioration due to transport.
• Damage caused by negligence, misuse, abuse or
accident or incorrect voltage and wattage.
• Any corrosion or rusting.
• Damage caused by incorrect set up and start up.
• Replacement parts due to general wear and tear.
• Pressure washers with serial number defacement,
modification or removal.
• Pressure washers with no original purchase receipt.
• Pressure washers which have been on sold, not
original purchaser.
• Blockages / damage caused by dust, dirt, spiders
webs or insects.
• Damage caused by the incorrect fitting of accessories.
• Damage caused by overloading, overworking the
pressure washer.
• Damage to attached equipment or third party
accessories.
• Damage caused by attached equipment or third
party accessories.

4
ASSEMBLY
This pressure washer MUST be fully assembled by you
prior to use. Failure to do so will result in the warranty
being VOID. Failure to fully assemble this pressure
washer may also result in personal injury.
LUBRICATION OF ENGINE
Oil is not supplied with this product.
Your engine comes with NO oil in the sump. You will need
to add engine oil, refer to pages 8 and 14 for complete
details and images. Failure to do this may result in
damage to the engine, pressure washer and/or injury to
the user.
GENERAL SAFETY INSTRUCTIONS
Before attempting to operate this pressure washer the
following basic safety precautions should be taken to
reduce the risk of fire, electric shock and personal injury.
It is important to read the instruction manual and to
understand applications, limitations and potential hazards
associated with this pressure washer. It is important that
you read, understand and follow these instructions very
carefully. They are designed for the safety of yourself
and others ensuring a long and trouble free service life
from your pressure washer. This pressure washer is not
intended for use by persons (including children) with
reduced physical, sensory or mental capabilities, or lack
of experience and knowledge, unless they have been
given supervision or instruction concerning the use of the
appliance by a person responsible for their safety.
OPERATING ENVIRONMENT
NEVER use your pressure washer indoors. Your pressure
washer produces deadly carbon monoxide and this is
harmful and can caused death. Only use your pressure
washer in well ventilated areas like the outdoors. Do not
expose your pressure washer to rain or use in damp or
wet locations. Do not expose your pressure washer to
direct sunlight. Keep the work area well lit. Do not use
your pressure washer in areas where there is a risk of
explosion or fire from combustible materials, flammable
liquids, paint, varnish, petrol, etc flammable gases
and dust of an explosive nature. As a precaution it is
recommended that you consult an expert on selecting
and using a suitable fire extinguisher and have it available
for use in an emergency when operating the pressure
washer.
BEWARE OF CHILDREN & PETS
Children and pets should be kept out of the operating
area. Children should not be allowed to touch or operate
pressure washers or touch extension cords. All pressure
washers should be kept out of reach of children. When
NOT in use keep the pressure washer preferably stored
or locked in a secure well ventilated cabinet or room with
the fuel tank empty.
SELECT A PRESSURE WASHER WITH
A SUFFICIENT RATING
Select the right pressure washer for the job. Do not use a
pressure washer to do a job for which it was not designed.
Do not force a small pressure washer to do the job of
a heavy duty pressure washer Any damage caused by
overloading will void the warranty. Do not use pressure
washers for purposes not intended.
FUEL - UNLEADED 91 PETROL - NO ETHANOL
Fuel used in this pressure washer is poisonous. Always
wear approved breathing protection when decanting
fuel. If you get any fuel on your skin or clothes wash
the affected area immediately with soap and water and
change your clothes. If you get fuel in your eyes wash
immediately with clean water and seek medical attention.
If any fuel is swallowed DO NOT induce vomiting, seek
immediate medical attention.
HOT COMPONENTS
Beware many of the components will get hot during use.
Never touch any of the metal pipes, pump or motor as
these may burn. In particular ensure that the high
pressure hose does not touch the hot muffler, either
during use or when storing. The hot muffler will damage
the high pressure hose and this will not be covered under
warranty.
MAINTAIN YOUR PRESSURE WASHER
WITH CARE
When not using your pressure washer ensure the fuel
choke is ‘OFF’. Never leave the fuel choke ‘ON’ as this
can damage the carburettor. Follow the instructions for
lubricating and changing accessories. Keep handles
clean, dry and free from oil and grease. Ensure that
ventilation slots are kept clean and free from dust at all
times. Blocked ventilation slots can cause overheating
and damage to the motor. Ensure that the air and fuel
filters are kept clean at all times.
FIRE PRECAUTIONS
Always contact your fire authority before using the
pressure washer on fire restricted days. It is not
recommended to use your pressure washer when a total
fire ban is in force. Never refuel your pressure washer
while it is still running. As a precaution it is recommended
that an expert is consulted on obtaining and using a
suitable fire extinguisher.
STOP PRESSURE WASHER
Ensure that the pressure washer has stopped and is
turned off when not in use, before servicing, lubricating,
making adjustments or when changing any accessories.
5
CLEANING YOUR PRESSURE WASHER
Always stop your pressure washer before you commence
cleaning. Always ensure that your pressure washer has
cooled, about one (1) hour, before cleaning and storing.
When cleaning your pressure washer use only a damp
soft cloth. NEVER use liquid or solvents of any type. All
areas can be wiped down, once cooled.
RISK OF DAMAGE
Damage may occur if nozzle is used too close to
appliance being cleaned. Always trial test the pressure
washer on an inconspicuous part of the appliance.
Beware poor paint and rust as the water will lift poor
paint and cause rust spots to grow. Damage caused by
pressure washer is not covered by warranty.
WORK AREA
Work areas and benches should be kept tidy. Cluttered
benches and work areas can cause accidents. Floors
should be kept clean and free from rubbish. Special care
should be taken when the floor is slippery due to water
and detergent. Always leave sufficient distance, at least 5
metres between the pressure washer and bystanders. As
this pressure washer uses a petrol engine, only run the
pressure washer outdoors or in a well ventilated area.
REMOVE ADJUSTING KEYS AND WRENCHES
Form the habit of always checking to see that any
adjusting keys or wrenches have been removed from the
pressure washer before operating.
CHECK DAMAGED PARTS
Before using the pressure washer it should be carefully
checked to determine that it will operate properly and
perform its intended function.
Check for broken or missing parts and have them
replaced or repaired at an authorised service facility.
Check any other condition that may affect the operation
of the pressure washer. A guard or any other part of the
pressure washer that is damaged should be properly
repaired or replaced by an authorised service facility
unless otherwise indicated in this instruction manual.
Any switch that does not operate correctly must be
replaced by an authorised service facility.
DO NOT use the pressure washer if the ‘ON / OFF’ motor
switch does not turn the pressure washer ‘ON’ and
‘OFF’.
PERSONAL SAFETY
Clothing
Do not wear loose clothing, jewellery or anything that
could get caught in moving machinery. Gloves may be
worn when filling pressure washer with fuel.
Hair
Long hair should be tied back or contained in a
protective covering.
Eye Protection
The use of safety goggles is highly recommended
(normal glasses are not sufficient for eye protection)
when using or refuelling pressure washers. Prescription
glasses do not have safety lenses.
Footwear
Where there is the risk of heavy objects or if there is a
risk of slipping on wet or slippery floors, suitable non–
slip, covered, safety footwear should be worn. Protect
your feet from dropping accidents.
Ear Protection
The use of ear protection is highly recommended when
using pressure washers. The continual noise may
damage your hearing.
Respiratory Protection
Always wear approved breathing protection when
decanting fuel. ALWAYS use this pressure washer in well
ventilated area. Never use indoors.
Warning! Do not breathe in exhaust fumes. Exhaust
fumes are poisonous and may cause drowsiness,
unconsciousness and even death.
Do Not Over Reach
Do not over reach. Keep a proper footing and maintain
your balance at all times. Avoid using abnormal stances
and awkward body positions.
Stay Alert
Watch what you are doing, use common sense, and
never operate a pressure washer when you are tired,
drinking alcohol, taking drugs or if taking medication that
causes drowsiness.
WARNING
Do not attempt to modify the pressure
washer in any way; this will VOID your warranty.
The use of any attachment or accessory other than
those recommended in this instruction manual
could result in damage to the pressure washer and
could cause injuries to the operator.
This petrol pressure washer complies with
Australian / New Zealand and International
standards and safety requirements. Repairs should
only be carried out by qualified persons using
original spare parts. Failure to do so may result in
considerable danger to the operator.

6
SPECIFIC SAFETY INSTRUCTIONS
Warning! Do not use the pressure washer in areas where
there is a risk of explosion or fire from combustible
materials. The sparks possibly caused when using this
pressure washer may ignite combustible materials as well
as flammable liquids, paint, varnish, petrol, flammable
gases and dust of an explosive nature. As a precaution it
is recommended that you consult an expert on a suitable
fire extinguisher and its use. Ensure that the work area is
kept clear of combustible materials.
Warning! Do not use the pressure washer indoors or in
confined spaces where exhaust gases, smoke or fumes
could reach dangerous concentrations.
• Fully assemble pressure washer before use.
• Always use the pressure washer in an open well
ventilated area.
• Unit will become hot during use. Please keep pressure
washer at least one metre (1m) away from buildings,
other equipment, pedestrian areas or flammable
materials.
• Never pull the re-coil starter once the pressure washer
engine has started. Any damage caused will not be
covered by warranty.
• Ensure the pressure washer has stopped before
servicing, or lubricating etc.
• Do not attempt to modify the pressure washer, guards
or the supplied accessories in any way.
• Do not touch the exhaust. This can become very hot
during operation and can cause serious burns.
• Do not allow high pressure hose to touch the muffler.
Damage will occur and will not be covered by
warranty.
• Always check the pressure washer for damaged parts
or fuel leaks, ensure these are fixed before using it.
• Never refuel while smoking or in the vicinity ofan
open flame.
• Always wear safety eye wear, ear and breathing
protection when operating or refuelling the pressure
washer.
• Toavoid a fire if you spill fuel while refuelling, clean up
before starting the pressure washer.
• Never operate or store the pressure washer on its
side, ALWAYS operate or store in an upright manner
on firm, solid ground.
• Ensure that the pressure washer has stopped
and turned off when not in use, before servicing,
lubricating, making changes and when changing
attachments such as air hoses / tools.
• Your pressure washer is factory set, NEVER attempt
to speed it up as this could endanger the user
and damage the pressure washer and/or attached
appliances.
• If the pressure washer makes an unfamiliar sound
or vibrates excessively, switch the pressure washer
‘OFF’ immediately. Investigate the possible cause or
consult your authorised service agent.
• Never use coolant in the pressure washer as damage
may occur.
• Never transport the pressure washer with fuel in the
tank. ALWAYS empty the fuel tank.
• Do not tamper or alter any parts as this may cause
personal injury or damage the pressure washer.
• Never point gun / lance at people or animals.
• Never hose or wet people or animals.
• Never spray the pressure cleaner.
• Never spray electrical connections, electrical outlets
or electrical appliances / fixtures.
• Never operate the pressure cleaner without water, any
damage caused will not be covered by warranty.
• Never use hot water. Only use cold water with this
pressure cleaner.
• Maximum water temperature is 35ºC.
• Bystanders or people watching must be at least 10m
away from operating the pressure cleaner.
• Only use clean water with this pressure cleaner.
• Never pump acids, alkaline, solvents or flammable
liquids through this pressure cleaner, any damage
caused will not be covered under warranty.
• Do not keep motor running if not using the wand.
Damaged cause will not be covered under warranty.
• Inlet water hose size must be at least 12mm diameter.
• Inlet flow rate must be at least 18 L/min and mains
pressure.
• Damage may occur if pressure washer nozzle is held
too close to the cleaning surface. Damage caused will
not be covered under warranty.
• Always trial the pressure washer cleaner and selected
nozzle on an inconspicuous part of the product to be
cleaned.
7
FUEL
ONLY USE UNLEADED 91 PETROL (ULP-91RON) - NO ETHANOL
Fuel tank capacity – 3.6 litres (3.6 L)
Use of incorrect fuel and/or oil may damage the pressure washer and will not be covered under warranty.
Do not use E10 or any type of ethanol fuel as this will damage the pressure washer and will not be covered under
warranty.
Do not use high octane fuels (greater than 91%) as this will damage the pressure washer and will not be covered
under warranty.
• Ensure you use clean fresh unleaded 91 petrol (ULP) - no ethanol
• Use a clean approved container to store your unleaded petrol (ULP) in before decanting into the fuel tank.
• If contaminated (dirty) or old (stale) fuel is used any damage caused will not be covered underwarranty.
OIL
CHECK DAILY - ONLY USE 4-STROKE MOTOR OIL
To operate, this pressure washer requires oil in the sump, not supplied. If the pressure washer does not have the
correct level of oil in the sump, it will not run, see note below.
Oil capacity – approximately four hundred millilitres (0.6 L or 600 mL)
Oil type – SAE 10W-30 4-stroke motor oil. Non-detergent or 2-stroke engine oils will damage the engine and
should not be used.
• Always check oil level before using.
• Always use fresh clean oil.
• Change oil every 50 hours or every 3 months.
• If contaminated (dirty) or old (stale) oil is used any damage caused will not be covered under warranty.
NOTE: This pressure washer is fitted with an oil cut out switch. If the oil level is empty or low then the pressure
washer WILL NOT start or run.
Always check the oil level before starting the pressure washer.
Never check or add oil while the pressure washer is running.
8
6
14
13
15
7
8
9
10
12
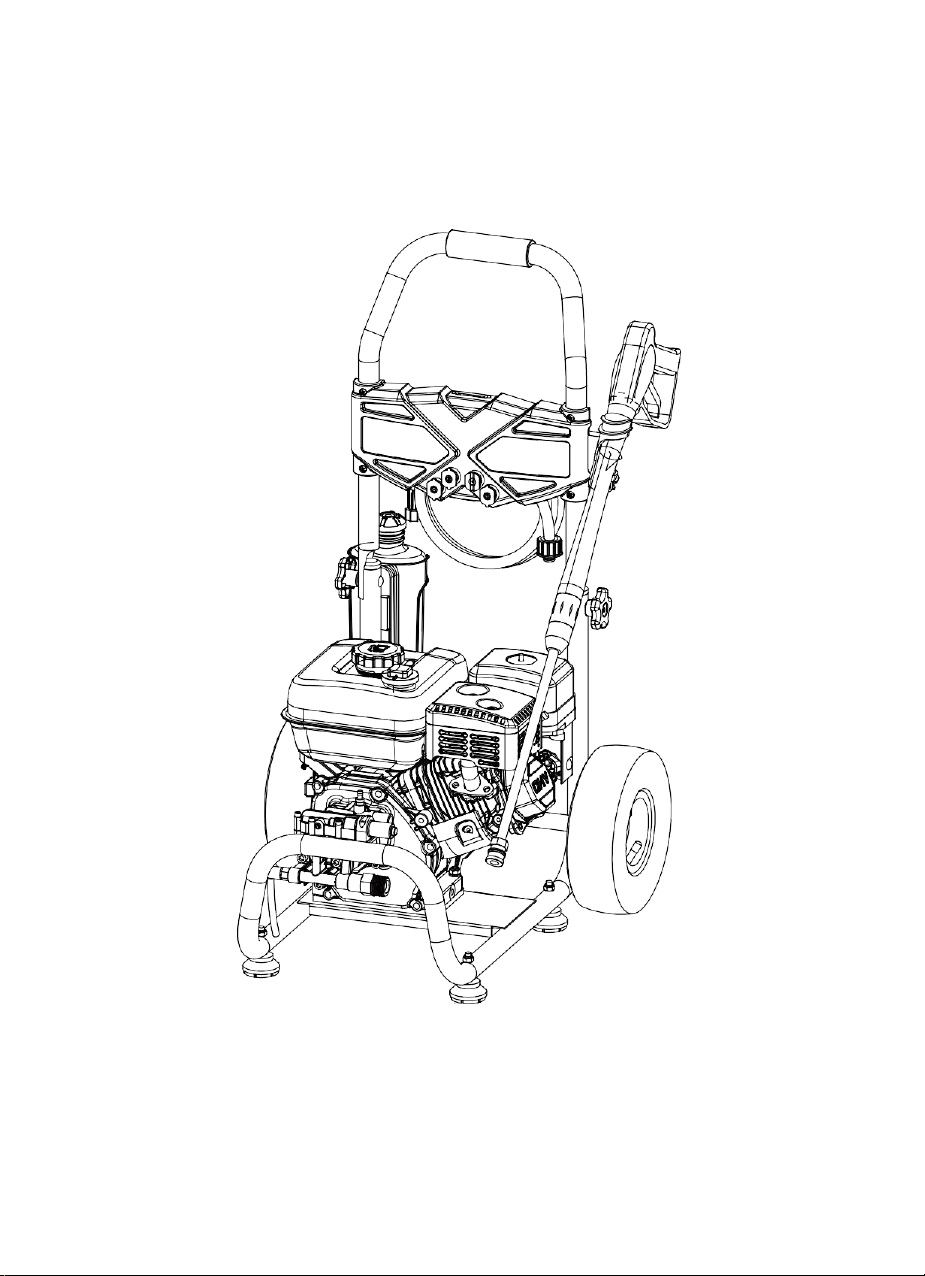
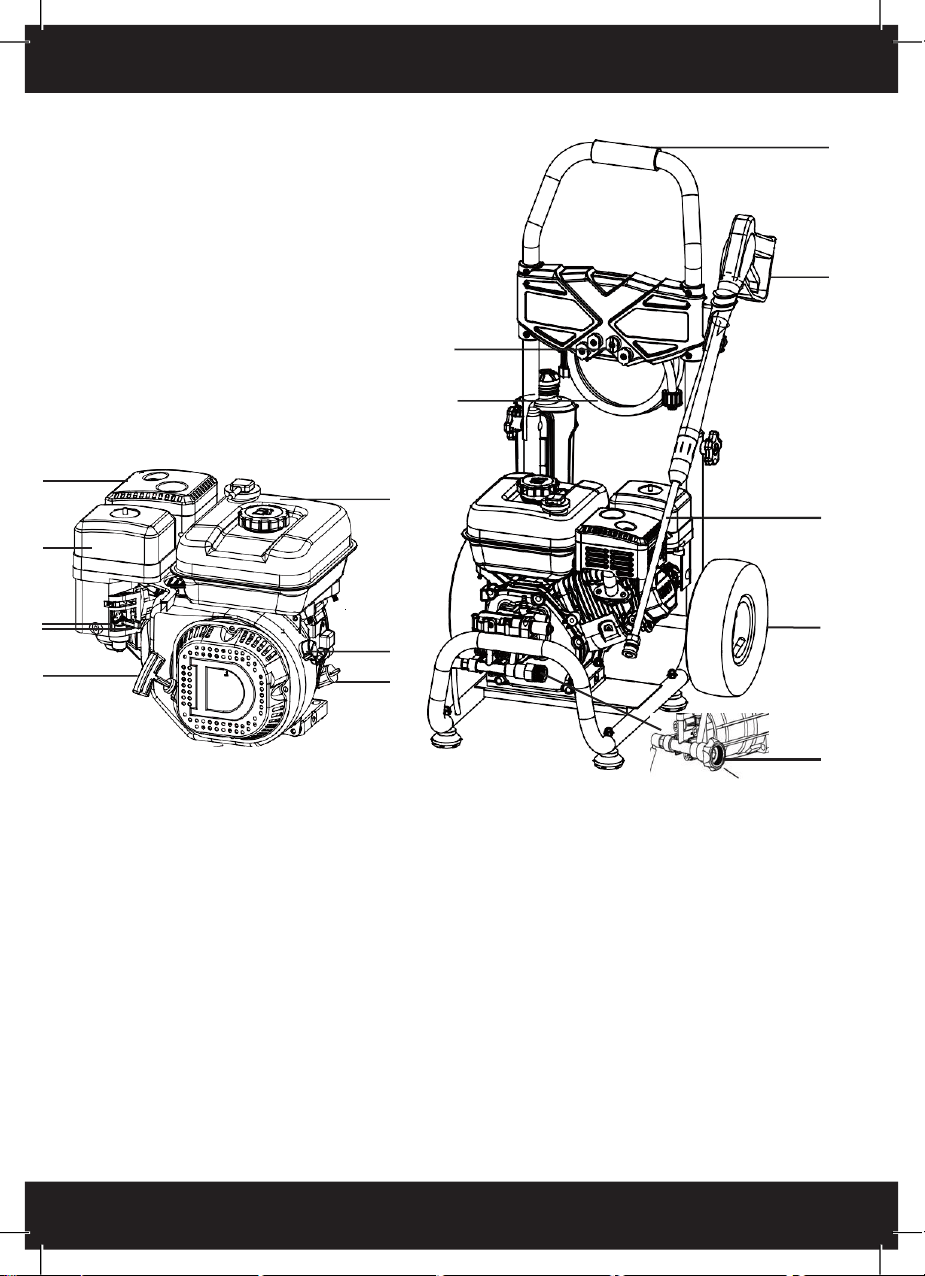
COMPONENTS & CONTROLS (PIC.1)
1. Handle
2. Gun and trigger
3. Nozzles
RED - 0°
YELLOW-15°
GREEN - 25°
WHITE - 40°
BLACK - Detergent
4. High pressure hose
5. Lance
6.
Wheel
7. Choke
8. Fuel tap
9. On/Off switch
10. Recoil starter
11. Water inlet
12. Oil sump
13. Fuel tank
14. Muffler
15. Air filter
1
2
3
4
5
6
11
9
ASSEMBLY INSTRUCTIONS
UNPACKING
Carefully unpack your pressure washer. This pressure
washer is bulky and heavy (22kg), and may require two
(2) people to lift. Dispose of all packing material in an
environmentally responsible manner.
Open carton, gently lift the pressure washer clear of
the carton and packaging, this may require 2 people.
Remove from plastic bag.
NOTE: Plastic bags can be a danger to young children,
dispose of immediately. Always dispose of packaging in
a responsible manner.
ASSEMBLY
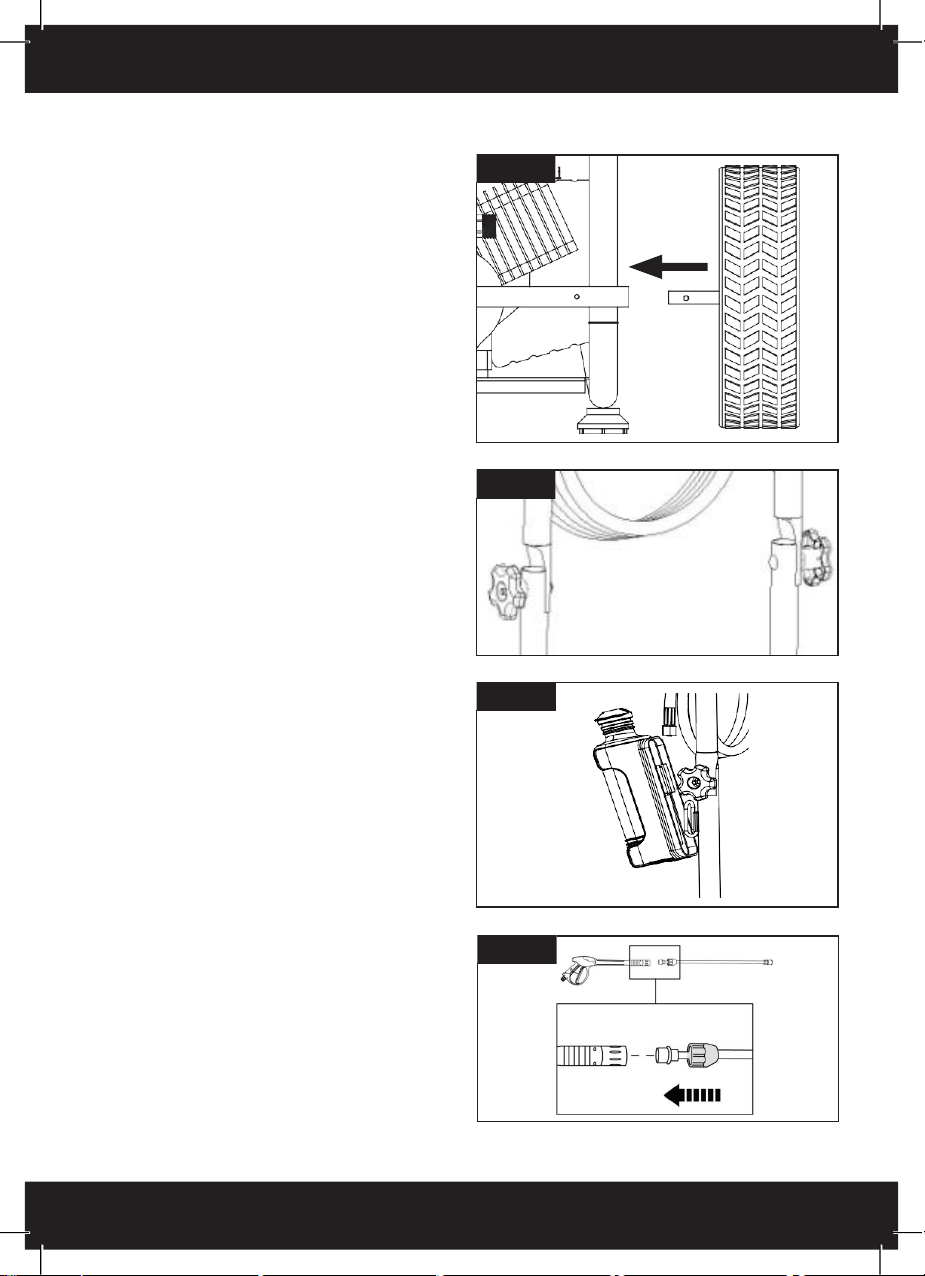
Wheels (Pic. 2)
1. Slide the axle into the tube under the frame. Depress
the brass button and push the axle into the tube.
2. Rotate the axle until the button “clicks” and locks
into the hole in the tube.
Handle (Pic. 3A)
1. Push both bolts through frame holes as shown
in Pic 3A.
2. Screw hand wheel on both bolts
Note: Bolt is 2 Stage
A) 1st stage - Bolt on hand wheel, softly tightened,
allows frame to fold.
B) 2nd stage - Tighten firmly to lock handle in place.
Detergent Botle (Pic. 3B)
Slide detergent bottle overthe locater on bottle holder.
Gun/Lance (Pic. 4)
Push the lance into the gun and tighten nut. Slide cover
over the nut.
PIC. 4
PIC. 2
PIC. 3A
PIC. 3B
10
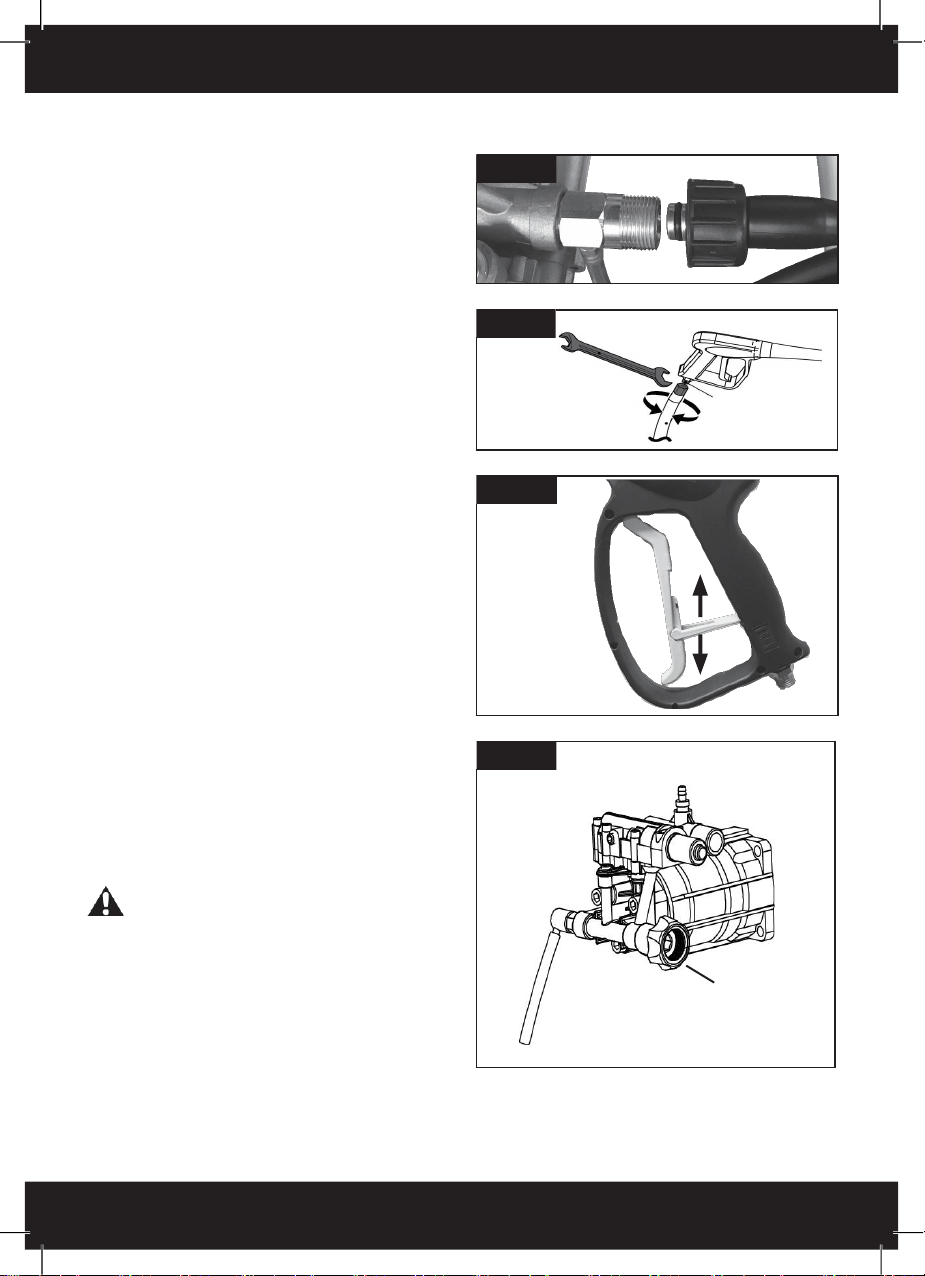
Pressure Hose to Pump Connection (Pic. 5)
1. Push hose fitting into the pump socket and tighten
clockwise.
Note: Do not cross thread the nut as this is not
covered under warranty.
Note: When operating do not allow the high pressure
hose to touch the muffler, as any damage will not be
covered under warranty.
Pressure Hose to Gun Connection (Pic. 6A)
1. Push hose fitting onto gun fitting and tighten
clockwise.
2. Toremove, loosen by turning anti-clockwise and
remove hose to make sure the connection is properly
tightened(Using the spanner provided) .
Gun Safety Lock (Pic. 6B)
To stop accidental use of the trigger the gun is fitted
with a safety lock.
1. Tolock - Push lever DOWN.
2. Tounlock - Push lever UP.
Garden Connection (Pic. 7)
1. Screw black garden hose connection clockwise
onto the pump.
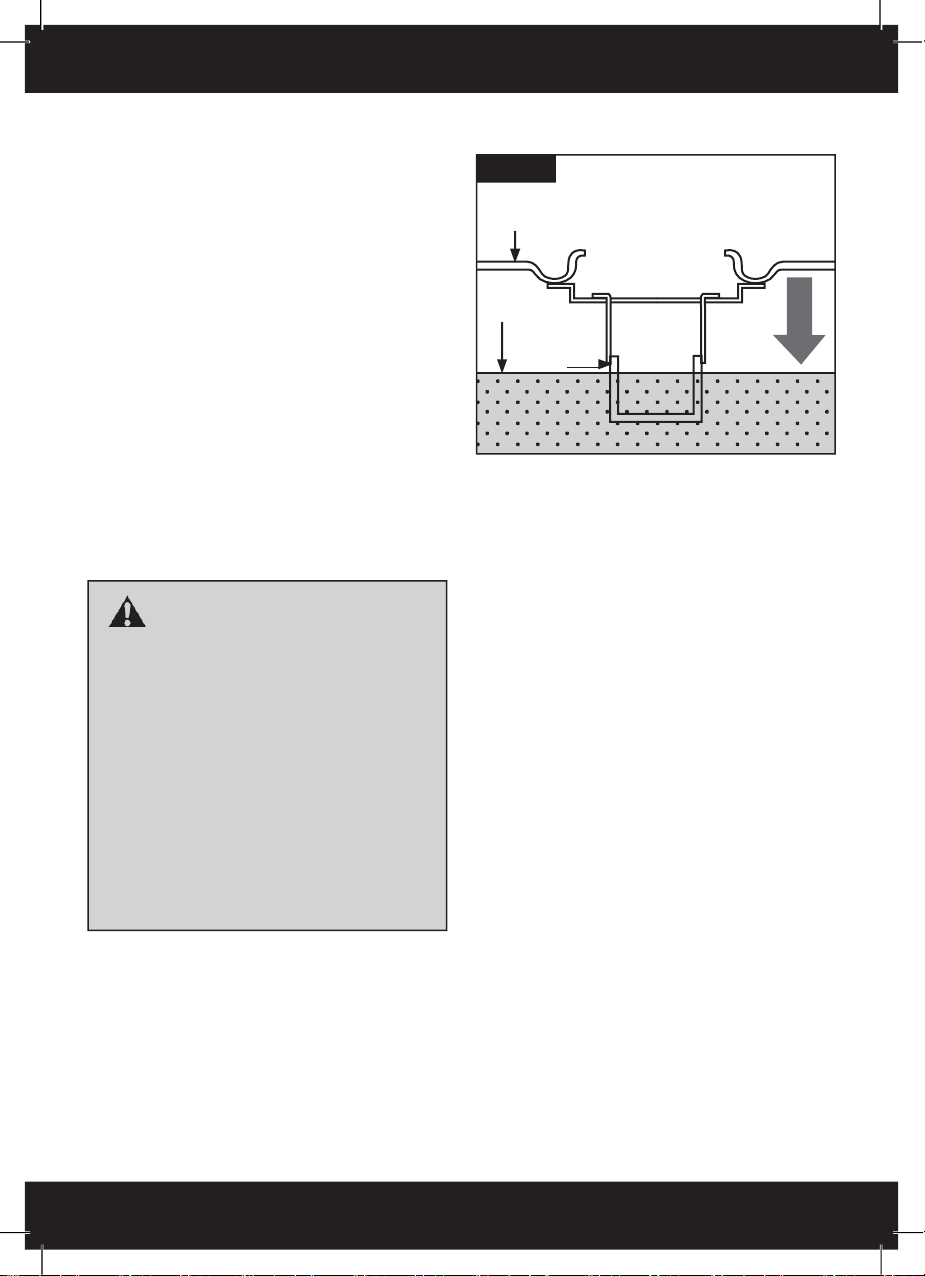
IMPORTANT NOTICE: Release Dump Tube (Pic. 7)
During times of no water flowing whilst motor is running.
The pump will heat up. Periodically the pump will dump
hot water through the tube to cool down.
PIC. 5
PIC. 6A
PIC. 6B
UP (Unlock)
DOWN (Lock)
PIC. 7
Water Inlet Connector
11
WARNING
Fuel and its vapours are extremely flammable and
explosive.
Fire or explosion can cause severe burns or death.
Always fill fuel tank outdoors or in well-ventilated
area.
Keep fuel away from sparks, open flames, pilot
lights, heat, and other ignition sources.
Check fuel lines, tank, cap, and fittings frequently
for cracks or leaks. Replace if necessary.
If fuel spills, wait until it evaporates before starting
engine.
Do not overfill fuel tank. Allow for expansion of the
fuel and do not fill above the bottom of the fuel
tank neck, Pic. 8.
OPERATING INSTRUCTIONS
Pre - Operation Preparation
Note: If unit has previously been used, the motor, muffler
and exhaust may still be hot enough to burn. Always
exercise caution when checking the pressure washer.
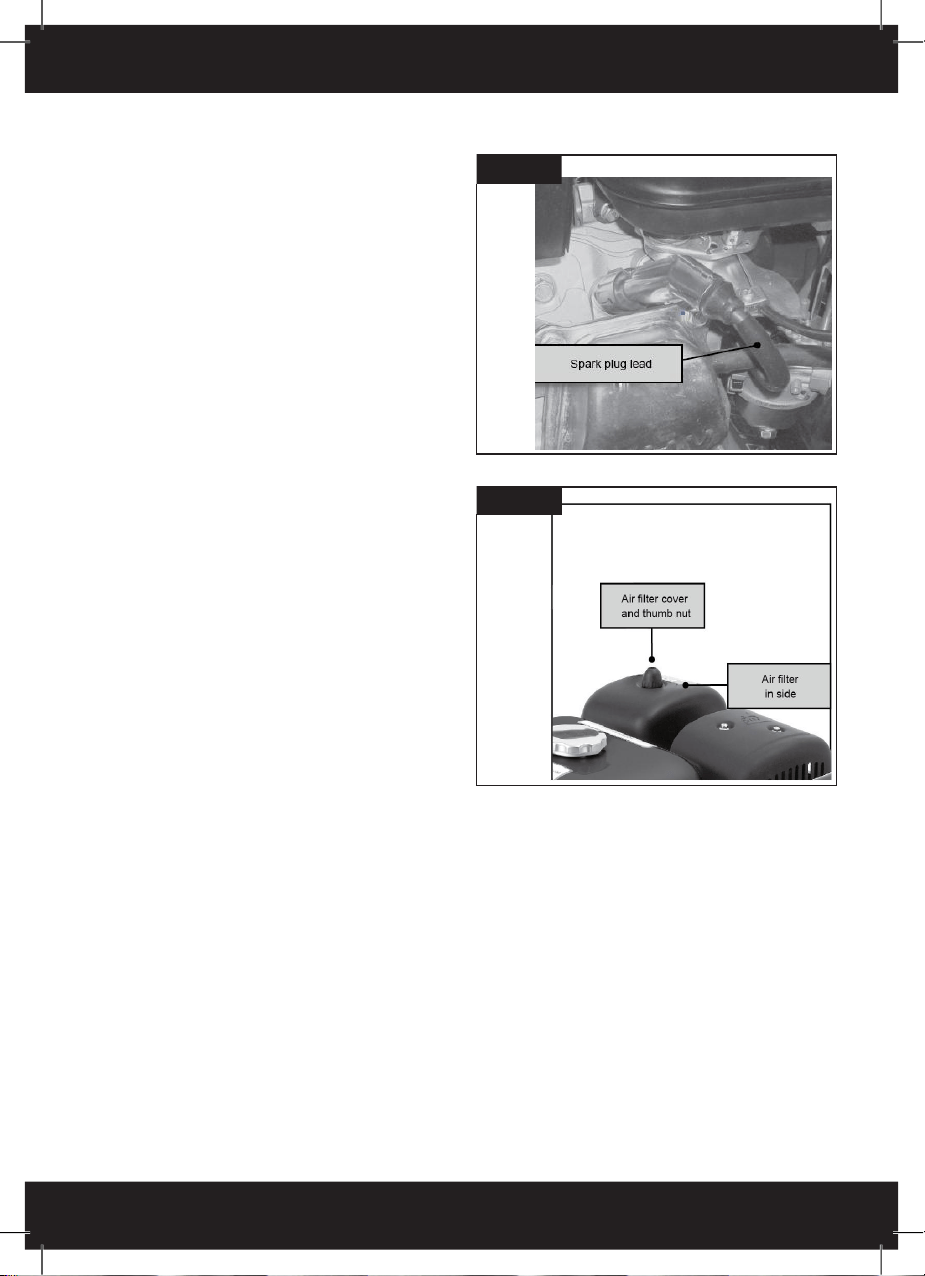
1. Check that the fuel/engine switch is OFF.
2. Check that the spark plug lead is firmly attached to
the top of the spark plug.
3. Holding on to the cage gently rock the pressure
washer and listen for any noise which may indicate
loose items. If anything appears to be loose either
tighten or consult a service agent.
FILLING FUEL TANK
Always use clean fresh fuel as specified on page 9. Stale
fuel can cause the pressure washer to run rough and
damage the motor; this will not be covered by warranty.
1. Ensure the engine is OFF.
2. Ensure the fuel tap and engine switch are both OFF.
3. Use fresh fuel as detailed on page 8.
4. Do not fill fuel tank above the top of the fuel filter,
Pic. 8.
5. Ensure that the fuel tank cap is screwed on tightly.
PIC. 8
Fuel Tank
Full Mark
Fuel
Filter
12
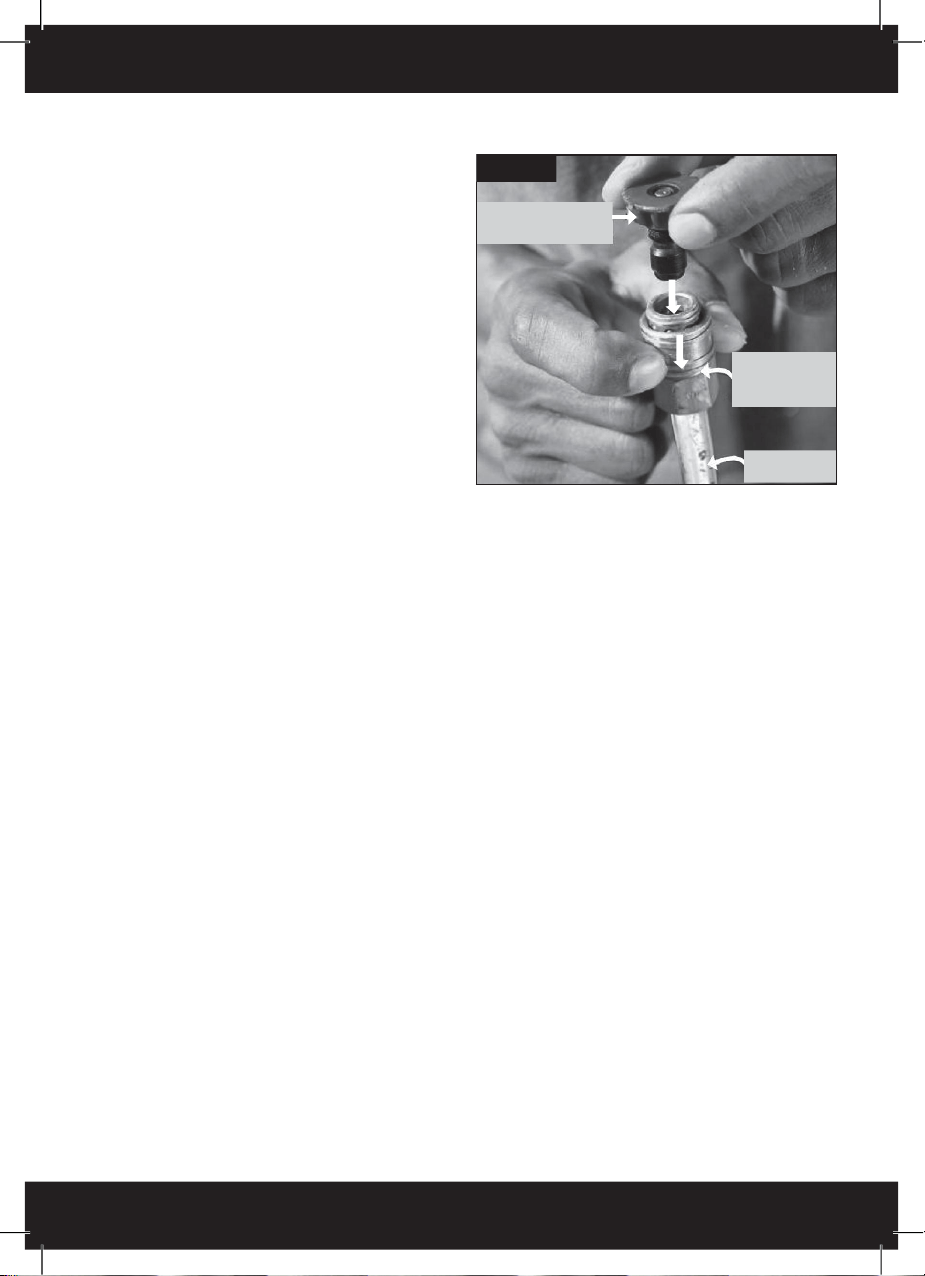
CONNECT / DISCONNECT NOZZLES (PIC. 9)
Connect
1. Pull down QC collar
2. Push nozzle into hole
3. Release QC collar
4. Pull nozzle to ensure it is locked in position
Disconnect
1. Pull down QC collar
2. Lift nozzle out
3. Release QC collar
SELECTING NOZZLE
Red 0º
This nozzle is for high pressure and proves a single “pencil” stream of water.
Yellow 15º
This nozzle is for high pressure and provides a wide 15º “fan” of water.
Green 25º
This nozzle is for high pressure and provides a wide 25º “fan” of water.
White 40º
This nozzle is for high pressure and provides the widest 40º “fan” of water.
Black
This nozzle is for low pressure and for use with
detergent tube.
PIC. 9
Pull quick
connect collar
down
Spray wand
Spray nozzle tip
13
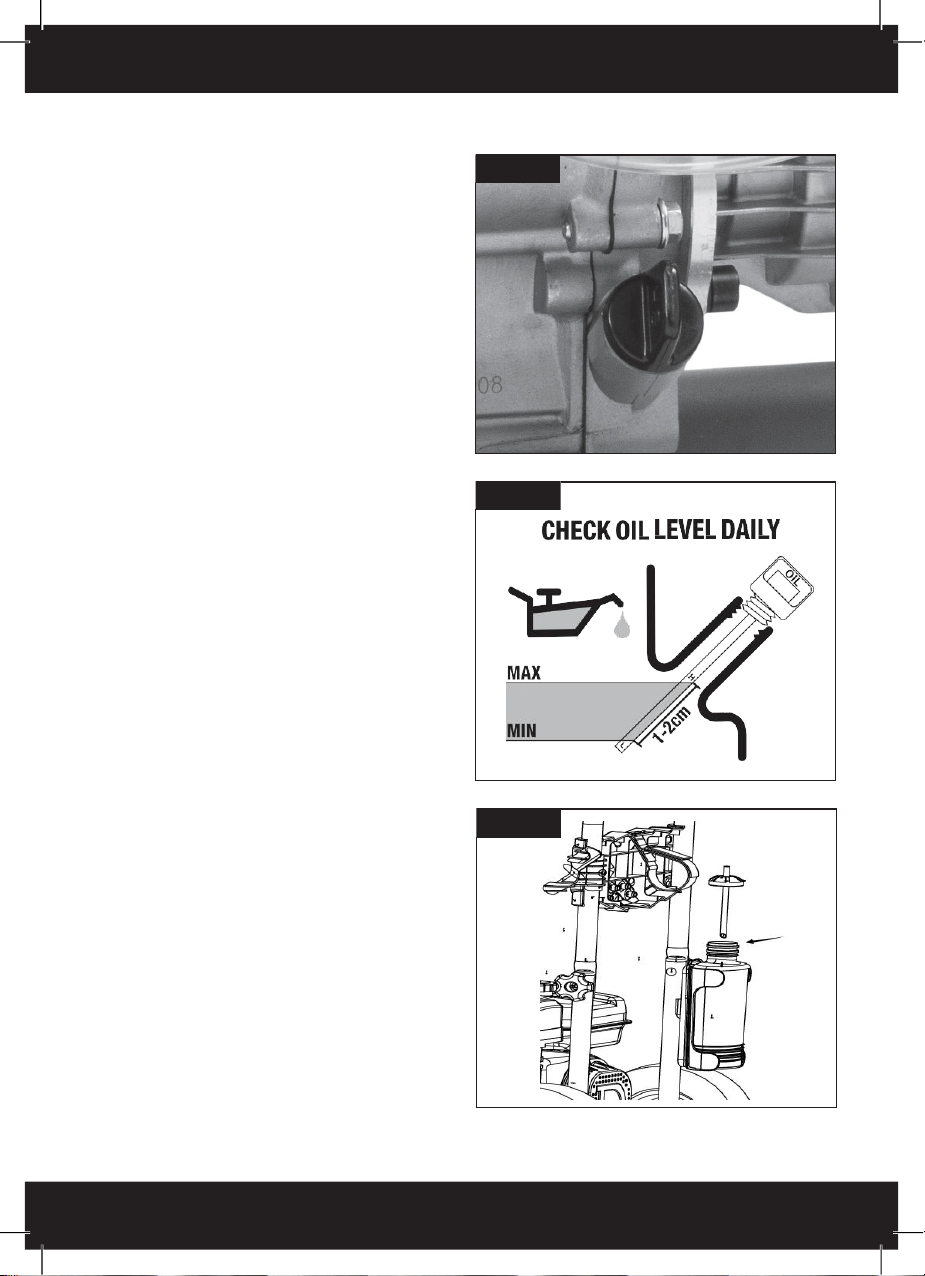
ADDING LUBRICATING OIL
Always use clean fresh oil as specified on page 8.
Incorrect or old oil can cause the pressure washer to run
rough and damage the motor; this will not be covered by
warranty.
1. Ensure that engine is OFF when filling oil.
2. Remove oil plug, see Pic. 10A.
3. Use oil as detailed on page 8.
4. Ensure pressure washer is level when filling with oil.
DO NOT TIP.
5. Only fill oil to the top of the thread, Pic. 10B.
6. Ensure that the oil filler cap is screwed on tightly
before attempting to start the pressure washer.
Warning: Over filling the oil can damage the pressure
washer, this damage will not be covered under warranty.
DETERGENT PICK UP TUBE (PIC. 11)
To use the detergent pick up tube place the filter and
tube into your detergent bottle.
NOTE: The detergent pick tube will only suck detergent
fluid up if the Black detergent nozzle is fitted.
PIC. 11
PIC. 10A
PIC. 10B
14
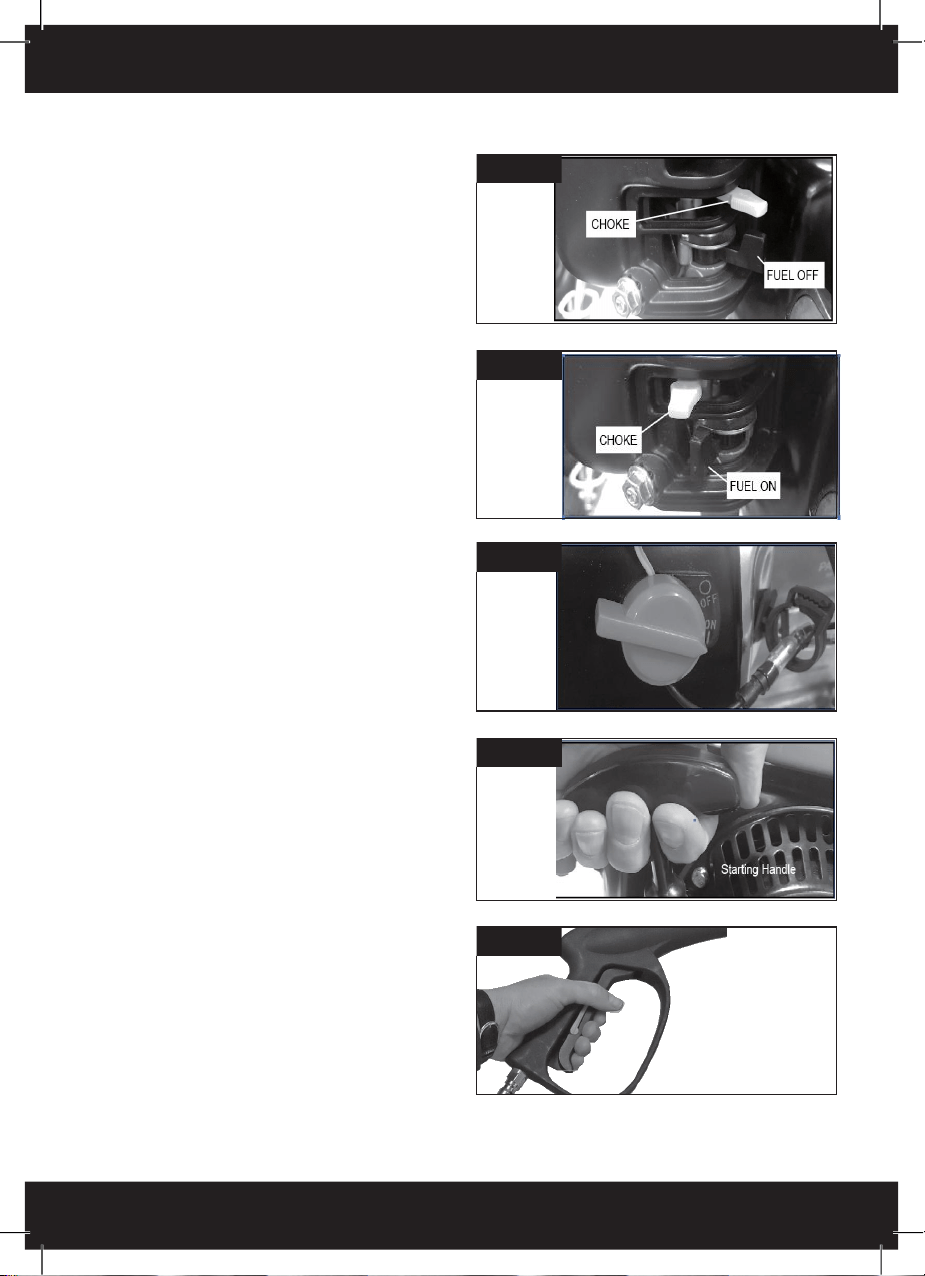
STARTING YOUR PRESSURE WASHER
1. Check oil level.
2. Check and fill fuel.
3. Connect garden hose to cold water source. Do not turn on!
4. Connect garden hose to garden connection on pump.
5. Select nozzle, see page 13
6. If using detergent fill and select bottle refer page 14, Pic. 10.
7. Turn choke to start by sliding the choke lever to the LEFT,
Pic 11.
8. Slide the fuel lever to run by sliding the fuel lever to the
right, Pic 12.
9. Turn switch to “1”, refer Pic. 13.
10. Pull the recoil starter slowly until engaged, then pull briskly.
This step may need to be repeated until pressure washer
engine starts, this can take up to about 12 pulls, Pic 14.
Warning: Never pull the recoil once the engine has started. Any
damage caused will not be covered under warranty.
11. Once started turn choke to off (run), slide to RIGHT.
12. Turn cold water source on.
13. Release safety lock on trigger, lift lever up.
14. Squeeze trigger on wand. Hold down until all air is purged
and a steady stream of water is passing through, Pic 15.
15. Release trigger to stop water flow.
WHEN FINISHED WITH DETERGENT
When finished with detergent, release trigger on wand. Remove
tube and filter from detergent bottle. Place tube and filter
around handle. Do not place on the ground as this will suck
dirt into pump. Any damage caused will not be covered under
warranty.
Change nozzle, see page 13.
Squeeze trigger and continue cleaning with clean cold water.
STOPPING YOUR PRESSURE WASHER
To stop your pressure;
1. Turn cold water supply off.
2. Squeeze gun trigger, releases some water and pressure.
3. Turn fuel tap off.
4. Push engine switch off “0”.
5. Once engine has stopped, squeeze gun trigger, releases
some water and pressure.
6. Disconnect the garden hose from pressure pump and
garden tap.
7. Lock the gun, push button to the left.
8. Tidy up hose, gun and lance.
9. Allow pressure washer to cool about 1 hour before wiping
down and store appropriately.
PIC. 12
PIC. 13
PIC. 14
PIC. 15
PIC. 16
15
TAKING A BREAK DURING USE
If taking a break of more than 2 minutes during use you
must turn the pressure washer off. See stopping your
pressure washer on page 14.
Damage will be caused if the pressure cleaner is left
running while the trigger is off no water coming out
for more than 2 minutes. Damaged caused will not be
covered under warranty. Pressure washer pump may also
release hot water from the release tube, when the pump
temperature gets too hot during this break time.
NOZZLE CLEANING (PIC. 17)
Clogging of the spray tip increases the water pressure in
the pump and might damage the pump.
Clean the spray tip by carefully inserting the provided
spray tip cleaner, or a thin sharp object (e.g. paper clips)
into the tip to remove deposits.
NOTE: If motor is labouring it is probably caused by a
blocked nozzle. Clean nozzle as above.
DRAINING THE TANK AND CARBURETOR (PIC. 18)
1. Turn ON fuel valve to make su re fuel is drained and
the tank is empty. Residual fuel left over a long time
will cause difficulty when next starting the engine.
2. Position an approved fuel container under the
carburetor drain screw to catch fuel; loosen the bolt
(Pic. 18). Allow fuel to drain completely into container.
3. Retighten drain bolt.
4. After draining the fuel tank and carburetor, start the
engine and allow it to run until the unit runs out of fuel.
Consult hazardous waste management guidelines in
your area for the proper way to dispose of fuel.
PIC. 17
PIC. 18

16
CLEANING
NEVER use this pressure washer to clean itself. Damage
caused by cleaning the pressure washer with its own
gun will not be covered under warranty. Ensure pressure
washer is cool before cleaning, about 1 hour after use.
• Wipe down all surfaces with a soft clean cloth.
• Rinse all nozzles in a bucket of clean water.
• Place in holder to dry.
• Ensure fuel tap is off.
• Ensure engine switch is off.
• Ensure high pressure hose is left wound up and not
kinked.
• Store in a suitable area away from children or infirm
persons.
• Store in a suitable area which will not freeze.
STORING
If the pressure washer is not to be used or is to be stored
for more than one month the following storage procedure
should be carried out.
1. Drain all the fuel from the fuel tank and the carburettor,
ensure that all the fuel has been drained.
2. Remove the spark plug and pour approximately one
tablespoon full of clean engine oil into the spark plug
hole.
3. With the ignition turned OFF gently pull on the recoil
starter cord several times.
4. Re-fit the spark plug and continue to pull the recoil
starter cord until the piston is on the compression
stroke (when resistance is felt) then stop pulling.
5. Store the pressure washer in a dry well ventilated
place under a cover to prevent any dust or debris
from accumulating on the pressure washer.
When storing for less than 4 weeks please follow these
points to ensure no damage will occur to the pump or
motor. Any damage caused will not be covered under
warranty.
Start motor and run for no more than 30 seconds. This
cleans the pump of excess water.
• Ensure the inlet water hose is not connected
• Ensure the high pressure hose is not connected to the
pump
• Turn fuel tap on
• Turn choke lever to on (start)
• Turn engine switch to ‘on’
• Pull recoil
• Turn choke to off (run)
• Allow motor to run no more than 30 seconds
• Turn fuel tap off
• Turn engine switch off
• Drain fuel from tank and carburettor
• Clean as per “cleaning”
17
MAINTENANCE INFORMATION
If scheduled maintenance is NOT carried out then this
will void your warranty. Use the Service Log on page 21
to keep track of the regular servicing. Ensure that the
authorised service agent has dated, signed and stamped
this log to ensure your warranty is not void.
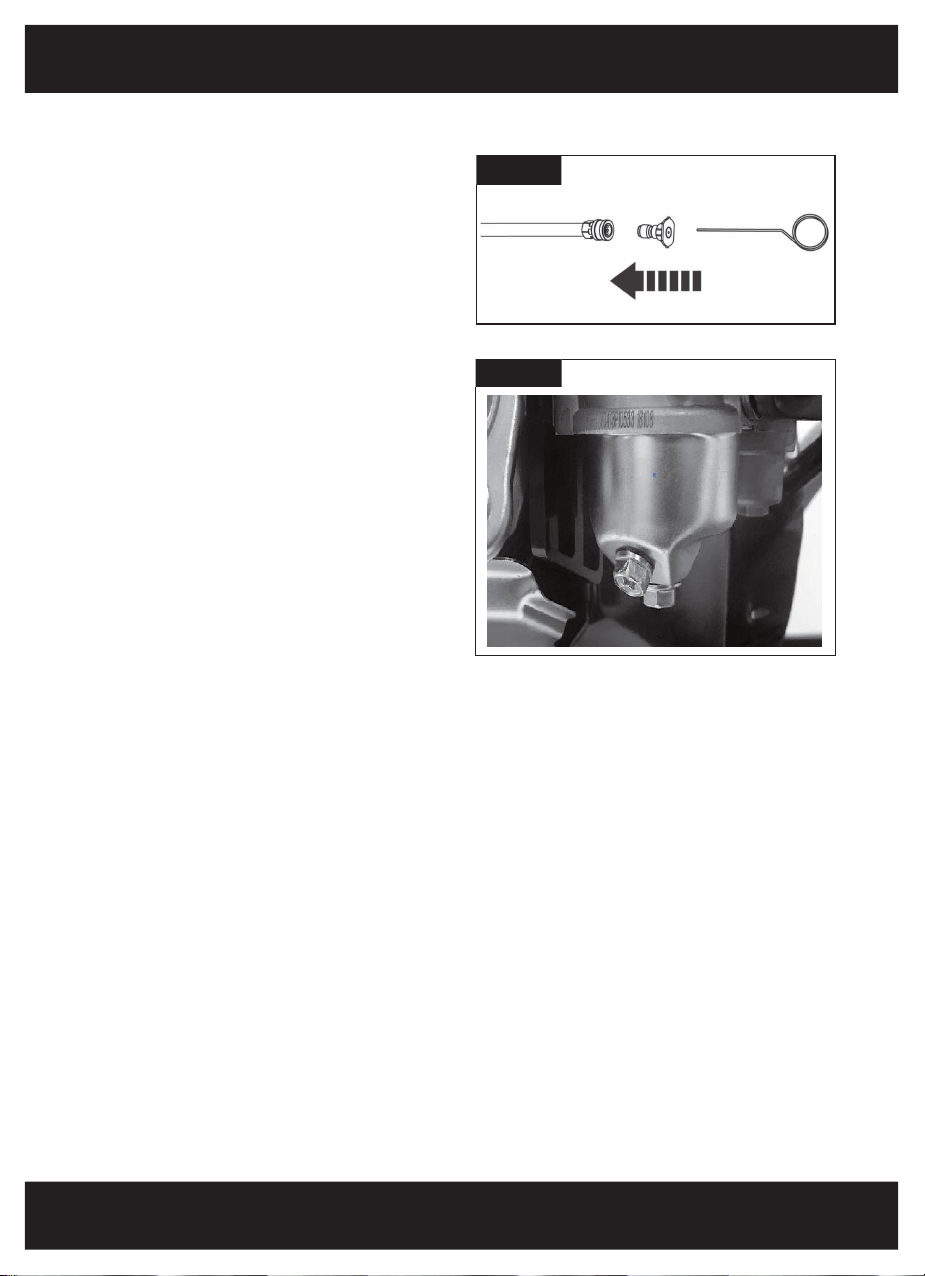
SPARK PLUG (PIC. 19)
Spark plug should be checked every 50 hours (operation) or
every 3 months and replaced every 100 hours (operation) or
every 6 months, which ever occurs first or whenever considered
necessary.
1.
Unplug the spark plug lead off the spark plug.
2.
To clean usea wire brush/nail file and remove the carbon
deposits on spark plug base.
3.
Check the spark plug gap using a feeler gauge. The gap
should be 0.7mm≈ 0.8mm
.
AIR FILTER (PIC. 20)
Air filter should be checked daily and replaced every 50 hours
(operation) or every 3 months which ever occurs first or
whenever considered necessary.
To check or replace the air filter;
1. Remove the air filter thumb nut and cover, see Pic. 20.
2. Remove air filter wing nut, washer and element.
3. If dirty clean or replace air filter element before using
4. Slide new air filter element onto the air filter box.
5. Replace air filter element, washer and wing nut.
6. Replace the air filter cover and thumb nut.
To Clean the Filter
1. Remove the foam filter.
2. Shake foam filter to get the excess dust and debris
off.
3. Using a foam filter cleaner thoroughly clean the foam
filter, follow the instruction on the bottle.
4. Place somewhere clean to air dry.
5. Once dry it is time to oil, you can either use a foam
filter oil or a mineral oil.
6. Cover the foam filter in a little oil and thoroughly work
the oil through the entire foam filter.
7. Squeeze out the excess oil.
8. Filter is now ready to re-use.
PIC. 19
PIC. 20
18
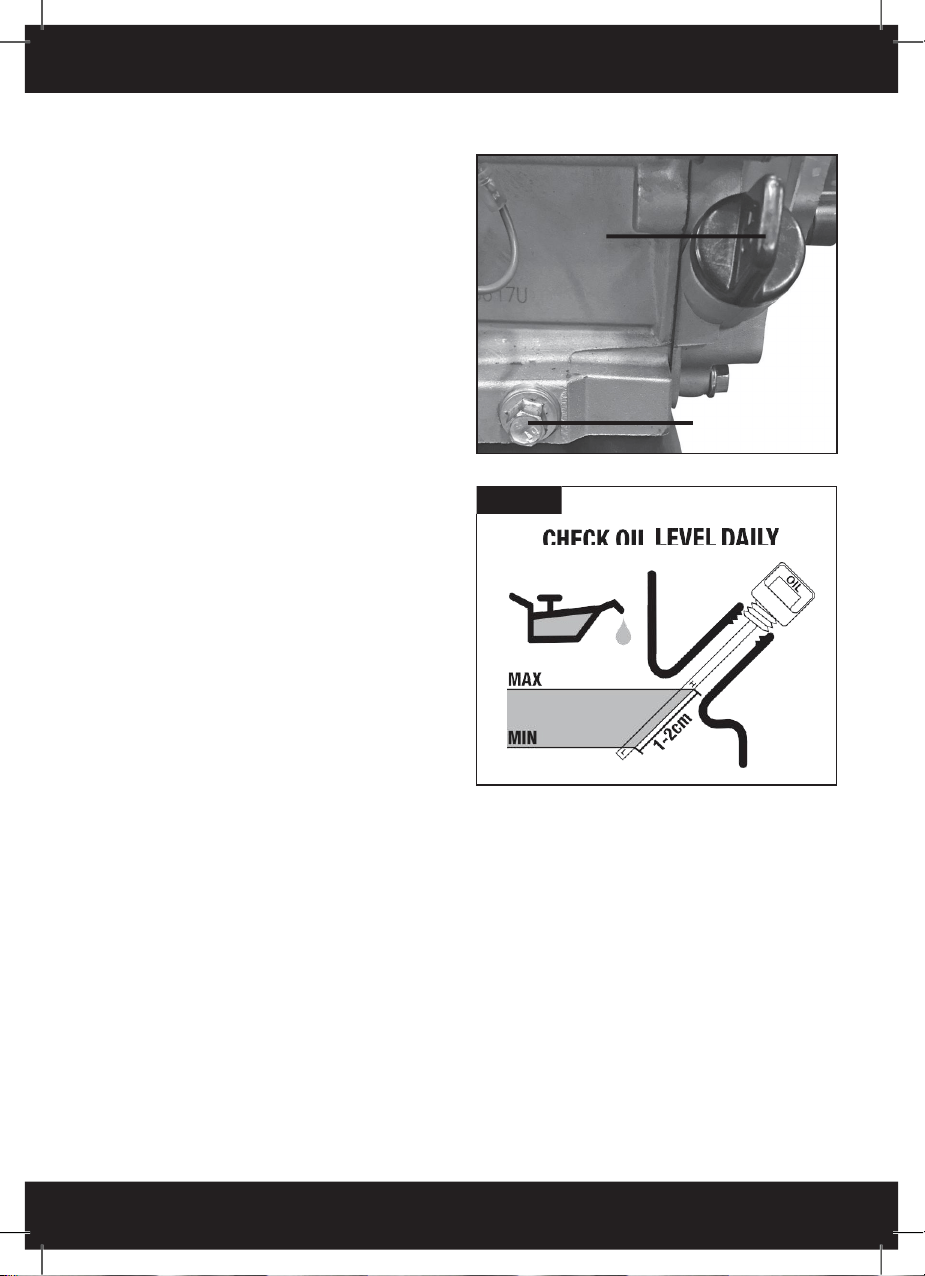
ENGINE OIL
Used oil is a hazardous waste product and must be
disposed of properly. Do not discard with household
waste. Check with your local authorities, service centre,
or dealer for safe disposal/recycling facilities.
Draining Oil
1. With engine off but still warm, disconnect the spark
plug wire and keep it away from the spark plug.
2. Remove the oil dipstick.
3. Remove the oil drain bolt (Pic. 21).
4. Drain the oil into an approved container.
5. After the oil has drained, install and tighten the oil
drain bolt.
To Add Engine Oil (not included)
Always use fresh oil as specified on page 8. SAE10W-30
is recommended.
1. Make sure pressure washer is level.
2. Clean the oil dipstick area of any dirt and debris.
3. Remove oil dipstick (Pic. 22) and wipe with a clean
cloth.
4. Replace the oil dipstick, DO NOT TURN OR
TIGHTEN.
5. Remove the dipstick and check the oil level. Correct
oil level is at the top of the full indicator on the
dipstick, Pic. 22.
6. Add oil, via the oil fill (Pic. 21). Add about 100ml at a
time and check before adding more oil.
7. Oil level will take about 1 minute to drain down and
settle.
8. Check oil level using the oil dipstick.
9. Replace the oil dipstick, DO NOT TURN OR
TIGHTEN.
10. Remove the dipstick and check the oil level. Correct
oil level is at the top of the full indicator on the
dipstick (Pic. 22).
11. Repeat steps 6 to 10 until correct oil level is achieved.
PIC. 21
OIL PLUG
& OIL FILL
SUMP PLUG
& OIL DRAIN
PIC. 22

19
MAINTENANCE SCHEDULE
NOTE: If unsure how to do any of these checks please
contact our service centre or an authorised service agent.
NOTE: When performing any maintenance or servicing
always ensure the pressure washer is stopped and
turned off.
First 5 Hours
• Change engine oil
Daily or Every 8 Hours
• Check engine oil level
• Clean area around engine muffler and engine controls
• Clean engine air intake grill
Every 25 Hours or Every Month
• Clean engine air filter*
Every 50 Hours or Every 3 Months
• Change engine oil
Every 200 Hours or Annually
• Replace spark plug
• Replace engine air filter
• Service fuel system
• Service exhaust system
• Check valve clearance**
* In dusty conditions or when airborne debris is present,
clean more often.
** Not required unless engine performance problems are
noted.
Repairs
Repairs to your pressure washer should only be carried
out by an authorised service agent.
20
TROUBLE SHOOTING
ENGINE WILL NOT START
POSSIBLE CAUSE SUGGESTED FIX
No or low fuel in the fuel tank Fill fuel tank
No or low oil in sump Fill oil sump
Fuel/Engine lever is OFF Turn fuel/engine lever ON
Engine switch is OFF Turn engine switch to ON
Choke is set to RUN Slide choke to START
UNIT DOES NOT REACH HIGH PRESSURE
Diameter of garden hose is too small Replace with a 12mm garden hose
Water supply is restricted Check garden hose for kinks, leaks and blockage
Water inlet filter is clogged Clean inlet filter
Black detergent nozzle is attached Remove detergent nozzle and attach a high pressure nozzle
Not enough inlet water supply Check garden hose for kinks, leaks and blockage
OUTPUT PRESSURE VARIES HIGH AND LOW
Pump is sucking air
Check garden hose for kinks, leaks or blockage.
Check whether hoses and fittings are air tight
Water inlet filter is clogged Clean inlet filter
Calcified gun, hose or spray wand
Blow out or remove debris with a fine needle. Run distilled
vinegar through detergent suction tube
NO DETERGENT
Detergent suction tube not properly
connected to the machine
Check connection
Detergent is too thick Dilute detergent
SPRAY WAND LEAKS
A high pressure nozzleis attached Replace with black detergent nozzle
Discharge nozzle is obstructed Blow out or remove debris with fine needle
GARDEN HOSE CONNECTION LEAKS
Filter on detergent suction tube is clogged Run warm water through filter to remove debris
Damaged or clogged detergent suction tube Remove obstruction or replace detergent suction tube
PUMP IS NOISY
Loose fittings Check that all fittings are tight
Spray wand not properly attached
Tighten the spray wand onto the gun. Turn the wand collar
clockwise onto the gun threads until tight
WATER LEAKS FROM PUMP
Pump is sucking air
Check whether hoses and fittings air tight. Turn off machine and purge pumpby
squeezing trigger gun until a steady flow of water emerges through nozzle
Loose fittings Check that all fittings are tight
OIL DROP
Oil seals are damaged or worn Contact service centre
21
This service is to be completed within 50 hours
or 3 months of purchase, which ever comes first.
Replace
Clean & Adjust
Oil
Spark plug
Air filter
Authorised Service Agent
(Name or Company Stamp)
Technician
Date
This service is to be completed within 100 hours
or 6 months of purchase, which ever comes first.
Replace
Air filter
Oil
Spark Plug
Authorised Service Agent
(Name or Company Stamp)
Technician
Date
This service is to be completed within 150 hours
or 9 months of purchase, which ever comes first.
Replace
Clean & Adjust
Oil
Spark plug
Air filter
Authorised Service Agent
(Name or Company Stamp)
Technician
Date
This service is to be completed within 200 hours
or 12 months of purchase, which ever comes first.
Replace
Air filter
Oil
Spark Plug
Authorised Service Agent
(Name or Company Stamp)
Technician
Date
SERVICE LOG