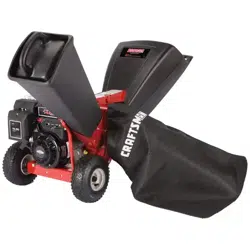

Operator's Manual
I:Rl FI'SlVl N
1450 Series Engine
Chipper Shredder
Model No. 247.77638
Before using this equipment,
read this manual and follow
all safety rules and operating
instructions.
* SAFETY
* ASSEMBLY
* OPERATION
* MAINTENANCE
* PARTS LIST
* ESPANOL
Sears Brands Management Corporation, Hoffman Estates, iL 60179 U.S.A.
Visit our website: www.craftsman.com
FORMNO.769-05040B
07/25/2011
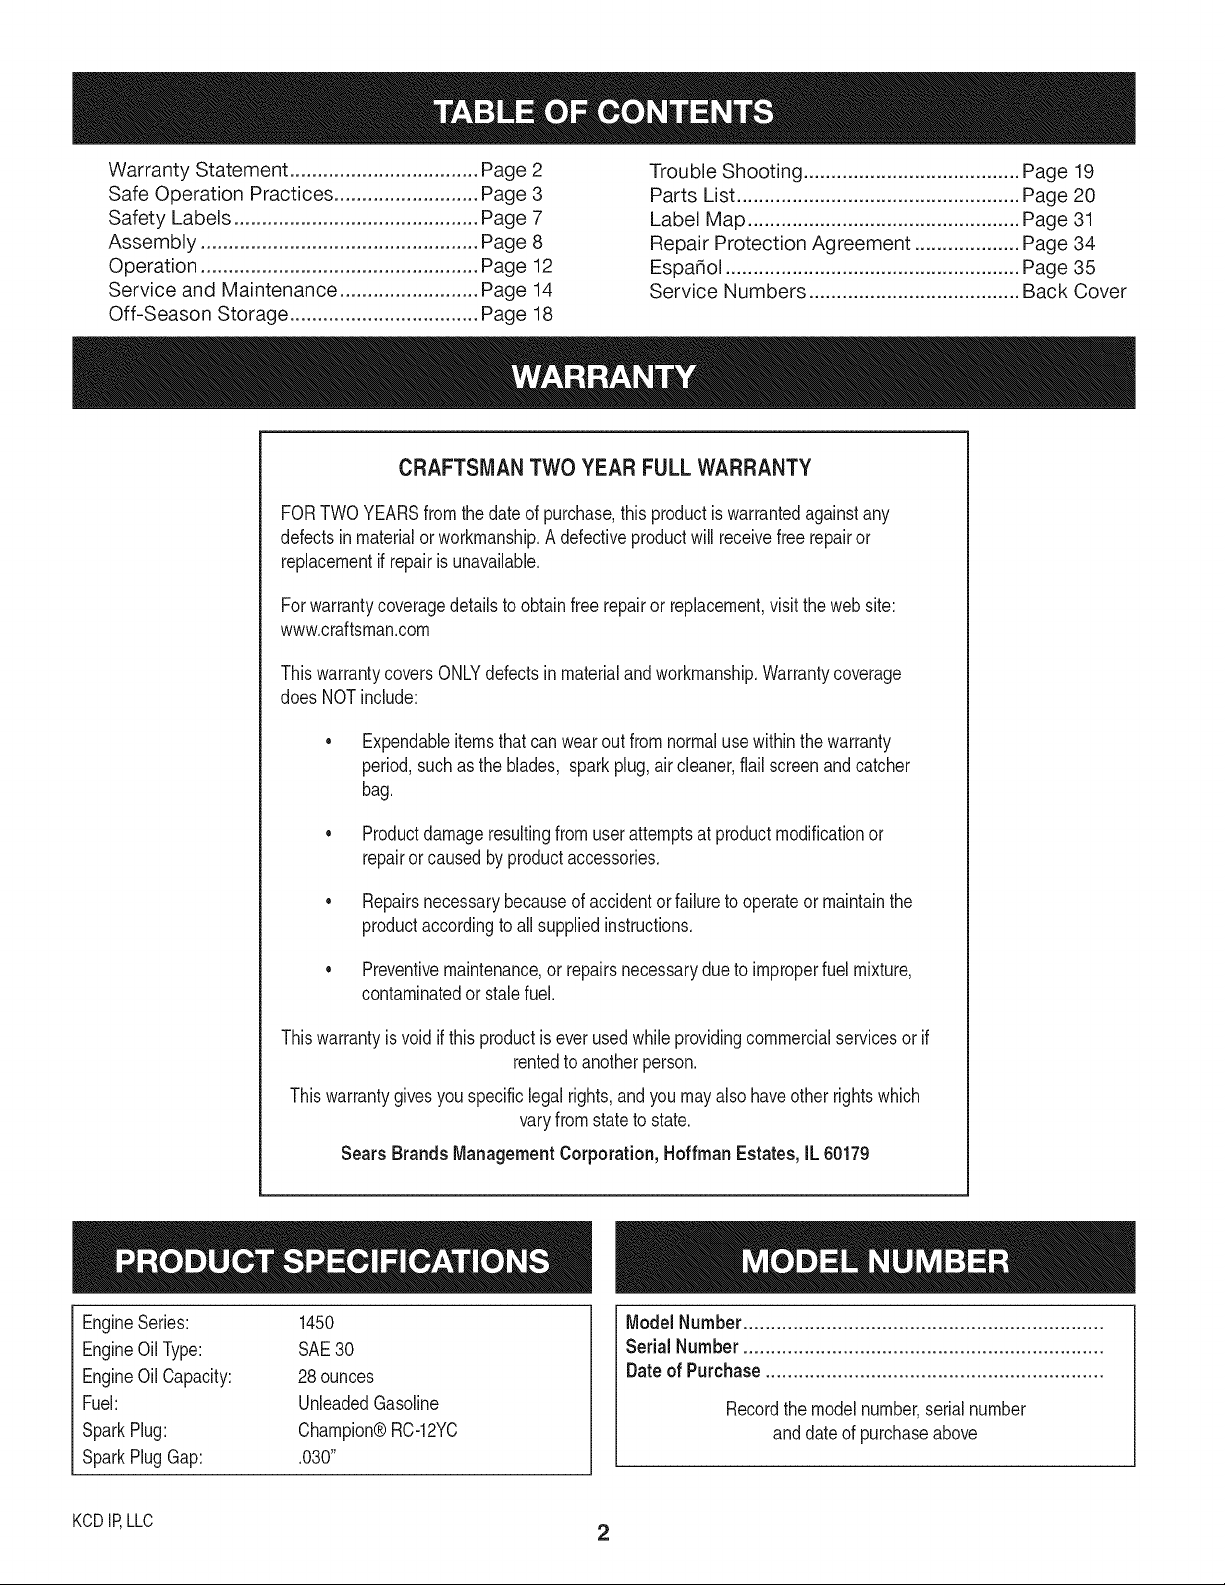
WarrantyStatement..................................Pac
SafeOperationPractices..........................Pac
SafetyLabels............................................Pac
Assembly..................................................Pac
Operation..................................................Pac
ServiceandMaintenance.........................Pac
Off-SeasonStorage..................................Pac
e2
e3
e7
e8
e12
e14
e18
TroubleShooting.......................................Page19
PartsList...................................................Page20
LabelMap.................................................Page31
RepairProtectionAgreement...................Page34
Espa_ol.....................................................Page35
ServiceNumbers......................................BackCover
CRAFTSMAN TWO YEAR FULL WARRANTY
FORTWOYEARSfromthe dateof purchase,thisproductis warrantedagainstany
defectsin materialor workmanship.A defectiveproductwill receivefreerepairor
replacementif repairis unavailable.
For warrantycoveragedetailsto obtainfreerepairor replacement,visit theweb site:
www.craftsman.com
ThiswarrantycoversONLYdefectsin materialandworkmanship.Warrantycoverage
does NOTinclude:
• Expendableitemsthatcanwearout fromnormaluse withinthe warranty
period,suchas the blades, sparkplug,air cleaner,flail screenandcatcher
bag.
Productdamageresultingfromuserattemptsat productmodificationor
repairorcausedbyproductaccessories.
Repairsnecessarybecauseof accidentor failureto operateor maintainthe
productaccordingto all suppliedinstructions.
• Preventivemaintenance,or repairsnecessarydue to improperfuel mixture,
contaminatedor stalefuel.
Thiswarrantyis void if this productisever usedwhileprovidingcommercialservicesor if
rentedto anotherperson.
Thiswarrantygivesyou specificlegal rights,and you mayalso haveotherrightswhich
varyfromstateto state.
Sears Brands ManagementCorporation, Hoffman Estates, IL 60179
EngineSeries: 1450
EngineOilType: SAE30
EngineOilCapacity: 28ounces
Fuel: UnleadedGasoline
SparkPlug: Champion®RC-12YC
SparkPlugGap: .030"
Model Number.................................................................
Serial Number .................................................................
Dateof Purchase.............................................................
Recordthe modelnumber,serialnumber
anddateof purchaseabove
KCD IR LLC 2
Thissymbolpointsout importantsafetyinstructionswhich,if not
followed,couldendangerthe personalsafetyand/orpropertyof
yourselfandothers. Readand followall instructionsin thismanual
beforeattemptingto operatethismachine.Failureto complywith
theseinstructionsmay resultin personalinjury.Whenyou seethis
symbol,HEEDITSWARNING!
CALIFORNIA PROPOSITION 65
EngineExhaust,someof its constituents,andcertainvehicle
componentscontainor emit chemicalsknownto Stateof California
to cause cancerandbirthdefects or other reproductiveharm.
Thismachinewas built to be operatedaccordingto the safeopera-
tion practicesin this manual.As withany typeof powerequipment,
carelessnessor error on the part of the operatorcan resultin
seriousinjury.Thismachineis capableof amputatingfingers,hands,
toesandfeetandthrowingdebris. Failureto observethe following
safetyinstructionscouldresultin seriousinjuryordeath.
Your Responsibility--Restrict the useof this powermachineto
personswho read,understandandfollowthewarningsand instruc-
tionsinthismanualandon the machine.
SAVETHESEINSTRUCTIONS!
TRAINING
• Read,understand,and followall instructionson the machineand
in themanual(s)beforeattemptingto assembleandoperate.
Keepthis manualina safeplacefor futureand regularreference
andfor orderingreplacementparts.
• Readthe Operator'sManualand followallwarningsand safety
instructions.Failureto do so can resultin seriousinjuryto the
operatorand/orbystanders.
• Befamiliarwithall controlsandtheir properoperation.Knowhow
to stop the machineand disengagethemquickly.
• Neverallowchildrenunder16 yearsof age to operatethis
machine.Children16andovershouldreadandunderstandthe
instructionsand safe operationpracticesin thismanualandon
the machineand be trainedand supervisedby anadult.
• Neverallowadultsto operatethis machinewithoutproper
instruction.
• Keepbystanders,pets,andchildrenat least 75 feetfrom the
machinewhile it is in operation.Stopmachineif anyoneenters
the area.
• Neverrunanengineindoorsor ina poorlyventilatedarea.Engine
exhaustcontainscarbonmonoxide,anodorlessand deadlygas.
• Do not puthandsandfeetnearrotatingpartsor inthe feeding
chambersanddischargeopening.Contactwith the rotating
impellercan amputatefingers,hands,andfeet.
• Neverattemptto unclogeitherthe feed intakeordischarge
opening,removeor emptybag,or inspectand repairthe machine
whilethe engineis running.Shutthe engineoff and wait untilall
movingpartshavecometo a completestop.Disconnectthe spark
plugwireand groundit againstthe engine.
PREPARATION
• Thoroughlyinspecttheareawherethe equipmentis to be used.
Removeall rocks,bottles,cans,or otherforeignobjectswhich
could be pickedupor thrownandcausepersonalinjuryor
damageto the machine.
• Alwayswear safetyglassesor safetygogglesduringoperation
andwhile performingan adjustmentor repair,to protectyour
eyes.Thrownobjectswhich ricochetcan causeseriousinjuryto
the eyes.
• Wearsturdy,rough-soledworkshoesandclose-fittingslacksand
shirts.Loosefittingclothesor jewelrycan be caughtin movable
parts.Neveroperatethis machinein bare feet or sandals.Wear
leatherworkgloveswhenfeedingmaterialinthe chipperchute.
• Beforestarting,checkallboltsandscrewsfor propertightnessto
besurethe machineis in safe workingcondition.Also,visually
inspectmachinefor any damageat frequentintervals.
• Maintainor replacesafetyandinstructionslabels,as necessary.
3
Safe Handling of Gasoline:
Toavoidpersonalinjuryor propertydamageuseextremecare in
handlinggasoline.Gasolineis extremelyflammableandthe vaporsare
explosive.Seriouspersonalinjurycan occurwhengasolineis spilled
onyourselfor yourclotheswhichcan ignite.Washyour skin and
changeclothesimmediately.
• Useonlyan approvedgasolinecontainer.
• Neverfill containersinsidea vehicleor ona truckor trailerbed
witha plasticliner.Alwaysplacecontainersonthe groundaway
fromyour vehiclebeforefilling.
• Whenpractical,removegas-poweredequipmentfromthe truck
ortrailerand refueliton the ground.Ifthisis notpossible,then
refuelsuchequipmenton a trailerwith a portablecontainer,rather
thanfrom a gasolinedispensernozzle.
• Keepthe nozzleincontactwiththe rimof the fuel tankor
containeropeningat all times untilfuelingis complete.Do not use
a nozzlelock-opendevice.
• Extinguishall cigarettes,cigars,pipesandother sourcesof
ignition.
• Neverfuel machineindoors.
• Neverremovegas capor addfuel whilethe engineishot or run-
ning.Allowengineto cool at leasttwo minutesbeforerefueling.
• Neveroverfill fueltank. Fill tankto nomorethan1/2inchbelow
bottomof filler neck to allowspacefor fuel expansion.
• Replacegasolinecapandtightensecurely.
• Ifgasolineisspilled,wipe itoff theengineandequipment.Move
unitto anotherarea.Wait5 minutesbeforestartingthe engine.
• To reducefire hazards,keepmachinefreeof grass, leaves,or
otherdebrisbuild-up.Cleanupoil or fuel spillageand removeany
fuel soakeddebris.
• Neverstorethe machineorfuel containerinsidewherethereis an
openflame,spark or pilotlightas on a water heater,spaceheater,
furnace,clothesdryer or othergas appliances.
OPERATION
• Do not puthandsandfeetnearrotatingpartsor in thefeeding
chambersand dischargeopening.Contactwith the rotating
impellercan amputatefingers,hands,andfeet.
• Beforestartingthe machine,makesurethe chipperchute,feed
intake,andcuttingchamberare emptyand freeof all debris.
• Thoroughlyinspectall materialto be shreddedandremoveany
metal,rocks,bottles,cans,or otherforeignobjectswhichcould
causepersonalinjuryor damageto the machine.
• If it becomesnecessaryto pushmaterialthroughthe shredder
hopper,usea small diameterstick. Donot useyour handsor feet.
• If the impellerstrikesa foreignobjector if yourmachineshould
start makingan unusualnoiseorvibration,immediatelyshut
the engineoff. Allowthe impellerto cometoa completestop.
Disconnectthe sparkplug wire,ground itagainstthe engineand
performthe followingsteps:
a. Inspectfor damage.
b. Repairor replaceanydamagedparts.
c. Checkfor anyloose partsand tightento assurecontinued
safeoperation.
• Donot allowan accumulationof processedmaterialto build up in
the dischargearea.Thiscan preventproperdischargeandresult
inkickbackof materialthroughthe feedopening.
• Donot attemptto shredor chip materiallargerthanspecified
on the machineor in this manual.Personalinjuryor machine
damagecould result.
• Neverattemptto unclogeitherthe feedintakeor discharge
openingwhilethe engineis running.Shuttheengineoff,wait until
all movingpartshavestopped,disconnectthe sparkplugwireand
grounditagainsttheenginebeforeclearingdebris.
• Neveroperatewithoutthe shredderhopper,chipperchute,or
chutedeflectorproperlyattachedto the machine.Neveremptyor
changedischargebagwhilethe engineis running.
• Keepall guards,deflectorsand safetydevicesin placeand
operatingproperly.
• Keepyourfaceandbodyback and to the sideof the chipper
chutewhilefeedingmaterialintothe machineto avoidaccidental
kickbackinjuries.
• Neveroperatethis machinewithoutgoodvisibility or light.
• Donot operatethismachineona paved,gravelor non-level
surface.
• Donot operatethismachinewhileunderthe influenceof alcohol
or drugs.
• Mufflerand enginebecomehot and cancausea burn.Do not
touch.
• Neverpick up or carry machinewhilethe engineis running.
• If situationsoccurwhichare notcoveredinthis manual,use care
andgoodjudgement.Contact1-800-4-MY-HOMEfor the location
of the nearestSearsParts& RepairServiceCenter.
MAINTENANCE & STORAGE
• Nevertamperwith safetydevices.Checktheir properoperation
regularly.
• Checkboltsandscrewsfor propertightnessat frequentintervals
to keepthe machinein safeworkingcondition.Also,visually
inspectmachinefor any damageandrepair,if needed.
• Beforecleaning,repairing,or inspecting,stopthe engineand
makecertainthe impellerand all movingpartshavestopped.
Disconnectthe sparkplug wireandgrounditagainsttheengine
to preventunintendedstarting.
• Donot changethe enginegovernorsettingsor overspeedthe
engine.The governorcontrolsthe maximumsafeoperatingspeed
of the engine.
4

• Maintainor replacesafetyand instructionlabels,as necessary.
Followthismanualfor safe loading,unloading,transporting,and
storageof this machine.
Neverstorethe machineor fuel containerinsidewherethereis an
openflame,sparkorpilot lightsuch as a waterheater,furnace,
clothesdryer,etc.
Allowmachineto cool at least5 minutesbeforestoring.
• Alwaysreferto the operator'smanualfor properinstructionson
off-seasonstorage.
• If thefuel tank hasto bedrained,do thisoutdoors.
• Observeproperdisposallawsand regulationsfor gas, oil,etc. to
protectthe environment.
• Accordingto the ConsumerProductsSafetyCommission(CPSC)
andthe U.S.EnvironmentalProtectionAgency(EPA),thisproduct
hasan AverageUsefulLifeof seven(7) years,or 60hoursof
operation.At the end of theAverageUsefulLife havethe machine
inspectedannuallybyan authorizedservicedealerto ensurethat
allmechanicalandsafetysystemsare workingproperlyand not
wornexcessively.Failureto do so can resultinaccidents,injuries
ordeath.
DO NOT MODIFY ENGINE
Toavoidseriousinjuryor death, do not modifyenginein anyway.
Tamperingwiththe governorsettingcan leadto a runawayengineand
causeit to operateat unsafespeeds.Nevertamperwithfactorysetting
of enginegovernor.
NOTICE REGARDING EMISSIONS
Engineswhich are certifiedtocomplywithCaliforniaandfederal
EPAemissionregulationsfor SORE(SmallOff RoadEquipment)are
certifiedto operateon regularunleadedgasoline,and mayinclude
the followingemissioncontrol systems:EngineModification(EM),
OxidizingCatalyst(CO), SecondaryAir Injection(SAI)and ThreeWay
Catalyst(TWO)if so equipped.
SPARK ARRESTOR
Thismachineis equippedwith an internalcombustionengineand
shouldnotbe usedon or near anyunimprovedforest-covered,
brushcoveredor grass-coveredland unlessthe engine'sexhaust
systemis equippedwith a sparkarrestormeetingapplicablelocal or
statelaws (if any)
Ifa sparkarrestoris used,it shouldbe maintainedin effectiveworking
orderby theoperator.Inthe State of Californiathe aboveis required
bylaw (Section4442 of the CaliforniaPublicResourcesCode). Other
statesmayhavesimilarlaws. Federallawsapplyonfederallands.
A sparkarrestorfor the muffleris availablethroughyournearestSears
PartsandRepairServiceCenter.

SAFETY SYMBOLS
Thispagedepictsand describessafetysymbolsthatmayappearonthis product. Read,understand,andfollowall instructionson the machine
beforeattemptingto assembleand operate.
i
i
• ®
il
READ THE OPERATOR'S MANUAL(S)
Read, understand, and follow all instructions in the manual(s) before attempting to assemble and
operate
WARNING-- ROTATING BLADES
Keep hands out of inlet and discharge openings while machine is running. There are rotating blades
inside
BYSTANDERS
Keep bystanders, pets, and children at least 75 feet from the machine while it is in operation. Stop
machine if anyone enters the area.
WARNING-- THROWN DEBRIS
Never operate without the chute deflector properly attached to the machine.
EYEPROTECTION
Always wear safety glasses or safety goggles when operating this machine.
I_ ARNING: Your Responsibility--Restrictthe useof this powermachineto personswho read,understandand followthe
warningsand instructionsinthis manualandonthe machine.
J
SAVETHESEINSTRUCTIONS!
6

r
100/.LIIO-NV:IIO
"lVflNV_ S,UOIVU3dOQV3H"G
"S3OV_IJflS]3AVUONO9NIIV_J3dO
N3HMNOIIflVOVSIX] qsfl"S9]ONVIS181V]98VHOSIO
10381083A3N'S]IUflrNI SI03PgoNMOUHIQIOAV01 "_
"3NIHOV_ONIOIA83SUOONIOOO]ONfl
]UO_38O3ddOIS]AVHSlHPd9NIAOW11VlllNfl S]IQNVH
ONIH]8NIVW3UONV']NION]dOlS'88]A]1HOlnlo]9VON]SIO"8
"]lnHg ]gHVHOSIO9010Nfl01 1001 lflO-NP]lO ]Sfl "Z
"l]]d ONVSONVH]lPlnd_P NVOH3onvuo Hq]l]d_JIHIIM
IOVINO0"u39npONV_J3113dWI9NllVIOU_JOH_IVMV d]3H "L
7
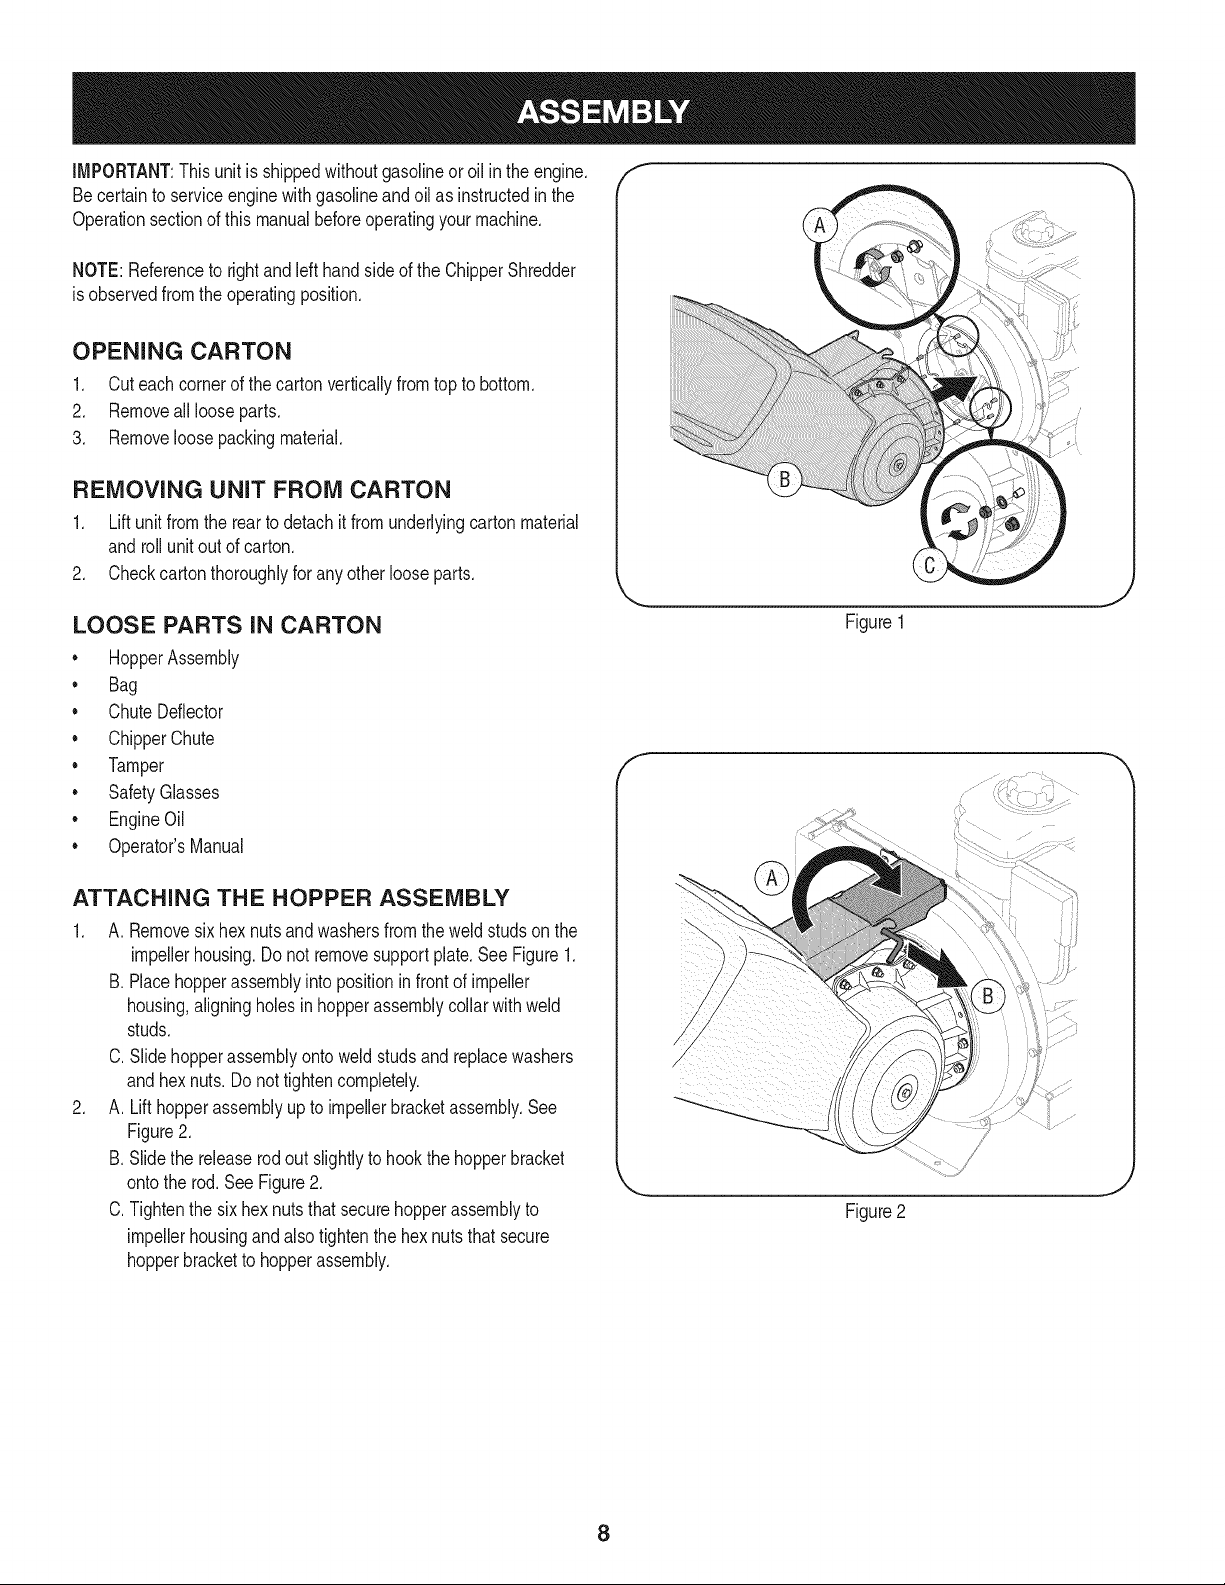
IMPORTANT:This unit isshippedwithoutgasolineoroil inthe engine.
Becertainto serviceenginewithgasolineandoilas instructedinthe
Operationsectionof this manualbeforeoperatingyourmachine.
NOTE:Referenceto rightand lefthand sideof the ChipperShredder
isobservedfromthe operatingposition.
OPENING CARTON
1. Cut eachcornerof the cartonverticallyfromtop to bottom.
2. Removeall looseparts.
3. Removeloosepackingmaterial.
REMOVING UNiT FROM CARTON
1. Lift unit from the rearto detach it from underlyingcartonmaterial
androllunit out of carton.
2. Checkcarton thoroughlyfor anyotherlooseparts.
LOOSE PARTS IN CARTON
• HopperAssembly
• Bag
• ChuteDeflector
• ChipperChute
• Tamper
• SafetyGlasses
• EngineOil
• Operator'sManual
ATTACHING THE HOPPER ASSEMBLY
1. A. Removesixhex nutsand washersfromthe weldstudson the
impellerhousing.Do not removesupportplate.See Figure1.
B. Placehopperassemblyinto positionin front of impeller
housing,aligningholesin hopperassemblycollarwithweld
studs.
C. Slidehopperassemblyonto weldstudsand replacewashers
andhex nuts.Do nottightencompletely.
2. A. Lift hopperassemblyup to impellerbracketassembly.See
Figure2.
B. Slide the releaserod out slightlyto hookthe hopperbracket
ontothe rod.SeeFigure2.
C.Tightenthe six hex nuts thatsecurehopperassemblyto
impellerhousingand alsotightenthe hex nutsthat secure
hopperbracketto hopperassembly.
f
Figure1
J
f
Figure2
8
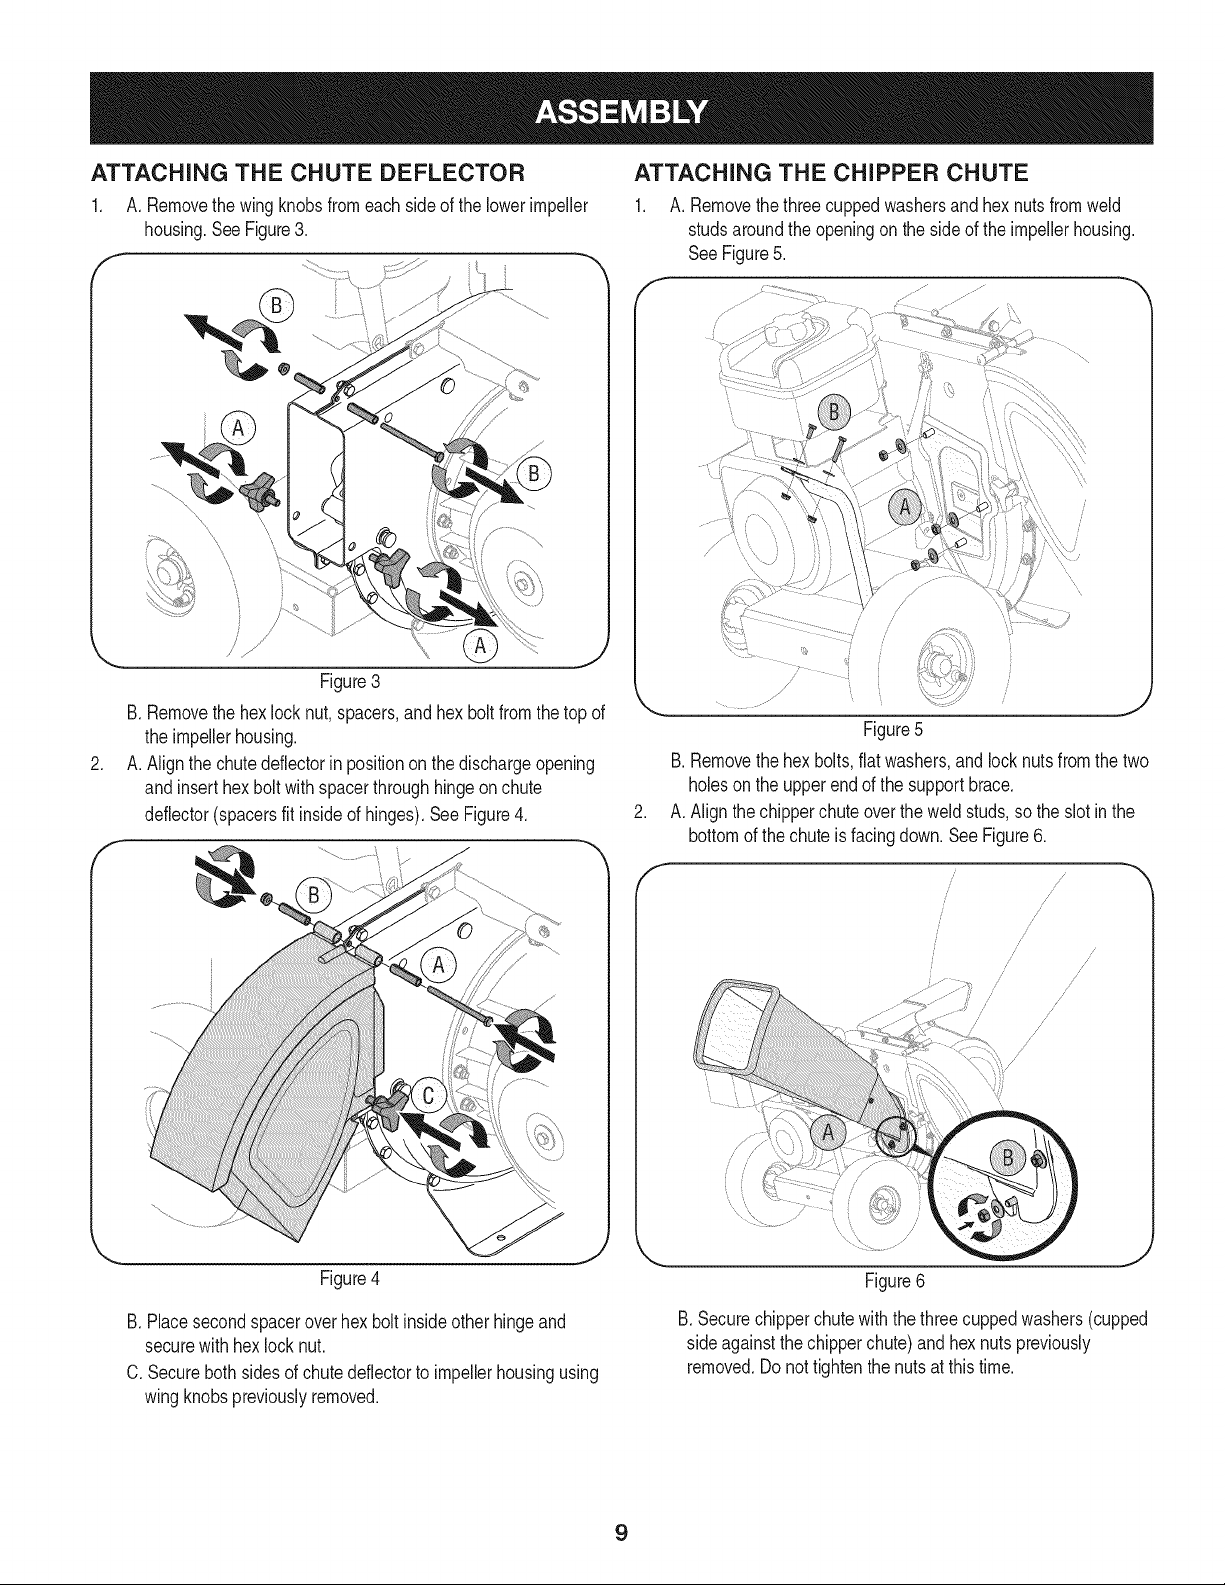
ATTACHING THE CHUTE DEFLECTOR
1. A. Removethe wingknobsfrom eachside of the lowerimpeller
housing.SeeFigure3.
ATTACHING THE CHIPPER CHUTE
1. A. Removethe threecuppedwashersand hexnutsfromweld
studsaroundthe openingonthe side of the impellerhousing.
SeeFigure5.
.
f
Figure3
B. Removethe hexlocknut,spacers,andhex boltfrom thetop of
the impellerhousing.
A. Align the chutedeflectorin positionon the dischargeopening
andinserthexbolt with spacerthroughhingeonchute
deflector(spacersfit insideof hinges).SeeFigure4.
f
Figure5
B. Removethe hex bolts,flatwashers andlocknutsfromthe two
holeson the upperend of the supportbrace.
A. Align thechipperchuteoverthe weldstuds,sothe slotinthe
bottomof the chute is facingdown. See Figure6.
i
i
i
/
/
/
/
/
/
/
/
/
/
/
/ /
i
/ i"
/ ,/
/ /s
/
/
/
/
/
/ ,
/ /
J
J
Figure4
Figure6
B. Placesecondspaceroverhex boltinsideotherhingeand
securewithhex locknut.
C. Securebothsides of chutedeflectorto impellerhousingusing
wing knobspreviouslyremoved.
B.Securechipperchutewiththethreecuppedwashers(cupped
sideagainstthe chipperchute)andhex nutspreviously
removed.Donot tightenthe nutsat thistime.
9
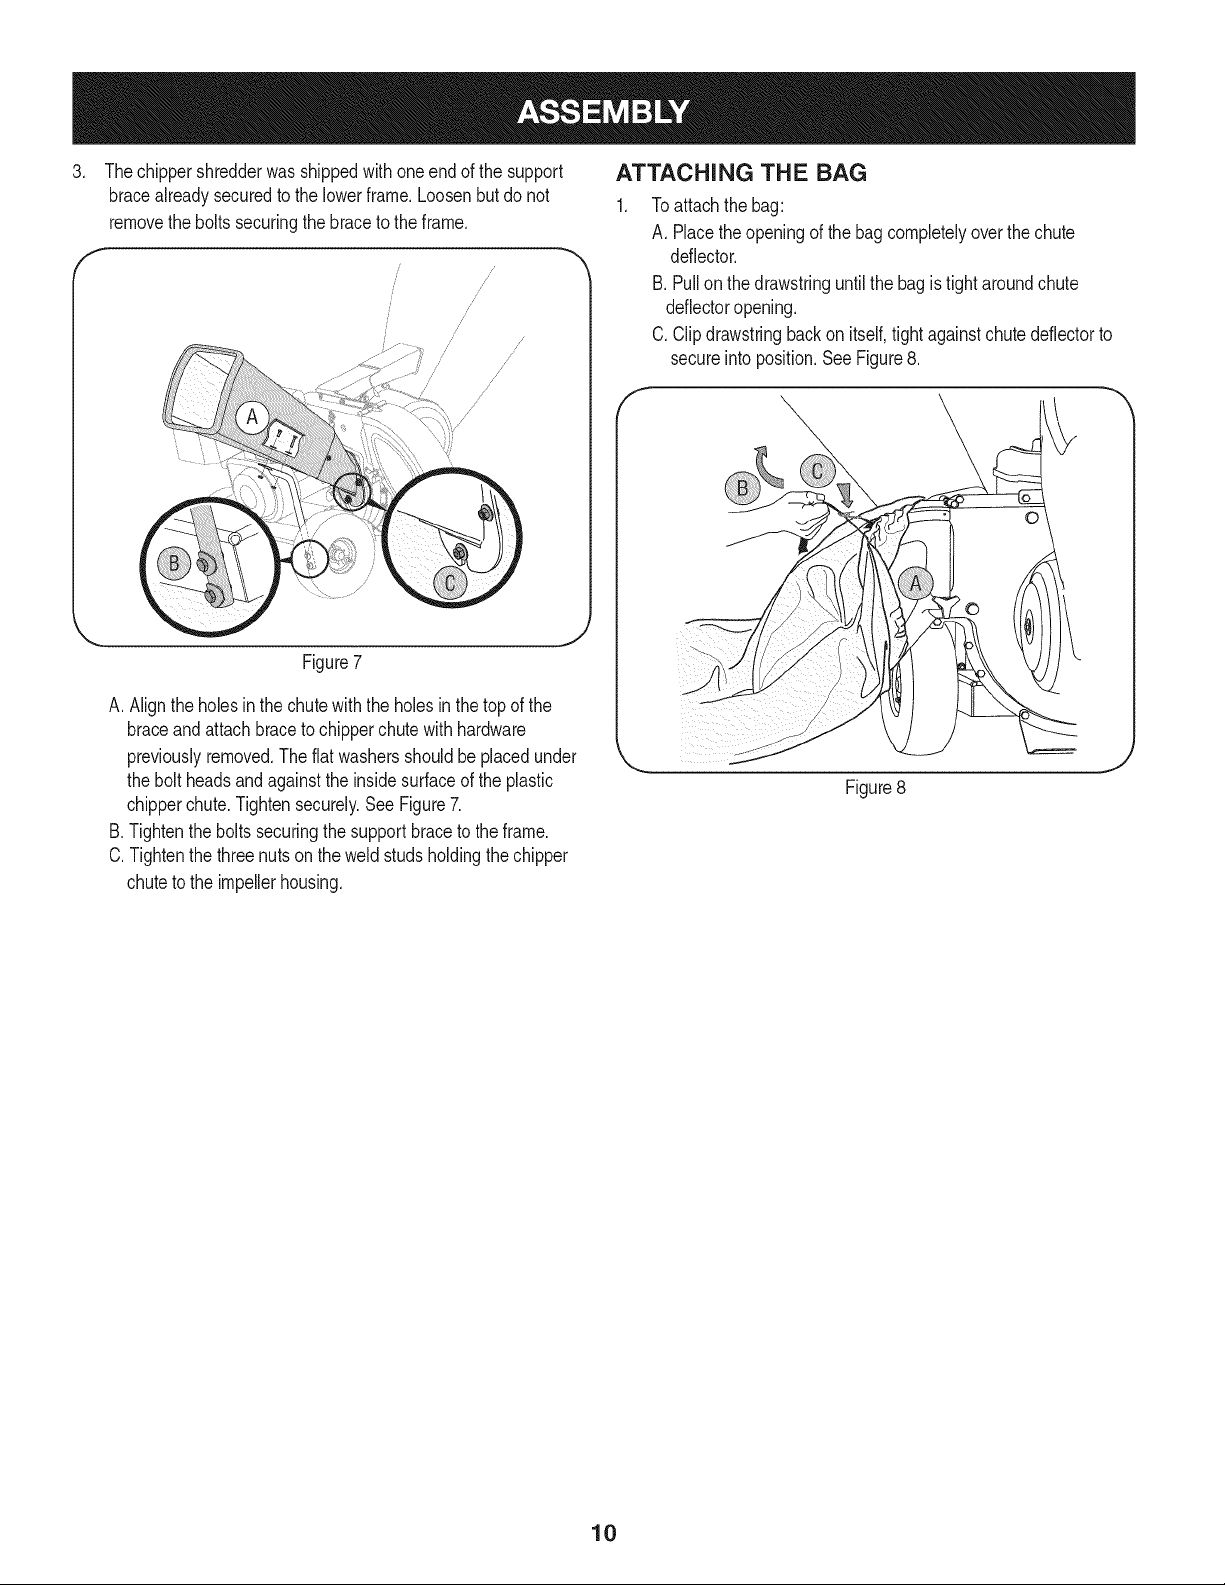
.
Thechippershredderwasshippedwithoneendof the support
bracealreadysecuredto the lowerframe.Loosenbutdo not
removethebolts securingthe braceto theframe.
Figure7
A. Align the holesinthe chutewiththe holesin the top of the
braceand attachbraceto chipperchutewithhardware
previouslyremoved.The flat washersshouldbe placedunder
the bolt headsand againstthe insidesurfaceof the plastic
chipperchute.Tightensecurely.SeeFigure7.
B. Tightenthe bolts securingthe supportbraceto the frame.
C.Tightenthe threenutsonthe weld studsholdingthe chipper
chuteto the impellerhousing.
ATTACHING THE BAG
f
Toattachthe bag:
A. Placetheopeningof the bag completelyoverthechute
deflector.
B. Pullon the drawstringuntilthe bagis tightaroundchute
deflectoropening.
C.Clipdrawstringbackon itself,tight againstchute deflectorto
secureinto position.See Figure8.
Figure8
J
10
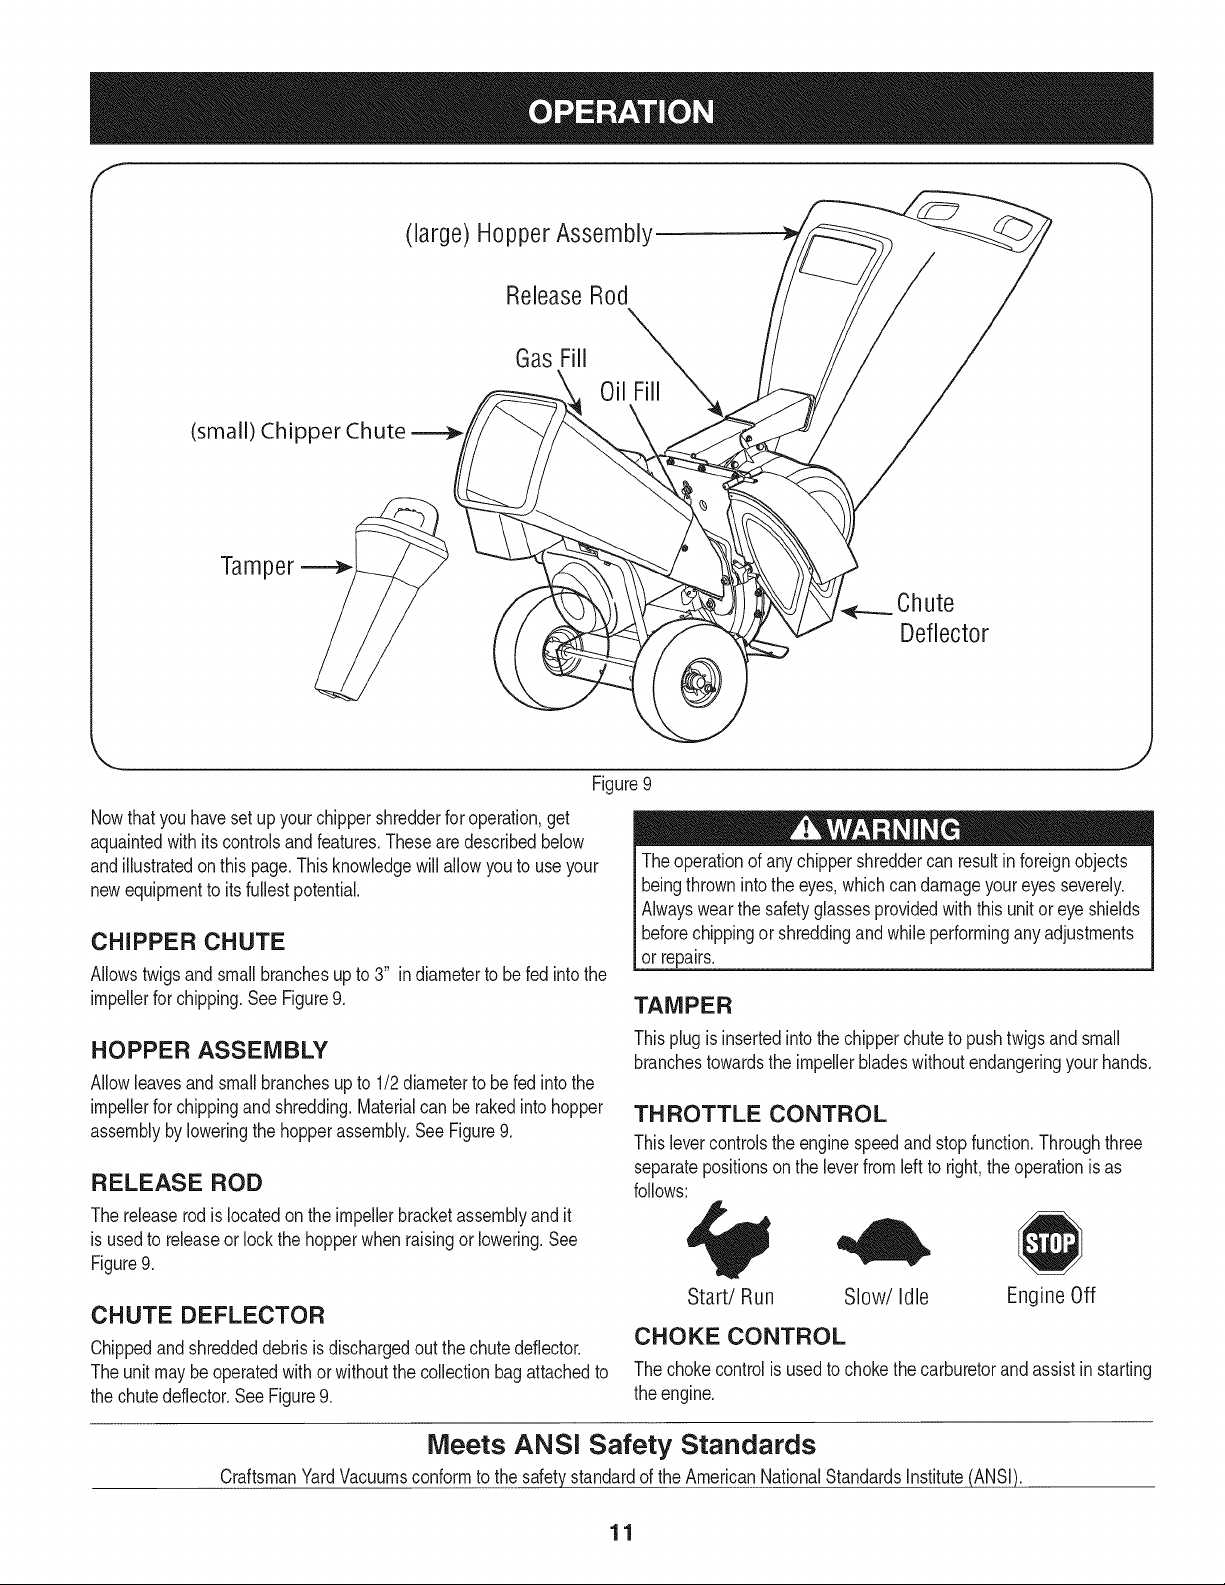
(large) Hopper Assembly
Release Rod
(small) Chipper Chute
Tamper--=_
Gas Fill
@
Chute
Deflector
Figure9
Nowthatyou haveset up your chippershredderfor operation,get
aquaintedwith its controlsand features.Theseare describedbelow
andillustratedon this page.Thisknowledgewillallowyou to useyour
newequipmentto its fullestpotential.
CHIPPER CHUTE
Allowstwigsand small branchesup to 3" in diameterto be fed intothe
impellerfor chipping.See Figure9.
Theoperationof anychippershreddercan resultinforeignobjects
beingthrownintothe eyes,whichcan damageyoureyes severely.
Alwayswearthe safetyglassesprovidedwiththisunitor eye shields
beforechippingor shreddingandwhileperformingany adjustments
or repairs.
TAMPER
HOPPER ASSEMBLY
Allowleavesand smallbranchesup to 1/2diameterto be fed intothe
impellerfor chippingand shredding.Materialcan berakedintohopper
assemblyby loweringthe hopperassembly.SeeFigure9.
RELEASE ROD
The releaserod is locatedon the impellerbracketassemblyandit
is usedto releaseor lock the hopperwhen raisingor lowering.See
Figure9.
CHUTE DEFLECTOR
Chippedandshreddeddebrisis dischargedout thechutedeflector.
Theunit may be operatedwith or withoutthe collectionbag attachedto
the chutedeflector.See Figure9.
Thisplugis insertedinto thechipperchuteto pushtwigsandsmall
branchestowardsthe impellerbladeswithoutendangeringyour hands.
TH ROTTLE CONTROL
Thislevercontrolsthe enginespeedandstopfunction.Throughthree
separatepositionson the leverfromleftto right,theoperationis as
follows:
Start/Run Slow/Idle Engine Off
CHOKE CONTROL
The chokecontrolis usedto chokethe carburetorand assistinstarting
the engine.
Meets ANSI Safety Standards
CraftsmanYardVacuumsconformto the safetystandardof the AmericanNationalStandardsInstitute(ANSI).
11

GAS AND OIL FILL-UP
Oil (one bottle shipped with unit)
FirstTime Use
1. Removeoil fill plug.
2. Withthe chippershredderonlevelground,usea funnelto empty
entirecontentsof oil bottleprovidedintothe engine.
3. Replaceoil fill plugandtighten.
Subsequent Uses
Onlyuse high qualitydetergentoil ratedwith APIserviceclassification
SF,SG,or SH. Selectthe oil'sSAEviscositygradeaccordingto the
expectedoperatingtemperature.Followthe chart below.
_older _ 32°F _Warmer'_
Oil Viscosity Chart
J
Alcoholblendedfuels(calledgasoholor usingethanolor methanol)
can attractmoisturewhich leadsto separationand formationof acids
duringstorage.Acidicgascan damagethe fuel systemof anengine
whilein storage.
Toavoidengineproblems,thefuel systemshouldbe emptiedbefore
storagefor 30 days orlonger.Drainthe gas tank,startthe engine
andlet it run untilthe fuel linesandcarburetorare empty.Use
freshfuel next season.See STORAGEInstructionsfor additional
information.
Neveruseengineorcarburetorcleanerproductsinthe fuel tankor
permanentdamagemayoccur.
NOTE:Checkthe fuel levelperiodicallyto avoid runningout of gaso-
linewhileoperatingthe chippershredder.If the unit runsout of gas as
itischipping,itmay be necessaryto unclogthe dischargeareabefore
itcan be restarted.Referto SERVICEAND MAINTENANCEsection.
Althoughmulti-viscosityoils (5W30,10W30,etc.)improvestarting
incold weather,theywill result inincreasedoil consumptionwhen
usedabove32°E Checkyourengine oil level morefrequentlyto avoid
possibleenginedamagefromrunninglowon oil.
1. Checkthe oil levelby removingthe oil fill plug and lookinginto
theoil fill hole.Oil shouldbe visibleup to thethreadsof theoil fill
plug,almostto the pointof overflowing.Fill if necessary.Capac-
ity is approximately28 oz.Overfillingcancausea hazardous
situation,be sureto wipeup anyspilledor excessoil.
2. Replaceoil fill plugandtighten.
3. Keepoil levelat FULL.Runningtheenginewithtoo little oil can
resultinpermanentenginedamage.
Gasoline
Useextremecarewhenhandlinggasoline.Gasolineis extremely
flammableand the vaporsare explosive.Neverfuel machineindoors
orwhilethe engineis hotor running.Extinguishcigarettes,cigars,
pipes,andothersourcesof ignition.
1. Removefuel cap from thefuel tank.
2. Makesurethe containerfrom which youwill pourthegasolineis
cleanand freefromrustor foreignparticles.Neveruse gasoline
thatmaybestalefromlongperiodsof storageinitscontainer.
Gasolinethathasbeen sittingfor anyperiodlongerthanfour
weeksshouldbe consideredstale.
3. Fillfuel tankwithclean,fresh,unleadedregulargasolineonly. Do
not usegasolinecontainingMETHANOL.Replacefuelcap.
TO START ENGINE
1. Attach sparkplugwireand rubberbootto sparkplug.
2. Filltankto nomorethan 1/2 inchbelowbottomof filler neckto
providespacefor fuel expansion.
3. Turnthe fuel shut-offvalve to the ONposition.
4. Movethechokeleveron the engineto CHOKEI'_1 position.(A
warmenginemaynot requirechoking.)See Figure10.
5. Movethrottlecontrol to START/RUN(Rabbit)_ position.See
Figure10.
6. Standingbehindthe unit,grasp starterhandleand pullropeout
untilyoufeel a drag.
f
Figure10
J
12
NOTE:Youwill heara noiseas the enginefinds the startof the
compressioncycle.The noiseis causedby the chippingandshredding
flails,and youwill hearit untilthe engineimpellerreachesfullspeed.
7. Pull the ropewith a rapid,continuous,full armstroke.Keepa firm
griponthe starterhandle.Letthe roperewindslowly.
8. Repeat,if necessary,untilenginestarts.Whenenginestarts,
movechokecontrolgraduallytowardthe RUNI JtI position..
9. If enginefalters,movechokecontrol backtowardthe CHOKE
I'o,I positionand repeatsteps5 though8.
10. ALWAYSkeepthe throttlecontrolin the START/RUNposition
whenoperatingthe chippershredder.
TO STOP ENGINE
1. Movethrottlecontrolleverto slow (turtle)'_ position.
Wheneverpossible,graduallyreduceenginespeedbefore
stoppingengine.
2. Movethrottlecontrolleverto STOPI or OFFposition.
3. Turnthe fuel shut-offvalveto the OFFposition.
4. Disconnectsparkplug wireandgrounditagainsttheengineto
preventaccidentalstartingwhilethe equipmentis unattended.
SHREDDING
Yardwastesuchas leavesandpineneedlescan be placedin the
hopperfor shredding.After materialhas beenprocessedbythe shred-
derbladeandflails, it will be forcedout of the chutedeflector,and, if
attached,into a debriscollectionbag.
Observethe followingguidelineswhenshreddingyarddebris:
• Neverattemptto shredmaterialotherthan normalyarddebris
(leaves,twigs,pinecones,etc.).
• Avoidshreddingfibrousplantssuchas tomatovines,palmfronds,
etc.,untiltheyare thoroughlydriedout. Freshvinesdo notshred
welland tend to wrapthemselvesaroundthe impellerandflails.
• Placereasonableamountsof debrisintothe hopperat a time. Do
not overloadthe hopper.
• Allowthe materialin the hopperto bedrawnintothe bladesand
shreddedbeforeaddingadditionaldebristo the hopper.Failureto
dueso mayresultin acloggedhopper,cloggedchutedeflectoror
a stalledengine.
CHIPPING
Branchesup to 3" in diametercan be fed intothe chipperchute.
Observethe followingguidelineswhenchippingbranches:
• Keepbothhandsfirmlyonthe branchas youfeed it intothe
chipperchute.
• Neverfeed morethan onebranchintothe chipperchuteat a time.
• Neverfeed anythingotherthan branches(orwood) intothe
chipperchute.
• Apply intermittentpressure(force,in shortpulses)whilefeeding
larger(3-inchdiameter)branchesinto thechipperchute,to avoid
boggingor stallingthe engine.
IMPORTANT:Neverfeed brancheswitha diametergreaterthan
three (3) inchesintothe chipperchute.Doingso can resultin serious
damageto yourunit'schipperblades,flailsor impeller.
NOTE:Forbestperformance,alwaysoperatethe unitwith sharp
chipperblades.If a noticeablelossin performanceisencountered
whilechippingbranches,the chipperbladesshouldbe replaced.
LOWERING THE HOPPER ASSEMBLY
1. Withone hand graspthe handleat the topof the hopperassem-
blyand lift slightly.
2. With the otherhandpullout onthe releaserod and lowerthe
hopperassemblyto theground.
TO EMPTY BAG
1. Un-clipdrawstringandloosenbagfromchutedeflectoropening.
2. Emptybag and reattachto the dischargechuteopening.Pullon
the drawstringuntilthe bagis tightaroundthe chuteopeningand
clip the drawstringtightagainstthe chutedeflector.
IMPORTANT:The flail screenis locatedinsidethe housingin the
dischargearea. If the flail screenbecomesclogged,removeand
cleanas instructedinthe Serviceand Maintenancesection.For best
performance,it is also importantto keepthe chipperbladessharp.
13
MAINTENANCE SCHEDULE
Beforeperforminganytypeof maintenance/service,disengageall
controlsand stoptheengine.Waituntilallmovingpartshavecometo
acompletestop.Disconnectsparkplugwireandgrounditagainstthe
enginetopreventunintendedstarting.Alwayswearsafetyglassesduring
operationor whileperforminganyadjustmentsor repairs.
Followthe maintenanceschedulegivenbelow.Thischartdescribes
serviceguidelinesonly. Usethe ServiceLogcolumnto keeptrackof
completedmaintenancetasks.To locatethe nearest Sears Service
Centeror to scheduleservice,simplycontactSears at
1-800-4-MY-HOME®.
EachUse
1st5 - 8 hours
25 hours
Annuallyor 50hours
Annuallyor 100hours
BeforeStorage 1. Fuelsystem
Underheavyload or in high temperatures
.
2.
3.
1.
1.
2.
3.
1.
2.
1.
Engineoillevel
Looseor missinghardware
Unitandengine.
Engineoil
Engineoill-
Aircleaner
Controllinkagesand pivots
Engineoil
Muffler
Sparkplug
1. Check
2. Tightenor replace
3. Clean
1. Change
1. Change
2. Replace
3. Lubewith lightoil
1. Change
2. Inspect
1. Clean,checkand resetgap,or
replacesparkplug.
1. Runengineuntilit stopsfromlackof
fuel or adda gasolineadditiveto the
gas in thetank.
Alwaysstopengineanddisconnectsparkplug wire beforeperforming
I anymaintenanceoradjustments.Alwayswear safetyglassesduring
_operationor whileperforminganyadjustmentsor repairs.
GENERAL RECOMMENDATIONS
• Alwaysobserveall safety rulesfoundon productlabelsandin
thisoperator'smanualwhenperformingany maintenance.Safety
rulescan be foundonthe productlabelsandin thisOperator's
Manualbeginningon page3.
• Thewarrantyon thischippershredderdoes notcoveritemsthat
havebeen subjectedto operatorabuseor negligence.To receive
fullvalue fromwarranty,operatormustmaintainthe equipmentas
instructedhere.
• Someadjustmentswillhaveto be madeperiodicallyto maintain
yourunit properly.
• Periodicallycheckall fastenersand makesurethesearetight.
ENGINE MAINTENANCE
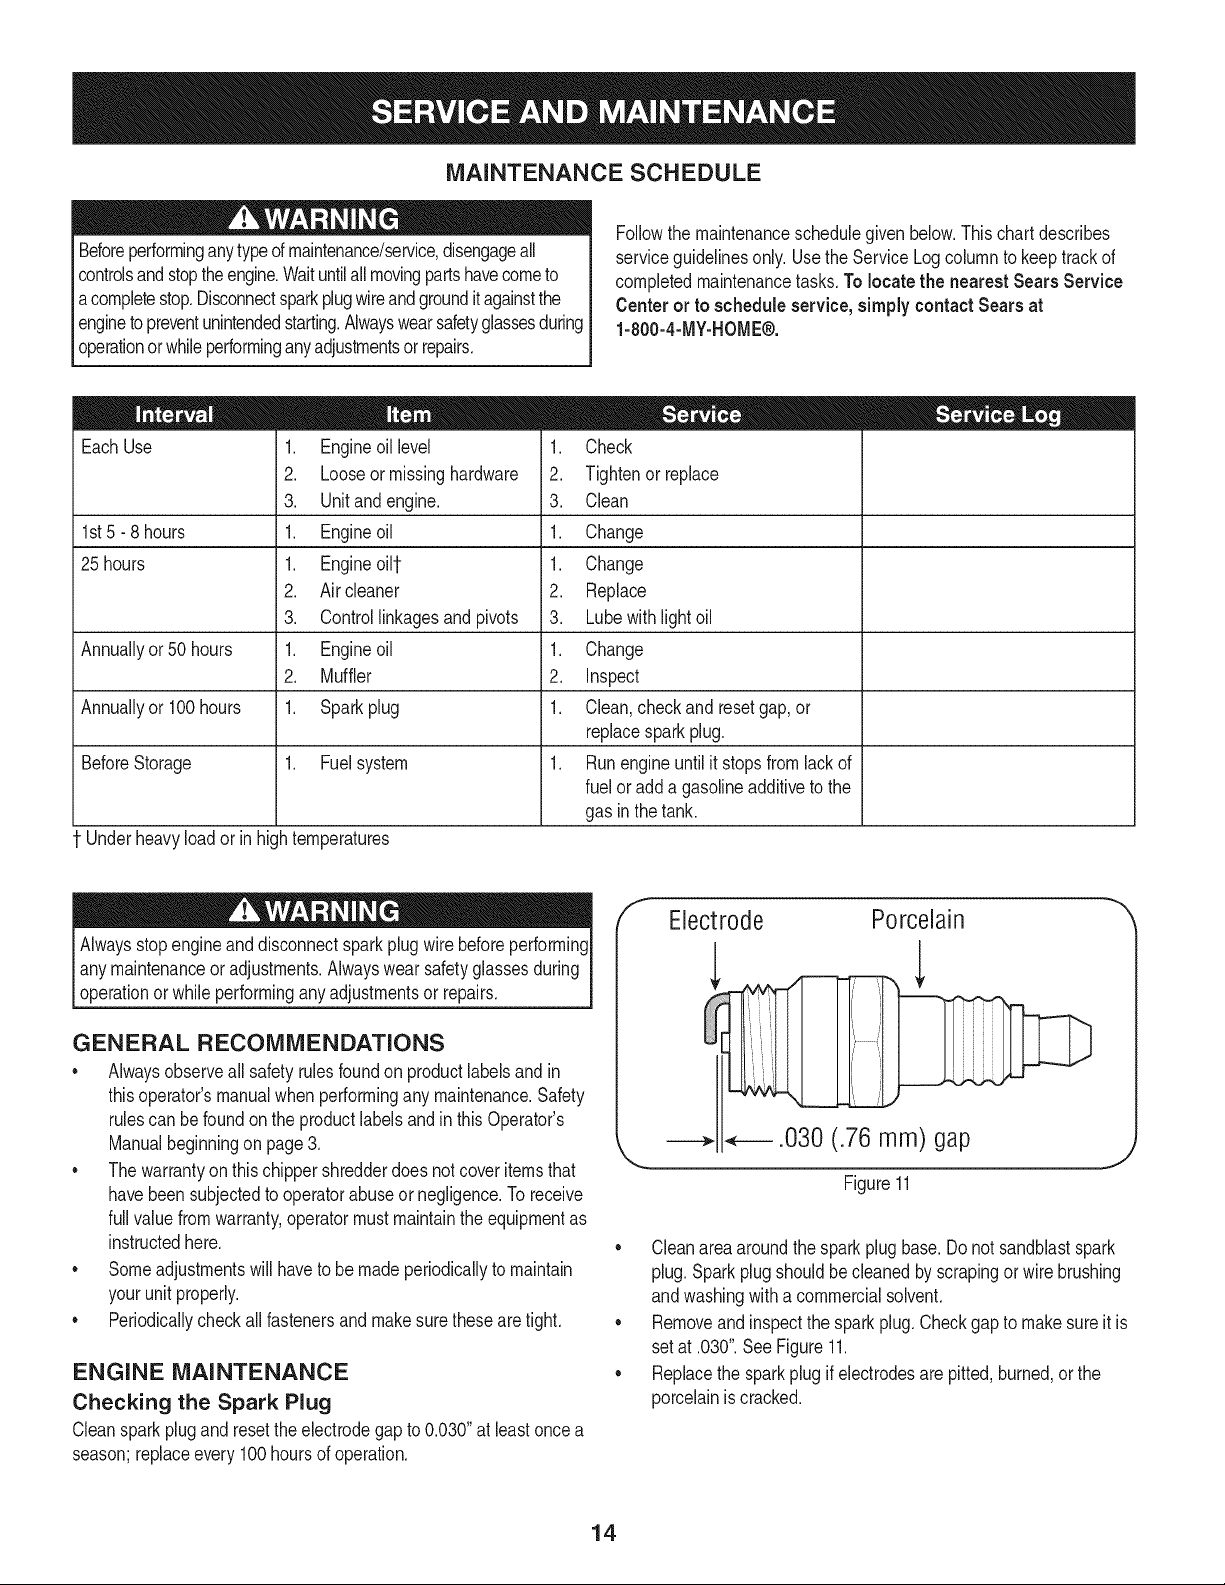
Checking the Spark Plug
Cleansparkplug and reset theelectrodegapto 0.030"at least oncea
season;replaceevery 100hoursof operation.
f
Electrode
Porcelain
,L
.030 (.76 mm) gap
Figure 11
• Cleanareaaroundthe sparkplug base. Donot sandblastspark
plug. Sparkplugshouldbe cleanedby scrapingor wirebrushing
andwashingwitha commercialsolvent.
Removeand inspectthe sparkplug.Checkgapto make sureit is
setat .030".SeeFigure11.
Replacethe sparkplug if electrodesare pitted,burned,or the
porcelainis cracked.
14

Servicing the Air Cleaner
Do notuse pressurizedairor solventsto cleanthe air cleaner
cartridge.
Theair cleanerpreventsdamagingdirt, dust,etc.,fromenteringthe
carburetorand beingforcedintothe engineand is importantto engine
life andperformance.Neverrunthe enginewithoutan air cleaner
completelyassembled.
Replacetheair cleanerevery25 hoursof operation.
1. Loosenscrewsthat holdthe air filtercover.
2. Opencover and removeair filter.See Figure12.
f
Cover
Air Filter
\
y
Figure12
3. Discardold air filter.
4. install newairfilter.
5. Closethe coverand tighten screws.
NOTE:If the filter is torn or damagedin anyway,replaceit.
Check Engine Oil
1. Makesureengineis leveland theareaaroundoil fill cap is clean.
2. Removeoil fill cap.
3. Oil shouldbe nearthe top of theoil fill cap threads,almostto the
pointof overflowing
Change Engine Oil
* Onlyuse highqualitydetergentoil ratedwith APIservice
classificationSF,SG, or SH. Select theoil's SAEviscositygrade
accordingto the expectedoperatingtemperature.Refertoopera-
tion sectionfor viscositychart.
. Changeengineoil afterthe first fiveto eighthoursof operation,
andeveryfifty hoursor every seasonthereafter.Changeoil every
twentyfivehourswhenoperatingengineunderheavyloadorin
hightemperatures.
To Drain Oil
1. Runthe engineto warmthe oil.
2. With engineOFF but still warm,disconnectthe sparkplugwire
and keepitawayfromsparkplug.
3. Removeoil draincap locatedat the baseof the engine,and drain
oil intoan appropriatereceptacle.SeeFigure13.
Oil Drain
End Cap _"
J
Figure13
e
Usedoil is a hazardouswasteproduct.Disposeof usedoil properly.
IDo notdiscardwithhouseholdwaste.Checkwithyour localauthori-
_tiesor SearsServiceCenterfor safe disposal/recyclingfacilities.
4. Whenengineis drainedof all oil, replaceand tightenthe oil drain
cap.
5. With the enginelevel, refillwith approximately28 oz. of freshoil.
Fillthe oil up intothe threadsof the oil fill plug,almostto the point
of overflowing.
6. Replacethe oilfill plugandwipe upanyoil that may havespilled
or overflowed.
7. Replacesparkplugwire beforestarting.
15
Service IVluffler
Temperatureof mufflerand nearbyareas mayexceed150° F (65°C).
Avoidtheseareas.
• Inspectmufflerevery 50 hours,and replaceif necessary.
Replacementpartsfor themufflermustbe the sameand installed
inthe samepositionas theoriginalparts.
Clean Engine
Dailyor beforeeveryuse,cleangrass,chaffor accumulated
debrisfromengine.Keeplinkage,spring,andcontrolsclean.
Keepareaaroundandbehindmufflerfreeof any combustible
debris.
• Keepingenginecleanallows air movementaroundengine.
• Engineparts shouldbe keptcleanto reducethe riskof overheat-
ingandignitionof accumulateddebris.
Do not usewaterto cleanengine parts.Watercouldcontaminatefuel
system.Usea brushor dry cloth.
Carburetor Adjustment
Thecarburetoronthis engineisnot adjustable.
Engine Speed
LUBRICATION
Do not,attemptto alterthe enginespeedby tamperingwiththe
engines governorlinkage.Doingsocould resultin seriouspersonal
I injuryand damageto the engine.The engineRPMhasbeen set at
thefactory.
• Hopper Assembly- Lubricatethe pivotpointson the hopper
assemblywith light oil oncea season.
• Discharge Chute- Lubricatethe pivot pointson the discharge
chutewithlight oil once a season.
• ReleaseRod- Lubricatethe releaserodand springwith lightoil
oncea season.
CLEAN EQUIPMENT
• Cleanthechippershredderthoroughlyaftereachuse.
• Washbagperiodicallywithwater.Allowto dry thoroughlyin
shade.
• Ifthe flail screenbecomesclogged,removeandcleanas
instructedbelow.
NOTE:Cleaningwitha forcefulsprayof wateris not recommendedas
it couldcontaminatethefuel system.
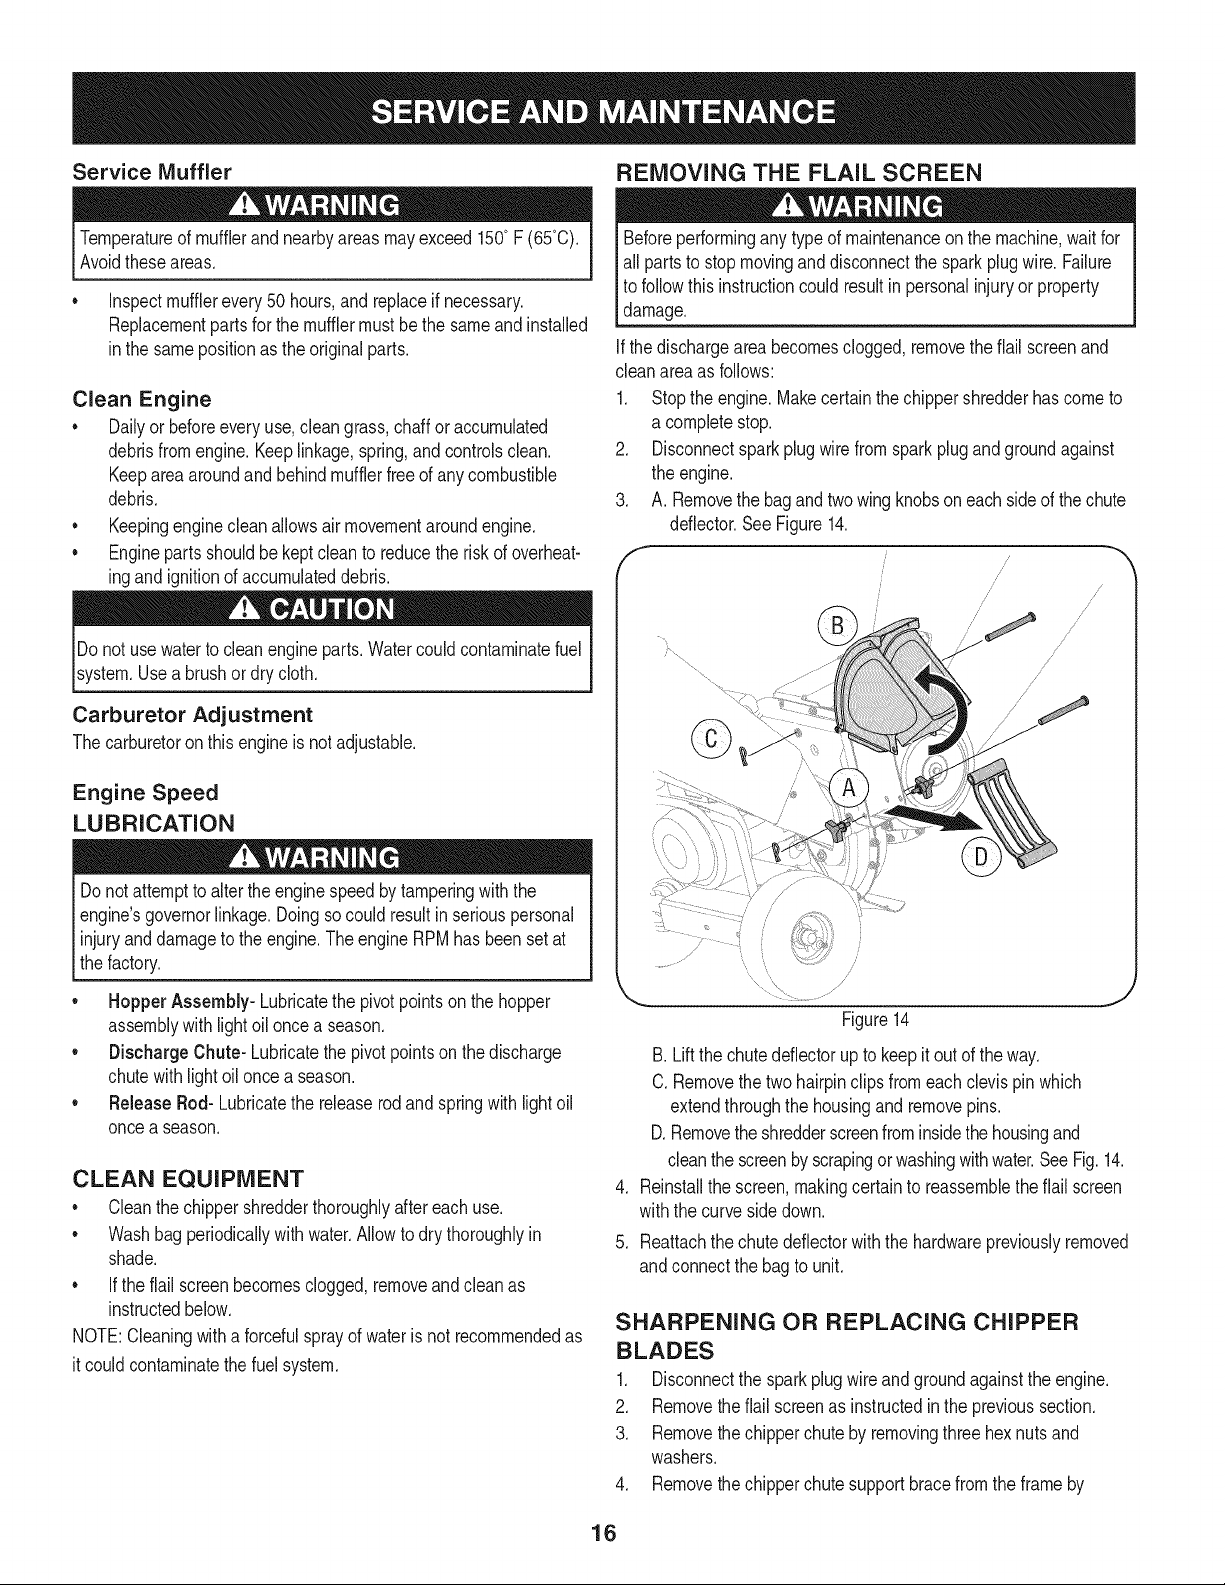
REMOVING THE FLAIL SCREEN
Beforeperformingany type of maintenanceonthe machine wait for
all partsto stopmovingand disconnectthe spark plugwire. Failure
to followthis instructioncouldresultinpersonalinjuryor property
damage.
Ifthe dischargearea becomesclogged,removethe flail screenand
cleanarea as follows:
Stopthe engine.Makecertainthe chippershredderhascome to
a completestop.
Disconnectsparkplug wirefromsparkplugandgroundagainst
the engine.
A. Removethe bagand two wingknobsoneach sideof thechute
deflector.SeeFigure14.
.
3.
f
/
s /
s'
/ /
/
//
/
j
Figure14
B. Lift the chutedeflectorupto keepit out of the way.
C.Removethetwo hairpinclips fromeach clevispinwhich
extendthroughthe housingand removepins.
D.Removetheshredderscreenfrominsidethe housingand
cleanthe screenby scrapingorwashingwithwater.SeeFig.14.
4. Reinstallthe screen,makingcertain to reassemblethe flail screen
withthe curvesidedown.
5. Reattachthechute deflectorwith the hardwarepreviouslyremoved
andconnectthe bagto unit.
SHARPENING OR REPLACING CHIPPER
BLADES
1. Disconnectthe sparkplug wireandgroundagainstthe engine.
2. Removethe flail screenas instructedinthe previoussection.
3. Removethe chipperchute by removingthreehexnutsand
washers.
4. Removethe chipperchute supportbracefromthe frameby
16

removingthe hexbolts.
5. Rotateimpellerassemblyby handuntil youlocateone of two
chipperbladesin thechipperchuteopening.
6. Removethebladeby removingthe internalhex screws,lock
washers,and hex nutswhich secureit to the impeller.Retainthe
/
/
Figure15
hardware.See Figure15.
NOTE:Use a 3/16" hexkey(Allen)wrenchon theoutside of the blade
anda 1/2" box(or socket)wrenchon the insideof the impeller.Hold
the Allenwrenchstationaryand rotatethe box(or socket)wrenchto
loosenthenut.
7. Installa replacementblade(Part No. 742-0544)with the hardware
removedearlieror sharpenand replaceexistingblade.
IMPORTANT:Whensharpeningthe blade,protecthandsby using
gloves.Followthe originalangleof grind and make sureto removean
equalamountfromeachblade.
8. To replacetheother blade,rotatethe impellerto exposethe
secondbladeand repeatthe stepsabove.
NOTE: Makecertainbladesare reassembledwith the sharpedge
facingthe samedirectionas when removed.Torquehardwareto 250
- 300in. Ibs.
The impeller'schipperbladesand shredderbladearesharp.Wear
leatherworkglovesto protectyour hands.
SHARPENING OR REPLACING THE
SHREDDER BLADE
1. Stopthe engineand makecertain that all movingpartshave
cometo a completestop.
2. Disconnectthe spark plugwire and groundagainsttheengine.
3. Lowerthehopperassemblyandplacea blockundertheflailhousing.
4. Removethesix hexlock nuts and flat washersfrom the weld
studson the flail housing.Retainthe hardware.
17
5. Carefullyseparatethe hopperassemblyfromthe impelleras-
semblyandremovethe shredderplate.The shredderplatecan be
identifiedby referringto item29 in thepartslist onpage20& 21.
NOTE:Whenreassemblingtheshredderplate,makecertainthe
embossedtab facesinwardtowardsthe impeller.
6. Removethe two wingknobsthatsecurethe chuteddlector and
raisethe chute.
7. Inserta 1/2"or 3/4" diameterpipethroughtheshredderscreen
intothe impellerto keepit from turningor removetheflail screen
and inserta pieceof woodintothe chuteopening.
8. A. Removethe two internalhexscrews,lock washers,and hex
locknutswhichsecurethe shredderbladeto the impeller.
B. Removethe hex bolt, lockwasher,and flat washerto
completelyfree shredderblade.SeeFigure16.
f
Weld
FlailHousing
Figure16
9. Installa replacementblade(PartNo.742-0544)with thehardware
removedearlierorsharpenand replaceexistingblade.
IMPORTANT:When reassemblingthe shredderblade,tightencenter
boltto between550and 700 in.-Ibs,andthe twooutsideboltsto
between250 and 350 in.-Ibs.
NOTE:Usea 3/16"hex key(Allen)wrenchonthe outsideof the
shredderblade and a 1/2" box(or socket)wrenchon the insideof the
shredderblade.Holdthe Allen wrenchstationaryand rotatethe box
(orsocket)wrenchto loosenthe nut. Usecautionwhen removingthe
bladeto avoidcontactingthe weldstudson housing.
IMPORTANT:Whensharpeningthe blade,followtheoriginalangle
of grind as a guide.It is extremelyimportantthateachcuttingedge
receivesan equalamountof grindingto preventan unbalancedblade.
An unbalancedbladewill causeexcessivevibrationwhen rotatingat
highspeedsand may causedamageto the unit. The bladecan be
testedby balancingit on ascrewdriverornail. Removemetal fromthe
heavysideuntil it is balancedevenly.
Neverstorechippershredderwithfuelintankindoorsorinpoorly
ventilatedareaswherefuelfumesmayreachanopenflame,spark,
orpilotlightasonafurnace,waterheater,clothesdryer,orgas
appliance.
PREPARING THE ENGINE
Forenginesstoredover30 days:
1. To preventgumfrom formingin fuel systemor on carburetor
parts, run engineuntilit stopsfromlackof fuelor add a gasoline
additiveto the gas in the tank. If you usea gas additive,runthe
enginefor severalminutesto circulatethe additivethroughthe
carburetor--afterwhichthe engineand fuel can be storedup to
six months.
2. Whileengineis stillwarm,changethe oil. SeeChangeEngineOil
in SERVICEAND MAINTENANCEsection.
3. Removesparkplugand pourapproximately1 oz. (30ml) of clean
engineoil intothe cylinder.Pull the recoilstarterseveraltimesto
distributethe oil, and reinstallthe sparkplug.
4. Cleanengineof surfacedebris.
PREPARING THE CHIPPER SHREDDER
* Whenstoringthe chippershredderin an unventilatedor metal
storageshed,careshouldbetakento rustproofthe non-painted
surfaces.Usinga lightoil or silicone,coat the equipment,
especiallyany springs,bearings,andcables.
, Removealldirt fromexteriorof engineand equipment.
, Followlubricationrecommendations.
o Storeequipmentin a clean,dry area.Do not storenext to
corrosivematerials,such as fertilizer.Do not storeinan area
whereequipmentis presentthatmayusea pilot lightor hasa
componentthatcan createa spark.
18
Beforeperforminganytyped maintenance/service,disengageall
controlsand stoptheengine.Waituntilallmovingpartshavecometo
acompletestop.Disconnectsparkplugwireandgrounditagainstthe
engineto preventunintendedstarting.Alwayswearsafetyglassesduring
operationor whileperforminganyadjustmentsor repairs.
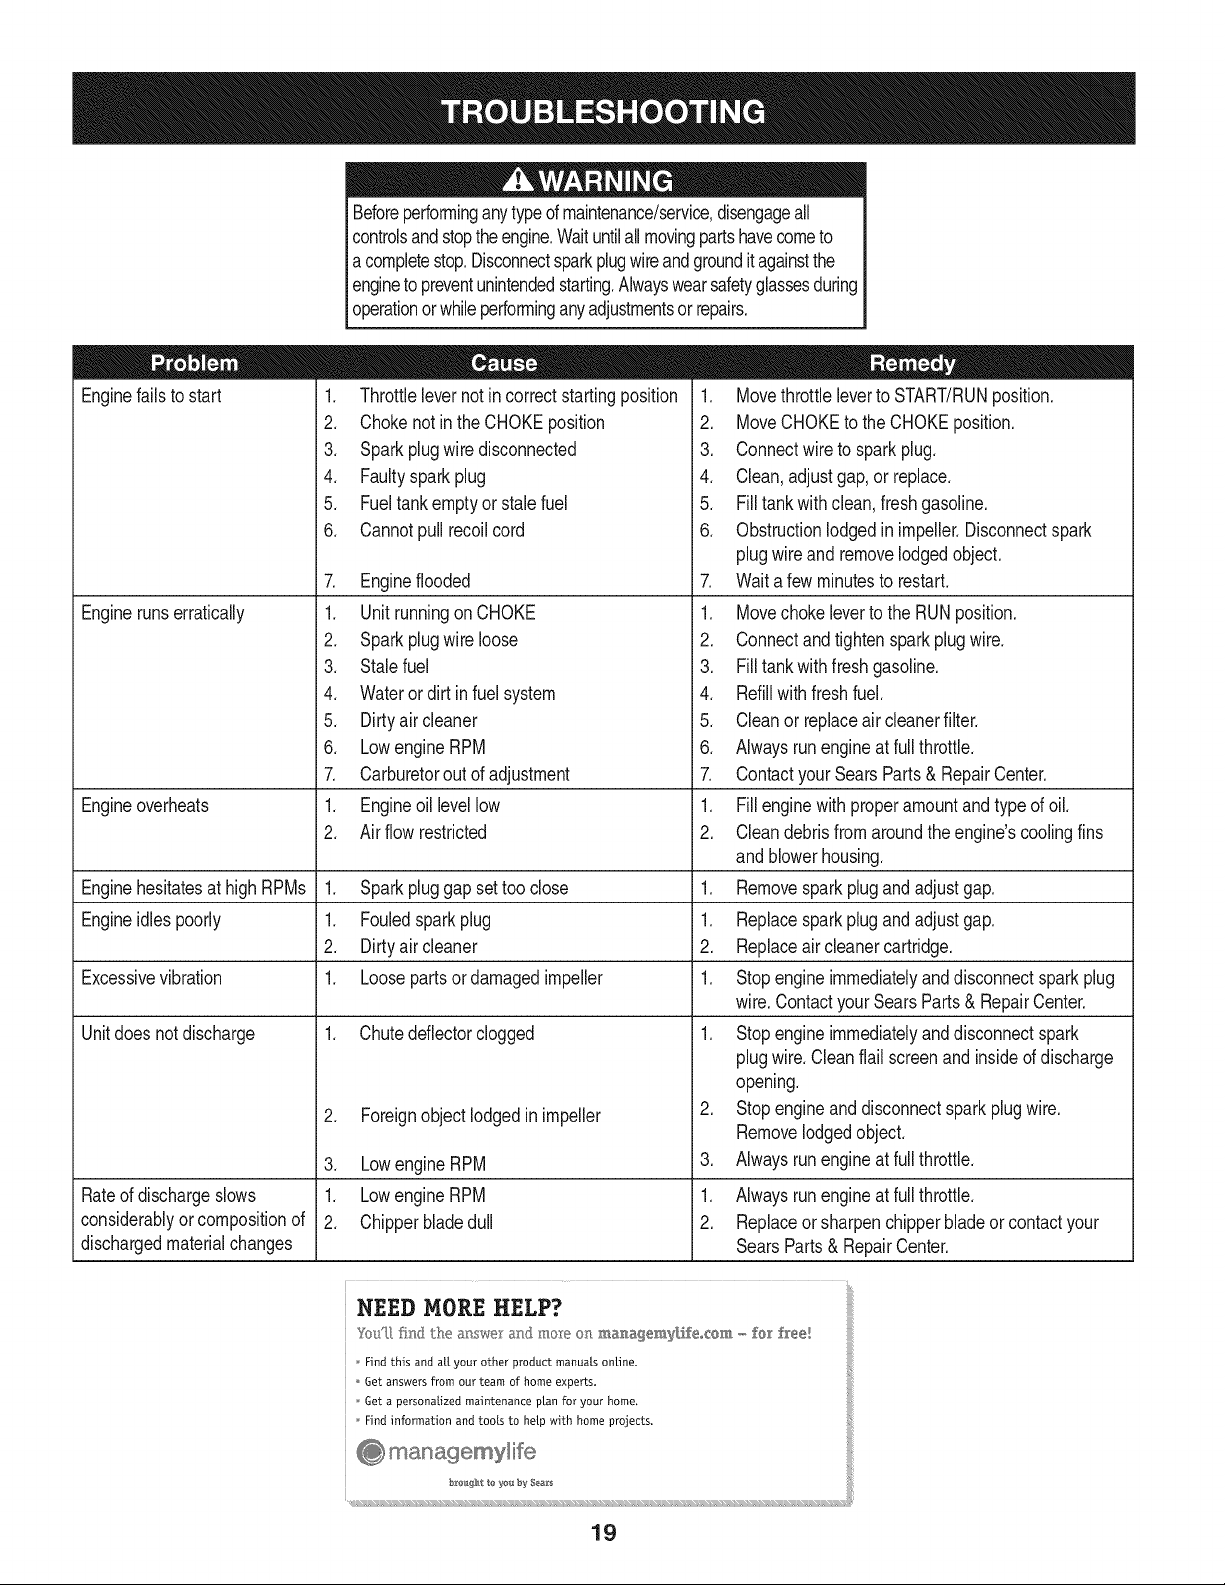
Enginefails to start
Enginerunserratically
1. Throttlelevernot in correctstartingposition
2. Chokenot in the CHOKEposition
3. Sparkplugwire disconnected
4. Faultyspark plug
5. Fueltankemptyor stalefuel
6. Cannotpull recoilcord
7. Engineflooded
1. Unit runningon CHOKE
2. Sparkplugwire loose
3. Stalefuel
4. Wateror dirt in fuel system
5. Dirtyair cleaner
6. LowengineRPM
7. Carburetorout of adjustment
1. Engineoil levellow
2. Air flow restricted
Engineoverheats
Enginehesitatesat highRPMs 1. Sparkpluggap settoo close
Engineidles poorly 1. Fouledspark plug
2. Dirtyair cleaner
Excessivevibration 1. Loosepartsor damagedimpeller
Unitdoes notdischarge 1. Chuteddlector clogged
Rateof dischargeslows
considerablyor compositionof
dischargedmaterialchanges
2. Foreignobject lodgedin impeller
3. Lowengine RPM
1. LowengineRPM
2. Chipperbladedull
1. Movethrottleleverto START/RUNposition.
2. MoveCHOKEto the CHOKEposition.
3. Connectwireto spark plug.
4. Clean, adjustgap,or replace.
5. Filltankwithclean,freshgasoline.
6. Obstructionlodgedin impeller.Disconnectspark
plugwire and removelodgedobject.
7. Wait a few minutesto restart.
1. Movechokeleverto the RUNposition.
2. Connectandtightensparkplugwire.
3. Filltankwithfreshgasoline.
4. Refillwith fresh fuel.
5. Cleanor replaceair cleanerfilter.
6. Alwaysrunengineat full throttle.
7. Contactyour SearsParts& RepairCenter.
1. Fillenginewith properamountand type of oil.
2. Cleandebrisfrom aroundthe engine'scoolingfins
and blowerhousing.
1. Removesparkplug and adjustgap.
1. Replacesparkplug and adjustgap.
2. Replaceair cleanercartridge.
1. Stopengineimmediatelyanddisconnectsparkplug
wire.ContactyourSearsParts& RepairCenter.
1. Stopengineimmediatelyanddisconnectspark
plugwire.Cleanflail screenand insided discharge
opening.
2. Stopengineanddisconnectspark plugwire.
Removelodgedobject.
3. Alwaysrunengineat full throttle.
1. Alwaysrunengineat full throttle.
2. Replaceor sharpenchipperbladeor contactyour
SearsParts& RepairCenter.
NEED MORE HELP?
Find tMs and a[[ your other product rnanuats online.
Get answers from our team of home experts.
Get a personal}zeal rnaintenance p[an for your home,
Find information and tools to help with home projects.
b_te_ght te ye_ by $¢alts
19
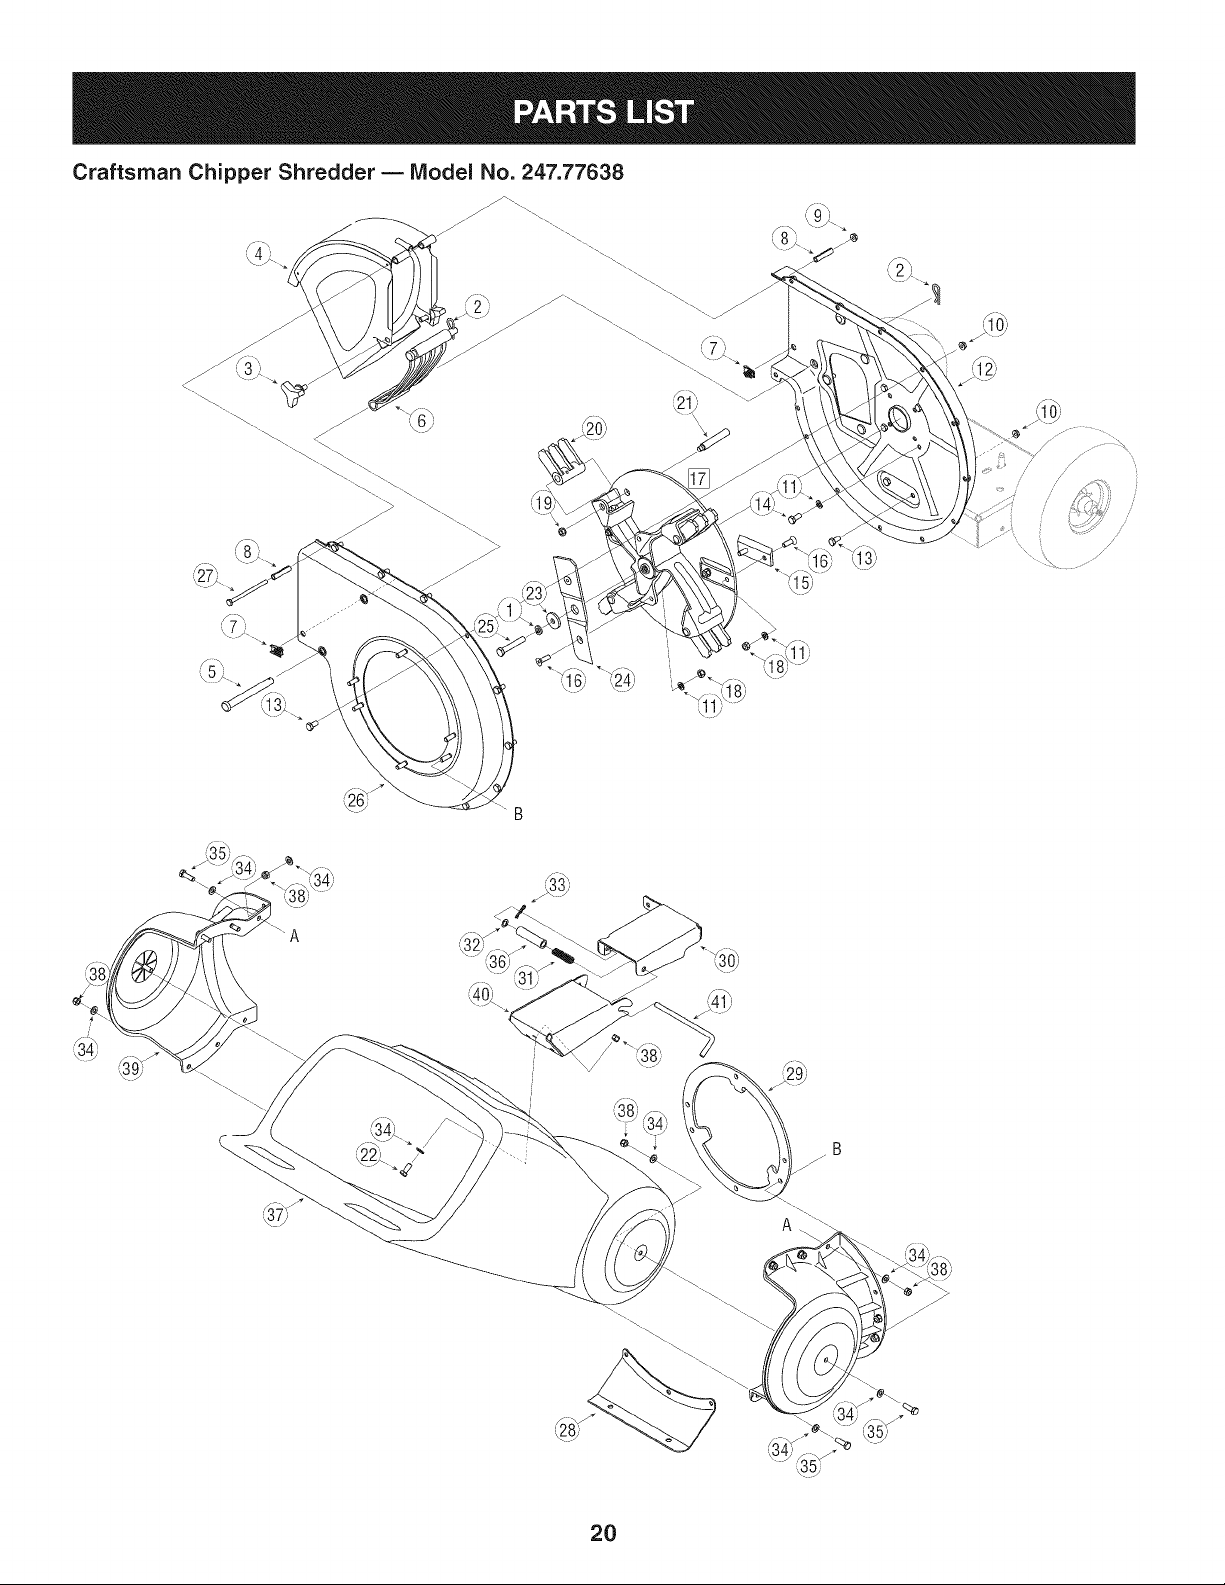
Craftsman Chipper Shredder -- Model No. 247.77638
/
/ ;/
/ /
_ ....
/
; /
2O
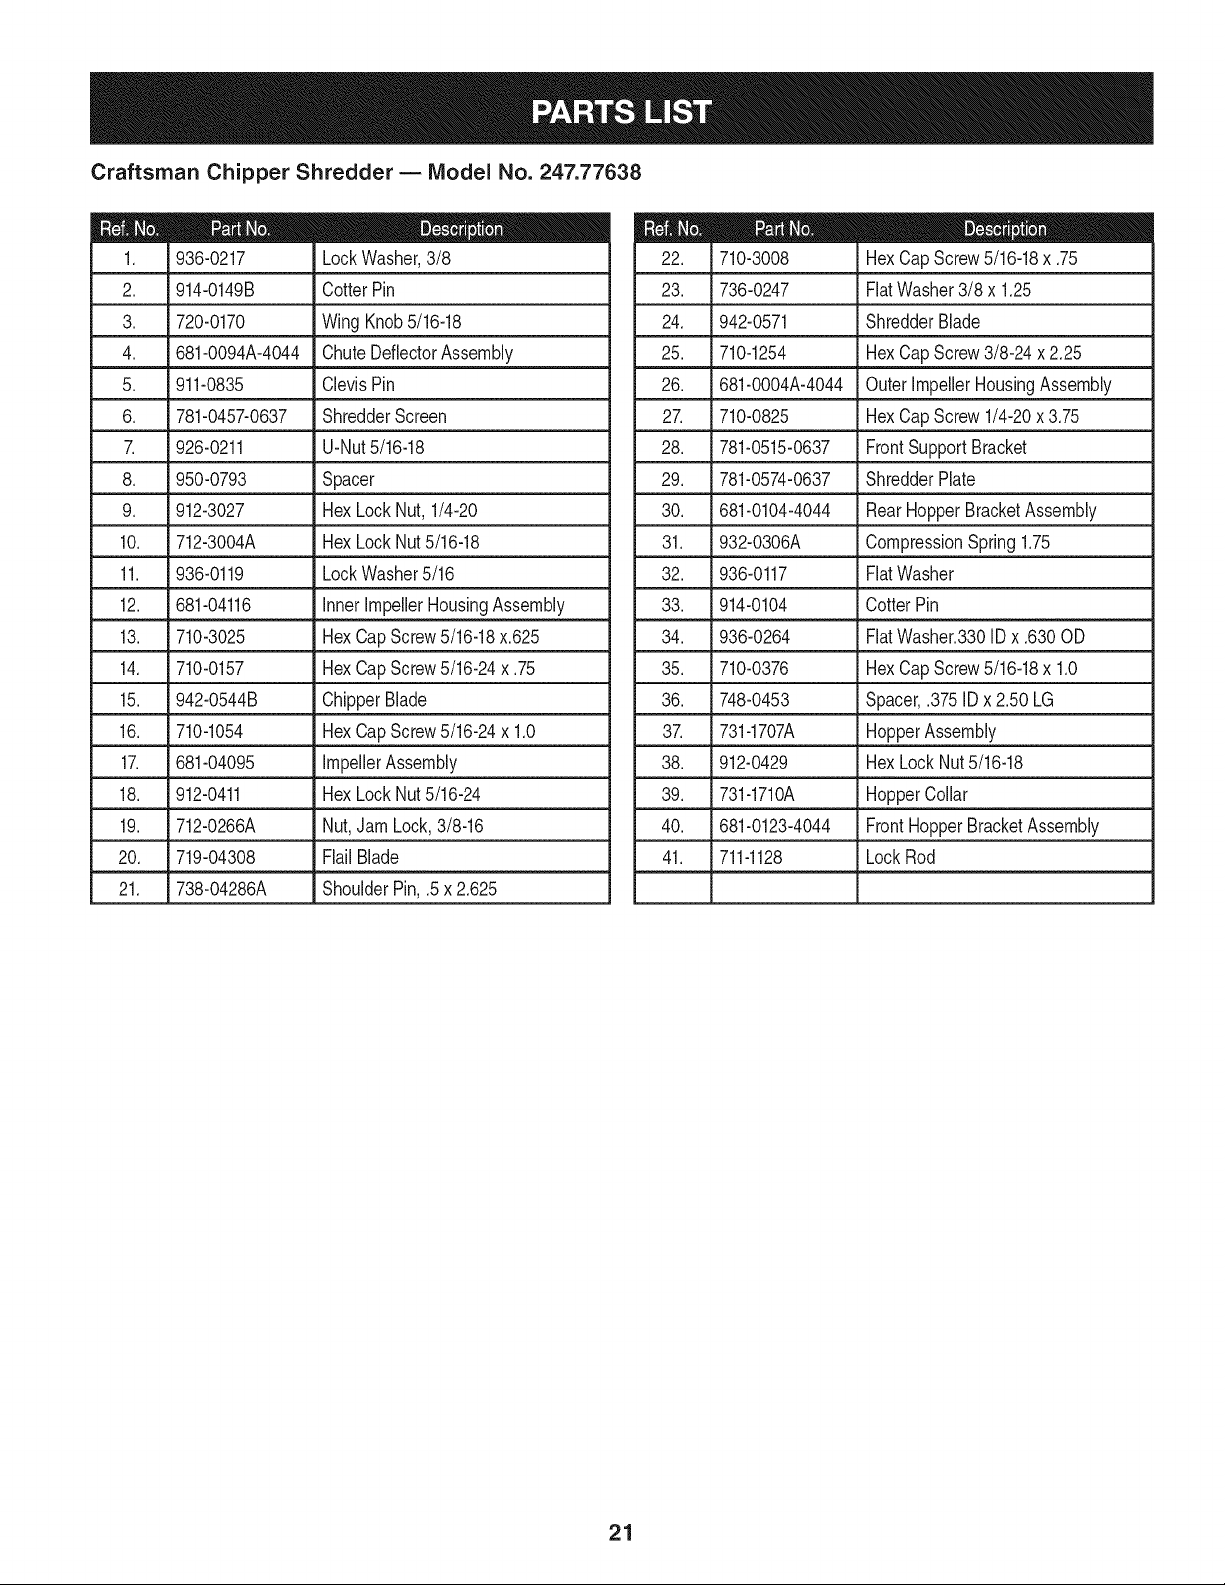
Craftsman Chipper Shredder B IViodel No. 247.77638
936-0217 LockWasher,3/8 710-3008
2. 914-0149B CotterPin 23. 736-0247
3. 720-0170 WingKnob5/16-18 24. 942-0571
4. 681-0094A-4044 ChuteDeflectorAssembly 25. 710-1254
5. 911-0835 ClevisPin 26. 681-0004A-4044
6. 781-0457-0637 ShredderScreen 27. 710-0825
7. 926-0211 U-Nut5/16-18 28. 781-0515-0637
8. 950-0793 Spacer 29. 781-0574-0637
9. 912-3027 HexLockNut,1/4-20 30. 681-0104-4044
10. 712-3004A HexLockNut5/16-18 31. 932-0306A
11. 936-0119 LockWasher5/16 32. 936-0117
12. 681-04116 innerImpellerHousingAssembly 33. 914-0104
13. 710-3025 HexCapScrew5/16-18x.625 34. 936-0264
14. 710-0157 HexCapScrew5/16-24x .75 35. 710-0376
15. 942-0544B ChipperBlade 36. 748-0453
16. 710-1054 HexCapScrew5/16-24x 1.0 37. 731-1707A
17. 681-04095 ImpellerAssembly 38. 912-0429
18. 912-0411 HexLockNut5/16-24 39. 731-1710A
19. 712-0266A Nut,Jam Lock,3/8-16 40. 681-0123-4044
20. 719-04308 FlailBlade 41. 711-1128
21. 738-04286A ShoulderPin, .5x 2.625
HexCapScrew5/16-18x .75
FiatWasher3/8 x 1.25
ShredderBlade
HexCapScrew3/8-24 x 2.25
OuterimpellerHousingAssembly
HexCapScrew 1/4-20x 3.75
FrontSupportBracket
ShredderPlate
Rear HopperBracketAssembly
CompressionSpring1.75
FlatWasher
CotterPin
FlatWasher.330ID x .630 OD
HexCapScrew5/16-18x 1.0
Spacer,.375ID x 2.50 LG
HopperAssembly
HexLockNut5/16-18
HopperCollar
FrontHopperBracketAssembly
LockRod
21
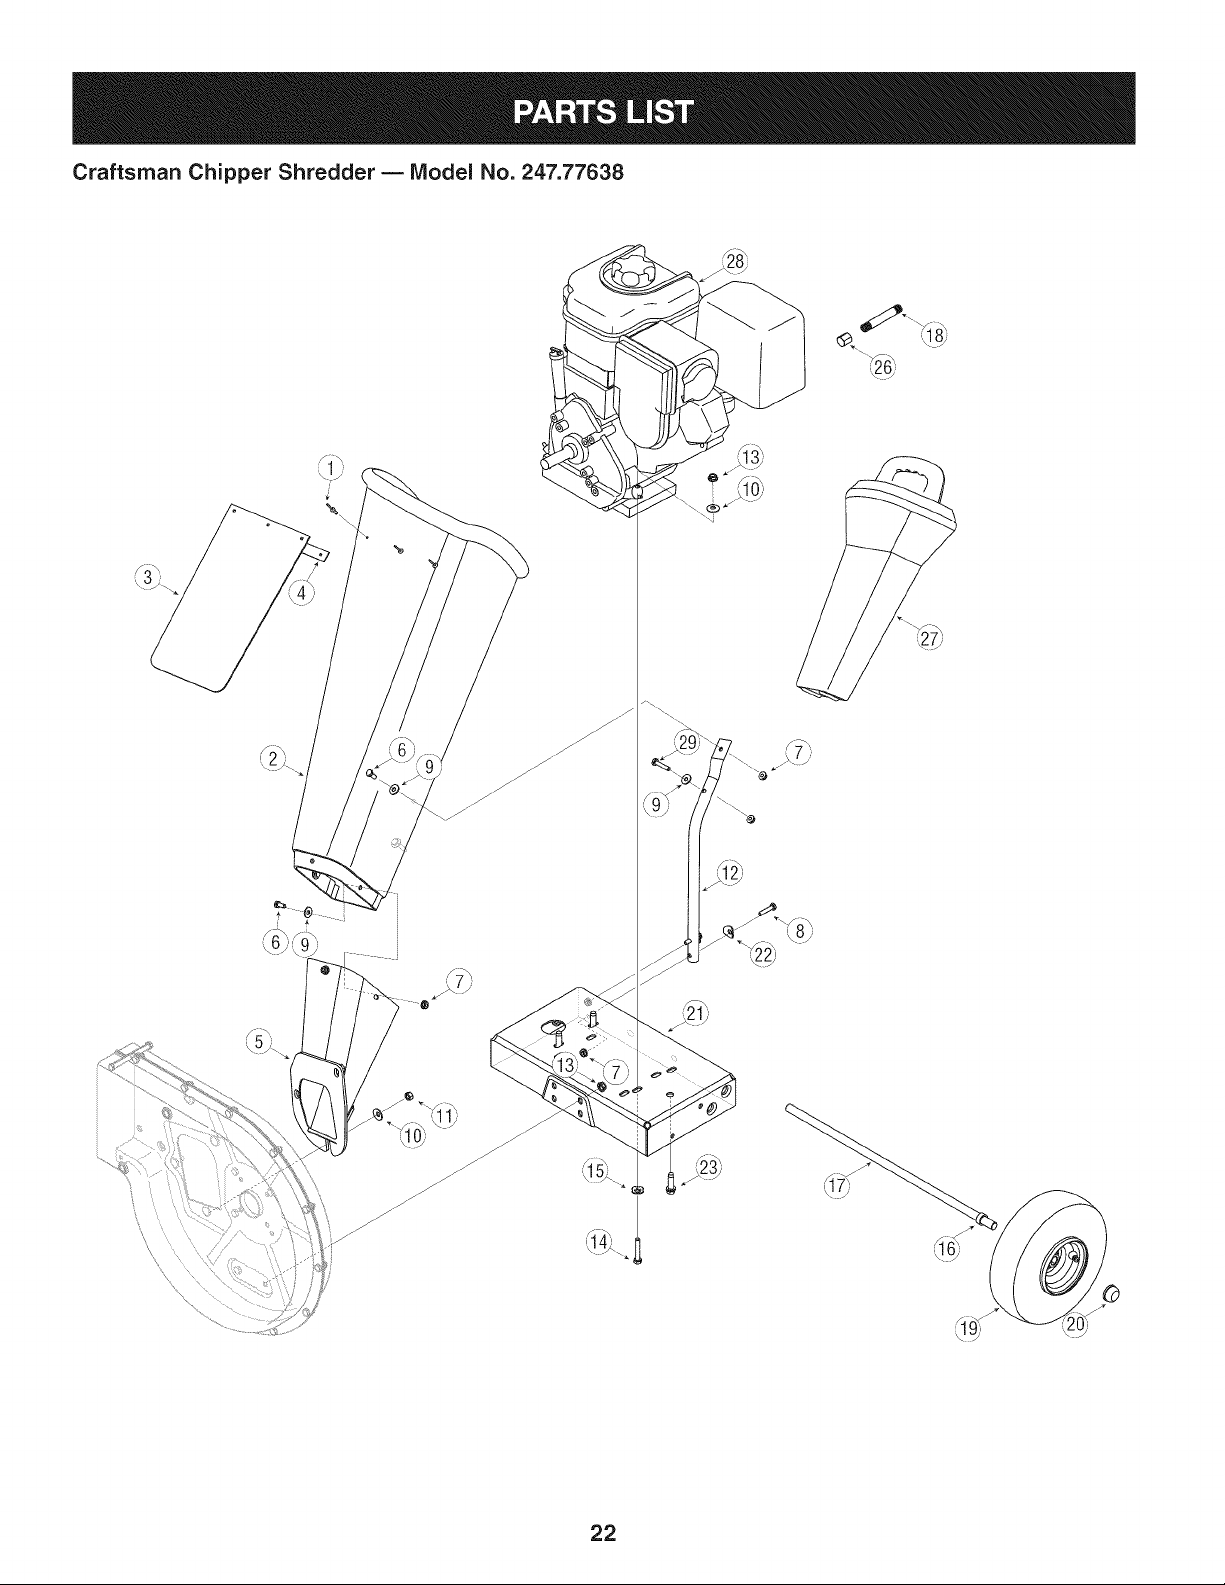
Craftsman Chipper Shredder B IViodel No. 247.77638
22
Craftsman Chipper Shredder B IViodel No. 247.77638
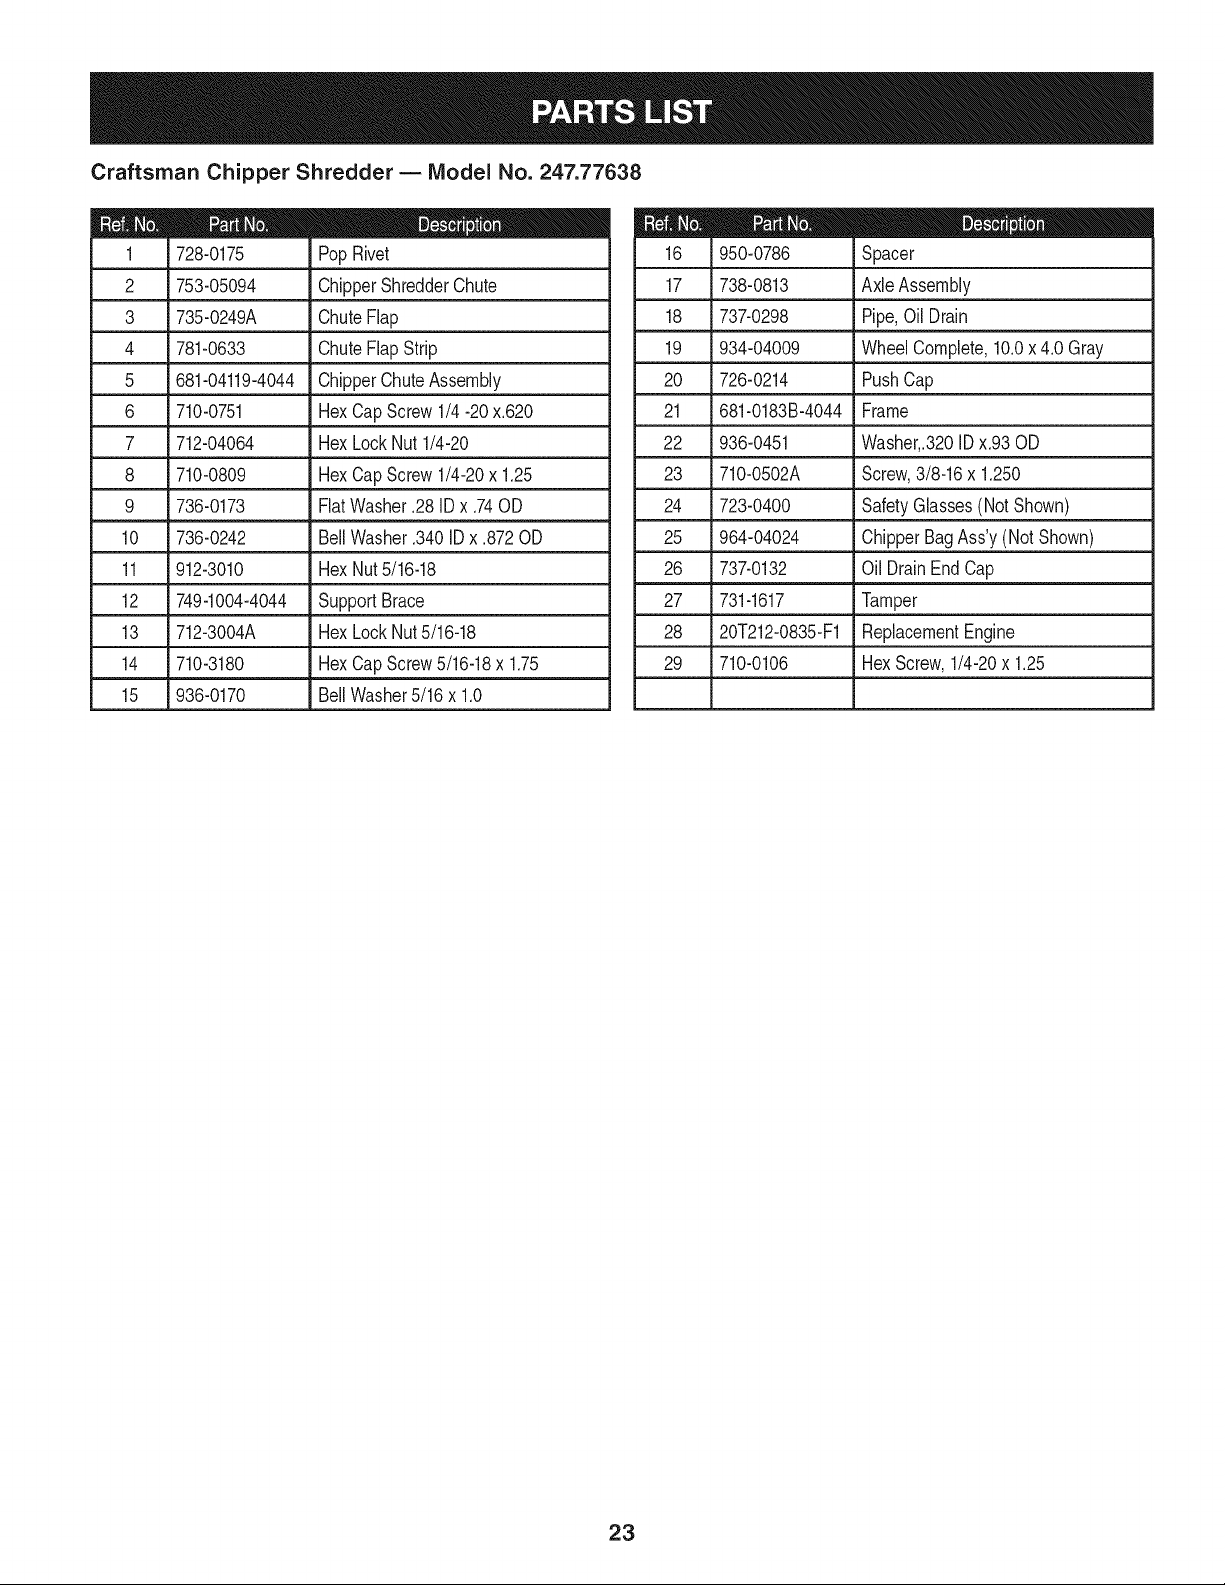
728-0175 PopRivet
2 753-05094 ChipperShredderChute 17
3 735-0249A ChuteFlap 18
4 781-0633 ChuteFlapStrip 19
5 681-04119-4044 ChipperChuteAssembly 20
6 710-0751 HexCapScrew 1/4-20x.620 21
7 712-04064 HexLockNut1/4-20 22
8 710-0809 HexCapScrew 1/4-20x 1.25 23
9 736-0173 FlatWasher.28 ID x .74OD 24
10 736-0242 BellWasher.340ID x .872OD 25
11 912-3010 HexNut5/16-18 26
12 749-1004-4044 SupportBrace
13 712-3004A HexLockNut5/16-18
14 710-3180 HexCapScrew5/16-18x 1.75
15 936-0170 BellWasher5/16x 1.0
950-0786 Spacer
738-0813 Axle Assembly
737-0298 Pipe,Oil Drain
934-04009 WheelComplete,10.0x 4.0 Gray
726-0214 PushCap
681-0183B-4044 Frame
936-0451 Washer,.320IDx.93OD
710-0502A Screw,3/8-16x 1.250
723-0400 SafetyGlasses(Not Shown)
964-04024 ChipperBagAss'y(Not Shown)
737-0132 Oil DrainEnd Cap
27 731-1617 Tamper
28 20T212-O835-F1 ReplacementEngine
29 710-0106 HexScrew,1/4-20x 1.25
23
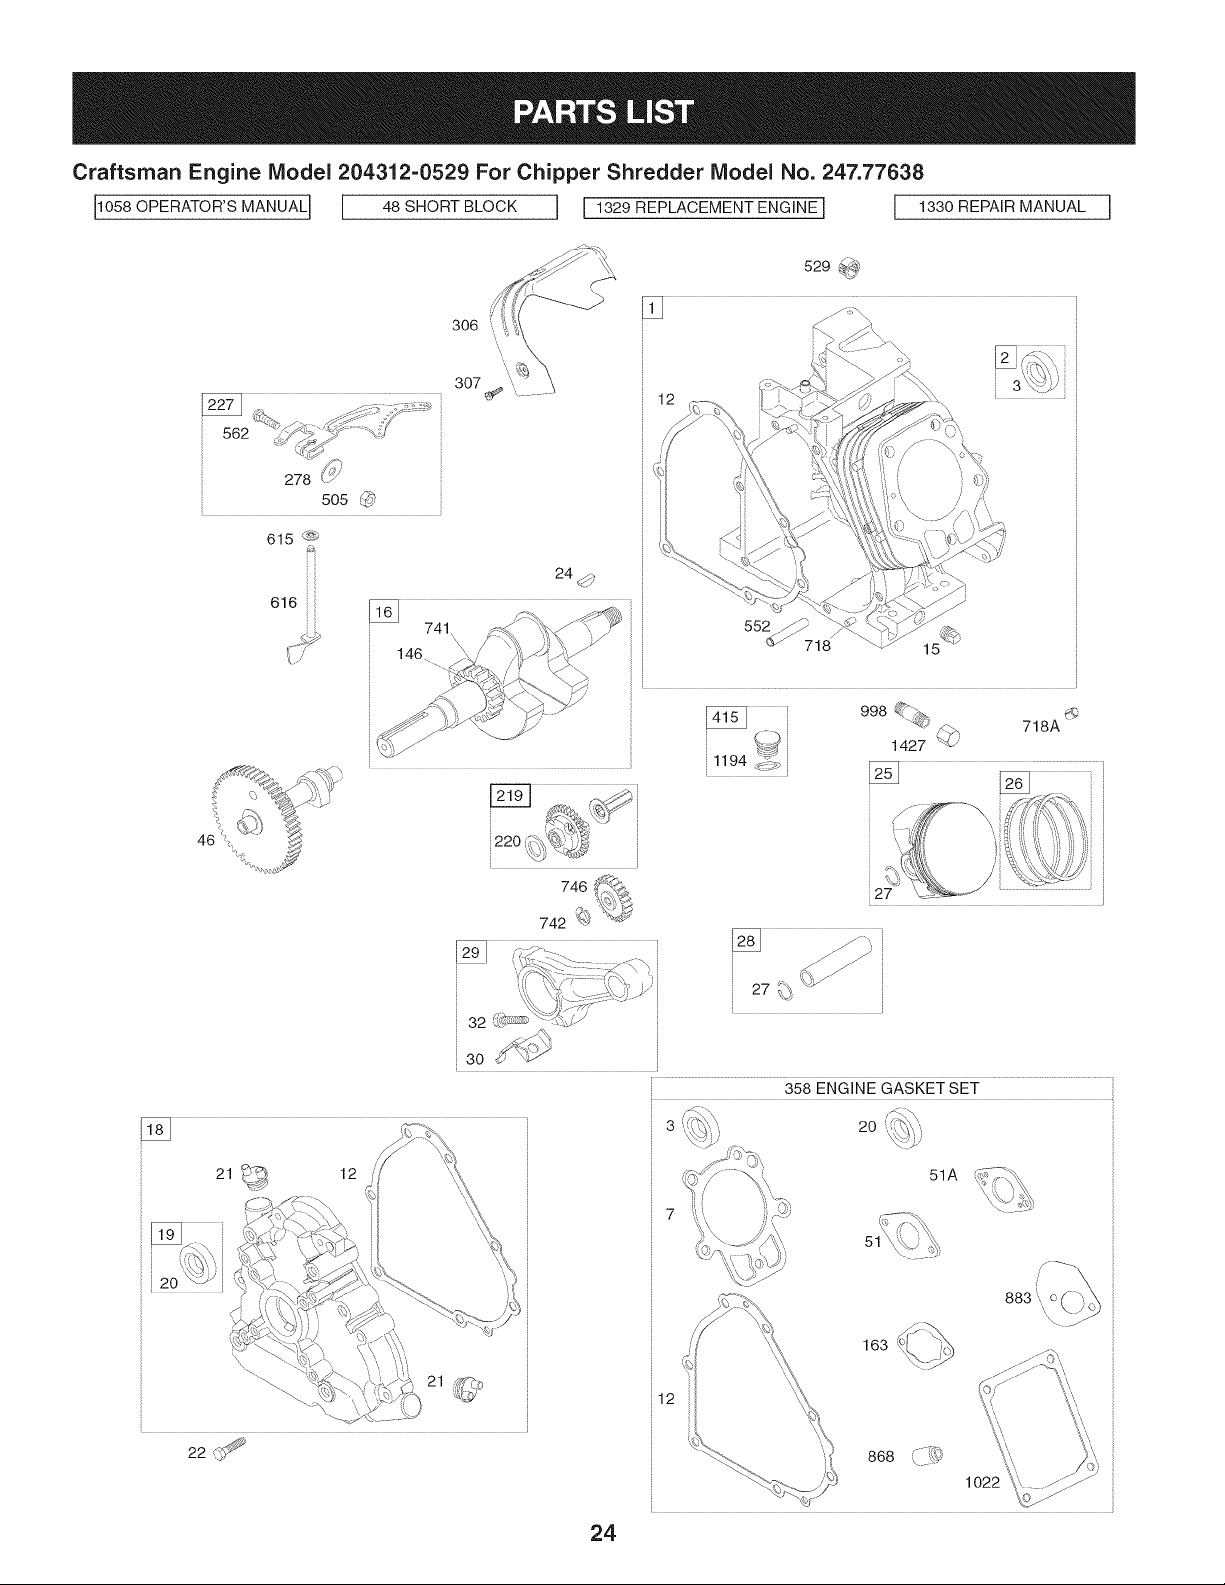
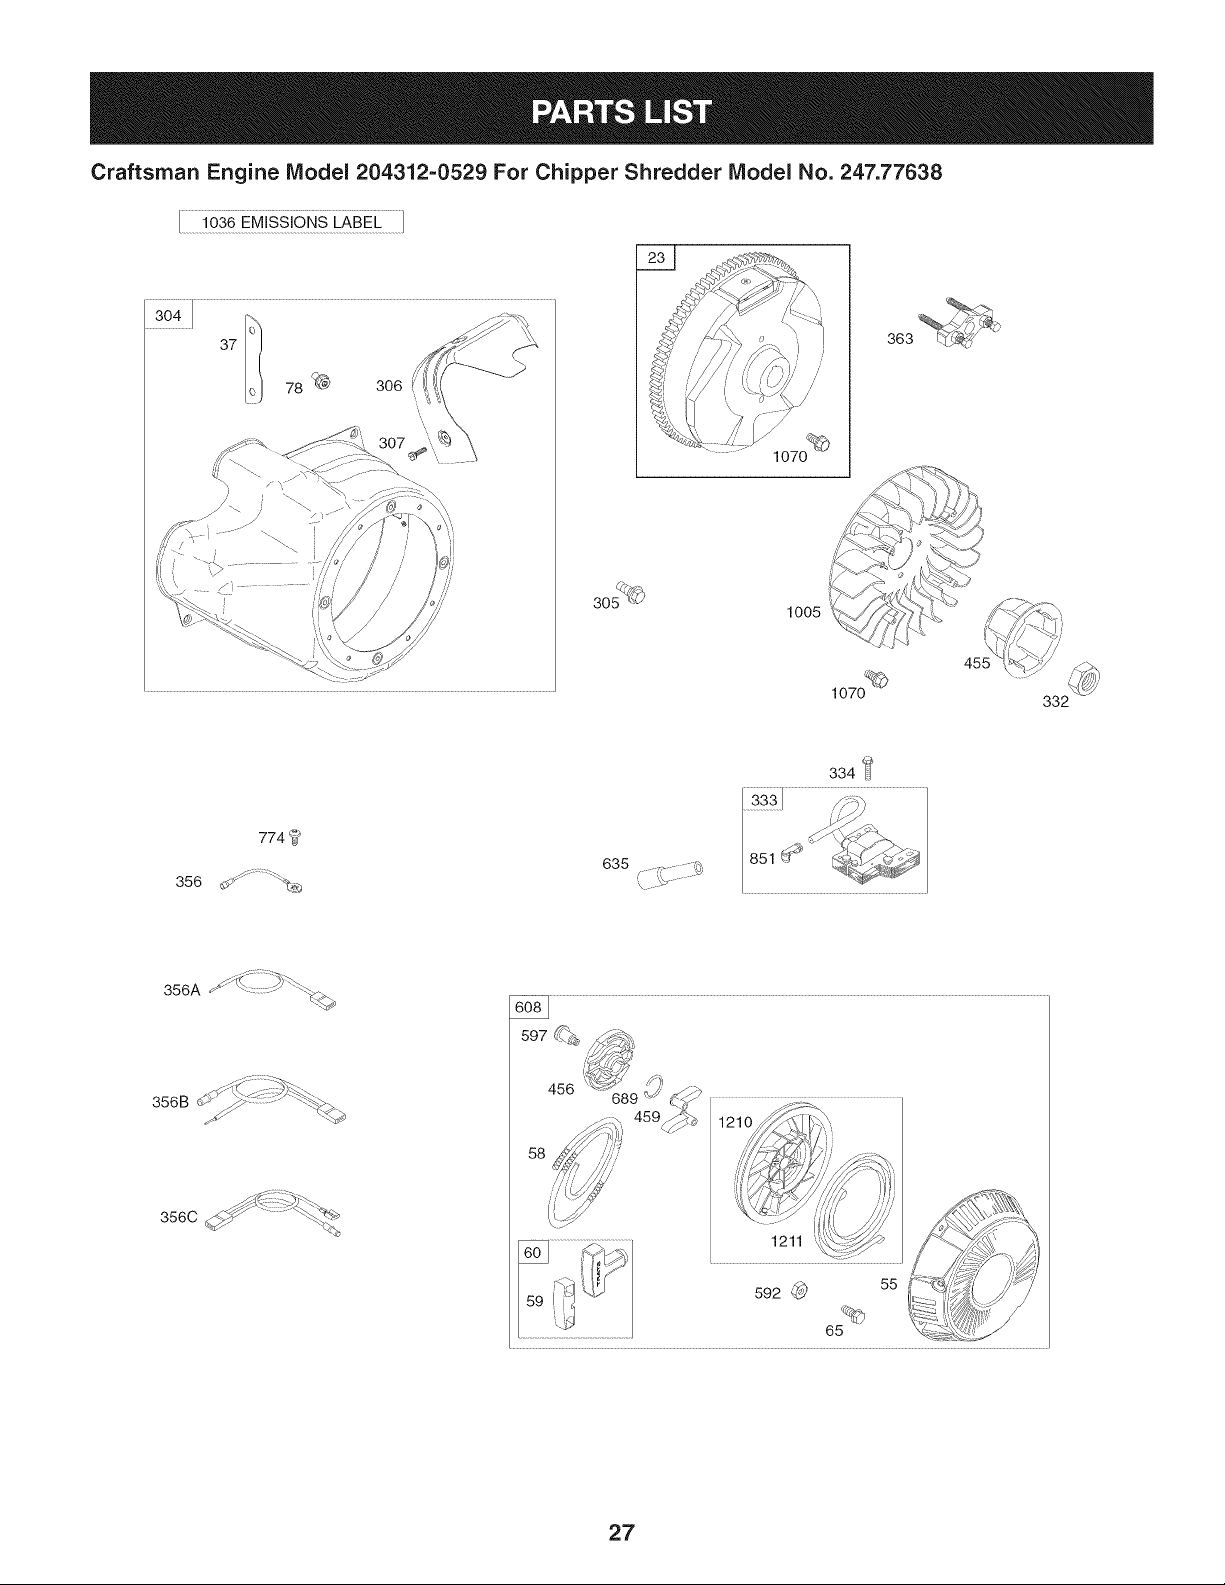
Craftsman Engine Model 204312=0529 For Chipper Shredder Model No. 247.77638
110_8OPERATORSMA,0A']I 48S,OmB.OOKI I 1329_EP.AOEMENTENG,NEII 13_9_E_A'_A"0A']
5o5 _
615 _)
616
396
397
529 _,
12
24_j
'Y 718 __b
J
...."_ 718A
1427 _
1194
746
742 _
22
12
32
30
358 ENGINE GASKET SET
2O
51A
163
12
868
1022
24
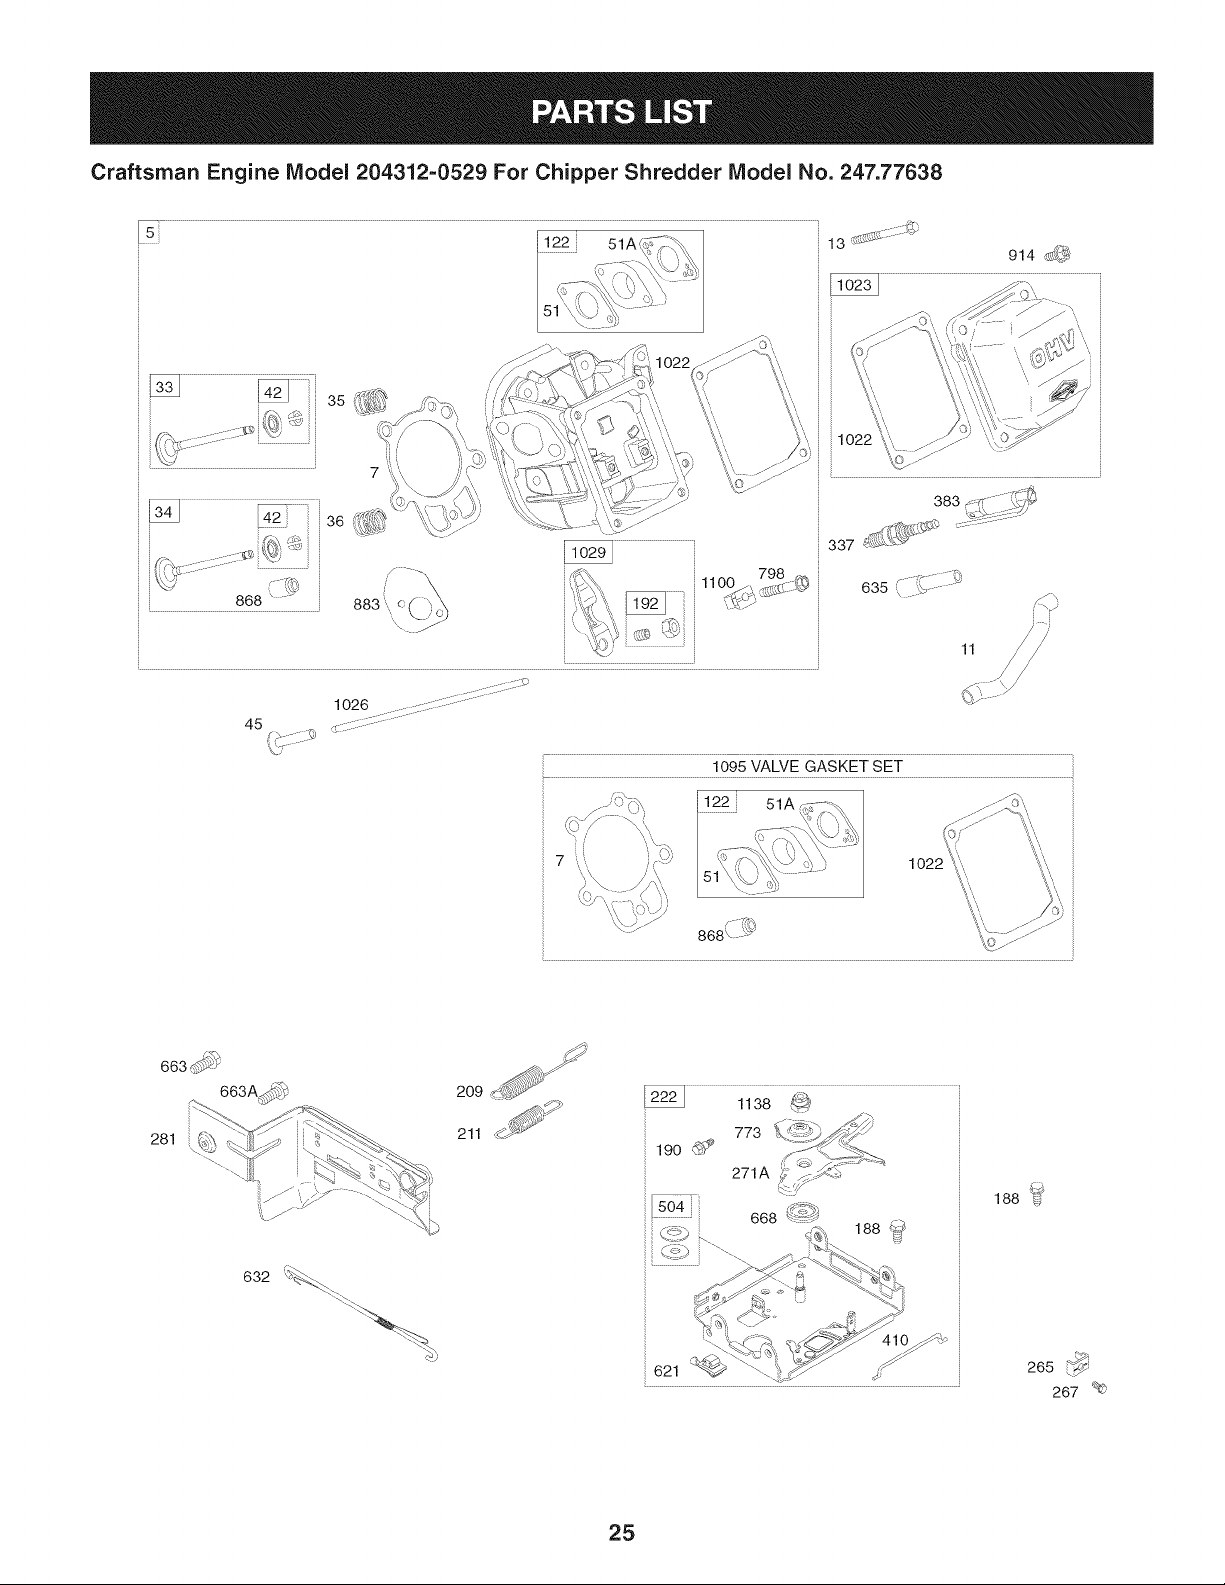
Craftsman Engine IViodel 204312-0529 For Chipper Shredder IViodel No. 247.77638
1095 VALVE GASKET SET
_22
51A
1O22
632
_o9_
188 (_
25
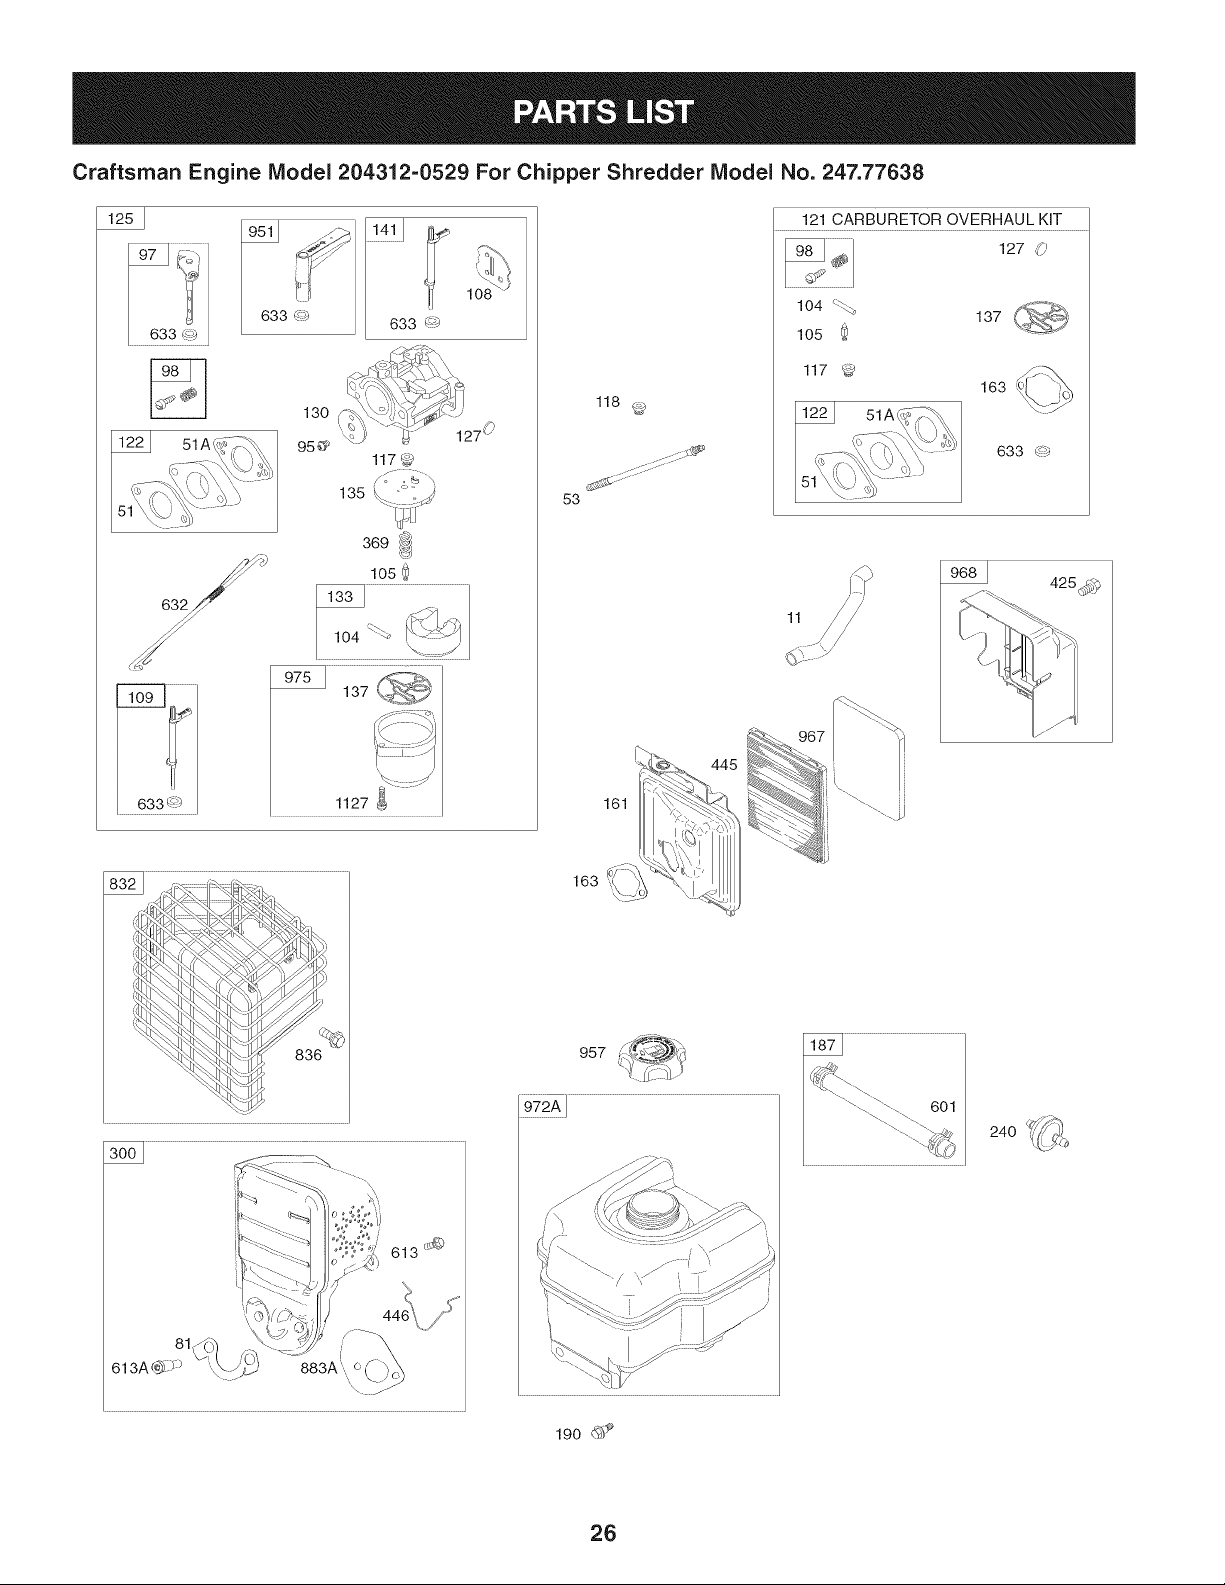
Craftsman Engine IViodel 204312-0529 For Chipper Shredder IViodel No. 247.77638
633 3 C:-._
51A(
130
127 °
95@
117@
369 i_
105 0
137
53
118 _@
121 CARBURETOR OVERHAUL KiT
127 0
51A(
163
633 (o_
\
1127 _
_%_.. 967
I _ 445
161I'i_'_s
957 _,."'t_,_- _"s
i_72A]
24O
613
190 _?'
26
Craftsman Engine IViodel 204312=0529 For Chipper Shredder IViodel No. 247.77638
37
78 _ 306
1005
363
1070
332
334
356
774
635
356A ........... C_
12
1211
592 @) 55
65
27

Craftsman Engine IViodel 204312=0529 For Chipper Shredder IViodel No. 247.77638
1
2
3
5
7
11
12
794849
698340
391086s.
794870
694872.+
696796
694953.
D = O
CylinderAssembly
Kit-Bushing/Seal(MagnetoSide)
Seal-Oil(MagnetoSide)
Head-Cylinder
Gasket-CylinderHead
Tube-Breather
Gasket-Crankcase
13 794829 Screw(CylinderHead)
15 697757 Plug-OilDrain
16 794874 Crankshaft
18 791965 Cover-Crankcase
19 698340 Kit-Bushing/Seal(PTOSide)
20 391086s• Seal-Oil(PTOSide)
21 281658s Cap-OilFill
22 794825 Screw(CrankcaseCover/Sump)
23 794814 Flywheel
24 222698s Key-Flywheel
25 792117 PistonAssembly(Standard)
792144 PistonAssembly(.020"Oversize)
26 793561 RingSet (Standard)
792073 RingSet (.020"Oversize)
27 690975 Lock-PistonPin
28 696581 Pin-Piston
29 691691 Rod-Connecting
30 694692 Dipper-ConnectingRod
32 690976 Screw(ConnectingRod)
33 499596 Valve-Exhaust
34 792200 Valve-Intake
35 694865 Spring-Valve(Intake)
36 694865 Spring-Valve(Exhaust)
37 790730 Guard-Flywheel
42 499586 Keeper-Valve
45 690977 Tappet-Valve
46 790958 Camshaft
48 N/A Short Block
51
51A
53
55
58
59
6948740.+
6948750.+
794830
695288
693389
805957
D = O I
Gasket-Intake
Gasket-Intake
Stud (Carburetor)
Housing-RewindStarter
Rope-Starter
Insert-Grip
60 490652 Grip-StarterRope
65 699228 Screw(RewindStarter)
78 795026 Screw(FlywheelGuard)
81 794817 Lock-MufflerScrew
95 690718 Screw(ThrottleValve)
97 696387 Shaft-Throttle
98 6954080 KiNdle Speed
104 6949180 Pin-FloatHinge
105 6961360 Valve-FloatNeedle
108 696143 Valve-Choke
109 790149 Shaft-Choke
117 696134 Jet-Main(Std.)(InclO-RingSeal)
118 696135 Jet-Main(High AIt.)(InclO-RingSeal)
121 696146 Kit-CarburetorOverhaul
122 694876 Spacer-Carburetor
125 699966 Carburetor
127 6907270 Plug-Welch
130 696139 Valve-Throttle
133 694914 Float-Carburetor
135 696142 Tube-FuelTransfer
137 6954260 Gasket-FloatBowl
141 696145 Kit-ChokeShaft
146 690979 Key-Timing
161 794768 Base-AirCleaner
163 6922770. Gasket-AirCleaner
187 791766 Line-Fuel(Cut To RequiredLength)
188 699479 Screw(ControlBracket)
190 699220 Screw(FuelTank)
192 690083 Adjuster-RockerArm
28

Craftsman Engine IViodel 204312=0529 For Chipper Shredder IViodel No. 247.77638
209
211
219
220
694867
695307
693578
691724
m = I! II
Spring-Governor(Red)
Spring-GovernedIdle
Gear-Governor
Washer(GovernorGear)
222 794799 Bracket-Control
227 694864 Lever-GovernorControl
240 298090s Filter-Fuel
265 691024 Clamp-Casing
267 699492 Screw(CasingClamp)
271 695381 Lever-Control
278 792008 Washer(GovernorControlLever)
281 697268 Panel-Control
300 794806 Muffler
304 791478 Housing-Blower
305 699480 Screw(BlowerHousing)
306 697240 Shield-Cylinder
307 794822 Screw(CylinderShield)
332 794824 Nut(Flywheel)
333 492341 Armature-Magneto
334 699477 Screw(MagnetoArmature)
337 491055s Plug-Spark
356 692603 Wire-Stop
356A 692390 Wire-Stop
356B 695815 Wire-Stop
356C 695295 Wire-Stop
358 695438 GasketSet-Engine
363 19203 Puller-Flywheel
369 695422 Spring-FloatBowl
383 19374s Wrench-SparkPlug
410 695382 Link-Control
415 691363 Plug(Cylinder)
425 794835 Screw(AirCleanerCover)
445 491588s Filter-AirCleanerCartridge
446 794941 Spring-Retainer
455 794867 Cup-Flywheel
456
459
493
5O4
5O5
529
692299
281505s
691177
695383
691251
791822
D = I! It
Plate-PawlFriction
PawI-Ratchet
Bracket-Mounting
WasherSet-Friction
Nut(GovernorControlLever)
Grommet(Cylinder)
552 694674 Bushing-GovernorCrank
562 793216 Bolt(GovernorControl Lever)
592 690800 Nut(RewindStarter)
597 691696 Screw(PawlFrictionPlate)
601 791850 Hose-Clamp
608 695287 Starter-Rewind
613 794846 Screw(Muffler)
613A 794848 Screw(Muffler)
615 694676 Retainer-GovernorShaft
616 694675 Crank-Governor
621 692310 Switch-Stop
632 695917 Spring/Link-MechanicalGovernor
633O 690998 Seal-Choke/ThrottleShaft
635 691909 Boot-SparkPlug
663 699492 Screw(ControlPanel)
663A 795026 Screw(ControlPanel)
668 694257 Spacer(ControlBracket)
689 691855 Spring-Friction
718 690959 Pin-Locating(Cylinder)
718A 695178 Pin-Locating(CylinderHead)
741 691288 Gear-Timing
742 692564 Retainer-ERing
746 694679 Gear-Idler
773 694258 Retainer
774 695447 Screw(StopWire)
798 697890 Screw(RockerArm)
832 795035 Guard-Muffler
836 794845 Screw(MufflerGuard)
836A 710023 Screw(MufflerGuard)
29

Craftsman Engine IViodel 204312=0529 For Chipper Shredder IViodel No. 247.77638
851
868
883
914
951
957
967
968
692424
690968.+
794818.
794827
699961
792647
491435s
794785
I = O O
Terminal-SparkPlug
Seal-Valve
Gasket-Exhaust
Screw(RockerCover)
Lever-Choke
Cap-FuelTank
Filter-PreCleaner
Cover-AirCleaner
972 694260 Tank-Fuel
975 696138 Bowl-Float
998 696683 Pipe-Oil
1005 794815 Fan-Flywheel
1022 690971.+ Gasket-RockerCover
1023 697691 Cover-Rocker
1026 695177 Rod-Push
1029 690972 Arm-Rocker
1036 Label-Emissions
1058 MS3797 Operator'sManual
1070 794821 Screw(FlywheelFan)
1095 695440 GasketSet-Valve
1100 791959 Pivot-RockerArm
1127 695407 Screw(FloatBowl)
1138 694255 Nut(ControlBracket)
• 1194 691876 Seal-O Ring(Plug)
1210 498144 Pulley/SpringAssembly(Pulley)
1211 498144 Pulley/SpringAssembly(Spring)
1329 2043120536e9 ReplacementEngine
1330 272147 RepairManual
1427 695757 Cap-Pipe
• Includedin EngineGasketSet,Key Number358
0 IncludedinCarburetorOverhaulKit, KeyNumber121
+ Includedin ValveGasketSet,KeyNumber1095
3O
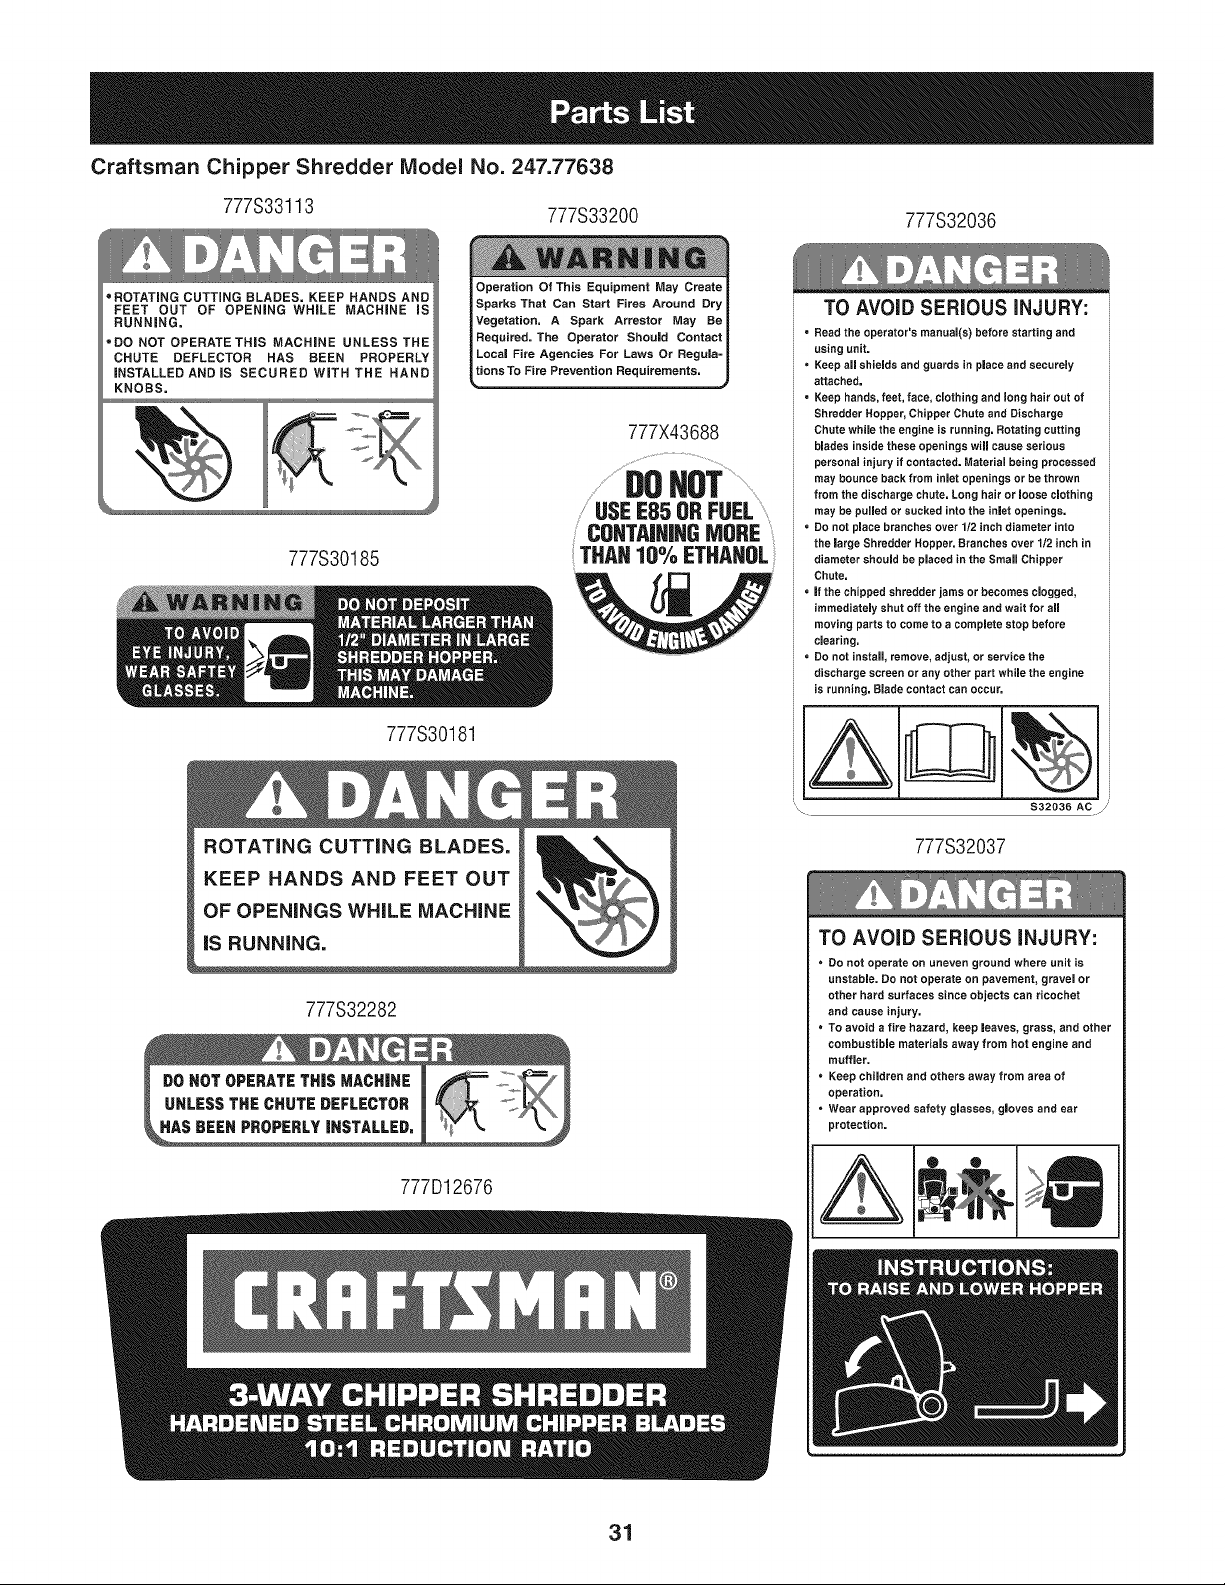
Craftsman Chipper Shredder Model No. 247.77638
777333113 777333200 777332036
®ROTATING CUTTING BLADES. KEEP HANDS AND
FEET OUT OF OPENING WHILE MACHINE mS
RUNNING.
=DO NOT OPERATE THiS MACHINE UNLESS THE
CHUTE DEFLECTOR HAS BEEN PROPERLY
iNSTALLED ANDJS SECURED WiTH THE HAND
KNOBS.
777S30185
Operatien Of This Equipment May Create
Sparks That Can Start Fires Around Dry
Vegetation. A Spark Arrestor May Be
Required. The Operator Should Contact
Local Fire Agencies For Laws Or ReguJa=
ionsTo Fire Prevention Requirements.
777X43688
.................DOHOT...................
USEE85 ORFUEL ......
CONTAiNiNGMORE
THAN 10% ETHANOL
777S30181
ROTATING CUTTING BLADES.
KEEP HANDS AND FEET OUT
OF OPENINGS WHILE MACHINE
iS RUNNING.
777S32282
DO NOT OPERATETHIS MACHINE
UNLESSTHE CHUTE DEFLECTOR
777D12676
TO AVOID SERIOUS iNJURY:
• Read the operator's manuaJ(s) before starting and
using unit.
• Keep ag shieJds and guards in place and secureJy
attached.
• Keep hands, feet, face, cJothing and Jong hair out of
Shredder Hopper, Chipper Chute and Discharge
Chute whge the engine is running. Rotating cutting
bJades inside these openings wiJJcause serious
personal injury if contacted. Material being processed
may bounce back from inJetopenings or be thrown
from the discharge chute. Long hair or Jeose clothing
may be puJJedor sucked into the inlet openings.
• Do not pJace branches over 1/2 inch diameter into
the Jarge Shredder Hopper. Branches over 1/2 inch in
diameter sheuJd be pJaeed in the SmaJJChipper
Chute.
• if the chipped shredder jams or becomes clogged,
immediateJy shut off the engine and wait for ail
moving parts to come to a complete stop before
cJearing.
• Do not instaJJ,remove, adjust, or service the
discharge screen or any other part whiJe the engine
is running. Blade contact can occur.
$32O36 AC
777332037
TO AVOID SERIOUS iNJURY:
DO not operate on uneven ground where unit is
unstabJe. Do net operate on pavement, gravel or
other hard surfaces since objects can ricochet
and cause injury.
To avoid a fire hazard, keep Jeaves, grass, and other
combustible materiaJs away from hot engine and
muffler.
• Keep children and ethers away from area of
operation,
, Wear approved safety glasses, gloves and ear
protection.
31
(Thispageapplicableinthe U.S.A.and Canadaonly.)
Sears Brands Management Corporation (Sears), the California Air Resources Board (CARD)
and the United States Environmental Protection Agency (U.S. EPA)
Emission Control System Warranty Statement (Owner's Defect Warranty Rights and Obligations)
EMISSIONCONTROLWARRANTYCOVERAGEISAPPLICABLETOCERTI-
FIEDENGINESPURCHASEDIN CALIFORNIAIN1995ANDTHEREAF-
TER,WHICHARE USEDINCALIFORNIA,ANDTO CERTIFIEDMODEL
California and United States Emission
The CaliforniaAir ResourcesBoard(CARD),U.S.EPAand Searsare pleased
to explainthe EmissionControlSystemWarrantyonyour modelyear2000and
latersmalloff-roadengine(SORE).InCalifornia,newsmall off-roadengines
mustbe designed,builtand equippedto meettheState'sstringentanti-smog
standards.Elsewherein theUnitedStates,newnon-road,spark-ignition
enginescertifiedfor modelyear 1997and latermustmeetsimilar standardsset
forth bythe U.S.EPA.Sears mustwarranttheemissioncontrol systemon your
YEAR 1997AND LATERENGINESWHICHARE PURCHASEDAND USED
ELSEWHEREIN THE UNITEDSTATES(ANDAFTERJANUARY1,2001 IN
CANADA).
Control Defects Warranty Statement
enginefor the periodsoftime listedbelow,providedthere has been noabuse,
neglector impropermaintenanceof your smalloff-roadengine.Youremis-
sion controlsystemincludespartssuch as thecarburetor,air cleaner,ignition
system,mufflerand catalyticconverter.Also includedmay be connectorsand
otheremissionrelatedassemblies.Wherea warrantableconditionexists,Sears
will repairyour smalloff-roadengineat no costto you includingdiagnosis,parts
and labor.
Sears Emission Control Defects Warranty Coverage
Smalloff-roadenginesarewarrantedrelativeto emissioncontrol partsdefects
fora periodof one year,subjectto provisionsset forth below.Ifany covered
Owner's Warranty
Asthe smalloff-roadengine owner,you are responsiblefor theperformanceof
therequiredmaintenancelistedin yourOperatingand MaintenanceInstruc-
tions.Searsrecommendsthatyou retain all yourreceiptscoveringmaintenance
on yoursmalloff-roadengine,but Sears cannotdenywarrantysolelyfor the
lackof receiptsor for yourfailureto ensuretheperformanceof all scheduled
maintenance.As the smalloff-roadengineowner,you shouldhoweverbe
awarethat Searsmaydenyyou warrantycoverageif your smalloff-roadengine
ora part hasfailed dueto abuse,neglect,impropermaintenanceor unap-
parton yourengineis defective,the part willbe repairedorreplacedbySears.
Responsibilities
provedmodifications.Youare responsiblefor presentingyour smalloff-road
engineto an AuthorizedSearsServiceDealeras soonas a problemexists.The
undisputedwarrantyrepairsshouldbe completedina reasonableamountof
time,notto exceed30 days.Ifyou haveany questionsregardingyourwarranty
rightsand responsibilities,you shouldcontacta SearsService Representative
at 1-800-469-4663.The emissionwarrantyis a defectswarranty.Defectsare
judgedon normalengineperformance.The warrantyis notrelatedto an in-use
emissiontest.
Sears Emission Control Defects Warranty Provisions
ThefollowingarespecificprovisionsrelativetoyourEmissionControlDefectsWarrantyCoverage.ItisinadditiontotheSearsenginewarrantyfornon-regulated
enginesfound in theOperatingand MaintenanceInstructions.
1. WarrantedParts
Coverageunderthis warrantyextendsonly to the parts listedbelow (the
emissioncontrolsystemsparts)to the extentthese partswere presenton
theengine purchased.
a. FuelMeteringSystem
• Cold start enrichmentsystem
• Carburetorand internalparts
• FuelPump
b. Air lnduction System
• Air cleaner
• Intakemanifold
c. IgnitionSystem
• Spark plug(s)
• Magnetoignitionsystem
d. CatalystSystem
• Catalyticconverter
• Exhaustmanifold
• Air injectionsystemor pulsevalve
e. MiscellaneousItemsUsedin AboveSystems
• Vacuum,temperature,position,time sensitivevalves
andswitches
• Connectorsandassemblies
2. Lengthof Coverage
Searswarrantsto the initialownerand eachsubsequentpurchaserthat
theWarrantedPartsshallbe free from defects in materialsandworkman-
shipwhich causedthe failure of the WarrantedPartsfor a periodof one
yearfrom the datethe engineis deliveredto a retailpurchaser.
3. NoCharge
Repairor replacementof anyWarrantedPartwill be performedat no
chargeto the owner,includingdiagnosticlabor whichleads to the
determinationthata WarrantedPartis defective,if the diagnosticworkis
performedat an AuthorizedSears ServiceDealer.Foremissionswarranty
servicecontact yournearestAuthorizedSears ServiceDealeras listed in
the "YellowPages"under"Engines,Gasoline,""GasolineEngines,""Lawn
Mowers,"or similarcategory.
4. Claimsand CoverageExclusions
Warrantyclaimsshall befiled in accordancewiththe provisionsof the
Sears EngineWarrantyPolicy.Warrantycoverageshall be excludedfor
failuresof WarrantedPartswhichare not original Sears partsor because
of abuse, neglector impropermaintenanceas setforth inthe Sears
EngineWarrantyPolicy.Sears is notliableto coverfailuresof Warranted
Partscausedby the use of add-on,non-original,or modifiedparts.
5. Maintenance
Any WarrantedPart whichis not scheduledfor replacementas required
maintenanceor whichis scheduledonly for regularinspectionto the effect
of "repairor replaceas necessary"shallbe warrantedas to defectsfor the
warrantyperiod.Any WarrantedPartwhich is scheduledfor replacement
as requiredmaintenanceshallbe warrantedas to defectsonly forthe
periodof time upto the first scheduledreplacementfor that part.Any
replacementpart that is equivalentin performanceand durabilitymay
be usedin the performanceof any maintenanceor repairs.The owneris
responsibleforthe performanceof all requiredmaintenance,as definedin
the SearsOperatingand MaintenanceInstructions.
6. ConsequentialCoverage
Coveragehereundershallextend to thefailure of any engine components
caused bythe failureof any WarrantedPartstill underwarranty.
Inthe USAandCanada,a 24 hour hot line, 1-800-469-4663,has a menu of pre-recordedmessagesofferingyou enginemaintenanceinformation.
GDOC-100188Rev.B
32
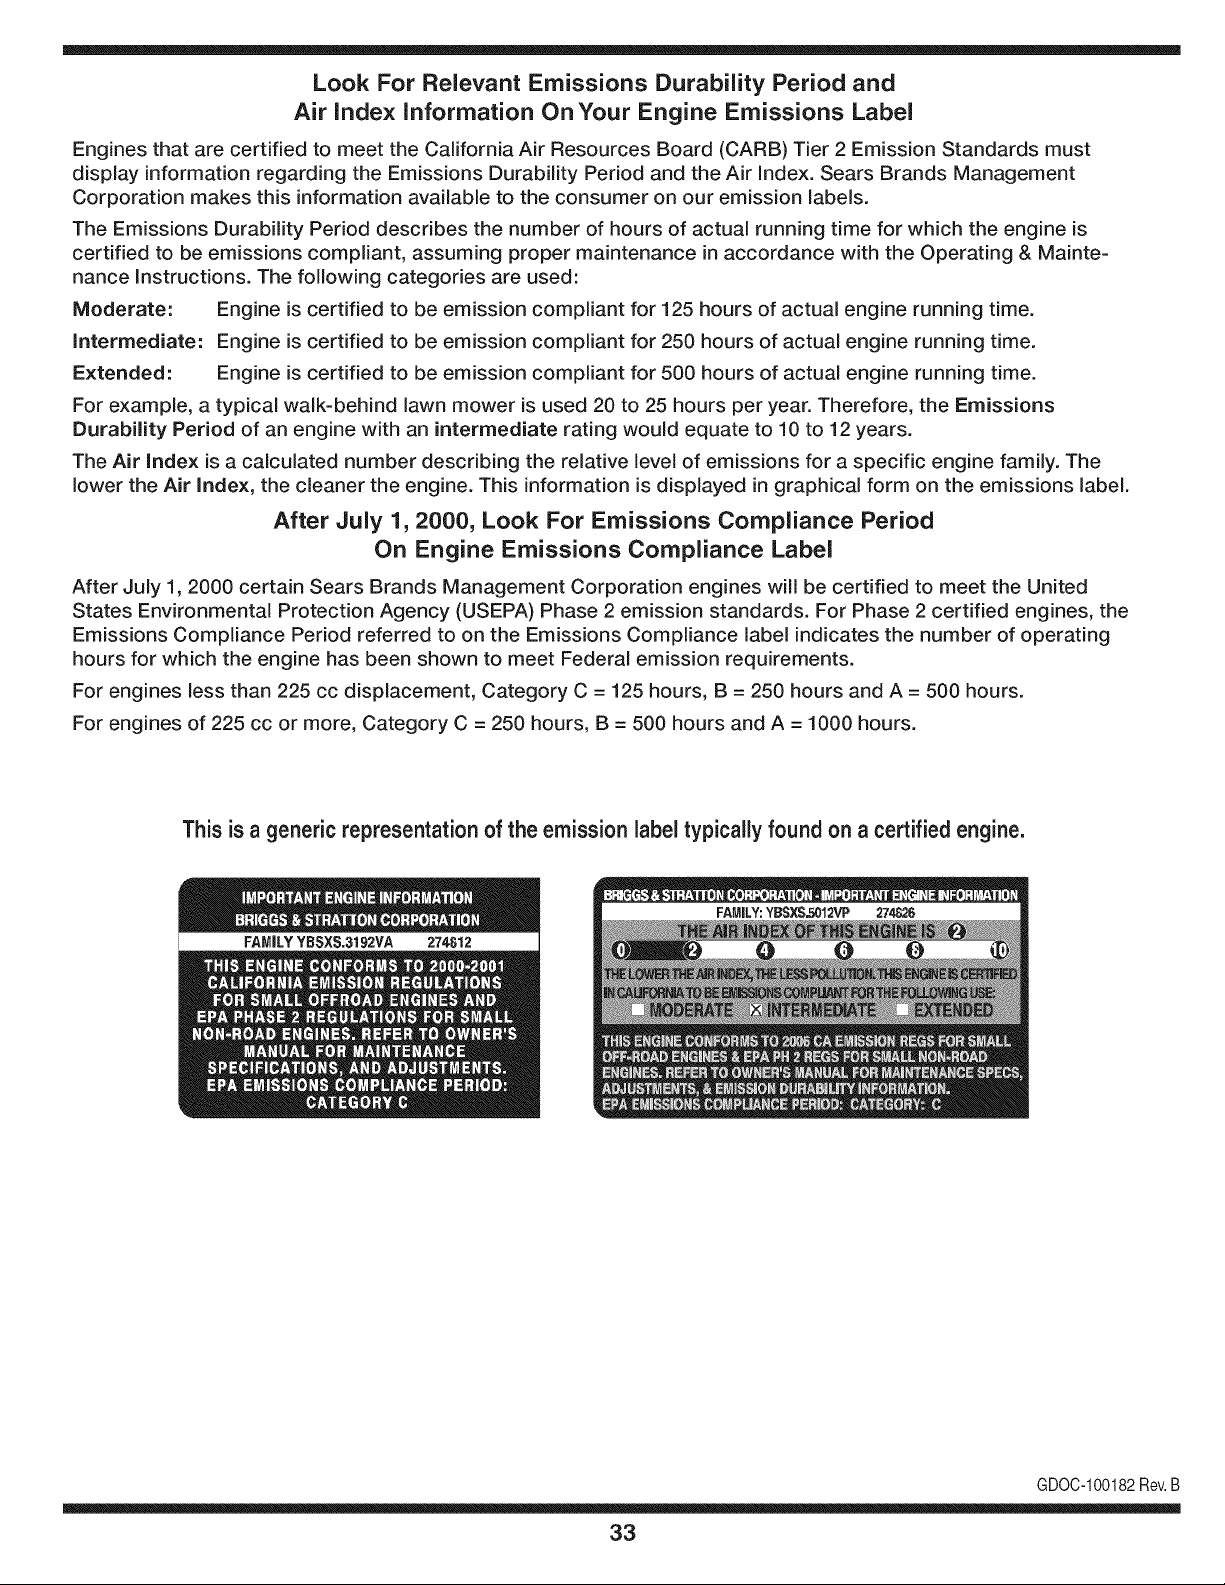
Look For Relevant Emissions Durability Period and
Air index information On Your Engine Emissions Label
Engines that are certified to meet the California Air Resources Board (CARB) Tier 2 Emission Standards must
display information regarding the Emissions Durability Period and the Air Index. Sears Brands Management
Corporation makes this information available to the consumer on our emission labels.
The Emissions Durability Period describes the number of hours of actual running time for which the engine is
certified to be emissions compliant, assuming proper maintenance in accordance with the Operating & Mainte-
nance Instructions. The following categories are used:
Moderate: Engine is certified to be emission compliant for 125 hours of actual engine running time.
Intermediate: Engine is certified to be emission compliant for 250 hours of actual engine running time.
Extended: Engine is certified to be emission compliant for 500 hours of actual engine running time.
For example, a typical walk-behind lawn mower is used 20 to 25 hours per year. Therefore, the Emissions
Durability Period of an engine with an intermediate rating would equate to 10 to 12 years.
The Air index is a calculated number describing the relative level of emissions for a specific engine family. The
lower the Air Index, the cleaner the engine. This information is displayed in graphical form on the emissions label.
After July 1,2000, Look For Emissions Compliance Period
On Engine Emissions Compliance Label
After July 1, 2000 certain Sears Brands Management Corporation engines will be certified to meet the United
States Environmental Protection Agency (USEPA) Phase 2 emission standards. For Phase 2 certified engines, the
Emissions Compliance Period referred to on the Emissions Compliance label indicates the number of operating
hours for which the engine has been shown to meet Federal emission requirements.
For engines less than 225 cc displacement, Category C = 125 hours, B = 250 hours and A = 500 hours.
For engines of 225 cc or more, Category C = 250 hours, B = 500 hours and A = 1000 hours.
This is a generic representation of the emission label typically found on a certified engine.
FAMILYYBSXS.3192VA 274812
GDOC-100182Rev.B
33

Congratulations on making a smart purchase. Your new Craftsman® product is designed and
manufactured for years of dependable operation. But like all products, it may require repair
from time to time. That's when having a Repair Protection Agreement can save you money and
aggravation.
Here's what the Repair Protection Agreement* includes:
[] Expert service by our 10,000 professional repair specialists
[] Unlimited service and no charge for parts and labor on all covered repairs
[] Product replacement up to $1500 if your covered product can't be fixed
[] Discount of 25% from regular price of service and related installed parts not covered by the
agreement; also, 25% off regular price of preventive maintenance check
[] Fast help by phone - we call it Rapid Resolution - phone support from a Sears representative.
Think of us as a "talking owner's manual."
Once you purchase the Repair Protection Agreement, a simple phone call is all that it takes for you
to schedule service. You can call anytime day or night, or schedule a service appointment online.
The Repair Protection Agreement is a risk-free purchase. If you cancel for any reason during the
product warranty period, we will provide a full refund. Or, a prorated refund anytime after the
product warranty period expires. Purchase your Repair Protection Agreement today!
Some limitations and exclusions apply. For prices and additional information in the U.S.A.
call 1=800=827=6655.
*Coverage in Canada varies on some items. For full details call Sears Canada at 1=800=361=
6665.
Sears Installation Service
For Sears professional installation of home appliances, garage door openers, water heaters, and
other major home items, in the U.S.A. or Canada call 1=800=4=MY=HOME®.
34
Declaraci6n de garantia ....................... Pagina 35
Practicas operacion seguras ............... Pagina 36
Montaje ................................................ Pagina 40
Operacion ............................................ Pagina 44
Servicio y Mantenimiento .................... Pagina 46
Almacenamiento fuera de temporada .... Pagina 50
Solucion de problemas ...................... Pagina 51
Etiquetas de seguridad ....................... Pagina 7
Lista de piezas ..................................... Pagina 20
Acuerdo de Proteccion Para
Reparaciones ....................................... Pagina 55
Labels .................................................. Pagina 31
NOmero de servicio ..................... Cubierta posterior
ARTESANO DE DOS AI/OS DEGARANT{A
PORDOSAI_OSSa partirde lafechadecompra,este productoestAgarantizadocontracualquier
defectodematerialo manode obra.Unproductodefectuosorecibir&la reparacbno la sustitucbnsi la
reparaci6nno est&disponible.
Paraobtenerinformacbndetalladacoberturadela garanfiaparaobtenerlareparaci6no sustitucbn
gratuita,visiteelsitioweb:www.craftsman.com
EstagarantiacubrelosdefectosSOLOdernaterialesy fabricaci6n.La garantiano induye:
• BementosreutilizaNesque puedengastarseporeluso normaldentrodel periodode
garanfia,talescomolas cuchillas,bujias,filtro de aire, pantallade desgranadoy una
bolsa.
• ProductodaSosresultantesde losintentosdel usuariode rnodificaci6ndel producto,
reparaci6no causadospor accesoriosde productos.
• Reparacionesnecesariasdebidoal accidenteo por no operaro mantenerel producto
segQnlas instruccionesprovistas.
• El mantenimientopreventivoo reparacionesnecesariasdebidoa una mezclaincorrectade
combustible,combustiblecontaminadoo pasado.
Estagarantiaes inv_Jidasi este productose utilizaal mismotiempola prestaci6nde servicios
comercialeso si se alquilaa otra persona.
Estagarantiale otorgaderechoslegalesespecificos,y ustedtambi_npuedetenerotrosderechos
quevariande estadoa estado.
Sears Brands ManagementCorporation, Hoffman Estates, IL 60179
Serie: 1450
Tipode aceite del motor: SAE30
Capacidadde aceitedel motor: 28onzas
Elcombustible: Gasolinasin PIomo
Bujias: Champion®RC-12YC
Separaci6nde las bujias: .030"
NSrnerode modelo ..........................................................
N_mero de serie ..............................................................
Fechade compra .............................................................
Registrearribael nOmerodel modelo,el nOmerode seriey la fecha
de compra
KCD IR LLC 35
Lapresenciade este sirnboloindicaquese tratadeinstrucciones
irnportantesde seguridadque sedebenrespetarparaevitar
poneren peligrosu seguridadpersonaly/o materialy la de otras
personas.Leay sigatodaslas instruccionesde estemanualantes
deponeren funcionarnientoesta rn_.quina.Si no respetaestas
instruccionespodria provocarlesionespersonales.Cuandovea este
sirnbolo,i presteatenci6na la advertencia!
Estarn_.quinarueconstruidaparaseroperadade acuerdocon
las reglasde seguridadcontenidaseneste manual.AI igualque
con cualquiertipo de equipornotorizado,undescuidoo errorpor
partedel operadorpuedeproducirlesionesgraves.Estarn_.quina
es capazde arnputarrnanosy piesy dearrojarobjetoscon gran
fuerza.De no respetarlas instruccionesde seguridadsiguientesse
puedenproducirlesionesgraveso larnuerte.
PROPOSICION 65 DE CALIFORNIA
Elescapedel motorde esteproducto,algunosdesuscornponentes
y algunoscornponentesdelvehiculocontieneno liberansustancias
quirnicasqueelestadode Californiaconsideraque puedenproducir
c_.ncer,defectosde nacirnientouotrosproblernasreproductivos.
Su responsabilidad--Restrinja el uso deestarn_.quina
rnotorizadaalas personasque lean,cornprendany respetenlas
advertenciase instruccionesque aparecenen este manualyen la
rn_.quina.
iGUARDEESTASINSTRUCCIONES!
CAPACITACiON
• Lea,entienday curnplatodaslas instruccionesincluidasen
la rnAquinay enlos rnanualesantesde rnontarlay utilizarla.
Guardeestemanualenun lugarseguropara consultasfuturasy
regulares,asi cornoparasolicitarrepuestos.
• Leael ManualdelOperadory sigatodas las advertenciase
instruccionesde seguridad.El fracasode hacerasi puedecausar
la heridaseriaal operadory/o personaspresentes.
• Farniliaricesecontodoslos controlesy su operaci6nadecuada.
Sepac6rnodetenerla rn_.quinay c6rnodesengranarloscontroles
r_.pidarnente.
• No perrnitanuncaque losnifos rnenoresde 16afrosutilicen
estarn_.quina.Los nifos de 16afrosy rn_.srnayoresdeben
leery cornprenderlas instruccionesde operaci6ny las reglas
de seguridadcontenidasen estemanual,y tarnbi_ndebenser
capacitadosy estarsupervisadosporunode los padres.
• Nuncaperrnitaque los aduitosoperenesta rn_.quinasin recibir
antesla instrucci6napropiada.
• Mantengaa los transeQntes,ayudantes,rnascotasy nifos al
rnenosa 75piesde la rn_.quinarnientrasest,.operando.Detenga
la rn_.quinasi alguienentraenla zona.
• Nuncaenciendaun motoren espacioscerradoso en una zona
con pocaventilaci6n.Elescapedel motorcontienernon6xidode
carbono,un gasinodoroy letal.
• No pongalas rnanoso los piescercadelas piezasrotatoriaso
en lasc_.rnarasde alirnentaci6nnien laaberturade descarga.El
contactocon el motorrotatoriopuedeproducirla arnputaci6nde
dedos,rnanoso pies.
• Nuncatratededestapar[atornade alirnentaci6no la aberturade
descarga,nitratede sacaro vaciarla bolsade la aspiradora,ni
de revisary repararla rn_.quinarnientrasel motorest,.enrnarcha.
Apagueel motory esperehastaquetodaslas piezasrn6vilesse
hayandetenidoporcornpleto.Desconecteel cablede la bujiay
p6ngalodernaneraque hagarnasacontra el motor.
PREPARATIVOS
* Inspeccionerninuciosarnenteel _.readondeutilizar_,el equipo.
Retiretodas las piedras,botellas,latasu otros objetosextrafos
que puedanserlevantadoso arrojadoscausandolesiones
personaleso dafos a la rn_.quina.
, Paraprotegerselosojos utilice siernpreanteojoso antiparras
de seguridadrnientrasoperala rn_.quinao rnientrasla ajusta
o repara.Losobjetosarrojadosquerebotanpuedenlesionar
gravernentelavista.
, Utilicezapatosde trabajoresistentes,desuelafuerte,asi corno
pantalonesy carnisasajustados.Las prendassueltaso las
alhajaspuedenquedaratrapadasen las piezasrn6viles.Nunca
utilicela rn_.quinadescaizoo con sandalias.Utiiiceguantesde
trabajode cuerocuandoalirnentematerialporel canal de la
cortadora.
, Antesde encenderla rn_.quinacontroleque todos los pernosy
tornillosest_nbienajustadosparacornprobarque la rn_.quinase
encuentraen condicionessegurasdeoperaci6n.Adern_.s,realice
una inspecci6nvisualde la rn_.quinaa intervalosfrecuentespara
controlarsi la rnisrnaest,. dafada.
, Mantengao reernplacelas etiquetasde seguridade instrucciones
segQnsea necesario.
36
Manejoseguro de la gasolina
Paraevitarlesionespersonaleso daSosrnaterialessea surnarnente
cuidadosoal rnanipularla gasolina.Lagasolinaes altarnenteinflarno
abley susvaporespuedencausarexplosiones.Se puedelesionar
gravernentesi derrarnagasolinasobreustedo sobrela ropaya que se
puedeencender.L_vesela piel y c&rnbiesede ropa de inrnediato.
• Utilices61orecipientesparagasolinaautorizados.
• NuncaIlenelos contenedoresen elinteriorde un vehiculo
o carni6nocaja decarnionetacon recubrirnientospl&sticos.
Coloquesiernprelos recipientesenel pisoy lejosdelvehiculo
antesde Ilenarlos.
• Retireel equipoa gasolinadel carni6no rernolquey II_neloen
el piso.Si estonoes posible,entoncesIlenedichoequipoenun
rernolqueconun recipienteport&til,en vez de desdeun dispen-
sadorde gasolina.
• Mantengala boquillade Ilenadoen contactoconel bordedela
entradadeltanquede gasolinao contenedorentodo rnornento
hastaqueest_Ileno.Noutilice un dispositivoparaabrir/cerrarla
boquilla.
• Apaguetodoslos cigarrillos,cigarros,pipasy otras fuentesde
cornbusti6n.
• Nuncacarguecornbustibben la rn&quinaen unespaciocerrado.
• Nuncasaquela tapa del gas ni agreguecombustiblernientrasel
motorest&calienteo enrnarcha.Dejequeel motorseenfrie por
Io rnenosdosrninutosantesdevolvera cargarcombustible.
• Nuncarecargueel tanquede combustible.Lleneel tanqueno
rn&sde 1/2 pulgadapor debajode la basedelcuellodel filtro
paradejarespacioparala dilatacbndelcornbustibb.
• Vuebaa colocarla tapade lagasolinay aj_steb bien.
• Lirnpielagasolinaderrarnadasobreel motory el equipo.Trasbde
la rn&quinaa otra zona.Espere5rninutosantes de encenderel
motor.
• Nuncaalrnacenela rn&quinao el recipientede combustibleen
unespaciocerradodondehayafuego,chispaso luz piloto(por
ejernplo,hornos,calentadoresdeagua,calefactores,secadores
de ropa,etc.)
• Parareducirel riesgodeincendiornantengalarn_.quinalirnpia
depasto,hojasy de acurnulaci6nde otrosdesechos.Lirnpielos
derrarnesde aceite o combustibley saquetodos los desechos
ernbebidosconcombustible.
OPERACION
• No pongalas rnanoso los piescercadelas piezasrotatoriaso
enlas c_.rnarasde alirnentaci6nni en la aberturade descarga.El
contactocon el motorrotatoriopuedeproducirla arnputaci6nde
dedos,rnanoso pies.
• Antesdeencenderla rn_.quinacornpruebeque el canaldela
cortadora,latornade alirnentaci6ny la c_.rnarade corte est_.n
vacbs y sin desechos.
• Inspeccionerninuciosarnentetodoel materialquedeseatriturar
y saquelos objetosrnet_.licos,piedras,botellas,latasu otros
objetosextraSosque puedenocasionarlesionesodaSarla
rn_.quina.
• Si es necesarioernpujarel materialporlatolvade latrituradora
useun palo de di_.rnetropequeSo.No utilicelas rnanosni los
pies.
• Si el motorgolpeaun objetoextraSoo si la rn_.quinaernpieza
a producirun sonidopococornQno unavibraci6n,apagueel
motordeinrnediato.Dejeque el motor sedetengapor cornpleto.
Desconecteel cablede la bujia,p6ngalode rnaneraque haga
rnasacontrael motory sigaestospasos:
a. Inspeccionela rn_.quinaparaver si est,. daSada.
b. Repareo reernplacelaspiezasdaSadas.
c. Controlesi hay piezasflojasy ajQstelasparaasegurarquela
rn_.quinafuncionede rnaneraseguray continua.
• Noperrnitaquese acurnulematerialprocesadoen la zonade
descarga.El rnisrnopuedeobstaculizarla descargaadecuada
y provocarel retornodel materiala travesde la aberturade
alirnentaci6n.
• Nointentetriturarni picarmaterialde mayortarnaSoal espe-
cificadoen la rn_.quinao enestemanual.Sepodrianproducir
lesioneso daSos.
• Nuncatratede destaparla tornade alirnentaci6no laabertura
de descargarnientrasel motorest,. en rnarcha.Apagueel motor
y esperehastaquetodaslaspiezasque sernuevense hayan
detenidopor cornpleto,desconecteel cablede la bujia y p6ngalo
de rnaneraque haga rnasacontra el motorantes de sacarlos
escornbros.
• Nuncaoperela rn_.quinasinque la tolva de la trituradora,el canal
de lacortadorao el canaldeflectorest_ncorrectarnenteconecta-
dos a la rn_.quina.Nuncavacienicarnbiela bolsade descarga
rnientrasel motorest,.en rnarcha.
• Mantengatodos los protectores,desviadoresy dispositivosde
seguridaden su lugary en buenascondiciones.
• Mientrasalirnentamaterialdentrode la rn_.quinarnantengasu
rostroy su cuerpodetr_.sy haciaun costadodelcanalde la
cortadoraparaevitarlesionesporretrocesosaccidentales.
• Nuncaopereestarn_.quinasin buenavisibilidado ilurninaci6n.
• Noopereestarn_.quinaen superficiescon grava.
• Noopereestarn_.quinaestandobajo los efectosdel alcoholo de
drogas.
• El silenciadory el motorse calientany puedenproducirquerna-
duras.Nolos toque.
• Nuncalevanteo transportela rn_.quinacuandoel motorest,.
encendido.
• Si se presentansituacionesquenoest_.nprevistaseneste
manualseacuidadosoy useel sentidocornQn.Marquepara
contactareldepartarnentodeatenci6nalclientey obtenerel
nornbrede su distribuidorrn_.scercano.
37
MANTENIMIENTO Y ALMACENAMIENTO
• Nuncarnanipulelos dispositivosde seguridadde rnanera
irnprudente.Controleperi6dicarnenteque funcionende forrna
adecuada.
• Controlefrecuenternentequetodoslospernosy tornillosest_n
bienajustadosparacornprobarque la rn_.quinase encuentraen
condicionessegurasde funcionarniento.Adern_.s,realiceuna
inspecci6nvisualde larn_.quinapara controlarsi larnisrnaest,.
da_aday rep_.reladeser necesario.
• Antesde lirnpiar,repararo inspeccionarla rn_.quina,detengael
motory cornpruebeque el rnisrnoy que todas las piezasrn6viles
se hallandetenido.Desconecteel cablede labujiay p6ngalo
de rnaneraque hagarnasacontrael motorparaevitarquese
enciendade rnaneraaccidental.
• Nocarnbielaconfiguraci6ndel reguladordel motorni acelere
dernasiadoel rnisrno.El reguladorcontrolalavelocidadrn_.xirna
segurade operaci6ndelmotor.
• Mantengao reernplacelasetiquetasde seguridade instrucciones
segQnseanecesario.
• Sigalas instruccionesde este manualparacargar,descargar,
transportary alrnacenardernaneraseguraesta rn_.quina.
• Nuncaalrnacenela rn_.quinao el recipientedecombustibleen un
espaciocerradodondehayafuego,chispaso luzpilotocornopor
ejernplo,calentadoresdeagua, hornos,secadoresde ropa,etc.
• Dejequela rn_.quinase enfriepot Io rnenos5 rninutosantesde
guardarla.
• Consultesiernpreel manualdel operadorparaconocerlas
instruccionesadecuadasparael alrnacenarnientofuerade
ternporada.
• Seg_nla Cornisi6nde Seguridadde Productosparael Consu-
rnidorde los EstadosUnidos(CPSC)y la Agenciade Proteccidn
Arnbientalde los EstadosUnidos(EPA),esteproductotieneuna
vida Otilmediade siete(7) a_os, 6 60 horasde funcionarniento.
AI finalizarla vida Otilmedia,adquieraunarn_.quinanuevao
hagainspeccionaranualrnente_staporundistribuidorde servicio
autorizadoparacerciorarsede quetodoslos sisternasrnec_.nicos
y de seguridadfuncionancorrectarnentey no tienenexcesivo
desgaste.Si no Io hace,puedenproducirseaccidentes,lesiones
o rnuerte
• Sidebevaciarel tanquedecombustible,h_.galoal airelibre.
• Respetelas norrnasreferentesa ladisposici6ncorrectay las
reglarnentacionessobregas,combustible,etc. paraprotegerel
medicarnbiente.
NO MODIFIQUE EL MOTOR
Paraevitarlesionesgraveso larnuerte,nornodifiqueel motorbajo
ningunacircunstancia.Si carnbialaconfiguracidndel reguladorel
motorpuededescontrolarsey operara velocidadesinseguras.Nunca
carnbiela configuracidnde f_.bricadel reguladordel motor.
AVISO REFERIDO A EMISIONES
Losrnotoresqueest&ncertificadosy curnplencon las regulaciones
de ernisionesfederalesEPAy de CaliforniaparaSORE(Equipos
peque_ostodoterreno)est_.ncertificadosparaoperarcongasolina
cornOnsin plornoy puedenincluirlos siguientessisternasde control
de ernisiones:Modificacidnde motor(EM) y catalizadorde tresvias
(TWO)siest_.nequipadosde esa rnanera.
GUARDACHISPAS
Estarn_.quinaest,.equipadacon unmotordecornbusti6ninternay
nodebeser utilizadaen o cerca de unterrenoagrestecubiertopor
bosque,rnalezaso hierbaexceptosi elsisternadeescapedelmotor
est,.equipadocon un arnortiguadorde chispasquecurnplacon las
leyeslocaleso estatalescorrespondientes,encasode habedas.
Si se utilizaunarnortiguadorde chispasel operadorIo debernantener
en condicionesde usoadecuadas.Enel Estadode Californialas
rnedidasanteriorrnenternencionadassonexigidasporIcy (Arficulo
4442del C6digode RecursosPt_blicosde California).Esposible
queexistanleyessirnilaresenotrosestados.Lasleyesfederalesse
aplicanen territoriosfederales.
Puedeconseguirel arnortiguadordechispasparael silenciadora
travesde su distribuidorautorizadode rnotoreso poni_ndoseen
contactoconel departarnentode servicios,RO.Box361131Cleve-
land, Ohio44136-0019.
38
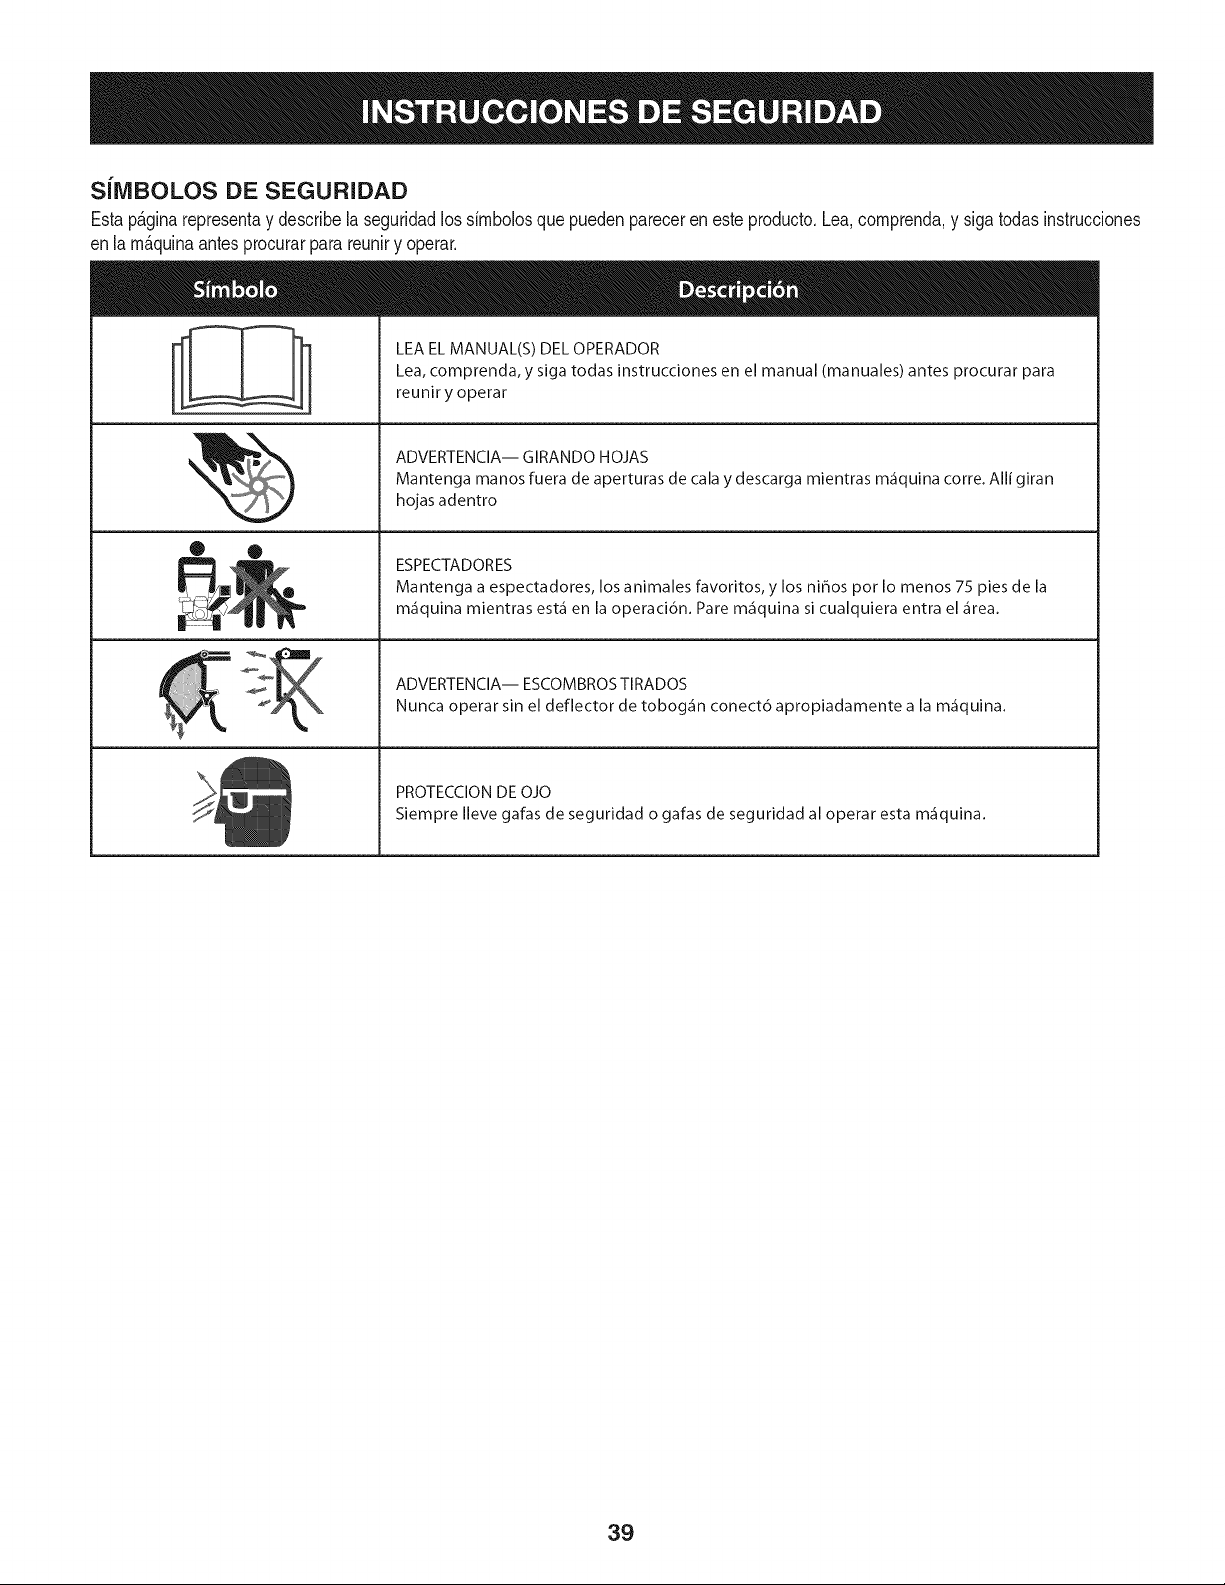
SilVIBOLOS DE SEGURIDAD
Estap&ginarepresentay describela seguridadlos simbolosque puedenpareceren este producto.Lea,comprenda,y sigatodasinstrucciones
enla m_.quinaantesprocurarpara reuniry operar.
LEA EL MANUAL(S) DEL OPERADOR
Lea, comprenda, y siga todas instrucciones en el manual (manuales) antes procurar para
reunir y operar
ADVERTENCIA-- GIRANDO HOJAS
Mantenga manos fuera de aperturas de cala y descarga mientras m_iquina corre. Alli giran
hojas adentro
ESPECTADORES
Mantenga a espectadores, los animales favoritos, y los niffos por Io menos 75 pies de la
m_iquina mientras est,1 en la operaci6n. Pare m_iquina si cualquiera entra el _irea.
ADVERTENClA-- ESCOMBROS TIRADOS
Nunca operar sin el deflector de tobog_in conect6 apropiadamente a la m_iquina.
PROTECClON DE OJO
Siempre Ileve gafas de seguridad o gafas de seguridad al operar esta m_iquina.
39

IMPORTANTE:Esta unidadse entregasin gasolinao aceiteenel
motor.AsegQresede servMo con motorde gasolinay aceitesegQn
las instrucdonesen la operad6nde este manualantesde operarsu
rn_.quina.
NOTA: Referenciaa la derechay la izquierdade la TrituradoraChip-
perse observadesdela posici6nde funcionarniento.
APERTURA DE LA CAJA DE CARTON
1. Cortecada una de lasesquinasde la cajaverticalrnente,de la
partesuperiora la base.
2. Saquetodas laspiezassueltas.
3. Quiteel materialde empaquesuelto.
COIVIO SACAR LA UNIDAD DE LA CAJA
1. Elevelaunidaddesdela parteposteriorparasepararladel
materialde la cajaque quededebajo,y haga rodarla unidad
fuerade la caja.
2. Verifiquecuidadosarnentesi enla cajaquedaalguna partesuelta.
/
.......
Figura1
PIEZAS SUELTAS DENTRO DE LA CAJA
• Montajede tolva
• Bolsa
• Canaldeflector
• Pis6n
• Anteojosde seguridad
• Canaldela cortadora
• Aceitede motor
• Manualde Operador
INSTALACION DE LA TOLVA IVIONTAJE
1. A. Saqueseis tuercashexagonalesy arandelasde los esp_.r
ragosde la soldadurade la caja del motor.Nosaquela placa
de sost_n.Vea la Figura1.
B. Coloqueel rnontajede la tolvaen posici6ndelantede la caja
del motor,alineandolos agujerosdel rnontajedelarc de la
tolvacon losesp_.rragosde lasoldadura.
C. Desliceel rnontajede la tolva sobrelos esp_.rragosde la
soldaduray vuelvaa colocarlas arandelasy las tuercas
hexagonales.Nolas ajustepor cornpleto.
2. A. Levanteelrnontajede latolvahastael rnontajedelsoportede
motor.Wase lafigura2.
B. Deslicelavarillade liberaci6nhaciaafueralevernentepara
engancharel soportede tolvaen la varilla.Veaia Figura2.
C.Ajustelasseis tuercashexagonalesqueunenel rnontajede la
tolvaa lacaja delmotory ajustetarnbi_nlas arandelas
hexagonalesqueunenel soportedela tolvaal rnontajedela
rnisrna.
J
Figura2
40
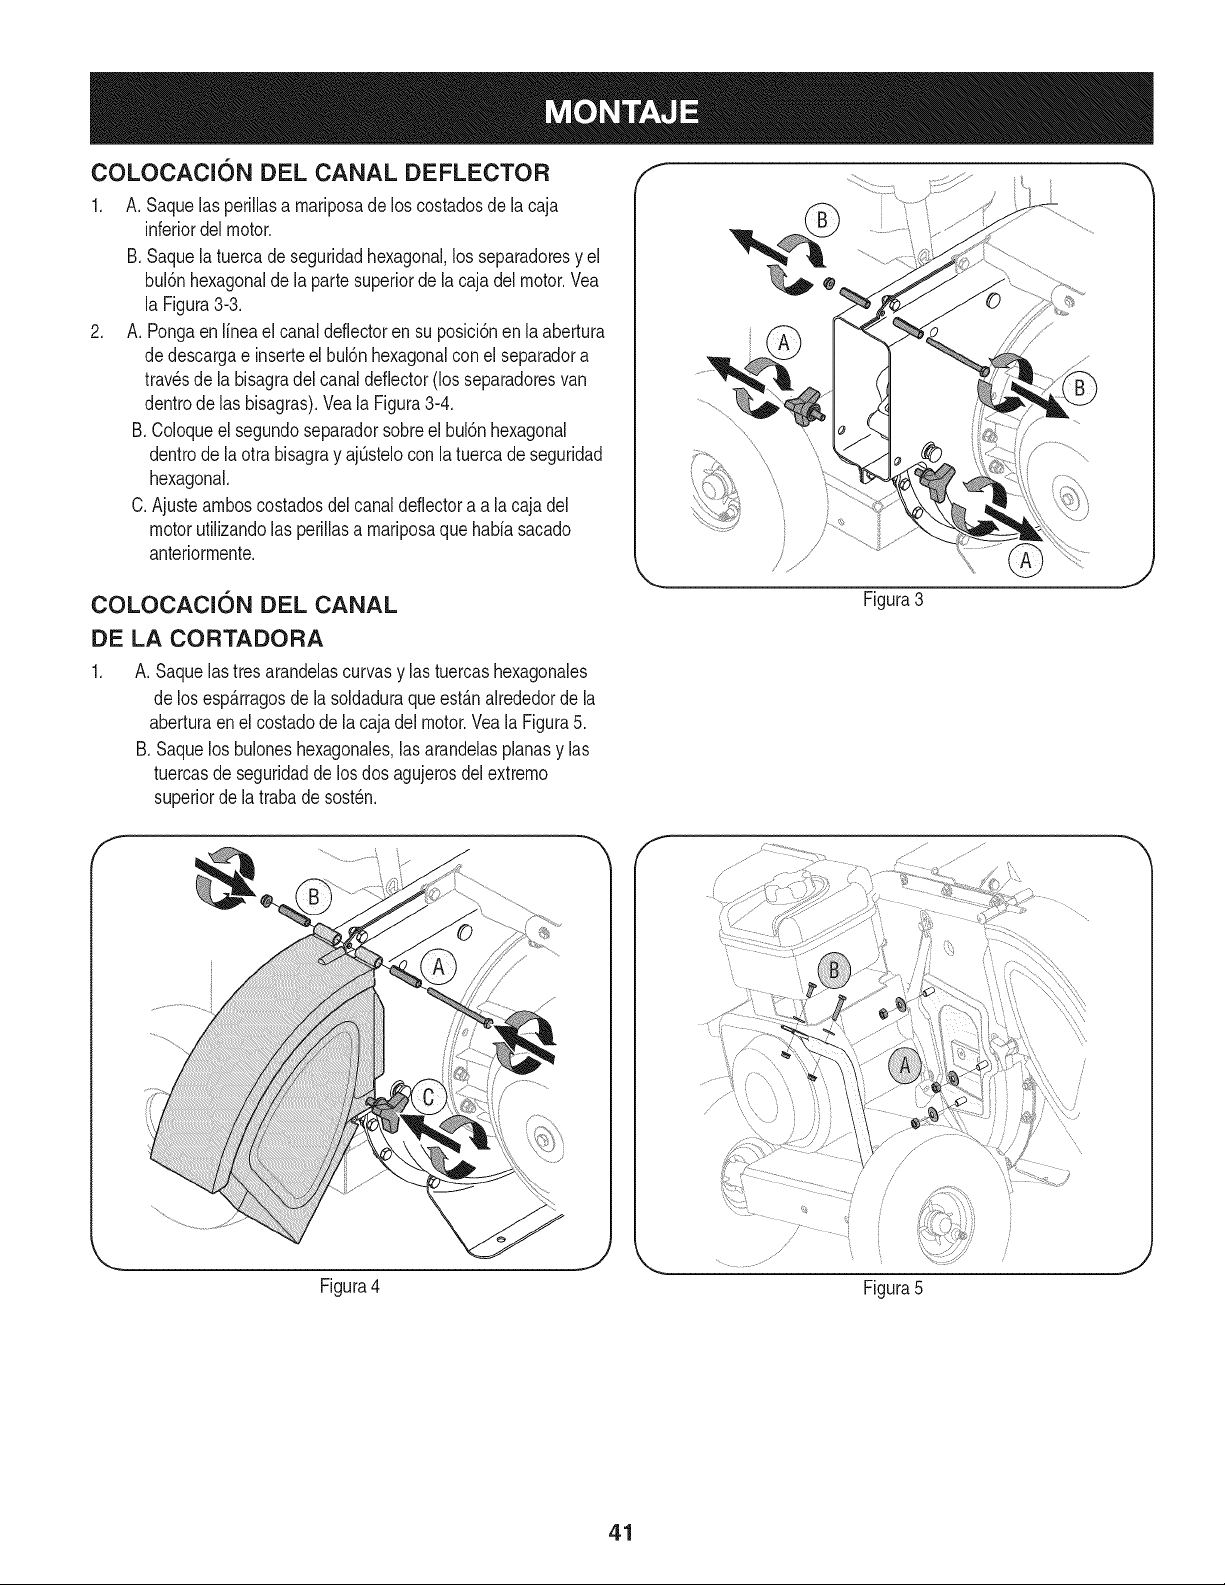
COLOCACl6N DEL CANAL DEFLECTOR r'
.
A. Saquelas perillasa mariposade los costadosde la caja
inferiordel motor.
B. Saquela tuercade seguridadhexagonal,los separadoresy el
bul6nhexagonalde la parte superiorde la cajadel motor.Vea
la Figura313.
A. Pongaen Ifneael canal deflectoren su posici6nen la abertura
de descargae inserteel bul6nhexagonalconel separadora
travesde la bisagradel canaldeflector(los separadoresvan
dentrode las bisagras).Vea la Figura314.
B. Coloqueel segundoseparadorsobreelbul6nhexagonal
dentrode la otra bisagray ajOstelocon la tuercade seguridad
hexagonal.
C.Ajusteamboscostadosdel canaldeflectora a lacaja del
motorutiNzandolas periNasa mariposaque habfasacado
anteriormente.
COLOCACl6N DEL CANAL
DE LA CORTADORA
A. Saquelastres arandelascurvasy las tuercashexagonales
delos esp_.rragosde la soldaduraque est_.nalrededorde la
aberturaen el costadode la caja del motor.Vea la Figura5.
B. Saquelos buloneshexagonales,las arandelasplanasy las
tuercasde seguridadde losdos agujerosdel extremo
superiordela trabade sosten.
........................................
Figura4
i
i
/ • i
,/
Figura5
41
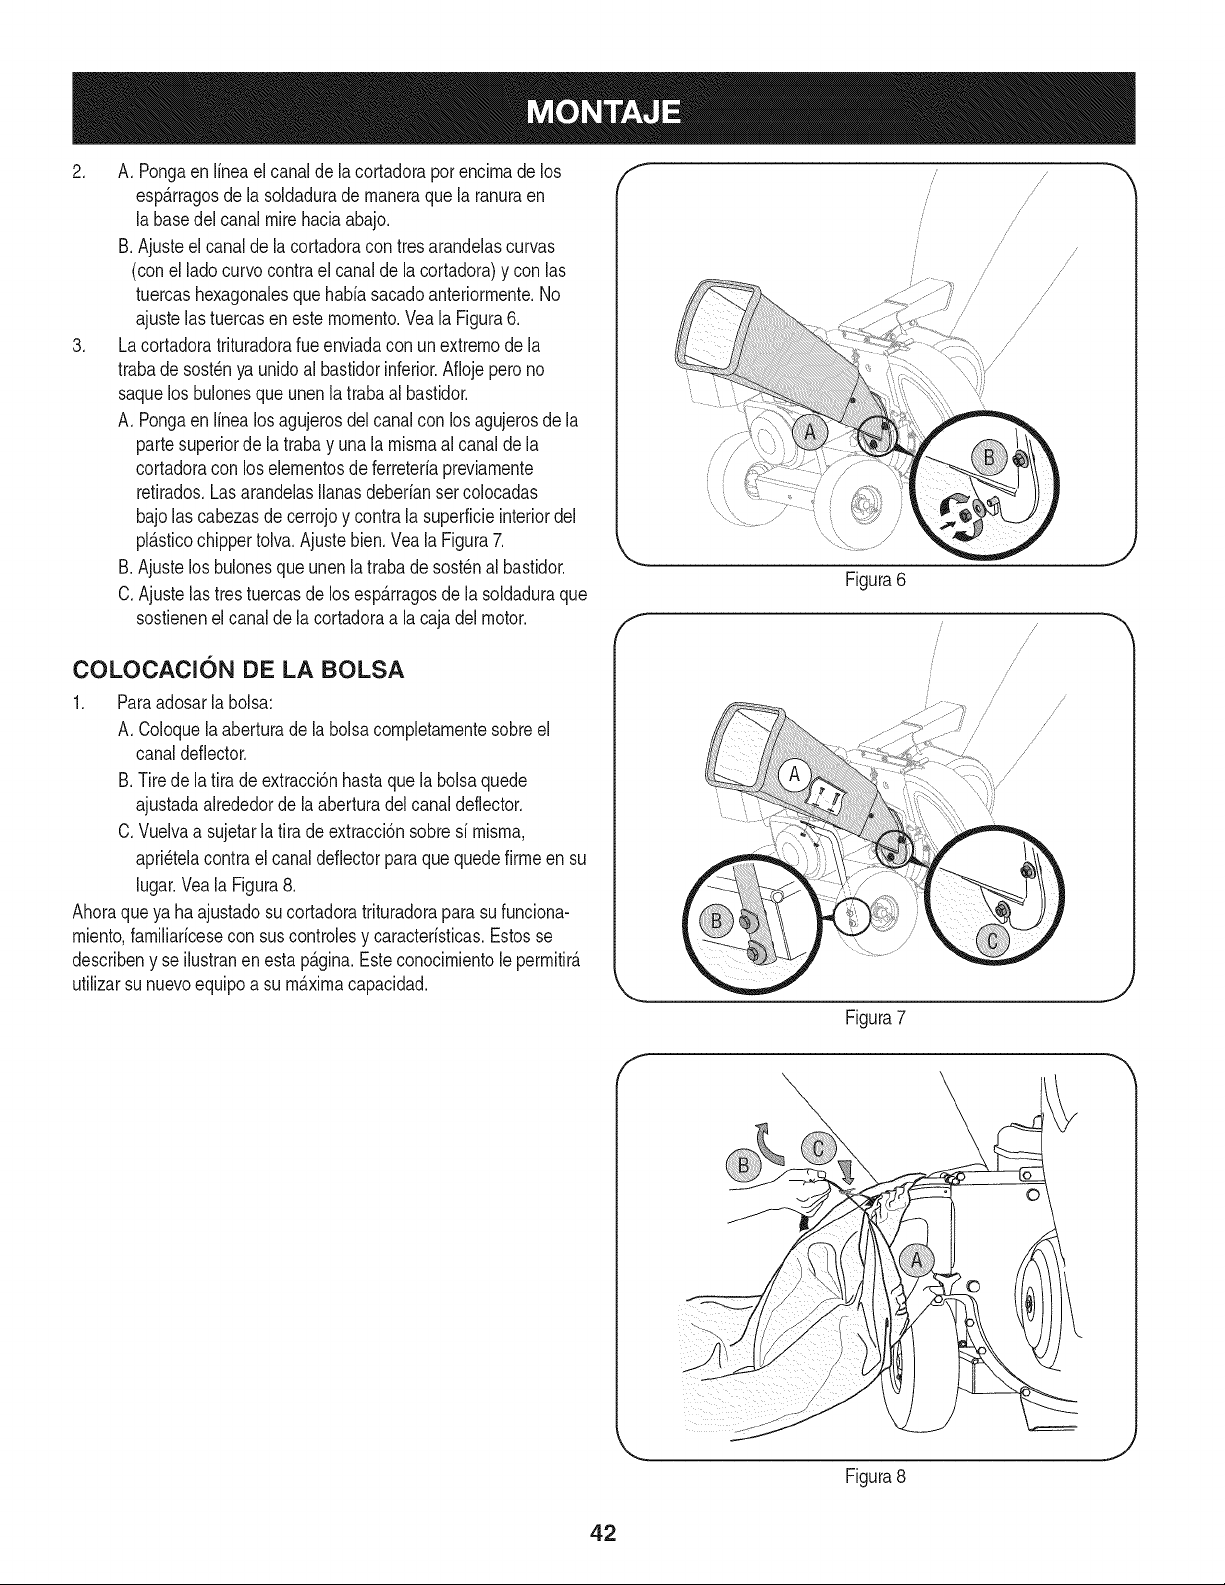
2, f
,
A, Pongaen Ifneael canalde lacortadoraporencimade los
esp_.rragosde la soldadurade maneraquela ranuraen
la basedel canalmirehaciaabajo,
B. Ajusteel canal de la cortadoracon tres arandelascurvas
(conel lado curvocontrael canalde la cortadora)y con las
tuercashexagonalesquehabfasacadoanteriormente,No
ajustelas tuercasen este momento.Vea la Figura6.
Lacortadoratrituradorafueenviadacon un extremode la
trabade sost@nya unidoal bastidorinferior.Aflojepero no
saquelosbulonesque unenla trabaal basfidor,
A, Pongaen Ifnealos agujerosdelcanalcon los agujerosde la
partesuperiorde la trabay unala mismaal canalde la
cortadoracon los elementosde ferreterfapreviamente
retirados,Lasarandelaslianasdeberianser colocadas
bajolascabezasdecerrojoy contrala superfMeinteriordel
pl&sficochippertolva.Ajustebien.Veala Figura7.
B. Ajustelos bulonesque unen la trabade sost@nal bastidor.
C,Ajustelas trestuercasde los esp_.rragosde la soldaduraque
sostienenel canalde lacortadoraa la cajadel motor,
COLOCAClON DE LA BOLSA
1. Paraadosarla bolsa:
A. Coloquela aberturade la bolsacompletamentesobreel
canaldeflector.
B. Tirede latira de extracci6nhastaque labolsaquede
ajustadaalrededorde la aberturadelcanaldeflector.
C.Vuelvaa sujetarlatira de extracci6nsobresi misma,
apri@telacontrael canaldeflectorparaque quedefirmeen su
lugar.Veala Figura8.
Ahoraqueya ha ajustadosu cortadoratrituradoraparasufunciona-
miento,familiaricesecon sus controlesy caracterfsticas.Estosse
describeny se ilustranen esta p_.gina.Esteconocimientole permitir_.
utilizarsu nuevoequipo a su m_.ximacapacidad.
/ /
7 /
i /
/
/ /
/
/
/ /
/ /
/
J
/
/
/ /
Figura6
/ /
/
/
/
Figura7
J
Figura8
42
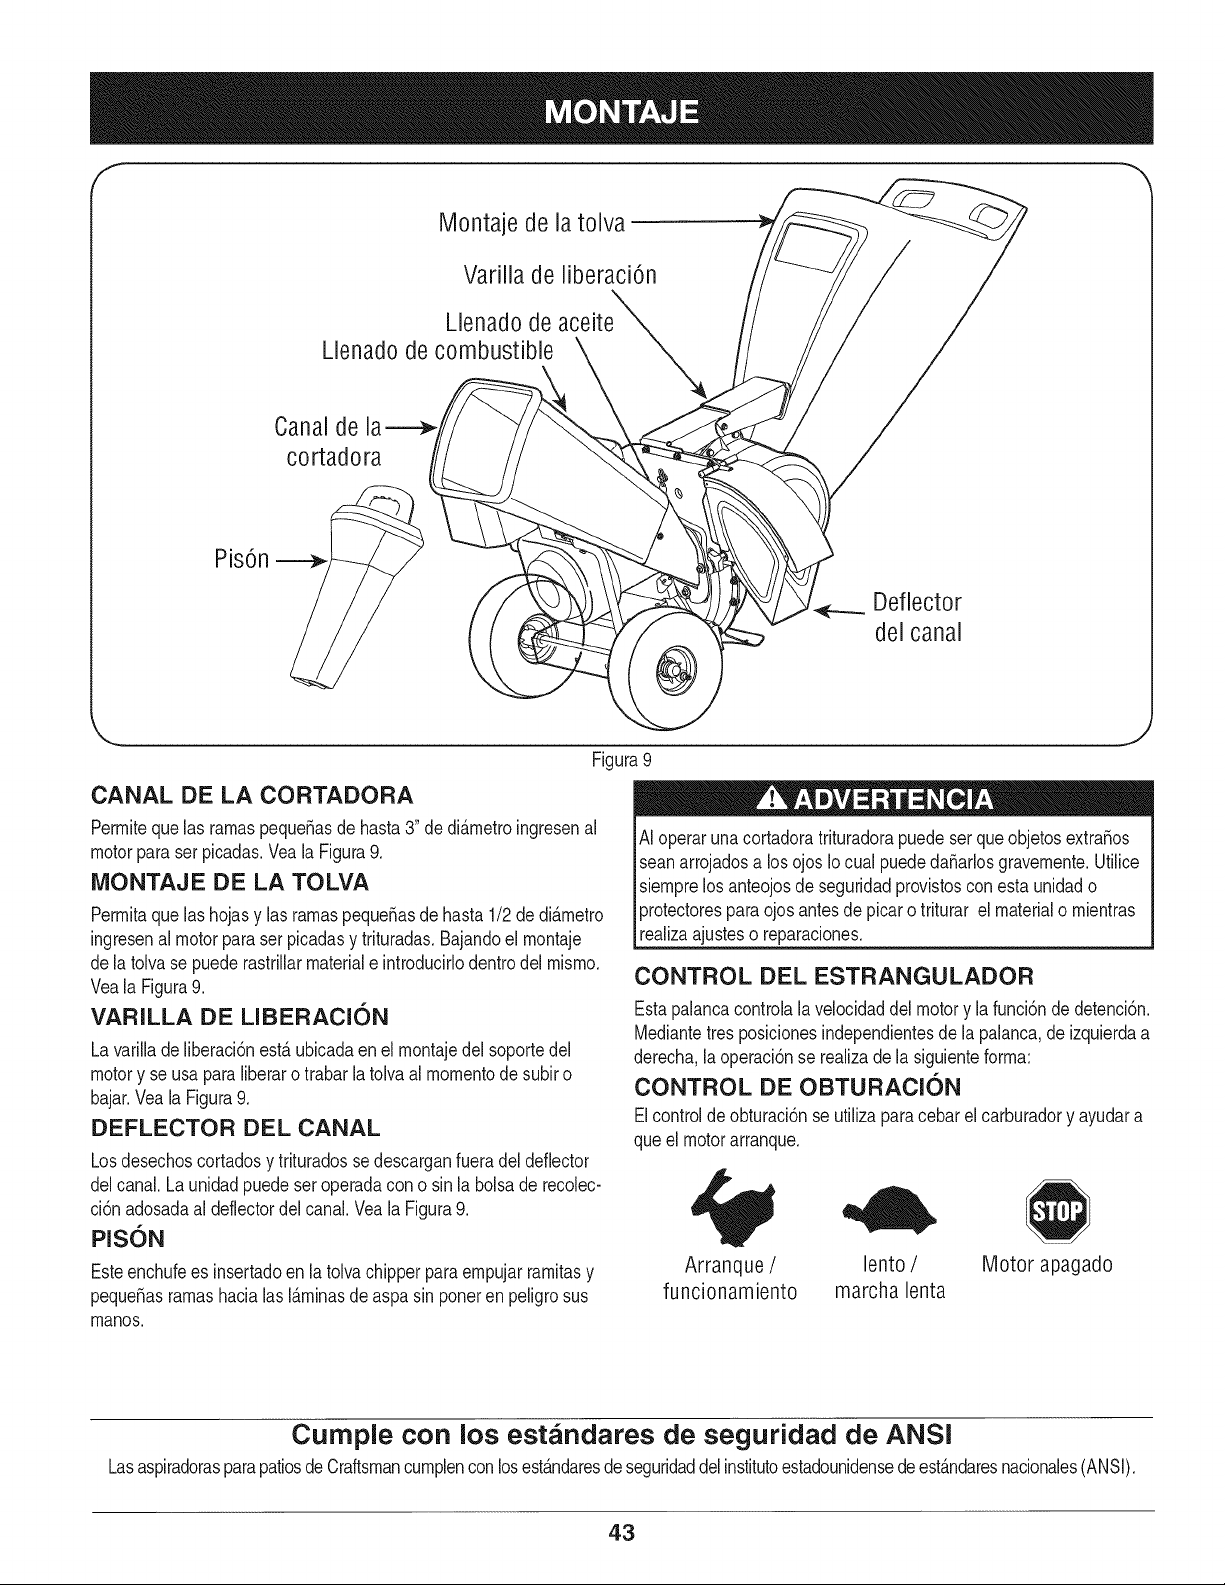
Montaje de la tolva
Varilla de liberaci6n
Llenado de aceite
Llenado de combustible
Canal de
cortadora
Pis6n
Deflector
del canal
Figura9
CANAL DE LA CORTADORA
Permiteque las ramaspeque_asde hasta3" de di_.metroingresenal
motorparaser picadas.Veala Figura9.
MONTAJE DE LA TOLVA
Permitaque lashojasy las ramaspeque_asde hasta1/2 de di_metro
ingresenal motorparaserpicadasy trituradas.Bajandoel montaje
dela tolvase puederastrillarmateriale introducirlodentrodel mismo.
Veala Figura9.
VARILLA DE LIBERACION
Lavarillade liberaci6nest,. ubicadaenel montajedel soportedel
motory se usaparaliberaro trabarla tolvaal momentode subiro
bajar.Veala Figura9.
DEFLECTOR DEL CANAL
Losdesechoscortadosy trituradossedescarganfueradeldeflector
delcanal.Launidadpuedeseroperadacono sinla bolsade recolec-
ci6nadosadaal deflectordelcanal.Veala Figura9.
PIS6N
Esteenchufees insertadoen la tolvachipperparaempujarramitasy
peque_asramashacialas I_.minasde aspasin poneren peligrosus
manos.
AI operaruna cortadoratrituradorapuedeserqueobjetosextra_os
seanarrojadosa los ojosIo cualpuededa_arlosgravemente.Utilice
siemprelos anteojosde seguridadprovistoscon estaunidado
protectoresparaojos antesde picaro triturar el materialo mientras
[rea za ajusteso reparacones.
CONTROL DEL ESTRANGULADOR
Estapalancacontrolala velocidaddel motory la funci6nde detenci6n.
Mediantetres posicionesindependientesde la palanca,de izquierdaa
derecha,la operaci6nse realizade la siguienteforma:
CONTROL DE OBTURACION
Elcontroldeobturaci6nse utiNzaparacebarel carburadory ayudara
queel motorarranque.
Arranque/
funcionamiento
lento / Motor apagado
marcha lenta
Cumple con los estandares de seguridad de ANSI
LasaspiradorasparapatiosdeCraftsmancumplenconlosestAndaresdeseguridaddelinstitutoestadounidensede estAndaresnacionales(ANSI).
43
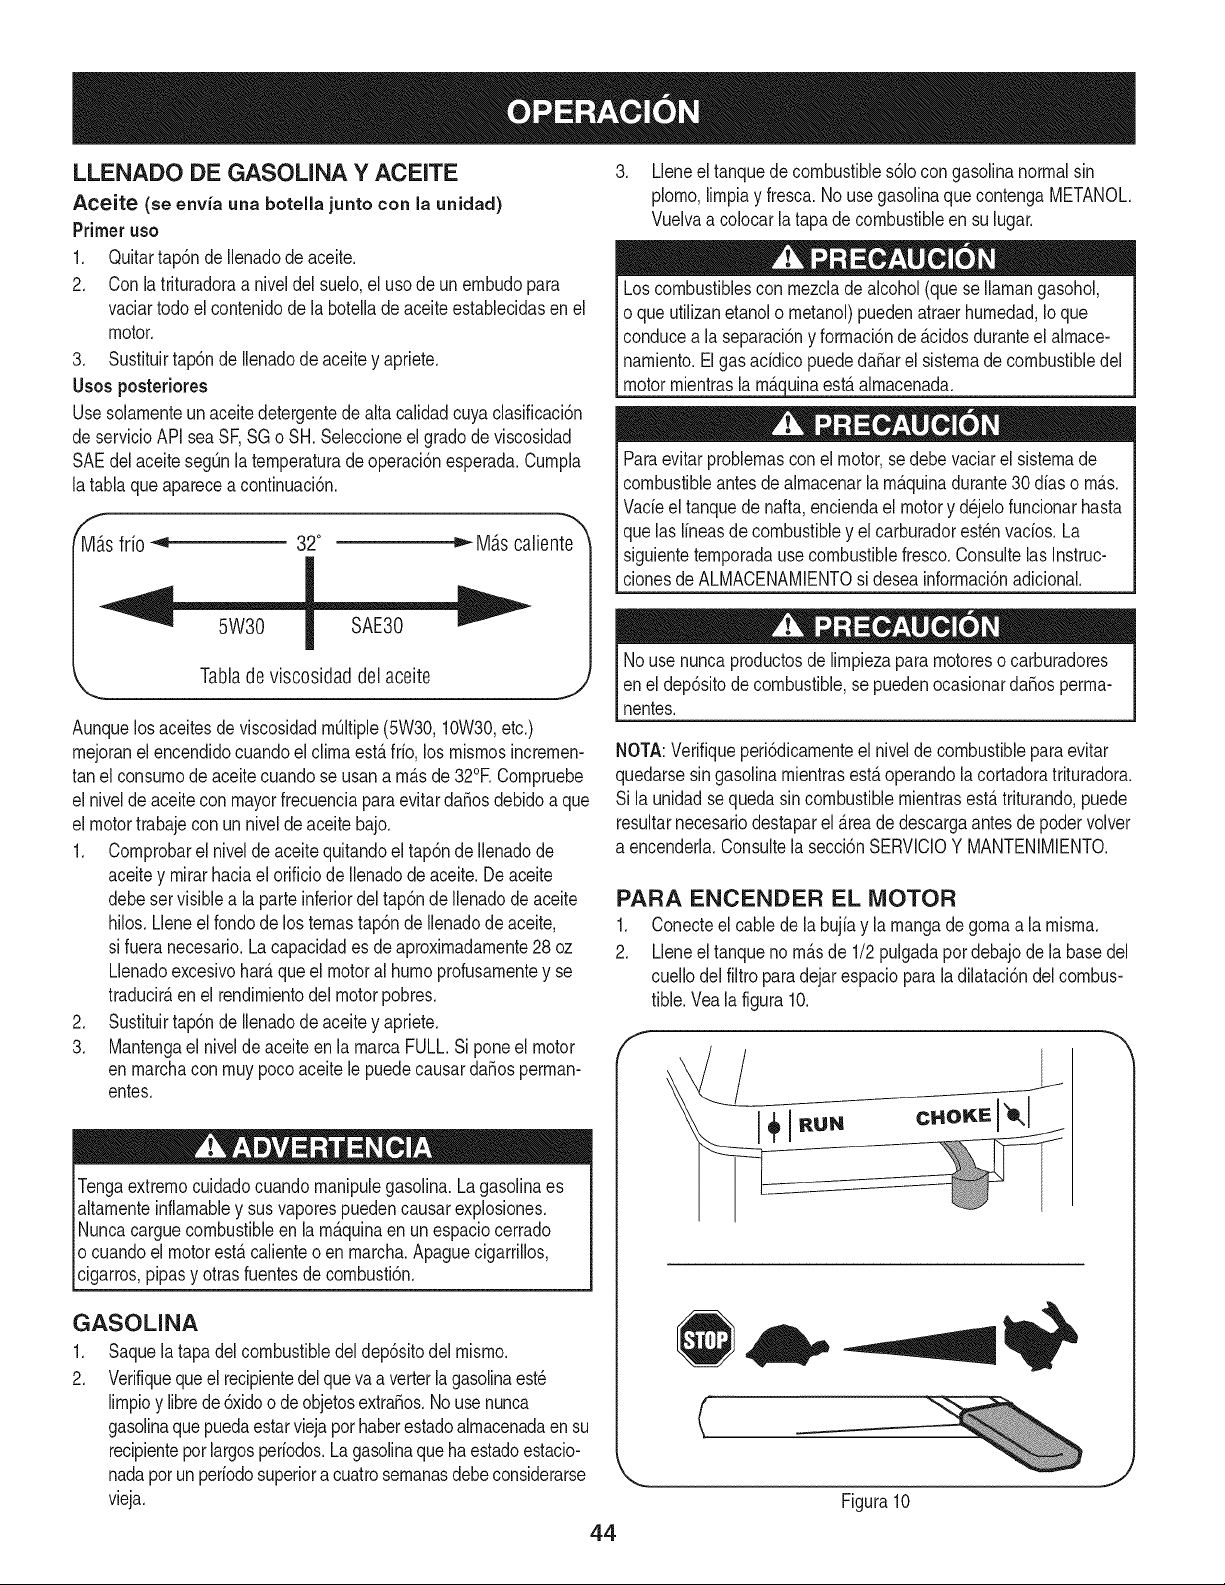
LLENADO DE GASOLINA Y ACEITE
Aceite (se env(a una botella junto con la unidad)
Primeruso
1. Quitartap6n de Ilenadode aceite.
2. Con la trituradoraa niveldel suelo,el uso de un embudopara
vaciartodoel contenidode la botellade aceiteestablecidasen el
motor.
3. Sustituirtap6nde Ilenadode aceitey apriete.
Usosposteriores
Usesolamenteun aceite detergentede alta calidadcuya clasificaci6n
de servicioAPI seaSF,SGo SH.Seleccioneelgradodeviscosidad
SAEdel aceitesegQnla temperaturade operaci6nesperada.Cumpla
latabla queaparecea continuaci6n.
_s frio -'_ 32°
Tablade viscosidad delaceite
MAscaliente
AunquelosaceitesdeviscosidadmQltiple(5W30,10W30,etc.)
mejoranel encendidocuandoelclimaestAfrio,los mismosincremen-
tanel consumode aceitecuandose usana m_sde 32°E Compruebe
el nivelde aceitecon mayorfrecuenciaparaevitar da_osdebidoa que
el motortrabajecon un niveldeaceitebajo.
1. Comprobarel nivelde aceitequitandoel tap6nde Ilenadode
aceitey mirarhaciael orificiode Ilenadode aceite.De aceite
debeservisible a la parteinferiordeltapdnde Ilenadode aceite
hilos.Lleneel rondode los temastap6nde Ilenadode aceite,
si fueranecesario.La capacidades de aproximadamente28oz
Llenadoexcesivohar_que el motoral humoprofusamentey se
traducir_en el rendimientodel motorpobres.
2. Sustituirtapdnde Ilenadode aceitey apriete.
3. Mantengael nivelde aceiteen la marcaFULL.Si poneel motor
en marchacon muy pocoaceitelepuedecausarda_osperman-
entes.
Tengaextremocuidadocuandomanipulegasolina.Lagasolinaes
altamenteinflamabley susvaporespuedencausarexplosiones.
Nuncacarguecombustibleen la m_quinaen un espaciocerrado
o cuandoel motoresta calienteo en march& Apaguecigarrillos,
cigarros,pipasy otras fuentesde combustidn.
GASOLINA
1. Saquela tapadelcombustibledel dep6sitodel mismo.
2. Verifiquequeel recipientedelquevaa verterla gasolinaest_
limpioy librede6xidoo deobjetosextra_os.Nousenunca
gasolinaque puedaestarviejapor haberestadoalmacenadaen su
recipienteporlargosperiodos.La gasolinaquehaestadoestacio-
nadapot un periodosuperiora cuatrosemanasdebeconsiderarse
vieja.
3. Lleneel tanquede combustibles61ocongasolinanormalsin
plomo,limpiay fresca.No usegasolinaquecontengaMETANOL.
Vuelvaa colocarlatapade combustibleensu lugar.
Loscombustiblescon mezclade alcohol(quese Ilarnangasohol,
o queutilizanetanolo metanol)puedenatraerhumedad,Ioque
conducea la separaci6ny formaci6nde _cidosduranteel almace-
namiento.Elgasaddico puededa_arel sistemade combustibledel
motormientraslam_q_uinaest_ almacenada.
Paraevitar problemasconel motor,sedebevaciarel sistemade
combustibleantesde almacenarla m_quinadurante30dfaso m_.s.
Vade eltanquede nafta,enciendael motory d_jelo funcionarhasta
quelas lineasde combustibley el carburadorest_nvados. La
siguientetemporadause combustiblefresco.Consultelas Instruc-
clonesde ALMACENAMIENTOsi deseainformaci6nadicional.
Nouse nuncaproductosde limpiezaparamotoresocarburadores
enel dep6sitodecombustible,se puedenocasionarda_osperma-
nentes.
NOTA:Verifiqueperi6dicamenteel nivelde combustibleparaevitar
quedarsesin gasolinamientrasest&operandola cortadoratrituradora.
Si la unidadse quedasin combustiblemientrasestatriturando,puede
resultarnecesariodestaparel &teade descargaantesdepodervolver
a encenderla.Consultela secci6nSERVlCIOY MANTENIMIENTO.
PARA ENCENDER EL MOTOR
1. Conecteel cablede la bujiay la mangade gomaa la misma.
2. Lleneel tanqueno m&sde 1/2pulgadapordebajode la basedel
cuellodel filtro paradejar espaciopara la dilataci6ndel combus-
tible.Vealafigura 10.
f
C
Figura10
44
3. Gire la v_.lvulade cierrede combustiblea la posici6nEN.
4. Muevael control del obturadorhaciael controldel regulador!'o,I
paraobturarel carburadordel motor.(Siel motorest,.tibio
la obturaci6npuedeno sernecesaria).
5. Muevala palancadecontroldel estranguladora la posici6n ,_
START/RUN(encendido/ funcionarniento,representadopor
unaliebre).Veala figura 10.
6. Situadodetr&sde la unidad,tomela rnanijadelarrancadory tire
dela cuerdahastaque sienta un tir6n.
NOTA:Escuchar_.un sonidocuandoalcanceelcornienzodelciclode
cornpresi6n.Estesonidoes causadopor el descebadoy los topesque
sonparte del rnecanisrnode la trituradorayes de esperarhastaqueel
motoralcancela rn_.xirnavelocidad.
7. Tire de la cuerdadernanerar_.piday continua.Aprietebienla
rnanijadel arrancador.Dejequelacuerdase enrosque
lentarnente.
8. Repitaestepaso,de sernecesario,hastaquese enciendael
motor.Cuandose enciendeel motorrnuevael controlde
obturacidngradualrnentelejosdel controldelestrangulador.
9. Siel motorfalla, rnuevael controldel obturadorhaciaatr_.s,en
direccidnal controldelestrangulador,y repitalos pasos5 a 8.
10. MantengaSIEMPREel control delestranguladorenposicidn
START/RUN(encendido/ funcionarniento)rnientrasoperela
cortadoratrituradora. _lJ
PARA DETENER EL MOTOR
1. El reguladorde movirnientocontrolala palancaparareducirla
rnarcha(tortuga)_ de la posici6n.Siernpreque posible,
gradualrnentereduzcala velocidadde motorantesde pararel
motor.
2. Muevalas palancasdecontroldel reguladora la posici6n
STOP(detencidn)uOFF(apagado).
3. Gire la v_.lvulade cierrede combustiblea la posicidnOFR
4. Desconecteel cabledela bujfay tierracontrael motorparaevitar
el arranqueaccidentalrnientrasel equipoest,. desatendido.
TRITURACION
Eldesechoquese acurnulaen los patioscornoporejernplolas hojas
y las agujasde los pinospuedeser colocadoenla tolvaparatriturarlo.
Despu_sdeprocesarel materialcon la cuchillade la trituradoray
dedesgranar,esernpujadofueradel deflectordelcanaly, si est,.
instalada,haciael interiorde la bolsade recolecci6nde desechos.
Respetelas siguientespautascuandotrituredesechosque se
acurnulanen lospatios:
• $61outilicela rn_.quinapara triturarel materialquese encuentra
enun pationormal(hojas,rarnas,picas de los pinos,etc.).
• Evitarla trituracidnlasplantasfibrosas,cornolasvidesde
tornate,hojasde palrna,etc,hasta que est_ncornpletarnente
secos.Frescasvisas notriturebieny tiendena envolverseen
todoel irnpulsory flails.
• Coloquecantidadesrazonablesde desechosen la tolvaporvez.
Nosobrecarguelatolva.
Perrnitaque el materialque seencuentraen la tolva sea atrafdo
hastalas cuchillasy trituradoantesde agregarrn_.sdesechos
dentrode la rnisrna.Deno hacerlose puedetaparla tolva,el
deflectordel canalo detenerel motor.
CORTE
Sepuedeperrnitirel ingresode rarnasdehasta3" de di_.rnetroen el
canalde la cortadora.Respetelassiguientespautasparael cortede
las rarnas:
• Mantengaarnbasrnanosfirrnernenteen la rarnaa rnedidaque la
colocadentrodel canalde la cortadora.
• Noponganuncarn_.sdeunararnadentrodelcanaldelacortadorapor
vez.
• Enel canalde lacortadoras61osepuedecolocarrarnas(de
rnadera).
• Apliquepresi6ninterrnitente(fuerza,en irnpulsoscortos)cuando
coloquerarnasrn_.slargas(de3 pulgadasdedi_.rnetro)dentro
del canalde la cortadoraparaevitar inundaro ahogarel motor.
IMPORTANTE:Nuncacoloquerarnascon undi_.rnetrosuperiora tres
(3)pulgadasdentrodel canalde lacortadora.Dehacerlose pueden
daSargravernentelas cuchillasde corte,eldesgranadoo el motorde
launidad.
NOTA:Pararnejoresresultados,operesiernprela unidadcon
cuchillasde corteafiladas.Si se produceuna reducci6napreciable
en el rendirnientornientrasse cortanrarnas,se debe reernplazarlas
cuchillasde la cortadora.
C6MO BAJAR EL MONTAJE DE LA TOLVA
1. Conunarnanotomela rnanijaquese encuentraen la parte
superiordel rnontajede la tolvay lev_.ntelalevernente.
2. Conlaotra rnanotire haciaafuerade lavarillade liberaci6ny
bajeel rnontajede la tolvahasta el piso.
C6MO DESCARGAR LA BOLSA
1. Sueltela cuerdade extracci6ny aflojela bolsade laaberturadel
canaldeflector.
2. Vacfela bolsay vuelvaa colocarlaenla aberturadelcanal de
descarga.Tire de la cuerdahastaque la bolsaest_ajustada
alrededordela aberturadelcanaly sujetela cuerdaapret_.ndola
contraelcanaldeflector.
IMPORTANTE:La pantallade desgranadoest,. ubicadadentrodela
caja en la zonade descarga.Si se tapala pantallade desgranado,
s_.quelay Ifrnpielacornose indicaen lasecci6nServicioy Man-
tenirniento.Paraobtenerel rnejorresultadotarnbi_nes irnportante
rnantenerafiladala cuchilladela cortadora.
45

LISTA DE iVlANTENIIVllENTO
Antesde realizarcualquiertipo del rnantenirniento/servicio,suelte
todoslos rnandosy pare el motor.Esperehasta quetodas las partes
de rnovirnientohayanvenidoa unaparadacornpleta.Desconecteel
alarnbredebujiay b_.selocontrael motorparaprevenirel cornienzo
involuntario.SiernpreIlevepuestoscristalesinastillablesdurantela
operaci6no realizandocualquierajuste o reparaciones.
CadaUso
los 5- 8 horas
25 horas
Anualrnenteo 50 horas
Anualrnenteo 100horas
Antesde Alrnacenaje
1. Niveldel aceitede motor
2. Hardwaresueltooausente
3. Unidadymotor
1. El aceitede motor
1. El aceitede rnotort
2. Filtrode aire
3. Encadenarnientosde control
y pivotes
1. El aceitede motor
2. El silenciador
1. Bujia
1. Sisternadecombustible
Bajocarga pesadao en ternperaturasaltas
Sigalalistade rnantenirnientodadaabajo.Estacarta describepautas
de servicios61o.Usela colurnnade Troncode Serviciopara guardar
la pistade tareasdernantenirnientocornpletadas.Localizarel rn_.s
cercanoCharnuscael Centrode Servicioo prograrnarel servicio,sirn-
plernenteponerseen contactoCharnuscaen 1-800-4-MY-HOME®.
1. Cornprobar
2. Aprieteo sustituir
3. Lirnpio
1. Carnbio
1. Carnbio
2. Sustituyen
3. Lubricaci6nconpetr61eoligero
1. Carnbio
2. Inspeccionar
1. Clean,checkand resetgap,or
replacesparkplug.
1. El motordirigidohasta que esto se
parea faltadelcombustibleoaSada
un aditivodegasolinaal gas en el
tanque.
Siernpredetengael motory desconecteelcable dela bujiaantes
de hacercualquiertipo de mantenirnientoo ajustes.Utilicesiernpre
pnteojos de seguridaddurantela operaci6no rnientrasajusta o
[reparaeste equipo.
RECOMENDACIONES GENERALES
• Alwaysobserveall safety rulesfoundon productlabelsandin
thisoperator'smanualwhenperformingany maintenance.Safety
rulescan be foundonthe productlabelsandin thisOperator's
Manualbeginningon page36.
• Lagarantiade esta cortadoratrituradorano cubreelernentosque
banestadosujetosal rnalusoo negligenciadel operador.Para
recibirel reernbolsototalde lagarantia,el operadordeber_,dar
rnantenirnientoal equipotal y cornose indicaen este manual.
• Algunosajustesdeben ser realizadosperi6dicarnentepara el
mantenirnientoadecuadodela unidad.
• Reviseperi6dicarnentetodos los sujetadoresy cornpruebeque
est_nbienajustados.
iVlANTENIlVlIENTO DE MOTOR
Servicio A La Bujia
Lirnpielabujiay ajusteelespacioa 0.030"al rnenosunavezpor
estaci6n;sustituyacada 100 horasde la operaci6n.
f
2
1,
2.
3.
\
3
Espaciode 0,030 pulg (0,76mm)
Electrodo
Porcelana
Figura11
J
• Arealirnpiaalrededorde labasede bujia. Nolije labujfa.Se
debenlirnpiarlasbujfasrnedianteraspadootalladocon cepillo
de alarnbrey lavadocon un solventecornercial.
• Quitee inspeccionelabujfa. Cornpruebeel huecoparaasegu-
rarsequees puestoen .030".Veala Figura11.
• Sustituyala bujiasi loselectrodosson picados,quernados,o la
porcelanaes rajada.
46
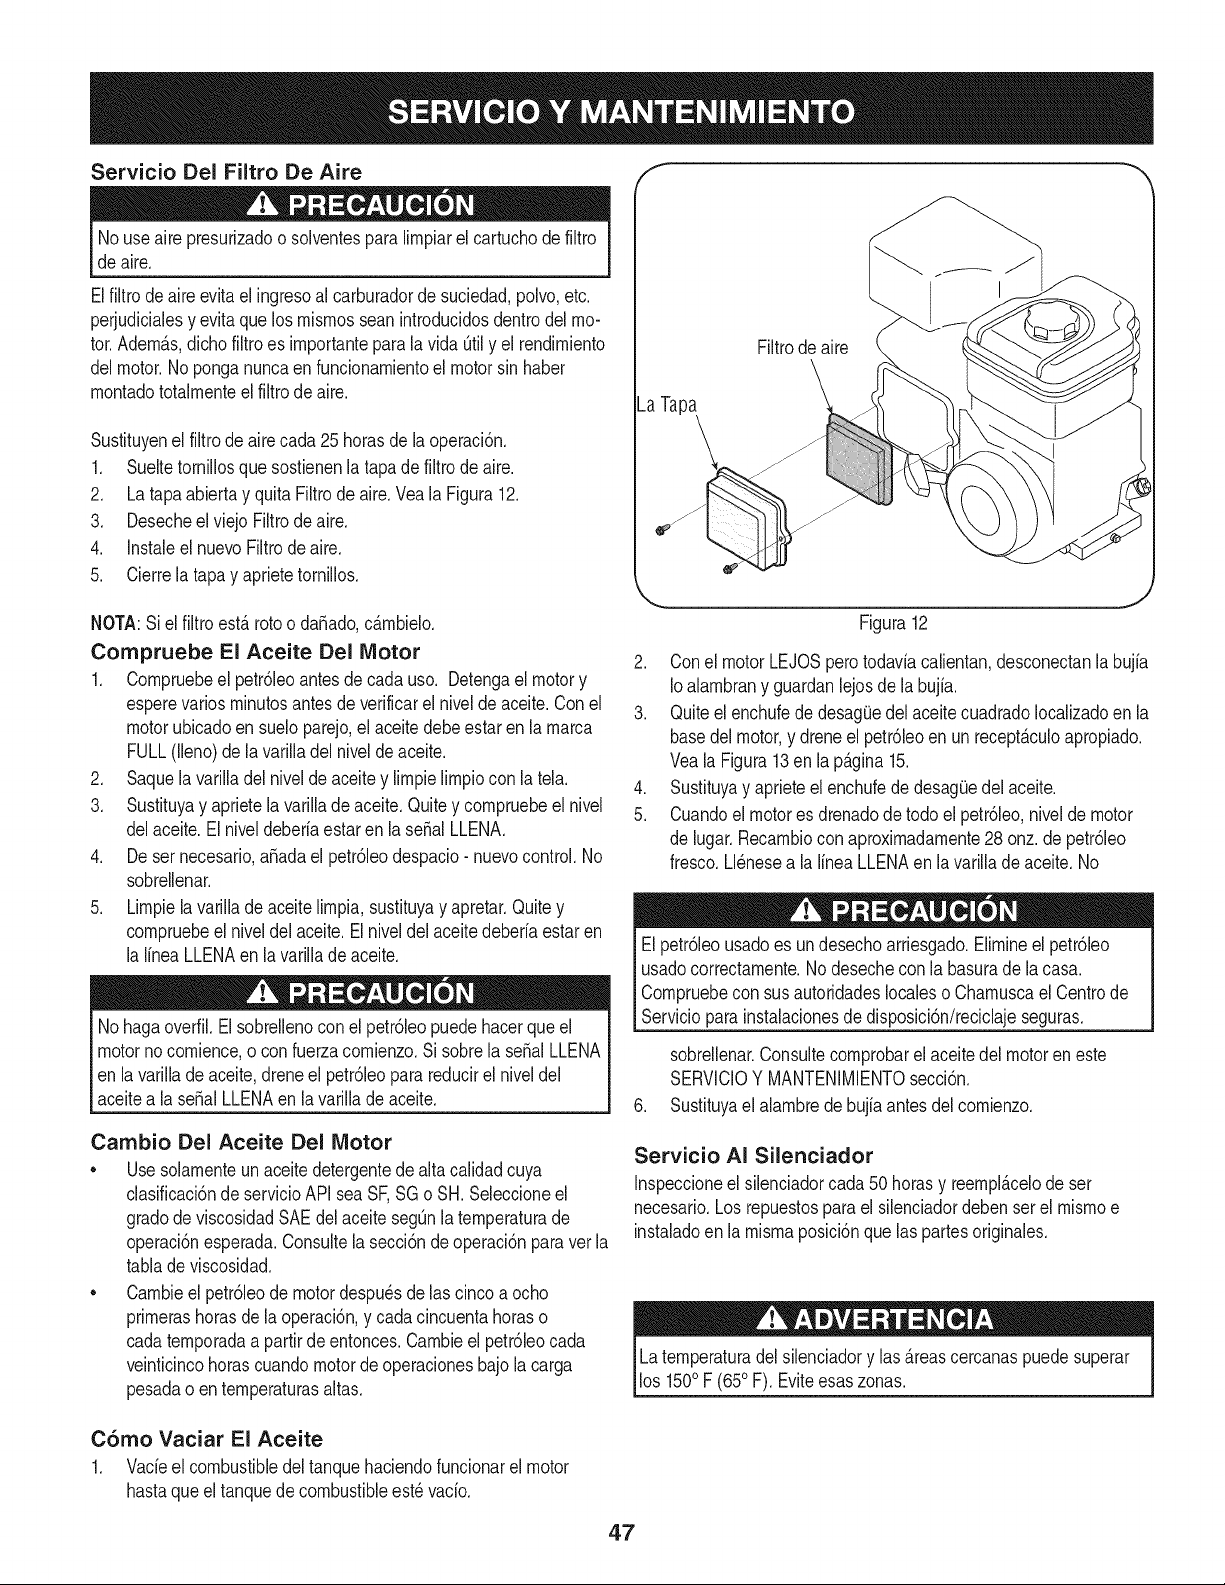
Servicio Del Filtro De Aire f
Nouse ake presurizadoo solventesparalimpiarel cartuchode filtro
de aire,
Elfiltrode aireevitael ingresoal carburadorde suciedad,polvo,etc,
perjudicialesy evitaque losmismosseanintroducidosdentrodelmo-
tor.Adem_.s,dichofiltro es importantepara la vida Qtily el rendimiento
delmotor.Noponganuncaen funcionamientoel motorsin haber
montadototalmenteel filtrode ake.
Sustituyenel filtrode airecada 25horasde la operaci6n.
1. Sueltetornillosquesosfienenla tapadefiltrode aire.
2, La tapa abiertay quita Filtrodeaire,Veala Figura12,
3. Desecheel viejo Filtrode aire.
4. InstaleelnuevoFiltrode ake.
5. Qerre la tapay aprietetornillos.
NOTA:Si el filtro estArotoo darado, cAmbielo,
Compruebe El Aceite Del Motor
1. Compruebeel petr61eoantesdecada uso. Detengael motory
esperevariosminutosantesde verificarel nivelde aceite.Conel
motorubicadoen sueloparejo,el aceitedebeestaren la marca
FULL(lleno)dela varilladel niveldeaceite.
2. Saquela varilladel niveldeaceitey limpielimpiocon latel&
3. Sustituyay aprietela varillade aceite.Quitey compruebeel nivel
delaceite.El niveldeberiaestaren laserial LLENA.
4. De set necesario,arada el petr61eodespacio-nuevocontrol.No
sobrellenar.
5. Limpielavarillade aceite limpia,sustituyay apretar.Quitey
compruebeel niveldel aceite.El niveldelaceitedeberiaestaren
la lineaLLENAenla varillade aceite.
Nohaga overfil.Elsobrellenocon el petr61eopuedehacerque el
motornocomience,o con fuerzacomienzo.Si sobrela seral LLENA
en la varillade aceite,dreneel petr61eopara reducirel niveldel
aceitea la seral LLENAen la varillade aceite.
Cambio Del Aceite Del Motor
• Usesolamenteun aceitedetergentede altacalidadcuya
clasificaci6nde servicioAPI seaSF,SGo SH.Seleccioneel
gradode viscosidadSAEdel aceitesegQnlatemperaturade
operaci6nesperada.Consultela secci6ndeoperaci6nparavetla
tablade viscosidad.
• Cambieelpetr61eode motordespu6sde las cinco a ocho
primerashorasde laoperaci6n,y cadacincuentahoraso
cadatemporadaa partirde entonces.Cambieel petr61eocada
veinticincohorascuandomotordeoperacionesbajolacarga
pesadao entemperaturasaltas.
C6mo Vaciar El Aceite
1. Vacieel combustibledeltanquehaciendofuncionarel motor
hastaqueel tanquede combustibleest6vacio.
Filtrode aire
La )a
Figura12
2. Conel motorLEJOSperotodaviacalientan,desconectanla bujia
Ioalambrany guardanlejosde labujia.
3. Quiteel enchufede desag(Jedel aceitecuadradoIocalizadoenla
basedel motor,y drene el petr61eoen un recept_.culoapropiado.
Veala Figura13en la p_.gina15.
4. Sustituyay aprieteel enchufede desagQedel aceite.
5. Cuandoel motores drenadode todo el petr61eo,nivelde motor
de lugar.Recambioconaproximadamente28onz.de petr61eo
fresco.LI6nesea lalineaLLENAen lavarillade aceite. No
El petr61eousadoes un desechoarriesgado.Elimineel petr61eo
usadocorrectamente.No desecheconla basurade la casa.
Compruebeconsusautoridadeslocaleso Chamuscael Centrode
Servicioparainstalacionesdedisposici6n/reciclajeseguras.
sobrellenar.Consultecomprobarel aceitedel motoren este
SERVlCIOY MANTENIMIENTOsecci6n.
6. Sustituyael alambrede bujia antesdel comienzo.
Servicio AI Silenciador
Inspeccioneel silenciadorcada50horasy reempl_.celode ser
necesario.Los repuestosparael silenciadordebenserel mismoe
instaladoen la mismaposici6nque laspartes originales.
Latemperaturadel silenciadory las _.reascercanaspuedesuperar
los 1500F (650F). Eviteesas zonas.
47
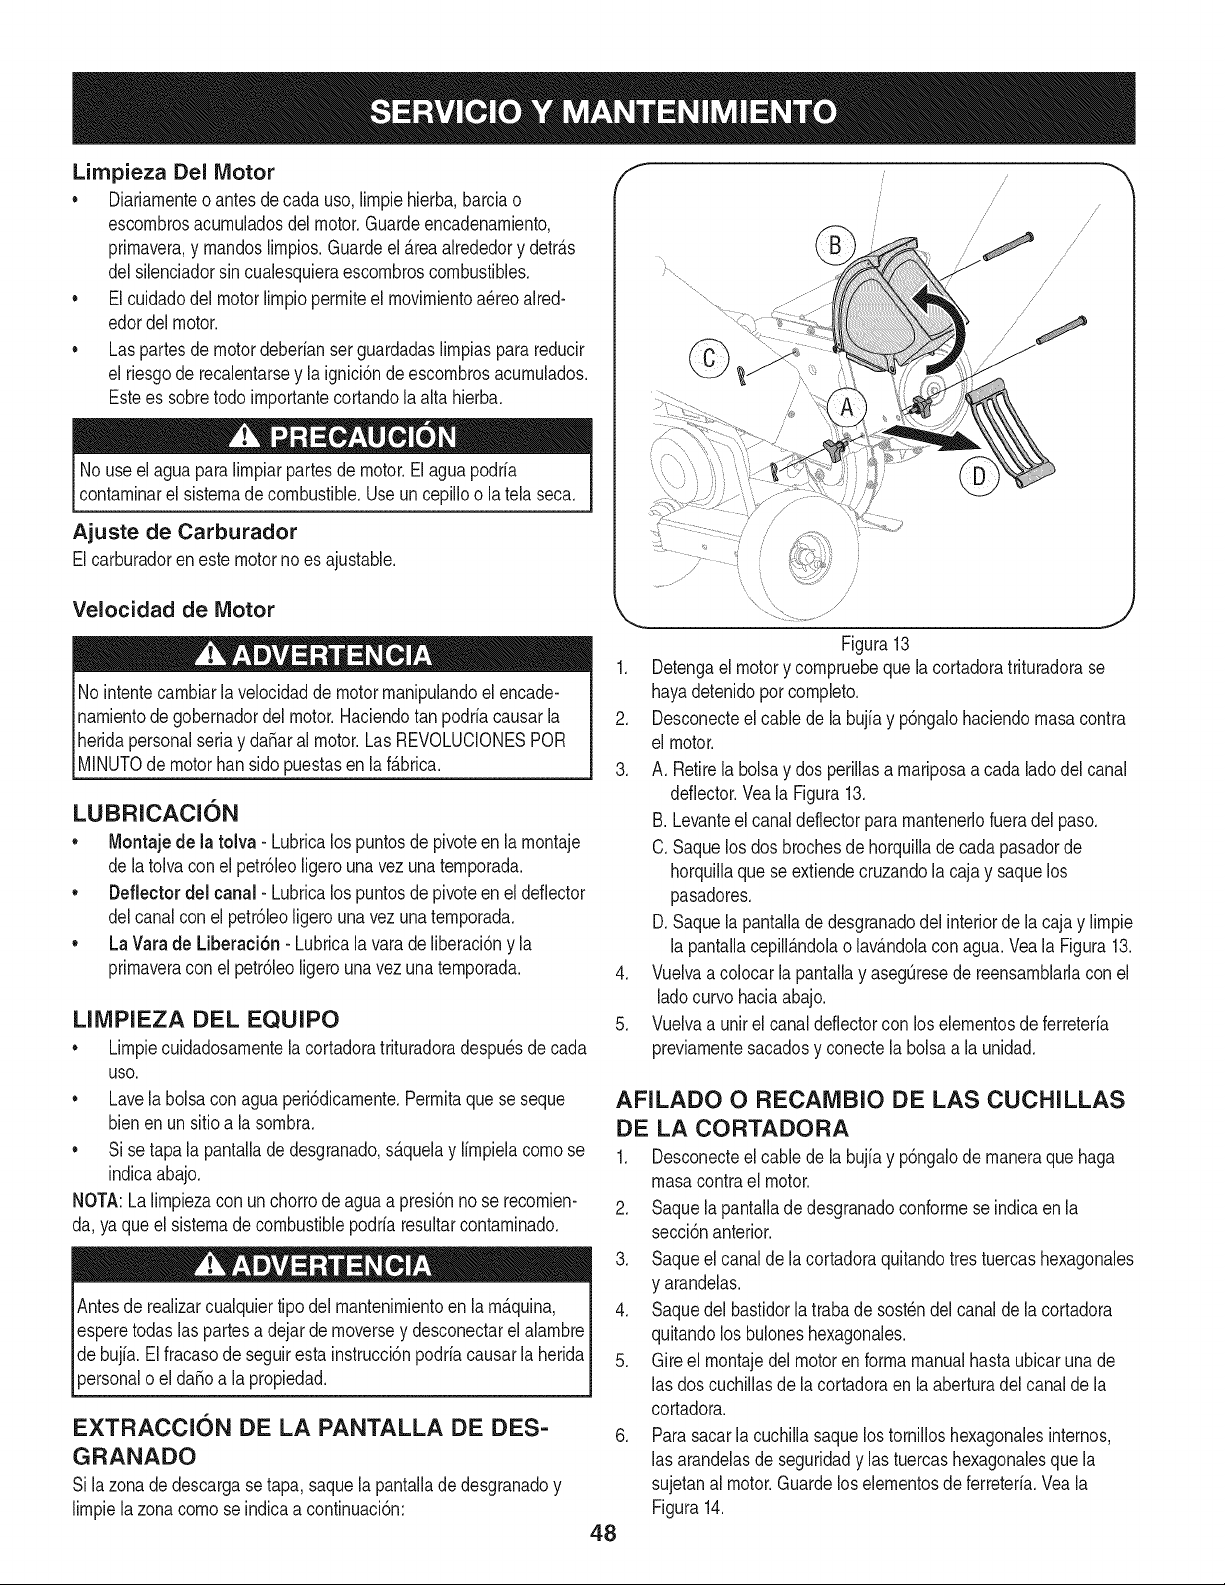
Limpieza Del Motor
• Diariarnenteoantesdecada uso,lirnpiehierba,barciao
escornbrosacurnuladosdelmotor.Guardeencadenarniento,
prirnavera,y rnandoslirnpios.Guardeel &reaalrededory detr&s
delsilenciadorsin cualesquieraescornbroscombustibles.
• Elcuidadodel motorlirnpioperrniteel rnovirnientoa_reoaired-
edordelmotor.
• Las partesde motordeberfanserguardadaslirnpiasparareducir
el riesgode recalentarsey la ignici6nde escornbrosacurnulados.
Estees sobretodo irnportantecortandola alta hierba.
No useel aguapara Nrnpiarpartesde motor.Elaguapodrfa
contarninarel sisternadecombustible.Useun cepiNoo la tela seca.
Ajuste de Carburador
Elcarburadorenestemotornoes ajustable.
Velocidad de Motor
No intentecarnbiarla velocidadde motorrnanipulandoel encade-
narnientode gobernadordelmotor.Haciendotan podrfacausarla
heridapersonalseriay da_aral motor.Las REVOLUCIONESPOR
IM NUTOde motorbans do puestasen a f_brca.
LUBFIICACI6N
• Montajede la toIva - Lubricalospuntosde pivoteen la rnontaje
de latolvaconel petr61eoNgerouna vez una ternporada.
• Deflector del canal- Lubricalos puntosde pivoteen eldeflector
delcanalcon el petr61eoNgerouna vez una ternporada.
• La Varade Liberaci6n - Lubricalavara de liberaci6ny la
prirnaveracon el petr61eoligerounavez unaternporada.
LIMPIEZA DEL EQUIPO
• Lirnpiecuidadosarnentela cortadoratrituradoradespu_sde cada
USO.
• Lavela bolsaconagua peri6dicarnente.Perrnitaquese seque
bienenun sitioa lasornbra.
• Si setapa la pantallade desgranado,s&quelay Ifrnpielacornose
indicaabajo.
NOTA:La Nrnpiezaconun chorrode aguaa presi6nno se recornien-
da, yaque elsisternadecombustiblepodrfaresultarcontarninado.
Antesde realizarcualquiertipo del rnantenirnientoen la rn&quina,
esperetodas laspartesa dejarde rnoversey desconectarel alarnbre
de bujfa.El fracasode seguirestainstrucci6npodrfacausarla herida
)ersonalo el da_oa lapropiedad.
EXTRACCION DE LA PANTALLA DE DES-
GRANADO
Si lazonade descargase tapa,saquela pantaNade desgranadoy
Nrnpiela zona cornose indicaa continuaci6n:
f
/
/
/
/ /
i /
©
//
/
Figura13
1. Detengael motory cornpruebeque la cortadoratrituradorase
hayadetenidopot cornpleto.
2. Desconecteel cablede la bujfay p6ngalohaciendornasacontra
el motor.
3. A. Retirela bolsay dos perillasa rnariposaa cada ladodel canal
deflector.Veala Figura13.
B. Levanteel canaldeflectorpararnantenerlofueradelpaso.
C.Saquelos dos brochesde horquiNade cadapasadorde
horquiNaque se extiendecruzandola cajay saquelos
pasadores.
D.Saquela pantaNadedesgranadodel interiorde la caja y Nrnpie
la pantallacepiN_ndolao lav_ndolacon agua.Veala Figura13.
4. VuelvaacolocarlapantaNay asegOresedereensarnblarlacon el
ladocurvohaciaabajo.
5. Vuelvaa unirel canaldeflectorcon los elernentosde ferreterfa
previarnentesacadosy conectela bolsaa la unidad.
AFILADO O RECANIBIO DE LAS CUCHILLAS
DE LA CORTADORA
1. Desconecteel cablede la bujfay p6ngalode rnaneraque haga
rnasacontrael motor.
2. Saque la pantallade desgranadoconforrnese indicaen la
secci6nanterior.
3. Saqueel canalde lacortadoraquitandotrestuercashexagonales
y arandelas.
4. Saquedel bastidorla trabade sost_ndel canalde la cortadora
quitandolosbuloneshexagonales.
5. Gire el rnontajedel motoren forrnamanualhasta ubicarunade
las dos cuchiNasde lacortadoraen la aberturadel canalde la
cortadora.
6. Parasacarla cuchillasaquelos torniNoshexagonalesinternos,
las arandelasde seguridady las tuercashexagonalesque la
sujetanal motor.Guardelos elernentosde ferreterfa.Vea la
Figura14.
48

NOTA:UseunaIlavehexagonalde 3/16" (Allen)en el exteriorde la
cuchillay una Ilavede tubode 1/2" (o cubo) en el interiordel motor.
Sostengala IlaveAllenfirrnernentey gire la Ilavede tubo (o cubo)para
aflojarla tuerca.
7. Coloqueunacuchillade repuesto(NQrnerode pieza742-0544)
con loselernentosdeferreteriaqueextrajoanteriorrnenteo
af[lela.
IMPORTANTE:Cuandoafilala cuchilla,prot_jaselas rnanosutilizando
guantes.Sigael _.ngulooriginalde afiladoy asegQresedeextraeruna
cantidadigualde cadacuchilla.
8. Parareernplazarla otracuchilla,gireel motorparaexponerla
segunacuchillay repitalos pasosanteriores.
NOTA:AsegQresede quelas hojasse volvieroncon el hordeafilado
enla rnisrnadirecci6ncornocuandose retiran.Par de hardwarea
250- 300pulgadasIbs.
AFILADO O CANIBIO DE LA CUCHILLA DE
LA TRITURADORA
1. Detengael motory verifiquequetodaslas piezasrn6vilesse
hayandetenidoporcornpleto.
Lascuchillasde trituraci6ny la cuchillade corte del motorsonfilosas.
Utiliceguantesdetrabajode cueroparaprotegerselas rnanos.
2. Desconecteel cabledela bujiay p6ngalode rnaneraquehaga
rnasacontrael motor.
3. Baje el rnontajede la tolva y trabela caja.
4. Saquelas seis tuercashexagonalesde seguridady lasarandelas
planasde los esp_.rragosde la soldadurade la caja de des-
granado.Guardeloselernentosde ferreteria.
5. Conrnuchocuidadosepareel rnontajedela tolvadel rnontajedel
motory retirela placade sost_n.
NOTA:Cuandovuelvaa rnontarla placade sost_ncornpruebeque la
aletagrabadamirehaciaadentrohaciael motor.
6. Saquelas dos perillasa rnariposaque unenel canaldeflectory
lev_.ntelo.
7. Inserteun tubo de 1/2"o 3/4" de di_.rnetroa travesde la pantalla
dedesgranadohaciael interiordelmotorparaevitarqueel
rnisrnogireo saquela pantallade desgranadoe inserteuntrozo
de rnaderaen la aberturadel canal.
8. A. Saque losdos tornilloshexagonalesinternos,lasarandelasde
seguridady las tuercasde seguridadhexagonalesque sujetan
la cuchillade latrituradoraal motor.
B. Saqueel perno hexagonal,la arandelade seguridady la
arandelaplanaparaliberartotalrnentela cuchillade la
trituradora.Vea la Figura15.
IMPORTANTE:Cuandovuelva a rnontarlacuchilladetrituraci6n
ajusteel bul6ncentralentre550 y 700 pulgadaslibrasy los dos
bulonesextedoresentre 250y 350pulgadaslibras.
/
/
Figura14
SueldeStuds
,_. Mayal ......... j
Figura15
NOTA:UseunaIlavehexagonalde 3/16"(Allen)en el exteriorde
lacuchillade latrituradoray unaIlavedetubo de 1/2"(o cubo)en
el interiorde la cuchilladela trituradora.Sostengala IlaveAllen
firmernentey gire la Ilavede tubo (o cubo)paraafiojarla tuerca.Tenga
precauci6ncuandosaquelacuchillaparaevitarel contactocon los
esp_.rragosde la soldadurade la caja.
IMPORTANTE:Cuandoafile la cuchilla,sigael _.ngulooriginalde
afiladocornogala. Es desurnairnportanciaquecadaextrernode
cortesea desbastadode igual rnaneraparaevitarque la cuchilla
quededesequilibrada.Si lacuchillaest,.desequilibradaproducir_.
unavibraci6nexcesivacuandogirea alta velocidady puededa_ar la
unidad.Sepuedeprobarlacuchillabalance_.ndolasobreundestornil-
ladoro clavo.Saquemetaldelladopesadohastaque quedebien
balanceada.
49
Nuncaalrnacenecortadoratrituradoracon elcombustibleenel
tanquedentroo en _.reasrnalventiladasdondelos vaporesde
combustiblepuedenalcanzarunallamaabierta,la chispa,o el
pilotocornoenun homo,calentadorde agua, secadorde ropa,o
aplicaci6nde gas.
PREPARACI6N DEL MOTOR
Yaquelos rnotoresalrnacenaronrn_.sde 30 dfas:
LA PREPARACION LA CORTADORA
TRITURADORA
1. Parairnpedira lagornaforrnarseen el sisternadecombustible
oen partesde carburador,dirijasel motorhastaque esto se
parea faltadel combustibleo aSadirun aditivodegasolinaal
gasen el tanque.Si usted usaunaditivode gas,dirigeelmotor
durantevariosrninutospara poneren circulaci6nel aditivoporel
carburador-- despu_squeel motory elcombustiblepuedenser
alrnacenadoshastaseisrneses.
2. Mientrasel motorest,. todavfacaNente,carnbiarel aceite.Wase
Carnbiode aceitedel motoren la secci6nSERVICIOY MANTEN-
IMIENTO.
3. Retirela bujfay viertaaproxirnadarnente1oz.(30 rnl)de aceite
de motorlirnpioen el cilindro.Saqueel arranquevariasveces
paradistribuirel petr61eo,y volvera instalarlabujfa.
4. Lirnpieel motorde escornbrossuperficiales.
• Alrnacenandocortadoratrituradoraen un cobertizode alma-
cenajeno ventiladoo rnet_.lico,el cuidadodeberfasertornado
a inoxidablelassuperficiesno pintadas.Usandoun petr61eo
ligeroo silicona,cubrael equipo,sobretodo cualquierprirnavera,
portes,y cables.
• Quitetoda lasuciedaddel exteriordemotory equipo.
• Siga recornendacionesde lubricaci6n.
• Equipode tiendaen un_.realirnpia,seca. Noalrnaceneen un
_.readonde el equipoest,. presentequepuedeusar unpilotoo
tieneun cornponenteque puede creeunachispa.
5O
hayanvenidoa una paradacornpleta.Desconecteel alarnbrede bujfay b_.selocontrael motorparaprevenirel cornienzoinvolun-
SiernpreIlevepuestoscristalesinastillablesdurantela operaci6no realizandocualquierajusteo reparaciones.
Elmotornoarranca
1. La palancadel reguladornoest,.en la
posici6nde arranquecorrecta
2. La palancade obturaci6nnoest,.en la
posici6nON(encendido)
3. Se ha desconectadoel cablede la bujia
4. La bujia no funcionacorrectarnente
5. El tanquedecombustibleest,. vado o el
combustiblees viejo
6. No se puedetirarde lacuerdade retroceso
7. El motor sedesbord6.
1. La unidadest,. funcionandoenla posici6n
CHOKE(obturaci6n)
2. El cablede la bujfaest,.fiojo
3. EIcombustibleesviejo
4. Aguao suciedaden el sisternadel combus-
tible
Elmotorfuncionade rnanera
err_.tica
5. El filtro de aire est,. sucio
6. RPMdel motorbajas
7. Es necesarioajustarelcarburador
1. Muevala palancadel reguladora la posici6nSTART
(inicio)/RUN(dirigido).
2. Pongael interruptoren laposici6nCHOKE(obtura-
ci6n).
3. Conecteel cable a la bujfa.
4. Lirnpie.ajustela distanciadisruptivao carnbie.
5. Lleneel tanquecon gasolinalirnpiay fresca.
6. Hayuna obstrucci6nen el motor.Desconecteel
cable de labujiay retireel objetoatascado.
7. Espereunosrninutosparareactivarse.
1. Carnbiela palancade obturaci6na la posici6nOFF
(apagado).
2. Conectey ajusteel cablede la bujia.
3. Lleneel tanquecon gasolinalirnpiay fresca.
4. Vacieel tanquedel combustible.Vuelvaa Ilenarlo
con combustiblelirnpio.
5. Lirnpieo carnbieel filtrodeaire.
6. Siernpreaccioneelmotorcon el estranguladoral
m_.xirno.
7. Contactecon su centrode partesy reparaciones
Sears.
51
tuier tipodel rnantenirniento/servicio,sueltetodos los rnandosy pareel motor.Esperehastaquetodaslaspartes de
yan venidoa unaparadacornpleta.Desconecteel alarnbrede bujfay b_.selocontrael motorpara prevenirel cornienzoinvolun-
SiernpreIlevepuestoscristalesinastillablesdurantelaoperaci6no realizandocualquierajusteo reparaciones.
El motorrecalienta
1. El nivelde aceitedel motores bajo
2. Flujodeairerestringido
Saltosocasionales(pausas)a 1. Ladistanciadisruptivade labujiaes rnuy
alta velocidad poca
El motorfuncionaen vado rnal 1. Bujiaensuciada 1.
2. El filtro de aireest,. sucio 2.
Dernasiadavibraci6n 1. Haypartesqueest_.nfiojaso el motorest,. 1.
da_ado
La unidadnodescarga 1. El_.reade descargaest,. tapada 1.
Latasade descargase reduce
de rnaneraconsiderableo
carnbiala cornposici6ndel
materialdescargado
2. Hay un objetoextra_oen el motor
3. RPMdel motorbajas
1. RPMdel motorbajas
2. La hoja de la cortadoraest,. desafilada
1. Lleneel c_.rtercon la adecuadaselecci6nde aceite.
2. Recortesde peri6dicodehierbalirnpiosy escorn-
brosde alrededorde las aletasde refrigeraci6ndel
motory alojarnientode soplador.
1. Quitela bujiay ajusteel hueco.
.
3.
Sustituyala bujiay ajusteel hueco.
Lirnpieo carnbieel filtro deaire.
Detengael motorde inrnediatoy desconecteel
cablede la bujfa.Contacteconsu centrode partesy
reparacionesSears.
Detengael motorde inrnediatoy desconecteel
cablede la bujfa. Lirnpiela pantalladedesgranadoy
elinteriorde la aberturade descarga.
Detengael motory desconecteel cablede labujia.
Saqueelobjetoextra_odel motor.
Siernpreaccioneel motorconel estranguladoral
rn_.xirno.
1. Siernpreaccioneel motorconel estranguladoral
rn_.xirno.
2. Reernplacela hojade la cortadorao contacteasu
centrode reparacionesy partesSears.
52
(Esta p_.ginase aplica s61oen EE.UU. y Canada.).
Sears Brands Management Corporation, el Consejo de Recursos Ambientales de California (CARB)
y la Agencia de Protecci6n Ambiental de los Estados Unidos (EPA)
Declaraci6n de garantia del sistema de control de emisiones (derechos y obligaciones de la garanfia de defectos del propi=
etario)
LA COBERTURADE LA GARANTJADE CONTROLDEEMISIONESES Y PARALOSMODELOSCERTIFICADOSDELANO 1997Y POSTERIORES,
APLIOABLEA LOS MOTORESCERTIFICADOSCOMPRADOSENCALIFOR- QUESE COMPRENY UTILICENENCUALQUIERPARTEDE LOSESTADOS
NIA EN 1995Y POSTERIORMENTE,QUESE UTILIZANENCALIFORNIA, UNIDOS(Y A PARTIRDEL 1 DE ENERODE 2001 ENCANADA).
Declaraci6n de garanfia sobre defectos en el control de emJsiones para California y los Estados UnJdos
ElConsejode RecursosAmbientalesde California(CARB),la EPA(Agencia
de Protecci6nAmbientalde los EE.UU.)y Searstienenel gusto de explicarla
garantiadel sistemade control de emisionespara motoresdela_o 2000y para
elfuturo con relaci6na motorespeque_ostodo terreno(SORE).En California,
los nuevosmotorespeque_ostodo terrenodebenestar dise_ados,construidos
y equipadosparacumplircon las rigurosasnormasanti-smogdelestado.En
el restode los EstadosUnidos,losmotoresnuevostodoterrenode encendido
porchispacertificadosparael a_o 1997debencumplirest_ndaressimilares
establecidospot la EPA.Sears debegarantizarel sistemade control de emi-
sionesde su motorpara losperiodosde tiempoenumeradosa continuaci6n,
siemprequeno hayaabuso,negligenciao mantenimientoindebidode su
motortodoterrenopeque_o.Su sistemade controlde emisionespuedeincluir
piezastalescomoel carburador,el filtrode aire, elsistemade encendido,el
silenciadoryel conversorcatalitico.Tambienpuedeincluirconectoresy otras
unidadesrelacionadascon lasemisiones.Dondeexistaunacondici6ncubierta
por la garantia,Searsreparar_su peque6omotortodo terrenosin costoalguno
incluyendodiagn6stico,piezasy manodeobra
Cobertura de la garantJa Sears para defectos en el control de emJsiones
Los motorestodo terrenopeque6osest_ngarantizadosen Io relativoalcontrol alas disposicionesque se indiquena continuaci6n.Si una partede su motor
de emisionesparadefectosenpiezasduranteun periodode dos a_os,sujeto cubiertapot lagaranfiaes defectuosa,Sears reparar_o sustituir_dichaparte.
Responsabilidades del propietario en relacibn con la garantia
Comopropietariodel motortodo terrenopeque_o,Ud.es responsablede la
realizaci6ndel mantenimientorequeridoquese incluyeen las instrucciones
de operaci6ny mantenimiento.Searsrecomiendaquese conserventodoslos
recibosrelativosal mantenimientode su motortodoterrenopeque_o,pero
no pude denegarla garantiasimplementepor la faltade los mismos,o por su
incumplimientodel mantenimientoprogramatic.Comopropietariodel motor
peque_otodoterrenodebe saberque, sin embargo,Sears lepuedenegar
lacoberturade lagarantiasi su motortodoterrenopeque6oouna piezadel
mismohanfalladodebido a abuso,negligencia,mantenimientoindebidoo
a modificacionesno aprobadas.Ud.es responsablede presentarsu motor
todoterrenopeque6oa un distribuidorde serviciosSearsautorizadotan pronto
comoaparezcaun problema.Las reparacionesde la garantiasinconfiicto
debencompletarseen un plazode tiempo razonable,no superiora 30 dias.Si
tienealgunapreguntarespectoa sus derechosy responsabilidadesreferentes
a lagarantia,debe contactarcon un representantede serviciosSears al 1--
800--469--4663.La garantiade emisioneses unagarantiapot defectos.Los
defectosse juzgande acuerdocon el funcionamientonormalde un motor.La
garantiano est_relacionadacon unapruebade emisionesen uso.
Disposiciones de la garantJa Sears para defectos en el control de emJsiones
Las siguientesson disposicionesespecificasrelacionadascon la coberturade lagarantia paradefectosenel controldeemisiones.Esun a_adidoa lagarantiade
motorSearsparamotoresno reguladosque seencuentraen lasinstruccionesde funcionamientoy mantenimiento.
1. Piezascon garantia
La coberturade esta garantiase extiendeL]nicamentealas piezas
queaparecena continuaci6n(las partesde lossistemasde control de
emisiones),siempreque dichaspiezasestuvieranya en el motoren el
momentode su compra.
a. Sistemade medici6n de combustible
• Sistema de enriquecimientoparaarranqueen frio
• Carburadory partesinternas
• Bombade combustible
b. Sistemade inducci6nde aire
• Filtrode aire
• Colector de admisi6n
c. Sistemadeencendido
• Bujia(s)de encendido
• Sistema de encendidomagneto
d. Sistemadelcatalizador
• Convertidorcatalitico
• Colector de escape
• Sistema de inyecci6nde aireo v_lvulade impulsos
e. Elementosvariadosusadosen lossistemasanteriores
• Wlvulas de vacio,sensiblesa temperatura,posici6ny tiempo
e interruptores
• Conectoresy montajes
2. AIcancede la cobertura
Searsgarantizaal poseedorinicialy a loscompradoressubsiguientes
quelas piezascon garantiano tendr_ndefectosen materialesni mano
de obra que provoquenla falla de las mismasduranteun periodode
dos aSosa partir de la fechaen queel motorse entregaa un comprador
particular.
3. Sin cargo
La reparaci6no reemplazode cualquierparte con garantia se realizar_
sin cargoalguno parael poseedor,incluyendotareasde diagn6sticoque
permitandeterminarsi una partecon garantiaes defectuosa,siempreque
dichodiagn6sticose realiceen un distribuidor de servicios Searsautoriza-
do. Parael serviciode lagarantia de emisiones,contacteal distribuidorde
serviciosSearsautorizadom_scercanoincluidoen las"P_ginasamarillas"
en lascategorias"Motores,gasolina","Motoresde gasolina","Podadoras
de cesped",o similares.
4. Reclamacionesy exclusionesa la cobertura
Las reclamacionesde lagarantia debenenviarsede acuerdocon las
disposicionesde la politica de garantia paramotoresSears.La cobertura
de lagarantia excluir_defectosen piezascon garantia queno scan partes
originalesSears,o abuso,negligenciao mantenimientoincorrecto,tal y
como se estableceen lapolitica de garantia para motoresSears.Sears no
es responsablede lasfallas en piezas con garantia provocadaspor el uso
de partesa6adidas,que no scan originaleso quese hayan modificado.
5. Mantenimiento
Cualquierpartecon garantiaque noesteprogramadapara set reempla-
zadacomo mantenimientorequerido,o que s61odeba inspeccionarse
regularmentealefecto de "inspeccioneo reemplacesegL]nsea necesario",
estar_garantizadacontradefectosduranteel periodode la garantia.Todas
las piezasgarantizadasqueesten programadasparasu reemplazopara
cumplir con los requisitosde mantenimientoestar_ngarantizadass61o
por el periodoanterioral primerreemplazoprogramaticparadicha pieza.
Cualquierpiezade recambioquesea equivalenteen funcionamientoy
durabilidadpuedeusarsepararealizarmantenimientoo reparaciones.El
propietarioes responsablede realizar todoel mantenimientorequerido,tal
y comose define en las instruccionesde funcionamientoy mantenimiento
Sears
6. Coberturaindirecta
Porla presente,la coberturase extiendea la falla de cualquiercomponente
de motorprovocadapot lafalla de unapiezacon garantiaque estetodavia
en periodode garantia.
En los EstadosUnidosy Canad_hay unalinea de atenci6nde24 horas,1-800-469--4GG3,quecuentacon un menL]con mensajespre-grabadosque contienen
informaci6nparael mantenimientode motores.
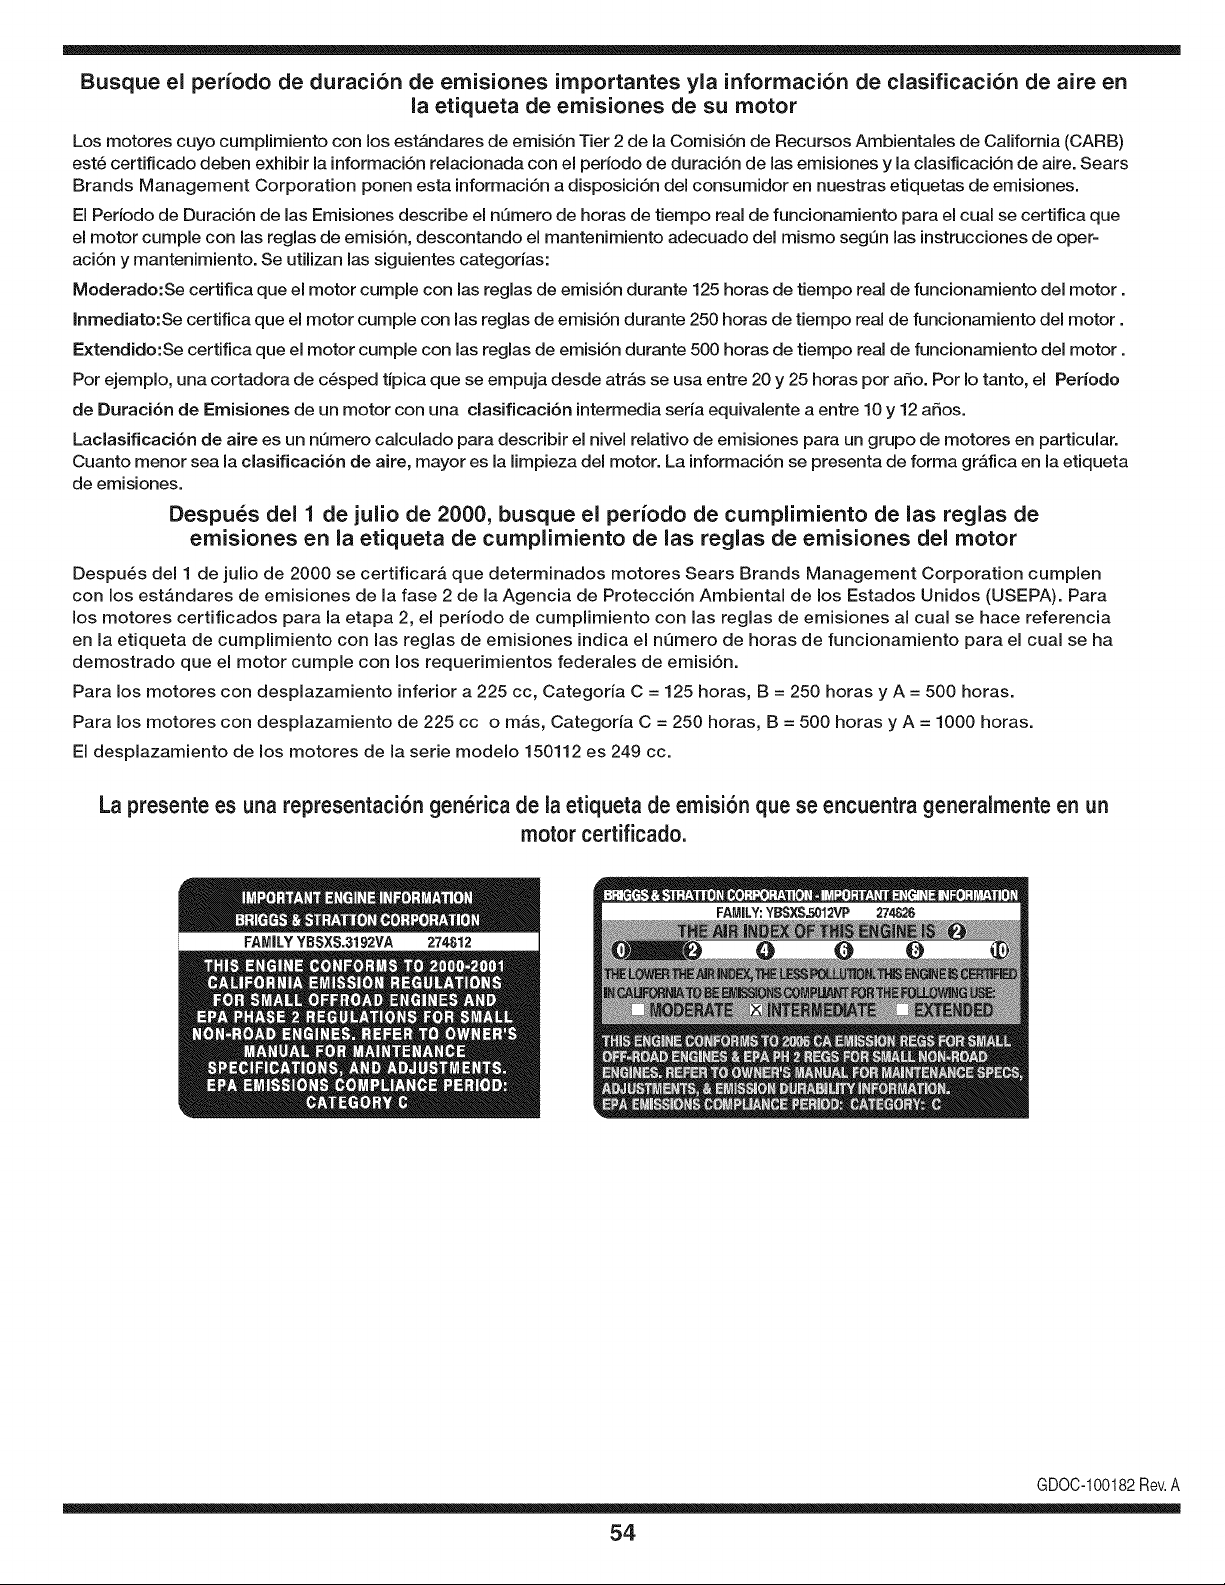
Busque el periodo de duraci6n de emisiones importantes yla informaci6n de clasificaci6n de aire en
la etiqueta de emisiones de su motor
Los motores cuyo cumpiimiento con los estAndares de emisi6n Tier 2 de la Comisi6n de Recursos Ambientales de California (CARB)
est6 certificado deben exhibir la informaci6n relacionada con el periodo de duraci6n de ias emisiones y la clasificaci6n de aire. Sears
Brands Management Corporation ponen esta informaci6n a disposici6n del consumidor en nuestras etiquetas de emisiones.
Ei Periodo de Duraci6n de las Emisiones describe el nQmero de horas de tiempo real de funcionamiento para el cuai se certifica que
el motor cumpie con ias reglas de emisi6n, descontando el mantenimiento adecuado del mismo segQn las instrucciones de oper-
aci6n y mantenimiento. Se utilizan las siguientes categonas:
Moderado:Se certifica que el motor cumpie con las reglas de emisi6n durante 125 horas de tiempo real de funcionamiento del motor.
Inmediato:Se certifica que el motor cumpie con las reglas de emisi6n durante 250 horas de tiempo real de funcionamiento del motor.
Extendido:Se certifica que el motor cumpie con las reglas de emisi6n durante 500 horas de tiempo real de funcionamiento del motor.
Por ejemplo, una cortadora de c6sped tJpica que se empuja desde arras se usa entre 20 y 25 horas por aSo. Por Io tanto, el Periodo
de Duraci6n de Emisiones de un motor con una clasificaci6n intermedia sena equivaiente a entre 10 y 12 aSos.
Laciasificaci6n de aire es un nQmero calculado para describir el nivel relativo de emisiones para un grupo de motores en particular.
Cuanto menor sea la clasificaci6n de aire, mayor es la limpieza del motor. La informaci6n se presenta de forma grAfica en la etiqueta
de emisiones.
Despu_s del 1 de julio de 2000, busque el periodo de cumplimiento de las reglas de
emisiones en la etiqueta de cumplimiento de las reglas de emisiones del motor
Despu6s del 1 de julio de 2000 se certificarA que determinados motores Sears Brands Management Corporation cumplen
con los estAndares de emisiones de la fase 2 de la Agencia de Protecci6n Ambientai de los Estados Unidos (USEPA). Para
los motores certificados para la etapa 2, el periodo de cumplimiento con ias reglas de emisiones al cual se hace referencia
en la etiqueta de cumplimiento con las reglas de emisiones indica el nQmero de horas de funcionamiento para el cual se ha
demostrado que el motor cumple con los requerimientos federales de emisi6n.
Para los motores con desplazamiento inferior a 225 cc, Categoria C = 125 horas, B = 250 horas y A = 500 horas.
Para los motores con desplazamiento de 225 cc o mAs, Categoria C = 250 horas, B = 500 horas y A = 1000 horas.
El desplazamiento de los motores de la serie modelo 150112 es 249 cc.
La presente es una representaci6n gen_rica de la etiqueta de emisi6n que se encuentra generaimente en un
motor certificado.
FAMILYYBSXS.3192VA 274812
GDOC-100182Rev.A
54
Felicitaciones por haber realizado una adquisici6n inteligente. El producto Craftsman® que ha
adquirido esta diseSado y fabricado para brindar muchos aSos de funcionamiento confiable. Pero
como todos los productos a veces puede requerir de reparaciones. Es en ese momento cuando el
disponer de un Acuerdo de protecci6n para reparaciones le puede ahorrar dinero y problemas.
A continuaci6n se detallan los puntos incluidos en el Acuerdo:
[] Servicio experto prestado por nuestros 10,000 especialistas en reparaciones profesionales
[] Servicio ilirnitado sin cargo para las piezasy la mano de obra en todas las reparacionescubiertas
[] Reernplazo del producto hasta 1500 d61aressi no es posible reparar el producto cubierto
[] Descuento de 25% del precio normal del servicio y de las piezas relacionadas con el mismo que no esten cubiertas
por el acuerdo; ademas, 25% del precio normal de laverificaci6n de mantenimientopreventivo
[] Ayuda r_pida pot tel_fono - Io IlamamosResoluci6n RApida- el apoyo telef6nico de un Chamusca al representante.
Piense en nosotros como el manual "de un dueSohablador."
Una vez adquirido el Acuerdo, puede programar el servicio con tan s61orealizar una Ilamadatelef6nica. Puede Ilamaren
cualquier momento del dia o de la noche o programar un servicio en linea.
ElAcuerdo de Protecci6nde Reparaci6nes una compra sin riesgo. Si usted anula por alguna raz6n duranteel periodo de
garantia de producto, proporcionaremos un reembolso Ileno.O, un reembolso prorrateado en cualquier momento despues
del periodo de garantia de producto expira, iAdquiera hoy su acuerdode protecci6n para reparaciones!
Se aplican determinadas limitaciones y exclusiones. Para obtener informaciTn adicional y precios en los Estados
Unidos Ilame al 1-800-827-6655.
El *Coverage en Canad_ivaria en algunos articulos. Para detalles Ilenos la Ilamada Chamusca Canad_ien 1-800-
361-8885.
Servicio de instalaci6n de Sears
Si desea solicitar la instalaci6n profesionalde Sears de aparatos domesticos, dispositivos paraabrir portones, calentado-
res de agua y otros articulos domesticos importantes, en los Estados Unidos o Canada flame al 1-800-4-MY-HOME®.
55

Your Home
For troubleshooting, product manuals and expert advice:
managernylife
www.managemylife.com
For repair - in your home - of all major brand appliances,
lawn and garden equipment, or heating and cooling systems,
no matter who made it, no matter who sold it!
For the replacement parts, accessories and
owner's manuals that you need to do-it-yourself.
For Sears professional installation of home appliances
and items like garage door openers and water heaters.
1-800-4-MY-HOME ® (1-800-469-4663)
Call anytime, day or night (U.S.A. and Canada)
www.sears.com www.sears.ca
Our Home
For repair of carry-in items like vacuums, lawn equipment,
and electronics, call anytime for the location of your nearest
Sears Parts & Repair Service Center
1-800-488-1222 (U.S.A.) 1-800-469-4663 (Canada)
www.sears.com www.sears.ca
To purchase a protection agreement on a product serviced by Sears:
1-800-827-6655 (U.S.A.) 1-800-361-6665 (Canada)
Para pedir servicio de reparaci6n
a domicilio, y para ordenar piezas:
1-888-SU-HOGAR ®
(1-888-784-6427)
www.sears.com
Au Canada pour service en frangais:
1-800-LE-FOYER Mc
(1-800-533-6937)
www.sears.ca
® Registered Trademark / TMTrademark of KCD IP, LLC in the United States, or Sears Brands, LLC in other countries
® Marca Registrada ! TMMarca de Fabrica de KCD IP, LLC en Estados Unidos, o Sears Brands, LLC in otros paises
MCMarque de commerce ! MDMarque deposee de Sears Brands, LLC

