
Operator's Manuam
I:RRFTSMRN°
7.5 Horse Power
CHIPPER SHREDDER
Model No. 247.776360
CAUTmON: Before using
this product, read this
manual and foN_ow aim
safety fumes and operating
instructions,
o SAFETY
ASSEMBLY
OPERATION
MAINTENANCE
PARTS LIST
Scars, Roebuck and Co., Hoffman Estates, IL 60179, U.S.A.
Visit our web site s www, sears,com/craftsman FORMNO,769-02543
05/24/2006
WarrantyStatement..................................Page2
SafeOperationPractices.........................Pages3-4
Assembly..................................................Page6
Operation..................................................Pages7-9
Maintenance.............................................Pages10-11
Off-SeasonStorage..................................Page12
TroubleShooting......................................Page13
PartsList...................................................Page14-16
Espadol.....................................................Page17
ServiceNumbers......................................BackCover
One-YearWarrantyon CraftsmanChipperShredder
Foroneyearfromthe dateof purchase,whenthisCraftsmanChipperShredderis maintained,lubricatedand tunedup accordingto the instruc-
tionsinthe owner'smanual,Searswill repair,free ofcharge,any defectin materialandworkmanship.If this Craftsmanchippershredderis used
for commercialor rentalpurposes,this warrantyappliesfor only 30 daysfrom the dateof purchase.
Thiswarrantydoesnot cover:
• Expendableitemswhichbecomewornduring normaluse,such as sparkplug, bladesand air cleaner.
• Repairsnecessarybecauseof operatorabuseor negligence,includingbentcrankshaftsandthe failureto maintainthe equipmentaccording
to the instructionscontainedinthe owner'smanual.
WARRANTYSERVICEIS AVAILABLEBYRETURNINGTHE CRAFTSMANCHIPPERSHREDDERTO THENEAREST
SEARSPARTS& REPAIRCENTERIN THE UNITEDSTATES.
Thiswarrantyappliesonly whilethisproductis in use in the United States.
TO LOCATETHENEARESTSEARSPARTS& REPAIRCENTERORTO SCHEDULESERVICE,
SIMPLYCONTACTSEARSAT1-800-4-MY-HOME®.
Thiswarrantygivesyou specificlegalrightsandyou mayalso haveotherrightswhichmayvaryfromstateto state.
SEARS,ROEBUCKANDCO., D/817WA,HOFFMANESTATES,IL 60179
Repair Protection Agreements
Congratulationson makinga smart purchase.YournewCraftsman@
productis designedand manufacturedfor yearsof dependableopera-
tion.But likeallproducts,it mayrequirerepairfromtimeto time.That's
whenhavinga RepairProtectionAgreementcansave youmoneyand
aggravation.
Here'swhat'sincludedin the Agreement:
• Expertserviceby our 12,000professionalrepairspecialists
• Unlimitedserviceand no chargefor parts and laboron all covered
repairs
• Productreplacementif yourcoveredproductcan'tbe fixed
• Discountof 10%fromregularpriceof serviceand service-related
partsnotcoveredby theagreement;also, 10%off regularprice of
preventivemaintenancecheck
• Fasthelpby phone- phonesupportfroma Searstechnicianon
productsrequiringin-homerepair,plus convenientrepair
scheduling
PurchaseaRepairProtectionAgreementnowand protectyourself
fromunexpectedhassleand expense.
Once youpurchasethe Agreement,a simplephonecall is all that it
takesfor youto scheduleservice.Youcan call anytimeday or night, or
schedulea serviceappointmentonline.
Searshasover12,000professionalrepairspecialists,who have
accessto over4.5millionqualitypartsandaccessories.That'sthe
kindof
professionalismyou cancount on to helpprolongthe life of yournew
purchasefor yearsto come.PurchaseyourRepairProtectionAgree-
menttoday!
Somelimitationsandexclusionsapply.For pricesand additional
informationcall 1-800-827-6655.
Sears InstallationService
ForSearsprofessionalinstallationof homeappliances,garagedoor
openers,waterheaters,andother majorhomeitems,in the U.S.A.call
1-800-4-MY-HOME®
Horse Power:
Engine Oil:
Oil Capacity:
Fuel:
Spark Plug:
Engine:
7.5 Horse Power
SAE 30
20 Ounces
Unleaded Gasoline
Champion® RC-12YC
Briggs and Stratton 150112-0408
Model Number .............................................................
Serial Number ..............................................................
Date of Purchase ..........................................................
Record the model number, serial number
and date of purchase above
WARNING: Engine Exhaust,some of its constituents,and certain vehicle components contain or emit
chemicals known to State of California to cause cancer and birth defects or other reproductiveharm.
DANGER: This machine was built to be operated according to the rules for safe operation in this manual. As with any type
of power equipment, carelessness or error on the part of the operator can result in serious injury.This machine is capable
of amputating hands and feet and throwing objects. Failureto observe the following safety instructionscould result in
serious injury or death.
WARNING: This symbol pointsout important safety instructionswhich, if notfollowed,could endangerthe
personalsafety and/or propertyof yourselfand others. Read and follow ail instructionsin this manual before
attemptingto operatethis machine. Failureto complywith these instructionsmay resultin personalinjury.
When you see this symbol.HEED ITS WARNING!
"1
Training
1. Read,understand,andfollowall instructionson the machineand in the 1.
manual(s)beforeattemptingto assembleandoperate.Keepthis manual
in a safeplaceforfuture and regularreferenceand for orderingreplace-
ment parts. 2.
2. Be familiarwith all controls andtheir proper operation.Know howto stop
the machineanddisengagethem quickly.
3. Neverallowchildrenunder 16years oldto operatethis machine.Children 3.
16 yearsold and overshould readand understandthe operationinstruc-
tions andsafety rulesin this manualand shouldbe trainedand supervised
by a parent.
4. Neverallow adultsto operatethis machinewithout proper instruction. 4.
5. Keepbystanders,helpers,pets,andchildren at least75 feet from the
machinewhile it is in operation.Stop machineif anyoneentersthearea.
6. Neverrunan engineindoorsor in a poorlyventilatedarea.Engineexhaust 5.
containscarbonmonoxide,an odorlessand deadlygas. 6.
7. Do not puthands andfeet near rotatingparts orin the feedingchambers
anddischargeopening.Contactwith the rotatingimpellercan amputate
fingers,hands,and feet.
8. Neverattempt to unclogeither the feed intakeor dischargeopening,
removeoremptyvacuumbag,or inspectand repairthe machinewhilethe
engine is running.Shutthe engine off andwait until all movingparts have
cometo a completestop. Disconnectthespark plugwire andground it
againstthe engine.
Thoroughlyinspectthe areawherethe equipmentisto be used. Remove
all rocks,bottles,cans, orotherforeignobjectswhichcould be pickedup
or thrown andcausepersonalinjuryor damageto the machine.
Alwayswearsafetyglassesor safetygoggles duringoperationor while
performingan adjustmentor repair,to protecteyes. Thrownobjectswhich
ricochetcan causeseriousinjuryto the eyes.
Wearsturdy,rough-soledwork shoesandclose-fittingslacksandshirts.
Loosefitting clothesorjewelry can be caught in movableparts.Never
operatethis machinein barefeet or sandals.Wearleatherworkgloves
whenfeedingmaterialin the chipperchute.
Beforestarting,check all bolts andscrewsfor proper tightnessto be sure
the machineis in safeworkingcondition.Also,visuallyinspectmachinefor
any damageat frequentintervals.
Maintainor replacesafetyand instructionslabels,as necessary.
To avoidpersonalinjuryor propertydamageuse extremecare in handling
gasoline. Gasolineis extremelyflammableandthe vapors areexplosive.
Seriouspersonalinjury can occurwhen gasolineis spilled on yourself
or yourclotheswhichcan ignite.Washyour skin andchangeclothes
immediately.
a. Useonlyan approvedgasolinecontainer.
b. Extinguishall cigarettes,cigars,pipes,and other sourcesof ignition.
c. Neverfuel machineindoors.
d. Neverremovegas cap or addfuel whilethe engine is hot or running.
e. Allowengine to cool at least two minutesbefore refueling.
f. Neveroverfill fuel tank. Filltankto no morethan 1/2inch below bottom
of filler neckto providespacefor fuel expansion.
g. Replacegasolinecap andtighten securely.
h. If gasolineis spilled,wipe it off the engine andequipment.Move
machineto anotherarea. Wait5 minutesbeforestartingthe engine.
Neverstore the machineor fuel container insidewherethere is an open
flame, spark,or pilot light (e.g.furnace, waterheater,spaceheater,
clothesdryer,etc.).
To reducea fire hazard,keep machinefree of grass, leaves,or other
debris build-up.Clean up oil orfuel spillageand removeany fuel
soakeddebris.
k. Allowmachineto cool at least 5 minutes beforestoring.
3
Operation
t. Do not putbands andfeet near rotatingparts or inthe feedingchambers
and dischargeopening.Contactwith the rotatingimpellercan amputate
fingers,hands,andfeet.
2. Beforestartingthe machine,makesurethe chipper chute,feed intake,and
cuttingchamberareempty andfree of all debris.
3. Thoroughlyinspectall materialto be shreddedand removeany metal,
rocks,bottles,cans,or otherforeignobjectswhichcouldcause personal
injuryor damageto the machine.
4. If the impellerstrikesaforeign objector ifyour machineshouldstart
makingan unusualnoise orvibration,immediatelyshutthe engineoff.
Allowthe impellerto cometo a completestop. Disconnectthe spark plug
wire, groundit againstthe engineand performthe following steps:
a. Inspectfor damage.
b. Repairor replaceany damagedparts.
c. Checkfor any loose parts andtighten to assure continuedsafe opera-
tion.
5. Do not allowanaccumulationof processedmaterialto build up in the
dischargearea.This canpreventproper dischargeand resultin kickback
of materialthrough thefeed opening.
6. Do not attemptto shred or chip materiallargerthan specifiedon the
machineor inthis manual.Personalinjuryor machinedamagecould
result.
7. Neverattemptto unclogeitherthefeed intakeor dischargeopeningwhile
theengineis running.Shuttheengineoff, waituntil all movingpartshave
stopped,disconnectthe sparkplug wire andgroundit againstthe engine
beforeclearingdebris.
8. Neveroperatewithoutvacuumbag anddischargechuteproperlyattached
to the machine.Neveremptyor changevacuumbagwhile the engine is
running.Zipperedendof vacuum bagmustbe kept closedat all times
duringoperation.
9. Neveroperatewithouteitherthe inlet nozzle or optional hoseattachment
properlyattachedto the machine.Neverattemptto attach or changeeither
attachmentwhilethe engineis running.
10.Keepall guards,deflectorsandsafetydevicesin place andoperating
properly.
11.Keepyour face and bodyback andto the side of thechipperchute while
feedingmaterialintothe machineto avoid accidentalkickbackinjuries.
12.Neveroperatethis machinewithoutgood visibilityor light. Alwaysbe sure
of yourfooting and keepa firm holdon the handles.
13.Do not operatethis machineon a gravelsurface.
14.Do not operatethis machinewhile underthe influenceof alcoholordrugs.
15.Mufflerand enginebecomehot and can causea burn. Donottouch.
16.Neverpickupor carry machinewhile the engine is running.
Maintenance & Storage
1. Nevertamperwith safetydevices.Checktheir properoperationregularly.
2. Check bolts andscrewsfor proper tightnessat frequentintervalsto keep
the machinein safe workingcondition.Also, visuallyinspectmachinefor
any damageand repair,if needed.
3. Beforecleaning,repairing,or inspecting,stoptheengineand makecertain
the impellerand all moving partshavestopped. Disconnectthe spark plug
wire and groundit againstthe engineto preventunintendedstarting.
4. Donotchangetheenginegovernorsettingsor overspeedthe engine.The
governorcontrolsthe maximumsafeoperatingspeedof the engine.
5. Maintainor replacesafetyand instructionlabels,as necessary.
6. Followthis manualfor safe loading, unloading,transporting,andstorage
of this machine.
7. Neverstorethe machineorfuel containerinside wherethere is an open
flame, sparkor pilot light suchas a water heater,furnace,clothes dryer,
etc.
8. Alwaysreferto the operator'smanualfor properinstructionson off-season
storage.
9. Ifthe fuel tank hasto be drained,do this outdoors.
10.Observeproper disposallaws and regulationsfor gas, oil,etc. to protect
the environment.
Do not modify engine
Toavoidseriousinjuryor death,do notmodifyenginein anyway.Tampering
withthe governorsettingcan leadto a runawayengine andcauseit to operate
at unsafespeeds.Nevertamperwithfactorysettingof engine governor.
Notice regarding Emissions
Engineswhichare certifiedto complywith CaliforniaandfederalEPAemission
regulationsfor SORE(SmallOff RoadEquipment)are certifiedto operateon
regularunleadedgasoline,and may includethe followingemissioncontrol sys-
tems:EngineModification(EM)andThreeWayCatalyst(TWC)if so equipped.
Your Responsibility
Restrictthe useof this powermachineto personswho read,understandand
followthe warningsandinstructionsinthis manualand on themachine.
Look For Relevant Emissions E)urabiHty Period and
Air hde× mnformation On Your Engine Emissions Labe_
Engines that are certified to meet the California Air Resources Board (CARB) Tier 2 Emission Standards must
display information regarding the Emissions Durability Period and the Air index. Sears, Roebuck and Co., U.S.A.
makes this information available to the consumer on our emission labels.
The Emissions Durability Period describes the number of hours of actual running time for which the engine is
certified to be emissions compliant, assuming proper maintenance in accordance with the Operating & Mainte-
nance Instructions. The following categories are used:
Moderate: Engine is certified to be emission compliant for 125 hours of actual engine running time.
Intermediate: Engine is certified to be emission compliant for 250 hours of actual engine running time.
Extended: Engine is certified to be emission compliant for 500 hours of actual engine running time.
For example, a typical walk-behind lawn mower is used 20 to 25 hours per year. Therefore, the Emissions
Durability Period of an engine with an intermediate rating would equate to 10 to 12 years.
The Air Index is a calculated number describing the relative level of emissions for a specific engine family. The
lower the Air Index, the cleaner the engine. This information is displayed in graphical form on the emissions label.
After Ju_y 1,2000, Look For Emissions Compliance Period
On Engine Emissions Compliance Labe_
After July 1, 2000 certain Sears, Roebuck and Co., U.SoA. engines will be certified to meet the United States
Environmental Protection Agency (USEPA) Phase 2 emission standards. For Phase 2 certified engines, the Emis-
sions Compliance Period referred to on the Emissions Compliance label indicates the number of operating hours
for which the engine has been shown to meet Federal emission requirements.
For engines less than 225 cc displacement, Category C = 125 hours, B = 250 hours and A = 500 hours.
For engines of 225 cc or more, Category C = 250 hours, B = 500 hours and A = 1000 hours.
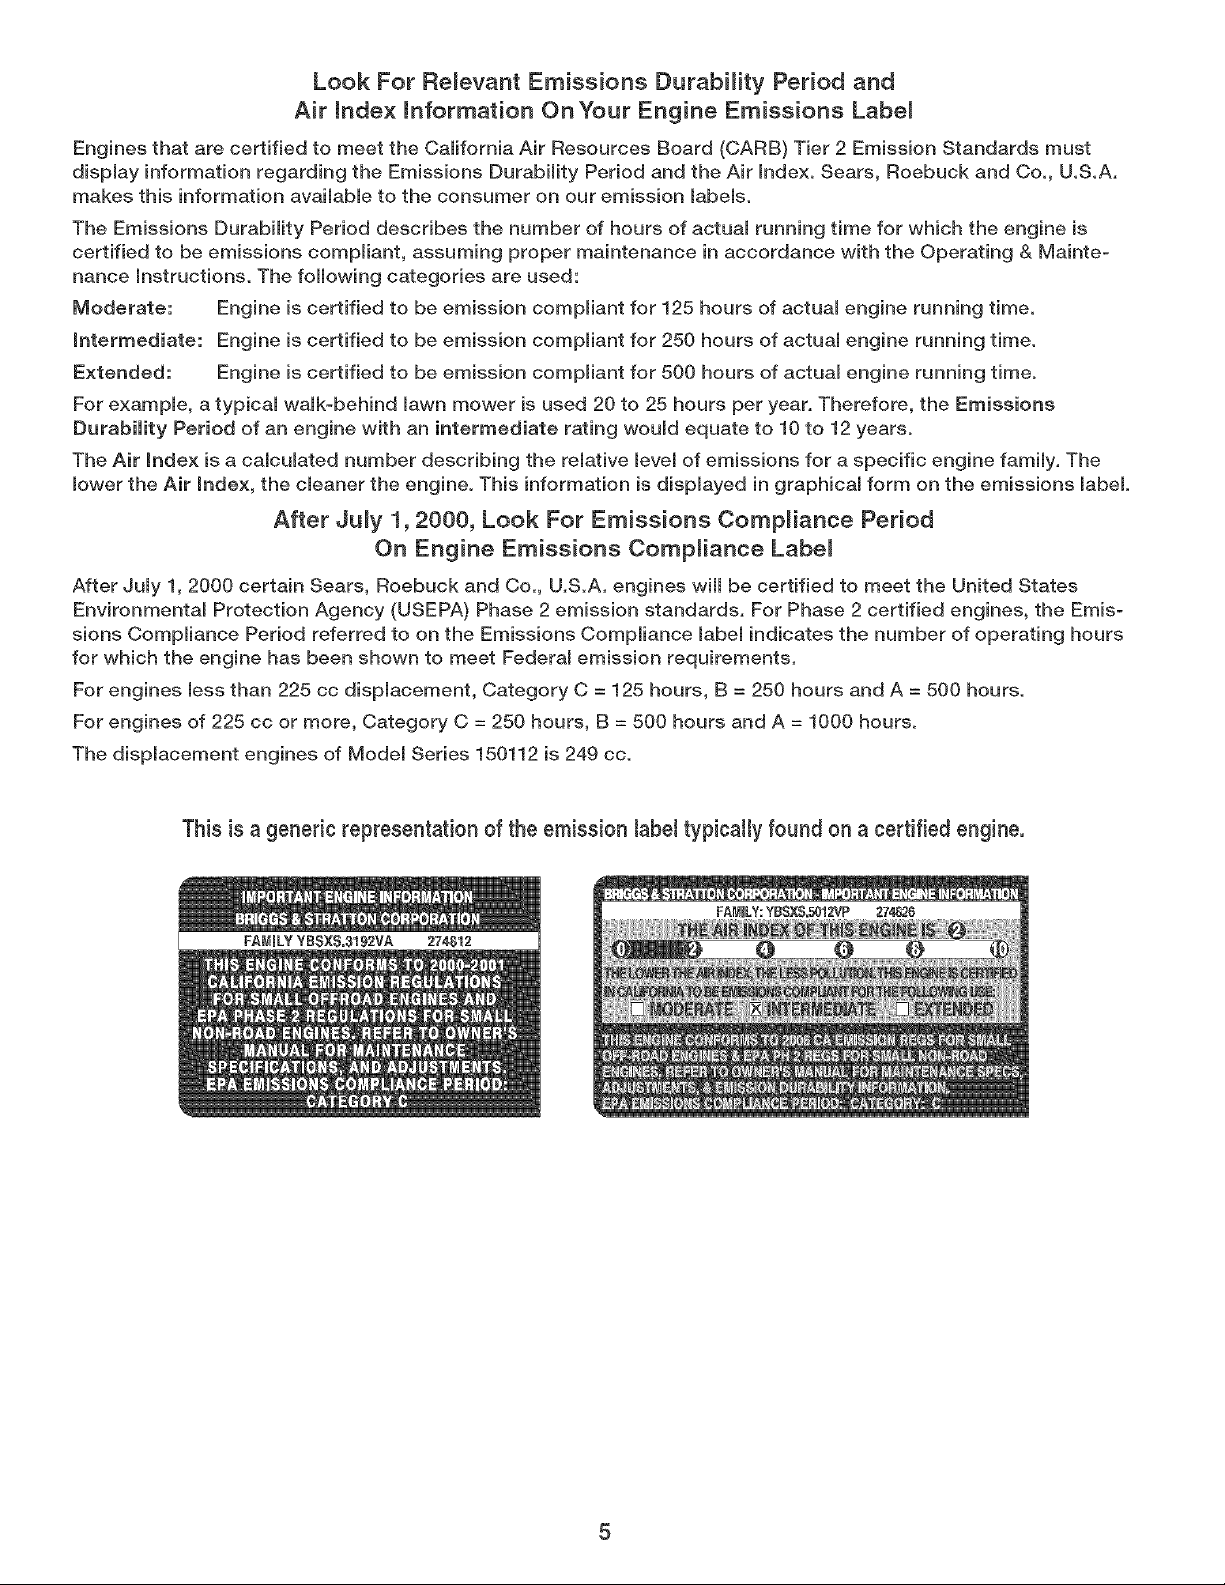
The displacement engines of Model Series 150112 is 249 cc.
This is a generic representation of the emission label typically found on a certified engine.
5
IMPORTANT," This unit is shipped without gasoline or
oil in the engine. After assembly, see OPERATION sec-
tion of this manual for proper fuel and engine oil tiff-up.
This Chipper Shredder has been completely assembled
at the factory, except for the debris collection bag,
which is stowed in the chipper chute for shipping.
Removing Unit From Carton
1. Remove staples, break glue on top flaps or cut tape
at carton end and peel along top flap to open carton.
2. Remove any loose parts.
3. Cut down along carton edges and lay carton down
flat.
4. Remove packing material, if present. Lift unit from
the rear and discard bottom pad, if present. Roll unit
out of carton. Check carton thoroughly for loose
parts.
Loose Parts Jn Carton
a. One Debris Collection Bag
b. One Pair of Safety Glasses
c. One 20 oz. Bottle of Engine Oil
d. One Operator's Manual
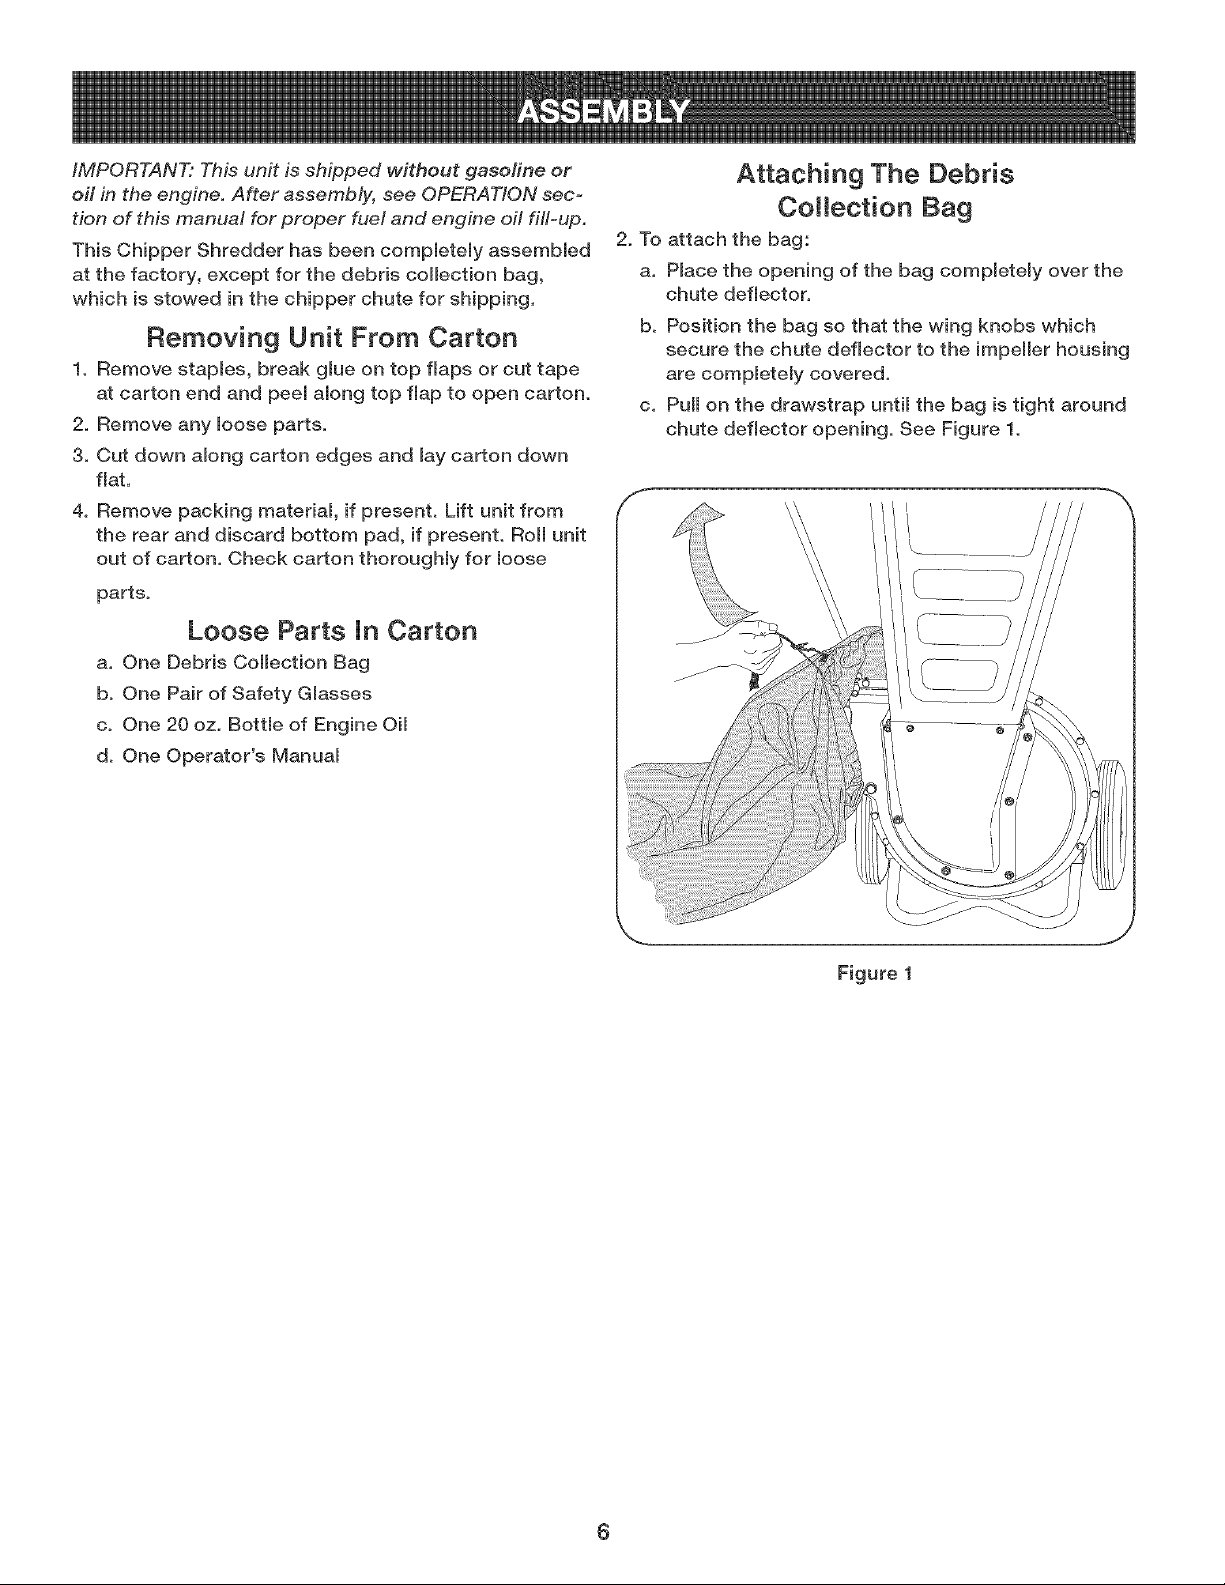
Attaching The Debris
Collection Bag
2. To attach the bag:
a. Place the opening of the bag completely over the
chute deflector.
b. Position the bag so that the wing knobs which
secure the chute deflector to the impeller housing
are completely covered.
c. Pull on the drawstrap until the bag is tight around
chute deflector opening. See Figure 1.
\
Figure 1
6
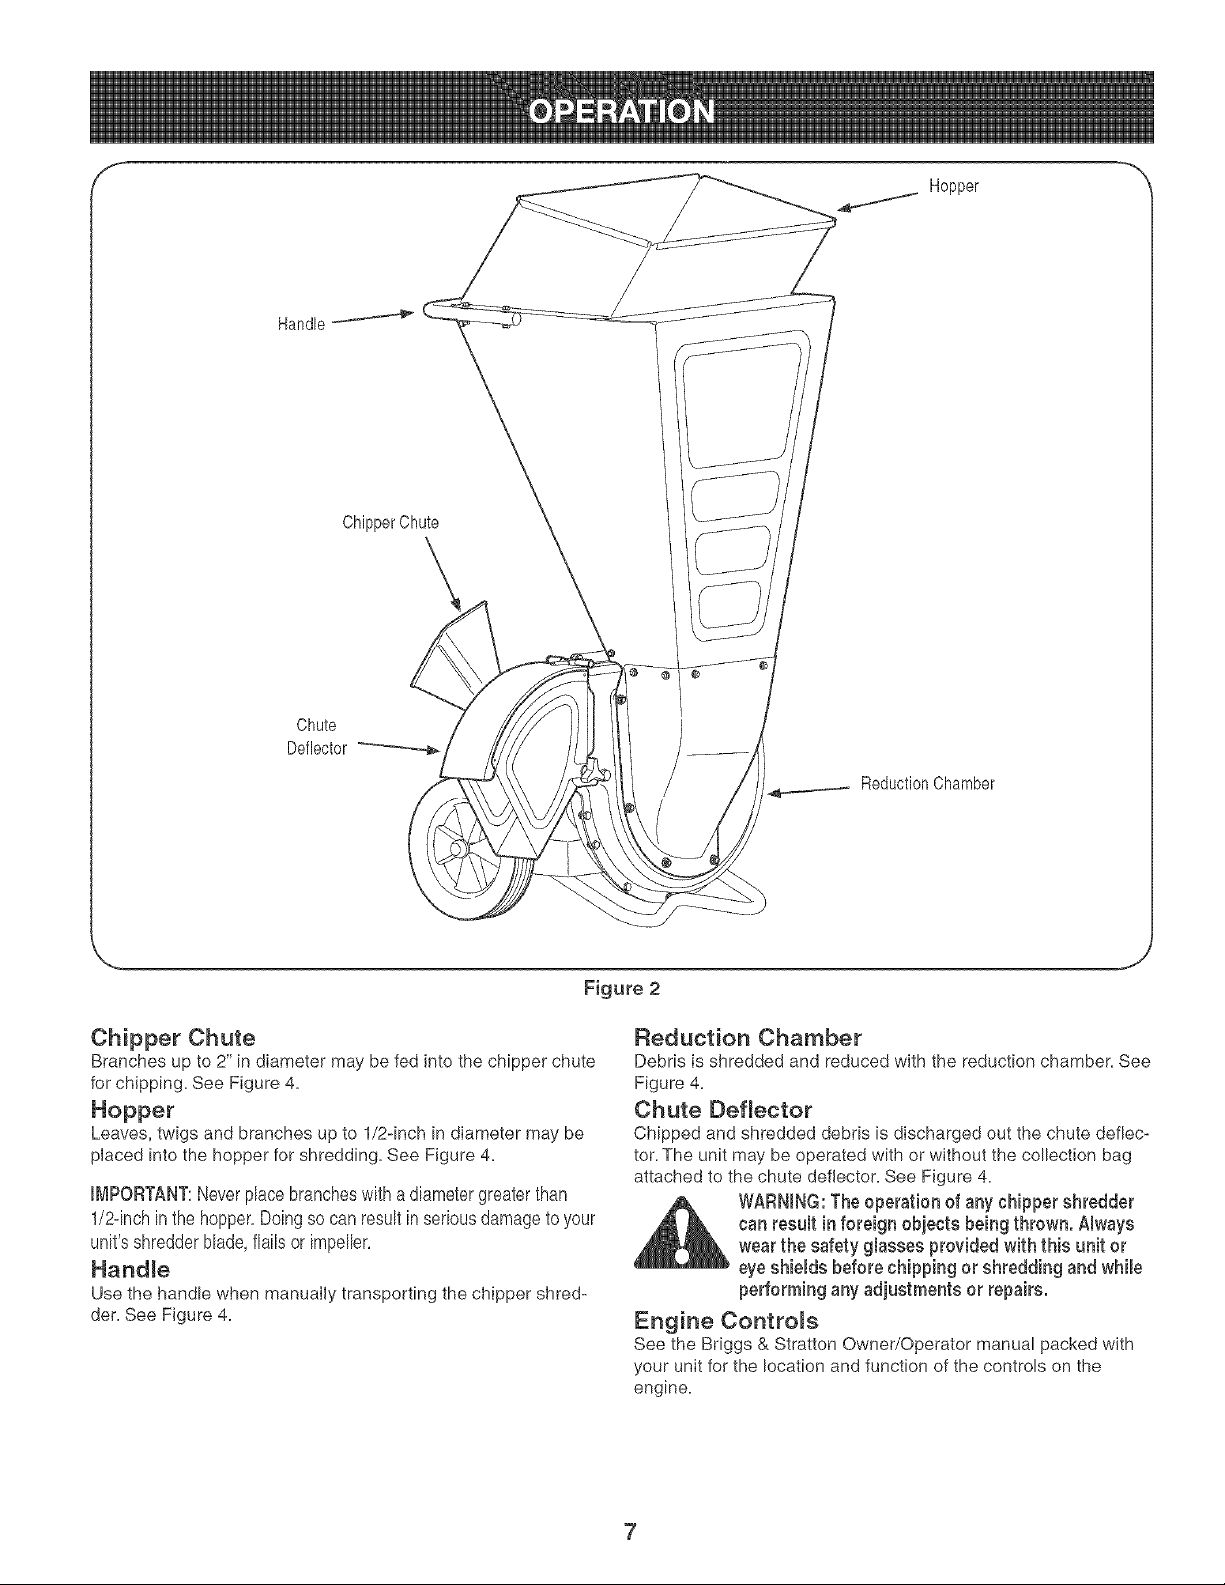
Hopper
Handle
ChipperChute
\
Chute
Deflector
ReductionChamber
Figure 2
J
Chipper Chute
Branches up to 2" in diameter may be fed into the chipper chute
for chipping= See Figure 4=
Hopper
Leaves, twigs and branches up to 1/2-inch in diameter may be
placed into the hopper for shredding= See Figure 4=
iMPORTANT: Never place branches with a diameter greater than
1/2dnch in the hopper, Doing so can result in serious damage to your
unit's shredder blade, flails or impeller,
HandJe
Use the handle when manually transporting the chipper shred-
der. See Figure 4=
Reduction Chamber
Debris is shredded and reduced with the reduction chamber. See
Figure 4.
Chute Deflector
Chipped and shredded debris is discharged out the chute deflec-
tor. The unit may be operated with or without the collection bag
attached to the chute deflector. See Figure 4.
_k ARNING: The operation of any chipper shredder
can result in foreign objects being thrown. Always
wear the safety glasses provided with this unit or
eye shields before chipping or shredding and while
pedorming any adjustments or repairs.
Engine Controls
See the Briggs & Stratton Owner/Operator manual packed with
your unit for the location and function of the controls on the
engine=
WARNING:The operation of any chipper shredder
can result inforeign objects being thrown intothe
eyes, which can damage your eyes severely. Always
wear the safety glasses provided with this unit or
eye shields before chipping or shredding and while
performing any adjustments or repairs.
Gas and Oil Fi{FUp
Servicethe enginewith gasolineand oil as instructedin the separate
Briggs& Strattonenginemanualpackedwithyourchippershredder,
Readinstructionscarefully,
WARNING:Neverfill fuel tank indoorswith engine
running or until the engine has been allowed to cool
for at least two minutes after running.
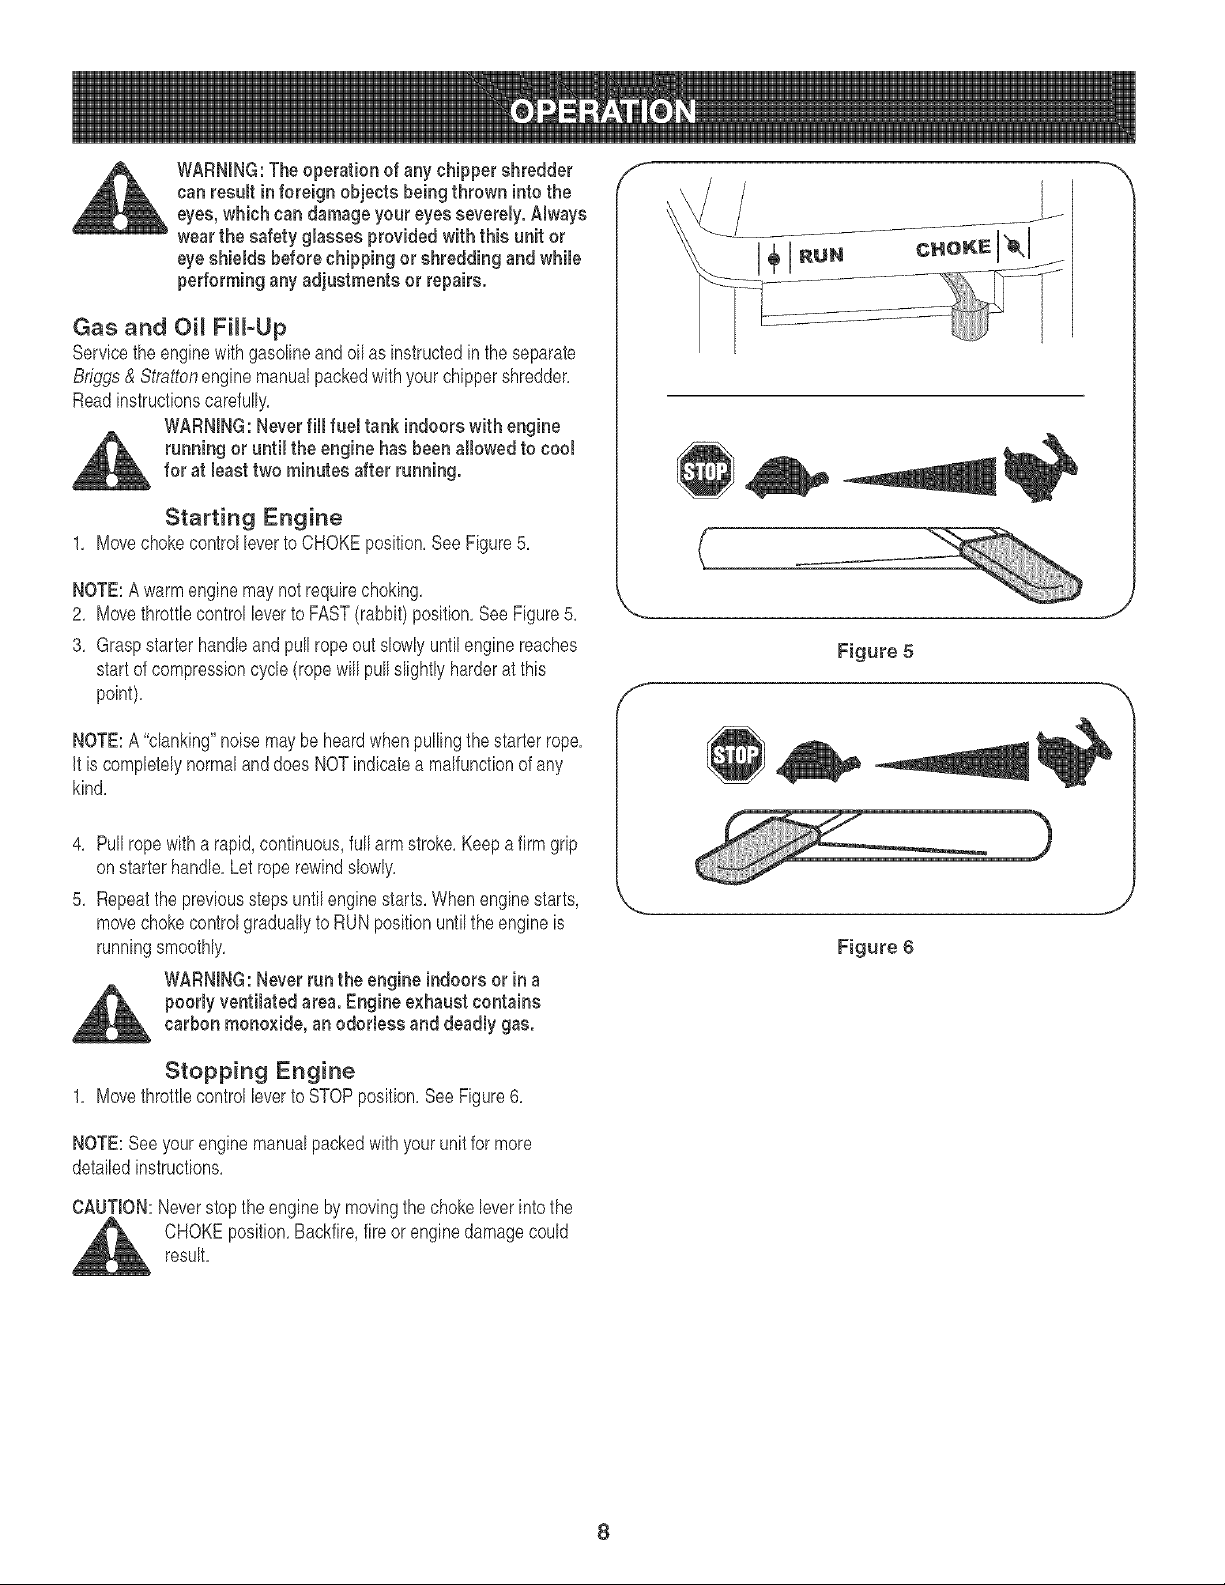
Starting Engine
1, Movechokecontrol leverto CHOKEposition,See Figure5,
NOTE:Awarmenginemaynotrequirechoking,
2, Movethrottlecontrolleverto FAST(rabbit)position,See Figure5,
3, Graspstarterhandleand pull rope out slowlyuntilenginereaches
startof compressioncycle(ropewill pullslightly harderat this
point),
NOTE:A "clanking"noisemay be heardwhenpullingthe starter rope,
it is completelynormalanddoes NOTindicatea malfunctionof am
kind,
4, Pull rope with a rapid,continuous,full armstroke,Keep a firm grip
onstarterhandle,Let roperewindslowly,
5, Repeatthe previousstepsuntilenginestarts,Whenenginestarts,
movechokecontrolgraduallyto RUNpositionuntilthe engineis
runningsmoothly,
WARNING:Neverrun the engine indoorsor in a
poorly ventilated area. Engineexhaust contains
carbon monoxide, anodorless and deadly gas.
Stopping Engine
1, Movethrottlecontrolleverto STOPposition,See Figure6,
NOTE:Seeyourenginemanualpackedwith your unitfor more
detailedinstructions,
CAUTION:Neverstopthe enginebymovingthe chokeleverintothe
CHOKEposition,Backfire,fire or enginedamagecould
result,
f
f
Figure 5
Figure 6
_J
8
Shredding
Yardwastesuchas leavesand pine needlescan be placedin the
hopperfor shredding,After materialhas beenprocessedby the shred-
derbladeandflails,it will beforcedoutof thechutedeflector,and,if
attached,intoa debriscollectionbag,
Observethe followingguidelineswhenshreddingyarddebris:
1, Neverattemptto shredmaterialotherthan normalyard debris
(leaves,twigs,pinecones,etc,),
2, Avoidshreddingfibrousplantssuch as tomatovines untilthey are
thoroughlydriedout, Freshvinesdo not shredwell and tendto
wrapthemselvesaroundthe impellerand flails,
3, Race reasonableamountsof debrisintothe hopperat a time, Do
not overloadthe hopper,
4, Allowthe materialin the hopperto be drawnintothe bladesand
shreddedbeforeaddingadditionaldebristo the hopper,Failureto
dueso mayresultin acloggedhopper,cloggedchutedeflectorora
stalledengine,
5, Avoidplacingtwigs longerthan24 inches intothe hopper,Twigs
longerthan 24 inchesmay resultin a cloggedhopper,
6, Neverplacebrancheswith a diametergreaterthan 1/2-inchin
the hopper,Doingso can result inseriousdamageto the unit's
shredderblade,flailsor impeller,
C_earing the Hopper
Shouldthe hopperbecomedogged with debrisduringoperation,
proceedas follows:
1, Graspthe handlewith bothhandsandgentlyagitatethe chipper
shredderto helploosendebris,drawingit intothe impeller,
if thedog doesnot clear,proceedas follows:
1, Stopengine,
2, Use yourhandsto removeany debrisfoundnearthe top of the
hopper,
3, Use a branch(or otheravailabledevice,i,e,broomstick)to dislodge
debrislocatedtowardthe baseof the hopper,
4, Restartengine,
NOTE:if you'reunableto pullthe starterropeas a resultof accumu-
lateddebrisnearthe impeller,followinstructionsunderthe heading
Cleaning the Reduction Chamber in the "MaintainingYourChipper
Shredder"sectionof thismanual,
Chipping
WARNING:Never operate the chipper shredder
without chipper chute lowered into the operating
position.
Branchesupto 2" in diametercan befed intothe chipperchute,
Observethe followingguidelineswhenchippingbranches:
1, Keepbothhandsfirmlyon the branchas youfeed it intothe chipper
chute,
2, Neverfeed morethanone branchintothe chipperchuteat a time,
3, Neverfeed anythingotherthan branches(or wood)intothe chipper
chute,
4, Apply intermittentpressure(force,in short pulses)while feeding
larger(2-inchdiameter)branchesintothe chipperchute,to avoid
boggingor stallingthe engine,
IMPORTANT:Neverfeed brancheswith a diametergreaterthan
two (2) inchesintothe chipperchute, Doingso can resultin serious
damagetoyour unit'schipperblades,flailsorimpeller,
NOTE:Forbestperformance,alwaysoperatethe unitwithsharp
chipperblades,If a noticeableloss in performanceis encountered
whilechippingbranches,the chipperbladesshouldbe replaced,
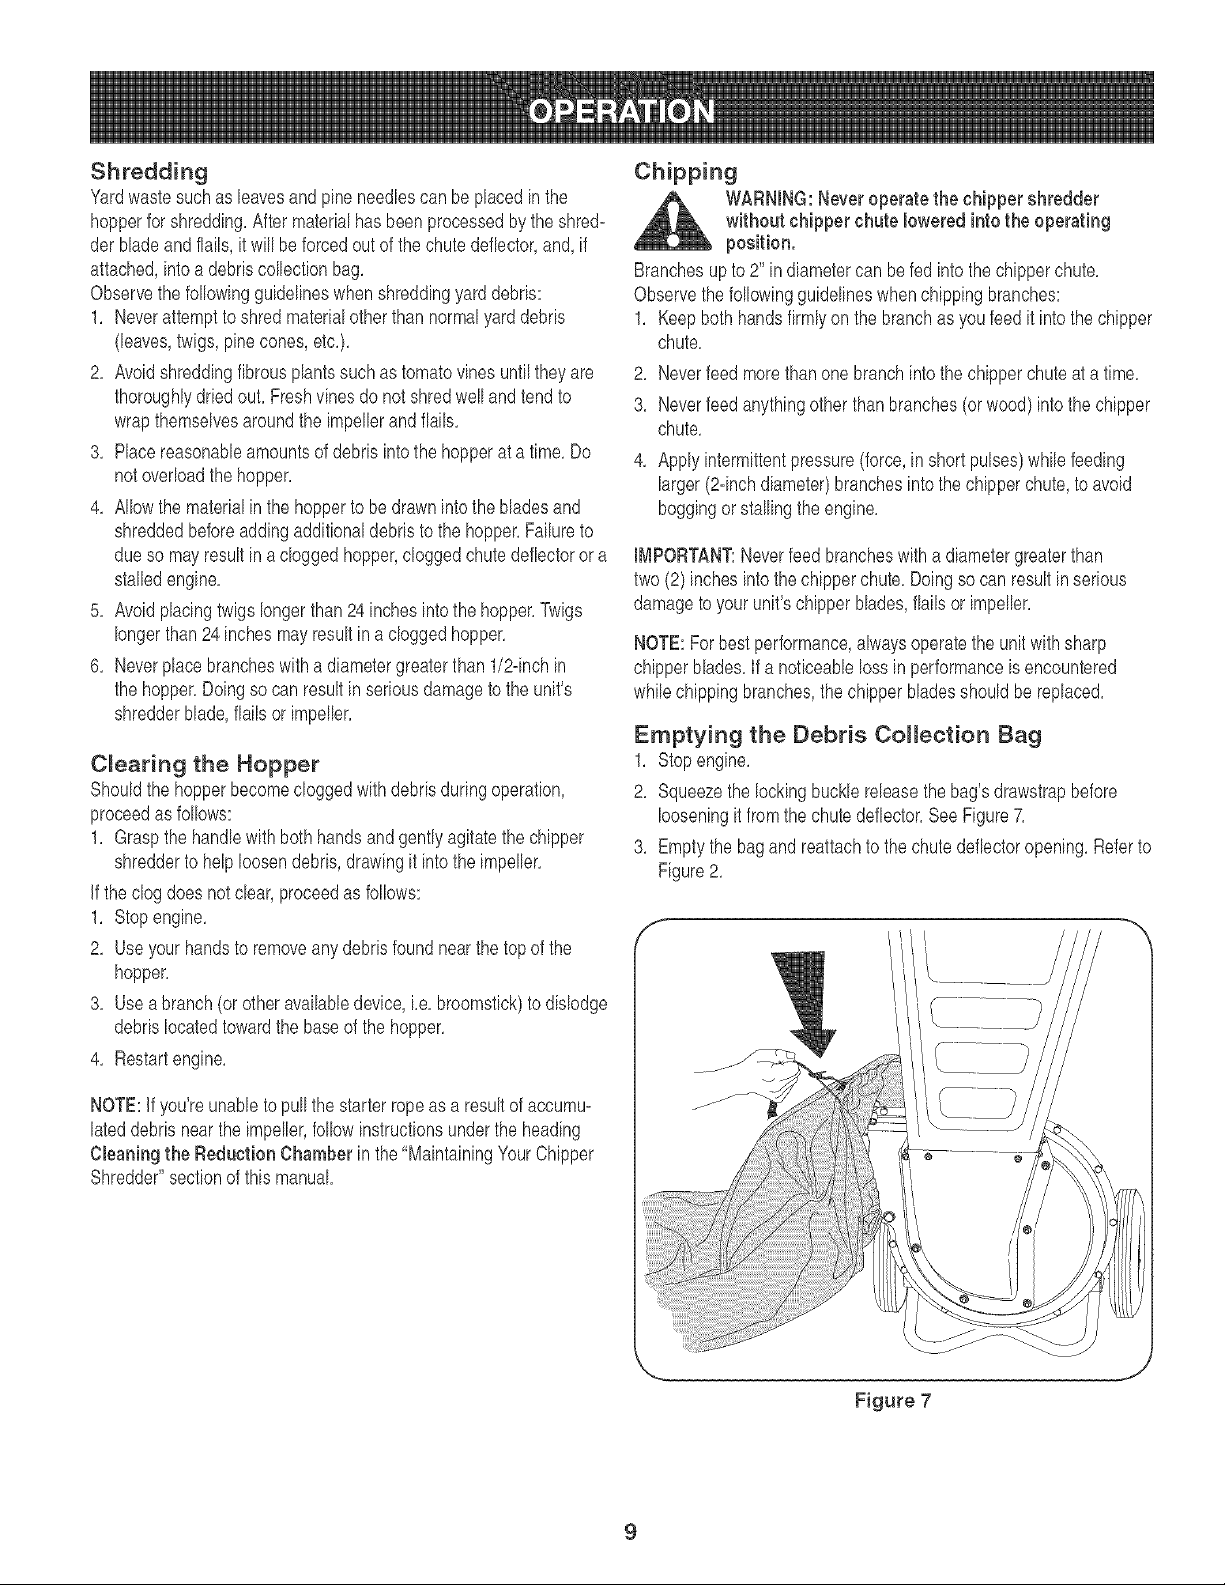
Emptying the Debris Collection Bag
1, Stopengine,
2, Squeezethe lockingbuckle releasethe bag'sdrawstrapbefore
looseningit from the chutedeflector,See Figure7,
3, Emptythe bagandreattachto the chute deflectoropening,Referto
Figure2,
\
Figure 7
WARNING:Alwaysstopengine,disconnectspark
plug,andgroundagainstengine before cleaning,
lubricating or doing any kind of maintenanceon your
machine.
Lubrication
1, Lubricatethe chipperchute hinge a with Nghtoil once a season,
2, Lubricatethe pivot pointson the chute deflectorwith lightoil oncea
season,
3, Referto the Briggs& StrattonOwner/Operatormanualpackedwith
yourunit forengine lubricationinstructions,
Engine Care
Referto the Maintenancesectionof the Briggs& StrattonOwneUOp-
eratermanualpackedwithyourunit,Readandfollowinstructions
carefuNy.
1, Checkengine oil level beforeeach useas instructedinthe
separateenginemanual
2, Cleanair cleaner's preeleaner every25 hoursundernormal
conditions,Cleaneveryfewhoursunderextremelydustycondi-
tions,Replacetheair cleaner cartridge oncea season,To service
the air cleaner,referto theseparateenginemanual
3, Thespark plug shouldbe cleanedandthe gapresetonce a
season,Referto the separateengine manualfor correctplugtype
andgapspecifications,
\
i s
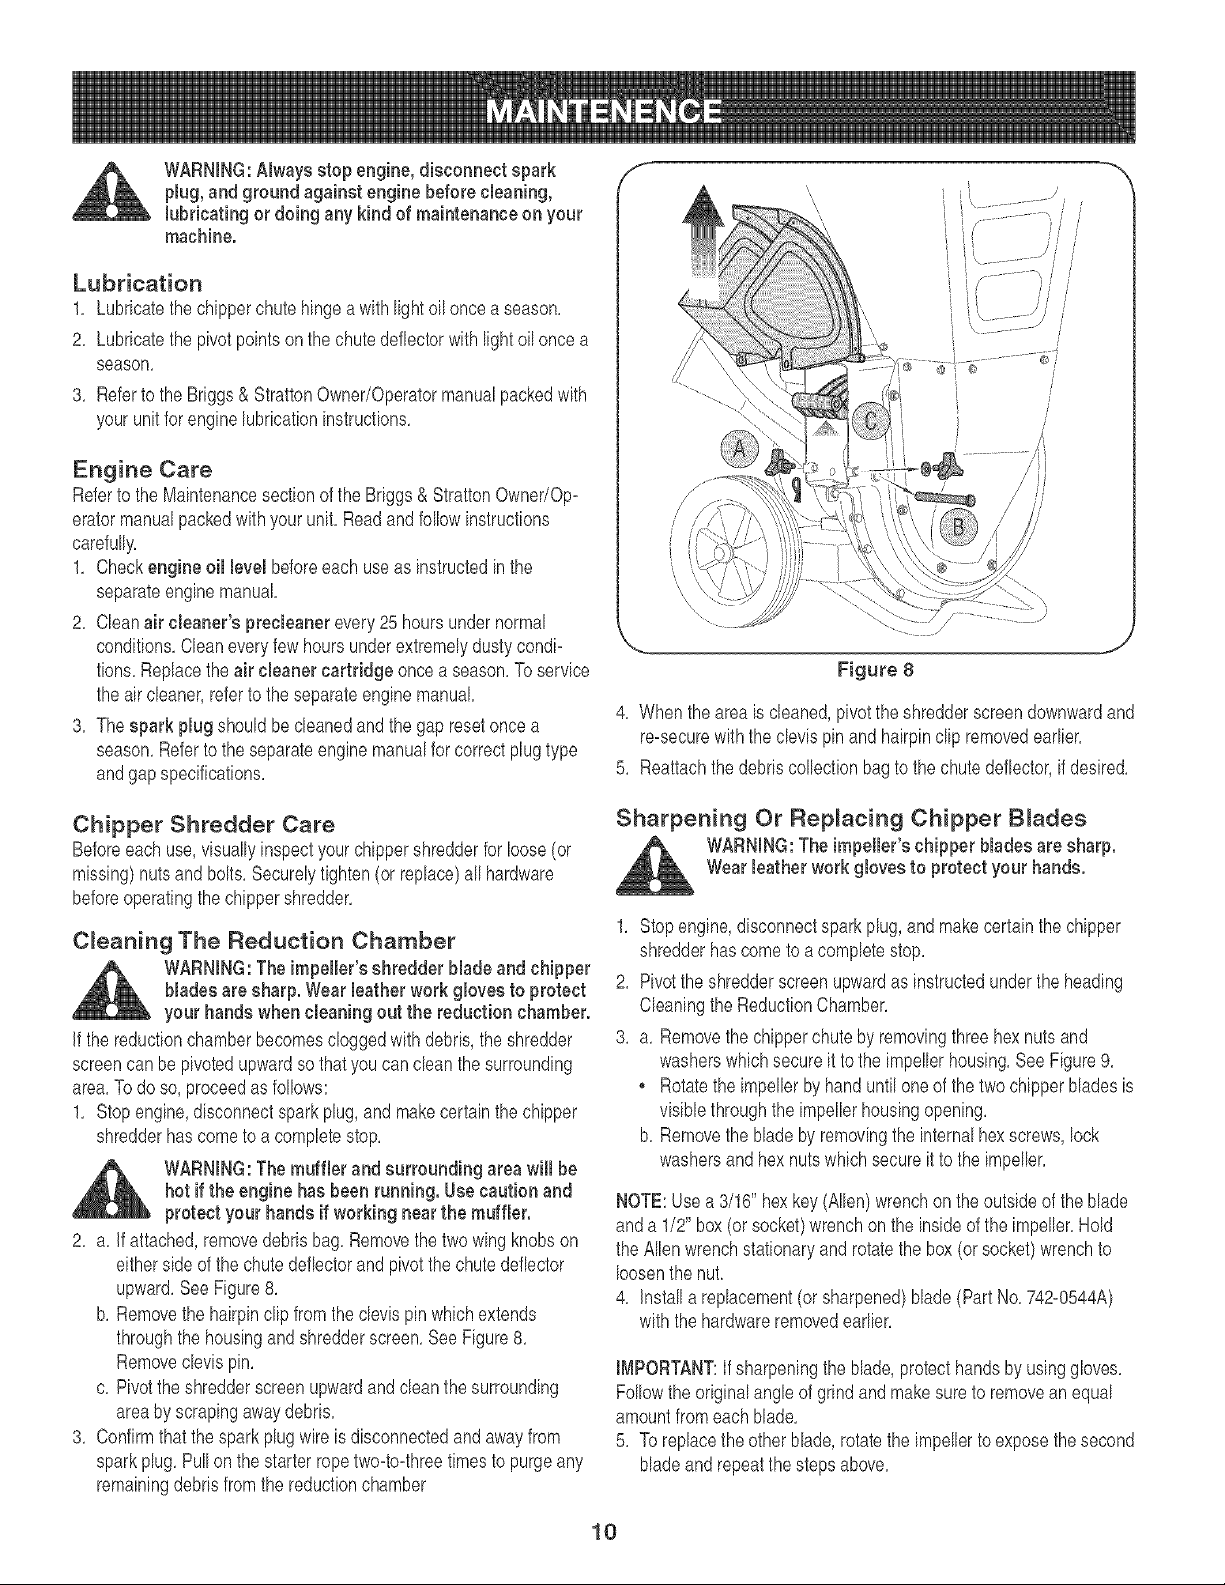
4, Whenthe area is cleaned,pivotthe shredderscreendownwardand
re-securewiththeclevis pin andhairpinclip removedearner,
5, Reattachthe debriscollectionbagto the chutedeflector,if desired,
Chipper Shredder Care
Beforeeach use,visuallyinspectyour chippershredderfor loose(or
missing)nutsandbolts, Securelytighten(or replace)all hardware
beforeoperatingthe chippershredder,
Cleaning The Reduction Chamber
WARNING:The impelleFs shredder blade and chipper
blades are sharp. Wear leather work gloves to protect
your hands when cleaning out the reduction chamber.
If the reductionchamberbecomescloggedwithdebris,the shredder
screencan be pivotedupwardso that youcan cleanthe surrounding
area.Todo so, proceedas follows:
1, Stopengine,disconnectsparkplug,and makecertainthe chipper
shredderhascometo a completestop,
i_L WARNING:The muffler and surrounding area will be
hot if the engine has been running. Use caution and
protest your hands if working near the muffler.
2, a, If attached,removedebrisbag,Removethetwo wingknobson
eithersideof the chute deflectorand pivotthe chute deflector
upward,SeeFigure8,
b, Removethe hairpinclip from the clevispin whichextends
throughthe housingand shredderscreen,SeeFigure8,
Removeclevispin,
c, Pivotthe shredderscreenupwardand cleanthe surrounding
areaby scrapingawaydebris,
3, Confirmthat the sparkplug wire is disconnectedand awayfrom
sparkplug, PuNon the starterropetwo-to-threetimesto purgeany
remainingdebrisfrom the reductionchamber
Sharpening Or Replacing Chipper Blades
WARNING:The impelleFs chipper blades are sharp.
Wearleather work gloves to protect your hands.
1, Stopengine,disconnectspark plug,and makecertainthe chipper
shredderhascometo acompletestop,
2, Pivot theshredderscreenupwardas instructedunderthe heading
Cleaningthe ReductionChamber,
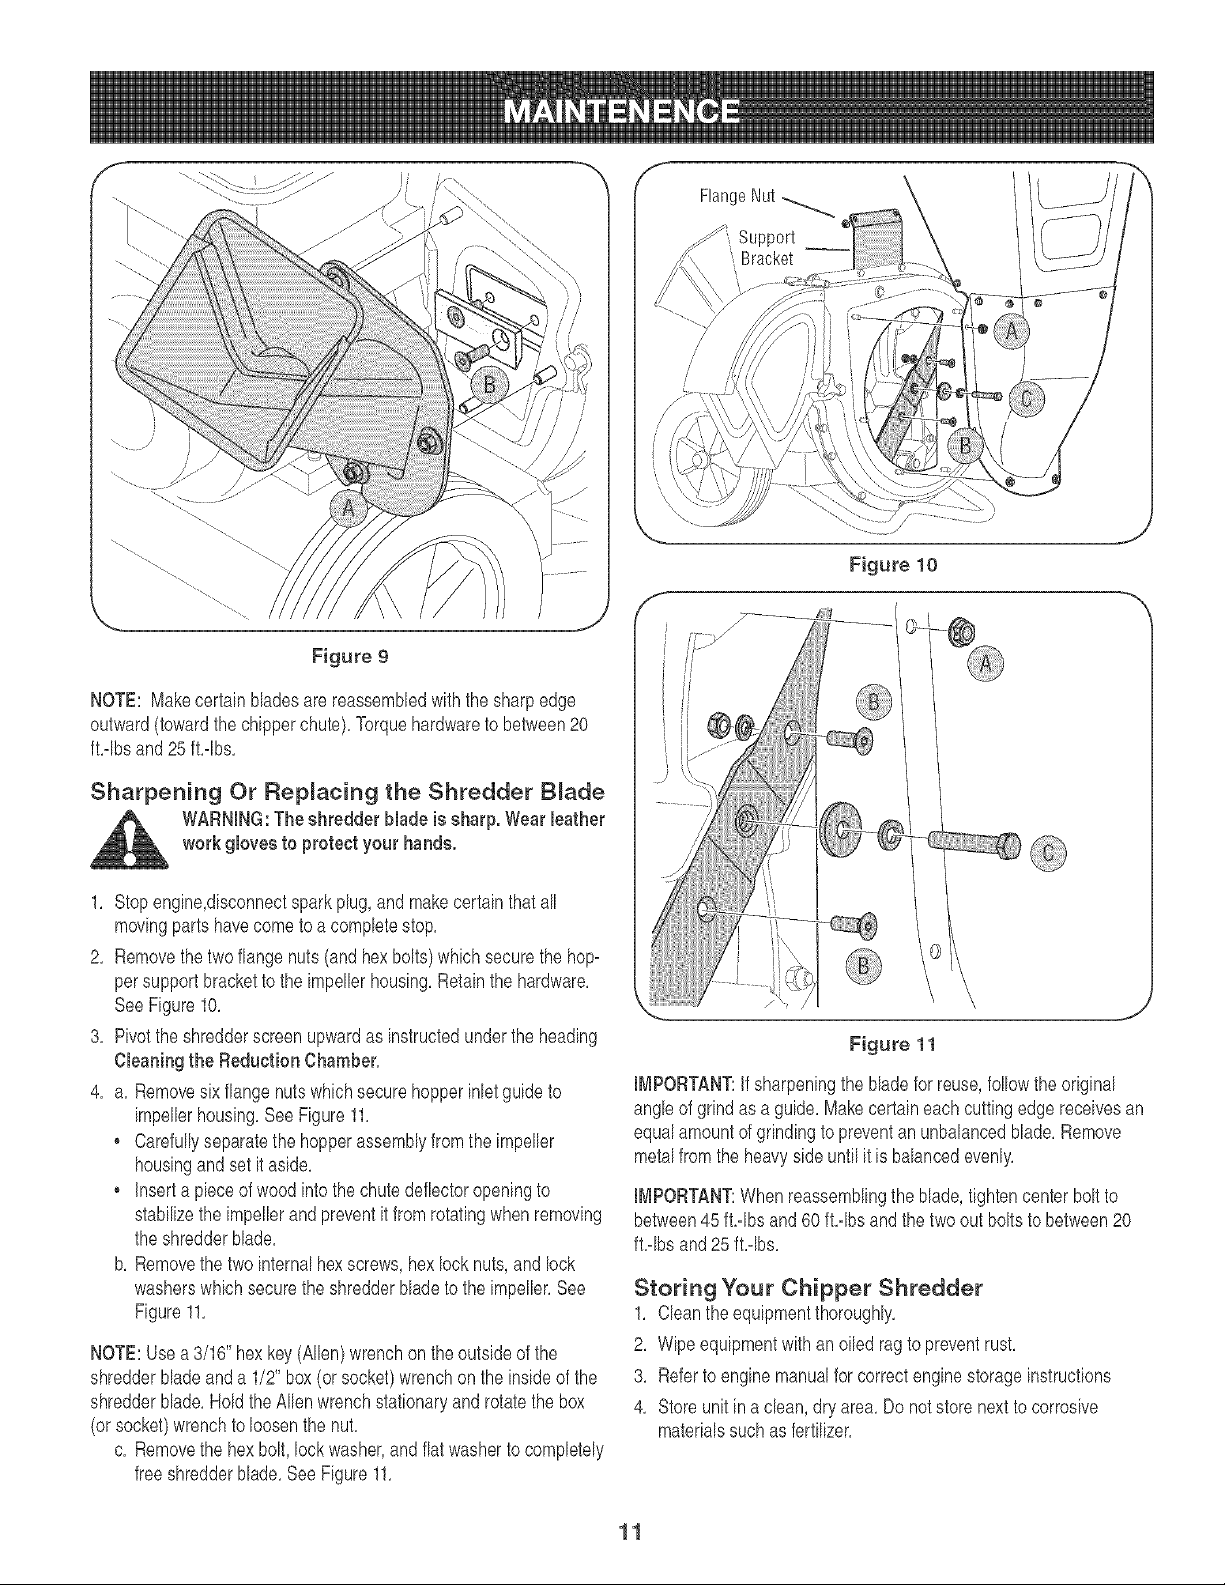
3, a, Removethe chipperchute by removingthreehex nutsand
washerswhichsecureit to the impellerhousing,See Figure9,
• Rotatethe impellerby hand untiloneof the twochipperbladesis
visiblethroughthe impellerhousingopening,
b, Removethe blade by removingthe internalhexscrews,lock
washersand hexnuts whichsecure it to the impeller,
NOTE:Usea 3/16" hexkey(Allen)wrenchonthe outsideof the blade
anda 1/2" box(or socket)wrenchon the insideof the impeller,Hold
the Allen wrenchstationaryand rotatethe box(or socket)wrenchto
loosenthe nut.
4, Installa replacement(orsharpened)blade(PartNo,742:0544A)
withthe hardwareremovedearlier,
IMPORTANT:If sharpeningthe blade,protecthandsby usinggloves,
Followthe originalangleof grind andmakesureto removean equal
amountfromeachblade,
5, To replacethe otherblade,rotatethe impellerto exposethe second
bladeandrepeatthe stepsabove,
10
f m
FlangeNut
Support
Figure 10
Figure 9
NOTE: Makecertainbladesare reassembledwiththe sharpedge
outward(towardthe chipperchute),Torquehardwareto between20
fblbs and 25 fblbs,
Sharpening Or Replacing the Shredder Blade
WARNING:The shredder blade is sharp. Wear leather
work gloves to protect your bands.
1, Stopengine,disconnectsparkplug,andmakecertainthatall
movingpartshavecometo a completestop,
2, Removethetwo flange nuts (and hexbolts)which securethe hop-
persupportbracketto the impellerhousing,Retainthe hardware,
SeeFigure10,
3, Pivotthe shredderscreenupwardas instructedunderthe heading
Cleaning the Reduction Chamber,
4, a, Removesix flangenuts whichsecurehopper inletguideto
impellerhousing,SeeFigure11,
• Carefullyseparatethe hopperassemblyfrom the impeller
housingandset it aside,
, Inserta pieceof woodinto the chutedeflectoropeningto
stabilizethe impellerandpreventit fromrotatingwhenremoving
the shredderblade,
b, Removethe two internalhexscrews,hexlock nuts,and lock
washerswhichsecurethe shredderblade to the impeller,See
Figure11,
NOTE:Usea3/16" hexkey(Allen)wrenchon theoutsideof the
shredderbladeanda 1/2" box(or socket)wrenchon the insideof the
shredderblade,HoldtheAllenwrenchstationaryandrotatethe box
(orsocket)wrenchto loosenthe nut,
c, Removethe hexbolt,lock washer,and flat washerto completely
freeshredderblade,SeeFigure11,
Figure 11
IMPORTANT:If sharpeningthe bladefor reuse,followthe original
angleof grindas a guide,Makecertaineachcuttingedge receivesan
equalamountof grindingto preventan unbalancedblade,Remove
metalfromthe heavysideuntil it is balancedevenly,
IMPORTANT:Whenreassemblingthe blade,tightencenter boltto
between45fblbs and60 fblbs and the two out bolts to between20
fblbs and25fblbs,
Storing Your Chipper Shredder
1, Cleanthe equipmentthoroughly,
2, Wipeequipmentwith an oiled rag to preventrust,
3, Referto enginemanualfor correctenginestorageinstructions
4, Storeunitina clean, dry area,Do notstore next to corrosive
materialssuch as fertilizer,
11
PrepareyourCraftsmanChipperShredderforstorageat the end of
the seasonor if the unitwill not be usedfor 30 daysor longer,A yearly
check-upbyyour localSearsParts & RepairCenteris a good wayto
ensurethatthe unit runsproperlynextseason,
Chipper Shredder
, Cleantheequipmentthoroughly,
, Wipeequipmentwith anoiledragto preventrust, Usea light oil or
siliconeto wipe,
, Storeunit in a clean,dry area,Do not store nextto corrosive
materialssuchas fertilizer,
Engine
• Servicethe engineas instructedin the separateBriggs& Stratton
enginemanualpackedwithyourchippershredder,
Other
• Do notstoregasolinefromoneseasonto another,
• Replacethe gasolinecan if it starts to rust, Rustand/ordirt in the
gasolinewill causeproblems,
• Storeunit in a clean,dry area,Do not store nextto corrosive
materials,suchas fertilizer,
NOTE:If storingin an unventilatedor metalstorageshed,becertainto
rustproofthe equipmentbycoatingwith a lightoil or silicone,
12
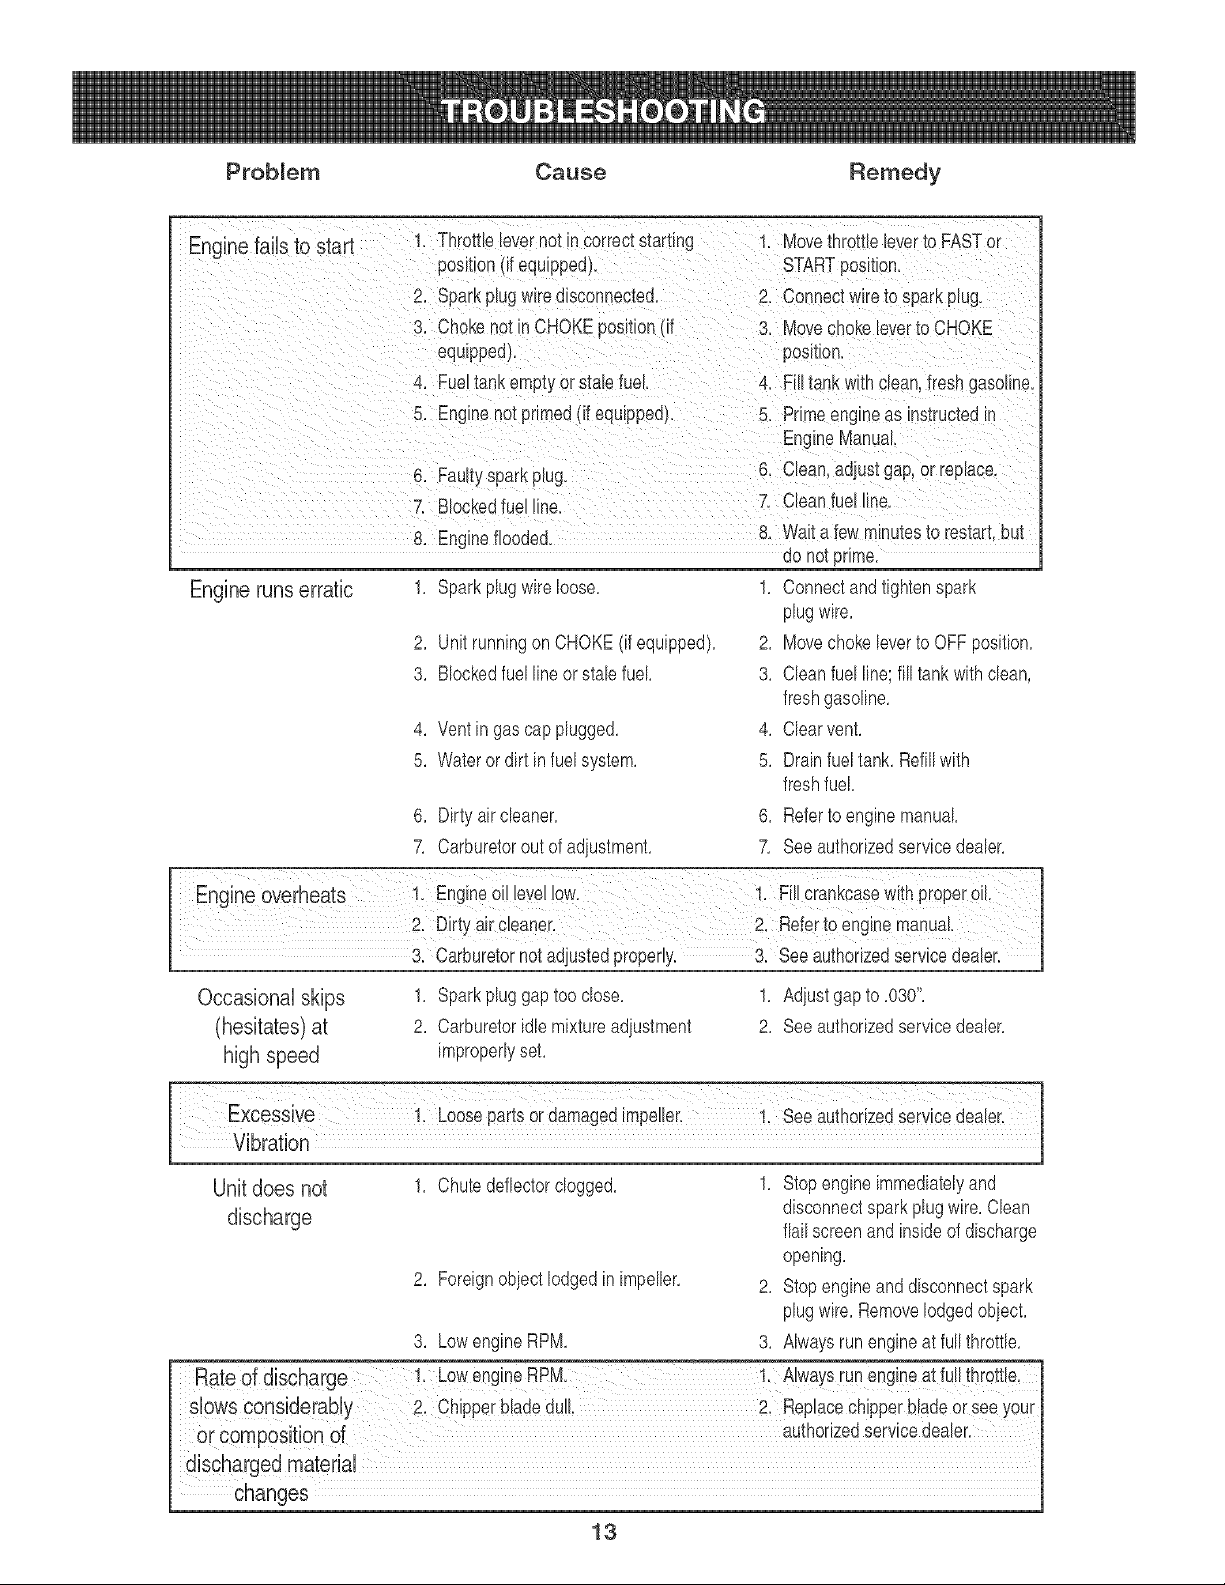
Problem Cause Remedy
Enginerunserratic
1. Throttleleverno[ tncorrec[startlnc 1. Movethrottle leverto FASTor
pos tion Iit equ_ppea,, STARTposmon
2. Sparkp_ugw_rea_sconnectea. 2. Connectwireto spa _tp_ug.
3. Choke notin CHOKE sosmon it 3. Movechoke bverto CHOKE
equppea).
4. Fueltankempt_or stalefuel.
5. Engineno[prlmea(if equipped).
6, Faultysparkplug.
position,
4. Filltank v,_thclean,freshgasoline.
5. Primeengineas mstruXed_n
EngineManua
6. Clean,adjust _ap,or replace.
7. Blocked fuel line. 7. Clean tue_Hne.
8, Engine flooded. 8, Wait a few minutes to restart, but
ao noi prime
1. Sparkplugwire loose. 1.
2. Unitrunningon CHOKE(if equipped). 2.
3. Blockedfuel line orstab fuel 3.
Connectandtightenspark
plugwire.
Movechokeleverto OFFposition.
Cban fuel line;fill tank with dean,
4. Ventin gas capplugged.
5. Wateror dirt in fuelsystem.
6. Dirtyaircbaner.
7. Carburetorout of adjustment.
freshgasoline.
4. Clearvent.
5. Drainfueltank. Refillwith
freshfuel
6. Referto engine manual
7. See authorizedservicedealer.
Occasional skips
(hesitates) at
high speed
1. Sparkplug gap too dose.
2. Carburetoridle mixtureadiustment
improperlyset.
1. Adiustgap to .030".
2. See authorizedservicedealer.
Unit does not
discharge
1. Chutedeflectordogged.
2. Foreignobjectlodgedinimpeller.
1. Stopengine immediatelyand
disconnectsparkplugwire.Cban
flail screenandinsideof discharge
opening.
2. Stopengineand disconnectspark
plugwire.Removelodgedobject.
3. LowengineRPM. 3. Alwaysrun engineat fullthrottle.
Rate of discharge !: Low engineBPMr !: A!waYsrun engineat fu!l thrott!e:
slows considerably 2. Chipperbiadedull 21 ReplaceChipperbladeorseeYour
changes
13
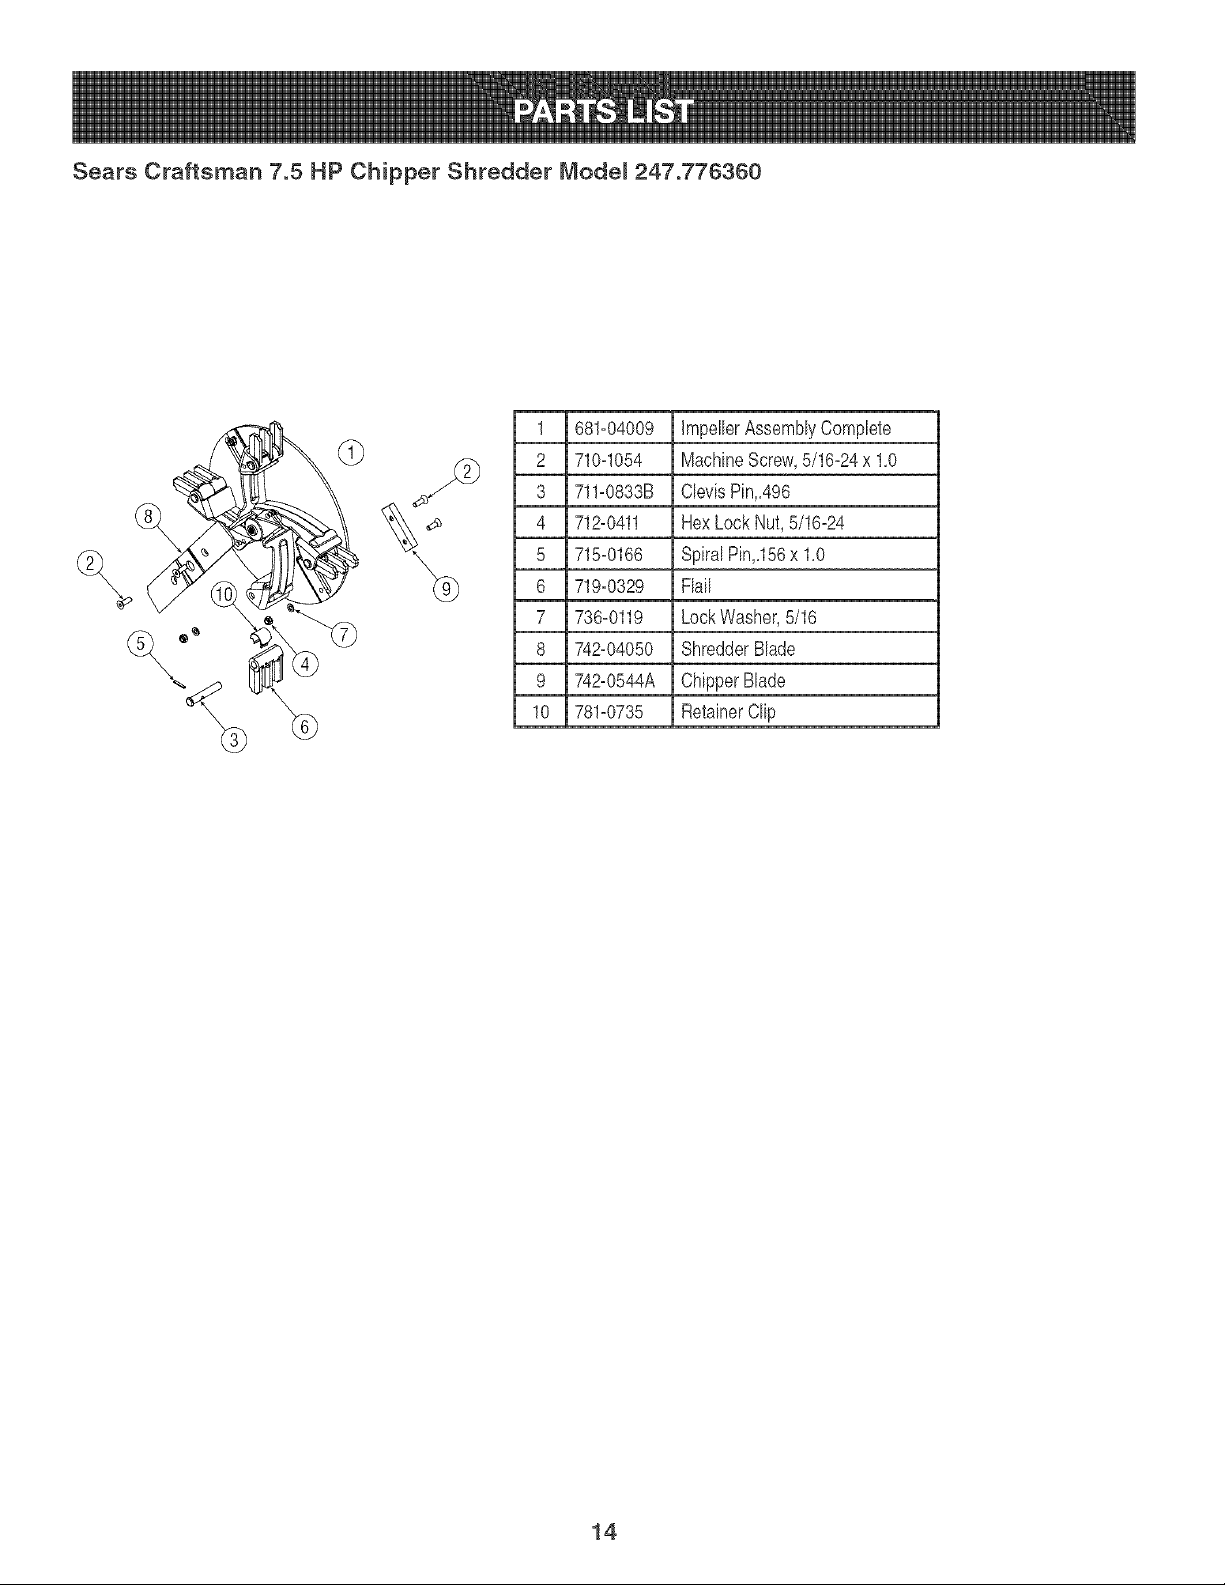
Sears Craftsman 7.5 HP Chipper Shredder Mode[ 247°776360
%
@
1 681-04009 ImpellerAssemblyComplete
2 710q054 MachineScrew,5/16_24x 1.0
3 711-0833B ClevisPin.496
4 712_0411 Hex Lock Nut,5/16_24
5 715-0166 SpiralPin.156x 1.0
6 719-0329 Flail
7 736-0119 LockWasher,5/16
8 742_04050 ShredderBlade
9 742-0544A ChipperBlade
10 781-0735 RetainerClip
14
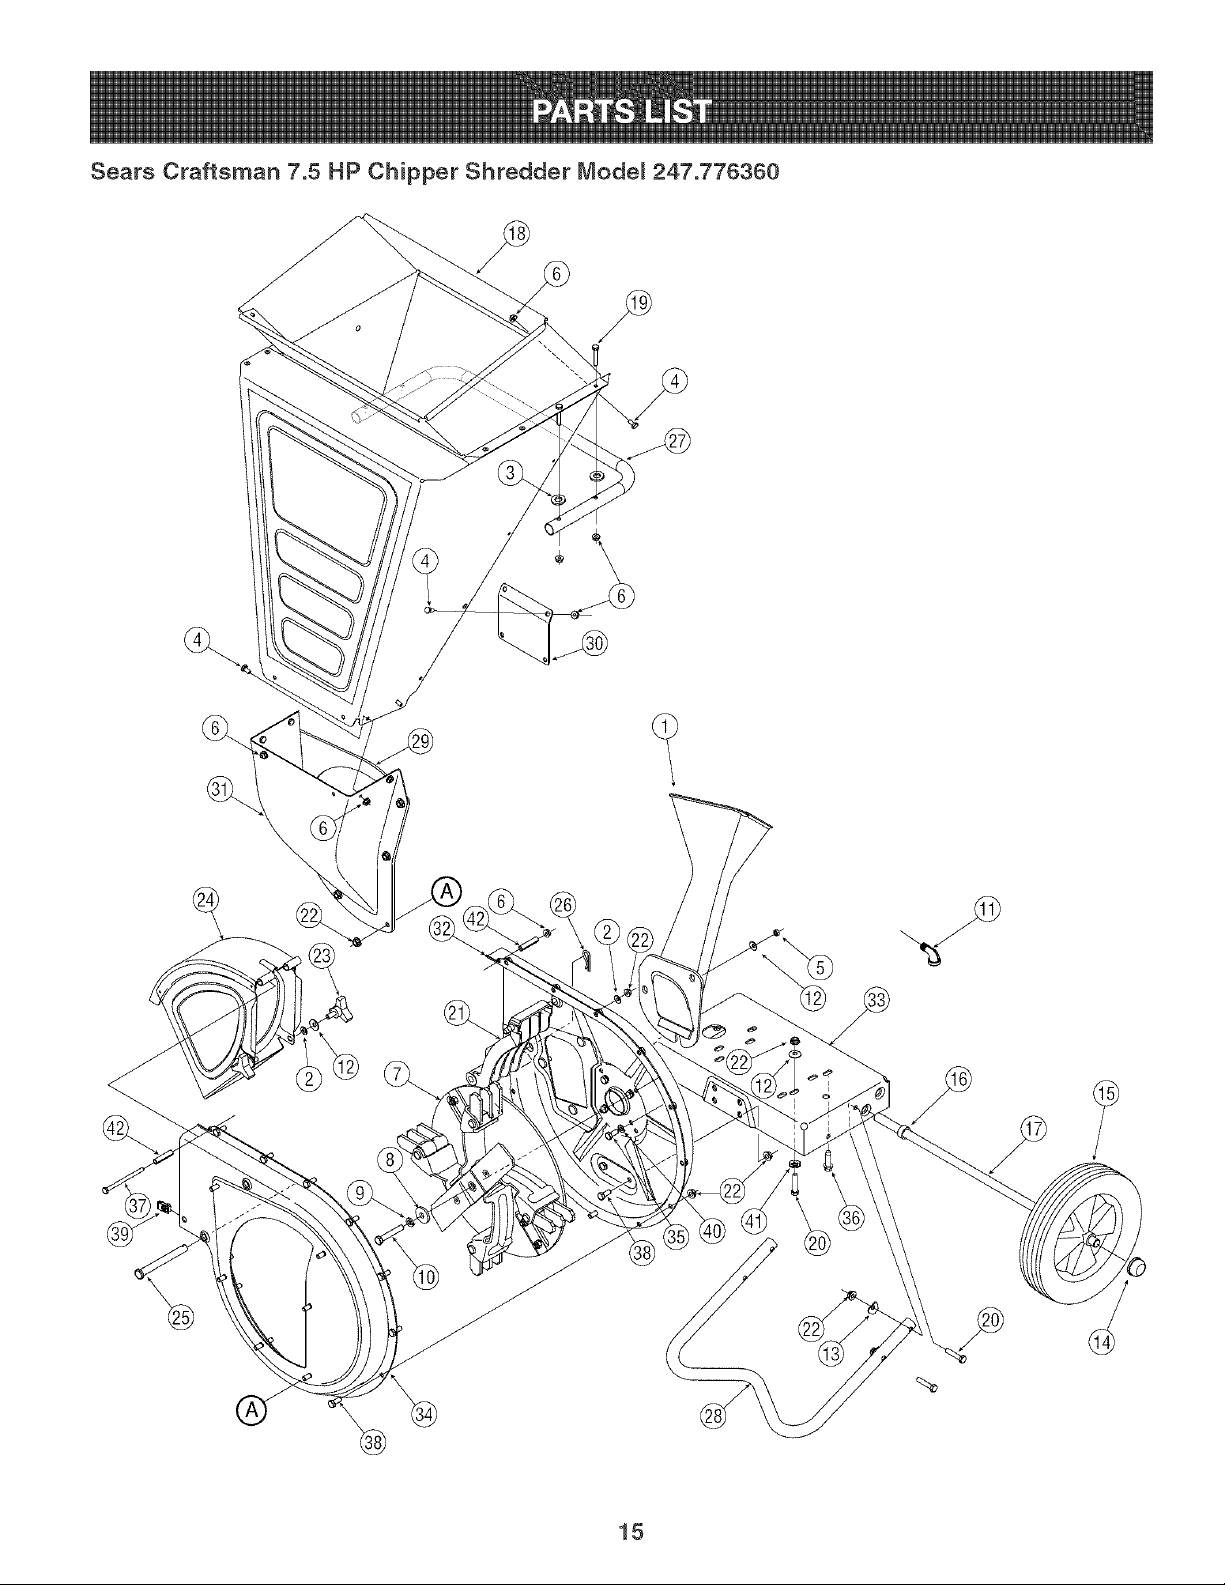
Sears Craftsman 7.5 HP Chipper Shredder Mode[ 247°776360
Y
@
15
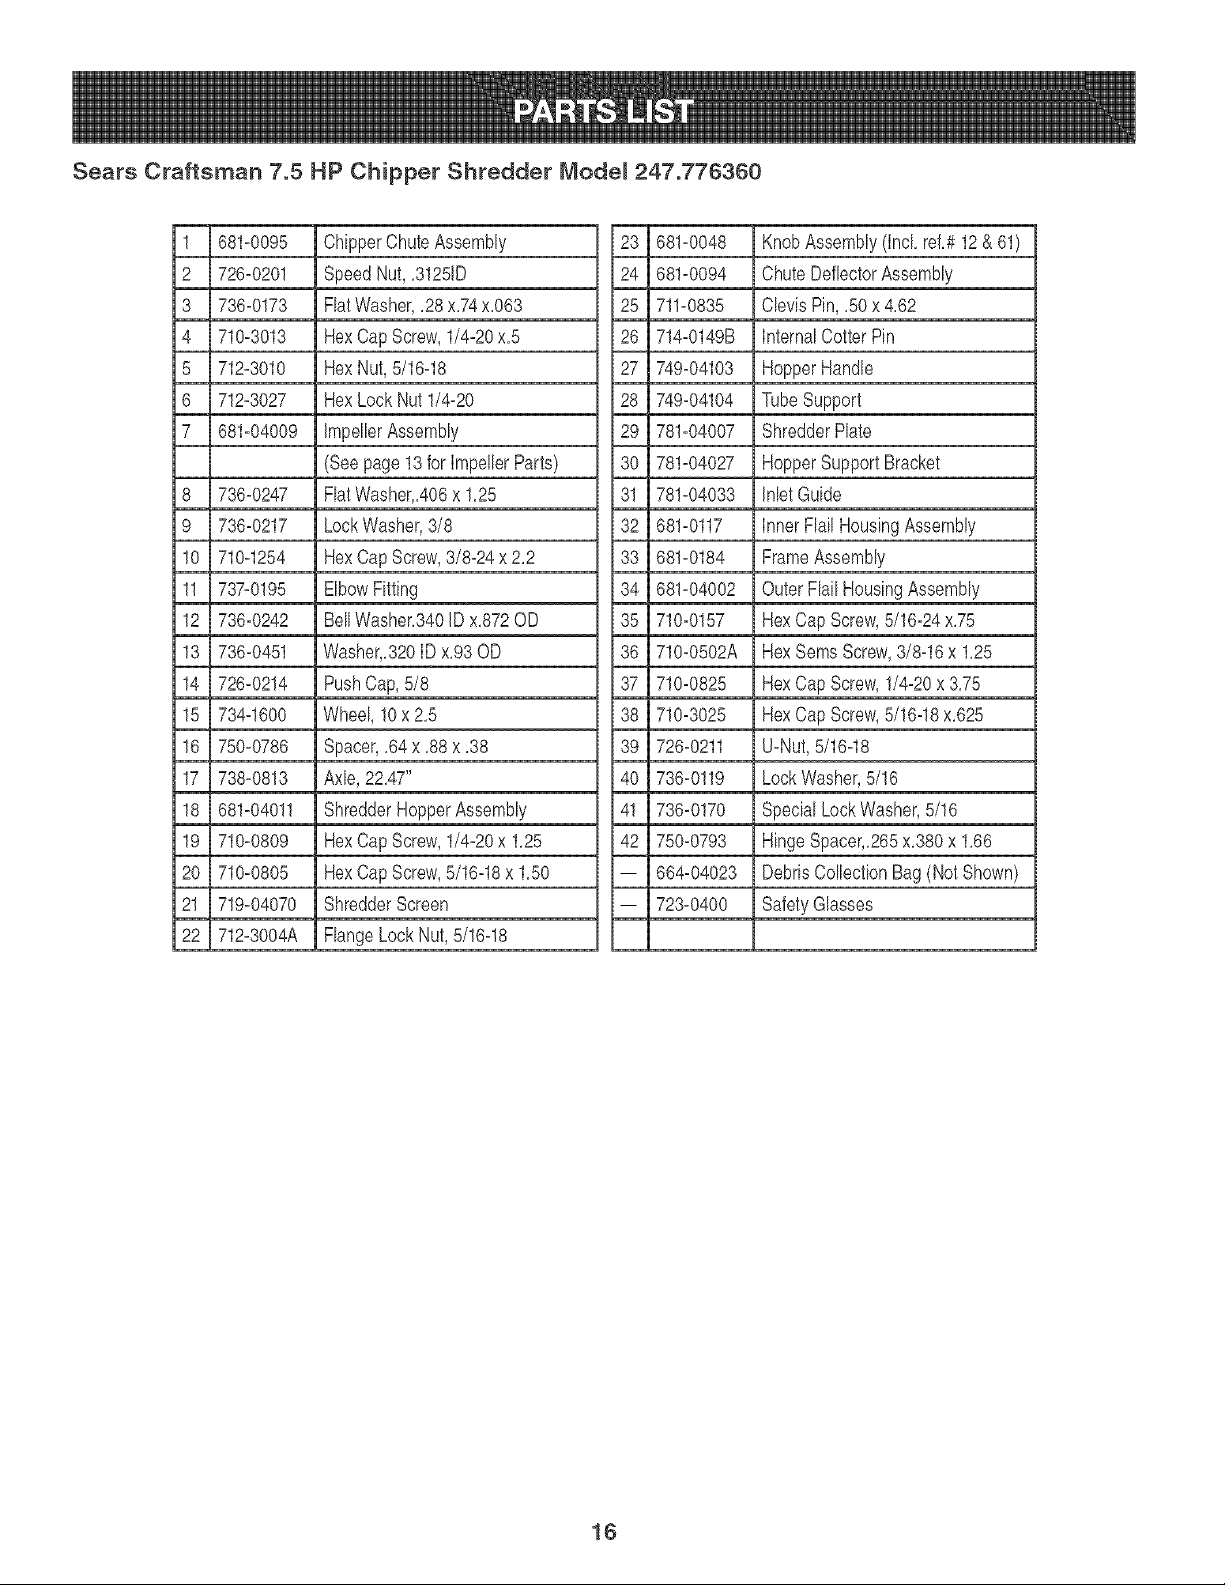
Sears Craftsman 7.5 HP Chipper Shredder Mode[ 247°776360
1 681_0095 ChipperChute Assembly
2 726_0201 SpeedNut,.31251D
3 736_0173 FlatWasher,.28x.74x.063
4 710_3013 HexCap Screw,1/4_20x.5
5 712_3010 HexNut, 5/16_18
6 712_3027 HexLock Nut l/4_20
7 681_04009 ImpellerAssembly
(Seepage13for ImpellerParts)
8 736_0247 FlatWasher.406x 1.25
9 736_0217 LockWasher,3/8
10 710_1254 HexCap Screw,3/8_24x 2.2
11 737_0195 ElbowFitting
12 736_0242 BellWasher.340iD x.872OD
13 736_0451 Washer,.320[D x.93 OD
14 726_0214 PushCap,5/8
15 734q600 Wheel,10x 2.5
16 750_0786 Spacer,.64x .88 x .38
17 738_0813 Axle, 22.47"
18 681_04011 ShredderHopperAssembly
19 710_0809 HexCap Screw,1/4_20x1.25
20 710_0805 HexCap Screw,5/16_18x 1.50
21 719_04070 ShredderScreen
22 712_3004A FlangeLockNut, 5/16q8
23 681_0048 KnobAssembly([ncLref.#12&61)
24 681_0094 Chute DeflectorAssembly
25 711_0835 ClevisPin, .50x 4.62
26 714_0149B [nternaICotterPin
27 749_04103 HopperHandle
28 749_04104 TubeSupport
29 781_04007 ShredderPlate
30 781_04027 HopperSupportBracket
31 781_04033 InletGuide
32 681_0117 InnerFlailHousingAssembly
33 681_0184 FrameAssembly
34 681_04002 OuterFlaiI HousingAssembly
35 710_0157 HexCap Screw,5/16_24x.75
36 710_0502A HexSeresScrew,3/8_16x1.25
37 710_0825 HexCap Screw,1/4_20x 3.75
38 710_3025 HexCap Screw,5/16_18x.625
39 726_0211 U_Nut,5/16_18
40 736_0119 LockWasher,5/16
41 736_0170 SpecialLockWasher,5/16
42 750_0793 HingeSpacer.265x.380x 1.66
-- 664_04023 DebrisCollectionBag (NotShown)
-- 723_0400 SafetyGlasses
16
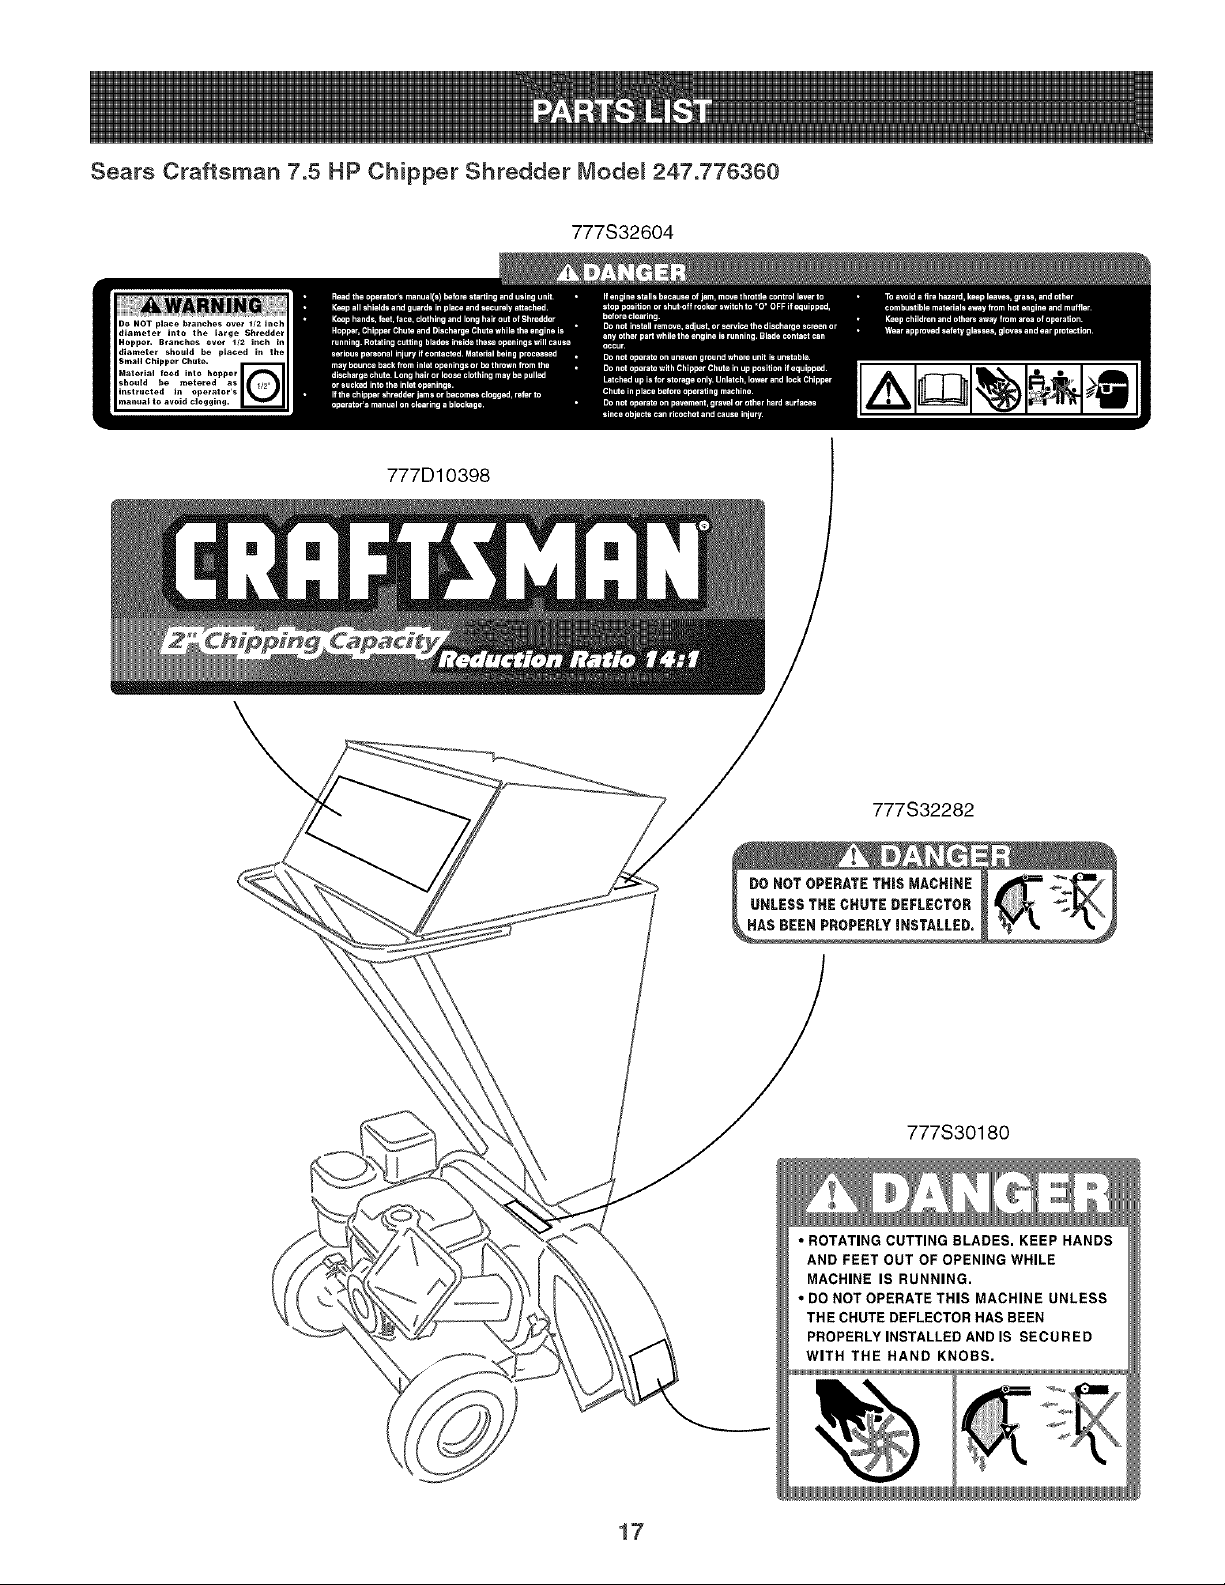
Sears Craftsman 7.5 HP Chipper Shredder Mode[ 247°776360
777S32604
777D10398
777S32282
777S30180
17
(Thispageapplicableinthe U,S,A,and Canadaonly,)
Sears, Roebuck and Co., U.S.A. (Sears}, the California Air Resources Board (CARB)
and the United States EnvironmentaJ Protection Agency (U.S. EPA}
Emission Control System Warranty Statement (Owner's Defect Warranty Rights and Obligations}
EMISSIONCONTROLWARRANTYCOVERAGEISAPPLICABLETO CERT!- YEAR 1997ANDLATERENGINESWHICHARE PURCHASEDAND USED
FlED ENGINESPURCHASEDIN CALIFORNIAIN 1995ANDTHEREAF- ELSEWHEREINTHE UNITEDSTATES(ANDAFTERJANUARY1,2001 IN
TER,WHICHARE USED IN CALIFORNIA,ANDTOCERTIFIEDMODEL CANADA).
California and United States Emission Control Defects Warranty Statement
The CaliforniaAir ResourcesBoard(CARB),U.S.EPAandSearsare pleased
to explainthe EmissionControlSystemWarrantyon your modelyear2000 and
latersmalloff-roadengine(SORE).In California,newsmall off-roadengines
mustbe designed,builtand equippedto meettheState'sstringentanti-smog
standards.Elsewhereinthe UnitedStates, newnon-road,spark-ignition
enginescertifiedfor modelyear 1997and latermustmeetsimilarstandardsset
forth bythe U.S.EPA.Sears mustwarranttheemissioncontrolsystemon your
enginefor the periodsof time listedbelow,providedtherehas beenno abuse,
neglector impropermaintenanceof your smalloff-roadengine.Youremis-
sion controlsystemincludespartssuch as thecarburetor,air cleaner,ignition
system,mufflerand catalyticconverter.Also includedmaybeconnectorsand
otheremissionrelatedassemblies.Wherea warrantableconditionexists,Sears
will repairyour smalloff-roadengine at no cost to you includingdiagnosis,parts
and labor.
Sears Emission Control Defects Warranty Coverage
Smalloff-roadenginesarewarrantedrelativeto emissioncontrolpartsdefects
fora period of oneyear,subjectto provisionsset forth below.Ifany covered
Owner's Warranty
Asthe smalloff-roadengineowner,you are responsiblefor the performanceof
therequiredmaintenancelistedinyour Operatingand MaintenanceInstruc-
tions.Sears recommendsthatyou retain all your receiptscoveringmaintenance
on yoursmall off-roadengine,butSearscannot denywarrantysolelyforthe
lackof receiptsor for yourfailureto ensurethe performanceof all scheduled
maintenance.Asthe smalloff-roadengineowner,you shouldhoweverbe
awarethat Sears maydenyyouwarrantycoverageif your smalloff-roadengine
ora part hasfaileddueto abuse,neglect,impropermaintenanceor unap-
part onyour engineis defective,the part will be repairedor replacedbySears.
Responsibilities
provedmodifications.Youare responsiblefor presentingyour smalloff-road
engineto an AuthorizedSearsService Dealeras soonas a problemexists.The
undisputedwarrantyrepairsshouldbe completedin a reasonableamountof
time,not to exceed30 days.Ifyou haveany questionsregardingyourwarranty'
rightsand responsibilities,you shouldcontacta SearsServiceRepresentative
at 1--800--469--4663.Theemissionwarrantyis a defectswarranty.Defectsare
judgedon normalenginepedormance.Thewarrantyis notrelatedto an in-use
emissiontest.
Sears Emission Control Defects Warranty Provisions
ThefollowingarespecificprovisionsrelativetoyourEmissionControlDefectsWarrantyCoverage.Itisin additionto theSearsenginewarrantyfornon-regulated
enginesfound in theOperatingandMaintenanceInstructions.
1. WarrantedParts
Coverageunderthis warrantyextendsonly to the parts listed below(the
emissioncontrolsystemsparts)to the extentthese parts werepresenton
theenginepurchased.
a. FuelMeteringSystem
oColdstart enrichmentsystem
oCarburetorand internal parts
oFuelPump
b. Airlnduction System
oAir cleaner
oIntakemanifold
c. IgnitionSystem
oSparkplug(s)
oMagnetoignitionsystem
d. CatalystSystem
oCatalyticconverter
oExhaustmanifold
oAir injectionsystemor pulsevalve
e. MiscellaneousItemsUsed inAboveSystems
oVacuum,temperature,position,time sensitivevalves
andswitches
• Connectorsand assemblies
2. Lengthof Coverage
Searswarrantsto the initialownerand eachsubsequentpurchaserthat
theWarrantedParts shall befree from defectsin materialsandworkman-
ship whichcausedthe failureof the WarrantedPartsfor a periodof one
yearfrom the datethe engineis deliveredto a retailpurchaser.
3. NoCharge
Repairor replacementof any WarrantedPartwill be performedat no
chargeto the owner,includingdiagnosticlabor whichleads to the
determinationthata WarrantedPartis defective,if the diagnosticwork is
performedat an AuthorizedSears ServiceDealer.For emissionswarranty
servicecontact your nearestAuthorizedSears Service Dealeras listed in
the "YellowPages"under"Engines,Gasoline,""GasolineEngines,""Lawn
Mowers,"or similarcategory.
4. Claimsand CoverageExclusions
Warrantyclaimsshall be filed in accordancewiththe provisionsofthe
Sears EngineWarrantyPolicy.Warrantycoverageshall be excludedfor
failures of WarrantedPartswhichare not originalSears parts or because
of abuse, neglector impropermaintenanceas setforth in theSears
EngineWarrantyPolicy.Searsis not liable to coverfailuresof Warranted
Partscausedby the useof add-on, non-original,or modifiedparts.
5. Maintenance
Any WarrantedPartwhich is notscheduledfor replacementas required
maintenanceor which is scheduledonly for regularinspectionto the effect
of repair or replaceas necessary"shall be warrantedas to defectsfor the
warrantyperiod.Any WarrantedPartwhich is scheduledfor replacement
as requiredmaintenanceshallbe warrantedasto defectsonly for the
periodof time upto the first scheduledreplacementforthat part. Any
replacementpart that is equivalentin performanceand durabilitymay'
be usedin theperformanceof any maintenanceor repairs.The owneris
responsibleforthe performanceof all requiredmaintenance,as definedin
the SearsOperating andMaintenanceInstructions.
6. ConsequentialCoverage
Coveragehereundershallextend to thefailure of any engine components
caused bythefailure of anyWarrantedPart still underwarranty.
Inthe USAand Canada,a 24 hour hot line, 1-800-469-4663,has a menuof pre-recordedmessagesofferingyouenginemaintenanceinformation.
18
Congratulationson makinga smartpurchase,YournewCraftsman®
productis designedand manufacturedfor yearsof dependableopera-
tion,But likeall products,it mayrequirerepairfrom time to time,That's
whenhavinga RepairProtectionAgreementcansave you moneyand
aggravation,
Here'swhat'sincludedinthe Agreement:
• Expertserviceby our 12,000professionalrepair specialists
• Unlimitedserviceand nochargefor partsandlaboronall covered
repairs
• Productreplacementif yourcoveredproductcan'tbe fixed
• Discountof 10%from regularpriceof serviceand service-related
partsnotcoveredby the agreement;also,10%off regularpriceof
preventivemaintenancecheck
• Fasthelp by phone- phonesupportfroma Searstechnicianon
productsrequiringimhomerepair,plus convenientrepair
scheduling
Purchasea RepairProtectionAgreementnowandprotectyourself
fromunexpectedhassleand expense,
Onceyou purchasethe Agreement,a simplephonecall is all that it
takesfor you toscheduleservice,Youcan call anytimeday or night, or
schedulea serviceappointmentonline,
Searshas over12,000professionalrepairspecialists,who have
accesstoover 4,5millionquality partsand accessories,That'sthe
kindof professionalismyoucan counton to helpprolongthe lifeof
your newpurchasefor yearsto come,Purchaseyour RepairProtection
Agreementtoday!
Some limitations and exclusions apply. For prices and additional
information call 1-800-827o8855.
Sears Installation Service
ForSearsprofessionalinstallationof homeappliances,garagedoor
openers,waterheaters,andothermaiorhomeitems,in the U,S,A,call
1-800-4-MY-HOME®
Look For ReJevant Emissions Durability Period and
Air index information On Your Engine Emissions Labe!
Enginesthatarecertifiedto meetthe CaliforniaAir ResourcesBoard(CARB)Tier2 EmissionStandardsmustdisplayinformationregardingthe
EmissionsDurabilityPeriodandtheAir index,Sears,RoebuckandCo,,U,S,A, makesthisinformationavailableto the consumeron our emission
labels,
The Emissions Durability Period describesthe numberof hoursof actualrunningtime for whichthe engine is certifiedto be emissionscompli-
ant,assumingpropermaintenancein accordancewiththe Operating& Maintenanceinstructions,The followingcategoriesare used:
Moderate: Engineis certifiedto be emissioncompliantfor 125hoursof actual enginerunningtime,
kitermediate: Engineis certifiedto be emissioncompliantfor 250 hoursof actual enginerunningtime,
Extended: Engineis certifiedto be emissioncompliantfor500 hoursof actualengine runningtime,
Forexample,a typicalwalk-behindlawnmoweris used20 to 25 hoursperyear,Therefore,theEmissions Durability Period of anenginewith
an intermediate ratingwouldequateto 10to 12years,
The Air kldex is a calculatednumberdescribingthe relativelevelof emissionsfor a specificenginefamily,The lowerthe Air hdex, the cleaner
the engine,This informationis displayedin graphicalform on the emissionslabel,
After Juty 1, 2000, Look For Emissions Compliance Period On
Engine Emissions CompJiance Labet
AfterJuly1,2000certainSears,RoebuckandCo,,U,S,A,engineswill be certifiedto meetthe UnitedStatesEnvironmentalProtectionAgency
(USEPA)Phase2 emissionstandards,ForPhase2 certifiedengines,the EmissionsCompliancePeriodreferredto on the EmissionsCompliance
labelindicatesthe numberof operatinghoursforwhich the enginehas beenshownto meetFederalemissionrequirements,Forenginesless
than225 cc displacement,CategoryC = 125hours, B = 250 hoursand A = 500 hours, Forenginesof 225 cc or more,CategoryC = 250 hours,B
= 500 hoursand A = 1000 hours,
The displacementenginesof ModelSeries210000is 344 cc, 280000is 465 cc, 310000enginesis501 cc,
19

20
Manuam dem operador
CRRFTSMRN
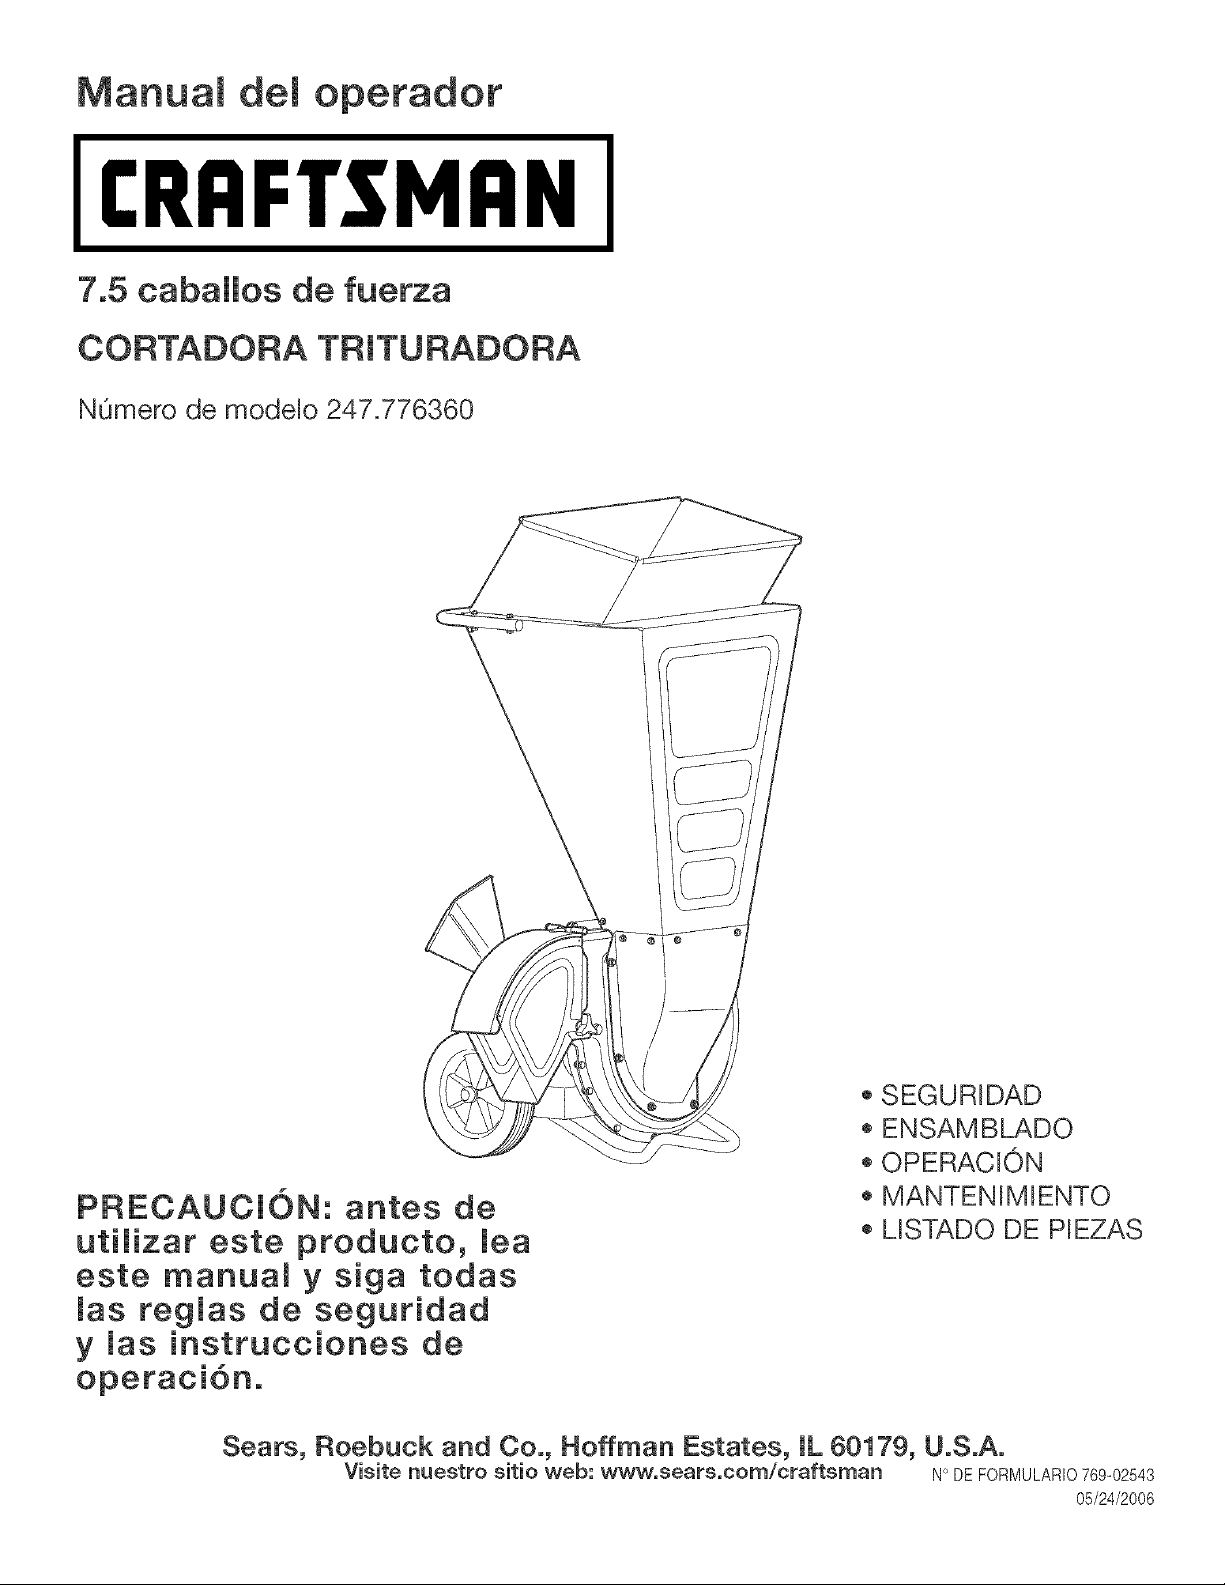
7.5 cabammosde fuerza
CORTADORA TRmTURADORA
NOmero de modelo 247.776360
PRECAUCION: antes de
uti_izar este producto, mea
este manual y siga todas
mas regmas de seguridad
y mas instrucciones de
o SEGURIDAD
ENSAMBLADO
OPERACJON
MANTENIMIENTO
MSTADO DE PIEZAS
Sears, Roebuck and Co., Hoffman Estates, IL 60179, U.S.A.
Visite nuestro sitio web: www, sears,com/craftsman N° DEFORMULARIO769-02543
05/24/2006
AHmacenamiento fuera de temporada ...... Pb_gina32
SoHuci6n de proMemas ............................. Pagina 33
Usta de piezas .................................................P_gina 34-37
NOmeros de servicio ...................... Cubierta posterior
Garanfia de dos aSos para la cortadora trituradora Craftsman
Durantedos ahosa partirde la fechade compra,siempreque a estacortadoratrituradorase le realiceel serviciode mantenimiento,
lubricaci6ny puestaapuntode acuerdoalas instruccionesdel manualdelpropietario,SearsrepararAsin cargocualquierdefecto
de materialeso manede obra.Siesta cortadoratrituradoraCraftsmanse utilizapara prop6sitoscomercialeso de alquiler,esta
garanfiase aplicas61odurante30 diasa partirde la fecha de compra.
Estagaranfiano cubre:
. Elementosdesechablesquese desgastanpor el usonormal,incluyendoentreotros,buiias,cuchillasy filtrosde aire.
. Reparacionesnecesariasdebidoa abusoo negligenciadel operador,incluyendoabolladuradel cig(]ehaly fallaper no realizar
mantenimientodel equipode acuerdocon las instruccionescontenidasen el manualdel propietario.
ELSERVlCIODE GARANT[AESTADISPONIBLEPARALOS USUARIOSQUELLEVENLA CORTADORATRITURADORAAL CENTRO
DE PIEZASY REPARAClONESDESEARSMASCERCANODENTRODELOSESTADOSUNIDOS.
Estagarantiaes validaOnicamentemientrasel ppducto se ufilicedentrode los EstadosUnidos.
PARAUBICARALCENTRODE SERVlCIOTECNICOSEARSMASCERCANO0 PARAPROGRAMAREL SERVlCIOTECNICO,
SIMPLEMENTECONTACTEA SEARSAL 1-800-4-MY-HOME®.
Estagarantialeotorgaderechoslegalesespecificos;ustedtambi6npuedetenerotrosderechos,los cualesvariande un estadoa otro.
SEARS,ROEBUCKANDCO., D/817WA,HOFFMANESTATES,IL 60179
Acuerdos de protecci6n sobre reparaciones
Felicitacionesperhaberrealizadounaadquisici6ninteligente.El
productoCraftsman®quehaadquiridoesta dise_adoy fabricado
parabrindartouchesa_osde fuocionamientoconfiable.Perocome
todoslosproductosa vecespuederequerirde reparaciones.Es en
esemementocuandoel disponerde unAcuerdode protecci6npara
reparacioneslepuedeahorrardinero
YAProblemas.
continuaciOnsedetallanlospuntosinduidosenelAcuerdo:
• Servicioexpertoprestadopornuestros12.000especialistasen
reparacionesprofesionales
, Servicioilimitadosincargoparalaspiezasy la manede obraen
todaslas reparacionescubiertas
•Reemplazodelproductosinoesposiblerepararelproductocubierto
• Descuentode 10%delprecionormaldelservicioy delaspiezas
relacionadasconel mismoquenoestencubiertaspore_
acuerdo;ademas10%dedescuentodelprecionormalde la
verificaciondemantenimientopreventive
, Ayudar@idaportelefono- asistenciatelefonicaa cargode un
tecrficodeSearsparalosproductosque requierenreparaciOn
adomicilio,ademasde unaprogramacionconvenienteparala
reparacion
Adquieraahoraunacuerdode protecci6nparareparacionesy
proteiasedeproblemasy gastosinesperados.
Unavezadquiridoelacuerdopuedeprogramarel serviciocon
tans61orealizaruna Ilamadatelef6nica.PuedeIlamarencualquier
mementodel dia o de lanoche,o programarunservicioenlinea.
Searsdisponedemasde 12.000especialistasen reparaciones
profesionalesquetienenaccesoa masde 4.5millonesde piezasy
accesoriosdegrancalidad.Estees eltipode
profesionalismoenelquepuedeconfiarparaquele ayudea
prolongarlavidaOtildel productorecientementeadquiridoen
losa_ospervenir,iAdquieraheysuacuerdodeprotecci6npara
reparaciones!
SeapHeandeterminadasJimitacionesy exc_usiones.Paraobtener
preeiose informaci6nadieiona_Hamea_1-800-827-6655,
Serviciode instaJaci6nde Sears
Paralainstalaci6nprofesionalde Searsdeartefactosdomesticos,
dispositivosde aperturadeportonesdegarage,calentadoresde
aguay otrosarticulosdelhogarenlos EstadosUnidos,Ilameal
1-800-4-MY-HOME®
Caballos de fuerza
Aceite del motor:
Capacidad de aceite:
Combustible:
Motor:
7.5 caballos de fuerza
SAE 30
20 Onzas
Gasoiina sin piomo
Champion® RC=12YC
Briggs and Stra#on 150112-0408
22

ADVERTENCIA:Elescapedelmotordeesteproducto,algunosdesuscomponentesy algunoscom-
ponentesdelvehiculocontienenoemitenproductosquimicosqueelestadodeCaliforniaconsideraque
puedenproducircancer,defectosdenacimientou otrosproblemasreproducfivos.
PELIGRO:Estamaquinaestadisefiadaparaserutilizadarespetandolasreglasdeseguridadcontenidasenestemanual.
AIigualqueconcualquiertipodeequipomotorizado,undescuidooerrorporpartedeloperadorpuedeproducirlesiones
graves.Estamaquinaescapazdeamputarmanosy piesy dearrojarobjetoscongranfuerza.Denorespetarlasinstruc-
cionesdeseguridadsiguientessepuedenprodudrlesionesgraveso lamuerte.
ADVERTENCIA:Lapresenciadeestesimboloindicaquesetratadeinstruccionesimportantesde
seguridadquedeberespetarparaevitarponerenriesgosuseguridadpersonaly/omaterialy lade
otraspersonas.Leay sigatodaslasinstruccionesenestemanualantesdeiniciarlaoperaci6ndeesta
maquina.Encasedenoseguirestasinstruccionespodriaprovocarlesionespersonales.Cuandovea
estesimboloSIGALAADVERTENCIA.
m
Capacitaci6n
1. Lea,comprenday respetetodaslas instruccionesquefiguran en la
maquinao en este(os) manual(es)antesde precederalensamblado
y operaciondel equipo. Guardeeste manualen un lugar seguropara
consultasfuturasy regulares,asi comopara solicitar repuestos.
2. Familiaricesecon todos loscontrolesy con el uso adecuadode losmis-
mos.Sepa comodetenerla maquinay c6mo desengranarloscontroles
r4pidamente.
3. Nuncapermitaque nifiosmenoresde 16 a[ios operenesta m_Jquina.Los
nif_osde 16a[ios y mayoresdebenleery comprenderlas instruccionesde
operaciony las reglasde seguridadcontenidasen estemanual,y tambi_n
debensercapacitadosy estar supervisadosperuno de lospadres.
4. Nuncapermitaqueadultossin los conocimientosadecuadosacercade la
m_Jquinalaoperen.
5. Mantengaa losobservadores,ayudantes,mascotasy a los nif_ospor
Io menosa 22,9 m. (75pies)de la mb,quina mientrasla mismaest;Jen
funcionamiento.Detengala maquinasi alguien entraenla zona.
6. Nuncaenciendaun motoren espacioscerradoso en unazonacon poca
ventilaci6n.Elescapedel motorcontienemonoxidode carbono,un gas
inodoroy letal.
7. No pongalas manoso los piescerca de las piezas rotatoriaso en las
camarasde alimentaci6nni en laabertura de descarga.El contactoconel
motorrotatoriopuede producirla amputaciondededos,manoso pies.
8. Nuncatrate de destapar latoma de alimentaci6no la aberturade
descarga,ni trate de sacar o vaciarla bolsa de la aspiradora,nide revisar
y repararla maquinamientrasel motorestaen marcha.Apagueel motor
y esperehastaquetodas las piezasm6vilesse hayandetenidoper
completo.Desconecteel cable de la bujiay p6ngalode maneraquehaga
masacontrael motor.
Preparativos
1. Reviseminuciosamentelazonadonde se utilizar_Jel equipo.Retiretodas
las piedras,botellas,latasu otrosobjetosextraflosquepuedanser levanta-
dos o arrojadoscausandolesionespersonaleso dafiosa lamb,quina.
2. Paraprotegerselos ojosutilice siempreanteojoso antiparrasde
seguridadmientrasopera la maquinao mientrasla ajustao repara.Los
objetos arrojadosque rebotanpuedenlesionargravementelavista.
3. Utilicezapatosde trabajo resistentes,de suelafuerte,y pantalonesy
camisasajustados.Las prendassueltaso lasalhajaspuedenquedar
atrapadasen las piezasm6viles.Nunca utilicela m_Jquinadescalzoocon
sandalias. Utiliceguantesdetrabajode cuero cuandoalimentematerial
por el canal de lacortadora.
4. Antesde encenderla maquinacontrolequetodoslospernosy tornillosesten
bienajustadosparacomprobarquela maquinaseencuentraen condiciones
segurasde operaci6n.Ademas,realiceunainspeccionvisualde la maquinaa
intervalosfrecuentesparacontrolarsi la mismaestadaf_ada.
5. Mantengao reemplacelas etiquetasde seguridade instruccionessegOn
sea necesario.
6. Sea sumamentecuidadosoal manipularla gasolinapara evitarlesiones
o daf_os.La gasolinaes altamenteinfiamabley susvaporespueden
causar explosiones.Se puedelesionargravementesi derramagasolina
sobre ustedo sobre laropaya que se puedeencender.Lavesela piely
cambiesederopade inmediato.
a. Utilices61orecipientespara gasolinaautorizados.
b. Apaguetodos los cigarrillos,cigarros,pipasy otrasfuentesde combustion.
c. Nuncacarguecombustibleen la m_Jquinaen un espaciocerrado.
d. Nuncasaque latapa de lagasolina ni agreguecombustiblemientrasel
motoresta calienteo en marcha.
e. Dejequeel motorse enfr[epor Io menos dos minutesantesde volvera
cargar combustible.
f. Nuncarecargueel tanquede combustibleen exceso.Lleneeltanque no
mas de 1/2 pulgadapordebajo de labasedel cuello del filtro paradejar
espaciopara la dilataciondel combustible.
g. Vuelvaa colocar latapa de lagasolinay ajOstelabien.
h. Limpiela gasolina derramadasobre el motory el equipo.Trasladela
maquinaa otra zona. Espere5 minutos antesde encenderel motor.
Nuncaalmacenela maquinao el recipientede combustibleen un espacio
cerradodondehayafuego,chispaso luz piloto(perejemplo, hornos,
calentadoresde agua,calefactores,secadoresde ropa,etc.)
Parareducirel riesgo de incendiomantengalamaquinalimpia de pasto,
hojasy de acumulaci6nde otros desechos.Limpielos derramesde aceite
o combustibley saquetodos losdesechosembebidoscon combustible.
K. Dejequela maquinase enfrie por Io menos5 minutos antesde guardarla.
23
Funcionamiento
1. No pongalasmanes o los piescerca de las piezas rotatoriaso en las
camarasde alimentacionni en laabertura de descarga.Elcontactocon el
motorrotatoriopuede producirla amputaciondededos,manoso pies.
2. Antesde encenderla maquinacompruebeque elcanal de la cortadora,la
toma de alimentaci6ny la cb,mara de corte estanvacias y sindesechos.
3. Inspeccioneminuciosamentetodo el materialque deseatriturar y saque
los objetosmet_Jicos,piedras,botellas,latas uotros objetosextratios que
puedenocasionarlesioneso daFlarla maquina.
4. Siel motorgolpeaun objeto extra[ioo si la m_Jquinaempiezaa producir
un sonido pococomLino unavibraci6n,apagueel motorde inmediato.
Dejeque el motorse detengaporcompleto. Desconecteel cablede la
bujfa,p6ngalode maneraquehaga masacontrael motory siga estos
pasos:
a. Inspeccionela maquinaparavet si esta daF_ada.
b. Repareo reemplacelaspiezas daFladas.
c. Controlesi hay piezasfiojas y ajOstelasparaasegurarque la maquina
funcionede maneraseguray continua.
5. No permitaquese acumulematerialprocesadoen lazona de descarga.
Elmismo puedeobstaculizarla descargaadecuaday provocarel retorno
del materialatraves de laaberturade alimentacion.
6. No intentetriturar ni picarmaterialde mayortamaF_oal especificadoen la
maquinao en este manual.Se podrian producirlesioneso da[ios.
7. Nuncatrate de destaparla toma de alimentaci6no la aberturade
descargamientrasel motoresta en marcha.Apagueel motory espere
hastaque todaslas piezasquese muevense hayandetenido por
completo,desconecteel cable de labujfay pongalode manera quehaga
masacontrael motorantesde sacarlos escombros.
8. Nuncaoperela maquinasin que la bolsade la aspiradoray el canal de
descargaestenconectadosa la maquinacomecorresponde.Nuncavac[e
ni cambiela bolsade la aspiradoramientrasel motorest,, en marcha. El
extremocon cierre de labolsade laaspiradoradebe quedarcerrado todo
eltiempo mientrasla opera.
9. Nuncaoperela maquinasi el pico de ingresoo la uni6nopcionalpara la
manguerano estanconectadosa la maquinaadecuadamente.Nunca
intenteconectaro cambiarningunade estas unionesmientrasel motor
estb,en marcha.
10.Mantengatodos losprotectores,desviadoresy dispositivosde seguridad
en su lugary en buenascondiciones.
11.Mientrasalimentamaterialdentrode lam_.quinamantengasu rostroy
su cuerpodetr_Jsy hacia un costadodel canal de la cortadorapara evitar
lesionesper retrocesosaccidentales.
12.Nuncaopereesta maquinasi no tiene buenavisibilidad o iluminaci6n.
Siempredebeestar segurode queesta bien afirmadoy sostengabien las
manijas.
13.Noopere esta maquinaen superficiescongrava.
14.Noopere esta m_.quinaestandobajolosefectos del alcoholo de drogas.
15.Elsilenciadory el motorse calientany puedenproducir quemaduras.No
lostoque.
16.Nuncalevanteotransporte la maquinacuandoesta en movimiento.
Mantenimiento y aJmacenamiento
1. Nuncaaltere los dispositivosde seguridad.Controle peri6dicamenteque
funcionende forma adecuada.
2. Verifiquefrecuentementequelos pernosy tornillos est6najustados
correctamenteparaasegurarsedeque la maquinaestetrabajandode
manerasegura.Ademas,realiceunainspecci6nvisualde lamb,quina
para controlarsi la mismaesta daF_aday reparelade ser necesario.
3. Antesde limpiar,repararo inspeccionarla maquina,detenga elmotor
y compruebequeel mismoy quetodas las piezasm6vilesse hallan
detenido. Desconecteel cable de labuj[ay p6ngalode maneraquehaga
masa contra el motorpara evitarque seenciendade maneraaccidental.
4. Nocambiela configuraci6ndel reguladordel motorni acelere demasiado
el mismo. Elreguladorcontrola lavelocidadmaximasegura de operaci6n
del motor.
5. Mantengao reemplacelas etiquetasde seguridad e instruccionessegOn
sea necesario.
6. Siga lasinstruccionesde estemanualparaque la carga,descarga,
transportey almacenamientode estamaquinaseanseguros.
7. Nuncaalmacenela maquinao el recipientede combustibleen un espacio
cerradodondehayafuego,chispas o luzpilotocomo perejemplo,
calentadoresde agua, hornos,secadoresde ropa,etc.
8. Consultesiempreel manualde operacionpara lasinstrucciones
adecuadasparael almacenamientofuerade temporada.
9. Si es necesarioevacuarel tanquede combustible,hagaloen exteriores.
10.Respetelas leyesy reglamentacionesreferentesa la disposici6ncorrecta
de combustible,aceite,etc. para protegerel medicambiente.
No modifique et motor
Paraevitar lesionesgraveso la muerte,no modifiqueel motorbajoninguna
circunstancia.Si cambia la configuraci6ndel reguladorel motorpuede
descontrolarsey operara velocidadesinseguras.Nuncacambiela configura-
ci6n de fabrica del reguladordel motor.
Aviso referido a emisiones
Los motoresqueestancertificadosy cumplencon las regulacionesde
emisionesfederalesEPAy de CaliforniaparaSORE (EquiposSmallOff Road
Equipment)estancertificadospara operarcon gasolinacomOnsin plomoy
puedenincluirlos siguientessistemasde controlde emisiones:Modificaci6n
de motor(EM)y catalizadorde tresv[as (TWC) si esta equipadode esa
manera.
Su responsabHidad
Restrinjael uso de estamaquinael6ctrica a personasque lean,comprendan
y respetenlas advertencias e instruccionesque aparecenenese manualy
en la maquina.
24
Busque el periodo de duraci6n de emisiones importantes yla informaci6n de dasificaci6n de aire en
maetiqueta de emisiones de su motor
Los motores cuyo cumplimiento con los est&ndares de emisiSn Tier 2 de la Comisi6n de Recursos Amb{entales de California (CARB)
est6 certificado deben exhibit la informaci6n relacionada con el periodo de duraci6n de las emisiones y la clasificaci6n de aire. Sears,
Roebuck and Co., de los Estados Unidos ponen esta informaci6n a disposici6n del consumidor en nuestras etiquetas de emisiones.
El Periodo de Duraci6n de las Emisiones describe el nQmero de horas de tiempo real de funcionamiento para el cual se certifica que
el motor cumple con las reglas de emisi6n, descontando el mantenimiento adecuado del mismo segQn las instrucciones de oper-
aci6n y mantenimiento. Se utilizan las siguientes categorias:
Moderado:Se certifica que el motor cumple con las reglas de emisi6n durante 125 horas de tiempo real de funcionamiento del motor.
lnmediato:Se certifica que el motor cumple con las reglas de emisi6n durante 250 horas de tiempo real de funcionamiento del motor.
Extendido:Se certifica que el motor cumple con las reglas de emisi6n durante 500 horas de tiempo real de funcionamiento del motor.
Por ejemplo, una cortadora de c6sped tipica que se empuja desde atr&s se usa entre 20 y 25 horas por a_o. Pot Io tanto, el Pedodo
de Duraci6n de Emisiones de un motor con una clasificacidn intermedia seria equivalente a entre 10 y 12 a_os.
LacmasificaciSn de aire es un nOmero calculado para describir el nivel relativo de emisiones para un grupo de motores en particular.
Cuanto menor sea la clasificaci6n de aire, mayor es la limpieza del motor. La informaci6n se presenta de forma gr&fica en la etiqueta
de emisiones.
Despues dei 1 de julio de 2000, busque el periodo de cumplimiento de las reglas de
emisiones en la etiqueta de cumpiimiento de las reglas de emisiones del motor
Despu6s del 1 de julio de 2000 se certificar& que determinados motores Sears, Roebuck and Co., de los Estados Unidos
cumplen con los estb.ndares de emisiones de la fase 2 de la Agencia de Protecci6n Ambiental de los Estados Unidos (USE=
PA). Para los motores certificados para la etapa 2, el periodo de cumplimiento con las reglas de emisiones al cual se hace
referencia en la etiqueta de cumplimiento con las reglas de emisiones indica el n_mero de horas de funcionamiento para el
cual se ha demostrado que el motor cumpie con los requerimientos federales de emisi6n.
Para los motores con desplazamiento inferior a 225 cc, Categoda C = 125 horas, B = 250 horas y A = 500 horas.
Para los motores con desplazamiento de 225 cc o m&s, Categoria C = 250 horas, B = 500 horas y A = 1000 horas.
El desplazamiento de los motores de la serie modelo 150112 es 249 cc.
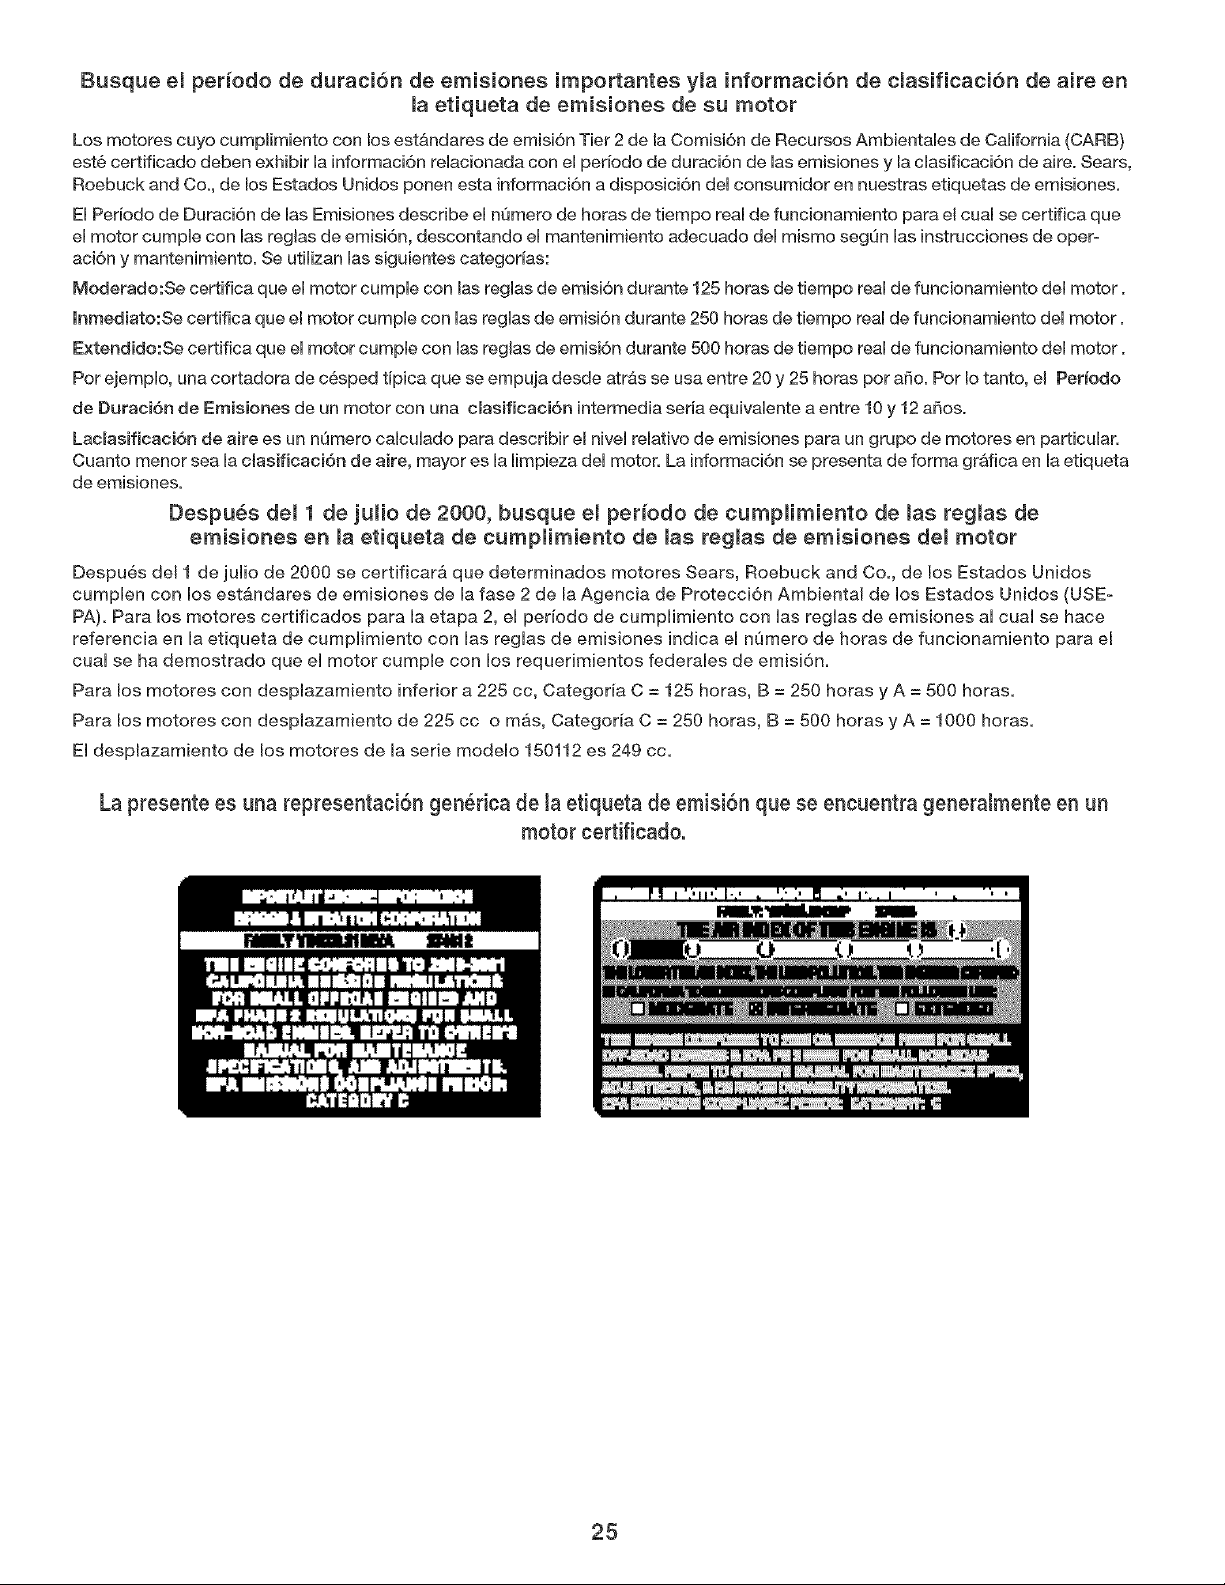
La presente es una representaciSn gen_rica de la etiqueta de emisiSn que se encuentra generalmente en un
motor certificado.
25
/MPORTANTE: Esta unidad es enviada sin gaso/ina
ni aceite en el motor. Despu6s de/montaje, consu/te
/a secci6n de FUNCIONAMIENTO para el correcfo
//enado de combustible y aceite de/motor.
Esta cortadora trituradora ha sido montada totalmente
en la fAbrica, excepto por la bolsa de recolecci6n de
desechos, la cual se guarda dentro del canal de la
cortadora para su envio.
Extracci6n de ta unidad de la caja
1. Saque las grapas, rompa el pegamento de las aletas
superiores o corte la cinta del extremo de la caja y
tire a Io largo de la aleta superior para abrir la caja.
2. Saque todas las piezas sueltas.
3. Corte a Io largo de los bordes de la caja y aplAnela.
4. Quite el material de empaque, en oaso de existir.
Levante la unidad de la parte posterior y deseche la
almohadilla de la base, si estA presente. Deslice la
unidad hasta sacarla de la caja de cart6n. Inspec-
cione minuciosamente la caja para detectar si hay
piezas sueltas.
Piezas suentas dentro de la caja
a. Una bolsa de recolecci6n de desechos
b. Un par de gafas de seguridad
c. Una botella de 20 oz. de aceite para motor
d. Un Manual del operador
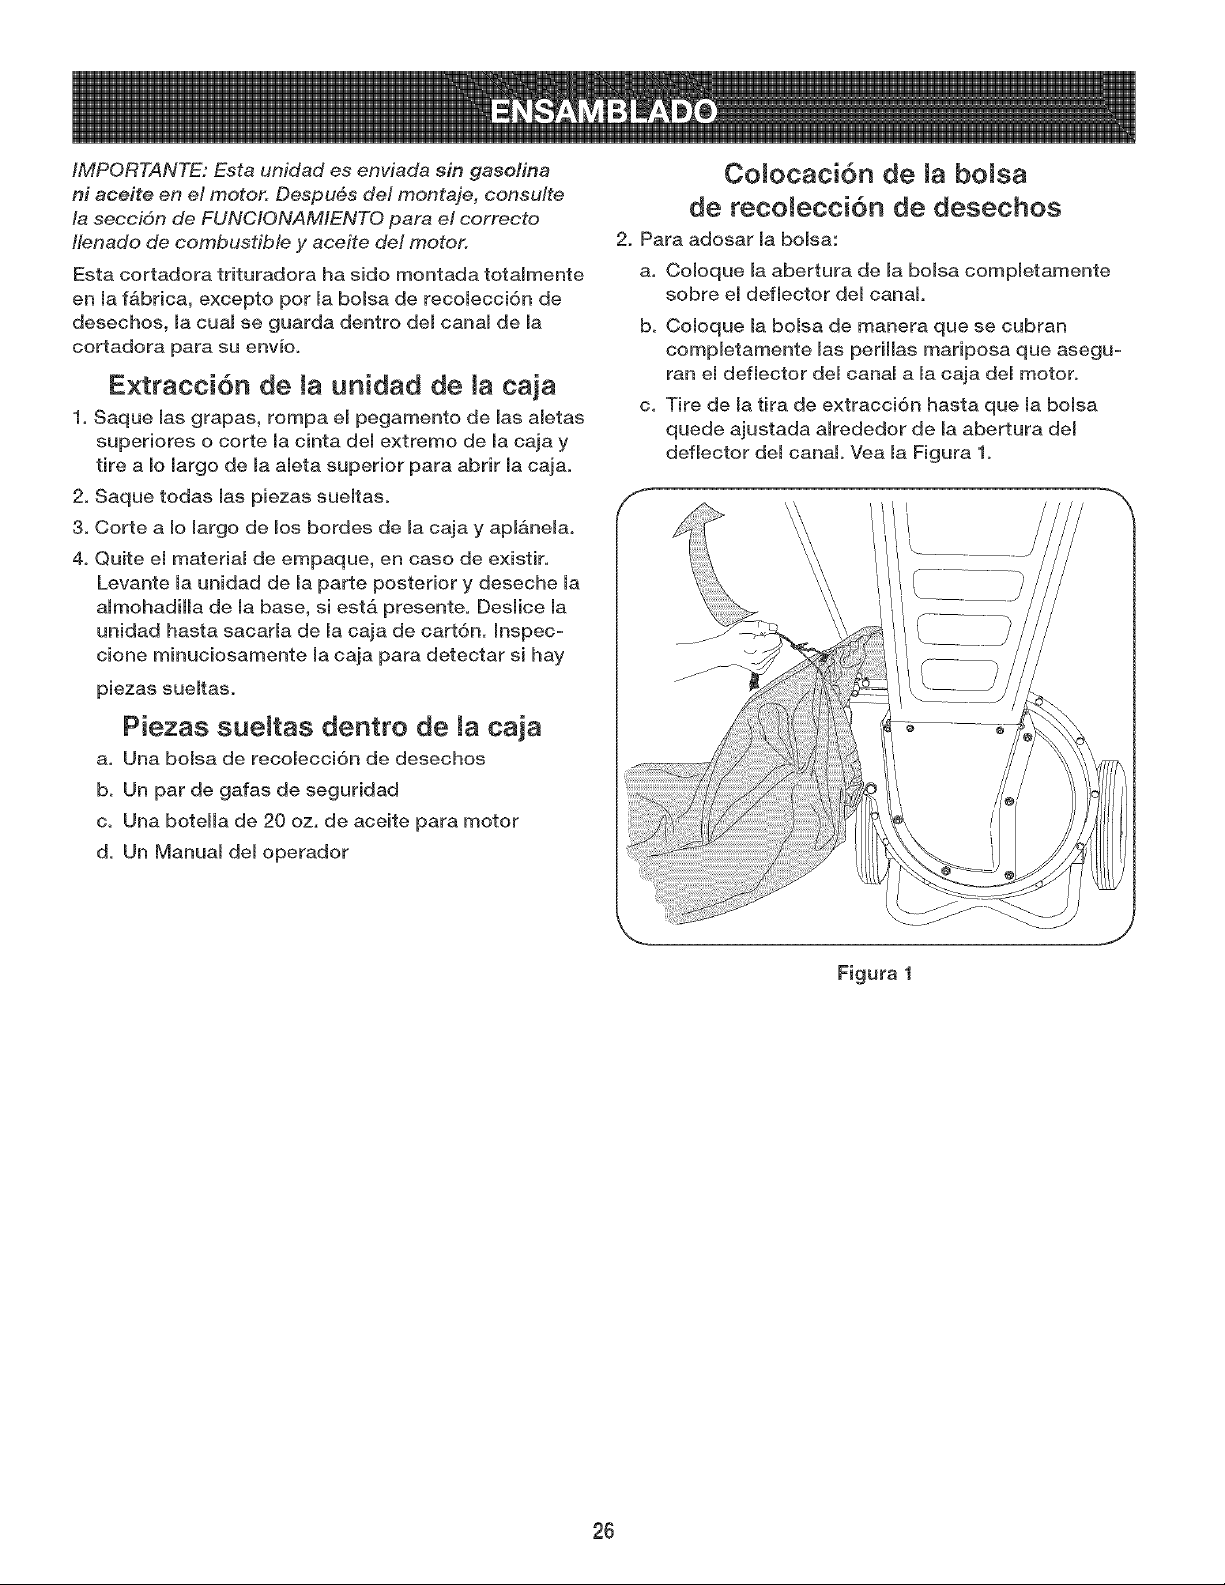
Coiocaci6n de ia bolsa
de reconecci6n de desechos
2. Para adosar la bolsa:
a. Coloque la abertura de la bolsa completamente
sobre el deflector del canal.
b. Coloque la bolsa de manera que se cubran
completamente las perillas mariposa que asegu-
ran el deflector del canal a la caja del motor.
c. Tire de la tira de extracci6n basra que la bolsa
quede ajustada alrededor de la abertura del
deflector del canal. Vea la Figura 1.
Figura 1
26
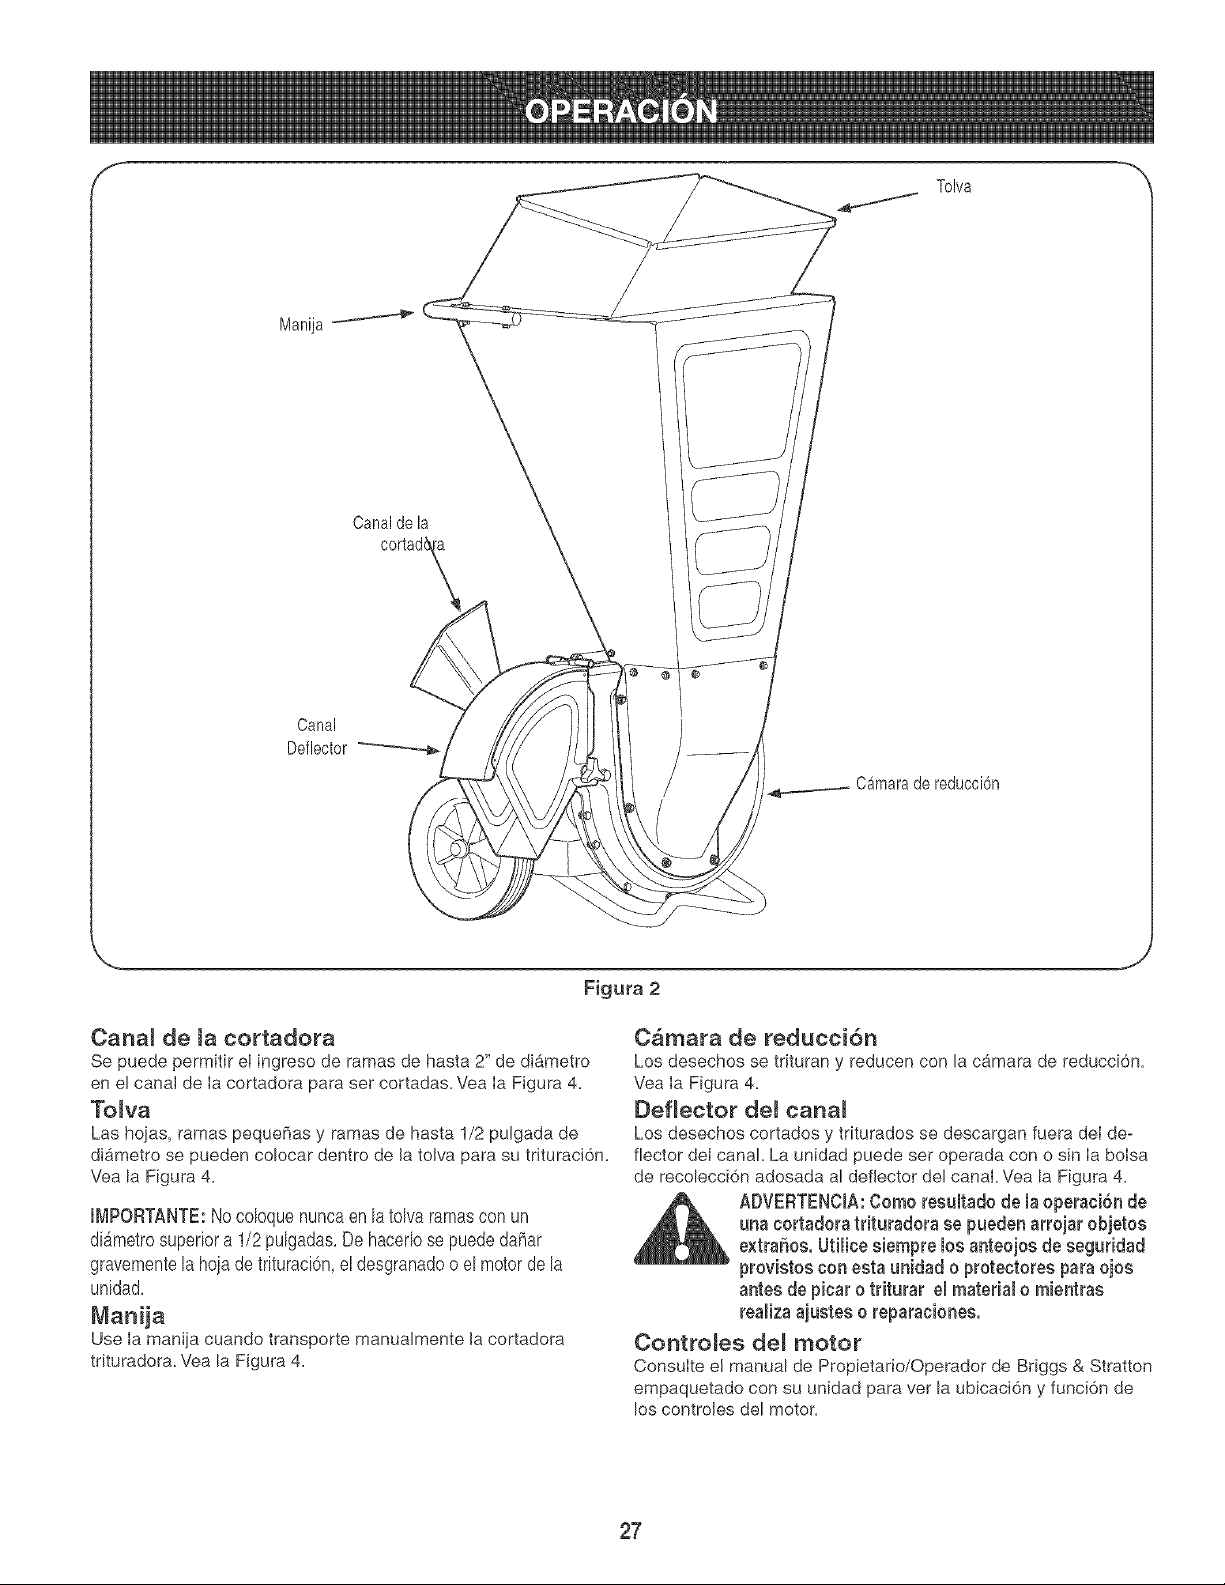
Tolva
Manija
Canal de la
Canal
Deflector
de reduccion
Figura 2
J
Canam de ]a cortadora
Se puede permitir el ingreso de ramas de hasta 2" de diametro
en el canal de Ia cortadora para set cortadas. Vea Ia Figura 4.
To_va
Las hojas, ramas pequefias y ramas de hasta 1/2 pulgada de
didtmetro se pueden colocar dentro de la tolva para su trituraci6n.
Vea la Figura 4.
IMPORTANTE:No coloquenuncaen la tolva ramascon un
dib,metrosuperiora 1/2 pulgadas.De hacerlose puededahar
gravementela hoja de trituraci6n,el desgranadoo el motorde la
unidad.
Manija
Use Ia manija cuando transporte manualmente la cortadora
trituradora. Vea la Figura 4.
C_mara de redueci6n
Los desechos se trituran y reducen con la camara de reducci6n.
Vea Ia Figura 4.
Deflector del eanam
Los desechos cortados y triturados se descargan fuera del de-
flector dei canal. La unidad puede ser operada con o sin la bolsa
de recolecci6n adosada al deflector del canal Vea la Figura 4.
_1, DVERTENC[A: Como resultado de la operaci6n de
una cortadora trituradora se pueden arrojar objetos
extraSos. Ufiliee siempre los anteojos de seguridad
provistos con esta unidad o proteetores para ojos
antes de piear o triturar el material o mientras
realiza ajustes o reparaeiones.
Coatromes de_ motor
Consulte el manual de Propietario/Operador de Briggs & Stratton
empaquetado con su unidad para vet la ubicaci6n y funci6n de
los controles del motor.
27
ADVERTENCIA:N operar una cortadoratrituradora
puedeset que objetos e×traSosscan arrojados a
los ojos Io cual puededaSadosgravemente.Ufilice
siemprelos anteojosdeseguddadprovistes con esta
unidado protectores para ojos antesde picar o triturar
el materialo mientrasrealizaajueteso reparaciones.
Llenado de gasolina y aceite
Cargueel motorcon gasolinay aceite comese indicaen el manualde
Briggs& Stratton,suministradoper separadoquevieneembaladocon
lacortadoratrituradora,Leacuidadosamentelas instrucciones,
ADVERTENCIA:Nuncacargueel tanquede combustible
en espacios cerrados con el motor en marchao hasta
que hayadejado que el mismo se enfrie per Io menos
dos minutes despu_s de haber eetado en marcha.
Encendido del motor
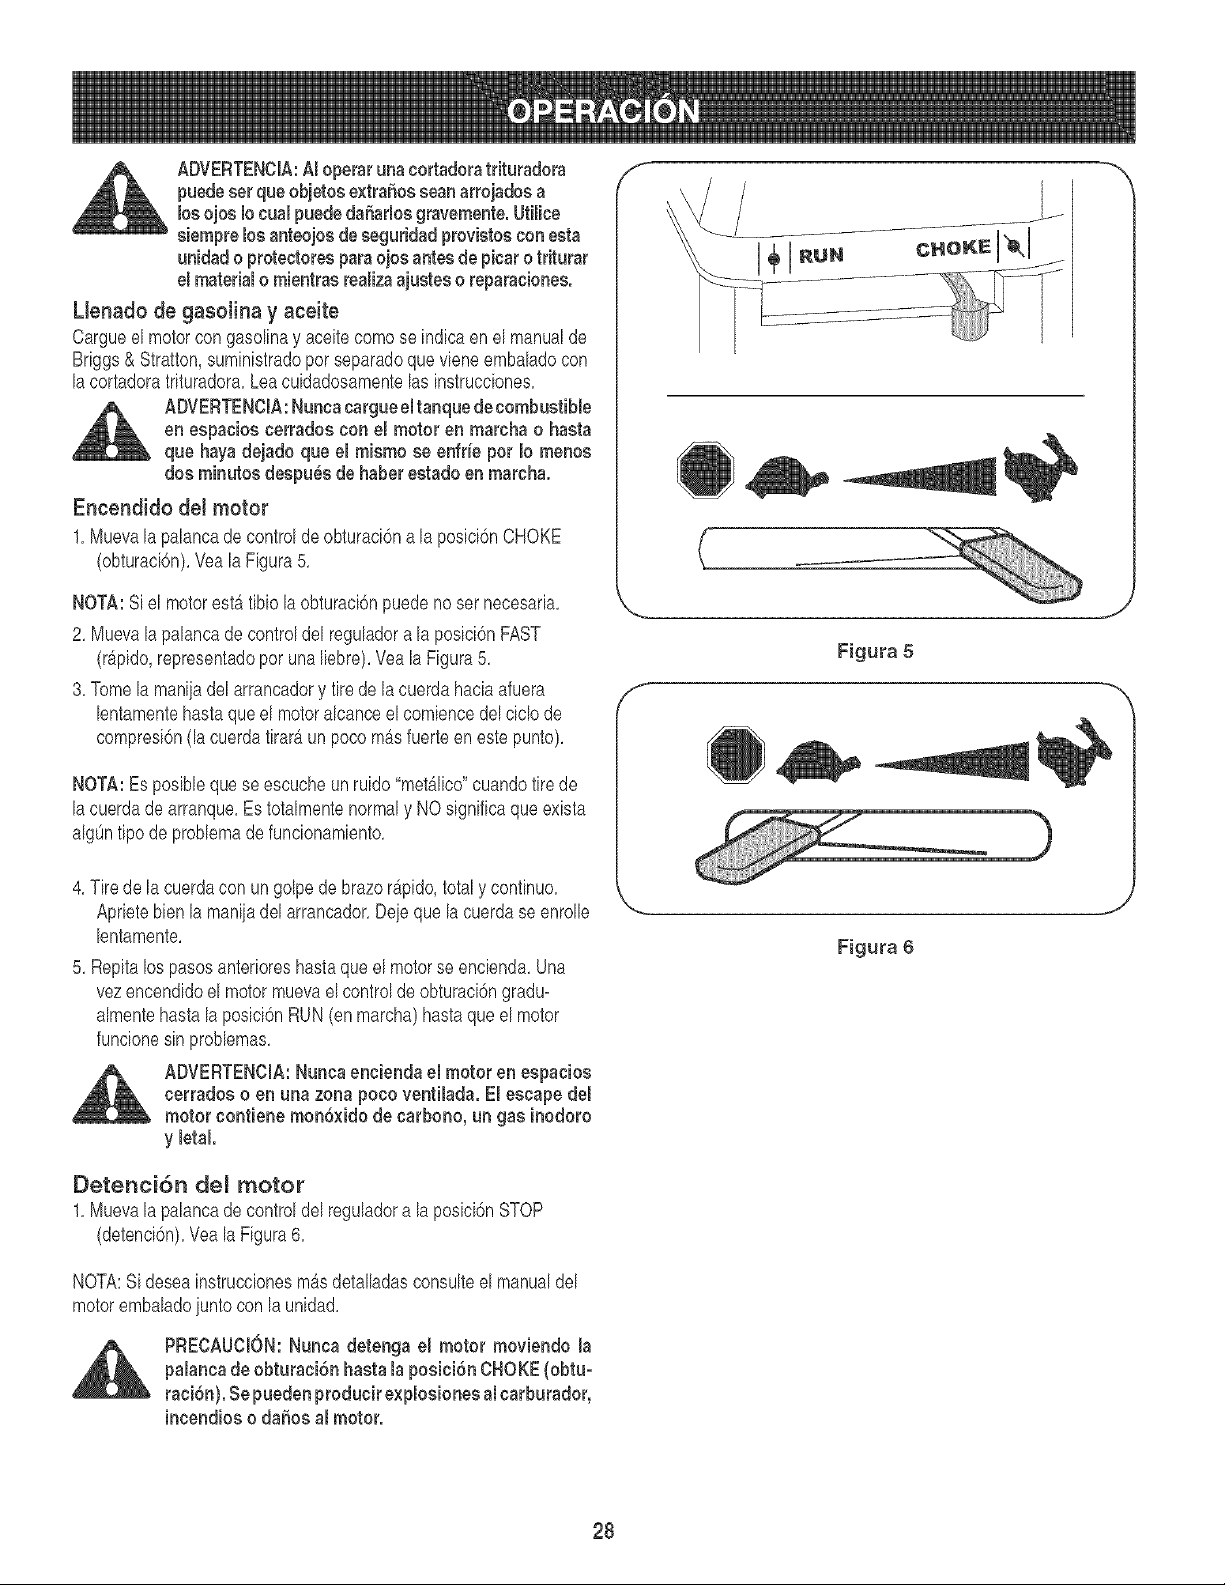
1, Muevala palancade controlde obturaci6na la posici6nCHOKE
(obturaci6n),Vea la Figura5,
NOTA:Si el motorestb_fibiola obturaci6npuedeno sernecesaria,
2, Muevala palancade controldel reguladora la posid6n FAST
(r_pido,representadoper una liebre),Veala Figura5,
3, Tomela maniiadelarrancadory tire de la cuerdahaciaafuera
lentamentehasta queel motoralcanceel comiencedeldclo de
compresi6n(la cuerdatirar_ un pocom_s fuerteen este punto),
NOTA:Es posiblequese escucheun ruido "met_lico"cuandotire de
lacuerdade arranque,Es totalmentenormaly NOsignificaque exista
algOntipo de problemade funcionamiento,
4,Tire de la cuerdacon un golpe de brazer@ido, total y continue,
Apdetebien la maniiadel arrancador,Deieque la cuerdase enrolle
lentamente,
5, Repita lospasosanterioreshastaque el motorse encienda,Una
vezencendidoel motor muevael controlde obturaci6ngradu=
almentehastala posid6n RUN(en marcha)hastaque el motor
funcionesin problemas,
ADVERTENCIA:Nuncaencienda el motor en espacios
cerrados o en una zona poco ventilada. El escape del
motor contiene mon6×ido de carbono un gas inodoro
y letal.
Detenci6n del motor
1, Muevala palancade controldel reguladora la poslcl6nSTOP
(detenci6n),Yea la Figura6,
NOTA:Sideseainstruccionesm&sdetalladasconsulteel manualdel
motorembaladoiunto con la unidad,
PRECAUCION:Nunca detenga el motor moviendo la
palanca de obturaci6n hasta la posici6n CHOKE(obtu-
raci6n).Sepuedenproducir e×plosionesal carburador,
incendios o daSos al motor.
f
f
(
Figura 5
Figura 6
m
,,J
28
Trituraci6n
EIdesechoque se acumuiaen los patioscomo por eiempIolas hoias
y las aguiasde los pinospuede sercoIocadoen la tolvapara triturarIo.
DespuesdeprocesareI materialcon la cuchillade la trituradoray
dedesgranar,es empuiadofueradel deflectordel canaly, si estb,
instalada,haciael interiorde la bolsade recolecci6nde desechos.
Respetelas siguientespautascuandotrituredesechosque se
acumulanen lospatios:
1. S61outilicela m_quinaparatriturar el materialque se encuentraen
un pationormal(hoias, ramas,pihasde los pinos,etc.).
2. Evite latrituraci6nde plantasfibrosascomo,poreiemplo,las de
tomateshastaqueestentotalmentesecas. Lasplantasde tomates
frescasnose trituranbieny tiendena enroscarsealrededordel
motory del desgranado.
3. Coloquecantidadesrazonablesde desechosen la tolva por vez.No
sobrecarguela tolva.
4. Permitaque el materialquese encuentraen la tolva seaatraido
hastalascuchillasy trituradoantes de agregarmAsdesechos
dentrode la misma.De no hacerlose puedetaparla tolva,el
deflectordelcanalo detenerel motor.
5. Evitecolocaren la tolva ramascuyaIongitudexcedalas24
pulgadas.Las ramasde mAsde 24 pulgadasde largopueden
taparla tolva.
6. Nuncacoloqueen la tolva ramasconun digmetrosuperiora 1/2
pulgadas.De hacerlose puededahargravementela cuchillade
trituraci6nde la unidad,el desgranadoo el motorde la unidad.
Lirnpieza de la to_va
Si setapa la tolvacon desechosduranteel funcionamiento,proceda
de la siguientemanera:
1.Tomela maniiaconlas dos manosy agitesuavementela cortadora
trituradoraparaayudara quese sueltenlos desechos,atray6ndo=
los hastael interiordel motor.
Si no se eliminael atascamientoprocedade la siguientemanera:
1. Detengael motor.
2. Use las manosparasacarlos desechosque se encuentrancerca
de la partesuperiorde la tolva.
3. Use unarama(u otrodispositivodisponiNe,es decir, unaescoba)
parasacarlos desechosubicadoscercade la basede la tolva.
4. Vuelvaa poneren marchael motor.
NOTA:Si no puedetirar de la cuerdade arranquepor los desechos
acumuladoscercadel motor,siga lasinstruccionesincluidasbajoel
fitulo Limpiezade la CAmarade Reducci6nen la seccbn "Mantem
imientodesu CortadoraTrituradora"de este manual
Corte
ADVERTENCIA:No utilice nunea la cortadora triturao
dora sin haber bajado el canal de la cortadora hasta la
posiciSn de funcionamiento.
Sepuedepermitirel ingresode ramasde hasta 2" dedib,metroen el
canalde la cortadora.Respetelassiguientespautaspara eIcorte de
las ramas:
1.Mantengaambasmanosfirmementeen la ramaa medidaque la
colocadentrodel canalde la cortadora.
2. NoponganuncamAsdeunaramadentrodelcanaldelacortadoraporvez.
3. Enelcanalde la cortadoras61ose puedecolocarramas(demadera).
4. Apliquepresi6nintermitente(fuerza,en impulsoscortos)cuando
coloqueramasmAslargas(de 2 pulgadasde diAmetro)dentrodel
canalde la cortadorapara evitar inundaro ahogarel motor.
IMPORTANTE:Nuncacoloqueramasconun dib,metrosuperiora tres(2)
pulgadasdentrodel canalde la cortador&De hacerlose puedendahar
gravementelascuchillasdecorte,el desgranadoo elmotordelaunidad.
NOTA:Parameioresresultados,operesiemprela unidadconcuchillas
de corte afiladas.Si se produceuna reducci6napreciableen el rein
dimientomientrasse cortan ramas,se debereemplazar las cuchillas
de la cortadora.
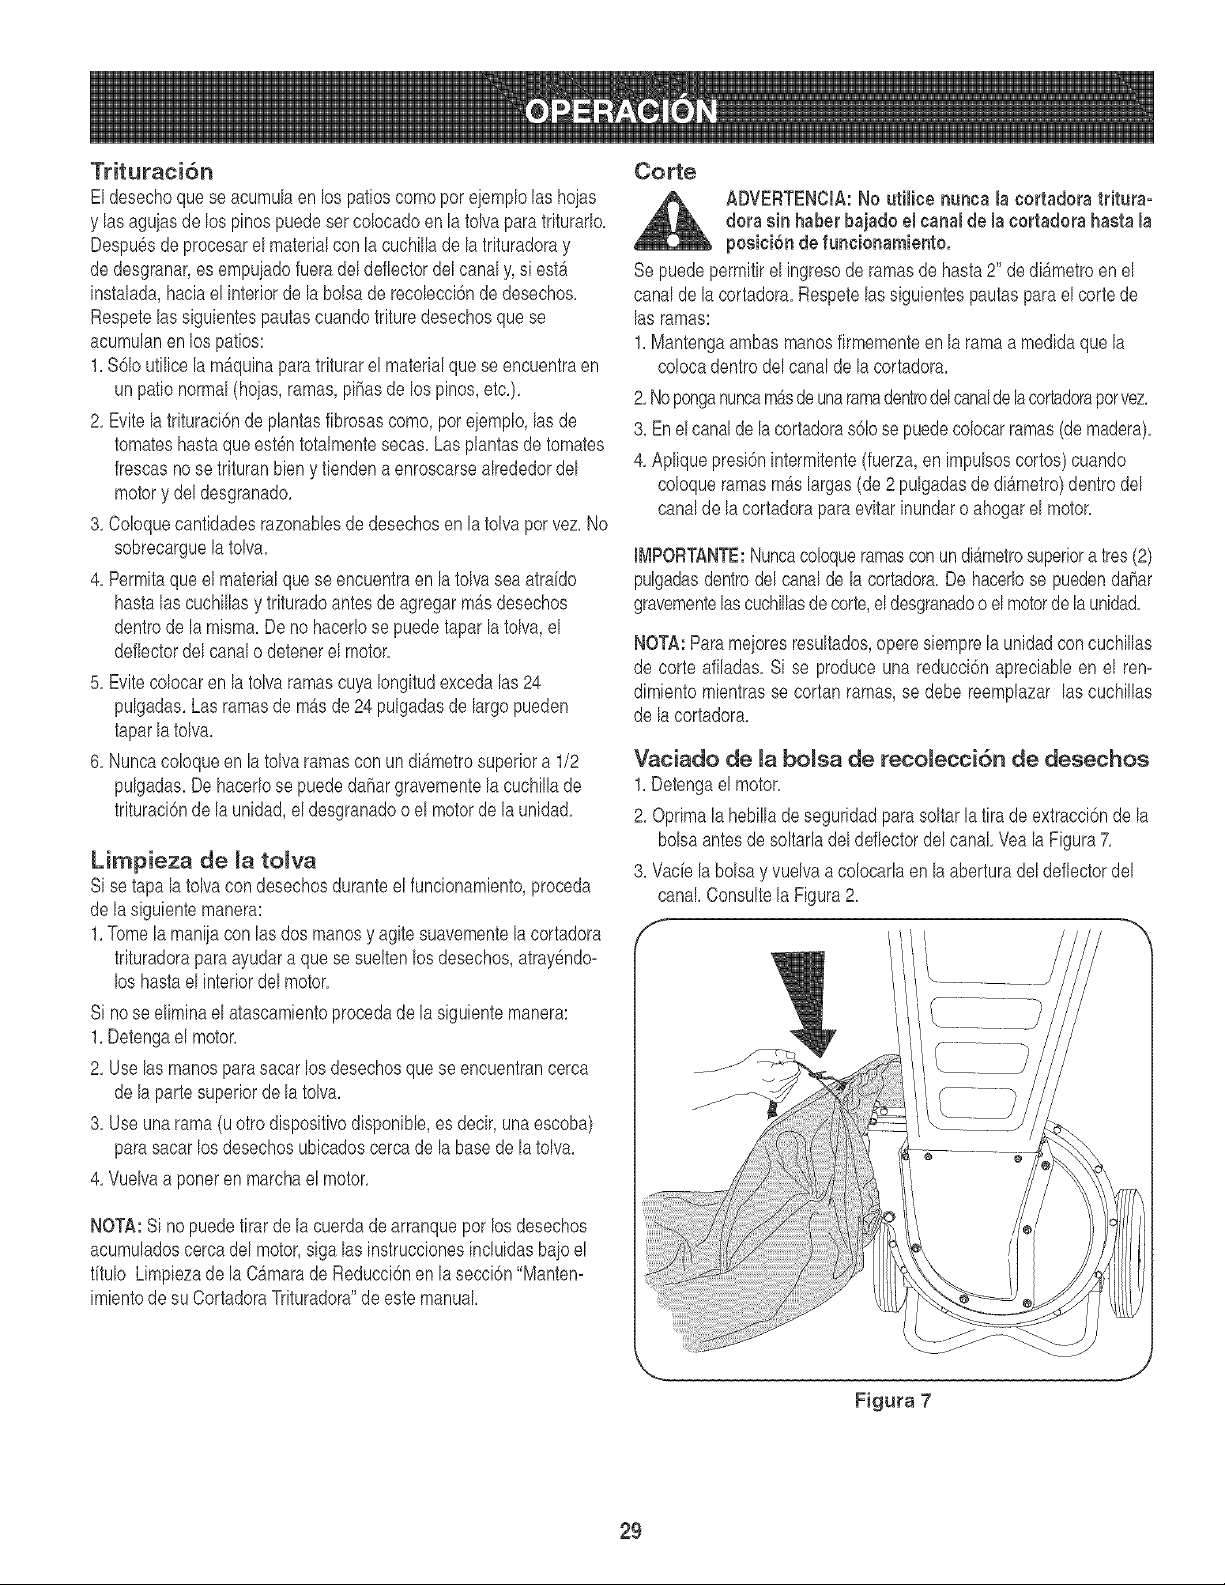
Vaciado de la bo_sa de reco_ecci6n de desechos
1.Detengael motor.
2. Oprimala hebilladeseguridadparasoltarlatira deextracci6ndela
bolsaantesde soltarladel deflectordel canal Veala Figura7.
3. Vaciela bolsay vuelva a colocarlaen la aberturadel deflectordel
canal Consultela Figura2.
Figura 7
29
ADVERTENCIA: Detenga siempre el motor, descoo
necte la buj[a y haga masa contra el motor antes de
limpiar, lubricar o hacer Ilevar a cabo cualquier clase
de mantenimiento en eu m_quina.
Lubricaci6n
1. Lubriquela bisagradel canalde la cortadoracon un aceite
ligerounavezpor temporada.
2. Lubriquelospuntosde pivotedel deflectordel canalcon un
aceiteNgerouna vez por temporada.
3. Consulteel manualdel propietario/operadorde Briggs&
Strattonquevieneembaladoconsu unidadparaver las
instruccionesde lubricacidndel motor.
Cuidados para el motor
Consultelasecc[dnde Manten[m[entodel manualdel prop[etado/op-
eradorde Bdggs& Strattonque v[ene embaladocon su un[dad.Lea y
siga lasinstruccionescuidadosamente.
1. Verifiqueel nivelde aceitedel motorantesde cadausocomose
indicaen el manualdelmotorquesesuministraporseparado.
2. Limpieelprefiltrodelfiltrodeairecada25horasencondiciones
normalesdeuso.Limpiea intervalosdepocashorascuandohaya
muchopolvo.Reemplaceel cartuchodelfiltrodea[reunavez
pottemporada.Pararealizarel mantenimientodelfiltrodeaire,
consulteel manualdelmotorquesesum[n[strapotseparado.
3. La bujfadebe Nmpiarsey se debereponerladistanciadisrup-
t[vauna vez portemporada.Consulteel manualdel motorque
se suministraporseparadoparaobtenerespecificaciones
sobreel tipode bujfay la distanciadisruptivaadecuada.
Cuidado de la cortadora trituradora
Antesdecadauso,inspecc[onevisualmentela cortadoratr[turadora
paradetectarsi haytuemaso pemossueltos(oque falten).A]ustecon
firmeza(oreemplace)todosloselementosde ferreterfaantesdeoperar
lacortadoratrituradora.
Limpieza del canat de reducci6n
ADVERTENCIA:Las cuchillae de trituraci6n y de corte
del motor eet_in afiladas. Use guantee de trabajo de
cuero para protegerse lae manos cuando limpie la
e_marade reducciSn.
S[ la cgmara de reducc[6nse tapa con desechos,la cdba de des-
granado se puede girar hacia arriba para que pueda limpiar la
zonac[rcundante.Parahacerloprocedade la s[gu[entemanera:
1. Detengael motor,desconecte la bujfa y compruebe que la cor-
tadoratr[turadorase hayadeten[dopor completo.
ADVEFITENCIA:El silenciador y la zona circundante
eet_incalientes si el motor ha estado en funcionamieno
to. Sea precavido y prot_jaee las manoe si trabaja
cerca del eilenciador.
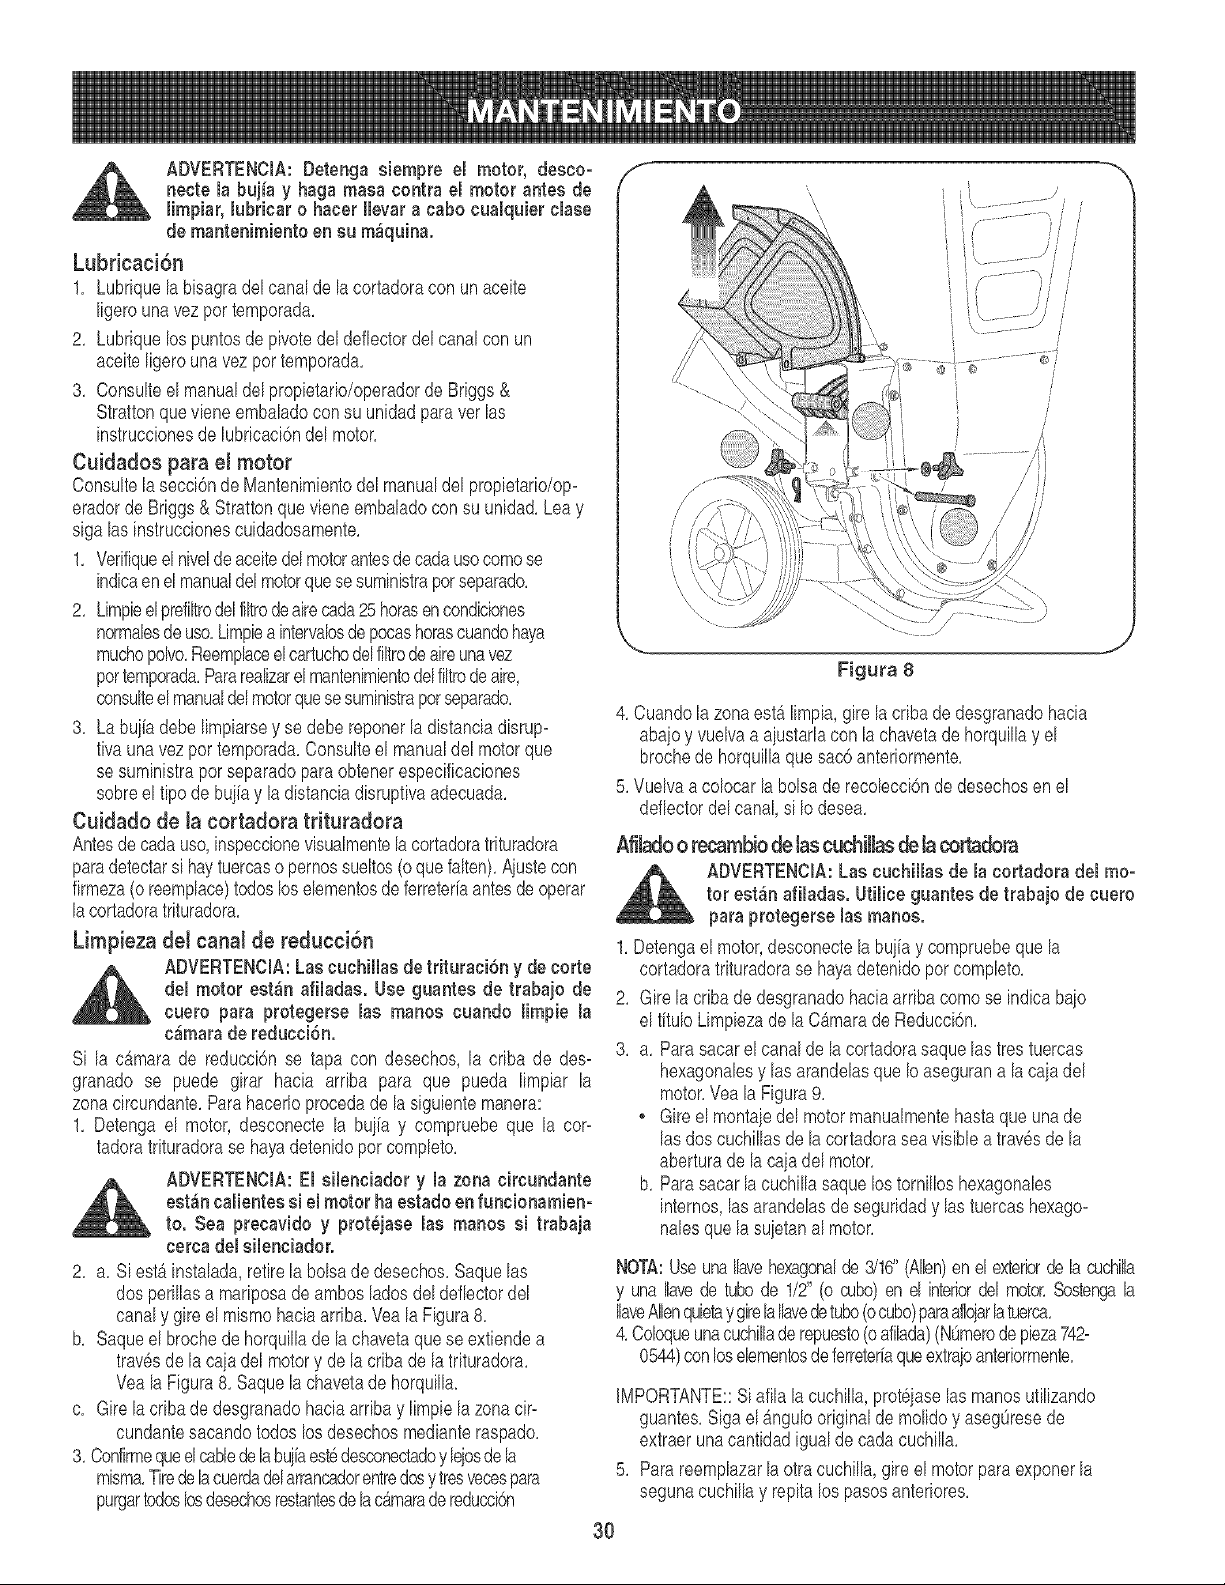
2. a. S[estD.[nstalada,retirela bolsade desechos.Saquelas
dos pedllasa madposade ambosladosdel deflectordel
canaly gire el mismohaciaarriba.Veala Figura8.
b. Saqueel brochede horqu[llade la chavetaquese ext[endea
trav6sde la cajadel motory de la cr[bade la tr[turadora.
VealaFigura8. Saquela chavetade horqu[lla.
c. Girelacriba dedesgranadohaciaarriba y Nmpiela zonacir-
cundantesacandotodos losdesechosmed[anteraspado.
3. Confirmequeelcabledeh bu]iaestedesconectadoy lejosdela
m[sma.Tiredelacuerdadelarrancadorentredosy tresvecespara
purgartodoslosdesechosrestantesde h cbmaradereducci6n
f
\
\
i s
\
Figuta 8
4. Cuandofazonaest_ Iimpia,gire facribade desgranadohacia
abajoy vuefvaa ajustarlacon la chavetade horquillay el
brochede horquillaque sac6 anteriormente.
5. Vuelvaa colocar labolsade recolecci6nde desechosen el
deflectordel canal,si Iodesea.
Afiladoorecambiodelasct_il!_ ® la ®_®m
ADVEFITENCIA:Las euehillas de la eortadora del too:
tot est_n afiladae. Utilice guantee de trabajo de cuero
para protegerse las manoe.
1.Detengael motor,desconectela bujfay compruebeque la
cortadoratrituradorase hayadetenidopot completo.
2. Gire la cribade desgranadohaciaarribacomo se indicabajo
el tftuloLimpiezade la C_marade Reducci6n.
3. a. Parasacarel canalde la cortadorasaquelastres tuercas
hexagonalesy las arandelasque Ioasegurana la caja del
motor.Yea la Figura9.
. Gireel montajedel motormanualmentehastaque una de
lasdos cuchillasde la cortadoraseavisible a trav6sde la
aberturade la cajadef motor.
b. Parasacarfacuchillasaquelos tornilloshexagonales
intemos,lasarandelasde seguridady lastuercashexago:
nalesque la sujetanal motor.
NOTA:Use unaIfavehexagonalde 3/16"(Allen)en el exterbrde la cuchilla
y una Ilavede tubode 1/2' (o cubo)en el interiordel motor.Sostengala
IlaveAllenquietay girela Ifavedetubo(ocubo)paraaflojarlatuerca.
4.Coloqueunacuchilladerepuesto(oafifada)(NOmerodepieza742=
0544)conloselementosdeferreterfaqueextrajoanteriormente.
IMPORTANTE::Siafifala cuchiNa,prot6jasefasmanosutilizando
guantes.Sigael &ngulooriginalde molidoy asegOresede
extraerunacantidadigualdecadacuchilla.
5. Para reemplazarfaotra cuchiNa,gire el motor paraexponerla
segunacuchillay repitalos pasosanteriores.
3O
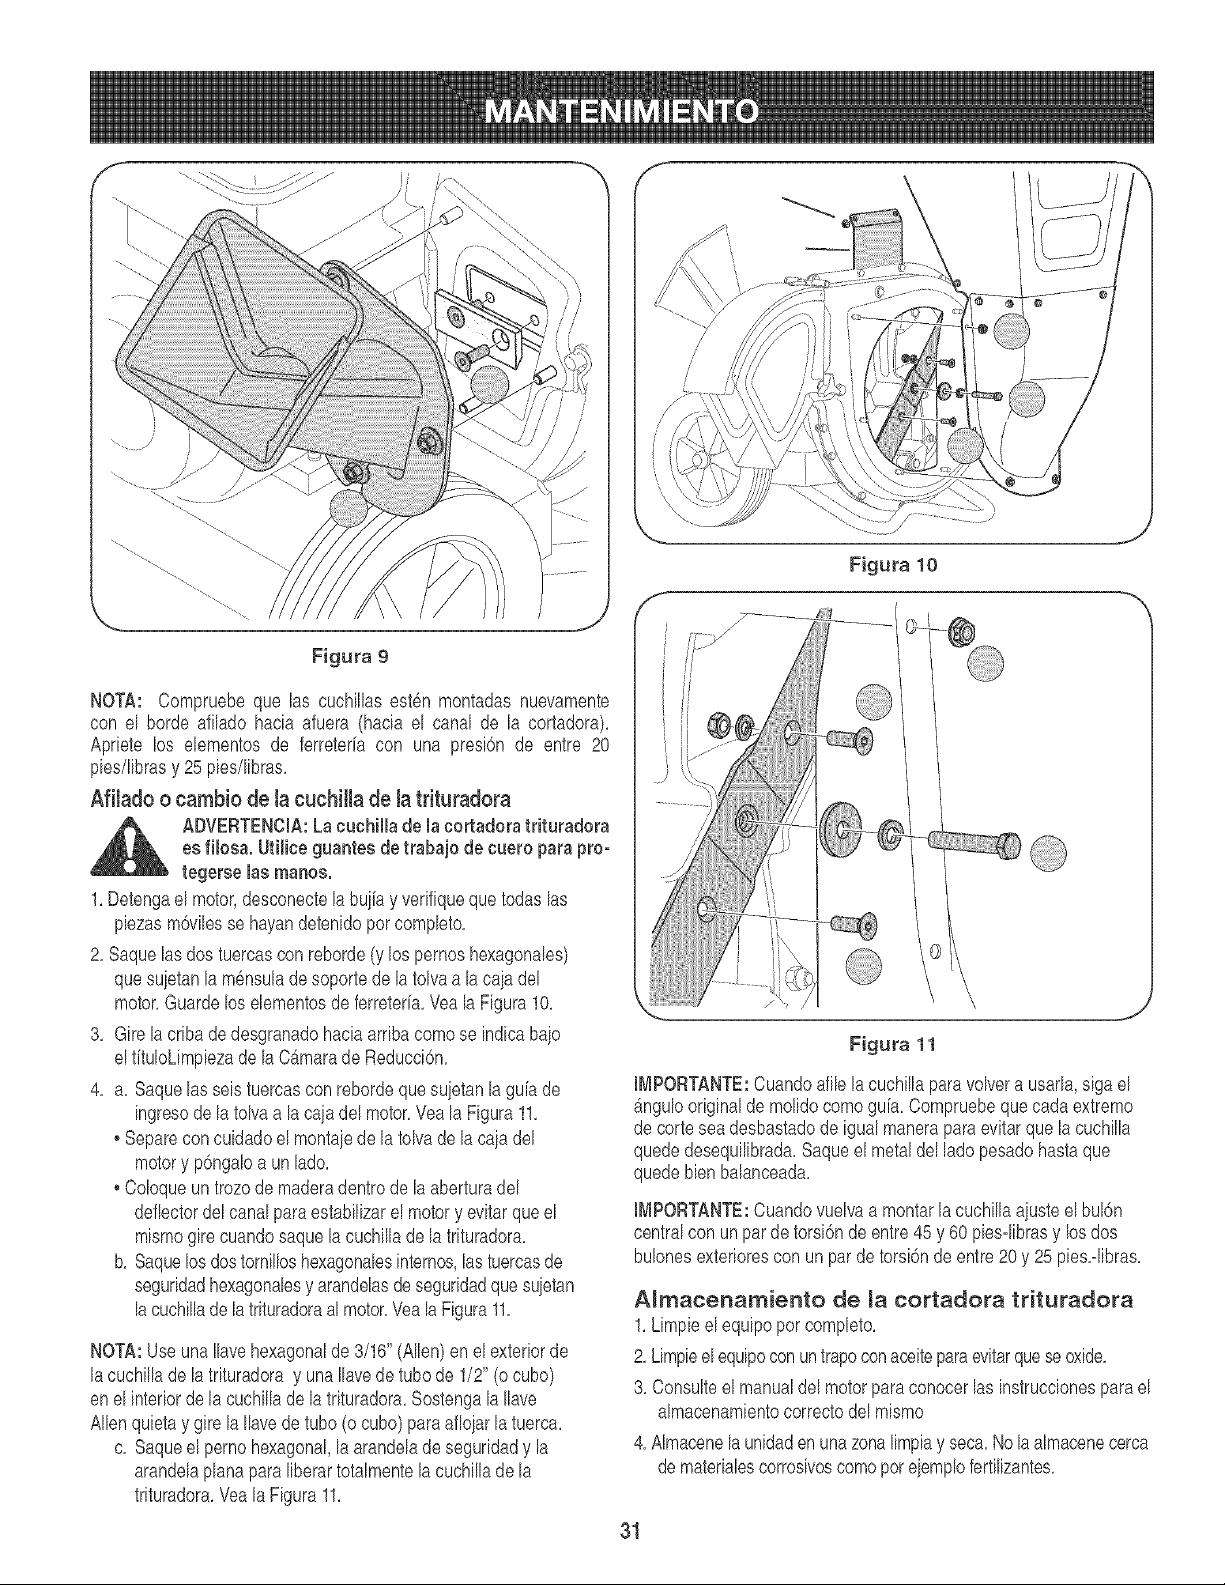
Figura 10
Figura 9
NOTA: Compruebeque las cuchillasest6n montadas nuevamente
con el horde afilado hacia afuera (hacia el canal de la cortadora),
Apriete los elementos de ferreteria con una presi6n de entre 20
pies/librasy 25pies/libras,
Afilado o cambio de la cuchitla de Jatrituradora
ADVERTENClA:La cucNIla de la cortadora trituradora
es files& Ufiliee guantes de trabajo de cuero para pro-
tegerse las manos.
1, Detengael motor,desconectela buiia y verifiqueque todas las
piezasm6vilesse hayandetenidopor completo,
2, Saquelas dos tuercascon reborde(y los pernoshexagonales)
quesuietanla m6nsulade soporte de la tolvaa la caiadel
motor,Guardelos elementosde ferreteria,Veala Figura10,
3, Gire la criba de desgranadohaciaarriba comese indicabaio
elfituloLimpiezade la CAmarade Reducci6n,
4, a, Saquelas seis tuercascon rebordeque suietanla guh de
ingresode la tolvaa la caiadel motor,Veala Figura11,
, Separeconcuidadoel montaiede la tolvade la caja del
motory p6ngaloa un lade,
, Coloqueun trozode maderadentrode la aberturadel
deflectordelcanalparaestaNlizarel motory evitar queel
mismogire cuandosaquela cuchilladela trituradora,
b, Saquelosdostornilloshexagonalesinternes,lastuercasde
seguridadhexagonalesy arandelasdeseguridadquesuietan
lacuchillade latrituradoraalmotor,VealaFigura11,
NOTA:Use unaIlavehexagonalde 3/16"(Allen)en el exteriorde
lacuchilladela trituradoray unaIlavede tubede 1/2" (o cube)
enel interiorde la cuchillade la trituradora,SostengalaIlave
Allenquietay gire la Ilavede tube (o cubo)para afloiarla tuerca,
c, Saqueel pernohexagonal,la arandelade seguridady la
arandelaplanaparaIiberartotalmentelacuchillade la
trituradora,Vea la Figura11,
Figura 11
IMPORTANTE:Cuandoafilela cuchillaparavolvera usarla,siga el
b,ngulooriginalde molidocomogu[a, Compruebeque cada extreme
de corte seadesbastadode igual manerapara evitarque la cuchilla
quededesequilibrada,Saqueel metaldel lade pesadohasta que
quedebienbalanceada,
I[_tPORTANTE:Cuandovuelvaa montarla cuchillaaiusteel bul6n
centralcon unpardetorsi6nde entre45 y 60 piesqibrasy los dos
bulonesexteriorescon un parde torsi6nde entre20 y 25 pies,qibras,
A_macer_amiento de _a cortadora trituradora
1,Limpieel equipo per completo,
2, Limpieelequipoconuntrapoconaceiteparaevitarqueseoxide,
3, Consulteel manualdel motorpara conocerlas instruccionesparael
almacenamientocorrectodel mismo
4, AImacenelaunidadenunazonalimpiay seca,Nola almacenecerca
de materialescorrosivescomepereiemplofertilizantes,
31
Preparela cortadoratr[turadoraCraftsmanpara su almacenam[entoal
finalizarlatemporada,o s[ no va a utilizarla unidaddurante30 dias o
mAs.Un buenmetodoparaasegurarquela un[dadfunc[oneadecua_
damentela s[gu[entetemporadaes Ilevarlapara que su centrolocal de
p[ezasy reparac[onesSearsle real[ceuna [nspecc[6nanual.
Cortadora trituradora
, L[mpieel equipo porcompleto.
, L[mpieel equipocon un trapo conaceite para evitarque se oxide
Utiliceunaceiteligeroo siliconaparalimpiar.
, Almacenela unidaden una zona limpiay seca.No la almacene
cercade materialescorrosivoscomopore]emplofertilizantes.
Motor
, Realiceel mantenimientoal motorcomose [rid[caen el manualdel
motorde Br[ggs& Strattonsum[n[stradopor separadoy que v[ene
embalado]unto consu cortadoratr[turadora.
Otros
No almacenegasol[nade unatemporadaa la otra.
Reemplaceel recipientede gasolinas[ com[enzaa oxidarse.La
presenciade6xidoo polvoen la gasolinacausaproblemas.
• AImacenela un[daden una zona I[mp[ay seca.No la almacene
cercade mater[alescorros[voscomopore]emplofert[l[zantes.
NOTA:S[ la almacenaen un galp6n de dep6s[torealvent[ladoo
metb,l[co,asegOresede real[zarleun tratam[entoanti- ox[danteal
equipocubri6ndolocon aceiteligero o silicona.
32
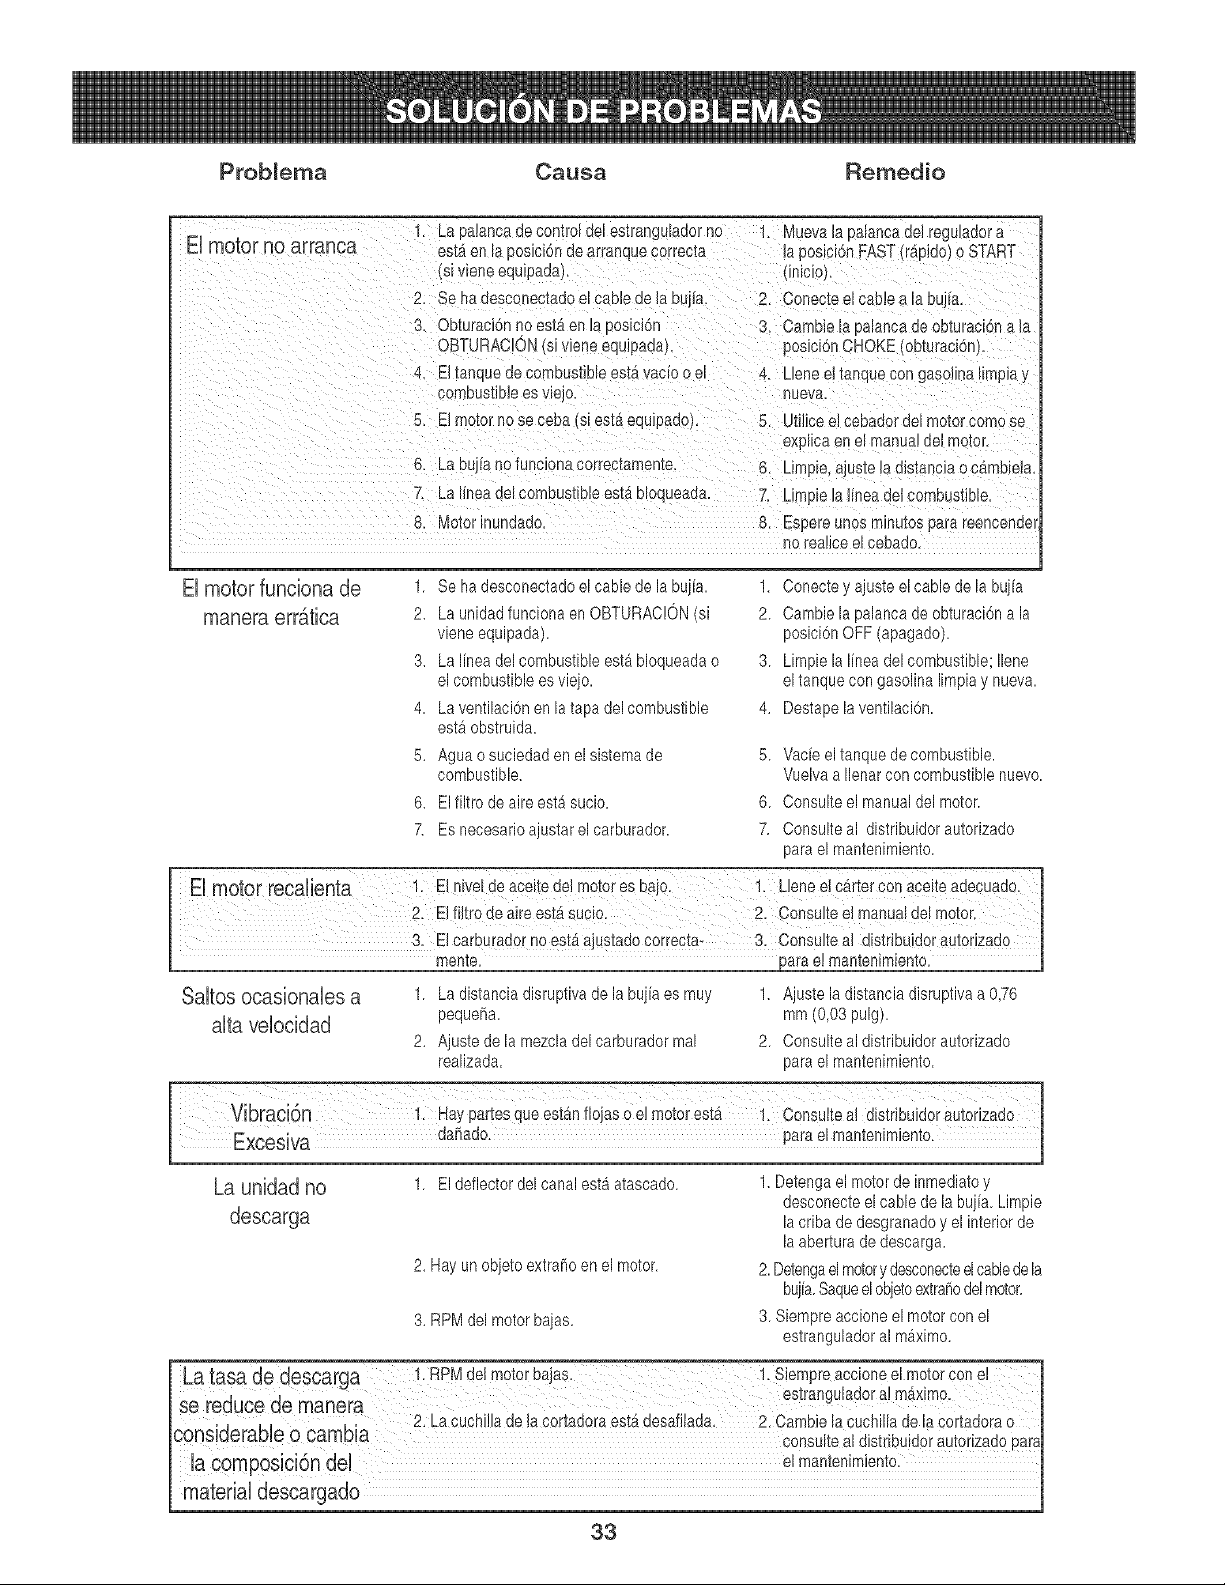
Prob_ema Causa Remedio
El motor no arranca
1. Laoatancaae comrol eel es[rangu aaor no 1. Muevala oa_ancaaeJreguJaaora
es[aera Doslclonee arranque( orrecta la posici6nFAST raeidol o START
s_wene equlpada m_cJo
2. Se hadesconec[adoel cable de la buja. 2. Conecteel cablea _a#uj a.
3. Obturaci6nno estb.en _Doslelon
OBTURACIOf',si vJeneequ_pada).
4 El_anaueae comDusIIDe esIa vac_oo el
COmDUS[lDle es v_elo.
5. Elmozo[no se ceba s esta equJpado',
6. La Duj_ano func_onacon'eczamen[e.
7. La _neadelcomeus[_bJees[a D_oqueaaa.
8. Motorinundado.
3. Cambie la oalanca se osturaclon a la
posicion CHOKE oD_uraclonL
4. Uene el ianque con gasoiJna tmpla y
I1ueva,
5, Utt]!ce el ceeaoor eel moior como se
explica en el manual det motor.
6, Llmple, aJuste la eis[ancla o can Dlela.
7. L_mple Jaimea aeJcombustible.
8, Es 3ere unos mmu[os pare reenceneer
no tea!ice e_ceDaoo.
El motor funciona de
1,
2.
3.
4.
5.
6.
7.
Se ha desconectadoel cable de labujia.
La unidadfuncionaen OBTURAC!ON(si
viene equipada).
La linea del combustibleesta bloqueadao
el combustibleesviejo.
La ventilacionen la tapa del combustible
esta obstruida.
Ague o suciedaden elsistemade
combustible.
Elfiltrode aireesta sucio.
Esnecesarioajustarel carburador.
1.
2.
3.
4.
5.
6.
7.
Conectey ajusteelcable de la bujia
Cambiela palancade obturaci6nala
posici6nOFF (apagado).
Limpiela linea del combustible;Ilene
eltanque con gasolinalimpiay nueva.
Destapela ventilaci6n.
Vacie eltanquede combustible.
Vuelvaa Ilenarcon combustiblenuevo.
Consulteel manualdel motor.
Consulteal distribuidorautorizado
para el mantenimiento.
Saltos ocasionales a
alto velocidad
1. Ladistanciadisruptivede labujia es muy
peque_a.
2. Ajustede la mezcladel carburadormal
realizada.
1. Ajustela distanciadisruptivea 0,76
mm (0,03pulg).
2. Consultealdistribuidorautorizado
para el mantenimiento.
La unidad no
descarga
1. Eldeflectordel canal esta atascado.
2. Hayun objeto extrarloen el motor.
3. RPMdel motorbajas.
1. Detengael motorde inmediatoy
desconecteel cable de la bujia. Limpie
la cribade desgranadoy el interiorde
la aberturade descarga.
2.Detengaelmotory desconecteelcabledela
bujia.Saqueelobjetoextrarlodelmotor.
3. Siempreaccioneel motorcon el
estranguladoral maximo.
eonsulteal distlibuid0[autodzadopa
33
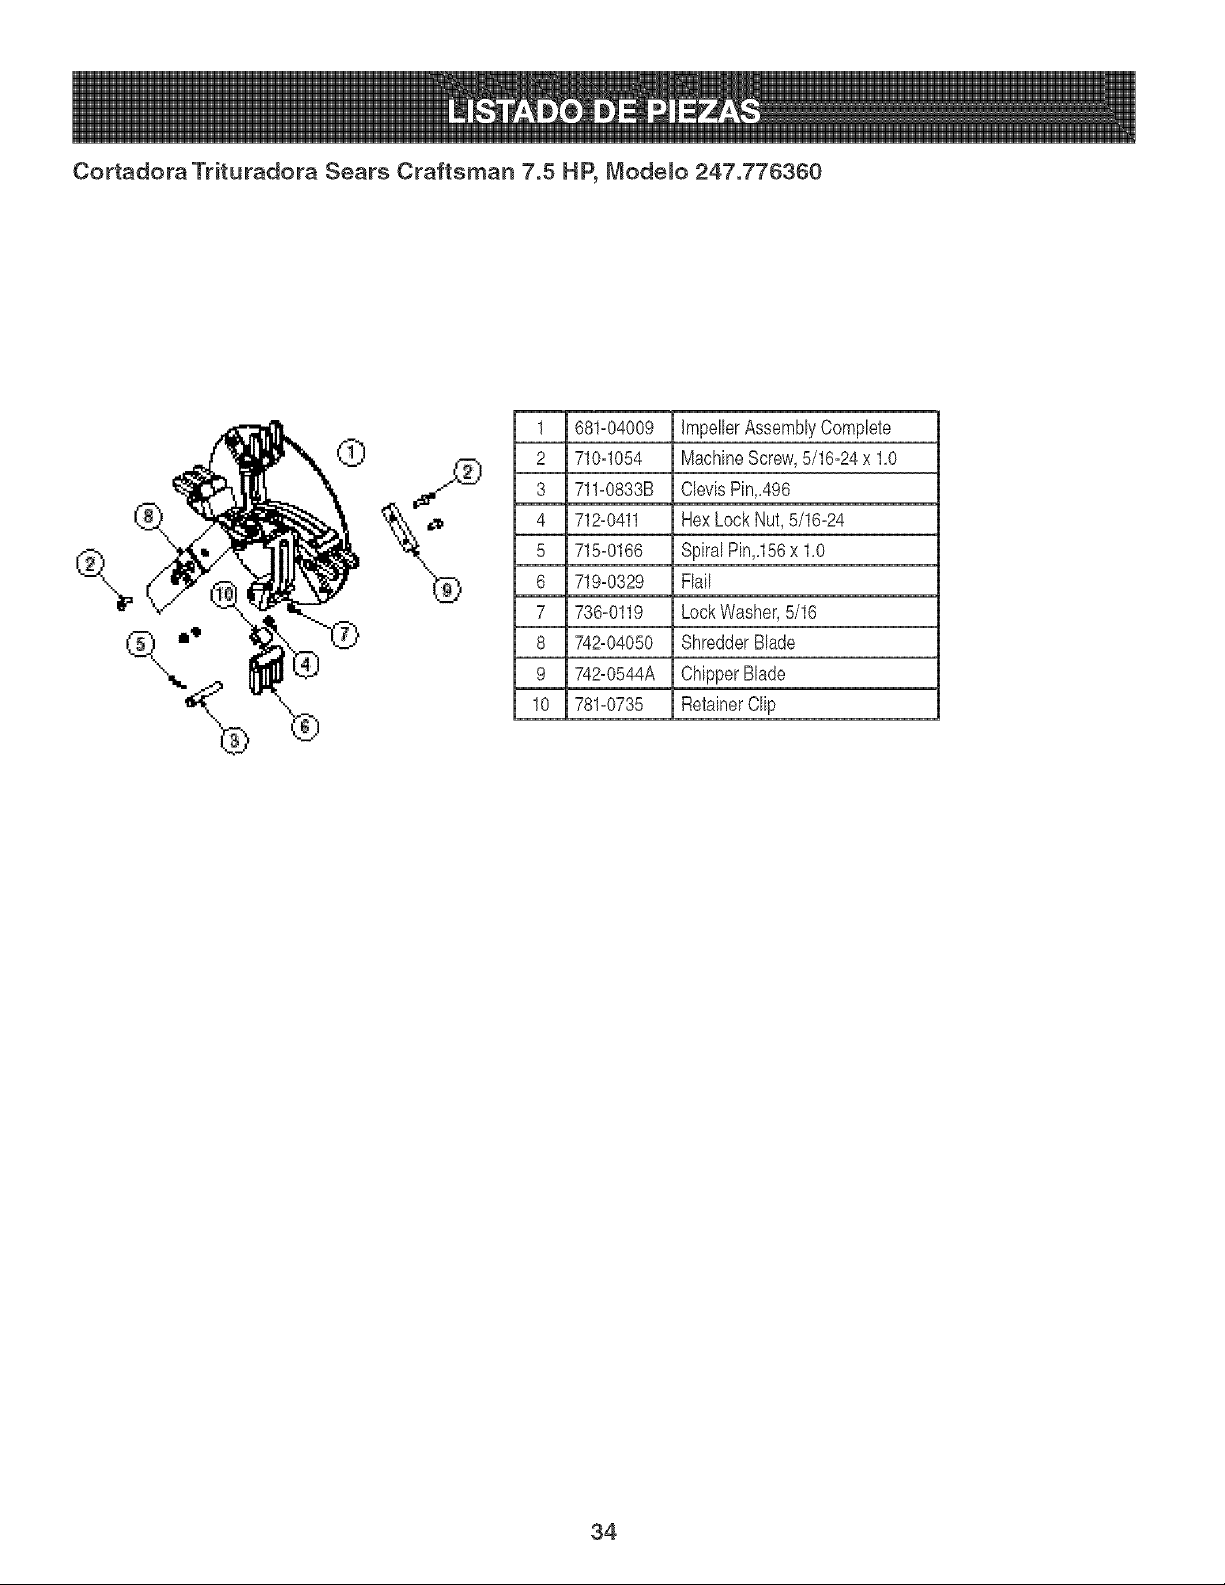
Cortadora Trituradora Sears Craftsman 7.5 HP, Mode_o 247.776360
®
®
1 681_04009 ImpellerAssemblyComplete
2 710q054 MachineScrew,5/16_24x 1.0
3 711-0833B ClevisPin.496
4 712_0411 Hex Lock Nut,5/16_24
5 715-0166 SpiralPin.156x 1.0
6 719-0329 Flail
7 736-0119 LockWasher,5/16
8 742_04050 ShredderBlade
9 742-0544A ChipperBlade
10 781-0735 RetainerClip
34
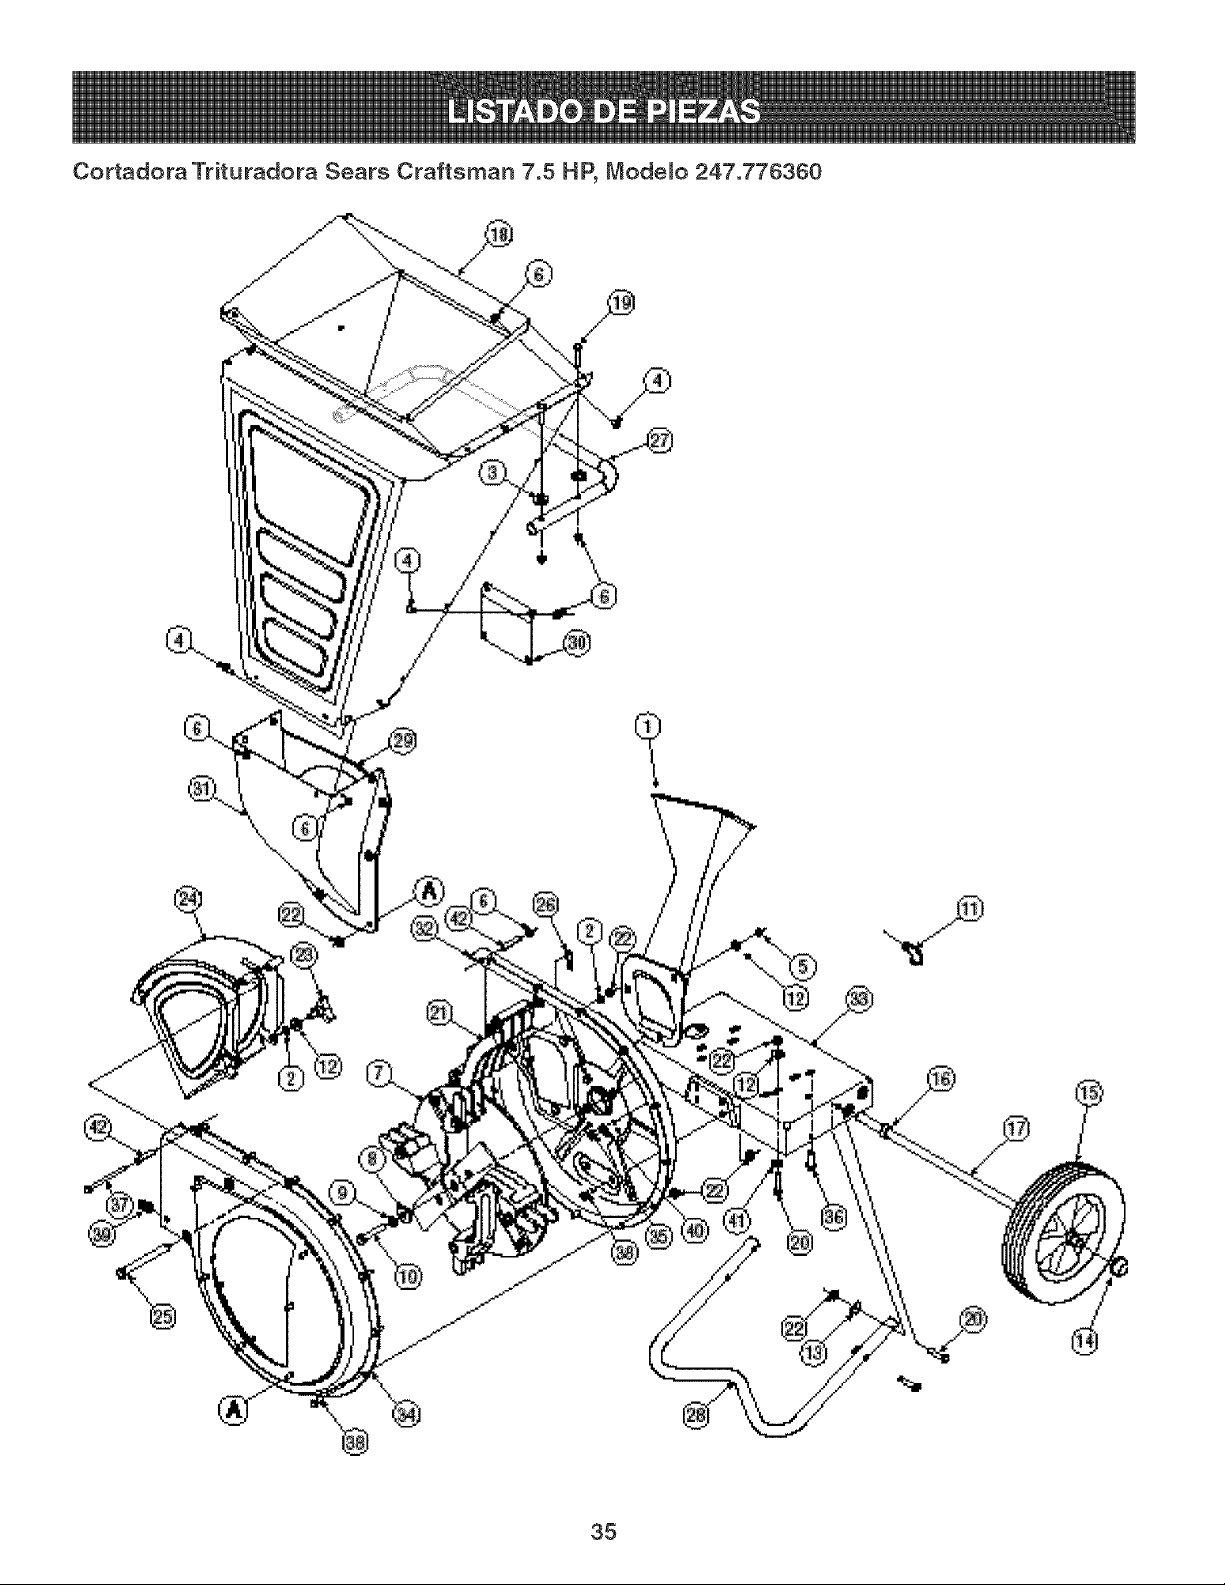
Cortadora Trituradora Sears Craftsman 7.5 HP, Mode_o 247.776360
@
/" ,,®
_.........
@
®
35
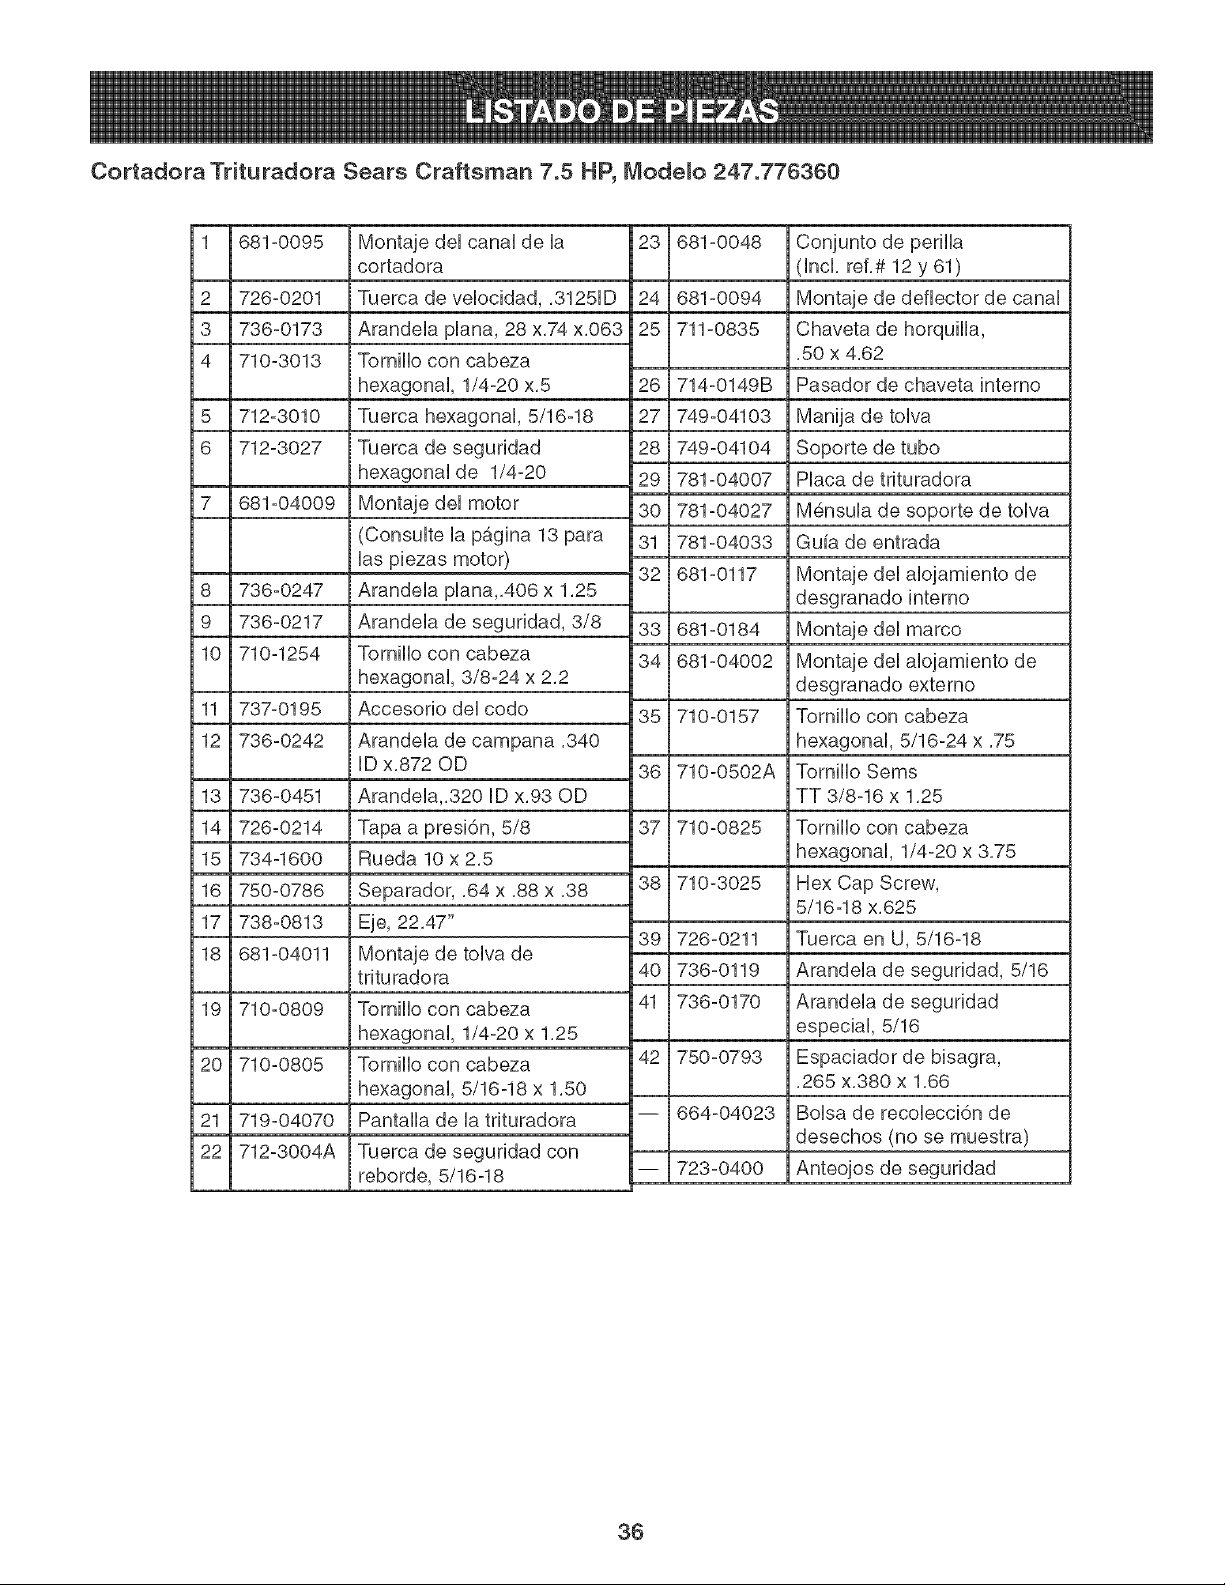
Cortadora Trituradora Sears Craftsman 7.5 HP, Mode_o 247.776360
1
2
3
4
5
6
7
681°0095
726-0201
736-0173
710-3013
712-3010
712-3027
681°04009
8 736-0247
9 736-0217
10 710-1254
11 737o0195
12 736-0242
13
14
15
16
17
18
19
20
736-0451
726-0214
734-1600
750-0786
21
22
Montaje deUcanaUde Ua
cortadora
Tuema de veUocidad, .3125UD
ArandeUa pUana,28 x.74 x.063
TomHUocon cabeza
hexagonaU, 1/4-20 x.5
Tuema hexagonaU, 5/16-18
Tuerca de seguridad
hexagonaU de 1/4-20
Montaje deUmotor
(ConsuUte Uapagina 13 para
Uaspiezas motor)
ArandeUa pUana.406 x 1.25
ArandeUa de seguridad, 3/8
TomHUocon cabeza
hexagonaU, 3/8-24 x 2.2
Accesorio deUcodo
ArandeUa de campana .340
UDx.872 OD
Arandela.320 ID x.93 OD
Tapa a presi6n, 5/8
Rueda 10 x 2.5
Separador, .64 x .88 x .38
738-0813 Eje, 22.47"
681o04011
710-0809
710-0805
719-04070
712-3004A
Montaje de toUvade
trituradora
TomHUocon cabeza
hexagonaU, 1/4-20 x 1.25
TomHUocon cabeza
hexagonaU, 5/16-18 x 1.50
PantaHa de Uatrituradora
Tuema de seguridad con
reborde, 5/16-18
23 681o0048
24 681o0094
25 711o0835
26 714-0149B
27 749 -04103
28 749 -04104
29 781o04007
30 781o04027
31 781-04033
32 681o0117
33 681o0184
34 681o04002
35 710o0157
36 710-0502A
37 710o0825
38 710o3025
39 726o0211
40 736-0119
41 736-0170
42 750-0793
-- 664-04023
-- 723-0400
Conjunto de perHla
(hcL ref.# 12 y 61)
Montaje de deflector de canaU
Chaveta de horquHla,
.50 x 4.62
Pasador de chaveta intemo
Manija de tolva
Soporte de tubo
Placa de trituradora
M6nsula de soporte de tolva
Guia de entrada
Montaje del alojamiento de
desgranado intemo
Montaje del marco
Montaje del alojamiento de
desgranado extemo
Tomillo con cabeza
hexagonal, 5/16-24 x .75
Tomillo Sems
TT 3/8-16 x 1.25
Tomillo con cabeza
hexagonal, 1/4-20 x 3.75
Hex Cap Screw,
5/16o18 x.625
Tuerca en U, 5/16-18
Arandela de seguridad, 5/16
Arandela de seguridad
especial, 5/16
Espaciador de bisagra,
.265 x.380 x 1.66
Bolsa de recolecci6n de
desechos (no se muestra)
Anteojos de seguridad
36
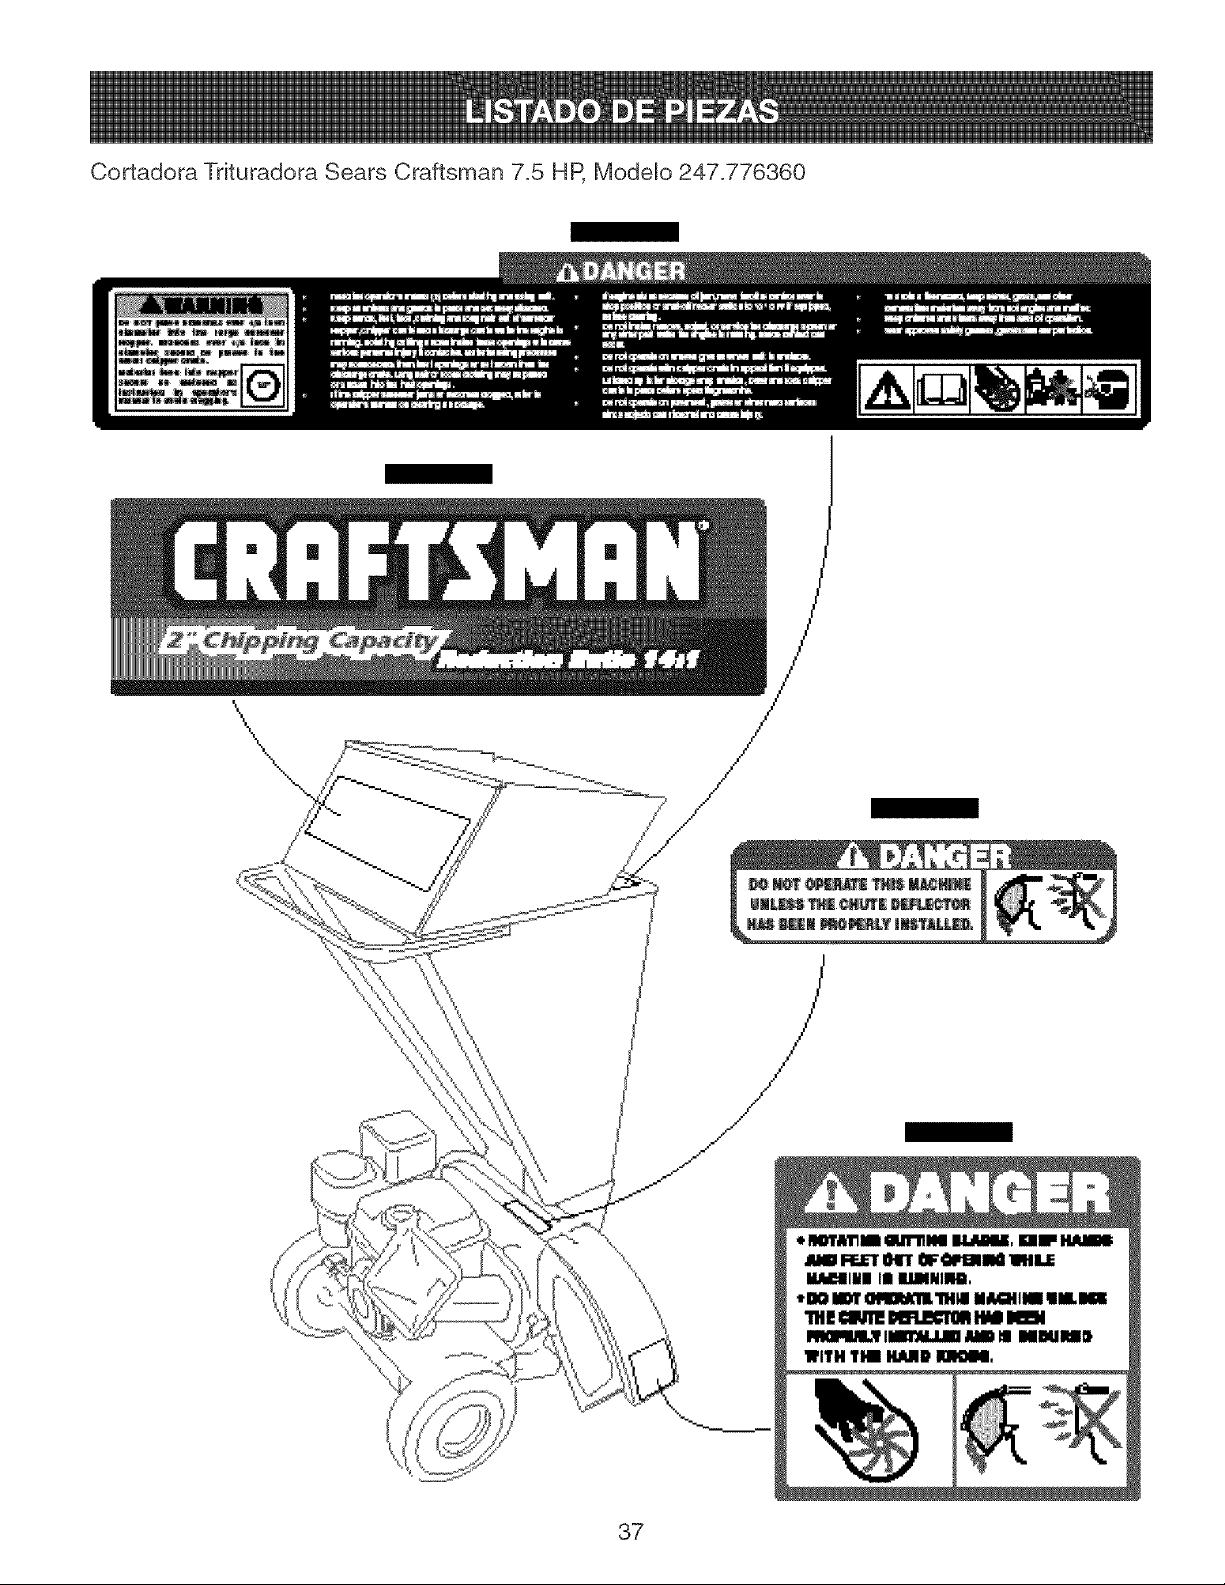
Cortadora Trituradora Sears Craftsman 7.5 HP,Modelo 247.776360
\
\
37
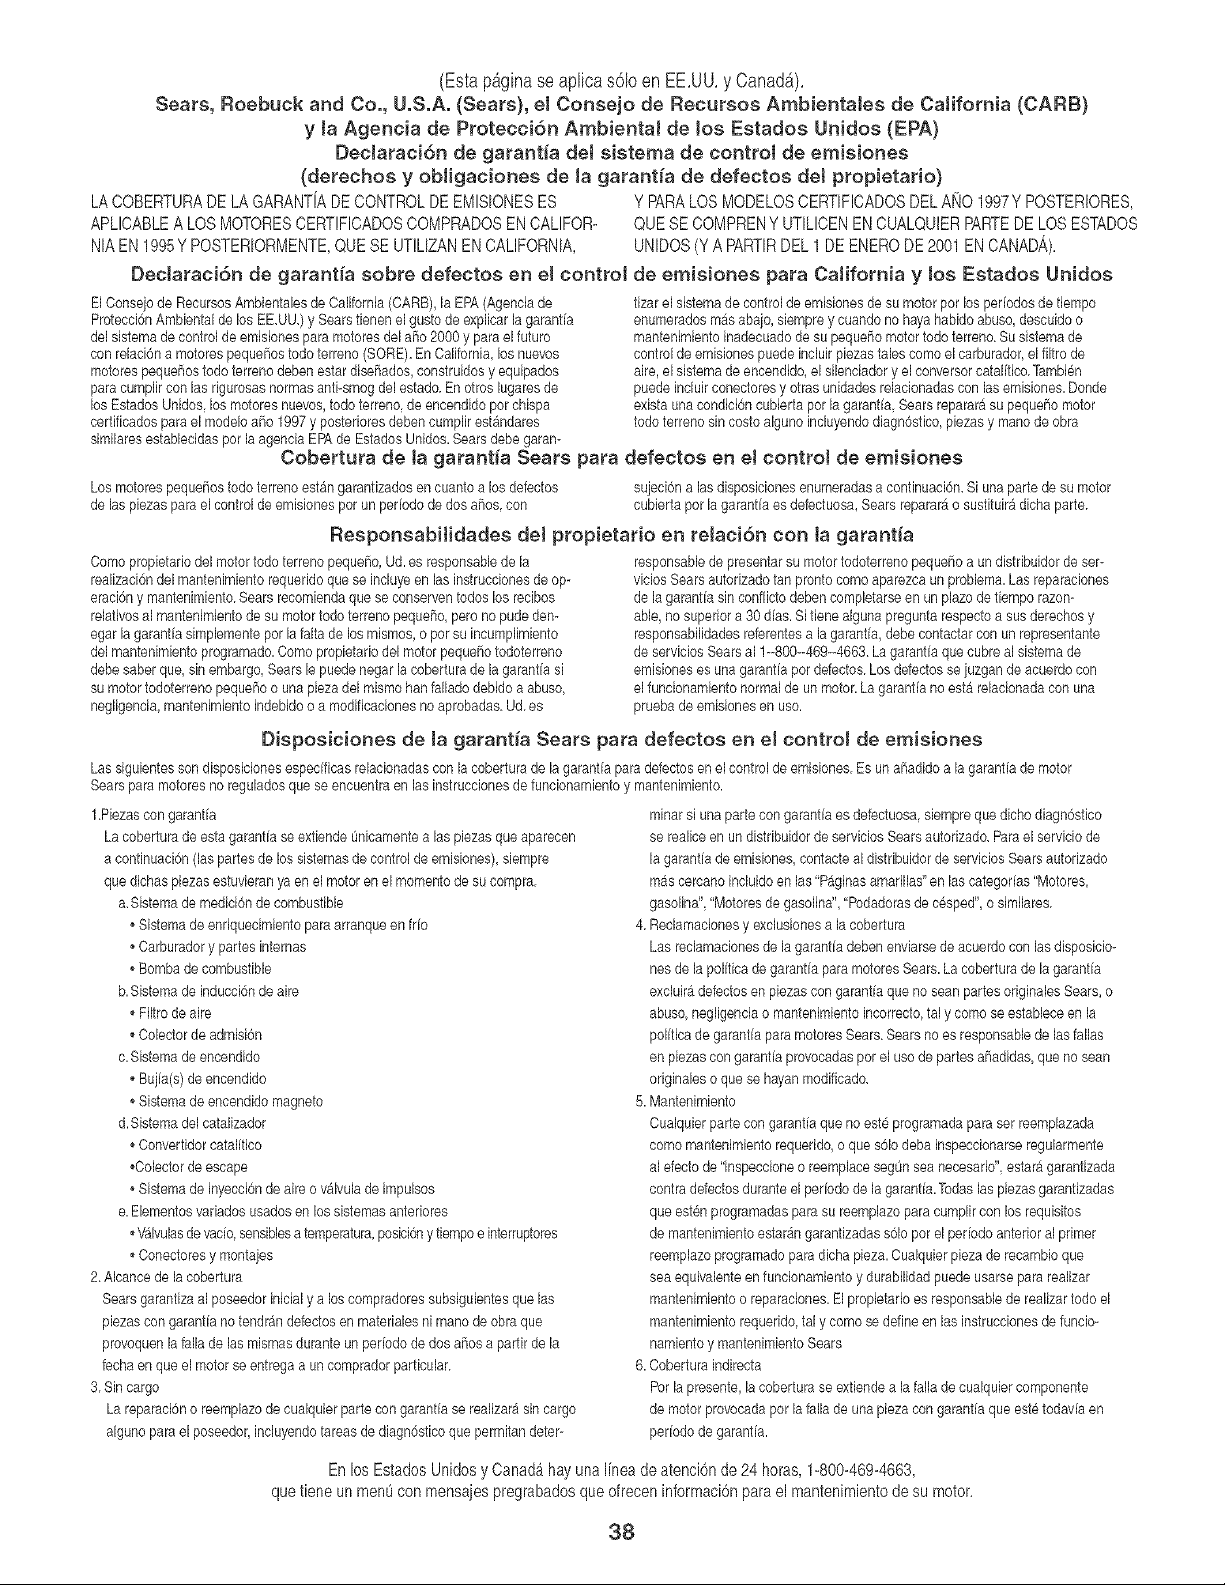
(Estapb,gina se aplicas61oen EE,UU,y Canada),
Sears, Roebuck and Co., U.S.A. {Sears), el Consejo de Recursos ArnbientaJes de California (CARB)
y ta Agencia de Protecci6n Ambiental de Jos Estados Unidos (EPA)
Declaraci6n de garant_a det sistema de control de ernisiones
{derechos y obligaciones de la garant_a de defectos del propietario)
LA COBERTURA DE LA GARANTiA DE CONTROL DE EMISIONES ES
APLICABLE A LOS MOTORES CERTIFICADOS COMPRADOS EN CALIFOR-
NIA EN 1995Y POSTERIORMENTE, QUE SE UTILIZAN EN CALIFORNIA,
Declaraci6n de garant_a sobre defectos en el control
ElConsejode RecursosArnbientalesde California(CARB),la EPA(Agenciade
Protecci6nArnbientalde los EE,UU,)y Searstienenel gusto de explicar lagarantia
delsisternade controlde ernisionespara rnotoresdel aSo2000y para el futuro
conrelaci6na motorespequeflostodoterreno (SORE).En California,los nuevos
motorespeque¢_ostodoterreno debenestar diseflados,construidosy equipados
para curnplircon las rigurosasnorrnasanti-smogdelestado.En otroslugaresde
los EstadosUnidos,los rnotoresnuevos,todo terreno,de encendidoper chispa
certificadospara el modeloaflo 1997y posterioresdebencurnplirest&ndares
similaresestablecidaspor la agenciaEPAde Estados Unidos,Sears debegaram
Y PARALOS MODELOS CERTIFICADOS DEL AFiO 1997 Y POSTERIORES,
QUE SE COMPREN Y UTILICEN EN CUALQUIER PARTE DE LOS ESTADOS
UNIDOS (Y A PARTIR DEL 1 DE ENERO DE 2001 EN CANADA).
de emisiones para CaJifomia y los Estados Unidos
tizarel sisternade controlde ernisionesde su motor por los per[odosde tiernpo
enurneradosrn_sabajo, siernprey cuando no hayahabido abuso,descuidoo
mantenirnientoinadecuadode su pequef_omotor todoterreno.Su sisternade
control de ernisionespuede incluirpiezastales como elcarburador,el filtro de
aire, el sisternade encendido,el silenciadory el conversorcatal[tico.Tarnbi_n
puedeincluirconectoresy otras unidadesrelacionadascon las ernisiones,Donde
existauna condicioncubierta per la garantia,Searsrepararasu pequeSomotor
todo terrenosin costoalguno incluyendodiagn6stico,piezasy manode obra
Cobertura de Ja garant_a Sears para defectos en e! control de emisiones
Losrnotorespeque¢_ostodo terrenoest_n garantizadosen cuantoa los defectos sujeci6nalas disposicionesenurneradasa continuacibn,Si unaparte de su motor
de las piezasparael controlde ernisionesper un per[odede dos afros,con cubierta per la garantia esdefectuosa,Searsreparar_o sustituir_dicha parte.
ResponsabiHdades del propietario en relaci6n con Jagarant_a
Comepropietariodel motortodo terrenopequeflo,Ud. es responsablede la
realizaci6ndelmantenirnientorequeridoque se incluyeen las instruccionesde op-
eraci6ny rnantenimiento.Sears recorniendaque se conserventodoslos recibos
relativosal rnantenirnientode su motortodoterreno pequeflo,pero no pude den-
egar la garantiasimplementeper la falta de los rnismos,o pot su incurnplirniento
delrnantenirnientoprograrnado.Come propietariodel motor pequeflotodoterreno
debesaberque, sin embargo,Searsle puedenegar la coberturade la garantiasi
su motortodoterrenopequef_oo unapieza delrnisrnohan falladodebido a abuse,
negligencia,mantenirnientoindebidoo a rnodificacionesno aprobadas.Ud.es
responsablede presentarsu motortodoterrenopequef_oa un distribuidorde ser-
viciosSears autorizadotan prontocornoaparezcaun problema.Lasreparaciones
de lagarantiasin conflictodebencornpletarseen un plazode tiernporazon-
able,no superiora 30 dias. Si tiene algunapreguntarespectoa sus derechosy
responsabilidadesreferentesa la garantia,debe contactarcon un representante
de serviciosSearsal 1--800-o469--4663_Lagarantia que cubreal sisternade
ernisioneses unagarantiapot defectos.Los ddectos sejuzgande acuerdocon
el funcionarnientonormalde un motor.La garantia no est_ relacionadacon una
pruebade ernisionesen use.
Disposiciones de ta garant_a Sears para defectos en et control de emisiones
Lassiguientesson disposicionesespecificasrelacionadasconla coberturade la garantiaparadefectosen el controlde ernisiones.Es un af_adidoa lagarantia de motor
Searspara motoresno reguladosque seencuentraen las instruccionesde funcionarnientoy mantenimiento.
1_Piezascon garantia
La coberturade esta garantiaseextiendeunicamentealas piezasque aparecen
a continuaci6n(laspartes de los sisternasde controlde ernisiones),siernpre
que dichaspiezasestuvieranya en el motoren el mementode sucompra.
a,Sisternade rnedici6nde cornbustible
Sistemade enriquecirnientopara arranqueen frio
Carburadory partesinternas
Bornbade combustible
b.Sistemade inducci6nde aire
Filtrode aire
Colectorde adrnisi6n
c,Sistemade encendido
* Bujia(s)de encendido
Sistemade encendido magneto
d.Sisternadel catalizador
Convertidorcatalitico
*Oolectorde escape
, Sistemade inyecci6nde aire o valvulade impulsos
e.Elernentosvariadosusadosen los sistemasanteriores
V_lvulasdevacio,sensiblesa temperatura,posiciony tiernpoe interruptores
* Oonectoresy montajes
2. Alcancede la cobertura
Searsgarantizaal poseedor inicialy a loscornpradoressubsiguientesquelas
piezascongarantiano tendr_ndefectosen rnaterialesni rnanode obra que
provoquenJafalla de JasrnJsmasduranteun periodode dos afrosa partir de Ja
fecha en queel motor seentrega a un cornpradorparticular_
3. Sin cargo
La reparaci6no reemplazode cualquierparte congarantia se realizar_sin cargo
algunopara el poseedor,incluyendotareasde diagn6sticoque perrnitandeter-
rninar si una parte con garantiaes defectuosa,siernprequedicho diagn6stico
se realiceen undistribuidorde serviciosSearsautorizado,Parael serviciode
la garantiade ernisiones,contacteal distribuidorde serviciosSearsautorizado
mAscercano incluidoen las 'P_ginasarnarillas"en las categorias"Motores,
gasolina","Motoresde gasolina",'Podadorasde c6sped', o similares.
4. Reclamacionesy exclusionesa la cobertura
Las reclarnacionesde la garantiadebenenviarsede acuerdoconlas disposicio-
nes de la politicade garantiapara rnotoresSears.La coberturade la garantia
excluirAdefectosen piezas congarantiaque no sean partesoriginalesSears, o
abuso,negligenciao rnantenimientoincorrecto,taly como seestableceen la
politica de garantia para rnotoresSears_Searsno es responsablede las fallas
en piezascongarantia provocadasper el uso de partes af_adidas,que no sean
originaleso que sehayan modificado,
5. Mantenirniento
Cualquierparte con garantiaque no este prograrnadaparaser reernplazada
come mantenirnientorequerido,o que s61odeba inspeccionarseregularrnente
al efecto de "inspeccioneo reernplacesegOnseanecesario', estar&garantizada
contradefectosdurante el periodode la garantia_Todaslas piezasgarantizadas
que est@nprograrnadaspara su reernplazopara curnplircon los requisitos
de rnantenimientoestar_n garantizadassOlopor el periodo anterior al prirner
reernplazoprogramadoparadicha pieza.Cualquierpiezade recarnbioque
sea equivalenteen funcionamientoy durabilidadpuede usarsepara realizar
mantenirnientoo reparaciones,Elpropietarioes responsablede realizartodo el
mantenirnientorequerido,tal y cornose defineen las instruccionesde funcio-
narnientoy mantenimientoSears
6. CoberturaJndJrecta
Porla presente,la coberturaseextiendea la falla de cualquiercornponente
de motorprovocadaper lafalla de una piezacon garantiaque est_ todavh en
periodode garantia.
En los EstadosUnidosy Canada hayuna lineade atenci6nde 24 horas,1-800-469-4663,
quetiene un men8con mensajespregrabadosque ofreceninformaci6nparael mantenimientode su motor.
38
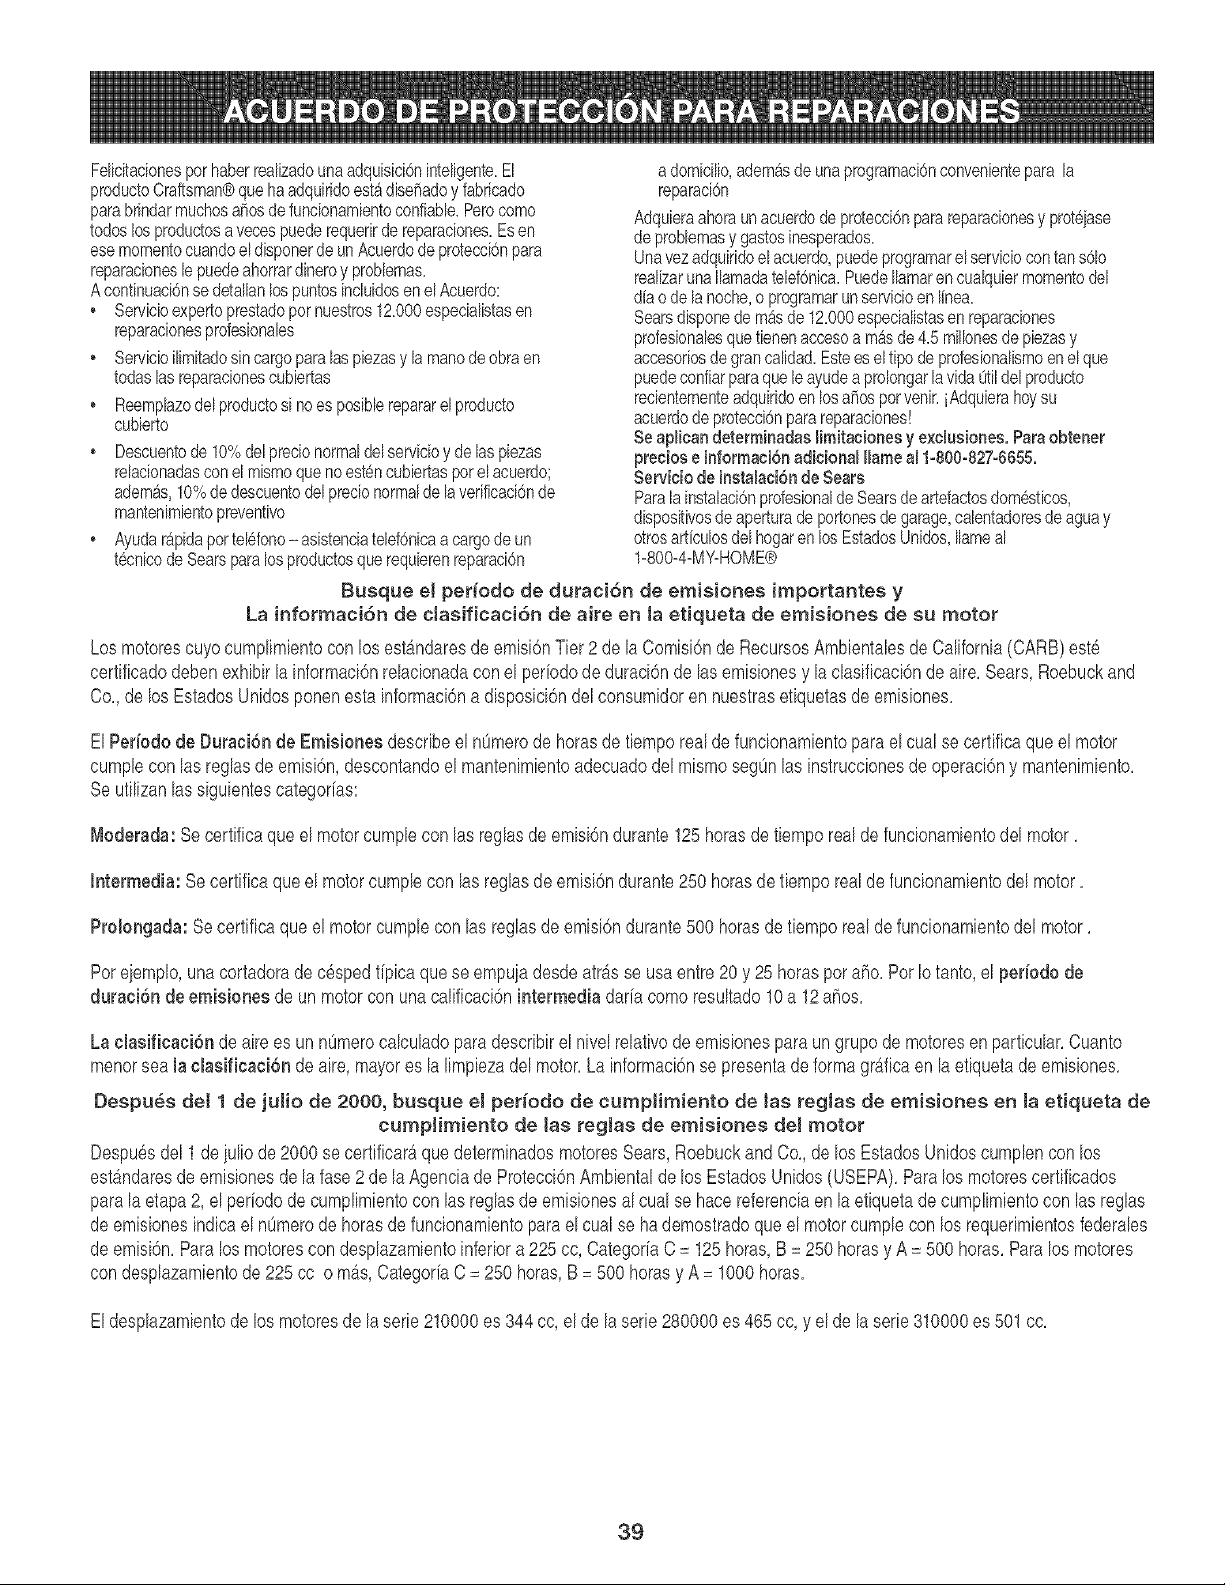
Felic_tacionesporhaberrealizadounaadquisicioninteligente.El
productoCraftsman®queha adquiridoestadisefiadoy fabricado
parabrindarmuchosa_osdefuncionamientoconfiable.Perocomo
todoslosproductosavecespuederequerirde reparaciones.Esen
esemomentocuandoeldisponerdeunAcuerdodeprotecci6npara
reparacioneslepuedeahorrardineroy problemas.
Acontinuaci6nsedetallanlospuntosinduidosenel Acuerdo:
o Servicioexpertoprestadopotnuestros12.000especialistasen
reparacionesprdesionales
o Servicioilimitadosincargoparalaspiezasy la manodeobraen
todaslasreparacionescubiertas
o Reemplazodelproductosi noesposiblerepararelproducto
cubierto
Descuentode 10%del precio normaldelservicioy de las piezas
relacionadascon elmismo queno est_ncubiertaspor el acuerdo;
ademas,10% de descuentodel precionormalde laverificacionde
mantenimientopreventivo
Ayudar_pidaportel6fono- asistenciatelef6nicaa cargode un
tecnicode Sears para losproductosque requierenreparaci6n
a domicilio,ademasde unaprogramaci6nconvenientepara la
reparaci6n
Adquieraahora un acuerdode protecci6npara reparacionesy proteiase
de problemasy gastosinesperados.
Unavezadquiridoel acuerdo,puedeprogramarelserviciocon tan s61o
realizarunaIlamadatelef6nica.PuedeIlamaren cualquiermomentodel
aliao de la noche,o programarunservicioenlinea.
Searsdisponede masde 12.000especialistasen reparaciones
profesionalesquetienen accesoa masde 4.5 millonesde piezasy
accesoriosde gran calidad.Estees el tipo de profesionalismoen el que
puedeconfiarpara quele ayudea prolongarlavida Otildel producto
recientementeadquiridoen los afios potvenir, iAdquierahoy su
acuerdode protecci6npara reparaciones!
Se apHcandeterminadas Jimitaciones y exc_uciones.Paraobtener
preeios e informaei6n adiciona_ I_ameal 1-800-827-6655.
Servicio de inctalaei6n de Sears
Parala instalaci6nprofesionalde Searsde artefactosdomesticos,
dispos_tivosde apertura de portonesde garage,calentadoresde aguay
otros anticulosdel hogaren los EstadosUnidos,Ilameal
1-800-4-MY-HOME®
Busque el periodo de duraci6n de emisiones importantes y
La informaci6n de clasificaci6n de aire en ta etiqueta de emisiones de su motor
Los motorescuyocumplimientocon los estSndaresde emisi6nTier 2 de la Comisi6nde RecursosAmbientalesdeCalifornia(CARB)est6
certificadodebenexhibitla informaci6nrelacionadaconel periodode duraci6nde lasemisionesy la clasificaci6nde aire.Sears,Roebuckand
Co.,de losEstadosUnidosponenesta informaci6na disposici6ndelconsumidorennuestrasetiquetasdeemisiones.
El Periodo de Duraci6nde Emisiones describeel nOmerode horasde fiemporealde funcionamientoparael cualse cerfificaque el motor
cumplecon las reglasde emisi6n,descontandoelmantenimientoadecuadodel mismosegOnlas instruccionesdeoperaci6ny mantenimiento.
Seutilizanlassiguientescategorias:
Moderada: Se certificaque el motorcumplecon las reglasde emisi6ndurante125horasde tiempo realde funcionamientodel motor.
Intermedia: Secertificaqueel motorcumplecon las reglasde emisi6ndurante250 horasde tiempo realde funcionamientodel motor.
Prolongada: Secertificaque el motorcumpleconlas reglasde emisi6ndurante500 horasde tiempo realde funcionamientodel motor.
Pot eiemplo,una cortadorade cespedtipica que se empuiadesdearrasse usaentre20 y 25 horaspot afro. Pot Iotanto,el pedodo de
duraci6n de emisionee de un motorcon una calificaci6nintermedia daria como resultado10a 12 ahos.
La claeificaci6n de aire es un nOmerocalculadoparadescribirel nivelrelativode emisionespara un grupode motoresen particular.Cuanto
menorsea la claeificaci6n de aire,mayores la limpiezadel motor.La informaci6nse presentade formagrb,fica enla etiquetade emisiones.
Despu_s det 1 de juHo de 2000, busque eJ pedodo de cumpHmiento de las reglas de emisiones en ta etiqueta de
cumplirniento de tas regJas de emisiones deJ motor
Despuesdel 1 deiulio de2000se certificar5quedeterminadosmotoresSears,Roebuckand Co.,de los EstadosUnidoscumplencon los
est_ndaresde emisionesde la fase 2 de la Agenciade Protecci6nAmbientalde los EstadosUnidos(USEPA).Paralos motorescertificados
paralaetapa2, el periodode cumplimientocon las reglasde emisionesal cualse hacereferenciaen la etiquetade cumplimientocon las reglas
deemisionesindicael nOmerode horasde funcionamientoparael cualse ha demostradoque el motorcumplecon losrequerimientosfederales
deemisi6n.Paralos motorescondesplazamientoinferiora 225 cc, CategorfaC = 125horas,B = 250 horasy A = 500 horas.Paralos motores
con desplazamientode 225 cc o m_s,CategoriaC = 250 horas,B = 500 horasy A = 1000horas.
Eldesplazamientode losmotoresde la serie210000es 344 cc, el de la serie280000 es 465 cc, y el de la serie310000es 501cc.
39

Your Home
For repair-in your home-of all major brand appliances,
lawn and garden equipment, or heating and cooling systems,
no matter who made it, no matter who sold it!
For the replacement parts, accessories and
owner's manuals that you need to do-it-yourself.
For Sears professional installation of home appliances
and items like garage door openers and water heaters.
1-800-4-MY-HOME ® (1-800-469-4663)
Call anytime, day or night (U.S.A. and Canada)
www.sears.com www.sears.ca
Our Home
For repair of carry-in items like vacuums, lawn equipment,
and electronics, call or go on-line for the location of your nearest
Sears Parts & Repair Center.
1-800-488-1222
Call anytime, day or night (U.S.A. only)
www.sears.com
To purchase a protection agreement (U.S.A.)
or maintenance agreement (Canada) on a product serviced by Sears:
1-800-827-6655 (U.S.A.) 1-800-361-6665 (Canada)
Para pedir servicio de reparaci6n Au Canada pour service en frangais:
a domicilio, y para ordenar piezas. 1-800- LE- FOYER Mc
1-888-SU-HOGAR sM 1 800 533 6937
( - _ _ )
.... (1-888-784-6427) www.sears.ca
® Registered Trademark / TivlTrademark / SMService Mark of Sears, Roebuck and Co.
® Marca Registrada / TM Marca de F&brica / SMMarca de Servicio de Sears, Roebuck and Co.
MCMarque de commerce / MDMarque d_posCe de Sears, Roebuck and Co. ® Sears, Roebuck and Co.

