Operator's Manual
®
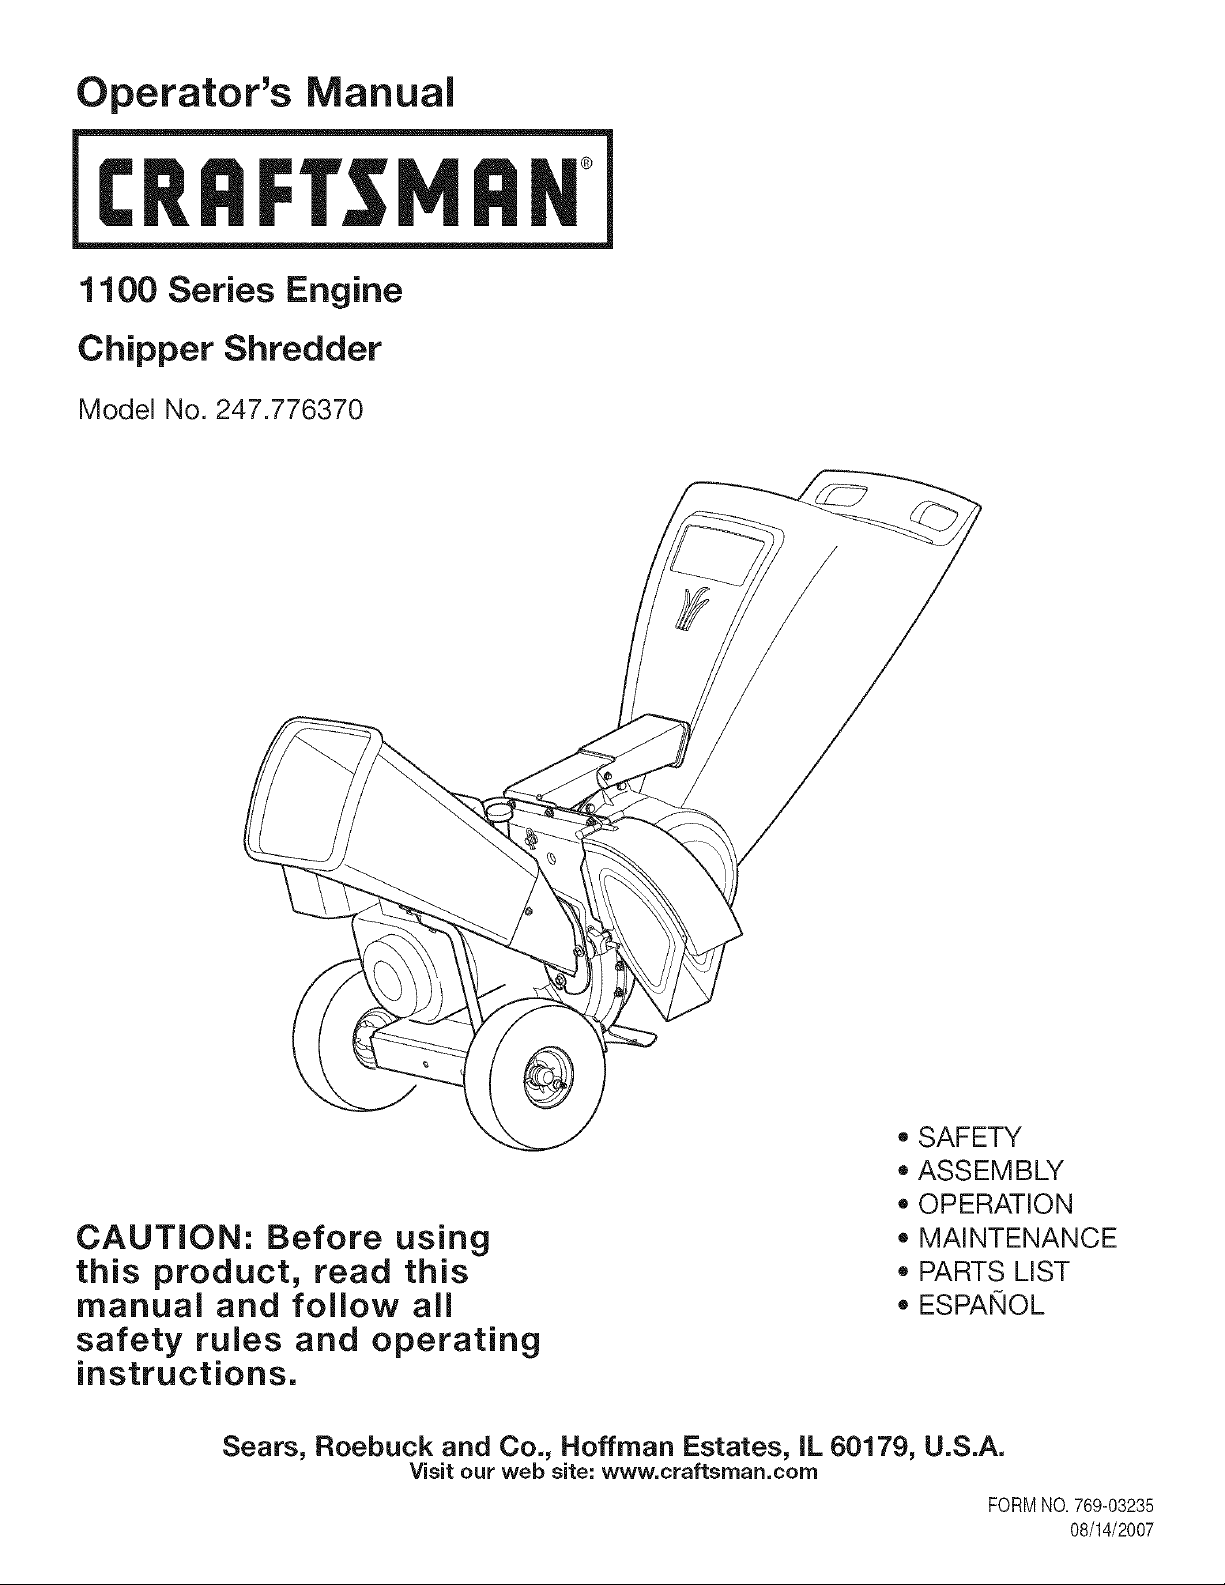
1100 Series Engine
Chipper Shredder
Model No. 247.776370
CAUTION: Before using
this product, read this
manual and follow all
safety rules and operating
instructions.
• SAFETY
ASSEMBLY
OPERATION
MAINTENANCE
PARTS LIST
ESPAIMOL
Sears, Roebuck and Co., Hoffman Estates, IL 60179, U.S.A.
Visit our web site: www.craftsrnan.corn
FORMNO.789-03235
08/14/2007
WarrantyStatement..................................Page2
RepairProtectionAgreement...................Page3
SafeOperationPractices.........................Pages4-5
SafetyLabels............................................Page7
Assembly..................................................Pages8-11
Operation..................................................Pages12-13
ServiceandMaintenance.........................Pages14-17
Off-SeasonStorage..................................Page18
TroubleShooting......................................Page19
PartsList...................................................Page20-29
Espa_ol.....................................................Page32
ServiceNumbers......................................BackCover
OneYear Full Warranty on Craftsman Chipper Shredder
Thisequipmentis coveredbya one-yearwarranty,providedthat it is maintained,lubricated,andtunedupaccordingto the instructionsinthe
operator'smanual.Duringthe warrantyyear,if this equipmentexperiencesany failuredue to defectsinmaterialor workmanship,RETURNITTO
YOURNEARESTSEARSPARTS& REPAIRCENTER,andSearswill repairit, freeof charge.In-homewarrantyserviceis available,butyou will
haveto paya trip charge.
This warranty does not cover:
• Expendableitemswhichbecomewornduringnormaluse,suchas sparkplugs, air cleaners,blades.
• Tire replacementor repaircausedby puncturesfrom outsideobjects,such as nails,thorns,stumps,or glass.
• Repairsnecessarybecauseof operatorabuse,includingbut notlimitedto, damagecausedby objects,suchas stones, metaldebrisor
oversizedpiecesof wood,or impactingobjectsthat bend theframeorcrankshaft,or over-speedingthe engine.
• Repairsnecessarybecauseof operatornegligence,includingbut not limitedto, electricaland mechanicaldamagecausedby improper
storage,failureto usethe propergrade and amountof engineoil, orfailureto maintainthe equipmentaccordingto the instructionscontained
in theoperator'smanual.
• Engine(fuelsystem)cleaningorrepairscausedbyfuel determinedto be contaminatedor oxidized(stale). Ingeneral,fuel shouldbeused
within30 daysof itspurchasedate.
• Equipmentif usedfor commercialorrentalpurposes.
Thiswarrantyappliesforonly 90 daysif this product is everusedfor commercialor rentalpurposes.
This warrantyappliesonly whilethisproductis usedinthe United States.
This warrantygivesyouspecificlegalrights,andyou mayalsohaveotherrightswhichvaryfromstateto state.
Sears, Roebuckand Co.,HoffmanEstates,IL 60179
EngineSeries: 1100
EngineOil Type: SAE30
EngineOil Capacity: 20 ounces
Fuel: UnleadedGasoline
SparkPlug: Champion@RC-12YC
SparkPlugGap: .030"
ModelNumber.................................................................
Serial Number.................................................................
Dateof Purchase.............................................................
Recordthe modelnumber,serialnumber
anddateof purchaseabove
© Sears Brands,LLC 2
Congratulationson makingasmartpurchase.YournewCraftsman®
productis designedand manufacturedfor yearsof dependableopera-
tion.But likeall products,it mayrequirerepairfromtimeto time.That's
whenhavinga RepairProtectionAgreementcansaveyou moneyand
aggravation.
Here'swhat'sincludedinthe Agreement:
,, Expertserviceby our 12,000professionalrepairspecialists
,, Unlimitedserviceand nochargefor partsandlaboronall covered
repairs
,, Productreplacementif yourcoveredproductcan'tbe fixed
,, Discountof 10%fromregularpriceof serviceand service-related
partsnotcoveredby the agreement;also, 10%off regularpriceof
preventivemaintenancecheck
,, Fasthelpby phone- phonesupportfroma Searstechnicianon
productsrequiringin-homerepair,plus convenientrepair
scheduling
Purchasea RepairProtectionAgreementnowand protectyourself
fromunexpectedhassleand expense.
Onceyou purchasethe Agreement,a simplephonecall is all thatit
takesfor you toscheduleservice.Youcan call anytimeday or night, or
schedulea serviceappointmentonline.
Searshas over12,000professionalrepairspecialists,who have
accesstoover 4.5millionquality partsand accessories.That'sthe
kindof professionalismyoucan counton to help prolongthe lifeof
your newpurchasefor yearsto come.Purchaseyour RepairProtection
Agreementtoday!
Some limitationsand exclusionsapply. For pricesand additional
informationcall 1-800-827-6655.
Sears Installation Service
ForSearsprofessionalinstallationof homeappliances,garagedoor
openers,waterheaters,andothermajorhomeitems,in the U.S.A.call
1-800-4-MY-HOME®
__1, Thissymbolpointsoutimportantsafetyinstructions
which,ifnotfollowed,couldendangerthepersonal
safetyand/orpropertyofyourselfandothers.Read
andfollowallinstructionsinthismanualbefore
attemptingtooperatethismachine.Failuretocomplywiththese
instructionsmayresultinpersonalinjury.Whenyouseethissymbol,
HEEDITSWARNING!
YourResponsibility:Restricttheuseofthispowermachineto
personswhoread,understand,andfollowthewarningsandinstruc-
tionsinthismanualandonthemachine.
Thismachinewasbuilttobeoperatedaccordingtotherulesfor
safeoperationinthismanual.Aswithanytypeofpowerequipment,
carelessnessorerroronthepartoftheoperatorcanresultinserious
injury.Thismachineiscapableofamputatinghandsandfeetand
throwingobjects.Failuretoobservethefollowingsafetyinstructions
couldresultinseriousinjuryordeath.
Engine Exhaust, some of its constituents, and certain vehicle
components contain or emit chemicals known to State of California to
Jcause cancer and birth defects or other reproductive harm.
TRAINING
• Read,understand,andfollowall instructionsonthe machineand in
the manual(s)beforeattemptingto assembleand operate.Keepthis
manualina safeplacefor future andregular referenceandfor ordering
replacementparts.
• Be familiarwith allcontrolsandtheir proper operation.Know howto stop
the machineanddisengagethem quickly.
• Neverallowchildrenunder 16years oldto operatethis machine.Chil-
dren 16years old and overshould readand understandthe operation
instructionsand safetyrulesin this manualand shouldbe trained and
supervisedbya parent.
• Neverallowadultsto operatethis machinewithout properinstruction.
• Keepbystanders,helpers,pets,andchildren at least75 feet from the
machinewhileit is inoperation.Stop machineif anyoneentersthe area.
• Neverrunan engineindoorsor in a poorlyventilatedarea.Engine
exhaustcontainscarbonmonoxide,an odorlessanddeadlygas.
• Do not put handsandfeet near rotatingparts orin thefeedingchambers
anddischargeopening.Contactwiththe rotatingimpellercan amputate
fingers,hands,andfeet.
,, Neverattemptto unclogeither the feed intakeor dischargeopening,
removeorempty chipperbag,or inspectand repairthe machinewhile
theengineis running.Shutthe engineoff andwait untilall movingparts
havecometo acompletestop. Disconnectthe spark plugwire and
groundit againstthe engine.
PREPARATION
• Thoroughlyinspectthe areawherethe equipmentisto be used. Remove
all rocks,bottles,cans, orotherforeignobjectswhichcould bepickedup
or thrown andcausepersonalinjury or damageto the machine.
,, Alwayswearsafetyglasses orsafetygoggles duringoperationor while
performinganadjustmentor repair,to protecteyes.Thrownobjects
which ricochetcan causeserious injuryto the eyes.
• Wear sturdy, rough-soledwork shoesandclose-fittingslacksand shirts.
Loosefitting clothesorjewelry can be caughtin movableparts. Never
operatethis machinein barefeet or sandals.Wear leatherwork gloves
whenfeedingmaterialinthe chipperchute.
• Beforestarting,check all boltsandscrewsfor proper tightnessto be
sure the machineis in safeworkingcondition.Also, visuallyinspect
machinefor any damageatfrequentintervals.
• Maintainor replacesafetyand instructionslabels,as necessary.
• To avoidpersonalinjury or propertydamageuse extremecare in
handlinggasoline.Gasolineis extremelyflammable andthe vapors are
explosive.Seriouspersonalinjury can occur when gasolineis spilled on
yourself oryour clotheswhichcan ignite.Washyour skinandchange
clothesimmediately.
• Useonly an approvedgasolinecontainer.
• Extinguishall cigarettes,cigars,pipes,and othersourcesof ignition.
• Neverfuel machineindoors.
• Neverremovegas cap or addfuel whilethe engine is hot or running.
• Allow engine to cool at least two minutesbefore refueling.
• Neveroverfill fuel tank. Filltankto no morethan 1/2inch below bottom
of filler neckto providespacefor fuel expansion.
,, Replacegasolinecap andtighten securely.
• If gasolineis spilled, wipeit off the engineandequipment.Move
machineto anotherarea.Wait 5 minutesbeforestartingthe engine.
• Neverstore the machineorfuel container insidewherethere is an open
flame, spark,or pilot light (e.g.furnace, waterheater,spaceheater,
clothesdryer,etc.).
,, To reduceafire hazard,keep machinefree of grass, leaves,or other
debris build-up.Clean up oil orfuel spillageand removeany fuel soaked
debris.
• Allow machineto cool at least 5 minutes beforestoring.
4
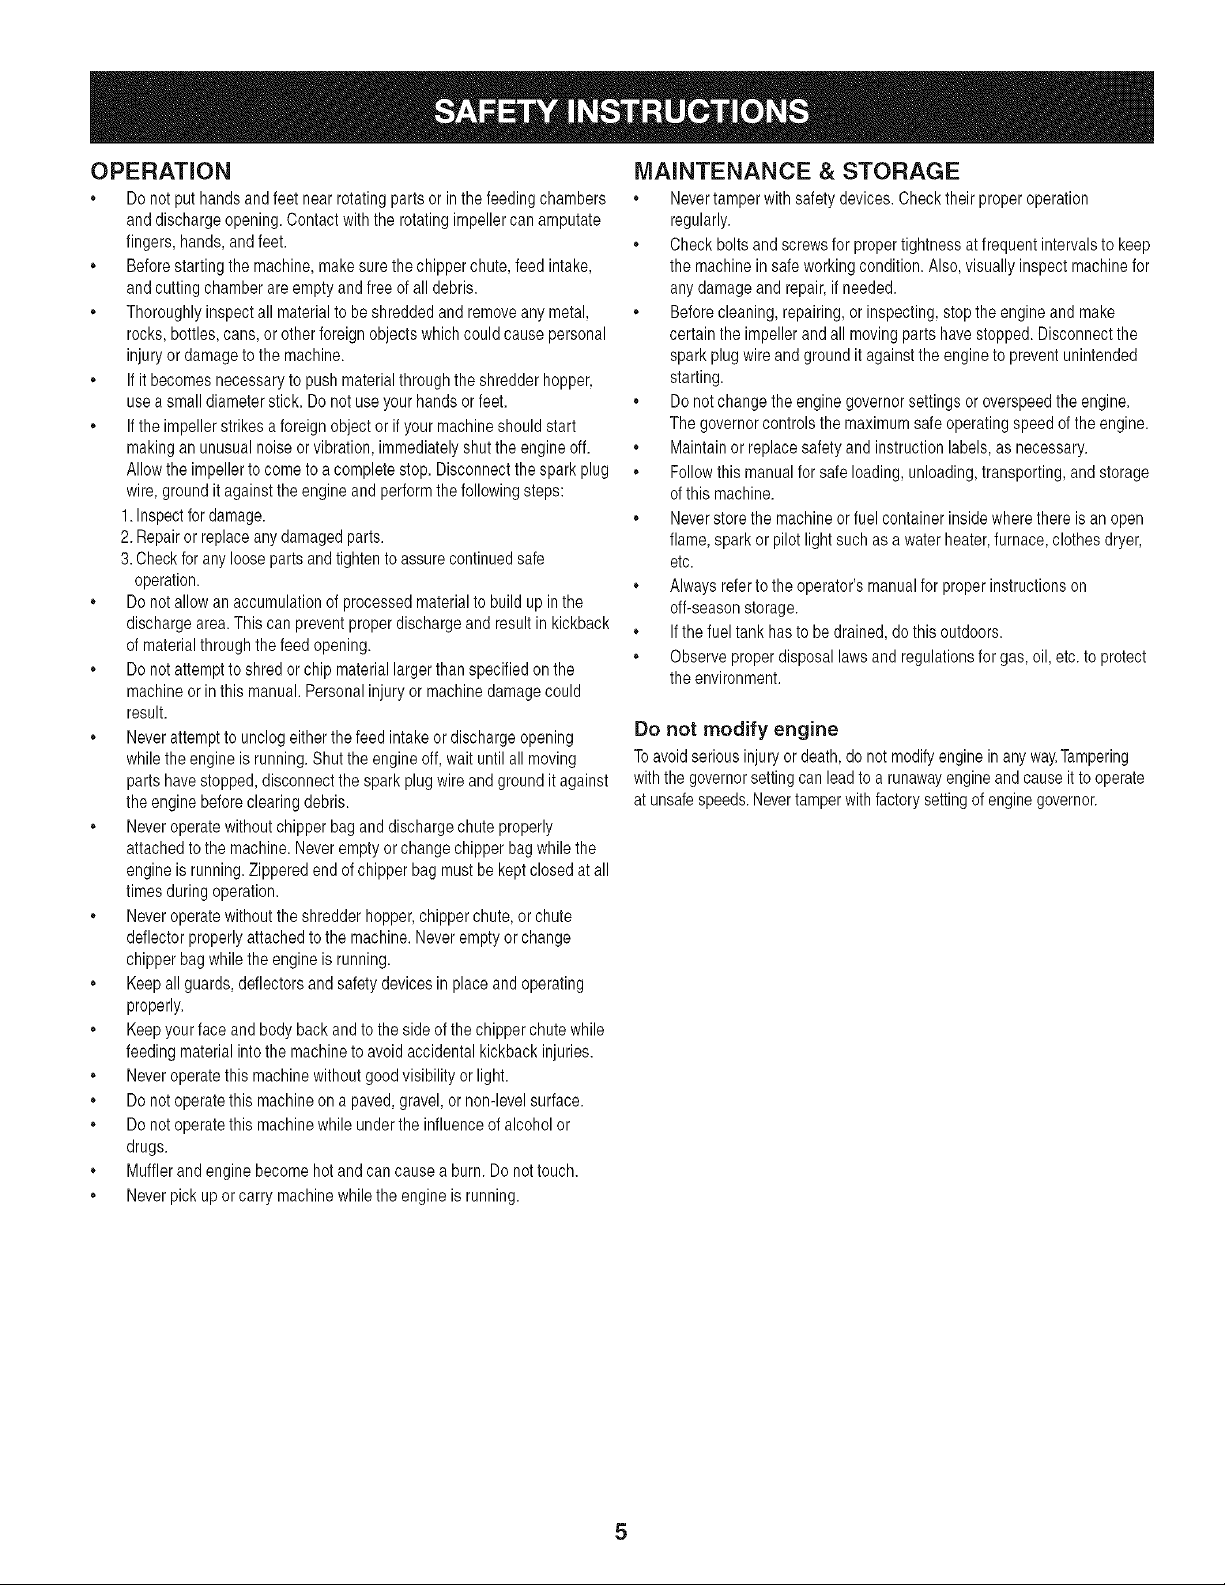
OPERATION
. Do notputhandsandfeet near rotatingparts or inthe feedingchambers
anddischargeopening.Contactwiththe rotatingimpellercan amputate
fingers,hands,and feet.
,, Beforestartingthe machine,makesurethe chipperchute,feed intake,
andcutting chamberare empty andfree of all debris.
,, Thoroughlyinspectall materialto be shreddedandremoveany metal,
rocks,bottles,cans, or other foreignobjectswhichcouldcause personal
injuryor damageto the machine.
,, If it becomesnecessaryto push materialthroughthe shredderhopper,
use a small diameterstick. Donotuse your handsor feet.
,, If the impellerstrikesaforeign objector ifyour machineshould start
makingan unusualnoiseorvibration,immediatelyshutthe engineoff.
Allowthe impellerto cometo a completestop. Disconnectthespark plug
wire, groundit againstthe engine and performthefollowingsteps:
1.Inspectfor damage.
2. Repairor replaceanydamagedparts.
3. Checkfor any loosepartsandtighten to assurecontinuedsafe
operation.
. Do notallowan accumulationof processedmaterialto build up inthe
dischargearea.This can preventproperdischargeand resultin kickback
of materialthroughthefeed opening.
,, Do notattemptto shred or chip materiallargerthan specifiedon the
machineor in this manual.Personalinjuryor machinedamagecould
result.
,, Neverattemptto unclogeither thefeed intakeor dischargeopening
whilethe engineis running.Shutthe engineoff, waituntil all moving
parts havestopped,disconnectthe sparkplug wire andground itagainst
theenginebeforeclearing debris.
,, Neveroperatewithoutchipperbagand dischargechute properly
attachedto the machine.Neveremptyor change chipperbagwhilethe
engineis running.Zipperedendof chipperbag mustbe keptclosedat all
timesduringoperation.
. Neveroperatewithouttheshredderhopper,chipperchute,or chute
deflectorproperlyattachedto the machine.Neveremptyor change
chipperbagwhilethe engineis running.
,, Keepall guards,deflectorsandsafetydevices in place andoperating
properly.
,, Keepyourface andbody back andto the side of thechipperchute while
feedingmaterialintothe machineto avoidaccidentalkickback injuries.
,, Neveroperatethis machinewithoutgood visibilityor light.
. Do notoperatethis machineon a paved,gravel, or non-levelsurface.
. Do notoperatethis machinewhile underthe influenceof alcoholor
drugs.
. Mufflerand enginebecomehot and can causea burn. Do nottouch.
,, Neverpickupor carry machinewhilethe engineis running.
MAINTENANCE & STORAGE
• Nevertamperwith safetydevices.Checktheir properoperation
regularly.
. Check bolts andscrewsfor propertightnessat frequentintervalsto keep
the machinein safe workingcondition.Also, visuallyinspectmachinefor
any damageand repair,if needed.
,, Beforecleaning,repairing,or inspecting,stoptheengineand make
certain the impellerand all moving parts havestopped.Disconnectthe
spark plug wire andground itagainstthe engineto preventunintended
starting.
. Donotchangethe enginegovernorsettingsor overspeedthe engine.
The governorcontrolsthe maximumsafe operatingspeedof the engine.
. Maintainor replacesafetyand instructionlabels,as necessary.
,, Followthis manualfor safeloading,unloading,transporting,and storage
of this machine.
,, Neverstorethe machineor fuel container insidewherethere is an open
flame, sparkor pilot lightsuch asa water heater,furnace,clothes dryer,
etc.
. Alwaysreferto the operator'smanualfor properinstructionson
off-seasonstorage.
. Ifthe fuel tank hasto be drained,do this outdoors.
,, Observeproper disposallawsand regulationsfor gas, oil,etc. to protect
the environment.
Do not modify engine
Toavoidseriousinjuryor death,do notmodifyenginein anyway.Tampering
withthe governorsettingcan leadto a runawayengineandcauseit to operate
at unsafespeeds.Nevertamperwithfactorysettingof engine governor.

This page left intentionally blank.
6
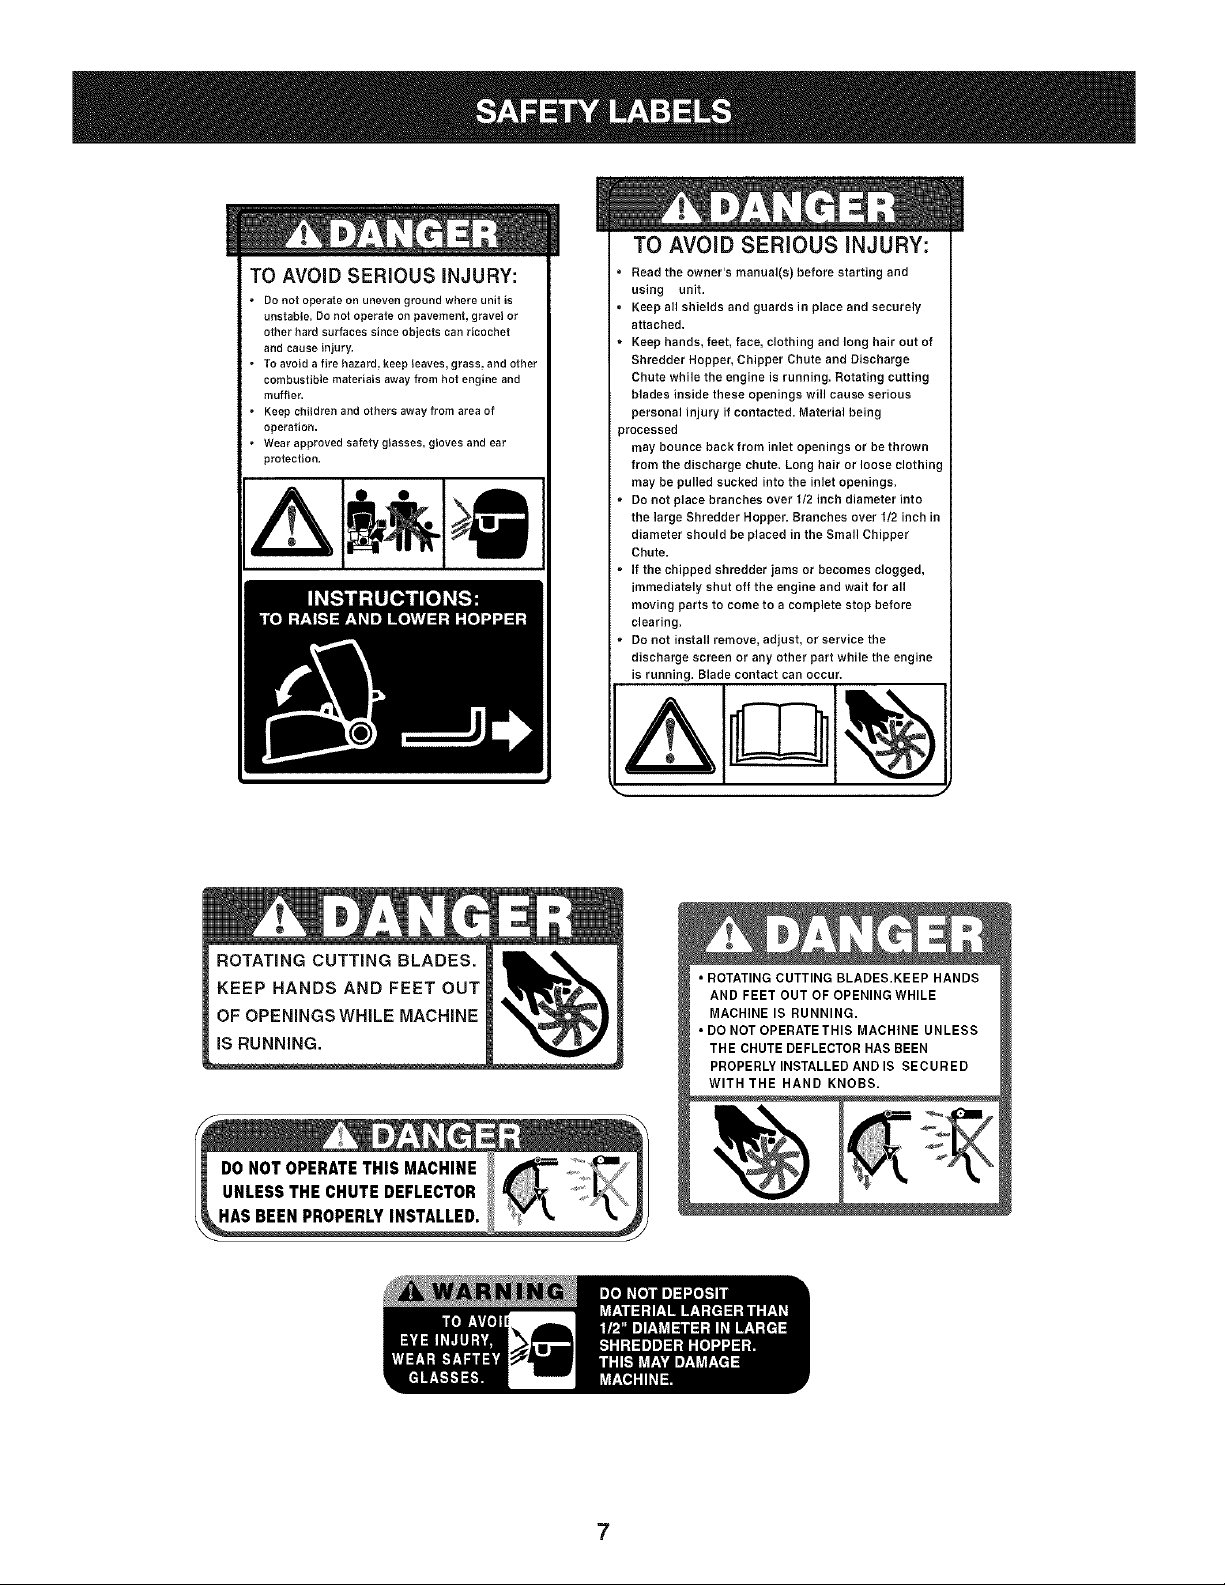
TO AVOID SERIOUS iNJURY:
Do not operate on uneven ground where unit is
unstable. Do not operate on pavement, gravel or
other hard surfaces since objects can ricochet
and cause injury.
To avoid a fire hazard, keep leaves, grass, and other
combustible materials away from hot engine and
muffler.
Keep children and others away from area of
operation.
Wear approved safety glasses, gloves and ear
protection.
ROTATING CUTTING BLADES.
TO AVOID SERIOUS INJURY:
• Read the owner's manual(s) before starting and
using unit.
Keep all shields and guards in place and securely
attached.
Keep hands, feet, face, clothing and long hair out of
Shredder Hopper, Chipper Chute and Discharge
Chute while the engine is running. Rotating cutting
blades inside these openings will cause serious
personal injury if contacted. Material being
_rocessed
may bounce back from inlet openings or be thrown
from the discharge chute. Long hair or loose clothing
may be pulled sucked into the inlet openings.
. Do not place branches over 1/2 inch diameter into
the large Shredder Hopper. Branches over I/2 inch in
diameter should be placed in the Small Chipper
Chute.
. If the chipped shredder jams or becomes clogged,
immediately shut off the engine and wait for all
moving parts to come to a complete stop before
clearing.
. Do not install remove, adjust, or service the
discharge screen or any other part while the engine
is running. Blade contact can occur.
KEEP HANDS AND FEET OUT
OF OPENINGSWHILE MACHINE
IS RUNNING.
HAS BEEN PROPERLYINSTALLED.
7
IMPORTANT:This unit is shippedwithoutgasolineor oil in theengine.
Becertainto serviceenginewith gasolineand oil as instructedinthe
separateenginemanualbeforeoperatingyourmachine.
NOTE:Referenceto rightand lefthandsideof the YardVacuumis
observedfromthe operatingposition.
OPENING CARTON
1. Cut eachcornerof the cartonverticallyfrom topto bottom.
2. Removeall looseparts.
3. Removeloosepackingmaterial.
REMOVING UNiT FROM CARTON
1. Lift unit fromthe rearto detachit from underlyingcartonmaterial
androll unitout of carton.
2. Checkcartonthoroughlyfor anyother looseparts.
LOOSE PARTS iN CARTON
,, HopperAssembly
,, Bag
,, ChuteDeflector
,, ChipperChute
,, SafetyGlasses
• EngineOil
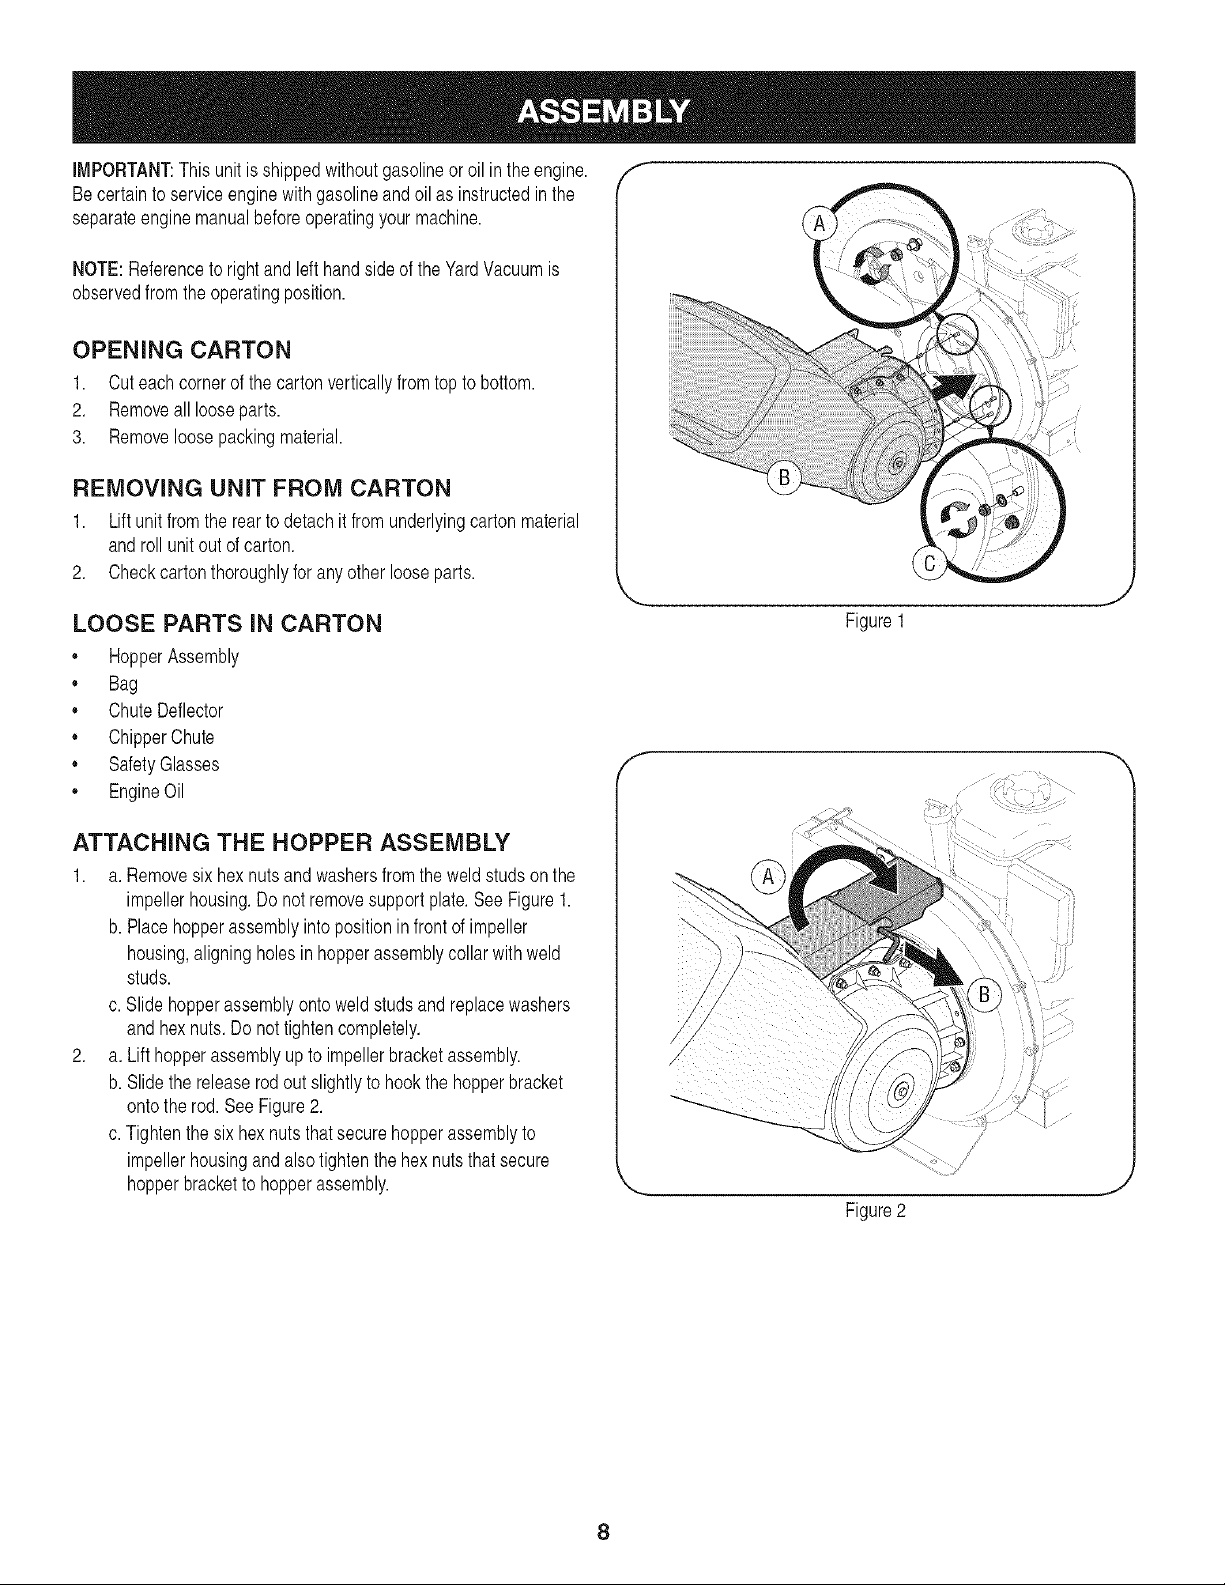
ATTACHING THE HOPPER ASSEMBLY
1. a. Removesixhex nutsand washersfrom the weldstudson the
impellerhousing.Do notremovesupportplate.SeeFigure1.
b. Placehopperassemblyintopositioninfrontof impeller
housing,aligningholesin hopperassemblycollarwith weld
studs.
c. Slidehopperassemblyontoweldstudsand replacewashers
and hexnuts.Do nottighten completely.
2. a. Lift hopperassemblyup to impellerbracketassembly.
b. Slide the releaserodout slightlyto hookthe hopperbracket
ontothe rod. SeeFigure2.
c.Tightenthesix hexnutsthatsecurehopperassemblyto
impellerhousingand alsotightenthe hex nutsthat secure
hopperbracketto hopperassembly.
f m
Figure1
f
-.,,
Figure2
,J
8
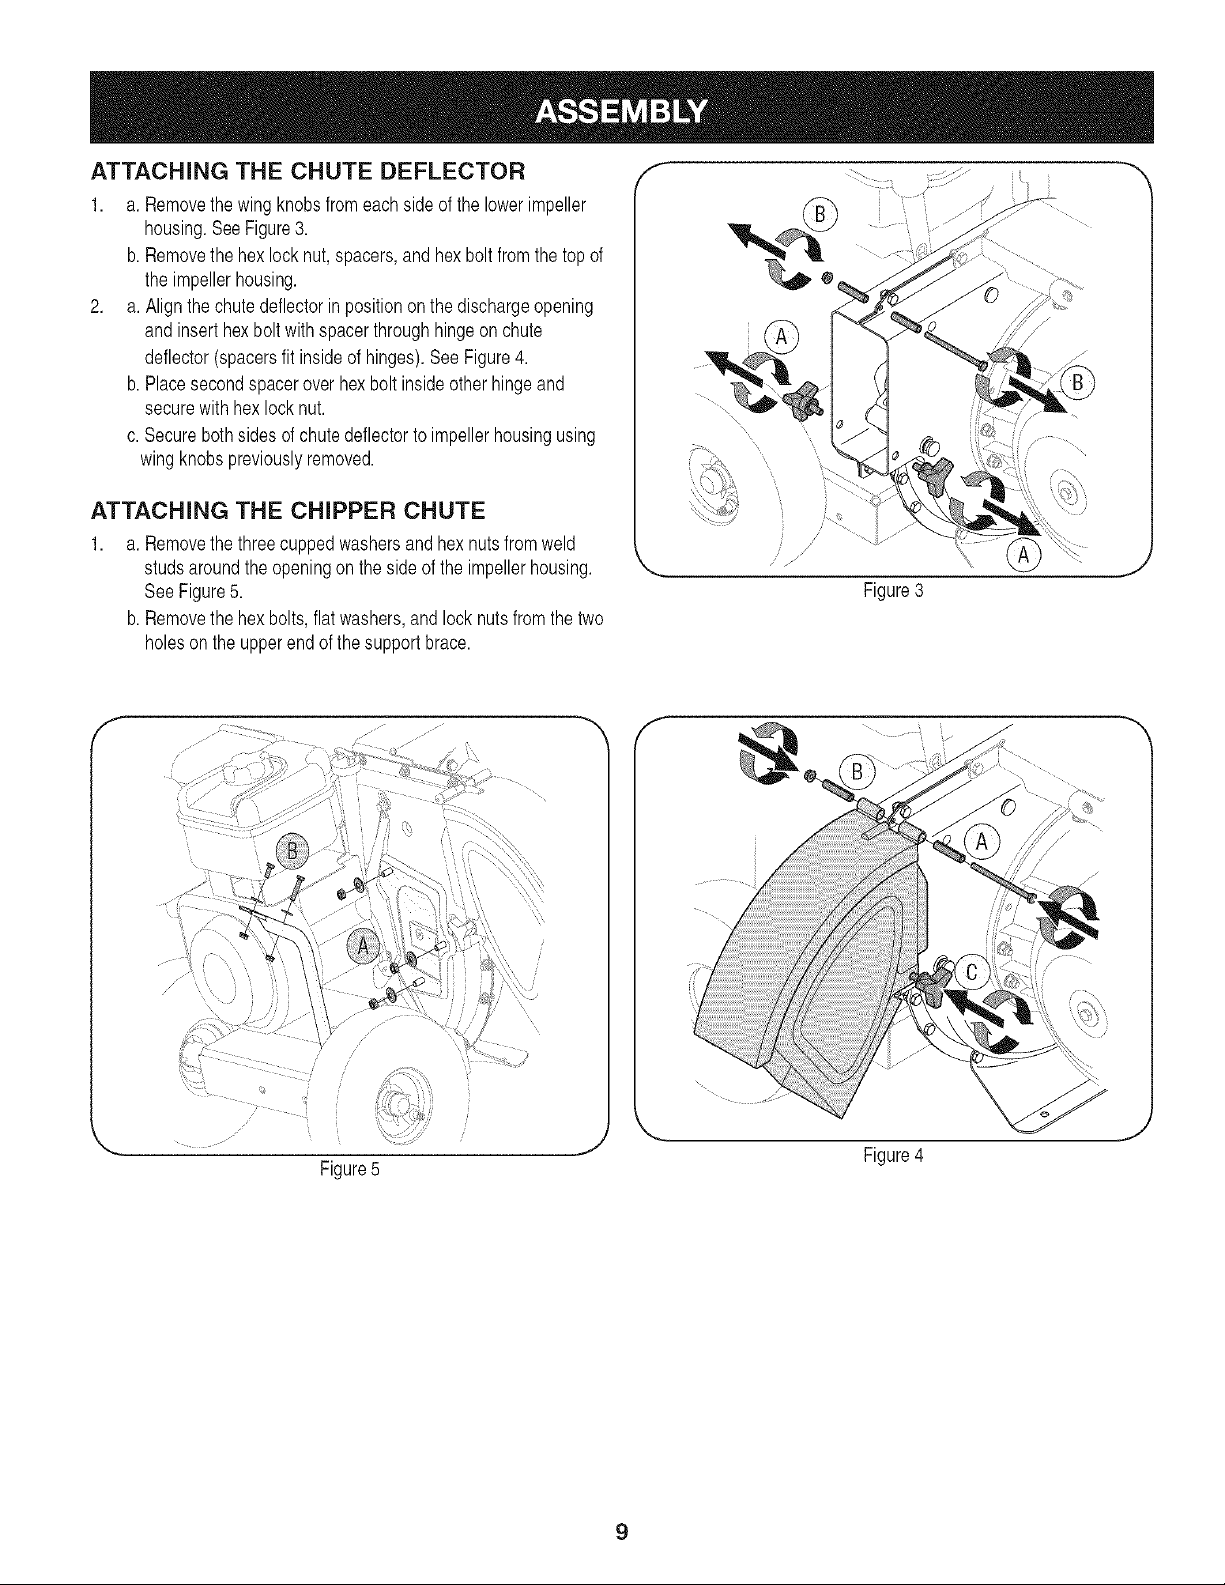
ATTACHING THE CHUTE DEFLECTOR
1. a. Removethewing knobsfrom eachside of the lowerimpeller
housing.SeeFigure3.
b. Removethe hexlocknut,spacers,andhexbolt fromthe topof
the impellerhousing.
2. a. Alignthe chutedeflectorin positionon the dischargeopening
andinserthex boltwith spacerthroughhingeon chute
deflector(spacersfit insideof hinges).SeeFigure4.
b. Placesecondspaceroverhex bolt insideotherhinge and
securewithhex lock nut.
c. Securebothsidesof chutedeflectorto impellerhousingusing
wingknobs previouslyremoved.
ATTACHING THE CHIPPER CHUTE
1. a. Removethethreecuppedwashersand hex nutsfromweld
studsaroundthe openingon the sideof the impellerhousing.
SeeFigure5.
b. Removethe hexbolts,flatwashers,andlocknutsfromthetwo
holeson the upperend of the supportbrace.
f
Figure3
J
/
/
Figure5
Figure4
9
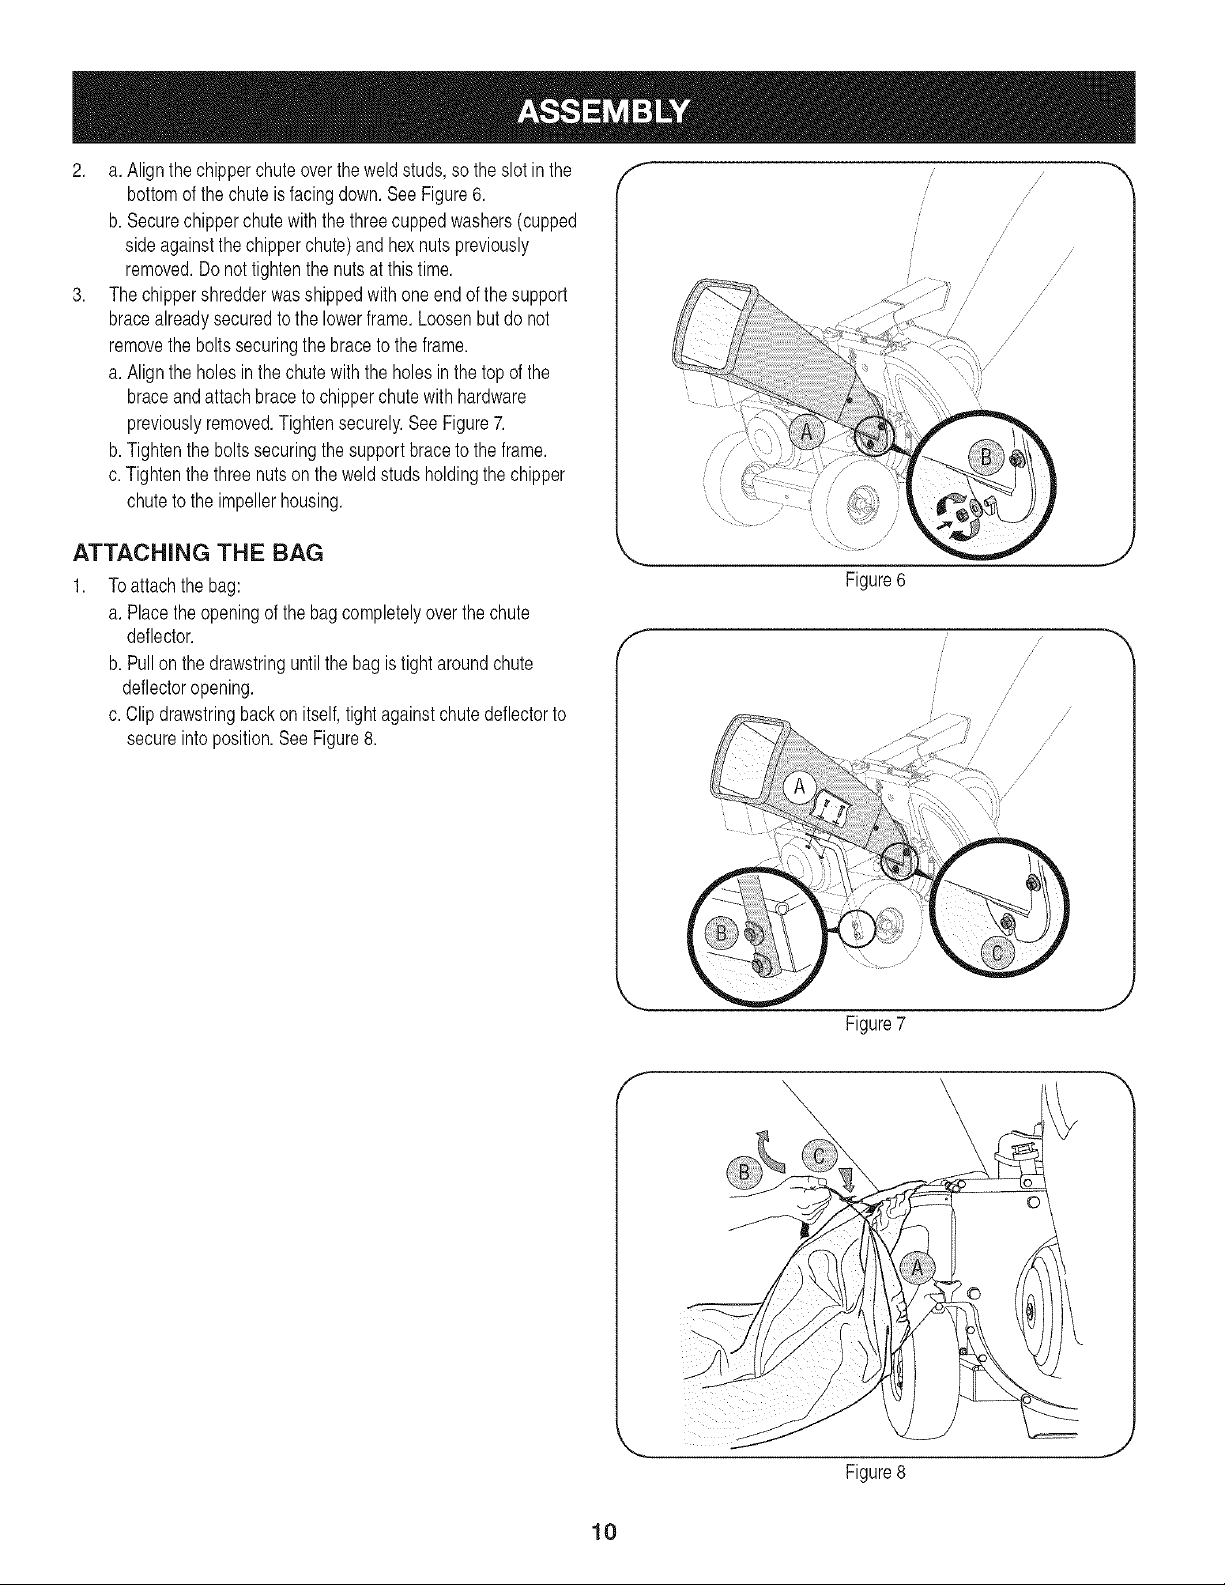
3,
a. Align the chipperchuteoverthe weldstuds,so the slot in the
bottomof the chuteisfacing down.See Figure6.
b. Securechipperchute withthe threecuppedwashers(cupped
side againstthechipperchute)and hexnuts previously
removed.Do nottightenthe nutsat this time.
The chippershredderwas shippedwith one end of the support
bracealreadysecuredto the lowerframe.Loosenbutdo not
removethe boltssecuringthe braceto the frame.
a. Align the holesin thechutewiththe holesin the top of the
braceand attachbraceto chipperchutewithhardware
previouslyremoved.Tightensecurely.See Figure7.
b. Tightenthe boltssecuringthe supportbraceto the frame.
c.Tightenthethree nutson the weldstudsholdingthe chipper
chuteto the impellerhousing.
ATTACHING THE BAG
1. Toattachthe bag:
a. Placethe openingof the bagcompletelyoverthe chute
deflector.
b. Pull on thedrawstringuntilthe bagis tightaroundchute
deflectoropening.
c. Clipdrawstringbackon itself,tight againstchute deflectorto
secureintoposition.See Figure8.
Figure6
Figure7
Figure8
10
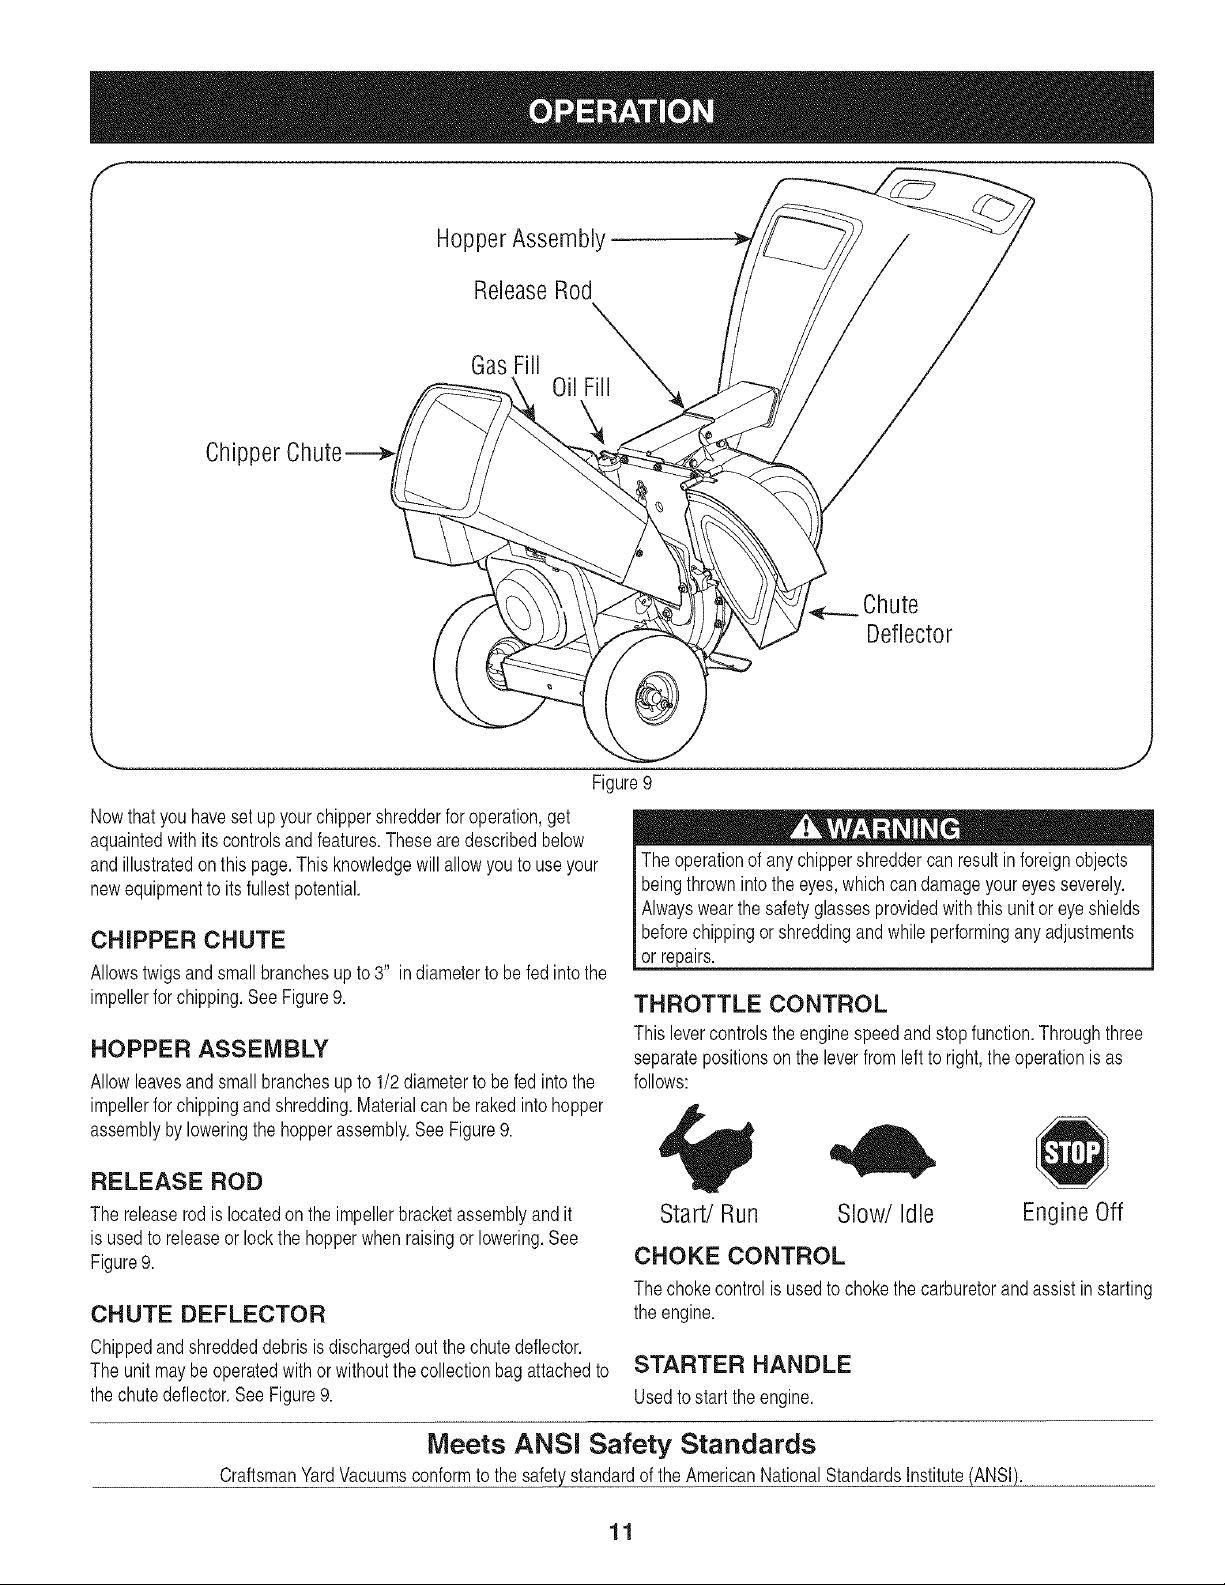
f
Hopper Assembly
ReleaseRod
Gas Fill
Chipper
,____Chute
Deflector
Figure9
Nowthat youhavesetupyour chippershredderfor operation,get
aquaintedwith itscontrolsandfeatures.Thesearedescribedbelow
andillustratedonthispage.This knowledgewill allowyouto use your
newequipmentto its fullestpotential.
CHIPPER CHUTE
Allowstwigsand small branchesup to 3" indiameterto be fed into the
impellerfor chipping.See Figure9.
HOPPER ASSEMBLY
Allowleavesand smallbranchesup to 1/2diameterto befed intothe
impellerfor chippingand shredding.Materialcan berakedintohopper
assemblyby loweringthe hopperassembly.See Figure9.
RELEASE ROD
The releaserodis locatedon the impellerbracketassemblyandit
is usedto releaseor lockthe hopperwhen raisingor lowering.See
Figure9.
CHUTE DEFLECTOR
J
The operationof anychippershreddercanresult in foreignobjects
beingthrownintothe eyes,whichcan damageyoureyesseverely.
Alwayswearthe safetyglassesprovidedwith this unitor eye shields
beforechippingor shreddingand while performingany adjustments
or repairs.
THROTTLE CONTROL
Thislevercontrolsthe enginespeedandstopfunction.Throughthree
separatepositionsonthe leverfrom left to right,the operationis as
follows:
Start/Run Slow/Idle Engine Off
CHOKE CONTROL
The chokecontrol is usedto chokethe carburetorand assist in starting
the engine.
Chippedandshreddeddebrisis dischargedout the chutedeflector.
The unitmay be operatedwith or withoutthe collectionbagattachedto STARTER HANDLE
the chutedeflector.See Figure9. Usedto start theengine.
Meets ANSI Safety Standards
CraftsmanYardVacuumsconformto thesafetystandardof the AmericanNationalStandardsInstitute(ANSI).
11
GAS AND OIL FILL=UP
Oil (one bottle shipped with unit)
FirstTime Use
1. Removeoil fill dipstick.
2. With thechippershredderon levelground,usea funnelto empty
entirecontentsof oil bottle providedintothe engine.
3. Replaceoil fill dipstickandtighten.
Subsequent Uses
Onlyuse highqualitydetergentoil ratedwith APIserviceclassification
SF,SG,or SH.Selectthe oil's SAEviscositygradeaccordingto the
expectedoperatingtemperature.Followthe chartbelow.
"Colder _ 32°F _Warrn_"
Oil Viscosity Chart
_._., ,,.j_
Althoughmulti-viscosityoils (5W30,10W30,etc.)improvestarting
incold weather,theywill result in increasedoil consumptionwhen
usedabove32°R Checkyour engineoil levelmorefrequentlyto avoid
possibleenginedamagefromrunninglowon oil.
1. Checktheoil levelmakingcertain notto rubthe dipstickalong the
insidewallsof the oil fill tube.This would resultina false dipstick
reading.Refillto FULLmarkon dipstick,if necessary.Capacity
is approximately18 oz. Overfillingwill causethe engineto smoke
profuselyandwill resultin poorengineperformance.
2. Replaceoil fill dipstickand tighten.
3. Keepoil levelat FULL.Runningthe enginewithtoo littleoilcan
resultinpermanentenginedamage.
Useextremecare whenhandlinggasoline.Gasolineis extremely
flammableandthe vaporsare explosive.Neverfuel machineindoors
or whilethe engineis hotor running.Extinguishcigarettes,cigars,
pipes,andothersourcesof ignition.
Gasoline
1. Removefuel cap fromthefuel tank.
2. Makesurethe containerfromwhichyouwill pour the gasolineis
cleanand freefrom rust or foreignparticles.Neveruse gasoline
thatmaybestalefromlongperiodsof storagein its container.
Gasolinethathasbeen sittingfor any periodlongerthan four
weeksshouldbe consideredstale.
3. Fill fueltankwithclean,fresh, unleadedregulargasolineonly.Do
not usegasolinecontainingMETHANOL.Replacefuelcap.
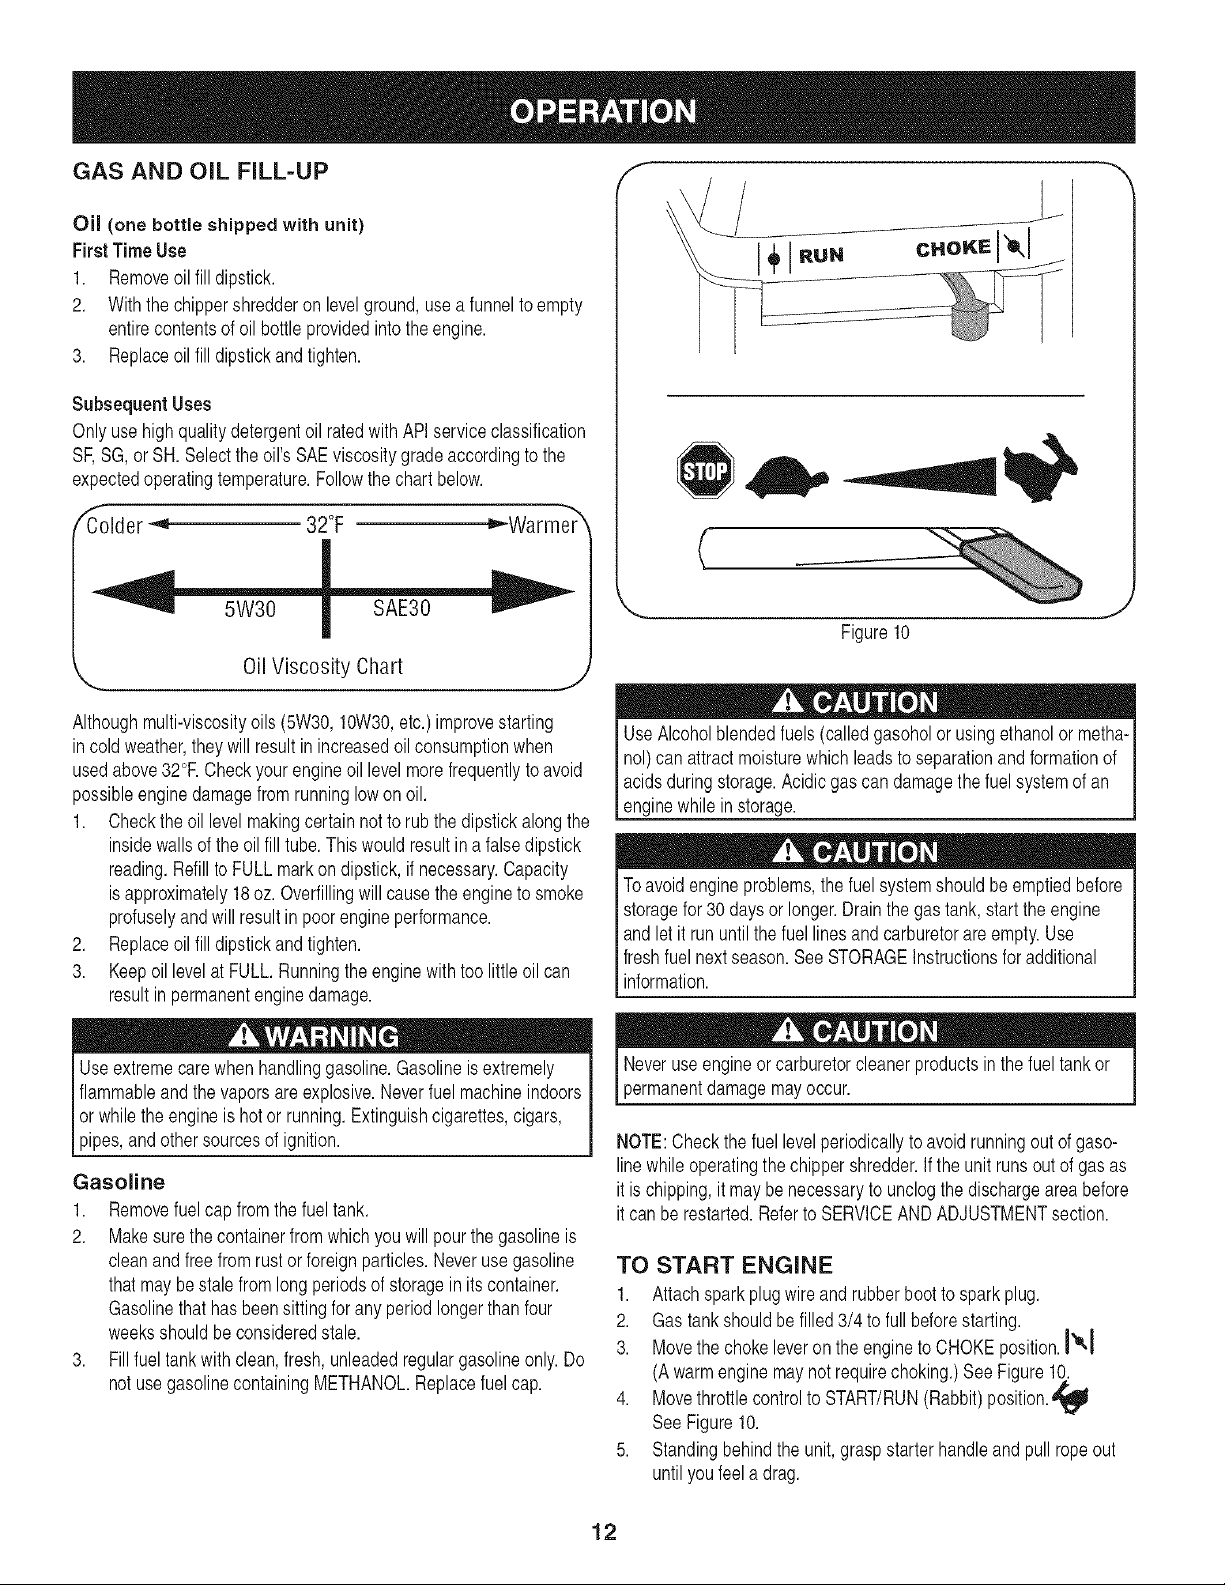
f
(
Figure10
UseAlcoholblendedfuels(calledgasoholor usingethanolormetha-
nol)can attract moisturewhichleadsto separationand formationof
acidsduringstorage.Acidicgascan damagethe fuelsystemof an
enginewhile in storage.
Toavoidengineproblems,thefuel systemshouldbe emptiedbefore
storagefor 30 days or longer.Drainthe gas tank,start the engine
andlet it run untilthe fuel linesand carburetorare empty.Use
freshfuelnext season.See STORAGEInstructionsfor additional
information.
Neveruse engineor carburetorcleanerproductsin the fuel tank or I
permanentdamagemayoccur.
NOTE:Checkthe fuel levelperiodicallyto avoidrunningout of gaso-
linewhileoperatingthechippershredder.If the unitruns outof gas as
it is chipping,it may be necessaryto unclogthedischargeareabefore
it can berestarted.Referto SERVICEANDADJUSTMENTsection.
TO START ENGINE
1. Attachspark plug wireand rubberboot to spark plug.
2. Gastank shouldbe filled3/4 to full beforestarting.
3. Movethe chokeleveronthe engineto CHOKEposition.I'_1
(Awarmenginemaynotrequirechoking.)See Figure10.
4. Movethrottlecontrolto START/RUN(Rabbit)position.
SeeFigure10.
5. Standingbehindthe unit,graspstarter handleand pull rope out
untilyoufeel a drag.
12
NOTE:A noisewillbe heardwhenfindingthestart of the compression
cycle.Thisnoiseis causedbythe flails and fingers,which are part of
the shreddingmechanism,and it shouldbe expecteduntilthe impeller
reachesfull speed.
6. Pullthe ropewitha rapid,continuous,full arm stroke.Keepa firm
grip onthe starterhandle.Letthe rope rewindslowly.
7. Repeat,if necessary,until enginestarts.When enginestarts,
movechokecontrolgraduallyawayfromthethrottlecontrol.
8. Ifenginefalters,movechokecontrolbacktowardthethrottle
controlandrepeatsteps5 through7.
9. ALWAYSkeepthe throttlecontrolin the START/RUN_11
positionwhenoperatingthe chippershredder.
TO STOP ENGINE
1. Movethrottlecontrolleverto slow(turtle)'_ position.
Wheneverpossible,graduallyreduceenginespeedbefore
stoppingengine.
2. Movethrottlecontrolleverto STOPor OFF_ position.
3. Disconnectsparkplugwireandgroundit to the retainingpost to
preventaccidentalstartingwhilethe equipmentis unattended.
SHREDDING
Yardwastesuchas leavesandpineneedlescan be placedinthe
hopperfor shredding.After materialhas beenprocessedby the shred-
derbladeandflails,it will beforcedoutof thechute deflector,and,if
attached,intoa debriscollectionbag.
Observethe followingguidelineswhenshreddingyarddebris:
,, Neverattemptto shredmaterialotherthan normalyard debris
(leaves,twigs,pinecones,etc.).
,, Avoidshreddingfibrousplantssuchas tomatovines untilthey are
thoroughlydriedout. Freshvinesdo not shredwell and tendto
wrapthemselvesaroundthe impellerandflails.
,, Placereasonableamountsof debrisintothe hopperat a time. Do
notoverloadthe hopper.
,, Allowthe materialin the hopperto be drawnintothe bladesand
shreddedbeforeaddingadditionaldebristo the hopper.Failureto
dueso may resultin a cloggedhopper,cloggedchutedeflectoror
a stalledengine.
CHiPPiNG
Branchesupto 3" in diametercanbe fed intothe chipperchute.
Observethe followingguidelineswhenchippingbranches:
,, Keepbothhandsfirmlyon the branchas youfeed it intothe
chipperchute.
,, Neverfeed morethanone branchintothe chipperchuteat a time.
,, Neverfeedanythingotherthan branches(orwood)intothe
chipperchute.
,, Apply intermittentpressure(force,inshortpulses)whilefeeding
larger(3-inchdiameter)branchesinto the chipperchute,to avoid
boggingor stallingthe engine.
IMPORTANT:Neverfeed brancheswitha diametergreaterthan
three (3) inchesintothe chipperchute.Doingso can resultin serious
damagetoyour unit'schipperblades,flailsorimpeller.
NOTE:Forbestperformance,alwaysoperatethe unitwithsharp
chipperblades.If a noticeableloss in performanceis encountered
whilechippingbranches,the chipperbladesshouldbe replaced.
LOWERING THE HOPPER ASSEMBLY
1. Withone handgraspthe handleat the top ofthe hopperassem-
bly and liftslightly.
2. With the otherhandpullout on the releaserodand lowerthe
hopperassemblyto the ground.SeeFigure10.
TO EMPTY BAG
1. Un-clipdrawstringand loosenbagfromchutedeflectoropening.
2. Emptybag and reattachto thedischargechuteopening.Pullon
the drawstringuntilthe bagis tight aroundthechute openingand
clip the drawstringtight againstthe chutedeflector.
IMPORTANT:The flail screenis locatedinsidethe housingin the
dischargearea.If theflail screenbecomesclogged,removeand
cleanas instructedin the Serviceand Maintenancesection.For best
performance,it is also importantto keepthe chipperblade sharp.
13
Alwaysstopengineanddisconnectsparkplugwire beforeperforminc
I anymaintenanceoradjustments.Alwayswearsafetyglassesduring
[operationor whileperformingany adjustmentsor repairs.
GENERAL RECOMMENDATIONS
,, Alwaysobservesafetyruleswhen performing
anymaintenance.
,, Thewarrantyon thischippershredderdoes notcover itemsthat
havebeensubjectedto operatorabuseor negligence.To receive
full valuefrom warranty,operatormustmaintaintheequipmentas
instructedhere.
,, Someadjustmentswill haveto be madeperiodicallyto maintain
yourunit properly.
,, Periodicallycheckall fastenersand makesuretheseare tight.
ENGINE MAINTENANCE
Checking the Spark Plug
Cleansparkplug and reset theelectrodegap to 0.030"at least oncea
season;replaceevery 100hoursof operation.
,, Cleanareaaroundthe spark plug base.Do notsandblastspark
plug.Sparkplug shouldbe cleanedbyscrapingor wire brushing
andwashingwitha commercialsolvent.
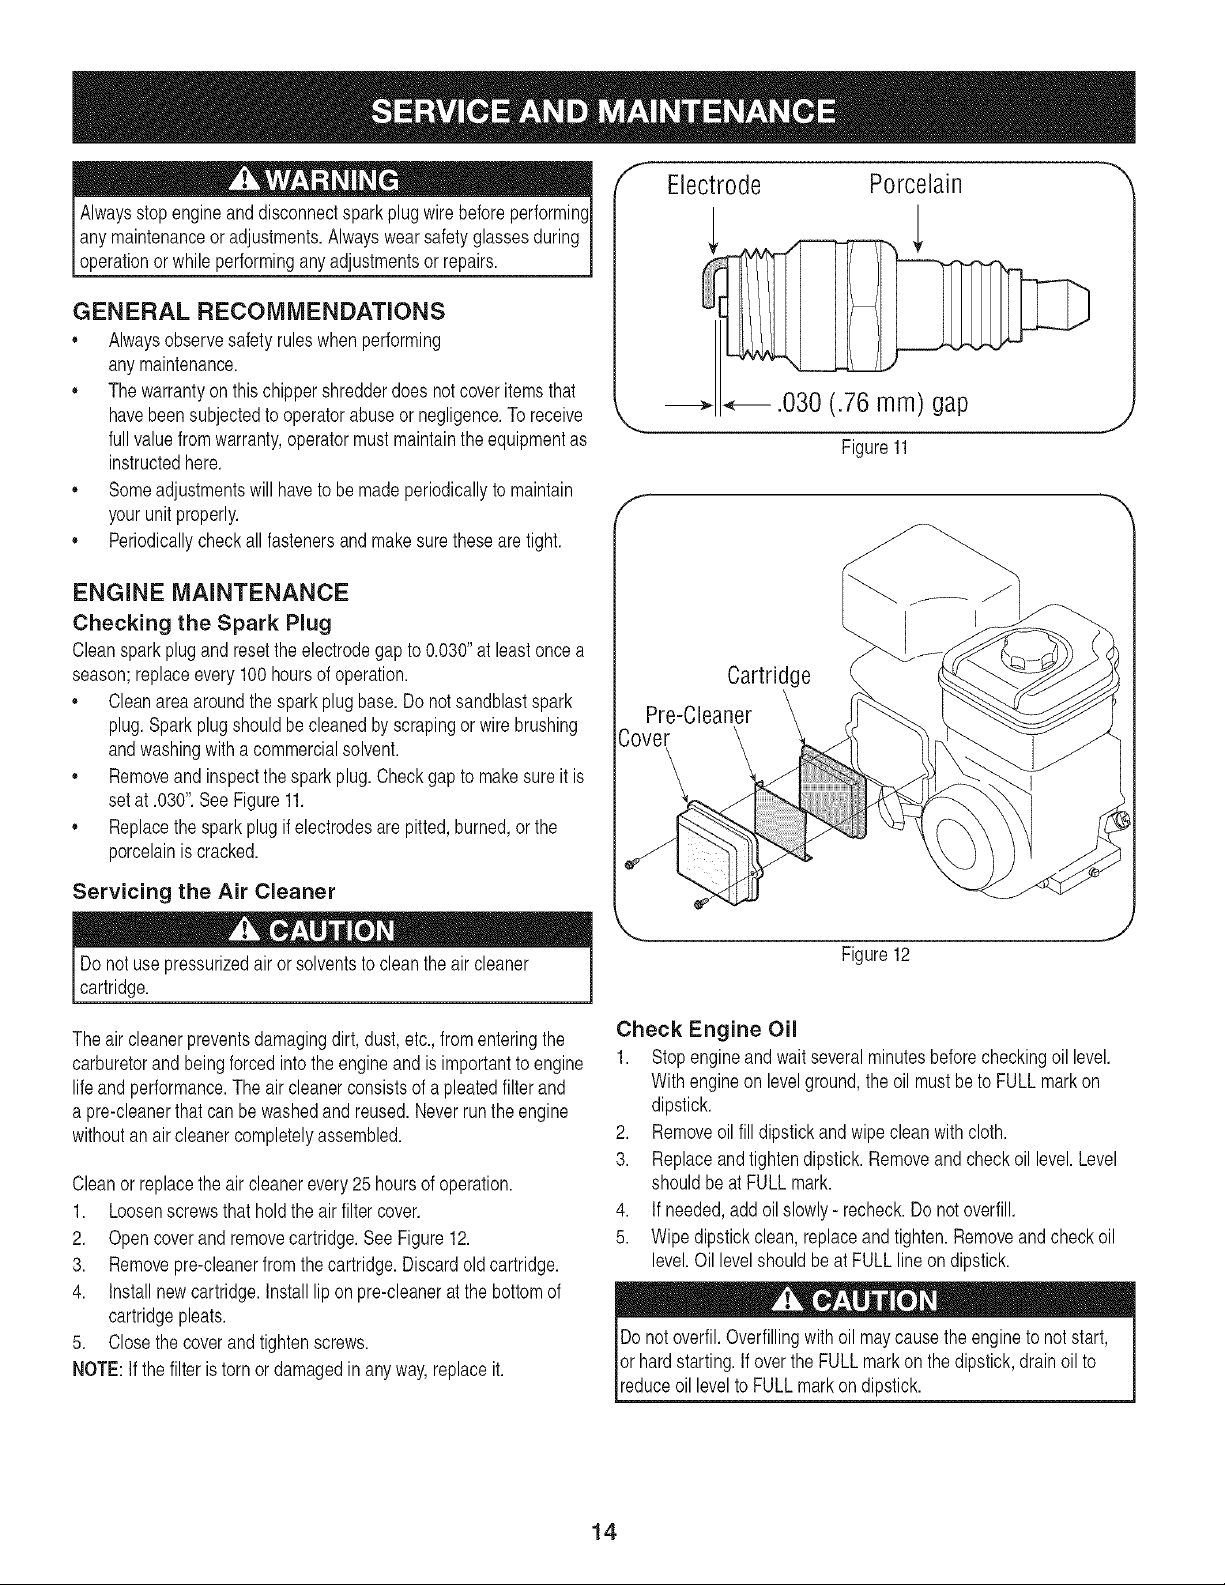
,, Removeand inspectthe spark plug.Checkgap to makesureit is
setat .030".SeeFigure11.
,, Replacethe spark plug if electrodesarepitted,burned,or the
porcelainis cracked.
Servicing the Air Cleaner
lDo not air solventsto cleanthe air cleanercartridge.USepressurized or 1
Theair cleanerpreventsdamagingdirt, dust,etc.,fromenteringthe
carburetorandbeingforcedintothe engineandis importantto engine
lifeand performance.Theair cleanerconsistsof a pleatedfilterand
a pre-cleanerthatcan be washedandreused.Neverrunthe engine
withoutan aircleanercompletelyassembled.
Cleanor replacetheair cleanerevery25hoursof operation.
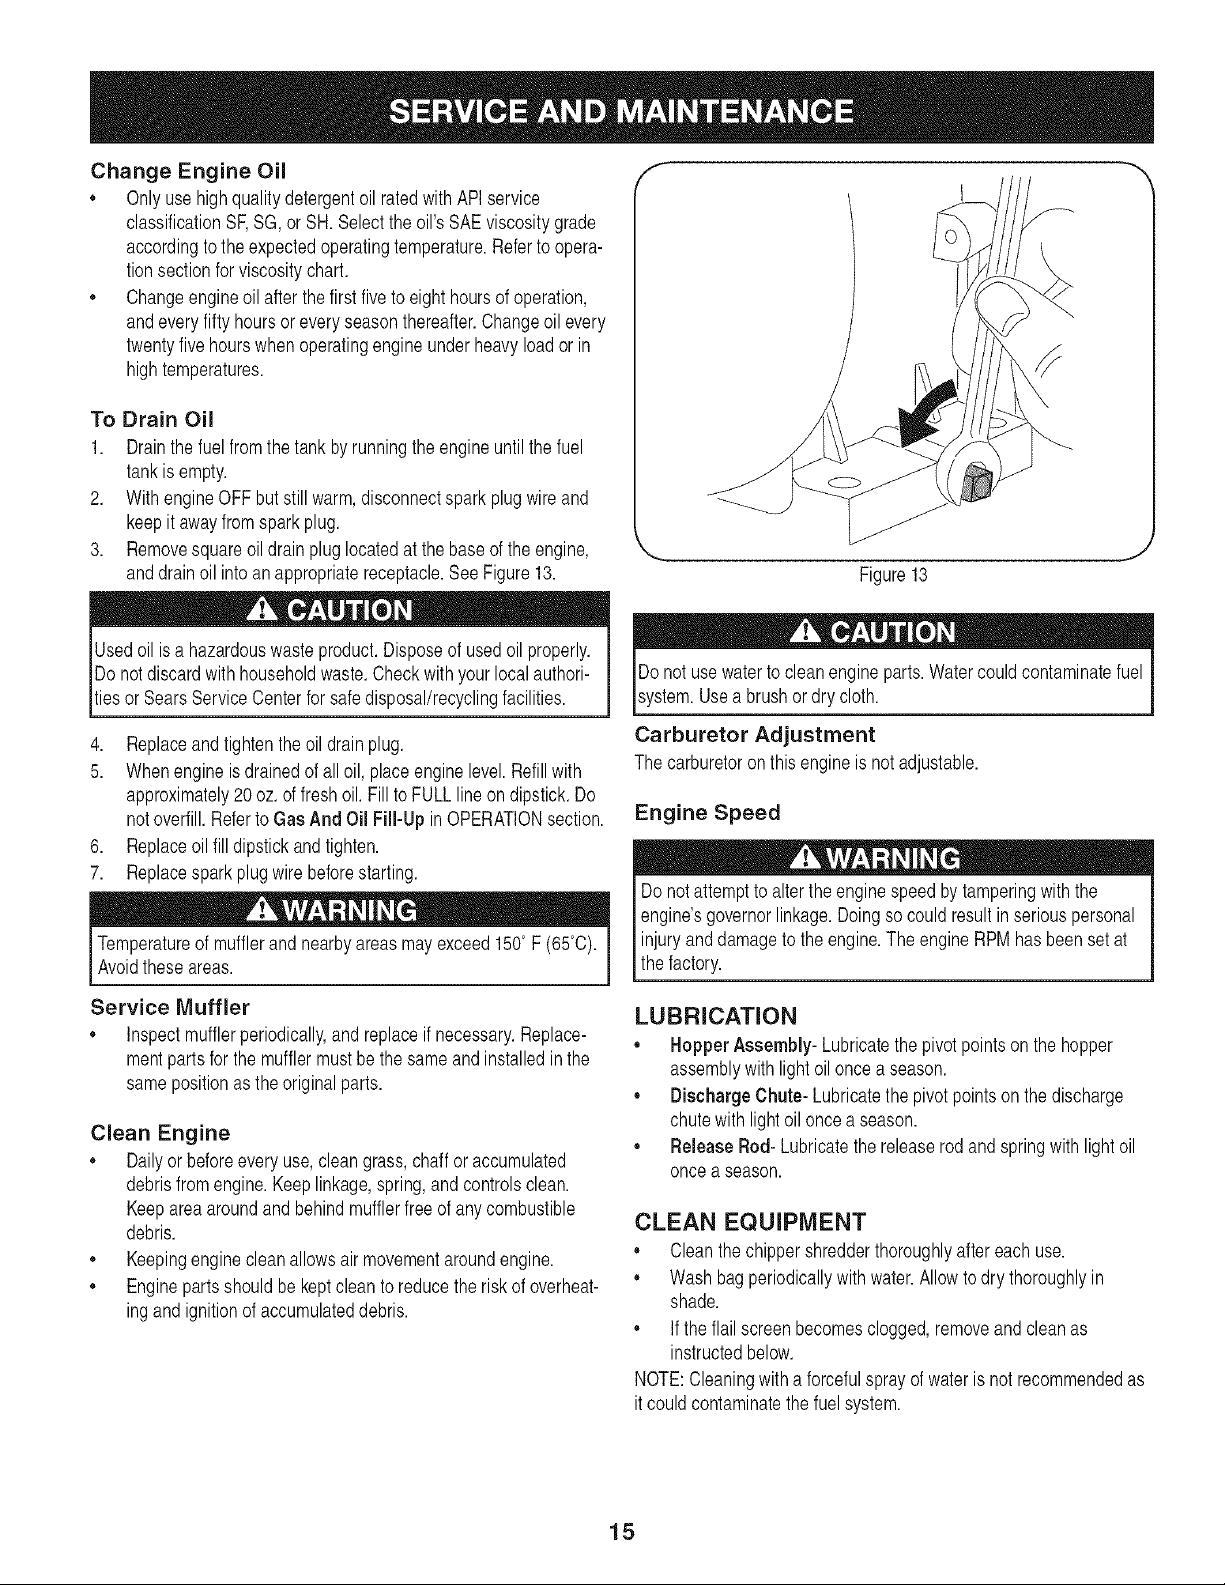
1. Loosenscrewsthat hold the airfiltercover.
2. Opencover and removecartridge.See Figure12.
3. Removepre-cleanerfromthecartridge.Discardoldcartridge.
4. Installnewcartridge.Installlip on pre-cleanerat the bottomof
cartridgepleats.
5. Closethe coverandtightenscrews.
NOTE:If thefilter istorn or damagedin anyway,replaceit.
f Electrode Porcelain
.030 (.76 mm) gap
\_, J
Figure11
Cartridge
Figure12
Check Engine Oil
1. Stopengineand wait severalminutesbeforecheckingoil level.
Withengineon levelground,the oil mustbeto FULL markon
dipstick.
2. Removeoil fill dipstickandwipecleanwith cloth.
3. Replaceandtightendipstick.Removeand checkoil level.Level
shouldbe at FULLmark.
4. Ifneeded,add oil slowly- recheck.Do notoverfill.
5. Wipe dipstickclean,replaceandtighten.Removeand checkoil
level.Oillevelshouldbe at FULLlineondipstick.
Donot overfil.Overfillingwithoilmaycausethe engineto not start,
or hardstarting.Ifover the FULLmarkon the dipstick,drainoilto
reduceoil levelto FULLmarkondipstick.
14
Change Engine Oil
,, Onlyuse high qualitydetergentoil ratedwith APIservice
classificationSF,SG,or SH.Selectthe oil'sSAEviscositygrade
accordingto the expectedoperatingtemperature.Referto opera-
tionsectionfor viscositychart.
,, Changeengineoil afterthefirst fiveto eight hoursof operation,
andeveryfifty hoursoreveryseasonthereafter.Changeoil every
twentyfivehourswhenoperatingengineunder heavyload or in
hightemperatures.
To Drain Oil
1. Drainthe fuelfromthe tank by runningthe engine untilthe fuel
tankis empty.
2. With engineOFF butstill warm,disconnectsparkplugwireand
keepit awayfromsparkplug.
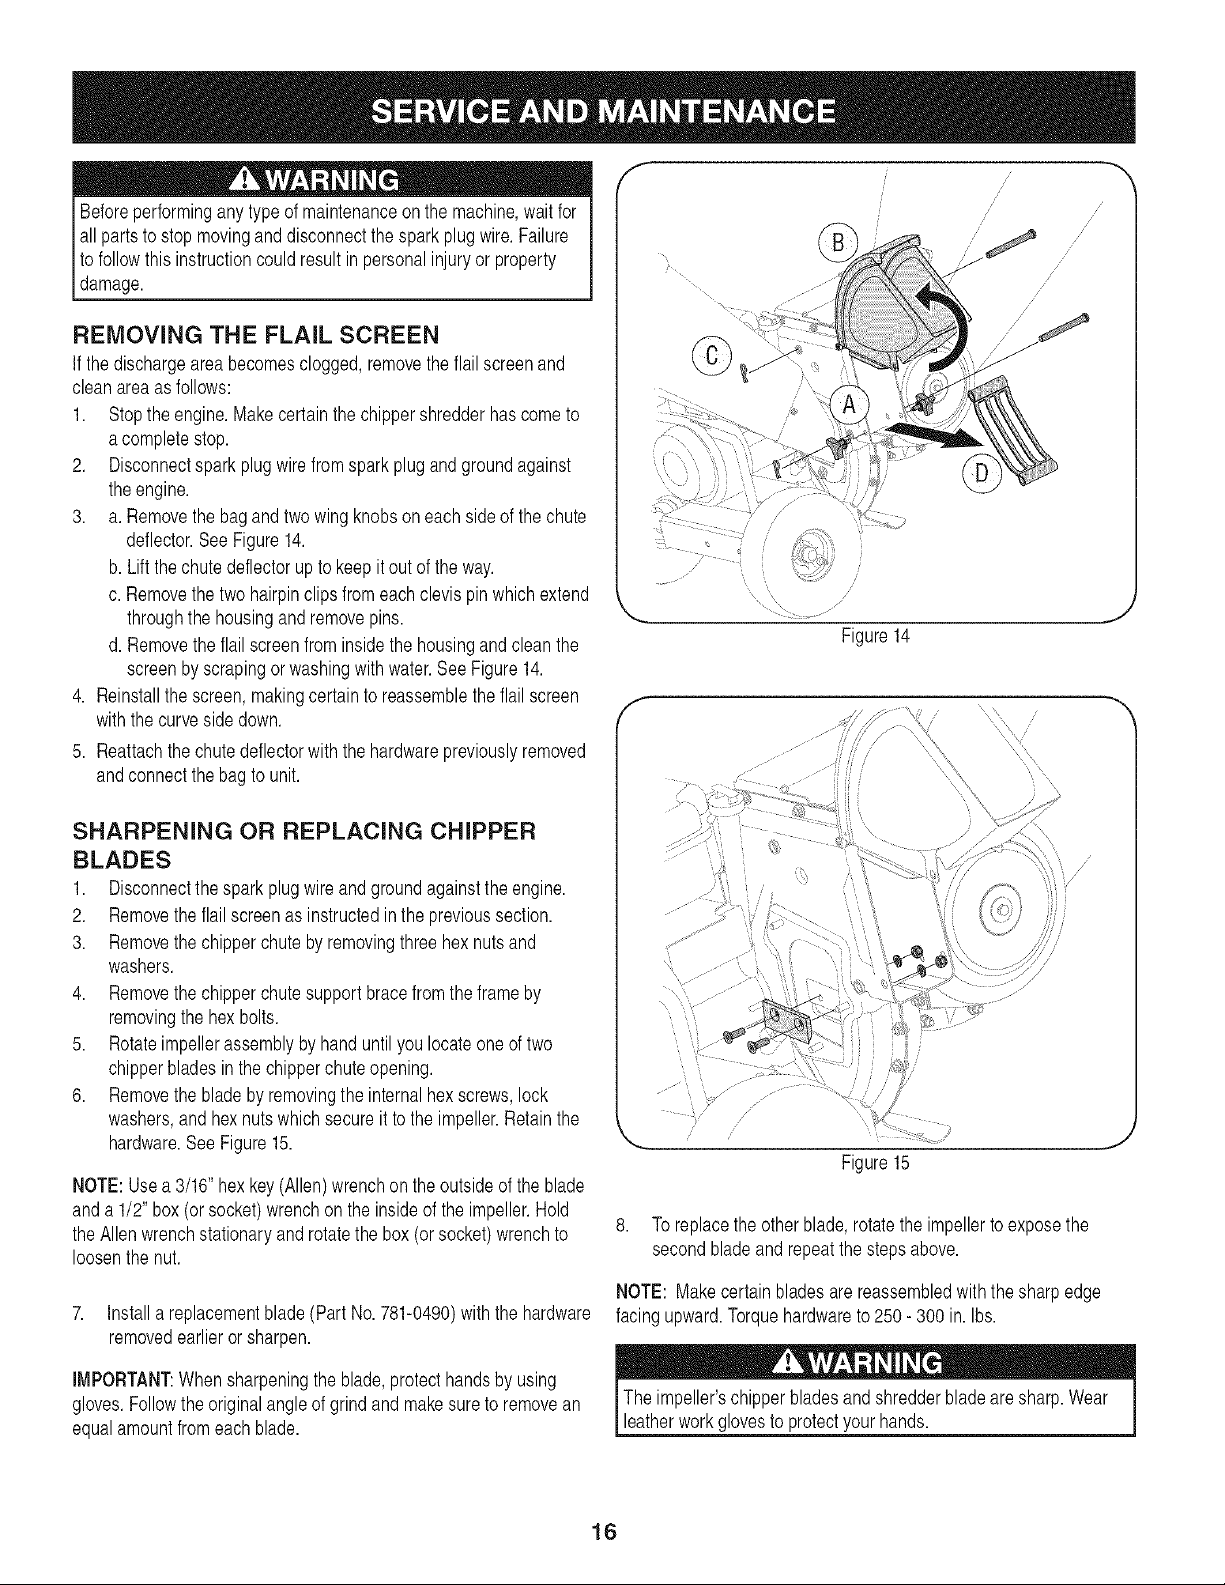
3. Removesquareoildrainpluglocatedat the baseof the engine,
anddrainoil into anappropriatereceptacle.See Figure13.
Usedoil is a hazardouswasteproduct.Disposeof usedoilproperly.
Do notdiscardwith householdwaste.Checkwith your localauthori-
tiesor SearsServiceCenterfor safedisposal/recyclingfacilities.
4. Replaceand tightentheoil drainplug.
5. Whenengine is drainedof all oil, placeenginelevel.Refillwith
approximately20 oz.of freshoil. Fillto FULLlineondipstick.Do
notoverfill.Referto GasAnd OilFill-UpinOPERATIONsection.
6. Replaceoil fill dipstickand tighten.
7. Replacespark plug wire beforestarting.
Temperatureof mufflerand nearbyareas mayexceed150° F (65°0).
Avod theseareas.
Service Muffler
,, Inspectmufflerperiodically,and replaceif necessary.Replace-
mentpartsfor the mufflermustbethe same and installedin the
samepositionas the originalparts.
Clean Engine
,, Dailyor beforeevery use,cleangrass,chaffor accumulated
debrisfromengine.Keeplinkage,spring,and controlsclean.
Keepareaaroundandbehindmufflerfreeof any combustible
debris.
,, Keepingenginecleanallows air movementaroundengine.
,, Enginepartsshouldbe keptclean to reducethe riskof overheat-
ingand ignitionof accumulateddebris.
Figure13
Donot usewaterto cleanengineparts.Watercouldcontaminatefuel
system.Useabrushor dry cloth.
Carburetor Adjustment
The carburetoron this engineis not adjustable.
Engine Speed
Do notattemptto alter theengine speedbytamperingwiththe
engine'sgovernorlinkage.Doingso couldresultinseriouspersonal
injuryand damageto theengine.The engineRPMhas beenset at
the factory.
LUBRICATION
• Hopper Assembly- Lubricatethe pivotpointson the hopper
assemblywithlightoil oncea season.
• Discharge Chute- Lubricatethe pivotpointsonthe discharge
chutewithlightoil oncea season.
• Release Rod- Lubricatethe releaserod and springwith lightoil
once a season.
CLEAN EQUIPMENT
,, Cleanthe chippershredderthoroughlyafter eachuse.
,, Washbagperiodicallywithwater.Allowto dry thoroughlyin
shade.
,, Ifthe flail screenbecomesclogged,removeandcleanas
instructedbelow.
NOTE:Cleaningwitha forcefulsprayofwateris not recommendedas
it couldcontaminatethe fuel system.
15
Beforeperformingany type of maintenanceon the machine,wait for
allpartsto stop movingand disconnectthe sparkplugwire.Failure
I to followthis instructioncouldresult in personalinjuryor property
|damage.
REMOVING THE FLAIL SCREEN
If the dischargeareabecomesclogged,removetheflail screenand
cleanarea as follows:
1. Stopthe engine.Makecertainthe chippershredderhascometo
a completestop.
2. Disconnectsparkplugwirefromsparkplugandgroundagainst
theengine.
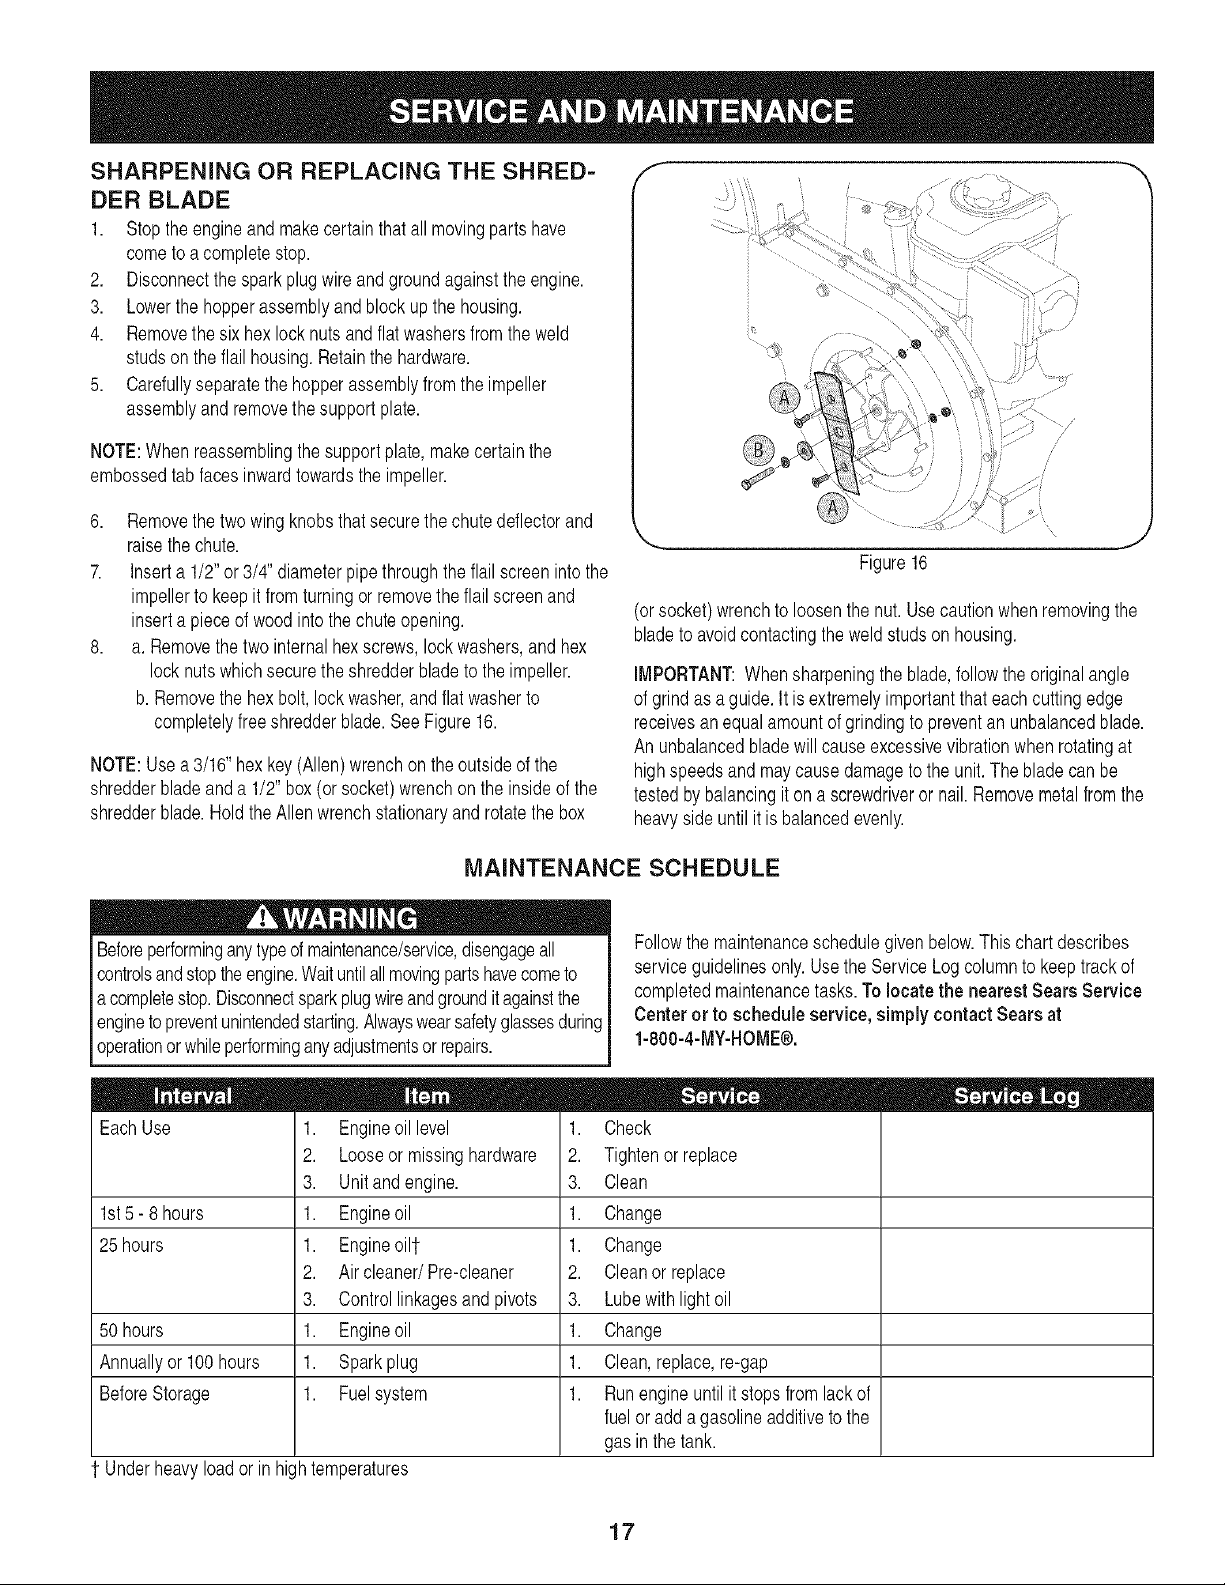
3. a. Removethe bagand two wingknobsoneachsideof the chute
deflector.SeeFigure14.
b. Lift thechute deflectorup to keepit out of the way.
c. Removethe two hairpinclipsfromeachclevis pinwhichextend
throughthe housingandremovepins.
d. Removethe flailscreenfrominsidethe housingand cleanthe
screenbyscrapingor washingwith water.See Figure14.
4. Reinstallthe screen,makingcertainto reassembletheflail screen
withthe curveside down.
5. Reattachthe chute deflectorwith the hardwarepreviouslyremoved
andconnectthe bagto unit.
SHARPENING OR REPLACING CHIPPER
BLADES
1. Disconnectthe spark plug wireand groundagainstthe engine.
2. Removethe flail screenas instructedinthe previoussection.
3. Removethe chipperchute byremovingthree hexnutsand
washers.
4. Removethe chipperchutesupport bracefrom the frameby
removingthe hex bolts.
5. Rotateimpellerassemblyby handuntilyoulocateoneof two
chipperbladesin the chipperchuteopening.
6. Removethe bladeby removingthe internalhexscrews,lock
washers,andhex nutswhich secureit to the impeller.Retainthe
hardware.SeeFigure15.
NOTE:Usea 3/16" hexkey(Allen)wrenchon the outsideof the blade
anda 1/2" box (or socket)wrenchon the insideof the impeller.Hold
the Allenwrenchstationaryand rotatethe box (or socket)wrenchto
loosenthe nut.
f
f
8,
/,
/
/
/
/
/
/
/
Figure14
iiiJ
Figure15
To replacethe otherblade,rotatethe impellerto exposethe
secondbladeandrepeatthe stepsabove.
7. Installa replacementblade(Part No.781-0490)withthe hardware
removedearlierorsharpen.
IMPORTANT:Whensharpeningthe blade,protecthandsby using
gloves.Followthe originalangleof grindand makesureto removean
equalamountfromeachblade.
NOTE: Makecertainbladesare reassembledwiththesharpedge
facingupward.Torquehardwareto 250- 300 in. Ibs.
The impeller'schipperbladesand shredderbladeare sharp.Wear
eatherworkg ovesto protectyourhands. J
16
SHARPENING OR REPLACING THE SHRED=
DER BLADE
1. Stopthe engineandmakecertainthatallmovingpartshave
cometo acompletestop.
2. Disconnectthe spark plugwire andgroundagainstthe engine•
3. Lowerthe hopperassemblyandblockupthe housing.
4. Removethe six hexlock nuts andflatwashersfromthe weld
studson the flail housing.Retainthe hardware.
5. Carefullyseparatethe hopperassemblyfrom the impeller
assemblyandremovethesupport plate•
NOTE:When reassemblingthe supportplate, makecertainthe
embossedtab facesinwardtowardsthe impeller.
6. Removethe twowingknobsthatsecurethe chute deflectorand
raisethe chute.
7. Inserta 1/2" or3/4" diameterpipethroughthe flailscreenintothe
impellerto keepit fromturningor removetheflail screenand
inserta pieceof woodinto thechuteopening.
8. a. Removethe two internalhexscrews,lockwashers,andhex
locknutswhichsecurethe shredderbladeto theimpeller.
b. Removethe hex bolt,lockwasher,and flat washerto
completelyfree shredderblade.See Figure16.
NOTE:Use a 3/16" hexkey (Allen)wrenchon theoutsideof the
shredderbladeanda 1/2" box(or socket)wrenchon the insideof the
shredderblade.HoldtheAllen wrenchstationaryand rotatethe box
f --,,
Figure16
/
/
/
J
(orsocket)wrenchto loosenthe nut.Usecautionwhenremovingthe
bladeto avoidcontactingthe weldstudson housing.
IMPORTANT:Whensharpeningthe blade,follow theoriginal angle
of grindas a guide.It is extremelyimportantthat eachcuttingedge
receivesan equalamountof grindingto preventanunbalancedblade.
An unbalancedbladewill causeexcessivevibrationwhen rotatingat
highspeedsand maycausedamageto the unit.The bladecan be
testedby balancingit on a screwdriveror nail.Removemetalfromthe
heavysideuntil it is balancedevenly.
MAINTENANCE SCHEDULE
Beforeperforminganytypeof maintenance/servioe,disengageall
controlsandstoptheengine.Waituntilall movingpartshavecometo
a completestop.Disconnectsparkplugwireandgroundit againstthe
enginetopreventunintendedstarting.Alwayswearsafetyglassesduring
operationor whileperforminganyadjustmentsorrepairs.
Followthe maintenanceschedulegivenbelow.This chart describes
serviceguidelinesonly.Usethe ServiceLog columnto keeptrackof
completedmaintenancetasks.To locate the nearest Sears Service
Centeror to schedule service, simply contactSears at
1-800-4-MY-HOME®.
EachUse
1st5- 8 hours
25 hours
50 hours
Annuallyor 100hours
BeforeStorage
•Underheavyloador in high temperatures
1. Engineoil level
2. Looseor missinghardware
3. Unit and engine.
1. Engineoil
1. Engineoi11
2. Air cleaner/Pre-cleaner
3. Controllinkagesand pivots
1. Engineoil
1. Sparkplug
1. Fuelsystem
1. Check
2. Tightenor replace
3. Clean
1. Change
1. Change
2. Cleanor replace
3. Lubewithlight oil
1. Change
1. Clean,replace,re-gap
1. Runengineuntil it stopsfrom lack of
fuelor addagasolineadditiveto the
gasin the tank.
17
Neverstorechippershredderwith fuelin tankindoorsor in poorly
ventilatedareaswherefuel fumesmayreachan open flame,spark,
or pilot lightas on a furnace,water heater,clothesdryer,or gas
appliance.
PREPARING THE ENGINE
Forenginesstoredover30 days:
1. To preventgumfrom formingin fuelsystemor oncarburetor
parts,run engineuntil it stopsfrom lack offuel or add a gasoline
additiveto the gas in the tank. If you usea gas additive,runthe
enginefor severalminutesto circulatethe additivethroughthe
carburetor--afterwhichtheengine andfuel can be stored up to
six months.
2. Whileengine is stillwarm,changethe oil.
3. Removesparkplugand pourapproximately1 oz. (30 ml)of clean
engineoil intothe cylinder.Pullthe recoilstarterseveraltimesto
distributethe oil, andreinstallthesparkplug.
4. Cleanengineof surfacedebris.
PREPARING THE CHIPPER SHREDDER
,, Whenstoringthe chippershredderin an unventilatedor metal
storageshed,careshouldbe takento rustproofthe non-painted
surfaces.Usinga lightoil or silicone,coat the equipment,
especiallyany springs,bearings,and cables.
,, Removeall dirt fromexteriorof engineand equipment.
,, Followlubricationrecommendations.
,, Storeequipmentin a clean,dry area.Do not storenextto
corrosivematerials,suchas fertilizer.Do notstorein an area
whereequipmentis presentthat may usea pilot lightor hasa
componentthat cancreatea spark.
18
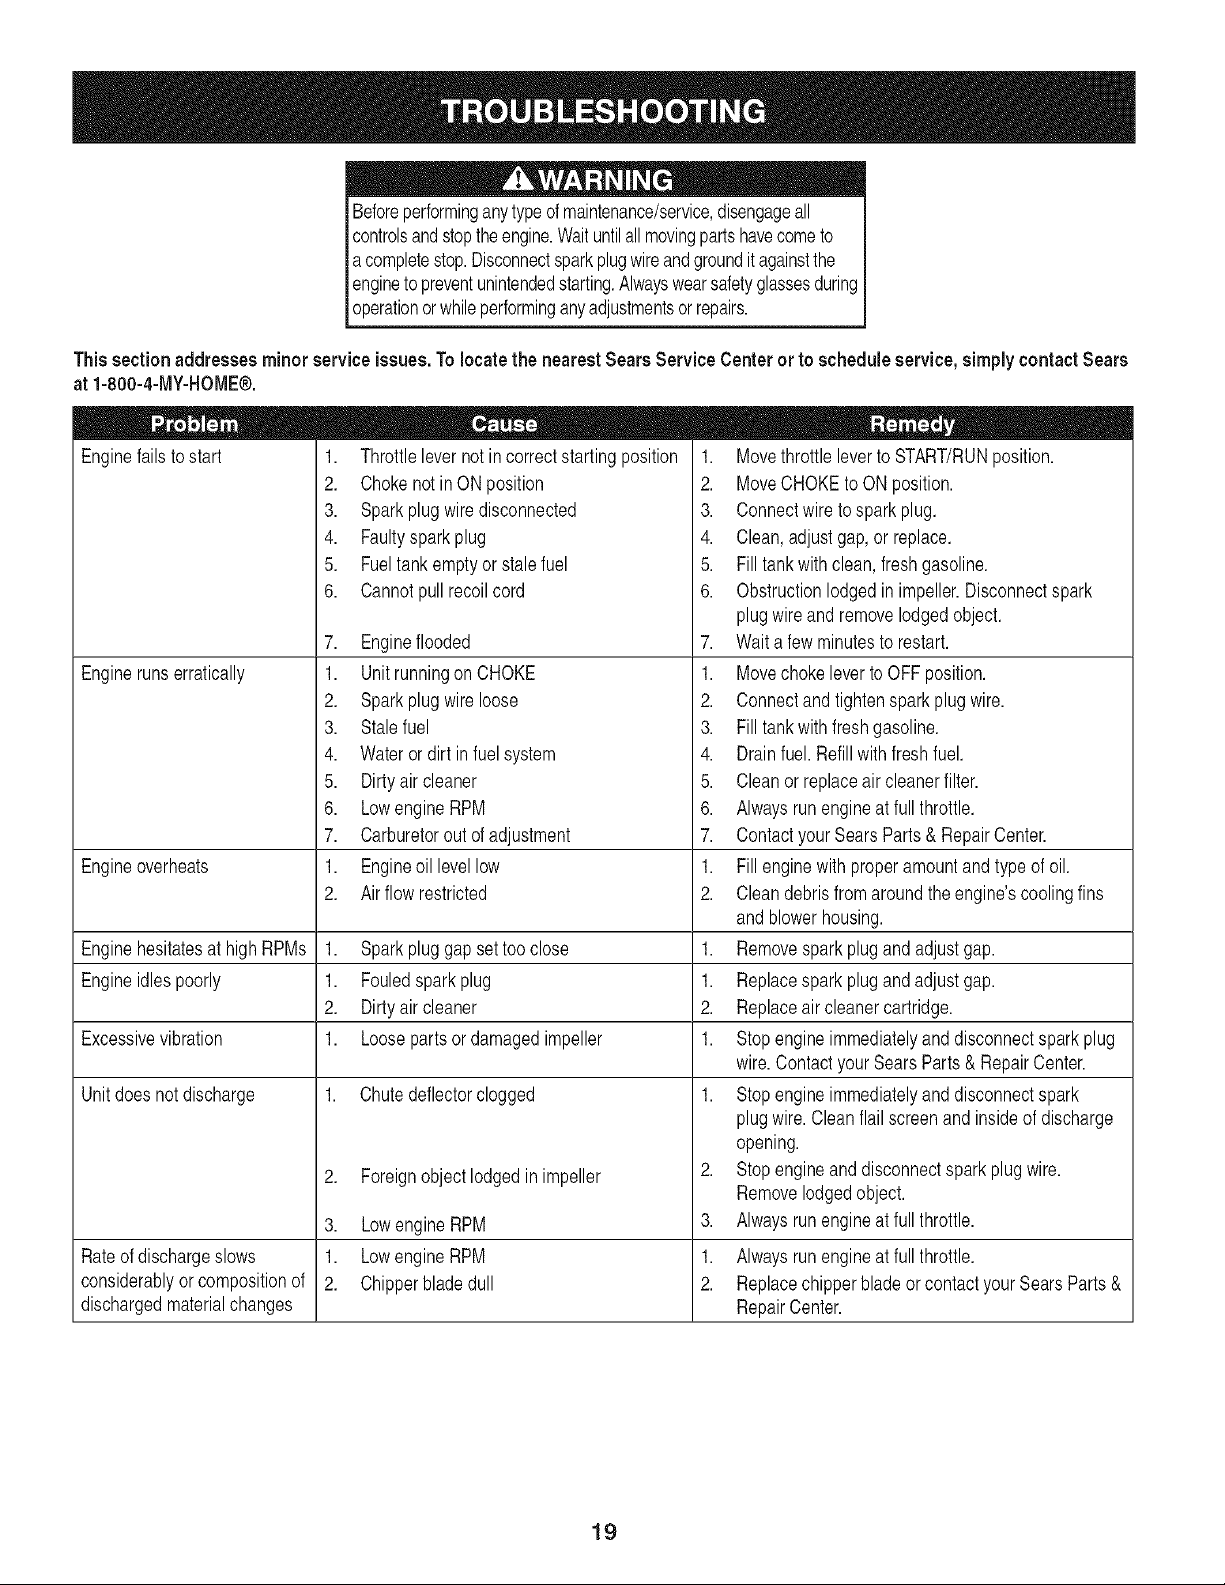
Beforeperforminganytype ofmaintenance/service,disengageall
controlsand stoptheengine.Waituntilallmovingpartshavecometo
acompletestop.Disconnectsparkplugwireandgroundit againstthe
engineto preventunintendedstarting.Alwayswearsafetyglassesduring
operationor whileperforminganyadjustmentsor repairs.
This sectionaddressesminor serviceissues,To locatethe nearestSears Service Centeror to schedule service,simply contactSears
at 1-800-4-MY-HOME®.
Enginefailsto start
Enginerunserratically
1. Throttlelevernot incorrectstartingposition
2. Chokenot inON position
3. Sparkplug wiredisconnected
4. Faultyspark plug
5. Fueltank emptyor stale fuel
6. Cannotpull recoilcord
7. Engineflooded
1. Unit runningon CHOKE
2. Sparkplug wireloose
3. Stalefuel
4. Wateror dirt in fuelsystem
5. Dirtyair cleaner
6. LowengineRPM
7. Carburetorout of adjustment
1. Engineoil levellow
2. Air flow restricted
Engineoverheats
Enginehesitatesat highRPMs 1. Sparkplug gap settoo close
Engineidles poorly 1. Fouledspark plug
2. Dirtyair cleaner
Excessivevibration 1. Loosepartsor damagedimpeller
Unitdoes notdischarge 1. Chutedeflectorclogged
Rateof dischargeslows
considerablyor compositionof
dischargedmaterialchanges
2. Foreignobject lodgedin impeller
3. Lowengine RPM
1. LowengineRPM
2. Chipperbladedull
1. Movethrottleleverto START/RUNposition.
2. MoveCHOKEto ONposition.
3. Connectwireto sparkplug.
4. Clean,adjustgap,or replace.
5. Fill tankwithclean,freshgasoline.
6. Obstructionlodgedin impeller.Disconnectspark
plugwire and removelodgedobject.
7. Waita fewminutesto restart.
1. Movechokeleverto OFFposition.
2. Connectand tightenspark plugwire.
3. Fill tankwithfreshgasoline.
4. Drainfuel. Refillwith fresh fuel.
5. Cleanor replaceair cleanerfilter.
6. Alwaysrun engineat full throttle.
7. Contactyour SearsParts& RepairCenter.
1. Fill enginewithproperamountand typeof oil.
2. Cleandebrisfrom aroundthe engine'scoolingfins
andblowerhousing.
1. Removesparkplugandadjustgap.
1. Replacespark plug and adjustgap.
2. Replaceair cleanercartridge.
1. Stopengineimmediatelyand disconnectspark plug
wire.ContactyourSearsParts & RepairCenter.
1. Stopengineimmediatelyand disconnectspark
plugwire.Cleanflail screenandinsideof discharge
opening.
2. Stopengineand disconnectspark plugwire.
Removelodgedobject.
3. Alwaysrun engineat full throttle.
1. Alwaysrun engineat full throttle.
2. Replacechipperbladeor contactyourSearsParts &
RepairCenter.
19
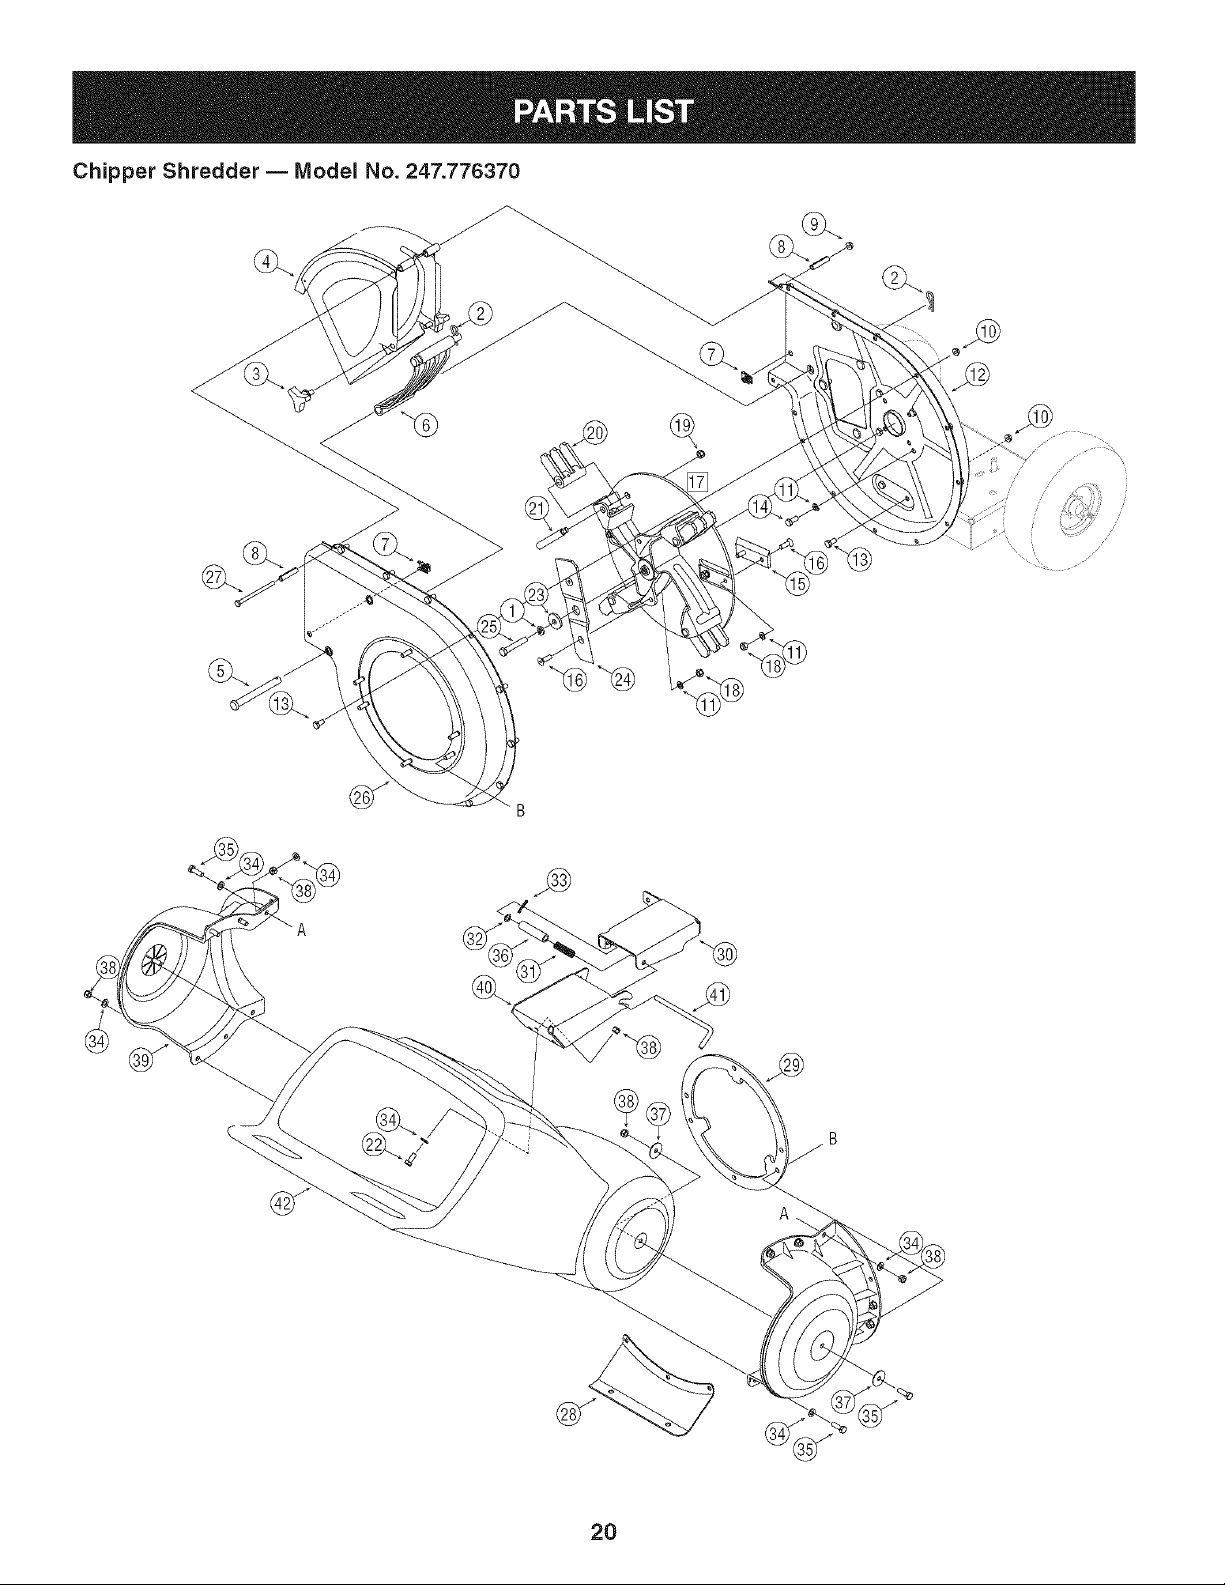
Chipper Shredder -- IVlodel No. 247.776370
Q
B
Q
2O

Chipper Shredder -- IVlodel No. 247.776370
D _ Q m
736-0217 LockWasher,3/8
2. 714-0149B Cotter Pin
3. 681-0048 l Wing Knob5/16-18
4. 681-0094 ChuteDeflectorAssembly
5. 711-0835 Clevis Pin
6. 781-0457 I ShredderScreen
7. 726-0211 U-Nut5/16-18
8. 750-0793 Spacer
9. 712-3027 HexLockNut, 1/4-20
10. 712-3004A HexLockNut5/16-18
11. 736-0119 LockWasher5/16
12. 681-0117 InnerImpellerHousingAssembly
13. 710-3025 HexCap Screw5/16-18x.625
14. 710-0157 HexCap Screw5/16-24x.75
15. 781-0490 IChipperBlade
16. 710-1054 HexCap Screw5/16-24x 1.0
17. 681-04096 ImpellerAssembly
18. 712-0411 HexLockNut5/16-24
19. 712-0266 I Nut,Jam Lock,3/8-16
20. 719-04308 FlailBlade
21. 738-04286 ShoulderPin, .5 x 2.625
710-3008
23. 736-0247
24. 742-0571
25. 710-1254
26. 681-0004A
2_ 710-0825
28. 781-0515
29. 781-0574
30. 681-0104
31. 732-0306
32. 736-0117
33. 714-0104
34. 736-0264
35. 710-0376
36. 748-0453
3_ 736-0362
38. 712-0429
39. 731-1710A
40. 681-0123
41. 711-1128
42. 731-1707
D _ 0 Q
HexCap Screw5/16-18x.75
FlatWasher3/8 x 1.25
ShredderBlade
HexCap Screw3/8-24 x 2.25
OuterImpellerHousingAssembly
HexCap Screw1/4-20x 3.75
FrontSupportBracket
ShredderPlate
Rear HopperBracketAssembly
CompressionSpring1.75
FlatWasher
CotterPin
FlatWasher.330ID x.630OD
HexCap Screw5/16-18x 1.0
Spacer,.375ID x 2.50 LG
FlatWasher.320ID x 1.25OD
HexLockNut5/16-18
HopperCollar
FrontHopperBracketAssembly
LockRod
HopperAssembly
21
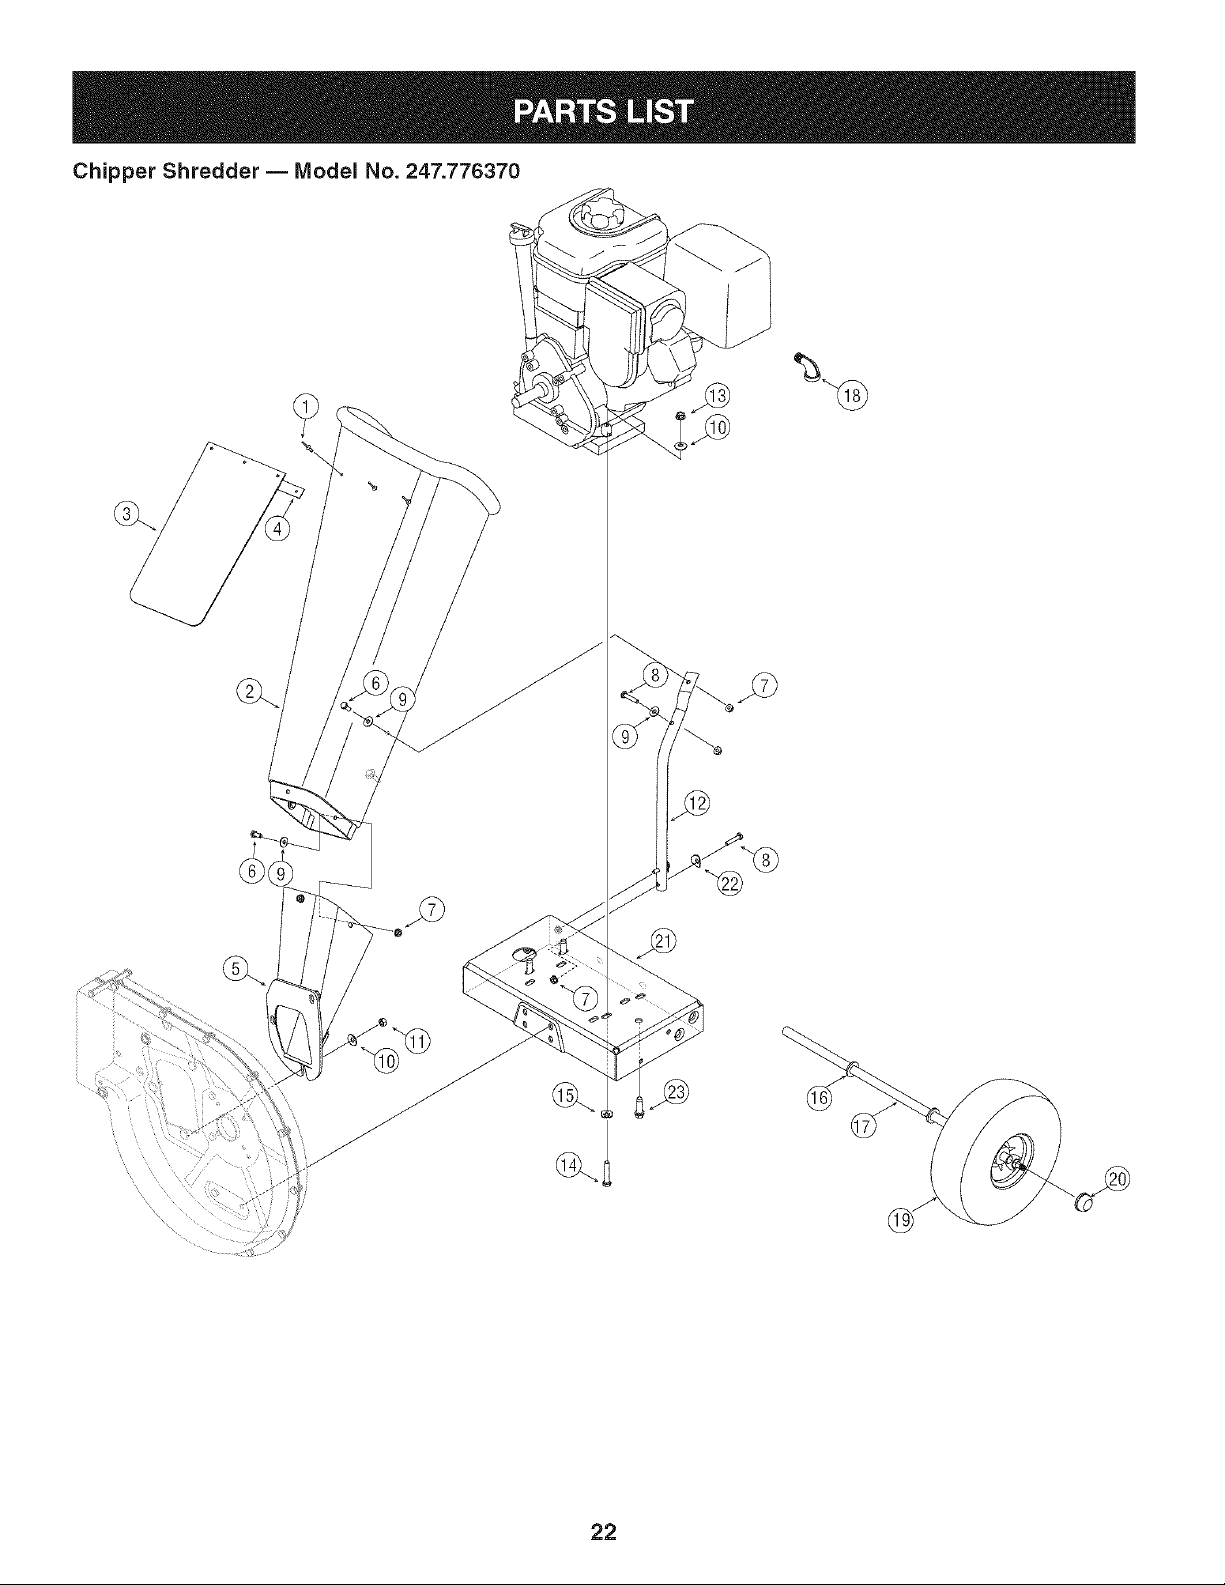
Chipper Shredder -- IVlodel No. 247.776370
Q
Q
22
Chipper Shredder -- IVlodel No. 247.776370
D _ O Q
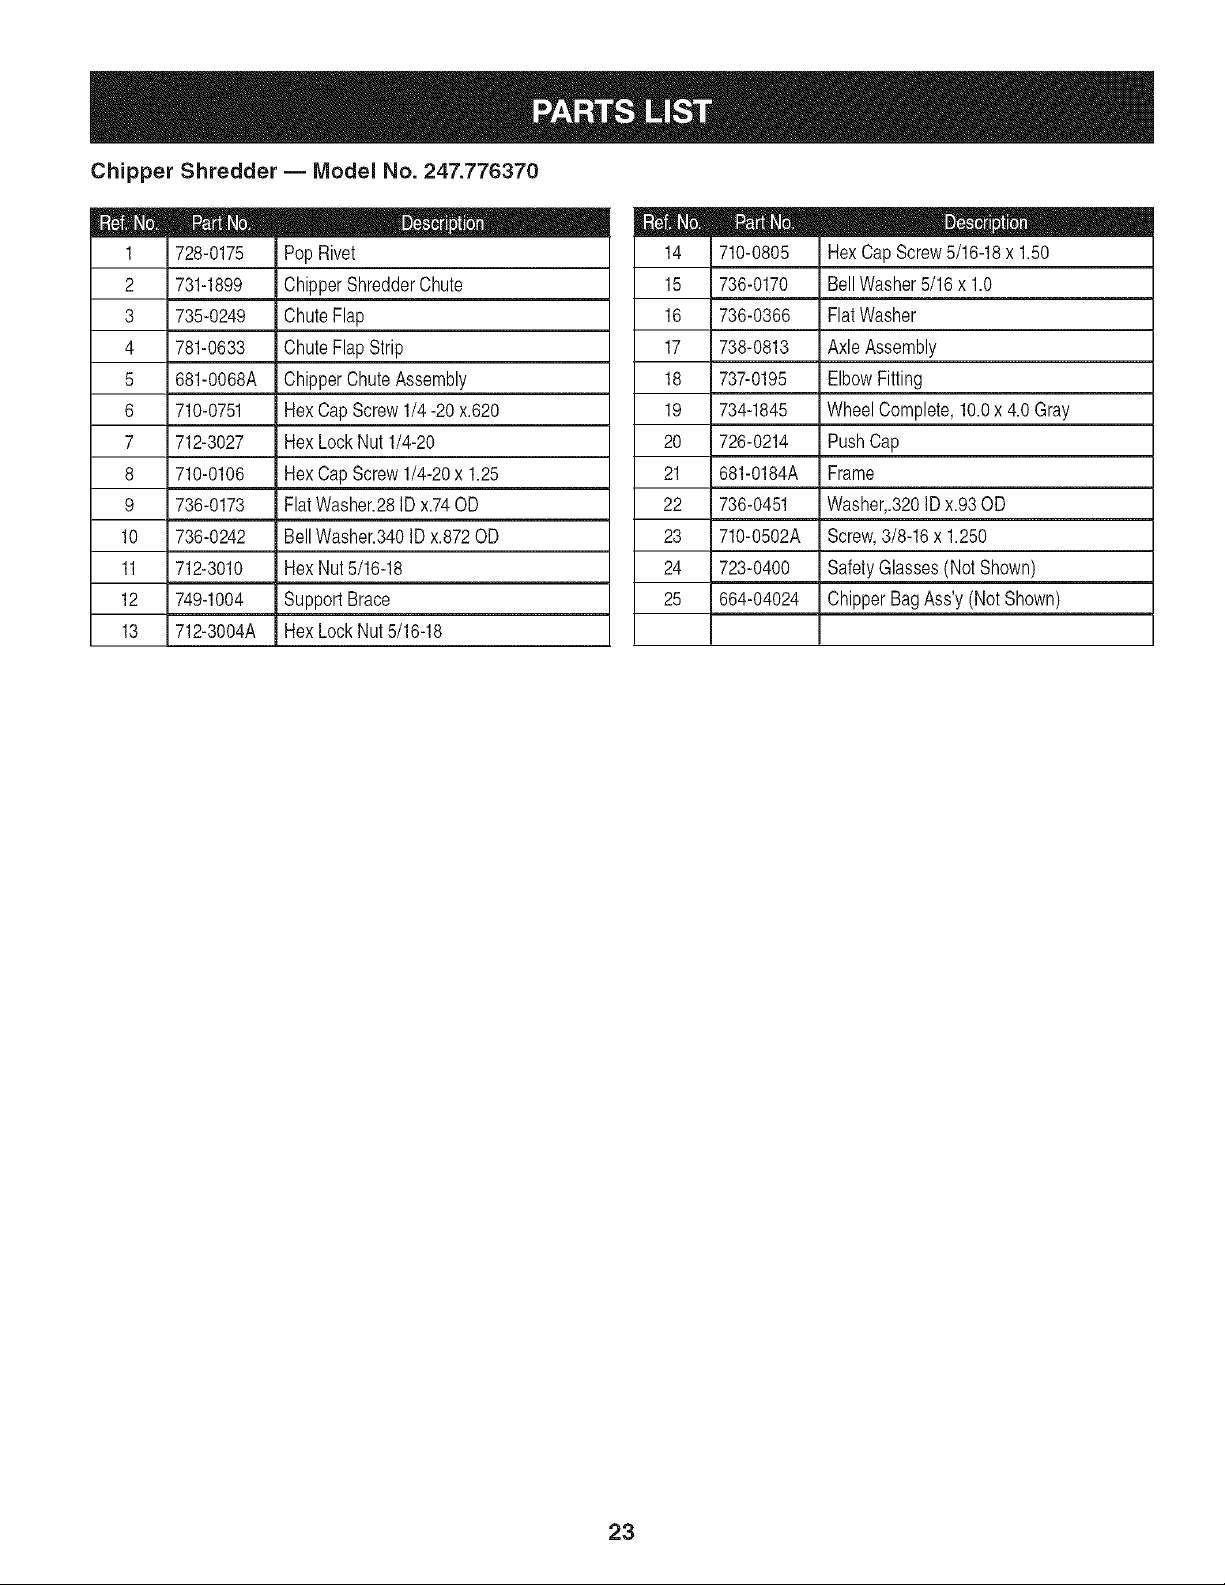
728-0175 Pop Rivet 710-0805 HexCap Screw5/16-18x 1.50
2 731-1899 ChipperShredderChute 15 736-0170 BellWasher5/16x 1.0
3 735-0249 iChuteFlap 16 736-0366 FlatWasher
4 781-0633 IChute FlapStrip 17 738-0813 Axle Assembly
5 681-0068A ChipperChuteAssembly 18 737-0195 ElbowFitting
6 710-0751 HexCap Screw1/4 -20 x.620 19 734-1845 WheelComplete,10.0x 4.0Gray
7 712-3027 i HexLockNut 1/4-20 20 726-0214 PushCap
8 710-0106 i HexCap Screw1/4-20x 1.25 21 681-0184A Frame
9 736-0173 FlatWasher.28ID x.74OD 22 736-0451 Washer,.320ID x.93 OD
10 736-0242 BellWasher.340ID x.872OD 23 710-0502A Screw,3/8-16x 1.250
11 712-3010 HexNut5/16-18 24 723-0400 SafetyGlasses(Not Shown)
12 749-1004 I SupportBrace 25 664-04024 ChipperBagAss'y (Not Shown)
13 712-3004A HexLockNut5/16-18
23

Craftsman 11 O0 Series Engine Model No. 150112
For Chipper Shredder Model 247.776370
552
287
524
684
306
742
307_ 746%
15A_
383_ 337 /
45
3%
22_
24
718 15_
1B
146
741
1095 VALVE GASKET SET
868 (_ 99 1022
12
51
358 ENGINE GASKET SET
1022
1029
24
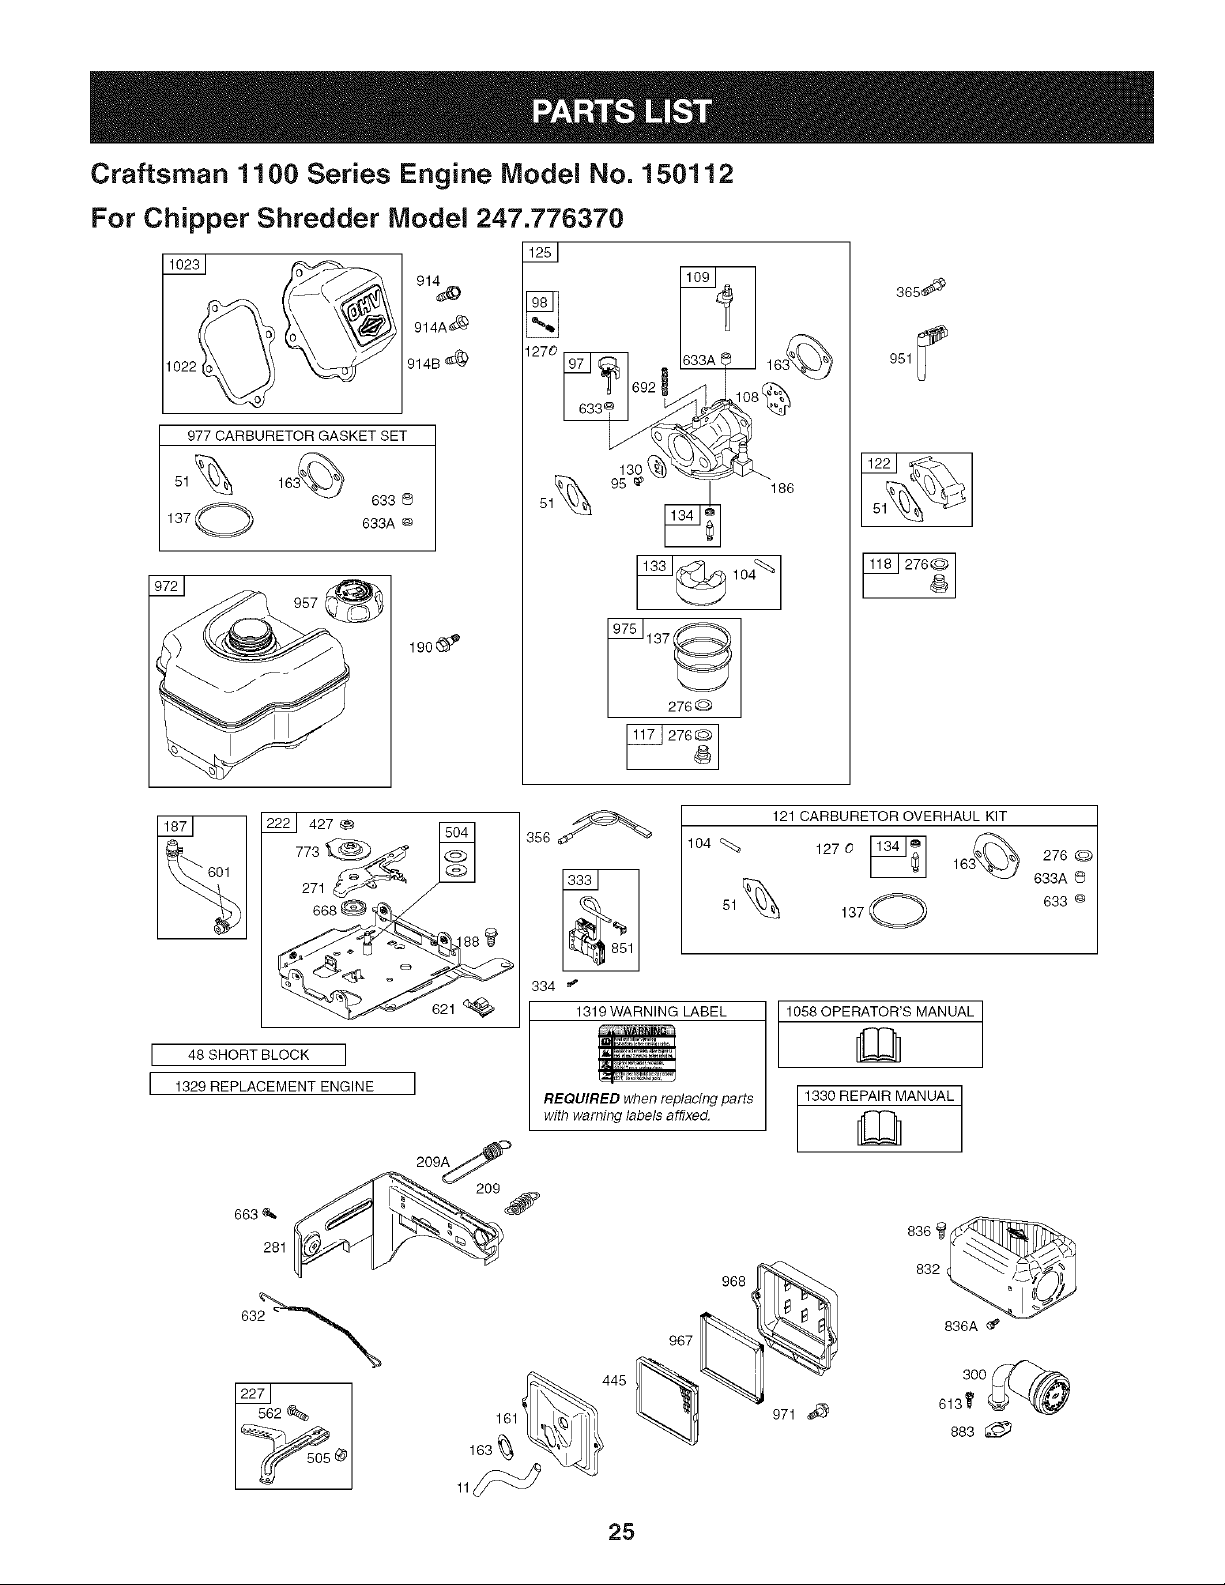
Craftsman 1100 Series Engine Model No. 150112
For Chipper Shredder Model 247.776370
91_
914A_
914B '_
1022_@
977 CARBURETOR GASKET SET
51 163_ 633
137 0 633A _
9_3°_166
!_J_ lO_
975_137_
276@
366_
951¢
276G
4_
222 _ 427_
773
271 _ _
__ 621_
I 48 SHORT BLOCK I
I 1329 REPLACEMENT ENGINE
209A
366
51
334 _'
121 CARBURETOR OVERHAUL KIT
104 q% 1270 __] 3_276@16
633A S
137 0 633@
1319 WARNING LABEL
REQUIRED when replacing parts
with warning labels affixed.
1058 OPERAS MANUAL 1
1330 REPAIR MANUAL
663_,
281
836
832
25
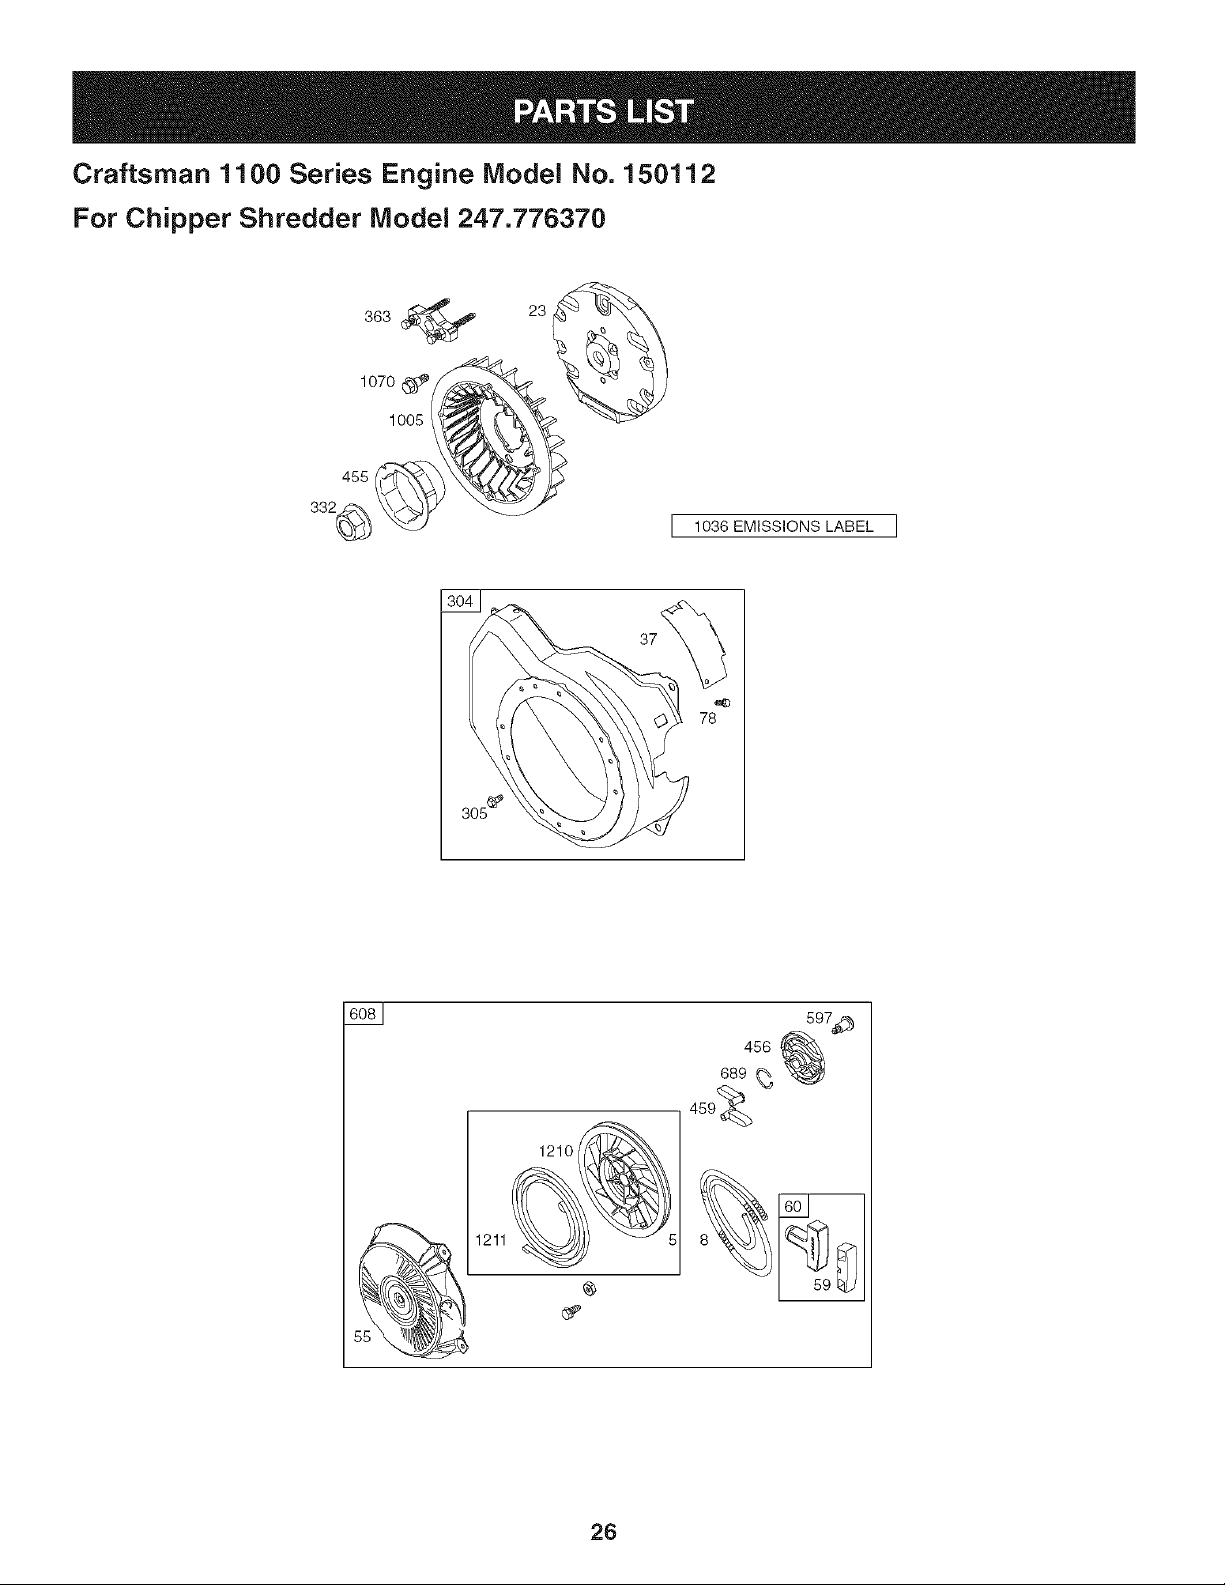
Craftsman 11 O0 Series Engine Model No. 150112
For Chipper Shredder Model 247.776370
363 _ 23
1070(_J_
1005
455
332_
1036 EMISSIONS LABEL ]
37
®
_P
26
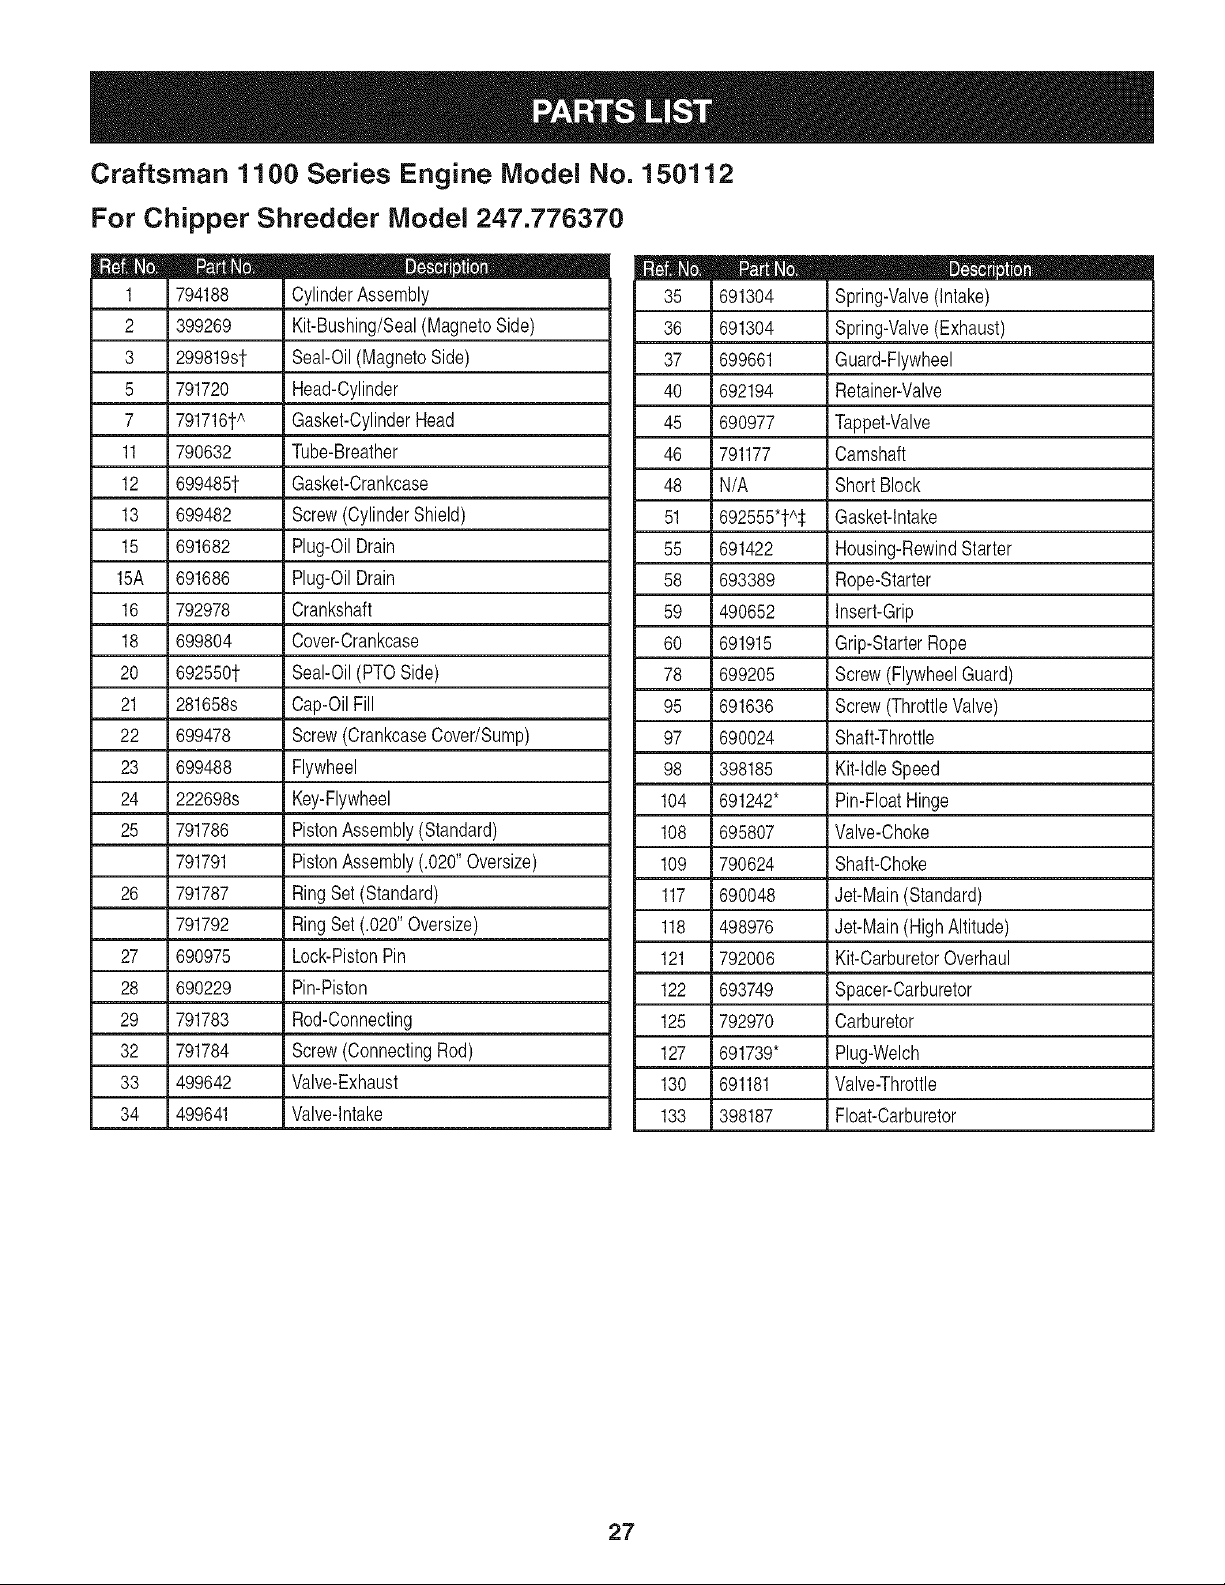
Craftsman 1100 Series Engine Model No. 150112
For Chipper Shredder Model 247.776370
794188 CylinderAssembly
2 399269 Kit-Bushing/Seal(MagnetoSide)
3 299819st Seal-Oil(MagnetoSide)
5 791720 Head-Cylinder
7 791716tA Gasket-CylinderHead
11 790632 Tube-Breather
12 699485t Gasket-Crankcase
13 699482 Screw(CylinderShield)
15 691682 Plug-OilDrain
15A 691686 Plug-OilDrain
16 792978 Crankshaft
18 699804 Cover-Crankcase
20 692550t Seal-Oil(PTOSide)
21 281658s Cap-OilFill
22 699478 Screw(CrankcaseCover/Sump)
23 699488 Flywheel
24 222698s Key-Flywheel
25 791786 PistonAssembly(Standard)
791791 PistonAssembly(.020"Oversize)
26 791787 RingSet (Standard)
791792 RingSet (.020"Oversize)
27 690975 Lock-PistonPin
28 690229 Pin-Piston
29 791783 Rod-Connecting
32 791784 Screw(ConnectingRod)
33 499642 Valve-Exhaust
34 499641 Valve-Intake
D _ O a
691304 Spring-Valve(Intake)
36 691304 Spring-Valve(Exhaust)
37 699661 Guard-Flywheel
40 692194 Retainer-Valve
45 690977 Tappet-Valve
46 791177 Camshaft
48 N/A Short Block
51 692555'tA_: Gasket-Intake
55 691422 Housing-RewindStarter
58 693389 Rope-Starter
59 490652 Insert-Grip
60 691915 Grip-StarterRope
78 699205 Screw(FlywheelGuard)
95 691636 Screw(ThrottleValve)
97 690024 Shaft-Throttle
98 398185 Kit-IdleSpeed
104 691242* Pin-FloatHinge
108 695807 Valve-Choke
109 790624 Shaft-Choke
117 690048 Jet-Main(Standard)
118 498976 Jet-Main(HighAltitude)
121 792006 Kit-CarburetorOverhaul
122 693749 Spacer-Carburetor
125 792970 Carburetor
127 691739* Plug-Welch
130 691181 Valve-Throttle
133 398187 Float-Carburetor
27
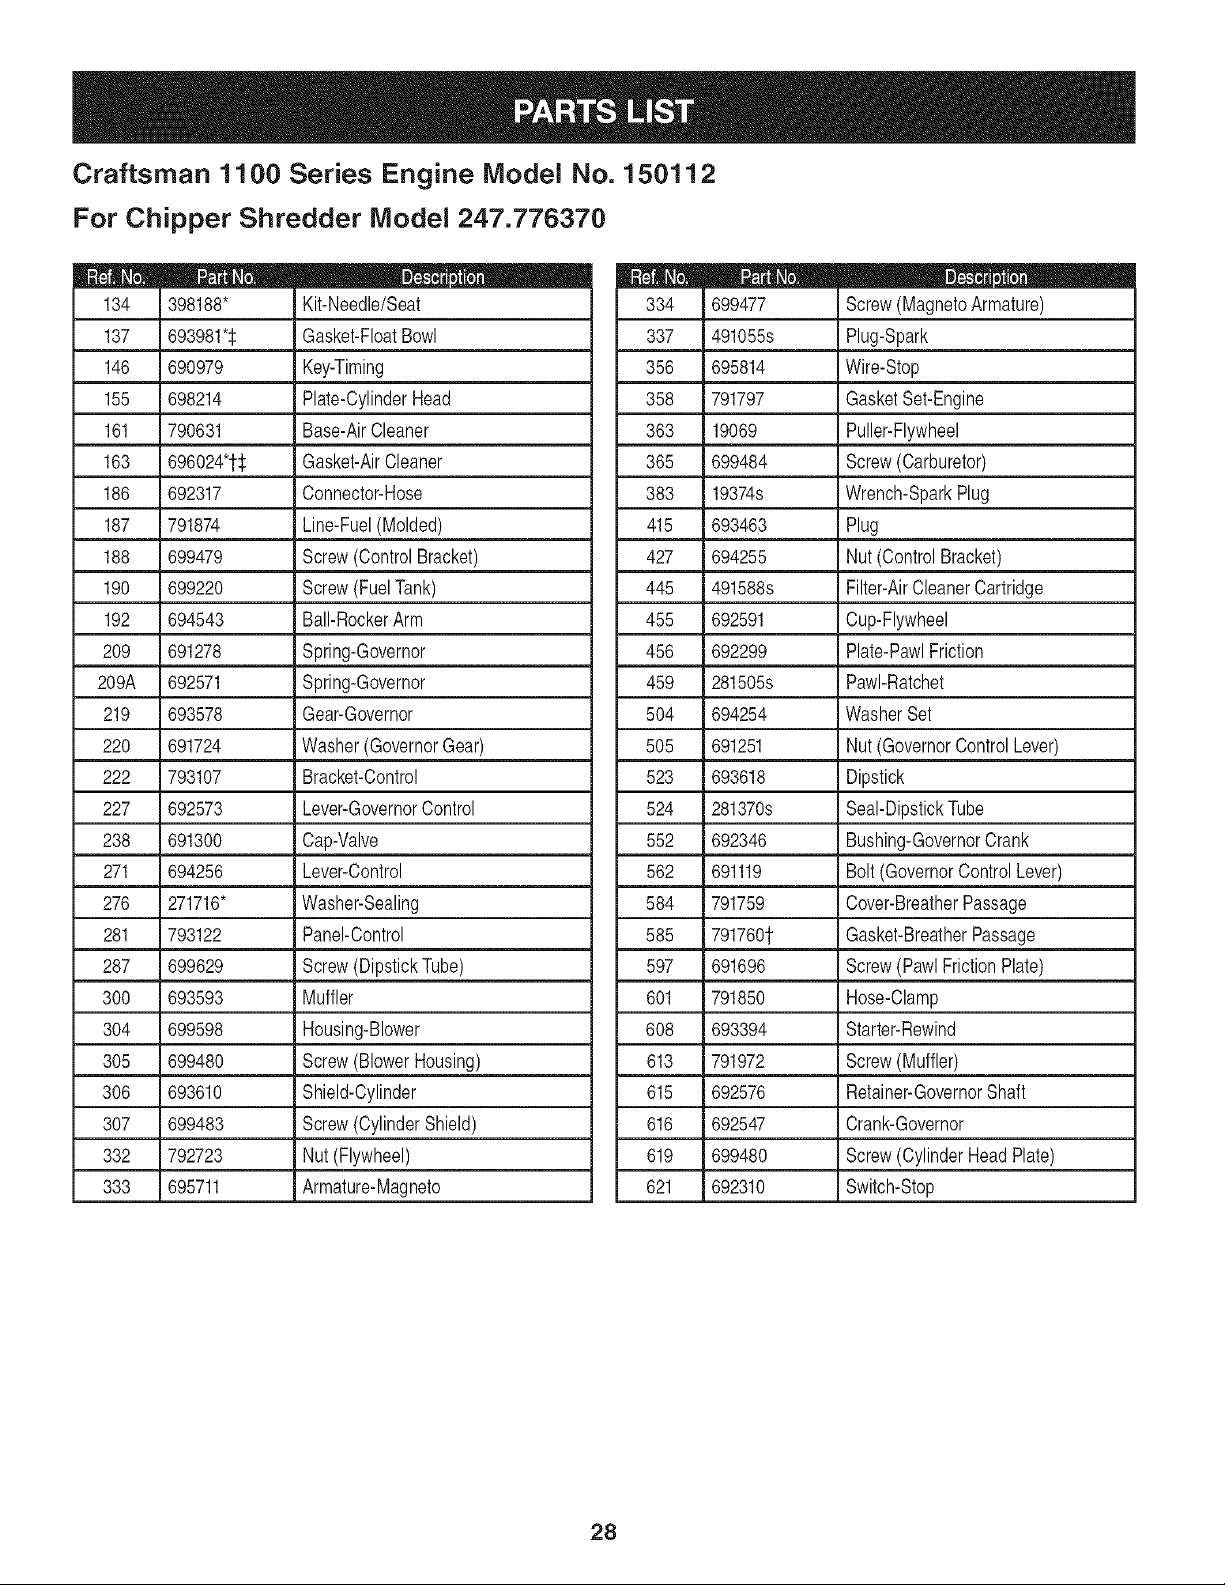
Craftsman 11 O0 Series Engine Model No. 150112
For Chipper Shredder Model 247.776370
m
134
137
146
155
161
163
186
187
188
190
192
2O9
209A
219
220
222
227
238
271
276
281
287
300
304
305
306
307
332
333
398188*
693981*_
690979
698214
790631
696024"f_
692317
791874
699479
699220
694543
691278
692571
693578
691724
793107
692573
691300
694256
271716*
793122
699629
693593
699598
699480
693610
699483
792723
695711
D _ 0 Q
Kit-Needle/Seat
Gasket-FloatBowl
Key-Timing
I
Plate-CyhnderHead
Base-AirCleaner
Gasket-AirCleaner
Connector-Hose
Line-Fuel(Molded)
Screw(ControlBracket)
i Screw(FuelTank)
Bali-RockerArm
Spring-Governor
Spring-Governor
Gear-Governor
Washer(GovernorGear)
Bracket-Control
i Lever-GovernorControl
i Cap-Valve
i Lever-Control
Washer-Sealing
I Panel-Control
Screw(DipstickTube)
i Muffler
i Housing-Blower
Screw(BlowerHousing)
I Shield-Cylinder
i Screw(CylinderShield)
Nut(Flywheel)
Armature-Magneto
m
334
337
356
358
363
365
383
415
427
445
455
456
459
504
505
523
524
552
562
584
585
597
601
608
613
615
616
619
621
699477
491055s
695814
791797
19069
699484
19374s
693463
694255
491588s
692591
692299
281505s
694254
691251
693618
281370s
692346
691119
791759
791760f
691696
791850
693394
791972
692576
692547
699480
692310
D _ J 0
Screw(MagnetoArmature)
Plug-Spark
Wire-Stop
GasketSet-Engine
Puller-Flywheel
Screw(Carburetor)
Wrench-SparkPlug
Plug
Nut(ControlBracket)
Filter-AirCleanerCartridge
Cup-Flywheel
Plate-PawlFriction
PawI-Ratchet
WasherSet
Nut(GovernorControlLever)
Dipstick
Seal-DipstickTube
Bushing-GovernorCrank
Bolt(GovernorControl Lever)
Cover-BreatherPassage
Gasket-BreatherPassage
Screw(PawlFrictionPlate)
Hose-Clamp
Starter-Rewind
Screw(Muffler)
Retainer-GovernorShaft
Crank-Governor
Screw(CylinderHead Plate)
Switch-Stop
28
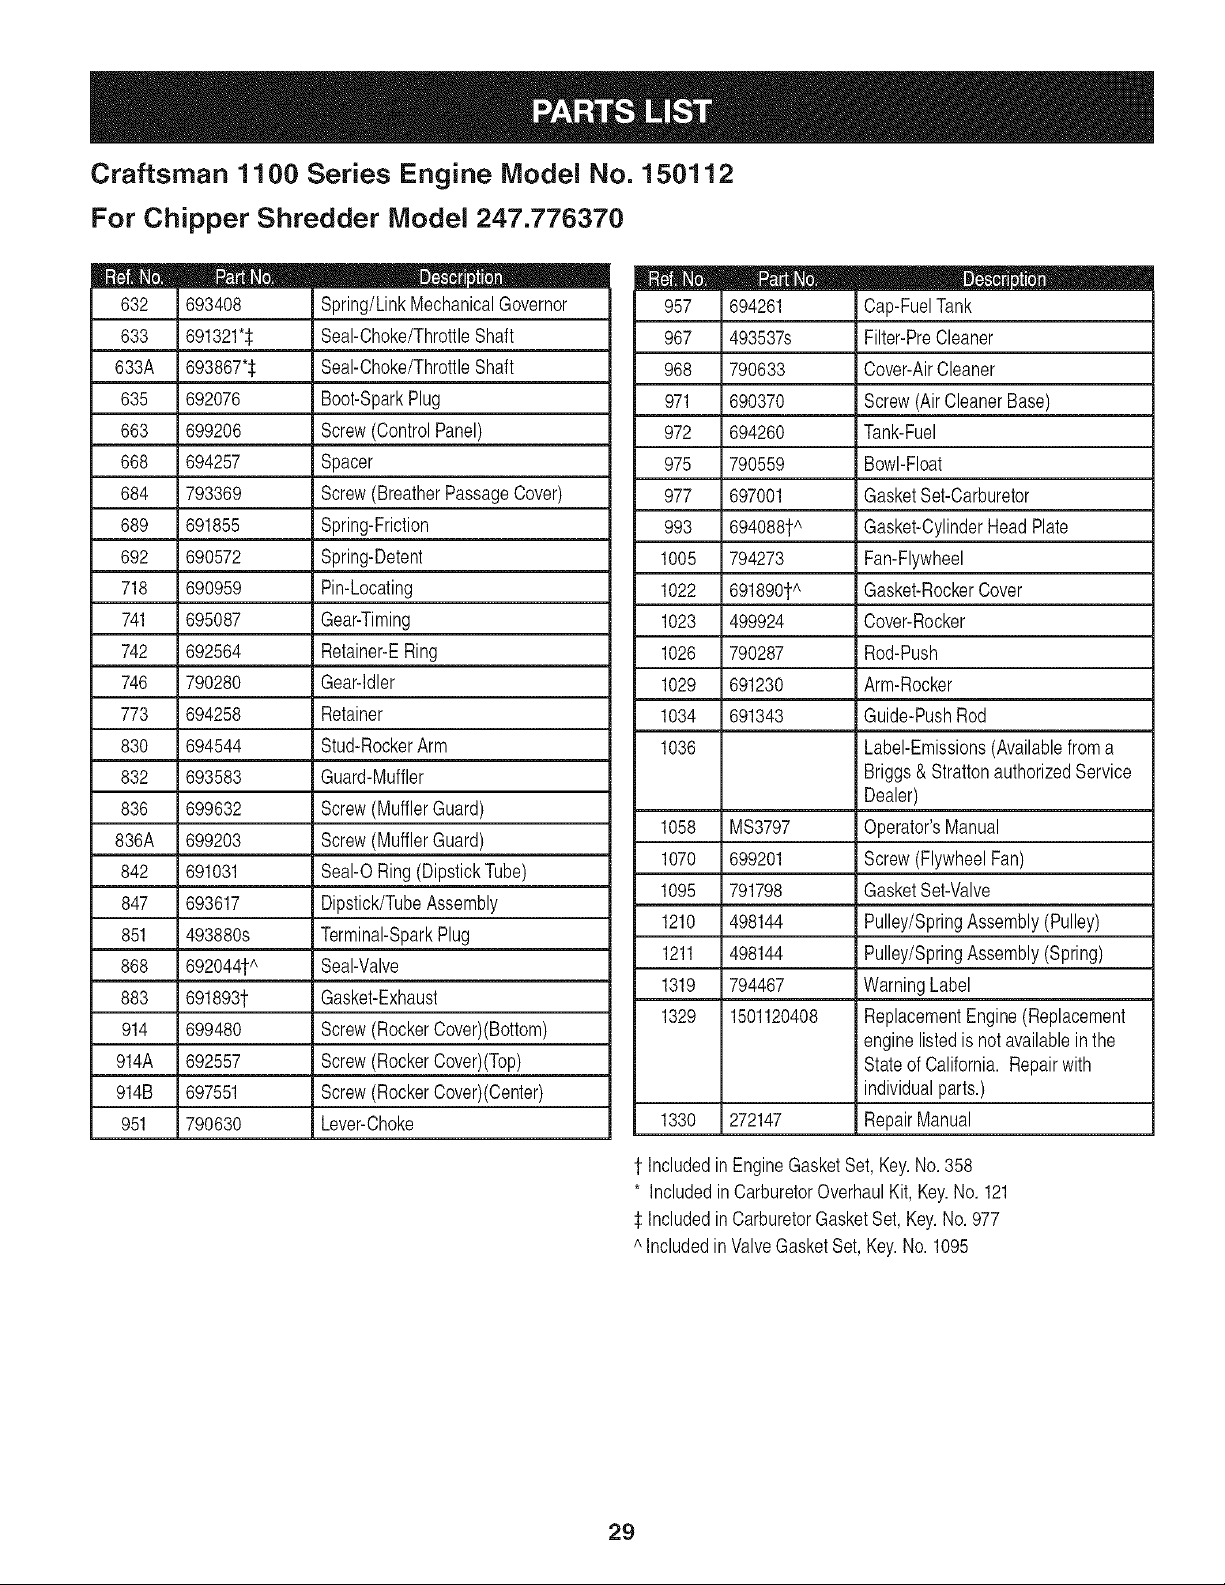
Craftsman 1100 Series Engine Model No. 150112
For Chipper Shredder Model 247.776370
m
632
633
633A
635
663
668
684
689
692
718
741
742
746
773
830
832
836
836A
842
847
851
868
883
914
914A
914B
951
693408
691321*$
693867*$
692076
699206
694257
793369
691855
690572
690959
695087
692564
790280
694258
694544
693583
699632
699203
691031
693617
493880s
692044t^
691893t
699480
692557
697551
790630
D _ 0 e
Spring/LinkMechanicalGovernor
Seal-Choke/ThrottleShaft
Seal-Choke/ThrottleShaft
Boot-SparkPlug
Screw(ControlPanel)
Spacer
Screw(BreatherPassageCover)
Spring-Friction
Spring-Detent
Pin-Locating
Gear-Timing
Retainer-ERing
Gear-Idler
Retainer
Stud-RockerArm
Guard-Muffler
Screw(MufflerGuard)
Screw(MufflerGuard)
SeaI-ORing (DipstickTube)
Dipstick/TubeAssembly
Terminal-SparkPlug
Seal-Valve
Gasket-Exhaust
Screw(RockerCover)(Bottom)
Screw(RockerCover)(Top)
Screw(RockerCover)(Center)
Lever-Choke
__ D _ e e
957 694261 Cap-FuelTank
967 493537s Filter-PreCleaner
968 790633 Cover-AirCleaner
971 690370 Screw(AirCleanerBase)
972 694260 Tank-Fuel
975 790559 Bowl-Float
977 697001 GasketSet-Carburetor
993 694088tA Gasket-CylinderHeadPlate
1005 794273 Fan-Flywheel
1022 691890tA Gasket-RockerCover
1023 499924 Cover-Rocker
1026 790287 Rod-Push
1029 691230 Arm-Rocker
1034 691343 Guide-PushRod
1036 Label-Emissions(Availablefroma
Briggs& StrattonauthorizedService
Dealer)
1058 MS3797 Operator'sManual
1070 699201 Screw(FlywheelFan)
1095 791798 GasketSet-Valve
1210 498144 Pulley/SpringAssembly(Pulley)
1211 498144 Pulley/SpringAssembly(Spring)
1319 794467 WarningLabel
1329 1501120408 ReplacementEngine(Replacement
enginelistedis notavailablein the
Stateof California. Repairwith
individualparts.)
1330 272147 RepairManual
t Includedin EngineGasketSet, Key.No. 358
* IncludedinCarburetorOverhaulKit, Key.No. 121
$ Includedin CarburetorGasketSet,Key.No.977
AIncludedin ValveGasketSet,Key.No.1095
29

(Thispageapplicablein the U.S.A.and Canadaonly.)
Sears, Roebuck and Co., U.S.A. (Sears), the California Air Resources Board (CARB)
and the United States Environmental Protection Agency (U.S. EPA)
Emission ControJ System Warranty Statement (Owner's Defect Warranty Rights and ObJigations)
EMISSIONCONTROLWARRANTYCOVERAGEISAPPLICABLETO CERTI- YEAR 1997AND LATERENGINESWHICHARE PURCHASEDAND USED
FlED ENGINESPURCHASEDIN CALIFORNIAIN 1995ANDTHEREAF- ELSEWHEREINTHE UNITEDSTATES(ANDAFTERJANUARY1,2001 IN
TER,WHICHARE USEDINCALIFORNIA,ANDTOCERTIFIEDMODEL CANADA).
California and United States Emission Control Defects Warranty Statement
The CaliforniaAir ResourcesBoard(CARB),U.S.EPAandSearsare pleased
to explainthe EmissionControlSystemWarrantyon your modelyear2000 and
latersmalloff-roadengine(SORE).In California,newsmall off-roadengines
mustbe designed,builtand equippedto meetthe State'sstringentanti-smog
standards.Elsewhereinthe UnitedStates, newnon-road,spark-ignition
enginescertifiedfor modelyear 1997and latermustmeetsimilarstandardsset
forth bythe U.S.EPA.Sears mustwarrantthe emissioncontrol systemon your
enginefor the periodsof timelistedbelow,providedtherehasbeenno abuse,
neglector impropermaintenanceof your smalloff-roadengine.Youremis-
sion controlsystemincludespartssuch as thecarburetor,air cleaner,ignition
system,mufflerand catalyticconverter.Also includedmaybe connectorsand
otheremissionrelatedassemblies.Wherea warrantableconditionexists,Sears
will repairyour smalloff-roadengine at no cost to you includingdiagnosis,parts
and labor.
Sears Emission Control Defects Warranty Coverage
Smalloff-roadenginesarewarrantedrelativeto emissioncontrol partsdefects
fora periodof oneyear,subjectto provisionsset forth below,Ifany covered
Owner's Warranty
Asthe smalloff-roadengineowner,you are responsiblefor the performanceof
therequiredmaintenancelistedinyour Operatingand MaintenanceInstruc-
tions.Searsrecommendsthatyou retain all your receiptscoveringmaintenance
on yoursmall off-roadengine,butSearscannot denywarrantysolelyforthe
lackof receiptsorfor yourfailureto ensurethe performanceof all scheduled
maintenance.Asthe smalloff-roadengineowner,you shouldhoweverbe
awarethat Sears maydenyyou warrantycoverageif your smalloff-roadengine
ora part hasfailed dueto abuse,neglect,impropermaintenanceor unap-
part onyour engineis defective,the part will be repairedor replacedbySears.
Responsibilities
provedmodifications.Youare responsiblefor presentingyour smalloff-road
engineto an AuthorizedSearsService Dealeras soonas a problemexists.The
undisputedwarrantyrepairsshouldbe completedina reasonableamountof
time,not to exceed30 days.Ifyou haveany questionsregardingyour warranty
rightsand responsibilities,you shouldcontacta SearsServiceRepresentative
at 1--800--469--4663.Theemissionwarrantyis a defectswarranty.Defectsare
judgedon normalengineperformance.Thewarrantyis notrelatedto an in-use
emissiontest.
Sears Emission Control Defects Warranty Provisions
ThefollowingarespecificprovisionsrelativetoyourEmissionControlDefectsWarrantyCoverage.It isin additionto theSearsenginewarrantyfornon-regulated
enginesfound in the OperatingandMaintenanceInstructions.
1. WarrantedParts
Coverageunderthis warrantyextendsonly to the parts listed below(the
emissioncontrol systemsparts)to the extentthese parts werepresenton
theenginepurchased.
a. FuelMeteringSystem
,,Coldstart enrichmentsystem
,,Carburetorand internal parts
• FuelPump
b. Airlnduction System
,,Air cleaner
• Intakemanifold
c. IgnitionSystem
,,Sparkplug(s)
• Magnetoignitionsystem
d. CatalystSystem
,,Catalyticconverter
• Exhaustmanifold
,,Air injectionsystemor pulsevalve
e. MiscellaneousItemsUsed inAboveSystems
• Vacuum,temperature,position,timesensitivevalves
andswitches
• Connectorsand assemblies
2. Lengthof Coverage
Searswarrantsto the initialownerand eachsubsequentpurchaserthat
theWarrantedParts shall befree from defectsin materialsandworkman-
ship whichcausedthe failureof the WarrantedPartsfor a periodof one
yearfrom the datethe engineis deliveredto a retailpurchaser.
3. NoCharge
Repairor replacementof any WarrantedPartwill be performedat no
chargeto the owner,includingdiagnosticlabor whichleads to the
determinationthata WarrantedPartis defective,ifthe diagnosticwork is
performedat an AuthorizedSears ServiceDealer.For emissionswarranty
servicecontact your nearestAuthorizedSearsServiceDealeras listed in
the "YellowPages"under"Engines,Gasoline,""GasolineEngines,""Lawn
Mowers,"or similarcategory.
4. Claimsand CoverageExclusions
Warrantyclaimsshall be filed in accordancewiththe provisionsofthe
Sears EngineWarrantyPolicy.Warrantycoverageshall be excludedfor
failures of WarrantedPartswhichare not originalSears parts or because
of abuse, neglector impropermaintenanceas setforth in the Sears
EngineWarrantyPolicy.Searsis not liable to coverfailuresof Warranted
Partscausedby the useof add-on, non-original,or modifiedparts.
5. Maintenance
Any WarrantedPartwhich is not scheduledfor replacementas required
maintenanceor which is scheduledonly for regularinspectionto the effect
of "repairor replaceas necessary"shall be warrantedas to defectsfor the
warrantyperiod.Any WarrantedPartwhich is scheduledfor replacement
as requiredmaintenanceshallbe warrantedasto defectsonly for the
periodof time upto the firstscheduledreplacementforthat part. Any
replacementpart that is equivalentin performanceand durabilitymay
be usedin the performanceof any maintenanceor repairs.The owneris
responsibleforthe performanceof all requiredmaintenance,as definedin
the SearsOperatingandMaintenanceInstructions.
6. ConsequentialCoverage
Coveragehereundershallextend to the failure of any engine components
caused bythefailure of anyWarrantedPartstill underwarranty.
Inthe USAand Canada,a 24 hour hot line, 1-800-469-4663,has a menuof pre-recordedmessagesofferingyou engine maintenanceinformation.
30

Look For Relevant Emissions Durability Period and
Air index information On Your Engine Emissions Label
Engines that are certified to meet the California Air Resources Board (CARB) Tier 2 Emission Standards must
display information regarding the Emissions Durability Period and the Air Index. Sears, Roebuck and Co., U.S.A.
makes this information available to the consumer on our emission labels.
The Emissions Durability Period describes the number of hours of actual running time for which the engine is
certified to be emissions compliant, assuming proper maintenance in accordance with the Operating & Mainte-
nance instructions. The following categories are used:
Moderate: Engine is certified to be emission compliant for 125 hours of actual engine running time.
intermediate: Engine is certified to be emission compliant for 250 hours of actual engine running time.
Extended: Engine is certified to be emission compliant for 500 hours of actual engine running time.
For example, a typical walk-behind lawn mower is used 20 to 25 hours per year. Therefore, the Emissions
Durability Period of an engine with an intermediate rating would equate to 10 to 12 years.
The Air index is a calculated number describing the relative level of emissions for a specific engine family. The
lower the Air index, the cleaner the engine. This information is displayed in graphical form on the emissions label.
After July 1,2000, Look For Emissions Compliance Period
On Engine Emissions Compliance Label
After July 1, 2000 certain Sears, Roebuck and Co., U.S.A. engines will be certified to meet the United States
Environmental Protection Agency (USEPA) Phase 2 emission standards. For Phase 2 certified engines, the Emis-
sions Compliance Period referred to on the Emissions Compliance label indicates the number of operating hours
for which the engine has been shown to meet Federal emission requirements.
For engines less than 225 cc displacement, Category C = 125 hours, B = 250 hours and A = 500 hours.
For engines of 225 cc or more, Category C = 250 hours, B = 500 hours and A = 1000 hours.
This is a generic representationof the emission labeltypically found on a certified engine.
31
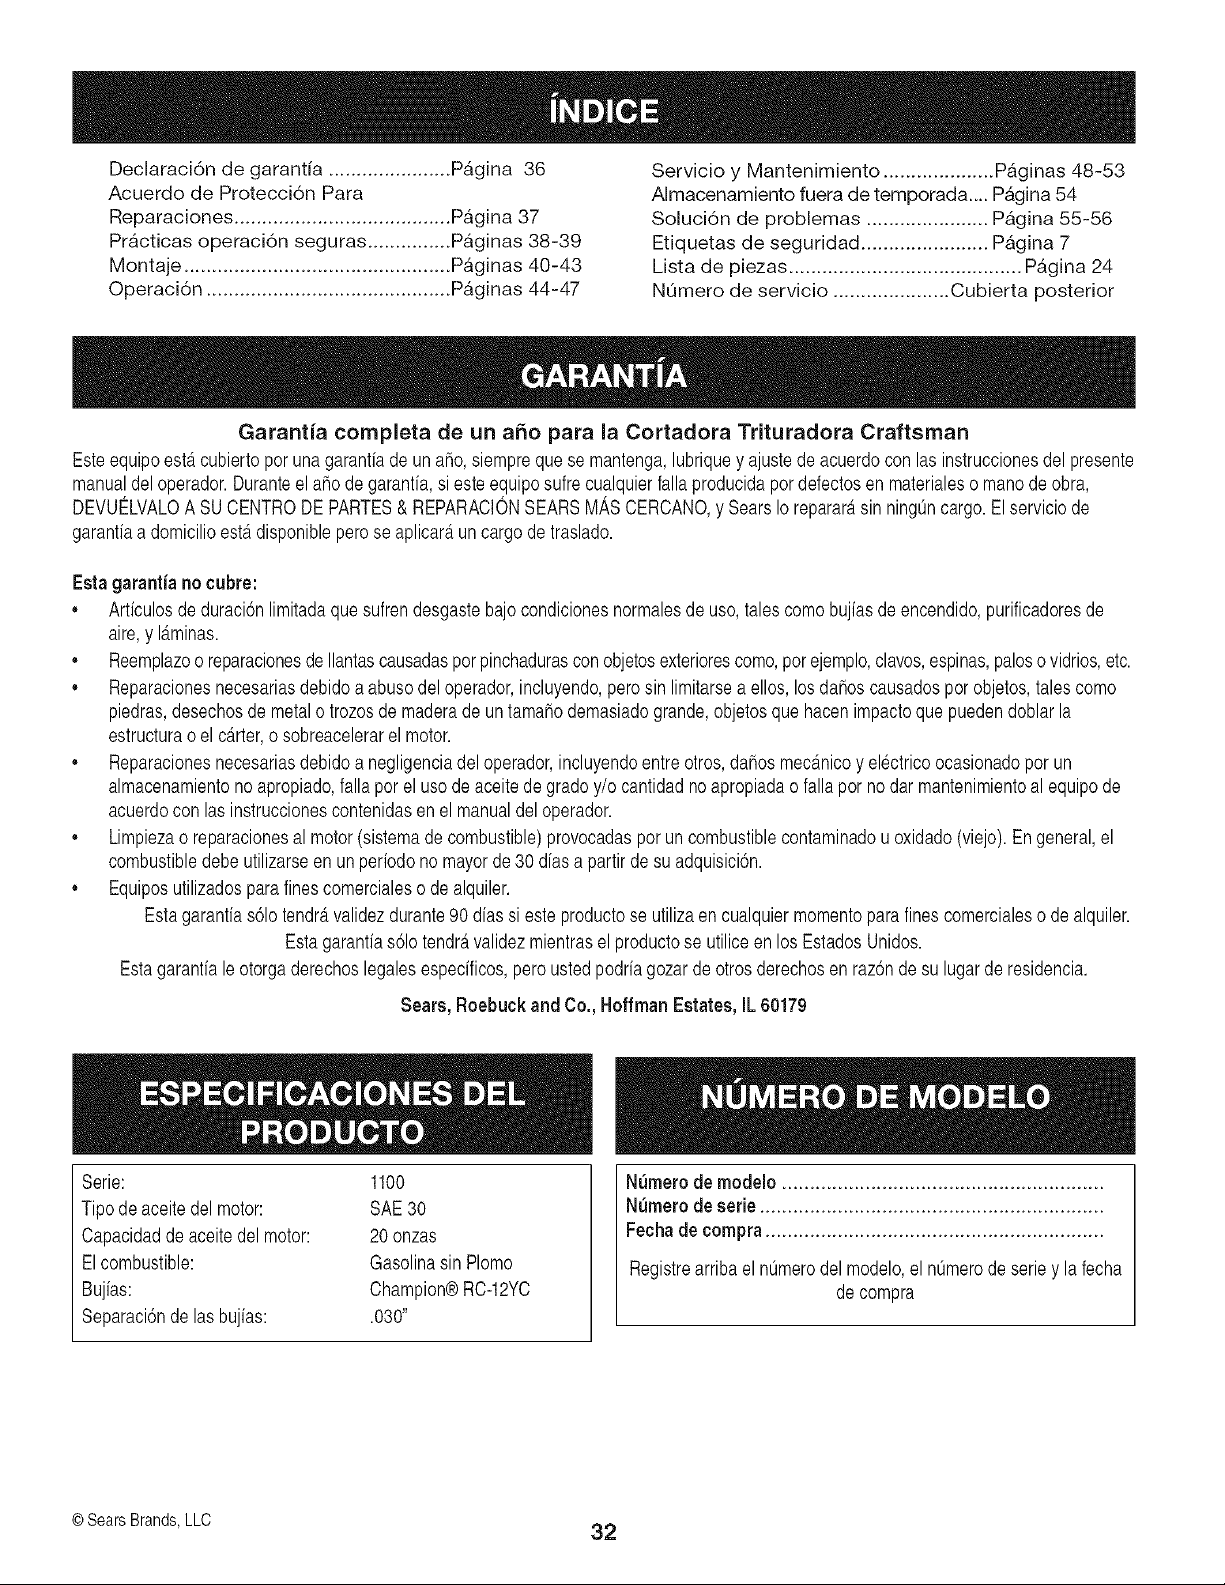
Declaraci6n de garantia ...................... PAgina 36
Acuerdo de Protecci6n Para
Reparaciones ....................................... PAgina 37
PrActicas operaci6n seguras ............... PAginas 38-39
Montaje ................................................ PAginas 40-43
Operaci6n ............................................ PAginas 44-47
Servicio y Mantenimiento .................... PAginas 48-53
Almacenamiento fuera de temporada.... PAgina 54
Soluci6n de problemas ...................... PAgina 55-56
Etiquetas de seguridad ....................... PAgina 7
Lista de piezas .......................................... PAgina 24
NOmero de servicio ..................... Cubierta posterior
Garantia completa de un a_o para la Cortadora Trituradora Craftsman
Esteequipoestacubiertoporunagaranfiade unaho,siempreque se mantenga,lubriquey ajustedeacuerdoconlas instruccionesdelpresente
manualdeloperador.Duranteel ahode garanfia,si esteequiposufrecualquierfallaproducidapordefectosen materialeso manodeobra,
DEVUELVALOA SUCENTRODE PARTES& REPARACIONSEARSM_,SCERCANO,y SearsIorepararAsin ningOncargo.El serviciode
garanfiaa domicilioestAdisponibleperose aplicarAun cargode traslado.
Esta garantia no cubre:
* Artfculosde duraci6nlimitadaquesufrendesgastebajocondicionesnormalesde uso,talescomobujiasde encendido,purificadoresde
aire,y lAminas.
, Reemplazoo reparacionesde Ilantascausadasporpinchadurasconobjetosexteriorescomo,porejemplo,clavos,espinas,palosovidrios,etc.
Reparacionesnecesariasdebidoa abusodel operador,incluyendo,perosin limitarsea ellos,losdahoscausadosporobjetos,talescomo
piedras,desechosde metalo trozosde maderade un tamahodemasiadogrande,objetosque hacenimpactoque puedendoblarla
estructurao el carter,o sobreacelerarel motor.
Reparacionesnecesariasdebidoa negligenciadeloperador,incluyendoentre otros,dahosmecanicoy electricoocasionadopor un
almacenamientonoapropiado,falla porel usode aceitede gradoy/o cantidadnoapropiadao fallapor nodar mantenimientoal equipode
acuerdocon las instruccionescontenidasenel manualdel operador.
Limpiezao reparacionesal motor(sistemade combustible)provocadasporuncombustiblecontaminadou oxidado(viejo). Engeneral,el
combustibledebeutilizarseen unperiodono mayorde30 diasa partir de su adquisici6n.
Equiposutilizadosparafinescomercialeso dealquiler.
Estagaranfias61otendravalidezdurante90 dias si este productose utilizaen cualquiermomentoparafines comercialeso dealquiler.
Estagaranfias61otendravalidezmientrasel productose utiliceen los EstadosUnidos.
Estagaranfiale otorgaderechoslegalesespecificos,pero ustedpodria gozarde otros derechosen raz6nde su lugarde residencia.
Sears, Roebuck and Co., Hoffman Estates, IL 60179
Serie: 1100
Tipo de aceite del motor: SAE30
Capacidadde aceitedel motor: 20 onzas
Elcombustible: Gasolinasin Plomo
Bujias: Champion®RC-12YC
Separaci6nde lasbujias: .030"
N_merode modelo ..........................................................
Numerode serie ..............................................................
Fechade compra.............................................................
Registrearribael nOmerodel modelo,el nOmerode seriey la fecha
de compra
© Sears Brands,LLO 32
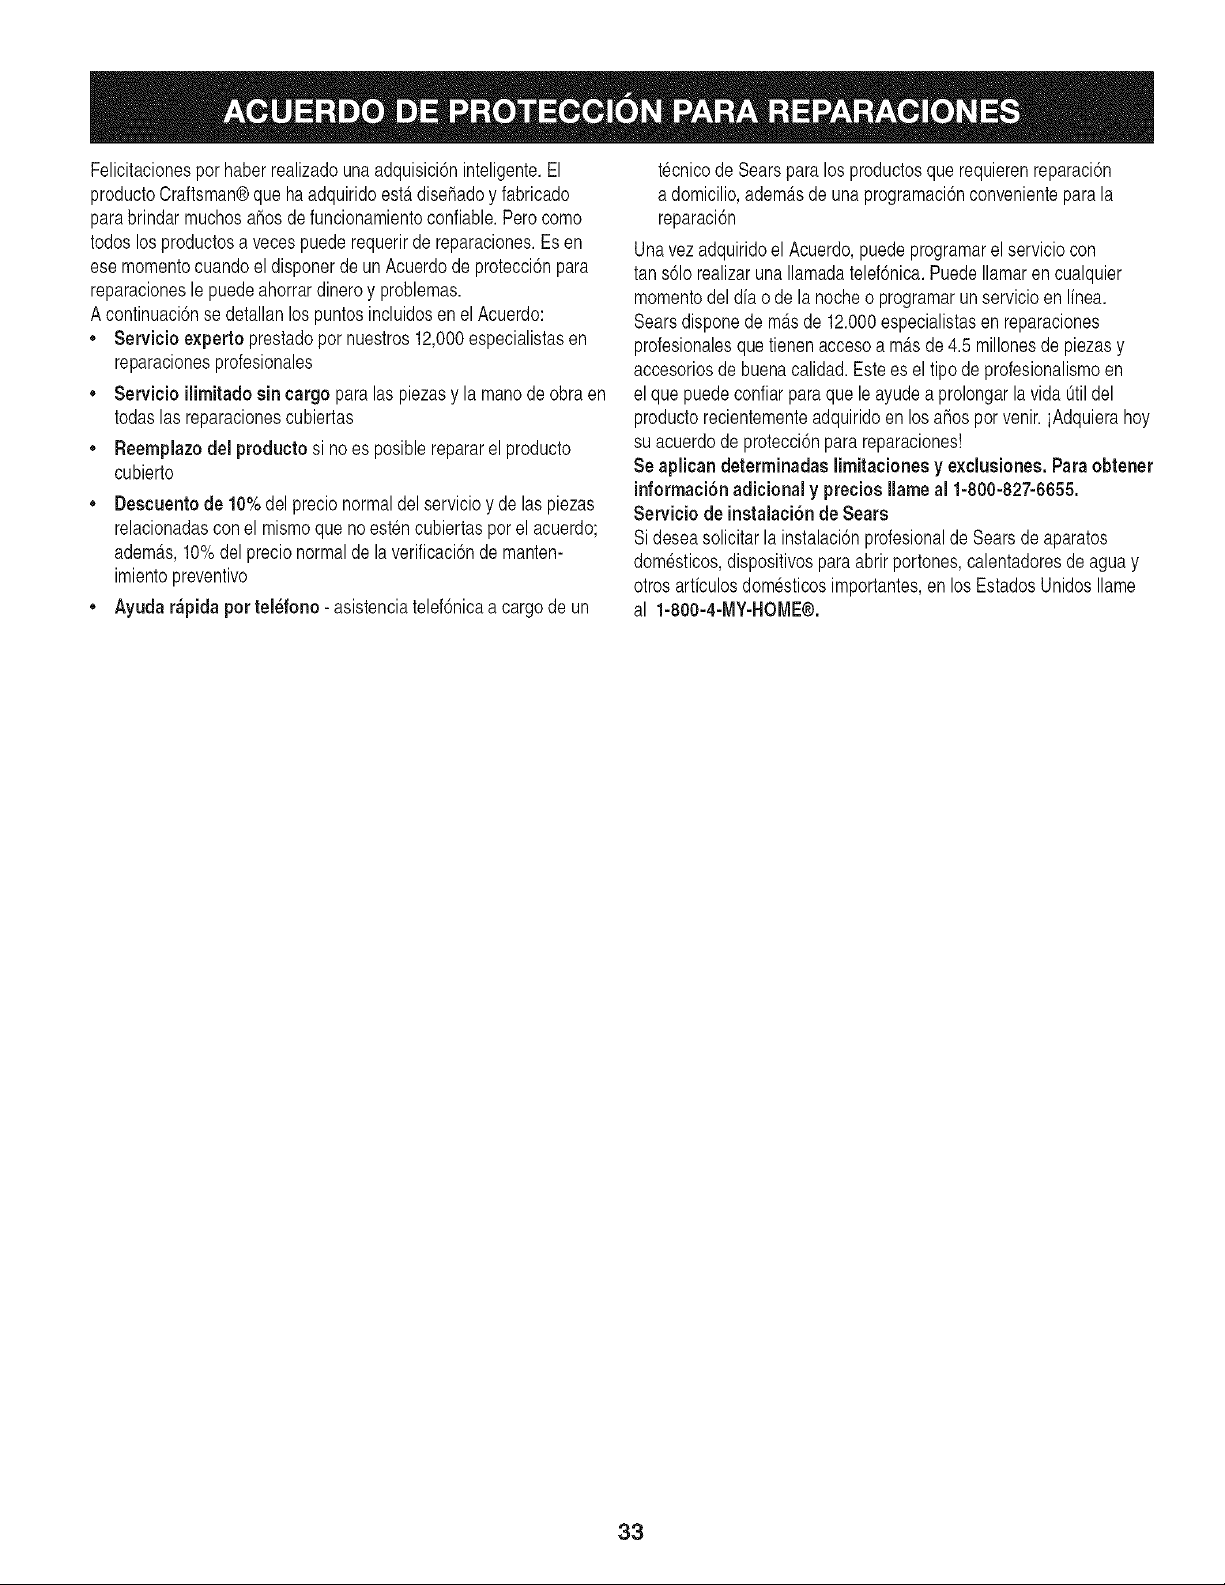
Felicitacionespor haberrealizadouna adquisici6ninteligente.El
productoCraftsman@que ha adquiridoest,. disehadoy fabricado
parabrindarmuchosahosde funcionamientoconfiable.Perocomo
todoslosproductosa vecespuederequerirde reparaciones.Esen
ese momentocuandoeldisponerde un Acuerdode protecci6npara
reparacionesle puedeahorrardineroy problemas.
Acontinuaci6nse detallanlos puntosincluidosen el Acuerdo:
, Servicio experto prestadopor nuestros12,000especialistasen
reparacionesprofesionales
Servicio ilimitadosin cargo paralas piezasy la manodeobraen
todaslas reparacionescubiertas
• Reemplazodel productosi noes posiblerepararel producto
cubierto
Descuentode 10%del precionormaldelservicioy delas piezas
relacionadascon el mismoquenoestencubiertasporel acuerdo;
adem_ts,10%delprecionormalde laverificaci6nde manten-
imientopreventivo
, Ayudar_pida portel_fono- asistenciatelef6nicaa cargode un
tecnicode Searsparalos productosque requierenreparaci6n
a domicilio,adem_tsdeunaprogramaci6nconvenienteparala
reparaci6n
Unavez adquiridoel Acuerdo,puedeprogramarel serviciocon
tan s61orealizarunaIlamadatelef6nica.PuedeIlamaren cualquier
momentodel dia o dela nocheo programarun servicioen linea.
Searsdisponede m_.sde 12.000especialistasenreparaciones
profesionalesque tienenaccesoa m_tsde4.5 millonesdepiezasy
accesoriosde buenacalidad.Estees el tipo deprofesionalismoen
el quepuedeconfiarparaque le ayudea prolongarla vida 0til del
productorecientementeadquiridoen losahos porvenir,iAdquierahoy
su acuerdode protecci6npara reparaciones!
Se aplican determinadaslimitacionesy exclusiones.Paraobtener
informaci6nadicional y preciosIlameal 1-800-827-6655.
Serviciode instalaci6nde Sears
Sideseasolicitarla instalaci6nprofesionalde Searsde aparatos
dom_sticos,dispositivospara abrir portones,calentadoresde aguay
otrosarticulosdom_sticosimportantes,en losEstadosUnidosIlame
al 1-800-4-MY-HOME@.
33
La presenciade estesimbolo indicaque se trata de
instruccionesimportantesde seguridadquese deben
respetarparaevitar poneren peligro su seguridad
personaly/o materialy lade otras personas.Leay siga
todaslas instruccionesde estemanualantesde poner
en funcionamientoesta maquina.Si no respetaestas instruccionespod@
provocarlesionespersonales.Cuandovea estesfmbolo,ipresteatenciona
la advertencia!
Su responsabilidad: Restrinjael usode estam_tquinamotorizada
alas personasque lean,comprendany respetenlasadvertenciase
instruccionesque aparecenen este manualyen la m_tquina.
Esta maquinafueconstruidapara ser operadade acuerdocon las reglas
de seguridadcontenidasen este manual.AI igual quecon cualquiertipo
de equipo motorizado,un descuidoo error por partedel operadorpuede
producirlesionesgraves.Esta maquinaes capazde amputarmanos y pies
y dearrojarobjetoscon gran fuerza. Deno respetarlas instruccionesde
seguridadsiguientesse puedenproducirlesionesgraveso lamuerte.
El escapedel motorde este producto,algunosde suscomponentesy
algunoscomponentesdelvehfculocontieneno liberansustanciasqufmicas
que el estadode Californiaconsideraque puedenproducircancer,defectos
de nacimientou otros problemasreproductivos.
r
CAPACITACION
,, Lea,entienday cumplatodas las instruccionesincluidasen la maquina
yen los manualesantesde montarlay utilizarla.Guardeeste manual
en un lugarseguropara consultasfuturasy regulares,asf como para
solicitarrepuestos.
,, Familiarfcesecon todos loscontrolesy su operacionadecuada.Sepa
c6modetener la maquinay comodesengranarloscontrolesrapidam-
ente.
,, No permitanuncaque losni_osmenoresde 16 a_osutilicenesta
maquina.Los ni_os de 16a_osy mas mayoresdebenleery comprender
las instruccionesde operaciony las reglasde seguridadcontenidasen
estemanual,y tambiendebensercapacitadosy estarsupervisadospor
unode los padres.
,, Nuncapermitaquelos adultosoperen esta maquinasinrecibir antesla
instruccionapropiada.
,, Mantengaa los transet]ntes,ayudantes,mascotasy ni_os al menosa
75 pies de lamaquinamientrasesta operando.Detengala maquinasi
alguienentraen lazona.
,, Nuncaenciendaun motoren espacioscerradoso en unazonacon poca
ventilaci6n.Elescapedel motorcontienemon6xidode carbono,un gas
inodoroy letal.
,, No pongalas maneso lospies cerca de las piezasrotatoriaso en las
camarasde alimentacionni en laabertura de descarga.Elcontactocon
el motorrotatoriopuedeproducir la amputacionde dedos,manoso pies.
,, Nuncatrate de destaparla toma de alimentaciono la aberturade
descarga,nitrate de sacar ovaciar la bolsa de la cortadora,ni de
revisary repararla maquinamientrasel motoresta en marcha.Apague
el motory espere hastaquetodas las piezasmoviles se hayandetenido
por complete.Desconecteel cablede labujia y pongalode manera que
haga masacontrael motor.
PREPARATIVOS
• InspeccioneminuciosamenteelAreadondeutilizaraelequipo.Retire
todaslaspiedras,botellas,latasu otrosobjetosextra_osquepuedanser
levantadosoarrojadoscausandolesionespersonaleso dahosa lamaquina.
,, Paraprotegerselos ojosutilice siempreanteojoso antiparrasde
seguridadmientrasopera la maquinao mientrasla ajustao repara.Los
objetos arrojadosque rebotanpuedenlesionargravementelavista.
,, Utilicezapatosde trabajo resistentes,de suela fuerte, asi como
pantalonesy camisasajustados.Las prendassueltaso lasalhajas
puedenquedaratrapadasen laspiezas moviles.Nuncautilice la
maquinadescalzoo con sandalias.Utilice guantesde trabajodecuero
cuandoalimentematerialpor el canalde la cortadora.
,, Antesde encenderla maquinacontrolequetodoslospemosy tornillos
estenbienajustadosparacomprobarquelamaquinaseencuentraen
condicionessegurasde operacion.Ademas,realiceunainspeccionvisual
de la maquinaa intervalosfrecuentesparacontrolarsi lamismaesta
da_ada.
,, Mantengao reemplacelas etiquetasde seguridade instruccionessegt]n
sea necesario.
,, Paraevitar lesionespersonaleso dahos materialessea sumamente
cuidadosoal manipularlagasolina.Lagasolinaes altamenteinflamable
y sus vaporespuedencausar explosiones.Se puedelesionargrave-
mentesi derramagasolina sobre ustedo sobre la ropaya que se puede
encender.Lavesela piely cambiesede ropa de inmediato.
,, Utilicesolo recipientespara gasolinaautorizados.
,, Apaguetodosloscigarrillos,cigarros,pipasy otrasfuentesde combustion.
,, Nuncacarguecombustibleen la maquinaen un espaciocerrado.
,, Nuncasaque latapa del gas niagreguecombustiblemientrasel motor
estacaliente o en mar@a.
,, Dejequeel motorse enfrfeper Io menosdos minutosantesde volvera
cargar combustible.
,, Nuncarecargueeltanque de combustible.Lleneel tanqueno mas de
1/2pulgadaper debajode la basedel cuello del filtro para dejar espacio
para ladilataciondel combustible.
,, Vuelvaa colocar latapa de lagasolinay aj@telabien.
,, Limpiela gasolinaderramadasobre el motory el equipo.Trasladela
maquinaa otra zona. Espere5 minutos antesde encenderel motor.
,, Nuncaalmacenela maquinao el recipientede combustibleen un
espaciocerrado dondehayafuego, chispaso luz piloto(porejemplo,
homes,calentadoresde agua, calefactores,secadoresde ropa,etc.)
,, Parareducirel riesgode incendiomantengalamaquinalimpia de
paste,hojasy de acumulacionde otros desechos.Limpielosderrames
de aceiteo combustibley saquetodos los desechosembebidoscon
combustible.
,, Dejequela maquinase enfriepor Io menos5 minutesantes de
guardarla.
34
OPERACION
• No pongalas maneso los piescerca de las piezas rotatoriaso en las
camarasde alimentacionni en laabertura de descarga.El contactocon
el motorrotatoriopuedeproducir la amputaci6nde dedos,manoso pies.
,, Antesde encenderla maquinacompruebeque elcanal de lacortadora,
latoma de alimentaciony la camarade corte estanvadas y sin
desechos.
,, Inspeccioneminuciosamentetodo el materialque deseatriturar y saque
losobjetosmeta.licos,piedras,botellas,latasu otrosobjetosextra_os
que puedenocasionarlesioneso da_arla maquina.
,, Si se hacenecesarioempujarelmaterialpor el saltadorde desfibradora,
use un peque_o palode diametro.No use sus maneso pies.
,, Siel motorgolpea unobjetoextrahoo si la maquinaempiezaa producir
un sonidopococomun o unavibraci6n,apagueel motorde inmediato.
Dejequeel motorse detengapor complete.Desconecteel cablede la
bujfa,p6ngalode maneraquehagamasacontrael motory sigaestos
pasos:
1. Inspeccionela maquinapara ver siesta da_ada.
2. Repareo reemplacelas piezasda_adas.
3. Controlesi hay piezasflojasy ajustelaspara asegurarquela maquina
funcionedemaneraseguray continua.
,, No permitaque se acumulematerialprocesadoen lazona de descarga.
El mismopuedeobstaculizarla descargaadecuaday provocarel
retornodel materiala traves de la aberturade alimentacion.
,, No intentetriturarni picarmaterialde mayortamaho al especificadoen
la maquinao en estemanual.Se podrfanproducir lesioneso dahos.
,, Nuncatrate de destaparlatoma de alimentaci6no la aberturade
descargamientrasel motorestaen marcha.Apagueel motory espere
hastaquetodas las piezasquese muevense hayan detenidopor
complete,desconecteel cablede la bujfay pongalode maneraque
haga masacontrael motorantesde sacar losescombros.
,, Nuncaoperela maquinasin que la bolsade la cortadoray elcanalde
descargaestenconectadosa la maquinacomo corresponde.Nunca
vacie nicambie la bolsa de la cortadoramientrasel motoresta en
marcha.El extremoconcierrede la bolsa de la cortadoradebequedar
cerradotodo el tiempo mientraslaopera.
,, Nuncafuncionesin el saltadorde desfibradora,chipper tolva,o tolva
deflectorcorrectamenteatadoa la maquina.Nuncavacieseo cambio
chipperbolsomientrasel motorcorre.
,, Mantengatodos los protectores,desviadoresy dispositivosde seguridad
en su lugaryen buenascondiciones.
,, Mientrasalimentamaterialdentrode lamaquinamantengasu rostro
y sucuerpodetrasy hacia un costadodel canalde lacortadora para
evitarlesionespor retrocesosaccidentales.
,, Nuncaopereestamaquinasin buenavisibilidado iluminaci6n.
,, No hagafuncionaresta maquinaen un pavimentado,grava,o no nivele
la superficie.
,, Noopere esta maquinaestandobajolosefectos del alcoholo de
drogas.
,, El silenciadory el motorse calientany puedenproducir quemaduras.No
lostoque.
,, Nuncalevanteotransporte la maquinacuandoel motorestaencendido.
MANTENIMIENTO Y ALMACENAMIENTO
,, Nuncamanipulelos dispositivosde seguridadde maneraimprudente.
Controleperi6dicamenteque funcionende formaadecuada.
,, Controlefrecuentementequetodos los pernosy tornillosesten bien
ajustadosparacomprobarque la ma.quinase encuentraen condiciones
segurasde funcionamiento.AdemAs,realiceuna inspecci6nvisual de
la maquinapara controlarsi la mismaestAdahaday reparelade ser
necesario.
,, Antesde limpiar,repararo inspeccionarla maquina,detengael motor
y compruebequeel mismoy quetodas las piezasmovilesse hallan
detenido. Desconecteel cablede la bujfay pongalode manera que
haga masacontrael motorpara evitar quese enciendade manera
accidental.
,, Nocambiela configuraci6ndel reguladordel motorni acelerede-
masiadoel mismo.El reguladorcontrolala velocidadmaximasegurade
operaciondel motor.
,, Mantengao reemplacelas etiquetasde seguridade instruccionessegt]n
sea necesario.
,, Siga lasinstruccionesde estemanualparacargar,descargar,transpor-
tary almacenardemaneraseguraestama.quina.
,, Nuncaalmacenela maquinao el recipientede combustibleen un
espaciocerrado dondehayafuego,chispaso luzpilotocomo por
ejemplo,calentadoresde agua, hornos,secadoresde ropa,etc.
,, Consultesiempreel manualdel operador paraconocerlas instrucciones
adecuadasparael almacenamientofueradetemporada.
,, Si debe vaciarel tanque de combustible,hagaloal airelibre.
,, Respetelas normasreferentesa la disposicioncorrectay las reglamen-
tacionessobre gas, combustible,etc. paraprotegerel medioambiente.
No modifique el motor
Paraevitarlesionesgraveso la muerte,no modifiqueelmotorbajo ninguna
circunstancia.Si cambialaconfiguraci6ndel reguladorel motorpuededescon-
trolarsey operara velocidadesinseguras.Nuncacambielaconfiguracionde
fabricadel reguladordel motor.
35
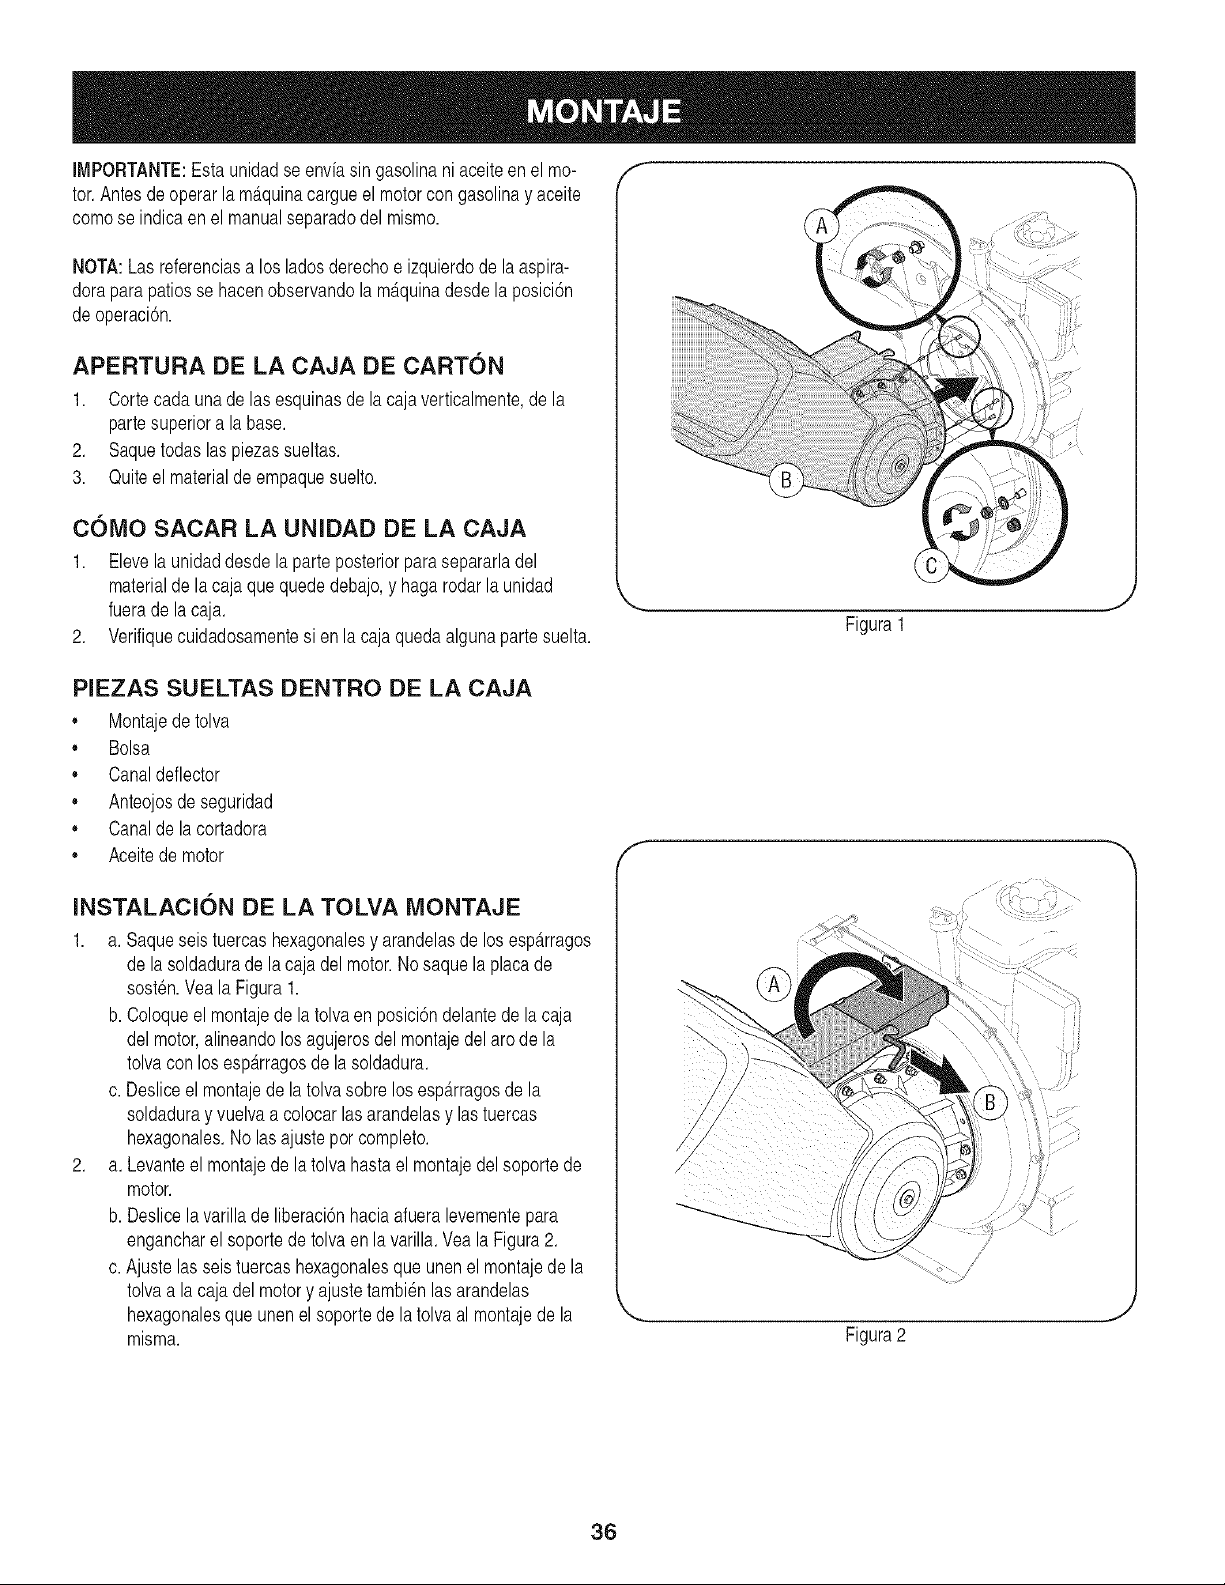
IMPORTANTE:Esta unidadse enviasin gasolinaniaceiteen el mo-
tor.Antesdeoperarlamaquinacargueel motorcongasolinay aceite
comose indicaen el manualseparadodelmismo.
NOTA:Las referenciasa los ladosderechoe izquierdode la aspira-
doraparapatiosse hacenobservandola m_tquinadesdela posici6n
deoperaci6n.
APERTURA DE LA CAJA DE CARTON
1. Cortecada unadelas esquinasde la cajaverticalmente,de la
partesuperiora la base.
2. Saquetodas laspiezassueltas.
3. Quiteel materialde empaquesuelto.
C61VlO SACAR LA UNIDAD DE LA CAJA
1. Elevela unidaddesdela parteposteriorparasepararladel
materialde la caja quequededebajo,y hagarodarlaunidad
fuerade lacaja.
2. Verifiquecuidadosamentesi enla cajaquedaalgunaparte suelta.
r
Figura1
J
PIEZAS SUELTAS DENTRO DE LA CAJA
,, Montajedetolva
,, Bolsa
,, Canaldeflector
,, Anteojosde seguridad
,, Canaldela cortadora
,, Aceitede motor
INSTALACION DE LA TOLVA MONTAJE
1. a. Saqueseistuercashexagonalesy arandelasde los esp_.rragos
de lasoldadurade la caja delmotor.Nosaquela placade
sosten.Veala Figura1.
b. Coloqueel montajedela tolvaen posici6ndelantede lacaja
del motor,alineandolos agujerosdel montajedel aro de la
tolvacon losesp_trragosde lasoldadura.
c. Desliceel montajede la tolvasobre losesp_trragosde la
soldaduray vuelvaa colocar lasarandelasy las tuercas
hexagonales.No lasajustepor completo.
2. a. Levanteelmontajede latolvahastael montajedel soportede
motor.
b. Deslicela varillade liberaci6nhaciaafueralevementepara
engancharel soporte de tolva en la varilla. Vea la Figura2.
c. Ajustelas seistuercashexagonalesque unenel montajede la
tolvaa lacaja delmotory ajustetambienlas arandelas
hexagonalesque unenel soportede la tolvaal montajede la
misma.
/
,.. j
Figura2
36
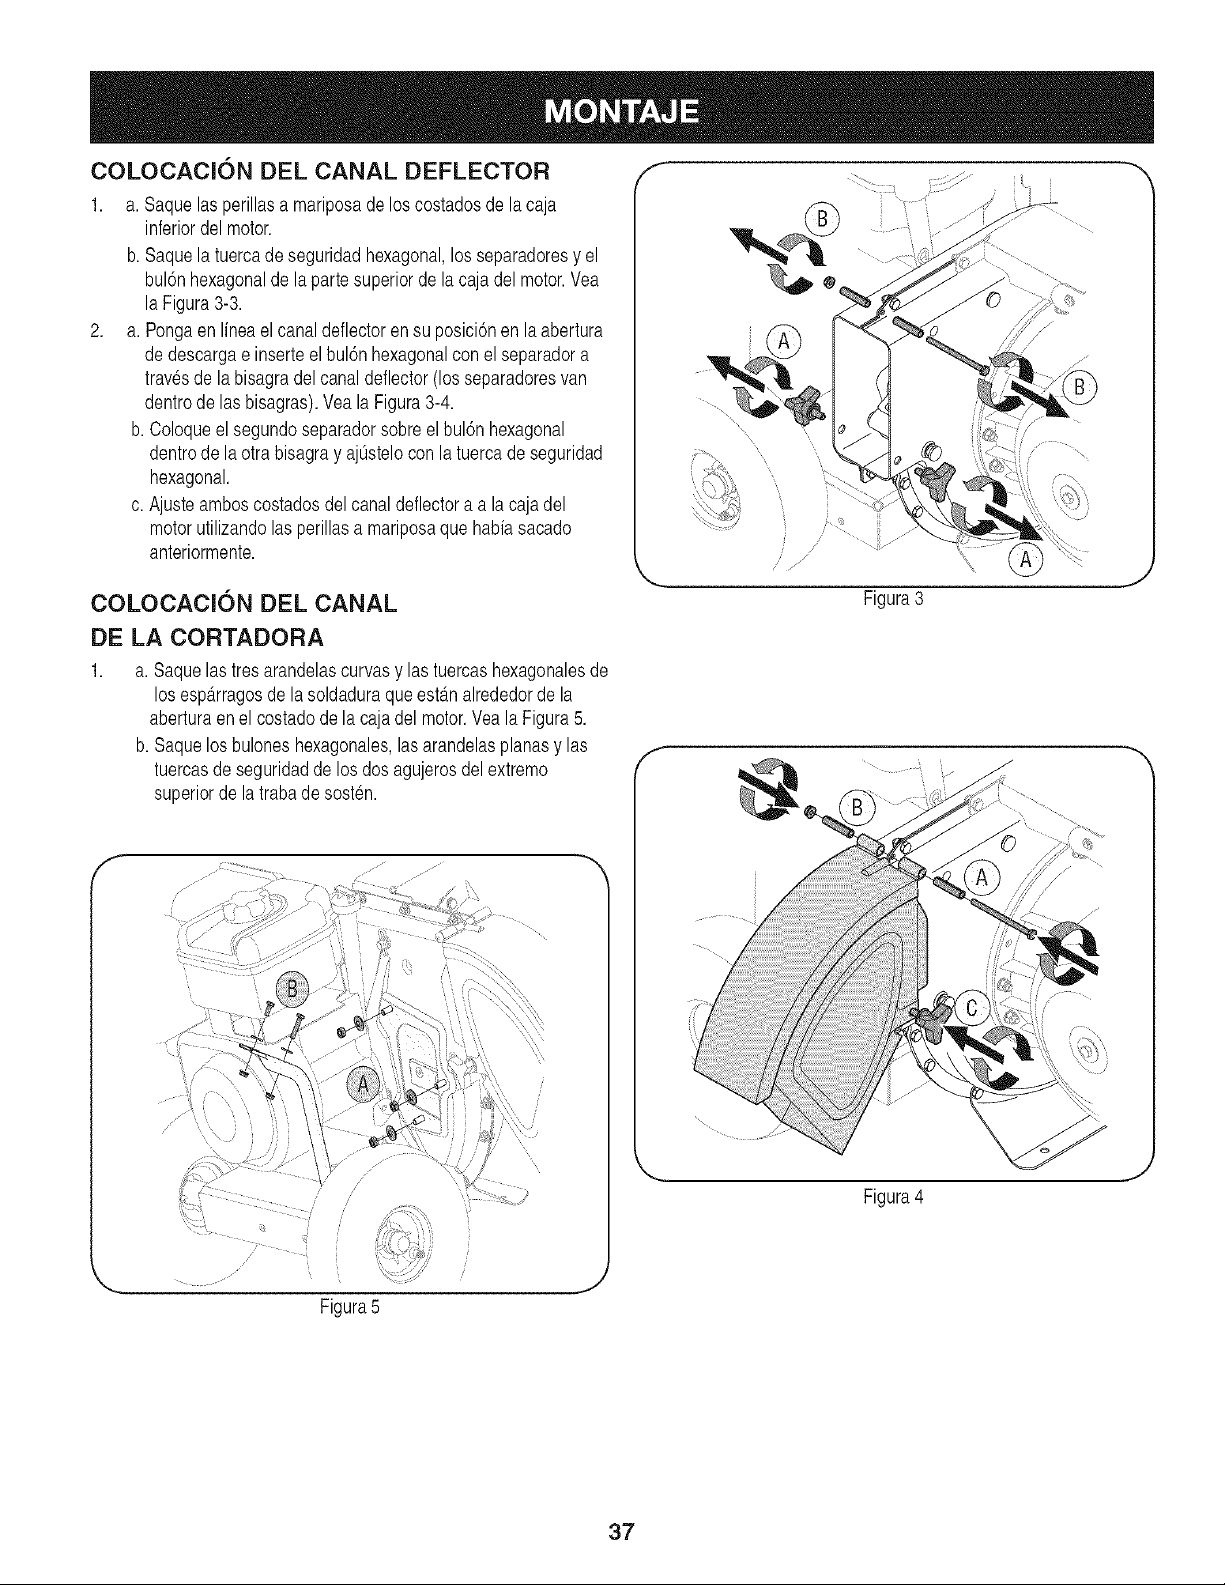
COLOCACl6N DEL CANAL DEFLECTOR
1. a. Saquelas perillasa mariposadelos costadosde lacaja
inferiordel motor.
b. Saquela tuercade seguridadhexagonal,los separadoresy el
bul6nhexagonalde la partesuperiorde la cajadel motor.Vea
la Figura3-3.
2. a. Pongaen lineaelcanaldeflectoren su posici6nen la abertura
de descargae inserteel bul6nhexagonalconel separadora
travesde la bisagradel canaldeflector(los separadoresvan
dentrode lasbisagras).Yeala Figura3-4.
b. Coloqueel segundoseparadorsobreel bul6n hexagonal
dentrode laotra bisagray ajOstelocon la tuercade seguridad
hexagonal.
c. Ajusteamboscostadosdelcanaldeflectora a la cajadel
motorutilizandolas perillasa mariposaque habiasacado
anteriormente.
COLOCACl6N DEL CANAL
DE LA CORTADORA
1. a. Saquelastres arandelascurvasy las tuercashexagonalesde
los espD.rragosde lasoldaduraqueestD.nalrededorde la
aberturaen el costadode la cajadel motor.Veala Figura5.
b. Saquelos buloneshexagonales,lasarandelasplanasy las
tuercasde seguridadde los dosagujerosdel extremo
superiorde latrabade sosten.
:i
"%..,,,, j
Figura5
f
\
\
Figura3
........... ....
Figura4
37
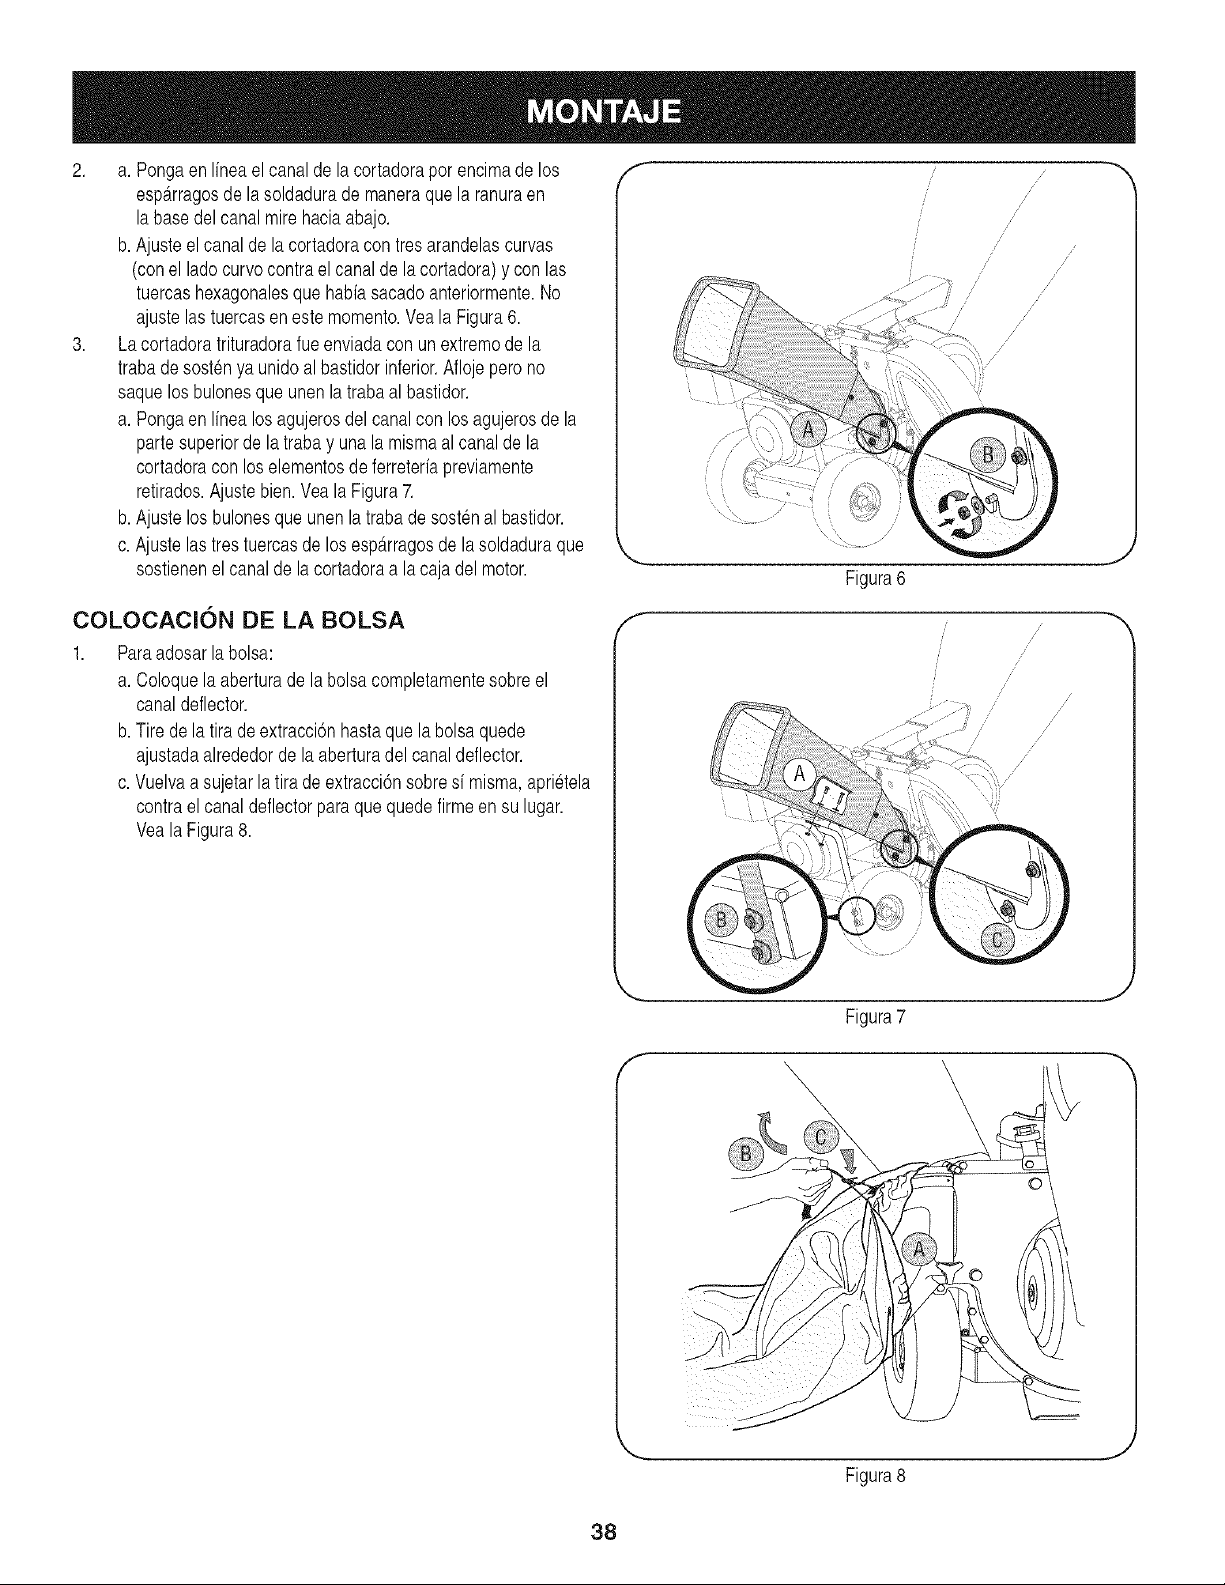
3,
a. Pongaen Ifneael canalde lacortadoraporencimade los
esp_.rragosde lasoldadurade maneraquela ranuraen
labase del canalmire haciaabajo.
b.Ajuste el canal dela cortadoracon tresarandelascurvas
(conel ladocurvocontrael canalde lacortadora)y con las
tuercashexagonalesque habiasacadoanteriormente.No
ajustelas tuercasen estemomento.Veala Figura6.
Lacortadoratrituradorafueenviadacon unextremode la
trabade sostenya unidoal bastidorinferior.Aflojepero no
saquelosbulonesque unenlatrabaal bastidor.
a. Pongaen Ifnea losagujerosdel canalcon losagujerosde la
partesuperiorde latraba y unala mismaal canalde la
cortadoracon los elementosde ferreterfapreviamente
retirados.Ajuste bien.Vea la Figura7.
b.Ajuste los bulonesqueunenlatrabade sostenal bastidor.
c.Ajustelastres tuercasde losesp_trragosde la soldaduraque
sostienenel canalde lacortadoraa la caja del motor.
COLOCACl6N DE LA BOLSA
1. Paraadosarla bolsa:
a. Coloquela aberturade labolsacompletamentesobreel
canaldeflector.
b.Tire de la tira deextracci6nhastaque la bolsaquede
ajustadaalrededordela aberturadelcanaldeflector.
c.Vuelvaa sujetar la tira deextracci6nsobresi misma,aprietela
contrael canaldeflectorparaquequedefirmeensu lugar.
Veala Figura8.
/
,/
/ /
/ //
/
i /
/
//
j s'/ //'
/
//
/
Figura7
Figura8
J
38
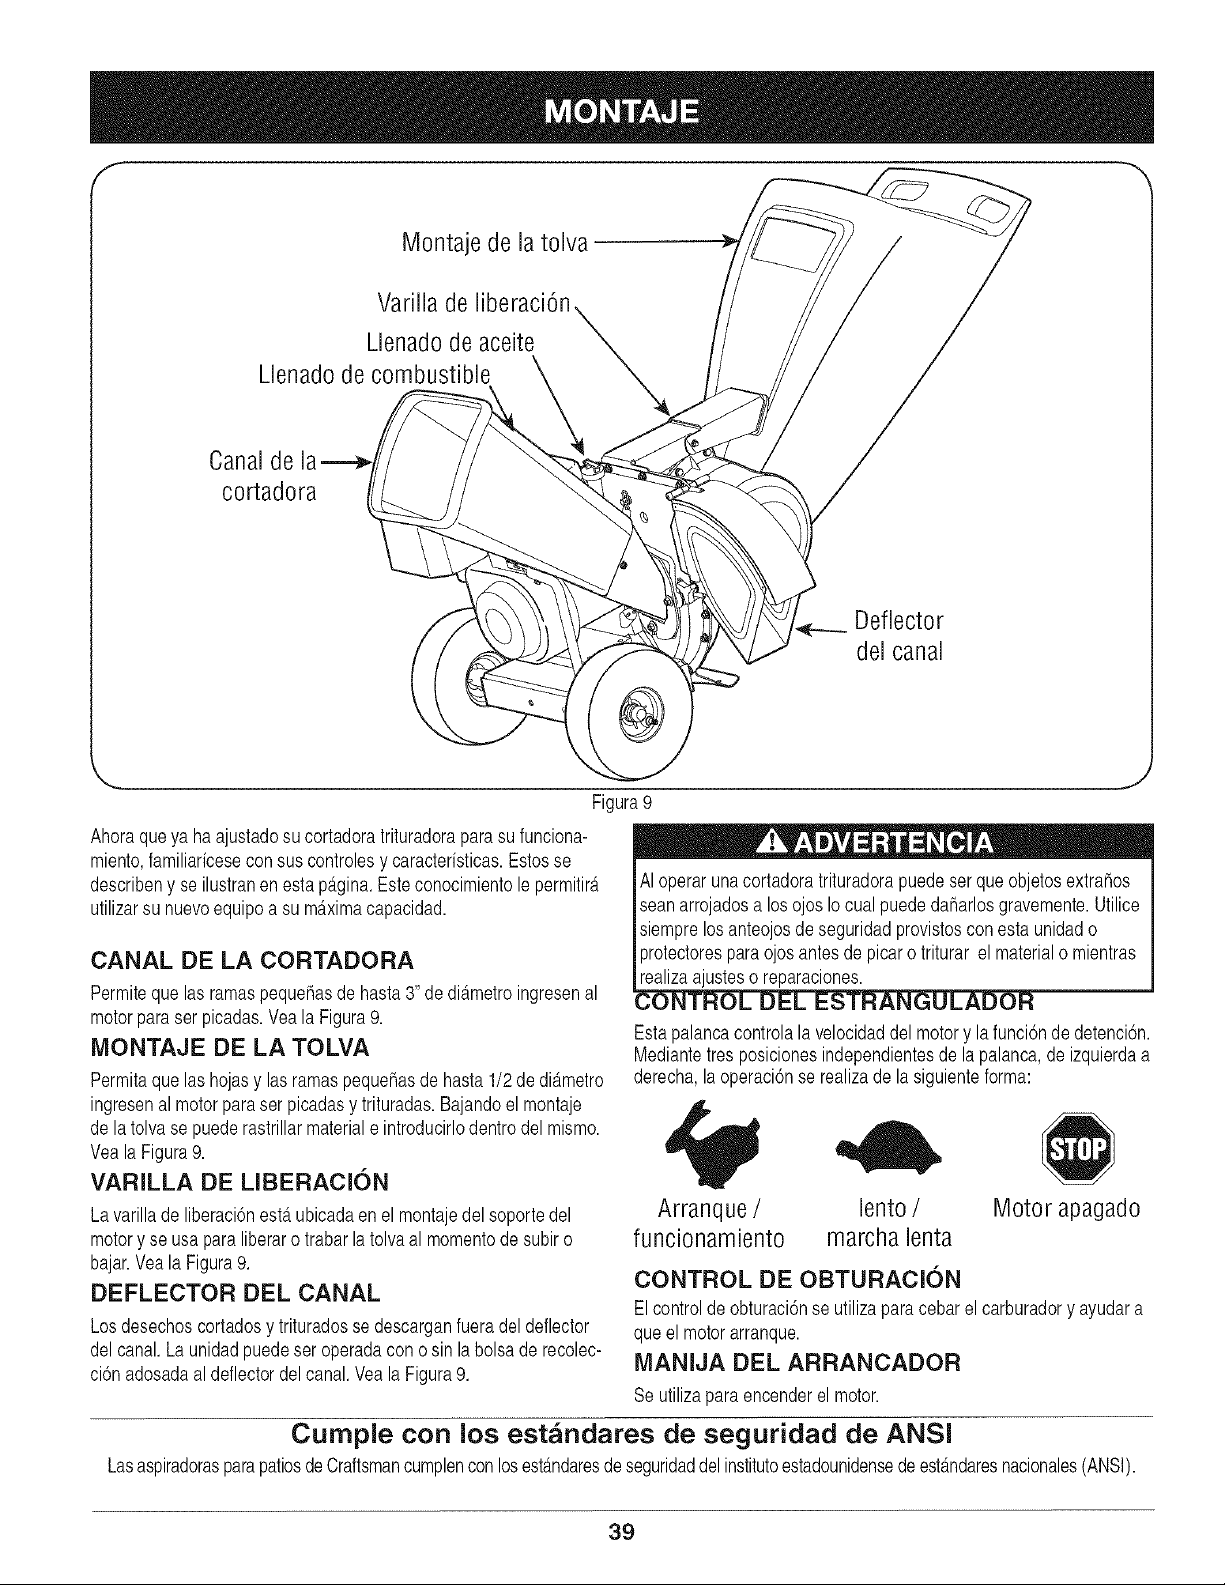
Montaje de la tolva
Varilla de
Llenado de aceite
Llenado de combustible
Canal de
cortadora
Deflector
del canal
J
Figura9
Ahoraqueya ha ajustadosu cortadoratrituradoraparasu funciona-
miento,familiaricesecon sus controlesy caracteristicas.Estosse
describeny se ilustranen estap_.gina.Esteconocimientole permitir_t
utilizarsu nuevoequipo a su maximacapacidad.
CANAL DE LA CORTADORA
Permiteque las ramaspequeSasde hasta3" de di_tmetroingresenal
motorparaser picadas.Veala Figura9.
MONTAJE DE LA TOLVA
Permitaquelas hojasy las ramaspequehasde hasta1/2 de di_.metro
ingresenal motorparaser picadasy trituradas.Bajandoel montaje
de latolvase puederastrillarmateriale introducirlodentrodelmismo.
VealaFigura9.
VARILLA DE LIBERACION
Lavarillade liberaci6nest,. ubicadaenel montajedel soportedel
motory se usapara liberaro trabarla tolva al momentode subiro
bajar.Veala Figura9.
DEFLECTOR DEL CANAL
Losdesechoscortadosy trituradosse descarganfueradel deflector
delcanal.Launidadpuedeser operadacon osin la bolsade recolec-
ci6nadosadaal deflectordelcanal.VealaFigura9.
AI operaruna cortadoratrituradorapuede serque objetosextrahos
seanarrojadosa losojos Io cualpuededaharlosgravemente.Utilice
siemprelos anteojosde seguridadprovistoscon estaunidado
protectoresparaojos antesde picaro triturar el materialo mientras
realizaajusteso reparaciones.
ANGULAD
Estapalancacontrolala velocidaddel motory la funci6nde detenci6n.
Mediantetresposicionesindependientesde la palanca,deizquierdaa
derecha,la operaci6nse realizade lasiguienteforma:
Arranque / lento / Motor apagado
funcionamiento marcha lenta
CONTROL DE OBTURAClON
Elcontroldeobturaci6nse utilizaparacebarel carburadory ayudara
queel motorarranque.
IVlANIJA DEL ARRANCADOR
Seutilizaparaencenderel motor.
Cumple con los est_ndares de seguridad de ANSI
LasaspiradorasparapatiosdeCraftsmancumplencon losest_tndaresdeseguridaddel institutoestadounidensedeest_.ndaresnacionales(ANSI).
39
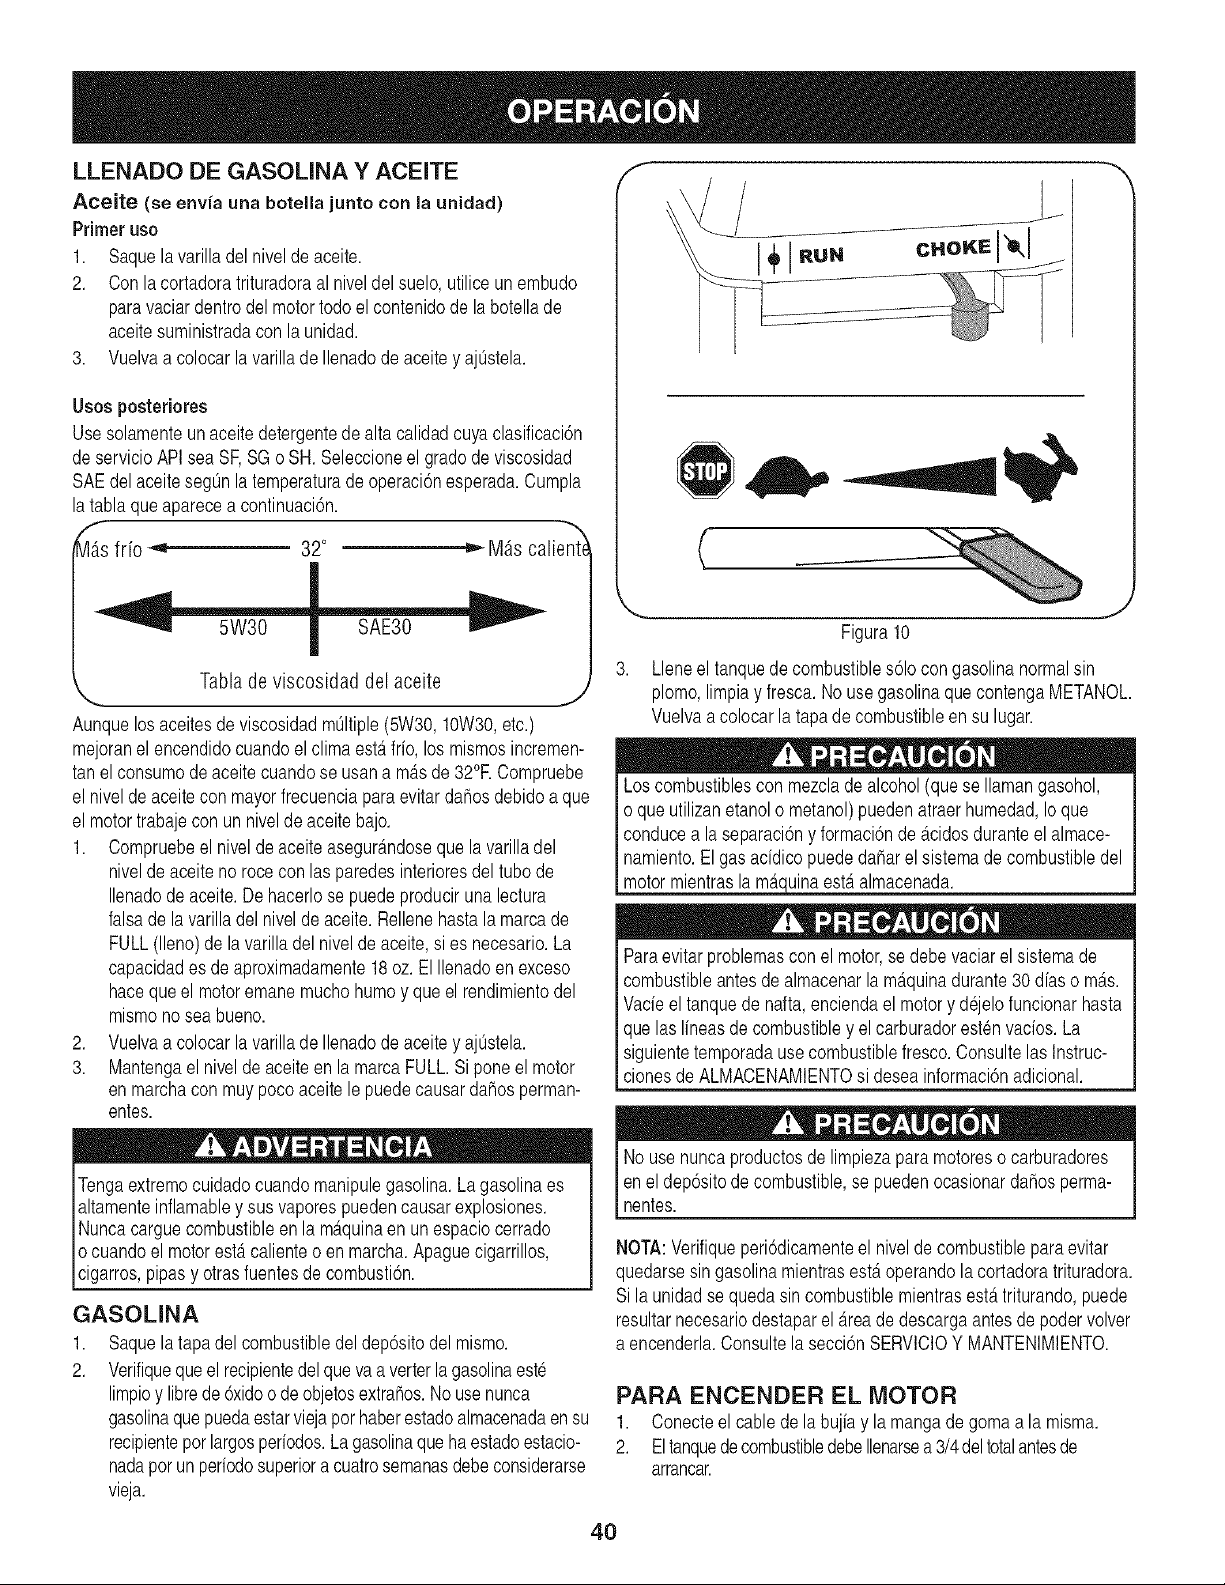
LLENADO DEGASOMNA Y ACEITE
Aceite (se envia una botella junto con la unidad)
Primeruso
1. Saquela varilladel nivelde aceite.
2. Con lacortadoratrituradoraal niveldel suelo,utilice un embudo
paravaciardentrodel motortodoel contenidode la botellade
aceitesuministradacon la unidad.
3. Vuelvaa colocarla varillade Ilenadode aceite y ajOstela.
Usos postedores
Usesolamenteun aceite detergentede alta calidadcuyaclasificaci6n
deservicioAPIsea SF,SGo SH. Seleccioneel gradode viscosidad
SAEdelaceitesegOnla temperaturade operaci6nesperada.Cumpla
latabla que aparecea continuaci6n.
_'_s frio _ 32° _ M_s calient_
-labia de viscosidad del aceite
,,. J
Aunquelosaceitesde viscosidadmOltiple(5W30,10W30,etc.)
mejoranel encendidocuandoel clima est,. fifo, los mismosincremen-
tan el consumode aceite cuandose usana m_.sde 32°RCompruebe
el niveldeaceitecon mayorfrecuenciaparaevitar dahosdebidoa que
el motortrabajecon un nivelde aceitebajo.
1. Compruebeel nivelde aceiteasegur_.ndosequela varilladel
nivelde aceite no roce conlas paredesinterioresdel tubode
Ilenadode aceite.De hacerlose puedeproduciruna lectura
falsadela varilladelnivelde aceite.Rellenehastala marcade
FULL(lleno)de lavarilladelnivelde aceite,si es necesario.La
capacidades de aproximadamente18 oz. El Ilenadoen exceso
haceque el motoremanemuchohumoy que el rendimientodel
mismonoseabueno.
2. Vuelvaa colocarla varillade Ilenadode aceite y ajOstela.
3. Mantengael niveldeaceiteen la marcaFULL.Si pone el motor
enmarchacon muy pocoaceitele puedecausardahosperman-
entes.
Tengaextremocuidadocuandomanipulegasolina.Lagasolinaes
altamenteinflamabley sus vaporespuedencausarexplosiones.
Nuncacarguecombustibleen la m_.quinaen un espaciocerrado
ocuandoel motorest,.calienteo en marcha.Apaguecigarrillos,
|c garros,ppas y otrasfuentesde combust6n.
GASOLINA
1. Saquela tapa delcombustibledeldep6sitodel mismo.
2. Verifiquequeel recipientedelqueva a verterla gasolinaeste
limpioy librede6xidoo deobjetosextrahos.Nousenunca
gasolinaque puedaestarviejapor haberestadoalmacenadaensu
recipienteporlargosperiodos.Lagasolinaque ha estadoestacio-
nadaporunperfodosuperiora cuatrosemanasdebeconsiderarse
vieja.
f --,,
(
_.,,,, v J
Figura10
3. Lleneel tanquede combustibles61ocongasolinanormalsin
plomo,limpiay fresca.No usegasolinaquecontengaMETANOL.
Vuelvaa colocar la tapade combustibleensu lugar.
Los combustiblescon mezclade alcohol(quese Ilamangasohol,
o queutilizanetanolo metanol)puedenatraerhumedad,Io que
conducea laseparaci6ny formaci6nde _.cidosduranteel almace-
namiento.El gasaddico puededahar el sistemade combustibledel
motormientraslam_.c[uinaest,.almacenada.
Paraevitarproblemascon el motor,se debevaciarel sistemade
combustibleantesdealmacenarlam_.quinadurante30 diaso m_.s.
Vade el tanquede nafta,enciendael motory dejelofuncionarhasta
quelas lineasde combustibley elcarburadorestenvacios. La
siguientetemporadause combustiblefresco.Consultelas Instruc-
cionesde ALMACENAMIENTOsi deseainformaci6nadicional.
No use nuncaproductosde limpiezapara motoreso carburadores
enel dep6sitodecombustible,se puedenocasionardahosperma-
nentes.
NOTA:Verifiqueperi6dicamenteel nivelde combustibleparaevitar
quedarsesin gasolinamientrasest,.operandolacortadoratrituradora.
Sila unidadse quedasin combustiblemientrasest,.triturando,puede
resultarnecesariodestaparel _.reade descargaantesdepodervolver
a encenderla.Consultela secci6nSERVlCIOY MANTENIMIENTO.
PARA ENCENDER EL MOTOR
1. Conecteel cablede la bujiay la mangade gomaa la misma.
2. EltanquedecombustibledebeIlenarsea 3/4del totalantesde
arrancar.
4O
3. Muevael controldel obturadorhaciael control del reguladorl,_l
paraobturarel carburadordel motor.(Siel motorest,. tibio
la obturaci6npuedenoser necesaria).Yeala figura10.
4. Muevala palancade controldel estranguladora laposici6n
START/RUN(encendido/ funcionamiento,representadopor una
liebre).Veala figura10.
5. Situadodetr_.sde la unidad,tome la manijadelarrancadory tire
de lacuerdahastaquesientauntir6n.
NOTA:Escuchar_tunsonidocuandoalcanceel comienzodel ciclo de
compresi6n.Estesonidoes causadoporel descebadoy lostopes que
son partedel mecanismode la trituradorayes de esperarhastaque el
motoralcancela m_tximavelocidad.
6. Tire de la cuerdade manerar_tpiday continua.Aprietebien la
manijadel arrancador.Dejeque la cuerdase enrosque
lentamente.
7. Repitaestepaso,de sernecesario,hastaquese enciendael
motor.Cuandose enciendeel motormuevaelcontrolde
obturaci6ngradualmentelejosdel controldel estrangulador.
8. Siel motorfalla, muevael controldelobturadorhaciaatr_ts,en
direcci6nal controldelestrangulador,y repitalospasos 5 a 7.
9. MantengaSIEMPREelcontroldelestranguladorenposici6n
,_lf START/RUN(encendido/ funcionamiento)mientrasoperela
cortadoratrituradora.
PARA DETENER EL MOTOR
1. El reguladordemovimientocontrolala palancaparareducirq_,
la marcha(tortuga)de la posici6n.Siemprequeposible,
gradualmentereduzcalavelocidadde motorantesde pararel
motor.
2. Muevalas palancasde controldel reguladora la posici6n
STOP(detenci6n)u OFF (apagado).
3. Desconecteel cablede la bujia de labujiay col6queloa masa
contrael postede retenci6npara evitarque se enciendaac-
cidentalmentemientrasnose esterprestandoatenci6nal equipo.
TRITURACION
Eldesechoquese acumulaen los patioscomo por ejemplolas hojas
y las agujasdelos pinospuede sercolocadoen la tolvapara triturarlo.
Despuesdeprocesarel materialcon lacuchillade latrituradoray
dedesgranar,es empujadofueradel deflectordel canaly,si est,.
instalada,haciael interiorde la bolsade recolecci6nde desechos.
Respetelas siguientespautascuandotrituredesechosque se
acumulanen lospatios:
,, %1outilicela m_.quinaparatriturarel materialque se encuentra
enun pationormal(hojas,ramas,pihasde los pinos,etc.).
,, Evitelatrituraci6ndeplantasfibrosascomo,por ejemplo,las
detomateshastaqueestentotalmentesecas. Lasplantas
detomatesfrescasnose trituran bieny tiendena enroscarse
alrededordel motory deldesgranado.
,, Coloquecantidadesrazonablesde desechosen la tolvapor vez.
No sobrecarguela tolva.
Permitaqueel materialquese encuentraen la tolvasea atraido
hastalas cuchillasy trituradoantesde agregarmasdesechos
dentrode la misma.De no hacerlose puedetaparla tolva,el
deflectordel canalo detenerel motor.
CORTE
Sepuedepermitirel ingresode ramasde hasta 3"de diametroen el
canalde la cortadora.Respetelassiguientespautaspara el corte de
las ramas:
,, Mantengaambasmanosfirmementeen la ramaa medidaque la
colocadentrodel canalde la cortadora.
,, Noponganuncam_tsdeunaramadentrodelcanaldela cortadorapor
vez,
,, Enel canalde la cortadoras61ose puedecolocarramas(de
madera).
,, Apliquepresi6nintermitente(fuerza,en impulsoscortos)cuando
coloqueramasm_tslargas(de3 pulgadasde di_.metro)dentro
del canaldela cortadorapara evitar inundaro ahogarel motor.
IMPORTANTE:Nuncacoloqueramascon undidtmetrosuperiora tres
(3)pulgadasdentrodel canalde lacortadora.Dehacerlose pueden
dahargravementelas cuchillasde corte,el desgranadoo el motorde
launidad.
NOTA:Para mejoresresultados,opere siemprela unidadcon
cuchillasde corte afiladas.Si se produceuna reducci6napreciable
en el rendimientomientrasse cortanramas,se debereemplazarlas
cuchillasde la cortadora.
COMO BAJAR EL MONTAJE DE LA TOLVA
1. Con una manotomelamanijaque se encuentraen la parte
superiordel montajedela tolvay lev_mtelalevemente.
2. Con laotra manotire haciaafuerade la varillade liberaci6ny
bajeel montajedelatolva hastael piso. Vea la Figura10.
COMO DESCARGAR LA BOLSA
1. Sueltela cuerdade extraccidny afloje la bolsade laaberturadel
canaldeflector.
2. Vaciela bolsay vuelvaa colocarlaen laaberturadel canalde
descarga.Tirede la cuerdahastaque la bolsaeste ajustada
alrededordela aberturadelcanal y sujetela cuerdaapret_mdola
contraelcanaldeflector.
IMPORTANTE:La pantallade desgranadoest,. ubicadadentrode la
caja en la zonade descarga.Si se tapala pantallade desgranado,
s_.quelay Ifmpielacomose indicaen lasecci6nServicioy Man-
tenimiento.Paraobtenerel mejorresultadotambienes importante
mantenerafiladala cuchilladela cortadora.
41
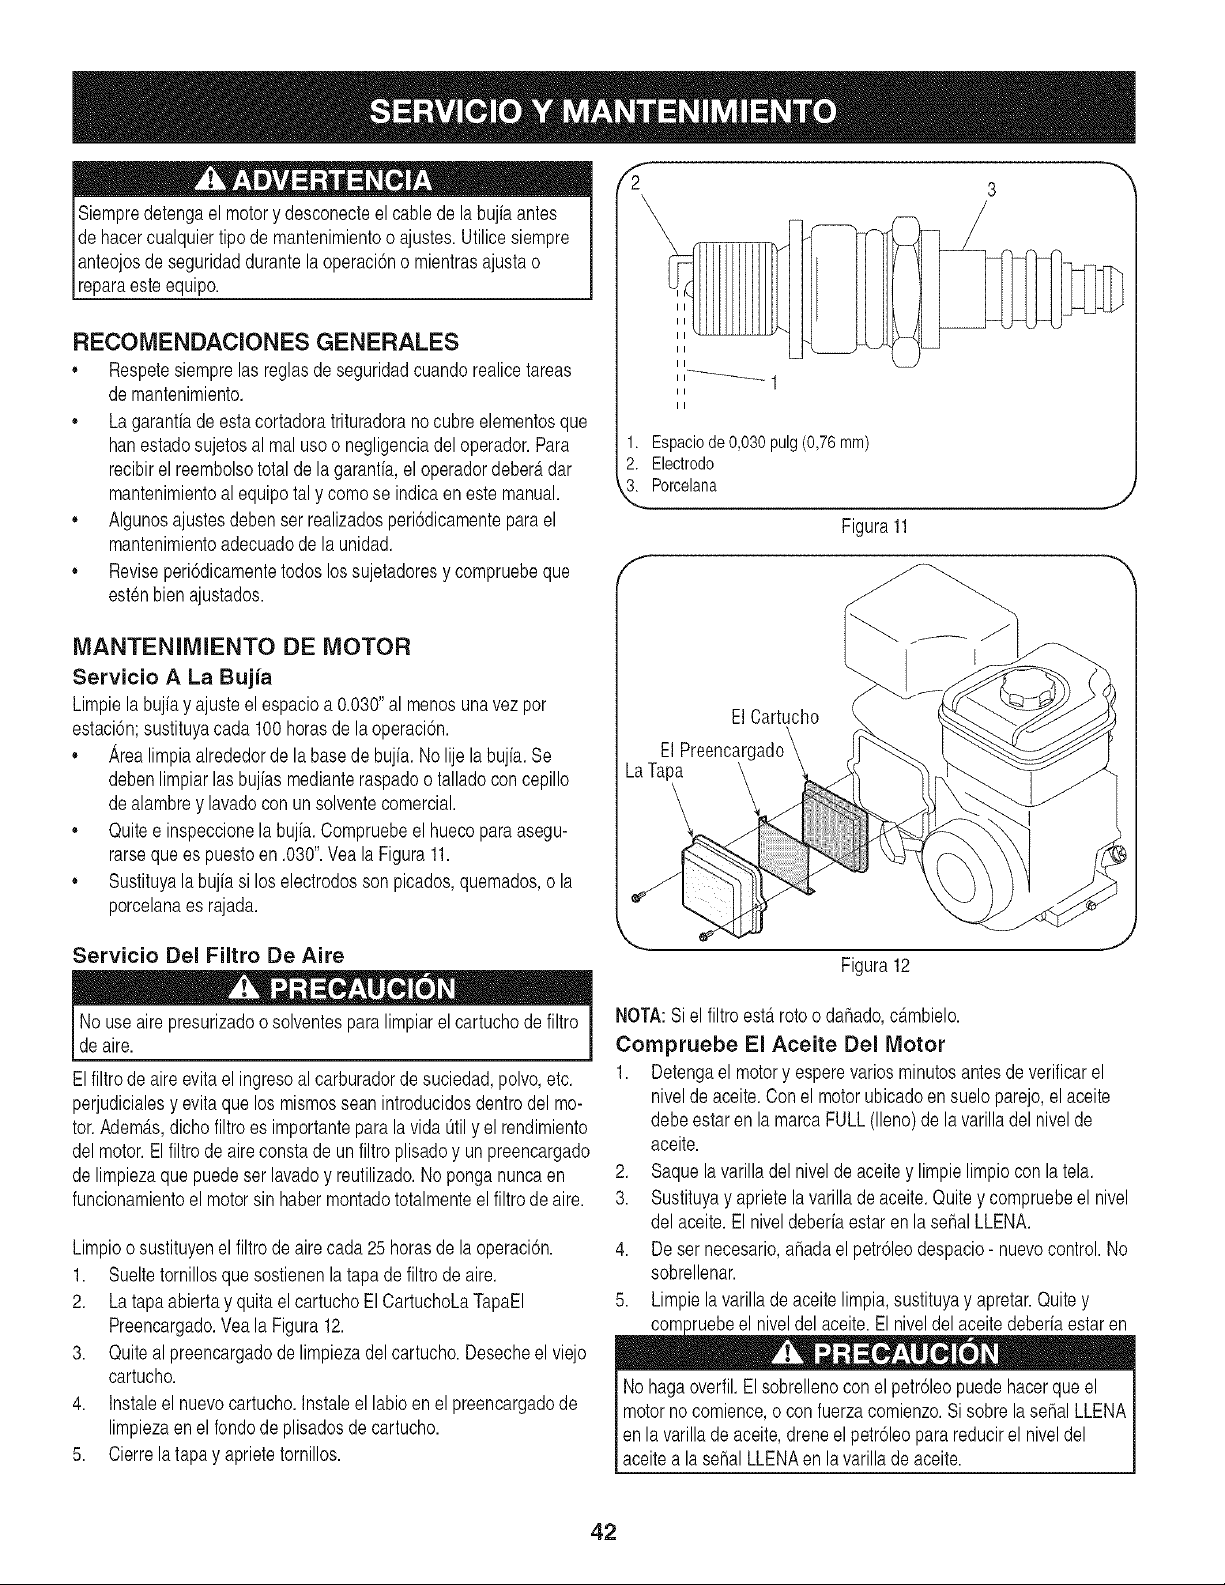
r?-
Siempredetengael motory desconecteel cablede la bujia antes
dehacercualquiertipode mantenimientoo ajustes.Utilicesiempre
pnteojos de seguridaddurantelaoperaci6no mientrasajustao
[reparaesteequipo.
RECOMENDACIONES GENERALES
,, Respetesiemprelas reglasde seguridadcuandorealicetareas
demantenimiento.
,, Lagaranfiade esta cortadoratrituradorano cubreelementosque
hanestadosujetosal realusoo negligenciadel operador.Para
recibirel reembolsototalde la garanfia,el operadordeber_tdar
mantenimientoal equipotal y como se indicaen este manual.
,, Algunosajustesdebenser realizadosperi6dicamenteparael
mantenimientoadecuadode la unidad.
,, Reviseperi6dicamentetodos lossujetadoresy compruebeque f"
estenbienajustados.
3
MANTENIMIENTO DE MOTOR
Servicio A La Bujia
Limpiela bujia y ajusteel espacioa 0.030"al menosuna vez por
estaci6n;sustituyacada 100horasde la operaci6n.
,, .4realimpiaalrededordela basede bujia.No lije la bujia.Se
debenlimpiarlas bujiasmedianteraspadoo talladoconcepillo
dealambrey lavadocon unsolventecomercial.
,, Quitee inspeccionela bujia.Compruebeel huecopara asegu-
rarseque es puestoen .030".Veala Figura11.
,, Sustituyala bujia si los electrodossonpicados,quemados,o la
porcelanaes rajada.
II
II
1. Espaciode 0,030 pulg(0,76mm)
2. Electrodo
3. Porcelana
Figura 11
El Cartucho
El Preencarc
LaTapa
Servicio Del Filtro De Aire
Nouse airepresurizadoo solventespara limpiarel cartuchode filtro
de are. j
Elfiltrode aireevitael ingresoal carburadorde suciedad,polvo,etc.
perjudicialesy evitaque los mismosseanintroducidosdentrodel mo-
tor.Adem_ts,dicho filtroes importanteparala vida0til y el rendimiento
delmotor.El filtro de aire constade unfiltroplisadoy unpreencargado
de limpiezaquepuedeser lavadoy reutilizado.No ponganuncaen
funcionamientoel motorsin habermontadototalmenteelfiltrode aire.
Limpioo sustituyenel filtrode aire cada25 horasde la operaci6n.
1. Sueltetornillosque sostienenla tapade filtrodeaire.
2. La tapa abiertay quitael cartuchoEl CartuchoLaTapaEI
Preencargado.Veala Figura12.
3. Quiteal preencargadode limpiezadel cartucho.Desecheel viejo
cartucho.
4. Instaleel nuevocartucho.Instaleel labioen el preencargadode
limpiezaen el rondode plisadosdecartucho.
5. Cierrelatapa y aprietetornillos.
Figura12
NOTA:Si el filtroesterrotoo daflado,dtmbielo.
Compruebe El Aceite Del Motor
1. Detengael motory esperevarios minutosantesde verificarel
nivelde aceite.Con el motorubicadoensuelo parejo,el aceite
debeestaren la marcaFULL(lleno) de lavarilladelnivelde
aceite.
2. Saquela varilladel nivelde aceitey limpielimpiocon la tela.
3. Sustituyay aprietela varilladeaceite.Quite y compruebeel nivel
delaceite.El niveldeberiaestaren la serialLLENA.
4. De ser necesario,afladael petr61eodespacio- nuevocontrol.No
sobrellenar.
5. Limpiela varillade aceitelimpia,sustituyay apretar.Quitey
No hagaoverfil.El sobrellenoconel petr61eopuedehacerque el
motornocomience,o con fuerzacomienzo.Sisobre la serial LLENA
enla varilladeaceite,dreneel petr61eoparareducirel niveldel I
aceitea la serialLLENAen la varilladeaceite.
42
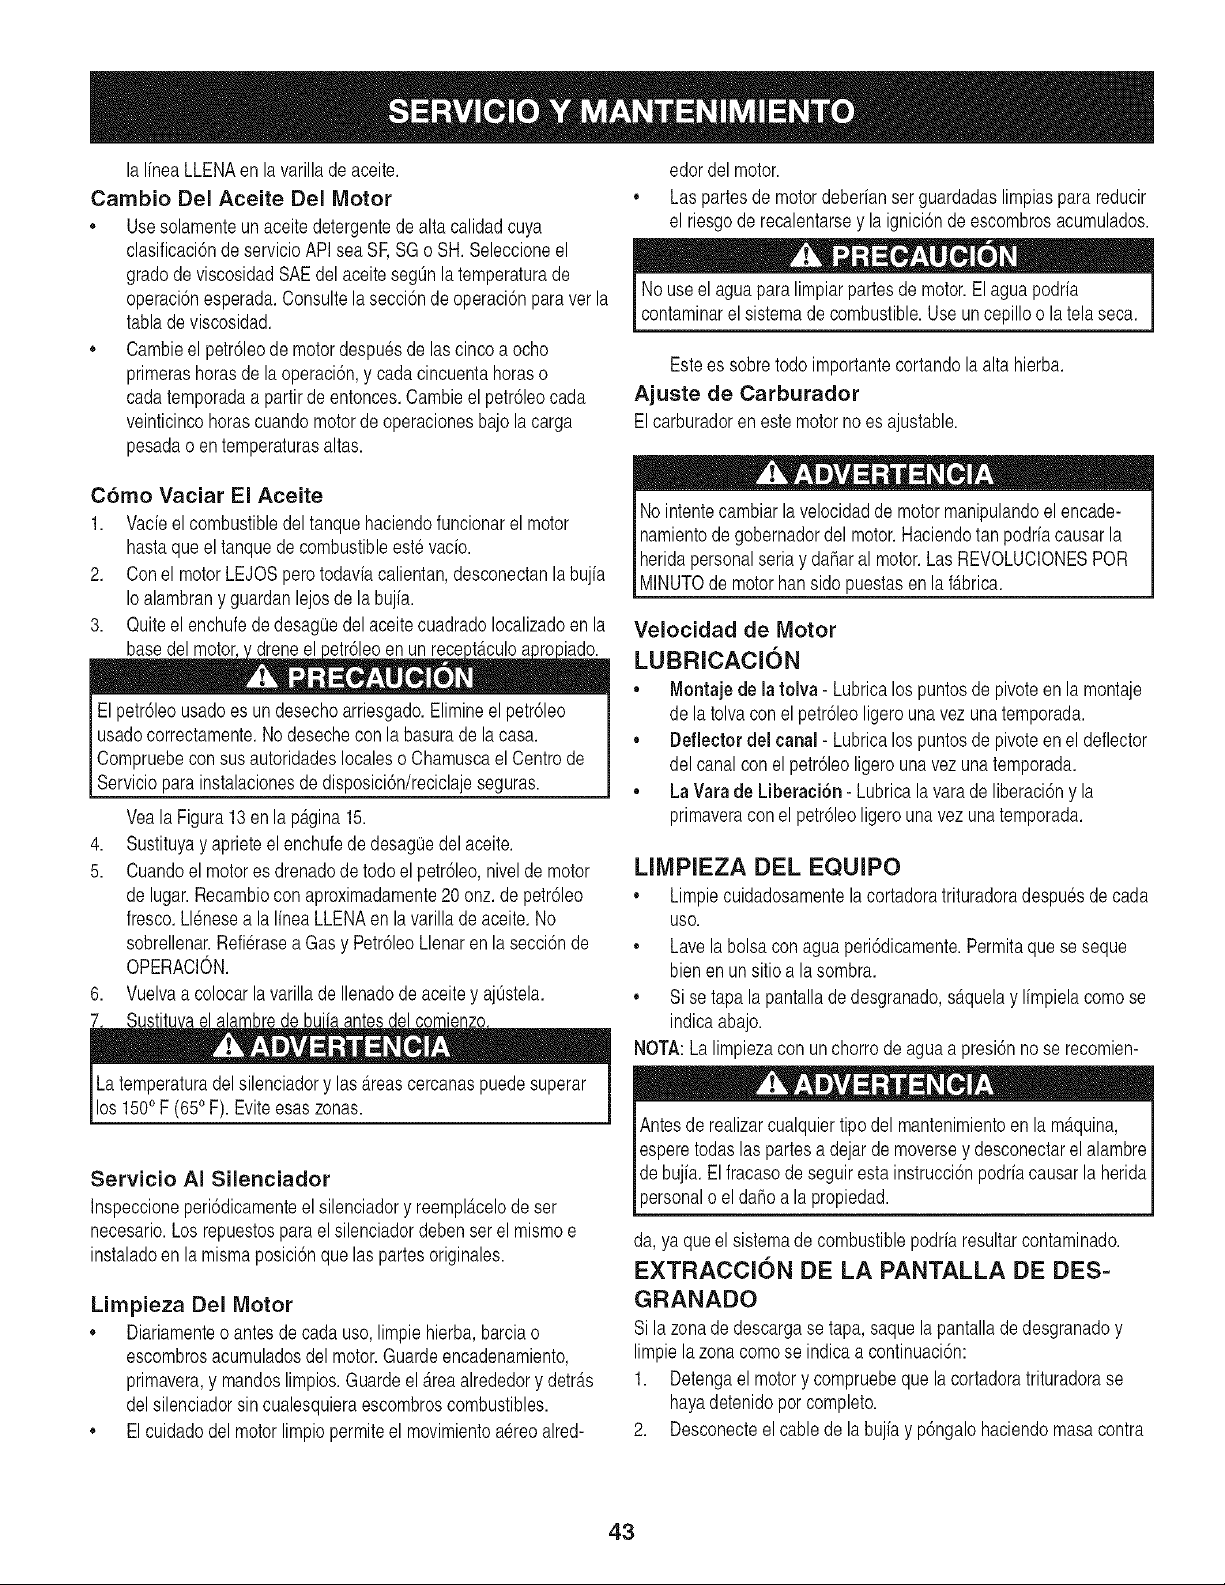
la lineaLLENAenla varillade aceite.
Cambio Del Aceite Del Motor
• Use solamenteunaceitedetergentede alta calidadcuya
clasificaci6nde servicioAPI seaSF,SG o SH. Seleccioneel
gradode viscosidadSAEdel aceitesegQnlatemperaturade
operacbnesperada.Consultela secci6nde operaci6npara ver la
tablade viscosidad.
Cambieel petr61eode motordespuesde lascincoa ocho
primerashorasde laoperaci6n,y cadacincuentahoraso
cadatemporadaa partirde entonces.Cambieel petr61eocada
veinticincohorascuandomotor de operacionesbajo la carga
pesadao entemperaturasaltas.
Como Vaciar El Aceite
1. Vacieel combustibledel tanquehaciendofuncionarel motor
hastaqueel tanquedecombustibleestevacio.
2. Conel motorLEJOSperotodaviacalientan,desconectanla bujia
Io alambrany guardanlejosdela bujia.
3. Quiteel enchufede desagQedel aceitecuadradoIocalizadoen la
El petr61eousadoes undesechoarriesgado.Elimineelpetr61eo
usadocorrectamente.Nodesechecon labasurade la casa.
Compruebecon susautoridadeslocaleso Chamuscael Centrode
Servicioparainstalacionesde disposici6n/reciclajeseguras.
VealaFigura13 en la p_.gina15.
4. Sustituyay aprieteelenchufede desagQedel aceite.
5. Cuandoel motores drenadode todoel petr61eo,niveldemotor
de lugar.Recambiocon aproximadamente20 onz.de petr61eo
fresco.Llenesea la IfneaLLENAen la varilladeaceite.No
sobrellenar.RefieraseaGas y Petr61eoLlenaren lasecci6nde
OPERACION.
6. Vuelvaa colocarla varillade Ilenadode aceite y ajOstela.
7. Sustitu, el alambrede delcomlenzo.
Latemperaturadel silenciadory las_.reascercanaspuedesuperar
los 1500F (650F). Eviteesas zonas.
Servicio AI Silenciador
Inspeccioneperi6dicamenteel silenciadory reempl_tcelode ser
necesario.Losrepuestosparael silenciadordebenser el mismoe
instaladoen la mismaposici6nque las partesoriginales.
Limpieza Del Motor
Diariamenteo antes de cada uso,limpie hierba,barciao
escombrosacumuladosdel motor.Guardeencadenamiento,
primavera,y mandoslimpios.Guardeel _.reaalrededory detr_ts
delsilenciadorsin cualesquieraescombroscombustibles.
Elcuidadodel motor limpiopermiteel movimientoa_reoaired-
edordel motor.
,, Las partesde motordeberianser guardadaslimpiasparareducir
el riesgode recalentarsey la ignici6ndeescombrosacumulados.
I No use aguaparalimpiarpartes aguapodria
el de motor.El
I contamnare s stemadecombustb e. Useuncep o o ate aseca. J
Estees sobretodo importantecortandola altahierba.
Ajuste de Carburador
Elcarburadoren estemotornoes ajustable.
No intentecambiarla velocidadde motormanipulandoel encade-
namientode gobernadordel motor.Haciendotan podriacausarla
heridapersonalseriay daharal motor.LasREVOLUCIONESPOR
IM NUTOde motorhans do puestasen a f_tbrca.
Velocidad de Motor
LUBRICACION
• Montaje de la tolva - Lubricalos puntosde pivoteenla montaje
de la tolvacon elpetr61eoligerouna vez una temporada.
• Deflector del canal - Lubricalos puntosde pivoteenel deflector
del canalconel petr61eoligerounavezunatemporada.
• La Vara de Liberaci6n - Lubricala varade liberaci6ny la
primaveracon el petr61eoligerouna vez una temporada.
LIMPIEZA DEL EQUIPO
,, Limpiecuidadosamentela cortadoratrituradoradespuesdecada
USO.
,, Lave la bolsacon aguaperi6dicamente.Permitaquese seque
bienen unsitioa la sombra.
,, Si se tapa la pantallade desgranado,s_tquelay limpielacomo se
indicaabajo.
NOTA:La limpiezacon unchorrode aguaa presi6nno se recomien-
Antesde realizarcualquiertipo delmantenimientoen la m_.quina,
esperetodaslas partesa dejar de moversey desconectarel alambre
de bujia.Elfracasodeseguirestainstrucci6npodriacausarla herida
)ersonalo el dahoa la propiedad.
da, ya queel sistemade combustiblepodriaresultarcontaminado.
EXTRACCION DE LA PANTALLA DE DES=
GRANADO
Sila zonadedescargase tapa,saquela pantalladedesgranadoy
limpiela zonacomose indicaa continuaci6n:
1. Detengael motory compruebeque la cortadoratrituradorase
hayadetenidopor completo.
2. Desconecteel cablede la bujia y p6ngalohaciendomasacontra
43
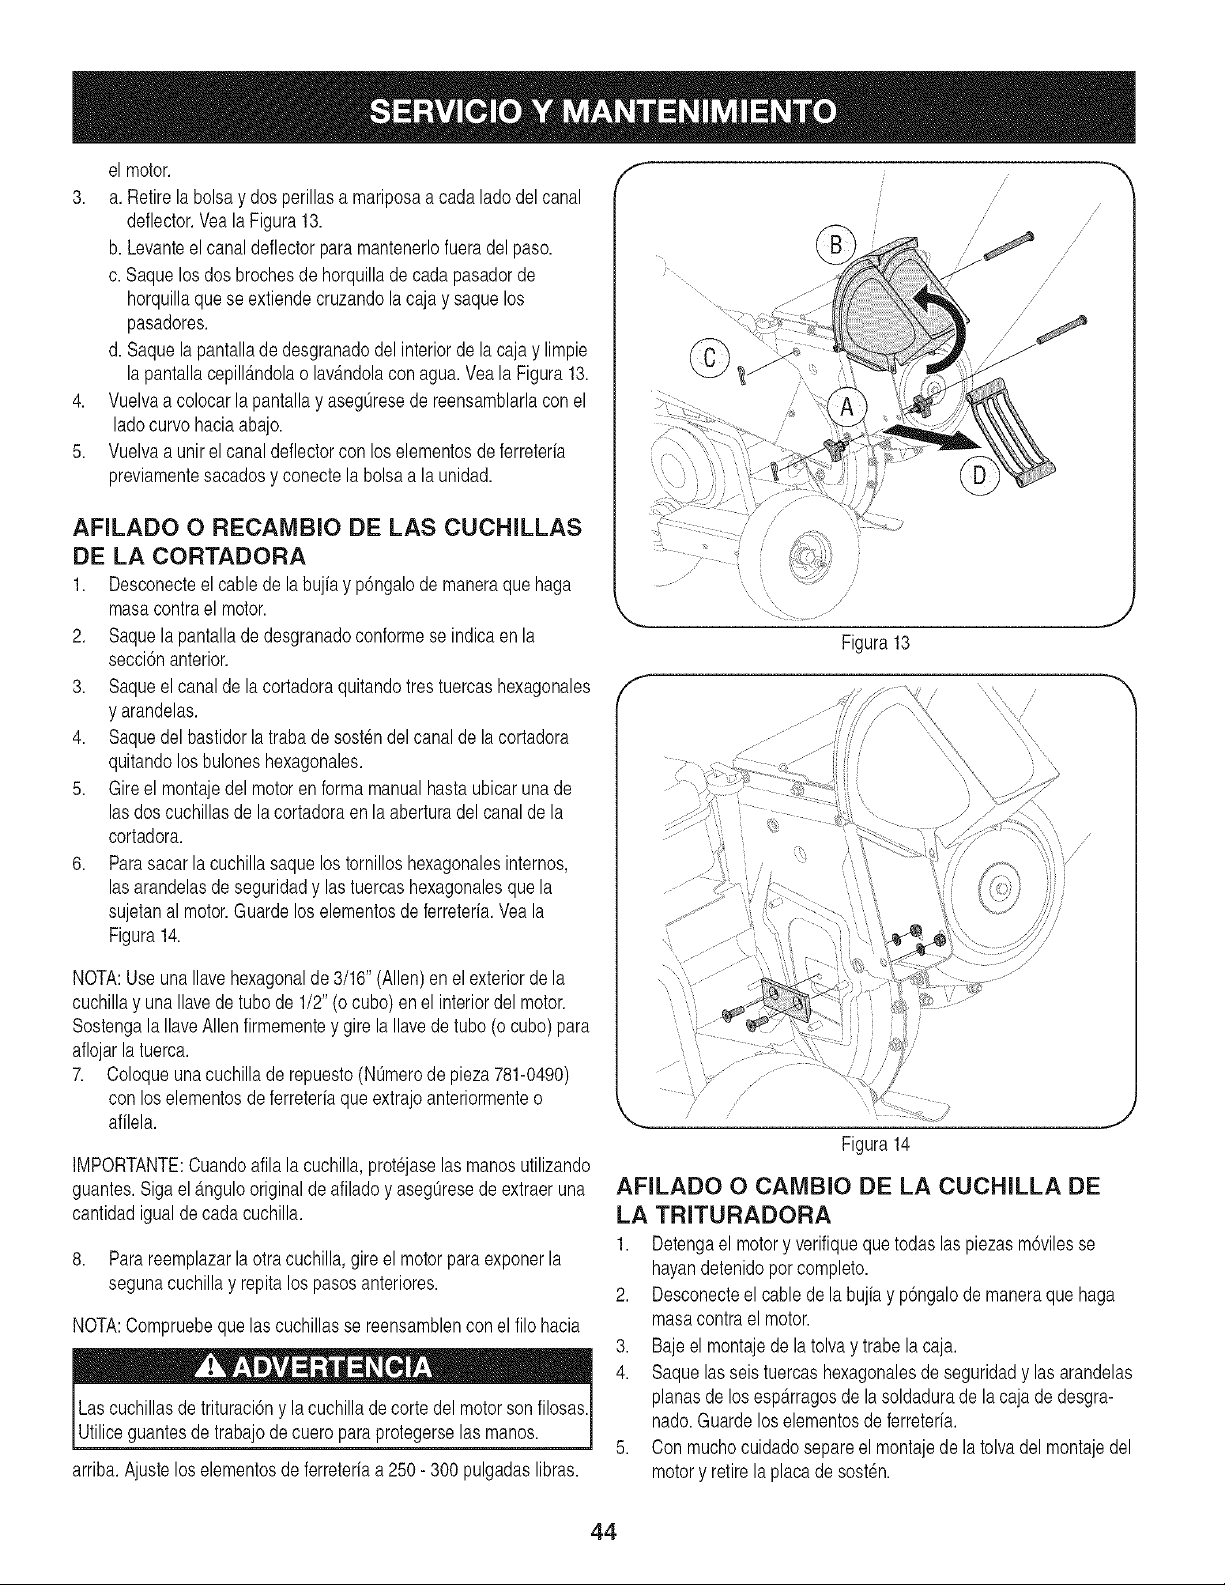
el motor.
3. a. Retirelabolsay dos perillasa mariposaa cadalado del canal
deflector.VealaFigura13.
b. Levanteel canaldeflectorparamantenerlofueradel paso.
c. Saquelos dosbrochesde horquillade cadapasadorde
horquillaquese extiendecruzandola cajay saquelos
pasadores.
d. Saque la pantallade desgranadodel interiorde la cajay limpie
la pantallacepill_.ndolao lav_mdolaconagua.Vea la Figura13.
4. Vuelvaa colocarla pantallay asegOresede reensamblarlaconel
ladocurvohaciaabajo.
5. Vuelvaa unirel canaldeflectorcon loselementosde ferreteria
previamentesacadosy conectela bolsaa la unidad.
AFILADO O RECAMBIO DE LAS CUCHILLAS
DE LA CORTADORA
1. Desconecteel cablede la bujia y p6ngalode maneraque haga
masacontrael motor.
2. Saquela pantallade desgranadoconformese indicaen la
secci6nanterior.
3. Saqueel canal dela cortadoraquitandotrestuercashexagonales
y arandelas.
4. Saquedel bastidorla trabade sostendelcanalde la cortadora
quitandolos buloneshexagonales.
5. Gire el montajedel motorenformamanualhastaubicarunade
las doscuchillasde la cortadoraen la aberturadel canalde la
cortadora.
6. Parasacar la cuchillasaquelostornilloshexagonalesinternos,
las arandelasde seguridady las tuercashexagonalesque la
sujetanal motor.Guardeloselementosde ferreteria.Vea la
Figura14.
NOTA:UseunaIlavehexagonalde 3/16" (Allen)en el exteriorde la
cuchillay una Ilavede tubode 1/2" (ocubo) en el interiordel motor.
Sostengala IlaveAllenfirmementey gire laIlavedetubo (o cubo)para
aflojarla tuerca.
7. Coloqueunacuchilla de repuesto(NOmerode pieza781-0490)
con loselementosde ferreteriaque extrajoanteriormenteo
afilela.
IMPORTANTE:Cuandoafila lacuchilla,protejaselas manosutilizando
guantes.Sigael _.ngulooriginal de afiladoy asegOresedeextraeruna
cantidadigualde cadacuchilla.
8. Para reemplazarla otracuchilla,gire el motorparaexponerla
segunacuchilla y repitalos pasosanteriores.
NOTA:Compruebequelas cuchillasse reensamblencon el filo hacia
Lascuchillasde trituracbn y la cuchillade corte del motorsonfilosas
Utiliceguantesde trabajode cueroparaprotegerselas manos.
arriba.Ajustelos elementosde ferreteriaa 250- 300 pulgadaslibras.
f --,,
//
/ /
/'
/
ii
/
//
//
/
/
//
///"
Figura14
AFILADO O CAMBIO DE LA CUCHILLA DE
LA TRITURADORA
1. Detengael motory verifiquequetodas laspiezasm6vilesse
hayandetenidopor completo.
2. Desconecteel cablede la bujiay p6ngalodemaneraque haga
masacontrael motor.
3. Bajeel montajede la tolvay trabela caja.
4. Saquelasseistuercashexagonalesdeseguridady las arandelas
planasde losesp_trragosde lasoldadurade la cajade desgra-
nado.Guardelos elementosde ferreteria.
5. Con muchocuidadosepareel montajede la tolva del montajedel
motory retirela placade sosten.
44
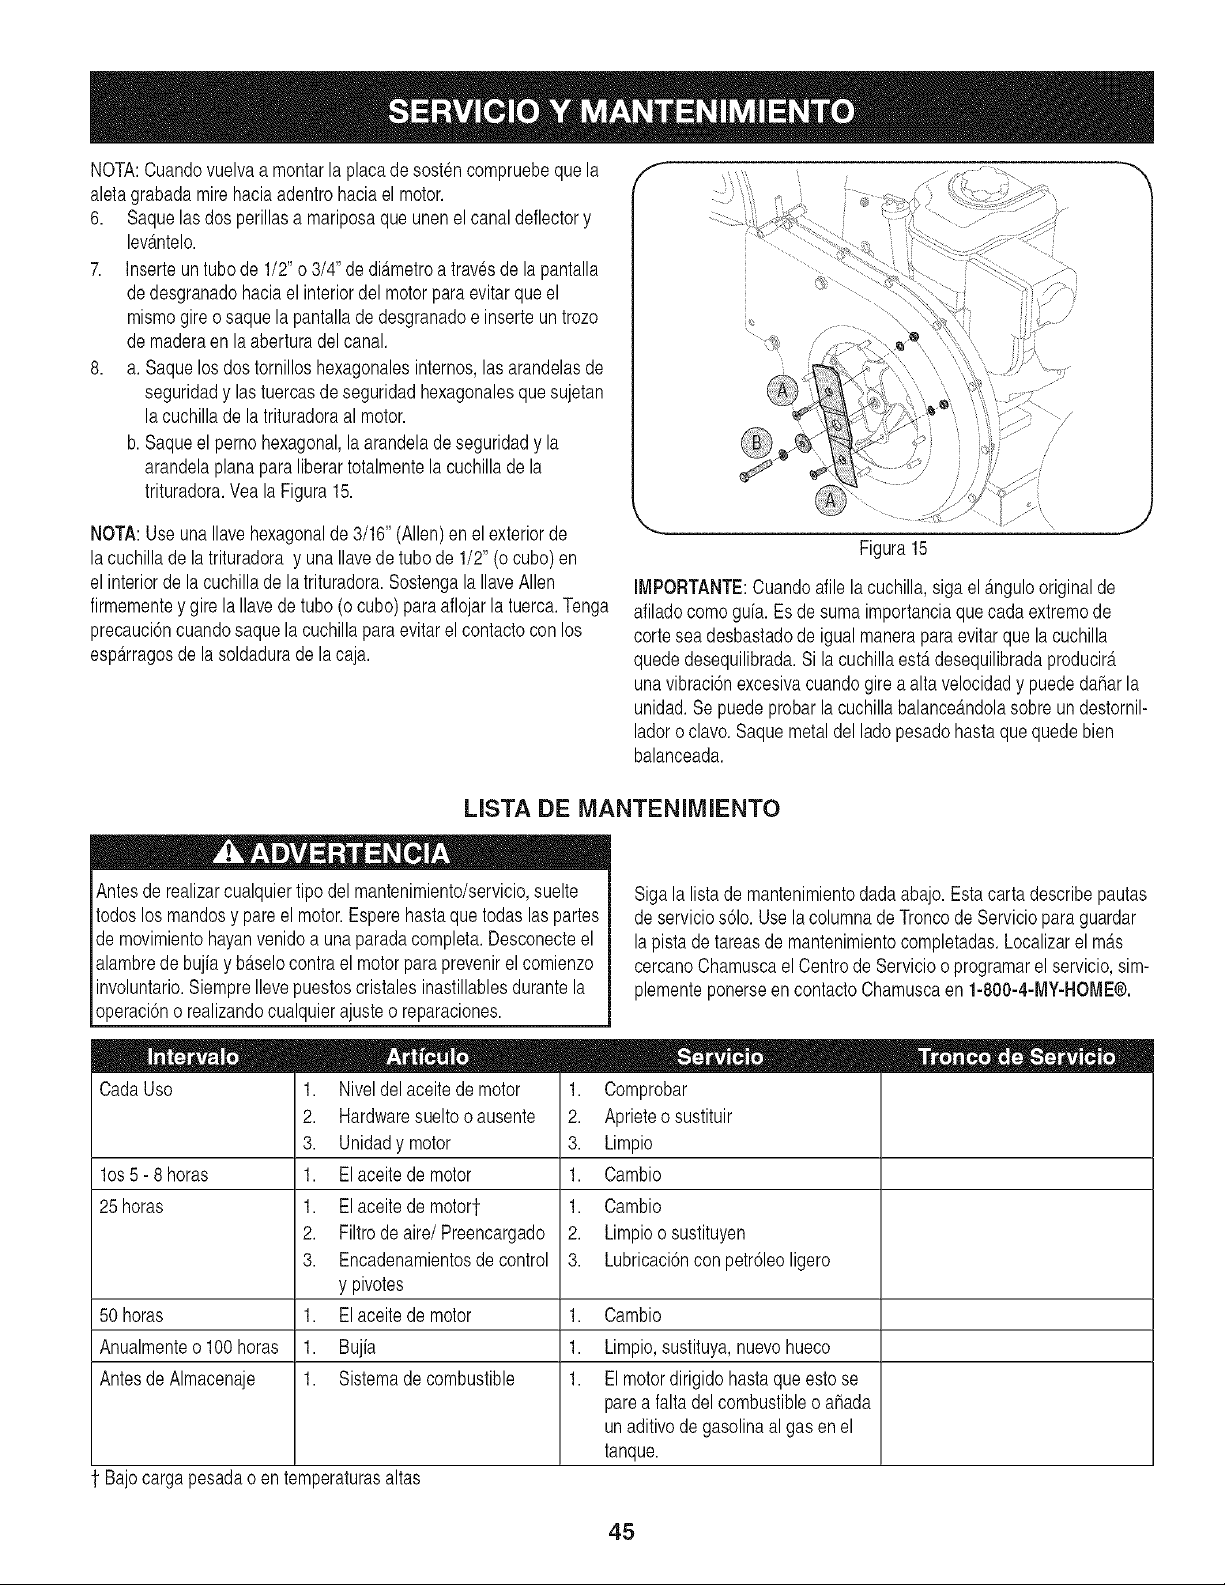
NOTA:Cuandovuelvaa montarla placade sostencompruebequela
aletagrabadamirehaciaadentrohaciael motor.
6. Saquelas dos perillasa mariposaqueunenel canaldeflectory
levb.ntelo.
7. Inserteun tubo de 1/2"o 3/4" de di_tmetroa travesde la pantalla
dedesgranadohaciael interiordelmotorparaevitarqueel
mismogireosaquela pantallade desgranadoe inserteuntrozo
de maderaenla aberturadel canal.
8. a. Saquelosdos tornilloshexagonalesinternos,las arandelasde
seguridady lastuercasde seguridadhexagonalesquesujetan
la cuchillade la trituradoraal motor.
b. Saqueel pernohexagonal,la arandeladeseguridady la
arandelaplanaparaliberartotalmentela cuchilladela
trituradora.Vea la Figura15.
NOTA:Use una Ilavehexagonalde3/16" (Allen)enel exteriorde
lacuchilladela trituradoray unaIlavede tubode 1/2" (o cubo)en
el interiorde la cuchillade latrituradora.Sostengala IlaveAllen
firmementey girela Ilavede tubo (ocubo)paraaflojarla tuerca.Tenga
precauci6ncuandosaquela cuchillaparaevitarelcontactocon los
esp_trragosde la soldadurade lacaja.
f --,,
/
"x
Figura15
J
IMPORTANTE:Cuandoafile lacuchilla,siga el #tngulooriginalde
afiladocomo guia.Es desumaimportanciaque cada extremode
cortesea desbastadode igualmaneraparaevitarquelacuchilla
quededesequilibrada.Si la cuchillaestb,desequilibradaproducirb.
unavibraci6nexcesivacuandogire aalta velocidady puededaharla
unidad.Se puede probarla cuchillabalanceb.ndolasobre undestornil-
ladoro clavo.Saquemetaldelladopesadohastaquequedebien
balanceada.
LISTA DE MANTENllVllENTO
Antesde realizarcualquiertipodel mantenimiento/servicio,suelte
todoslos mandosy pareel motor.Esperehastaque todas laspartes
demovimientohayanvenidoa unaparadacompleta.Desconecteel
alambredebujiay bb.selocontrael motorparaprevenirel comienzo
involuntario.SiempreIlevepuestoscristales inastillablesdurantela
operaci6no realizandocualquierajuste o reparaciones.
Cada Uso
los 5- 8 horas
25 horas
1. Niveldelaceitede motor
2. Hardwaresueltooausente
3. Unidady motor
1. Elaceite de motor
1. Elaceite de motort
2. Filtrode aire/Preencargado
3. Encadenamientosdecontrol
y pivotes
1. Elaceite de motor
1. Bujia
1. Sistemade combustible
Sigala listade mantenimientodada abajo.Estacarta describepautas
deservicios61o.Usela columnadeTroncode Serviciopara guardar
lapistade tareasdemantenimientocompletadas.Localizarel m_.s
cercanoChamuscael Centrode Servicioo programarel servicio,sim-
plementeponerseencontactoChamuscaen 1-800-4-MY-HOME®.
= •
1. Comprobar
2. Aprieteosustituir
3. Limpio
1. Cambio
1. Cambio
2. Limpioosustituyen
3. Lubricaci6ncon petr61eoligero
50 horas 1. Cambio
Anualmenteo 100horas 1. Limpio,sustituya,nuevohueco
AntesdeAlmacenaje 1. El motordirigido hastaque esto se
parea faltadelcombustibleo ahada
unaditivode gasolinaalgas enel
tanque.
t Bajocargapesadao en temperaturasaltas
45
Nuncaalmacenecortadoratrituradoracon el combustibleenel
tanquedentroo en _treasmalventiladasdondelos vaporesde
combustiblepuedenalcanzarunallamaabierta, la chispa,o el
pilotocomo en un homo,calentadordeagua, secadorde ropa,o
aplicaci6nde gas.
PREPARACl6N DEL MOTOR LA PREPARACl6N LA CORTADORA
Yaquelos motoresalmacenaronm_tsde 30dfas: TRITURADORA
1. Para impedira lagomaformarseen elsistemade combustible
o enpartesde carburador,dirijasel motorhastaqueestose
parea faltadel combustibleo ahadirunaditivode gasolinaal
gasen el tanque.Si usted usaun aditivo degas,dirigeel motor
durantevariosminutospara poner en circulaci6nel aditivopor el
carburador-- despuesque el motory el combustiblepuedenser
almacenadoshasta seis meses.
2. Mientrasel motores todavfacaliente,cambioel petr61eo.
3. Quitela bujfa y vierta aproximadamente1 onz. (30 ml) del
petr61eode motorlimpioen el cilindro.Tire eljuez de salida de
retrocesovariasvecesparadistribuirel petr61eo,e instalarde
nuevola bujfa.
4. Limpieel motorde escombrossuperficiales.
,, Almacenandocortadoratrituradoraen un cobertizode alma-
cenajeno ventiladoo met_.lico,el cuidadodeberiasertomado
a inoxidablelassuperficiesnopintadas.Usandounpetr61eo
ligeroo silicona,cubraelequipo,sobretodocualquierprimavera,
portes,y cables.
,, Quitetoda la suciedaddel exteriorde motory equipo.
,, Sigarecomendacionesdelubricaci6n.
,, Equipodetiendaen un_.realimpia,seca. Noalmaceneen un
Areadondeel equipoest,.presentequepuedeusarun pilotoo
tieneun componenteque puedecreeunachispa.
46

47
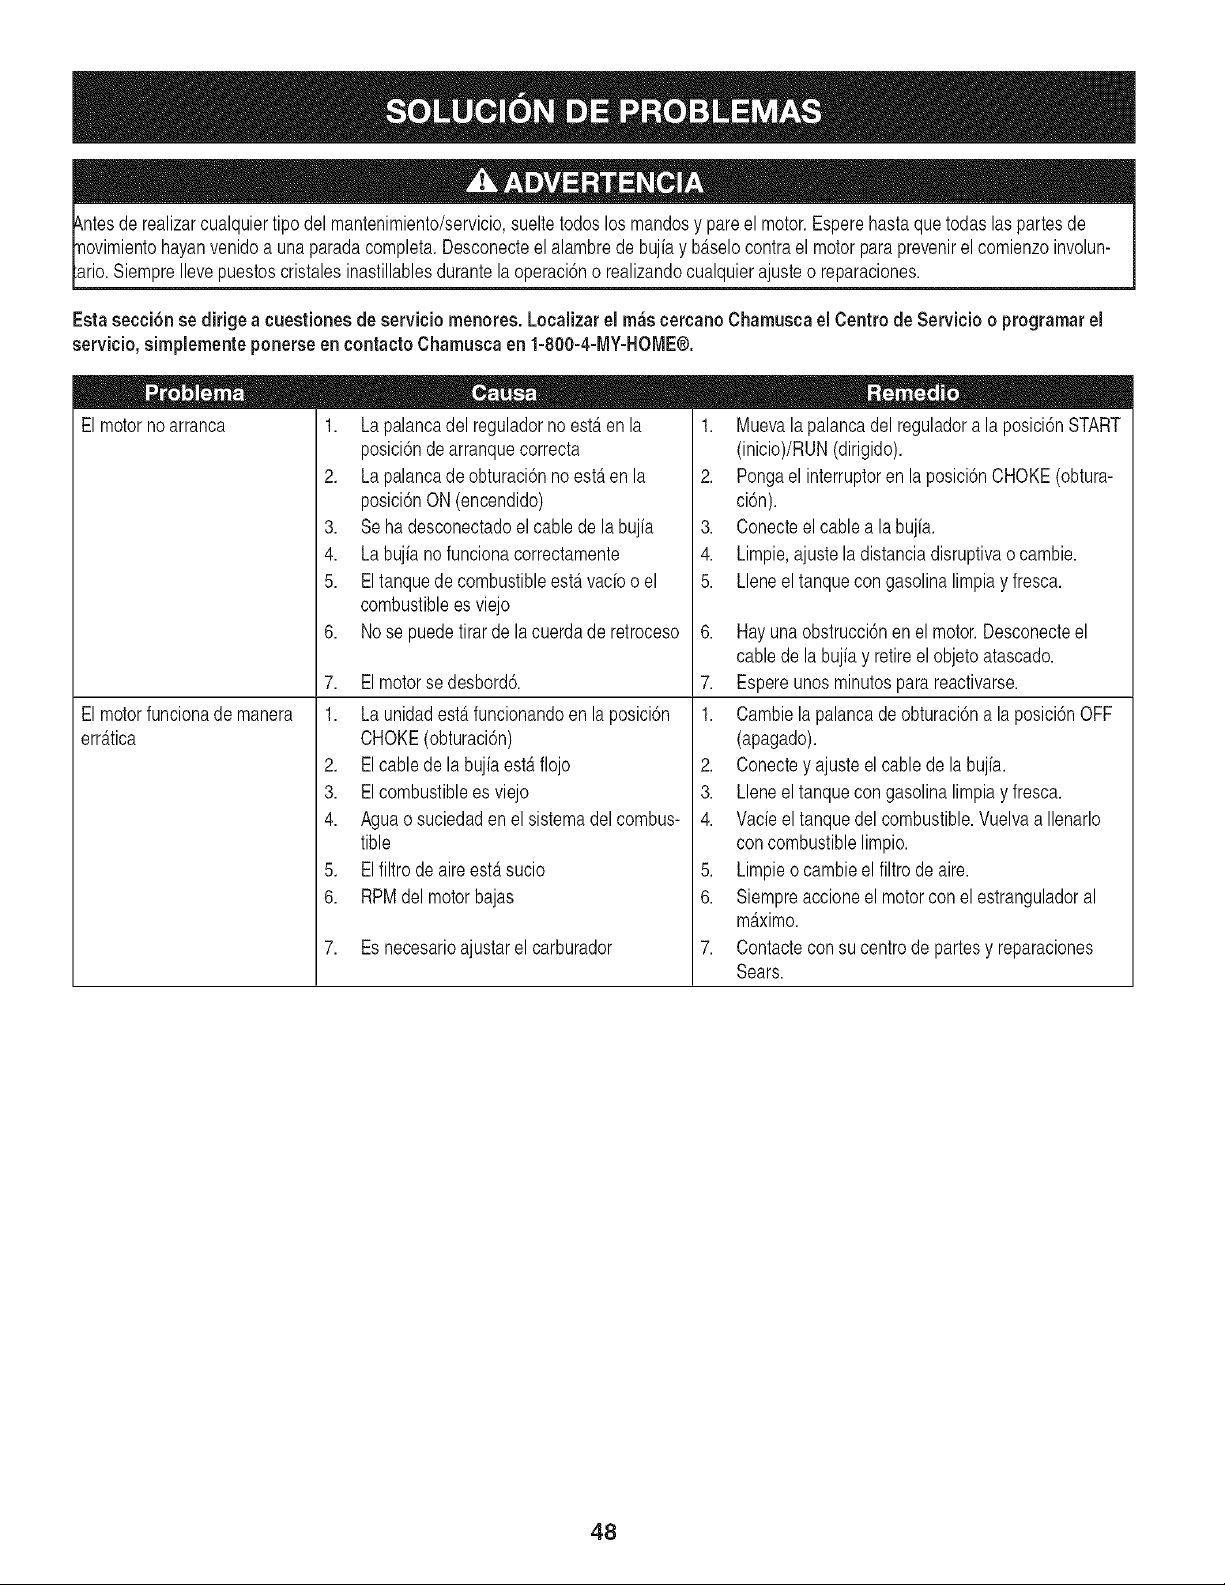
realizarcualquiertipo del mantenimiento/servicio,sueltetodoslos mandosy pareel motor.Esperehastaque todas las partesde
novimientohayanvenidoa una paradacompleta.Desconecteel alambrede bujfay b_tselocontrael motorpara prevenirel comienzoinvolun-
ario.SiempreIlevepuestoscristalesinastillablesdurantela operaci6no realizandocualquierajusteo reparaciones.
Estasecci6needirigea cuestionesde eerviciomenores. Localizarel m_scercanoChamuecael Centrode Servicio o programarel
eervicio,eimplementeponereeencontactoChamuecaen 1-800-4-MY-HOME®.
1. La palancadel reguladorno estdten la
posici6ndearranquecorrecta
2. La palancade obturaci6nnoesteren la
posici6nON(encendido)
3. Se ha desconectadoel cablede la bujia
4. La bujfano funcionacorrectamente
5. El tanquede combustibleestervacfoo el
combustiblees viejo
6. Nose puedetirarde la cuerdade retroceso
7. El motorsedesbord6.
1. La unidadesterfuncionandoen laposici6n
CHOKE(obturaci6n)
2. El cablede la bujfaesterflojo
3. EIcombustiblees viejo
4. Aguao suciedaden el sistemadel combus-
tible
El motornoarranca
El motorfuncionade manera
err_ttica
5. El filtro de aireest,.sucio
6. RPMdel motorbajas
7. Es necesarioajustarelcarburador
1. Muevala palancadel reguladora la posici6nSTART
(inicio)/RUN(dirigido).
2. Pongael interruptoren laposici6nCHOKE(obtura-
ci6n).
3. Conecteel cablea la bujia.
4. Limpie,ajuste la distanciadisruptivao cambie.
5. Lleneel tanquecon gasolinalimpiay fresca.
6. Hay unaobstrucci6nen el motor.Desconecteel
cablede labujiay retireel objetoatascado.
7. Espereunos minutosparareactivarse.
1. Cambiela palancade obturaci6na laposici6nOFF
(apagado).
2. Conectey ajusteel cablede la bujia.
3. Lleneel tanquecon gasolinalimpiay fresca.
4. Vade el tanquedel combustible.Vuelvaa Ilenarlo
concombustiblelimpio.
5. Limpieo cambieel filtro deaire.
6. Siempreaccioneel motorcon el estranguladoral
m_.ximo.
7. Contactecon sucentrode partesy reparaciones
Sears.
48
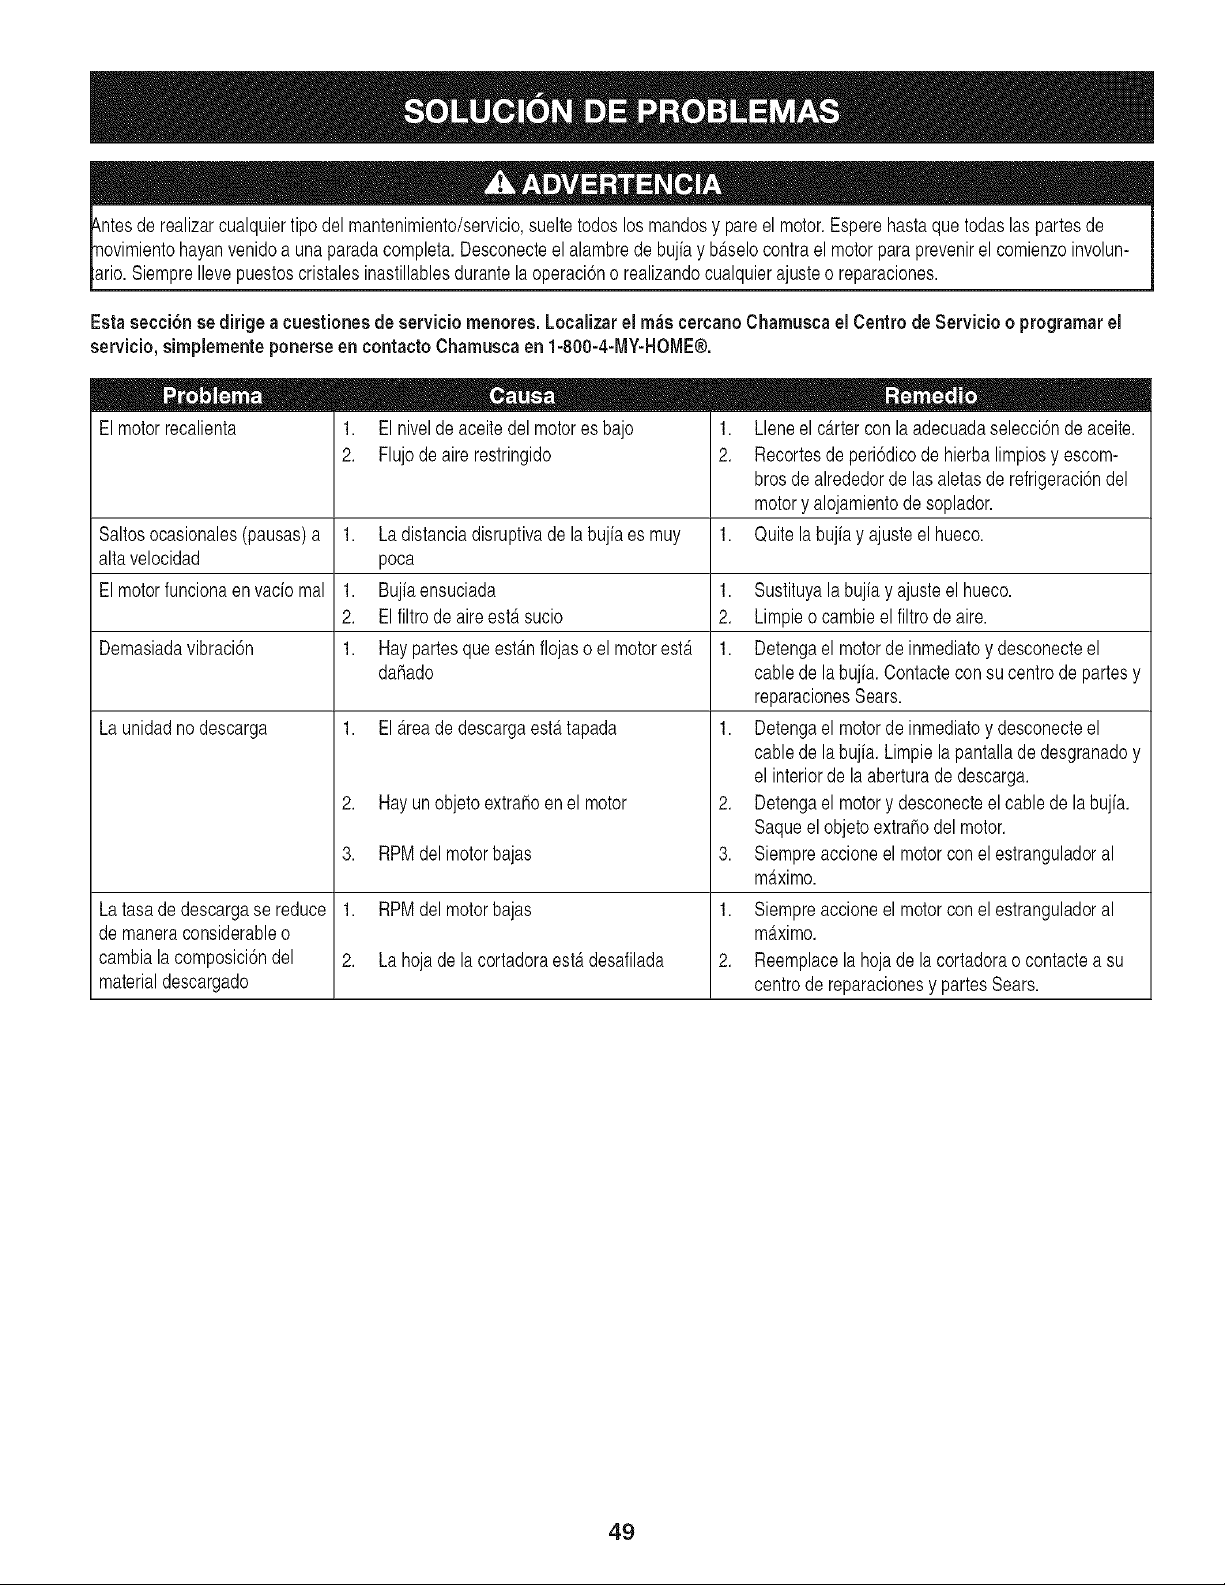
luier tipodel mantenimiento/servicio,sueltetodoslos mandosy pare el motor.Esperehastaque todas las partesde
Ilevepuestoscristalesinastillablesdurantela operaci6no realizandocualquierajusteo reparaciones.
Estasecci6needirigea cuestionesde eerviciomenores. Localizarel m_ecercanoChamuecael Centrode Servicio o programarel
eervicio,eimplementeponereeen contactoChamuecaen 1-800-4-MY-HOME®.
El motorrecalienta
1. El nivelde aceitedel motores bajo
2. Flujode aire restringido
Saltosocasionales(pausas)a 1. Ladistanciadisruptivade labujiaes muy
alta velocidad poca
El motorfuncionaenvado mal 1. Bujiaensuciada 1.
2. El filtro de aireestersucio 2.
Demasiadavibraci6n 1. Hay partesque est_mflojaso el motorester 1.
dahado
La unidadnodescarga 1. El _treadedescargaestertapada 1.
La tasade descargase reduce
de maneraconsiderableo
cambiala composici6ndel
materialdescargado
2. Hay un objetoextrahoen el motor
3. RPMdel motorbajas
1. RPMdel motorbajas
2. La hojade lacortadoraesterdesafilada
. = @ @
1. Lleneel c_.rtercon la adecuadaselecci6nde aceite.
2. Recortesde peri6dicode hierbalimpiosy escom-
brosde alrededorde las aletasde refrigeraci6ndel
motory alojamientode soplador.
1. Quite la bujiay ajusteel hueco.
2.
3.
1.
2.
Sustituyalabujia y ajusteel hueco.
Limpieo cambieel filtro de aire.
Detengael motorde inmediatoy desconecteel
cable de la bujia.Contacteconsu centrodepartesy
reparacionesSears.
Detengael motorde inmediatoy desconecteel
cable de la bujia. Limpiela pantalladedesgranadoy
el interiorde laaberturade descarga.
Detengael motory desconecteel cablede la bujia.
Saqueelobjetoextrahodel motor.
Siempreaccioneel motorconel estranguladoral
m_tximo.
Siempreaccioneel motorconel estranguladoral
m_.ximo.
Reemplacela hojade lacortadorao contactea su
centrode reparacionesy partesSears.
49
(Esta p_tginase aplica s61oen EE.UU. y CanadA).
Sears, Roebuck and Co., LI.S.Ao (Sears), el Coneejo de Recureoe Ambientalee de California (CARB)
y la Agencia de Protecci6n Ambiental de los Eetados Unidoe (EPA)
Declaracion de garant[a del sieterna de control de emisionee (derechoe y obmigacionee de la garant[a de defectoe del propi-
etario)
LA COBERTURADELA GARANTfADE CONTROLDEEMISIONESES
APLICABLEA LOS MOTORESCERTIFICADOSCOMPRADOSEN CALIFOR-
NIAEN 1995Y POSTERIORMENTE,QUE SE UTILIZANENCALIFORNIA,
Declaracion de garantia sobre defectoe en el control
ElConsejode RecursosAmbientalesde California(CARB),la EPA(Agencia
de ProteccionAmbientalde los EE.UU.)y Searstienen el gustode explicarla
garantfadel sistemade control de emisionespara motoresdel ado2000y para
elfuture con relaciona motorespequehostedo terreno(SORE).En California,
los nuevosmotorespequeSostodo terrenodebenestar diseSados,construidos
y equipadosparacumplircon las rigurosasnormasanti-smogdelestado.En
el restede losEstadosUnidos,losmotoresnuevostodoterrenode encendido
perchispa certificadosparael aSo1997debencumplirestAndaressimilares
establecidosper la EPA.Searsdebegarantizarel sistemade control de emis-
Y PARALOS MODELOSCERTIFICADOSDELAiqO 1997YPOSTERIORES,
QUESE COMPRENY UTILICENENCUALQUIERPARTEDE LOS ESTADOS
UNIDOS(YA PARTIRDEL 1 DEENERODE2001 ENCANAD,_).
de emisionee para California y los Eetadoe Unidoe
ionesdesu motorparalosperiodosde tiempo enumeradosa continuaci6n,
siemprequeno hayaabuse,negligenciao mantenimientoindebidode su
motortodoterrenopeque_o.Su sistemade controlde emisionespuedeincluir
piezastales comeel carburador,el filtrode aire, elsistemade encendido,el
silenciadory elconversercatalitico.Tambienpuedeincluirconectoresy otras
unidadesrelacionadascon las emisiones.Dondeexistaunacondicioncubierta
perla garantfa,Searsrepararasu peque_omotortodo terrenosincostoalguno
incluyendodiagnostico,piezasy manede obra
Cobertura de la garantia Sears para defectoe en el control de ernieionee
Los motorestodo terrenopeque_osestangarantizadosen Io relativeal control alas disposicionesque se indiquena continuacion.Siuna parte de su motor
de emisionesparadefectosenpiezasduranteun periodode dos ahos,sujeto cubiertaper la garantiaesdefectuosa,Sears repararao sustituiradicha parte.
Responeabilidadee del propietario en relacibn con la garantia
Comepropietariodel motortodo terrenopequeffo,Ud.es responsablede la
realizaciondel mantenimientorequeridoquese incluyeen las instrucciones
de operaciony mantenimiento.Sears recomiendaquese conserventodoslos
recibosrelativesal mantenimientode su motortodoterrenopequeSo,pero
no pude denegarlagarantfasimplementeperla faltade losmismos,o per su
incumplimientodel mantenimientoprogramado.Comepropietariodel motor
peque_otodoterrenodebesaberque, sinembargo,Sears lepuedenegar
lacoberturade lagarantfasi su motortodoterrenopequeSoo una piezadel
mismehanfalladodebidoa abuse,negligencia,mantenimienteindebideo
a modificacienesno aprobadas.Ud.es responsablede presentarsu motor
todoterrenopequehoa un distribuidorde serviciosSearsautorizadotan pronto
comeaparezcaun problema.Lasreparacionesde la garantiasinconflicto
debencompletarseen un plazodetiemporazonable,no superiora 30 dfas.Si
tienealguna preguntarespectoa sus derechosy responsabilidadesreferen-
tes a la garantia,debe contactarcon un representantede serviciosSearsal
1--800--469--4663.La garantiade emisioneses unagarantiaper defectos.Los
defectossejuzgan de acuerdocon elfuncionamientenormalde un motor.La
garantfano esta relacionadacon unapruebade emisionesen use.
Diepoeicionee de la garantia Sears para defectoe en el control de emieiones
Las siguientesson disposicionesespecificasrelacionadascon la coberturade la garantiaparadefectosenel controlde emisiones.Esun a_adidoa la garantiade
motorSearspara motoresno reguladesque seencuentraen lasinstruccionesde funcionamientoy mantenimiento.
1. Piezascon garantfa
La coberturade estagarantfase extiendeunicamentealas piezas
que aparecena continuacion(las partesde los sistemasde controlde
emisiones),siemprequedichaspiezasestuvieranya en el motoren el
mementode su compra.
a. Sistemade medicionde combustible
• Sistemade enriquecimientopara arranqueen frio
• Carburadory partesinternas
• Bombade combustible
b. Sistemade induccionde aire
• Filtrode aire
• Colectorde admision
c. Sistemade encendido
• Bujia(s)deencendido
• Sistemade encendidomagneto
d. Sistemadelcatalizader
• Convertidorcatalftico
• Colectorde escape
• Sistemade inyecci6nde aireo valvula de impulses
e. Elementosvariadosusadosen los sistemasanteriores
• Valvulasde vacio, sensiblesa temperatura,posici6ny tiempo
e interruptores
• Conectoresy montajes
2. Alcancede la cobertura
Searsgarantiza alposeederinicialy a loscempradoressubsiguientes
que laspiezascon garantiano tendran defectosenmaterialesnimane
de obra que provoquenla falla de las mismasduranteun periodo de
dos ahosa partirdela fecha en queel motorse entregaa un comprador
particular.
3. Sincargo
La reparaciono reemplazode cualquierparte con garantfase realizara
sin cargo alguno parael poseedor,incluyendotareasde diagnosticoque
permitandeterminarsi una partecongarantiaes defectuosa,siempreque
dicho diagnosticose realiceen un distribuidorde serviciosSearsautoriza-
do. Parael servicio de lagarantiadeemisiones,contacteal distribuidorde
serviciosSears autorizadomas cercanoincluidoen las"Paginasamarillas"
en lascategoNas"Motores,gasolina","Motoresde gasolina","Podadoras
de cesped",o similares.
4. Reclamacionesy exclusionesa la cobertura
Las reclamacionesde lagarantfadebenenviarsede acuerdocon las
disposicionesde la polfticade garantfapara motoresSears. La cobertura
de la garantiaexcluiradefectosen piezascon garantfaque no seanpartes
originalesSears,o abuse,negligenciao mantenimientoincorrecto,tal y
come se estableceen lapoliticade garantiaparamotoresSears.Searsno
es responsablede lasfallas en piezascon garantia provocadasperel use
de partesa_adidas,que no sean originaleso que se hayanmodificado.
5. Mantenimiento
Cualquierpartecon garantiaque no este programadapara ser reem-
plazadacomemantenimientorequerido,o que solo deba inspeccionarse
regularmenteal efectode "inspeccioneo reemplacesegun sea necesario",
estaragarantizadacontra defectosduranteel periodo de la garantfa.Todas
las piezas garantizadasqueesten programadasparasu reemplazopara
cumplir con los requisitesde mantenimientoestarangarantizadassolo
per el periodoanterioral primerreemplazoprogramadopara dicha pieza.
Cualquierpiezade recambioquesea equivalenteen funcionamientoy
durabilidadpuedeusarse para realizarmantenimientoo reparaciones.El
propietarioes responsablede realizartodo el mantenimientorequerido,tal
y come sedefineen lasinstruccionesde funcionamientey mantenimiento
Sears
6. Ceberturaindirecta
Perla presente,la coberturase extiendea lafalla de cualquiercomponente
de motorprovocadaper lafalla de unapiezacon garantfaqueestetodavfa
en periodode garantfa.
En los EstadosUnidosy Canadahayunalinea de atenci6nde 24 horas,1-800=469--4663,quecuentacon un menL_con mensajespre-grabadosquecontienen
informacionpara el mantenimientode motores.
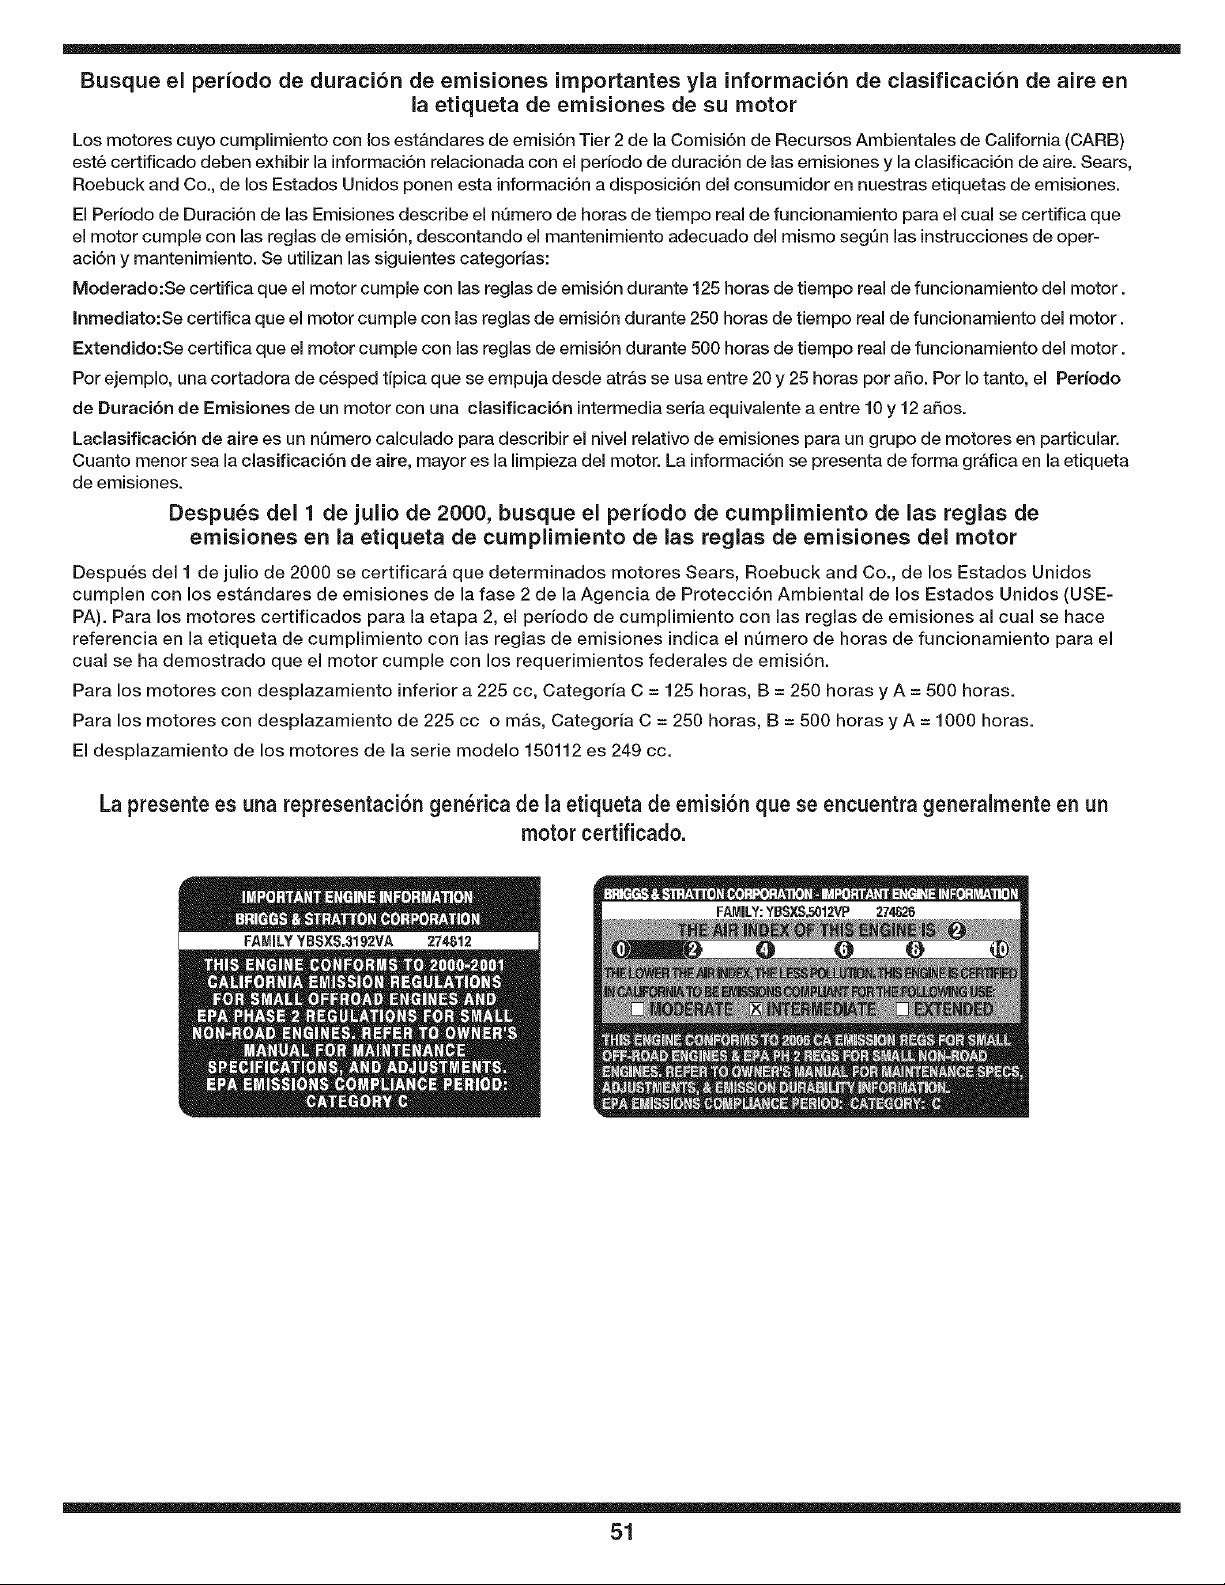
Busque el periodo de duracion de emisiones importantes yla informaci6n de clasificacion de aire en
la etiqueta de emisiones de su motor
Los motores cuyo cumplimiento con los est&ndares de emisi6n Tier 2 de la Comisi6n de Recursos Ambientales de California (CARB)
est6 certificado deben exhibir la informaci6n relacionada con el periodo de duraci6n de las emisiones y la clasificaci6n de aire. Sears,
Roebuck and Co., de los Estados Unidos ponen esta informaci6n a disposici6n del consumidor en nuestras etiquetas de emisiones.
El Pedodo de Duraci6n de las Emisiones describe el nQmero de horas de tiempo real de funcionamiento para el cual se certifica que
el motor cumple con las reglas de emisi6n, descontando el mantenimiento adecuado del mismo segQn las instrucciones de oper-
aci6n y mantenimiento. Se utilizan las siguientes categodas:
Moderado:Se certifica que el motor cumple con las reglas de emisi6n durante 125 horas de tiempo real de funcionamiento del motor.
Inmediato:Se certifica que el motor cumple con las reglas de emisi6n durante 250 horas de tiempo real de funcionamiento del motor.
Extendido:Se certifica que el motor cumple con las reglas de emisi6n durante 500 horas de tiempo real de funcionamiento del motor.
Por ejemplo, una cortadora de c6sped tipica que se empuja desde atr&s se usa entre 20 y 25 horas por afio. Por Io tanto, el Per{odo
de Duraci6n de Emisiones de un motor con una clasificaci6n intermedia seria equivalente a entre 10 y 12 afios.
Laclasificaci6n de aire es un nQmero calculado para describir el nivel relativo de emisiones para un grupo de motores en particular.
Cuanto menor sea la clasificaci6n de aire, mayor es la limpieza del motor. La informaci6n se presenta de forma gr&fica en la etiqueta
de emisiones.
Despu_s del 1 de julio de 2000, busque el per{odo de cumplimiento de las reglas de
emisiones en la etiqueta de cumplimiento de las reglas de emisiones del motor
Despu6s del I de julio de 2000 se certificar& que determinados motores Sears, Roebuck and Co., de los Estados Unidos
cumplen con los est&ndares de emisiones de la fase 2 de la Agencia de Protecci6n Ambiental de los Estados Unidos (USE-
PA). Para los motores certificados para la etapa 2, el periodo de cumplimiento con las reglas de emisiones al cual se hace
referencia en la etiqueta de cumplimiento con las reglas de emisiones indica el n_mero de horas de funcionamiento para el
cual se ha demostrado que el motor cumple con los requerimientos federales de emisi6n.
Para los motores con desplazamiento inferior a 225 cc, Categoria C = 125 horas, B = 250 horas y A = 500 horas.
Para los motores con desplazamiento de 225 cc o re&s, Categoria C = 250 horas, B = 500 horas y A = 1000 horas.
El desplazamiento de los motores de la serie modelo 150112 es 249 cc.
La presente es una representaci6n gen_rica de la etiqueta de emisi6n que se encuentra generalmente en un
motor certificado.
51

For expert home solutions advice: www.managemyhome.com
Our Home
For repair of carry-in items like vacuums, lawn equipment,
and electronics, call or go on-line for the location of your nearest
Sears Parts & Repair Service Center
1-800-488-1222 (U.S.A.) 1-800-469-4663 (Canada)
Call anytime, day or night
1-888-S U-HOGAR ®
(1-888-784-6427)
® Registered Trademark / TM Trademark / SM Service Mark of Sears Brands, LLC
® Marca Registrada / TMMarca de F_brica / s_ Marca de Servicio de Sears Brands, LLC
Mc Marque de commerce / MD Marque dCposCe de Sears Brands, LLC © Sears Brands, LLC

