
User Manual
Version 1.00 | 12/11/2020
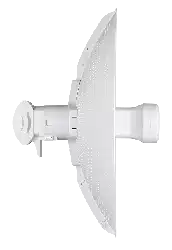
DAP-3712
20 km Long Range 802.11ac Wireless Bridge

2D-Link DAP-3712 User Manual
Table of Contents
Product Overview .............................................................. 3
Package Contents .........................................................................3
System Requirements ................................................................. 4
Introduction ................................................................................... 5
Features ............................................................................................ 6
Hardware Overview ..................................................................... 7
Connection ............................................................................. 7
LED Indicators ........................................................................ 8
Installation ......................................................................... 9
Assembling the Access Point ............................................ 9
Preparation before Installation ......................................11
Powering the Access Point ..............................................12
Conguring the First DAP-3712 in Access Point
Mode .......................................................................................12
Conguring the Second DAP-3712 in Client Mode 14
Mounting the Device ........................................................15
Mounting on a Pole ...........................................................15
Conguration ...................................................................17
Factory Default Setting ............................................................17
Web-based Conguration .......................................................18
Wizard .............................................................................................20
Basic Settings ...............................................................................23
Wireless ..................................................................................23
Network .................................................................................. 29
QoS........................................................................................... 31
Ser vice ....................................................................................34
System ....................................................................................37
Status ..............................................................................................39
Info ...........................................................................................39
Statistics .................................................................................41
Network .................................................................................. 42
Syslog Info .............................................................................43
Tools ................................................................................................44
Ping IP .....................................................................................44
Traceroute .............................................................................45
Link Test .................................................................................. 46
Antenna Alignment ...........................................................47
Spectrum Analyzer .............................................................48
Technical Specications ..................................................49
Table of Contents

3D-Link DAP-3712 User Manual
Section 1 - Product Overview
Package Contents
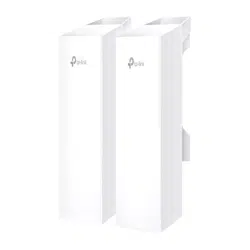
DAP-3712 20 km Long Range 802.11ac Wireless Bridge
Quick Start Guide
Power Injector
Power cord
Mounting tie

4D-Link DAP-3712 User Manual
Section 1 - Product Overview
System Requirements
Web-based Conguration
Requirements
Computer with the following:
• Microsoft Windows®, Apple Mac OS, or a Linux-based operating
system
Browser Requirements:
• Microsoft Edge, Firefox 60.0, Safari ,or Chrome 68.0.3440.106

5D-Link DAP-3712 User Manual
Section 1 - Product Overview
Introduction
The DAP-3712 is a high-performance 802.11ac 2T2R outdoor-deployable wireless bridge that provides wireless connectivity
to multiple network locations. The DAP-3712 has a built-in 23 dBi dish antenna that can deliver connectivity at a distance of
up to 20 km.
Note: Actual data throughput will vary. Network conditions and environmental factors, including volume of network trac, building materials and construction, and network
overhead, lower actual data throughput rate.

6D-Link DAP-3712 User Manual
Section 1 - Product Overview
• High-performance 802.11ac 2×2 chip
• Max. transmission range: 20 km
• Max. transmission throughput: up to 867 Mbps
• Integrated TDMA, intelligent rate control, and Auto ACK timeout
• TDMA solves the hidden-node problem in 802.11 networks
• Supports 4 operation modes: Access Point, Client, WDS Access Point, WDS Client
• Supports point-to-point and point-to-multipoint connections
• Unique RF and antenna design enable long-range transmission
• Wireless multimedia optimization technology guarantees video/audio transmission QoS
• User-friendly web-based UI makes the installation and setup processes much easier
• Reliable PoE+ 802.3at standard power input
• Waterproof housing and protection from weather
Features
7D-Link DAP-3712 User Manual
Section 1 - Product Overview
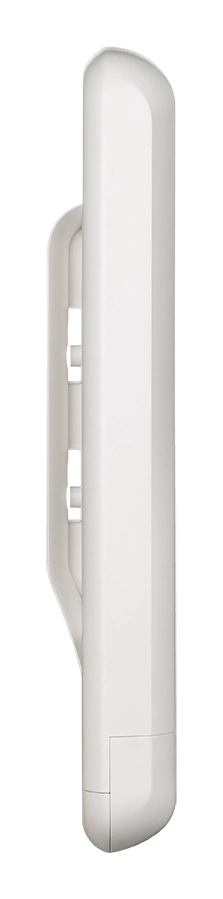
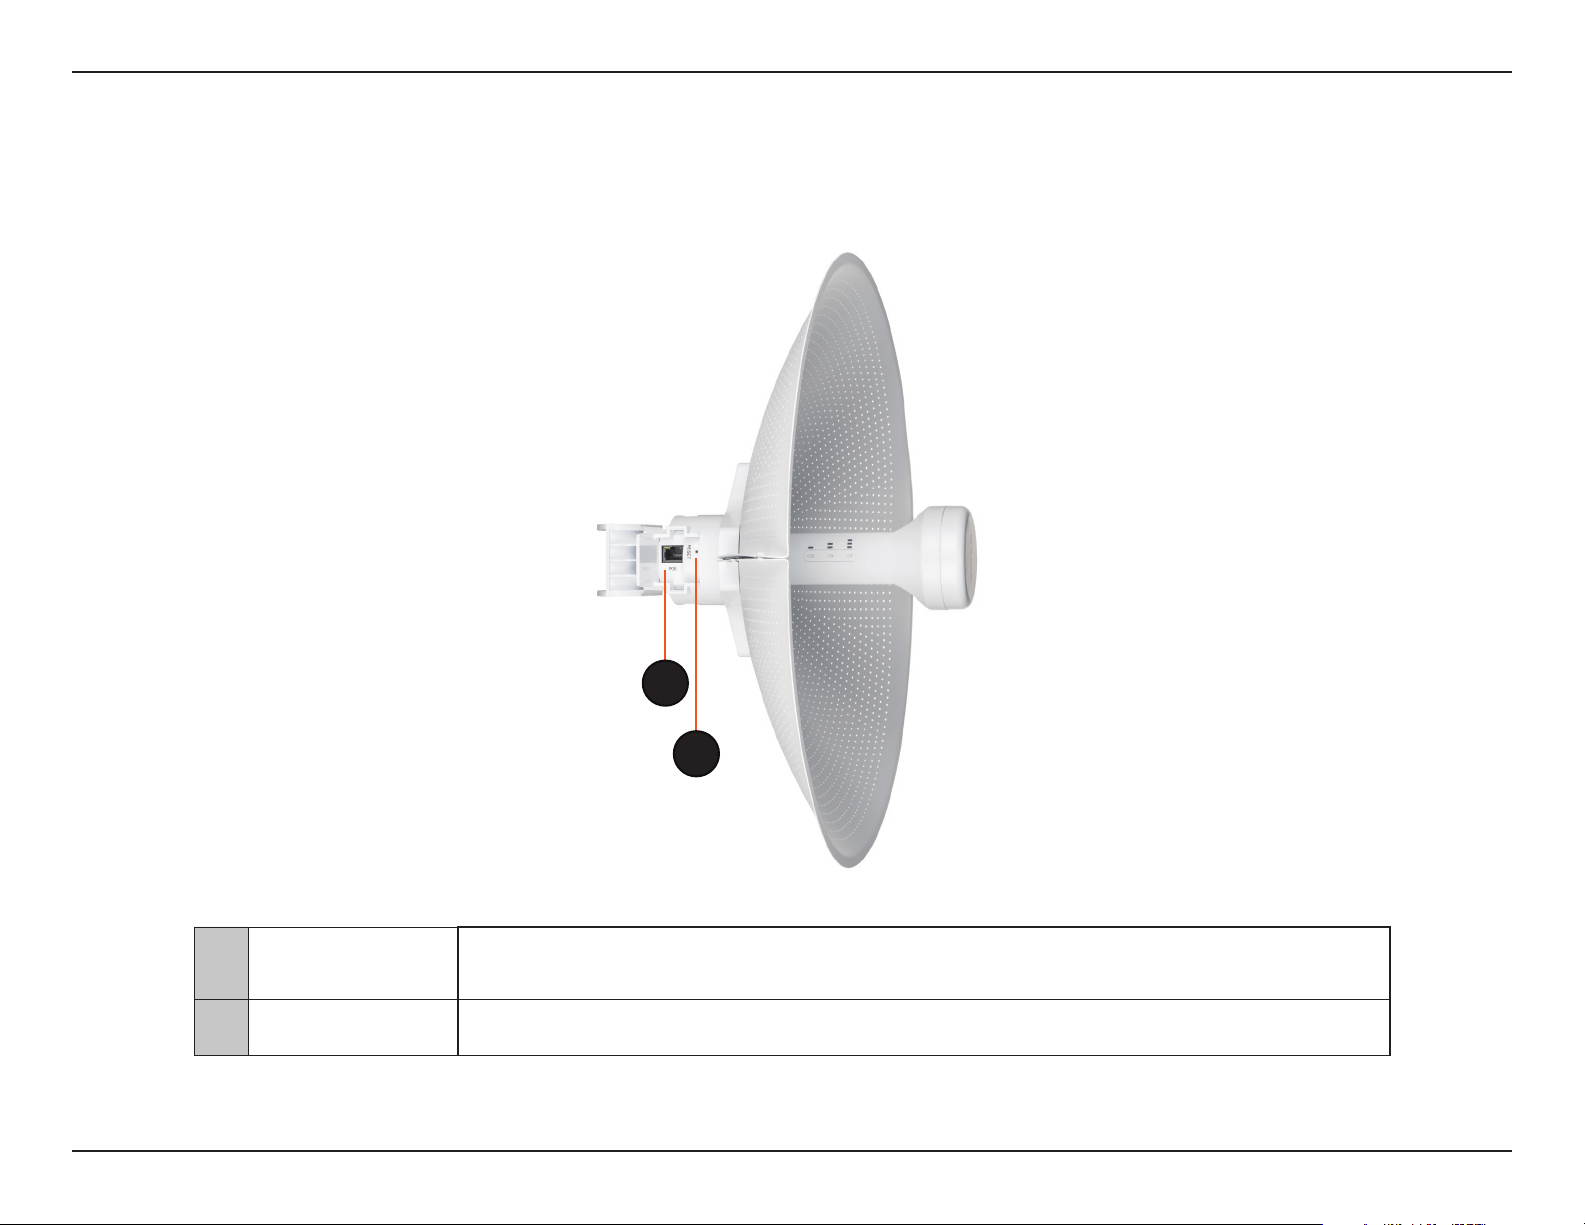
Hardware Overview
Connection
1 PoE Port
Uses a standard Ethernet cable to connect the device to a PoE power source such as a PoE
switch or PoE injector.
2 Reset Button Resets the device to its factory settings.
1
2
8D-Link DAP-3712 User Manual
Section 1 - Product Overview
Hardware Overview
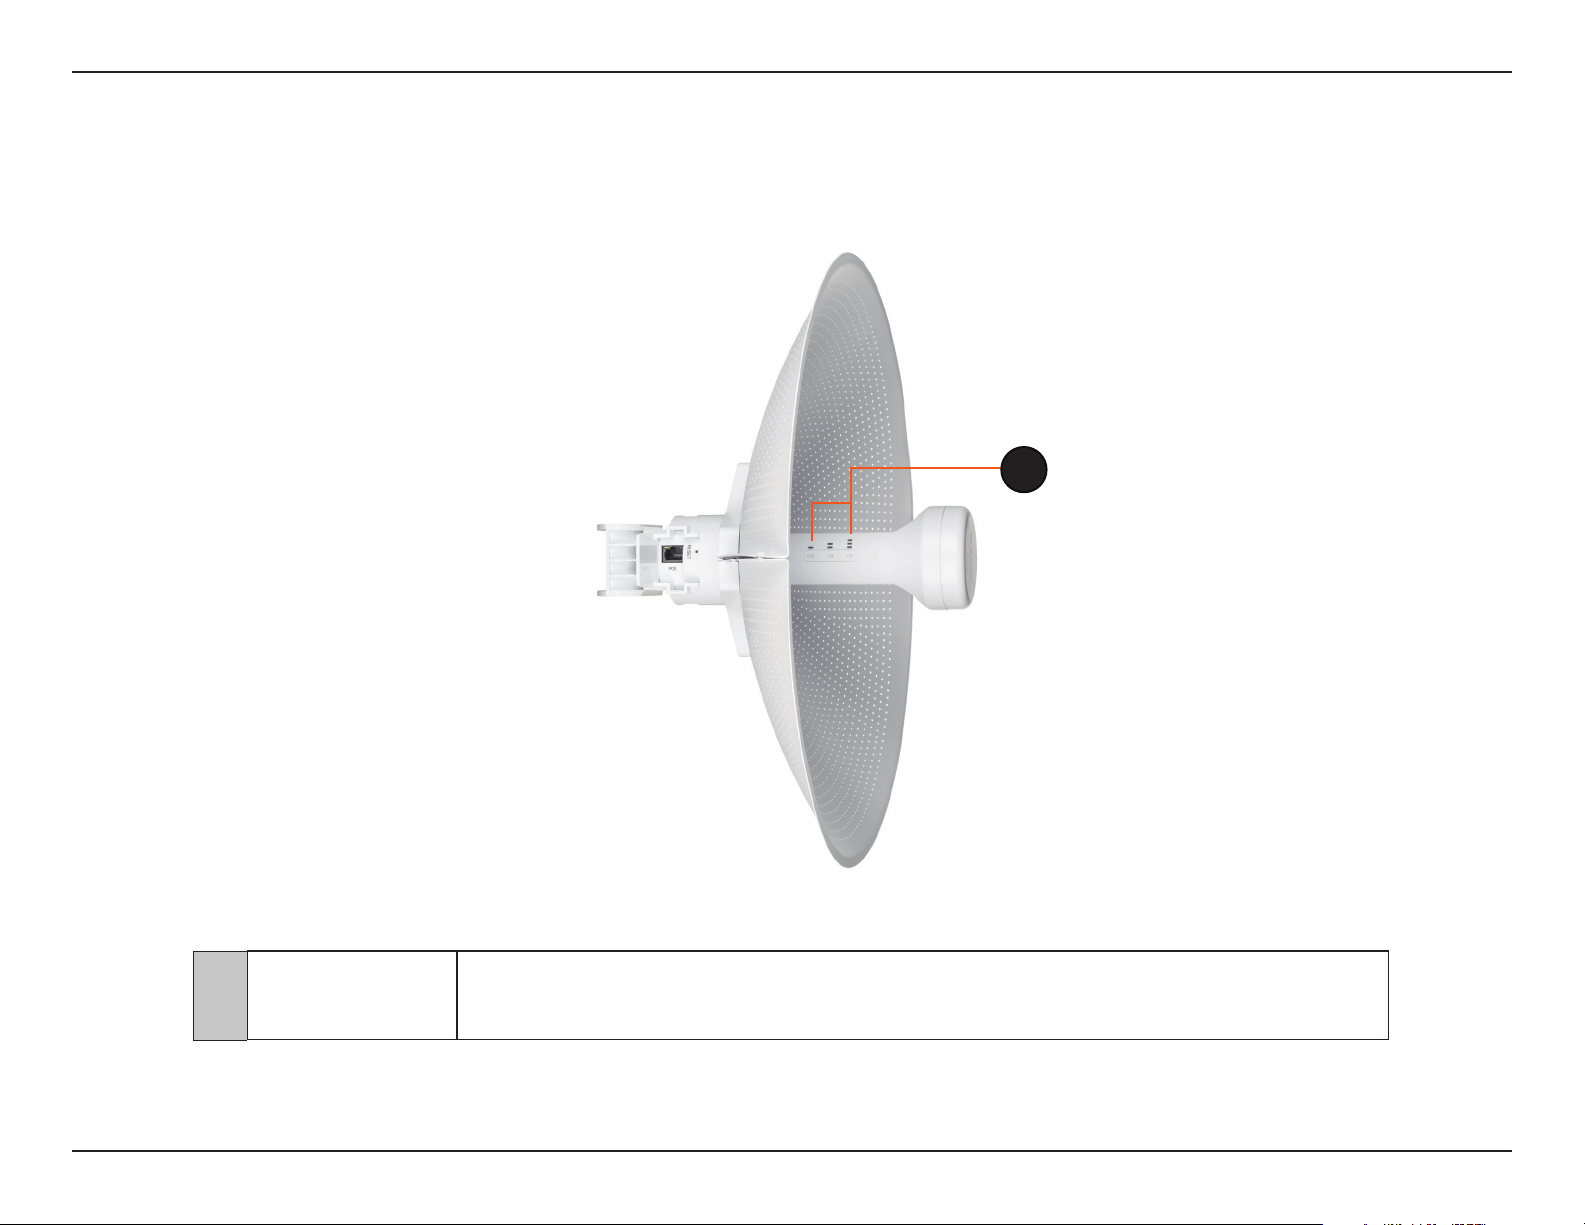
LED Indicators
1
1 Signal Strength
Signal strength indicators. One light indicates a weak signal. Two lights indicate a medium
signal. Three lights indicate a strong signal.
9D-Link DAP-3712 User Manual
Section 2 - Installation
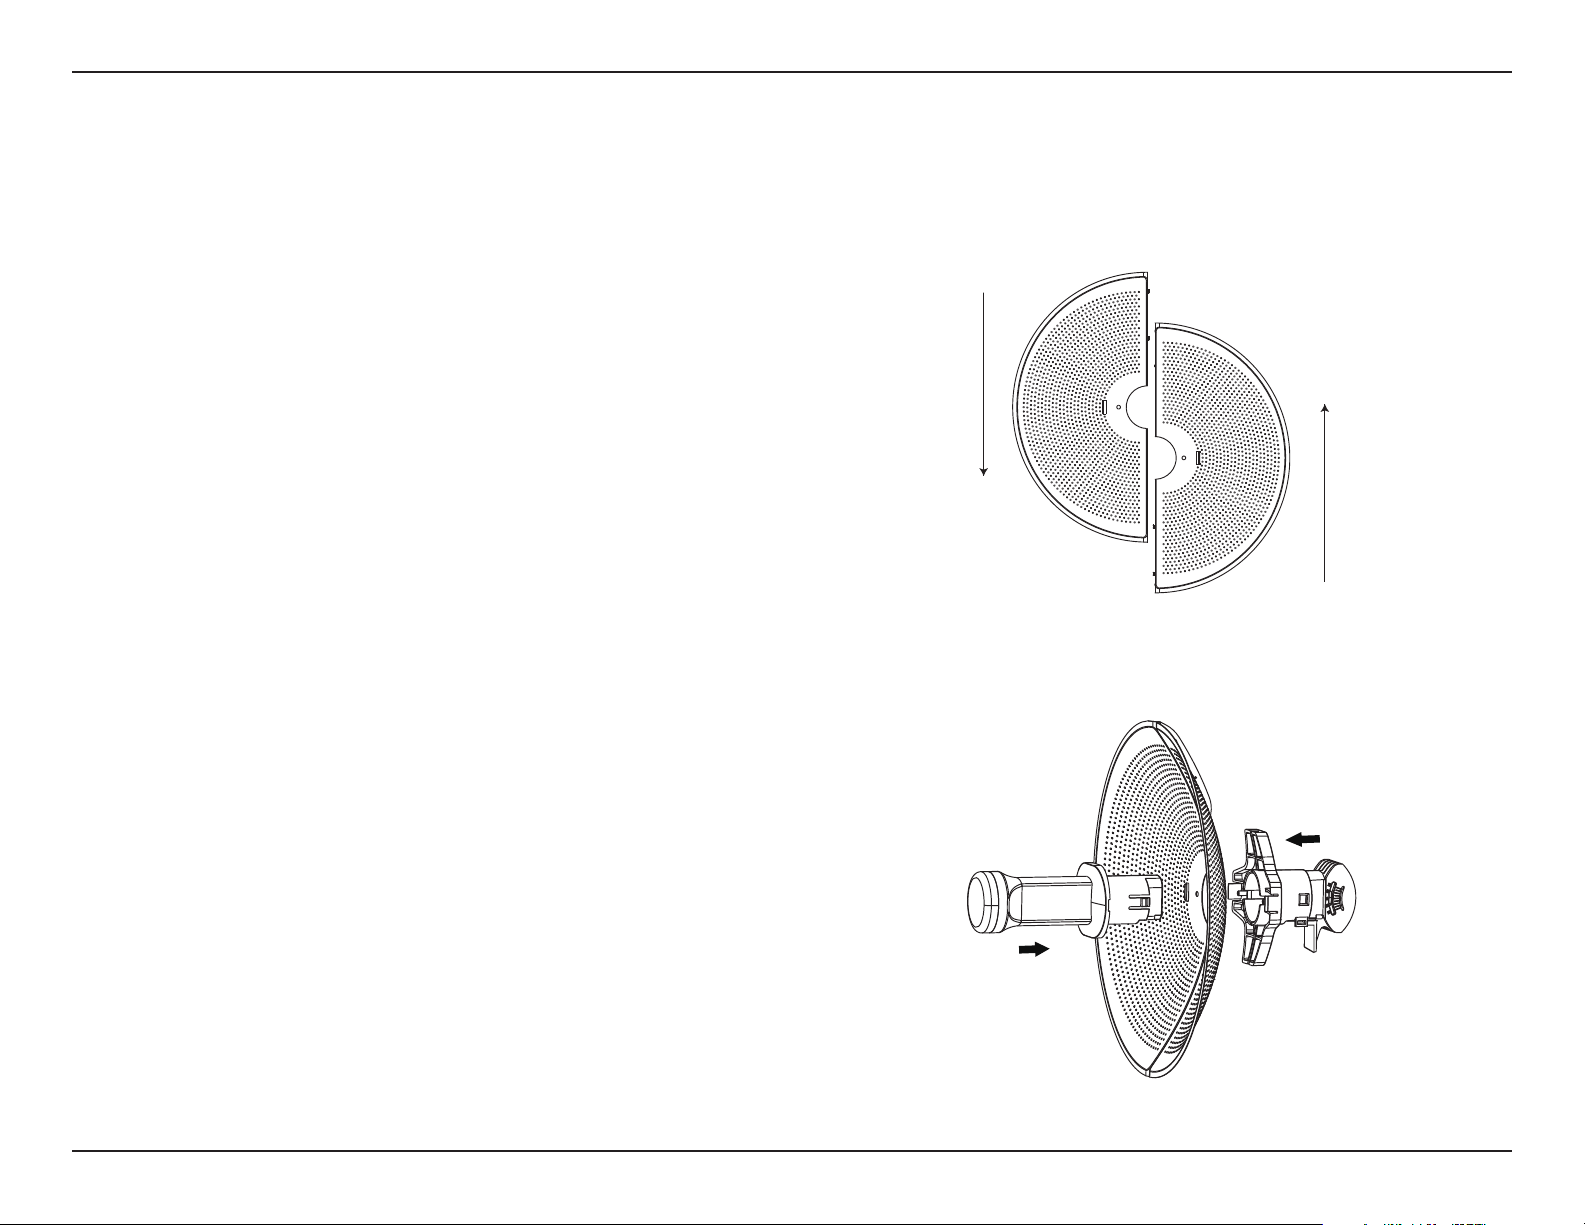
Assembling the Access Point
1. Assemble the dish of the DAP-3712 by sliding the two
halves together until they lock in place.
2. Connect the antenna and base through the hole in the
center of the dish.
Installation
10D-Link DAP-3712 User Manual
Section 2 - Installation
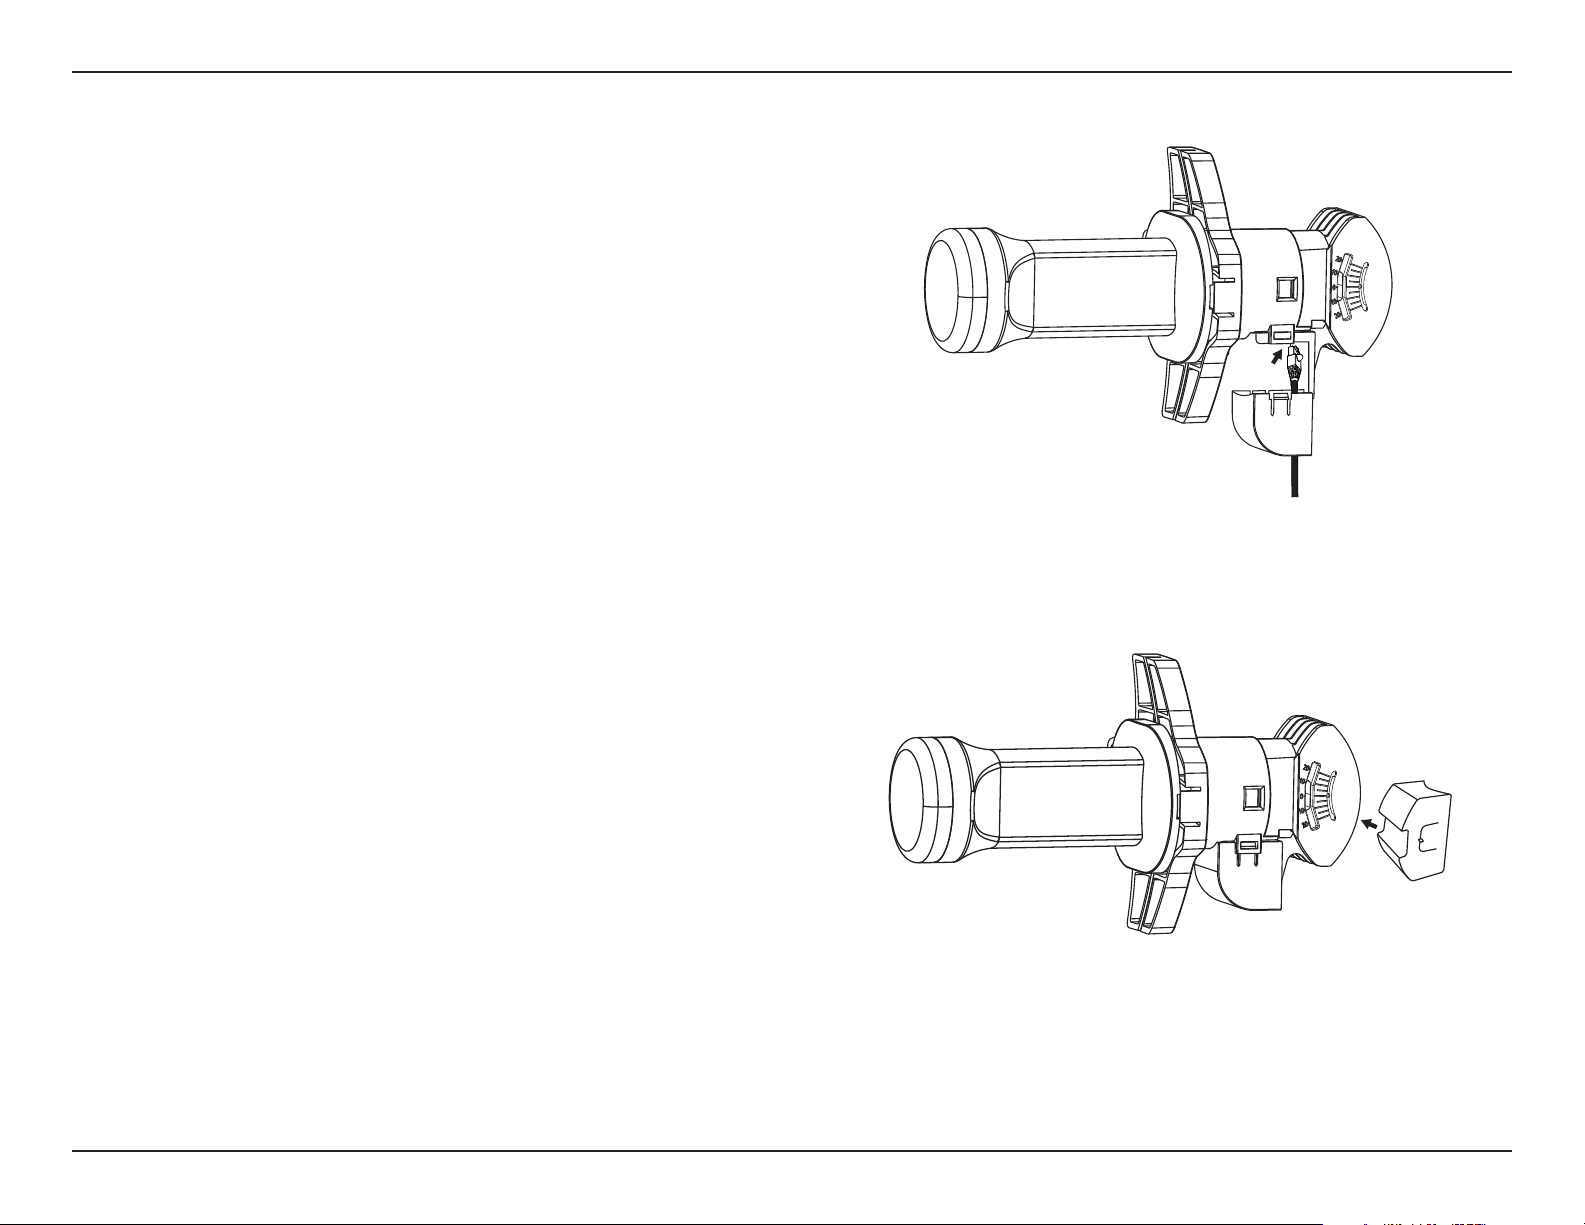
3. Thread a standard RJ-45 Ethernet cable through the cover
for the PoE port on the underside of the DAP-3712. Insert
the cable into the PoE port, then attach the cover to the
device.
4. Connect the adjustment kit to the base of the DAP-3712
by pressing it in until it clicks and locks in place. Use the
adjustment kit to position the antenna at the desired.
11D-Link DAP-3712 User Manual
Section 2 - Installation
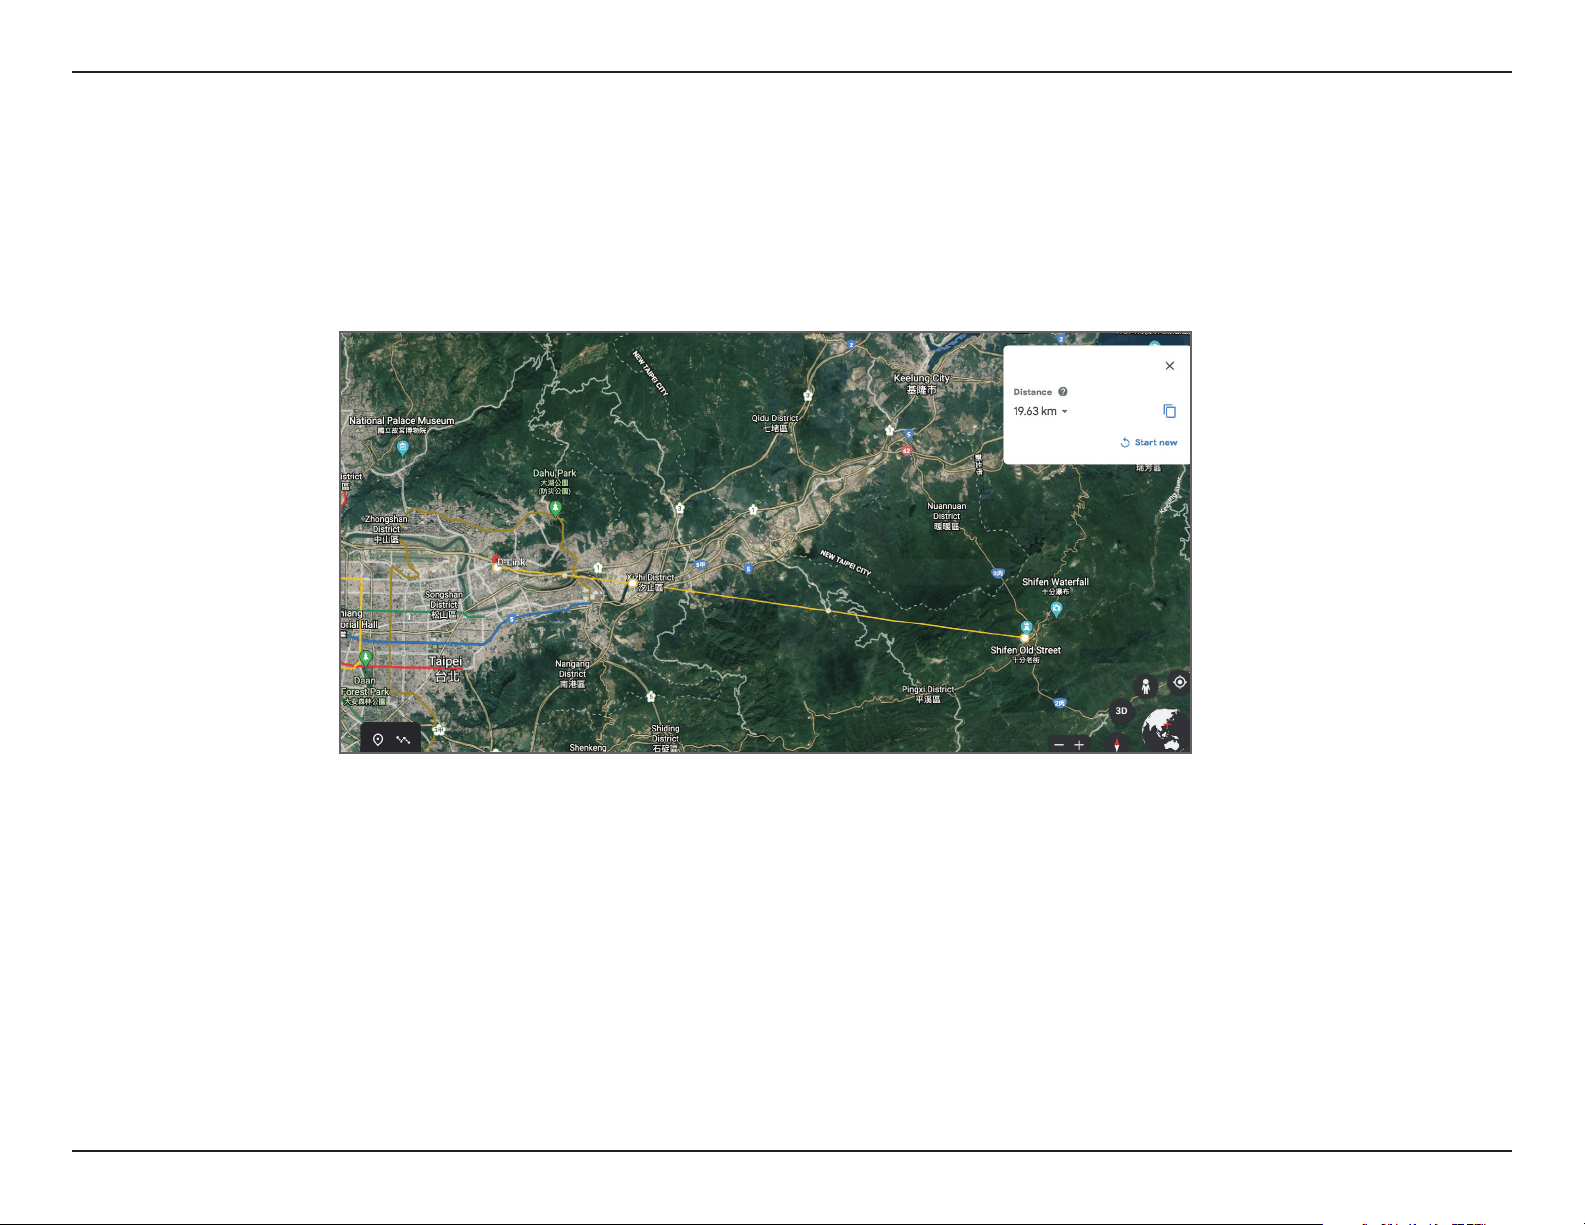
Preparation before Installation
Before installing the DAP-3712, check the distance between the two sides and ensure that they are within wireless signal
range of each other. It may be helpful to use a Graphic Information System (GIS) program such as Google Earth to check for
obstructions between the two sites. If there is an obstruction, it may help to install the DAP-3712 as high as possible to prevent
the signal from being blocked.
Note: Ensure that both devices have the same model number and are running the same firmware version. The radiation pattern and wireless protocol of
the DAP-3712 is designed for high-performance bridge connectivity. Using different models or models with mismatched firmware versions may cause
problems, such as performance degradation or a reduction in coverage area.
12D-Link DAP-3712 User Manual
Section 2 - Installation
Powering the Access Point
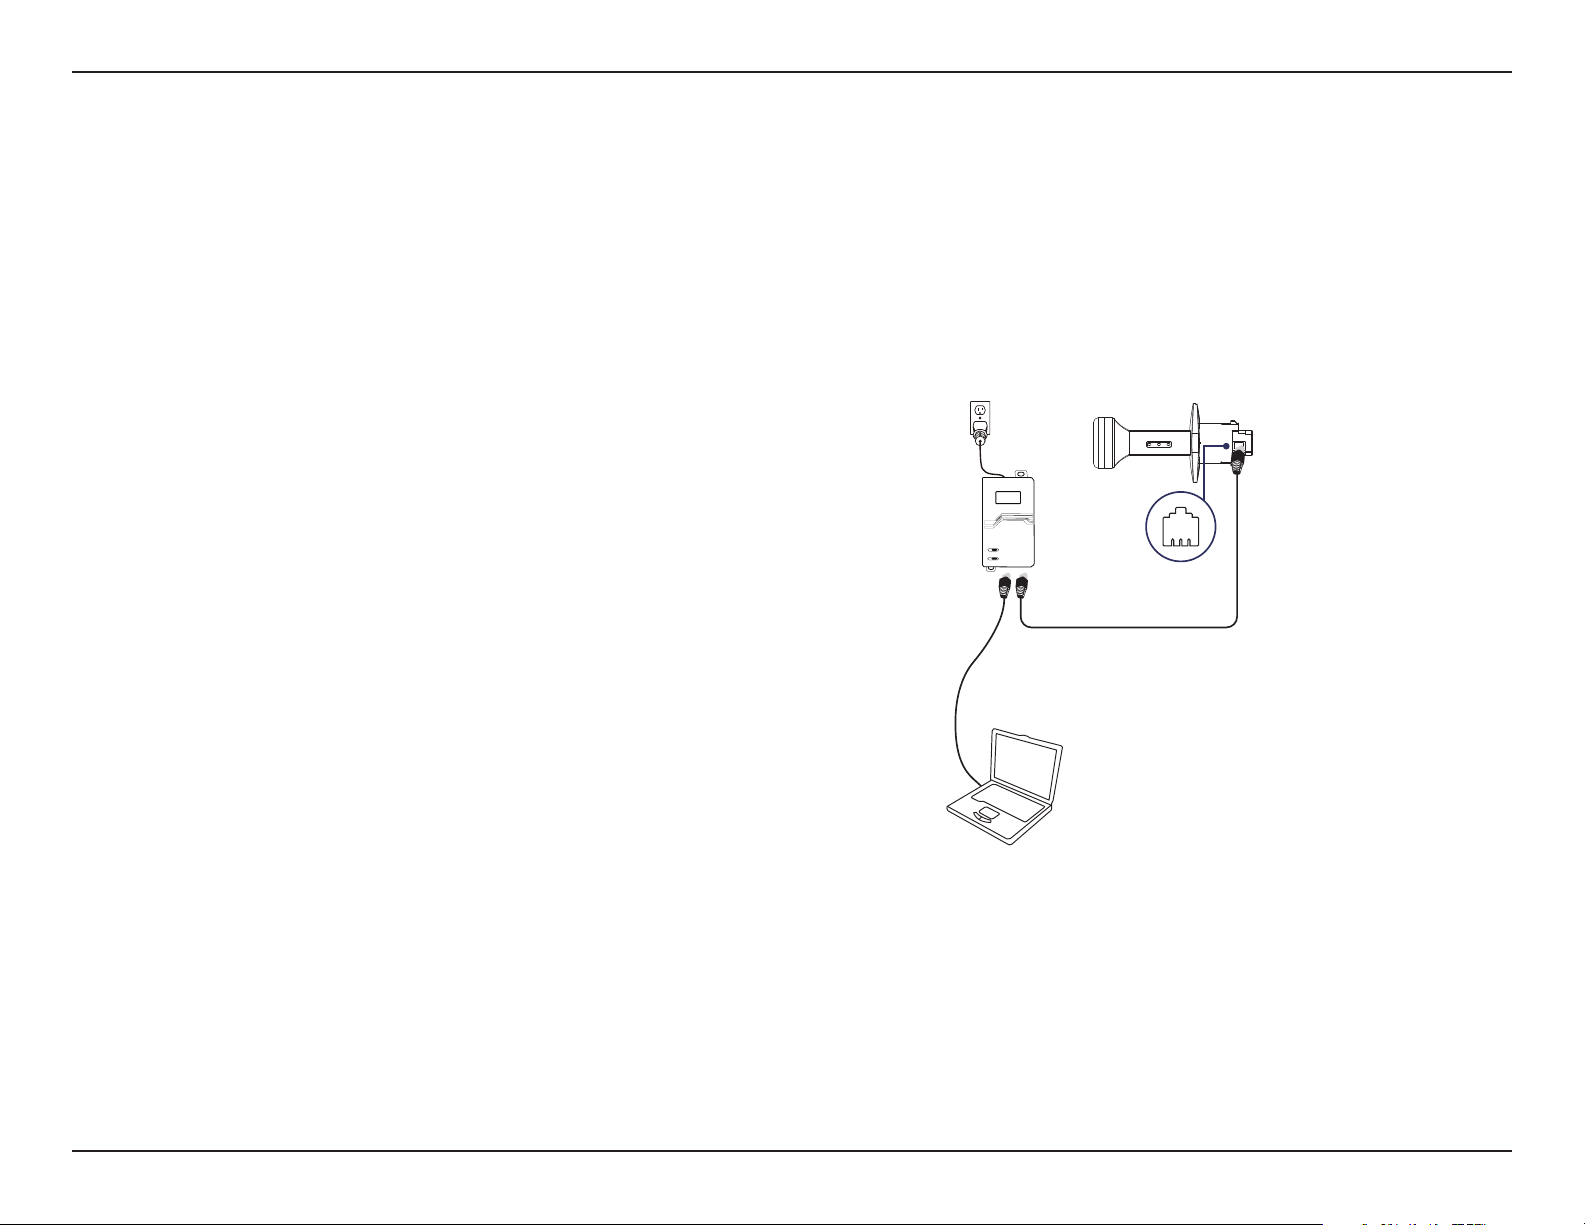
To power the DAP-3712, use a standard Ethernet cable to connect the PoE port on the DAP-3712 to a 48 V PoE injector.
Cable Requirements
Use a CAT 5 cable with an even sheath. The Ethernet ports on the DAP-3712 access point cannot accept a CAT 5 cable that has
an uneven sheath; the RJ-45 connector on the cable will not t properly into the receptacle on the access point.
Conguring the First DAP-3712 in Access Point Mode
1. Use an Ethernet cable to connect the LAN port on the
DAP-3712 to the PoE Out port on the PoE injector. Using
another cable, attach the PoE injector to your switch or
management computer.
2. Ensure the computer is congured with the static IP
address 192.168.0.2 and a subnet mask of 255.255.255.0.
3. Launch a web browser. Enter 192.168.0.50 in the
address eld of your browser.
13D-Link DAP-3712 User Manual
Section 2 - Installation
4. Log in to the administration user interface. The default
login information is:
Username: admin
Password: admin
5. Follow the Setup Wizard’s instructions to congure the
device in Access Point Mode.
14D-Link DAP-3712 User Manual
Section 2 - Installation
Conguring the Second DAP-3712 in Client Mode
1. Follow steps 1-4 of the instructions above to power on
the device. Launch the Setup Wizard to congure the
device in Client Mode.
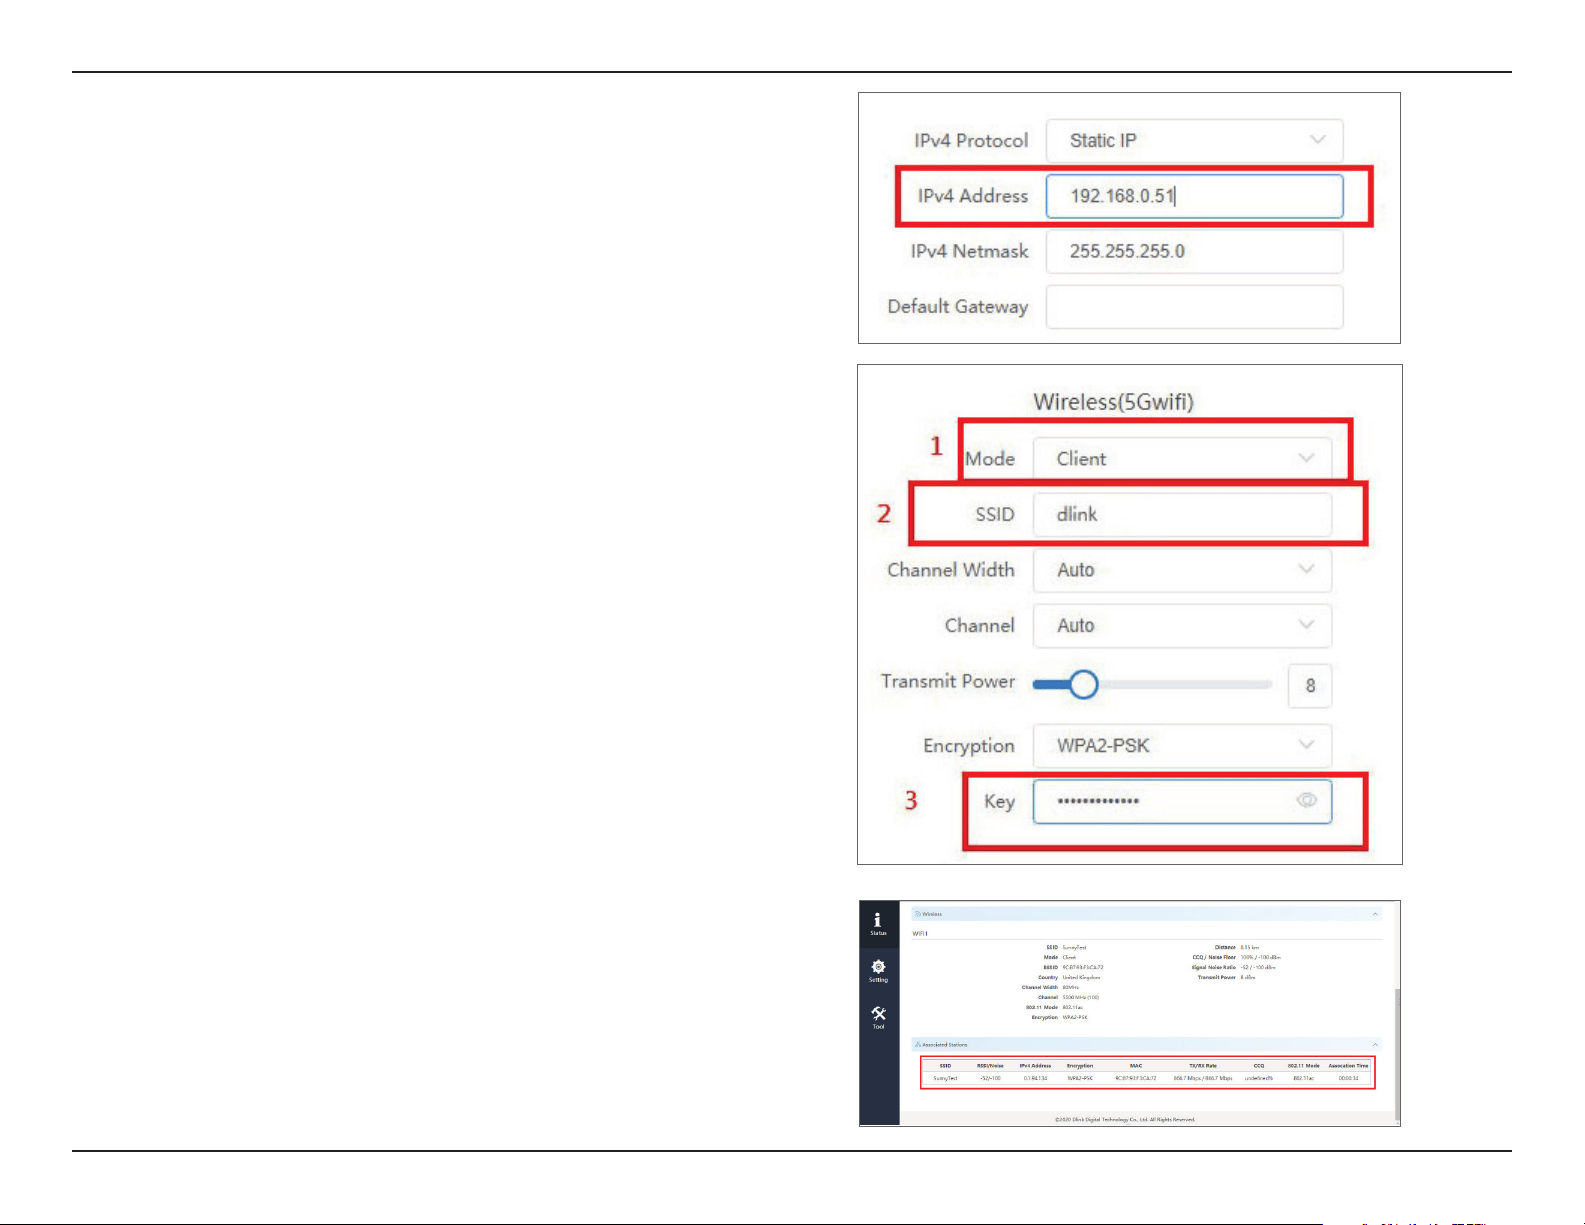
2. To avoid an IP address conict, change the IPv4 address
so that it is dierent from the rst DAP-3712’s IP address
(for instance, by changing it to 192.168.0.51, as in the
following screenshot).
3. On step four of the Setup Wizard (Wireless), select Client
from the drop-down list. Enter the same SSID and key
that you entered when conguring the rst device.
4. To conrm that wireless connectivity between the two
devices is congured correctly, navigate to the Status
page and check the information under Associated
Stations (shown below).
15D-Link DAP-3712 User Manual
Section 2 - Installation
Mounting the Device
If you plan to install the DAP-3712 on a pole, orient the front of the device (the dish and antenna) toward the intended coverage
area.
The antenna only transmits data in the direction it is pointed. Be sure to install the device at a height that ensures that the
alignment between the devices is visible and there are no obstructions in the middle.
Note: The DAP-3712 is designed to receive PoE power from an 802.3at-compliant source. Connecting the DAP-3712 to a PoE device that is not
approved by D-Link can damage the equipment.
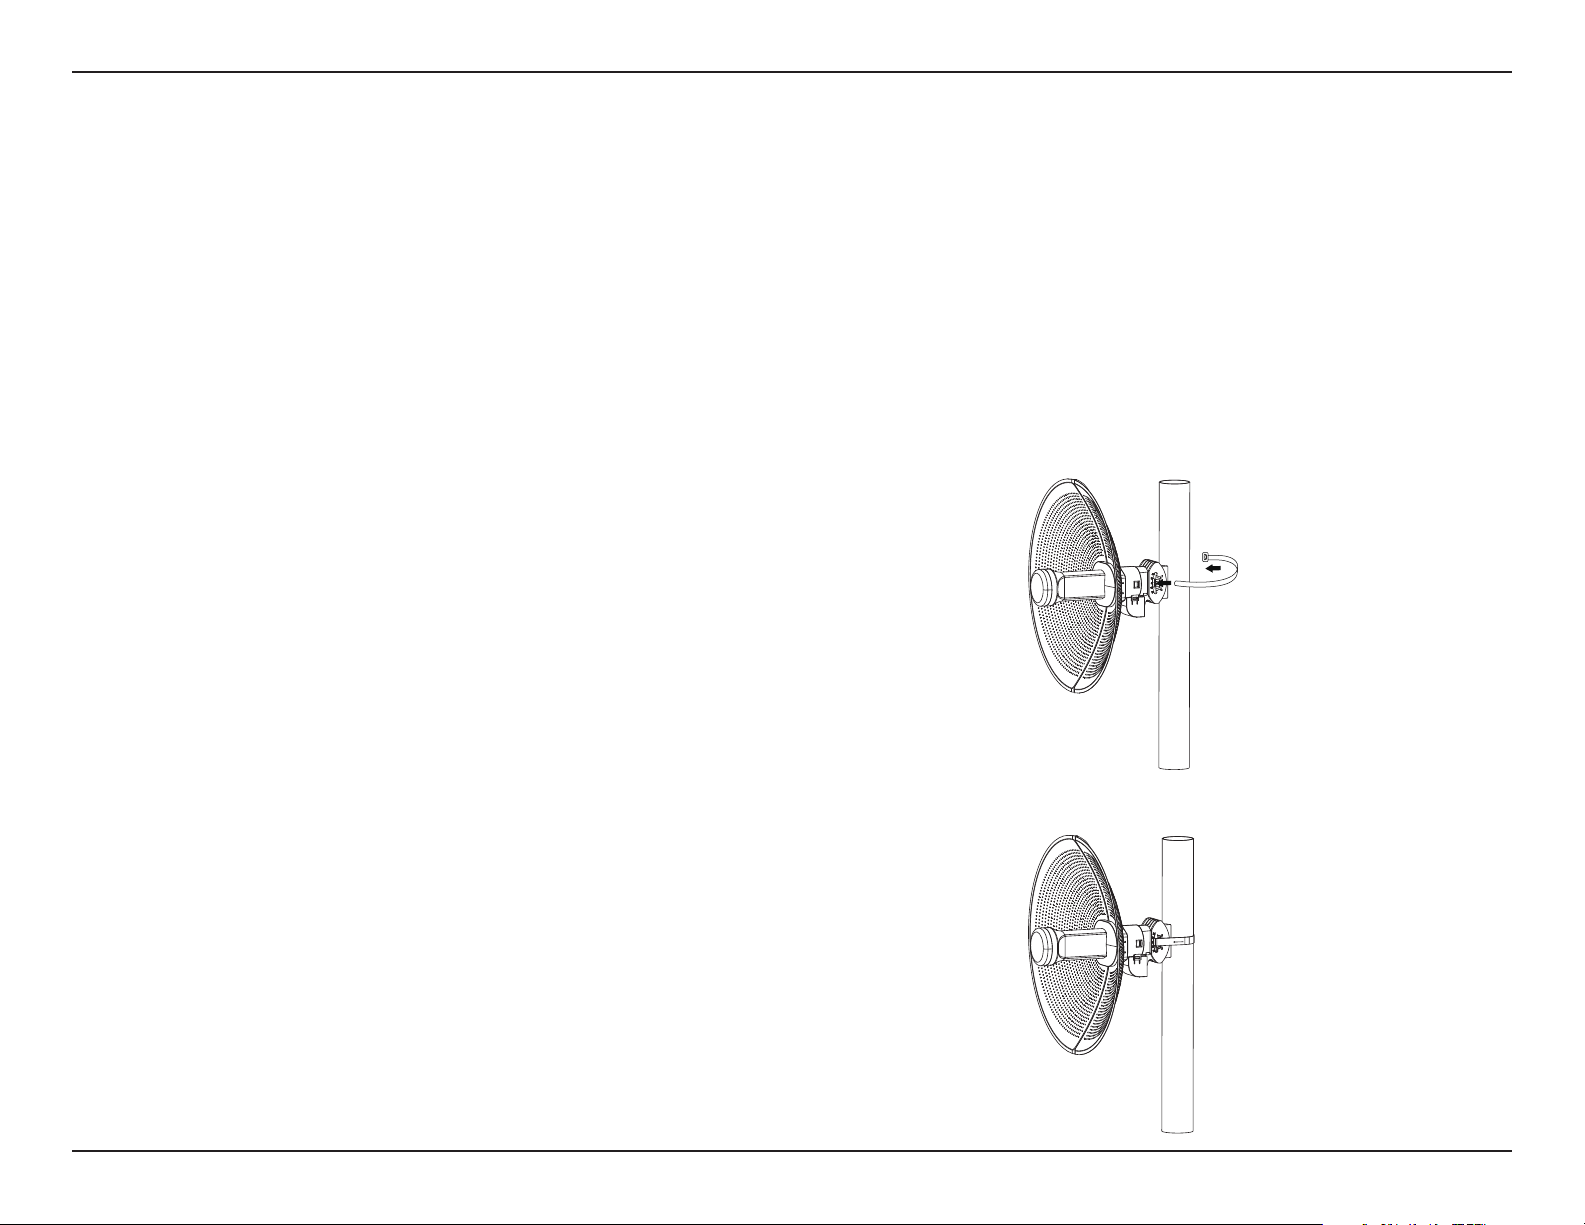
Mounting on a Pole
1. Hold the DAP-3712 against the pole in the desired
position.
2. Thread the metal mounting tie through the hole on the
base of the DAP-3712 and wrap it around the pole. Fasten
the tie to secure the device against the pole.
16D-Link DAP-3712 User Manual
Section 2 - Installation
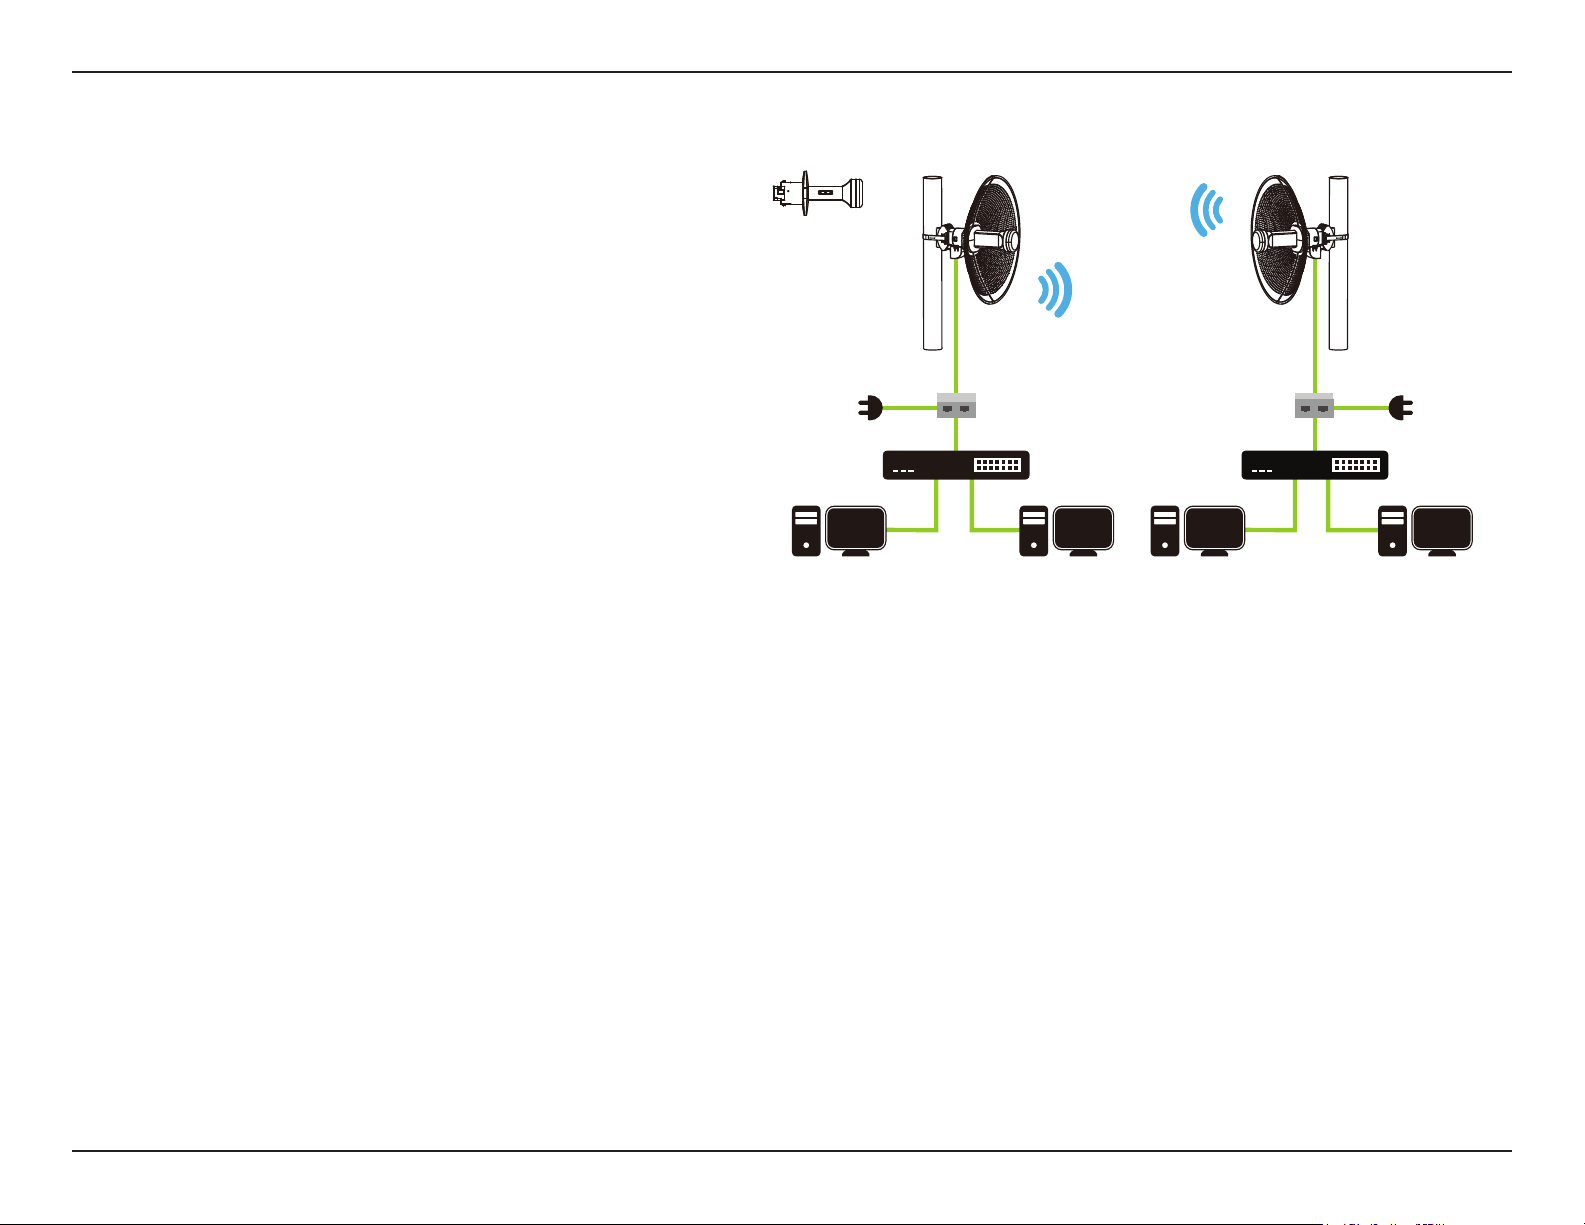
Once completed, your network will resemble the following
diagram.
PoE injectorPoE injector
DAP-3712
DAP-3712
Switch
PC1
PC2
Switch
PC3
PC4
AP modeClient mode
17D-Link DAP-3712 User Manual
Section 3 - Conguration
Conguration
Factory Default Setting
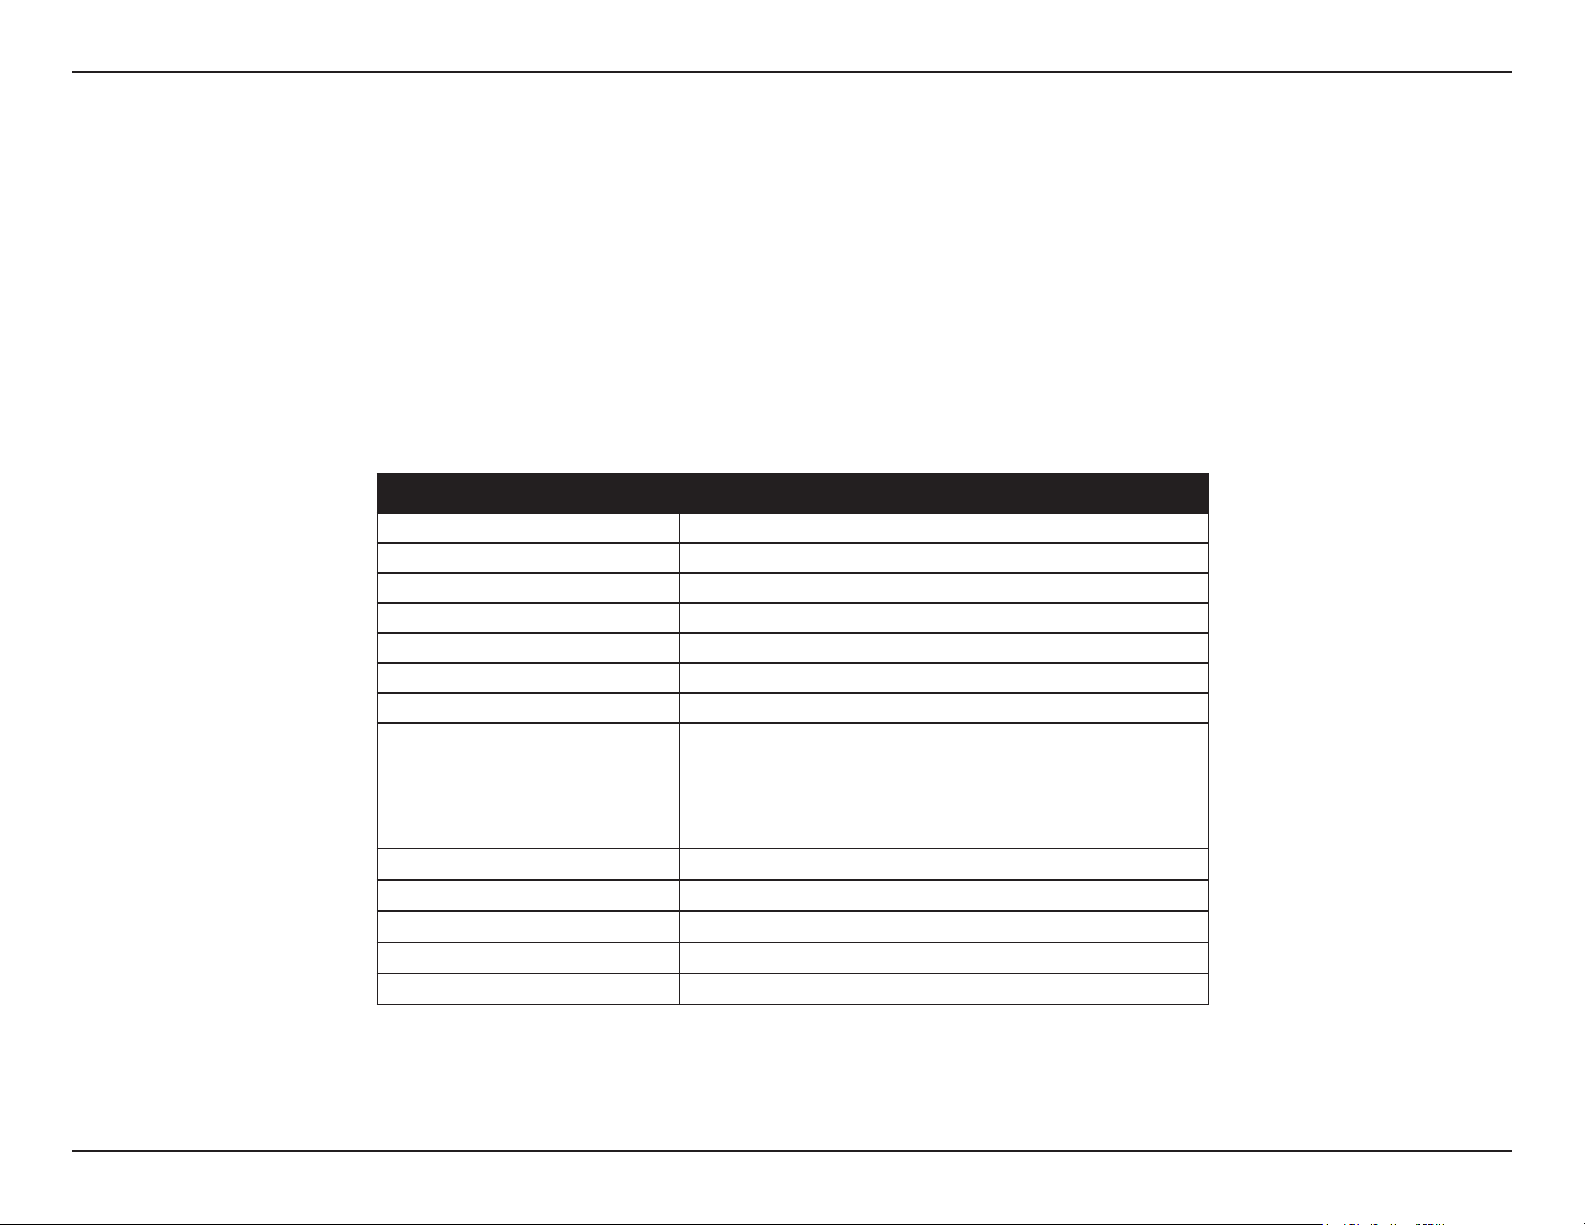
The following table shows the DAP-3712’s default settings.
Features Factory Default Setting
Username admin
Password admin
Operation Mode Bridge
Wi-Fi Mode Access Point
SSID dlink
Encryption WPA2-PSK
Key 1234567890abc
LAN
IP: 192.168.0.50
Subnet: 255.255.255.0
Gateway: 192.168.0.1
DHCP Server disable
802.11 mode 802.11 ac
Channel auto
Bandwidth 80 MHz
TDMA disable
This section will show you how to congure your New D-Link DAP-3712 using the web-based conguration utility.
18D-Link DAP-3712 User Manual
Section 3 - Conguration
Web-based Conguration
To log in the DAP-3712 web interface, you will need to congure your computer’s TCP/IP settings:
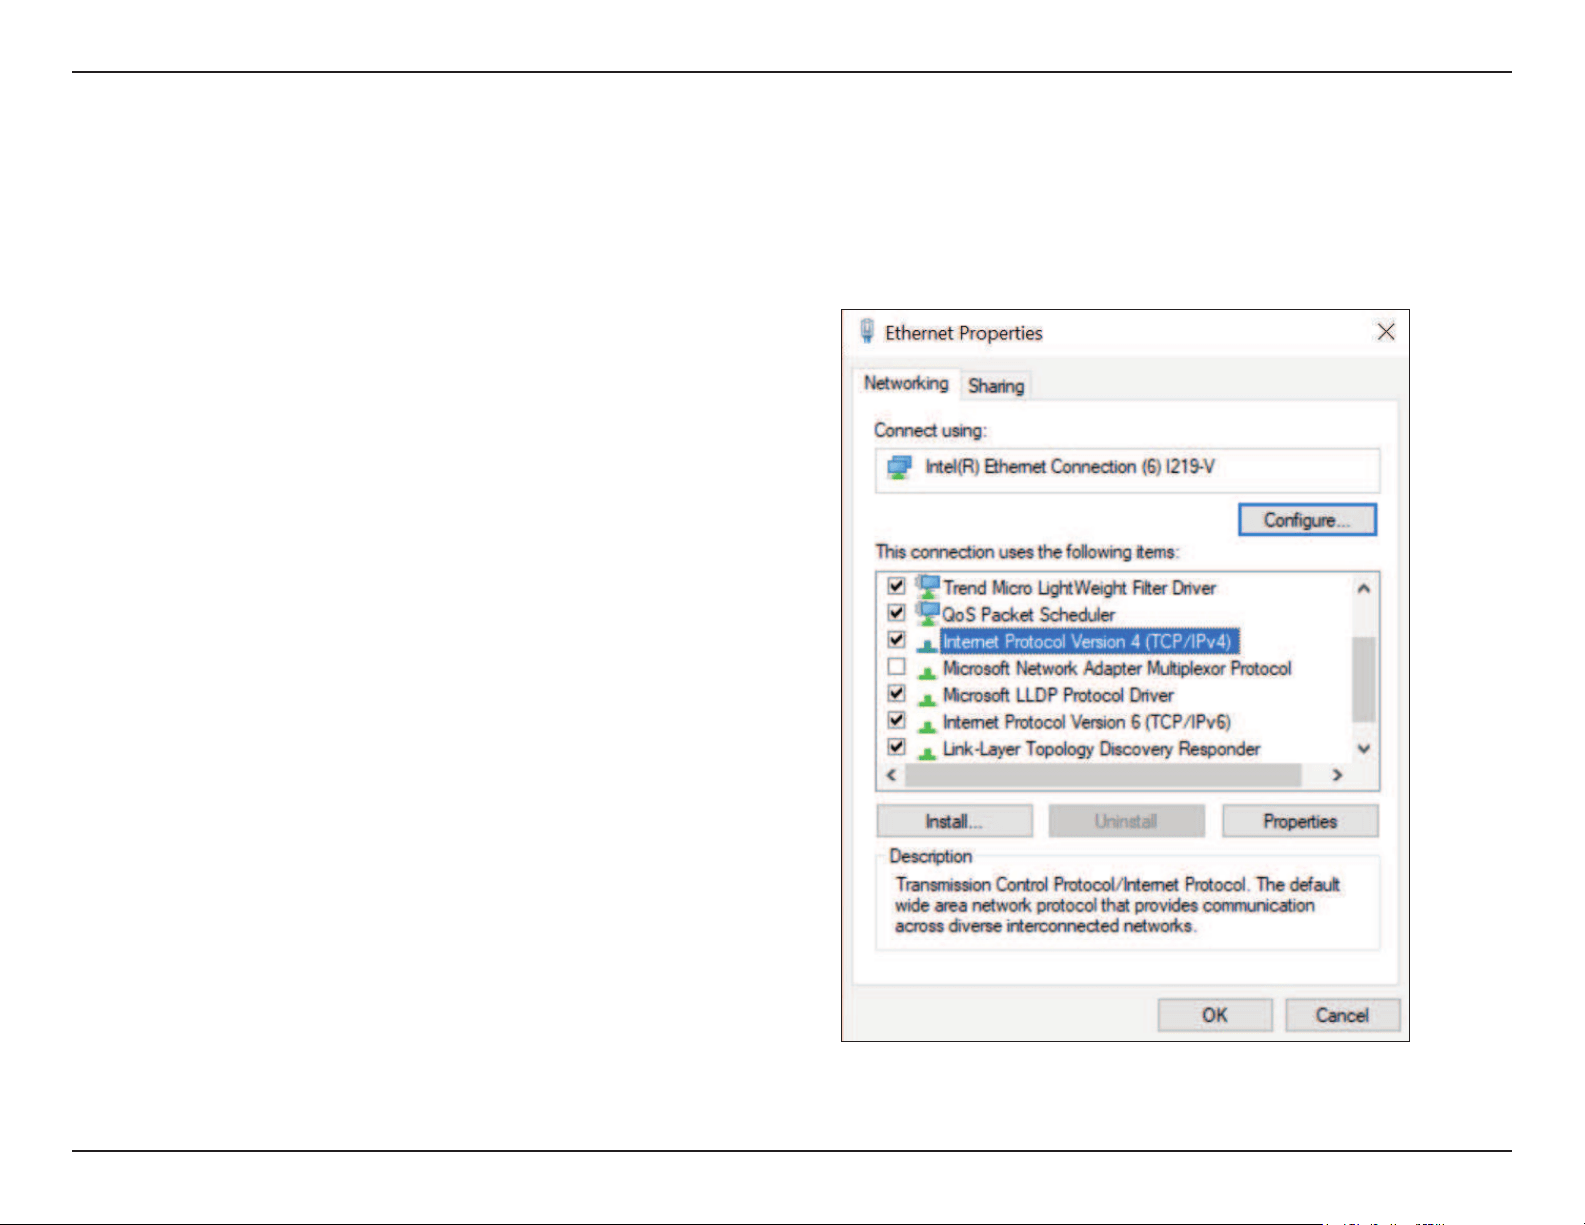
1. Right-click the Local Area Connection icon on your
computer and click Properties, then click Continue. The
Local Area Connection Properties dialog box will appear,
as seen below.
19D-Link DAP-3712 User Manual
Section 3 - Conguration
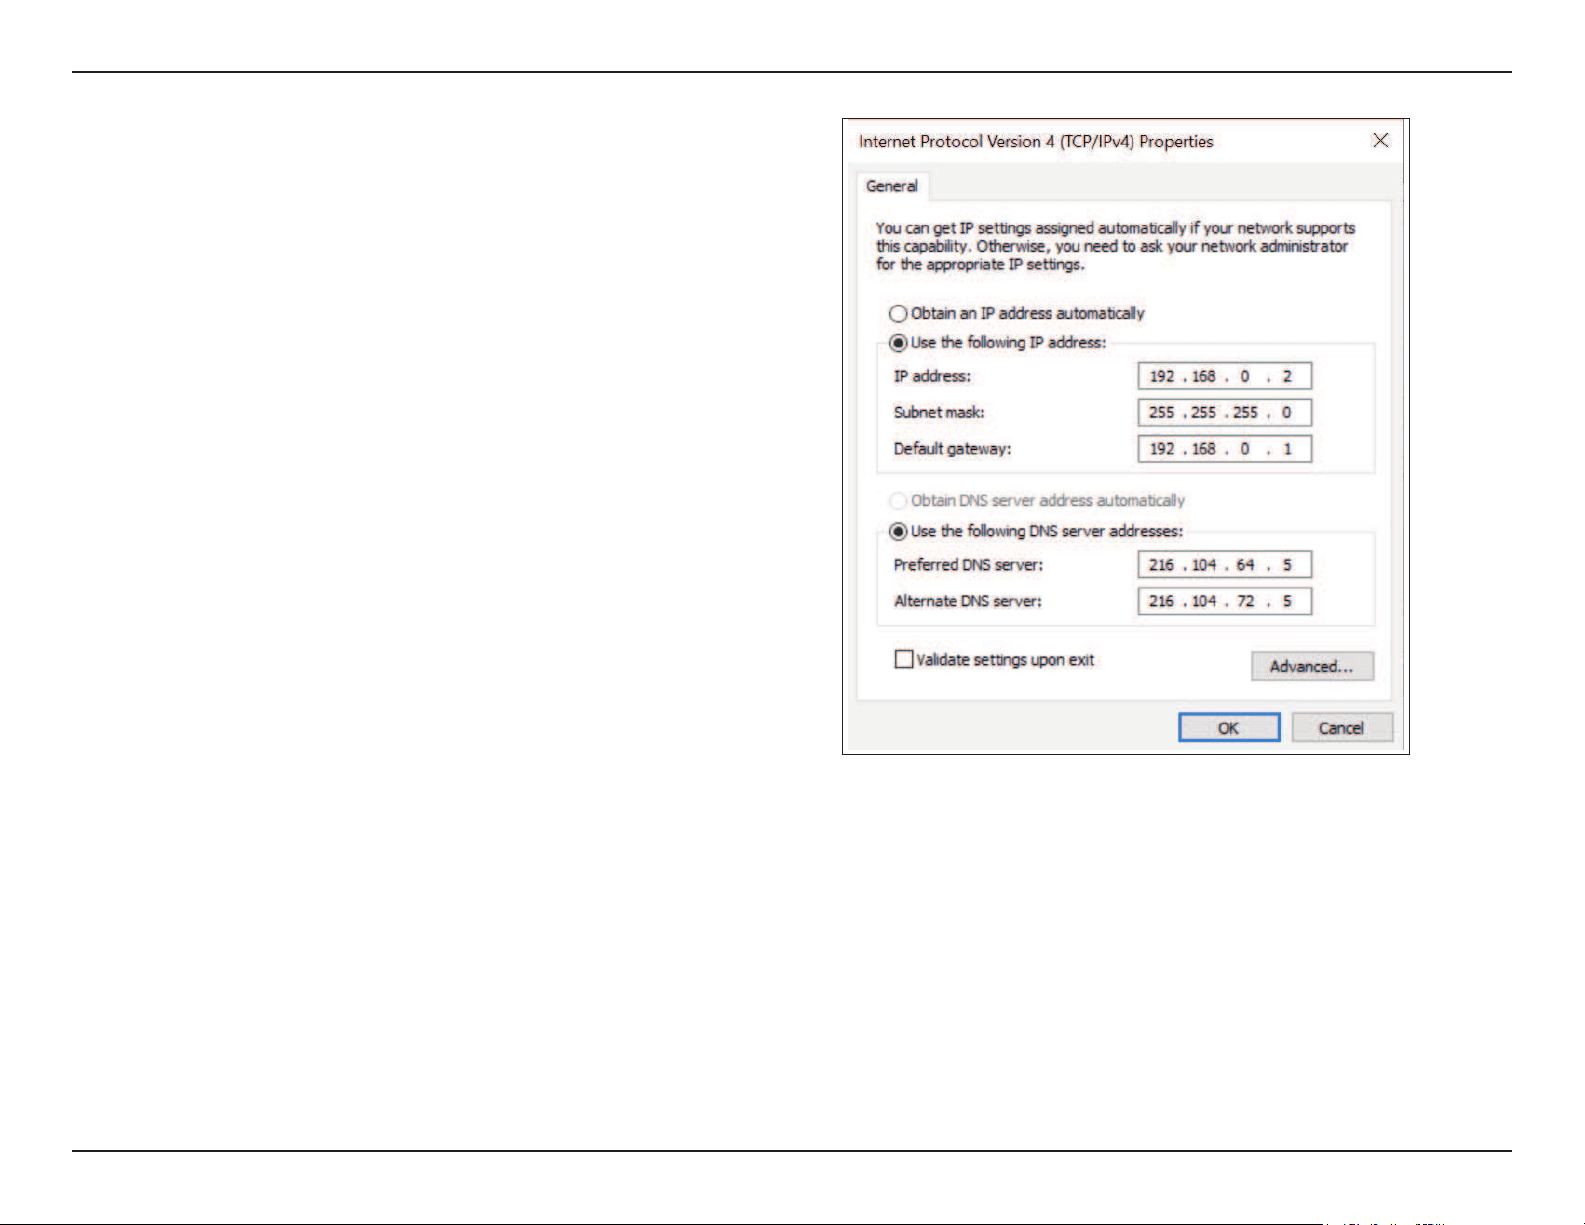
2. Select Internet Protocol (TCP/IP) and click the Properties
button, and the following dialog box will appear:
3. In the above gure, the IP address should be set to
192.168.0.*. Here, * can be any number between 1-255
(but not 50, since the DAP-3712’s default IP address is
192.168.0.50).
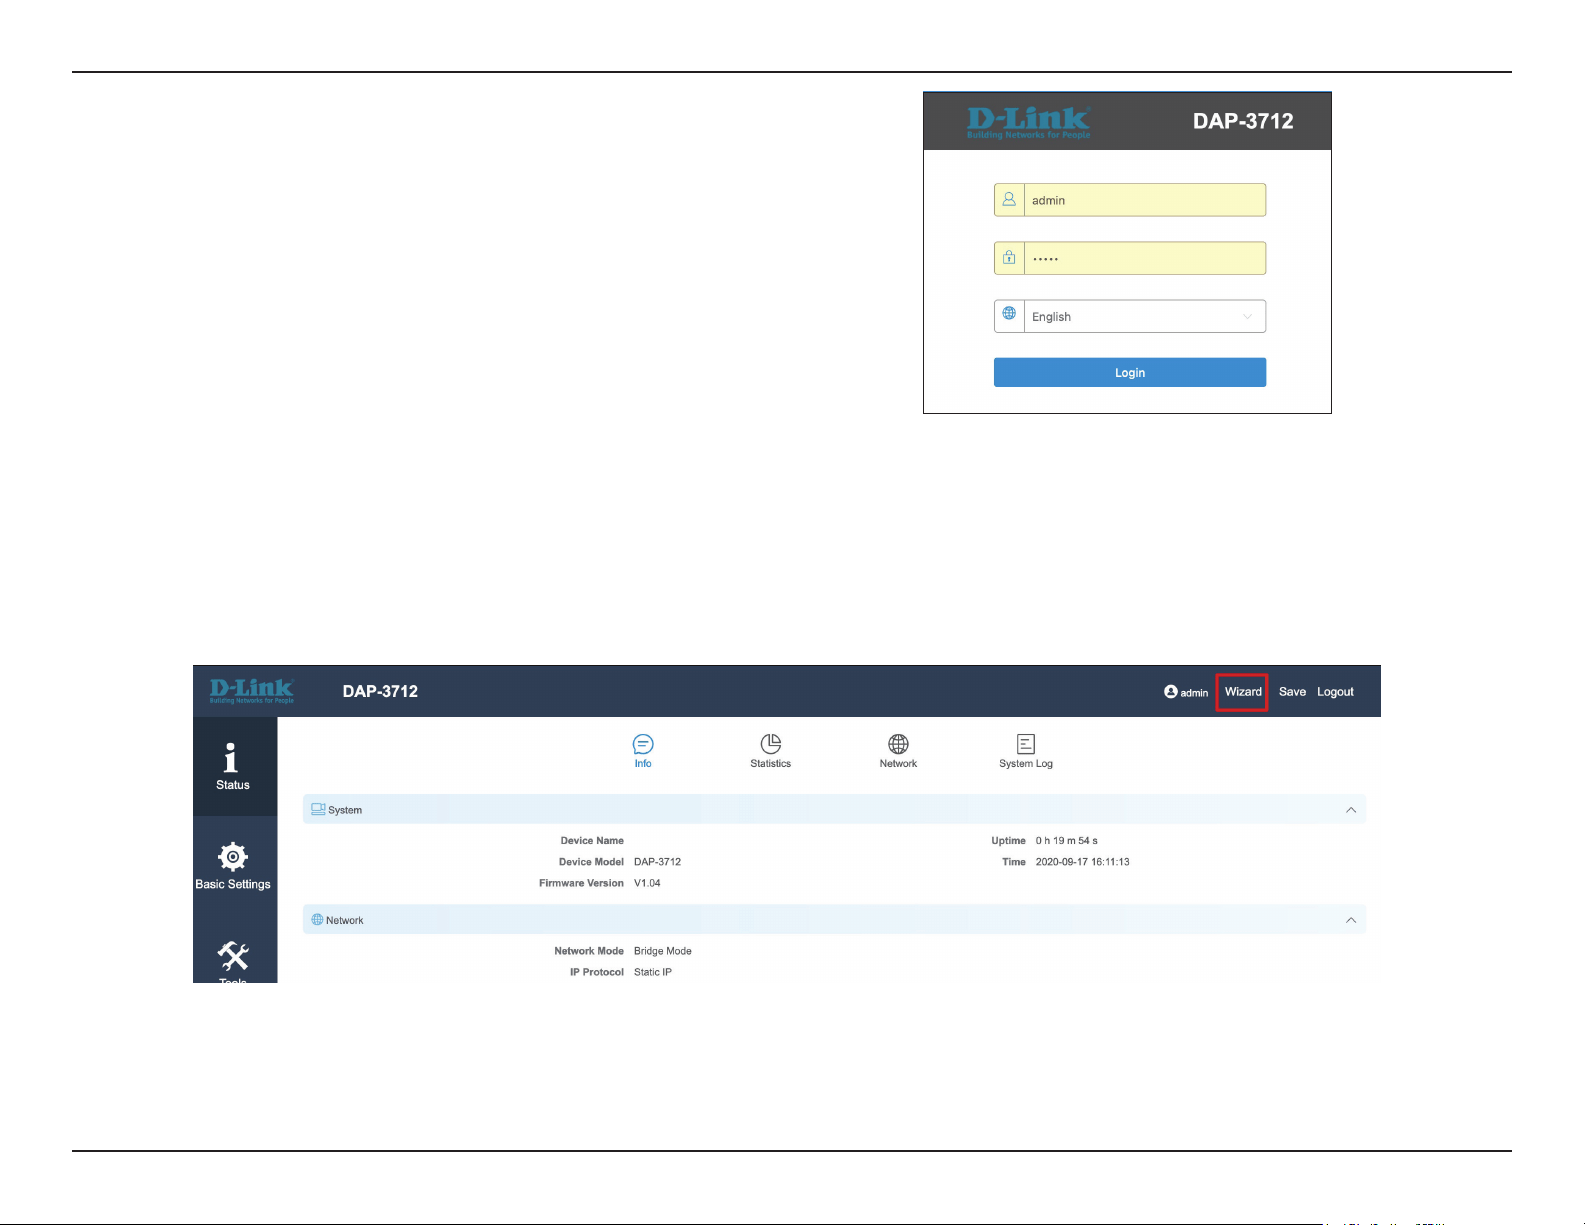
20D-Link DAP-3712 User Manual
Section 3 - Conguration
4. When you are done conguring the IP settings above,
enter the default IP address (192.168.0.50) into the
address bar of your web browser, and the following login
interface will appear.
Wizard
When you log into the DAP-3712 for the rst time, the Wizard page will automatic pop-up. You can also click Wizard in the top
right corner.
To congure the device, follow these steps:
21D-Link DAP-3712 User Manual
Section 3 - Conguration
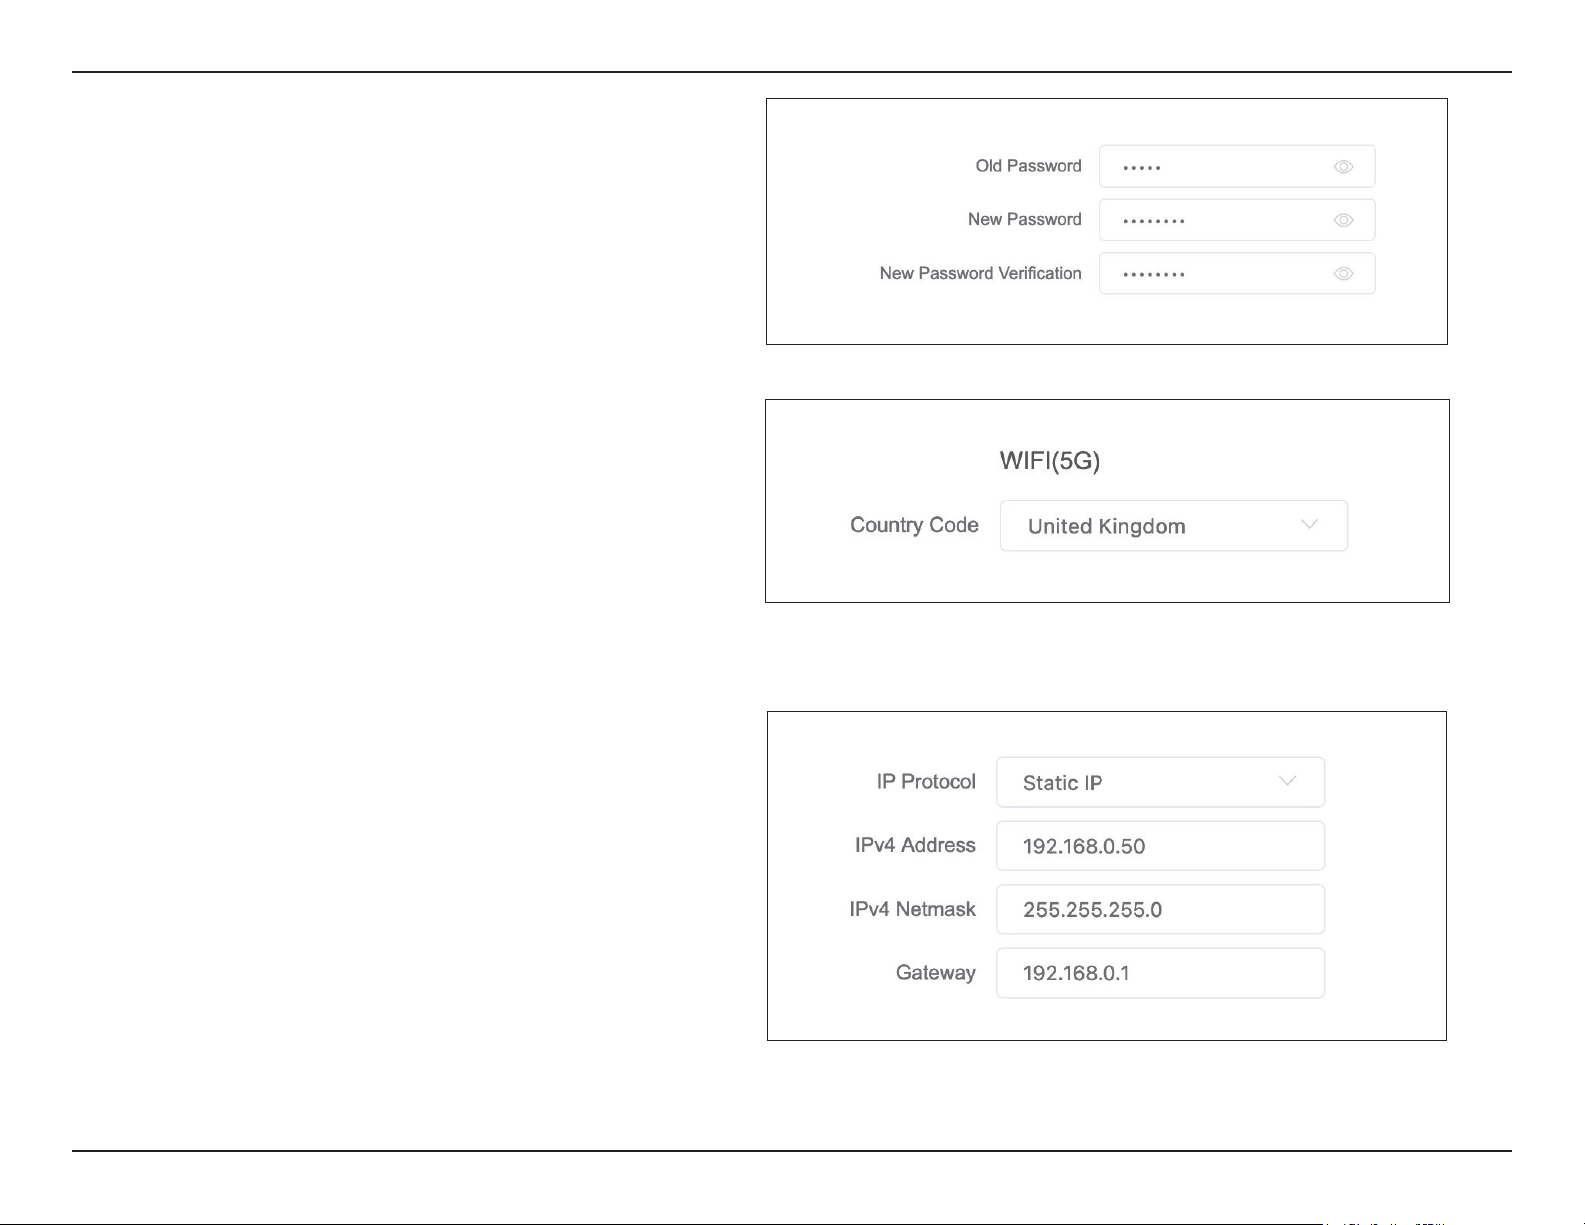
1. Change password
If this is the rst time you have logged into
the DAP-3712, you will need to change the
password. The default password is admin.
2. Country
On the next screen, select your country.
3. Network
You can change the IP address of the DAP-3712. The default
IP is 192.168.0.50. Click Next to advance to the next page.
22D-Link DAP-3712 User Manual
Section 3 - Conguration
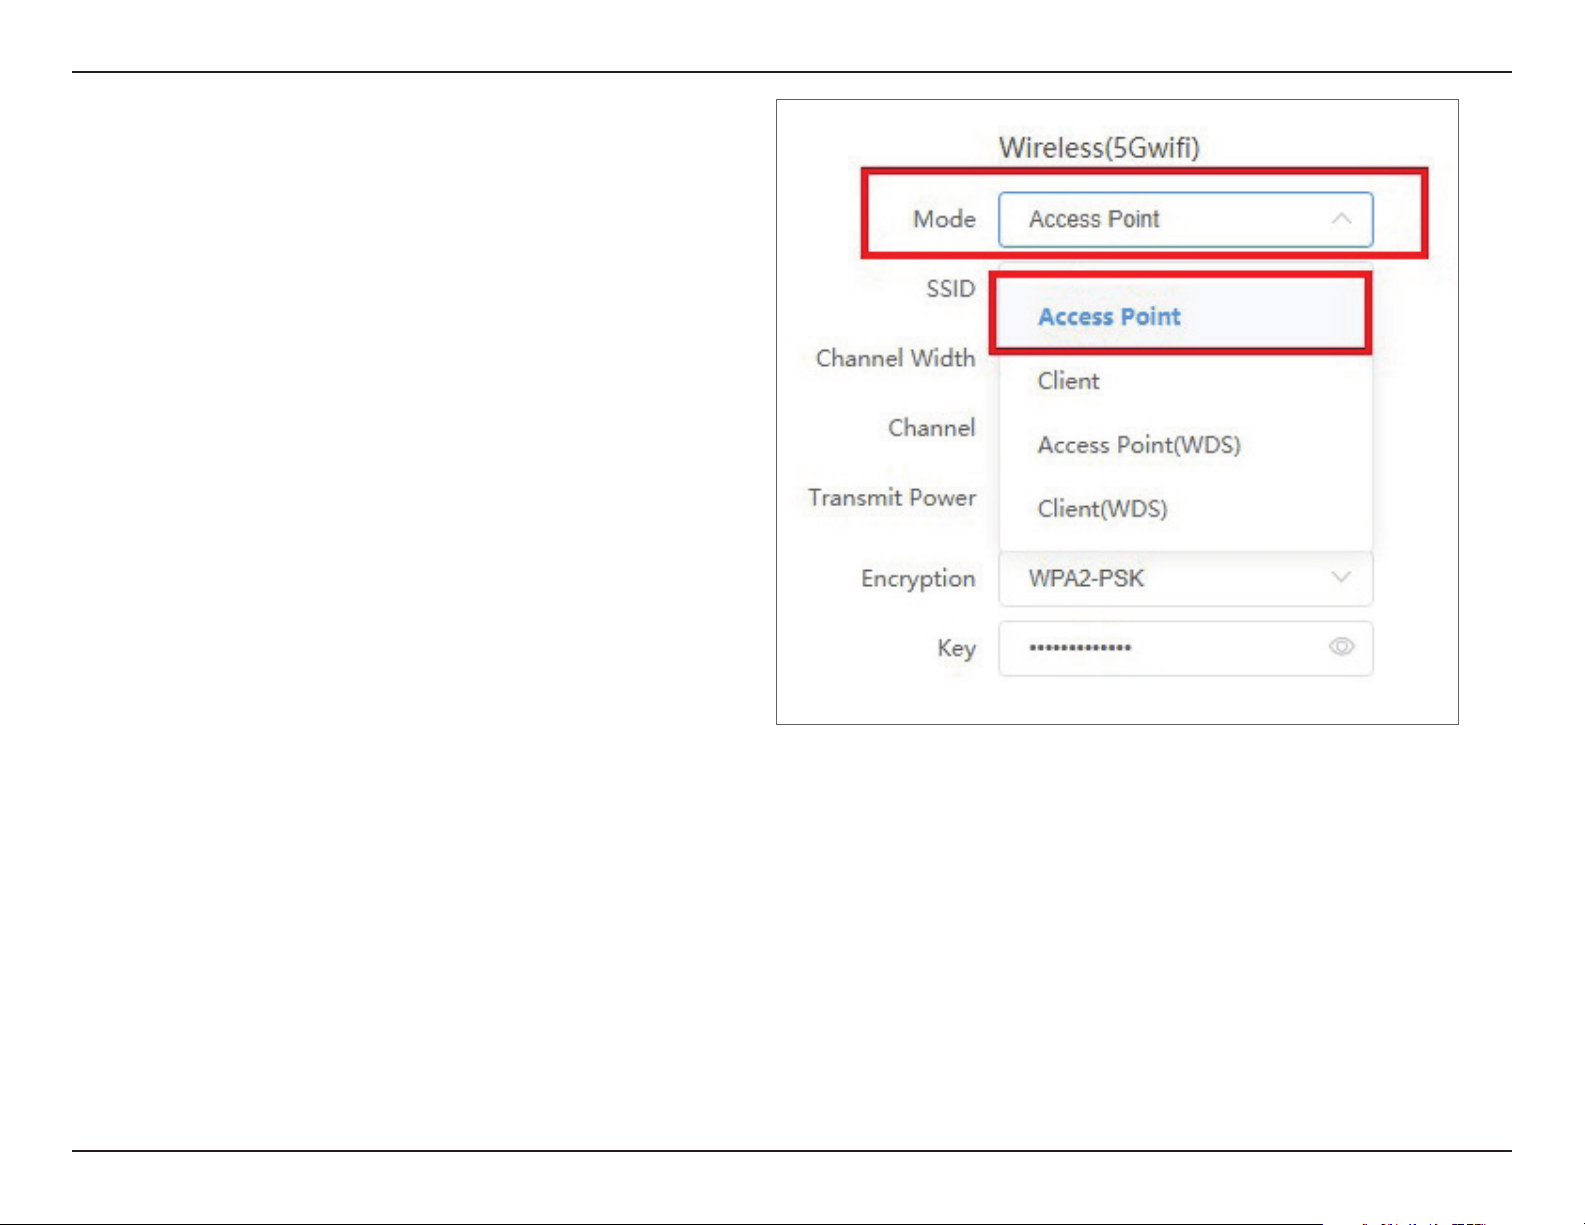
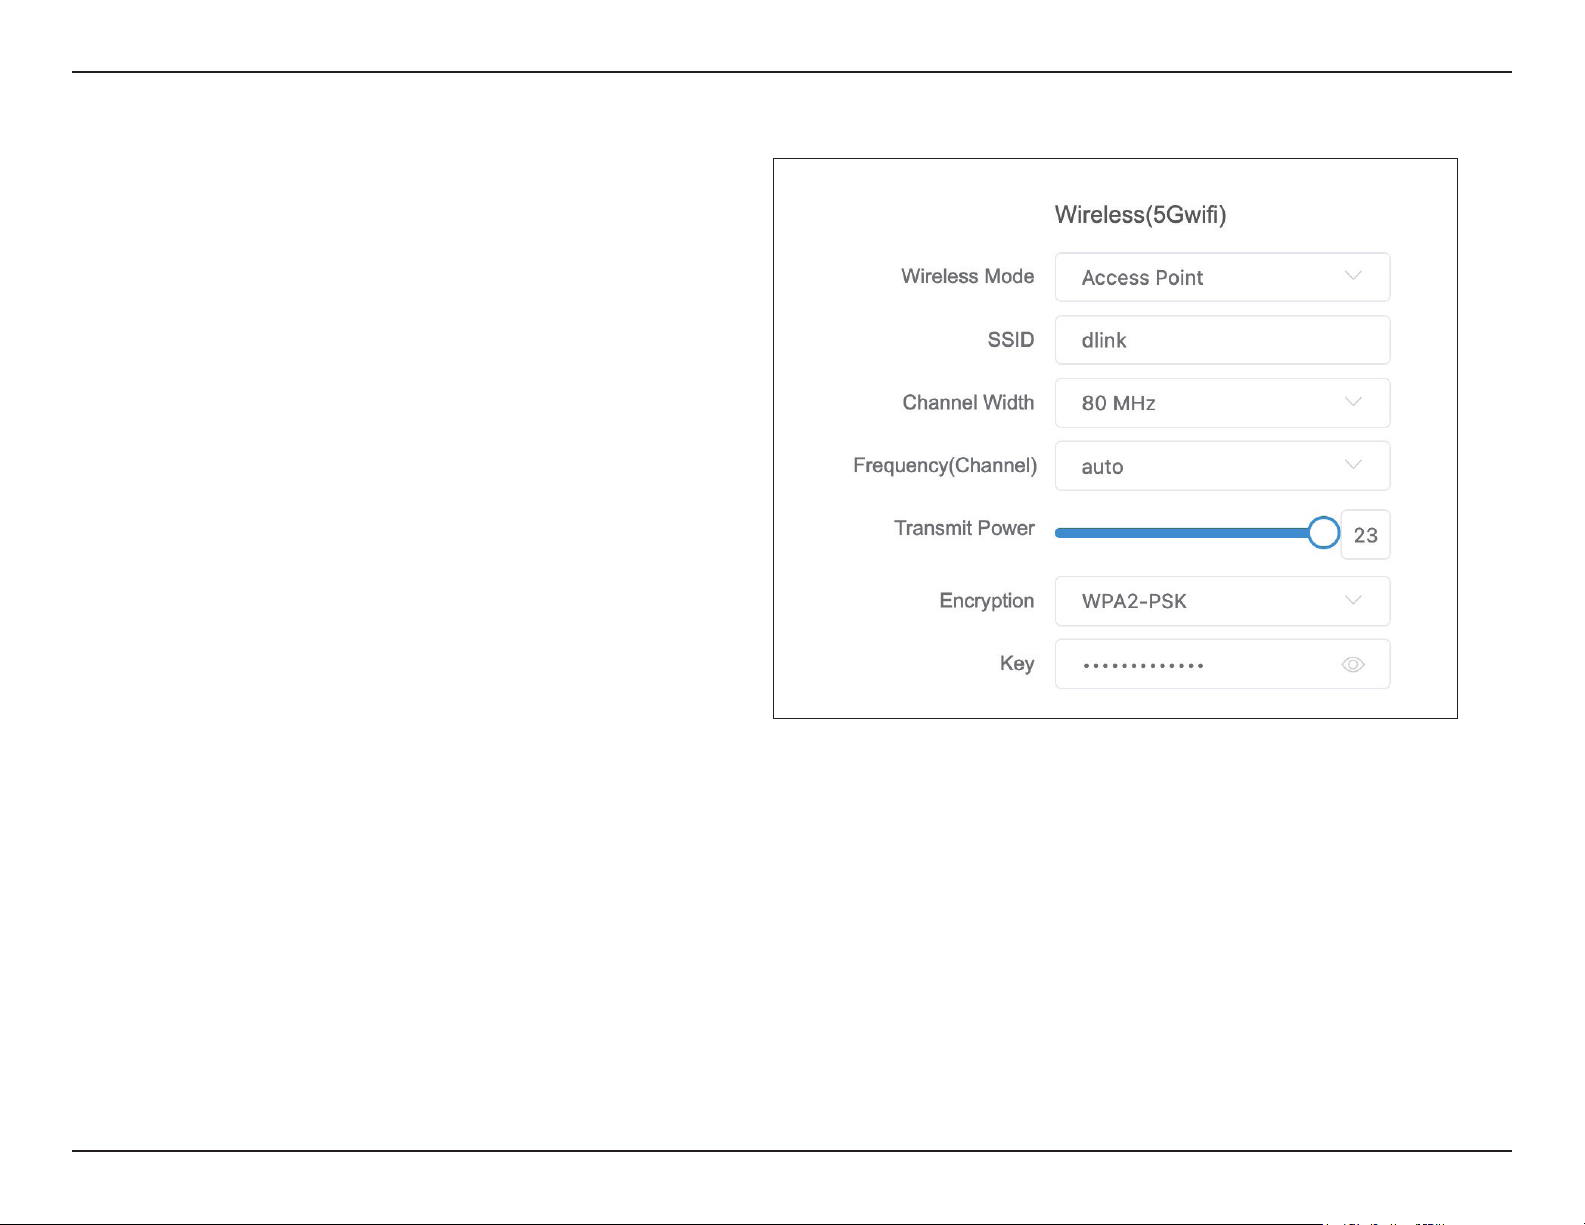
There are four wireless modes: Access Point, Client,
Access Point (WDS), and Client (WDS). To use a
point-to-point or point-to-multipoint connection,
you need to congure the primary DAP-3712 in
Access Point or Access Point (WDS) mode and the
other DAP-3712s in Client mode or Client (WDS)
mode.
If you want to preserves MAC address of clients
frame , it is suggest to use Acess Point(WDS) and
Client (WDS) for each size.
You can set the SSID which the device will
broadcast when Access Point or Access Point
(WDS) is selected. Alternately, set the SSID of the
remote site when Client or Client (WDS) is selected.
The default SSID is dlink.
Use this to select the channel bandwidth of the
DAP-3712. The default is 80 Mhz.
Use this to select the Wi-Fi channel the AP will
broadcast on. The available channels depend on
the county you selected.
Use this to set the DAP-3712’s output power.
You can select which Wi-Fi encryption the DAP-
3712 should use: Open, WPA-PSK, WPA2-PSK, WPA/
WPA2 Hybrid-PSK, or IEEE802.1X.
To input the WiFI encryption key. The default key
is 1234567890abc
Wireless Mode:
SSID:
Channel Width:
Frequency
(Channel):
Transmit
Power:
Encryption:
Key:
4. Wireless
23D-Link DAP-3712 User Manual
Section 3 - Conguration
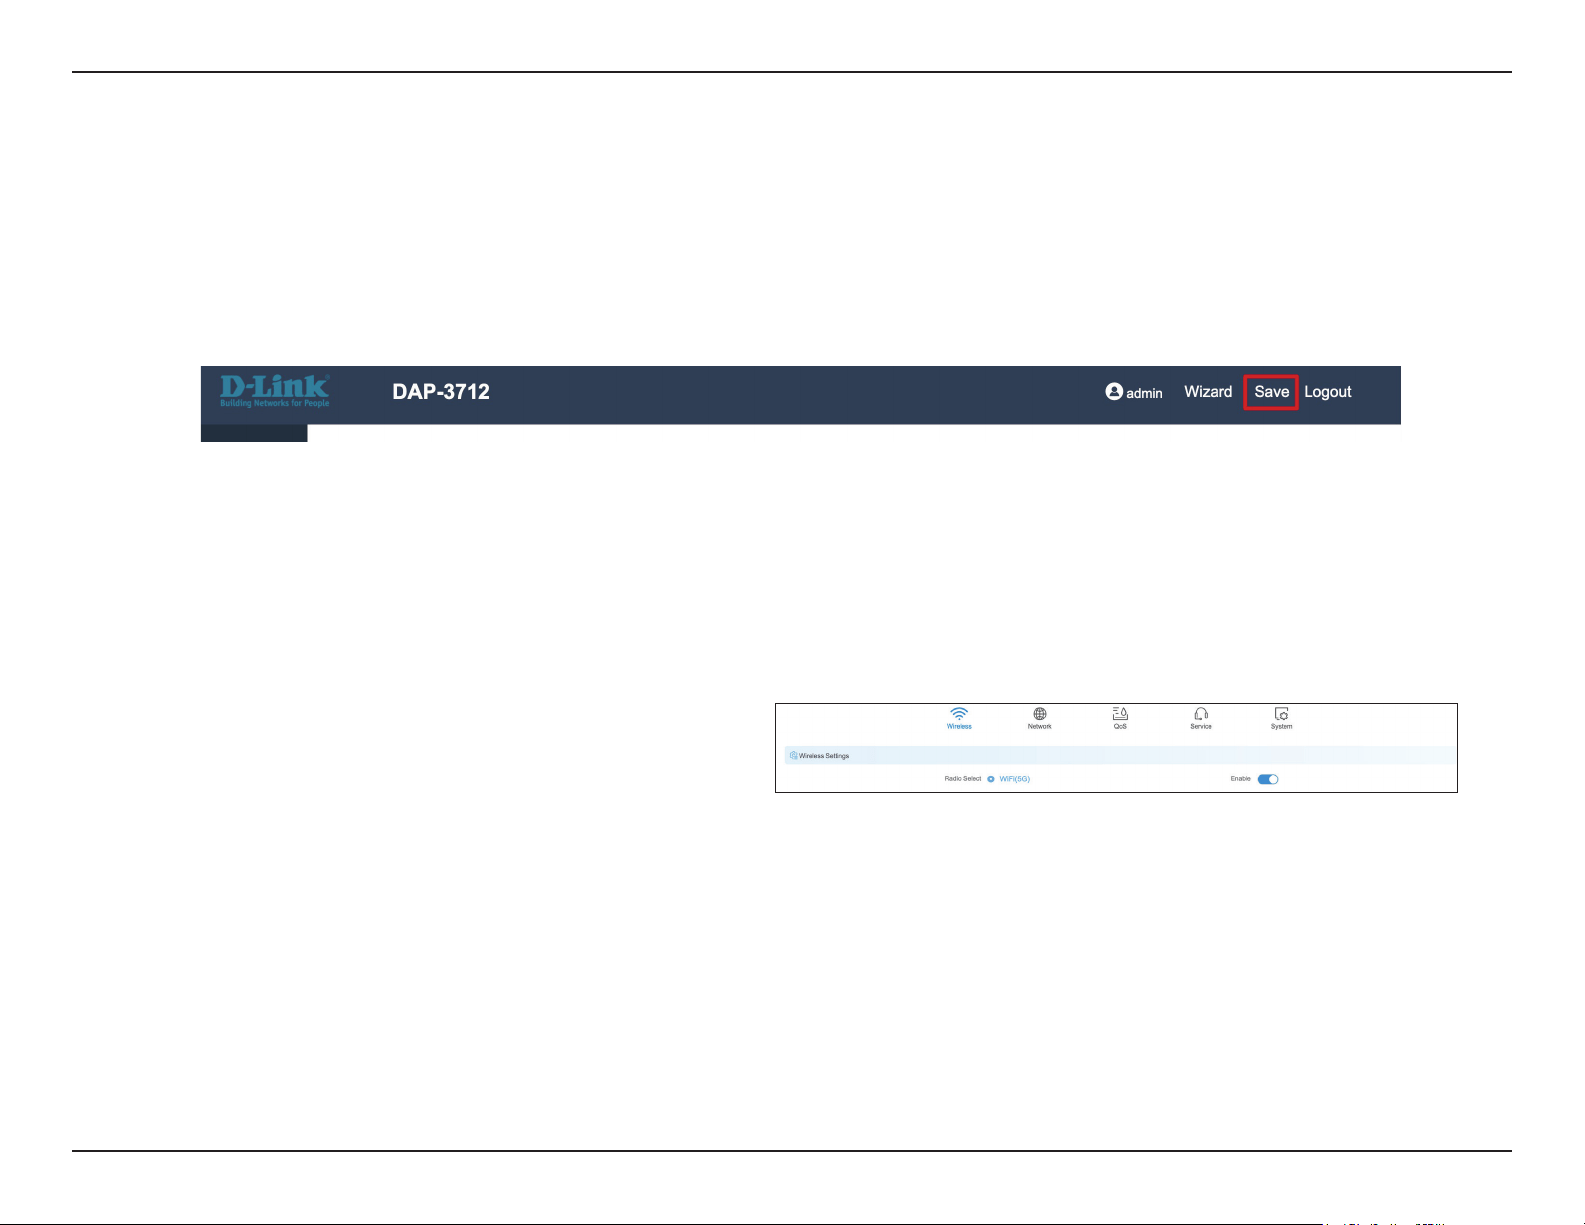
Basic Settings
This section will introduce how to navigate the Basic Settings page. On this page, there are Five tabs: Wireless, Network, QoS,
Service, and System.
After making changes, click Save to apply them.
Wireless
In the Wireless tab, you can congure the DAP-3712’s Wi-Fi and radio settings.
Toggle the button to enable or disable Wi-Fi.Wireless
Settings:
24D-Link DAP-3712 User Manual
Section 3 - Conguration
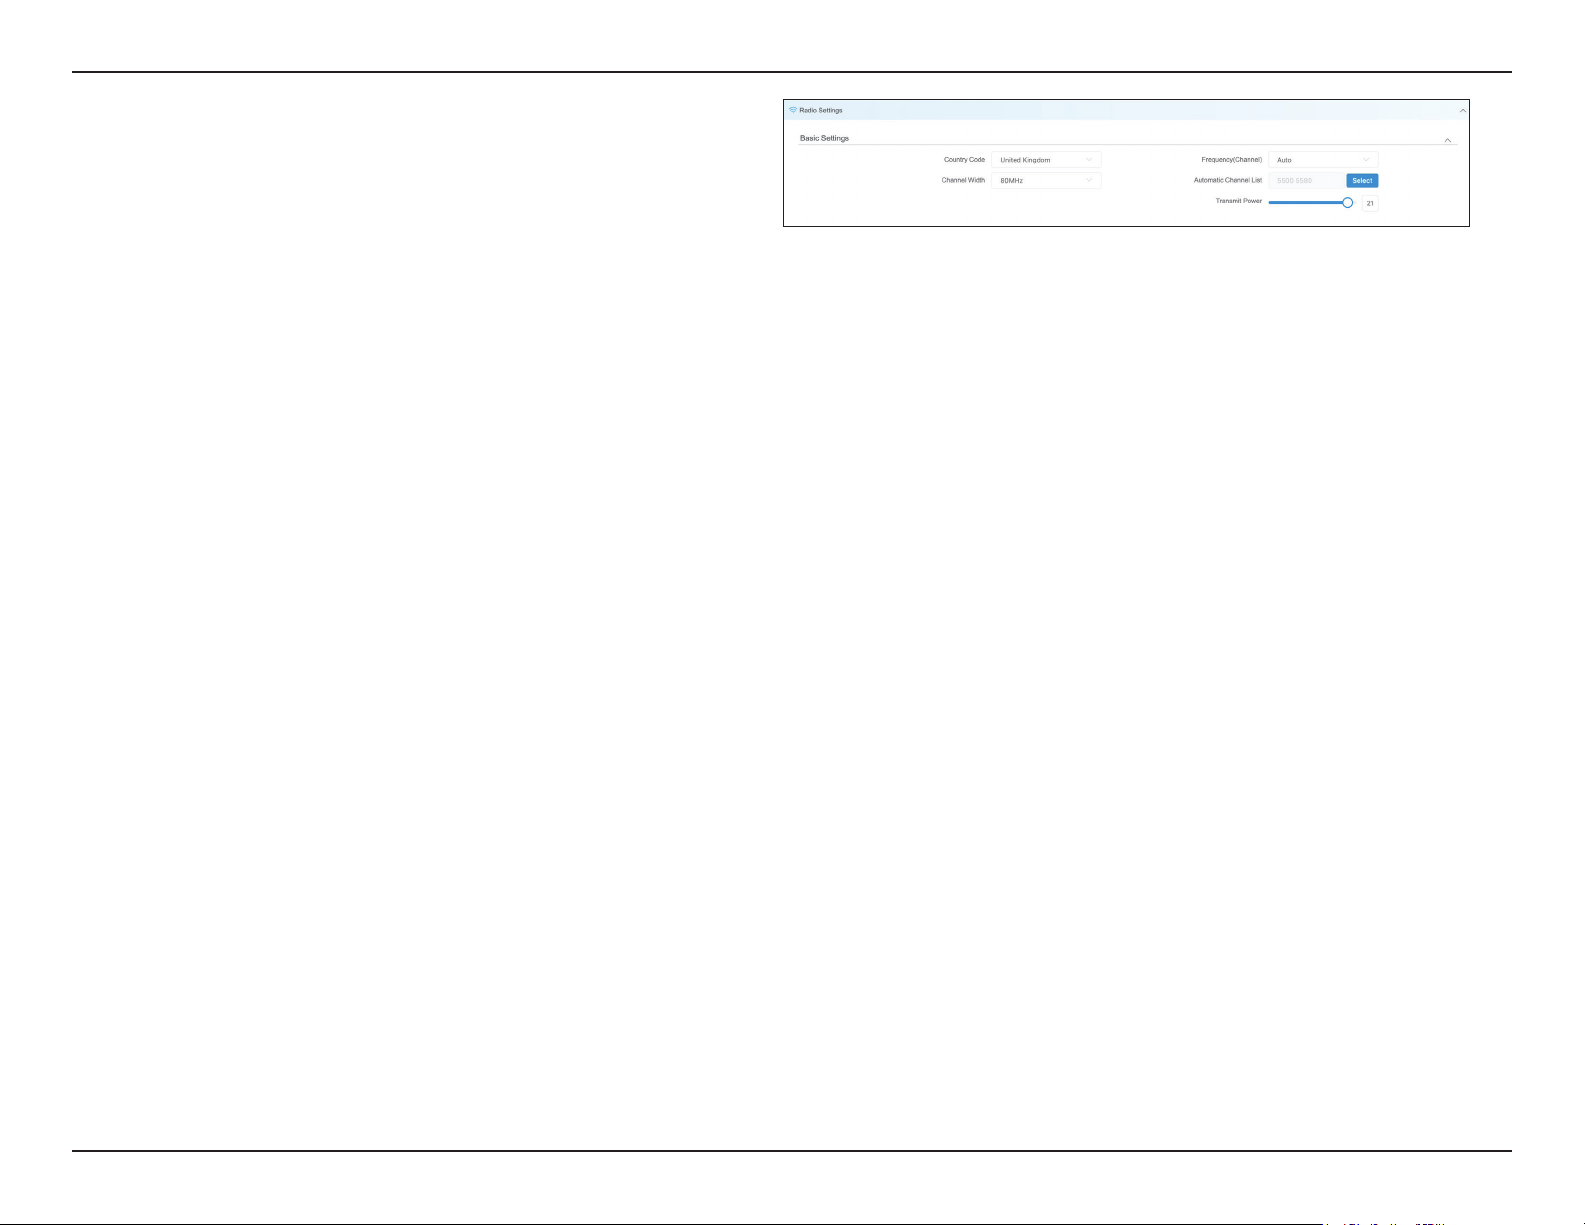
In this section, users can set up basic and advanced
Wi-Fi and radio settings.
Radio Setting:
Basic Settings
Use this to select the country where the DAP-3712
is installed.
Use this to change the AP’s channel width. The
default is 80 MHz.
Use this to specify the Wi-Fi channel to use, or
select Auto to determine this automatically.
If you select Auto in Frequency, you can decide
which channels to operate here. The available
channels will depend on your country.
The device’s output power. When the output
power is increased, the signal distance and signal
strength will be improved.
Country Code:
Channel Width:
Frequency:
Automatic
Channel List:
Transmit
Power:
25D-Link DAP-3712 User Manual
Section 3 - Conguration
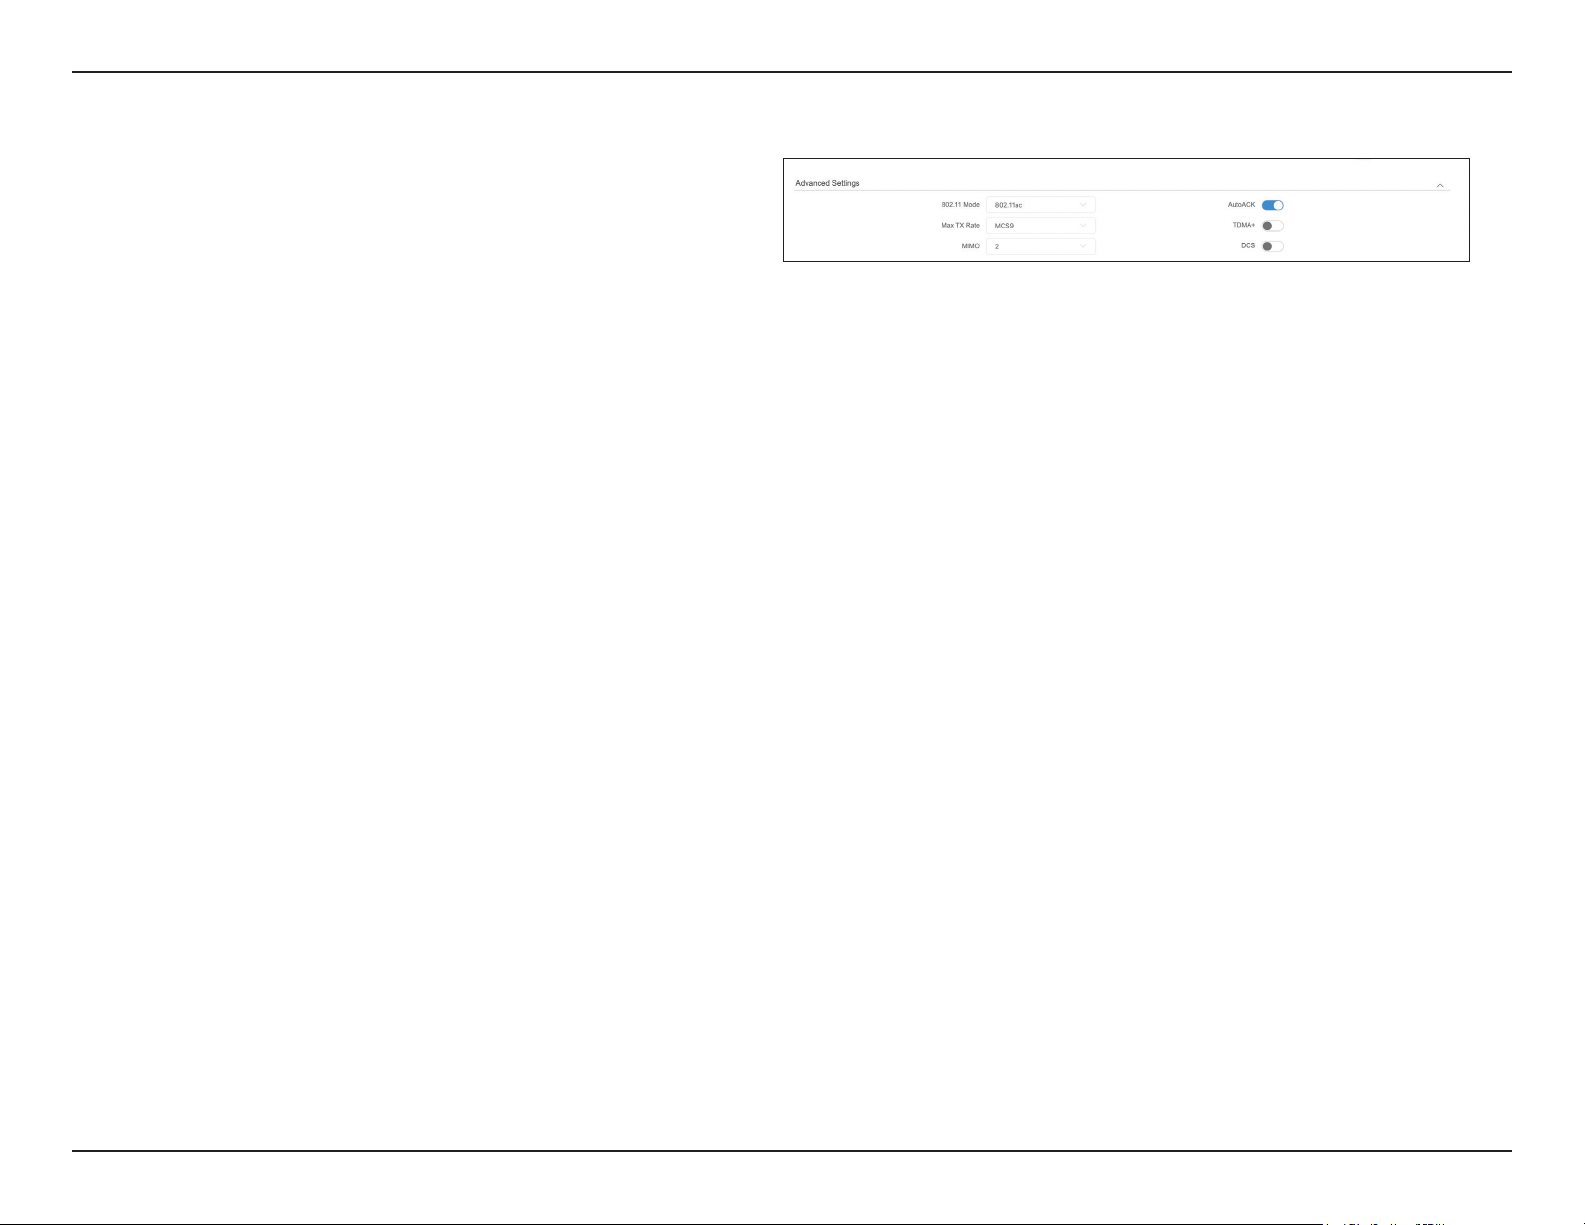
Advanced Settings
You can select the 802.11 mode which the DAP-
3712 should use. It is suggested to keep this setting
at 802.11ac to provide an optimal transmission
rate.
This can be used to limit the maximum transmission
rate of the device.
The DAP-3712 supports 2T2R Multi-Input-Multi-
Output. In high-interference environments, you
can set this to 1T1R to reduce the noise.
Enabling this function will automatically detect
the distance between the two DAP-3712 units
and optimize the link quality. Enabling this is
recommended. If you disable this function, you
will need to manually enter the distance between
the two units.
To use TDMA, you will need to enable TDMA
mode in both DAP-3712 units. TDMA can prevent
802.11 hidden node issues. When setting up PTMP,
enabling TDMA+ is recommended. The TDMA+
function can only work between two DAP-3712
units.
When TDMA+ is enabled, you can also decide
whether you want to enable JTrans. JTrans can help
prevent an internal wireless attack. The client and
access point must be turned on at the same time
when JTrans is enabled.
802.11 Mode:
Max Tx Rate:
MIMO:
Auto ACK:
TDMA+:
26D-Link DAP-3712 User Manual
Section 3 - Conguration
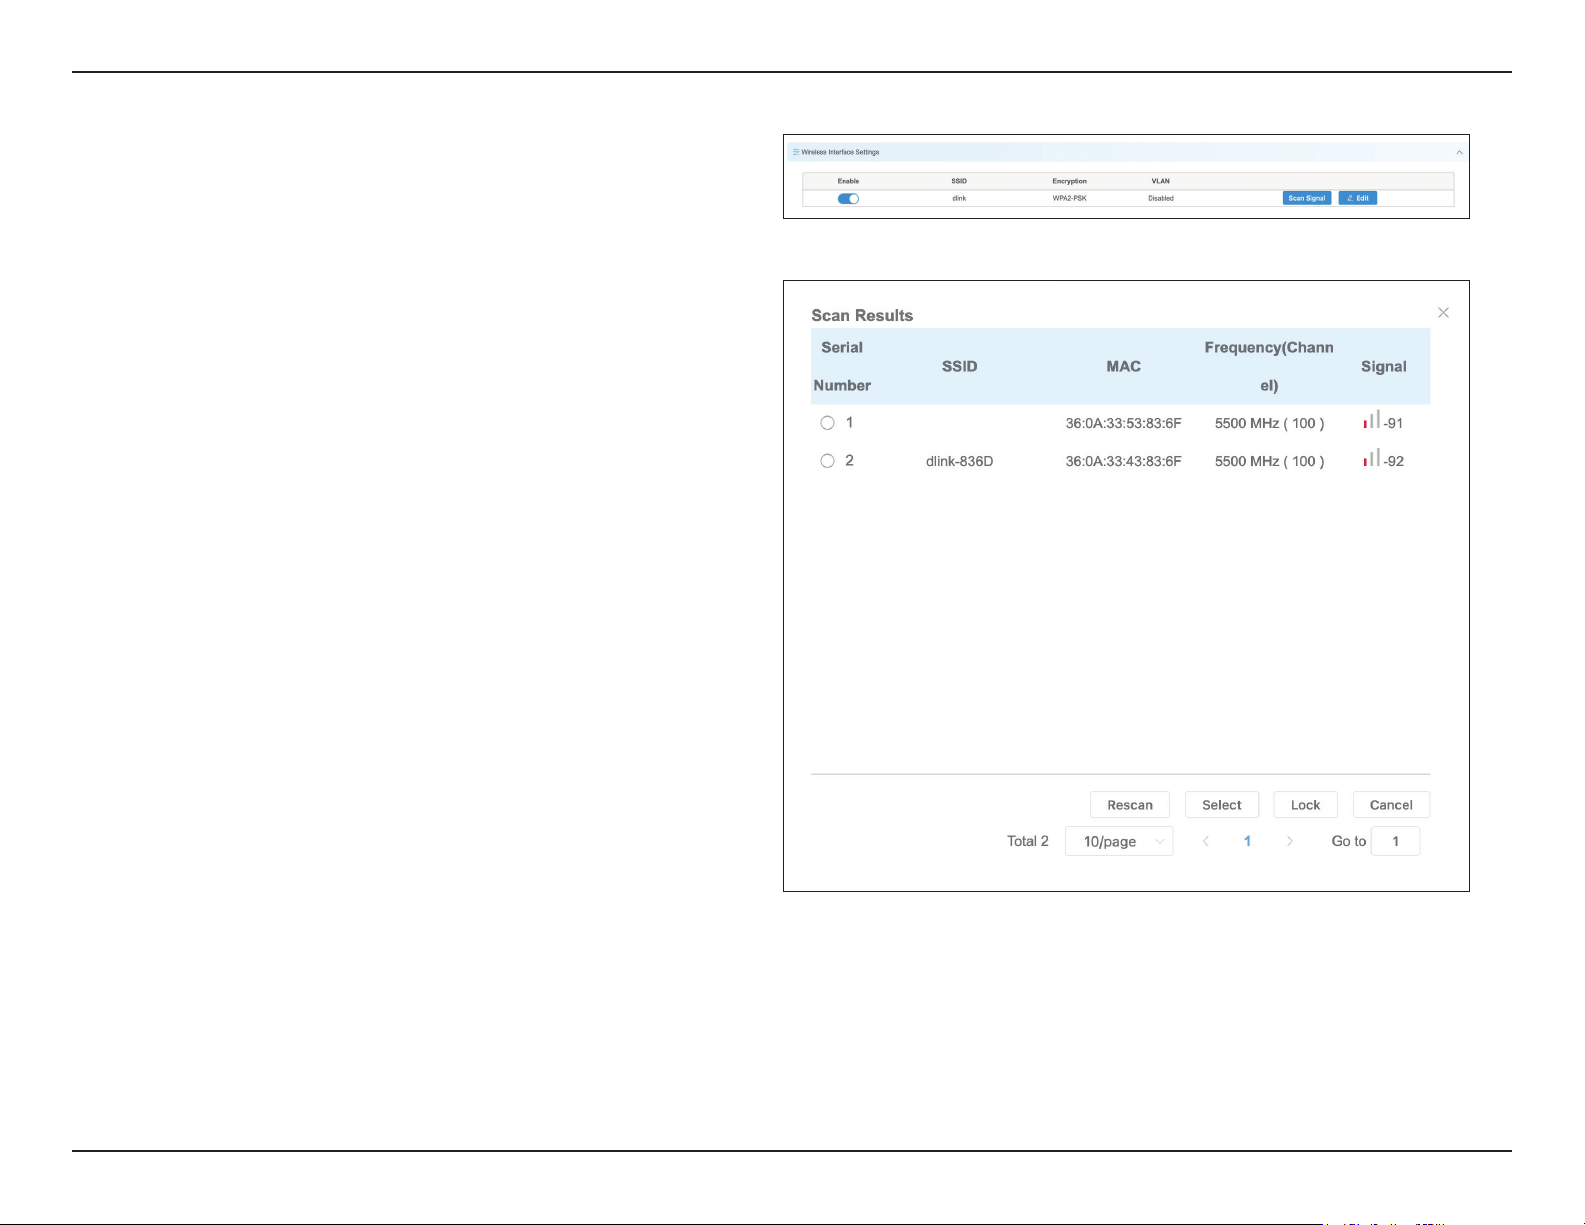
Wireless Interface Settings
When you click Scan Signal, the device will
conduct a site survey to nd the SSIDs that the
DAP-3712 can detect. If you select an SSID, the
DAP-3712 will switch to client mode and connect
to the SSID you selected. Click the Edit button to
set up encryption (if required).
Scan Signal:
In this section, you can change the settings for the DAP-3712’s Wi-Fi
operation mode, SSID, encryption, and site survey.
Click this to perform a site survey again.
Click this to select which SSID the DAP-3712 should
connect to.
Use this to select which SSID and MAC address the
DAP-3712 should connect to. If you enable this, the
DAP-3712 will only connect to the AP you specify.
Click this to cancel the scan.
Rescan:
Select:
Lock:
Cancel:
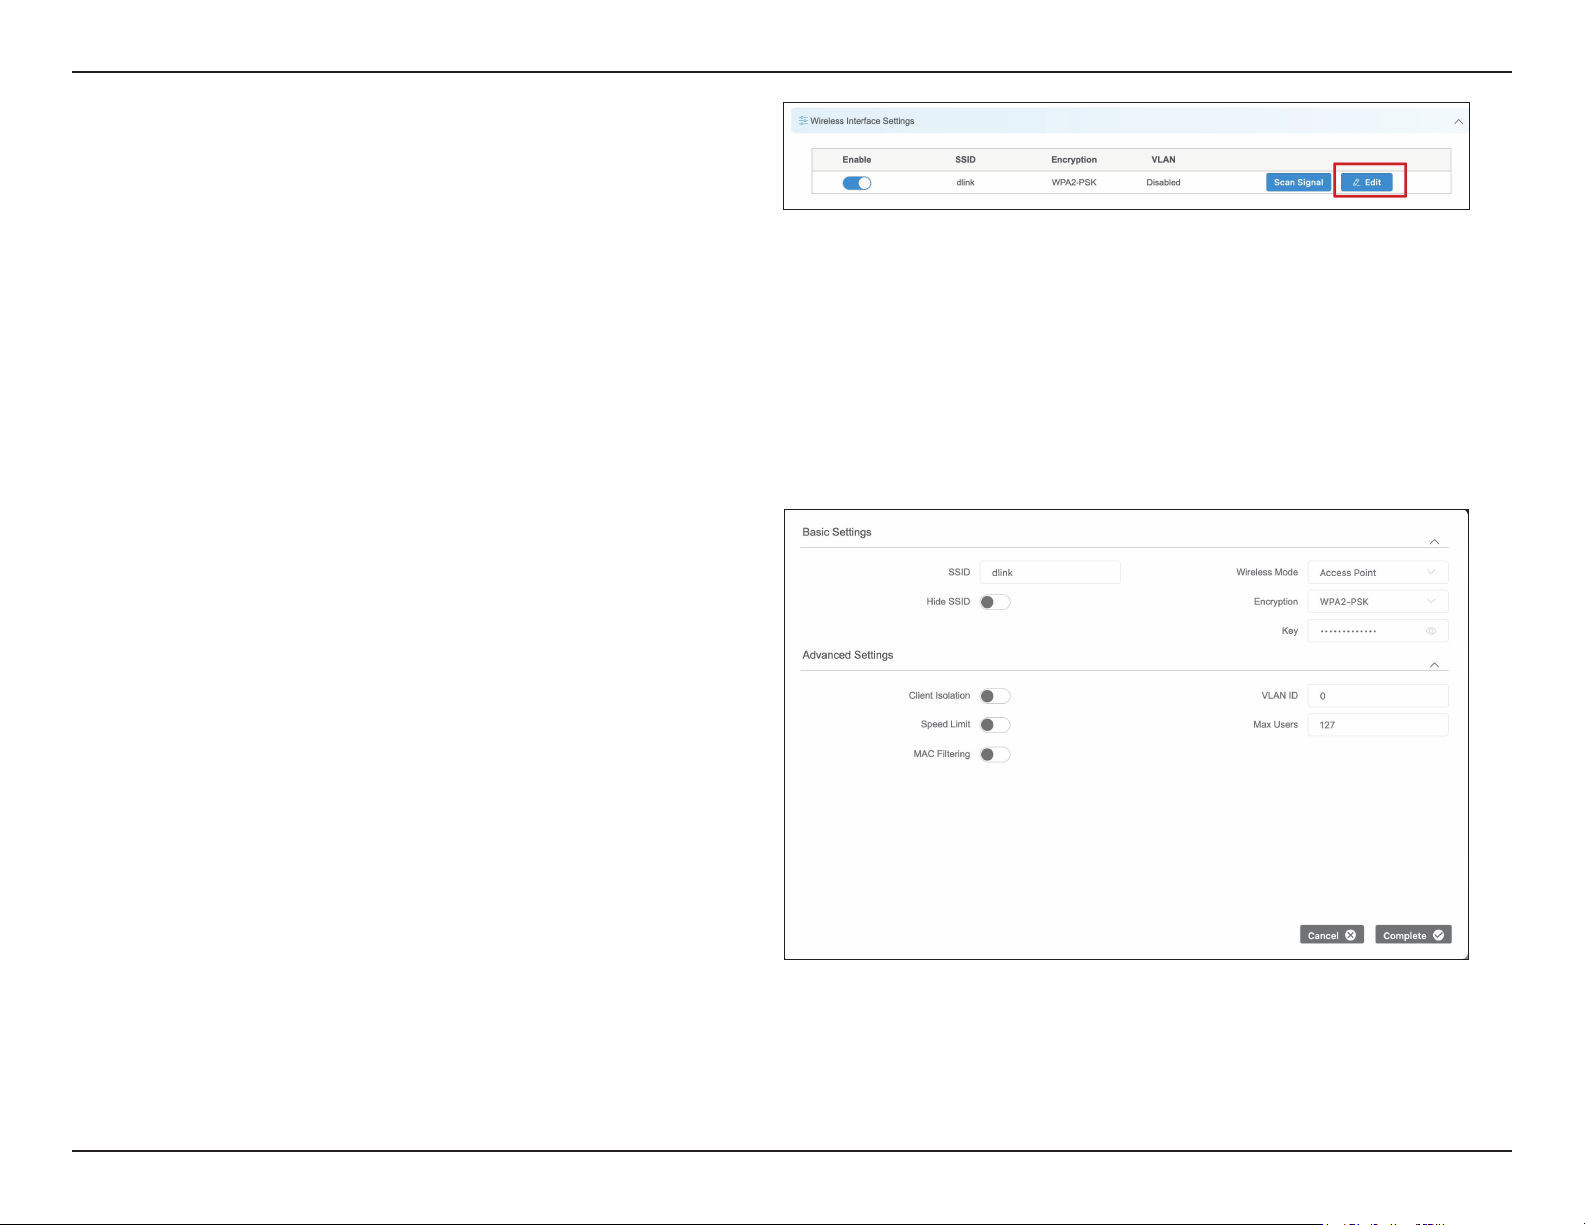
27D-Link DAP-3712 User Manual
Section 3 - Conguration
To set the SSID which the DAP-3712 will broadcast
when it operates in Access Point or Access Point
(WDS) or SSID mode, or the SSID that the DAP-
3712 will attempt to connect to when it operates
in Client or Client (WDS) mode.
When the DAP-3712 is in Access Point or Access
Point (WDS) mode, this function will be displayed.
Use this to hide the broadcast name of the wireless
network.
There are four wireless modes: Access Point, Client,
Access Point (WDS), and Client (WDS). To use a
point-to-point or point-tomultipoint
connection, you need to congure the primary
DAP-3712 in Access Point or Access Point (WDS)
mode and the other
DAP-3712s in Client mode or Client (WDS) mode.
If you want to preserves MAC address of clients
frame , it is suggest to use Acess Point(WDS) and
Client (WDS) for each size.
You can select which Wi-Fi encryption the DAP-
3712 should use: Open, WPA-PSK, WPA2-PSK,
WPA/WPA2 Hybrid-PSK, or IEEE802.1X.
To input the WiFI encryption key. The default key
is 1234567890abc
SSID:
Hidden SSID:
Wireless
Mode :
Encryption:
Key:
Edit
Click this to change the DAP-3712’s operation mode, encryption
and key. The following page will pop up:

28D-Link DAP-3712 User Manual
Section 3 - Conguration
Client
Isolation:
Speed Limit:
VLAN ID:
Max. Users:
MAC Filtering:
When you enable this function, the clients which
are connected to the DAP-3712 will not be able to
communicate with each other.
When you enable this function, you will be able
to set up a maximum upload/download speed for
each client.
Use this to set up the VLAN ID for the SSID.
Use this to set up the maximum number of clients
that can connect to the DAP-3712.
Use this to set up a list of MAC addresses that you
want to allow or disallow to connect to DAP-3712.
29D-Link DAP-3712 User Manual
Section 3 - Conguration
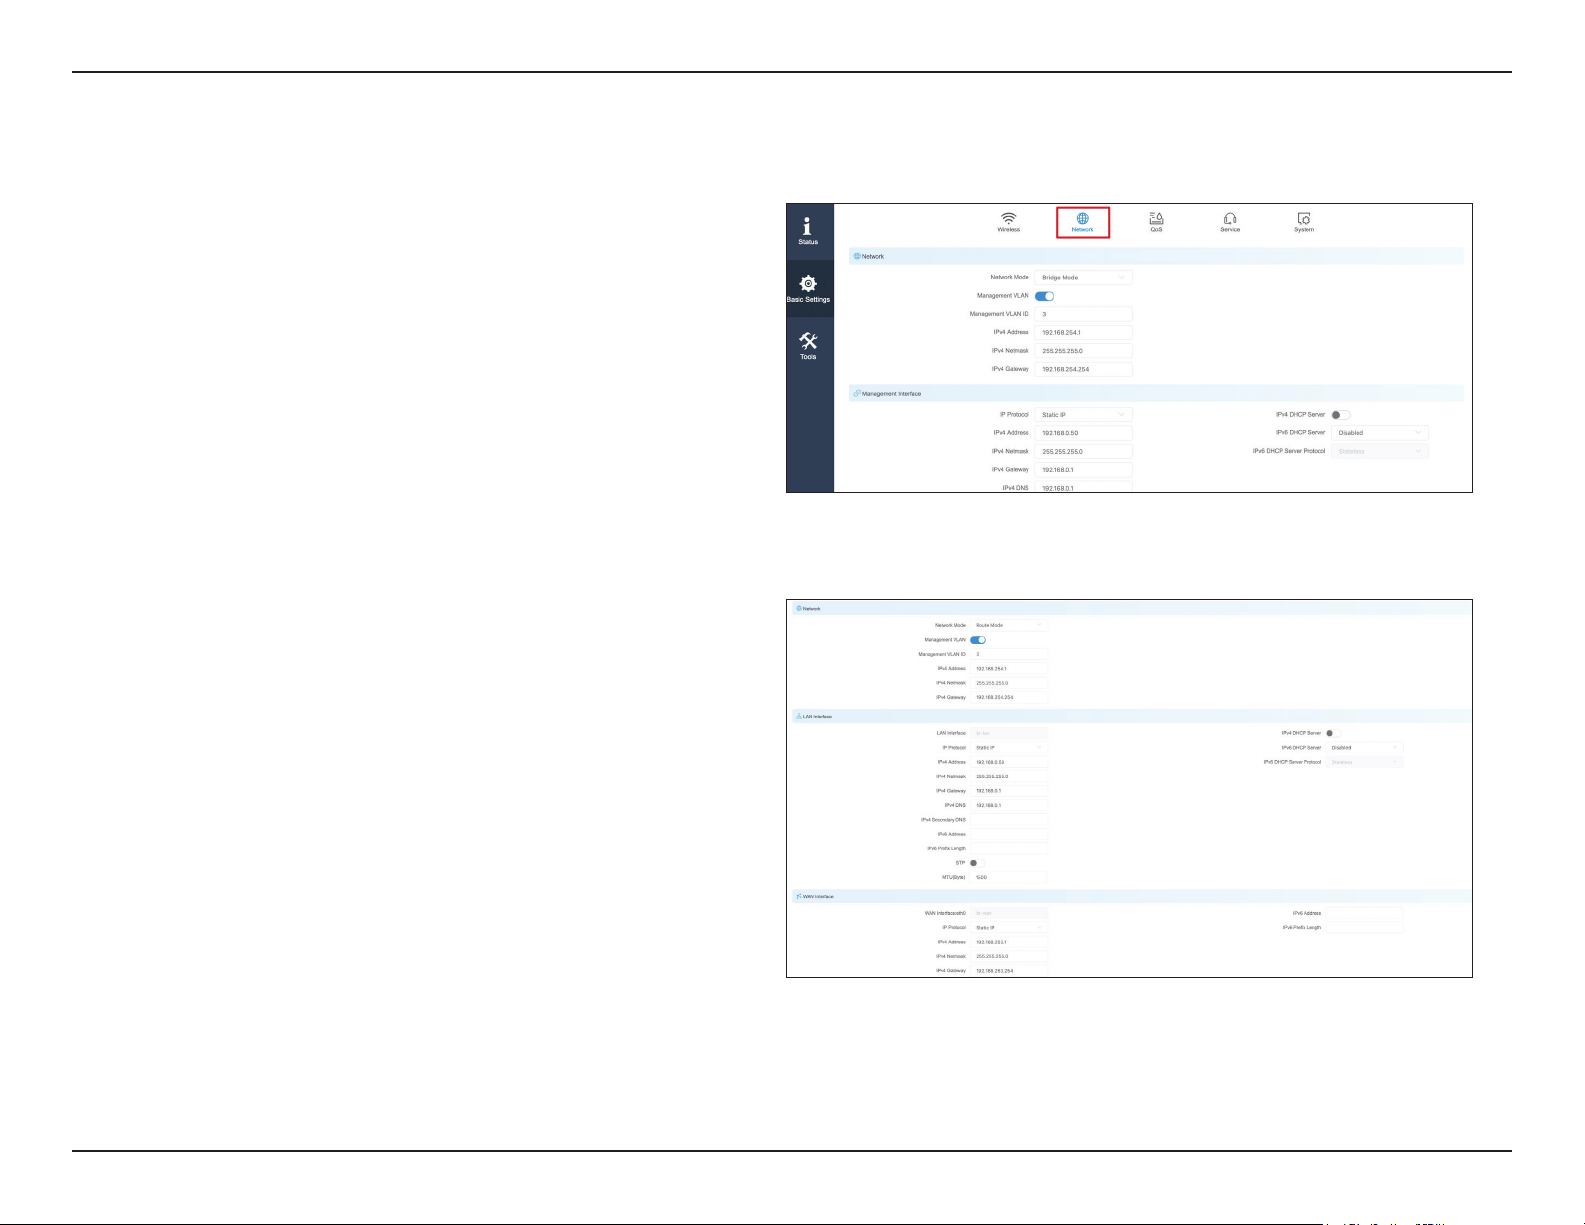
Network
In the Network tab, you can set up the DAP-3712’s network mode and IP address.
Select either Bridge Mode or Router Mode.
In this mode, the DAP-3712’s LAN Port and Wi-Fi
will bridge together.
In this mode, the DAP-3712 will act as a router.
Use this to set up a management VLAN ID tag and
IP address. When the VLAN is enabled, the DAP-
3712 can only be accessed with this VLAN tag and
IP address.
Network Mode:
Bridge Mode:
Router Mode:
Management
VLAN:
In Bridge Mode, users can congure the DAP-3712’s LAN interface.
Use this setting to select either Static IP or DHCP IP.
Enabling this function in bridge mode is not
recommended. When you enable this function,
you need to make sure there are no DHCP servers
in the DAP-3712’s network.
IP Protocol:
IPv4/IPv6
DHCP Server:
In Router Mode, you need to congure the LAN and WAN interface
of the DAP-3712.
You can set the IP addresses of the devices which
can be accessed via Wi-Fi using this setting.
In router mode, the physical LAN port becomes
the WAN port. You need to enter the IP address
or congure DHCP clients to get the IP address as
well as PPPoE.
LAN interface:
WAN Interface:
30D-Link DAP-3712 User Manual
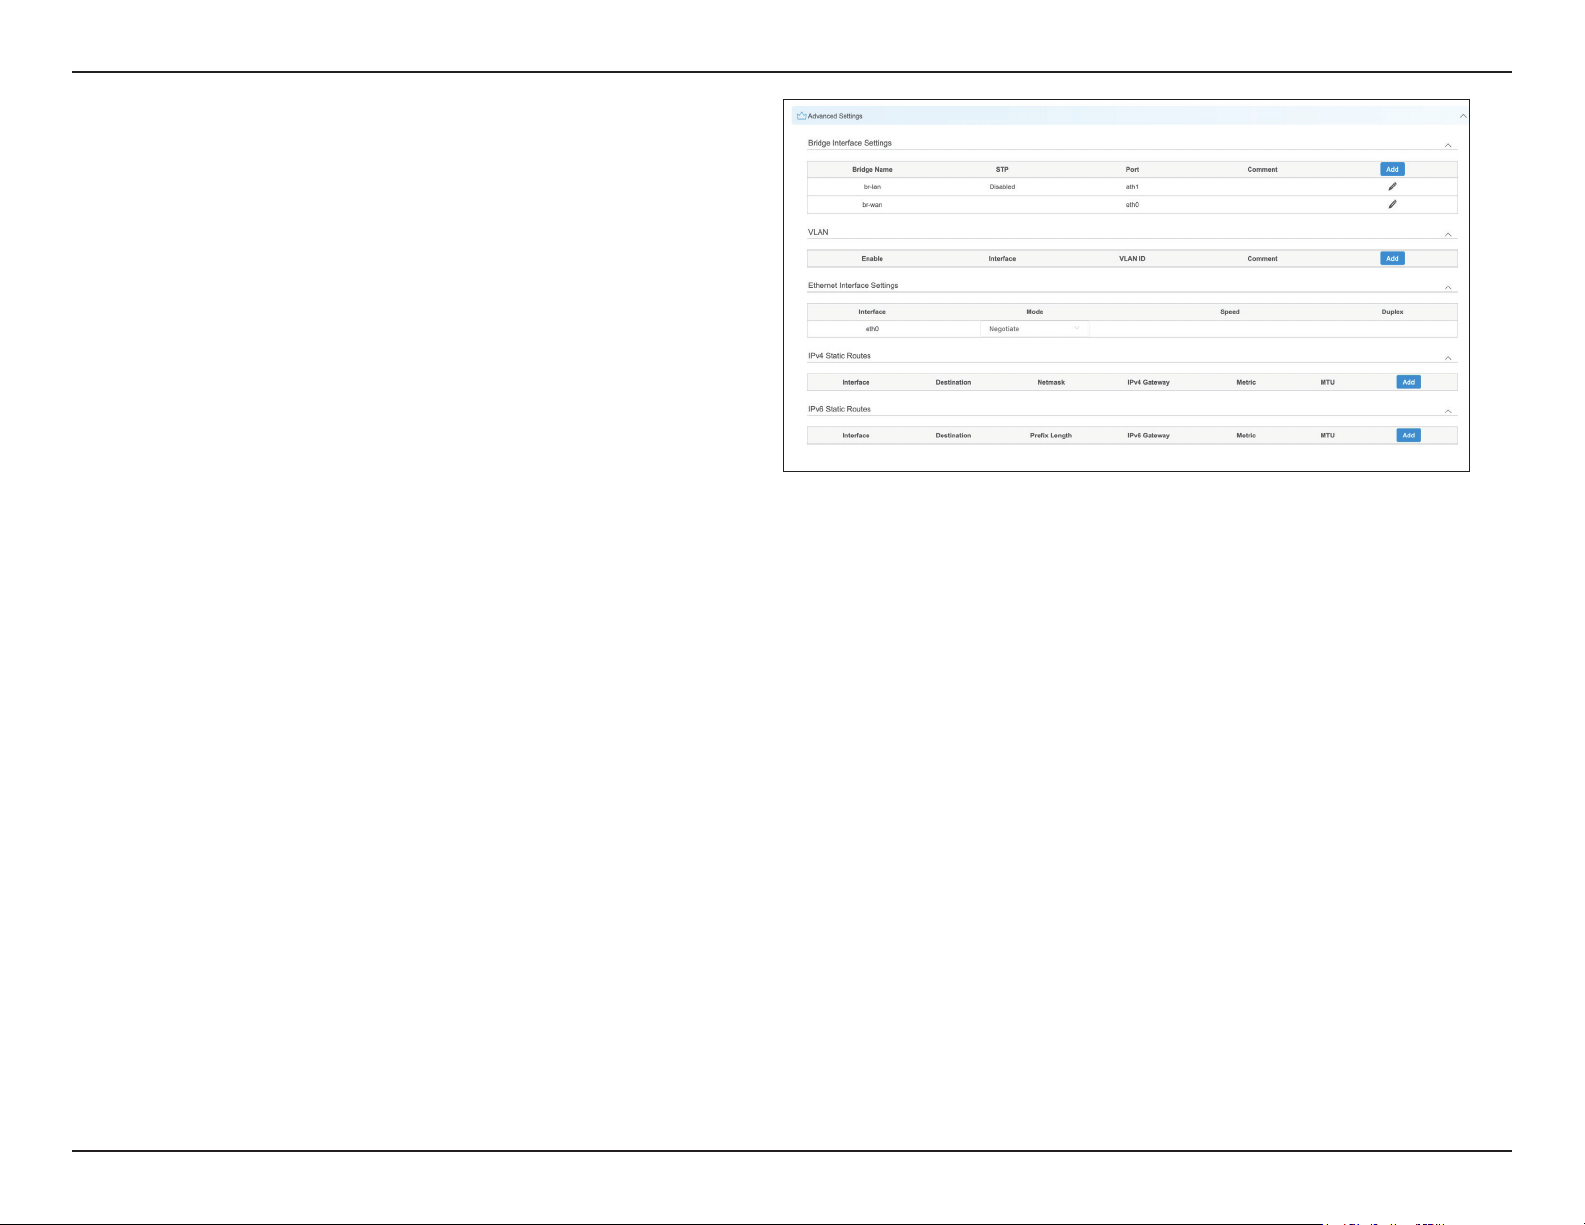
Section 3 - Conguration
In this section, you can congure settings such
as static routes. In general, users will not need to
congure anything in this section.
This displays and controls the DAP-3712’s bridge
policy.
This displays the DAP-3712 VLAN ID tag.
Use this to select the LAN port’s speed negotiation
mode.
Use this to add the Static Route rule for the DAP-
3712.
Advanced
Settings:
Bridge
Interface
Setting:
VLAN:
Ethernet
Interface
Setting:
IPv4/IPv6
Static Route:
31D-Link DAP-3712 User Manual
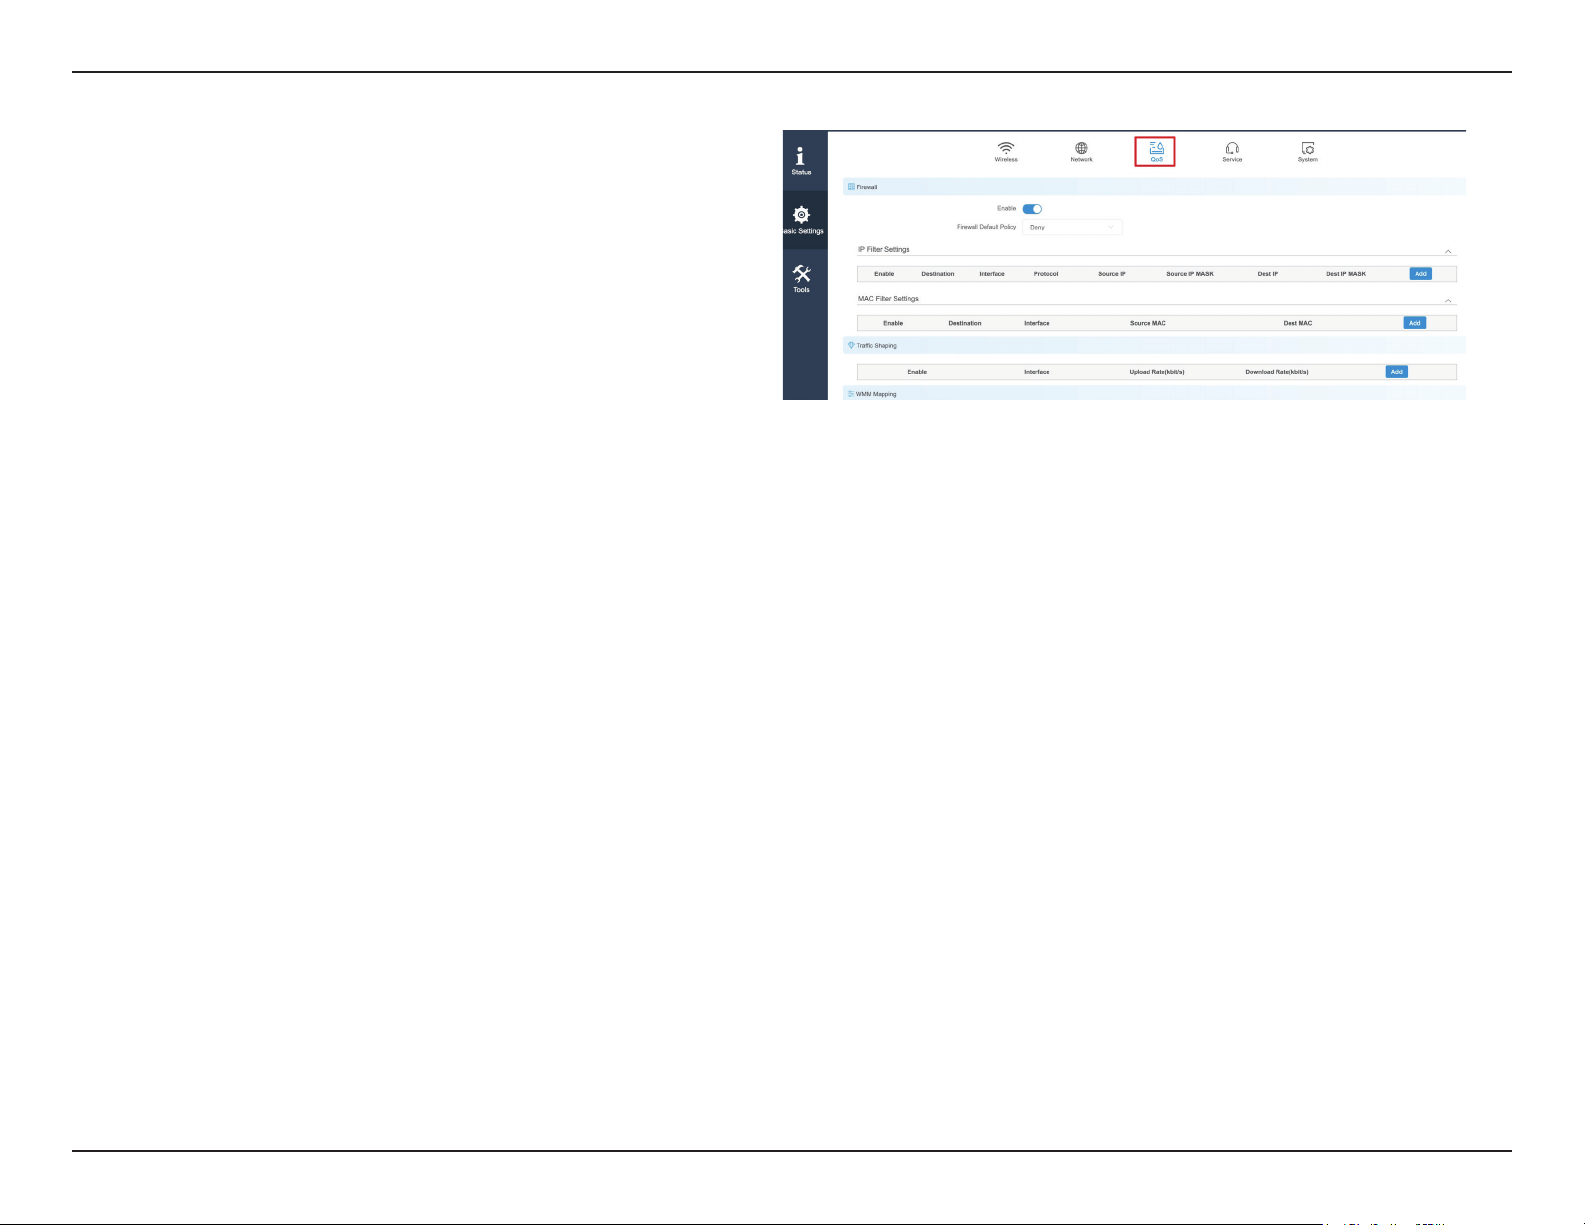
Section 3 - Conguration
QoS
In the QoS tab, there are four sections on this page: Firewall, Trac
Shaping, WMM, and QoS Priority.
When the rewall is enabled, the device will only
allow certain devices to connect to it.
Firewall:
Only accept the devices listed in IP Filter Settings
and MAC Filter Settings.
Deny the devices listed in IP Filter Settings and
MAC Filter Settings.
Accept:
Deny:
Firewall Default Policy
32D-Link DAP-3712 User Manual
Section 3 - Conguration
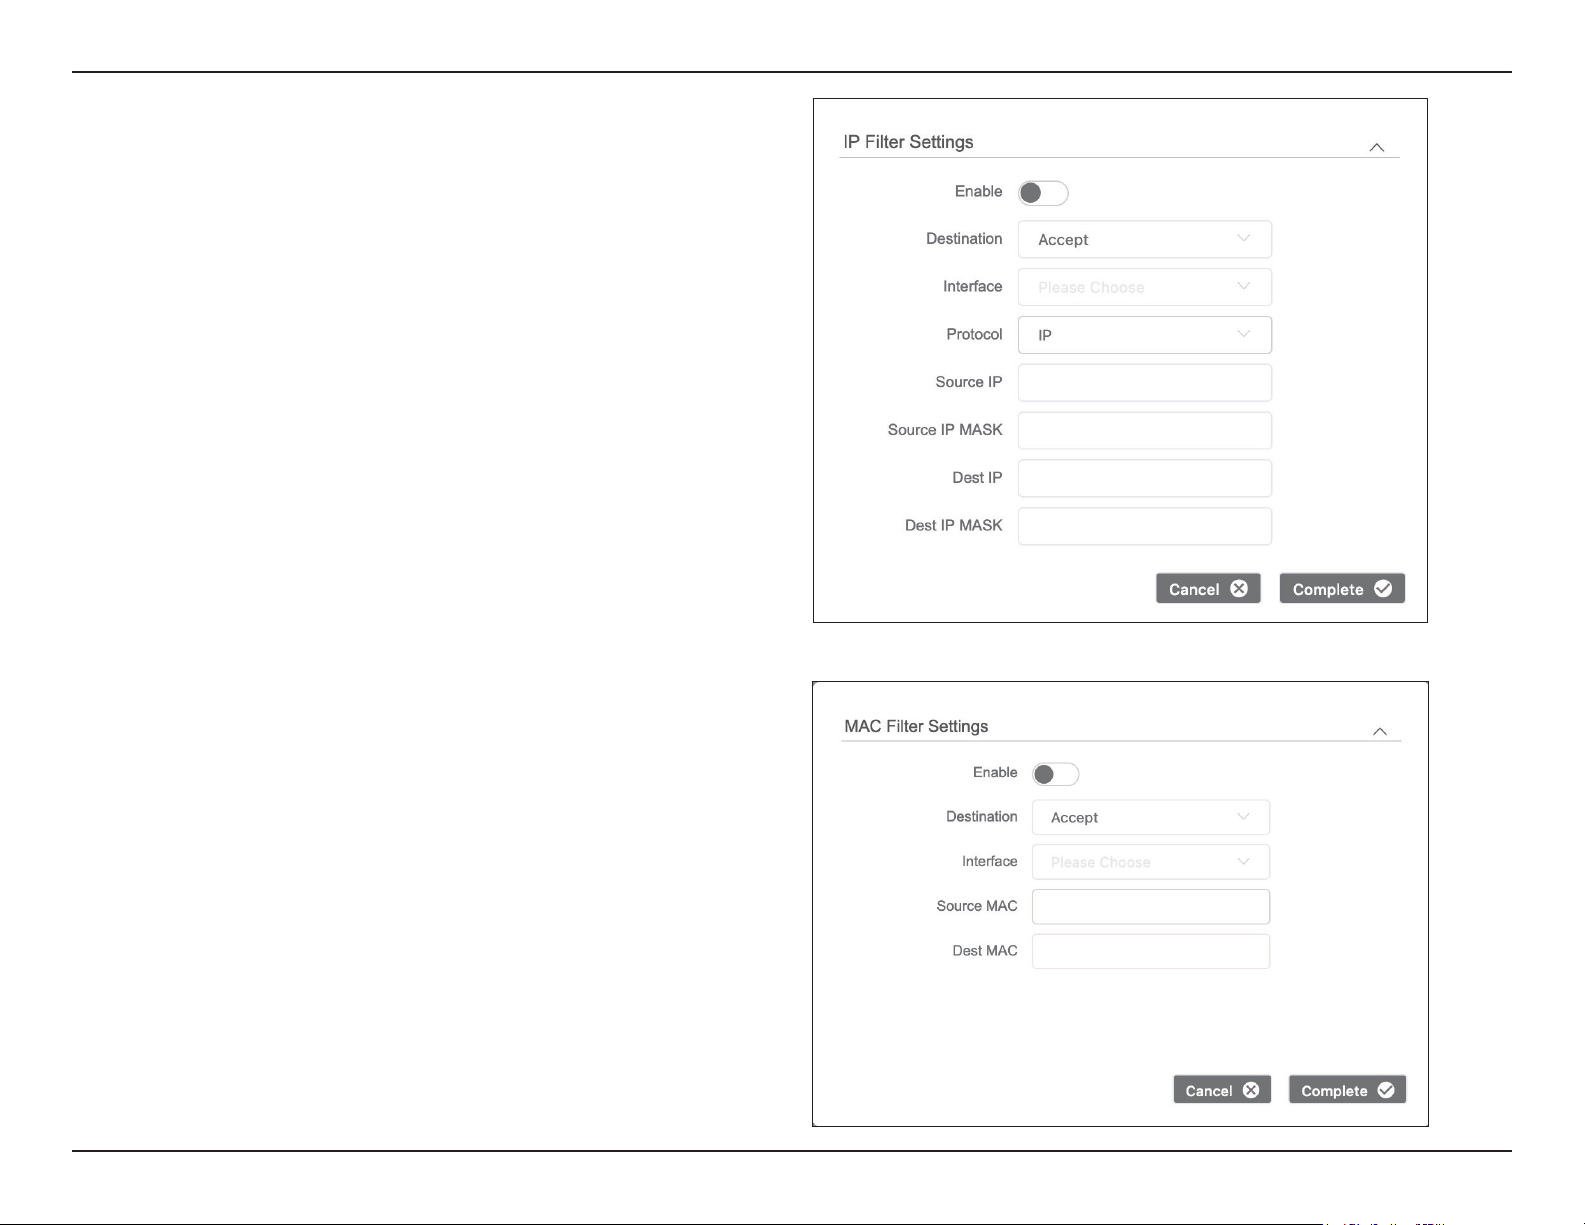
Click Add to add a new IP address to allow or deny. IP Filter
Settings:
Click Add to add a new MAC address to accept or
deny.
MAC Filter
Settings:
33D-Link DAP-3712 User Manual
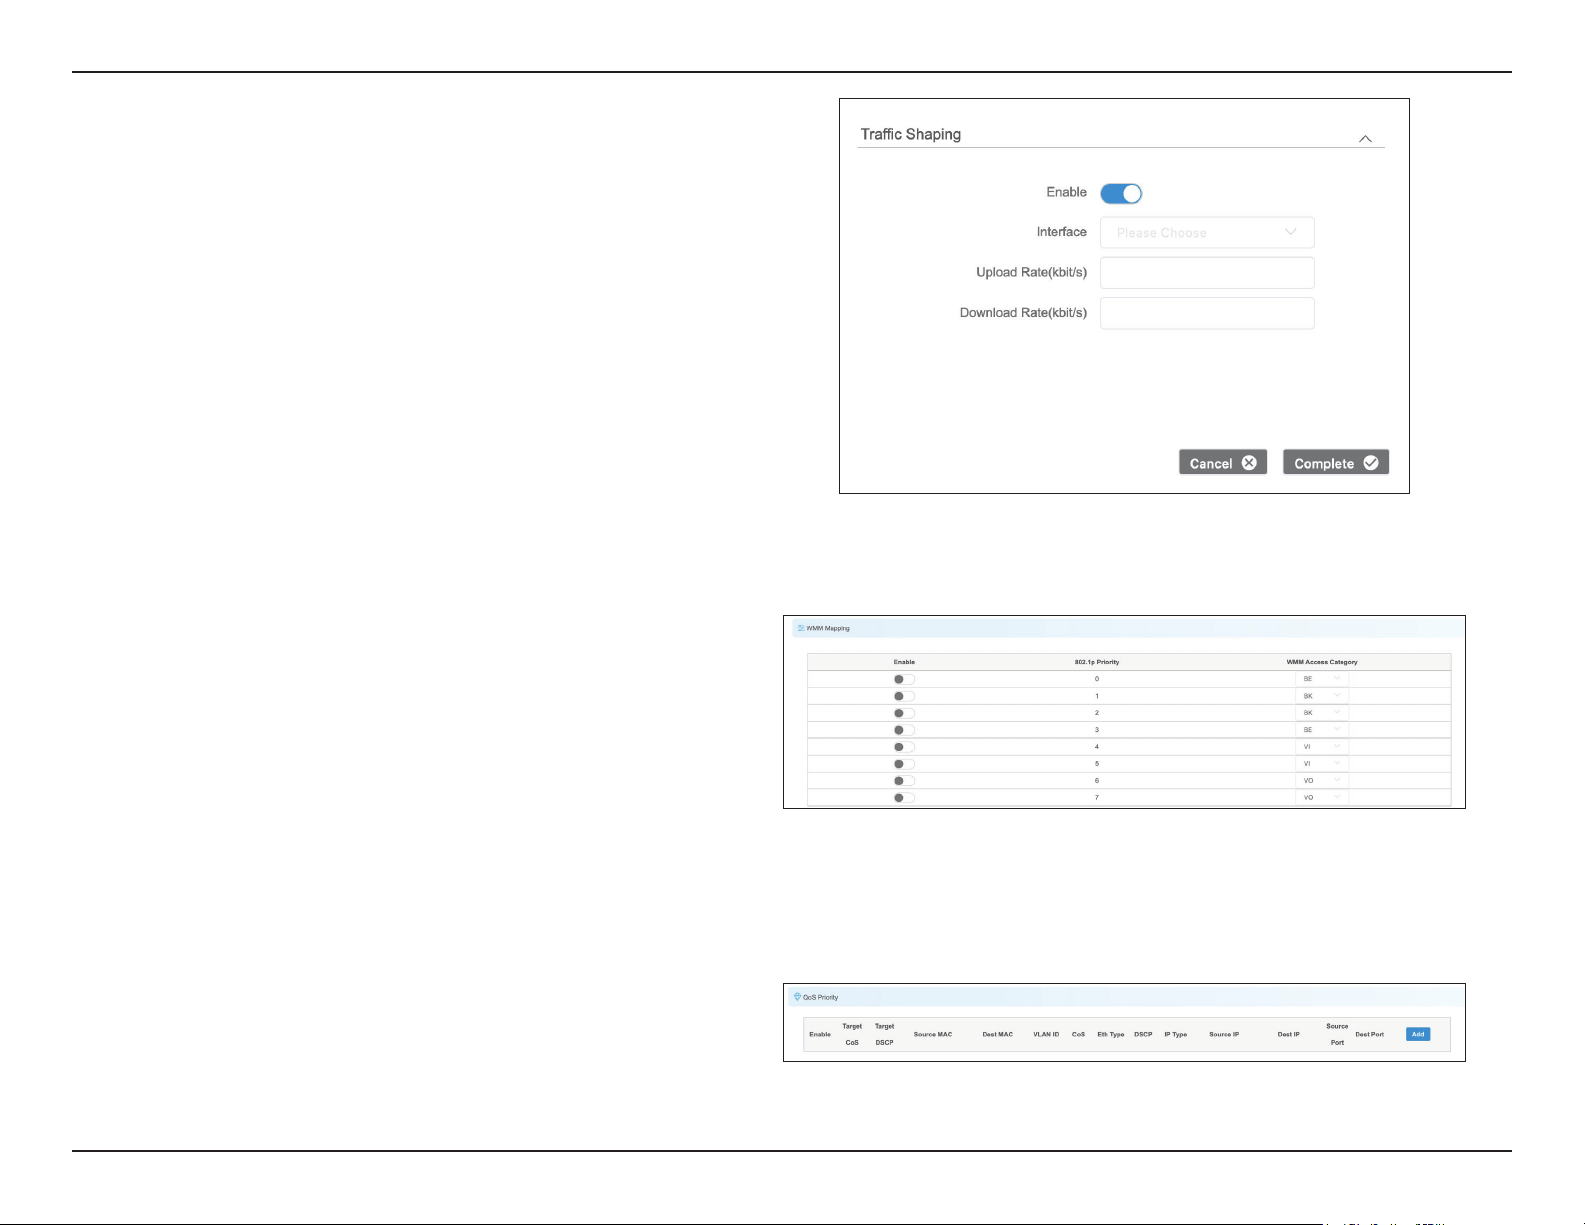
Section 3 - Conguration
Traffic shaping is used to control the upload/
download trac on each network port.
Select an interface: Ath0 (wireless) or Eth0 (LAN).
Enter the maximum upload speed.
Enter the maximum download speed.
Trac
Shaping:
Interface:
Upload Rate:
Download
Rate:
WMM (Wi-Fi Multimedia) allows wireless
communication to dene a priority limit on the
basis of data type. Time-sensitive data (like video/
audio data) can be assigned a higher priority than
other data. For WMM to be enabled, the wireless
client must support it as well.
WMM
Mapping:
Use this setting to set the QoS settings on the LAN
port.
QoS Priority:
34D-Link DAP-3712 User Manual
Section 3 - Conguration
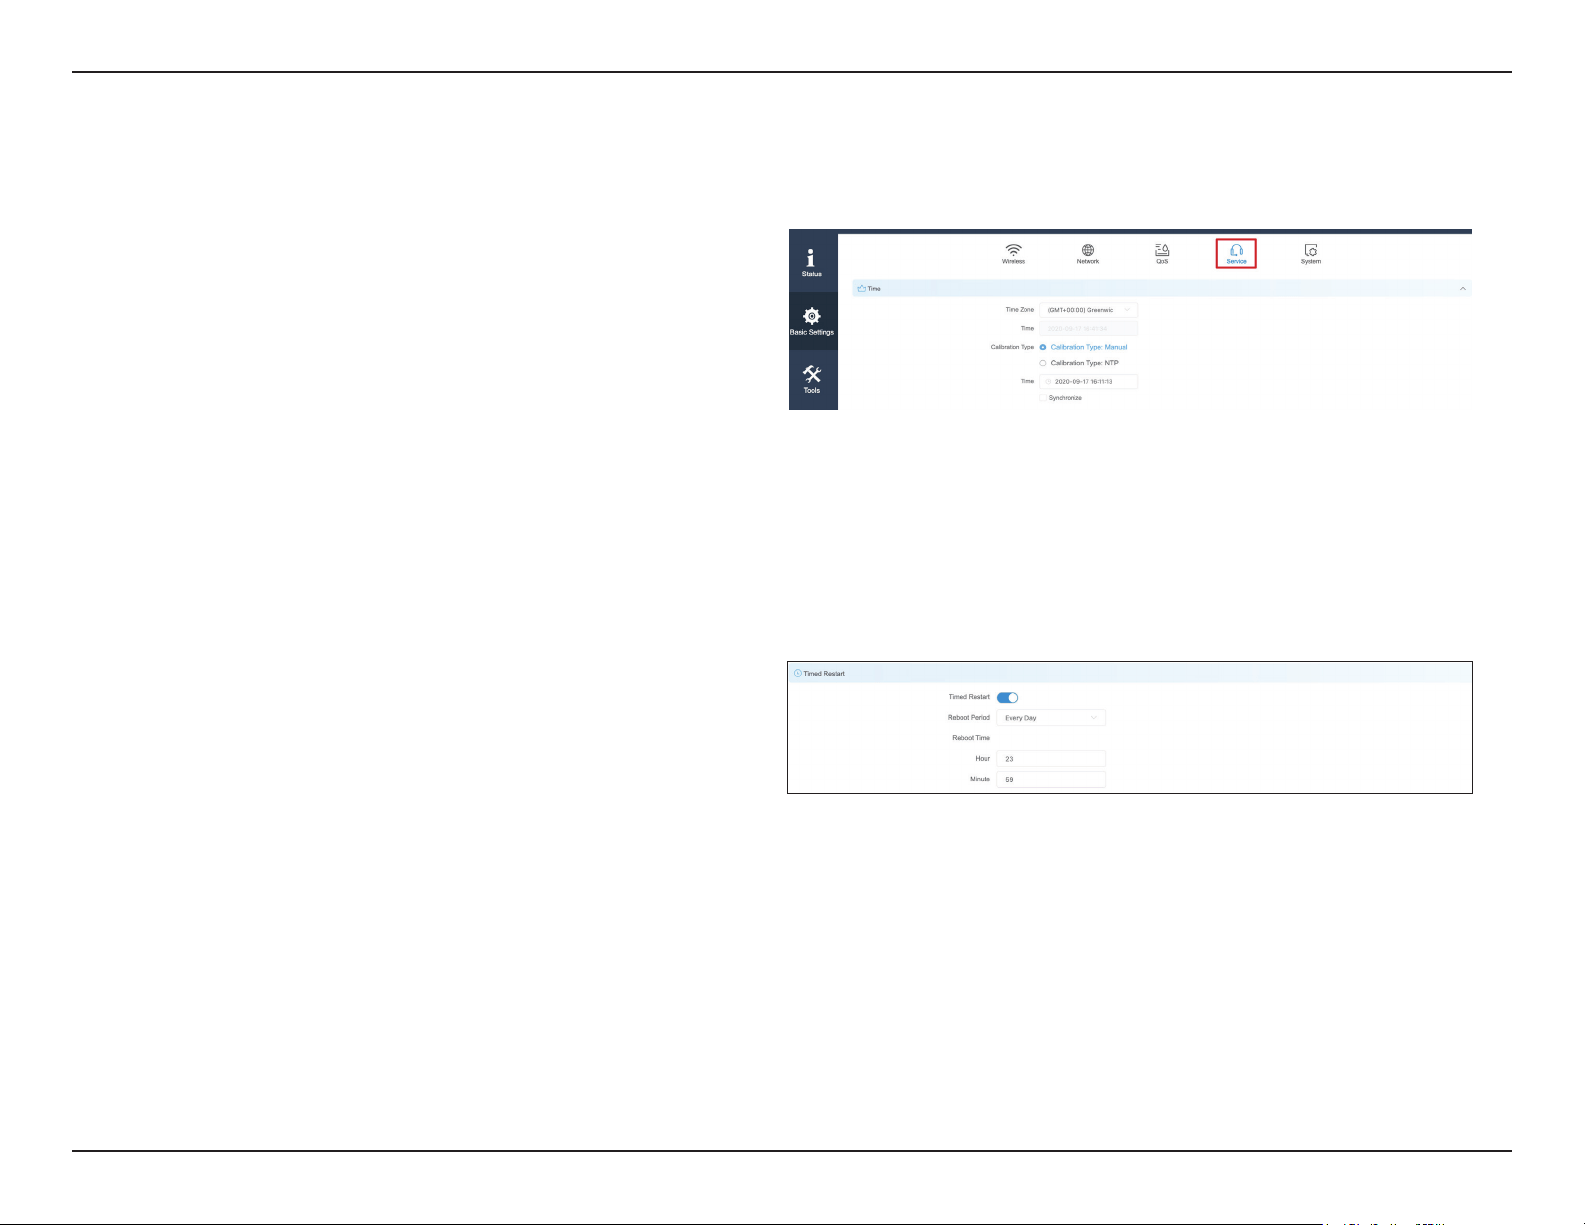
Service
In the service tab, you can congure the following settings: Time, Automatic Restart, External System Log Server, Ping Watchdog and LED Settings.
Here you can configure the DAP-3712’s time
settings.
Use this to select your time zone.
If Manual is selected, you can change the time,
or click Synchronize to sync the DAP-3712’s time
with user’s PC.
If NTP is selected, the DAP-3712 will sync with a
dedicated NTP server. Internet access is required
if this setting is enabled.
Time:
Time Zone:
Calibration
Type:
When this function is enabled, the DAP-3712 will
automatically restart according to a schedule that
you set.
There are three items can be selected: Every Day,
Every Week, and Once.
Time Restart:
Reboot Period:
35D-Link DAP-3712 User Manual
Section 3 - Conguration
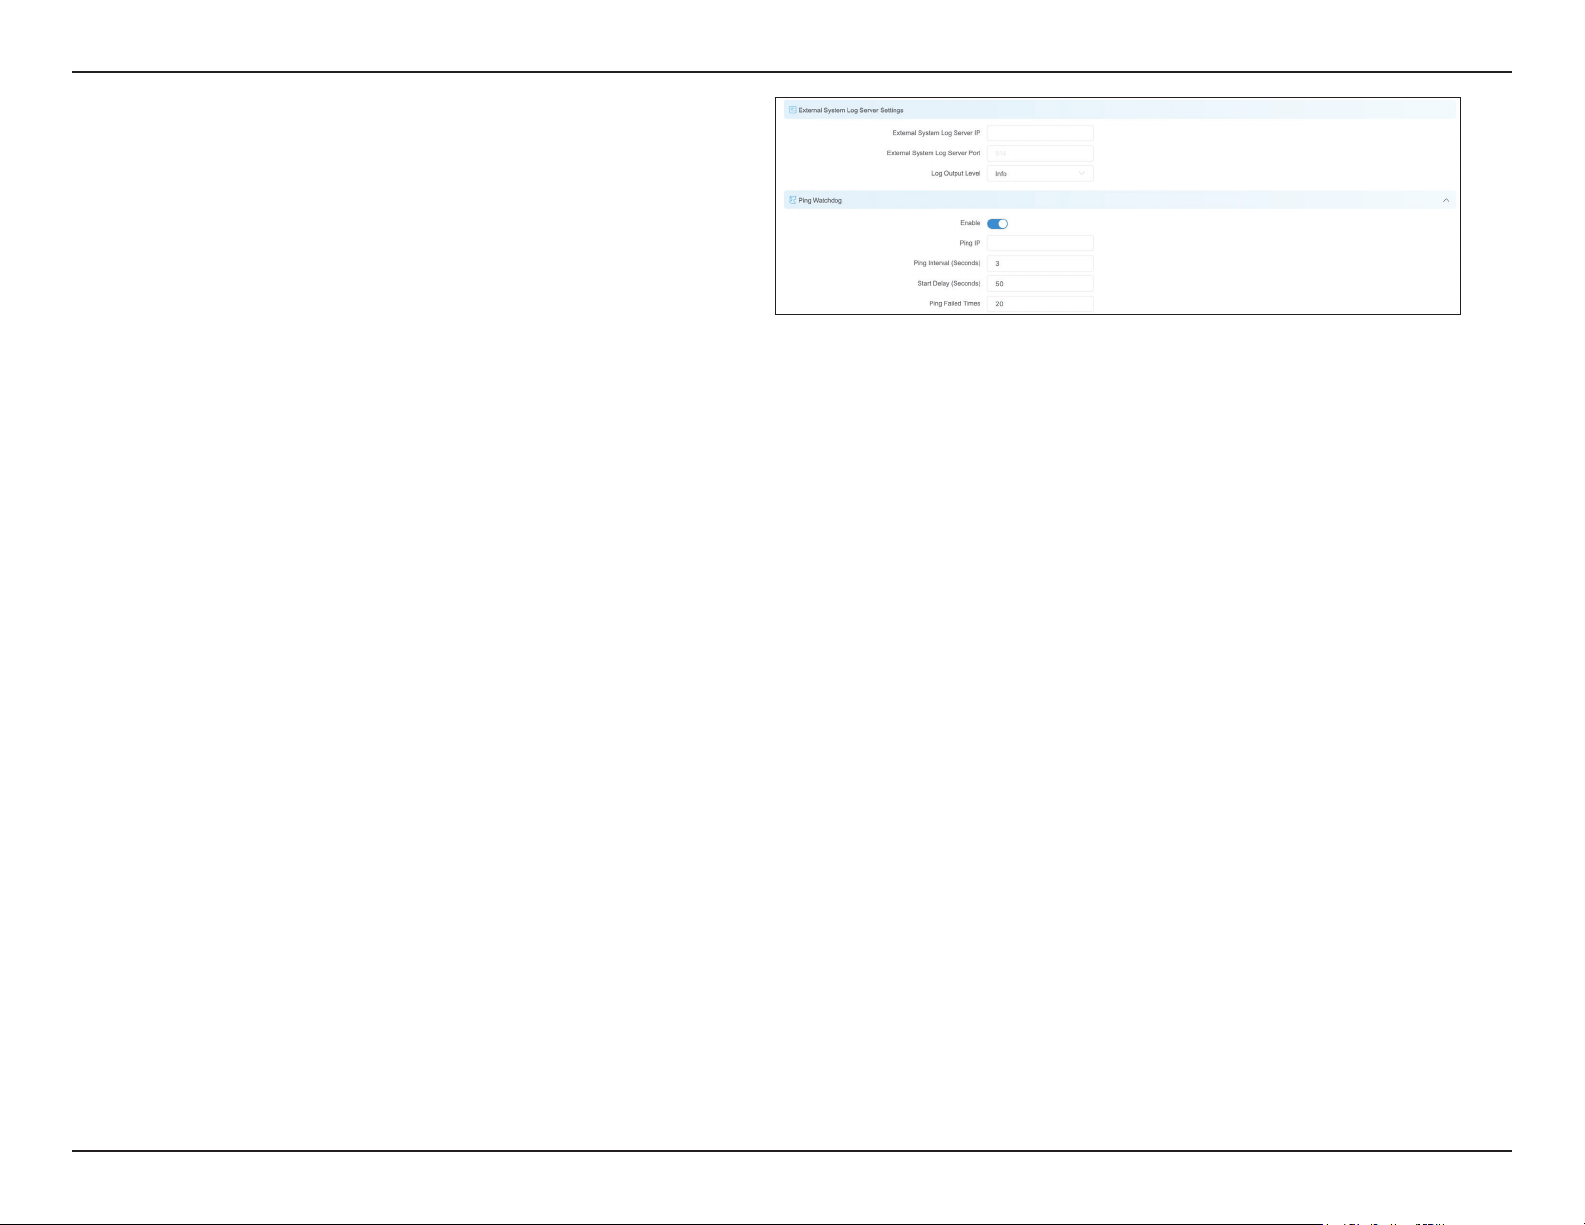
When this is enabled and a server IP is also set here,
the log information will be saved to the Syslog
server automatically.
External
System
Log Server
Settings:
The Ping Watchdog sets the DAP-3712 to
continuously ping a user-dened IP address (for
example, the IP address of the AP that the client
is connecting to). If it is unable to ping using
the settings that you entered, the DAP-3712 will
automatically reboot. It is highly recommended
that you enable this feature when using Access
Point / Access Point (WDS) Mode.
Specify the IP address of the target which will be
monitored using ping.
If this feature is enabled in Client/Client (WDS)
mode, the IP address should be the IP address of
the AP that the client is connecting to.
Specify the time interval (in seconds) that the Ping
Watchdog should wait between ping requests.
Specify the initial time delay (in seconds) before
the rst ping request should be sent by the Ping
Watchdog.
Specify the number of ping replies to wait for. If the
designated number of ping replies is not received,
the Ping Watchdog will reboot the device.
Ping
Watchdog:
Ping IP:
Ping Interval:
Startup Delay:
Ping Failure:
Note: If you want to modify the parameters of the Ping Watchdog, please disable
it rst and then apply the desired settings. When the web page shows that Ping
Watchdog is disabled, users will be able to re-enable it with modied parameters.
36D-Link DAP-3712 User Manual
Section 3 - Conguration
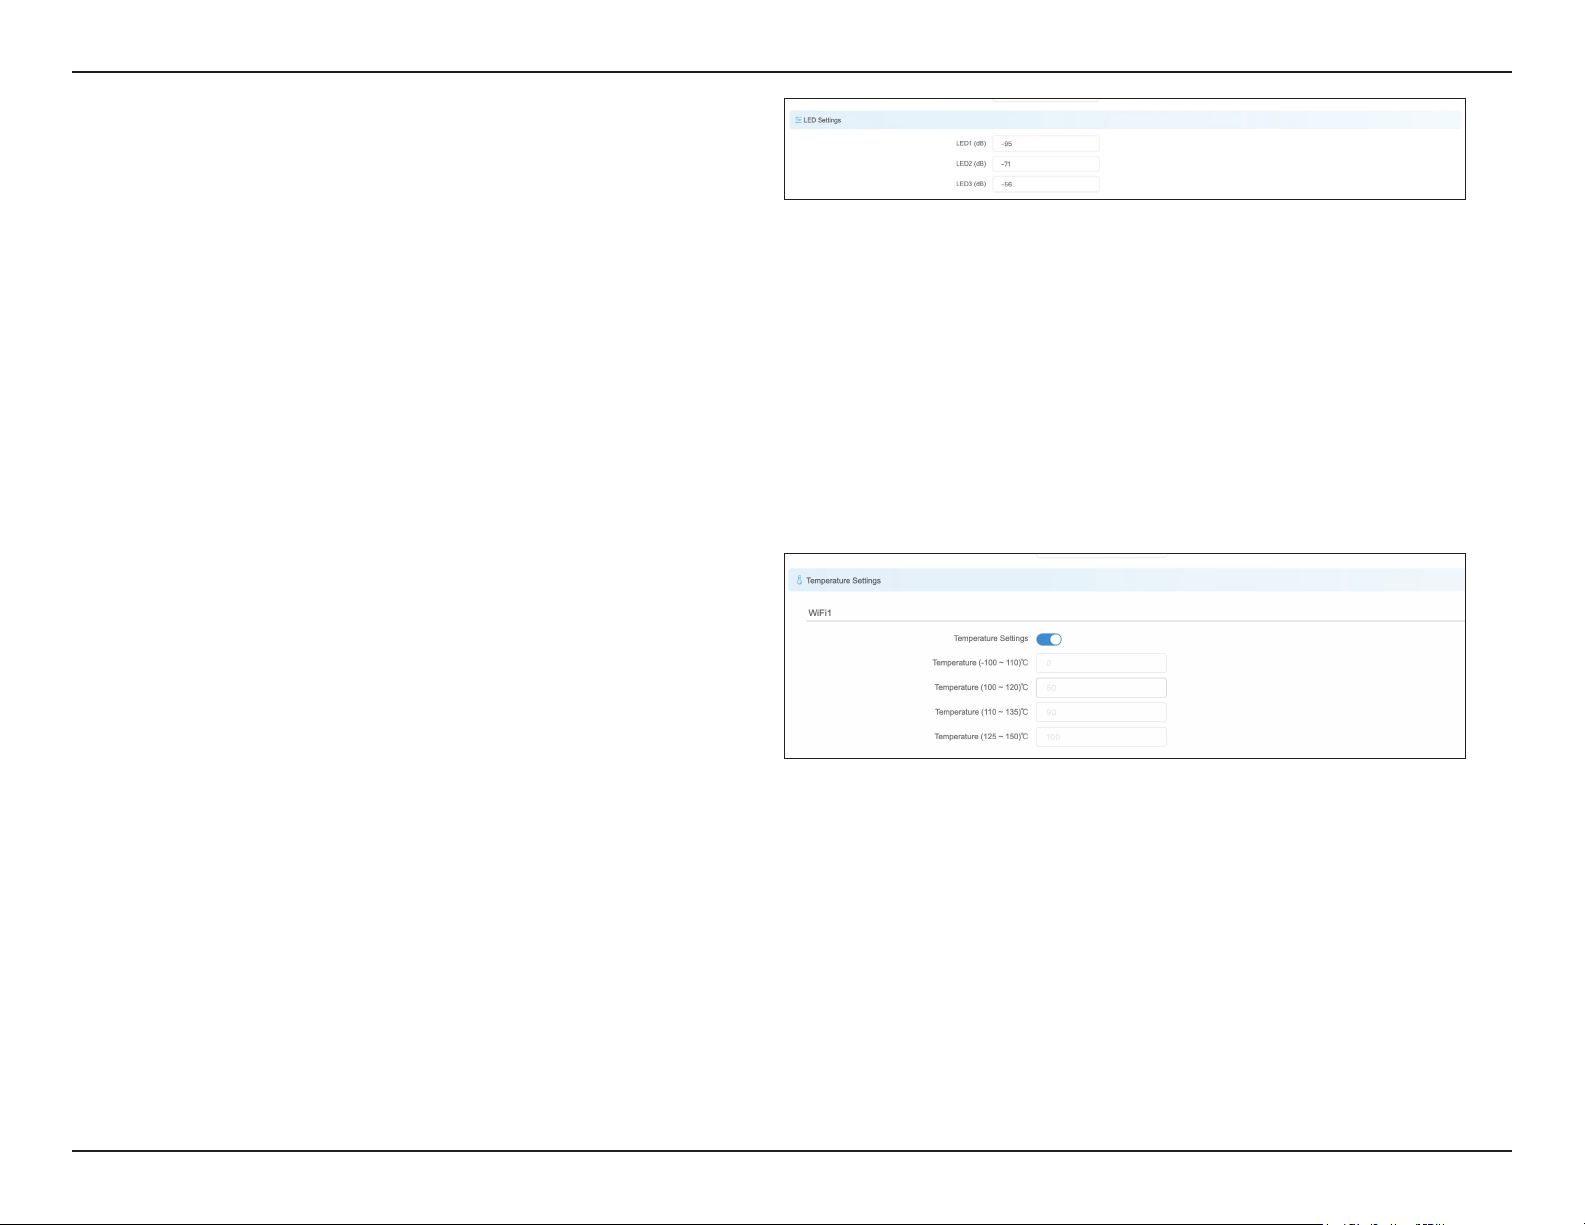
LED1, LED2, and LED3 light up to indicate the
DAP-3712’s signal strength. The default ranges are:
LED1: -95 dBm to -71 dBm
LED2: -71 dBm to -56 dBm
LED3: -56 dBm and above
When the signal strength is within LED1’s range,
only LED1 will light up. When it is within LED2’s
range, both LED1 and LED2 will light up. When the
signal strength is above -56 dBm, all three LEDs
will light up.
LED
Conguration:
To extend the working life of your equipment, you
can enable the overheating protection function.
To do this, enter the Advanced Conguration
Temperature Configuration page. This page
shows the performance degradation rate of
the device at dierent temperatures. When the
temperature is between -100°C and 110°C, the rate
will not change. When the temperature is between
100°C and 120°C, the rate will drop by 50%. At a
temperature between 110°C and 135°C, the rate
will drop by 90%, and when the temperature is
between 125°C and 150°C, the rate of decline will
be 100%.
Temperature
Setting:
37D-Link DAP-3712 User Manual
Section 3 - Conguration
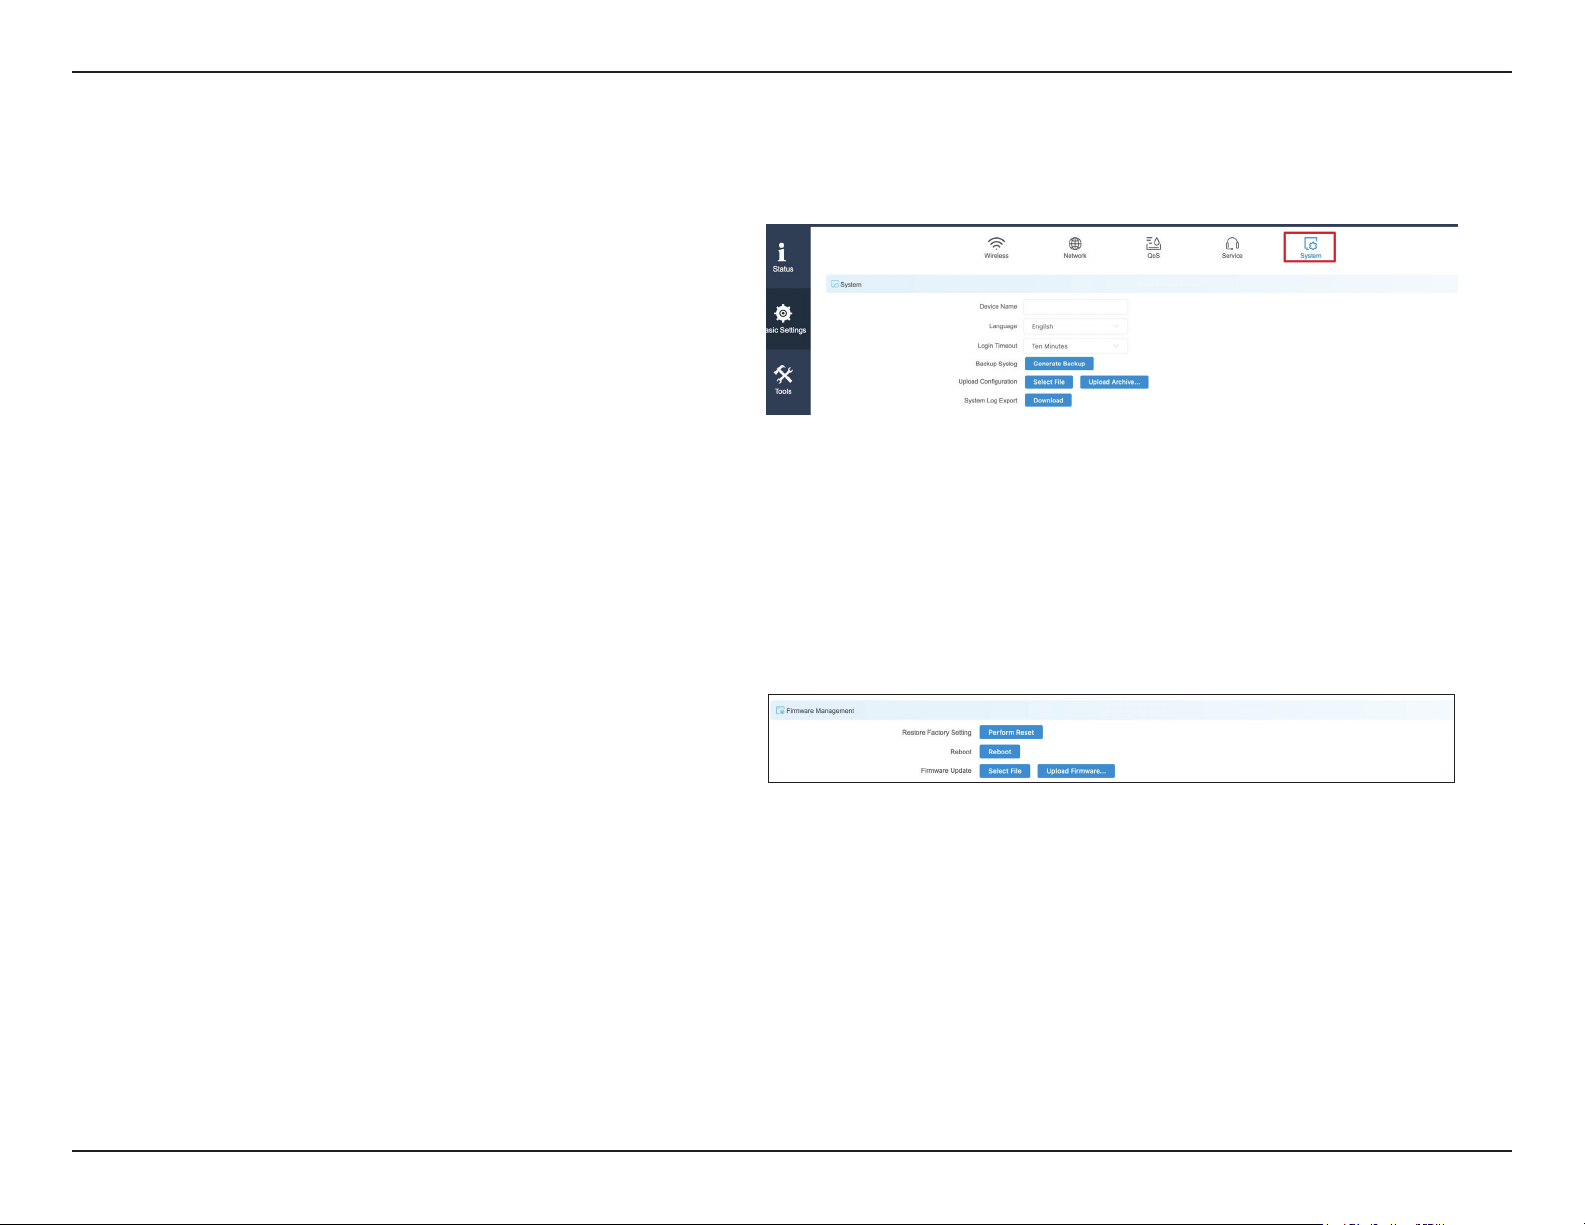
System
There are three subsections in the System section: System, Firmware Management, and Account Management.
Enter the device name here.
Enter the time (in minutes) before users should be
automatically logged out of the web UI.
Click to back up the current system conguration
settings and download them as a le.
Click Browse to choose the backup conguration
le and then click Upload to apply the settings.
Click to download a backup of the current system
log.
Device Name:
Login Timeout:
Backup Syslog:
Upload
Conguration:
System Log
Export:
Click the Reset button to restore the device to the
factory default settings.
Click the button to reboot the DAP-3712.
Click the Browse button and choose a rmware
le, then click the Update button to upgrade the
rmware to the latest version.
Restore
Factory
Settings:
Reboot:
Firmware
Update:
38D-Link DAP-3712 User Manual
Section 3 - Conguration
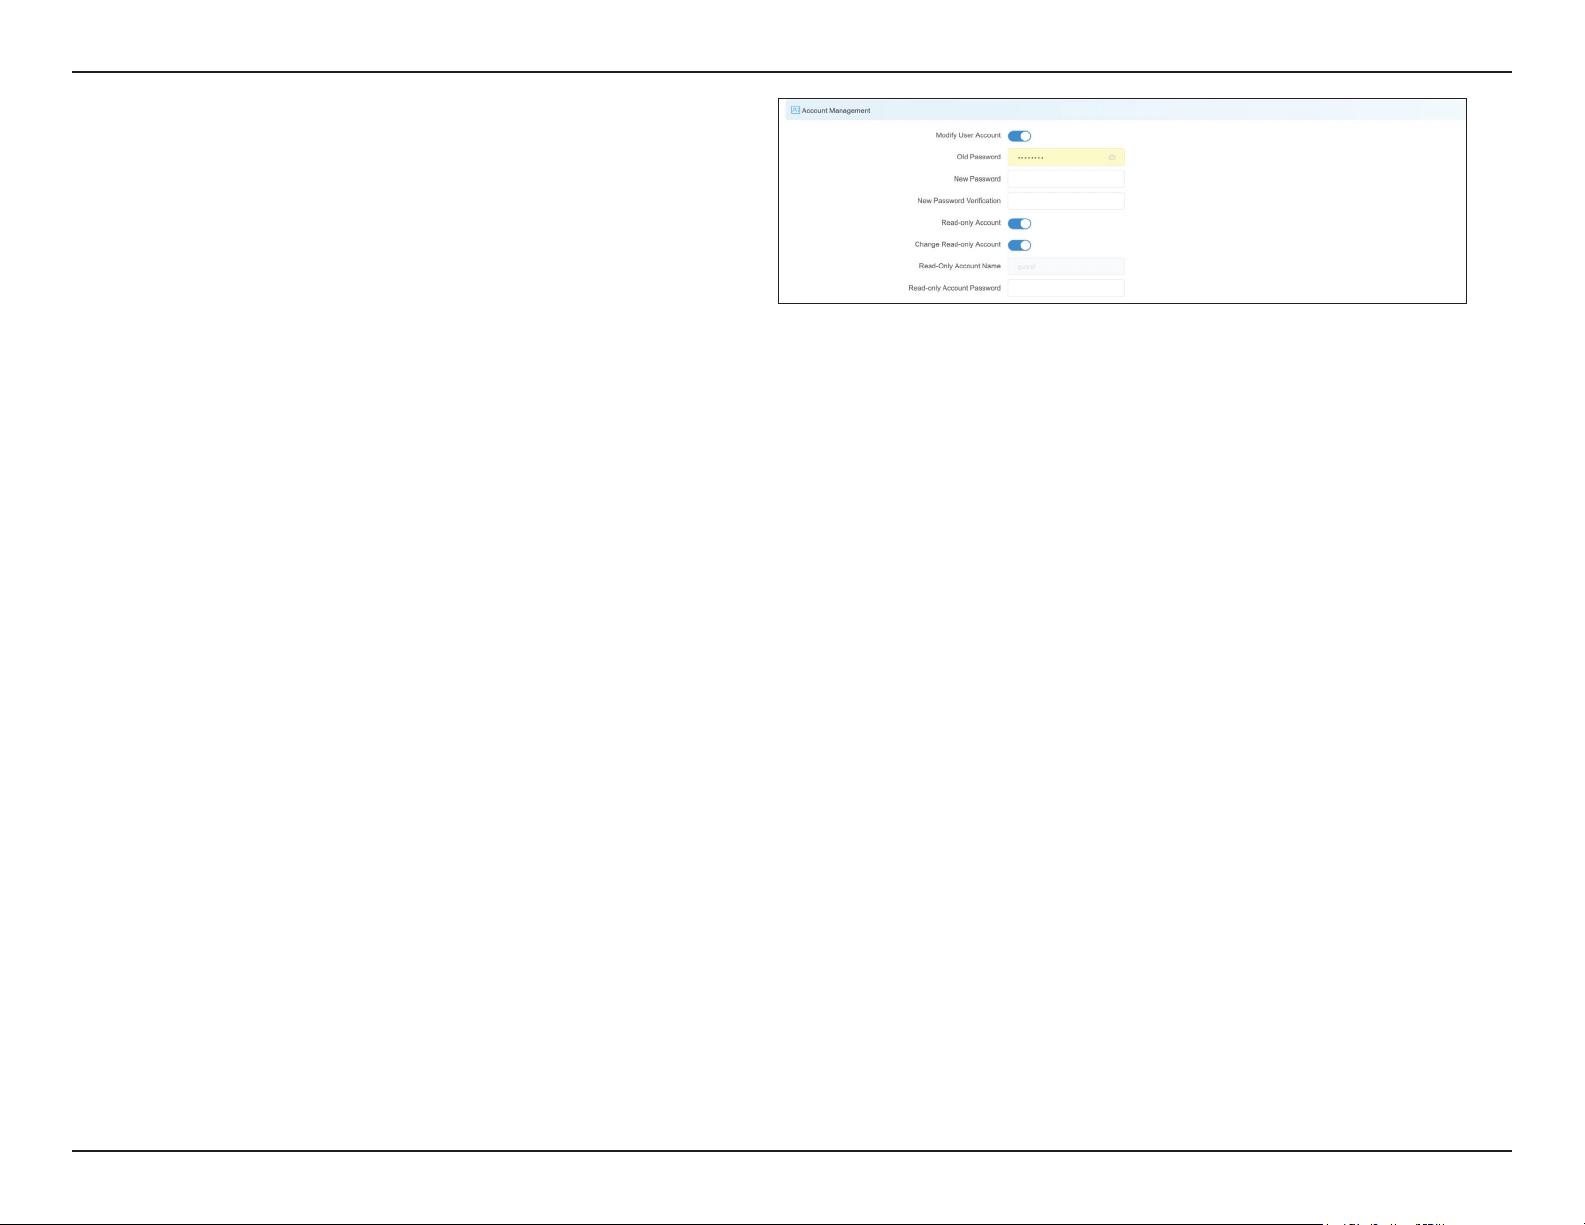
In this section you can change the admin password
or set up a Read Only account.
Use this to change the admin account’s password
Use this to enable a Read Only guest account
Use this to change the guest account’s password
Account
Management:
Modify User
Account:
Read-Only
Account:
Change Read-
Only Account:
39D-Link DAP-3712 User Manual
Section 3 - Conguration
Status
There are four tabs in the Status section:
Info
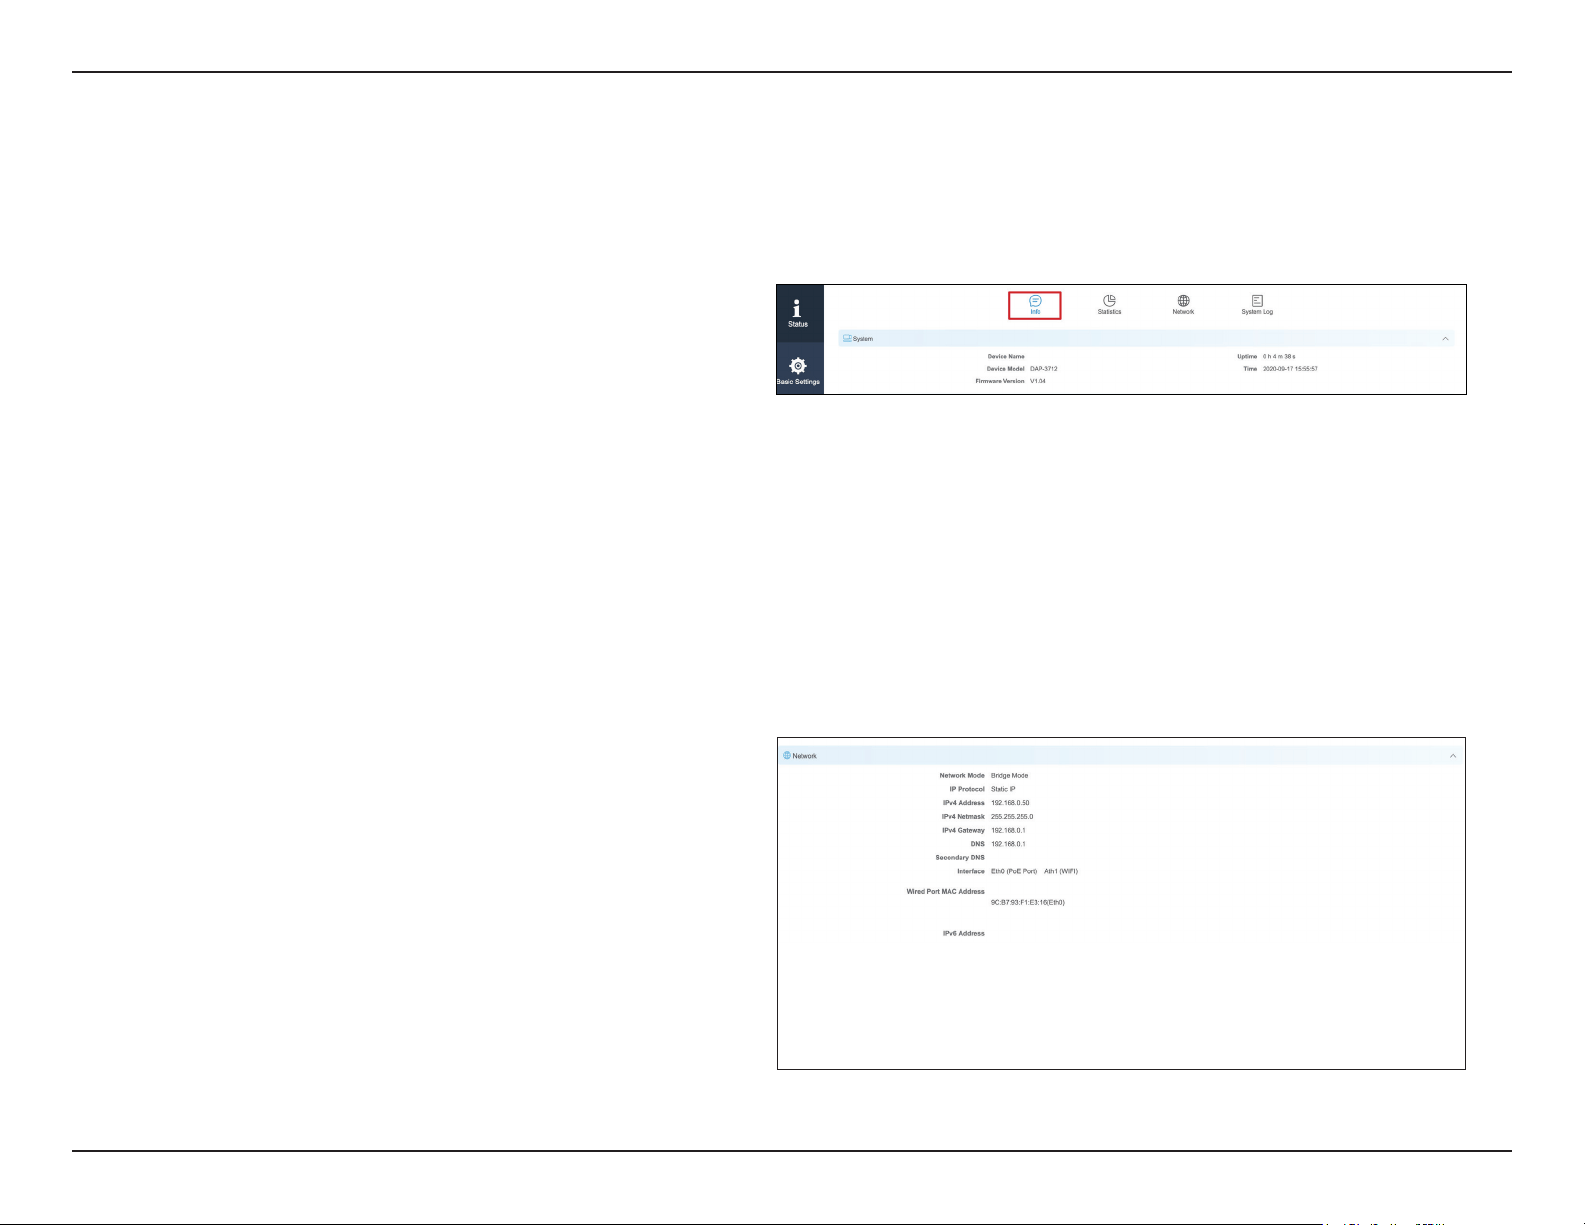
In the Info tab, information about the device is displayed.
Device Name: The name of the device
Device Model: The model (DAP-3712)
The software version number
The length of time that the device has been
powered on
The current time
Device Name:
Device Model:
Firmware
Version:
Uptime:
Time:
This displays the DAP-3712’s network status
This indicates whether the device is in Router Mode
or Bridge Mode
This indicates whether the device is congured
with a Static IP or DHCP
This displays the device’s LAN MAC Address
Network:
Network Mode:
IP Protocol:
Wired Port
MAC Address:
40D-Link DAP-3712 User Manual
Section 3 - Conguration
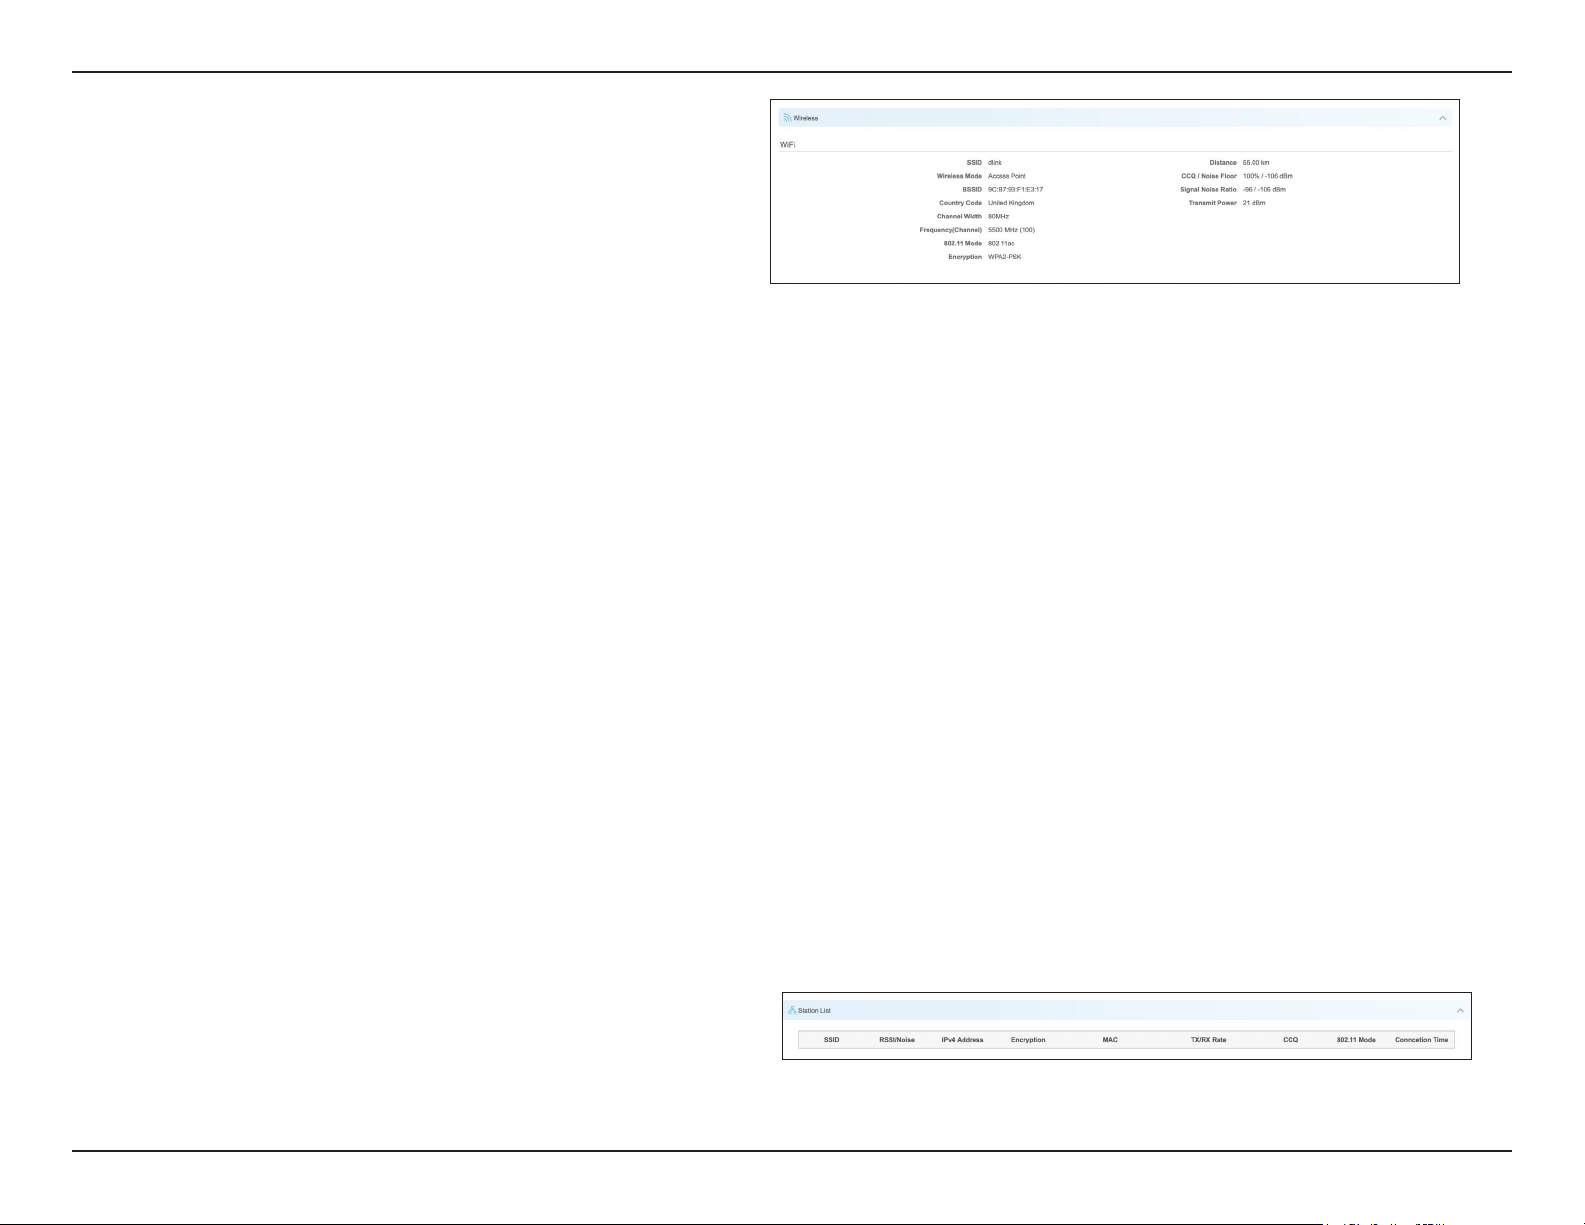
SSID: Displays the device’s SSID
This displays the device’s mode: Access Point,
Client, Access Point (WDS), or Client (WDS)
This displays the device’s Wi-Fi MAC address
This displays the device’s country code
This displays the device’s current operating
channel width (10/20/40/80 MHz)
Displays the device’s current operating channel
This displays the device’s current 802.11 mode:
802.11ac or 802.11 a/n
Displays the current Wi-Fi encryption
Shows distance between the two associated
devices
Displays the current noise oor value. In order
to achieve the best results, a value of less than
-95dBm is recommended
Displays the DAP-3712’s current Wi-Fi power
output
SSID:
Wireless Mode:
BSSID:
Country Code:
Channel Width:
Frequency
(Channel):
802.11 Mode:
Encryption:
Distance:
Noise Floor:
Transmit
Power:
This will list all of the client devices which are
connected to the DAP-3712.
Station
List Info:
41D-Link DAP-3712 User Manual
Section 3 - Conguration
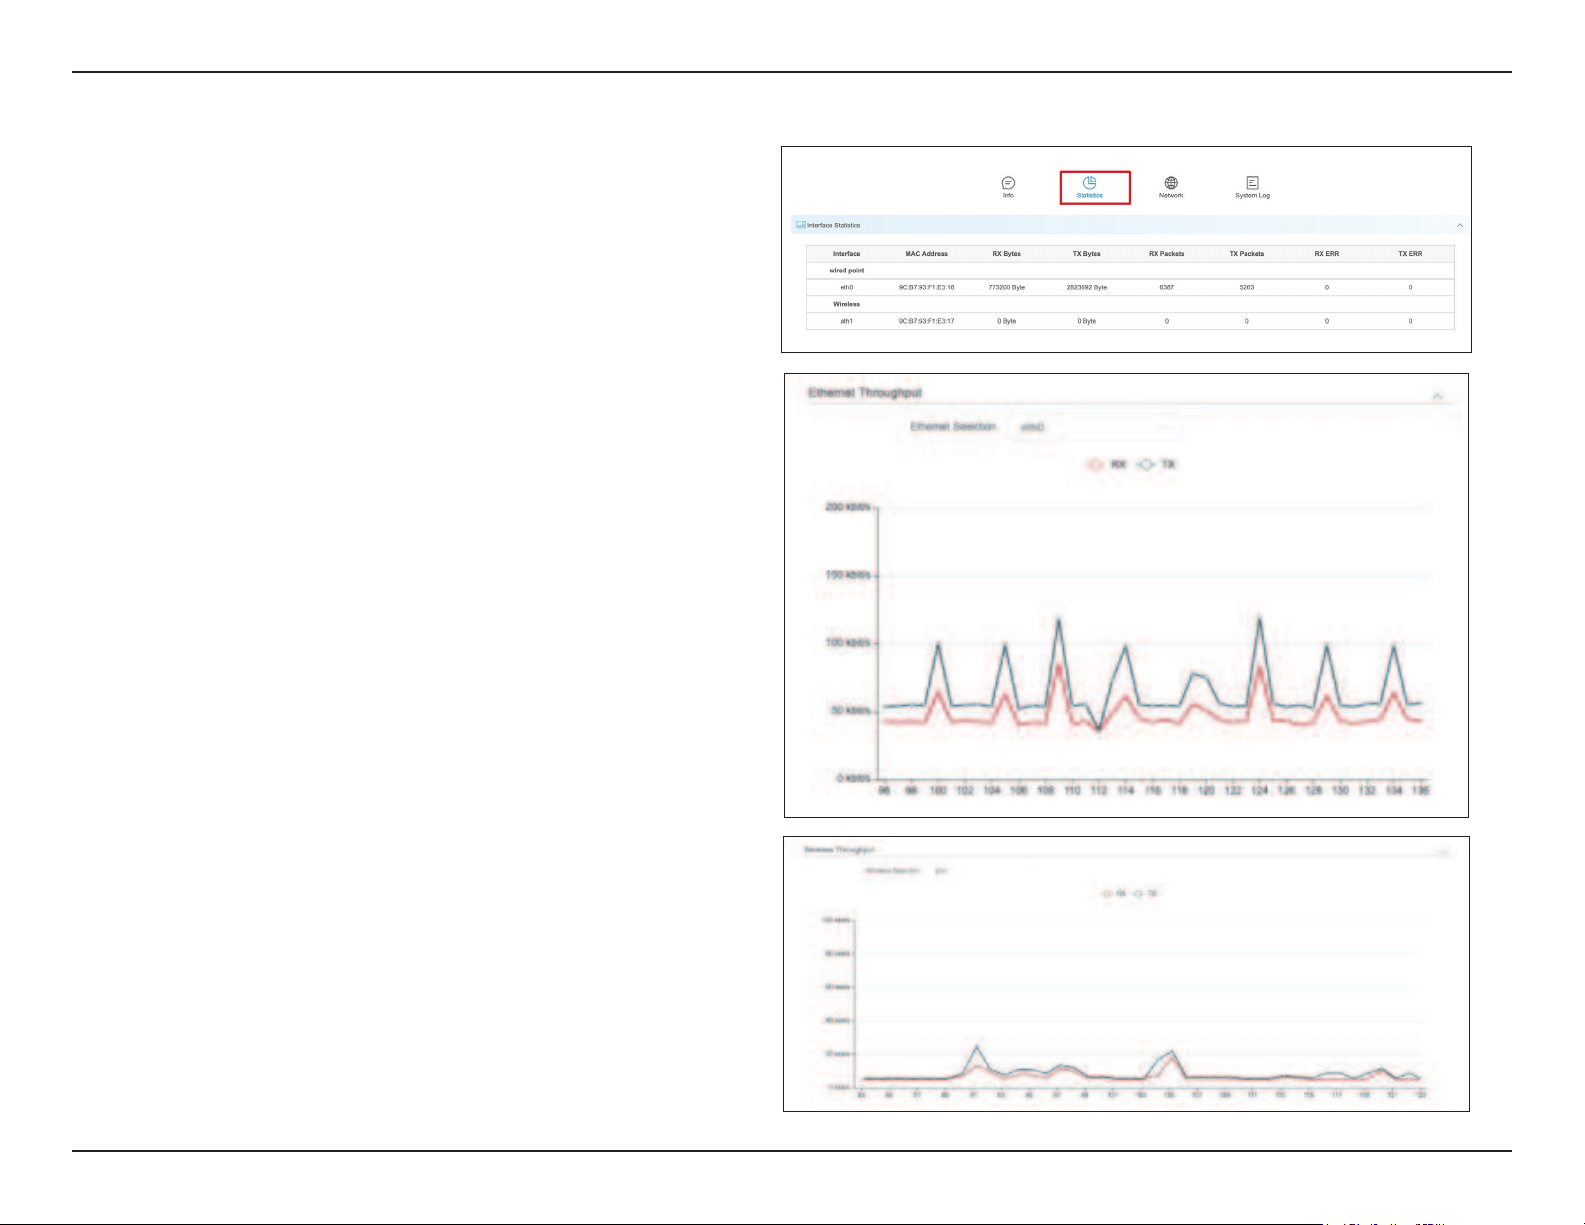
Statistics
There are two subsections: Interface Statics and Throughput.
Displays the DAP-3712’s trac Interface
Statics:
Displays the current Ethernet and wireless trac Throughput:
42D-Link DAP-3712 User Manual
Section 3 - Conguration
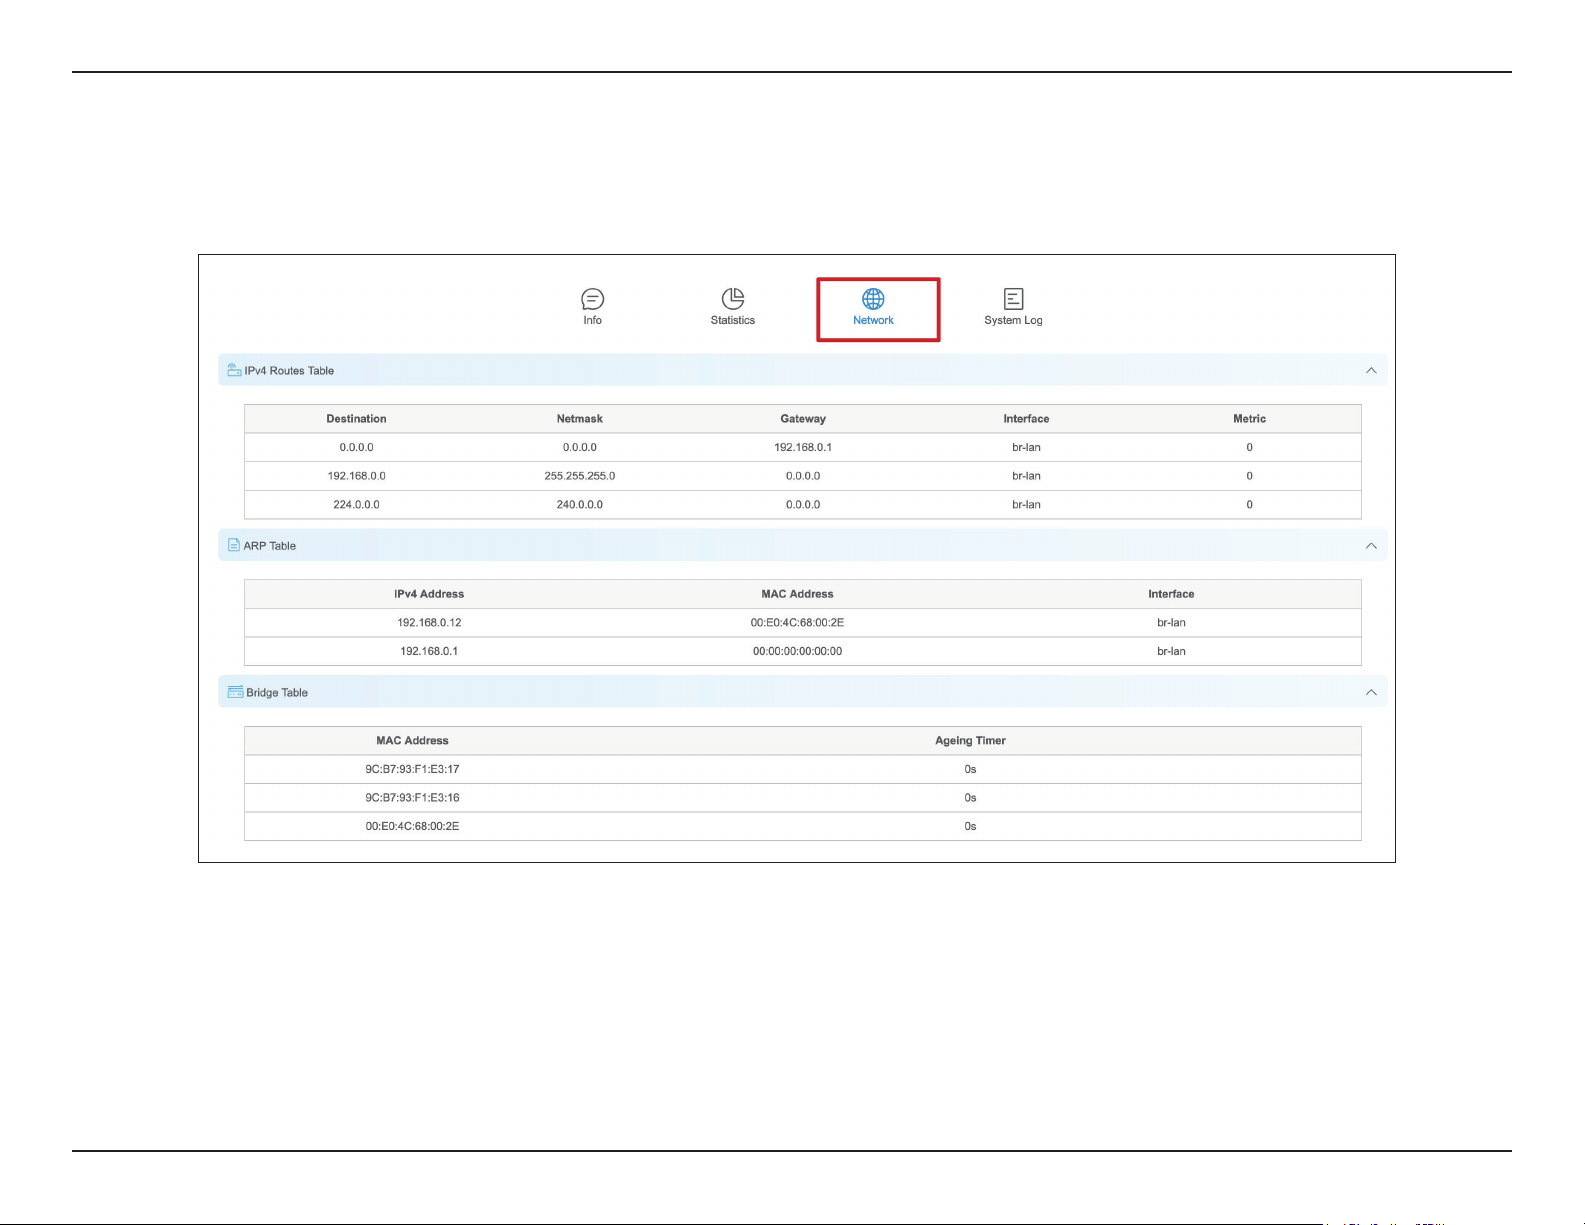
Network
In this tab, you can see the current IPv4 route table, APR table and bridge table.

43D-Link DAP-3712 User Manual
Section 3 - Conguration
Syslog Info
This tab shows the current syslog. Click the Clear button to clear the log.
44D-Link DAP-3712 User Manual
Section 3 - Conguration
Tools
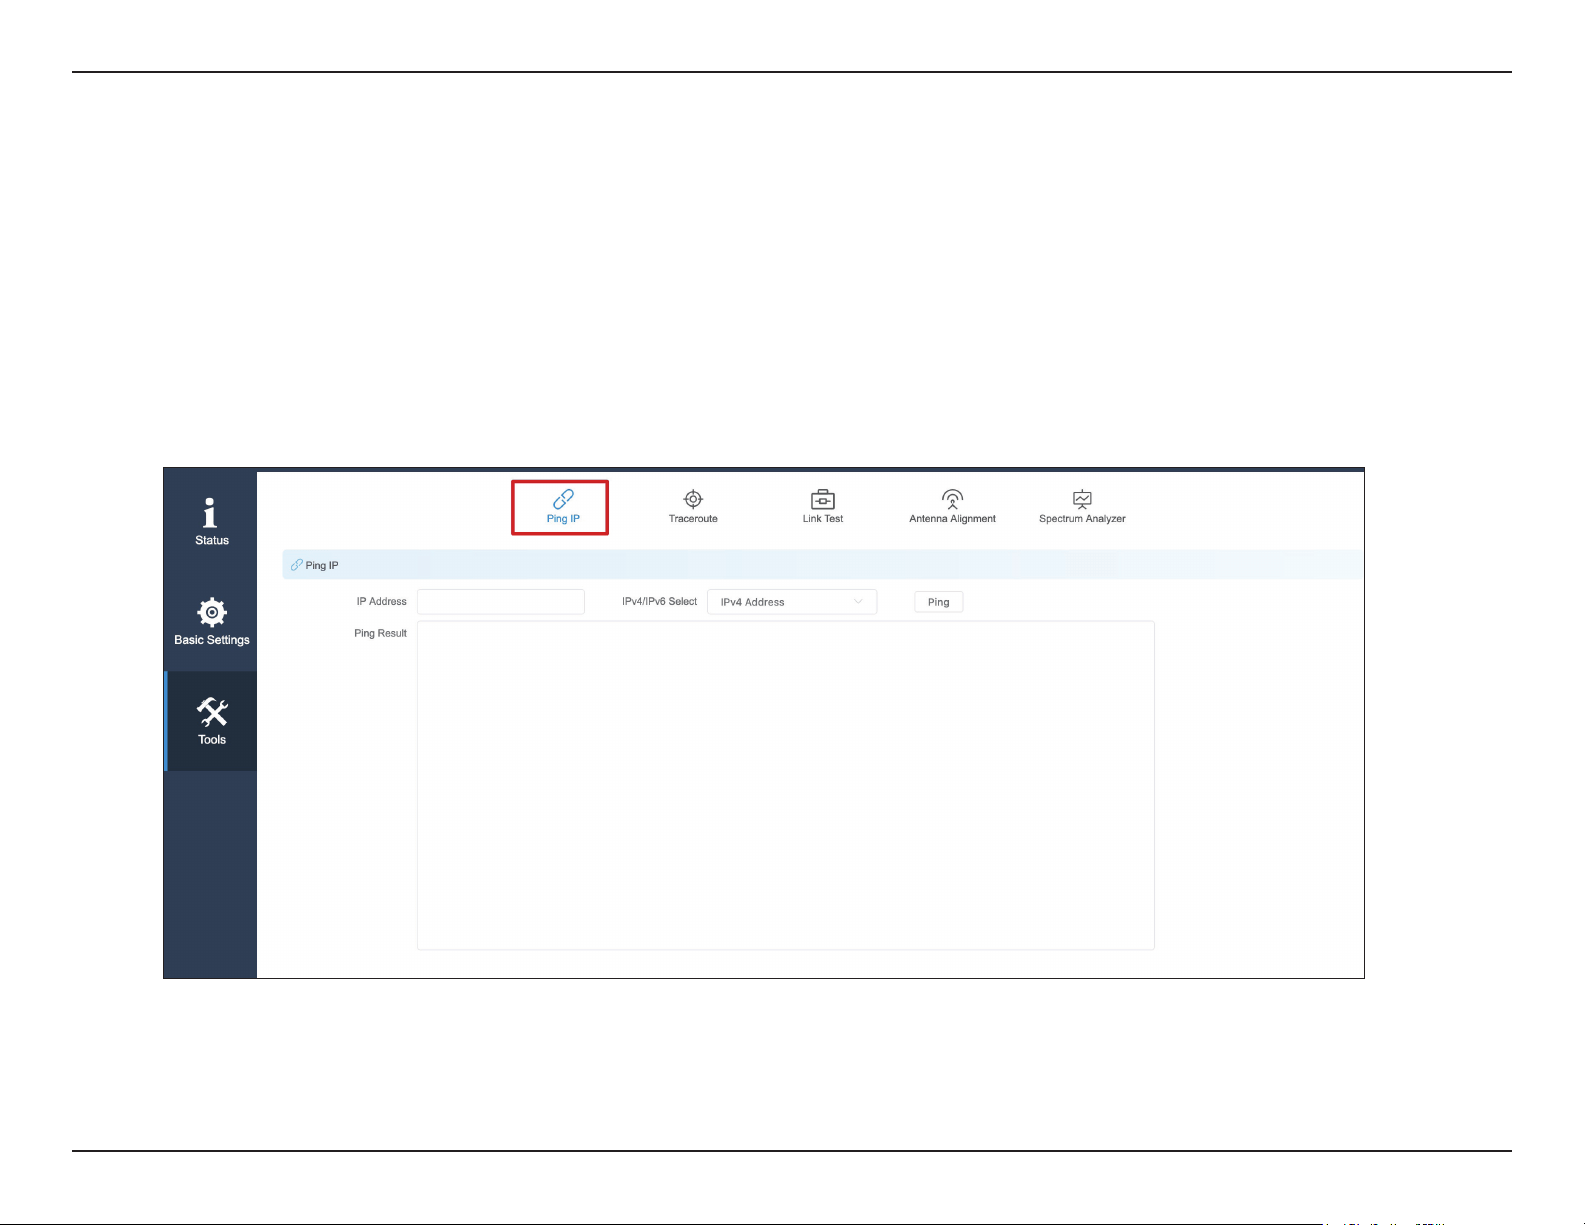
The DAP-3712 has many useful tools built in to help you manage the device and your network. These tools include Ping IP,
Traceroute, Link Test, Antenna Alignment and Spectrum Analyzer.
Ping IP
You can type in an IP address and check the ping result.
Enter the IP address that you would like to ping.IP Address:
45D-Link DAP-3712 User Manual
Section 3 - Conguration
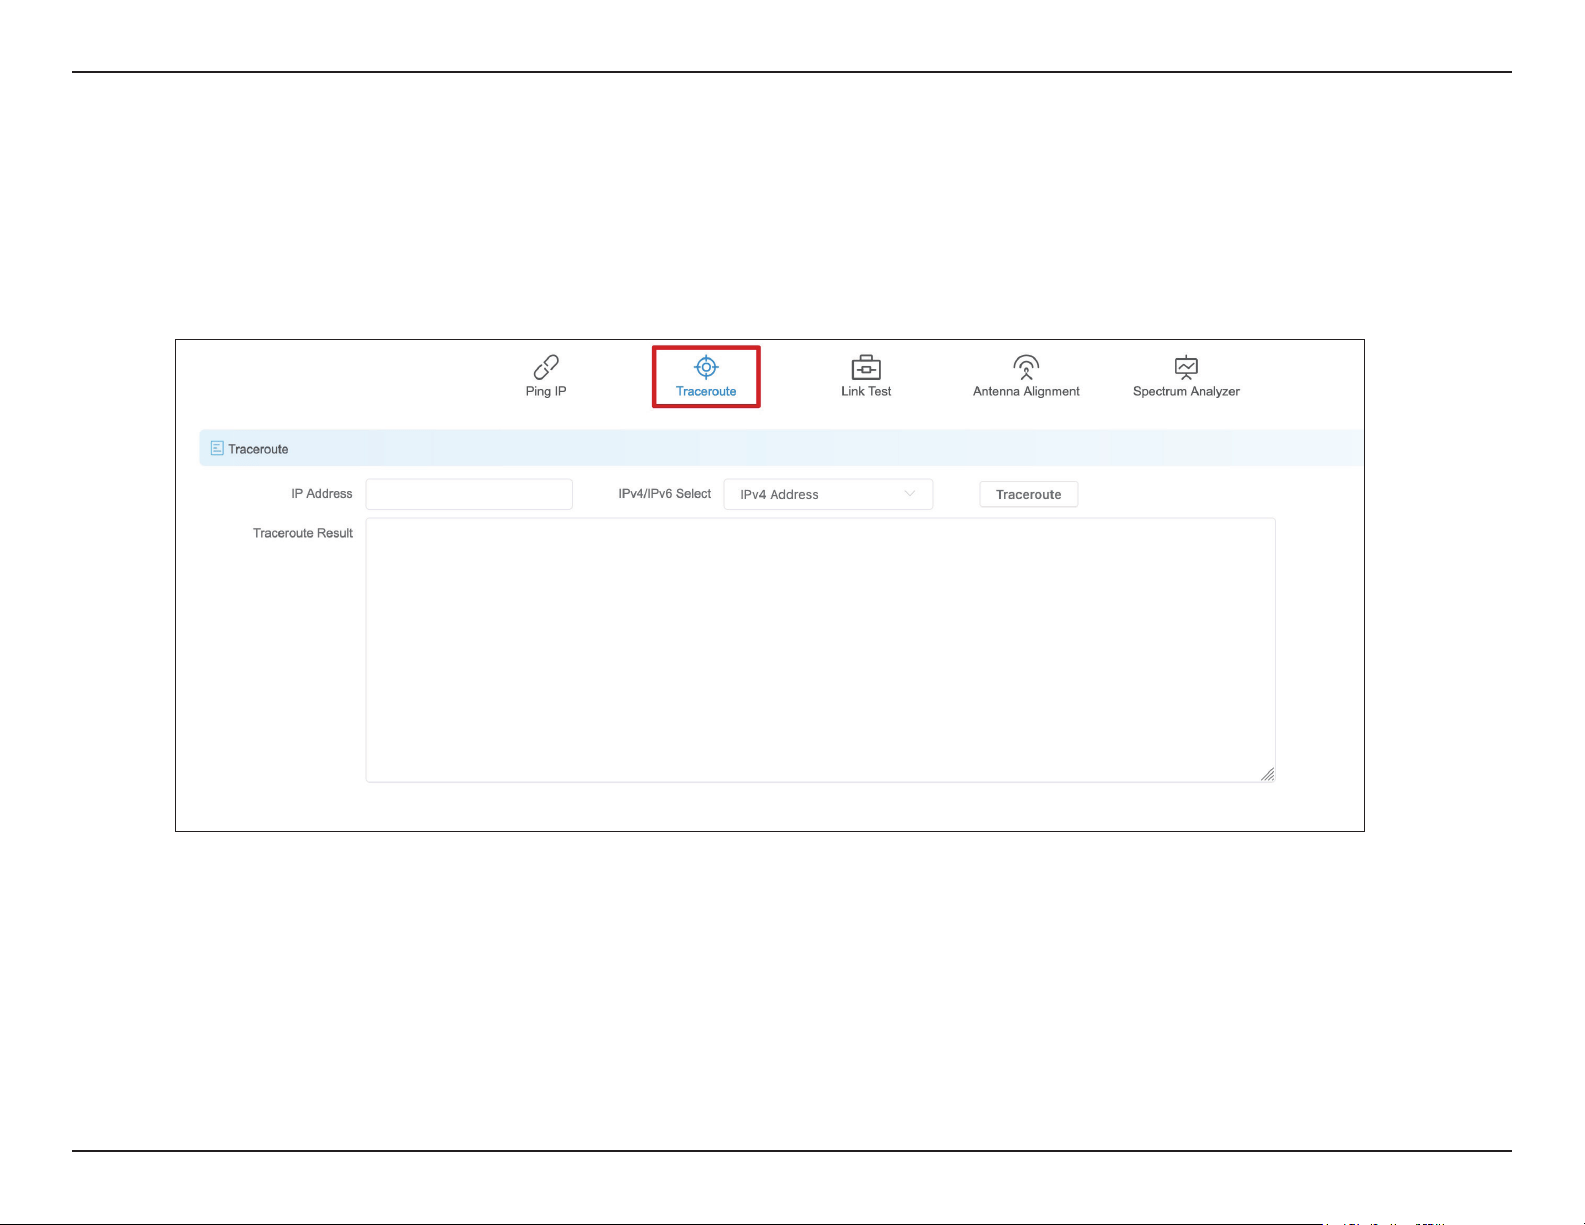
Traceroute
This allows the user to traceroute an IP address.
Enter the IP address to tracerouteIP Address:
46D-Link DAP-3712 User Manual
Section 3 - Conguration
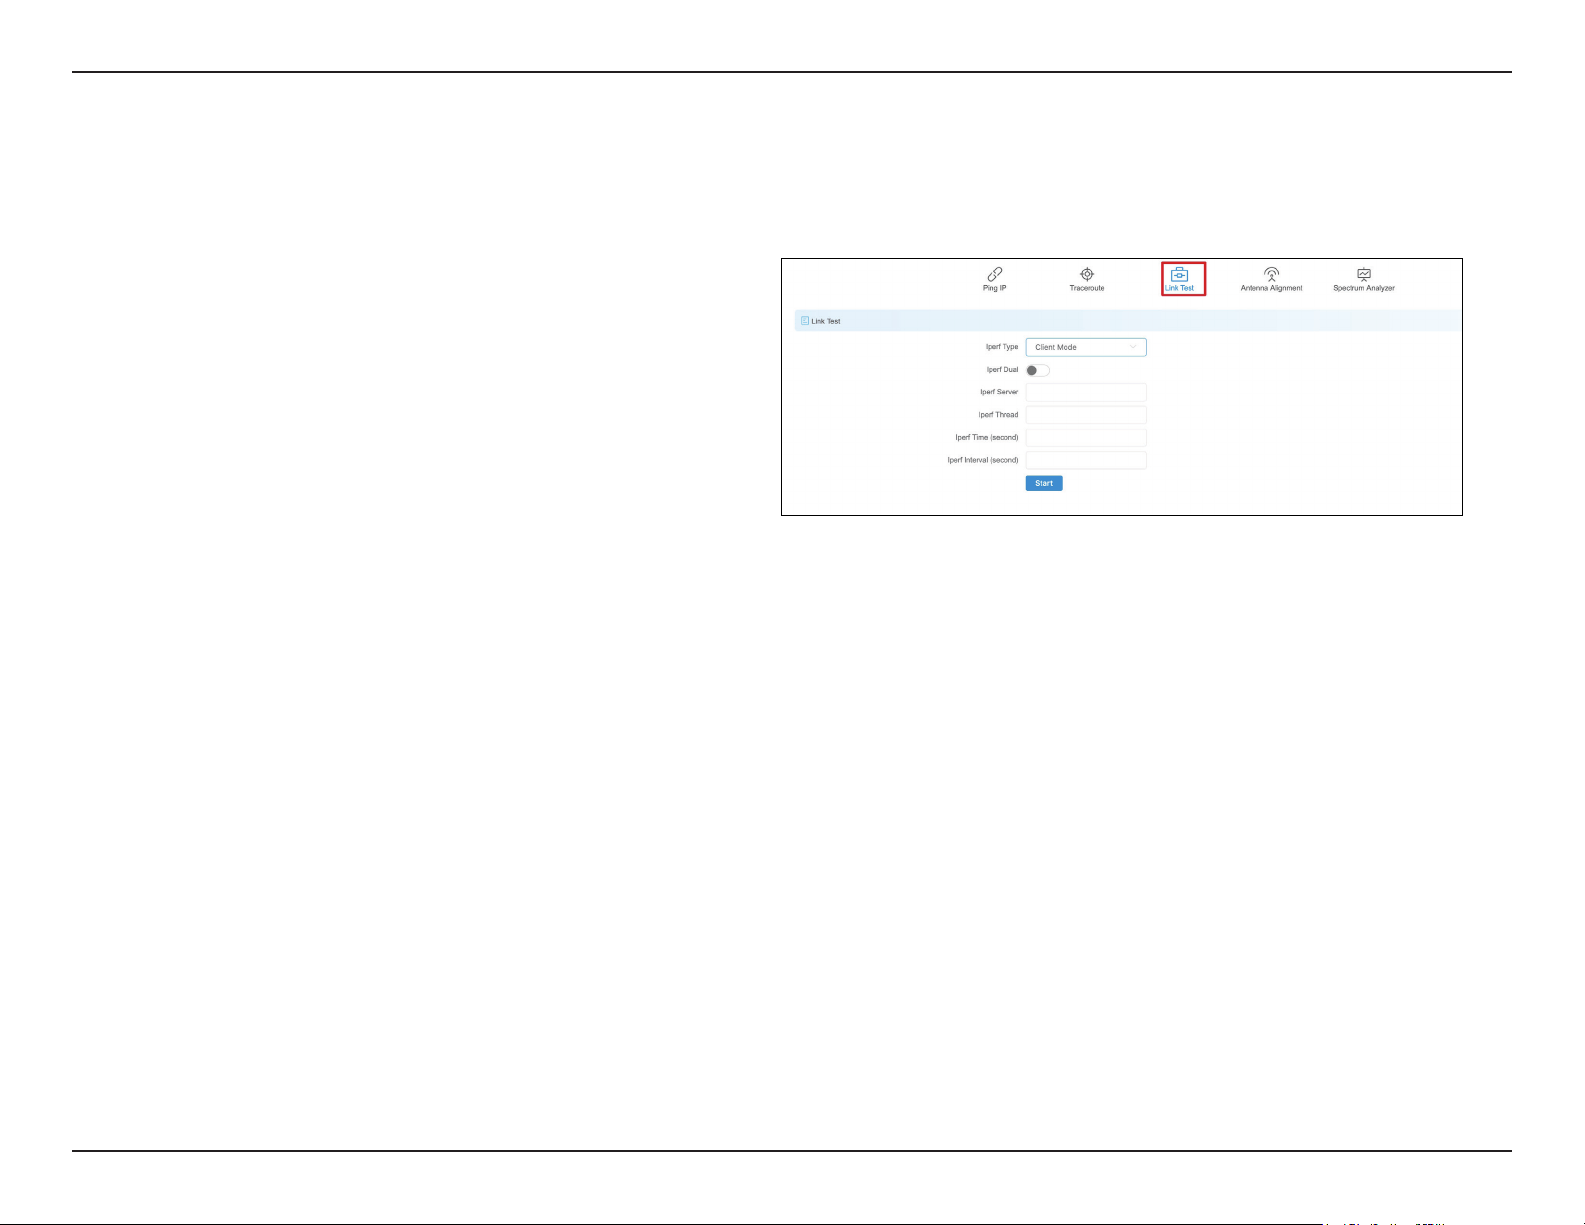
Link Test
The DAP-3712 has a built-in Iperf function. Users can congure the DAP-3712 in Iperf Server Mode. Then the Iperf client can connect to the Iperf
server to verify the speed between the two links. In client mode, you can assign an Iperf server IP address to check the speed between the two links.
Select Client or Server
If you select Iperf Dual, the DAP-3712 will conduct
a bi-directional speed test. Otherwise, it only test
the speed of transmission from the Iperf client to
the Iperf server.
Enter the Iperf server’s IP address.
Enter the number of threads during the test.
Enter how long the speed test should last.
Enter the interval to wait between the tests.
Iperf Type:
Iperf Dual:
Iperf Server:
Iperf Thread:
Iperf Time:
Iperf Interval:
47D-Link DAP-3712 User Manual
Section 3 - Conguration
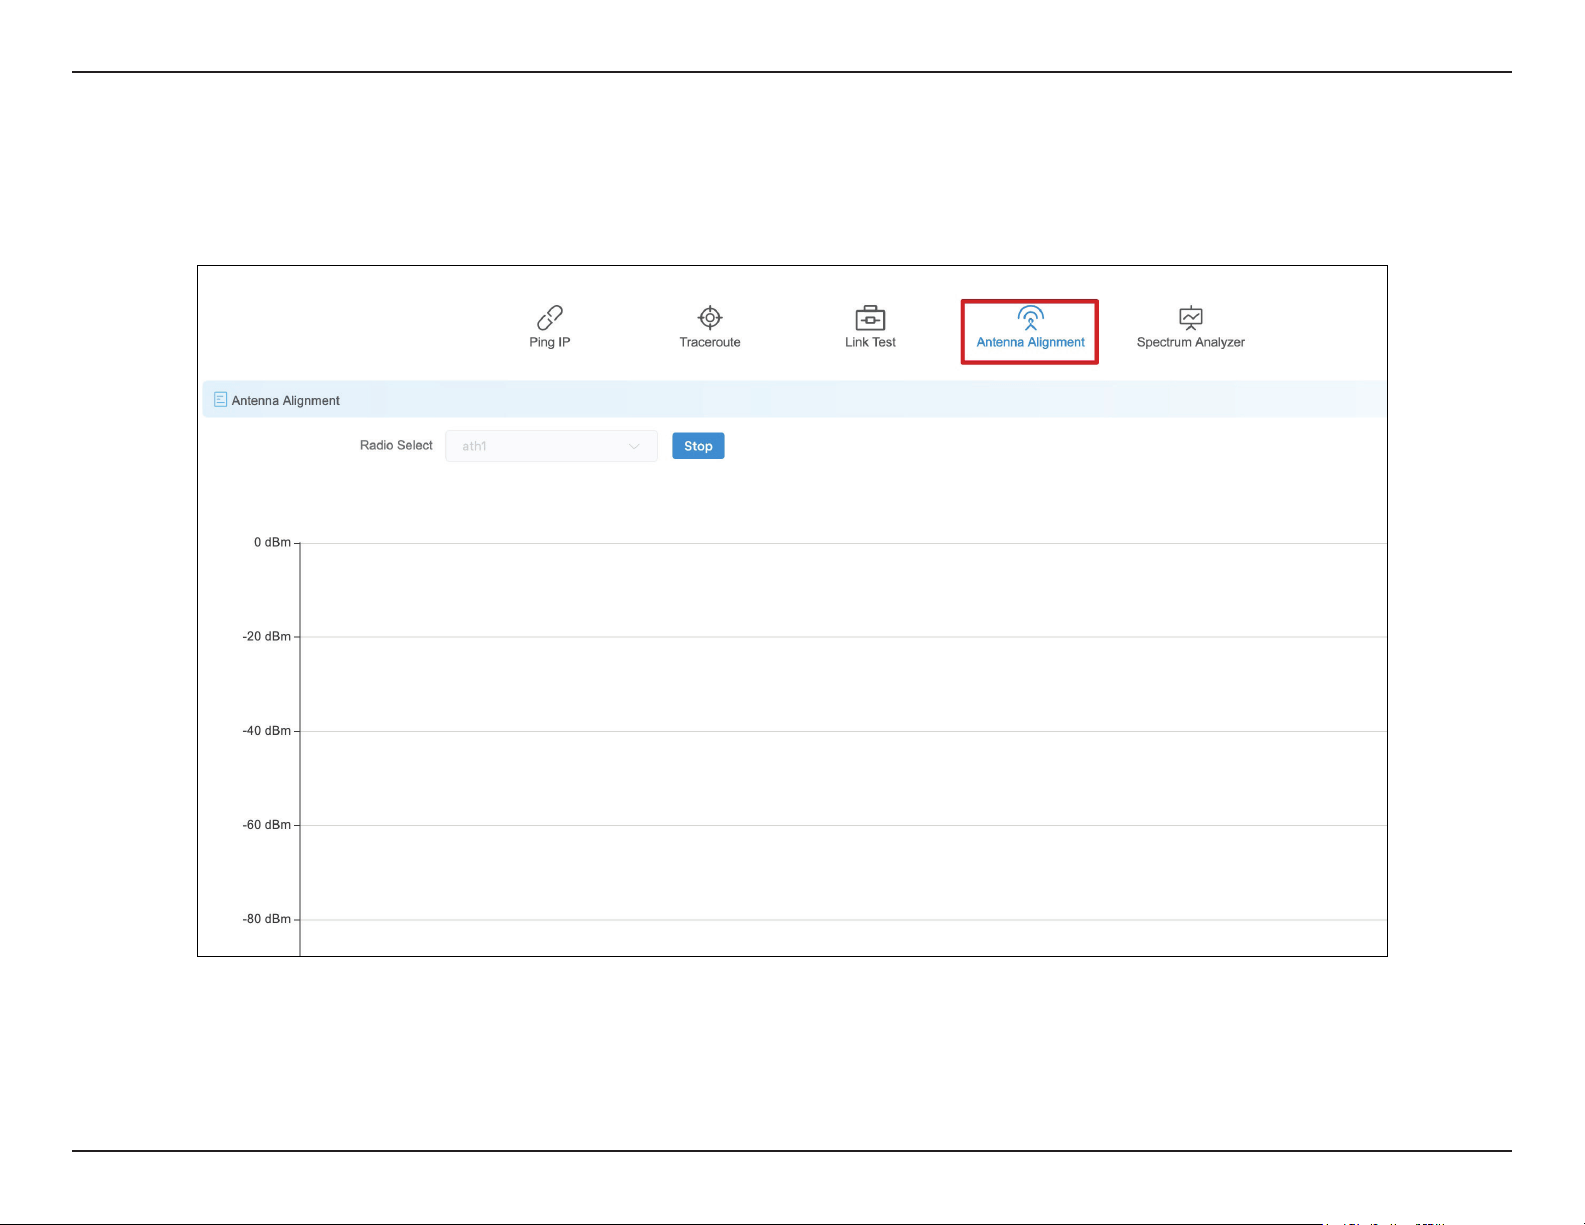
Antenna Alignment
When you select this, the DAP-3712 will recalibrate its signal strength. You can check which angle has the best antenna alignment when you install
the DAP-3712.
48D-Link DAP-3712 User Manual
Section 3 - Conguration
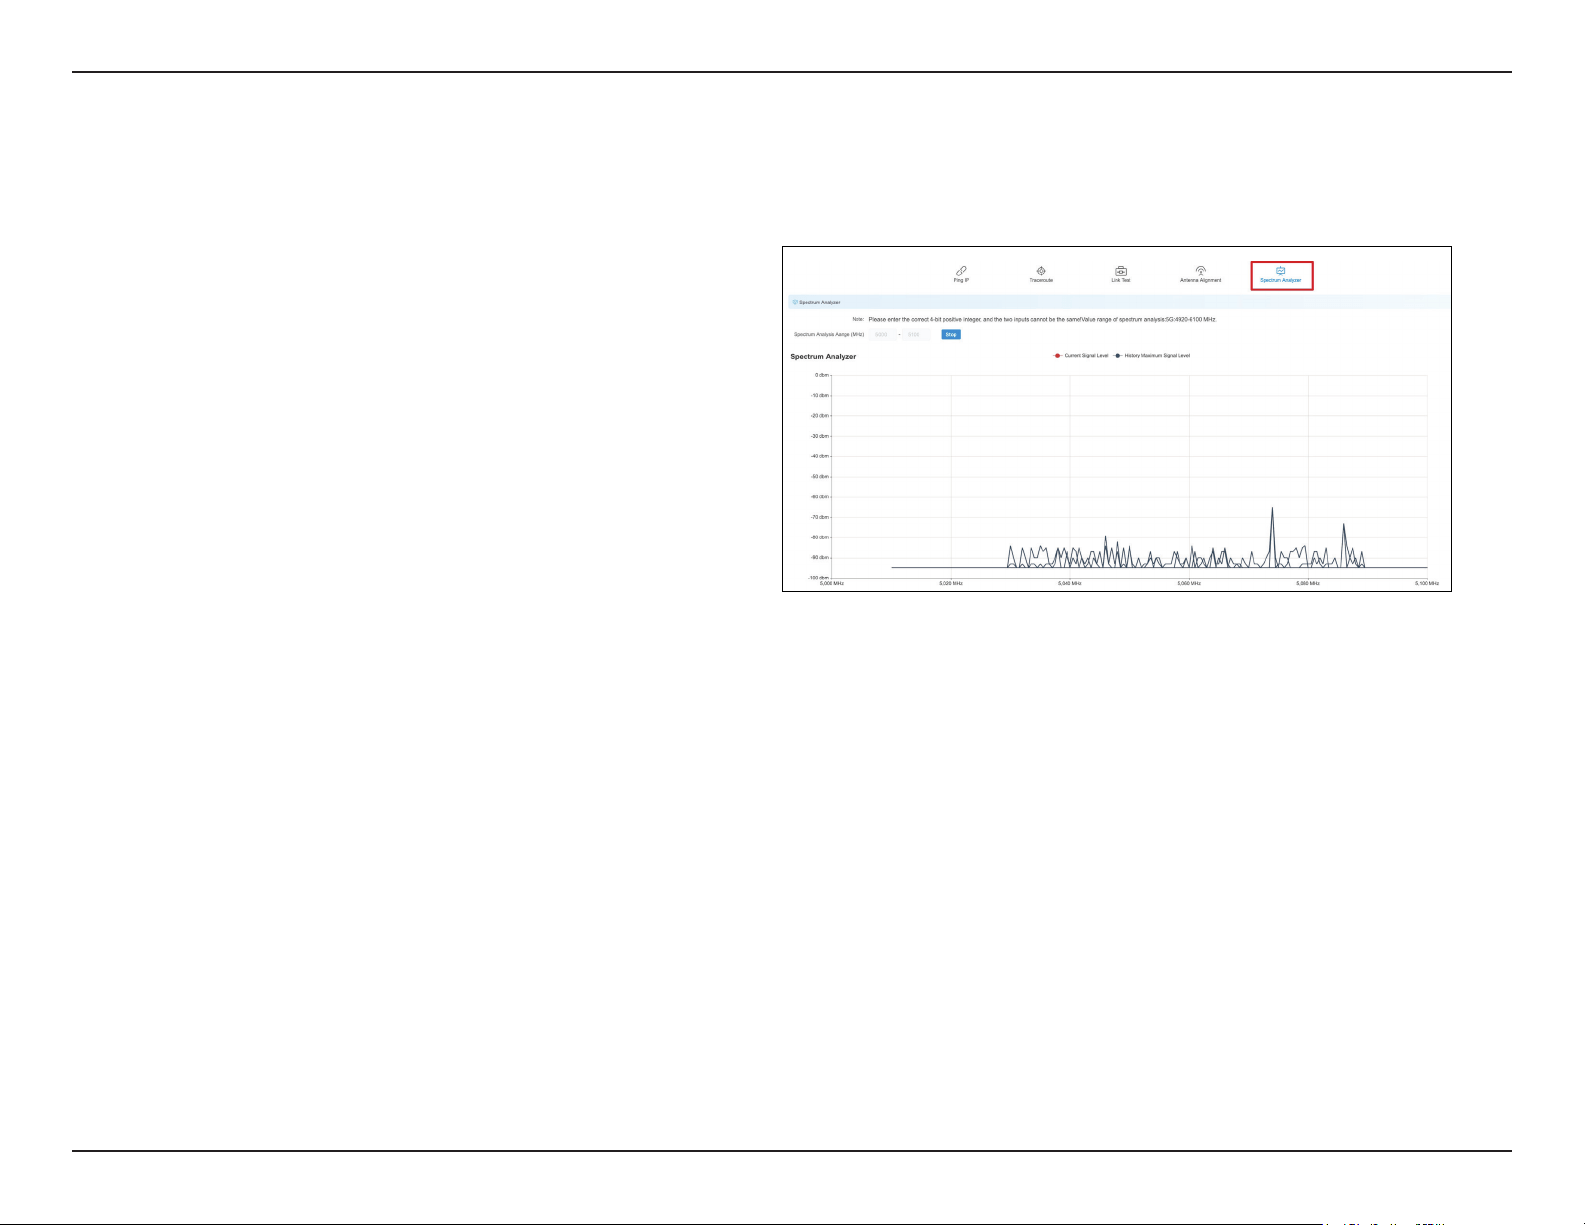
Spectrum Analyzer
You can use the Spectrum Analyzer to scan for the best channels. When performing the scan, the DAP-3712 Wi-Fi may disconnect.
Enter the frequency range to conduct spectrum
analysis on. It will take a few seconds to nish the
scan.
Spectrum
Analysis
Range:

49D-Link DAP-3712 User Manual
Appendix A - Technical Specications
Technical Specications
Standards
802.11a/n/ac
Device Interfaces
1 x 100/1000 Mbps Ethernet port, reset button
LEDs
Signal strength
Antenna Type
Dish
Antenna Gain
23 dBi
Beamwidth
H: 10°, V: 10°
Standards
802.11a/n/ac
Protection
8 kV ESD Protection
Enclosure
ABS, IP66 compliant
Operation Modes
AP, Station, WDS AP, WDS Station
Operating Frequency
5180~5320 MHz, 5745~5825 MHz
Max. Transmit Power¹
27 dBm
Wireless Speed
Up to 867 Mbps
Bandwidth Support
20/40/80 MHz
Wireless Conguration
Auto channel support, transmit power selection,
SSID broadcast enabling/disabling
Security
802.11i 128-bit AES Personal / Enterprise
System Tools
Ping, traceroute, NTP, ping watchdog, syslog,
spectrum analyzer, throughput testing (lperf )
Smart Wireless Technology
TDMA, Auto ACK, intelligent rate control,
co-channel interference avoidance
Advanced Features
Max. station limit
1
Range will vary depending on country’s maximum transmit power output regulation. Maximum wireless signal rate derived from IEEE Standard 802.11g and 802.11n specications.
Actual data throughput will vary. Network conditions and environmental factors, including volume of network trac, building materials and construction, and network overhead,
lower actual data throughput rate. Environmental conditions will adversely aect wireless signal range.

50D-Link DAP-3712 User Manual
Appendix A - Technical Specications
LAN Type
Static, DHCP
VLAN Support
Yes
Firewall
IP / MAC lter
Monitors
Throughput, interfaces, routes table, bridge
table, ARP table, AP information, syslog
Firmware Upgrade
Web-based upgrade
Power Input
PoE+ 48 V
Power Consumption
≤ 15 W
Operating Temperature
-40ºC to 65ºC
Storage Temperature
-40ºC to 85ºC
Operating Humidity
0% to 90%
Storage Humidity
0% to 90%
Weight
900 g (2.0 lbs)
Dimensions
372 x 372 x 241 mm (14.6 x 14.6 x 9.5 in)
Certications
CE
FCC

51D-Link DAP-3712 User Manual
Trademarks:
D-Link is a registered trademark of D-Link Corporation/D-Link Systems, Inc. Other trademarks or registered trademarks are the property of their
respective owners.
Copyright Statement:
No part of this publication or documentation accompanying this product may be reproduced in any form or by any means or used to make any
derivative such as translation, transformation, or adaptation without permission from D-Link Corporation/D-Link Systems, Inc., as stipulated by the
United States Copyright Act of 1976 and any amendments thereto. Contents are subject to change without prior notice.
Copyright ©2020 by D-Link Corporation/D-Link Systems, Inc. All rights reserved.
FCC Statement
This equipment has been tested and found to comply with the limits for a Class A digital device, pursuant to Part 15 of the FCC Rules. These limits
are designed to provide reasonable protection against harmful interference when the equipment is operated in a commercial environment. This
equipment generates, uses, and can radiate radio frequency energy and, if not installed and used in accordance with the instruction manual, may
cause harmful interference to radio communications. Operation of this equipment in a residential area is likely to cause harmful interference in
which case the user will be required to correct the interference at his own expense.
FCC Radiation Exposure Statement
This device complies with FCC radiation exposure limits set forth for an uncontrolled environment and it also complies with Part 15 of the FCC RF
Rules. This equipment must be installed and operated in accordance with provided instructions and the antenna(s) used for this transmitter must be
installed to provide a separation distance of at least 20 cm from all persons and must not be co-located or operating in conjunction with any other
antenna or transmitter. End-users and installers must be provided with antenna installation instructions and consider removing the no-collocation
statement.
This device complies with Part 15 of the FCC Rules. Operation is subject to the following two conditions: (1) this device may not cause harmful
interference, and (2) this device must accept any interference received, including interference that may cause undesired operation.
Caution!
Any changes or modications not expressly approved by the party responsible for compliance could void the user’s authority to operate the
equipment.