Loading ...
Loading ...
Loading ...
En
22
Changing the settings
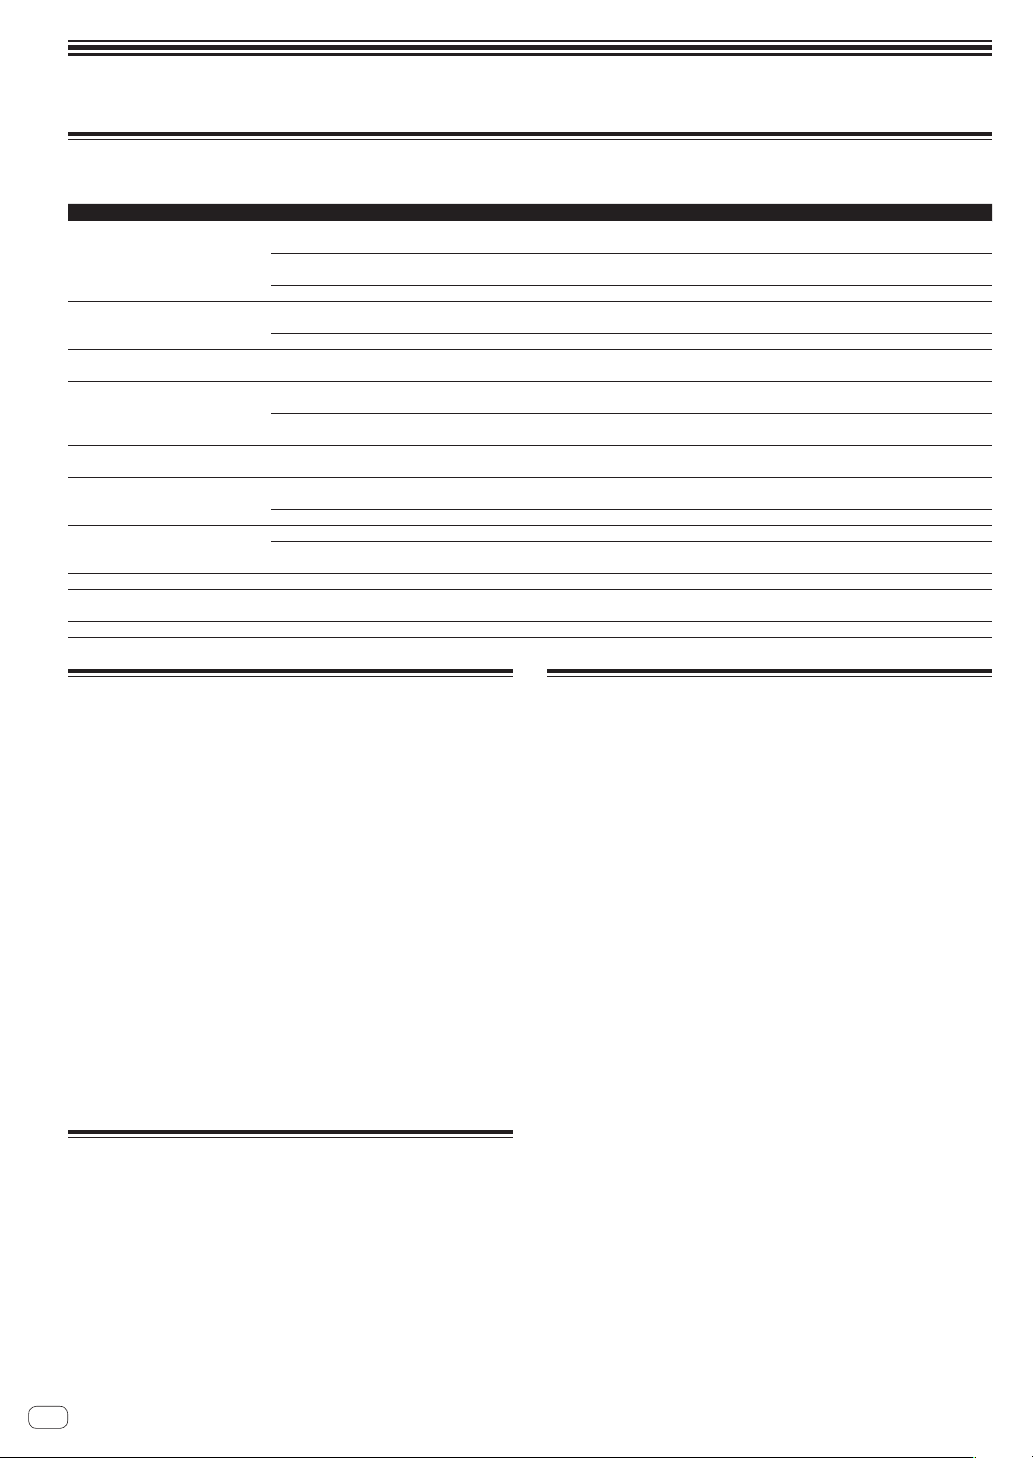
Setting preferences
*: Setting upon purchase
Options settings Detail setting items Setting value Descriptions
MASTER OUT
PEAK LIMITER
OFF, ON*
Reduces sudden, unpleasant digital clipping of the master
output.
ATT.
–12 dB, –6 dB, 0 dB*
Sets the attenuation level of the sound output from the
[MASTER1] and [MASTER2] terminals.
MONO/STEREO MONO, STEREO* Sets monaural or stereo sound for master output.
BOOTH OUT
ATT.
–12 dB, –6 dB, 0 dB*
Sets the attenuation level of the sound output from the
[BOOTH] terminal.
MONO/STEREO MONO, STEREO* Sets monaural or stereo sound for booth output.
MIC OUT TO MASTER PEAK LIMITER THRESHOLD LEVEL
0 dB, 3 dB, 6 dB, 9 dB, 12 dB,
15 dB,
OFF*
Sets the microphone audio limiter to be applied to the
master output.
MIC OUT TO BOOTH
LEVEL
OFF,
–18 dB, –15 dB, –12 dB, –9 dB,
–6 dB, –3 dB, 0 dB*
Sets the microphone audio level to be applied to the booth
output.
PEAK LIMITER THRESHOLD LEVEL
0 dB, 3 dB, 6 dB, 9 dB, 12 dB,
15 dB,
OFF*
Sets the microphone audio limiter to be applied to the
booth output.
MIC LOW CUT
— OFF, ON*
Turns on/off the function that cuts the low frequencies of
the microphone audio.
TALK OVER
MODE
ADVANCED*, NORMAL
Selects the talk over function’s mode, [ADVANCED] or
[NORMAL].
LEVEL
–24 dB, –18 dB*, –12 dB, –6 dB Sets the talk over function’s sound attenuation level.
MIDI
CH
1* to 16 Sets the MIDI channel.
BUTTON TYPE
TOGGLE*, TRIGGER
Selects the MIDI signal transmission mode, [TOGGLE] or
[TRIGGER].
OLED BRIGHTNESS
— 1 to 3* Sets the main unit display’s brightness.
PC UTILITY
— OFF*, ON
Sets whether or not to launch the computer’s setting utility
software automatically when a USB cable is connected.
AUTO STANDBY
— OFF, ON* Turns the auto standby function on and off.
Changing the settings
1 Press the [UTILITY (WAKE UP)] button for over 1
second.
[UTILITY (WAKE UP)] indicator lights.
2 Press the [BEAT c, d] button.
Select the setting item.
3 Press the [TAP] button.
The values set for each field are displayed.
4 Press the [BEAT c, d] button.
Change the setting value.
5 Press the [TAP] button.
Enter the setting value.
The previous screen reappears.
! To return to the previous screen without changing the settings, press
the [AUTO/TAP] button.
6 Press the [UTILITY (WAKE UP)] button.
The [UTILITY] screen closes.
The [UTILITY (WAKE UP)] indicator turns off.
Returning to default settings
1 While pressing and holding the [UTILITY (WAKE UP)]
button, press the [POWER] button.
[FACTORY RESET] mode is displayed.
2 Press the [BEAT c, d] button.
Select [YES].
3 Press the [TAP] button.
Enter the setting value.
4 Press the [POWER] button.
Turn off the power of this unit.
About the auto standby function
When [AUTO STANDBY] is set to [ON], the unit automatically enters
the standby mode if 10 hours elapses with all of the following conditions
met.
— None of this unit’s buttons or controls are operated.
— No audio signal is input to any channel of this unit.
! Pressing the [UTILITY (WAKE UP)] button cancels the standby state.
! This unit is shipped with the auto standby function turned on. If you
do not want to use the auto standby function, set [AUTO STANDBY]
to [OFF].
! When in standby state, the [UTILITY (WAKE UP) indicator] lights.
Loading ...
Loading ...
Loading ...