1
West Bend ®CLOCK/TRIPLE ELECTRONIC TIMER
No. 40053 L5492
Three timing channels counts to and from 100 hours
www.westbend.com
INTRODUCTION: This compact Electronic Triple Timer®/Clock/Stopwatch is very easy to use. Read the
following instructions carefully, then practice using it a few times. You will soon find a multitude of uses for it
almost anywhere.
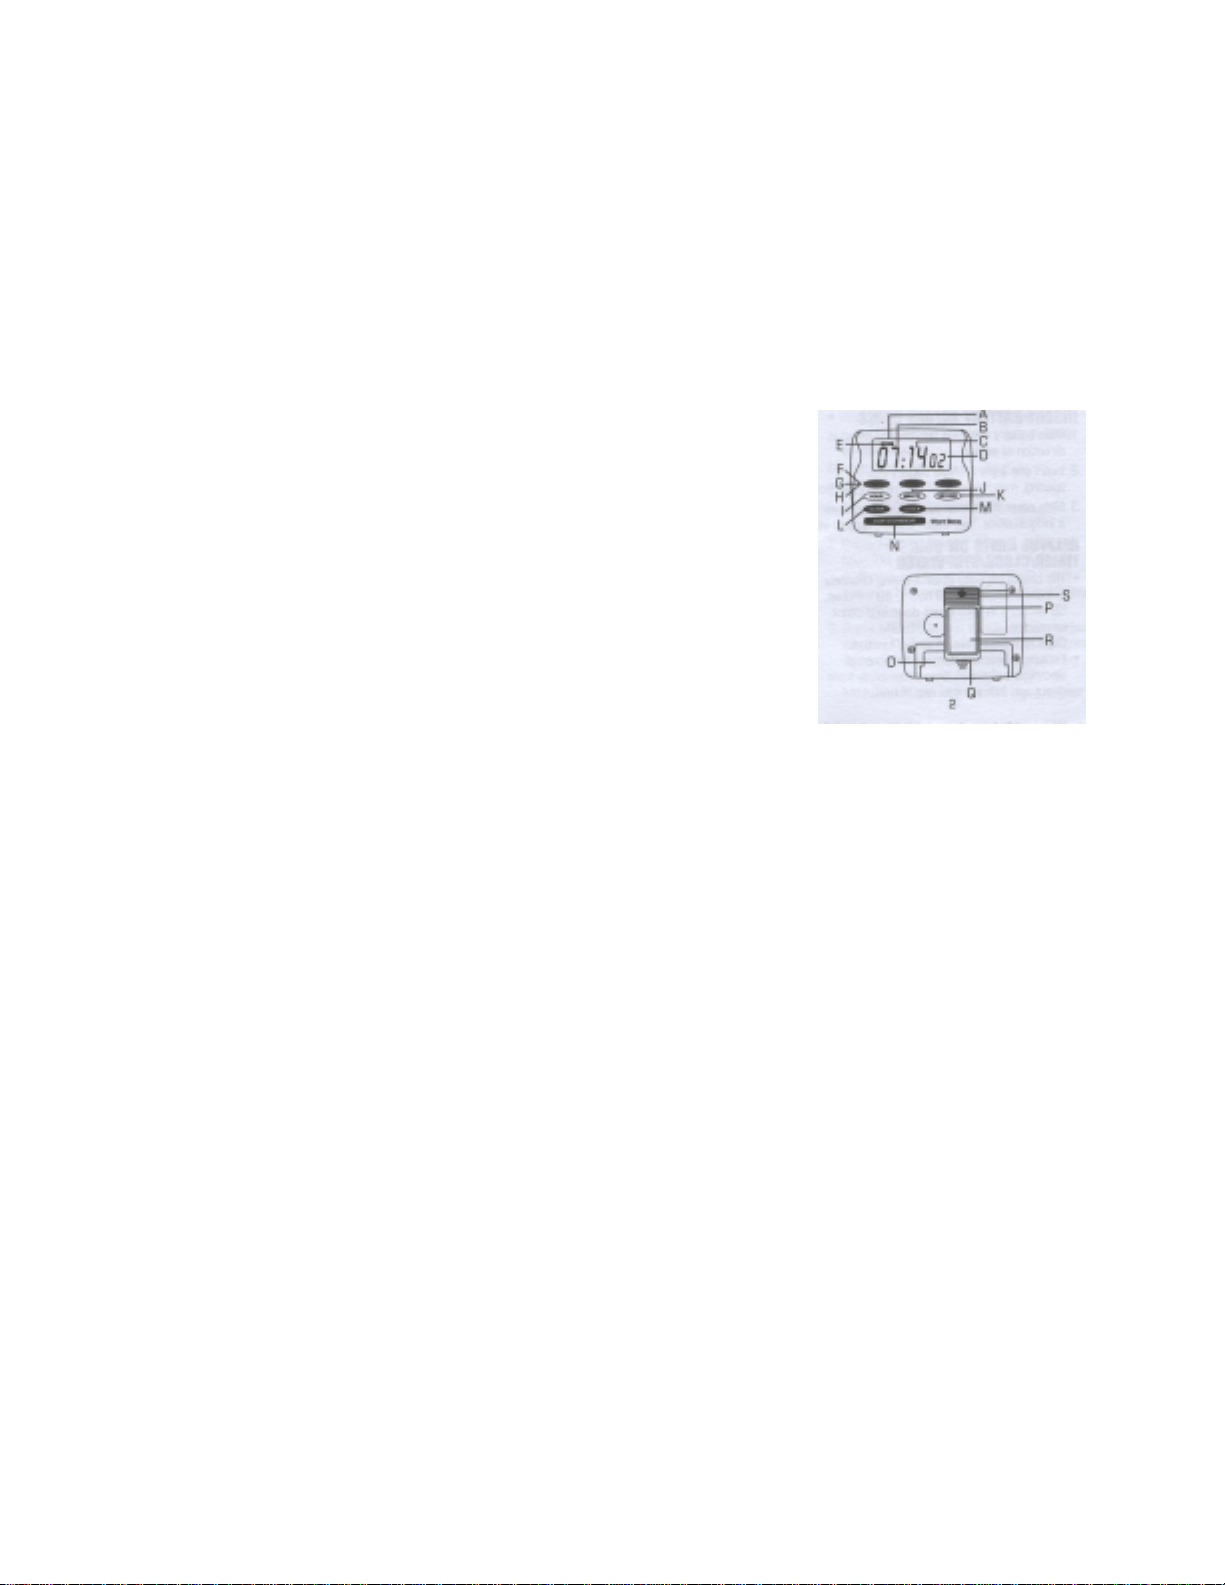
FEATURES
A. LCD Display K. SECOND Button
B. Hours L. CLEAR Button
C. Minutes M. CLOCK Button
D. Seconds N. START/STOP/
E. Timer Channel Symbols MEMORY Button
F. TIME 1 Button O. Battery Cover
G. TIME 2 Button P. Clip
H. TIME 3 Button Q. Stand
I. HOUR Button R. Magnet
J. MINUTE Button S. Hanging Hole
INSERT BATTERY BEFORE USING
1. Slide battery cover on backside of timer in direction of arrow.
2. Insert one Triple A (AAA)) battery into opening, matching plus (+) and
minus (-) symbols.
3. Slide cover down over battery, making sure it locks in place. Your timer is now ready to use.
HELPFUL HINTS ON USING TIMER/CLOCK/STOPWATCH
1. The timing capacity of all 3 timing channels is from 1 second to 99 hours, 59 minutes, 59 seconds in both count
down and count up modes.
2. Clock is independent of timing function.
3. Excessive heat can damage the internal electronics of timer. Keep timer away from direct and indirect sources of
heat.
4. Wipe timer case with a damp cloth if necessary. Never immerse timer in water or other liquid. For household
use only.
TO SET CLOCK
1. Press CLOCK button down for about 5 seconds until digits flash in display.
2. Press HOUR button to advance to correct hour. The AM or PM indicator will appear in display. Holding down
the HOUR button switches between AM/PM modes in 12-hour intervals.
3. Press MINUTE button to advance to correct minutes. To fast forward minutes, hold button down. If error is
made when programming clock, simply press respective HOUR or MINUTE buttons until correct digits appear.
4. Press CLOCK button to start clock. Seconds will continue to count in the clock mode. You can check clock
time at any time by simply pressing CLOCK button. If timers are operating, respective T1, T2 or T3 symbols
will flash in display.
TO SET COUNT DOWN TIMERS
1. Press Time1, Time2 or Time3 button for desired timer channel. The selected channel symbol will appear in
display (T1, T2, or T3). Press CLEAR button to zero display.
2. Press individual HOUR, MINUTE, or SECOND buttons to program desired time. The numbers can be fast
forwarded by holding individual buttons down for 3 seconds. If error is made in programming, press CLEAR
button to zero display, then reprogram time as explained above.
3. Press START/STOP/MEMORY button to start timer. Time will count down in 1 second intervals.
4. When time expires, alarm will sound and timer will begin to count up in seconds. Each timing channel has it
own distinctive alarm. Time1 has 1 repetitive beep, Time2 has 2 repetitive beeps and Time3 has 3 repetitive

2
beeps. Press START/STOP/MEMORY button to turn alarm off and stop count up timer. If not turned off, alarm
will automatically turn off in 1 minute to extend battery life, however, count up timer continues to operate until
START/STOP/MEMORY button is pressed. Press CLEAR button to reset display to zero.
Follow same procedure above for programming the other timer channels. All 3 timer channels can be used at the
same time. When using all timer channels, simply press the channel button to note count down time remaining.
Solid channel symbol indicates the count down time of channel being displayed. Flashing channel symbols indicate
other timer channels are in operation.
TO STOP/RESTART or CLEAR COUNT DOWN TIMERS
1. To stop timing function before time expires, press correct timer channel button, then press
START/STOP/MEMORY button once. To restart same timing period, press START/STOP/MEMORY button
once again.
2. To clear timer, press START/STOP/MEMORY button, then press CLEAR button to reset display to zero.
MEMORY RECALL: After time has expired and timer has been turned off, the same time period can be
recalled by pressing START/STOP/MEMORY button once, which will re-enter the time in display. Press
SRART/STOP/MEMORY button again to start timer. If you wish to stop and clear time, press
START/STOP/MEMORY button, then press CLEAR button to reset display to zero.
TO SET COUNT UP/STOPWATCH TIMERS
1. Press desired timer channel button. Then press CLEAR button to reset display to zero. Press
START/STOP/MEMORY button and time will begin to count up in 1 second intervals.
2. To stop timing process, press START/STOP/MEMORY button. If you wish to restart timing process, press
START/STOP/MEMORY button again.
3. To turn off, press START/STOP/MEMORY button, then press CLEAR button. If count up/stopwatch timer is
not turned off before it reaches 99 hours, 59 minutes, 59 seconds, the timing operation stops with 99:5959
appearing in display. Press START/STOP/MEMORY button. Then press CLEAR button to reset timer to zero.
TO REPLACE BATTERY: Replace battery when display fades. See “Insert Battery Before Using” section
in this booklet, removing used battery first. Always use one Triple A (AAA) battery in timer. DISCARD USED
BATTERY IMMEDIATELY. KEEP BATTERY AWAY FROM CHILDREN. CAUTION: To prevent personal
injury, never place battery in mouth for any reason, as they are small and can be swallowed. The clock will need to be
reset after replacing battery. See “To Set Clock” instructions in this booklet.
SPECIAL ATTACHMENT DEVICES: Your timer is extremely handy because it is designed to be used
almost anywhere. The clip on the backside will attach to any thin board or belt. The clip also has a magnet for
attachment to any magnetic surface. Using the clip with metal stand bar, the timer will stand on any flat surface for
easy viewing of display. And finally, there is a small hole in the back for hanging on a string or cord.
90 DAY WARRANTY: Your West Bend® Warranty covers failures in the materials and workmanship of the
timer for 90 days from date of original purchase. Any failed part of the timer will be repaired or replace without
charge.
This warranty gives you specific legal rights, and you may also have other rights which very from state to state. This
warranty does not cover alleged damage to the timer caused by misuse, abuse, accidents or alterations to the timer. If
you think the timer has failed or requires service within its warranty period, please carefully package and return the
timer with a description of the difficulty to:
West Bend Housewares NOT VALID IN MEXICO
Attn: Returned Goods
1100 Schmidt Road
West Bend, Wisconsin U.S.A.
(262) 334-6949
Please ensure that you enclose the sales slip or proof of date of purchase in order to assure warranty coverage. Return
shipping fees are nonrefundable.