Overview and Quick Start
Introduction to phone exterior
Introduction to buttons and widgets
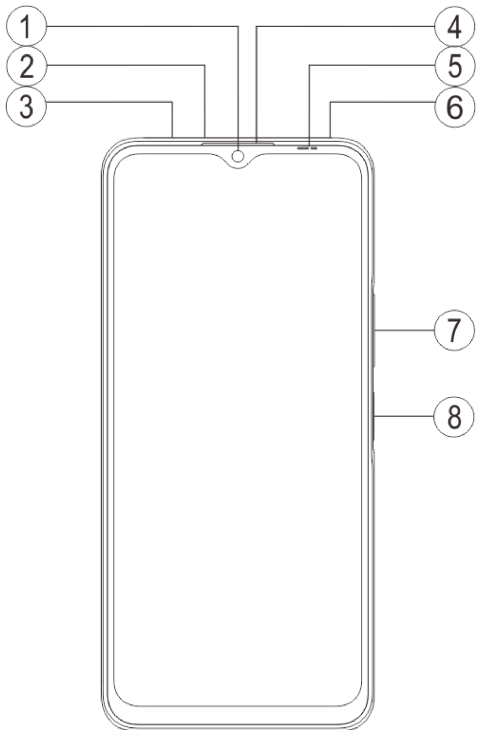
1. (5) Light & proximity sensors: Automatically detects the intensity of the ambient light and adjusts the brightness of the screen accordingly.
When making phone calls, this sensor automatically detects the distance between you and your phone. If you are too close to your phone, it will switch off your screen to avoid unintentional triggering of certain functions. The sensor is inactive in headset and hands-free mode.
2. (7) Volume button: You can adjust the volume using the volume buttons.
3. (1) Front camera/®Triple rear cameras: You can take photos and record videos.
4. (4) Receiver: You can hear the caller through the receiver when on the phone.
5. (8) Power button & Fingerprint sensor: When the phone is powered off, long press the Power button to turn it on. When the phone is powered on, long press the button to turn off or reboot the phone.
The button has a fingerprint recognition function, which can be used to unlock the phone instead of a password.
NOTE: When the phone cannot be used normally, simultaneously long press the Power button and the Volume button- for at least 10 seconds to force the device to restart.
6. (3) Card tray: Insert/Remove cards.
7. (2) Pin port: Insert the pin into the pinjack on the side of the phone, and press it inwards to eject the card tray.
8. (6) Secondary microphone/(3)Main microphone: Used to transfer sound during calls.
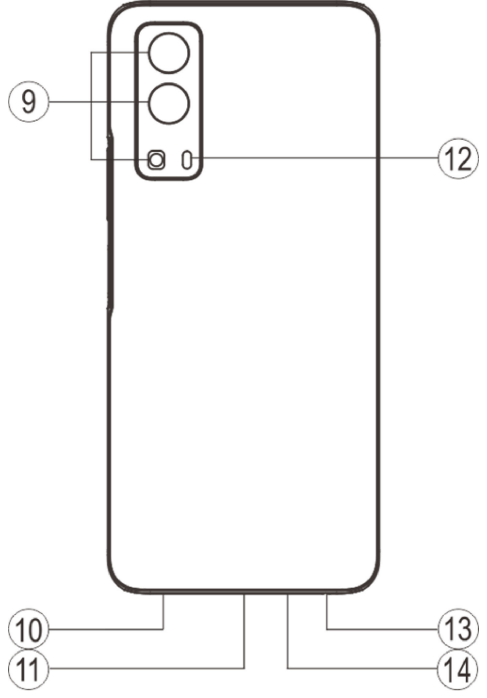
9. (12) Rear flash: A light source.
10. (10) Speaker: Used to play sound.
11. (11) USB port: You can connect your phone to other devices such as a charger or computer using a data cable.
12. (13) Headset port: You can connect headphones to your phone using the headphone jack.
Installation and Preparation
Procedure for installing SIM/SD card
Note: You may have a single or dual SIM phone based on the needs of your region or carrier, but the differences between the two versions are not fully covered in the instructions. The pictures used in these instructions are for reference only and may differ from your phone.
This phone supports hot swapping of nano (SIM1/SIM2) and micro SD cards. When the phone is on, it can automatically recognise inserted nano cards (SIM1/SIM2) and micro SD cards.
This phone supports nano cards (SIM1/SIM2) and micro SD cards.
1. Insert the pin into the SIM pin port on the side of the phone, press it inwards to eject the SIM card tray, and then remove the card tray.

2. Ensure that the metal part of the nano card (SIM1/SIM2) or micro SD card faces downward, with the oblique angle corresponding to that of the card tray. Insert the nano card (SIM1/SIM2) or micro SD card into the card slot according to the direction indicated by the arrows in the diagram.
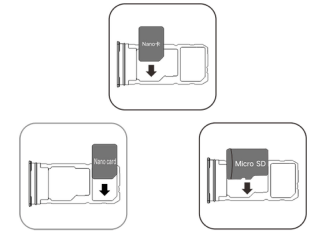
3. With the touch screen facing up, insert the card tray according to the direction of the arrow (with a nano card or micro SD card inserted)

NOTE:
- The back cover cannot be removed, so as to prevent damage to the phone.
- Place the SIM/SD card on the card tray, then insert the card tray into the phone. SIM/SD cards must not be inserted directly into the phone.
- You are suggested not to cut your SIM card by yourself. If the nano card (SIM1/SIM2) does not fit, please contact your carrier to change to a standard nano card.
- The phone supports "Dual-card dual-standby single-pass", which means that you cannot use both SIM cards for calls or data services simultaneously. When you are on a call using one card, the other card cannot be used to make or answer any calls. If there is an incoming call to the other card, the caller may hear messages such as "The number you called is not in service" or "The subscriber you dialled cannot be connected for the moment. Please try again later." When you are using the data service of one card, the data service of the other card will be disabled. This is due to the design of the phone itself and has nothing to do with the carrier's network status. Single-pass is adopted because the phone uses a single-chip design, which can significantly improve the battery life and energy efficiency of the phone. The user is encouraged to consult local operators to enable services such as "Missed call reminder", "Incoming call reminder" and "Phone Secretary" to avoid the issue of not receiving alerts for missed calls.
Connect headphones
Plug the headphones into the headphone jack on the phone, ensuring that the headphones are fully inserted.
Charge the phone
Insert one end of the data cable into the USB port on the phone and the other end into the charger or a compatible device. The phone will start to charge. After charging is complete, disconnect the phone from the charger or the compatible device and remove the charger from the socket.
NOTE: Please use the data cable and charger that came with the phone.
Antenna
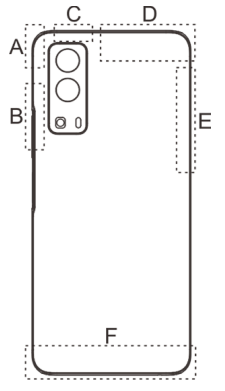
This phone is equipped with a built-in antenna. Please do not touch the antenna when it is transmitting or receiving signals. Touching the antenna may affect the quality of communication, cause the phone to use more power than is needed or shorten the battery life. The antenna is located inside the dotted circle. Please do not cover this area when holding the phone, as shown in the picture below:
A. GPS/Wi-Fi/Bluetooth antenna; B/C/E. 5G antenna; D. Upper main antenna; F. Lower main antenna.
Status bar icons and notifications
Meaning of status icons
The status bar at the top of the screen provides some basic status information of the phone, including signal strength, time and battery power.
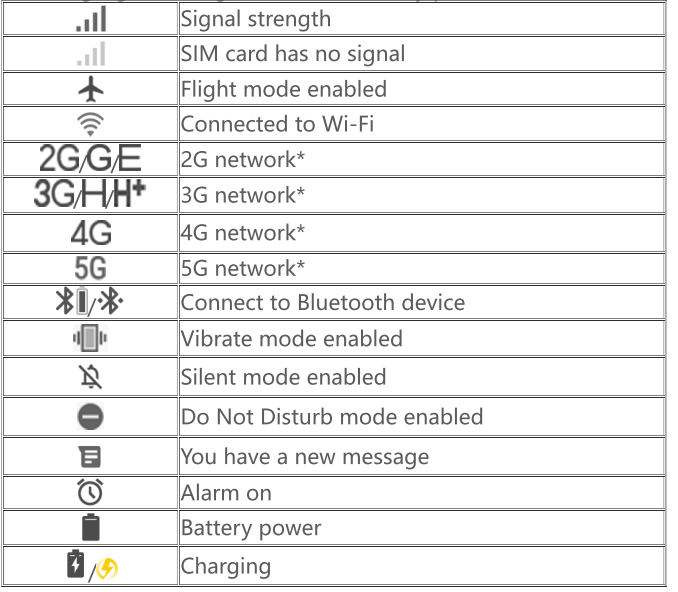
NOTE: The network symbol is displayed to indicate current operators and network settings. The 5G icon is for illustrative purposes only and can only be shown on 5G network supported mobile phones.
View notifications
When you receive a new event notification, its content will be displayed on the status bar. You can swipe the status bar down and tap the notification to view details.
Introducing the home screen
When no app is open on your phone, your home screen will be displayed. This device can have multiple home screens. Swipe left or right to switch between these home screens.
If you swipe up on the home screen interface, you can see all the apps on your phone.
Change home screen settings
By tapping and holding a blank area of the home screen, you can change the home screen settings and add widgets or wallpapers according to your own preferences.
Search through the home screen
Tap on the Google icon and enter what you want to search for.
Add apps to the home screen
In the app drawer, tap and drag an app to move it to wherever you want.
Shortcut centre on the home screen
Swipe down from the top of the screen to reveal the home screen shortcut centre.Tap any icon in the shortcut centre to quickly turn on/off the function corresponding to that icon.
Desktop apps
iManager
From the iManager home page, tap  to go to "Settings", where you can adjust the detailed settings of iManager and view more relevant information.
Tap any function on the home screen of iManager to enter the Execute or Settings interface to enjoy a secure and green mobile life.
Camera
- Use the camera to take photos and videos so that you can record the wonderful moments in your life at any time.
- Go to the "Camera" interface and you can zoom the camera frame in/out and adjust the focal length in the following ways:
(1) Use two fingers to zoom in/out on the screen;
(2) The camera can automatically focus on objects and will display a rectangular box to indicate the focus area. You can also tap the screen to manually set the focus and lock the focused area onto the objects you want to highlight.
Albums
You can view the photos and videos you have captured and the various images stored on your storage devices.
NOTE: Picture location information is only available for pictures which include geographical location information.
Slideshow
- Go to "Photos", open a photo/video and tap "More > Slideshow".
- Go to "Albums", open a photo/video in a folder and tap "More > Slideshow"
Share and delete
- In the "Photos" screen, tap
 or press and hold a photo/video to enter edit mode; select multiple photos or videos, and tap
- In the "Albums" screen, go to a folder, tap or press and hold a photo/video to enter edit mode; select multiple photos or videos, and tap
Edit image
In the "Photos" or "Albums" screen, open an image to view, and tap the image screen to show/hide buttons and edit the image.
Calculator
Enter the "Calculator" interface. Tap numbers and functions just as you would with a standard calculator. The standard calculator is displayed by default. You can hold the phone horizontally to display the scientific calculator.
Recorder
The recorder allows you to use the built-in microphone and use the phone as a portable recording device. Enter the Recorder interface. You can then perform the following operations:
Tap  to start recording. Tap
  to pause recording, and tap
  to stop and save the recording.
Play recording
Choose a recording file, then tap  to play/pause.
Drag the slider on the progress bar to go forwards or backwards.
Share and delete recording
Tap and hold to select the corresponding recording file, and then tap
Clock
The clock consists of four functions:
- Alarm: You can tap
 to add several alarm clocks. In the alarm clock interface, tap
  to configure detailed settings according to your habits.
 - Clock: You can tap
 to add times for different cities.
 - Timer: You can use the timer as a countdown clock.
- Stopwatch: Tap
 to start timing, and tap
  to count a lap.
Compass
You can check out directions, longitude, latitude and the horizontal line with the compass. Before using the function, please make sure your phone is horizontal and away from electromagnetic interference so as to ensure accuracy.
Note:
- Please enable a network connection and the location service before checking your current location.
- When subject to severe interference, the compass will switch to the calibration window and can be used again after calibration.
- The digital compass can only be used to assist navigation. Please do not use it to determine an accurate location, proximity, distance or directions.
vivo.com
You can learn more about vivo and our products in "Home/Products". You can also provide your feedback on the "Support" page and find solutions to common problems.
Note: Before using this function, please enable network access on your phone.
Google apps
Google provides entertainment, social networking and other apps. Some apps may require you to sign in to your Google account in order to use them.
For further information, visit the Help page of the app.
Introducing some features
Chrome/Google: Google Chrome is a popular browser used to search and visit web pages.
Gmail: Gmail is an email client that uses Google Mail services to send and receive emails.
Maps: Google Maps helps find your location while also showing you what's around. You can also fill in your commute information so it can show you traffic information for your reference.
YT Music: YouTube Music has the coolest new music and videos for you to enjoy. Stream or save music to your device.
YouTube: YouTube has a variety of videos for you to enjoy. You can even upload your own.
Photos: Google Photos is the perfect place to edit and manage your photos and videos from all different sources.
Assistant: Google Assistant can help you send SMS messages, make phone calls and plan routes all by using your voice.
Duo: Google Duo helps keep you in touch with friends and family through videos calls.
Files: Files is a file manager used to help you manage, share and clean up your saved files and apps.
Google pay: Google Pay puts together all payment methods supported by Google so you can enjoy a quick and secure payment experience after entering your bank information once.
Calendar: Calendar can remind you of upcoming events by sending a notification to your phone when the event approaches.
Play store: After signing in, you can find the latest Android apps, games, films, music and other amazing content. You can search for and download any content according to your needs.
Note: Apps may be unavailable or vary in functions depending on your region and service provider.
Settings
Network & internet
WLAN
You can enable or disable Wi-Fi under "Settings > Wi-Fi". Choose a network connection after enabling Wi-Fi. If a Wi-Fi network is encrypted, & will be displayed and you will need to enter the password. When your phone is connected to a Wi-Fi network, the signal strength of the Wi-Fi network will be displayed as ^ in the status bar at the top of the screen. The more bars you see, the stronger the signal. If there is no Wi-Fi network available, or you have disabled Wi-Fi, your phone
will try to connect to the Internet via a mobile data network. Once your phone is connected to a WiFi network, it will connect to the network automatically when in range.
SIM card and mobile network
You can view the current SIM card status and adjust the SIM card settings here.
Data network: When mobile data is enabled, you can use network-related apps such as Browser and Email via a data network. Your carrier may impose charges on the service. P ease consult your carrier for more details.
Hotspot & tethering
You can share the phone's internet connection by creating a Wi-Fi hotspot.
Aeroplane mode
- You can enable or disable "Aeroplane mode" in the "Settings>Network & internet" interface.
- Swipe up from the bottom of the screen and tap "Aeroplane mode" to enable or disable this function.
Note: Enabling "Aeroplane mode" can save battery power.
VPN
An organisation's internal VPN allows you to communicate private information securely over a public network. For example, you may need to configure a VPN to access your work emails. You can tap '' VPN " to configure the VPN.
Bluetooth & devices
Bluetooth
You can then send data including files, contacts, pictures and music via Bluetooth.
Smart Mirroring
- Local file mirroring: This function allows you to mirror media files on your phone to be played on your device.
- Phone screen mirroring: Content on your phone screen can be displayed on your device synchronously. You can directly touch the screen controls on your phone to proceed.
OTG
On-The-Go (OTG) technology realises data transfer among storage devices. For example: By connecting a digital camera to a printer via USB, we can print photos using OTG technology. OTG enables you to connect external storage devices with your phone. Enable OTG to be able to operate pictures, videos and music files in your storage device.
Display and brightness
You can adjust the system settings such as screen brightness, auto-lock time of the phone.
Lock screen & wallpaper
You can view or change system default themes or wallpapers here. You can also set the lock screen as you like.
Dynamic Effects
A variety of animation styles are provided under the corresponding feature. You can select and apply your favourite style.
Sound
You can set your preferred sounds profile in "Settings > Sound".
Apps & notifications
All functions and services installed on your phone will be listed. You can adjust the detailed settings as you like.
You can use this function to manage and set app permissions.
Battery
You can view current battery usage, power consumption and more here.
Storage
Go to the"Storage"interface to view the memory usage of the storage devices, as well as format the storage devices. Formatting will remove all data from the phone storage. Please make sure that you have backed up important data before formatting.
Security
You can update your security settings to keep your phone secure.
Security status
You can view your app security scan/update status here. "Find My Device" can help you remotely locate your device.
Device security
You can set a screen lock or register your fingerprint or face to unlock the phone to improve the security of your phone.
Privacy
Here is a collection of functional settings to ensure the security of your phone, such as system security and privacy security. You can adjust the settings according to your needs.
Location
You can enable the location function under "Settings > Location". After enabling the function, apps such as Maps and Camera as well as third-party location-based apps can collect and use location data. When you do not need location data, you can disable the function to save battery power.
Note: It is recommended to use a Wi-Fi network where possible as the location service consumes a large amount of network traffic.
Ultra Game Mode
You can add games to Ultra Game Mode manually so they can use Ultra Game Mode functions. Tap the add button to select games.
Shortcuts and Accessibility
S-capture
You can adjust the settings by going to "S-capture". You can also learn more about screenshot modes via "S-capture > Instructions".
Smart Split
Split screen allows you to handle two apps easily at the same time.On the interfaces of some apps, an incoming message will show as a floating icon. Tap the icon and the screen will split into two, and the two apps will display at the same time.
Smart motion
You can go to "Smart motion" to configure smart motions.
Quick action
Enable "Quick action", when the screen is off, press and hold the Volume - button to enable the customised feature. This setting can't be used while music is playing.
Easy Touch
When "Easy Touch" is enabled, you can adjust the detailed settings to your preferences.
Task timer
You can configure detailed settings for "Task timer" in "Task timer". When you have set "Scheduled power on/off", your phone will turn on or off at the set time. At your set time, your phone will ask you to confirm whether you want to power off. You can choose "Cancel" to stop the phone from turning off. If no specific instructions are received, the phone will turn off after 60 seconds.
One-handed
You can go to "One-handed" to configure this function. You can tap the switches to select whether to display a one-handed interface for corresponding options.
Accessibility
Using the screen reader, the zoom gesture, the screen colour corrector and other accessibility functions can help you make better use of your phone.
Digital Wellbeing & parental controls
You can check the usage of the device here and adjust the settings of some functions to reduce the interference the device causes to you. You can also set up Parental Control to control and manage the use of the phone by your child.
Google
You can adjust some of the functional configurations provided by Google here. Tap  on the home screen to learn about detailed solutions to related problems.
Accounts
Add account
To add an account, tap "Add account" and choose the account. You can choose to add multiple accounts.
You need to register and sign in to a Google account to use some functions on the phone.
Auto-sync app data
When "Auto-sync app data" is activated, apps can automatically sync data.
Note: Please connect to a network before using this function. Auto sync data will consume power and incur data usage. It is suggested that you turn off this function after you have finished syncing.
System
System navigation
Selecting "Gesture navigation" will hide the navigation keys; selecting "3-button navigation" will show the navigation keys. You can configure the navigation key settings in "System navigation".
Languages & input
You can set the system language in "Languages & input". Tap "Languages> ” to choose a language.
Date & time
You can go to "Date & time" to configure your phone's date and time.
Back up data/Restore data
You can back up apps and data on your phone to the Google server and restore backed up information to your phone.
Reset options
You can reset your phone data here. Please tap the corresponding reset option for further details.
Multiple users
Once this feature is enabled, other users can be added to this phone. Each user will have their own space on the phone to use.
About phone
Go to "About phone" to find a variety of information related to the phone. For legal information, go to "About phone > Legal information
Developer options
"Developer options" is used by Android developers. Enabling set options under "Developer options" may lead to crashes or exceptions occurring to your apps or device. Please use it with caution.
Before using a PC tool to manage the device, please enable "USB debugging". The "USB debugging" switch is under the "Developer options" menu. Steps to access the "Developer options" menu:
- Enter "Settings > About phone>Software information".
- Tap seven times on "Build number".
- The "Developer options" menu will appear in "Settings >System".
System update
You can use "System update" to easily and quickly upgrade your phone system. First, enable Wi-Fi or data network. Then go to "Settings" and tap "System update". The phone will automatically detect new software versions, which you can simply download and install.
Note: A recovery or system update that is not performed by vivo may cause security risks. It is recommended that you back up important data to a storage device before upgrading. System update consumes a large amount of data, therefore, you are suggested to use Wi-Fi when performing a system update.
Device Maintenance
About maintenance
It is important to understand mobile phone maintenance and servicing thoroughly so that you can use your phone safely and effectively and extend its service life as much as possible.
Phone and accessories
This phone uses the Android operating system. To view the phone's version, go to "Settings > About phone".
In "Settings > About phone > Legal information > Safety information", you can learn the safety considerations for this device to help you use it in a safer way.
Help
If you encounter any problems when using your phone, contact your network carrier or contact the vivo after-sales service centre. Please go to "Settings >About phone> Customer service >Service Centre" to find the service hotline.
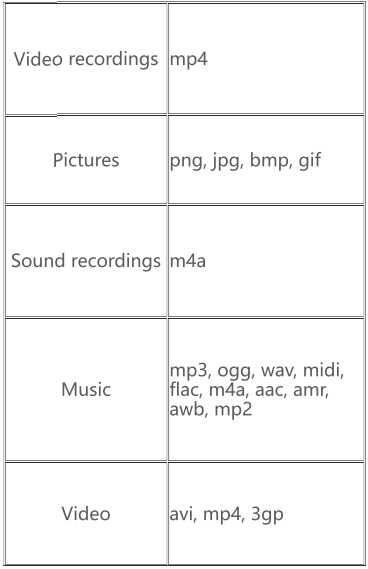
Supported file formats
Instructions for connecting to USB
Connect to a PC using a USB cable, swipe down to display the notification drawer, tap the charging connection notification in silent notifications and select "File transfer" on the redirected page. You can then manage the files on your phone using the PC.
Windows
- Users of Windows 7 and above do not need to install any drivers. Double-click "Computer" (Win 7) or "This Computer" (Win 10) on the desktop to view your device, and then double-click it to copy and manage the files on your phone.
- With Windows XP, users need to install the MTP driver. Go to vivo website on your computer, select the "Support" tab and type "USB" in the search box to find the link for the MTP driver. Download and install the driver to manage the files on your phone using your computer.
Note: To use the function properly, computers running Windows XP need to install Windows Media Player 11 or above.
Mac
- Mac OS users need to download "AndroidFileTransfer.dmg" to manage files on the phone.
- Visit vivo website, select the "Support" page, and click "USB" to download the Mac system MTP management tool. After the download is completed, you can open it to use the computer to manage files on the phone.
Linux
Manage files on the phone using mtpfs software:
- Install the tool "sudo apt-get install mtp-tools mtpfs";
- Create a new directory "sudo mkdir/media/mtp";
- Modify the directory permission "sudo chmod 755 /media/mtp";
- Install the device "sudo mtpfs -o allow other /media/mtp", then you can manage files on the phone using File Manager;
- Uninstall the device "sudo unmount/media/mtp".
During installation, do not disconnect the USB data cable connecting the phone and the computer. If the mtpfs software cannot be used after being installed, please restart the computer or follow steps 1-5 to reinstall the software.