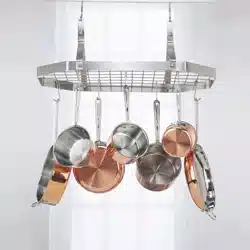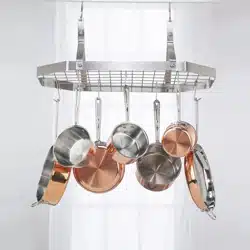
Brushed Stainless Steel
Octagonal Hanging Cookware Rack
Model CRC-29B
Beautifully display Cuisinart
®
Cookware and keep it
within easy reach. This Cuisinart
®
Brushed Stainless
Cookware Rack eliminates the need to bend down to
stack and store cookware in cupboards. The solid
brushed stainless rack is easy to install and designed
to last a lifetime.
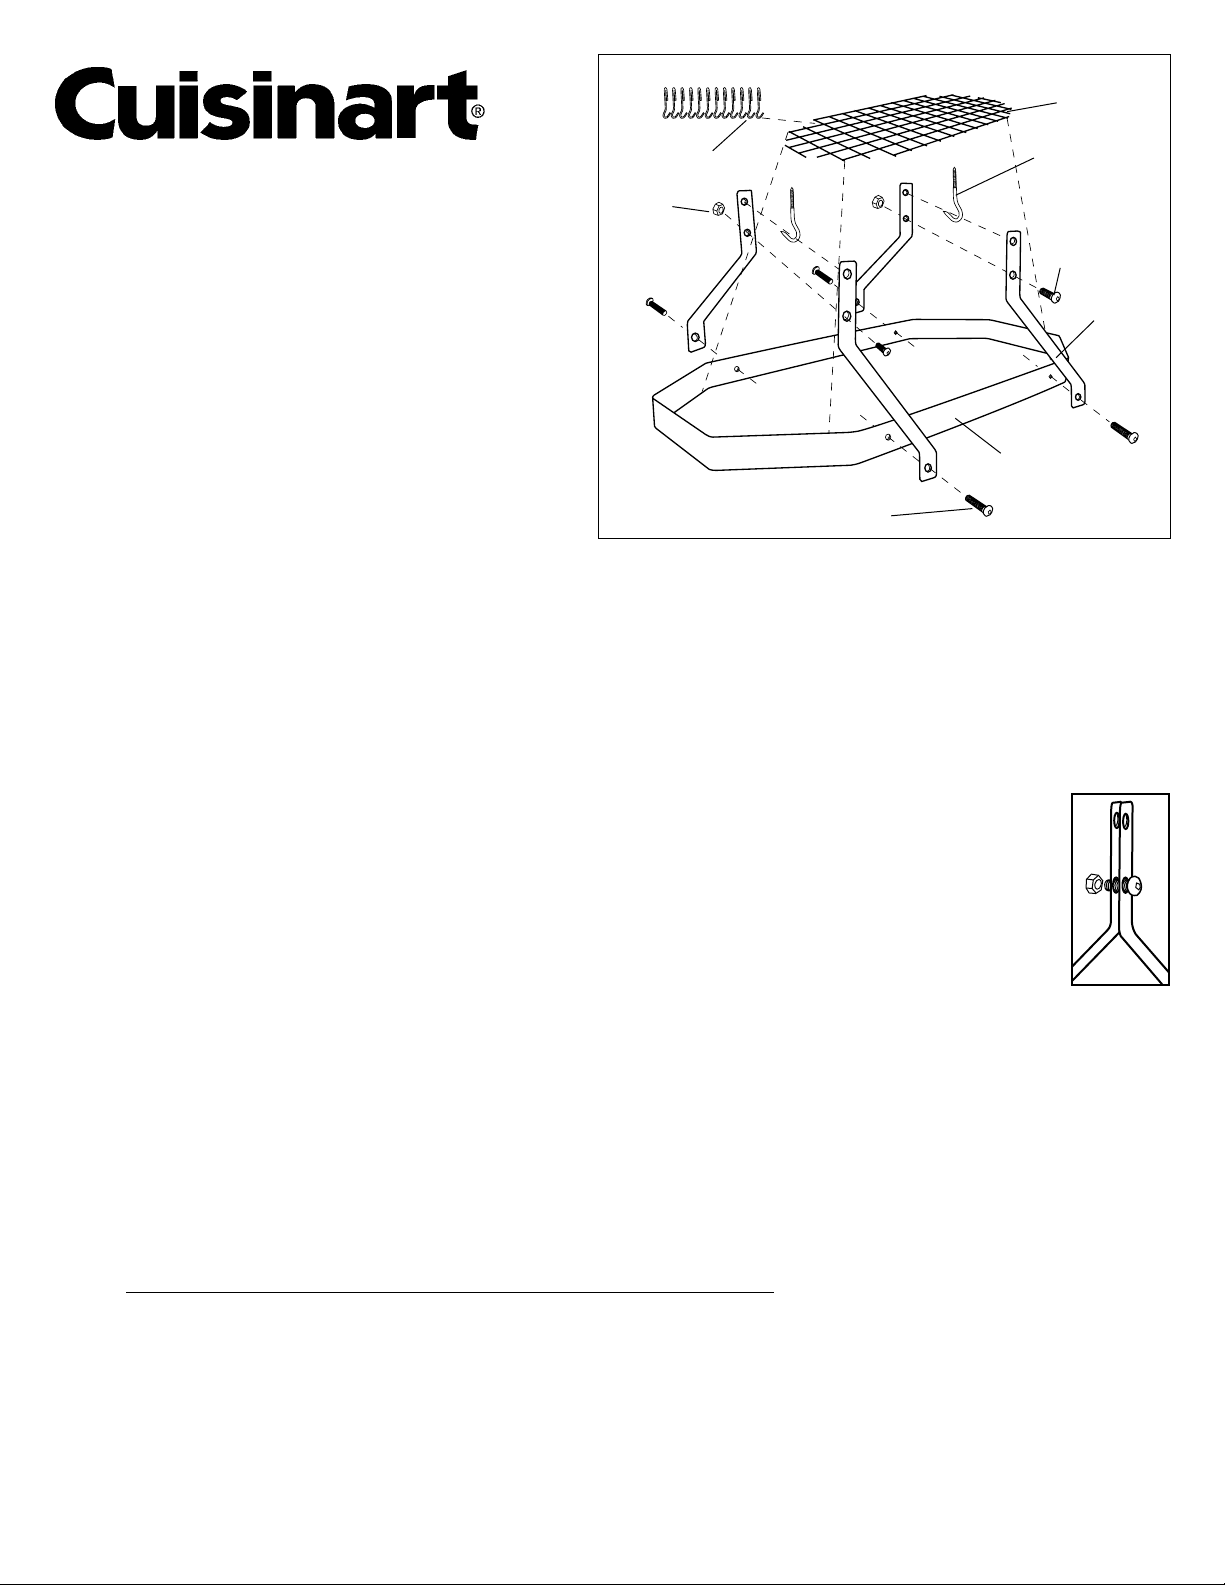
Enclosed you will find everything needed for the proper assembly and use of your cookware rack. Two people make
assembly and installation easier. The parts and hardware included are:
1 - Octagonal Base 4 - Allen Head Long Bolts 2 - Ceiling Screw Hooks 12 - Pot Hooks 1 Grid
2 - Allen Head Short Bolts 2 - Nuts with Lock Washers 1 - Allen Head Wrench 4 - Hanger Arms
ASSEMBLY AND INSTALLATION INSTRUCTIONS
Please proceed carefully, using the following instructions to ensure this rack is assembled properly for safe
installation and use, and without damage to the finish. Haste in assembly could result in needless scratching or
marring of the stainless steel finish.
1. Unwrap rack base and grid from plastic covering. Notice that each hanger arm has one hole on one
end and two different sized holes at the other end. The end with one hole is the end that attaches to the
octagonal base.
2. Join the two hanger arms by placing an allen head short bolt through the two holes and fastening with
the nut and lock washer in each set. Leave the screw loose (Diagram A).
3. Place the octagonal base on a flat surface. Next attach the hanger arm sets to the base by placing them directly over
the mounting holes on the base. (Make sure that the allen head bolts at the top of the arm sets are both showing
from the same side of the rack.) Attach the four remaining allen head long bolts going from the outside of the hanger
arms to the inside of the base. Make sure that the arm sets are at right angles to the base, and then tighten all the
screws using the allen head wrench provided. Tighten the two nuts onto the ends of the joined hanger arms.
4. Slide from one end and place the grid on the octagonal base, resting on the allen head bolts. Assembly is now com-
plete and your cookware rack is ready to hang.
5. Your rack must be anchored into the solid wood of ceiling joists or beams – to install otherwise is incorrect.
Plasterboard or wall fasteners will not work and should not be used. Carefully measure the area where the rack
is to be hung. The ceiling screw hooks should be 16" apart.
6. Install your ceiling screw hooks. Your local hardware store can advise you if special hardware is needed for your
particular kitchen.
7. Hang your pot hooks from the interior grid only. Do not hang them from the perimeter or the cut portion of the grid.
Distribute cookware evenly. Each hook can hold up to 5 lbs. Do not overload.
WARNING:
PLEASE READ ALL INSTRUCTIONS
BEFORE ASSEMBLING AND INSTALLING
YOUR NEW COOKWARE RACK
Rack Size: 31½" Length x 15½" Width x 19" Height
Diagram A
Pot Hooks
Nut
Grid
Ceiling Hook
Base
Allen Head Long Bolt
Allen Head
Short Bolt
Hanger
Arm
OVER PLEASE

© 2021 Cuisinart
Glendale, AZ 85307
Printed in China 21CW081081
WARRANTY
LIFETIME WARRANTY (U.S. and Canada Only)
Your Cuisinart
®
Cookware Rack is warranted to be free of defects in material and workmanship under normal home
use from the date of original purchase throughout the original purchaser’s lifetime.
HASSLE-FREE REPLACEMENT WARRANTY
Your ultimate satisfaction in Cuisinart products is our goal, so if your Cuisinart
®
Cookware Rack should fail
within the generous warranty period, we will repair it or, if necessary, replace it at no cost to you. To obtain a
return shipping label, email us at www.cuisinart.com/customer-care/product-assistance/product-inquiry.
Or call our Consumer Service Center toll-free at 1-800-726-0190 to speak with a representative.
This warranty excludes damage caused by accident, misuse or abuse, including damage caused by overheating,
and it does not apply to scratches, stains, discoloration or other damage to external or internal surfaces that
does not impair the functional utility of the Cookware Rack. This warranty also expressly excludes all incidental
or consequential damages. Some states do not allow the exclusion or limitation of incidental or consequential
damages, so the foregoing limitation or exclusion may not apply to you. This warranty gives you specific legal
rights, and you may also have other rights, which vary from state to state.
CALIFORNIA RESIDENTS ONLY
California law provides that for In-Warranty Service, California residents have the option of returning a nonconforming
product (a) to the store where it was purchased or (b) to another retail store that sells Cuisinart
®
products of the same
type. The retail store shall then, according to its preference, either repair the product, refer the consumer to an
independent repair facility, replace the product, or refund the purchase price less the amount directly attributable to the
consumer’s prior usage of the product. If the above two options do not result in the appropriate relief to the consumer,
the consumer may then take the product to an independent repair facility, if service or repair can be economically
accomplished. Cuisinart, and not the consumer, will be responsible for the reasonable cost of such service, repair,
replacement or refund for nonconforming products under warranty.
California residents may also, according to their preference, return nonconforming products directly to Cuisinart for
repair, or if necessary, replacement, by calling our Consumer Service Center toll-free at 1-800-726-0190. To obtain a
return shipping label, email us at www.cuisinart.com/customer-care/product-assistance/product-inquiry.
Cuisinart will be responsible for the cost of the repair, replacement, and shipping and handling for such nonconforming
products under warranty.
8. Use a low-abrasive product to clean your cookware rack. A periodic cleaning will restore the stainless steel to its
original brilliance.
WARNING
It is important that your cookware rack be assembled and installed according to the above directions. If the
unit is assembled and/or installed incorrectly, it could become unstable, collapse and possibly cause injury. Cuisinart is not
responsible for any damage due to improper assembly or installation.