Loading ...
Loading ...
Loading ...
Converting to Point-of-Use (POU)
WARNING:
It is highly recommended to have the Point-of-use PQC2FS system installed by a
professional (licensed) plumber. If you are installing the system yourself, it is your responsibility
to ensure that all water line connections are properly connected and sealed, and that there are no
system water leaks before operating the unit. You must adhere to all applicable governing State,
Federal, Provincial and Local Plumbing Code Regulations.
Purchase the PUR® PQC2FS Dual Stage Water Filtration System. Read the Manual carefully.
Option A: Connecting to a Water Line from Under the Sink:
Follow the instruction of Connecting to Cold Water Line on Page 4 of PQC2FS Owner’s Manual.
NOTE: The filtration system includes 1.8 meter (6 feet)of 1/4” OD Flexible Tubing. If additional
Tubing is needed, it can be purchased at your local hardware store.
NOTE : Depending on the type of plumbing in your home (copper or flexible pipe), the following
plumbing installation accessories (not included with the water dispenser and filtration system) will
be required to complete the installation of your water dispenser. These items can be purchased at
your local hardware store.
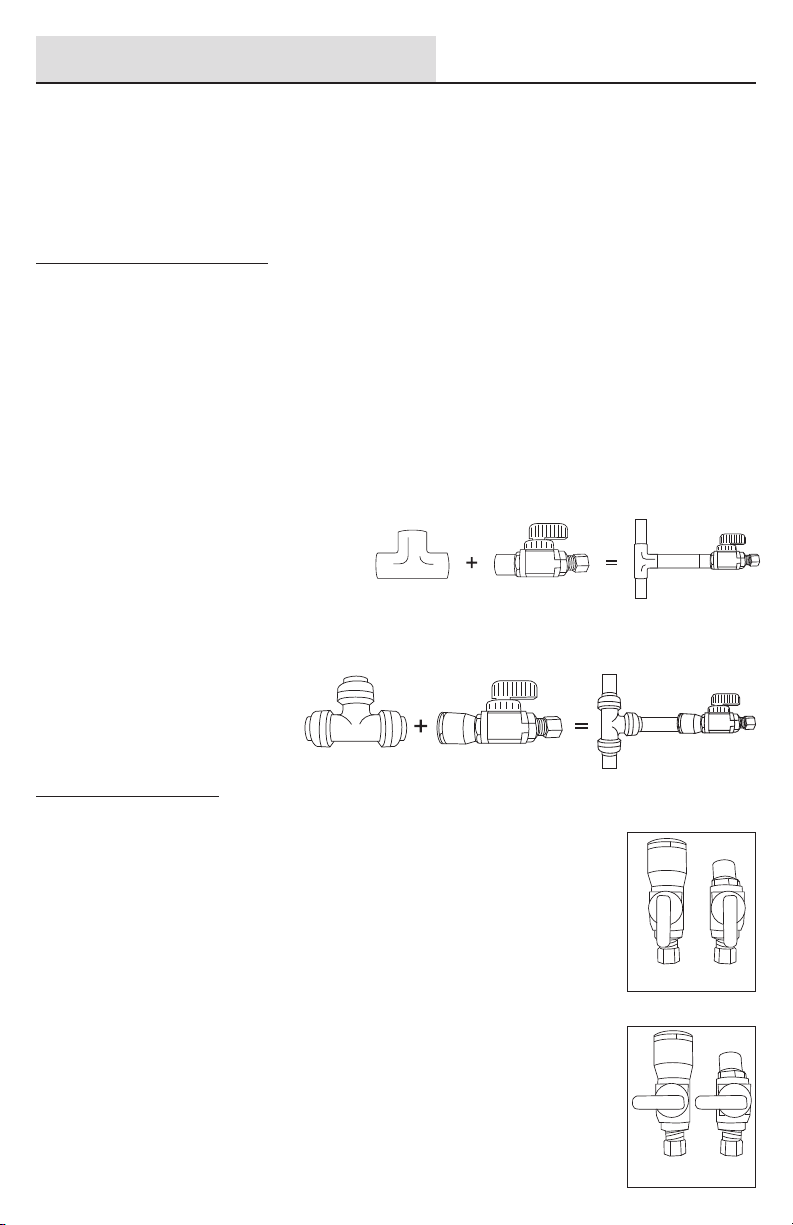
Option C: Connecting to Water Line from Flexible Pipe Plumbing
Connecting to Water Line
Water Line Hook-Up
(A)
1/2” Copper Tee
(D)
1/2” x 1/2” x 1/2”
Quick-Grip Tee
Tools Required
Option B: Connecting to Water Line from Copper Pipe:
Tools Required
(B)
1/2” Male Solder x
1/4” OD Compression
Fitting Shut-O Valve
(E) 1/2” Quick-Grip x
1/4” OD Compression Fitting
Shut-O Valve
(C)
Installation
Appearance
(F)
Installation
Appearance
• Soldering flux
• Solder
• Emery cloth
• Copper tube/pipe cutter
• Welding torch
• Towels (water clean-up)
• Plastic tube/pipe cutter
1. IMPORTANT: Turn o the household cold water supply line.
2. Open the cold water faucet of the water supply line allowing water to purge
the system to minimize water leakage cleanup.
3. COPPER PIPE PLUMBING: Using a tube/pipe cutter, cut and remove a
section of the cold water line at the desired height. Cut should be made
above any manual shut-o valve installed on the water line.
4. Using an emery cloth, clean the ends of the copper pipes and apply a liberal
layer of flux to both the inside of the fitting and the outside of the pipe before
sliding the two parts together that are being soldered. Follow manufacturer’s
installation instructions provided with the 1/2” Male Solder x 1/4” OD
Compression Fitting Shut-O Valve (B).
5. FLEXIBLE PIPE PLUMBING: Using a tube/pipe cutter, cut and remove
a section of the cold water line at the desired height. Cut should be
made above any manual shut-o valve installed on the water line. Follow
manufacturer’s installation instructions provided with the 1/2” x 1/2” x 1/2”
Quick-Grip Tee (D) and 1/2” Quick-Grip x 1/4” OD Compression Fitting Shut-
O Valve (E).
Figure A
Figure B
Valve Open
Valve Closed
Loading ...
Loading ...
Loading ...