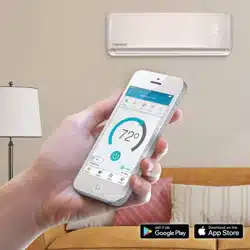
User manual Smart Control for Pioneer TST-APWIFICWPD
Unpacking & Plugging In- Installation of Pioneer Smart Controller in Pioneer AC
- Step1: Power off your AC from the mains circuit breaker and open the Front Panel of your Air Conditioner.
- Step 2: Inside the front panel. you will find a docking station as shown in the red border below. Remove its screw and take it off.
Unpacking & Plugging In- Installation of Pioneer Smart Controller in Pioneer AC (Cont)
- Step 3: Open the lid cover of the docking station. Unplug the Docking Station’s cable connector by simply pulling it out.
- Step 4: Pull out the existing PCB. Store the removed PCB as it is no longer required with the Pioneer Smart Controller.
Unpacking & Plugging In- Installation of Pioneer Smart Controller in Pioneer AC (Cont)
- Step 5: Open the Pioneer Smart Controller box and take out the smart PCB and the connecting cable.
- Step 6: Attach the Pioneer connecting cable with Pioneer smart controller PCB by simply plugging it inside the PCB connector.
Unpacking & Plugging In- Installation of Pioneer Smart Controller in Pioneer AC (Cont)
- Step 7: Fix the Pioneer Smart Controller and cable inside the docking station by pressing it in the preset space.
- Step 8: Close the lid of docking station and screw it back at its original location.
Unpacking & Plugging In- Installation of Pioneer Smart Controller in Pioneer AC (Cont)
- Step 9: Connect the cable of newly installed Smart PCB to the AC cable coming out from the display panel.
You’re Done with the Installation. Close the front panel of your Pioneer Air Conditioner.
STEP 1B: PRIOR TO APP INSTALLATION
Your Pioneer AC
- Make sure your Pioneer Smart Controller is installed inside the front panel of your AC as described in the previous section
- Power ON your Pioneer Air Conditioner
Your Smart Phone
- Make sure Wi-Fi is turned ON in your Smart Phone
- Make sure you have internet access on your Smart Phone
Your Wi-Fi Router
- Make sure you have working internet connection on your Wi-Fi Router
- Make sure there is no proxy server or authentication server configured on your internet connection
- Make sure there is no captive portal on your Wi-Fi Router
Important : Make sure IP isolation or client isolation is turned OFF on your Wi-Fi Router
STEP 2A: APP INSTALLATION
- Go to the App Store / Play Store
- In “search” section type “Cielo Home”
- Once “Cielo Home” App is displayed, press the Install button
- Open the App after installation is complete
STEP 2B: LOGIN / REGISTER
- You can either create a new user account or use the App as an existing user
- As an existing user, enter user name and password; Tap on “Login” button
- If you are a new user, Tap on “Register” button and fill in the information
STEP 3A: REGISTER PIONEER SMART CONTROLLER - FOR iOS USERS
Note: Pioneer Smart Controller registration process is meant to connect the Pioneer Smart Controller to your home Wi-Fi network through the Cielo Home App
To begin registration:
- Step 1: After successful login, you are at the Home Screen
- Step 2: Go to your phone settings
- Note: Pioneer Smart Controller registration process is meant to connect the Pioneer Smart Controller to your home Wi-Fi network through the Cielo Home App
- Step 3: Go to your phone’s Wi-Fi settings
- Step 4: Connect your phone to Pioneer Smart Controller Wi-Fi (Cielo_BI01_XXXXXX)
- Note: If you can not find a Wi-Fi that starts with Cielo_BIXX_XXXXXX, Power off the AC from the mains and power it on again after few seconds OR press LED button on your mini split remote control 7 times within one minute. Now connect to the Wi-Fi that starts with Cielo_BIXX_XXXXXX
- Step 5: Go back to Cielo Home App
- Step 6: Tap “+” on the Home Screen
- Step 7: Wait for your phone to fetch the list of available Wi-Fi networks
- Step 8: Select your Home Wi-Fi network from the list (Please ensure that there is NO Captive Portal or port blocking on your selected network)
- Step 9: Enter the password of your home Wi-Fi Network.
- Step 10: On this screen, type device name of your choice. (For example, Bedroom, Lounge, Office, etc.)
Next, select “manufacturer” as Pioneer and your “remote model number” from the list
On the next screen, “Allow Location Access” for enhanced functionality
Your registration process is complete. Pioneer Smart Controller will now appear on your home screen.
STEP 3B: REGISTER PIONEER SMART CONTROLLER - FOR ANDROID USERS
Note: Pioneer Smart Controller Registration process is meant to connect the Pioneer Smart Controller to your home Wi-Fi Network through Cielo Home App.
To begin registration:
- Step 1: After successful login, you are at the Home Screen
- Step 2: Go to your phone settings
- Step 3: Go to your phone’s Wi-Fi settings
- Step 4: Connect your phone to Pioneer Smart Controller Wi-Fi (CieloBI01XXXXXX)
- Note: If you can not find a Wi-Fi that starts with CieloBIXXXXXXXX. Power off the AC from the mains and power it on again after few seconds OR press LED button on your mini split remote control 7 times within one minute. Now connect to the Wi-Fi that starts with CieloBIXXXXXXXX
- Step 5: Go back to Cielo Home App
- Step 6: Tap “+” on the Home Screen
- Step 7: Wait for your phone to fetch the list of available Wi-Fi networks
- Step 8: Select your Home Wi-Fi network from the list (Please ensure that there is NO Captive Portal or port blocking on your selected network)
- Step 9: Enter the password of your home Wi-Fi Network
- Step 10: On this screen. type device name of your choice. (For example. Bedroom. Lounge. Office. etc.)
Next. select “manufacturer” as Pioneer and your “remote model number” from the list
Your registration process is complete.
STEP 4A: YOUR HOME SCREEN
Your home screen shows the real-time status of all your connected Pioneer Smart Controllers. If you have only one Pioneer Smart Controller, a single device will be displayed.
A registered Pioneer Smart Controller displays 2 types of status, shown as outlined circles:
- Green - Device is online
- Red - Device is offline
Note: In cases where the Pioneer Smart Controller is not appearing online, please refer to the Troubleshooting section at the end of this manual.
TROUBLESHOOTING: CHANGING WI-FI NETWORK OF PIONEER SMART CONTROLLER
Case 1:
- Pioneer Smart Controller and Mobile are on same Wi-Fi network - Simply tap on wrench symbol to enter device settings. Press the change Wi-Fi button. List of available Wi-Fi will appear. Enter password of selected Wi-Fi. Your new Wi-Fi settings are done.
Case 2:
- Pioneer Smart Controller and Mobile are on different Wi-Fi network - Go to your Mobile Settings screen and connect your Mobile with same Wi-Fi network as Pioneer Smart Controller. The remaining process is same as given in case 1.
- Note: In case your mobile couldn't connect to same Wi-Fi network as Pioneer Smart Controller, press LED button on your mini split remote control 7 times within one minute. Now follow the instruction as given in case 3.
Case 3:
- Pioneer Smart Controller is in AP (Access Point) mode - Connect mobile with Pioneer Smart Controller Wi-Fi i.e. Cielo BIXX_XXXXXX in Mobile Wi-Fi settings. Go back to Cielo home App. Simply tap on wrench symbol to enter device settings. Press the change Wi-Fi button. List of available Wi-Fi will appear. Enter password of selected Wi-Fi. Your new Wi-Fi settings are done.