
Loading ...
Loading ...
Loading ...
15.0 troubleshooting
SYMPTOM PROBLEM TEST SOLUTION
Main burner goes out; pilot
stays on.
Pilot flame is not large enough or
not engulfing the thermopile.
- Turn up the pilot flame.
- Replace pilot assembly.
Thermopile shorting. - Clean thermopile connection to the valve. Reconnect.
- Replace thermopile / valve.
Remote wall switch wire is too
long; too much resistance in the
system.
- Shorten wire to connect length or wire gauge.
Faulty thermostat or switch. - Replace.
Main burner goes out; pilot
goes out.
Refer to “MAIN BURNER GOES OUT; PILOT STAYS ON”
Pilot goes out when the gas
knob is released.
The gas valve has an inter-
lock device which will not
allow the pilot burner to be
lit until the thermocouple
has cooled. Allow approxi-
mately 60 seconds for the
thermocouple to cool.
System is not correctly purged. - Purge the gas line.
Out of propane gas.
- Fill the tank.
Pilot flame is not large enough. - Turn up the pilot flame.
Pilot flame is not engulfing the
thermocouple
- Gently twist the pilot head to improve the flame pattern
around the thermocouple.
Thermocouple shorting / faulty.
- Loosen and tighten thermocouple.
- Clean thermocouple and valve connection.
- Replace thermocouple.
- Replace valve.
Faulty valve. - Replace.
Pilot burning; no gas to main
burner; gas knob is on ‘HI’;
wall switch / thermostat is on.
Thermostat or switch is defective - Connect a jumper wire across the wall switch terminals; if
main burner lights, replace switch / thermostat.
Wall switch wiring is defective.
- Disconnect the switch wires & connect a jumper wire across
terminals 1 & 3; if the main burner lights, check the wires for
defects and/or replace wires.
Main burner orifice is plugged. - Remove stoppage in orifice.
Faulty valve. - Replace.
Pilot will not light. No spark at pilot burner.
- Check if pilot can be lit by a match.
- Check that the wire is connected to the push button igniter.
- Check if the push button igniter needs tightening.
- Replace the wire if the wire insulation is broken or frayed.
- Replace the electrode if the ceramic insulator is cracked or
broken.
- Replace the push button ignitor
Out of propane gas. - Fill the tank.
Spark gap is incorrect.
- Spark gap should be 0.150” (3.8mm) to 0.175” (4.5mm)
from the electrode tip and the pilot burner. To ensure proper
electrode location, tighten securing nut (finger tight plus 1/4
turn).
No gas at the pilot burner. - Check that the manual valve is turned on.
- Check the pilot orifice for blockage.
- Replace the valve.
- Call the gas distributor.
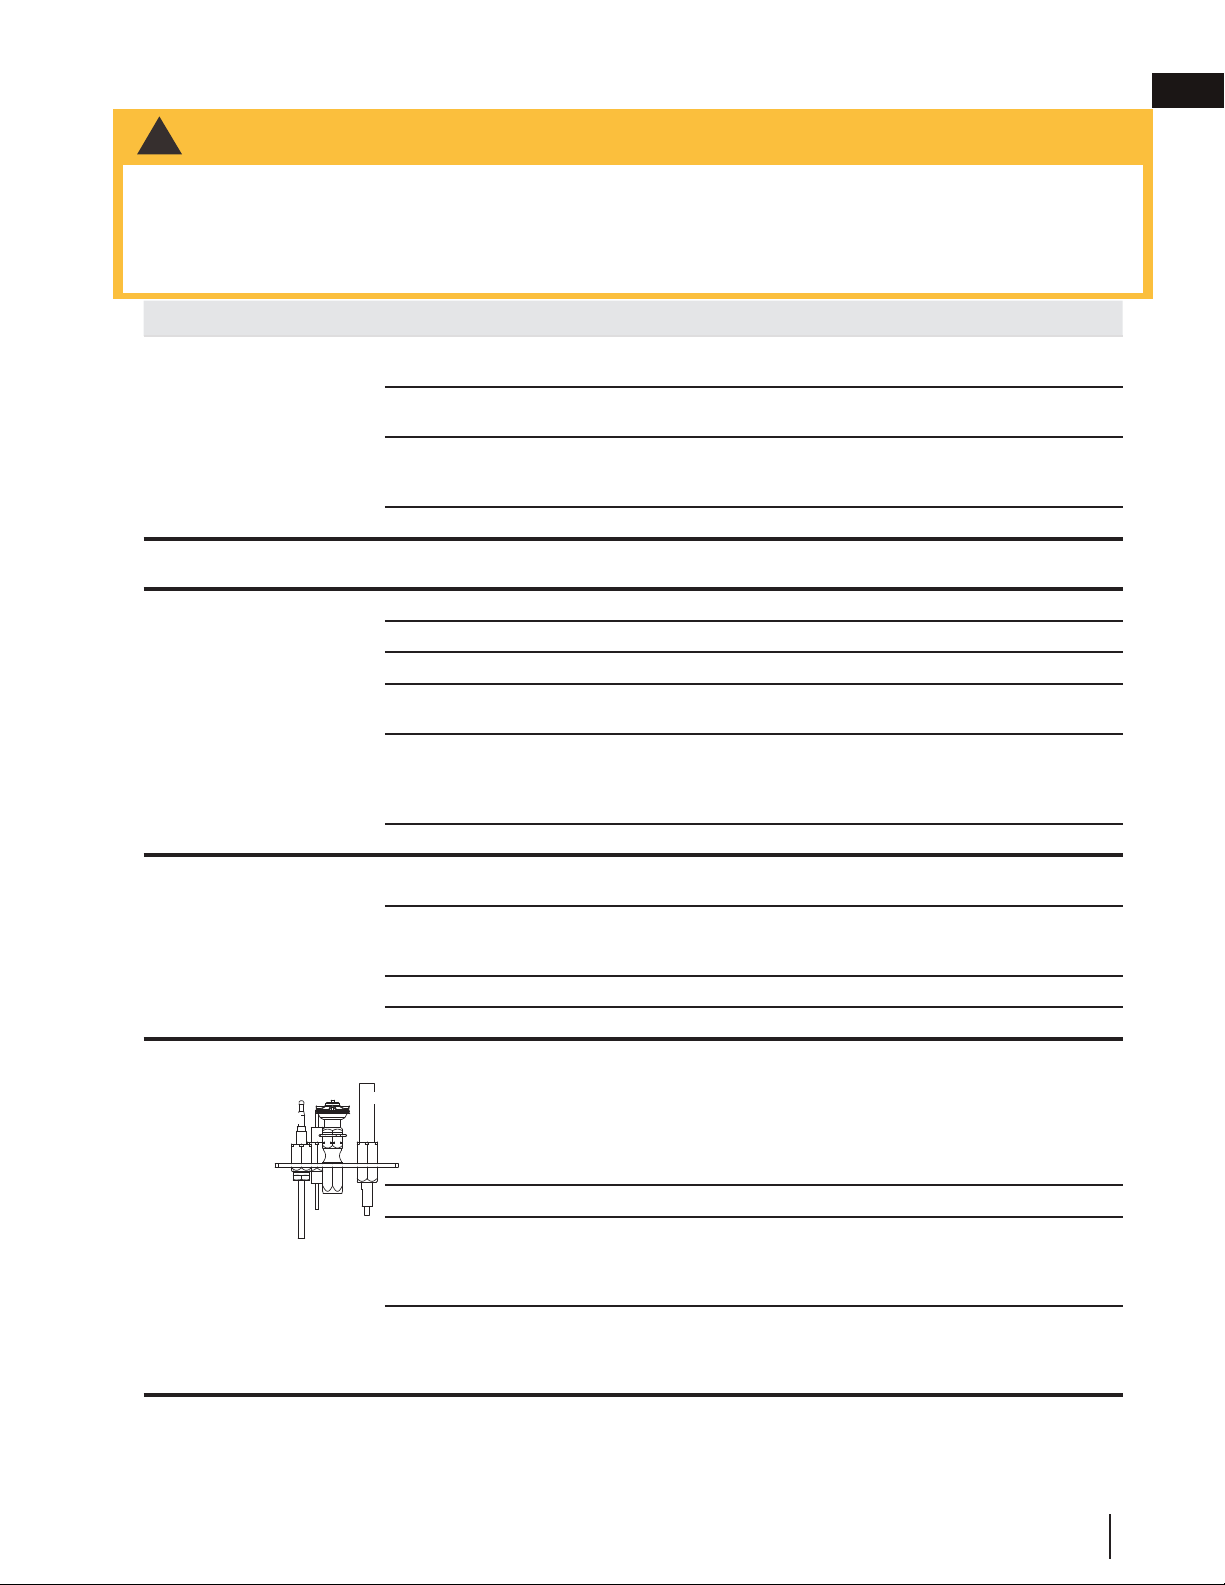
PILOT
BURNER
THERMOCOUPLE
THERMOPILE
27.2
symptom problem test solution
Main burner flame is a
blue, lazy, transparent
fl ame.
Blockage in vent. - Remove blockage. In really cold conditions, ice buildup may occur on the
terminal and should be removed as required. To minimize this from happening
again, it is recommended that the vent lengths that pass through unheated
spaces (attics, garages, crawl spaces) be wrapped with an insulated mylar
sleeve. Prevent sleeve from sagging. Contact your local authorized dealer for
more information.
Main burner goes out;
pilot stays on.
Pilot flame is not large enough or
not engulfing the thermopile.
- Turn up the pilot flame.
- Replace pilot assembly.
Thermopile shorting. - Clean thermopile connection to the valve. Reconnect.
- Replace thermopile / valve.
Remote wall switch wire is too
long; too much resistance in the
system.
- Shorten wire to correct length or wire gauge.
Faulty thermostat or switch. - Replace.
Main burner goes out;
pilot goes out.
Refer to “MAIN BURNER GOES OUT; PILOT STAYS ON”
Vent is blocked - Check for vent blockage.
Vent is re-circulating - Check joint seals and installation
Flexible vent has become
disconnected from appliance.
- Re-attach to appliance.
- Cap was not replaced.
Flames are consistently
too large or too small.
Carboning occurs.
Appliance is over-fired or
underfi red.
- Check pressure readings:
Inlet pressure can be checked by turning screw (A) counter-clockwise 2 or
3 turns and then placing pressure gauge tubing over the test point. Gauge
should read as described on the chart below. Check that main burner is
operating on ‘HI’. Outlet pressure can be checked the same as above using
screw (B). Gauge should read as described on the chart below. Check that
main burner is operating on ‘HI’. AFTER TAKING PRESSURE READINGS,
BE SURE TO TURN SCREWS CLOCKWISE FIRMLY TO RESEAL. DO
NOT OVER TORQUE.
Leak test with a soap and water solution.
Air shutter improperly adjusted. - Return air shutter to specified opening, see “venturi adjustment” section.
Carbon is being
deposited on glass,
logs, rocks, media or
combustion chamber
surfaces.
Air shutter is blocked. - Ensure air shutter opening is free of lint or other obstructions.
Flame is impinging on the
glass, logs, rocks, media or
combustion chamber.
- Ensure the media is positioned correctly in the appliance.
- Open air shutter to increase the primary air.
- Check the input rate: check the manifold pressure and orifice size as specified
by the rating plate.
- Ensure door gasketing is not broken or missing and the seal is tight.
- Ensure vent liners are free of holes and well sealed at all joints.
- Check that minimum rise per foot (meters) has been adhered to for any
horizontal venting.
White / grey film forms. Sulphur from fuel is being
deposited on glass, logs or
combustion chamber surfaces.
- Clean the glass with a recommended gas fireplace glass cleaner. DO NOT
CLEAN GLASS WHEN HOT.
- If deposits are not cleaned off regularly, the glass may become permanently
marked.
Exhaust fumes smelled
in room, headaches.
Appliance is spilling.
(This is not applicable in outdoor
appliances)
- Check door seal.
- Check for exhaust damage.
- Check that venting is installed correctly.
- Room is in negative pressure; increase fresh air supply.
INSERT
PHOTO
OF VALVE
HERE
Pressure
Natural Gas
(inches)
Natural Gas
(millibars)
Propane
(inches)
Propane
(millibars)
Inlet
* 13”
(MIN. 4.5”)
17.4mb
(MIN. 11.2mb)
13”
(MIN. 11”)
32.4mb
(MIN. 27.4mb)
Outlet
3.5” 8.7mb 10” 24.9mb
* Maximum inlet
pressure not to
exceed 13”
!
WARNING
• Always light the pilot whether for the fi rst time or if the gas supply has run out, with the glass door open or
removed.
• Turn off gas and electrical power before servicing the appliance.
• Appliance may be hot. Do not service until appliance has cooled.
• Do not use abrasive cleaners
EN
W415-1796 / B / 08.01.18
31
Loading ...
Loading ...
Loading ...