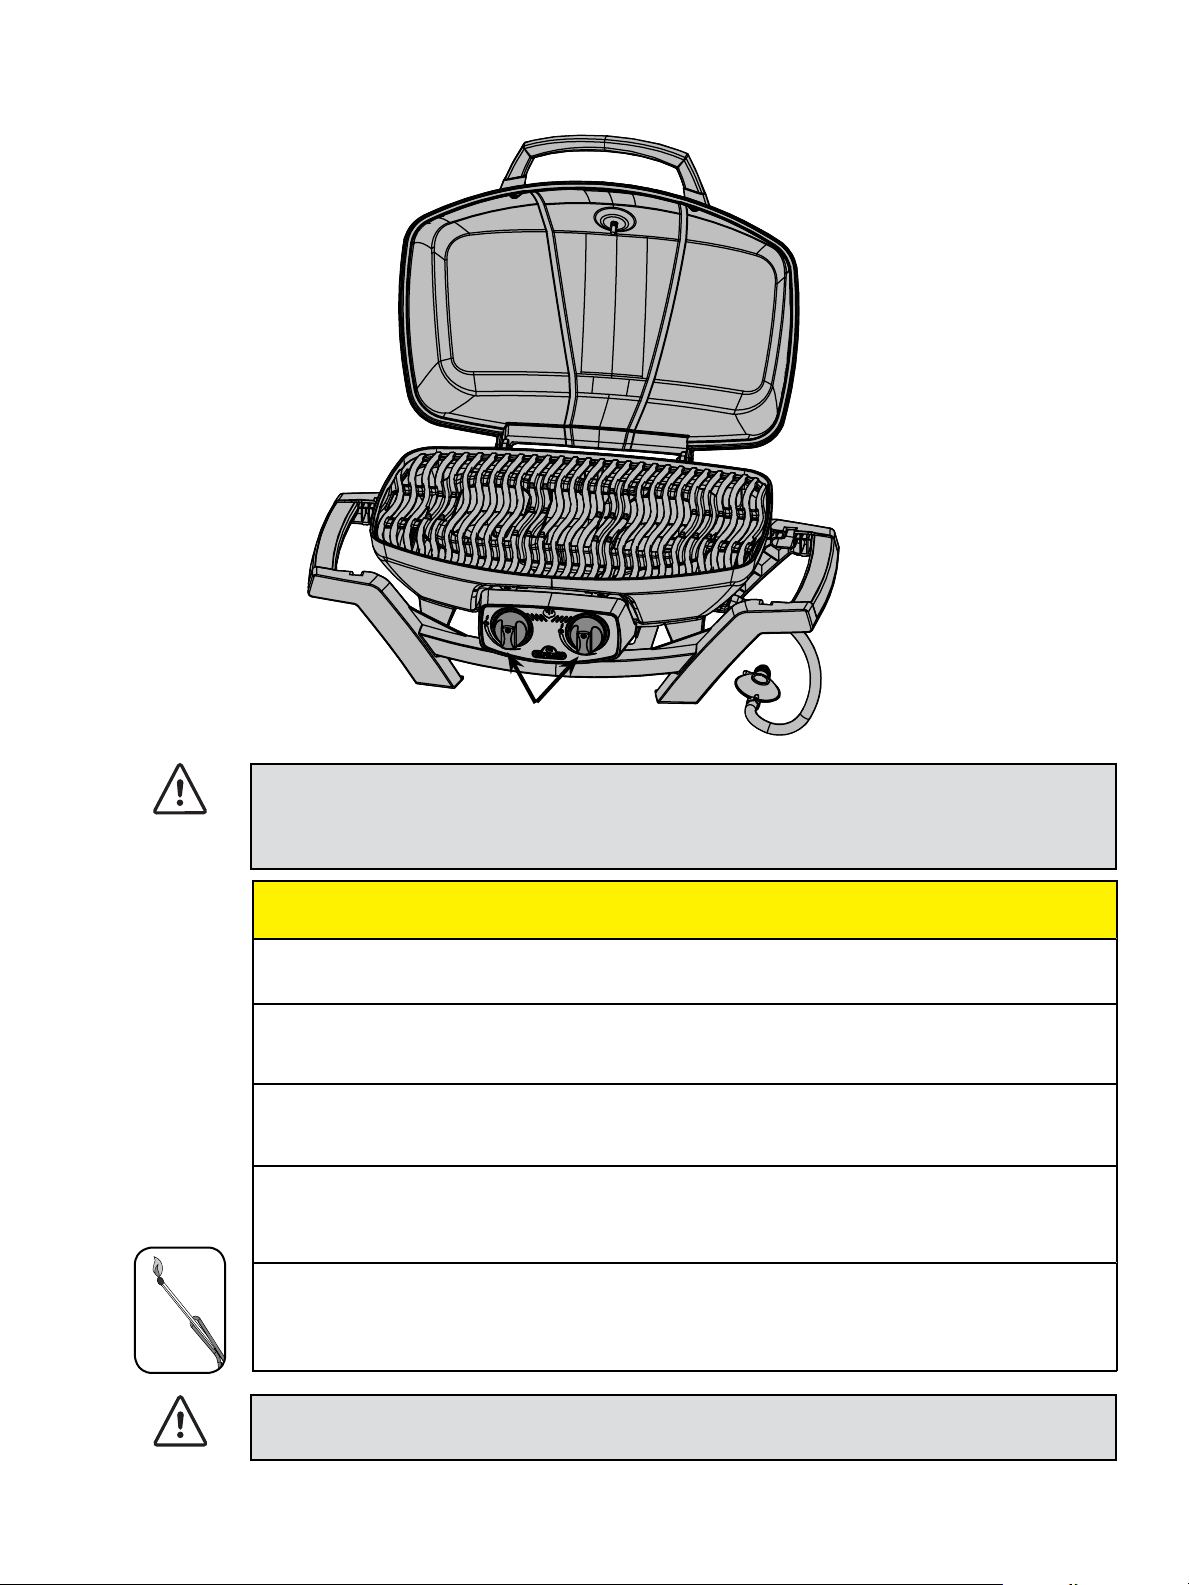
DANGER
IF YOU SMELL GAS:
• Shut o gas to the appliance.
• Exnguish any open ame.
• Open lid.
• If odor connues, keep away from the
appliance and immediately call your gas
supplier or re department.
APPLY SERIAL NUMBER LABEL FROM CARTON
Serial No.
XXXXXX000000
MODEL NO.
This gas grill must be used only outdoors in a well-venlated space and must not be used inside a
building, garage, screened-in porch, gazebo or any other enclosed area.
N415-0309-AU JUN 27.16
Noce to Installer: Leave these instrucons with the grill owner for future reference.
Adults and especially children should be alerted to the hazards of high surface temperatures.
Young children should be supervised near the gas grill.
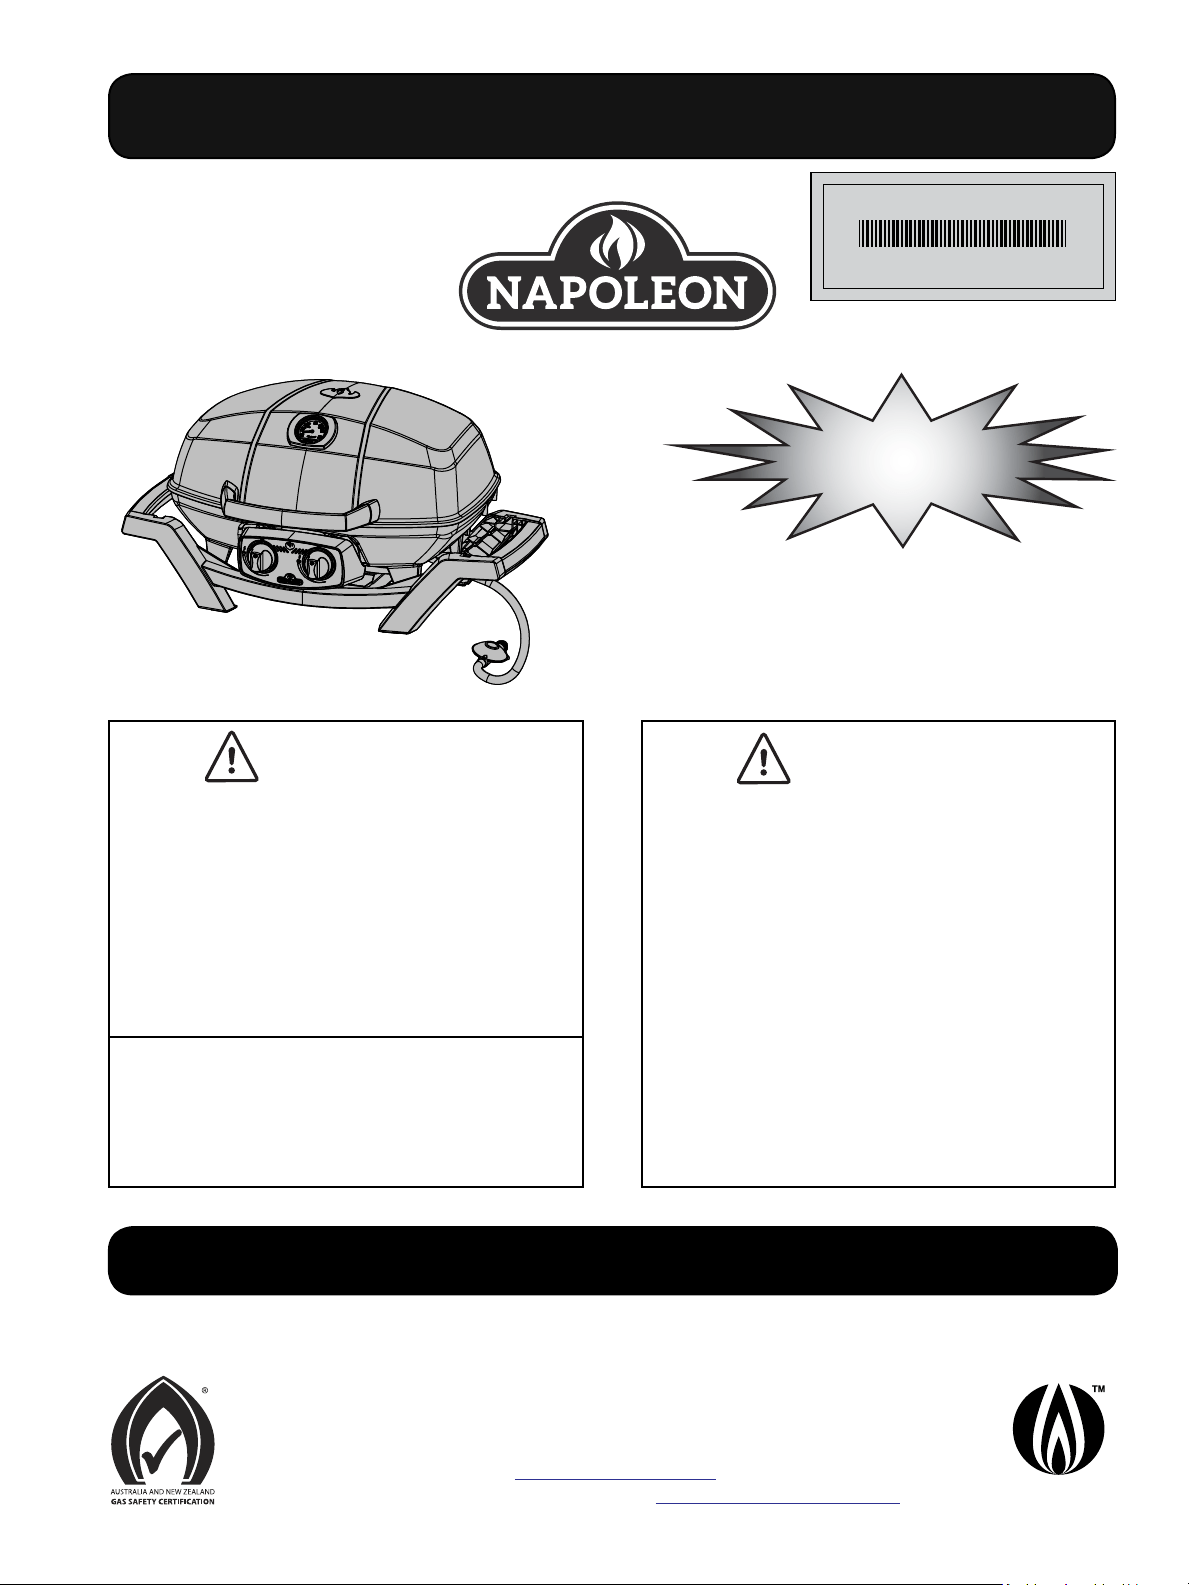
PRO285
WARNING! Failure to follow these
instrucons exactly could result in re,
or explosion which could cause property
damage, personal injury or death.
WARNING
Do not try to light this appliance without
reading the “LIGHTING” instrucons secon
of this manual.
Do not store or use gasoline or other
ammable liquids or vapors in the vicinity of
this or any other appliance. An L.P. cylinder
not connected for use must not be stored in
the vicinity of this or any other appliance.
If the informaon in these instrucons is
not followed exactly, a re or explosion may
result, causing property damage, personal
injury or death.
SAI Global
SAI-400093
AS4557
DO NOT REMOVE
www.gtrc.gov. au
Napoleon Group of Companies
214 Bayview Dr., Barrie, Ontario, Canada L4N 4Y8
Phone: 1-705-726-4278 Fax: (705)-727-4282
www.napoleongrills.com
Customer Soluons: 1-866-820-8686 or grills@napoleonproducts.com
DO NOT DISCARD
www.napoleongrills.com
2
THANK YOU FOR CHOOSING NAPOLEON
NAPOLEON products are designed with superior components and materials, and are assembled by trained
crasmen who take great pride in their work. This grill has been thoroughly inspected by a qualied
technician before packaging and shipping to ensure that you, the customer, receive the quality product
you expect from NAPOLEON.
We at Napoleon are dedicated to you, “our valued customer”. It is our goal to provide you with the
necessary tools for an unforgeable grilling experience. This manual is provided to assist you in assuring
your new grill is assembled, installed, maintained and cared for properly. It is important to read and
understand this enre manual before operang your new grill to ensure you fully understand all the safety
precauons and features your grill has to oer. By carefully following these instrucons, you will enjoy
years of trouble-free grilling. If this product fails to meet your expectaons, for any reason, please call our
customer soluons department at 1-866-820-8686 between 9 AM and 5 PM (Eastern Standard Time) or
visit our Website at www.napoleongrills.com.
Napoleon Gas Grill President’s Limited Warranty
NAPOLEON warrants that components in your new NAPOLEON product will be free from defects in
material and workmanship from the date of purchase, for the following period:
Lid Assembly 5 years
plus5
Base Casng 5 years
plus5
Stainless steel tube burners 5 years
plus5
Porcelain-enameled cast iron cooking grids 5 years
plus5
Plasc components 5 years
All other parts 2 years
plus5
indicates a period of extended warranty coverage whereby the replacement part will be made
available to the consumer for an addional 5 years at 50% of the current retail price.
Condions and Limitaons
NAPOLEON warrants its products against manufacturing defects to the original purchaser only, provided that
the purchase was made through an authorized NAPOLEON dealer and is subject to the following condions and
limitaons:
This factory warranty is non-transferable and may not be extended what-so-ever by any of our representaves.
This limited warranty does not cover damages caused by misuse, lack of maintenance, grease res, hosle
environments, accident, alteraons, abuse or neglect and parts installed from other manufacturers will nullify this
warranty. Discoloraon to plasc parts from chemical cleaners or UV exposure is not covered by this warranty.
This limited warranty further does not cover any scratches, dents, painted or plated nishes, corrosion or discoloring
by heat, abrasive and chemical cleaners, nor chipping on porcelain enamel parts..
Should deterioraon of parts occur to the degree of non-performance (rusted through or burnt through) within the
duraon of the warranted coverage, a replacement part will be provided.
Aer the rst year, with respect to this President's Limited Warranty NAPOLEON may, at its discreon, fully discharge
all obligaons with respect to this warranty by refunding to the original warranted purchaser the wholesale price of
any warranted but defecve part(s).
NAPOLEON will not be responsible for the installaon, labor or any other costs or expenses related to the re-
installaon of a warranted part, and such expenses are not covered by this warranty.
Notwithstanding any provision contained in this President's Limited Warranty NAPOLEON's responsibility under this
warranty is dened as above and it shall not in any event extend to any incidental, consequenal, or indirect damages.
This warranty denes the obligaon and liability of NAPOLEON with respect to the NAPOLEON gas grill and any other
warranes expressed or implied with respect to this product, its components or accessories are excluded.
NAPOLEON neither assumes, nor authorizes any third party to assume, on its behalf, any other liabilies with respect
to the sale of this product.
NAPOLEON will not be responsible for: over ring, blow outs caused by environmental condions such as strong
winds, or inadequate venlaon,
Any damages to the gas grill due to weather damage, hail, rough handling, damaging chemicals or cleaners will not be
the responsibility of NAPOLEON.
The bill of sale or copy will be required together with a serial number and a model number when making any
warranty claims from NAPOLEON.
NAPOLEON reserves the right to have its representave inspect any product or part prior to honoring any warranty
claim.
NAPOLEON shall not be liable for any transportaon charges, labor costs, or export dues.

www.napoleongrills.com
3
• This instrucon manual contains important informaon necessary for the proper
assembly and safe use of the appliance.
• Read and follow all warnings and instrucons before assembly and using the
appliance.
• Follow all warnings and instrucons when using the appliance.
Safe Operang Pracces
• This gas grill must be assembled exactly according to the instrucons in the manual. If the grill was
store assembled, you must review the assembly instrucons to conrm correct assembly and perform
the required leak tests before operang the grill.
• Read the enre instrucon manual before operang the gas grill.
• This gas grill must only be used outdoors in a well-venlated space and must not be used inside a
building, garage, screened in porch, gazebo or any other enclosed area.
• Do not use this grill under extended awnings. Failure to follow these instrucons could result in a re
or personal injury.
• This gas grill must not be installed in or on recreaonal vehicles and/or boats.
• This gas grill is designed for Universal LPG only.
• Do not locate in windy sengs. High winds adversely aect the cooking performance of the gas grill.
• Under no circumstances should this gas grill be modied.
• Do not operate unit under any combusble construcon.
• Maintain proper clearance to combusbles 18” (457mm) to rear of unit, 18” (457mm) to sides).
Addional clearance is recommended near vinyl siding or panes of glass.
• The gas supply hose must be installed in a manner that will not allow contact with any hot surfaces of
the grill while in use or in the storage/travel mode.
• The propane cylinder must be disconnected when the gas grill is not in use.
• When the propane cylinder is connected to the appliance, the gas grill and cylinder must be stored
outdoors in a well-venlated space.
• When the gas grill is to be stored indoors, the connecon between the propane cylinder and the gas
grill must be disconnected and the cylinder removed and stored outdoors in a well venlated space
out of reach of children. Disconnected cylinders must not be stored in a building, garage or any other
enclosed area.
• Inspect the gas supply hose before each use. If there is evidence of excessive abrasion or wear or the
hose is cut, it must be replaced prior to using the gas grill with a replacement pressure regulator and
hose assembly specied by the grill manufacturer.
• Do not route hose underneath drip pan - proper hose clearance to boom of unit must be
maintained.
• Leak test the unit before inial use, annually and whenever any gas components are replaced.
• Follow the lighng instrucons carefully when operang grill.
• Do not light burners with lid closed.
• The use of alcohol, prescripon or non-prescripon drugs may impair the consumer’s ability to
properly assemble or safely operate the gas grill.
• Do not leave grill unaended when operang. Keep children and pets away from the appliance at all
mes.
• Do not move grill when hot or operang.
• Keep any electrical supply cord and fuel supply hose away from any heated surfaces.
• Clean grease tray regularly to avoid build-up, which may lead to grease res.
• Do not use water, beer, or any other liquids to control are-ups.
• Do not use a pressure washer to clean any part of the unit.
• This gas grill is not intended for commercial use.
• This gas grill is not intended for and should never be used as a heater.
www.napoleongrills.com
4
Locang Your Outdoor Gas Grill
It is important when selecng a locaon for your gas grill to ensure clearances to adjacent combusbles
are met. This appliance is intended for installaon on an outdoor pao or in your yard.
‘This appliance shall only be used in an above ground open-air situaon with natural venlaon, without
stagnant areas, where gas leakage and products of combuson are rapidly dispersed by wind and natural
convecon.’
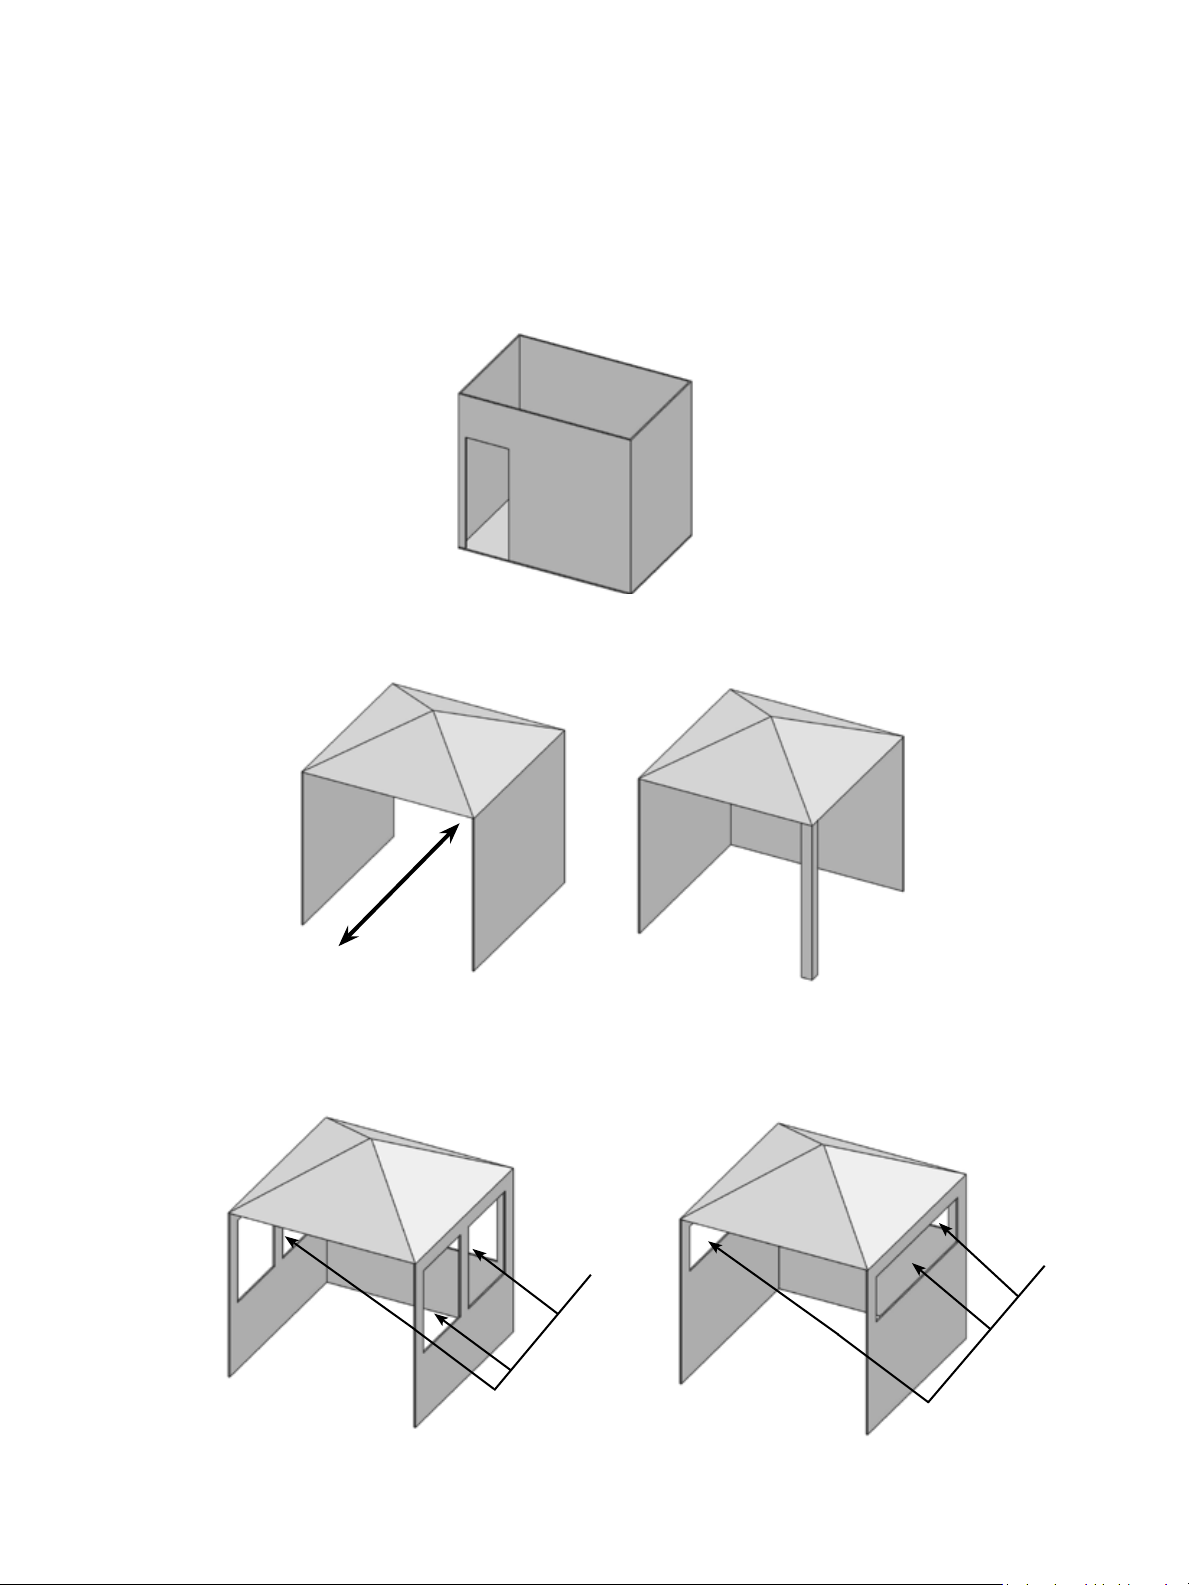
Any enclosure in which the appliance is used shall comply with one of the following:
An enclosure with walls on all sides, but at least one permanent opening at ground level and no overhead
cover.
Within a paral enclosure that includes an overhead cover and no more than two sidewalls. These
sidewalls may be parallel, as in a breezeway, or at right angles to each other.
Within a paral enclosure which includes an overhead cover and more than two walls, the following shall
apply:
a) at least 25% of the total wall area is completely open; and.
b) at least 30% of the remaining wall area is open and unrestricted.
In the case of balconies, at least 20% of the total of the side, back and front wall areas shall be and remain
open and unrestricted.
Locaon
Open both ends
Open side at
least 25% of
total wall area
30% or more in total of the
remaining wall area is open
and unrestricted
Open side at
least 25% of
total wall area
30% or more in total of the
remaining wall area is open
and unrestricted
www.napoleongrills.com
5
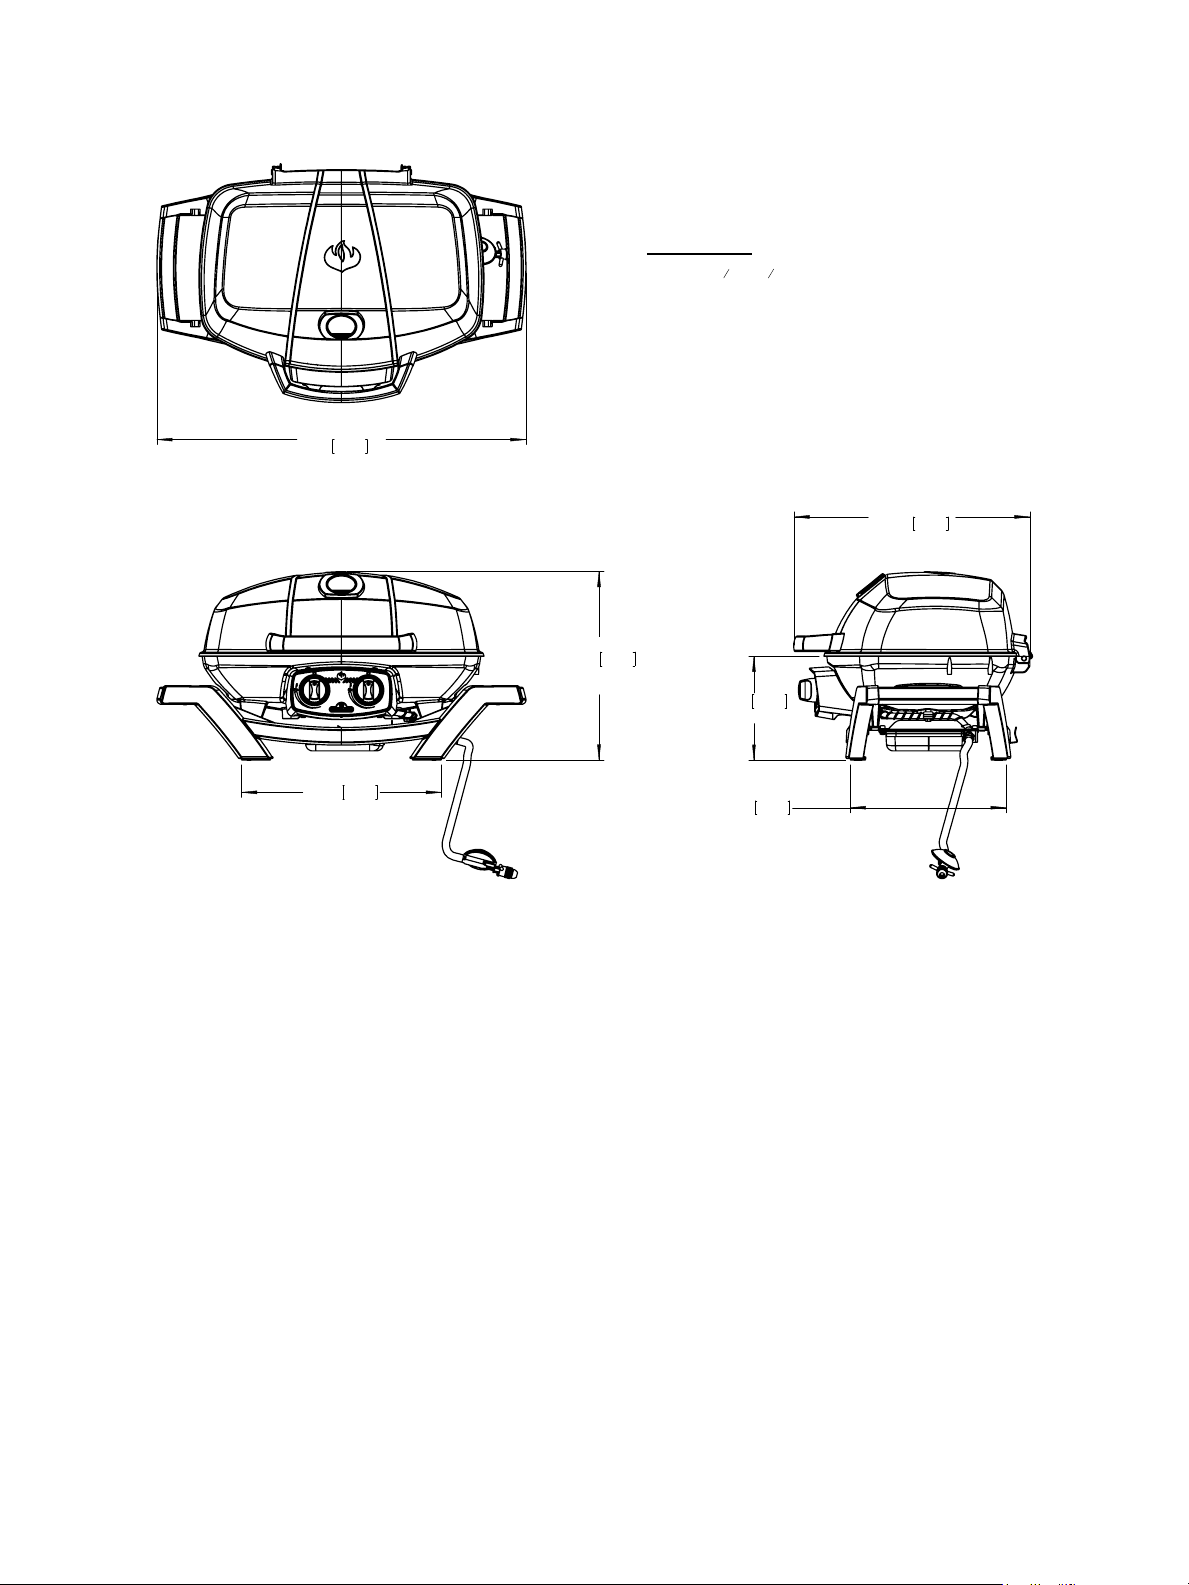
OVERALL HEIGHT
14 3/4"
38cm
(25 1/4" [64 cm]
- LID OPEN)
15 3/4"
40cm
OVERALL WIDTH
29"
74cm
OVERALL DEPTH
18 1/2"
47cm
8 1/4"
21cm
(GRILL HEIGHT)
12 1/4"
31cm
PRO285 GRILL
GRILL SIZE: 14
1
2
in X 21
1
2
in (IRREGULAR) = 285 in
2
(37 cm x 54 cm (IRREGULAR) = 1840 cm
2
)
ALL DIMENSIONS ARE APPROXIMATE
DIMENSIONS
www.napoleongrills.com
6
Handle With Care
CAUTION! Use care when handling or transporng your grill to prevent damage and misalignment
of internal components. Although this grill has been designed with mobility in mind, rough handling or
abuse will result in damage to internal components, prevenng your grill from operang properly.
General Informaon
This gas grill is cered for outdoor use and should be installed to conform to local codes. Check gas type
and specicaons on the rang plate located on the control panel of the grill.
Use only the pressure regulator provided with this barbecue. Replacement pressure regulators must be
supplied by or specied by the manufacturer. The regulator supplies a pressure of 2.75 kilopascals to the
gas grill and has a female CGA#600 type ng.
Propane Cylinder Specicaons
WARNING! If these instrucons are not followed exactly, a re causing death or serious injury
may occur.
WARNING! Do not store a spare propane cylinder on the shelf beneath the barbecue.
This gas grill has been designed for use with an approved 9 kg size propane cylinder (not supplied). The
propane cylinder must be equipped with a POL tank valve connecon. A dented or rusty cylinder may be
hazardous and should be checked by your propane supplier. Never use a cylinder with a damaged valve.
The cylinder supply system must be arranged for vapor withdrawal and the cylinder shall include a dust
cap to protect the cylinder valve. The cylinder shall incorporate a listed OPD (overll protecon device).
Do not store a spare LP-gas cylinder under or near this appliance. Never ll the cylinder beyond 80 percent
full.
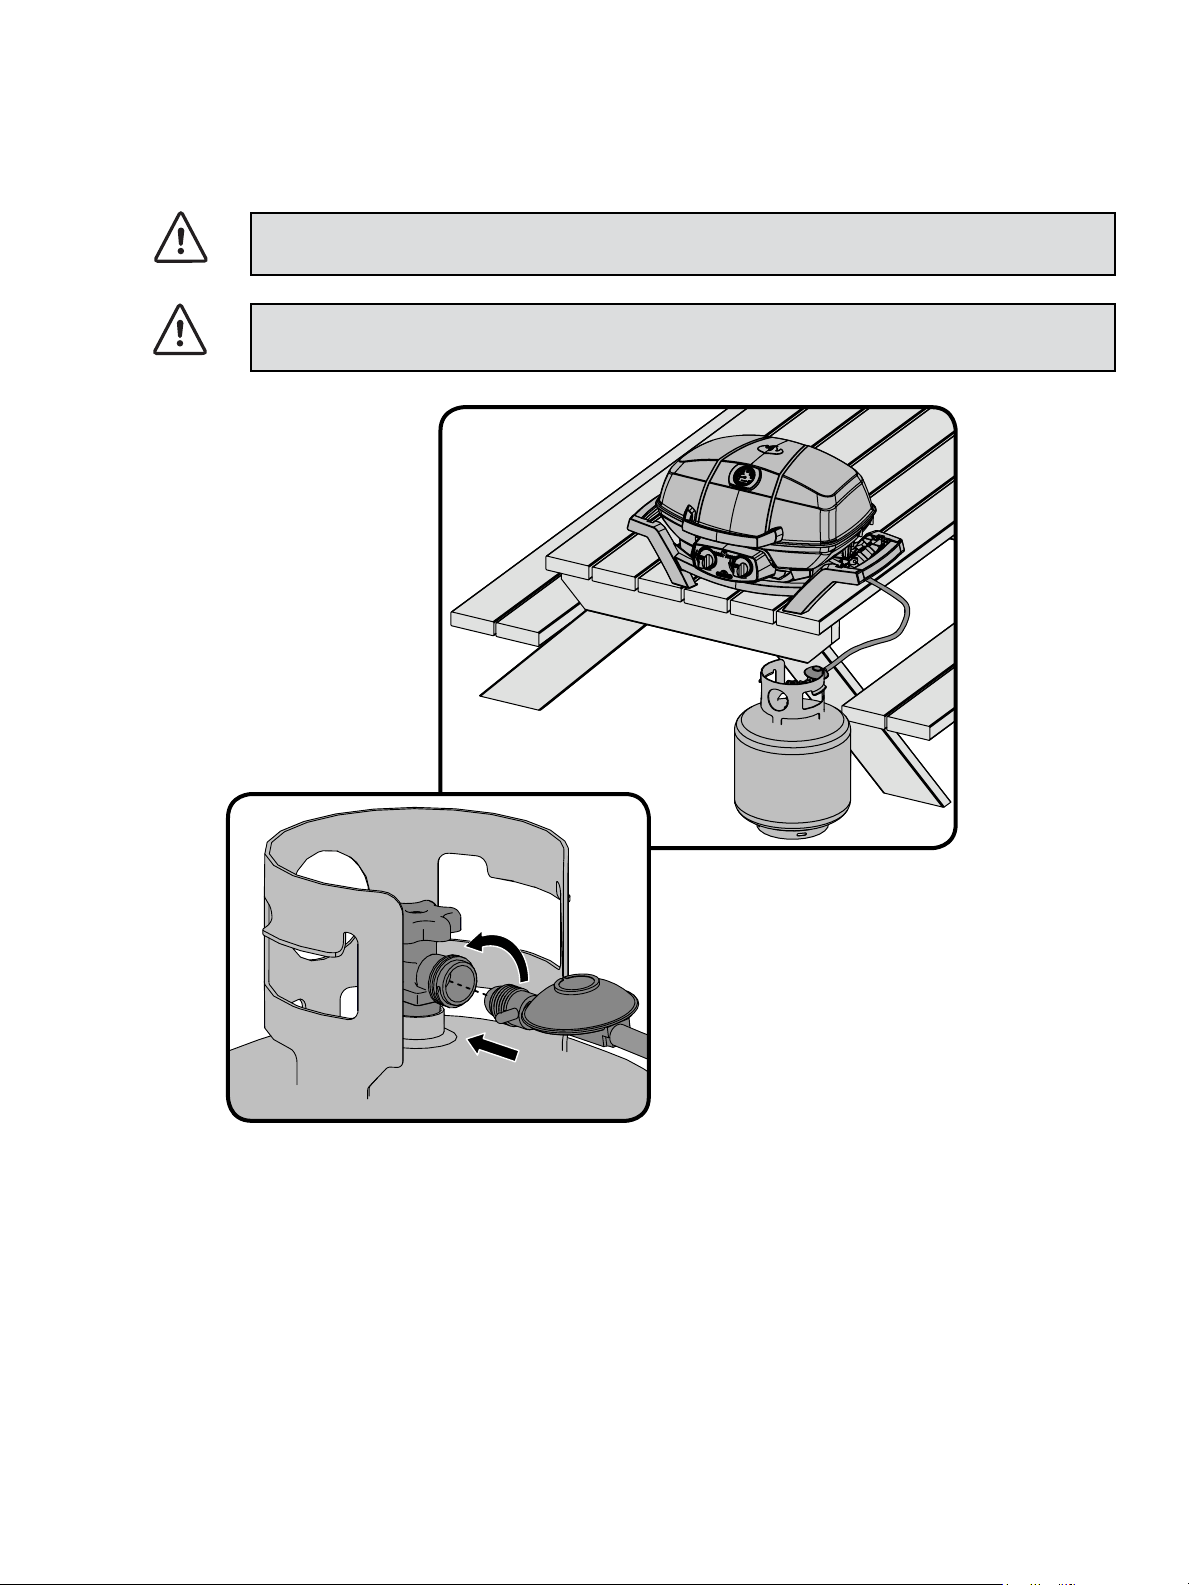
Cylinder Connecon: 20 lb (9.1 kg). Ensure that the gas regulator hose is kink free. Remove the cap or
plug from the cylinder fuel valve. Insert the POL regulator nipple onto the POL fuel valve. Hand ghten
counterclockwise. Do not use tools. Leak test all joints prior to using the barbecue. A leak test must be
performed annually, and each me a cylinder is hooked up, or if a part of the gas system is replaced.
• Check that the cylinder valve is closed by turning the knob clockwise.
• Check that the grill’s burner knobs are in the o posion.
• Posion the cylinder so that the valve faces toward the front of the unit.
• Aach regulator hose.
WARNING! Locate the hose out of pathways where people may trip over it or in areas where the
hose may be subject to accidental damage. Do not p or move propane supply cylinder.
WARNING! Use only the pressure regulator and hose assembly provided with this barbecue.
Replacement pressure regulators and hose assemblies must be specied by the manufacturer. Do not
store a spare propane cylinder on the shelf beneath the barbecue (if applicable.) The regulator must be
aached so that no part of the hose touches the underside of the grill or drippan. A re will result if
these direcons are ignored.
www.napoleongrills.com
7
POL HOSE
CONNECTION
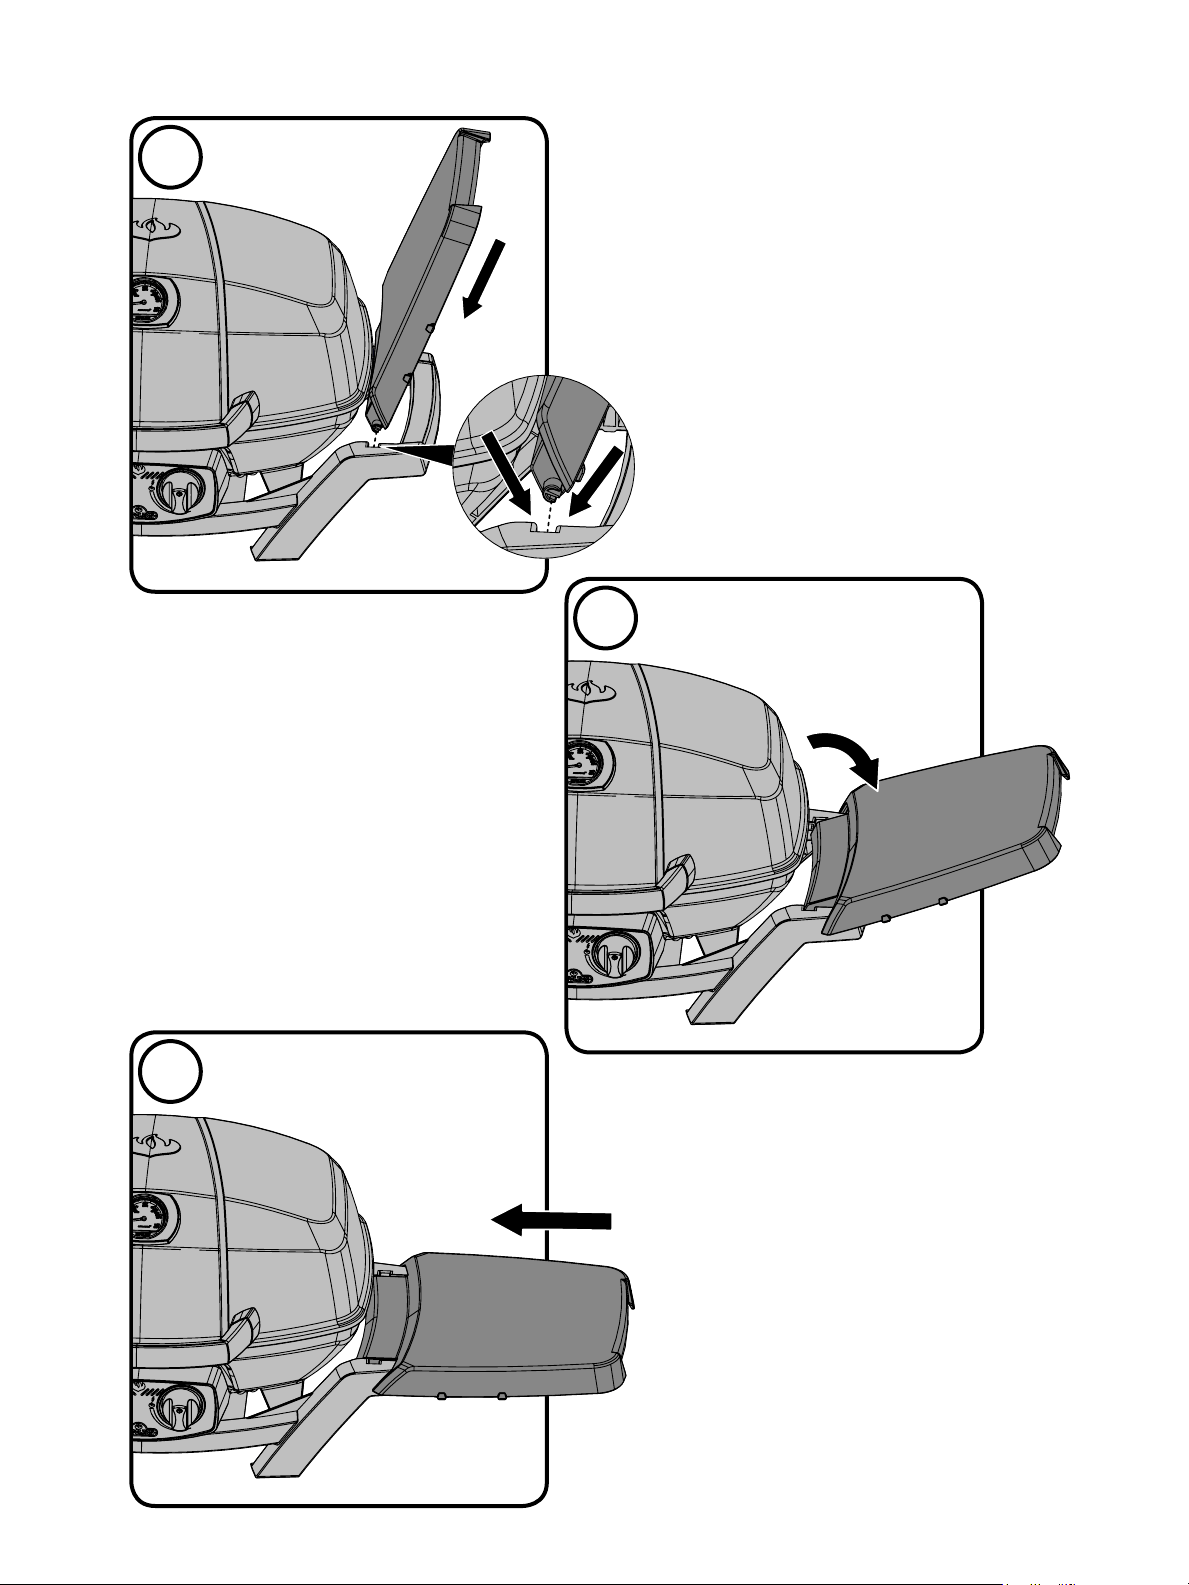
Table Top Use
The TQ285/PRO285 has been designed with mobility in mind. With collapsible legs, the TQ285/PRO285
can be set up on most table tops. The legs fold out and lock into place, folding back into a locked
posion when on the go.
WARNING! The legs located on each side of your grill must be unfolded during use.
WARNING! Do not use the grill on plasc, resin or glass table tops.
www.napoleongrills.com
8
1
2
3
www.napoleongrills.com
9
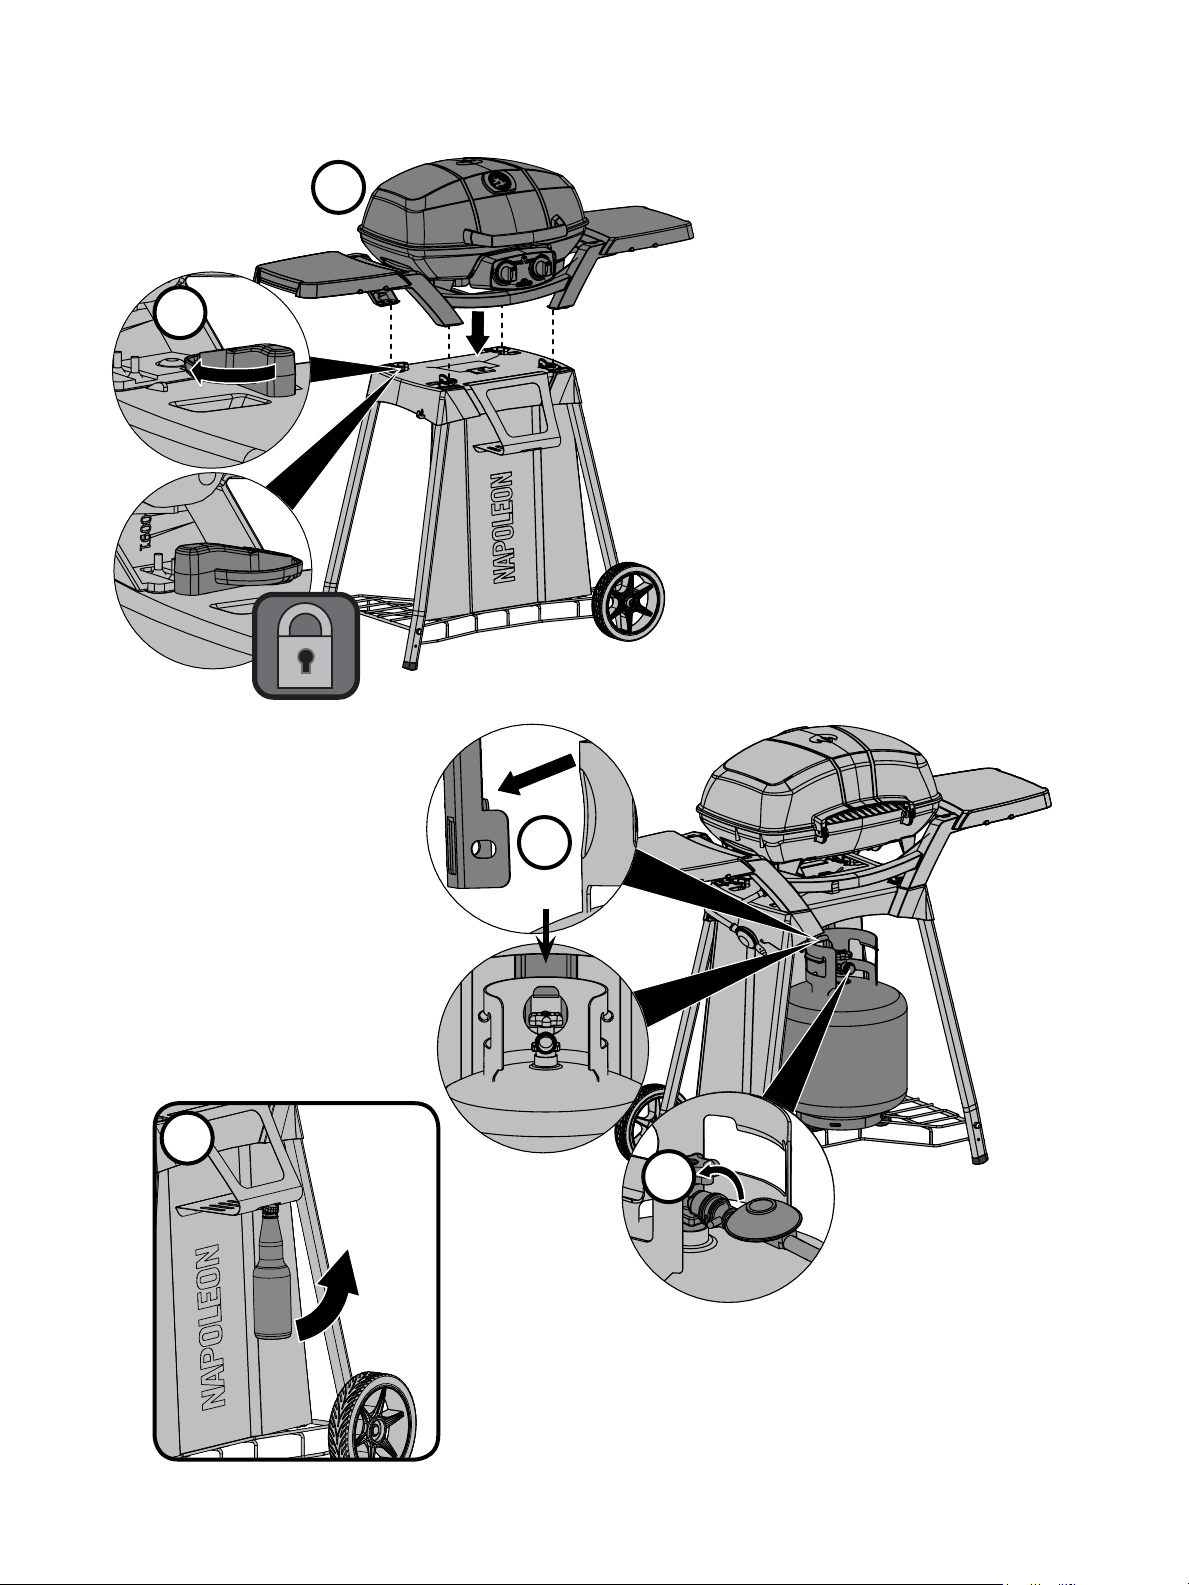
OPTIONAL STAND
1
2
x4
4
3
5
www.napoleongrills.com
10
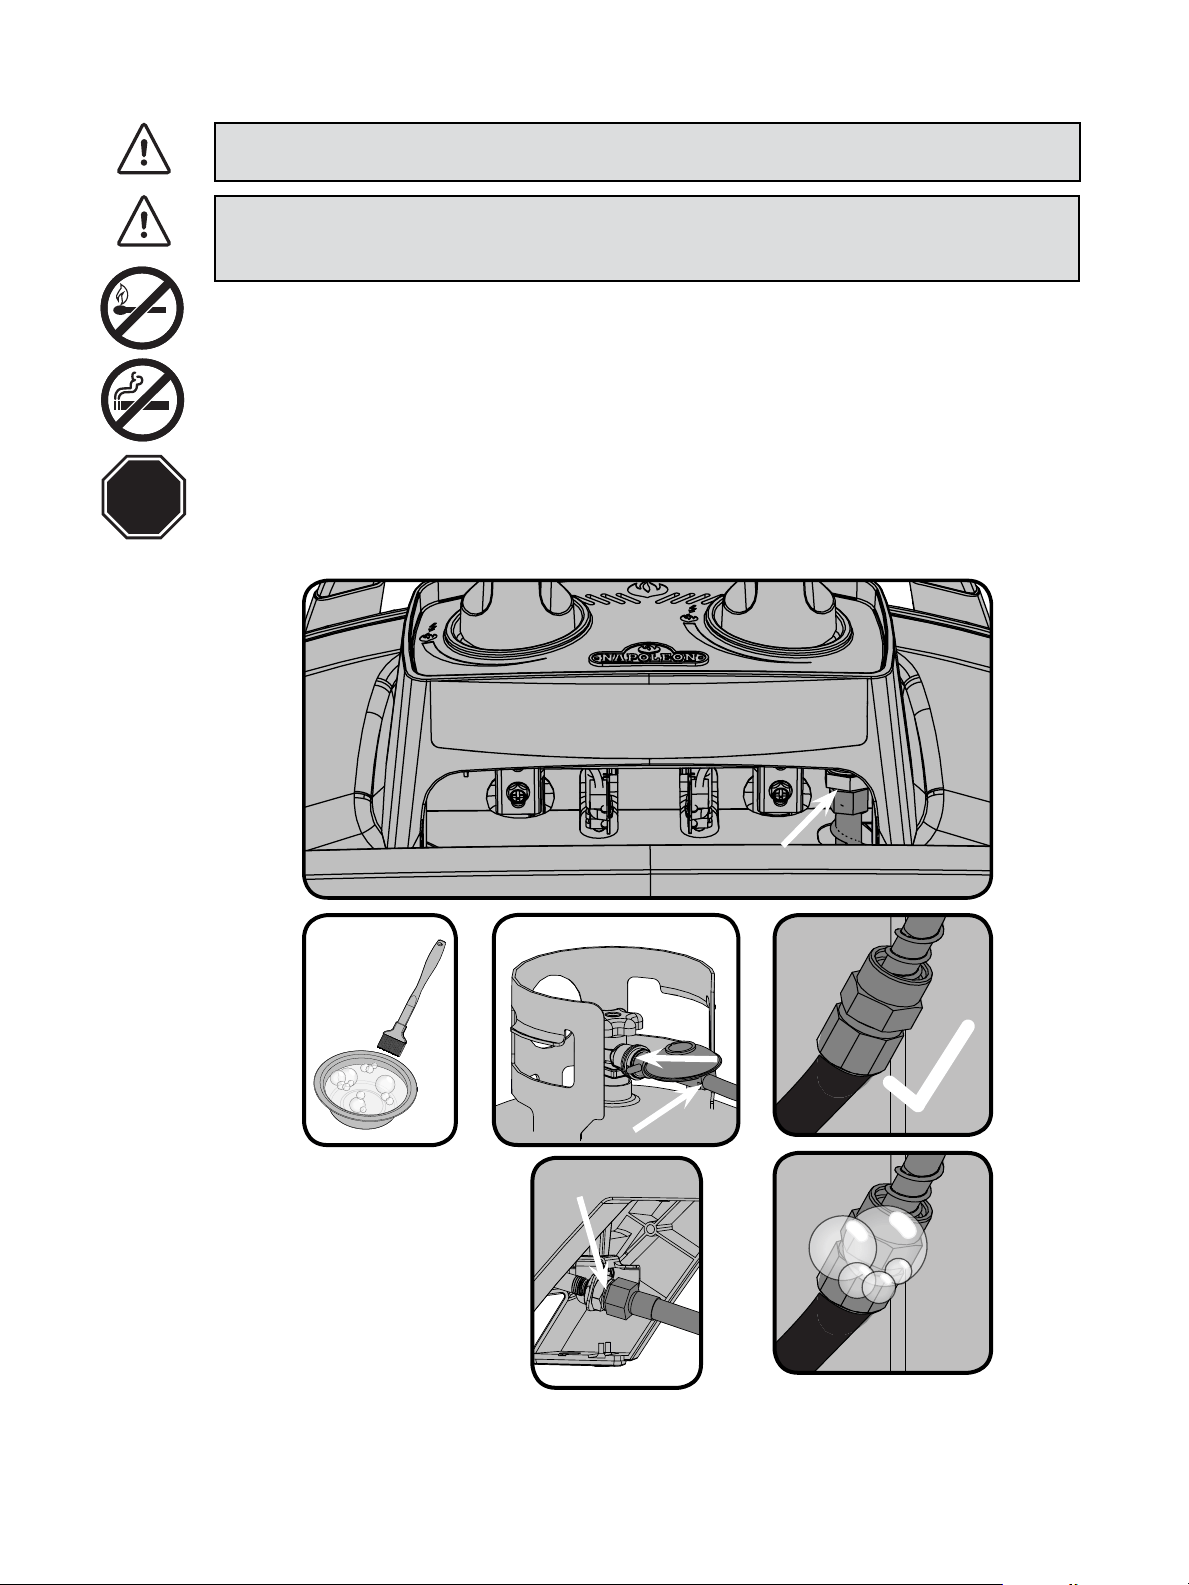
Leak Tesng Instrucons
WARNING! A leak test must be performed annually and each me a cylinder is hooked up or if a
part of the gas system is replaced.
WARNING! Never use an open ame to check for gas leaks. Be certain no sparks or open ames
are in the area while you check for leaks. Sparks or open ames will result in a re or explosion,
damage to property, serious bodily injury, or death.
Leak tesng: This must be done before inial use, annually, and whenever any gas components are
replaced or serviced. Do not smoke while performing this test, and remove all sources of ignion. See Leak
Tesng Diagram for areas to check. Turn all burner controls to the o posion. Turn gas supply valve on.
Brush a half-and-half soluon of liquid soap and water onto all joints and connecons of the regulator,
hose, manifolds and valves.
Bubbles will indicate a gas leak. Either ghten the loose joint or have the part replaced with one
recommended by the Napoleon Customer Soluons department and have the grill inspected by a cered
gas installer.
If the leak cannot be stopped, immediately shut o the gas supply, disconnect it, and have the grill
inspected by a cered gas installer or dealer. Do not use the grill unl the leak has been corrected.
STOP
X
www.napoleongrills.com
11
Lighng Instrucons
Burner Control
WARNING! Open lid
WARNING! Ensure all burner controls are in the o posion. Slowly turn on the gas supply valve.
Main Burner Lighng
1. Open grill lid
2. Push and turn any main burner control knob slowly to the 'hi' posion. This acon
will ignite the selected burner.
3. If the burner does not ignite, then immediately turn the control knob back to the
'o' posion and repeat step 2 several mes.
4. If the burner will not ignite within 5 seconds, turn the control knob to the 'o'
posion and wait 5 minutes for any excess gas to dissipate, either repeat steps 2 and 3
or light with a match.
5. If lighng the unit with a match, clip the match into the supplied lighng rod. Hold
the lit match down through the grill while turning the corresponding burner valve to
high.
WARNING! The propane cylinder is equipped with an excess ow device. Unless all burners are
turned o prior to turning the cylinder on, only small ames and low heat will be achievable.
www.napoleongrills.com
12
Cooking Instrucons
Inial Lighng: When lit for the rst me, the gas grill emits a slight odor. This is a normal temporary
condion caused by the “burn-in” of internal paints and lubricants used in the manufacturing process and
does not occur again. Simply run the main burners on high for approximately one-half hour.
Cleaning Instrucons
Note: Stainless steel tends to oxidize or stain in the presence of chlorides and suldes, parcularly in
coastal areas and other harsh environments, such as the warm, highly humid atmosphere around pools
and hot tubs. These stains could be perceived as rust, but can be easily removed or prevented. To provide
stain prevenon and removal, wash all stainless steel and chrome surfaces every 3-4 weeks or as oen as
required with fresh water and/or stainless steel cleaner.
Cleaning Inside The Gas Grill : Remove the cooking grids. Use a brass wire brush to clean loose debris
from casng sides and underneath the lid. Brush all debris from inside the gas grill into the removable
drip pan.
WARNING! Do not use this grill under extended awnings. Failure to follow these instrucons
could result in a re or personal injury.
DANGER! Do not put this grill in storage or travel mode immediately aer use. Allow the grill to
cool to the touch before moving or storing. Failure to do so could result in a re resulng in property
damage, personal injury or death.
WARNING! Always wear protecve gloves and safety glasses when servicing your grill.
WARNING! To avoid the possibility of burns, maintenance should be done only when the grill is
cool. Avoid unprotected contact with hot surfaces. Ensure all burners are turned o. Clean grill in an
area where cleaning soluons will not harm decks, lawns, or paos. Do not use oven cleaner to clean
any part of this gas grill. Do not use a self-cleaning oven to clean cooking grids or any other parts of
the gas grill. Barbecue sauce and salt can be corrosive and will cause rapid deterioraon of the gas grill
components unless cleaned regularly.
Cast Iron Cooking Grids: The cast iron cooking grids supplied with your new grill oer superior heat
retenon and distribuon. By regularly seasoning your grids you are adding a protecve coang, which
will aid in resisng corrosion and increase your grids non-sck capabilies.
First Time Use: Wash the cooking grids by hand with mild dish soap and water to remove any residue
from the manufacturing process (never wash in a dish washer). Rinse thoroughly with hot water and dry
completely with a so cloth. This is important to avoid moisture from entering the cast iron.
Seasoning: Using a so cloth, spread VEGETABLE SHORTENING over the enre grid surface ensuring
all grooves and corners are covered. Do not use salted fats such as buer or margarine. Pre-heat your
grill for 15 minutes, then place the seasoned cooking grids in the grill. Turn the burner control knobs to
medium with the lid closed. Allow the cooking grids to heat for approximately one-half hour. Turn all the
burners to the “OFF” posion and turn the gas o at the source. Let the cooking grids stand unl cool.
This procedure should be repeated several mes throughout the season, although it is not required for
daily use (follow daily usage procedure below).
Daily Usage: Before pre-heang, and cleaning with a brass wire grill brush, coat the enre top surface of
the cooking grids with VEGETABLE SHORTENING. Pre-heat the grill and then brush away any unwanted
residue with a brass wire brush.
Main Burner Use: When searing foods, the lid must be kept open and the burners can be set to high. If
cooking with the lid closed, preheat grill on high for 10 minutes with the lid closed, and then turn the main
burners to low. Food cooked for short periods of me (sh, vegetables) can be grilled with the lid open.
Cooking with the lid closed will ensure higher, more even temperatures that can reduce cooking me
and cook meat more evenly. Food that has a cooking me longer than 30 minutes, such as roasts, can be
cooked indirectly (with the burner lit opposite to the food placement). When cooking very lean meats,
such as chicken breasts or lean pork, the grids can be oiled before pre-heang to reduce scking. Cooking
meat with a high degree of fat content can create are-ups. Either trim the fat or reduce temperatures to
inhibit this. Should a are-up occur, move food away from the ames and reduce the heat. Leave the lid
open. See Your All Season Grill cookbook by Napoleon for more detailed instrucons.
www.napoleongrills.com
13
Drip Pan: Accumulated grease is a re hazard. Clean the drip pan frequently to avoid grease buildup.
Grease and excess drippings pass through to the drip pan, located beneath the gas grill and accumulate.
To clean, slide the drip pan free of the grill. Never line the drip pan with aluminum foil, sand or any other
material as this could prevent the grease from owing properly. The pan should be scraped out with a
puy knife or scraper.
Cleaning The Outer Grill Surface: Do not use abrasive cleaners or steel wool on any painted, porcelain or
stain
less steel parts of your Napoleon Grill. Doing so will scratch the nish. Exterior grill surfaces should be
cleaned with warm soapy water while the metal is sll warm to the touch. To clean stainless surfaces, use
a stainless steel or a non-abrasive cleaner. Always wipe in the direcon of the grain. Over me, stainless
steel parts discolor when heated, usually to a golden or brown hue. This discoloraon is normal and does
not aect the performance of the grill. Porcelain enamel components must be handled with addional
care. The baked-on enamel nish is glass-like, and will chip if struck. Touch-up enamel is available from
your Napoleon Grill dealer.
WARNING! Always wear protecve gloves and safety glasses when cleaning your grill.
WARNING! Turn o the gas at the source and disconnect the unit before servicing. To avoid the
possibility of burns, maintenance should be done only when the grill is cool. A leak test must be
performed annually and whenever any component of the gas train is replaced or gas smell is present.
Maintenance Instrucons
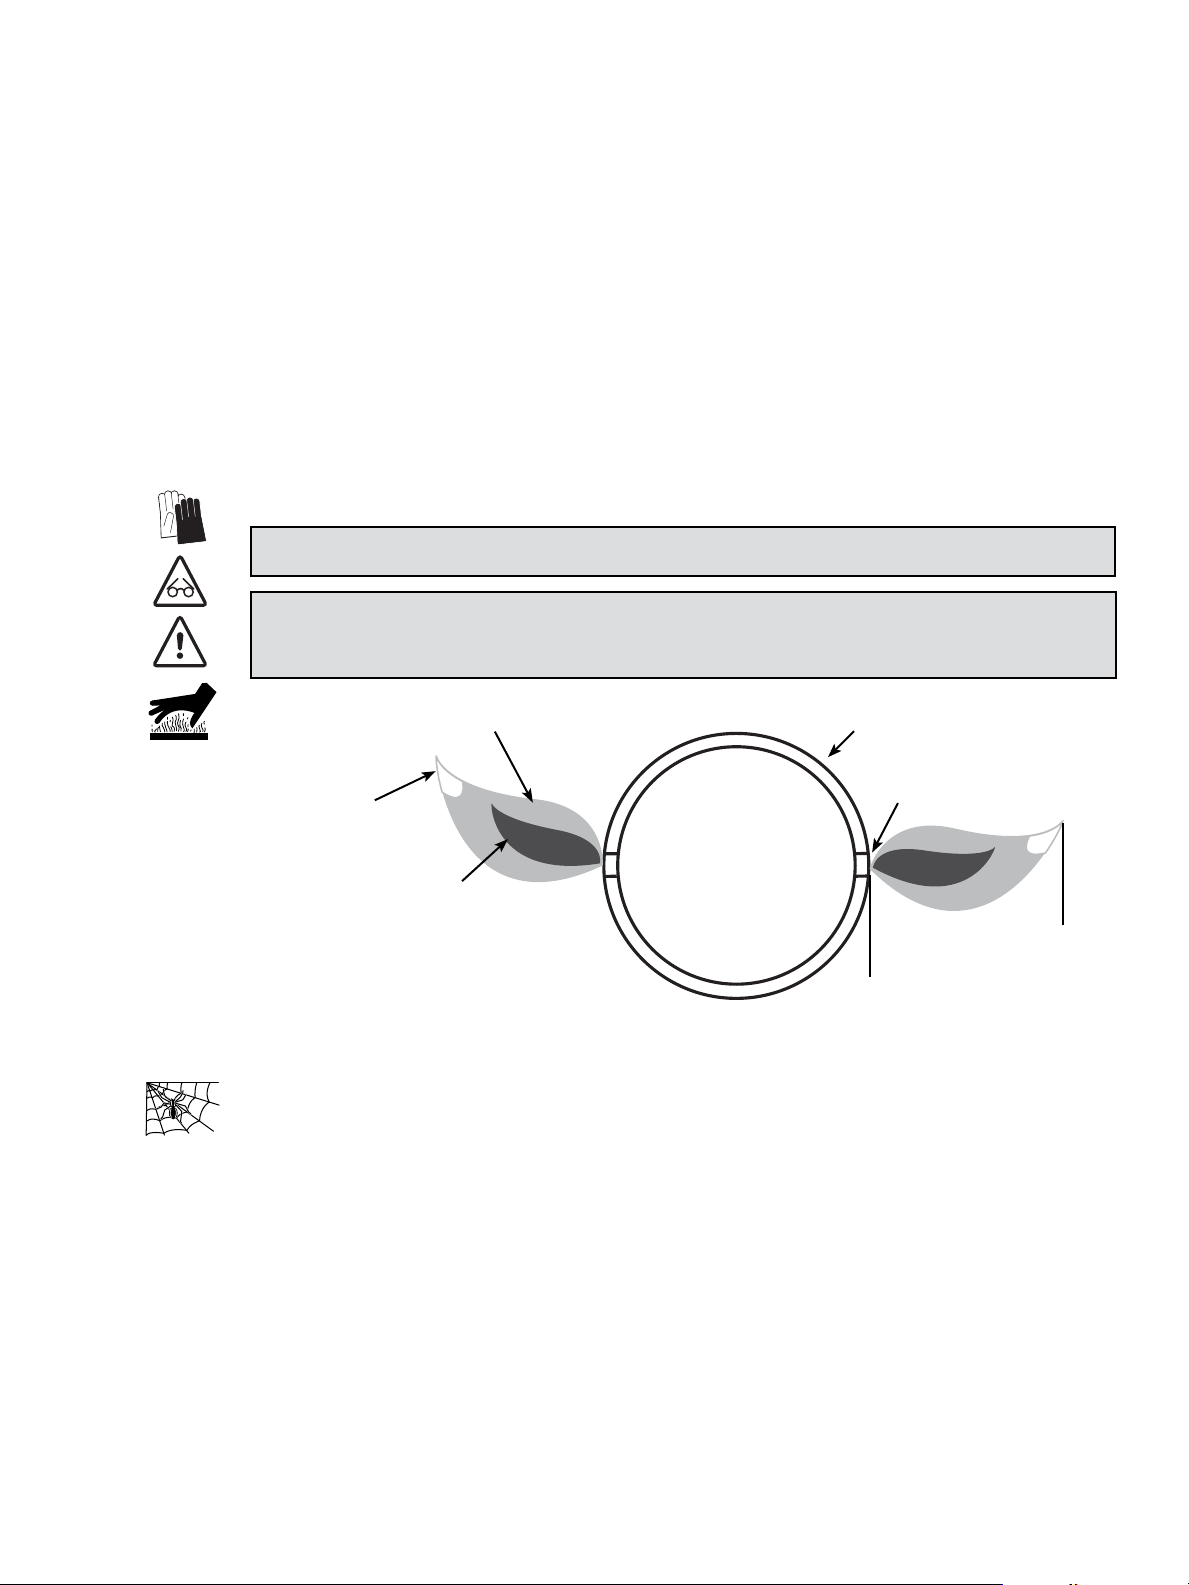
Burner: The burner is made from heavy wall 304 stainless steel, but extreme heat and a corrosive
environment can cause surface corrosion to occur. This can be removed with a brass wire brush.
CAUTION! Beware of Spiders.
Spiders and insects are aracted to the smell of propane and natural gas. The burner is equipped with an
insect screen on the air shuer, which reduces the likelihood of insects building nests inside the burner
but does not enrely eliminate the problem. A nest or web can cause the burner to burn with a so yellow
or orange ame or cause a re (ashback) at the air shuer underneath the control panel. To clean the
inside of the burner, it must be removed from the gas grill: Remove the screw (s) that aach the cross
light bracket and the burner to the base. Slide the burner back and upwards to remove. Cleaning: Use
a exible venturi tube brush to clean the inside of the burner. Shake any loose debris from the burner
through the gas inlet. Check the burner ports and valve orices for blockages. Burner ports can close over
me due to cooking debris and corrosion; use an opened paperclip to clean them. The ports are easier to
clean if the burner is removed from the grill, but it can also be done with the burner installed.
CAUTION! Take care not to enlarge the holes.
Ensure the insect screen is clean, ght, and free of any lint or other debris.
Reinstallaon: Reverse the procedure to reinstall the burner. Check that the valve enters the burner when
installing. Replace cross light bracket and ghten screws to complete reinstallaon.
We recommend this gas grill be thoroughly inspected and serviced annually by a qualied service person.
At all mes keep the gas grill area free from combusble materials, gasoline and other ammable vapors
and liquids. Do not obstruct the ow of venlaon and combuson air.
Light Blue
Yellow Tipping
Dark Blue
Burner
Burner Port
Approximately
1/2” (13mm)
www.napoleongrills.com
14
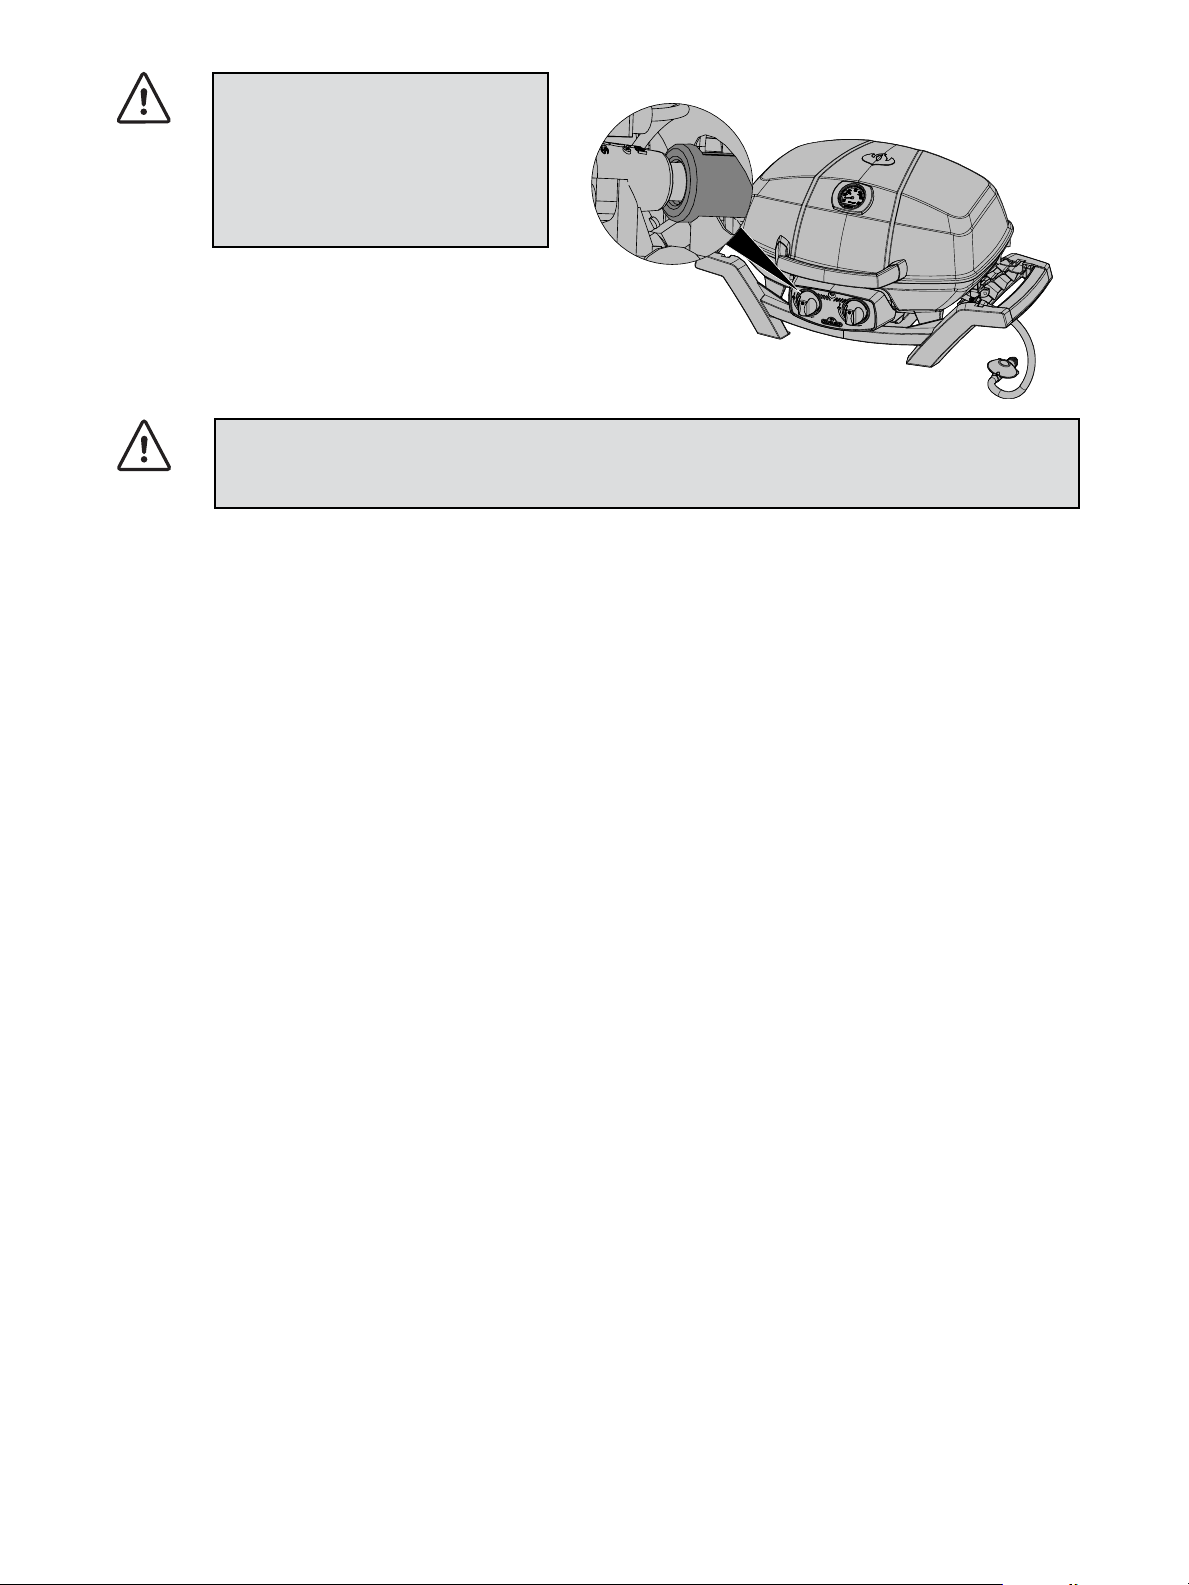
WARNING! Hose: Check for abrasions, melng, cuts, and cracks in the hose. If any of these
condions exist, do not use the gas grill. Have the part replaced by your Napoleon Grill dealer or
qualied gas installer.
WARNING! When reinstalling
the burner aer cleaning it is very
important that the valve/orice
enters the burner tube before lighng
your gas grill. If the valve is not inside
the burner tube a re or explosion
could occur.
Cast Aluminum Lid: Your grill is equipped with a cast aluminum lid which will not rust and can easily
be renished. The inside of the lid is raw aluminum, ow marks and releasing agent marks may be
present, this is not a defect but marks from the mold which is used in the manufacturing process.Clean
the lid periodically with warm soapy water. Although cast aluminum will not rust, high temperatures
and weathering can cause oxidaon to occur on aluminum surfaces. This appears as white spots on
the casng. To renish these areas, clean rst and sand lightly with ne sandpaper. Wipe the surface to
remove any residue and paint with high temperature barbecue paint. Protect surrounding areas from
over-spray. Follow the manufacture’s direcons for curing.
www.napoleongrills.com
15
Troubleshoong
Problem Possible Causes Soluon
Low heat / Low ame when
valve turned to high.
Blockage of gas.
Improper preheang.
Propane regulator in “low
ow” state.
For natural gas - undersized
supply line.
Check for spider webs in the burner or
orice.
Preheat grill with main burners on high
for 5 to 10 minutes.
Ensure lighng procedure is followed
carefully. All gas grill valves must be
in the o posion when the tank valve
is turned on. Turn tank on slowly to
allow pressure to equalize. See lighng
instrucons.
Pipe must be sized according to installa-
on code.
Excessive are-ups/uneven
heat.
Improper preheang.
Excessive grease and ash build
up in drip pan.
Preheat grill with both main burners on
high for 5 to 10 minutes.
Clean drip pan regularly. Do not line pan
with aluminum foil. Refer to cleaning
instrucons.
Burners burn with yellow
ame, accompanied by the
smell of gas.
Possible spider web or other
debris.
Thoroughly clean burner by removing.
See general maintenance instrucons.
Burner will not light with
the igniter, but will light
with a match.
Jet-re outlet is dirty or
clogged.
Clean jet-re outlet with a so bristle
brush.
“Paint” appears to be peel-
ing inside lid or hood.
Grease build-up on inside
surfaces.
This is not a defect. The peeling is
caused by hardened grease, which dries
into paint-like shards that ake o.
Regular cleaning will prevent this. See
cleaning instrucons.
Burner output on “high”
seng is too low. (Rum-
bling noise and uer-
ing blue ame at burner
surface.)
Lack of gas.
Supply hose is pinched.
Dirty or clogged orice.
Spider webs or other maer in
venturi tube.
Check gas level in propane cylinder.
Reposion supply hose as necessary.
Clean burner orice.
Clean out venturi tube.
Humming regulator. Normal occurrence on hot
days.
This is not a defect. It is caused by inter-
nal vibraons in the regulator and does
not aect the performance or safety of
the gas grill. Humming regulators will
not be replaced.

www.napoleongrills.com
16
KEEP YOUR RECEIPT AS PROOF OF PURCHASE TO VALIDATE YOUR WARRANTY.
Ordering Replacement Parts
Warranty Informaon
MODEL:
DATE OF PURCHASE:
SERIAL NUMBER:
(Record informaon here for easy reference)
Before contacng the Customer Soluons Department, check the Napoleon Website for more
extensive cleaning, maintenance, troubleshoong and parts replacement instrucons at
www.napoleongrills.com. Contact your local distributor directly (refer to the distributor contact list
provide with your grill) for replacement parts and warranty claims.
To process a claim, we must be provided with the following informaon:
1. Model and serial number of the unit.
2. Part number and descripon.
3. A concise descripon of the problem (‘broken’ is not sucient).
4. Proof of purchase (photocopy of the invoice).
In some cases the Customer Soluons Representave could request to have the parts returned to the
factory for inspecon before providing replacement parts. These parts must be shipped prepaid to the
aenon of the Customer Soluons Department with the following informaon enclosed:
1. Model and serial number of the unit.
2. A concise descripon of the problem (‘broken’ is not sucient).
3. Proof of purchase (photocopy of the invoice).
4. Return Authorizaon Number - provided by the Customer Soluons Representave.
Before contacng Customer Soluons Representave, please note that the following items are not
covered by the warranty:
• Costs for transportaon, brokerage or export dues.
• Labour costs for removal and reinstallaon.
• Costs for service calls to diagnose problems.
• Discoloraon of stainless steel parts.
• Part failure due to lack of cleaning and maintenance, or use of improper cleaners (oven
cleaner).
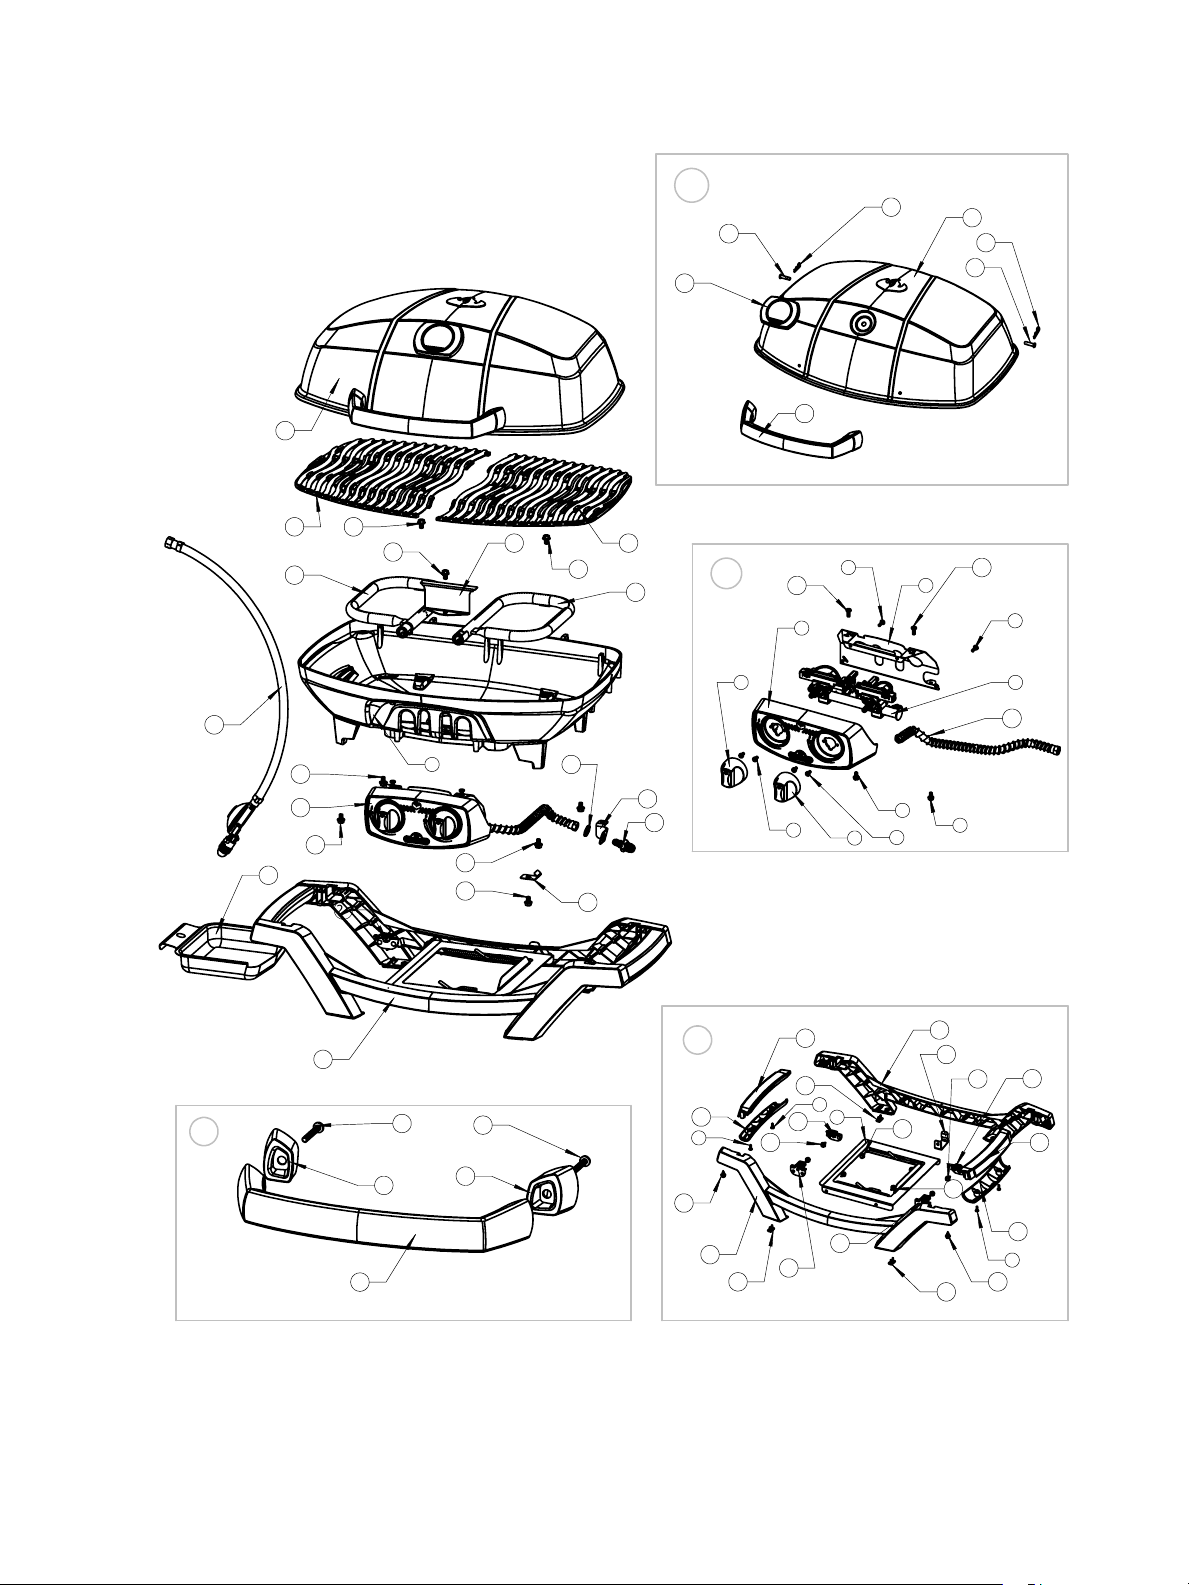
Item Part # Descripon
1 N135-0045ND-BK1HT base x
2 N010-0830 drip pan plate x
3 N570-0104 screw, 10-24 X 3/8” x
4 N475-0319 control panel x
5 N010-0773 manifold x
6 N570-0078 screw, m4 x 8mm x
7 N585-0089-BK1HT control panel heat shield x
8 N570-0076 screw, #8 X 1/2” x
9 N380-0020-RD control knob x
10 N570-0073 screw 1/4-20 x 3/8” x
11 N710-0079 drip pan x
12 Z570-0033 screw, 10-24 x 12mm x
13 N100-0047 burner, right x
14 N100-0046 burner, le x
15 N325-0083 lid handle x
16 N655-0179 lid handle support le x
17 N655-0180 lid handle support right x
18 N685-0017 temperature gauge x
19 N570-0107 screw, 10-24 x 30mm x
20 N135-0048-BK1HG lid x
21 N485-0023 clevis pin x
22 N485-0021 coer pin x
23 N080-0302 cross light bracket x
24 N305-0087-BK2FL cooking grid le x
25 N305-0088-BK2FL cooking grid right x
26 N080-0303 bracket, leg x
27 N160-0025 clip x
28 N570-0068 screw, #14 x 1/2” x
29 N080-0346-BK1SG bracket, ex line x
30 N160-0029-BK1SG bracket, regulator x
31 N255-0057 ng x
32 W450-0027 nut, 1/2-20 x
33 N530-0048 regulator x
34 N075-0091 craddle front x
35 N325-0088 craddle handle x
36 N325-0089 craddle handle cover x
37 N510-0013 silicone bumper x
38 N720-0060 manifold ex x
39 N135-0048-BKIHG-SER assembly, lid x
40 N475-0319-SER assembly, control panel x
41 N010-0834 assembly, craddle x
42 N325-0083-SER assembly, lid handle x
68286 vinyl cover - grill head only ac
68287 vinyl cover - for PRO285 - stand ac
56080 griddle ac
PRO285-STAND-AU oponal cart and shelves for PRO285 ac
www.napoleongrills.com
17
Item Part # Descripon
1 N135-0045ND-BK1HT base x
2 N010-0830 drip pan plate x
3 N570-0104 screw, 10-24 X 3/8” x
4 N475-0319 control panel x
5 N010-0773 manifold x
6 N570-0078 screw, m4 x 8mm x
7 N585-0089-BK1HT control panel heat shield x
8 N570-0076 screw, #8 X 1/2” x
9 N380-0020-RD control knob x
10 N570-0073 screw 1/4-20 x 3/8” x
11 N710-0079 drip pan x
12 Z570-0033 screw, 10-24 x 12mm x
13 N100-0047 burner, right x
14 N100-0046 burner, le x
15 N325-0083 lid handle x
16 N655-0179 lid handle support le x
17 N655-0180 lid handle support right x
18 N685-0017 temperature gauge x
19 N570-0107 screw, 10-24 x 30mm x
20 N135-0048-BK1HG lid x
21 N485-0023 clevis pin x
22 N485-0021 coer pin x
23 N080-0302 cross light bracket x
24 N305-0087-BK2FL cooking grid le x
25 N305-0088-BK2FL cooking grid right x
26 N080-0303 bracket, leg x
27 N160-0025 clip x
28 N570-0068 screw, #14 x 1/2” x
29 N080-0346-BK1SG bracket, ex line x
30 N160-0029-BK1SG bracket, regulator x
31 N255-0057 ng x
32 W450-0027 nut, 1/2-20 x
33 N530-0048 regulator x
34 N075-0091 craddle front x
35 N325-0088 craddle handle x
36 N325-0089 craddle handle cover x
37 N510-0013 silicone bumper x
38 N720-0060 manifold ex x
39 N135-0048-BKIHG-SER assembly, lid x
40 N475-0319-SER assembly, control panel x
41 N010-0834 assembly, craddle x
42 N325-0083-SER assembly, lid handle x
68286 vinyl cover - grill head only ac
68287 vinyl cover - for PRO285 - stand ac
56080 griddle ac
PRO285-STAND-AU oponal cart and shelves for PRO285 ac
Parts List
x - standard ac - accessory
www.napoleongrills.com
18
Parts Diagram
39
24
25
10
14
23
13
10
10
1
10
40
10
10
41
28
10
31
29
32
27
11
33
22
21
20
18
42
21
22
12
7
8
38
3
5
4
9
6
9
6
3
41
10
7
34
34
37
37
28
8
37
8
36
35
35
36
28
8
17
19
15
16
19
30
2
26
28
26
26
26
28
28
28
39
40
42
ITEM NO.
PART NUMBER
DESCRIPTION
QTY.
1
N135-0045
CASTING, BASE
1
2
N500-XX49
PLATE, DRIP
1
3
N570-0104
SCREW, #10-24x3/8"
HEX WSHR HEAD STN STL
4
4
N475-0319
PANEL, CONTROL
1
5
N432-0020
MANIFOLD TUBE
1
6
N570-0078
SCREW, M4 X 8MM PAN HD PHIL ZINC
4
7
N585-0089
SHIELD HEAT CONTROL PANEL
1
8
N570-0076
SCREW, #8x1/2 HI/LO TAPPING PHIL FLAT HD 8
9
N380-0019A
KNOB, CONTROL
2
10
N570-0073
SCREW, 1/4-20 X 3/8 S/S HEX WASHER HD
8
11
N710-0079
PAN, DRIP
1
12
Z570-0033
SCREW,10-24 X 1/2" STN STEEL
4
13
N100-0047
1
14
N100-0046
BURNER TUBE
1
15
N325-XX83
HANDLE, LID
1
16
N655-0179
SUPPORT, LID HANDLE LEFT
1
17
N655-0180
1
18
TEMP-F002
1
19
Z570-0029
SCREW, 10-24 35 MM STN STL PAN HEAD 2
20
N135-XX46-F001
CASTING, PRO285 LID
1
21
N485-XX23
PIN, CLEVIS 6x20MM
2
22
N485-0021
PIN, HAIRPIN COTTER
4
23
N080-0302
CROSS LIGHTING TUBE
1
24
N305-0087 IGS
1
25
N305-0088 IGS
1
26
N080-0303
BRACKET, FOLDING LEG
4
27
N160-0025
CLIP, FLEX LINE
1
28
N570-0068
SCREW, 14 X 1/2 STN STL HEX HD AB
13
29
N080-PROTO2
BRACKET, FLEX LINE TO REG HOSE
1
30
N080-REGHOSE
BRACKET, FLEX LINE TO REG HOSE
1
31
N255-0057
FITTING, UNION 3/8" MF TO 1/4"MF
1
32
W450-0027
NUT, 1/2-20 BRASS
1
33
REGULATOR HOSE FOR MANUAL
1
34
N075-0091
2
35
N325-0088
2
36
N325-0089
2
37
N510-0013-MC
BUMPER, RECTANGULAR BLK SILICONE
4
38
FLEX LINE-PRO285-BETTER
1
54
N485-0023
PIN, CLEVIS 6x20MM
2
55
EURO REGULATOR 701-790-1042 1
56
HOSE CLAMP FOR N530-0035
2
57
N530-0035 REGULATOR NUT
1
8

www.napoleongrills.com
19
Notes

N415-0309-AU
Napoleon products are protected
by one or more U.S. and Canadian
and/or foreign patents or patents
pending.