Loading ...
Loading ...
Loading ...
18
1
2
3
4
5
6
7
8
9
10
11
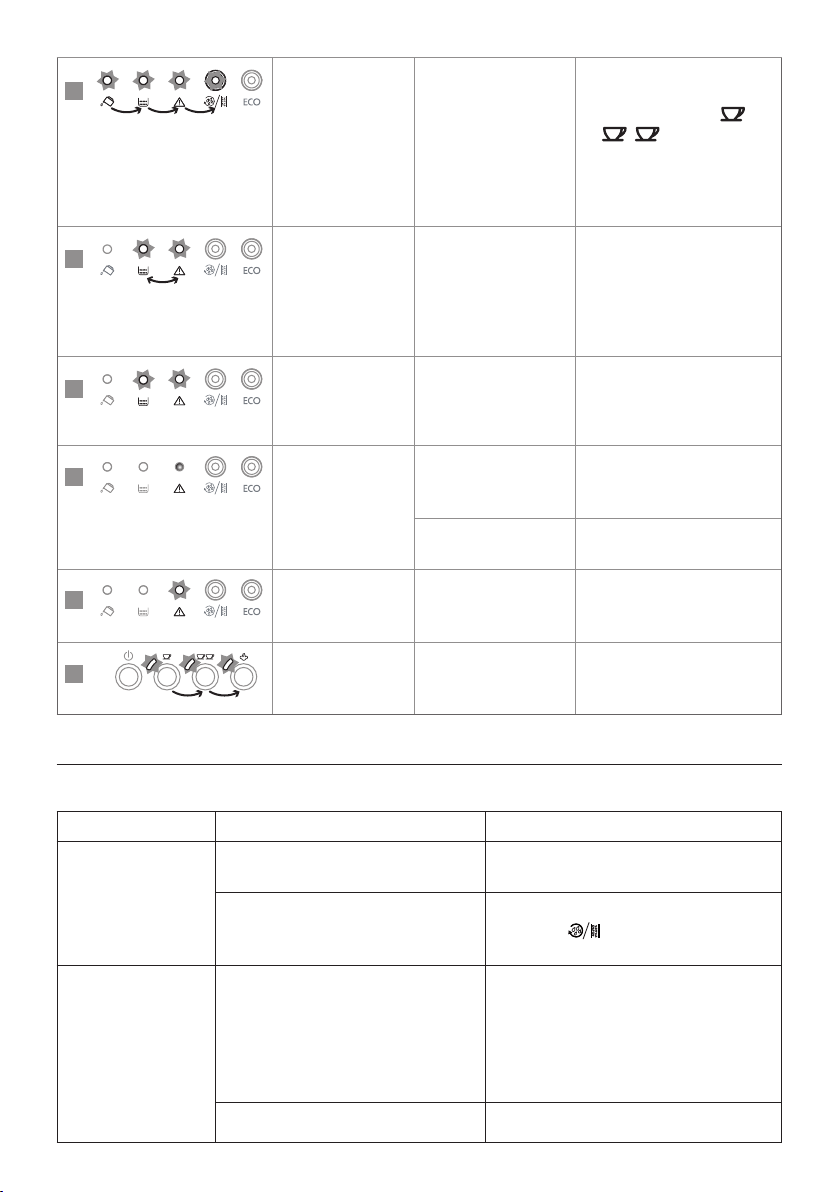
There is an unusual
noise and the lights
ash alternately
The infuser has not been
replaced after cleaning
Leave the service door (A16) closed
and the infuser (A20) out of the
coee maker. Press the
(B3)
or (B5) buttons toge-
ther until the four lights go o.
Only when all four lights are o
can the door be opened and the
infuser inserted.
1
2
3
4
5
6
7
8
9
10
11
The lights ash
alternately
The coee maker has
just been turned on, the
infuser is not inserted cor-
rectly and the service door
is not correctly closed.
Press the word PUSH on the infuser
(A20)until it clicks into place.
Make sure the two red buttons
have snapped out.
Close the service door and turn the
appliance on again
1
2
3
4
5
6
7
8
9
10
11
The lights ash The pre-ground coee
funnel is clogged
Empty the funnel (A8) with the
help of a brush as described in the
section “13.7 Cleaning the pre-
ground coee funnel”.
1
2
3
4
5
6
7
8
9
10
11
The light (B13) is on
steadily
The infuser has not been
replaced after cleaning.
Insert the infuser (A20) as descri-
bed in the paragraph “13.8 Clea-
ning the infuser”
The inside of the appliance
is very dirty
Clean the appliance thoroughly
1
2
3
4
5
6
7
8
9
10
11
The light ashes The service door is open If you cannot close the door (A16),
make sure the infuser (A20) is cor-
rectly inserted
1
2
3
4
5
6
7
8
9
10
11
The lights ash
alternately
The coee maker has been
switched on with the steam
knob in the open position
You must turn the steam/hot
water knob (B10) to position 0
19. TROUBLESHOOTING
Below is a list of some of the possible malfunctions.
If the problem cannot be resolved as described, contact Customer Services.
PROBLEM POSSIBLE CAUSE SOLUTION
The coee is not hot The cups were not preheated. Warm the cups by rinsing them with hot water
(N.B. you can use the hot water function).
The infuser has cooled down because 2/3 mi-
nutes have elapsed since the last coee was
made.
Before making coee, heat the infuser (A20) by
pressing the
button (B14).
The coee is weak or not
creamy enough.
The coee is ground too coarsely. Turn the grinding adjustment knob (A1) one click
anticlockwise towards “1” while the coee mill is in
operation (g. 7). Continue one click at a time until
coee delivery is satisfactory. The eect is only visi-
ble after delivering 2 coees (see the section “10.3
Adjusting the coee mill”).
The coee is unsuitable. Use pre-ground coee for espresso coee makers
Loading ...