Owner Manual Microwavesz
Getting to know your appliance
In this chapter, we will explain the displays and controls. You will also find out about the various functions of your appliance.
Note: Depending on the appliance model, individual details and colours may differ.
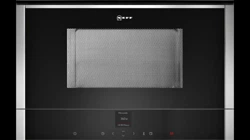
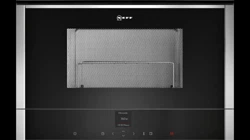
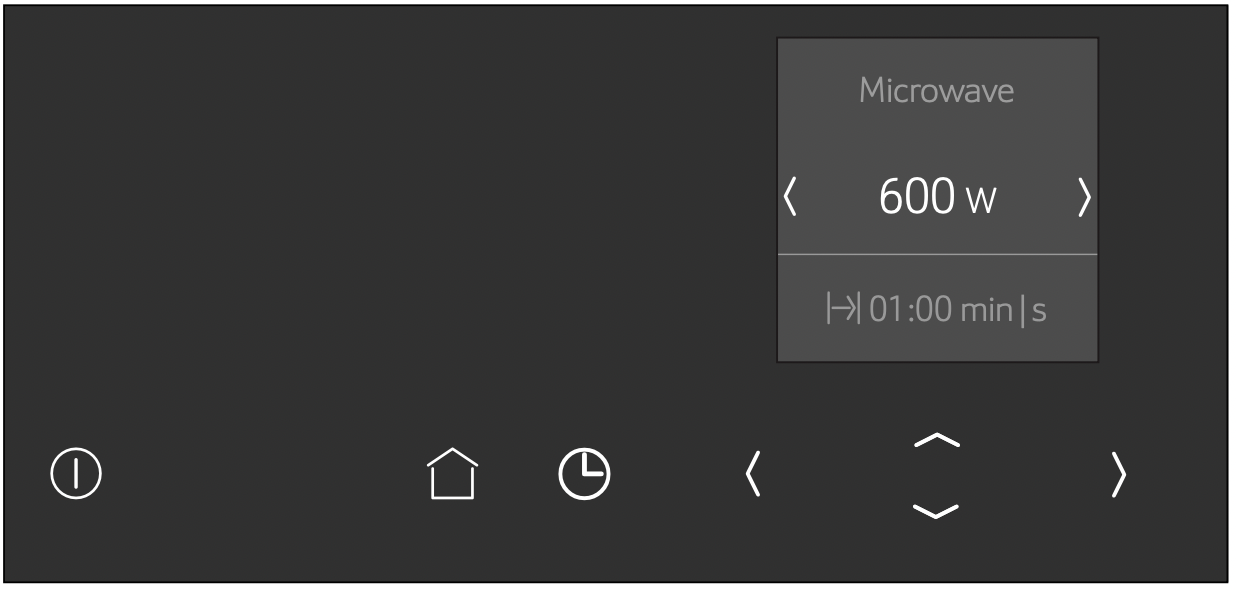
Control panel
In the control panel, set the appliance's different functions. The current settings are shown in the display.
The overview shows the control panel when the appliance is switched on with a selected operating mode.
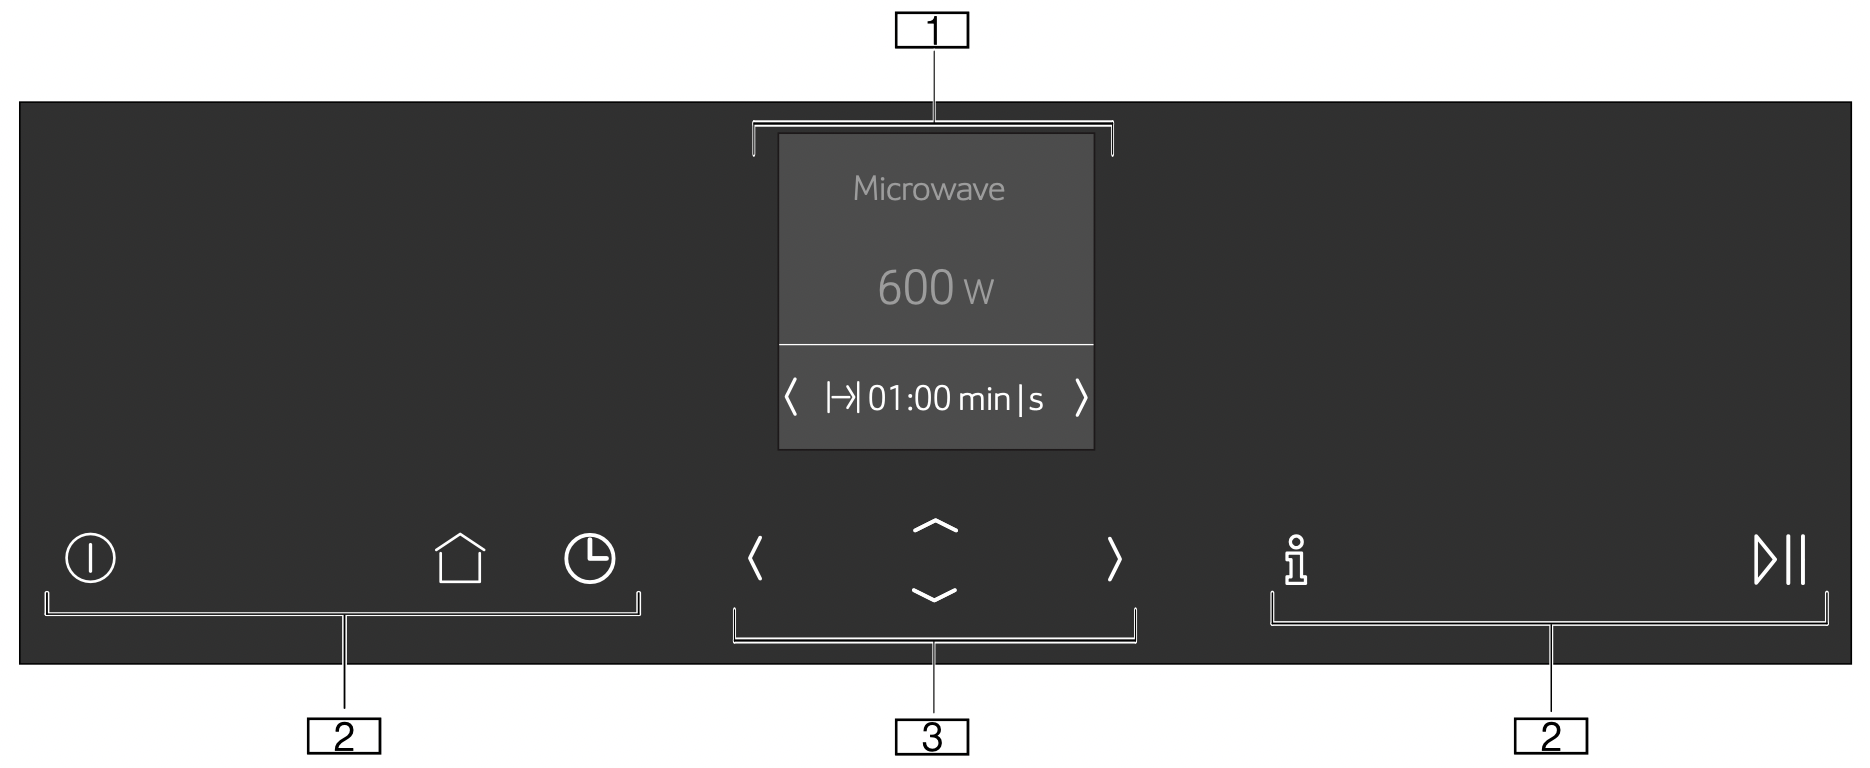
- Display
- Touch buttons
- ShiftControl control
Controls
Use the controls to set your appliance simply and directly.
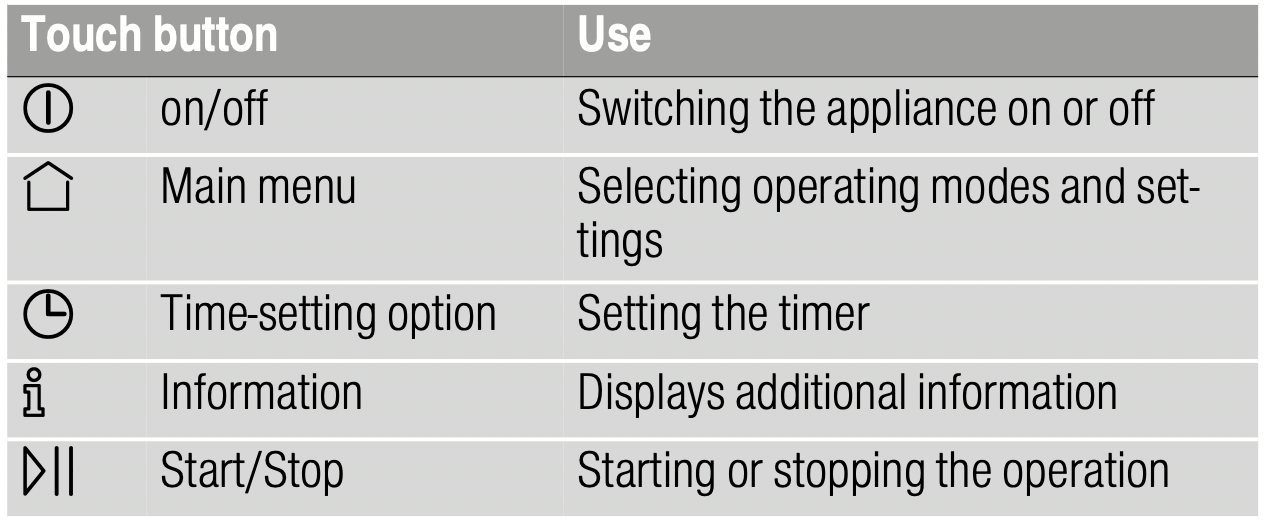
Touch buttons
There are sensors under the touch buttons. Touch on the corresponding touch button to select a function.
ShiftControl control
Use the ShiftControl control to navigate through the lines in the display and select the settings. Settings that you can change are shown by the ( ... ) arrows.
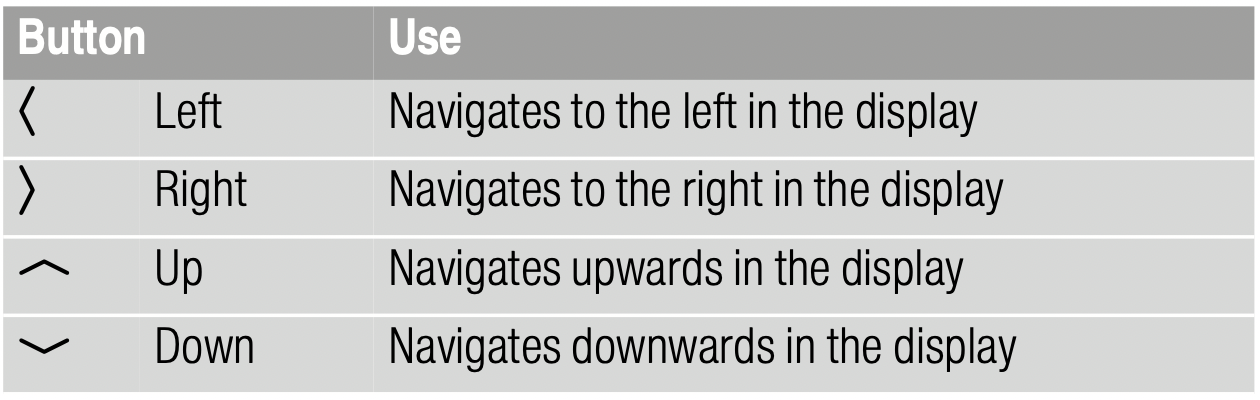
Note: You can also scroll through the settings values quickly by pressing and holding a button. As soon as you release the button, you stop scrolling through the values.
Main menu
Touch the  touch button to access the main menu.
Further information
If the  touch button lights up, information can be displayed. Touch the
  touch button to do this. The information is displayed for a few seconds.
Accessories
The following accessories are included with your appliance:
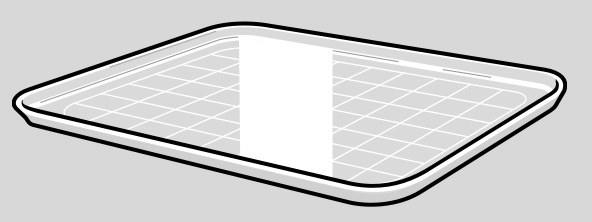
Glass tray
For defrosting and cooking food.
Only use original accessories provided by your appliance manufacturer. They are specially adapted for your appliance.
You can buy accessories from the after-sales service, from specialist retailers or online.
Note: Microwaveable ovenware can be placed on the cooking compartment floor (level 0).
Cooking compartment functions
The functions in the cooking compartment make your appliance easier to use. This, for example, enables the cooking compartment to be well lit and a cooling fan to prevent the appliance from overheating.
Interior lighting
When you open the appliance door, the interior lighting switches on. If the door remains open for longer than around five minutes, the cooking compartment lighting switches off again. When the door is closed and opened again, the cooking compartment lighting switches on again.
For all operating modes, the cooking compartment lighting switches on as soon as the operation is started. When the operation has finished, the lighting switches off.
Note: Opening the appliance door during operation: The operation is suspended. After closing the door, press the start/stop  button briefly. The operation will then continue.
Cooling fan
The cooling fan switches on as required. The hot air escapes above the door.
The cooling fan may continue to run for a certain time after the operation.
Caution! Do not cover the ventilation slots. Otherwise, the appliance may overheat.
Notes: The appliance remains cool during microwave operation. Despite this, the cooling fan will still switch on. The fan may run on even when the microwave operation has ended.
Operating the appliance
You have already learnt about the controls and how they work. Now we will explain how to set your appliance. You will learn about what happens when you switch the appliance on and off, and how to select the operating mode.
Switching the appliance on and off
Before you are able to set the appliance, you must switch it on.
Note: The timer can also be set when the appliance is switched off. Some displays and notes remain visible in the display after the appliance has been switched off.
Switch off your device when it is not being used. If no settings are applied for a long time, the appliance switches itself off automatically.
Switching on the appliance
Use the  touch button to switch on the appliance.
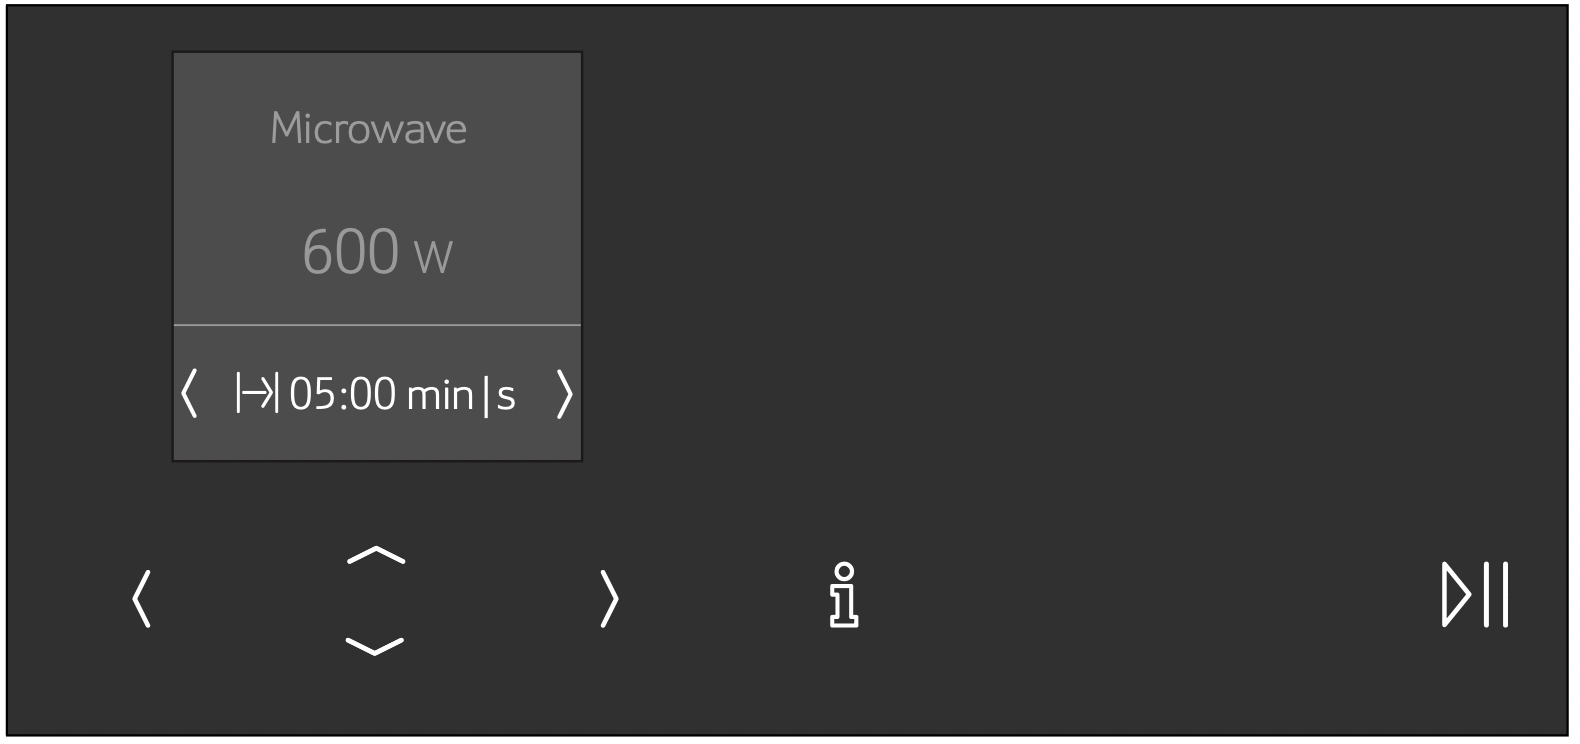
The Neff logo appears in the display, followed by the maximum microwave output.
The appliance is ready to use.
You can find out how to set the operating modes in the individual chapters.
Switching off the appliance
Use the  touch button to switch off the appliance.
Any functions that may be running are cancelled.
The time and date appear in the display.
Note: You can set whether the time and date should be displayed when the device is switched off in the basic settings. "Basic settings" on page 14
Operation
Some operating steps are the same for all operating modes. In the following, you can learn about the basic operating steps.
Starting the operation
You must use the  touch button to start each operation.
After the operation starts, your settings are shown in the display.
Note: If the operation is paused due to the appliance door being opened, the operation must be restarted using the  touch button after the door has been closed.
Pausing the operation
Use the  touch button to pause and restart the operation.
Touch the  touch button to delete the settings.
Notes
- Opening the appliance door also pauses the operation.
- The fan may continue to run after an operation is paused or cancelled.
Selecting an operating mode
After the appliance is switched on, the default operating mode is displayed. You can start this setting immediately.
If you want to select a different operating mode, you can find detailed descriptions of these modes in the appropriate chapters.
The following always applies:
- Touch the
 touch button.
The operating modes are shown.
- Use the
 or
or  touch button to select the operating mode.
- Use the
 touch button to navigate to the next line.
- Use the
 or
or  touch button to select the setting.
Tip: Additional settings are available, depending on the operating mode. For each additional setting, use the  touch button to navigate to the next lines. Use the
  or
or  touch button to select the setting.
- Touch the
 touch button.
The appliance starts the operation.
Note: If you want to leave the current setting, you can navigate back to the operating modes level using the  touch button.
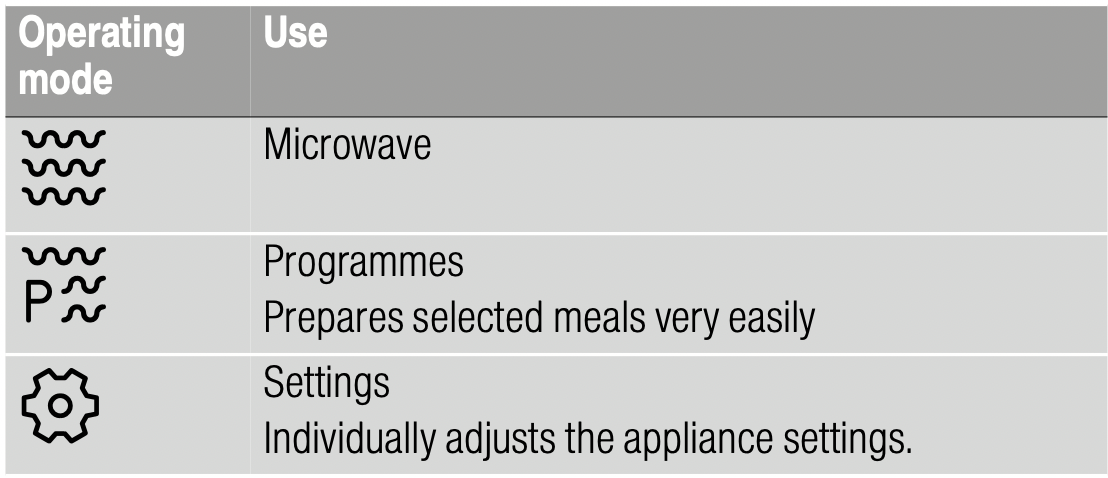
Microwave
You can use the microwave to cook, heat up or defrost food quickly.
To ensure optimum use of the microwave, please observe the notes on cookware and familiarise yourself with the data in the application tables at the end of the instruction manual. ~ "Tested for you in our cooking studio" on page 18
Cookware
Not all cookware is microwavable. So that your food is heated and the appliance is not damaged, only use microwavable cookware.
Suitable cookware
Heat-resistant cookware made of glass, glass ceramic, porcelain, ceramic or heat-resistant plastic are suitable. These materials allow microwaves to pass through.
You can also use serving dishes. This saves you having to transfer food from one dish to another. You should only use cookware with decorative gold or silver trim if the manufacturer guarantees that they are suitable for use in microwaves.
Unsuitable cookware
Metal cookware is unsuitable. Metal does not allow microwaves to pass through. Food in covered metal containers will remain cold.
Caution! Creation of sparks: Metal – e.g. a spoon in a glass must be kept at least 2 cm from the cooking compartment walls and the inside of the door. Sparks can irreparably damage the glass on the inside of the door.
Cookware test
Never switch on the microwave unless there is food inside. The short cookware test is the only exception to this rule.
Perform the following test if you are unsure whether your cookware is suitable for use in the microwave.
- Heat the empty cookware at maximum power for ½ to 1 minute.
- Check the temperature of the cookware during this time.
The cookware should remain cold or warm to the touch.
The cookware is unsuitable if it becomes hot or sparks are generated.
In this case, stop the test.
Warning – Risk of burns! The accessible parts become very hot when in operation. Never touch hot parts. Keep children at a safe distance.
Microwave power settings
The following microwave power settings are available.
The microwave power settings do not always correspond to the exact wattage that the appliance uses.
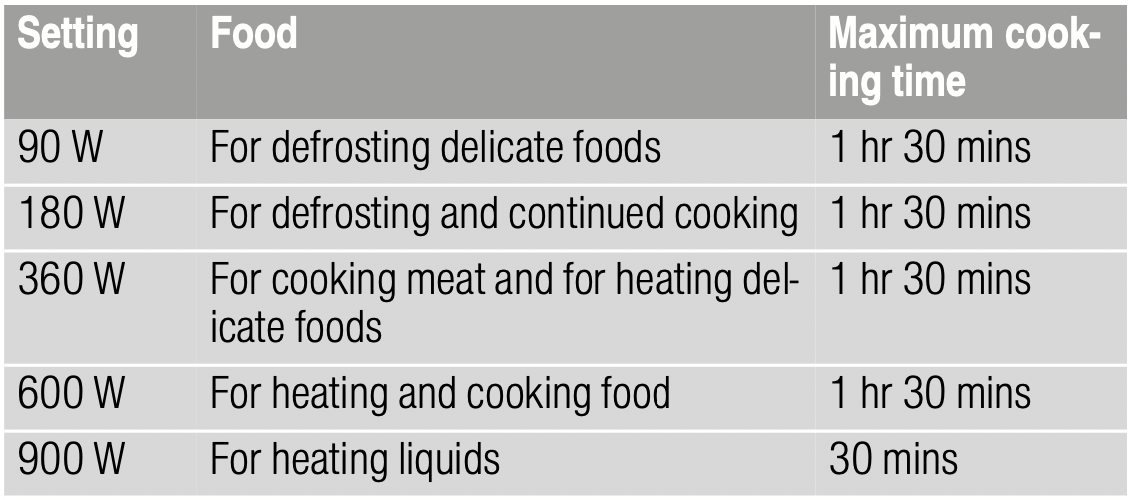
Default value: The appliance provides a default cooking time for each microwave output setting. You can accept this value or change it in the appropriate area.
The maximum setting is for heating liquids. After a certain period, the microwave's power output is reduced to below maximum to protect the appliance.After a cooling period, the microwave's full power will be available once more.
Setting the microwave
Example: Microwave output 600 W, cooking time 5 minutes.
- Touch the
 touch button.
The appliance is ready to use. The maximum microwave output is displayed as the default value in the display. You can change this at any time.
- Use the
 or
or  touch button to select the required microwave output.
The microwave output and a default cooking time are shown in the display.
- Touch the
 touch button.
The cooking time can be set.
- Use the
 or
or  touch button to set the required cooking time.
- Touch the
 touch button.
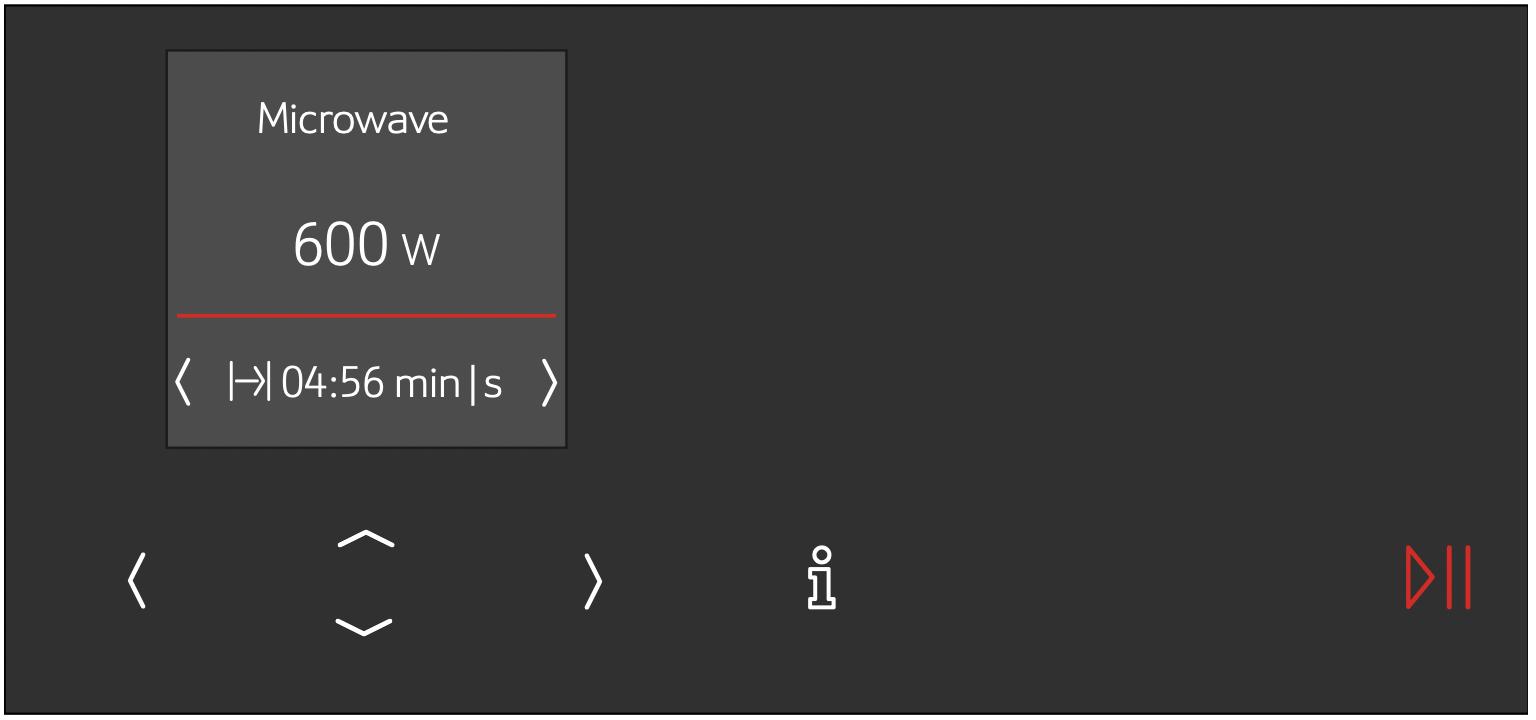
The appliance starts the operation. The cooking time counts down on the display.
Notes
- When you switch on the appliance, the highest microwave output always appears in the display as a suggestion.
- If you open the appliance door when the appliance is in use, the fan may continue to run.
Cooking time elapsed
An audible signal sounds.
Operation has finished.
Stopping the audible signal early:
Touch the  touch button.
Note: After touching the  touch button, the timer function appears; after a short time, it automatically disappears. If you touch the
  touch button again, the timer function will disappear instantly.
Use the  touch button to switch off the appliance.
Changing the cooking time
This can be done at any time.
Use the  or
or  touch button to change the cooking time. The operation continues.
Changing the microwave output
This can be done at any time.
Use the  touch button to change the microwave output.
Use the  or
or  touch button to set the required microwave output.
The cooking time remains unchanged. The operation continues.
Note: If the set cooking time exceeds the maximum time for the microwave output of 900 W, it is reduced automatically. The operation stops. Use the  touch button to start the operation.
Timer
You can use the timer as a kitchen timer. The timer runs alongside other settings. You can set it at any time, even if the device is switched off. It has its own audible signal so that you can tell whether it is the timer or a cooking time which has elapsed.
Setting the timer
The maximum setting is 24 hours.
The higher the value, the longer the time intervals.
- Touch the
 touch button.
The timer is displayed.
- Use the
 or
or  touch button to set the timer duration.
- Use the
 touch button to start.
Note: The timer will also start automatically after a few seconds.
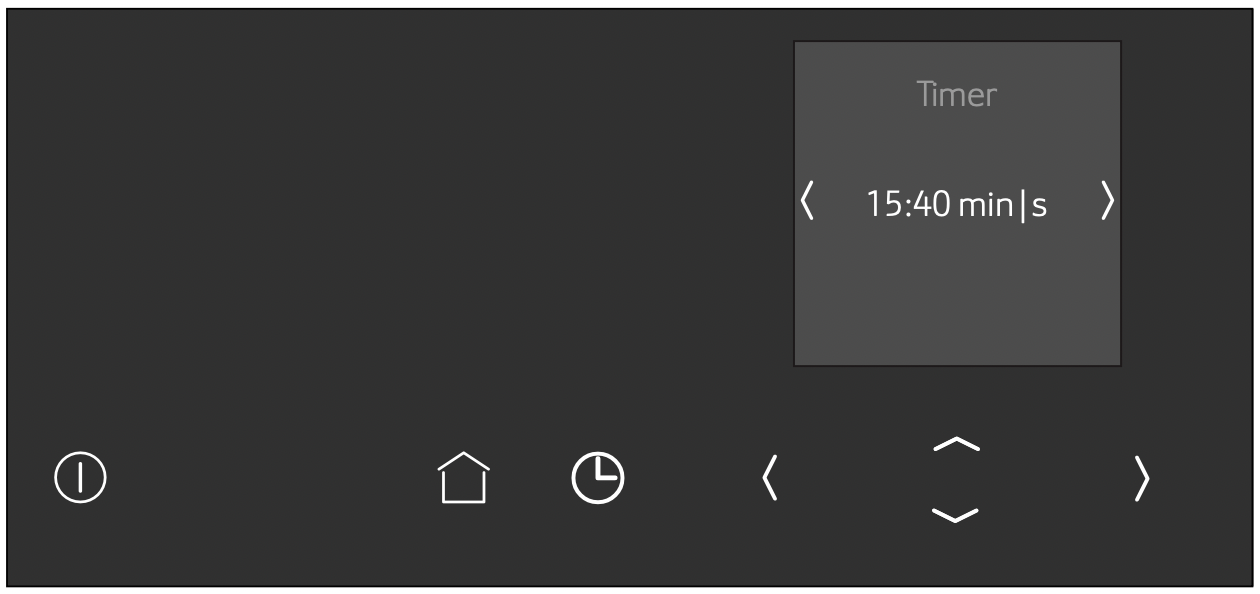
The timer duration counts down. The display switches back after a short time. If an operating mode is running, a timer symbol is also shown on the display. If the appliance is switched off, the time duration and a timer symbol are shown on the display.
An audible signal sounds once the timer duration has come to an end. Use the  touch button to cancel the audible signal early.
Notes
- The timer remains visible in the display if the appliance is switched off.
- If an operating mode is running, touch the
 touch button to display the timer. The timer duration is displayed for a few seconds and can be altered.
Changing the timer
Touch the  touch button to change the timer duration. The timer duration is displayed – touch the
  or
or  touch button to change it.
Cancelling the timer
If you want to cancel the timer, reset the duration on the timer to zero. Once the change has been applied, the symbol is no longer lit up.
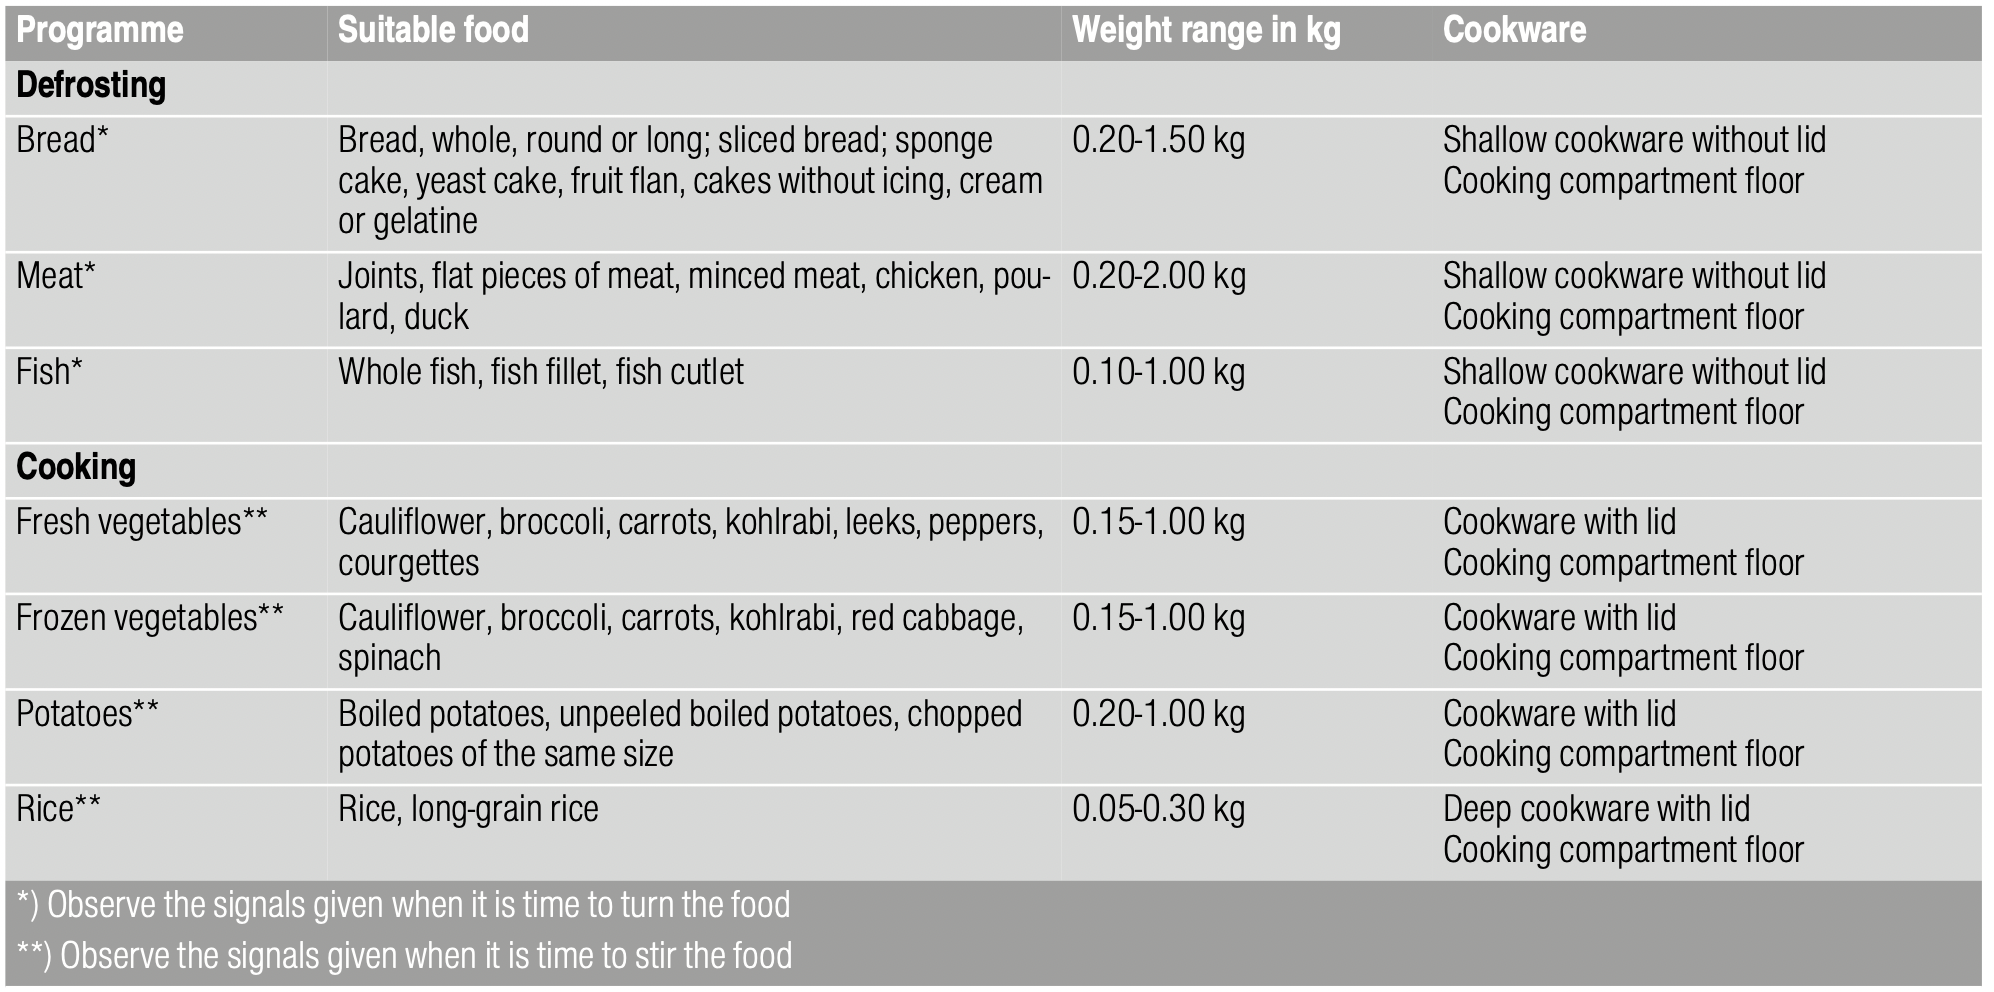
Programmes
You can prepare food really easily using the various programmes. You select a programme and enter the weight of your food. The program then applies the most suitable settings.
Setting a programme
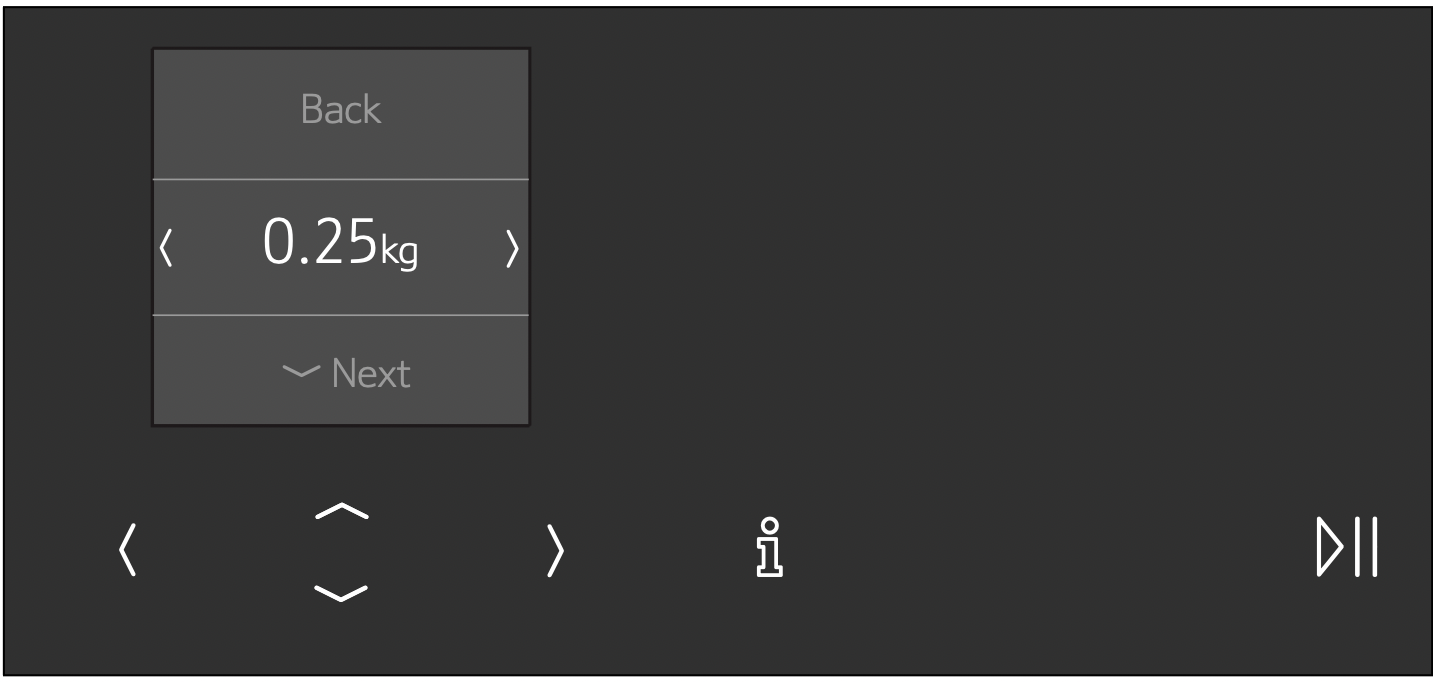
Example: "Defrost bread" programme, weight 0.25 kg.
- Touch the touch button.
The appliance is ready to use.
- Touch the touch button.
The operating modes are shown.
- Use the or touch button to select the
 operating mode.
- Touch the touch button.
The first programme appears in the display.
- Use the or touch button to set the required programme.

- Touch the touch button.
The required programme is selected. The default value for the weight appears in the display.
- Use the or touch button to set the required weight.
- Touch the touch button.
The preparation instruction is displayed.
- Touch the touch button.
The appliance starts the operation. The time counts down on the display.
Notes
- The cooking time is calculated by the programmes.
- For some dishes, the display provides instructions for turning or stirring during preparation. Follow the information provided. Opening the appliance door pauses the operation. After closing the appliance door, restart the operation. If you do not turn or stir the dish, the programme runs as normal until it reaches the end.
Information about the programmes
Place the food in the cold cooking compartment.
Take the food out of its packaging and weigh it. If it is not possible to enter the exact weight, you should round it up or down.
For the programmes, always use microwavable cookware, for example made of glass or ceramic. Follow the notes on cookware in the programme table.
A table of suitable types of food with appropriate weight ranges and the accessories required can be found in the section after the notes.
It is not possible to set a weight outside the weight range.
Defrosting:
- As far as possible, freeze and store food flat and in portion-sized quantities at -18 °C.
- Place the frozen food in flat cookware, such as a glass or porcelain plate.
- After defrosting in the appliance, leave the food to continue defrosting for a further 15 to 90 minutes until it reaches an even temperature.
- Bread should only be defrosted in the required amounts, as it quickly becomes stale.
- Liquid will be produced when defrosting meat or poultry. Drain off this liquid when turning meat and poultry and under no circumstances use it for other purposes or allow it to come into contact with other foods.
- After turning, remove any minced meat that has already defrosted.
- Whole poultry should be placed in the cookware breast-side down and poultry portions skin-side down.
Vegetables:
- Fresh vegetables: Cut into pieces of an equal size.
Add one tablespoon of water for every 100 g vegetables.
- Frozen vegetables: This programme is only suitable for blanched, not pre-cooked vegetables. It is not suitable for frozen vegetables in cream sauce. Add 1 to 3 tablespoons of water. Do not add water to spinach or red cabbage.
Potatoes:
- Boiled potatoes: Cut into pieces of an equal size.
Add two tablespoons of water per 100 g of potatoes, and salt to taste.
- Unpeeled boiled potatoes: Use potatoes of the same thickness. Wash the potatoes and prick the skin. Place the wet potatoes in a dish. Do not add water.
Rice:
- Do not use brown or boil-in-the-bag rice.
- Add two to two and a half times the amount of water to the rice.
- For very small portions, use slightly more water.
Resting time
Some dishes need to rest in the cooking compartment after the programme has ended.
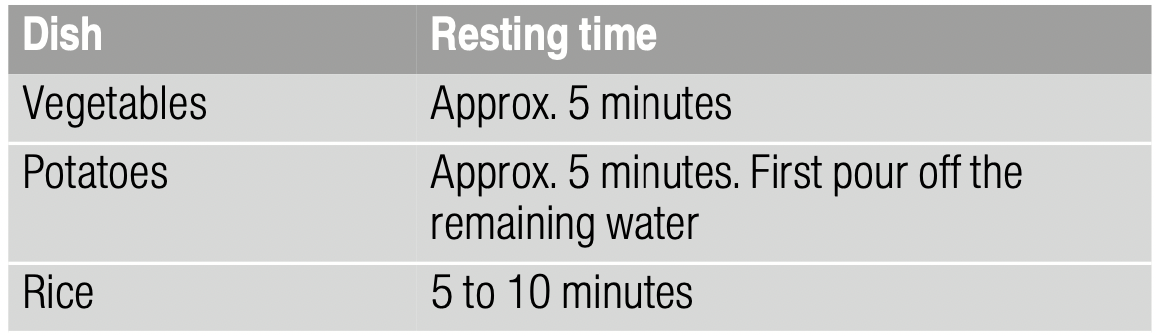
Programme table
Basic settings
There are various settings available to you in order to help use your appliance effectively and simply. You can change these settings as required.
Changing settings
- Touch the touch button.
- Touch the touch button.
- Use the or touch button to select the "
 settings".
- Use the touch button to navigate to the next line.
- Use the or touch button to select the setting.
- If necessary, use the touch button to navigate to the next line.
- Use the or touch button to select the setting.
- Touch the touch button.
- To save the setting, use the touch button to select "Save".
To discard the setting, use the touch button to select "Discard".
List of basic settings
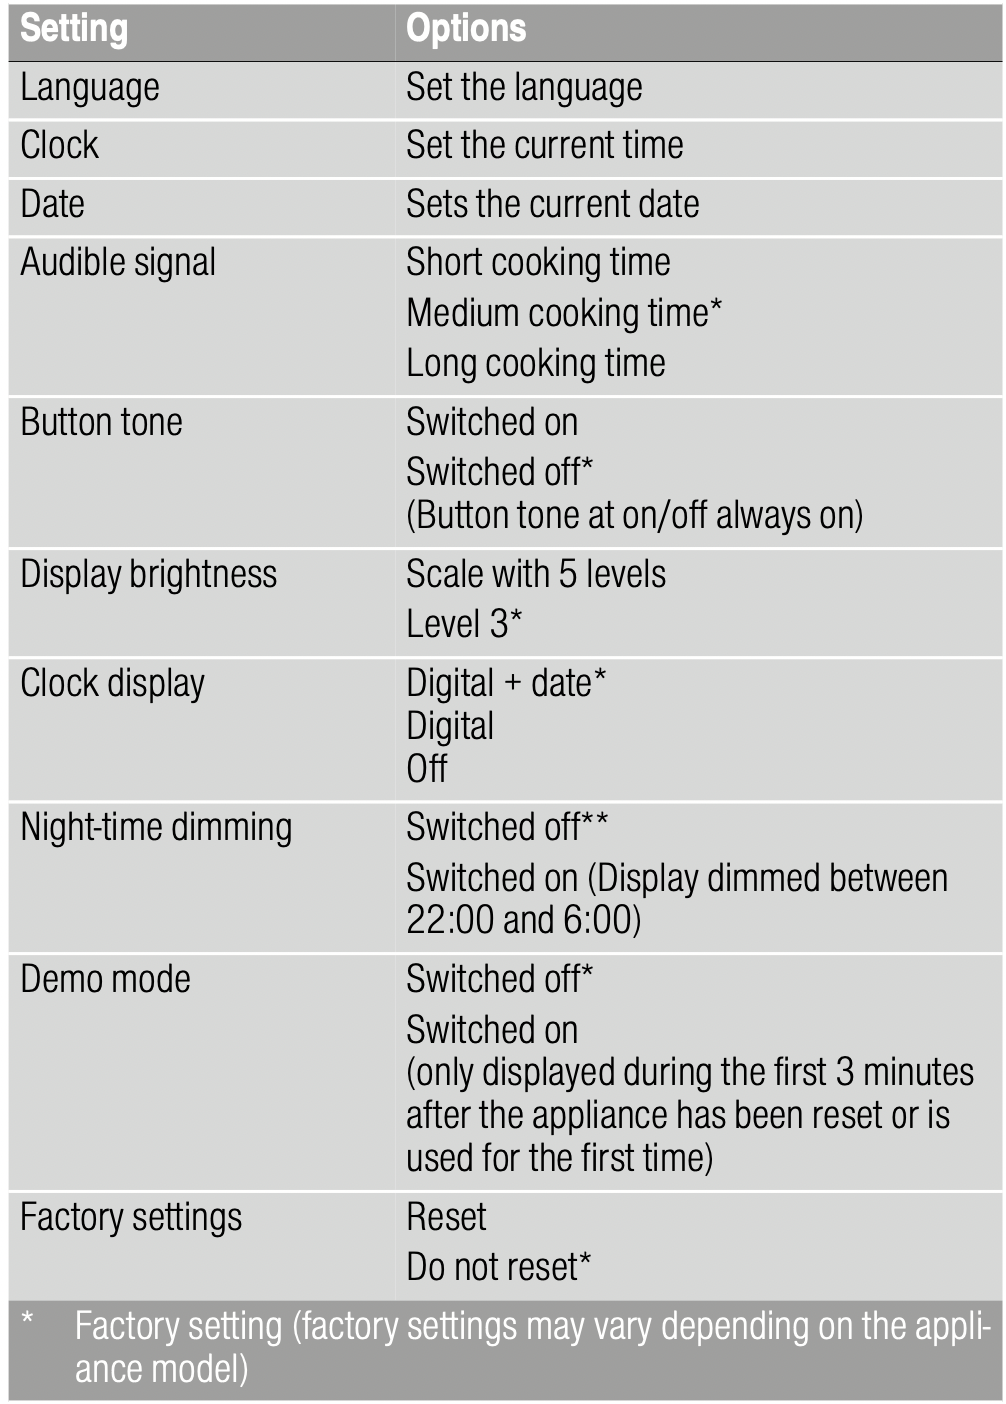
Note: Changes to the language, button tone and display brightness settings take effect immediately. All other changes take effect after the settings have been saved.
Power cut
The changes you make to the settings are retained even after a power cut.
Only the settings pertaining to the initial use of the appliance need to be implemented once again following a power cut.
Changing the time
If you want to change the time, for example from summer to winter time, you have to change the basic setting.
- Touch the touch button.
- Touch the touch button.
- Use the or touch button to select the "
 settings".
- Use the touch button to navigate to the next line.
- Use the or touch button to select the time.
- If necessary, use the touch button to navigate to the next line.
- Use the or touch button to change the time.
- Touch the touch button.
- To save the setting, use the touch button to select "Save".
To discard the setting, use the touch button to select "Discard".
Cleaning
With good care and cleaning, your appliance will retain its appearance and remain fully functioning for a long time to come. We will explain here how you should correctly care for and clean your appliance.
Warning – Risk of burns! The appliance becomes very hot. Never touch the interior surfaces of the cooking compartment or the heating elements. Always allow the appliance to cool down. Keep children at a safe distance.
Warning – Risk of electric shock! Do not use any high-pressure cleaners or steam cleaners, which can result in an electric shock.
Warning – Risk of injury! Scratched glass in the appliance door may develop into a crack. Do not use a glass scraper, sharp or abrasive cleaning aids or detergents.
Note: Unpleasant odours, for example after fish has been prepared, can be removed very easily. Add a few drops of lemon juice to a cup of water. Always place a spoon in the container to prevent delayed boiling. Heat the water for 1 to 2 minutes at maximum microwave output.
Cleaning agent
To ensure that the different surfaces are not damaged by using the wrong cleaning agent, observe the information in the table.
Do not use:
- Harsh or abrasive cleaning agents.
- Metal or glass scrapers to clean the door panels.
- Metal or glass scrapers to clean the door seal.
- Hard scouring pads or sponges.
- Cleaning agents with a high alcohol content.
Wash new sponge cloths thoroughly before use.
|
Area
|
Cleaning agent
|
|
Appliancefront
|
Hot soapy water: Clean using a dish cloth and then dry with a soft cloth. Do not use a metal or glass scraper for cleaning.
|
|
Display
|
Wipe down using a microfibre cloth or a slightly damp cloth. Do not wipe with a wet cloth.
|
|
Stainless steel
|
Hot soapy water: Clean using a dish cloth and then dry with a soft cloth. Remove flecks of limescale, grease, starch and albumin (e.g. egg white) immediately. Corrosion can form under such flecks. Special stainless-steel cleaning agents are available from the after sales service or from specialist retailers.
|
|
Cooking compartment made of stainless steel
|
Hot soapy water or vinegar solution: Clean using a dish cloth and then dry with a soft cloth. Do not use oven spray or any other aggressive oven cleaners or abrasive materials. Scouring pads, rough sponges and pan cleaners are also unsuitable. These items scratch the surface. Allow the interior surfaces to dry thoroughly.
|
|
Door panels
|
Glass cleaner: Clean with a dish cloth. Do not use a glass scraper.
|
|
Door seal
Do not remove.
|
Hot soapy water: Clean with a dish cloth and do not scour. Do not use a metal or glass scraper for cleaning.
|
Troubleshooting
If a fault occurs, there is often a simple explanation. Before calling the after-sales service, please refer to the fault table and attempt to correct the fault yourself.
Tip: If a dish does not turn out exactly as you wanted, refer to the following chapter, where you will find lots of tips and notes relating to the optimum settings. "Tested for you in our cooking studio" on page 18
Warning – Risk of electric shock! Incorrect repairs are dangerous. Repairs may only be carried out and damaged power cables replaced by one of our trained after-sales technicians. If the appliance is defective, unplug the appliance from the mains or switch off the circuit breaker in the fuse box. Contact the after-sales service.
|
Fault
|
Possible cause
|
Remedy/information
|
|
The appliance does notwork or the display is not working
|
The plug is not plugged into the mains
|
Connect the appliance to the electricity supply
|
|
Power cut
|
Check whether other kitchen appliances are working
|
|
The circuit breaker is faulty
|
Check in the fuse box to make sure that the fuse for the appliance is OK
|
|
Faulty operation
|
Switch off the circuit-breaker for the appliance in the fuse box and switch it back on after approx. 60 seconds
|
|
The appliance cannot be started
|
The appliance door is not fully closed
|
Close the appliance door
|
|
Food does not heat up.
The 6 symbol for demo mode is shown in the display.
|
The appliance is in demo mode
|
Deactivate demo mode in the basic settings.
To do this, briefly disconnect the appliance from the mains (switch off the household fuse or the circuit breaker in the fuse box). Then deactivate demo mode in the basic settings within 3 minutes.
|
|
The interior lighting is not working
|
The interior lighting is faulty
|
Call the after-sales service
|
|
Error message "Exxx"*
|
|
If an error message is displayed, switch the appliance off and on again; if the message disappears, it was a one-off problem. If the fault occurs again or the error message is still displayed, please contact the after-sales service and provide the fault code.
|
|
* Special features:
Error message "E0532": Open and close the appliance door.
Error message "E6501": Switch off the appliance. Wait for 10 minutes. Switch the appliance on again.
|