Loading ...
Loading ...
Loading ...
16
4. Prepare measurement
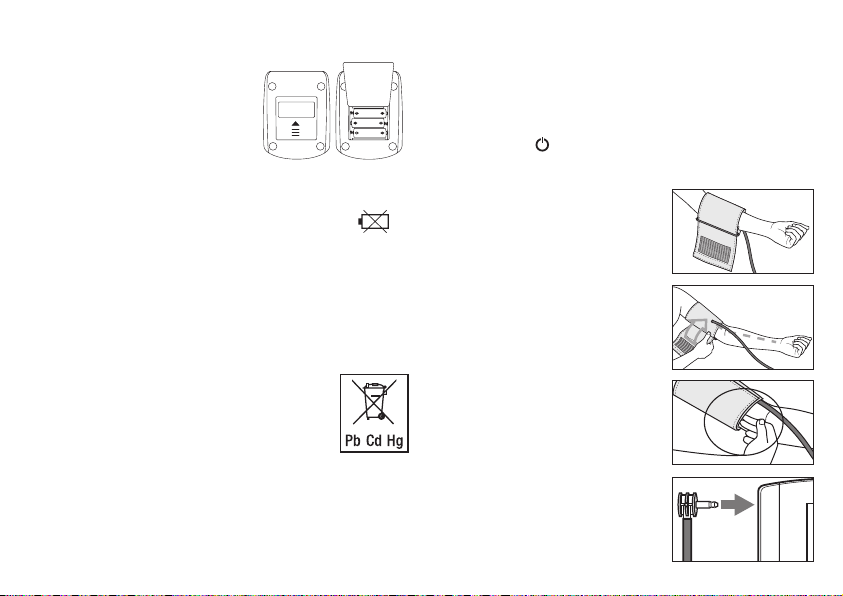
Inserting battery
•
Remove the battery cover from the
back of the monitor.
•
Insert four AA 1.5 V alkaline
batteries. Making absolutely
sure that you insert them with
the correct polarity as marked.
Never use rechargeable bat teries.
•
Replace the battery cover carefully.
If 4 warning tones have been sounded and the symbol
appears simultaneously on the display, it is no longer possible
to perform a measurement and all batteries must be replaced.
Once the batteries have been removed from the device, the
time must be set again.
The empty, completely flat batteries must be disposed of
through specially designated collection boxes, recycling points
or electronics retailers. You are legally required to dispose of
the batteries.
The codes below are printed on batteries contain-
ing harmful substances:
Pb = Battery contains lead, Cd = Battery contains
cadmium, Hg = Battery contains mercury.
Setting date and time
You should set the date and time without fail. Otherwise, you
will not be able to save your measured values correctly with
a date and time and to access them again later. The time is
shown in 12-hour format i.e. the time from 13:00 is displayed
as 01:00 PM.
Proceed as follows to set the date and time:
•
Confirm twice using the SET button.
•
Use the + or - buttons to first set the month 1–12, and then
confirm using the SET button.
•
Set the day/hour/minute and confirm each using the SET
button.
Press the button
to exit the settings mode.
5. Measuring blood pressure
Positioning cuff
Fit the cuff round your bare left up-
per arm. Blood circulation in the
arm should not be restricted by tight
clothing or other objects.
The cuff should be placed on the
upper arm so that the lower edge is 2
to 3 cm above the bend of the elbow
and above the artery. The tube should
be in line with the centre of the palm.
Now place the free end of the cuff
snugly, but not too tightly, around the
arm, and fix it with the Velcro
fastener. The cuff should be fitted
tight enough to allow just two fingers
to fit beneath the cuff.
Insert the cuff tubing into the socket
for the cuff attachment.
4 x AA (LR06) 1,5 V
Loading ...
Loading ...
Loading ...