Documents: Go to download!
User Manual
- User Manual - (English)
- Quick Guides
- Connections
- Peripherals
- Smart Features
- TV Viewing
- Picture and Sound
- System and Support
- Troubleshooting
- Precautions and Notes
- Accessibility Guidance
Table of contents
User manual 40" Class N5200 Smart Full HD TV Samsung UN40N5200AFXZA
Quick Guides
Using Smart Hub
Connect to Smart Hub for apps, games, movies, and more.
Enjoy the multiple functions provided by Smart Hub simultaneously on a single screen.
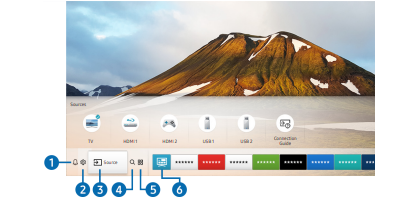
When you press the button on your remote control, you can use the following functions and features.
Notification
- You can view a list of notifications for all events that occur on your TV. A notification appears on the screen when it is time to broadcast a scheduled program or when an event occurs on a registered device.
Settings
- When the focus is moved to the icon, a list of quick settings icons appears above the top of the menu. You can quickly set frequently used functions by clicking the icons.
Source
- You can select an external device connected to the TV.
Search
- You can search for channels, programs, movie titles, and apps from Smart Hub.
APPS
You can enjoy a wide range of content including news, sports, weather, and games by installing the corresponding apps on your TV.
- To use this feature, the TV must be connected to the Internet.
- For more information, refer to "Using the APPS Service."
Universal Guide
Universal Guide is an app that allows you to search for and enjoy various content such as TV shows, dramas, and movies in one place. Universal Guide can recommend content tailored to your preferences and notify you of new drama series.
- For more information about the Universal Guide, refer to "Using the Universal Guide App."
- Images may look blurry depending on the service provider's circumstances.
- This function may not be supported depending on the model or geographical area.
Updating the TV’s Software
Updating the TV’s software to the latest version
- DO NOT turn off the TV’s power until the update is complete. The TV will turn off and on automatically after completing the software update. Video and audio settings will be reset to their defaults after a software update.
Updating through a USB device
After downloading the update file from the Samsung website and storing it on a USB device, connect the USB device to the TV to update.
- To update using a USB flash drive, download the update package from Samsung.com to your computer. Then, save the update package in the USB device's top-level folder. Otherwise, the TV will not be able to locate the update package.
Updating the TV automatically
If the TV is connected to the Internet, you can have the TV's software update itself automatically while you are watching the TV. When the background update is completed, it is applied the next time the TV is turned on. If you agree to the Smart Hub terms and conditions, Auto Update is set to On automatically.
If you want this function disabled, use the Select button to turn it off.
- This function may take a longer time if another network function is running concurrently.
- This function requires an Internet connection.
Getting Support
Getting support through Remote Management
After consenting to our service agreement, you can use Remote Management to access Remote Support and have a Samsung service technician diagnose your TV, correct problems, and update your TV's software remotely via the web. You can also turn Remote Management on and off.
- You can also start this function by pressing and holding the button for 5 or more seconds.
- This function requires an Internet connection.
What is Remote Support?
Samsung Remote Support service offers you one-on-one support with a Samsung Technician who can remotely:
- Diagnose your TV
- Adjust the TV settings for you
- Perform a factory reset on your TV
- Install recommended firmware updates
How does Remote Support Work?
You can easily get Samsung Remote Support service for your TV:
- Call the Samsung Contact Center and ask for remote support.
- Open the menu on your TV and go to the Support section. ( Settings Support)
- Select Remote Management, then read and agree to the service agreements. When the PIN screen appears, provide the PIN number to the technician.
- The technician will then access your TV.
Finding the contact information for service
You can view the address of the Samsung website, the call center phone number, your TV's model number, your TV's software version, Open Source License and other information you may need to get service support from a Samsung call agent or the Samsung website.
- You can also view information by scanning the QR code of your TV.
- You can also start this function by pressing and holding the (Play) button for 5 or more seconds. Continue holding the button until the customer information pop-up window appears.
Requesting service
You can request service when you encounter a problem with the TV. Select the item matching the problem that you encountered, and then select Request Now or Schedule Appointment Request Send. Your service request will be registered. The Samsung Contact Center will contact you to set up or confirm your service appointment.
- You must agree to the terms and conditions for the service request.
- This function may not be supported depending on the geographical area.
- This function requires an Internet connection.
Connections
You can watch live broadcasts by connecting an antenna and antenna cable to your TV and can get access to the Internet by using a LAN cable or wireless router. Using various connectors, you can also connect external devices.
Connection Guide
- It shows you how to connect various external devices such as cable boxes, game consoles, and PCs using pictures. If you select the connection method and an external device, the connection details appear.
It shows you how to connect various external devices such as cable boxes, game consoles, and PCs using pictures. If you select the connection method and an external device, the connection details appear.
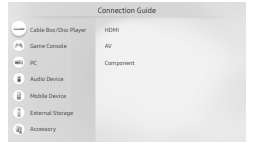
The image on your TV may differ from the image above depending on the model and geographical area.
Connecting an Antenna
- An antenna connection is not necessary if you connect a cable box or satellite box.

Connecting to the Internet
Establishing a wired Internet connection
- If you connect a LAN cable, the TV automatically accesses the Internet.

- Use a CAT 7 (*STP type) cable for the connection
- The TV will not be able to connect to the Internet if your network speed is below 10 Mbps.
Establishing a wireless Internet connection
Make sure that you have the wireless router's SSID (name) and password settings before attempting to connect. The network name (SSID) and security key are available on the wireless router's configuration screen. See the wireless router's user manual for more information.
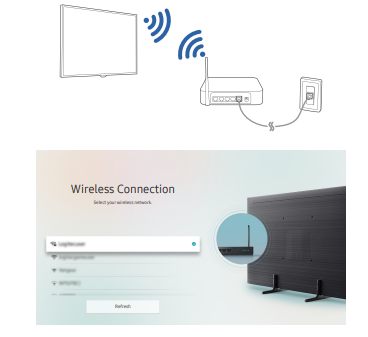
- The image on your TV may differ from the image above depending on the model and geographical area.
- If no wireless router is found, select Add Network at the bottom of the list and enter the network name (SSID).
- If your wireless router has a WPS or PBC button, select Use WPS at the bottom of the list, and then push the WPS or PBC button on your router within 2 minutes. The TV will connect automatically
Connecting an IP control device to the TV
You can connect an IP control device to the TV remotely to manage your IP device.
- To use this function, Power On with Mobile must be turned on
- Turning this feature on may allow other IP control devices to control your TV. We recommend turning this feature on only if an authorized third-party custom controller is installed and configured specifically for a Samsung TV and if your Wi-Fi network is password protected.
- This function may not be supported depending on the model or geographical area.
Troubleshooting Internet Connectivity Issues
Troubleshooting Internet connectivity issues
- After reading the following content, troubleshoot the Internet connection issue. If the problem persists, contact your Internet Service Provider.
No network cable found
- Make sure that the LAN cable is plugged in on both ends. If it is plugged in, make sure that the router is turned on. If the router is on, try turning it off and then on.
Wireless network connection failed
- If a selected wireless router is not found, go to Open Network Settings, and then select the correct router.
Unable to connect to a wireless router
- Check if the router is turned on. If it is, turn it off and then on.
- Enter the correct password if required.
IP auto setting failed
- Configure the settings in IP Settings.
- Make sure that the DHCP server is enabled on the router, and then unplug the router and plug it back in.
- Reset the router if required. For wireless connection, enter the correct password if required.
Unable to connect to the network
- Check all IP Settings
- After checking the DHCP server status (must be active) on the router, remove the LAN cable, and then connect it again. For wireless connection, enter the correct password if required.
Connected to a local network, but not to the Internet
- Make sure that the Internet LAN cable is connected to the router's external LAN port.
- Check the DNS values in IP Settings.
Connecting Video Devices
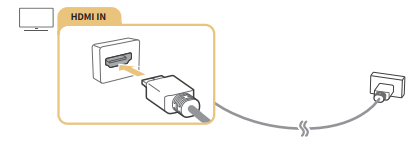
Connecting with an HDMI cable
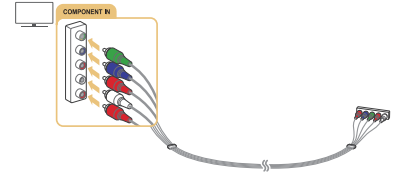
Connecting with a component cable
Connect the component cable to the component input connections of the TV and the component output connections of the device as shown in the image below.
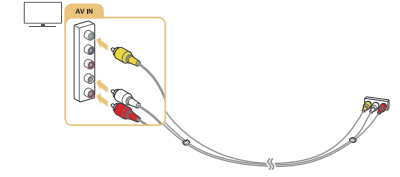
Connecting with a composite (A/V) cable
- Connect the AV cable to the input connections of the TV and the AV output connections of the device as shown in the image below.
- If you are using the TV's AV input connectors, connect the device's video output to the TV using a Y connector.
Audio Input and Output Connections
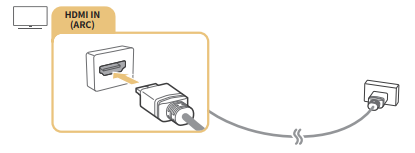
Connecting with an HDMI (ARC) cable
Connecting with a digital audio (optical) cable
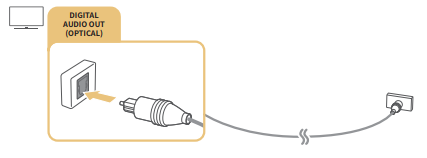
Connecting through a wireless network
- You can connect the TV to a Samsung audio device that supports the Wi-Fi function through your wireless network. The two devices must be connected to the same network. For more information about how to connect and use a Samsung audio device that supports the Wi-Fi function, refer to its user manual.
Connecting a Computer
- Use the TV as a computer monitor or connect the TV to a computer via your network and access the computer's content.
Connecting through the HDMI port ― Screen sharing (HDMI)
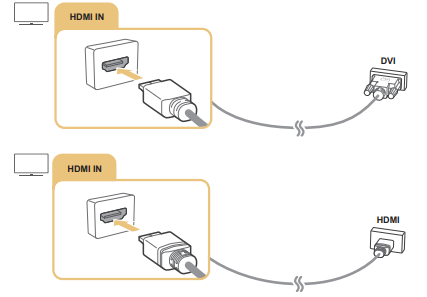
Connecting Your Mobile Device
Connect your mobile device to the TV on the same network to control the TV with the mobile device or enjoy the content of the mobile device on the TV.
Use the SmartThings app on your mobile device to quickly and easily connect to the TV and control its main settings. In addition, you can remotely check and control the statuses of various devices such as Samsung smart devices, home appliances, and speakers registered to the server.
- Make sure that your TV supports SmartThings. You can check this with the Supported Devices menu in the SmartThings app.
- To use the SmartThings app, you must be signed in to your Samsung account on the TV
- This function may not be supported depending on the TV model or mobile device.
- The supported functions may differ depending on the version of the SmartThings app
Connecting to the TV via the SmartThings app
- Turn on the TV.
- Start the SmartThings app on your mobile device.
- Tap Add Device on the dashboard of the SmartThings app. Connectable TVs are searched for.
- From the search results, select the model of your TV.
- Enter the PIN number displayed on the TV screen
- Once the TV is registered with your Samsung account, you can use the SmartThings app to control the TV.
Bidirectionally mirroring your TV and mobile device using the SmartThings app
Bidirectional mirroring refers to either outputting the screen and sound of a mobile device on a TV or outputting the screen and sound of a TV on a mobile device. You can use the SmartThings app to enjoy the screen and sound of the TV on your mobile device or to play the screen and sound of your mobile device on the TV.
Start the SmartThings app on your mobile device. Tap your TV from the dashboard or device. You can use the following functions:
- You can enjoy the screen and sound of the mobile device on your TV. After you connect a mobile device that supports screen mirroring to your TV, you can use screen mirroring to enjoy the screen and sound of the mobile device on your TV wirelessly and play the video, audio, or photo files currently playing on the mobile device on your TV.
- You can enjoy TV screen and sound on your mobile device.
- You can only listen to the TV sound on your mobile device.
Editing the name and icon of an external device
You can change the port name for a connected external device or add it to the Home Screen.
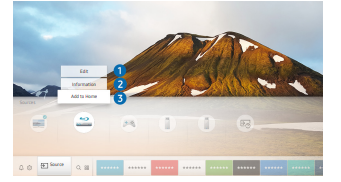
- Move the focus to a connected external device.
- Press the up directional button. The following functions become available.
Connection notes for computers
- For the resolutions supported by the TV, refer to "Read Before Connecting a Computer (Supported Resolutions)."
- As long as file sharing is activated, unauthorized access may occur. When you do not need to access data, disable file sharing.
- If you want to connect your PC and TV wirelessly, both of them must be connected to each other on the same network.
- When sharing content with other network-based devices such as those in an IP (Internet Protocol) storage system, sharing may not be supported due to the network’s configuration, quality, or functionality, for example, if the network has an NAS (Network-Attached Storage) device.
Connection notes for mobile devices
- To use the Smart View function, the mobile device must support a mirroring function such as Screen Mirroring or Smart View. To check whether your mobile device supports the mirroring function, refer to the mobile device's user manual.
- To use Wi-Fi Direct, the mobile device must support the Wi-Fi Direct function. To check whether your mobile device supports Wi-Fi Direct function, refer to the mobile device's user manual.
- The mobile device and your Smart TV must be connected to each other on the same network.
- The video or audio may stop intermittently, depending on network conditions.
- When sharing content with other network-based devices such as those in an IP (Internet Protocol) storage system, sharing may not be supported due to the network’s configuration, quality, or functionality, for example, if the network has an NAS (Network-Attached Storage) device.
Peripherals
Using Anynet+ (HDMI-CEC)
Control an external device connected via Anynet+ (HDMI-CEC) with the remote control.
- You can use the TV's remote control to control external devices that are connected to the TV by an HDMI cable and that support Anynet+ (HDMI-CEC). Note that you can only set up and operate Anynet+ (HDMI-CEC) with the remote control.
Connecting an external device through Anynet+ and using their menus
- Set Anynet+ (HDMI-CEC) to On.
- Connect an HDMI-CEC-compliant device to the TV.
- Turn on the connected external device. The device is automatically connected to the TV. After the connection process is finished, you can access the menu of the connected device using your TV remote and control the device.
Read before connecting an Anynet+ (HDMI-CEC) device
- Anynet+ (HDMI-CEC)-enabled devices must be connected to the TV with an HDMI cable. Note that some HDMI cables may not support Anynet+ (HDMI-CEC).
- Anynet+ cannot be used to control external devices that do not support HDMI-CEC.
- The TV remote control may not work under certain circumstances. If this occurs, set up the device as an Anynet+ (HDMICEC)-enabled device again.
- Anynet+ (HDMI-CEC) works only with external devices that support HDMI-CEC and only when those devices are either in standby mode or turned on.
- Anynet+ (HDMI-CEC) can control up to 12 compliant external devices (up to 3 of the same type) except for home theaters. Anynet+ (HDMI-CEC) can control only one home theater system.
- To listen to 5.1 channel audio from an external device, connect the device to the TV via an HDMI cable and connect a 5.1 home theater system directly to the external device's digital audio output connector.
Using the keyboard and mouse
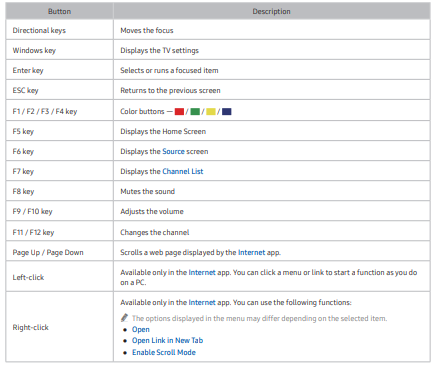
Smart Features
Smart Hub
View descriptions of Smart Hub's basic functions.
From Smart Hub, you can use the Internet search function, install and use various apps, view photos and videos, or listen to music stored on external storage devices, and perform more functions.
- Some Smart Hub services are paid services.
- To use Smart Hub, the TV must be connected to the Internet.
- Some Smart Hub features may not be supported depending on the service provider, language, or geographical area.
- Smart Hub service outages can be caused by disruptions in your Internet service.
- To use Smart Hub, you must agree to the Smart Hub service agreement, and collection and use of personal information. Without giving consent, you cannot use the additional features and services. You can view the entire text of the Terms & Policy document by navigating to Settings Support Terms & Policy. Try Now
- If you want to stop using Smart Hub, you can cancel the agreement. To cancel the Smart Hub service agreement, select Reset Smart Hub ( Settings Support Self Diagnosis Reset Smart Hub).
Displaying the Home Screen
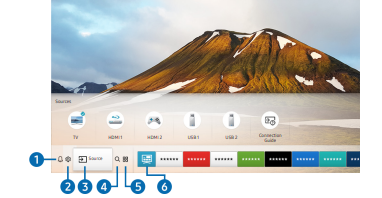
Launching Smart Hub automatically
- When you set Autorun Smart Hub to On, the TV displays the Home Screen automatically when you turn the TV on. You can also turn this function on or off: press the Select button at the current menu.
Launching the last used app automatically
- If Autorun Last App is set to On, the last used app is automatically run when you turn on the TV. You can also turn this function on or off: press the Select button at the current menu.
Using the APPS Service
You can enjoy a wide range of content including news, sports, weather, and games by installing the corresponding apps on your TV.
- To use this feature, the TV must be connected to the Internet.
- When Smart Hub is launched for the first time, the default apps are automatically installed. The default apps may differ depending on the geographical area.
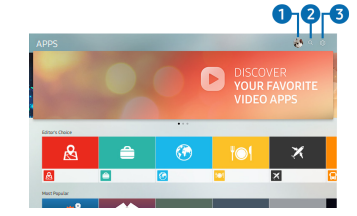
Installing and running an app
Installing an app
- Move to the app you want to install, and then press the Select button. The detailed information screen appears.
- Select Install. When the installation is complete, the Open menu appears.
- Select Open to run the app immediately
- You can view installed apps on the Settings screen.
- If the TV's internal memory is insufficient, you can install some specific apps on a USB device.
- You can run an app installed on a USB device only when the USB device is connected to the TV. If the USB device is disconnected while an app is running, the app is terminated.
- You cannot run an app installed on a USB device on a PC or another TV.
Managing purchased or installed apps
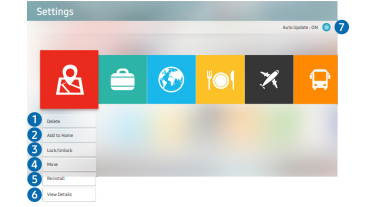
Removing an app
- Select an app to delete.
- Select Delete.
- The selected app is deleted.
Adding apps to the Home Screen
- Select an app to add.
- Select Add to Home.
- After the Home screen appears, move the selected app to the desired location.
- Press the Select button.
- The selected app is added to the Home Screen
Locking and unlocking apps
- Select an app to lock or unlock.
- Select Lock/Unlock.
- The selected app is locked or unlocked
Moving apps
- Select an app to move.
- Select Move.
- Move the app to the desired location.
- Press the Select button.
- The selected app is moved.
Reinstalling an app
- Select the app to install again.
- Select Reinstall.
- Reinstallation starts.
Checking the app information details
- Select the app to check.
- Select View Details.
- The app information screen appears.
Using the Universal Guide App

Universal Guide is an app that allows you to search for and enjoy various content such as TV shows, dramas, and movies in one place. Universal Guide can recommend content tailored to your preferences and notify you of new drama series.
You can use this feature on your mobile with Samsung SmartThings app.
- To enjoy the content from these apps on your TV, they must be installed on the TV.
- When you watch some paid content, you may need to make a payment using their associated app.
- Some content may be restricted depending on your network conditions and your subscriptions to paid channels.
- Parental control is necessary when children use this service.
- Images may look blurry depending on the service provider's circumstances.
- This function may not be supported depending on the model or geographical area.
Using the SmartThings App
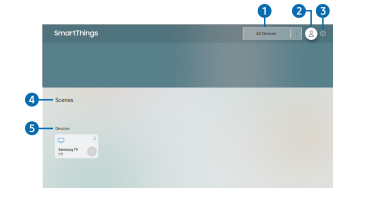
From your TV, you can monitor and configure smart devices you connected to the SmartThings service via the SmartThings app installed on them. You can receive notifications about the statuses of your smart devices.
- To use this function, you must be logged in to your Samsung account.
- This function may not be supported depending on the model or geographical area.
Playing pictures/video/music
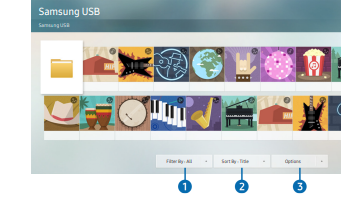
You can play media content saved on storage devices, such as USB devices, mobile devices, and cameras on the TV.
- You cannot play media content if the content or the storage device is not supported by the TV. For more information, refer to "Read Before Playing Photo, Video, or Music Files."
- Backup important files before connecting a USB device. Samsung is not responsible for damaged or lost files
TV Viewing
Viewing Broadcast Information at a Glance
Using the guide
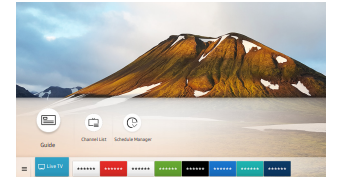
In the Guide, you can see the daily program schedules for each broadcaster, see program information, choose a program to watch, and set up a schedule viewing.
In the Guide, you can see only the TV programs scheduled after the current time.
Setting up a schedule viewing for a channel
Using the schedule viewing options from the guide screen
- On the Guide screen, select a program you would like to view, press and hold the Select button, and then select Schedule Viewing in the pop-up menu that appears.
Using the schedule viewing options in the program info window
- Press the Select button while watching TV. The Program Info window appears. Select a program that will be broadcast using the left or right directional buttons. Press the Select button, and then select Schedule Viewing to schedule viewing of that program.
Picture and Sound
Setting the Viewing Environment for External Devices
Playing games on an optimized screen
You can enable game mode to optimize the TV's settings for playing video games with a gaming console, such as a PlayStation™ or Xbox™.
- The game mode is not available for normal TV viewing.
- The screen may shake somewhat.
- When Game Mode is enabled, Picture Mode and Sound Mode are switched to Game automatically.
- To use a different external device on the same port, remove the game console connection, set Game Mode to Off, and then connect the external device to the port.
Using the Sound Support Functions
Listening to the TV through a Samsung audio device that supports the Wi-Fi function
- For more information about how to connect and use a Samsung audio device that supports the Wi-Fi function, refer to its user manual.
Using Samsung audio devices that support the Wi-Fi function to create a surround sound configuration
If you've connected one or more Samsung wireless audio devices that support the Wi-Fi function to the TV, you can create an optimal sound set up by configuring the surround effect settings. You can select any of the surround sound configurations, with or without a sound bar.
A surround sound configuration can be used if all of the following conditions are met:
- Two or more Samsung wireless speakers of the same type must be connected to the same wireless network.
- The Samsung audio devices that support the Wi-Fi function must be connected to the same wireless network as the TV.
System and Support
Setting the current time
You can set the Clock manually or automatically. Once the Clock is set, you can view the current time on the TV anytime.
You must set the clock in the following cases:
- The power cable is disconnected and then connected.
- The Clock Mode is changed from Auto to Manual.
- The TV is not connected to the Internet.
- No broadcast signals are received.
Setting the clock automatically
- This function works only when the TV is connected to the Internet or is receiving digital broadcasts through a connected antenna.
- The accuracy of the time information received may differ with the channel and signal.
- If you get your TV signal from a cable broadcast receiver/set-top box or a satellite receiver/satellite set-top box connected to an HDMI or Component port, you must set the current time manually.
Running Accessibility Shortcuts
The Accessibility Shortcuts provide easy access to the accessibility functions. To display the Accessibility Shortcuts, press the CC/VD button. You can easily turn on or turn off the functions such as Voice Guide, Video Description, High Contrast, Enlarge, Learn TV Remote, Learn Menu Screen, Caption, etc.
- Even if the Voice Guide is set to Off or muted, the voice guide for Accessibility Shortcuts is enabled.
- The menus may not appear depending on the model or geographical area.
Enabling voice guides for the visually impaired
You can activate voice guides that describe the menu options aloud to aid the visually impaired. To activate this function, set Voice Guide to On. With Voice Guide on, the TV provides voice guides for channel change, volume adjust, information on current and upcoming programs, schedule viewing, other TV functions, and various content in the Internet, and in Search.
You can go to Voice Guide, and then press the Select button to turn the function on or off.
- The Voice Guide is provided in the language that is specified on the Language screen. However, some languages are not supported by Voice Guide even though they are listed in the Language screen. English is always supported.
- For more information about the TV language settings, refer to "Changing the menu language."
Troubleshooting
How does Remote Support Work?
You can easily get Samsung Remote Support service for your TV:
- Call the Samsung Contact Center and ask for remote support.
- Open the menu on your TV and go to the Support section. ( Settings Support)
- Select Remote Management, then read and agree to the service agreements. When the PIN screen appears, provide the PIN number to the technician.
- The technician will then access your TV.
Finding the contact information for service
You can view the address of the Samsung website, the call center phone number, your TV's model number, your TV's software version, Open Source License and other information you may need to get service support from a Samsung call agent or the Samsung website.
- You can also view information by scanning the QR code of your TV.
- You can also start this function by pressing and holding the (Play) button for 5 or more seconds. Continue holding the button until the customer information pop-up window appears.
Requesting service
You can request service when you encounter a problem with the TV. Select the item matching the problem that you encountered, and then select Request Now or Schedule Appointment Request Send. Your service request will be registered. The Samsung Contact Center will contact you to set up or confirm your service appointment.
- You must agree to the terms and conditions for the service request.
- This function may not be supported depending on the geographical area.
- This function requires an Internet connection.
Testing the picture
The TV image does not look as good as it did in the store.
Store displays are tuned to a digital HD channel.
If you have an analog cable box or satellite box, upgrade to a digital cable box or satellite box. Use HDMI or Component cables to deliver HD (high definition) picture quality.
Many HD channels are upscaled from SD (Standard Definition) content. Look for a channel that is broadcasting HD content.
- Cable/Satellite Subscribers: Try HD channels from the channel lineup.
- Air/Cable Antenna Connection: Try HD channels after running the Auto Program function.
The picture is distorted.
- The compression of video content may cause picture distortions, especially in fast moving pictures from sports programs and action movies.
- If the signal reception is weak or poor, screen distortion may be visible but it is not a malfunction.
- Mobile phones used close to the TV (within 3.2 ft) may cause noise on analog and digital channels.
The color is wrong or missing.
- If you’re using a Component connection, make sure that the Component cables are connected to the correct jacks.
- Incorrect or loose connections may cause color problems or a blank screen.
Anynet+ (HDMI-CEC) Isn't Working
The message "Connecting to Anynet+ device..." or "Disconnecting from Anynet+ device" appears on the screen.
- You cannot use the remote control when the TV is configuring Anynet+ or switching to a viewing mode.
- Use the remote control after the TV has completed the Anynet+ configuration or has switched to a viewing mode.
The TV audio is not being played through the AV receiver.
- Make sure that the AV receiver is connected to the TV's HDMI (ARC) port with an HDMI cable.
- Confirm that the AV receiver is HDMI (ARC) compatible.
- If the AV receiver is not HDMI (ARC) compatible, connect the TV and the AV receiver with an optical cable.
I Have Trouble Launching/Using Apps
I launched an app, but it's in English. How can I change the language?
- Languages supported by the app may be different from the user interface language.
- The ability to change the language depends on the service provider.
My application is not working.
- Check with the service provider.
- Refer to the Help section on the application service provider's website.
My File Won't Play
Some files can't be played.
- This problem may occur with high-bitrate files.
- Most files can be played back, but you might experience problems with high-bitrate files.
Other Issues
The TV is hot
- Watching TV for an extended period of time causes the panel to generate heat.
- The heat from the panel is dissipated through internal vents running along the top of the TV.
- The bottom, however, may feel hot to the touch after extended use.
- Children watching TV need constant adult supervision to prevent them from touching the TV.
- This heat, however, is not a defect and does not affect the TV's functionality.
The "Mode Not Supported" message appears.
- The output resolution of the attached device is not supported by the TV.
- Check the TV's supported resolutions and adjust the external device’s output resolution accordingly.
The Captions item in the TV is grayed out
- When an external device is connected with an HDMI or Component cable, the Caption function is unavailable.
- Adjust the caption setting on the external device.
The TV is tilted to the side.
- Remove the base stand from the TV and reassemble it.
The stand is wobbly or crooked.
- Make sure the indicator arrows on the stand and stand holder are properly aligned.
The remote control and/or voice control does not work.
- The TV ships with protective stickers covering some of the sensors. Make sure all of the stickers have been removed.
The TV is making a humming noise.
- Your TV utilizes high-speed switching circuits and high levels of electrical current.
- Depending on the TV's brightness level, the TV may seem slightly noisier than a conventional TV
- Your TV has undergone strict quality control procedures that meet our demanding performance and reliability requirements.
- Some noise coming from the TV is considered normal and is not an acceptable cause for an exchange or refund.
Precautions and Notes
Read Before Using APPS
- Due to the product characteristics featured on Samsung Smart Hub, as well as limitations in available content, certain features, applications, and services may not be available on all devices or in all territories. Visit http:// www.samsung.com for more information on specific device information and content availability. Services and content availability are subject to change without prior notice.
- Samsung Electronics takes no legal responsibility whatsoever for any interruption of app services caused by the service provider for any reason.
- Application services may be provided in English only and available content may differ with the geographical area.
- For more information about applications, visit the applicable service provider's website.
- An unstable Internet connection may cause delays or interruptions. In addition, applications may terminate automatically depending on the network environment. If this occurs, check your Internet connection and try again.
- Application services and updates may become unavailable.
- Application content is subject to change by the service provider without prior notice.
- Specific services may differ with the version of the application installed on the TV.
- An application's functionality may change in future versions of the application. If this occurs, run the application's tutorial or visit the service provider's website.
- Depending on the service provider's policies, certain applications may not support multitasking.
Read Before Using the Internet Function
- The Internet function is not compatible with Java applications.
- File download is not supported.
- The Internet function may not be able to access certain websites.
- The TV does not support playback of flash videos.
- E-commerce for online purchases is not supported.
- With websites that have scrollable windows, scrolling a window can result in corrupted characters.
- ActiveX is not supported.
- Only a limited number of fonts are supported. Certain symbols and characters may not be displayed properly.
- The response to remote commands and the resulting on-screen display may be delayed while a web page is loading.
- Loading a web page may be delayed or suspended completely with certain operating systems.
- Copy and paste operations are not supported.
- When composing an email or a simple message, certain functions such as the font size and color selection may not be available.
- There is a limit to the number of bookmarks and the size of the log file that can be saved.
- The number of windows that can be opened concurrently differs with the search conditions and the TV model.
- Web browsing speed will differ with the network environment.
- Embedded videos in a web page cannot be played at the same time the PIP (picture-in-picture) function is operating.
- Depending on the types of video/audio codecs supported, you may not be able to play certain HTML5 video and audio files.
- Video sources from PC-optimized streaming service providers may not play properly on our proprietary Internet browser.
Read before setting up a wireless Internet connection
Precautions for wireless Internet
- This TV supports the IEEE 802.11 a /b /g /n /ac communication protocols. Samsung recommends using IEEE 802.11n. Video files stored on a device connected to the TV via a Home Network may not play back smoothly.
- To use wireless Internet, the TV must be connected to a wireless router or modem. If the wireless router supports DHCP, the TV can use a DHCP or static IP address to connect to the wireless network.
- Select a channel that is not currently being used by the wireless router. If the channel set is currently being used by the wireless router to communicate with another device, the result is usually interference and/or a communications failure.
- Most wireless networks have an optional security system. To enable a wireless network's security system, you need to create a password using characters and numbers. This password is then needed to connect to a security-enabled AP.
Read Before Playing Photo, Video, or Music Files
Limitations to the use of photo, video, and music files
- The TV supports MSC (Mass Storage Class) USB devices only. MSC is a class designation for mass storage devices. Types of MSC devices include external hard drives, flash card readers, and digital cameras. (USB hubs are not supported.) These kinds of devices must be connected directly to the USB port. The TV may not be able to recognize a USB device or read the files on the device if it is connected with a USB extension cable. Do not disconnect USB devices while they are transferring files.
- When connecting an external hard drive, use the USB (HDD) port. We recommend that you use an external hard drive with its own power adapter.
- Certain digital cameras and audio devices may not be compatible with the TV.
- If there are multiple USB devices connected to the TV, the TV might not be able to recognize some or all the devices. USB devices that use high-power input should be connect to the USB [5V, 1A] port.
- The TV supports the FAT, exFAT, and NTFS file systems.
- After sorting files in the Folder view mode, the TV can display up to 1,000 files per folder. If the USB device contains more than 8,000 files and folders, however, some files and folders might not be accessible.
- Certain files, depending on how they are encoded, may not play on the TV.
- Certain files are not supported on all models.
- DivX and DTS codecs are not supported by the Samsung TV models released in 2018.
Supported external subtitles
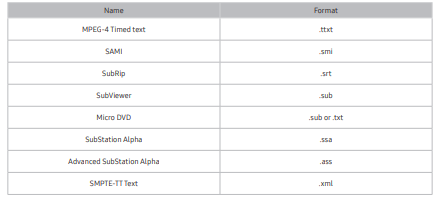
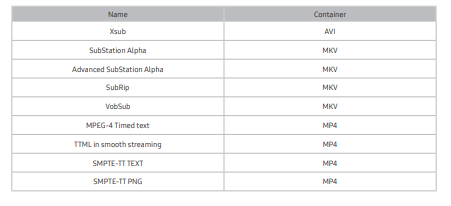
Supported internal subtitles
Supported image formats and resolutions

Supported music formats and codecs

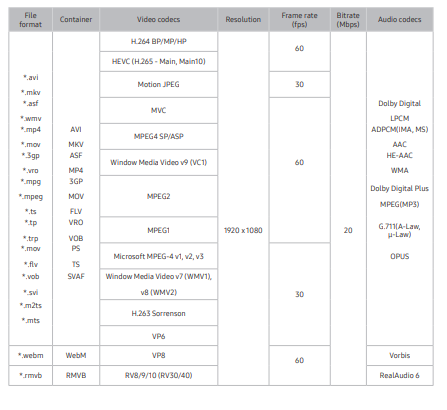
Supported video codecs
Other restrictions
- Codecs may not function properly if there is a problem with the content.
- Video content does not play or does not play correctly if there is an error in the content or container.
- Sound or video may not work if they have standard bit rates/frame rates above the TV’s compatibility ratings.
- If the Index Table is has an error, the Seek (Jump) function will not work.
- When playing video over a network connection, the video may not play smoothly because of data transmission speeds.
- Some USB/digital camera devices may not be compatible with the TV.
- HEVC codec is only available in MKV / MP4 / TS containers.
- The MVC codec is supported partly
Video decoders
- H.264 is supported up to Level 4.1. (TV does not support FMO / ASO / RS)
- VC1 AP L4 is not supported.
- GMC 2 or above is not supported.
Audio decoders
- WMA is supported up to 10 Pro 5.1 channels, M2 profile.
- WMA1, WMA lossless / Voice are not supported.
- QCELP and AMR NB/WB are not supported.
- Vorbis is supported for up to 5.1 channels.
- Dolby Digital Plus is supported for up to 5.1 channels.
- The supported sample rates are 8, 11.025, 12, 16, 22.05, 24, 32, 44.1, and 48 KHz, and differ with the codec.
Read Before Connecting a Computer (Supported Resolutions)
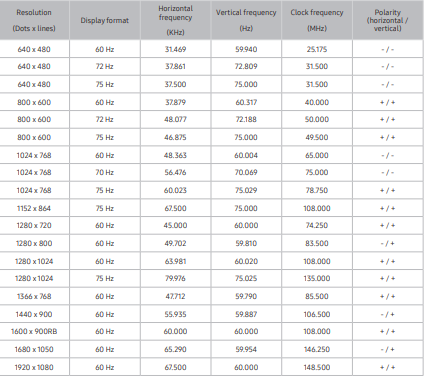
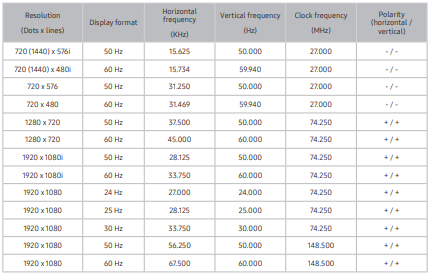
When you connect your TV to a computer, set the computer's video card to one of the standard resolutions listed in the tables below or on the next page. The TV will automatically adjust to the resolution you choose. Note that the optimal and recommended resolution is 1920 x 1080 at 60 Hz. Choosing a resolution not included in the tables can result in a blank screen or just the power indicator turning on. Refer to the user manual of your graphics card for compatible resolutions.
IBM

MAC

VESA DMT
Supported Resolutions for Video Signals
VESA CVT

CEA-861
Blocking programs based on their TV Rating
- To block content, select a rating category to lock. All programs at that level and higher are blocked and require the PIN to watch. To unblock a category, select the lock icon. To unblock all the categories in a row, select the lock under ALL
Categories on the left:
- TV-Y: Young children
- TV-Y7: Children 7 and over
- TV-G: General audience
- TV-PG: Parental guidance
- TV-14: Viewers 14 and over
- TV-MA: Mature audience
Categories on the top:
- ALL: Lock all TV ratings.
- FV: Fantasy violence
- V: Violence
- S: Sexual situations
- L: Adult Language
- D: Sexually Suggestive Dialog
Blocking programs based on their Canadian English Rating
This rating system applies to all rated material viewed on English-Canadian TV channels. Select a lock beside one of the rating categories to block that category and all higher categories. To unblock a category, select the lock icon.
- C: Programming intended for children under age 8
- C8+: Programming generally considered acceptable for children 8 years and over to watch on their own
- G: General programming, suitable for all audiences
- PG: Parental Guidance
- 14+: Programming containing themes or content that may not be suitable for viewers under the age of 14
- 18+: Adult programming
Blocking programs based on their Canadian French Rating
This rating system applies to all rated material viewed on French-Canadian TV channels. Select a lock beside one of the rating categories to block that category and all higher categories. To unblock a category, select the lock icon.
- G: General
- 8 ans+: Programming acceptable for children 8 years and over to watch on their own
- 13 ans+: Programming that may not be suitable for children under the age of 13
- 16 ans+: Programming not suitable for children under the age of 16
- 18 ans+: Programming restricted to adults
Blocking Programs based on their Downloadable U.S. Rating
- This rating system only applies to material originating from US DTV channels.
- Parental restriction information is automatically downloaded while you watch DTV channels. This download may take several seconds. If the information is unavailable from the broadcasting station, the Downloadable U.S. Rating menu is deactivated.
- Parental restriction levels differ with the broadcasting station. The default menu name and the Downloadable U.S. Rating name changes depending on the downloaded information.
- Even when the on-screen display is set to another language, the Downloadable U.S. Rating menu appears only in English.
- Select a lock beside one of the rating categories to block that category and all higher categories. To unblock a category, select the lock icon.
Accessibility Guidance
Accessibility Shortcuts menu
Press the CC/VD button to display the Accessibility Shortcuts menu. The Accessibility Shortcuts menu allows you to turn Voice Guide and other Accessibility functions on or off. Voice Guide speaks the names of the menu items displayed on the screen so that people who cannot see the screen can easily use the TV. The menu contains a number of items including:
- Voice Guide: This function works on every screen on the TV and when turned on speaks to identify items displayed on screen. For example, it tells you the selected volume, the current channel and program information. It also reads out the program information in the Electronic Program Guide (EPG).
- Caption: This function allows you to turn on captions in programs that provide broadcast captions. In programs that provide broadcast captions, the Position function is activated so that you can change the caption position.
- High Contrast: This function allows you to display all menus with an opaque black background and a white font, providing maximum contrast.
- Enlarge: This function enlarges important elements on the screen such as the names of programs.
- Learn TV Remote: Learn the names and functions of the buttons on remote control. On this screen, pressing the power button (top left button) will turn off the TV, but when any other button is pressed the TV will say the button name and briefly tell what that button does. This teaching mode helps you to learn the location and operation of the buttons on the remote without affecting normal TV operation. Press the or EXIT buttons twice to exit Learn TV Remote.
- Learn Menu Screen: Learn the menus on the TV screen. Once enabled, your TV will tell you the structure and features of the menus you select.
Opening the Accessibility Shortcuts menu
- If you press the CC/VD button while Voice Guide is turned off, the Accessibility Shortcuts menu appears and Voice Guide starts. You can turn on or turn off the functions such as Voice Guide, Video Description, High Contrast, Enlarge, Caption, and you can move to the Learn TV Remote and Learn Menu Screen pages.
Using the Accessibility Shortcuts menu
- To use the Accessibility Shortcuts menu, you will need to locate the Directional and Select buttons. To learn where the buttons are located, refer to the Learn TV Remote menu.
- Use the up and down directional buttons to move between the menu items. Press the Select button to turn on or turn off the function indicated by the menu where you are located. Again, use the up and down directional buttons to move between options and press Select to choose an option. To close this menu, use the right directional button to get to the Close option and select this, or press the button.
Step by Step instructions to run the options
Turning on Voice Guide
- Press the CC/VD button on the remote. The Accessibility Shortcuts menu appears.
- Press the up or down directional buttons on the remote to move to and highlight the Voice Guide option.
- Press the Select button on the remote to turn Voice Guide on or off.
- Close the menu either by pressing on the remote or by pressing the right directional button to highlight Close, and then pressing the Select button.
Turning on Video Description
- Press the CC/VD button on the remote. The Accessibility Shortcuts menu appears.
- Press the up or down directional buttons on the remote to move to and highlight the Video Description option.
- Press the Select button on the remote to turn Video Description on or off.
- Close the menu either by pressing on the remote or by pressing the right directional button to highlight Close, and then pressing the Select button.
Learning TV Remote
- Press the CC/VD button on the remote. The Accessibility Shortcuts menu appears.
- Press the up or down directional buttons on the remote to move to and highlight the Learn TV Remote option.
- Press the Select button on the remote. You are now in the e-Manual and specifically on the Learn TV Remote page.
- Press a button on the remote. The name and function of the button are heard.
- When you have finished and want to exit the e-Manual, press the button twice to exit Learn TV Remote.
Accessing the main accessibility menu to change Voice Guide settings
You can also go to an accessibility menu from the TV settings menu. This provides more options, for example, to change the speed of Voice Guide. The TV will not verbalize this menu unless Voice Guide is already turned on.
- Press the Home button.
- Press the left directional button until you reach Settings.
- Press Select and a menu will open.
- Press the down directional button to reach General, and then press Select to open this menu.
- Use the directional buttons to go to the Accessibility menu, and then press Select to open this menu.
- The menu will appear with Voice Guide Settings being the first menu. Highlight Voice Guide Settings, and then press Select.
- A menu appears with the options to change Voice Guide and Volume, Speed, Pitch.
- Select the menu using the directional buttons, and then press Select.
Displaying your favorite channels:
- If you have set up favorite channels, you will be able to filter the Guide so that only those channels are shown. This makes it easier to find channels you want.
- To display your favorites list, move to the current time (press the button) and then press the left directional button to move to the list of channels. Use the up directional button to move up the list until you reach the Filter By : All option. Press Select to bring up a list of options. Use the up and down directional buttons to move between the categories in the list. Highlight the option you want, for example, Favorites 1, and then press Select. The Guide will then show the information for only those channels.
Registering channels as favorites
- Press the right directional button to move to the Category List.
- Select Favorites.
- Select a favorites list. When you select a favorites list, the Edit Favorites screen appears.
- Move to the channel you want to add, and then press the Select button
- Repeat Step 4 to select all the channels you want to add.
- Press the right directional button to move to the icon, and then press the Select button. The selected channels are added to the favorites list.
To add channels to a favorites list - Detail
- Open the Channel List.
- Press the right directional button to move to the Category List.
- Use the up and down directional buttons to move to Favorites, and then press Select. You will see Favorites 1 to Favorites 5. Move to the list to which you want to add channels, and then press the Select button.
- Use the up directional button to move to Edit Favorites, and then press the Select button.
- In the Edit Favorites screen, move to a channel you want to add to the favorites list, and then press the Select button.
- Repeat Step 5 to select all channels you want to add.
- Press the right directional button to move to the icon, then press the Select button. The selected channels are added to the favorites list
Deleting channels from a favorites list – Detail
- Open the Channel List.
- Press the right directional button to move to the Category List.
- Use the up and down directional buttons to move to Favorites, and then press Select. You will see Favorites 1 to Favorites 5. Move to the list from which you want to delete channels, and then press the Select button.
- Use the up directional button to move to Edit Favorites, and then press the Select button.
- In the Edit Favorites screen, move to a channel you want to delete from the favorites list, and then press the Select button.
- Repeat Step 5 to select all channels you want to delete.
- Press the left directional button to move to the icon, and then press the Select button. The selected channels are deleted from the favorites list.
See other models: DV438A RFG238AA RB217AB QN65Q90RAFXZA QN65Q80RAFXZA
