Loading ...
Loading ...
Loading ...
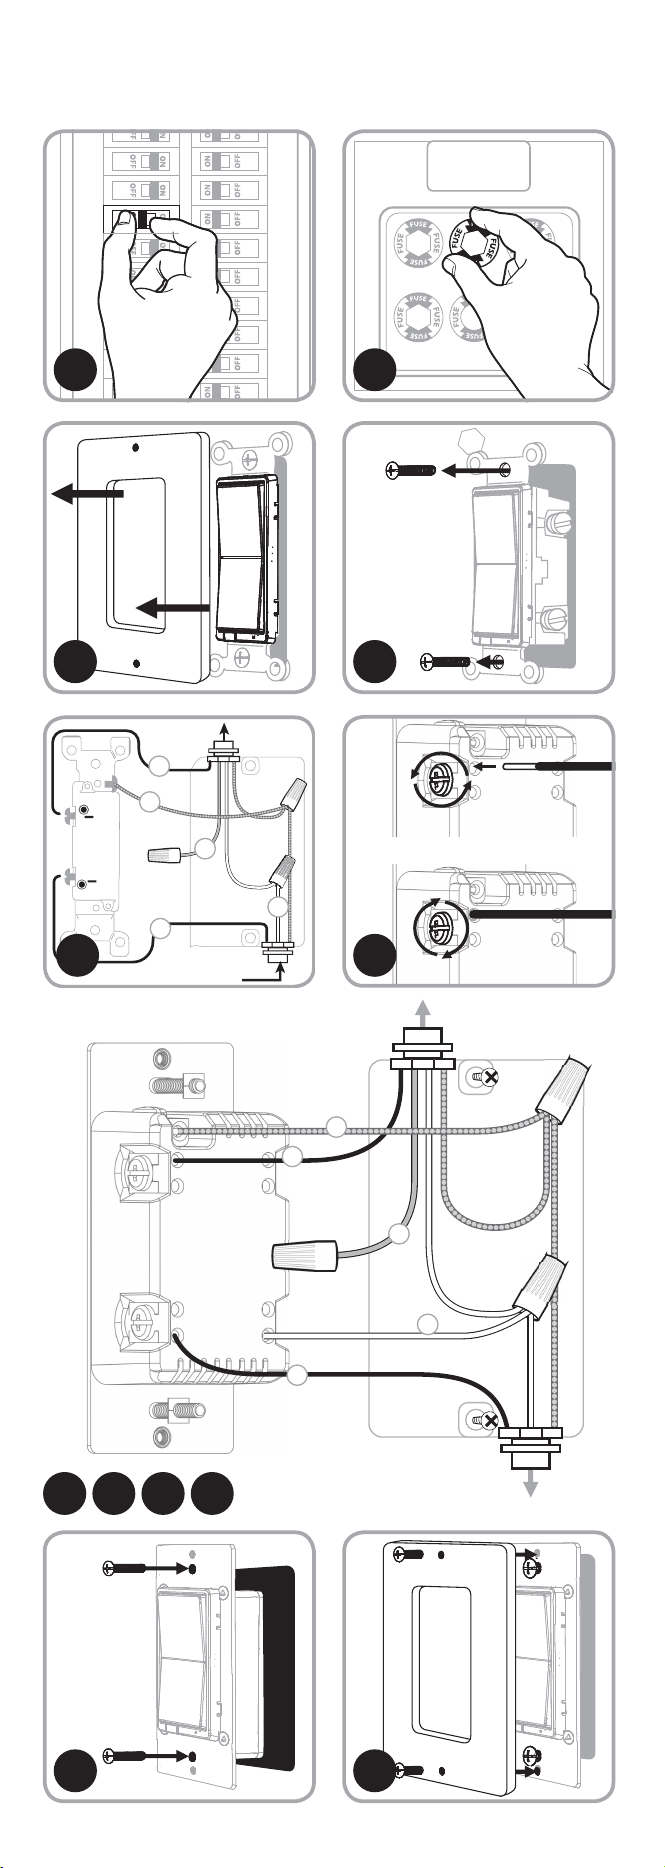
A.
Ground (Green/Bare)
B.
Line or Load (Black)
C.
Line or Load (Black)
D.
Traveler (Red/Other)
E.
Neutral (White)
F.
Top rocker — Press to
turn switch ON
G.
Bottom rocker — Press
to turn switch OFF
IMPORTANT!
The fixture controlled by the ZWave InWall Smart Switch must not exceed
960W (incandescent); 1800W (15A) Resistive or 1/2 HP Motor. The switch
is designed only for use with permanently installed fixtures.
• Turn ON/OFF manually or remotely via the ZWave controller
• Can be added in multiple groups and scenes
• May be used in single-pole installation or with up to two Honeywell
add-on switches in 3-way or 4-way wiring configurations
• Compatible with all incandescent and CFL/LED bulbs
• Auto line/load detection
• Interchangeable paddle switch — white & light almond paddle in package
• Uses a standard, decorative-size wallplate for single-gang installations
(wallplate not included)
• Blue LED indicates switch location in a dark room
• ZWave certified for simple pairing and integrated home automation
• Screw terminal installation — requires wiring connections for line (hot), load,
neutral and ground. Traveler wire required for 3-way or 4-way installation
• This ZWave device has advanced features that allow you to
customize your experience. These features can only be adjusted
by a ZWave enabled controller that supports the ZWave
configuration command class. For a complete list of adjustable
configurations, visit www.honeywellelectricalaccessories.com
FEATURES2
TOOLS
INSTALLATION
1 3
13 14
1 1
2 3
F
G
B
E
C
A
D
7
8 9
10 11
E
FROM BREAKER BOX
OUT TO
LIGHT (LOAD)
B
A
D
C
C
E
B
D
A
OUT TO LIGHT (LOAD)
FROM BREAKER BOX
5
Insert wires into holes, do not wrap wires around screws.
Do not remove screws.
Loading ...
Loading ...
Loading ...