Loading ...
Loading ...
Loading ...
8 English
Wall Installation
WARNING
USE TWO OR MORE PEOPLE TO MOVE AND INSTALL THE RANGE
HOOD. FAILURE TO DO SO CAN RESULT IN BACK OR OTHER
INJURY.
The hood is attached to the wall with a wood support that is attached to
the inside back of the hood. To support the hood safely, the wood support
must be xed rmly to at least 2 vertical wooden studs that are located
behind the sheetrock that makes up the wall.
NOTE: These instructions are not applicable to masonary (brick,
concrete, etc.) walls. If you have a masonary wall, consult a professional
installer.
IMPORTANT: The studs (or wall if you have a masonary wall) must be
capable of supporting up to 150 lbs.
NOTE: If your kitchen has wood framing, at least 2 screws provided for
mounting this range hood must be fastened into solid wood studs. Do not
fasten into sheetrock only.
NOTE: Mark the Range Hood knockouts on the wall and make the
necessary cutouts before installing the hood.
Installation Instructions if you have wood framing:
1. Determine and mark the centerline on the wall where the hood will
be installed.
2. Select a mounting height “X” (See D below).
• For gas cooktop & range installations: Mount the hood so the
bottom is at least 32” (81.2 cm) above the cooking surface.
• For electric/induction cooktop & range installations: Mount the
hood so the bottom is at least 30” (76.2 cm) above the cooking
surface.
3. Mark a horizontal reference line on the wall (B below) for the bottom
of the hood. Use a level to conrm that the line is level.
4. Find and mark the location of the wood studs or wood supports
behind the wall.
5. Draw a line 15 3⁄8” (39.1cm) above the reference line for the bottom
of the hood to mark the wood support location on the wall.
Use a level to conrm that the line is level.
A
B
C
D
“x”
15
3
⁄8”
(39 cm)
E
Ø 1”
2.5 cm
A. Wood support
B.Bottom of range hood
C. Center Line
D. Dimension “x” = range
hood mounting height
E. Knockout wiring holes
6. Remove the wood support from the back of the hood by loosening
the 2 screws from the inside.
7. Line the top of the wood support up with the wood support location
line on the wall, and then center it on the center line.
8. Locate the marks for the studs, and then draw two vertical lines
on the wood support marking where the studs intersect with the
wood support.
9. Mark the center of each line, remove the wood support from the
wall, and then drill a pilot hole at each mark.
10. Again, line the top of the wood support up with the wood support
location line, and then center it on the center line.
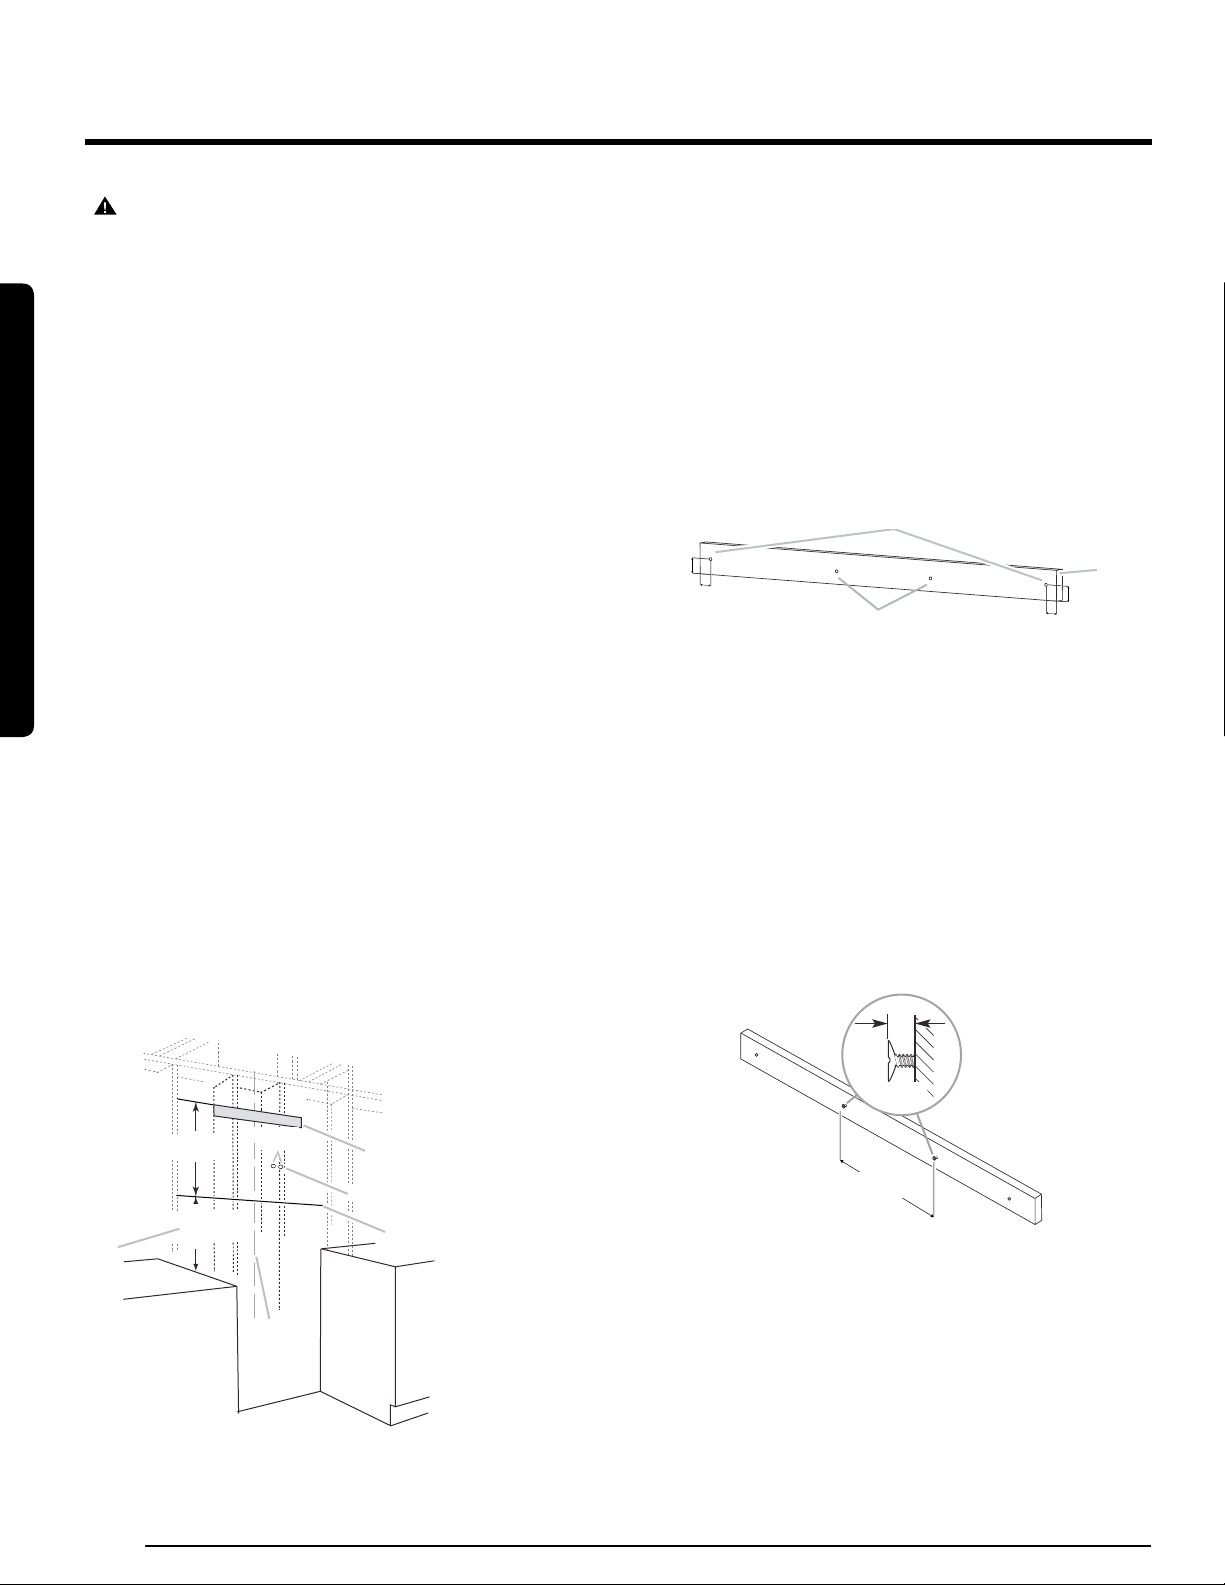
11. Push a pencil point or awl through the holes you just drilled in the
wood support (A) to mark the location of the pilot holes for two screws
that will go into the studs.
12. Also mark the locations of two additional pilot holes (B) by pushing a
pencil point or awl through pre-drilled holes in the center of the wood
support. These holes are for the supplied wall anchors. See the
diagram below.
C
B
A
1
3
⁄16”
(3 cm)
1
3
⁄16”
(3 cm)
1 ”
(2.5 cm)
1 ”
(2.5 cm)
A. Screw holes
B. Screw holes (already made)
C.Wood Support
13. Remove the wood support, and then drill four pilot holes into the wall.
14. Push two of the supplied wall anchors into the two pilot holes at the
center.
15. Fasten the wood support to the wall by screwing 2 xing screws
6 x 80 mm (.25 x 3.15 in) through the wood support into the pilot
holes you drilled in the studs.
16. Using the rear installation diagram as a guide (See page 7), cut the
knockout wiring holes in the wall.
17. Screw two 6 x 80 mm (.25 x 3.15 in) screws screws into the holes (B)
in the center of the wood support. Screw them through the support
into the anchors underneath.
Leave a 1⁄4”(6.4mm) gap between the wall and the back of the
screw head to slide range the hood into place.
1
⁄4”
(6.4 mm)
15
1
⁄16”
(38.5 cm)
NOTE: Once the hood is mounted you must tighten these screws.
Complete Preparation
1. Determine and make all necessary cuts in the wall or roof for the vent
system. Install the vent system before installing the range hood. See
the “Venting Methods” section.
2. Determine the location where the power supply cable will be run
through the wall.
Installation
Installation
Loading ...
Loading ...
Loading ...