The illustrations in this operation manual may differ from the actual machine.
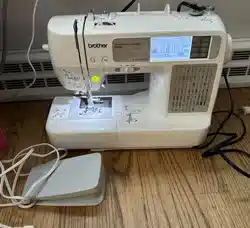
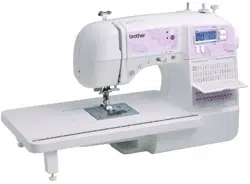
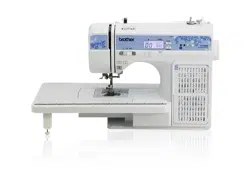
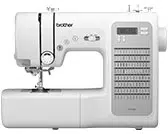
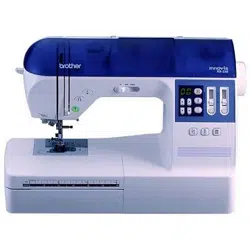
The main parts
1. Bobbin winder (page 15)
This winds the thread onto the bobbin for use as the lower thread.
2. Upper tension-control dial (page 41)
This controls the tension of the upper thread.
3. Bobbin-winding thread guide and pre-tension disc (page 15)
Pass the thread under this thread guide and around the pre-tension disc when winding the bobbin thread.
4. Thread take-up lever (page 25)
5. Thread cutter (page 40)
Pass the threads through the thread cutter to cut them.
6. Flat bed attachment with accessory compartment (page 7 and 44)
7. Operation buttons (page 9)
The operation buttons differ depending on the sewing machine model.
8. Operation panel (page 10)
This is used to select the stitch and specify the various settings. Design and position of the operation panel differs depending on the sewing machine model.
9. Spool pin (page 10, 15 and 23)
This holds the spool of thread.
10. Handwheel
This is used to manually raise and lower the needle.
11. Air vent
This vent allows the air surrounding the motor to circulate. Do not cover the air vent while the sewing machine is being used.
12. Main power and sewing light switch (page 12)
You can turn the main power and sewing light switch on and off.
13. Jack/socket connector (page 12)
Insert the plug on the power supply cord into the jack/ socket connector.
14. Foot controller (page 13)
You can use this to control the sewing speed, and to start and stop sewing.
15. Foot controller jack/socket (page 13)
Plug in the foot controller plug.
16. Feed dog position lever (page 55 and 65)
Use the feed dog position lever to lower the feed dogs.
17. Presser foot lever (page 23)
This is used to raise and lower the presser foot.
18. Thread guide (page 16 and 25)
This is used when winding the thread onto the bobbin and then threading the machine.
19. Thread guide cover (page 17 and 23)
Pass the thread under this thread guide when winding the bobbin thread and threading the machine.
20. Handle
Carry the sewing machine by its handle when transporting the machine.
Needle and presser foot section
1. Needle threader (for models equipped with the needle threader) (page 26)
2. Buttonhole lever
Lower the buttonhole lever when sewing buttonholes and bar tacks.
3. Presser foot holder
The presser foot is installed onto the presser foot holder.
4. Presser foot holder screw
Use the presser foot holder screw to hold the presser foot holder in place.
5. Presser foot
The presser foot applies pressure consistently on the fabric as the sewing takes place. Attach the appropriate presser foot for the selected stitching.
6. Needle plate cover release
Use when removing the needle plate cover.
7. Needle plate cover
Remove the needle plate cover to clean the race.
8. Feed dogs
The feed dogs feed the fabric in the sewing direction.
9. Quick-set bobbin (for models equipped with the quickset bobbin)
You can start sewing without pulling up the bobbin thread.
10. Bobbin cover
Open the bobbin cover to set the bobbin.
11. Needle plate
The needle plate is marked with guides for sewing straight seams.
12. Needle bar thread guide
Pass the upper thread through the needle bar thread guide.
13. Presser foot lever
Raise and lower the presser foot lever to raise and lower the presser foot.
14. Needle clamp screw
Use the needle clamp screw to hold the needle in place
Operation buttons
The operation buttons help you to easily perform various basic sewing machine operations.
The operation buttons differ depending on the sewing machine model.
1. Reverse/reinforcement stitch button
Press the reverse/reinforcement stitch button to sew reverse stitches. Reverse stitches are sewn by keeping the button pressed down to sew in the opposite direction. For details, refer to “Sewing reinforcement stitches” (page 40).
■ Buttons provided on some models
2. Start/stop button (for models equipped with the start/stop button)
Press the start/stop button to start or stop sewing. The machine sews at a slow speed at the beginning of sewing while the button is depressed. When sewing is stopped, the needle is lowered in the fabric. For details, refer to “Starting to sew” (page 39).
3. Needle position button (for models equipped with the needle position button)
Press the needle position button to raise or lower the needle. Be sure to raise the needle before threading the needle. Use this button to change the sewing direction or for detailed sewing in small areas. Pressing the button twice sews one stitch.
4. Sewing speed controller (for models equipped with the sewing speed controller)
Slide the sewing speed controller to adjust the sewing speed.
Operation panel
The operation panel, located on the front of the sewing machine, allows you to select a stitch and specify how the stitch will be sewn. The operation panel differs depending on the sewing machine mode.
1. LCD (liquid crystal display)
The number of the selected stitch (1), the presser foot type to be used (2), the stitch length (mm) (3), and the stitch width (mm) (4) are displayed here.
2. Stitch selection keys
Press the stitch selection keys, and then select the number for the stitch that you wish to use. For details, refer to “Selecting a stitch” (page 37).
3. Stitch length adjustment key
Press this key to adjust the stitch length. (Press the “–” side to reduce the stitch length; press the “+” side to increase the stitch length.)
4. Stitch width adjustment key
Press this key to adjust the stitch width. (Press the “–” side to reduce the stitch width; press the “+” side to increase the stitch width.)
■ Keys and indicators provided on some models
5. Stitch category selection key
Press this key to select desired stitch category. For details, refer to “Selecting a stitch” (page 37) .
6. Utility stitch indicator
This indicator lights up when the utility stitch is selected with the stitch category selection key.
7. Mirror image stitch indicator
This indicator lights up when the mirror image stitch is selected with the stitch category selection key.
8. Character stitch indicator (for models equipped with character stitches)
This indicator lights up when the character stitch is selected with the stitch category selectio
Spool pin
As shown, press down on the spool pin lever with your finger to raise the spool pin.
■ Storing the spool cap
The enclosed spool cap (large, medium, small) can be stored by attaching it to the spool pin as shown in the illustration. When attaching the spool cap, position it with the rounded side toward the spool pin.
■ Storing the spool pin
When placing the cover on the sewing machine before storing or if the spool pin will not be used, return the spool pin to its storage position. Remove the spool from the spool pin, and then fold up the spool pin, as shown in the illustration, until it snaps into place to secure it.
■ Installing the spool pin
1. If the spool pin has been removed from the machine, insert the tab on the spool pin into the hole on the back of the machine, as shown.
2. Push the spool pin down until it locks into place.
USING YOUR SEWING MACHINE
Power supply
1. Insert the plug into a wall outlet.
2. Set the main power switch to “I”.
The sewing light comes on when the machine is turned on.
3. To turn off the machine, set the main power switch to “O”.
The sewing light goes off when the machine is turned off.
Note
● If a power outage occurs while the sewing machine is being operated, turn off the sewing machine and unplug the power supply cord. When restarting the sewing machine, follow the necessary procedure to correctly operate the machine.
(For U.S.A. only)
● This appliance has a polarized plug (one blade wider than the other). To reduce the risk of electric shock, this plug is intended to fit in a polarized outlet only one way. If the plug does not fit fully in the outlet, reverse the plug. If it still does not fit, contact a qualified electrician to install the proper outlet. Do not modify the plug in any way.
Foot controller
Insert the foot controller plug into its jack/socket on the rear side of the sewing machine.
When you press the foot controller down lightly, the machine will run at a low speed. When you press harder, the machine’s speed will increase. When you take your foot off the foot controller, the machine will stop.
You should make sure that nothing is placed on the foot controller when the machine is not in use.
Note
● When the foot controller is plugged in, the start/stop button cannot be used to start sewing (only for models equipped with the start/stop button).
THREADING THE MACHINE
Winding the bobbin
This section describes how to wind the thread onto the bobbin.
• For details on the fast bobbin winding, see page 18.
1. As shown, press down on the spool pin lever with your finger.
The spool pin swings up
2. Remove the spool cap
3. Fully insert the spool of thread for the bobbin onto the spool pin.
Slide the spool onto the pin so that the spool is horizontal and the thread unwinds to the front at the bottom
4. Slide the spool cap onto the spool pin.
With the slightly rounded side of the spool cap positioned toward the left, slide the spool cap onto the spool pin as far as possible to the right so that the spool is moved to the right end of the spool pin.
Memo
● When sewing with fine, cross-wound thread, use the small spool cap, and leave a small space between the cap and the spool.
5. While holding the spool with your right hand, and then pass the thread under the thread guide.
6. Pass the thread under the thread guide cover from the back to the front.
Hold the thread with your right hand so that there is no slack in the thread that is pulled out, and then pass the thread under the thread guide cover with your left hand.
7. Pull the thread to the right, pass it under the hook of the bobbin-winding thread guide, and then wind the thread counterclockwise between the discs, pulling it in as far as possible.
Make sure that the thread passes under the pre-tension disk.
Note
● Make sure that the thread is pulled as far as possible into the pre-tension disk, otherwise the bobbin may not be wound cleanly
8. Put the bobbin onto the bobbin winder shaft and slide the bobbin winder shaft to the right. Turn the bobbin clockwise, by hand, until the spring on the shaft slides into the notch in the bobbin
• Make sure to pull out 7 to 10 cm (2-3/4 to 3-15/16 inches) of thread from the hole on the bobbin.
9. Turn on the sewing machine.
10. While holding the end of the thread, gently press the foot controller or press (start/ stop button) (for models equipped with the start/stop button) to wind the thread around the bobbin a few times. Then stop the machine.
Note
● If the sewing machine is to be operated using the foot controller, connect the foot controller before turning on the machine.
● When the foot controller is plugged in, the start/stop button cannot be used to start sewing (only for models equipped with the start/stop button).
11. Trim the excess thread above the bobbin.
• Pull 1 cm (3/8 inch) of thread from the hole on the bobbin.
12. Slide the sewing speed controller to the right (to set the speed to fast). (For models equipped with the sewing speed controller.)
13. Press the foot controller or press (start/ stop button) (for models equipped with the start/stop button) to start.
14. When the bobbin seems full and begins spinning slowly, take your foot off the foot controller or press (start/stop button) (for models equipped with the start/stop button).
15. Cut the thread, slide the bobbin winder shaft to the left and remove the bobbin.
16. Slide the sewing speed controller back to its original position (for models equipped with the sewing speed controller)
Memo
● When the sewing machine is started or the handwheel is turned after winding the thread around the bobbin, the machine will make a clicking sound; this is not a malfunction.
● The needle bar does not move when you slide the bobbin winding shaft to the right.
REPLACING THE NEEDLE
Checking the needle
Sewing with a bent needle is extremely dangerous since the needle may break while the machine is being operated.
Before using the needle, place the flat side of the needle on a flat surface and check that the distance between the needle and the flat surface is even.
■ Correct needle
■ Incorrect needle
If the distance between the needle and the flat surface is not even, the needle is bent. Do not use a bent needle.
Replacing the needle
Replace the needle as described below. Use the disc-shaped screwdriver and a needle that has been determined to be straight according to the instructions in “Checking the needle”.
1. Raise the needle by turning the handwheel toward you (counterclockwise) so that the mark on the wheel points up. (With models equipped with (needle position button), raise the needle by pressing once or twice.)
2. Turn off the sewing machine
3. Lower the presser foot leve
4. Hold the needle with your left hand, and then use a disc-shaped screwdriver to turn the needle clamp screw counterclockwise to remove the needle.
Note
● The needle can be removed by simply loosening the needle clamp screw about one turn. (If the needle clamp screw is loosened too much, the needle clamp (which holds the needle) may fall off. Therefore, do not loosen the needle clamp screw too much.)
• Do not apply strong force when loosening or tightening the needle clamp screw, otherwise certain parts of the sewing machine may be damaged.
5. With the flat side of the needle toward the rear of the machine, insert the needle until it touches the needle stopper.
6. While holding the needle with your left hand, use the disc-shaped screwdriver to tighten the needle clamp screw by turning it clockwise.
Install the twin needle in the same way.
REPLACING THE PRESSER FOOT
Replacing the presser foot
1. Raise the needle by turning the handwheel toward you (counterclockwise) so that the mark on the wheel points up. (With models equipped with (needle position button), raise the needle by pressing once or twice.)
2. If the sewing machine has been turned on, turn it off.
3. Raise the presser foot lever.
4. Pess the black button at the back of the presser foot holder to release the presser foot.
5. Place a different presser foot below the holder so that the presser foot pin is aligned with the shank in the holder.
Position the presser foot so the letter indicating the presser foot type (J, A, etc.) is positioned to be read.
Note
● The presser foot to be used with each stitch appears in the LCD. To select a stitch, refer to “Selecting a stitch” (page 37).
6. Slowly lower the presser foot lever so that the presser foot pin snaps into the shank in the presser foot holder.
The presser foot is attached.
7. Raise the presser foot lever to check that the presser foot is securely attached.
MAINTENANCE
Simple sewing machine maintenance operations are described below.
Restrictions on oiling
In order to prevent damaging this machine, it must not be oiled by the user.
This machine was manufactured with the necessary amount of oil applied to ensure correct operation, making periodic oiling unnecessary.
If problems occur, such as difficulty turning the handwheel or an unusual noise, immediately stop using the machine, and contact your authorized dealer or the nearest authorized service center.
Precautions on storing the machine
Do not store the machine in any of the locations described below, otherwise damage to the machine may result, for example, rust caused by condensation.
Exposed to extremely high temperatures
Exposed to extremely low temperatures
Exposed to extreme temperature changes
Exposed to high humidity or steam
Near a flame, heater or air conditioner
Outdoors or exposed to direct sunlight
Exposed to extremely dusty or oily environments
Note
In order to extend the life of this machine, periodically turn it on and use it.
Storing this machine for an extended period of time without using it may reduce its efficiency.
Cleaning the machine surface
If the surface of the machine is dirty, lightly soak a cloth in neutral detergent, squeeze it out firmly, and then wipe the surface of the machine. After cleaning it once with a wet cloth, wipe it again with a dry cloth.
CAUTION Unplug the power supply cord before cleaning the machine, otherwise injuries or an electric shock may occur.
Cleaning the race
Sewing performance will suffer if dust collects in the race therefore, it should be cleaned periodically.
1. Switch the machine off and unplug it.
2. Raise the needle and the presser foot.
3. Loosen the presser-foot screw and the needle clamp screw to remove the presser-foot holder and the needle.
4. Slide the needle plate cover release toward you to remove the needle plate cover.
5. Remove the bobbin case.
Grasp the bobbin case, and then pull it out
6. Use the cleaning brush or a vacuum cleaner to remove any dust from the race and its surrounding area.
Note Do not put oil on the race.
7. Insert the bobbin case so that the mark on the bobbin case aligns with the mark on the machine.
• Align the and marks.
• Make sure that the indicated points are aligned before installing the bobbin case.
8. As shown, insert the tab on the needle plate cover into the hole in the needle plate, and then correctly position of the needle plate cover.
• Check that the needle plate cover is flush with the top surface of the machine.
9. From the front, slide the needle plate cover back into position.
TROUBLESHOOTING
If the machine stops operating correctly, check the following possible problems before requesting service. You can solve most problems by yourself. If you need additional help, the Brother Solutions Center offers the latest FAQs and troubleshooting tips.
If the problem persists, contact your dealer or the nearest authorized service center.
Frequent troubleshooting topics
Detailed causes and remedies for common troubleshooting topics are described below. Be sure to refer to this before contacting us.
■ Upper thread tightened up
page 92
■ Tangled thread on wrong side of fabric
page 93
■ Incorrect thread tension
page 96
■ Fabric isIf the bobbin is inserted with the thread unwinding in the wrong direction, sewing will be done with an incorrect thread tension caught in the machine and cannot be removed
page 97
Upper thread tightened up
■ Symptom
• The upper thread appears as a single continuous line.
• The lower thread is visible from the upper side of the fabric. (Refer to the illustration below.)
• The upper thread has tightened up, and comes out when pulled.
• The upper thread has tightened up, and wrinkles appear in the fabric.
• The upper thread tension is tight, and the results do not change even after the thread tension is adjusted.
■ Cause
Incorrect lower threading
If the lower thread is incorrectly threaded, instead of the appropriate tension being applied to the lower thread, it is pulled through the fabric when the upper thread is pulled up. For this reason, the thread is visible from the upper side of the fabric
■ Remedy/check details
Correctly install the lower thread.
1. Turn off the sewing machine.
2. Remove the bobbin from the bobbin case.
3. Place the bobbin in the bobbin case so that the thread unwinds in the correct direction.
• Hold the bobbin with your right hand with the thread unwinding to the left, and hold the end of the thread with your left hand. Then, with your right hand, place the bobbin in the bobbin case.
If the bobbin is inserted with the thread unwinding in the wrong direction, sewing will be done with an incorrect thread tension
4. While holding the bobbin in place with your finger, pass the thread through the slit in the needle plate
• Hold down the bobbin with your right hand, and then pull the end of the thread around the tab with your left hand.
On models equipped with the quick-set bobbin, pull the thread to pass it through the slit in the needle plate, then cut it with the cutter.
Sewing with the correct thread tension is possible after the bobbin has been correctly installed in the bobbin case.
Tangled thread on wrong side of fabric
■ Symptom
• The thread becomes tangled on the lower side of the fabric
• After starting sewing, a rattling noise is made and sewing cannot continue.
• Looking under the fabric, there is tangled thread in the bobbin case.
■ Cause
Incorrect upper threading
If the upper thread is incorrectly threaded, the upper thread passed through the fabric cannot be firmly pulled up and the upper thread becomes tangled in the bobbin case, causing a rattling noise.
■ Remedy/check details
Remove the tangled thread, and then correct the upper threading
1. Remove the tangled thread. If it cannot be removed, cut the thread with scissors.
• For details, refer to “Cleaning the race” on page 89.
2. Remove the upper thread from the machine.
3. Refer to the following steps to correct the upper threading.
• If the bobbin was removed from the bobbin case, refer to “Lower threading” (page 20) and “Remedy/check details” in the section “Upper thread tightened up” (page 92) to correctly install the bobbin.
4. Raise the presser foot using the presser foot lever.
• If the presser foot is not raised, the sewing machine cannot be threaded correctly
5. Raise the needle by turning the handwheel toward you (counterclockwise) so that the mark on the wheel points up, or press (needle position button) (for models equipped with the needle position button) once or twice to raise the needle.
6. Pull some thread off the spool, and then pass the thread under the thread guide.
7. Pass the thread under the thread guide cover from the back to the front.
Hold the thread with your right hand so that there is no slack in the thread that is pulled out, and then pass the thread under the thread guide cover with your left hand.
8. Feed the upper thread as shown in the illustration below.
9. Make sure you guide the thread through the thread take-up lever from right to left as shown in the illustration below.
Sewing is possible only if the thread is securely hooked on the thread take-up lever.
• Make sure that the thread is securely hooked on the thread take-up lever.
10. Put the thread behind the needle bar thread guide above the needle.
The thread can easily be passed behind the needle bar thread guide by holding the thread in your left hand, then feeding the thread with your right hand.
11. Thread the needle according to steps and in “Upper threading” (page 26) or steps through in “Using the needle threader (for models equipped with the needle threader)” (page 26).


 (for models equipped with the start/stop button)
 (for models equipped with the needle position button)


 (start/ stop button) (for models equipped with the start/stop button) to wind the thread around the bobbin a few times. Then stop the machine.


 (start/ stop button) (for models equipped with the start/stop button) to start.


 (needle position button), raise the needle by pressing


 (needle position button), raise the needle by pressing


 mark on the bobbin case aligns with the
  mark on the machine.


 (needle position button) (for models equipped with the needle position button) once or twice to raise the needle.


 and
and  in “Upper threading” (page 26) or steps
  through
  in “Using the needle threader (for models equipped with the needle threader)” (page 26).