User manual Sewing Machine
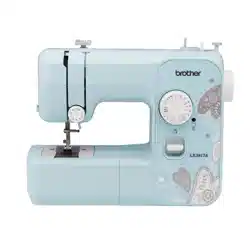
THE MAIN PARTS
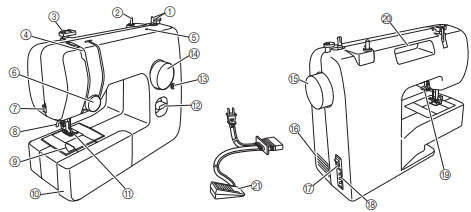
1. Bobbin winder (Page 13)
This winds the thread onto the bobbin for use as the lower thread.
2. Spool pin (Page 13, 17)
This holds the spool of thread.
3. Thread guide (Page 13, 17)
This is used when winding the thread onto the bobbin and then threading the machine.
4. Thread take-up lever (Page 18)
5. Hole for extra spool pin (Page 26)
This holds a second spool of thread for sewing with the twin needle.
6. Upper tension-control dial (Page 27)
This controls the tension of the upper thread.
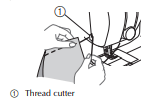
7. Thread cutter (Page 24)
Pass the threads through the thread cutter to cut them.
8. Needle threader (Page 19)
(This is only available on certain models.)
9. Quick-set bobbin (Page 16, 21)
(This is only available on certain models.)
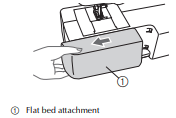
10. Flat bed attachment with accessory compartment (Page 6)
11. Presser foot (Page 10)
12. Reverse sewing lever (Page 12)
Push this lever to stitch in the reverse direction.
13. Buttonhole fine-adjustment screw (Page 34)
14. Pattern selection dial (Page 11)
Rotate the dial in either direction to choose the stitch you want.
15. Handwheel
Used to manually raise and lower the needle.
16. Air vent
The air vent allows the air surrounding the motor to circulate. Do not cover the air vent while the machine is being used.
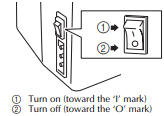
17. Main power and sewing light switch (Page 8)
You can turn the main power and sewing light switch on and off.
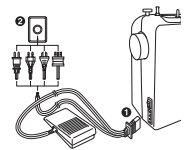
18. Foot controller jack / socket (Page 7)
Plug in the foot controller plug and connect the machine to the power supply.
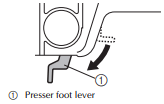
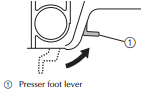
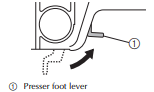
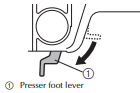
19. Presser foot lever (Page 17)
Used to raise and lower the presser foot.
20. Handle
Carry the machine by its handle when transporting.
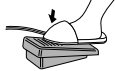
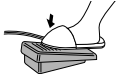
21. Foot controller (Page 8)
You can use this to control the sewing speed, and to start and stop sewing.
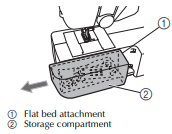
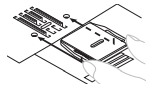
Flat bed attachment
The accessories can be stored in a compartment inside the flat bed attachment.
1. Slide the flat bed attachment to the left to open it.
USING YOUR SEWING MACHINE
Connecting plugs
1 Connect the foot controller plug to the machine.
2 Connect the power supply plug to a wall outlet.
Note
- If a power outage occurs while the sewing machine is being operated, turn off the main power and unplug the power supply cord. When restarting the sewing machine, follow the necessary procedure to correctly operate the machine. (For U.S.A. only)
- This appliance has a polarized plug (one blade wider than the other). To reduce the risk of electric shock, this plug is intended to fit in a polarized outlet only one way. If the plug does not fit fully in the outlet, reverse the plug. If it still does not fit, contact a qualified electrician to install the proper outlet. Do not modify the plug in any way.
Main power and sewing light switch
This switch turns the main power and sewing light on or off.
Replacing the needle
1 Turn off the machine.
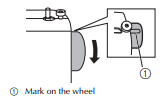
2 Raise the needle by turning the handwheel toward you (counterclockwise) so that the mark on the wheel points up.
3 Lower the presser foot lever.
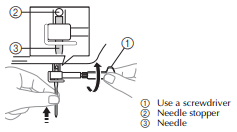
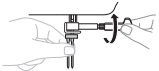
4 Hold the needle with your left hand, and then use a screwdriver to turn the needle clamp screw counterclockwise to remove the needle.
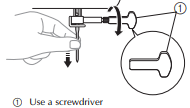
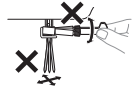
- Do not use excessive force when loosening or tightening the needle clamp screw, otherwise certain parts of the sewing machine may be damaged.
5 With the flat side of the needle toward the back of the machine, insert the needle until it touches the needle stopper. Next, tighten the needle clamp using a screwdriver.
Install the twin needle in the same way.
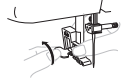
Changing the presser foot
You will have to change the presser foot depending on what you want to sew and how.
1 Turn off the machine. Raise the presser foot lever.
2 Raise the needle by turning the handwheel toward you (counterclockwise) so that the mark on the wheel points up.
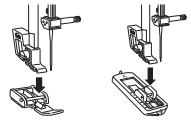
3 Remove the presser foot by pulling it vertically downward. OR Press the black button at the back of the presser foot holder to release the presser foot.
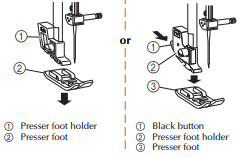
Note Depending on the type of presser foot holder, the method of releasing the presser foot will vary.
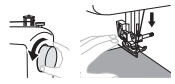
4 Put a different presser foot on the needle plate so that the bar on the presser foot is in line with the slot on the shank.
5 Lower the presser foot lever and fix the presser foot onto the shank. If the presser foot is in the correct place, the bar should snap in.
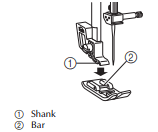
- Presser foot installation orientation
THREADING THE MACHINE
Winding the bobbin
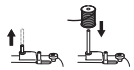
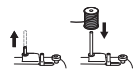
1 Pull up the spool pin and put a spool of thread on this pin.
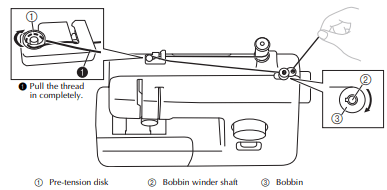
2 While holding the thread from the spool with your right hand, pass the thread toward you, in the groove on the thread guide. Then, pass the thread around the pre-tension disk and pull the thread in completely.
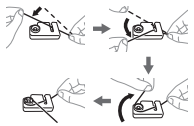
3 Pass the end of the thread through the hole on the bobbin from the inside of the bobbin.

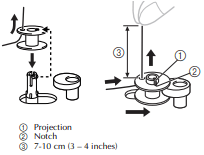
4 Put the bobbin onto the bobbin winder shaft and slide the bobbin winder shaft to the right. Turn the bobbin clockwise, by hand, until the projection slides into the notch of the bobbin.
- Make sure to pull out 7 to 10 cm (3-4 inches) of thread from the hole on the bobbin.
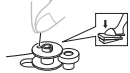
5 Turn on the machine.
6 While holding the end of the thread, gently press the foot controller to wind the thread around the bobbin a few times. Then stop the machine.
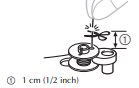
7 Trim the excess thread above the bobbin.
- Leave 1 cm (1/2 inch) of thread from the hole on the bobbin.
8 Press the foot controller to start.
9 When the bobbin seems full and begins spinning slowly, take your foot off the foot controller.
10 Cut the thread, slide the bobbin winder shaft to the left and remove the bobbin.
Note
- When the sewing machine is started or the handwheel is turned after winding the thread around the bobbin, the machine will make a clicking sound; this is not a malfunction.
- The needle bar does not move when you slide the bobbin winder shaft to the right.
Lower threading
1 Prepare the bobbin wound properly before threading the lower thread.
- See page 13 for the details about bobbin winding.
2 Raise the needle by turning the handwheel toward you (counterclockwise) and raise the presser foot lever.
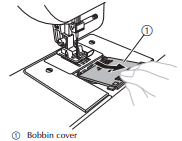
3 Remove the bobbin cover by sliding it and lift toward you.
4 Put the bobbin in so the thread comes out in the direction shown by the arrow.
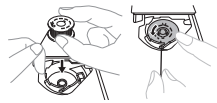
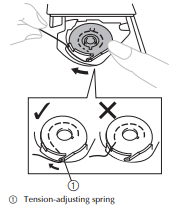
5 Hold the end of the thread, push the bobbin down with your finger, and then pass the thread through the slit, as shown.
- If the thread is not correctly inserted through the tension-adjusting spring of the bobbin case, it may cause incorrect thread tension.
6 Replace the bobbin cover. Put the projection into the bobbin race retainer groove and push closed.
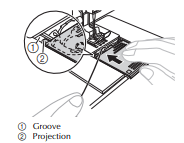
- Make sure that the end of the thread comes out from the cover toward the rear of the machine (as shown in the illustration).
- Draw up the lower thread before starting sewing. Refer to “Drawing up the lower thread” on page 21 after threading the upper thread.
Upper threading
1 Turn off the machine.
2 Raise the presser foot lever.
3 Raise the needle by turning the handwheel toward you (counterclockwise) so that the mark on the wheel points up.
- If the needle is not correctly raised, the sewing machine can not be threaded.
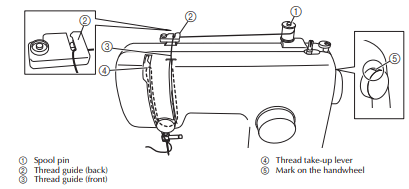
4 Pull up the spool pin and put a spool of thread on this pin.
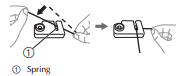
5 While holding the thread from the spool with your right hand, pass the thread toward you, in the groove on the thread guide.
- Make sure that the spring in the groove catches the thread.
6 Feed the upper thread as shown in the following illustration.
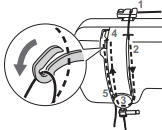
7 Make sure you guide the thread through the thread take-up lever from right to left as shown in the following illustration.
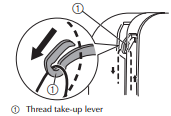
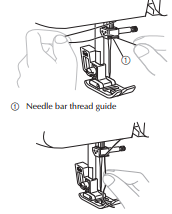
8 Put the thread behind the guide above the needle.
- The thread can easily be passed behind the needle bar thread guide by holding the thread in your left hand, then feeding the thread with your right hand.
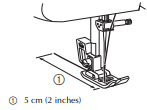
9 Thread the needle from front to back leaving a thread tail of about 5 cm (2 inches).
- If your sewing machine is equipped with a needle threader, use the needle threader to thread the needle (see next section).
Note
- Make sure you raise the presser foot lever and the thread take-up lever before you feed the upper thread.
- If you incorrectly feed the thread you may cause sewing problems.
SEWING BASICS
Starting sewing
1 Turn on the machine.

2 Raise the needle by turning the handwheel toward you (counterclockwise) so that the mark on the wheel points up.
3 Turn the pattern selection dial to select a stitch (see page 11).
4 Change the presser foot (see page 10).
5 Raise the presser foot lever.
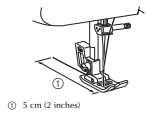
6 Place the fabric under the presser foot, pass the thread under the presser foot, and then pull out about 5 cm (2 inches) of thread toward the rear of the machine.
7 While holding the end of the thread and the fabric with your left hand, turn the handwheel toward you (counterclockwise) with your right hand to lower the needle to the starting point of the stitching.
8 Lower the presser foot lever.
9 Slowly press down on the foot controller.
- The machine starts sewing.
10 Take your foot off the foot controller.
The machine stops sewing.
- You can use reverse sewing for back tacking and reinforcing seams by pressing the reverse sewing lever. Refer to “Reverse sewing lever” on page 12 for the details.
11 Raise the needle by turning the handwheel toward you (counterclockwise).
12 Raise the presser foot lever.
13 Pull the fabric to the left side of the machine, and then pass the threads through the thread cutter to cut them.
Trial sewing
A trial piece of fabric should be sewn. Use a piece of fabric and thread that are the same as those used for your project, and check the thread tension and stitch length and width.
Changing the sewing direction
Stop the machine with the needle in the fabric at the point where you want to change the sewing direction, and then raise the presser foot lever. Using the needle as a pivot, turn the fabric, lower the presser foot lever, and then continue sewing.
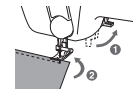
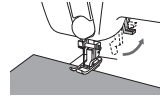
Sewing thick fabrics
If the fabric does not fit under the presser foot
If the fabric does not fit easily under the presser foot, raise the presser foot lever even higher to bring the presser foot to its highest position.
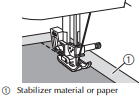
Sewing thin fabrics
When sewing thin fabrics, the stitching may become misaligned or the fabric may not feed correctly. If this occurs, place thin paper or stabilizer material under the fabric and sew it together with the fabric. When you have finished sewing, tear off any excess paper.
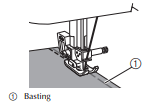
Sewing stretch fabrics
First, baste the pieces of fabric together, and then sew without stretching the fabric.
Stitching cylindrical pieces
Removing the flat bed attachment makes it easier to sew cylindrical pieces such as cuffs and pant legs, or hardto-reach areas.
1 Slide the flat bed attachment to the left to release it.
- With the flat bed attachment removed, free-arm sewing is possible.
2 Slide the part that you wish to sew onto the arm, and then sew from the top.
Sewing with a twin needle (Option)
We have designed your machine so you can sew with this needle and two top threads. You can use the same color or two different colors of thread for making decorative stitches.
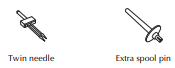
- Attaching the twin needle
Attach the twin needle in the same way as a single needle (see page 8–9). The flat side of the needle should face toward the back and the rounded side should face toward you.
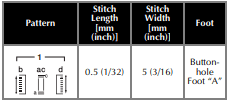
Making a buttonhole
Memo
- We recommend that you practice making a buttonhole on a scrap piece of fabric before you try it on an actual garment.
- When making buttonholes on soft fabrics, place a stabilizer material on the underside of the fabric.
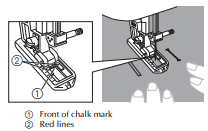
1 Using tailor’s chalk, mark the position and length of the buttonhole on the fabric.

2 Attach the buttonhole foot and push the frame back until it stops with the plastic insert at the front of the frame.
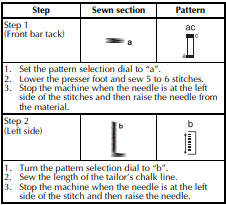
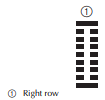
3 You need to sew the front bar tack first. Line the bar tack mark under the center of the presser foot and match it up to the two lines on the presser foot.
- Securing the Stitching and Cutting the Buttonhole
1 To secure the stitching, turn the material 90 degrees counterclockwise and sew straight stitches to the end of the front bar tack of the buttonhole.
2 Remove the material from the machine. We recommend that you put pins across both ends of the buttonhole to prevent the stitches from being cut.
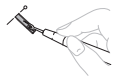
3 Cut an opening in the middle of the buttonhole with the seam ripper tool. Be careful not to cut through any stitches.
Adjusting buttonholes
If the stitching on the two sides of the buttonhole is not the same, you can make the following adjustments.
1 After sewing the left side of the buttonhole, stitch the right side and observe the feeding.
2 If the left side is too open or tight compared with the right side, adjust the buttonhole fine-adjustment screw as described in the following paragraphs.
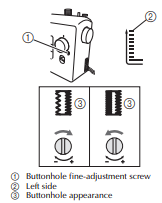
If the left side is too open, turn the buttonhole fine-adjustment screw with a large screwdriver in the “–” direction. If the left side is too tight, turn the buttonhole fine-adjustment screw with a large screwdriver in the “+” direction.
- This adjustment ensures both sides of the buttonhole are the same.
USING ATTACHMENTS AND APPLICATIONS
Zipper insertion
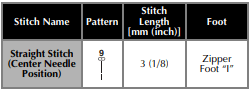
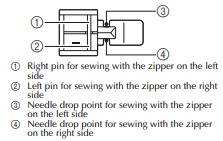
You can use the zipper foot “I” to sew different types of zippers, and can easily position it to the right or left side of the needle.
When sewing with the zipper on the right side, attach the shank to the left pin of the zipper foot. When sewing with the zipper on the left side, attach the shank to the right pin of the zipper foot.
1 Prepare the fabric with the zipper basted on the wrong side.
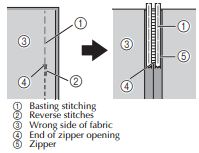
2 Turn off the machine. Attach the zipper foot “I”.
3 Turn on the machine.
4 With the right side of the fabric facing up, continue sewing with the zipper on the right side of the presser foot.
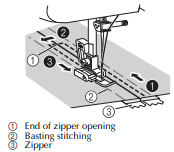
- Sew the stitching in order, from 1 to 3.
5 When you have finished sewing, remove the basting stitching.
Gathering
1 Loosen the tension of the upper thread so that the lower thread lies on the underside of the material.
2 Sew a single row (or many rows) of straight stitches.
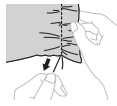
3 Pull the lower threads to gather the material.
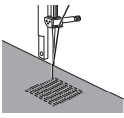
Darning

1 Turn off the machine. Place the darning plate on the needle plate, then turn on the machine.
2 Either remove both the presser foot and presser foot holder assembly and then lower the presser foot lever.
3 Put the section you want to darn under the presser foot together with fabric for reinforcement.
4 Turn on the machine.
5 Begin sewing by alternating between gently drawing the work away from you and pulling it toward you.
6 Repeat this motion until the section being darned is filled with parallel lines of stitching.
APPENDIX
MAINTENANCE
Restrictions on oiling
In order to prevent damaging this machine, it must not be oiled by the user.
This machine was manufactured with the necessary amount of oil applied to ensure correct operation, making periodic oiling unnecessary.
If problems occur, such as difficulty turning the handwheel or an unusual noise, immediately stop using the machine, and contact your authorized Brother Service Center or the nearest authorized Brother Service Center.
Precautions on storing the machine
Do not store the machine in any of the locations described below, otherwise damage to the machine may result, for example, rust caused by condensation.
- Exposed to extremely high temperatures
- Exposed to extremely low temperatures
- Exposed to extreme temperature changes
- Exposed to high humidity or steam
- Near a flame, heater or air conditioner
- Outdoors or exposed to direct sunlight
- Exposed to extremely dusty or oily environments
Note In order to extend the life of this machine, periodically turn it on and use it. Storing this machine for an extended period of time without using it may reduce its efficiency
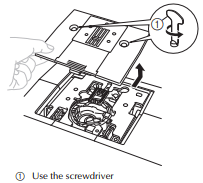
Cleaning
1 Turn off the machine and unplug it.
2 Raise the needle and the presser foot.
3 Loosen the presser foot screw and the needle clamp screw to remove the presser foot holder and the needle.
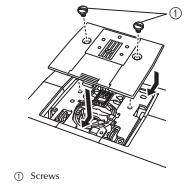
4 Using the screwdriver, remove the two screws. Lift up the needle plate as shown in the illustration, and then slide the needle plate to the left to remove it.
5 Grasp the bobbin case, and then lift it out to the left.
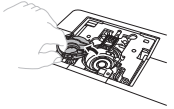
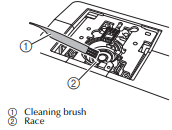
6 Use the cleaning brush or a vacuum cleaner to remove any dust from the bobbin race and its surrounding area.
7 Insert the bobbin case so that the ▲ mark on the bobbin case aligns with the ● mark on machine as shown below.
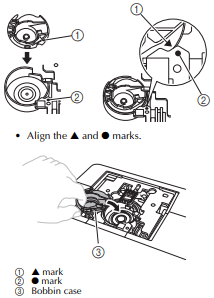
- Make sure that the indicated points are aligned before installing the bobbin case.
8 Install the needle plate, and then tighten the screws.
- Make sure that you install the needle plate securely.
TROUBLESHOOTING
The sewing machine does not work.
- The main power switch is turned off.
Turn on the main power switch.
- The bobbin-winder shaft is pushed to the right.
Move the bobbin-winder shaft to the left.
- You have not used the foot controller properly.
Use the foot controller properly
Fabric being sewn with the machine cannot be removed.
- Thread is tangled below the needle plate.
Lift up the fabric and cut the threads below it, and clean the race.
The needle breaks.
- The needle is incorrectly installed.
Correctly install the needle.
- The needle clamp screw is loose.
Use the screwdriver to firmly tighten the screw.
- The needle is bent or blunt.
Replace the needle.
- The upper thread was not threaded correctly.
Correct the upper threading.
- You have not used the right combination of fabric, thread and needle.
Choose a thread and needle that are appropriate for the type of fabric.
- The presser foot you are using is not appropriate for the type of stitch that you want to sew.
Attach the presser foot that is correct for the type of stitch that you want to sew.
- The upper thread tension is too tight.
Loosen the upper thread tension.
- You are pulling the fabric too much.
Lightly guide the fabric.
- You have not fitted the spool properly.
Fit the spool properly.
- The area around the hole in the needle plate or the presser foot is scratched.
Replace the needle plate. Contact your retailer or the nearest authorized Brother Service Center.
- The bobbin case is scratched.
Replace the bobbin case. Contact your retailer or the nearest authorized Brother Service Center.
- You have not used a bobbin that has been designed for this machine.
Use a bobbin that has been designed for this machine.
The upper thread breaks
- You have not threaded the upper thread properly. (For example, you have not fitted the spool properly, or the thread has come out of the guide above the needle.)
Correct the upper threading.
- There are knots or tangles in the thread.
Remove any knots or tangles.
- The needle is not appropriate for the thread you are using.
Choose a needle that is appropriate for the type of stitch.
- The upper thread tension is too tight.
Loosen the upper thread tension.
- The needle is bent or blunt.
Replace the needle.
- The needle is incorrectly installed.
Correctly install the needle.
- The area around the hole in the needle plate or the presser foot is scratched.
Replace the needle plate. Contact your retailer or the nearest authorized Brother Service Center.
- The bobbin case is scratched, or has a burr on it.
Replace the bobbin case. Contact your retailer or the nearest authorized Brother Service Center.
- You have not used a bobbin that has been designed for this machine.
Use a bobbin that has been designed for this machine.
The lower thread is tangled or breaks.
- You have not wound the bobbin thread properly.
Wind the bobbin thread properly.
- The bobbin is scratched or does not turn smoothly.
Replace the bobbin.
Remove the tangled thread and clean the race.
- You have not used a bobbin that has been designed for this machine.
Use a bobbin that has been designed for this machine.
- Bobbin is set incorrectly.
Reset the bobbin thread correctly.
The thread tension is incorrect.
- You have not threaded the upper thread properly.
Correct the upper threading.
- You have not wound the bobbin thread properly.
Wind the bobbin thread properly.
- You have not threaded the right combination of thread and needle for the fabric you are using.
Choose a thread and needle that are appropriate for the type of fabric.
- You have not attached the presser foot holder properly.
Attach the presser foot holder properly.
- The thread tension is incorrect.
Adjust the tension of the upper thread.
- You have not used a bobbin that has been designed for this machine.
Use a bobbin that has been designed for this machine
- Bobbin is set incorrectly.
Reset the bobbin thread correctly.
The fabric is wrinkled.
- You have not threaded the upper thread properly or fitted the bobbin properly.
Thread the upper thread and wind the bobbin thread properly.
- You have not fitted the spool properly.
Fit the spool properly.
- You have not used the right combination of fabric, thread and needle.
Choose a thread and needle that are appropriate for the type of fabric.
- The needle is bent or blunt.
Replace the needle.
- If thin fabrics are being sewn, the fabric is not being fed correctly.
Sew with stabilizer material under the fabric.
- The presser foot you are using is not appropriate for the type of stitch that you want to sew.
Attach the presser foot that is correct for the type of stitch that you want to sew.
- The thread tension is incorrect.
Adjust the tension of the upper thread.
Stitches are skipped.
- You have not threaded the upper thread properly.
Correct the upper threading.
- You have not used the right combination of fabric, thread and needle.
Choose a thread and needle that are appropriate for the type of fabric.
- The needle is bent or blunt.
Replace the needle.
- The needle is incorrectly installed.
Correctly install the needle.
- Dust has accumulated under the needle plate or in the bobbin case.
Remove the needle plate and clean the plate and the bobbin case.
The needle threader can not be used.
- The needle has not been raised to the correct position.
Raise the needle by turning the handwheel toward you (counterclockwise) so that the mark on the wheel points up.
- You have not inserted the needle properly.
Insert the needle properly.
The stitch is not sewn correctly
- The presser foot that you are using is not correct for the type of stitch.
Attach the presser foot that is correct for the type of stitch that you want to sew.
- The thread tension is incorrect.
Adjust the tension of the upper thread.
Remove the tangled thread. If the thread is tangled in the bobbin case, clean the bobbin case.
The fabric does not feed.
- The darning plate is fitted on the needle plate.
Remove the darning plate.
- You have not used the right combination of fabric, thread and needle.
Choose a thread and needle that are appropriate for the type of fabric.
- The thread is tangled, for example, in the race.
Remove the tangle thread. If the thread is tangled in the race, clean the race.
- The presser foot you are using is not appropriate for the type of stitch that you want to sew.
Attach the presser foot that is correct for the type of stitch that you want to sew.