USER GUIDE Microwave Oven
Features
- 900 Watts of power
- Auto cook setting
- Express cook setting
- LED display
- Child lock
- Power saving mode
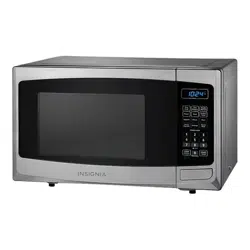
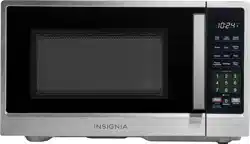
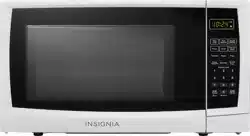
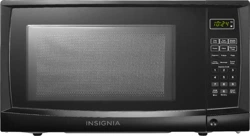
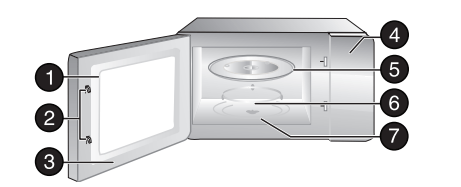
Microwave oven
| # |
ITEM |
DESCRIPTION |
| 1 |
Observation window |
Use to view the item being cooked |
| 2 |
Safety interlock system |
Prevents the oven from operating when the door is open. |
| 3 |
Door assembly |
Protects you from exposure to excessive microwave energy |
| 4 |
Control panel |
Use to set cooking times and enter other information as needed. |
| 5 |
Glass turntable |
Allows food to cook evenly. |
| 6 |
Turntable ring assembly |
Allows the turntable to rotate to cook food evenly. |
| 7 |
Turntable shaft |
Rotates the turntable assembly. |
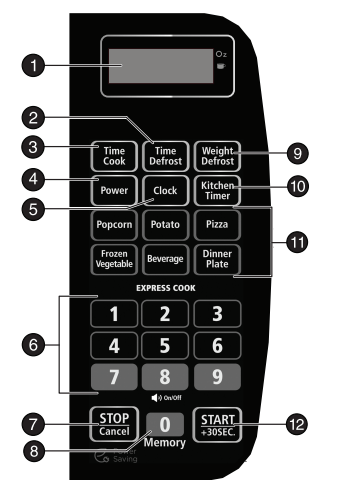
Control panel
| # |
ITEM |
DESCRIPTION |
| 1 |
Display |
In standby mode, displays the time. In cooking mode, displays cooking time, weight, and other information. |
| 2 |
Time Defrost |
Press this button, then enter the time you want for an item to defrost |
| 3 |
Time Cook |
Press this button, then enter the time you want for an item to cook |
| 4 |
Power |
Press to set the power level of your microwave, then press the number buttons to set the level you want (0-10). See “Understanding and setting the power level” on page 13. |
| 5 |
Clock |
Press to set the clock, then press the number buttons to enter the current time. |
| 6 |
Number buttons |
Press to enter cook time, defrost time, clock time, and other information. |
| 7 |
STOP/Cancel |
Press to stop the cooking process. Press again to cancel the cooking operation. In standby mode, press for less than three seconds to cook in energy saving mode. See “Using the energy saving mode” on page 17. In standby mode, press and hold for three seconds or more to set the child lock. See “Using the child-lock” on page 18. |
| 8 |
Memory |
Press this button to set up to three memorized procedures. |
| 9 |
Weight Defrost |
Press this button, then enter the weight of the item you want to defrost. The cooking time is set automatically. |
| 10 |
Kitchen Timer |
Press this button, then enter the time you want to count down |
| 11 |
Auto menu |
Press one of these buttons to automatically cook the item indicated |
| 12 |
Start/+30 SEC |
In standby mode, press this button to begin cooking. While cooking, press this button to add 30 seconds to cooking time |
Setting up your microwave oven
1 Remove the oven and all materials from the carton and oven cavity.
2 Examine the oven for any damage, such as dents or a broken door. Do not install or use the oven if any damage is found.
3 Remove any protective film from the microwave oven cabinet surface, the door, and the control panel.
Note Do not remove the light brown mica cover in the oven cavity. This cover protects the magnetron.
4 Place the oven on a level surface that provides enough open space for the intake and outlet vents.
Notes
- A minimum clearance of 3.0 inches (7.5 cm) is required between the oven and any adjacent walls. One side must be open
- Leave a minimum clearance of 12 in. (30 cm) above the oven.
- Do not remove the legs from the bottom of the oven.
- Blocking the intake and/or outlet openings can damage the oven.
- Place the oven as far away from radios and TVs as possible. Operation of the microwave oven may cause interference to your radio or TV reception.
5 Plug your oven into a standard household outlet. Be sure the voltage and the frequency is the same as the voltage and the frequency on the rating label.
Caution Do not mount your oven under a cabinet.
- Do not install your oven over a range cooktop or other heat-producing appliance. If installed near or over a heat source, the oven could be damaged and the warranty would be voided.
Installing the turntable
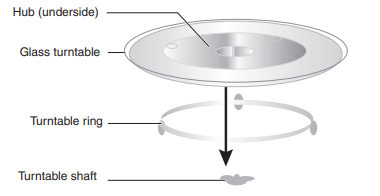
Notes
- Never place the glass tray upside down. The glass tray should never be restricted.
- Both the glass tray and turntable ring must always be used during cooking.
- Always place all food and containers of food on the glass tray for cooking.
- If the glass tray or turntable ring cracks or breaks, contact your nearest authorized service center.
1 Place the turntable ring in the round depression in the bottom of the microwave oven so that it turns freely.
2 Place the glass turntable (flat side up) on the turntable ring so that the hub engages the turntable shaft in the bottom of the oven. The glass turntable should not turn freely when it is correctly installed.
Using your microwave oven
Understanding and setting the power level
The following table shows the 11 power levels available.

1 Press Power once. The display shows “PL10” (the default power is 100%).
2 Press the number keys to adjust the power level. For example, press 5 to set the power level to 50%.
Setting the clock
1 Press Clock.
2 Press the number keys to enter the current time.
3 Press Clock to confirm the setting.
Note If the numbers input are not within the range of 1:00--12:59, the setting is invalid until valid numbers are input.
Using the kitchen timer
1 Press Kitchen Timer.
2 Press the number keys and enter the time you want (the maximum time is 99 minutes and 99 seconds).
3 Press START/+30SEC. to confirm the setting. When the time reaches 0, the buzzer rings five times and the display shows the current time.
Note While the kitchen timer is running the oven cannot be programmed.
Cooking in your microwave oven
1 Press Time Cook once.
2 Press the number keys to enter the cooking time you want (the maximum cooking time is 99 minutes and 99 seconds). For example, press 1, 5, 0, 0 to cook for 15 minutes.
3 Press Power once. The display shows “PL10” (the default power is 100%).
4 Press the number keys to adjust the power level. For example, press 5 to set the power level to 50%.
5 Press START/+30SEC. to start cooking
Cooking quickly
From standby mode you can instantly cook something at 100% power by selecting a cooking time from one to six minutes.
1 Press any number from 1 to 6, then press START/+30SEC.. Cooking begins immediately.
2 Press START/+30SEC. again to increase cooking time in 30 second increments. The maximum cooking time is 99 minutes and 99 seconds.
OR
1 Press START/+30SEC. to cook the item at 100% power level for 30 seconds.
2 Press START/+30SEC. again to increase cooking time in 30 second increments. The maximum cooking time is 99 minutes and 99 seconds.
Defrosting in your microwave oven
Defrosting by weight
1 Press Weight Defrost. The display shows “dEF1.”
2 Press the number buttons to input the weight of the item to be defrosted (in ounces). Input weight must be between four and 100 ounces.
3 Press START/+30SEC. to start defrosting and the remaining cooking time is displayed.
Defrosting by time
1 Press Time Defrost. The display shows “dEF2.”
2 Press the number buttons to input the defrosting time you want. The time range must be between 00:01 and 99:99. 3 The default microwave power for Time Defrost is power level
3. If you want to change the power level, press Power once. The display shows “PL 3."
4 Press the number button of the power level you want.
5 Press START/+30SEC. to start defrosting. The remained cooking time is displayed
Cooking popcorn
1 Press Popcorn repeatedly until the weight of popcorn you want shows on the display. The display cycles through “1.75”>”3.0”>”3.5” (oz.).
2 Press START/+30 SEC.. When the popcorn is done popping, the buzzer sounds five times and the oven returns to standby mode.
Cooking potatoes
1 Press Potato repeatedly until the number of potatoes you want to cook shows on the display. The display cycles through “1”>”2”>”3" medium potatoes.
2 Press START/+30 SEC.. When the food is cooked, the buzzer sounds five times and the oven returns to standby mode.
Cooking frozen vegetables
1 Press Frozen Vegetable repeatedly until the weight of the frozen vegetables you want to cook shows on the display. The display cycles through “4.0”>”8.0”>”16.0” (oz.).
2 Press START/+30 SEC.. When the food is cooked, the buzzer sounds five times and the oven returns to standby mode.
Heating beverages
1 Press Beverage repeatedly until the number of cups you want to heat shows on the display. The display cycles through “1”>”2”>”3” cups (one cup is approximately 4 oz. [120 ml]).
2 Press START/+30 SEC.. When the beverage is heated the buzzer sounds five times and the oven returns to standby mode.
Heating a dinner plate
1 Press Dinner Plate repeatedly until the size of the meal (in ounces) you want to heat shows on the display. The display cycles through “9.0”>”12.0”>”18.0” (oz.).
2 Press START/+30 SEC.. When the meal is heated, the buzzer sounds five times and the oven returns to standby mode.
Heating pizza
1 Press Pizza repeatedly until the size of the pizza (in ounces) you want to heat shows on the display. The display cycles through “4.0”>”8.0”>”14.0” (oz.).
2 Press START/+30 SEC.. When the pizza is cooked, the buzzer sounds five times and the oven returns to standby mode.
Using the memory function
You can set up to three memory settings for frequently used cook times and power levels.
To memorize a procedure:
The following procedure represents an EXAMPLE of how to set memory #2 to cook something for 3 minutes and 20 seconds at 80% power.
1 Press 0/MEMORY twice, until the display shows “2” (for memory #2).
2 Press Time Cook once, then press 3, 2, and 0 (for 3:20).
3 Press Power once. When “PL10” appears on the display, press 8. The display shows “PL8” (for 80% power).
4 Press START/+30 SEC. to save the setting in memory. The buzzer sounds once, then the oven returns to standby mode. If you press START/+30SEC. again, the procedure will be saved as memory #2 and cooking begins. The procedure remains in memory. The procedure needs to be reset if the oven loses power.
To use a memorized procedure:
1 Put the item to be cooked into the oven and close the door.
2 Press 0/MEMORY repeatedly to cycle through memory 1, 2, or 3. The display shows “1”, “2,” or “3.” Stop when you get to the memorized procedure you want to use.
3 Press START/+30 SEC. to use the procedure.
Using multi-stage cooking
Up to two stages can be used to cook your food. For example, you can defrost a meal, then cook it.
In this example, the food will be cooked with 80% power for five minutes, then 60% power for 10 minutes.
Note Auto cooking cannot be used with multi-stage cooking.
1 Put the item to be cooked into the oven and close the door.
2 Press Time Cook, then press 5, 0, and 0 to set the cooking time to five minutes.
3 Press Power, then press 8 to set the power level for 80% power.
4 Press Time Cook, then press 1, 0, 0, and 0 to set the second cooking time to10 minutes.
5 Press Power, then press 6 to set the second power level to 60% power.
6 Press START/ +30 SEC. to begin cooking.
Using the energy saving mode
Energy saving mode turns off the LED display to save power.
- In standby mode, press the “STOP/Cancel” once (for less than 3 seconds to avoid starting the child lock function), then release.
OR
- In child-lock mode, press the “STOP/Cancel” once (for less than 3 seconds), then release.
Note Energy saving mode only works if the door is closed.
Checking the time and power level while cooking
- To check the time while cooking a meal, press Clock. The display shows the current time for three seconds, then returns to the cooking time remaining.
- To check the power level while cooking a meal, press Power. The display shows the power level being used for three seconds, then returns to the cooking time remaining.
Using the child-lock
- To lock the oven — Press and hold STOP/Cancel for three seconds. The oven sounds a long beep and the display shows
 , indicating that the lock is active.
- To unlock the oven — When the oven is locked, press and hold STOP/CANCEL for three seconds. The oven sounds a long beep, indicating that lock is released.
Turning off the buzzer
1 In standby mode, press and hold number 8 on the control panel for three seconds. A long beep sounds and the buzzer is turned off.
2 To turn the buzzer back on, press and hold the number 8 button on the control panel for three seconds. A long beep sounds and the buzzer is turned back on.
Troubleshooting
If you have a problem with your oven, review the following chart for a possible solution. If the oven still does not work properly, contact the nearest authorized service center.
| PROBLEM |
POSSIBLE CAUSE |
POSSIBLE SOLUTION |
| Oven will not start |
The electrical cord is not plugged in. |
Plug in the electrical cord. |
| |
The door is open. |
Close the door and try again. |
| |
The wrong operation is set. |
Check the instructions and try again. |
| Arching or sparking in the oven |
You are attempting to use incorrect materials in the oven. |
Use only microwave-safe materials. |
| |
You are attempting to use the oven when it’s empty |
Do not operate the oven when it’s empty. |
| |
Spilled food remains in the oven. |
Clean the oven with a wet towel |
| Unevenly cooked foods |
You are attempting to use incorrect materials in the oven. |
Use only microwave-safe materials. |
| |
The food is not defrosted completely |
Defrost the food completely before attempting to cook it. |
| |
The cooking time or power level is not adequate to cook the food. |
Use the correct cooking time and power level. |
| |
The food is not turned or stirred. |
Turn or stir the food |
| Overco |
The cooking time or power level is not adequate to cook the food. |
Use the correct cooking time and power level. |
| Undercooked foods |
You are attempting to use incorrect materials in the oven |
Use only microwave-safe materials. |
| |
The food is not defrosted completely. |
Defrost the food completely before attempting to cook it. |
| |
The cooking time or power level is not adequate to cook the food. |
Use the correct cooking time and power level. |
| |
The oven ventilation ports are blocked or restricted. |
Make sure that the ventilation ports are not blocked or restricted. |
| Improper defrosting |
You are attempting to use incorrect materials in the oven. |
Use only microwave-safe materials |
| |
The cooking time or power level is not adequate to cook the food. |
Use the correct cooking time and power level. |
| |
The food is not turned or stirred. |
Turn or stir the food |
Maintaining your microwave oven
Keep your microwave oven clean, especially the interior of the oven.
- Clean the exterior with a damp cloth or sponge. Do not allow water or cleaning solution to drip into the ventilation ports.
- Clean the interior with a damp cloth or sponge.
Specifications
| Model |
NS-MW09SS8 |
| Rated voltage |
120 V~60 Hz |
| Rated input power (microwave) |
1350 W |
| Rated output power (microwave) |
900 W |
| Oven capacity |
0.9 Cu. ft. |
| Turntable diameter |
10.6 in. (270 mm) |
| External dimensions (WxDxH) |
19.1 x 14.8 x 11.5 in. (485 x 375 x 293 mm) |
| Internal dimensions (WxDxH) |
12.4 x 13.7 x 8.7 in. (314 x 347 x 221mm) |
| Certifications |
UL approved |
| Power cord length |
39.4 in. (1m) |
| Net weight |
27.3 lbs. (12.4 kg) |