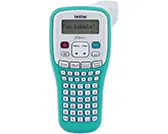
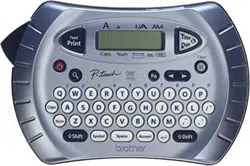
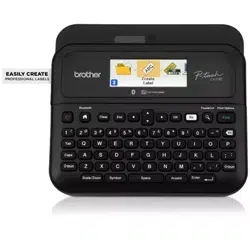
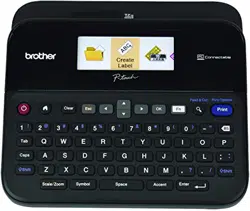
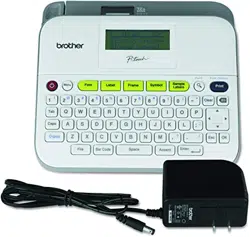
User manual Label Maker
Power Supply and Tape Cassette
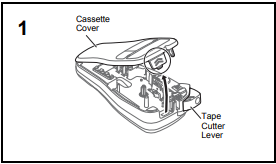
Open the Cassette Cover by pressing the above indicated area at the top end of the machine.
If a Tape Cassette is already installed, remove it by pulling it straight up. Also, if batteries are already installed, remove them.
- Make sure that the power is turned off when replacing batteries or Tape Cassettes.
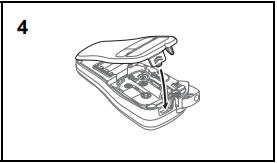
Insert six new AAA alkaline batteries (LR03) or fully charged Ni-MH batteries (HR03), making sure that their poles point in the correct directions.
Users of alkaline batteries: Always replace all six batteries at the same time with brand new ones.
Users of Ni-MH batteries: Always replace all six batteries at the same time with fully charged ones.
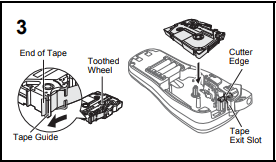
Insert a Tape Cassette, making sure that it locks into place.
- Make sure that the end of the tape feeds under the tape guides.
- Use only Brother TZe tapes with this machine.
Securely close the Cassette Cover, making sure that it locks into place.
LCD Display & Keyboard
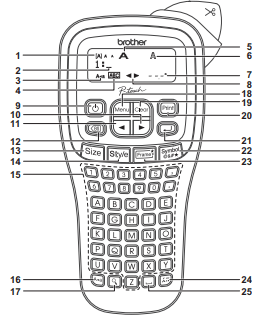
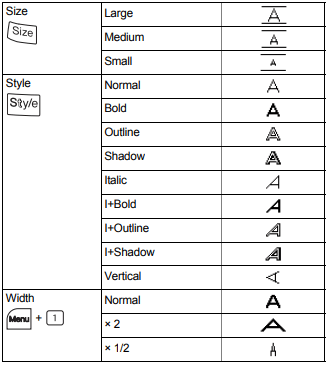
1. Size
2. Cursor
3. Caps
4. Underline/Frame
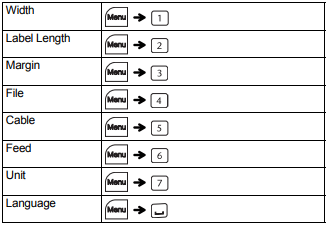
5. Width
6. Style
7. Label Length. If a specific label length has been selected,  also appears.
8. Guidance (left, right)
9. Power key
10. Cursor key : Right
11. Cursor key : Left
12. Backspace key
13. Size key
14. Style key
15. Character keys
16. Caps key
17. Preview key
18. Menu key
19. Clear key
20. Print key
21. Enter key
22. Symbol key
23. Frame key
24. Accent key
25. Space key
NOTE
- The LCD shows one row of 12 characters; however, the text that you enter can be up to 80 characters in length.
- While selecting the settings, press the Space key to go back to the default item.
- The print preview is a generated image of the label, and may differ from the actual label when printed.
- Label length shown on LCD may slightly differ from the actual label length when printed.
Initial Settings
1 Start your machine. Supply power by using six AAA batteries, and then press  .
.
2 Set the language.

Set the unit of measurement. The default setting is [inch].

NOTE
- The machine automatically turns off if no keys are pressed within five minutes.
- To cancel any operation, press
 .
.
BASIC USAGE
Entering Text
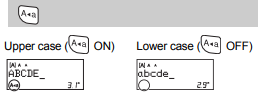
Switching Upper Case/Lower Case
Making Two Lines of Text
To make two lines of text, do one of following:
a) Enter the text for the first line and then press  for the second line.
b) Move the cursor to where the second line starts and press .
Use either 0.35" (9 mm) or 0.47" (12 mm) wide tape for two line text.

NOTE Do not press after the second line; otherwise the “Line Limit!” error message will appear.
To Clear
By pressing  , the letters will be deleted one by one. To delete all text and settings :

To delete text only :

Printing Labels
Preview
You can preview the text before printing.

Only the text can be previewed, not the size, font or any additional features.
Feeding (Tape Feed)

Printing

- If you need only 1 copy of the label, press
 without selecting the number of copies.
- The number of copies can also be specified by pressing a number key.
- To prevent damage to the tape, do not touch the cutter lever while the message "Printing..." or "Feeding..." is displayed.
- To cut off the label, push in the tape cutter lever on the upperright corner of the machine.
- Peel the printed label from the backing and apply the label.
- You can print up to 9 copies of each label.
Setting Margin

[Full]/[Half]/[Narrow]
For leaving equal margins on both sides of the text.

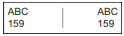
[Chain Print]
For creating a label containing text in various styles.
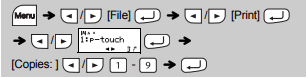
1. Enter text.
2. Press  , then [Copies: ] appears.
3. Press  or enter number with number keys to select the number of copies.
4. Press  . Printing will start, and then the message "OK to Feed?" appears.
5. Press  to enter more text.
6. Clear the text, enter the text for the next label, and then press .
7. When the message "OK to Feed?" appears after the last label is printed, press .
8. After the tape is fed, press the cutter lever to cut off the chain of labels.
NOTE When [Half] or [Narrow] is set, the displayed label length is the length from the printed dots ( ) to the end of the label.
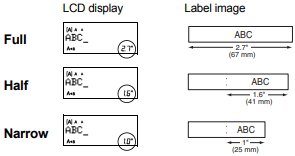
- To print more than 1 copy of a label with minimum margin, set the margin to [Narrow].
- When [Chain Print] is set, feed the tape before using the cutter otherwise a part of the text may be cut off. Also, cut along the printed dots (:) with scissors so the text is centered in the label.
*Feed the tape before using the cutter.
- Do not pull the tape since this may damage the Tape Cassette.
Entering Accented Characters
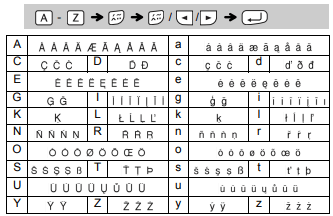
- To cancel the current operation, press .
- The order of accented characters differs depending on the selected LCD language.
Changing Label Length

NOTE
- After the label is printed, cut along the printed dots (:) with scissors so that the label length matches the machine setting.
- If a specific label length has been selected,
 also appears in the LCD.
Saving Label Files
You can save up to 9 labels and recall them for printing at a later date. A maximum of 80 characters can be saved per file, a maximum total of 720 characters for the total memory. You can also edit and overwrite the stored label.
Print
Save

Open

NOTE If you try to store a label when there is already a label stored to that number, a message “Overwrite?” will appear. Press to save your new label. Press to cancel.
Accessories
Replacing the Cutter Unit
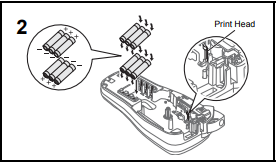
1. Pull out the two sections of the cutter unit (green) in the direction of the arrows shown in the illustration.
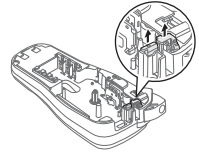
2. Install a new cutter unit. Push it in until it snaps into place.
Do not touch the cutter blade directly with your fingers.
Resetting the P-touch
You can reset the P-touch labeler when you want to initialize the settings, or in the event the P-touch labeler is not working properly.
1 Turn off the P-touch labeler, hold down  and
and  and then press
  to turn the P-touch back on.
2 Release and .
The P-touch labeler turns on with the internal memory reset.
NOTE All text, settings and stored files are cleared.
Frame Key 
Press to select the frame design.
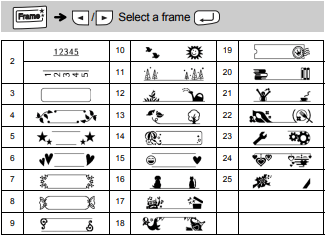
NOTE Frames cannot be printed on 0.13" (3.5mm) tape.
USEFUL FUNCTION KEYS
Text Keys 
1 Press  or
or  or
or  +
+  to select the settings to enter the text

2 Press  to select the settings.
Short Cut Keys
Cable Label
This function allows you to create cable labels as below with 2 lines of text wrapping around cable. We recommend using Brother Flexible ID tape when wrapping. Refer to the insertion sheet included with Flexible ID tape about the recommended conditions for use.


NOTE With the Cable Label function, [Auto] is automatically selected for the label length and [Full] for the margins.
Symbol Key 
Press to select various symbols.
To enter Basic symbols :

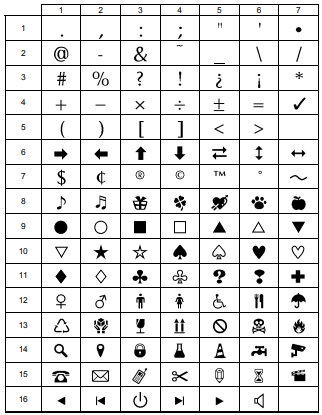
To enter Pictograph symbols :

For example, a shoe  is displayed as
  in the screen.
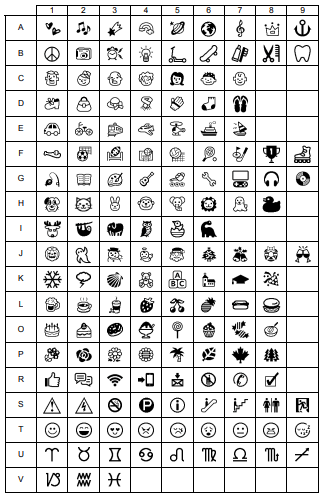
To print all pictographs :

NOTE Press  to return to the previous step.
Troubleshooting
Error message
Low Battery!
- The batteries are weak.
- If using AAA alkaline batteries: Replace them with new ones.
- If using Ni-MH batteries: Charge them fully
Battery Dead
- The installed batteries are running low.
Invalid!
- An invalid number was entered as the label length.
No Text!
- You tried to print a text file when there is no data stored in the memory.
- is pressed when no text is entered.
- You tried to select Text Preview or Cable Label when no text is entered.
Line Limit!
- You tried to enter a 3rd line by pressing
 .
.
- You tried to print or preview two lines of text while 0.13" (3.5 mm) or 0.23" (6 mm) tape is installed. Install tape of a larger size.
No Cassette!
- You tried to print a label when there is no cassette installed.
Cutter Error
- The tape cutter lever was used during the printing process.
Text Full!
- The maximum number of characters (80 characters) have already been entered.
Text Limit!
- Since the number of entered characters exceeds the label length, reduce the text, or select [Auto] as the label length.
No Frame OK?
- Printing on 0.13" (3.5 mm) tape with invalid Frame setting ON. (Select to print with no Frame,
 to cancel.)
OK to Feed?
- Feeding tape after printing when [Chain Print] is selected. Refer to “Setting Margin”.
Wrong Tape!
- Use a Tape Cassette with the
 mark.
mark.
What to do when...
The display stays blank after you have turned on the machine.
- Check that the batteries are correctly inserted.
- If the batteries are weak, replace them.
When the label is printed out, the margin(space) is too large on both sides of the text.
- See “Setting Margin” in this users guide and select [Half] or [Narrow] to have smaller margins for your label.
The machine does not print, or the printed characters are not formed properly.
- Check that the Tape Cassette has been inserted correctly.
- If the Tape Cassette is empty, replace it.
- Check the Cassette Cover is properly closed.
The setting has cleared on its own.
- The batteries may be weak. Replace them.
- When power is disconnected for more than three minutes, all text & formats in the display will be lost. Language and Unit settings will also be cleared.
A blank horizontal line appears through the printed label.
- There maybe some dust on the print head. Remove the Tape Cassette and use a dry cotton swab to gently wipe the print head with an up-and-down motion.
The machine has “locked up” (i.e., nothing happens when a key is pressed, even though the machine is on.)
- Refer to “Resetting the P-touch”.
The power turns off when you try to print.
- The batteries may be weak. Replace them.
- Check that the batteries are correctly inserted.
The tape does not feed properly or the tape gets stuck inside the machine.
- Check that the end of the tape feeds under the tape guides.
- The cutter lever is used while printing. Do not touch the cutter lever during printing.
All text and format settings need to be cleared to create a new label.
- Press
 and select [Text&Format].
The LCD is set to an incorrect language.
- Refer to “Initial Settings”.