
ELECTRONIC LABELING SYSTEM
(QJOLVK
8VHU·V*XLGH
H11
0
ELECTRONIC LABELING SYSTEM
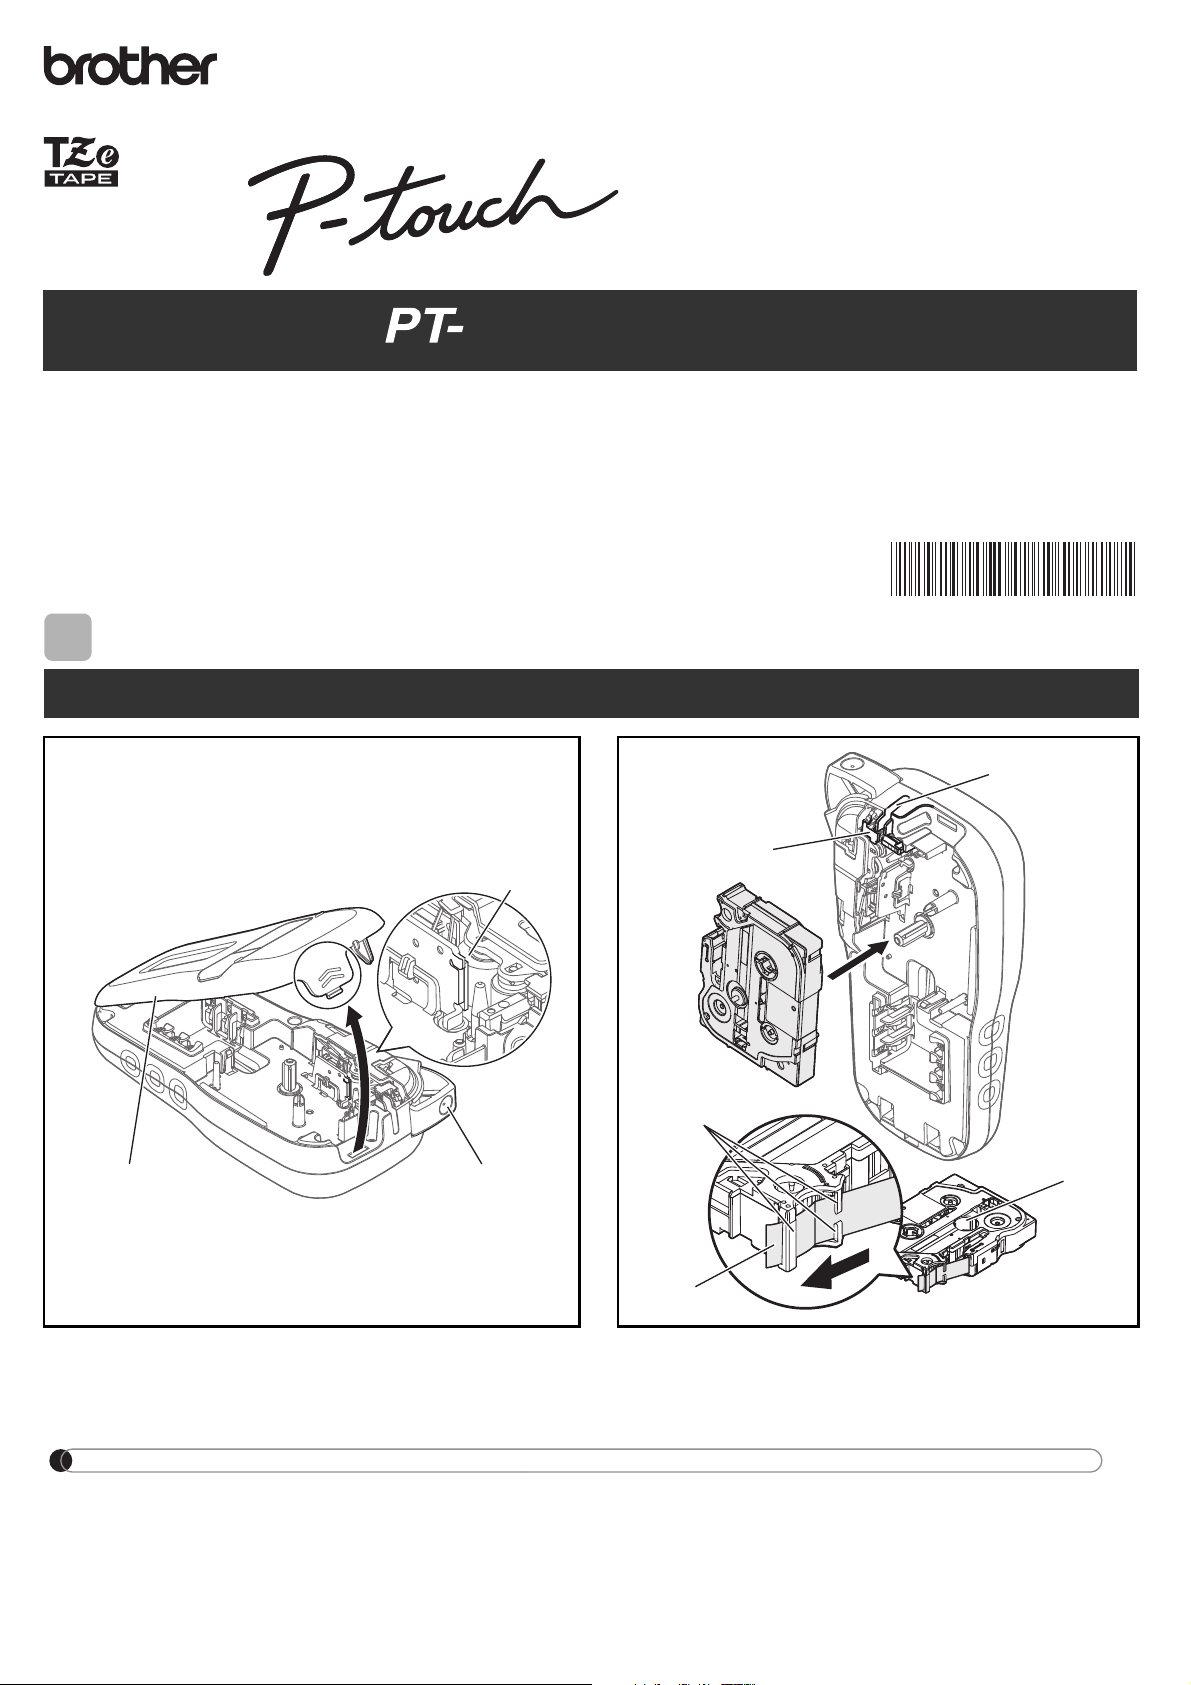
GETTING STARTED
Power Supply and Tape Cassette
Open the cassette cover by pressing the above
indicated area at the top end of the label maker.
Insert a tape cassette, making sure it snaps
into place.
1
Print head
Tape cutter leve
r
Cassette cover
1
Tape exit slot
Toothed Wheel
Cutter's edge
End of tape
Tape guides
2
www.brother.com
(QJOLVK
8VHU·V*XLGH
H11
0
NOTE
When using optional AC adapter
1.
2.
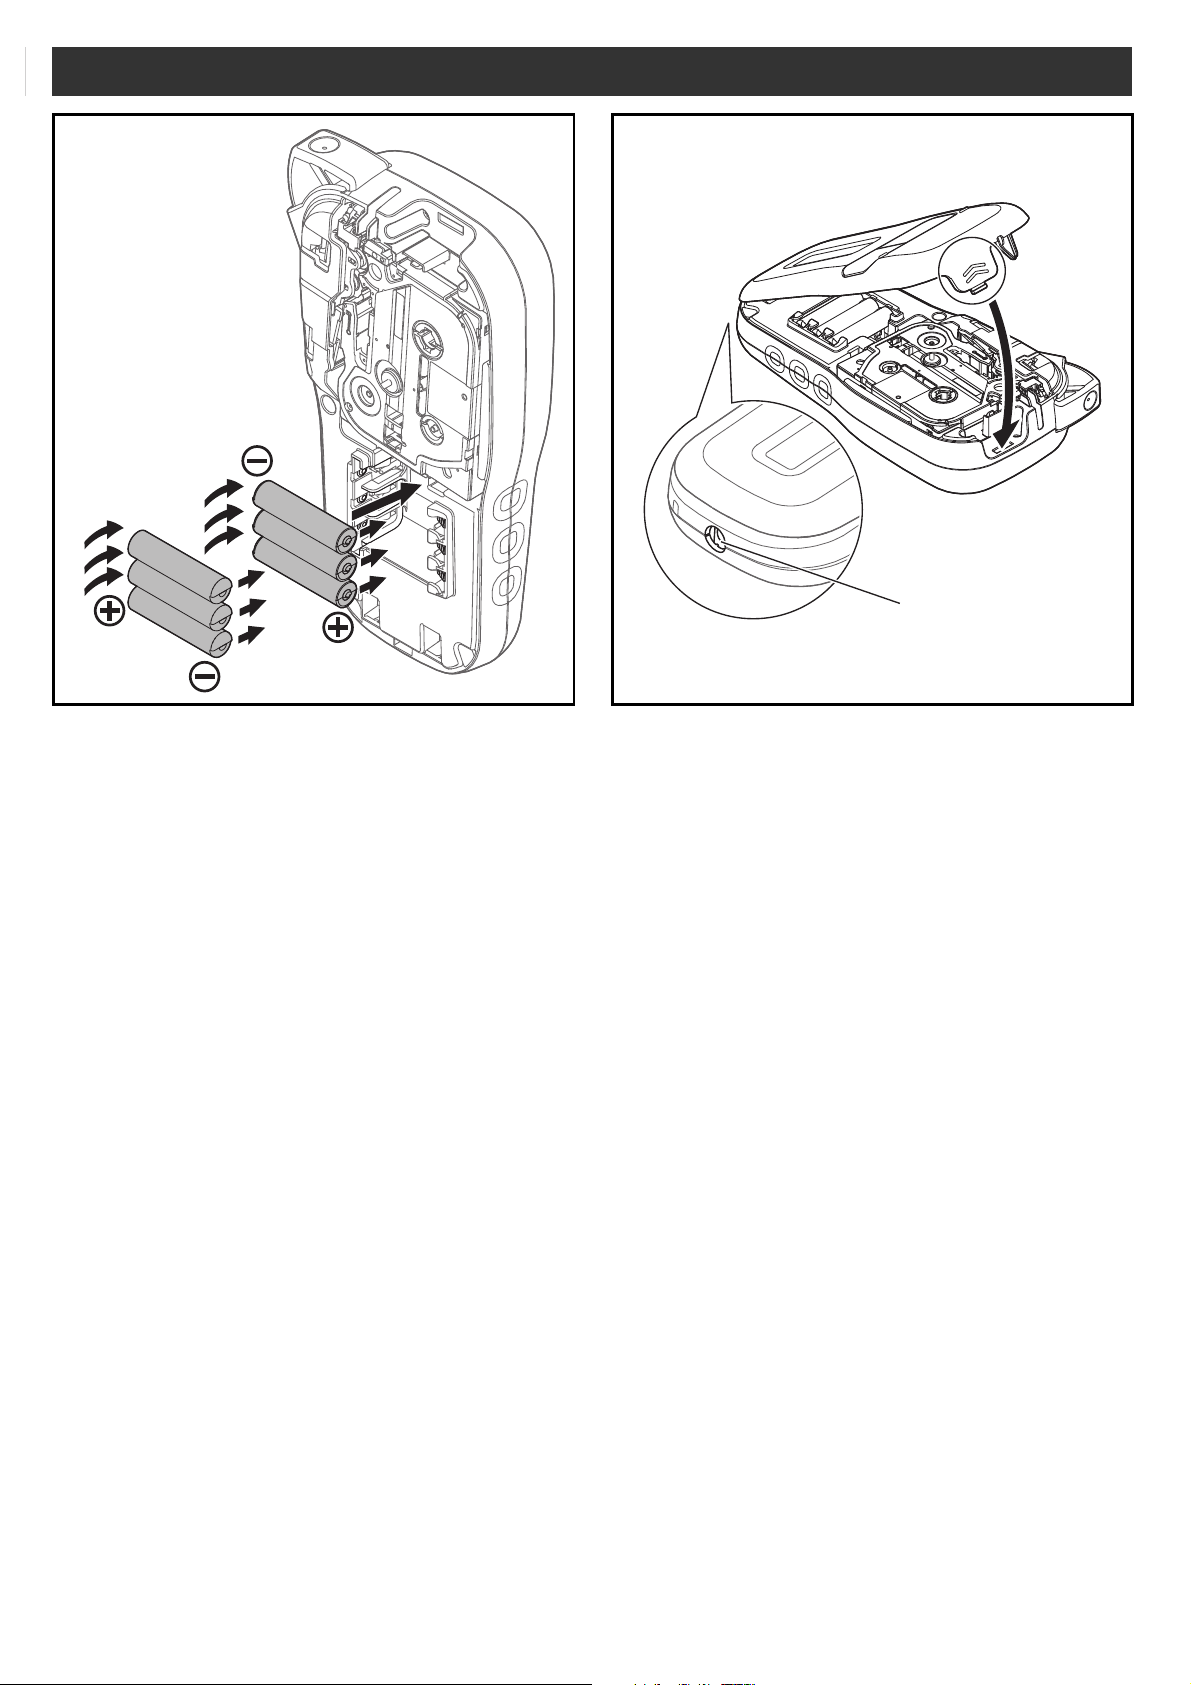
Insert six new AAA alkaline batteries (LR03) or
fully charged Ni-MH batteries (HR03), making
sure their poles point in the correct directions.
Users of alkaline batteries:
Always replace all six batteries at the same
time with brand new ones.
Users of Ni-MH batteries:
Always replace all six batteries at the same
time with fully charged ones.
1
Insert the two hooks at the bottom of the
cassette cover into the slots on the label
maker.
2
Securely close the cassette cover
making sure it snaps into place.
3
AC adapter jack
4
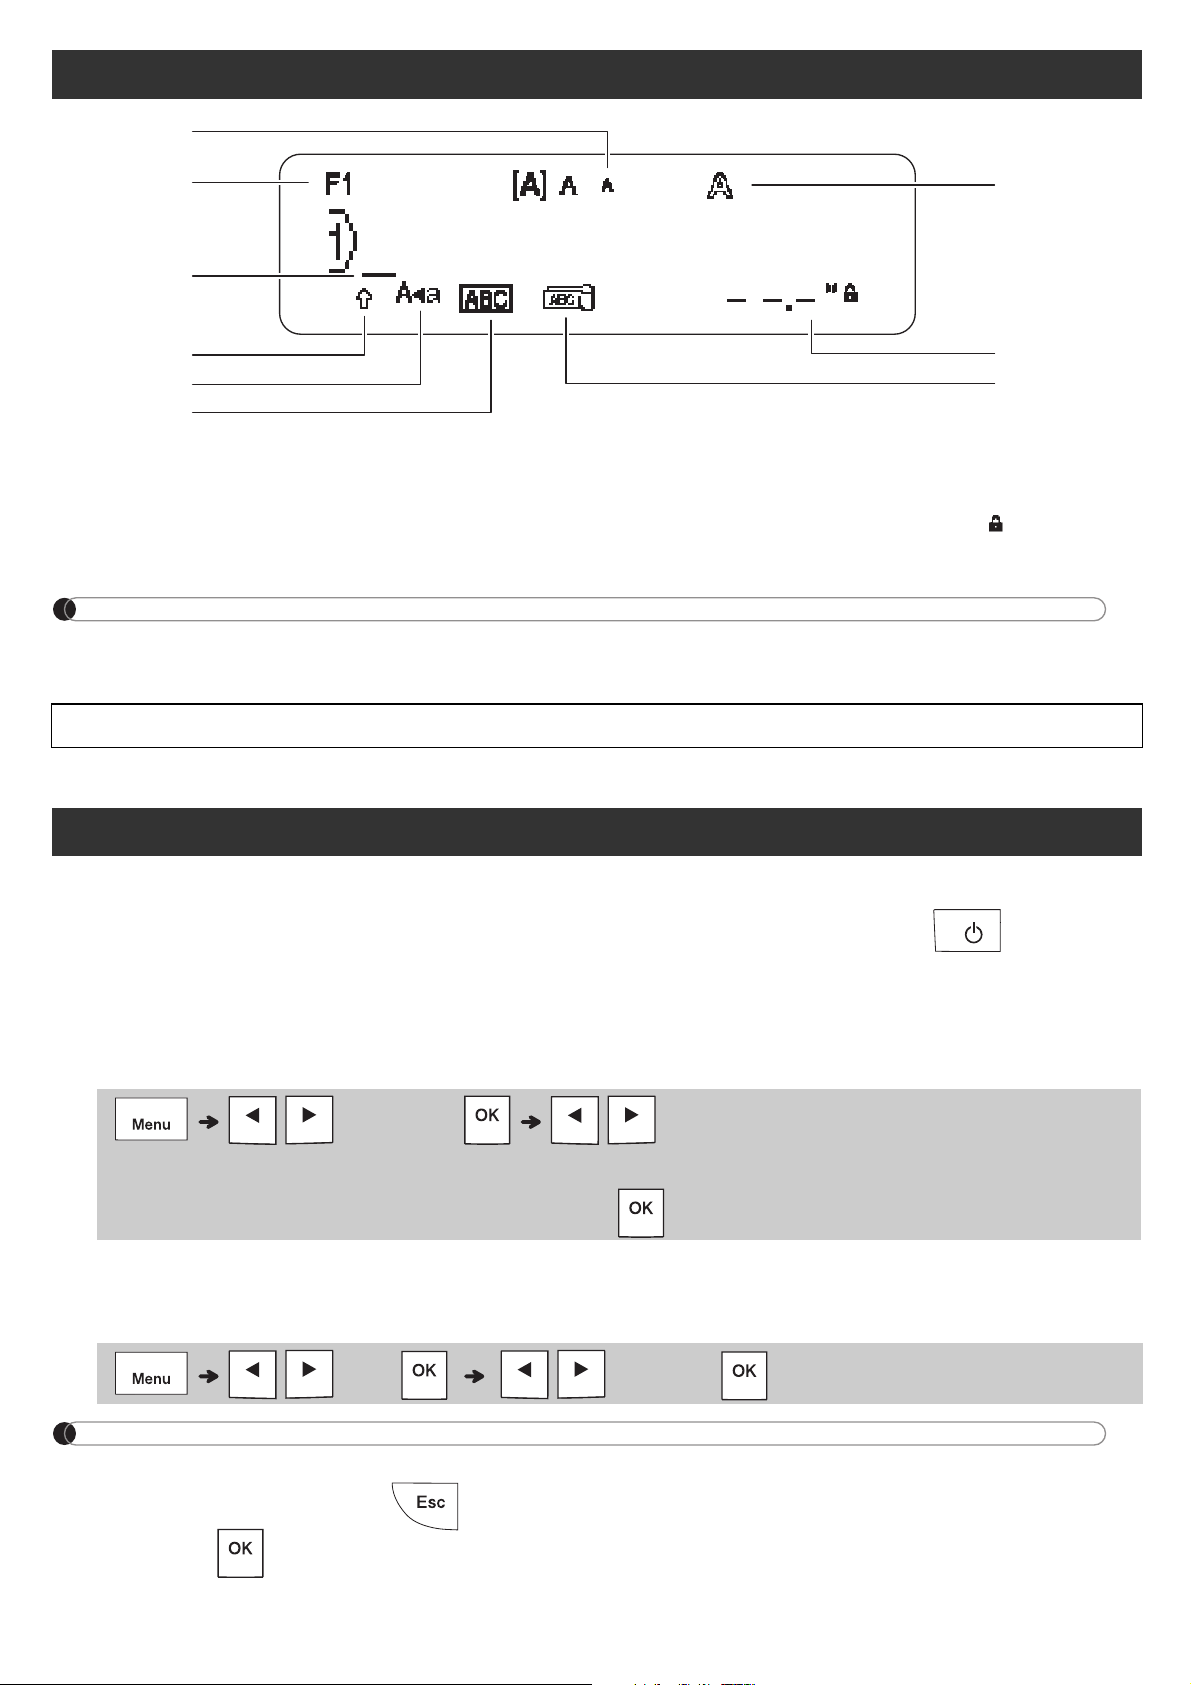
NOTE
LCD
1.
2.
3.
4.
5.
6.
7.
8.
9.
1
2
3
8
6
7
5
4
9
1
Turn on your label maker.
2
Set the language.
3
Set the unit of measurement.
NOTE
Initial Settings
NOTE
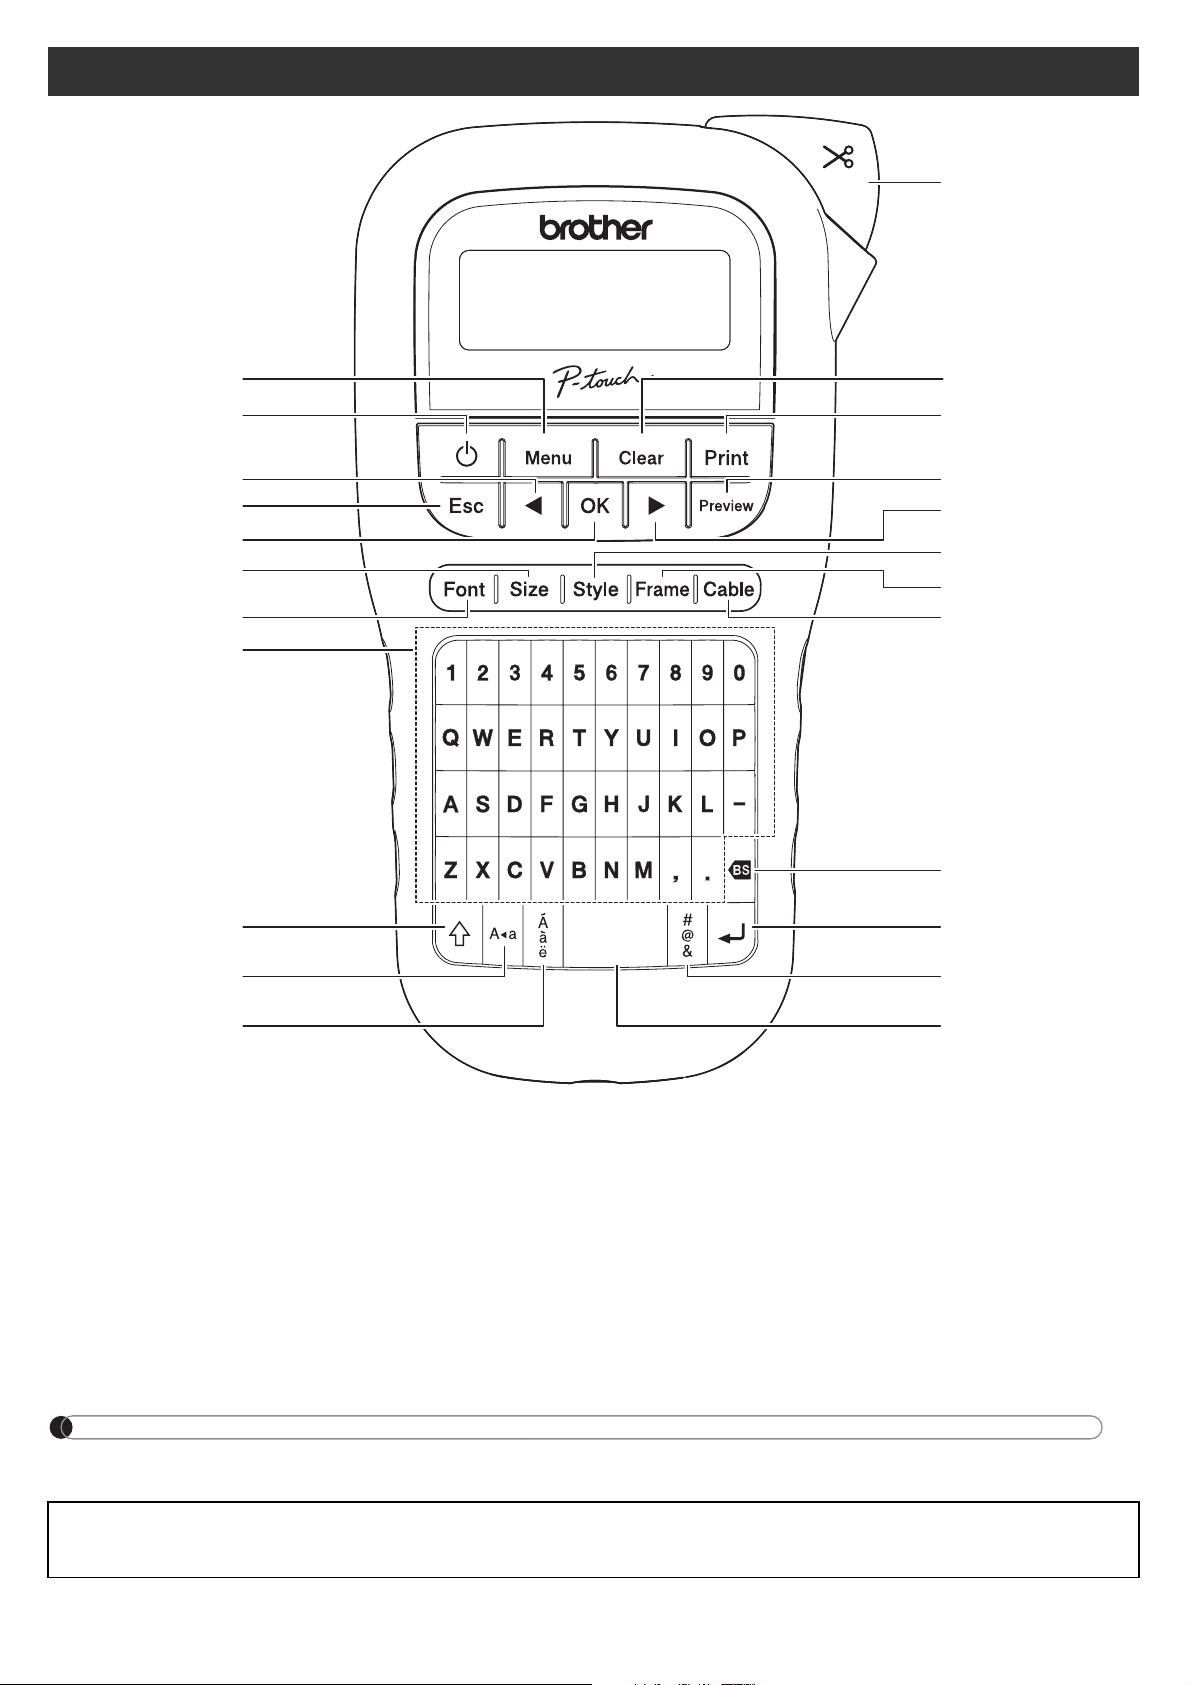
Keyboard
1.
2.
3.
4.
5.
6.
7.
8.
9.
10.
11.
12.
13.
14.
15.
16.
17.
18.
19.
20.
21.
22.
23.
GETTING STARTED (Continued)
BASIC USAGE
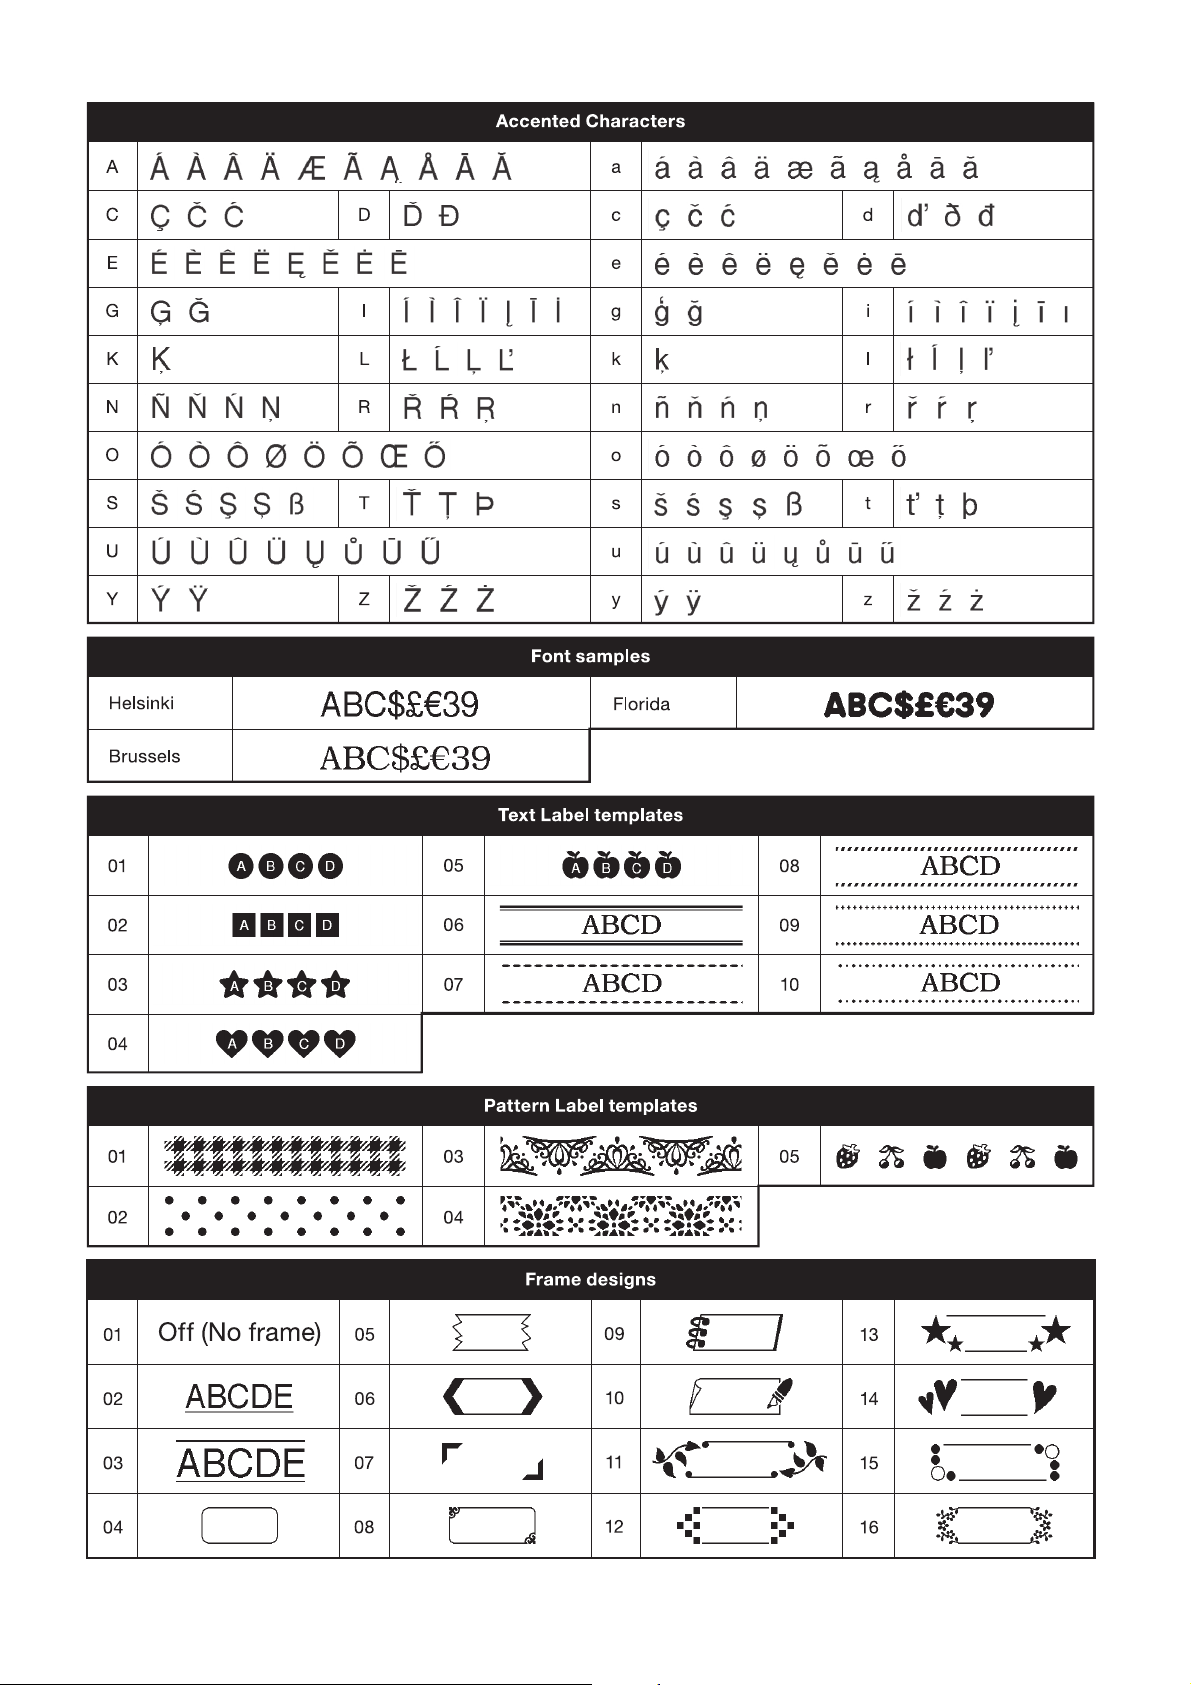
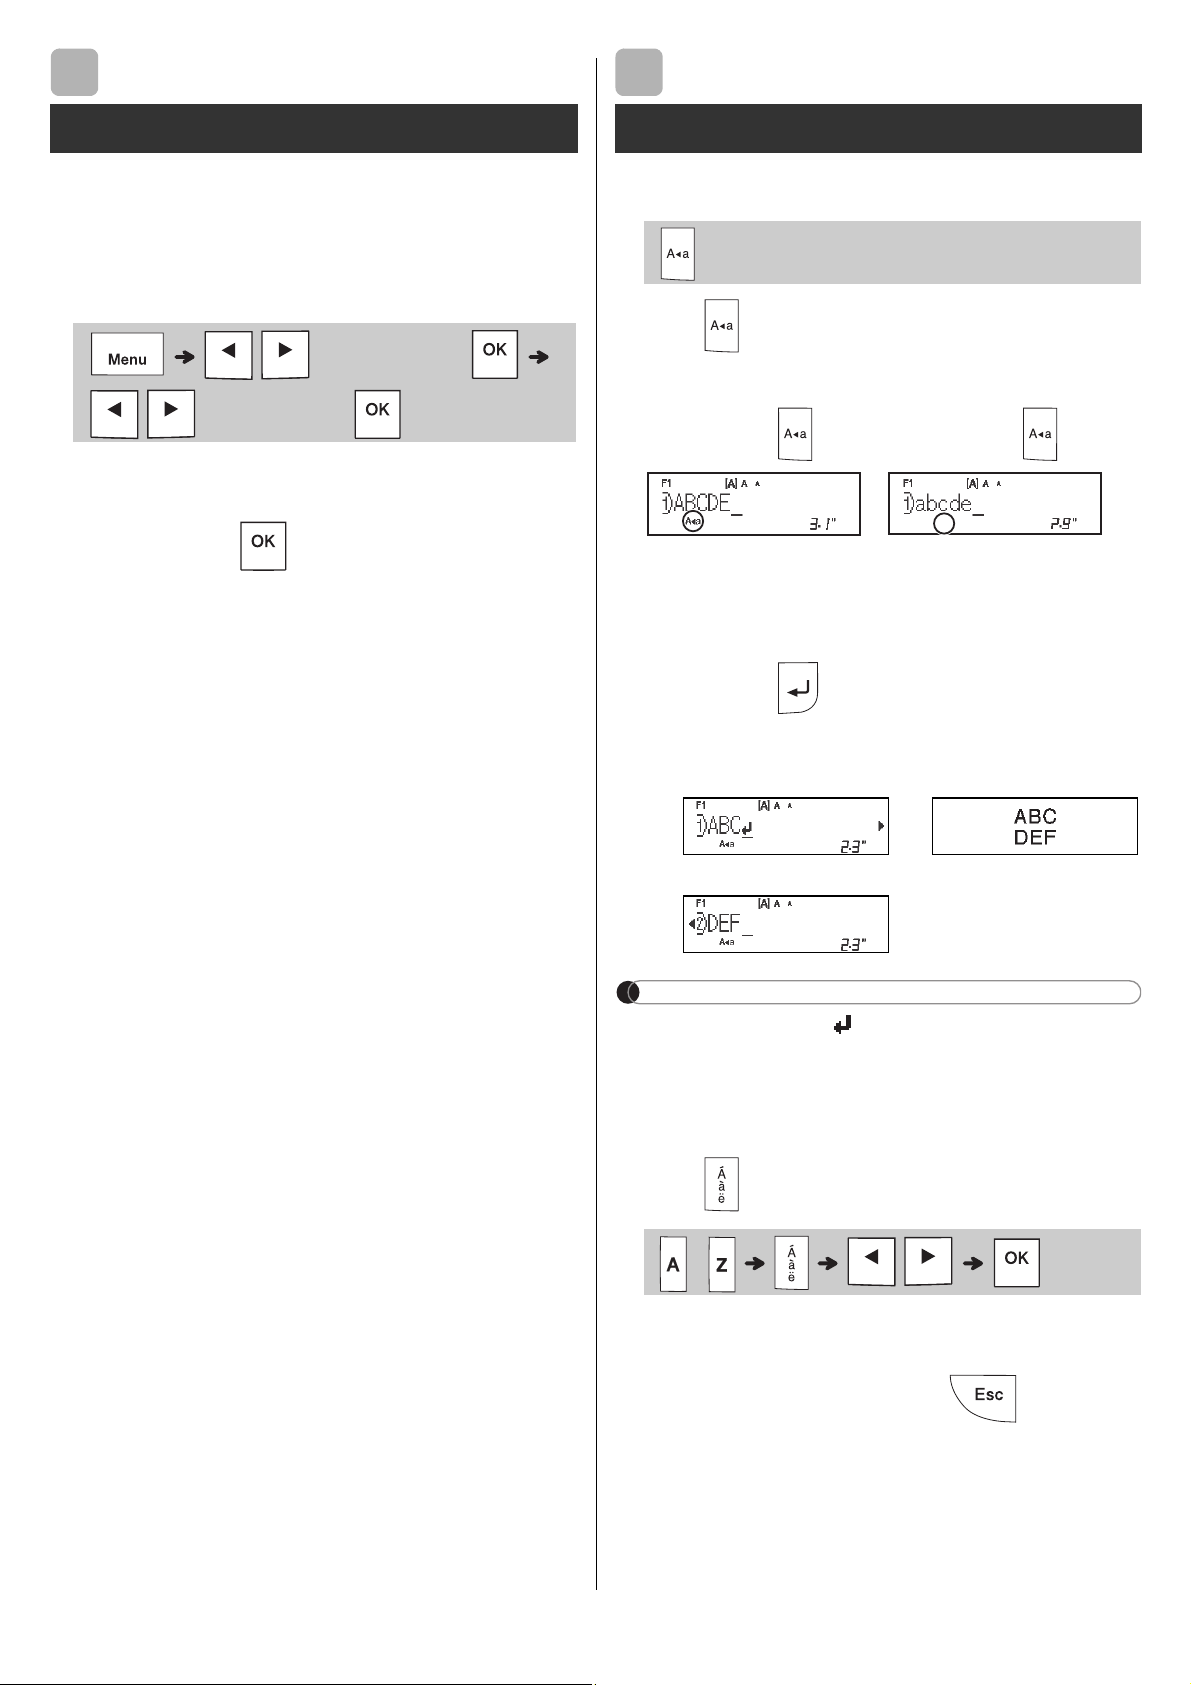
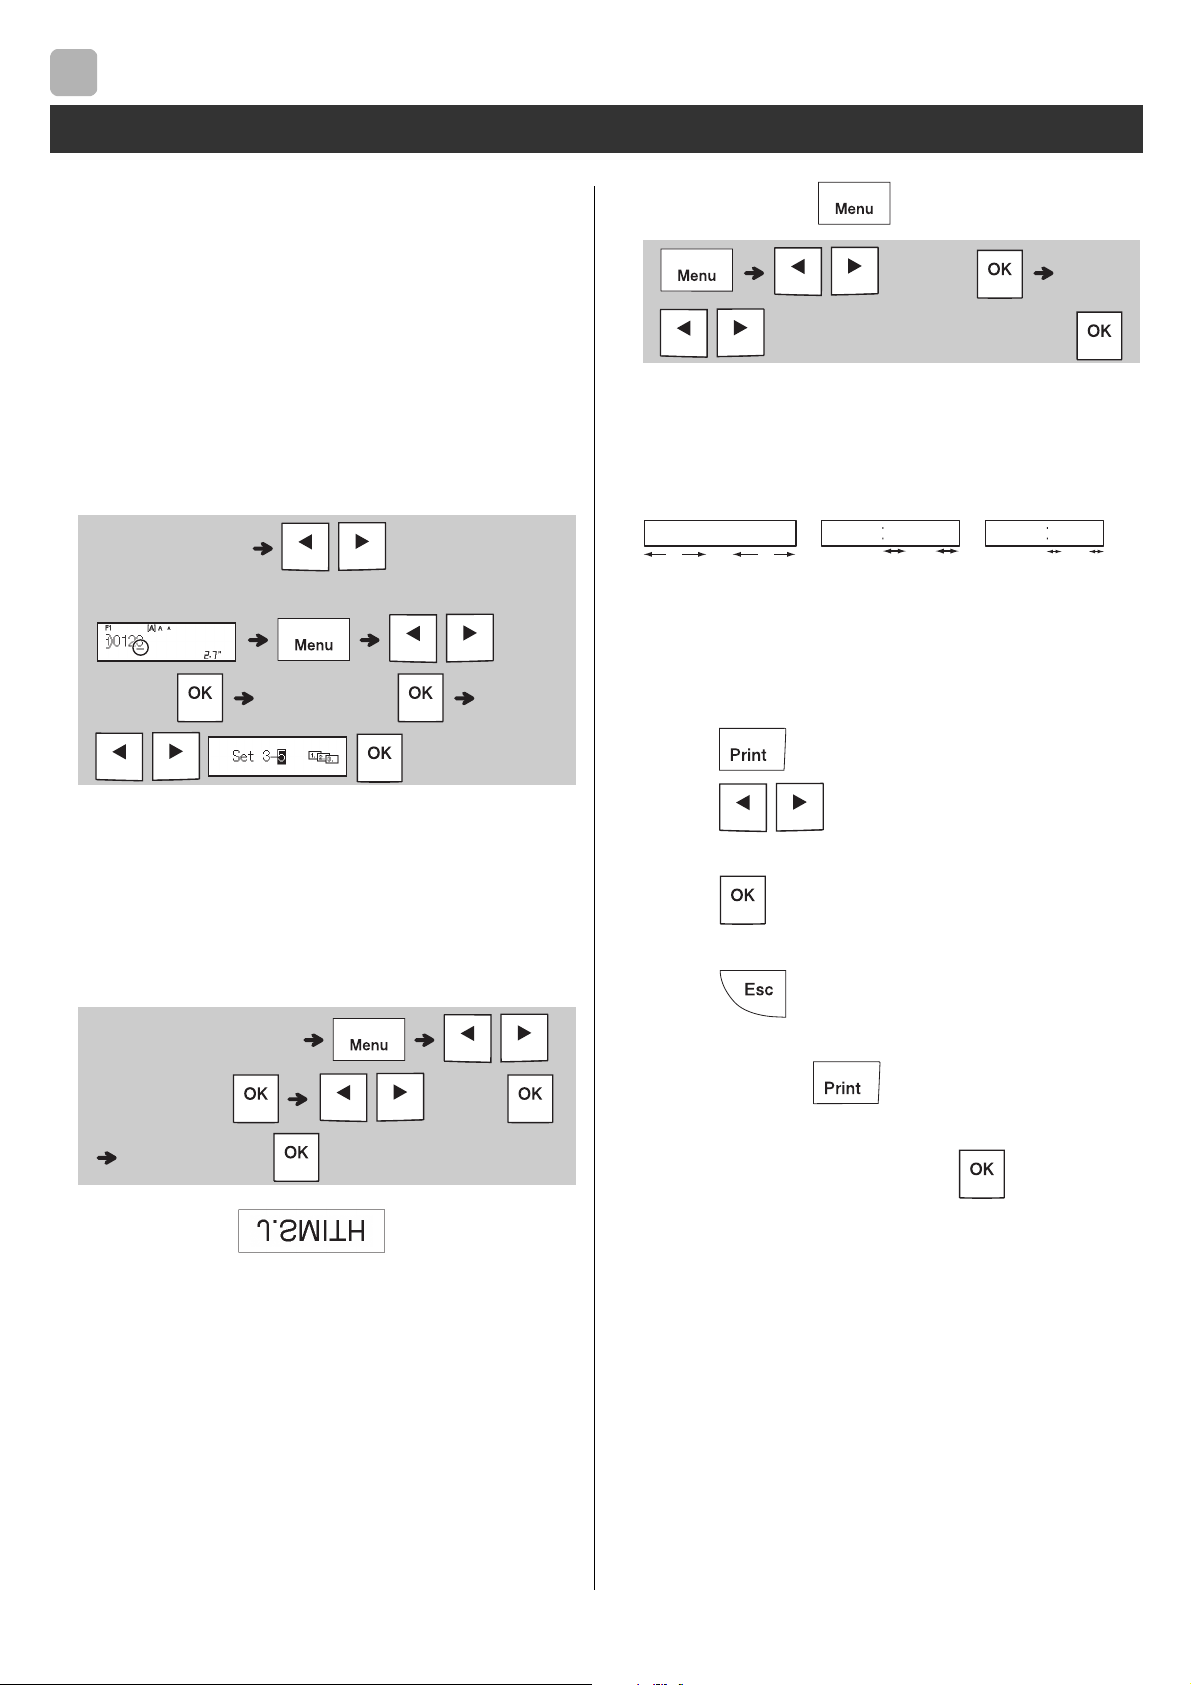
X Switching Upper Case/Lower Case
X Creating Two-Line Labels
NOTE
X Entering Accented Characters
Contrast
1
Entering Text
2
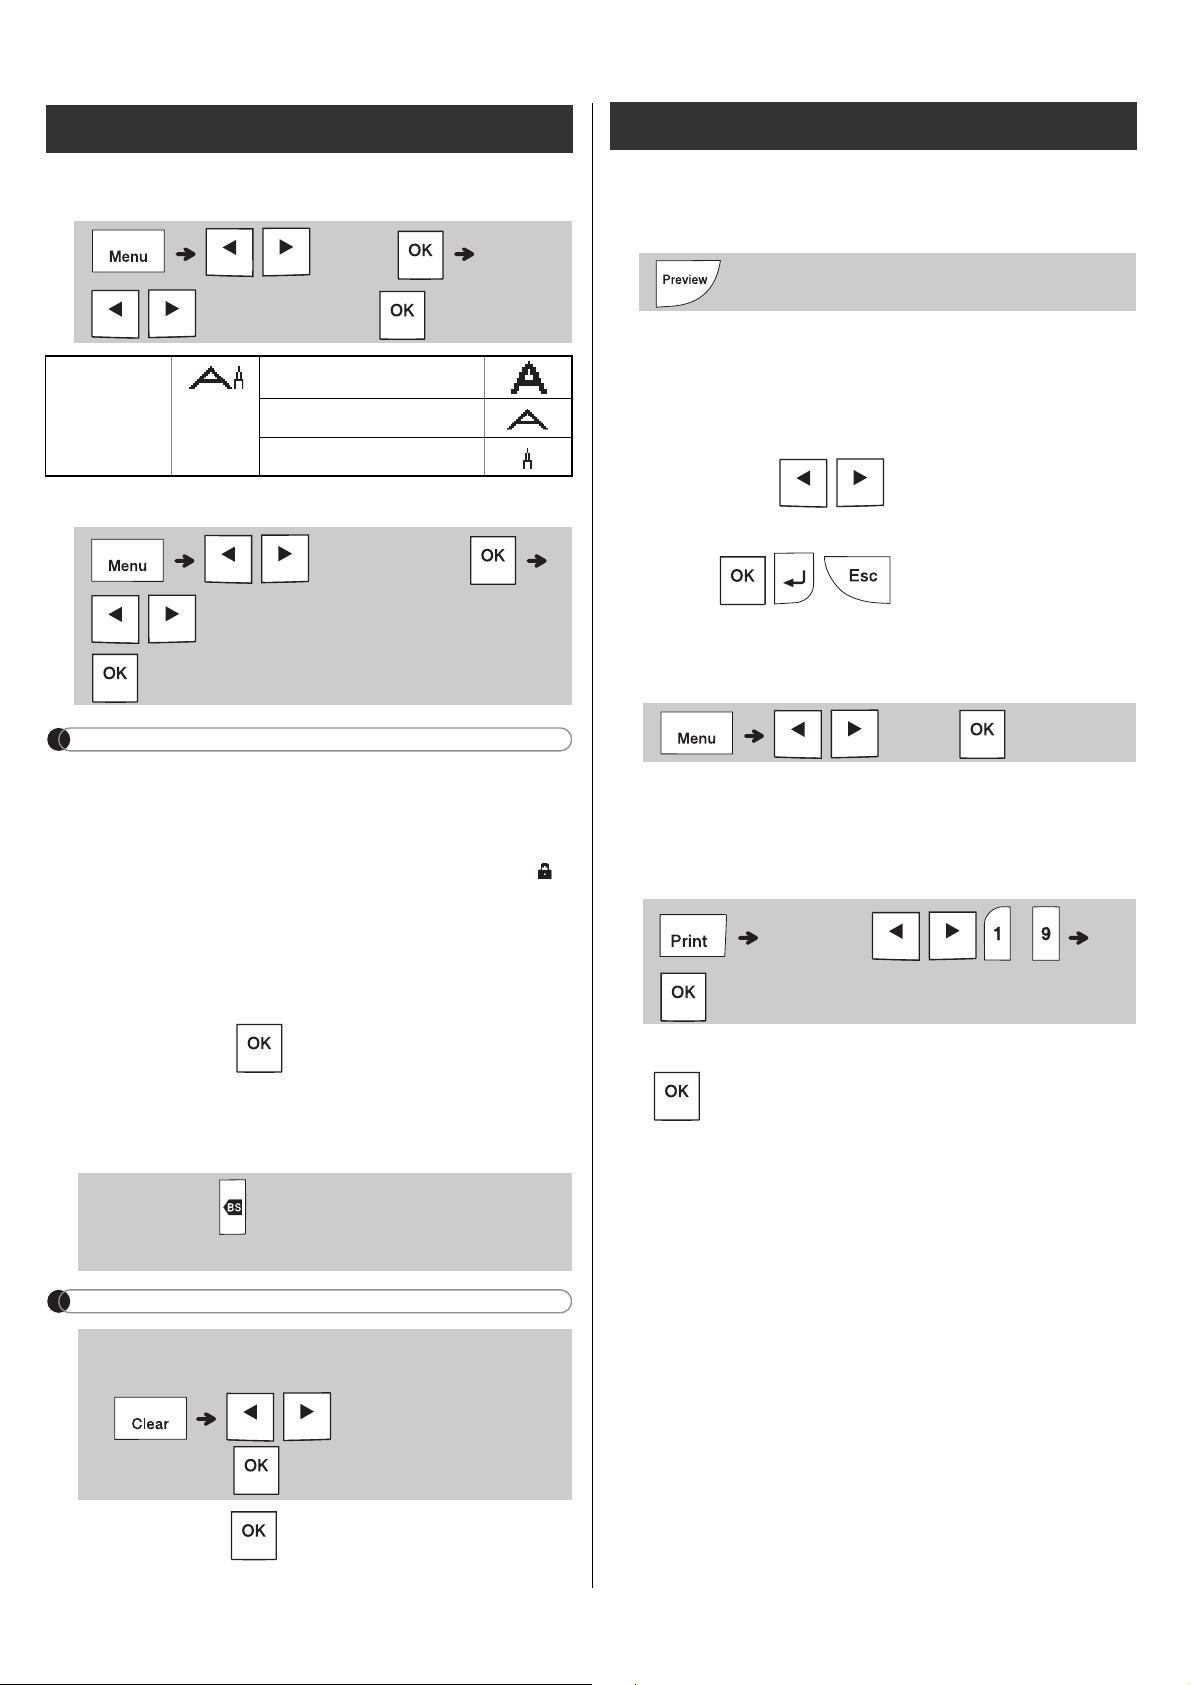
X Changing Label Width
X Changing Label Length
NOTE
X To Clear
NOTE
X Preview
X Feeding (Tape Feed)
X Printing
Entering Text (continued)
Printing Labels
BASIC USAGE (Continued)
X Using Print Options
[Numbering]
Example:
[Mirror]
Example:
X Setting Margin ( )
[Full]/[Half]/[Narrow]
[Chain Print]
1.
2.
3.
4.
5.
6.
7.
8.
Printing Labels (continued)
2
1"
0.16"0.16"
1"
ABC ABC
0.47" 0.47"
ABC

NOTE
X Save
X Print
X Open
NOTE
Printing Labels (continued)
Full
Half
Narrow
2.7"
ABC
1.6"
ABC
1.0"
ABC
Saving Label Files
USING TEMPLATES
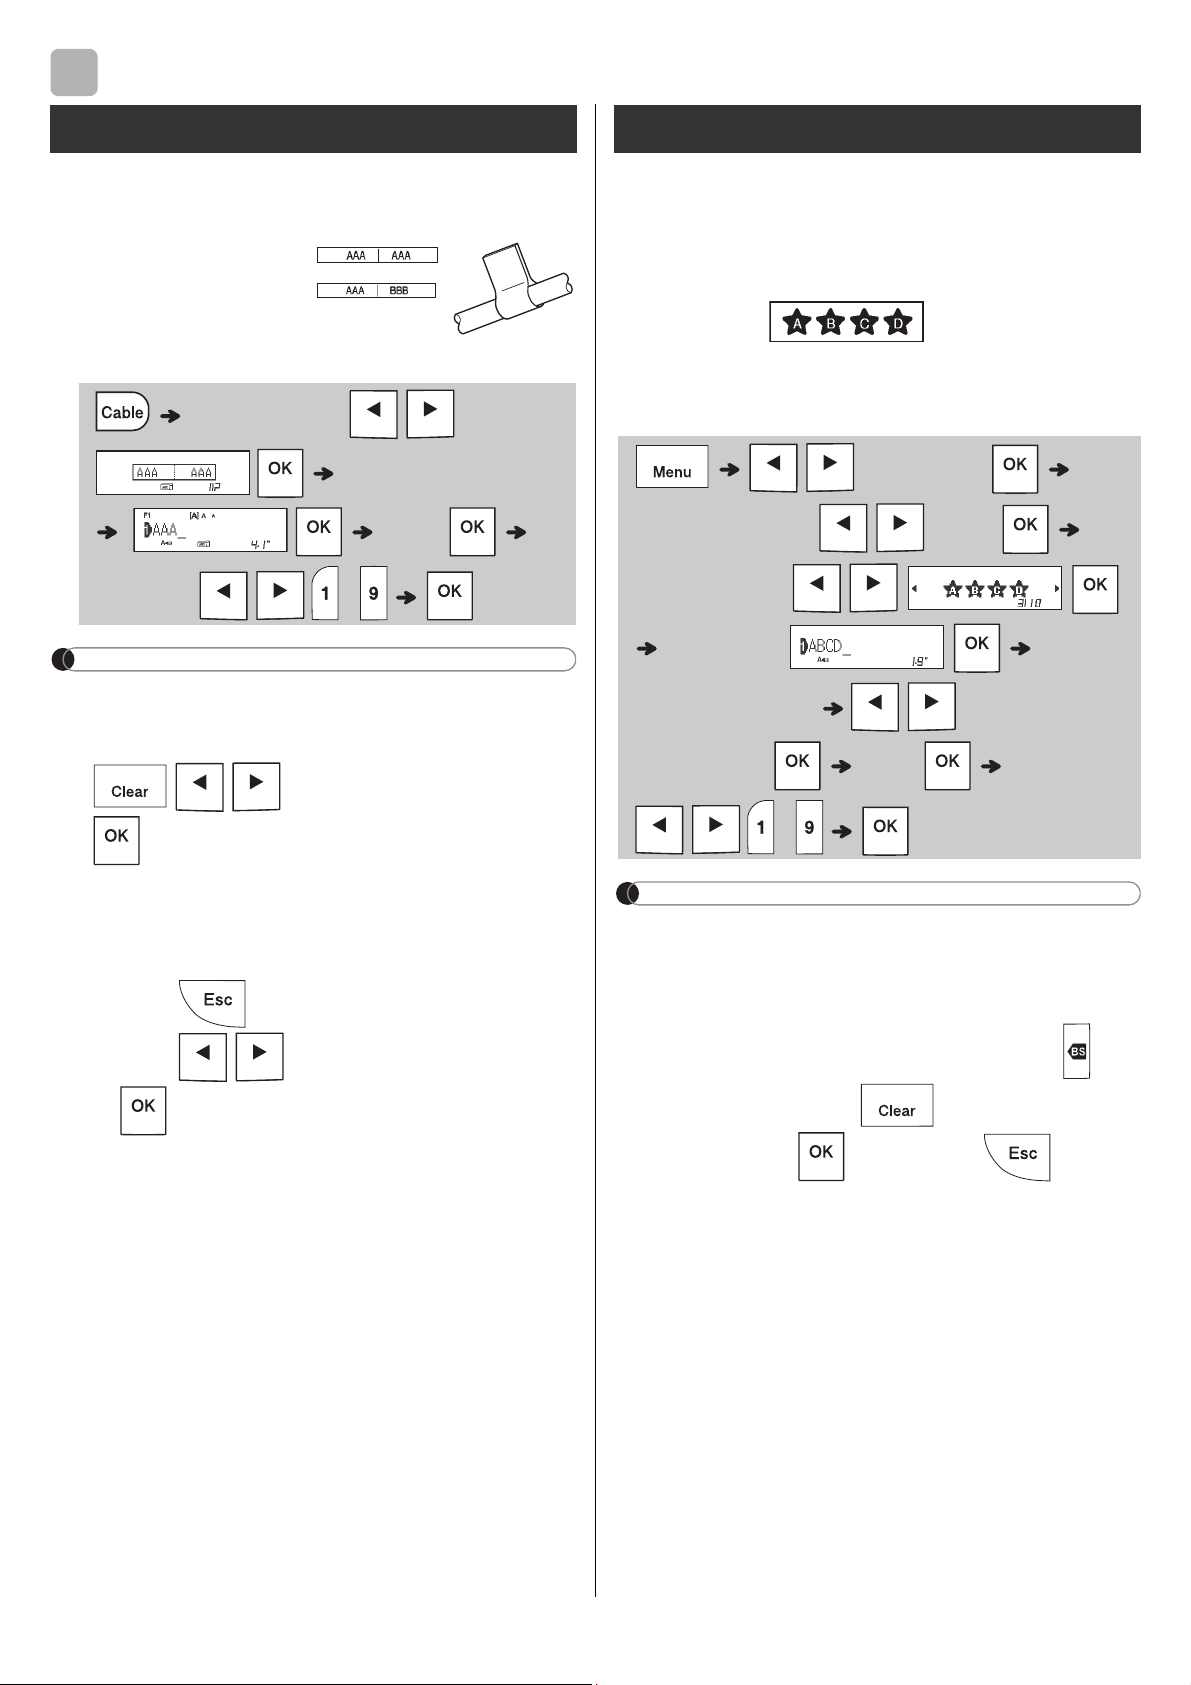
This function allows you to create two types of
cable labels.
Example: Cable Label 1
NOTE
Labels.
.
a) Press .
b) Press
when "Print" appears.
X
NOTE
appears. Press to clear. Press to cancel.
3
Cable Label
Text Label

a) Press .
b) Press
when "Print" appears.
This function allows you to create unique labels
NOTE
to return to the initial
a) Press .
b) Press
when "Print" appears.
Text Label (continued) Pattern Label
4 / 5
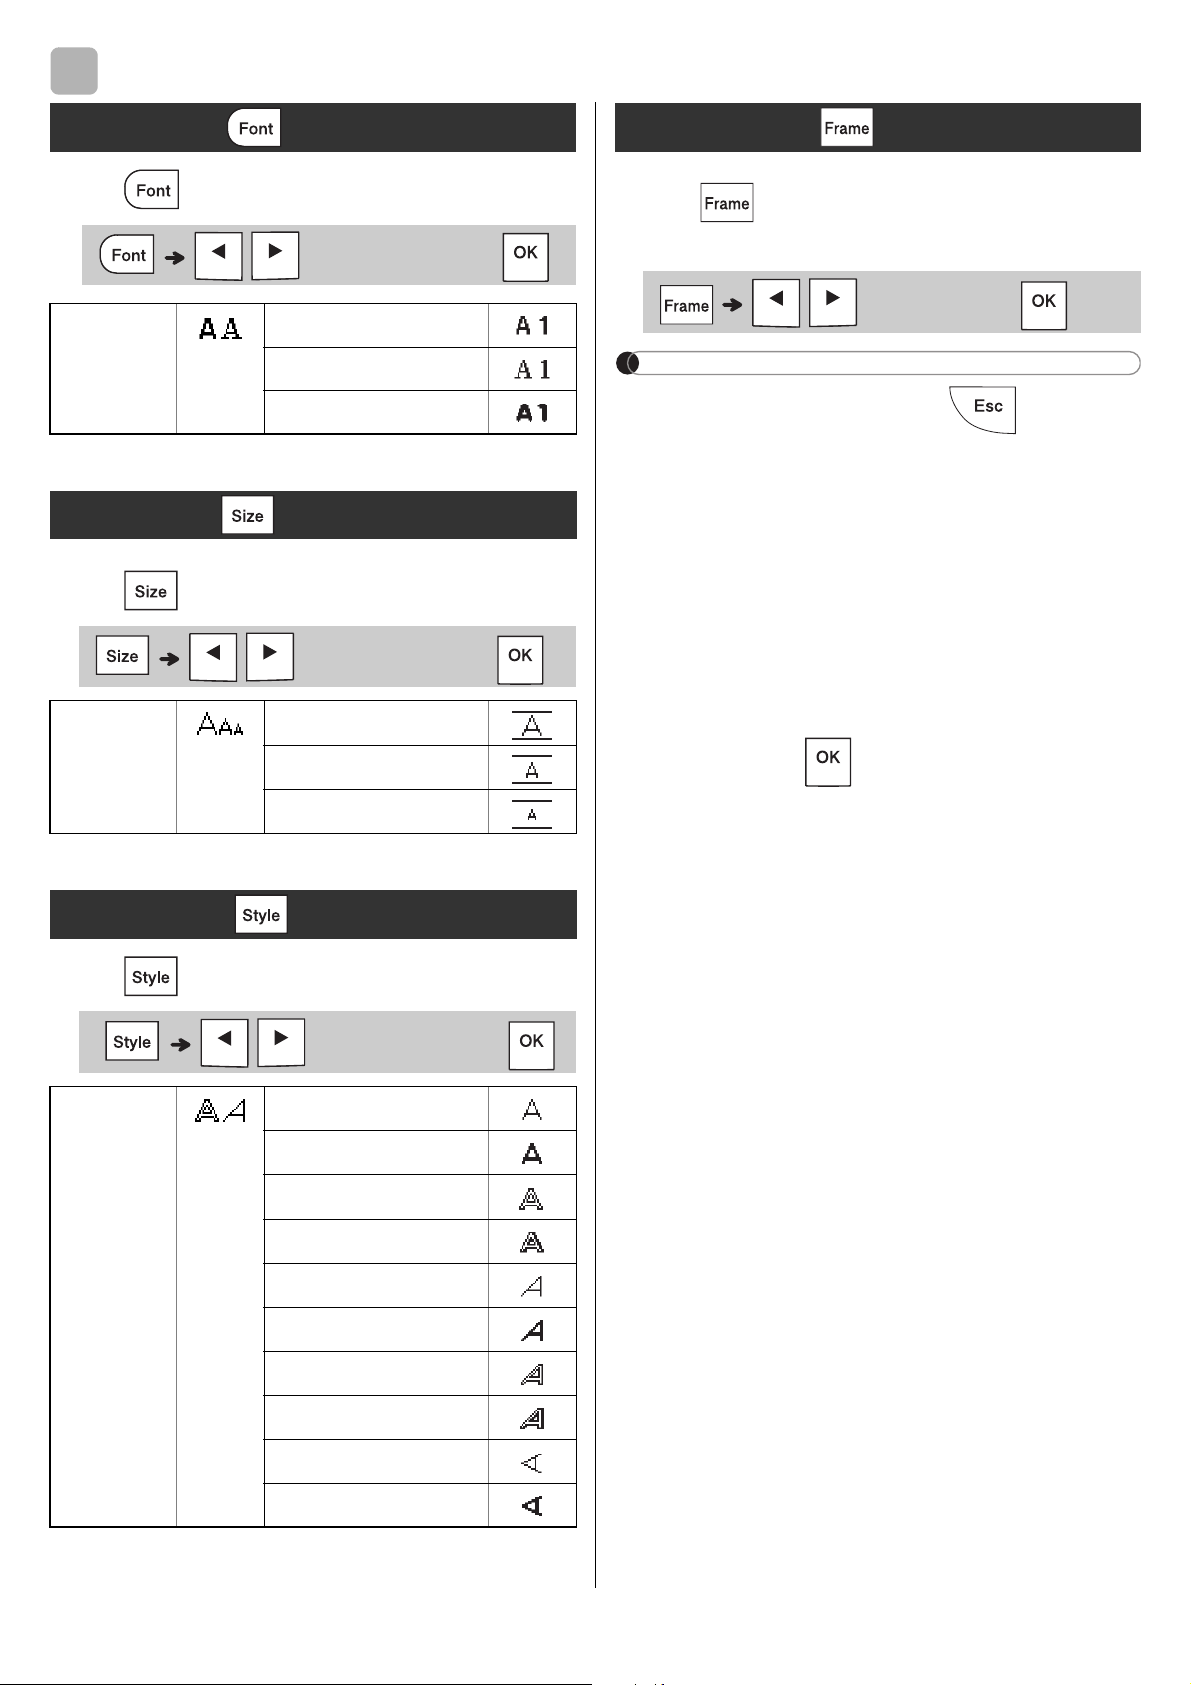
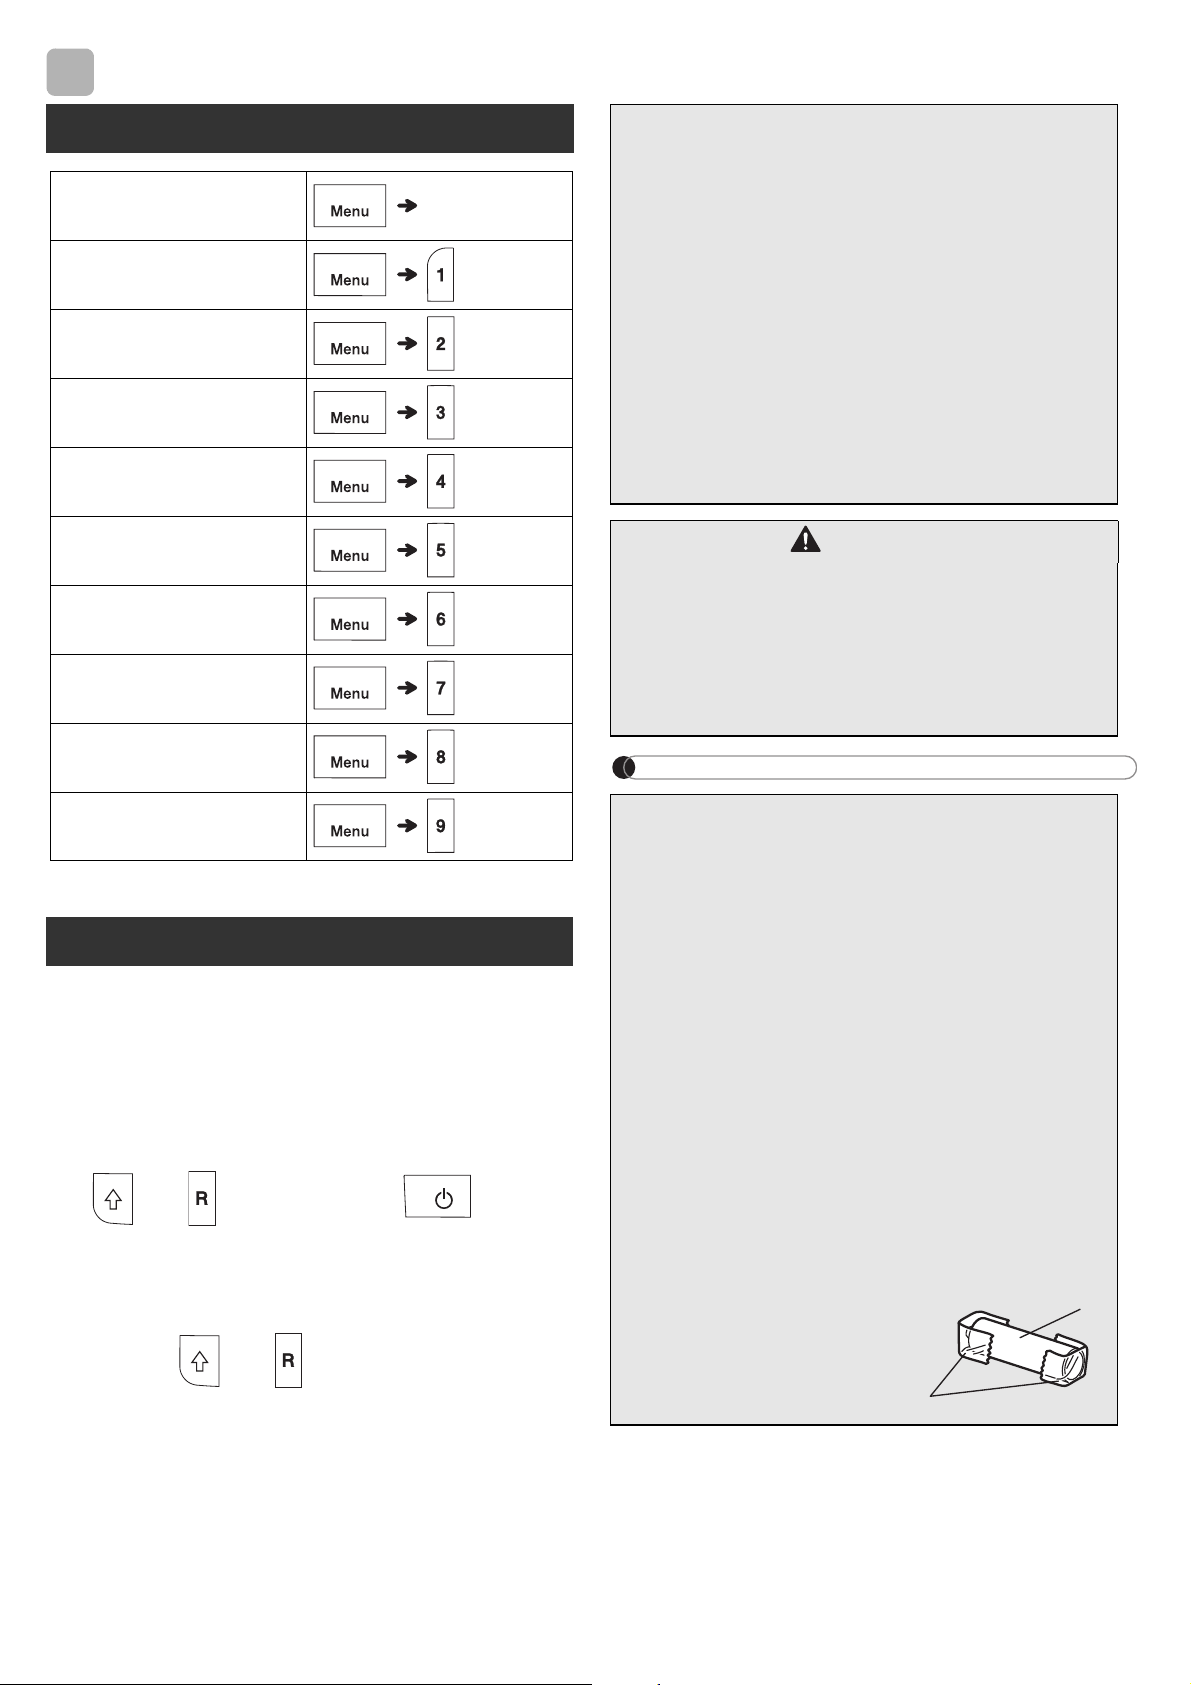
FORMATTING KEYS
Press to change the font settings.
Press
to change the size settings.
Press
to change the style settings.
NOTE
insertion sheet.
4
Font Key
Brussels
Size Key
Style Key
Outline
Vertical
Frame Key
X Entering Symbols
insertion sheet.
X Basic
X Pictograph
OTHER
1.
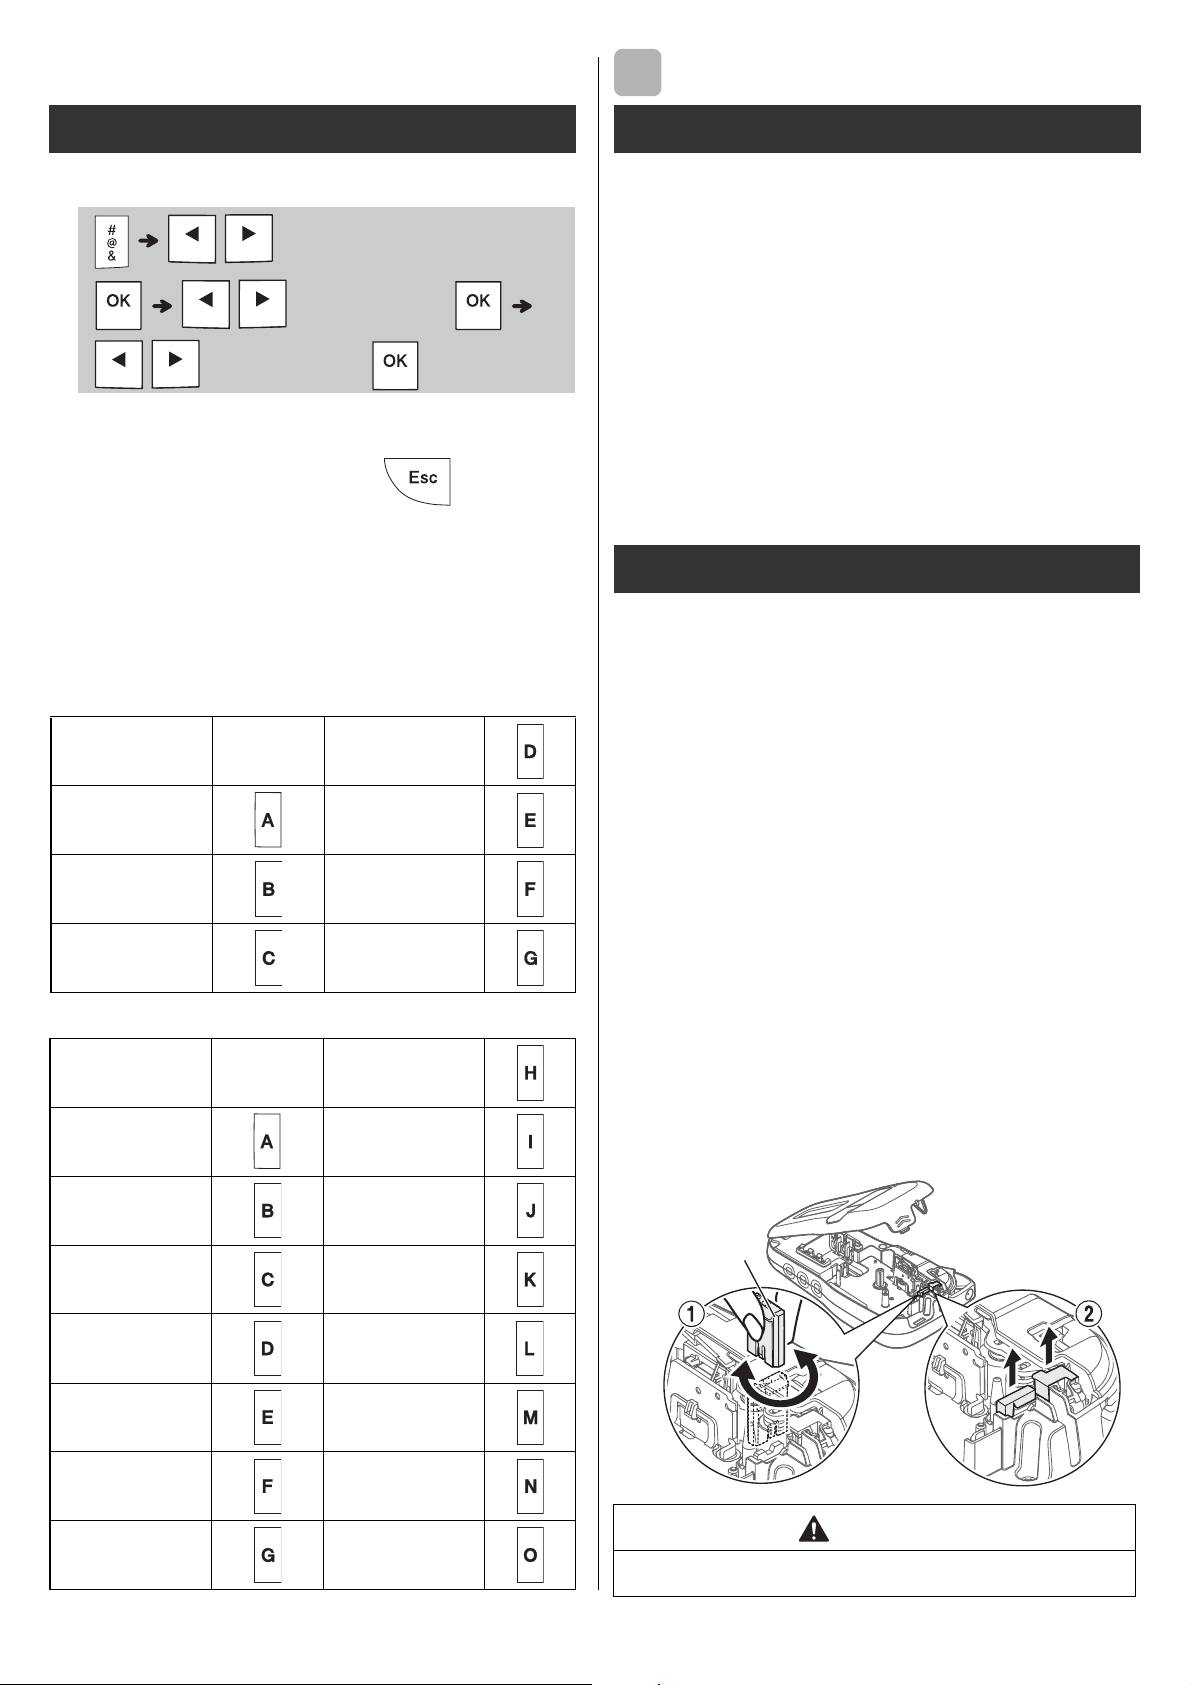
X Replacing the Cutter Unit
1.
Pull out the two sections of the cutter unit
the illustration 2.
2.
into place.
Symbol key
Punctuation
Unit
Kitchen
Specifications
Dimensions:
(W x D x H)
Weight:
Power supply:
1
Tape cassette:
Accessories
Tape
Cassettes:
AC Adapter:
Cutter Unit:
WARNING
5
cutter board

HELPFUL HINTS
X Error message X What to do when...
Troubleshooting
6
Message Cause/Remedy
batteries with other battery types.
to cancel.)
Problem Solution
in the correct position.
batteries with other battery types.
correctly.
there is too
(space) on both
characters are not
cassette correctly.
correctly.
The label
own.
are lost.
line appears
happens when a
The power
turns off when
you try to print.
correctly or the
HELPFUL HINTS (continued)
1
Turn off the label maker, hold down
and , and then press to turn
the label maker back on.
2
First release the power button, and then
release and .
NOTE
6
Short Cuts
Print Option
Unit
Resetting the label maker
CAUTION
Battery Recommendations
1. Cellophane tape
battery
2
1
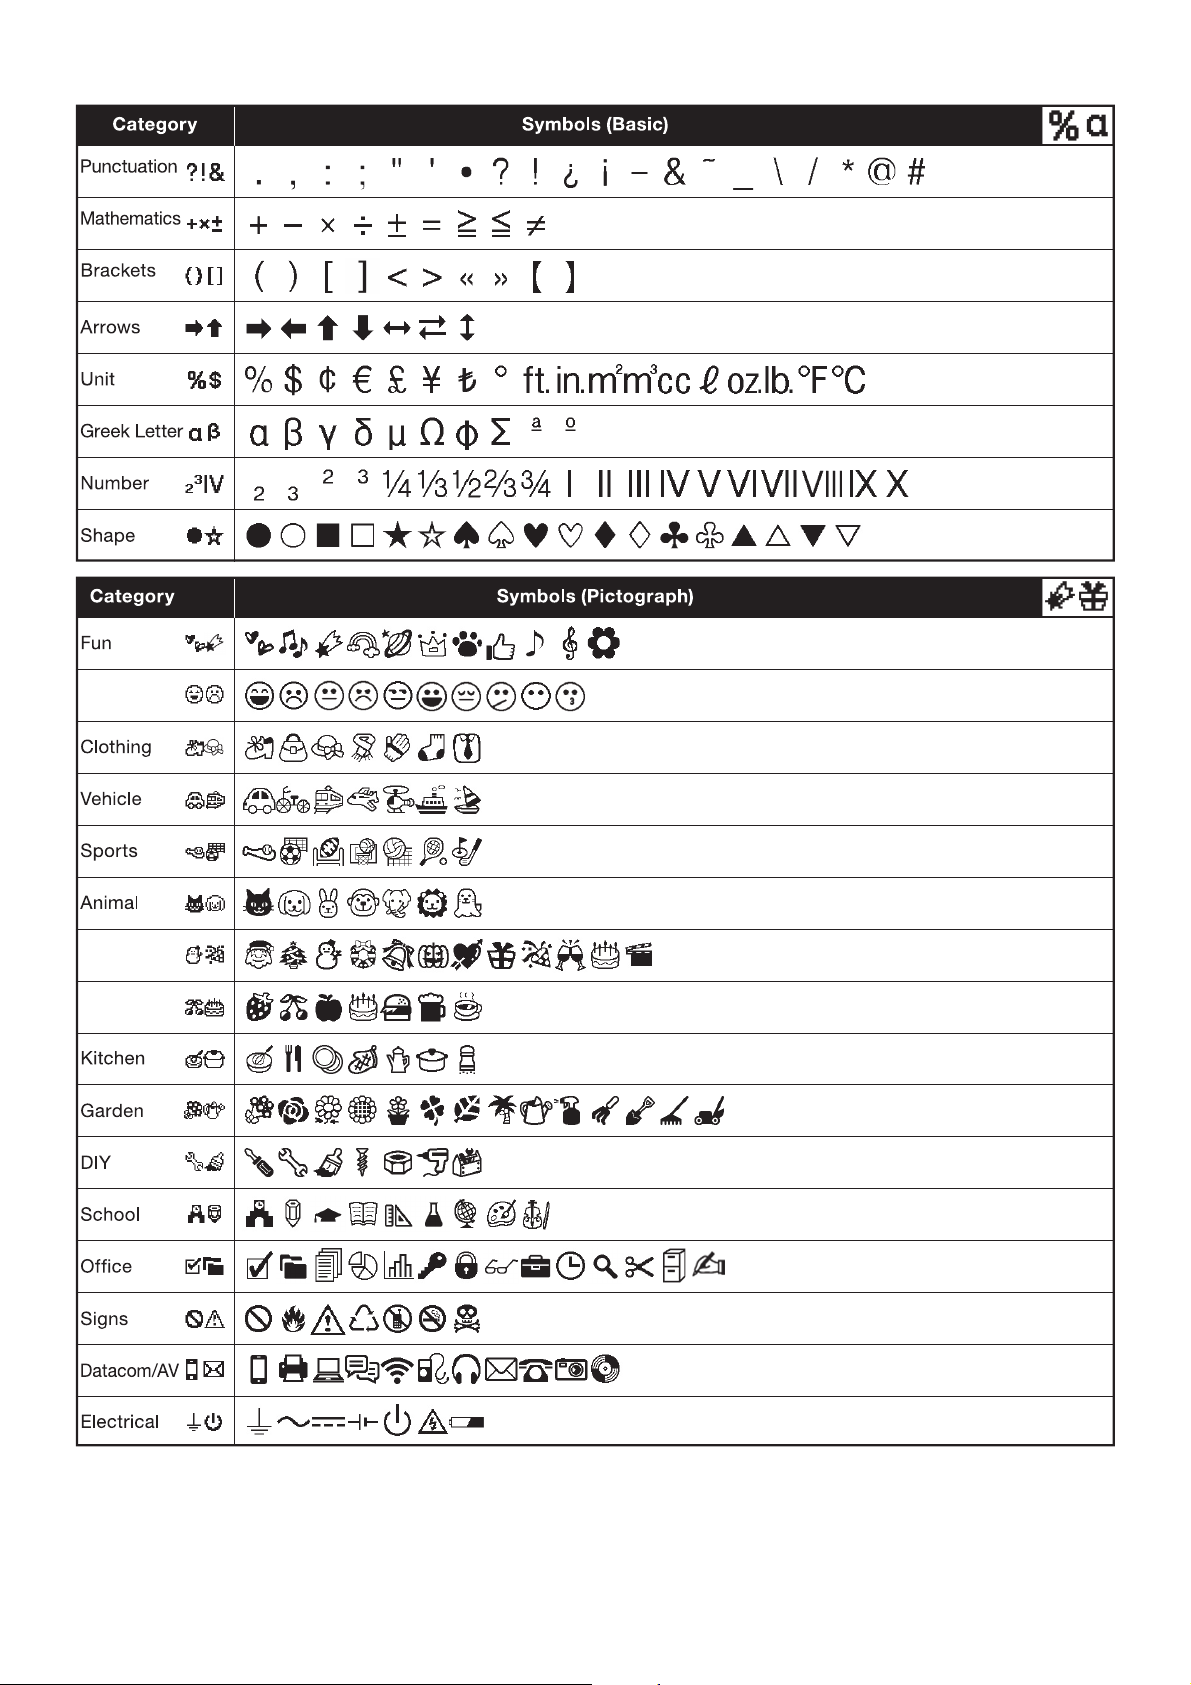
Smiley
Holiday
Food/Drink