*Wipe clean only. See “Care and cleaning” section for more information.
**Removable drip stop valve can be cleaned as an assembly.
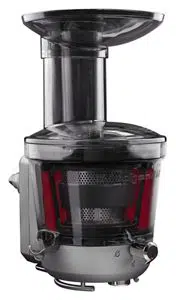
ASSEMBLING THE JUICER
Assembling the Juicer parts
Before First Use
Before using your Juicer for the first time, wipe Juicer parts with a warm damp cloth, then wipe clean with a damp cloth. To avoid damaging the juicer, do not wash or immerse the drive assembly in water or other liquids. Dry with a soft cloth. See “Care and Cleaning” section.
1. Slide pulp chute out and insert gasket behind chute as shown.
2. Place the bowl into the drive assembly
3. Put the screen wiper basket into the bowl.
4. Place the screen of your choice into the screen wiper basket, matching up the red alignment marks on the screen and bowl as shown.
5. Place the auger/blade assembly inside the screen.
6. Place the lid on the juicer, aligning the unlocked icon on the lid with the red arrow on the juicing bowl. Rotate lid clockwise until lid locks into place.
7. Place hopper on top of feed chute. Insert food pusher in feed chute.
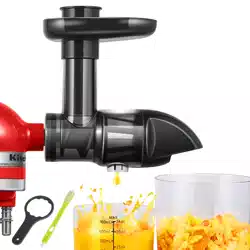
Attaching the Juicer assembly to the Stand Mixer
1. Turn Stand Mixer OFF and unplug
2. For Stand Mixers with a hinged attachment hub cover: Flip up to open.
For Stand Mixers with a removable attachment hub cover: Turn the attachment knob counterclockwise to remove attachment hub cover.
3. Insert the juicer into the attachment hub. Rotate attachment back and forth if necessary. The pin on the attachment housing will fit into the notch of the hub rim when in proper position.
4. Tighten attachment knob until the Juicer attachment is completely secured to Stand Mixer.
5. Place a container under both the juice spout and pulp chute.
OPERATING THE JUICER
Making juice
WARNING: Electrical Shock Hazard
Plug into a grounded 3 prong outlet.
Do not remove ground prong.
Do not use an adapter.
Do not use an extension cord.
Failure to follow these instructions can result in death, fire, or electrical shock.
WARNING: Rotating Blade Hazard
Always use food pusher.
Keep fingers out of openings.
Keep away from children.
Failure to do so can result in amputation or cuts.
1. Plug the mixer into a grounded 3-prong outlet. Turn on the Stand Mixer to speed 10.
IMPORTANT: Large seeds or pits need to be removed prior to juicing to avoid damage to the auger or baskets. This includes fruits such as: nectarines, peaches, mangoes, apricots, plums, cherries, etc.
2. Place items to be juiced into the hopper. Use the food pusher to slowly feed items into the Juicer bowl.
3. To make juice, the pulp chute should always be pushed in; this is the open position. When the pulp chute is open, pulp created while juicing will flow through the pulp chute, separating it from the juice.
4. To make sauces, pull the pulp chute out; this is the closed position. Make sure the rubber gasket is in place. When the pulp chute is closed, the juice and fiber exit through the juice chute as a sauce.
TIPS FOR GREAT RESULTS
Quick tips
The pulp chute controls how much fibrous material or pulp exits through the juice chute.
- Pulling the pulp chute out closes the chute, increasing the amount of pulp and fiber for your sauce recipes.
- Pushing the pulp chute in opens the chute, reducing the amount of pulp for your juice recipes.
Remember to open the pulp chute when using the high or low pulp screens. Keeping the pulp chute open will prevent the Juicer from locking up.
The rubber gasket on the bottom of the juicer needs to be in place to reduce loss of juice into the pulp chute. Only remove the rubber gasket if you want juice to flow into the pulp ejector.
The drip stop should be opened before juicing.
Large seeds or pits need to be removed prior to juicing to avoid damage to the auger or baskets. This includes fruits such as: nectarines, peaches, mangoes, apricots, plums, cherries, etc.
Before saucing hard fruits (such as apples), it is recommended that you steam the fruit for 2-3 minutes.
Run Juicer Attachment for 1-2 minutes after the last piece of food is inserted. This ensures the maximum amount of juice is extracted.
RECIPES
Juices
Carrot Ginger Juice
makes 1 cup
12 small-medium carrots
½ inch piece of ginger (spicy)
Cucumber Refresher
makes 1 ½ cups
2 large english cucumbers
1 cup packed fresh spinach
½ lemon
NOTE: If you prefer a more sweet juice, add 1 apple.
Pomegranate Apple Juice
makes 1 ½ cups
1 large gala apple
1 ½ cups pomegranate seeds
Ruby Red Juice
makes 1 cup
½ cup packed kale
1 small apple
1 beet
3 medium carrots
Vitamin C Juice
makes 1 cup
6 large strawberries
1 kiwi
½ cup peeled and chopped mango
Winter Fruit Juice
makes 2 cups
1 gala apple
1 d’anjou pear
1 navel orange, peeled if desired
NOTE: For a mild orange flavor, remove peel before juicing.
Marinades and sauces
Cilantro Lime Marinade (low pulp screen)
Makes 2 cups
Taco Tuesday will never be the same once you have this marinade in your culinary toolbox. Use it the next time you’re preparing chicken, pork or beef.
4 limes
1 small yellow onion, peeled and quartered
1 cup packed cilantro leaves and stems
6 tablespoons extra virgin olive oil
1 tablespoon granulated sugar
1 teaspoon kosher salt
½ teaspoon freshly ground black pepper
Fit your KitchenAid® Juicer Stand Mixer attachment with the low pulp screen. Juice two limes, then the onion and cilantro and finish with the remaining limes.
Pour the juice into a jar with a liquid tight lid and add the olive oil, sugar, kosher salt, and pepper. Tighten on the lid and shake to combine. Use as a marinade or vinaigrette.
Store in the refrigerator for up to two weeks.
Classic Tomato Sauce
Yield: 3 ½ to 4 cups
A classic tomato sauce is a staple in every cook’s kitchen. The Juicer makes quick work of the otherwise tedious task of seeding and straining the tomatoes, producing a smooth sauce perfect for pasta, pizza, or lasagna. Use the best tomatoes you can find, San Marzano or ripe Roma tomatoes are best. If it is not prime tomato season, canned tomatoes are a better choice.
Total Time: 2 hours
3 ½ pounds fresh Roma tomatoes, halved or 2 (28 ounce) cans whole peeled San Marzano tomatoes
1 medium carrot
1 tablespoon unsalted butter
1 tablespoon extra virgin olive oil
½ medium onion, finely chopped
2 garlic cloves, minced
½ teaspoon dried oregano
¼ teaspoon salt
¼ teaspoon freshly ground black pepper
Using the saucing screen with pulp control closed, juice tomatoes (along with their juices if using canned tomatoes) and carrot. You should end up with about 6 cups of juice.
In a large saucepan over medium heat, heat olive oil and butter until melted and frothy. Add onion and garlic and sauté until fragrant, about 1 minute. Add tomato juice and oregano and bring to a simmer; cook, stirring occasionally, for 60 to 90 minutes or until sauce has thickened to desired consistency. Season to taste with salt and pepper.
Sauce will keep, refrigerated in airtight container, for up 5 days, or frozen for up to 3 months.
Pear Caramel Sauce
Yield: 3/4 cup
Taking homemade caramel sauce to another level of flavor with fresh fruit, this pear caramel sauce features fresh pear juice and pear liqueur. It is wonderful poured over homemade vanilla or cinnamon spice ice cream, and simply sinful drizzled on top of a slice of chocolate cake.
Total Time: 40 minutes
2-3 Comice or Anjou pears, quartered
½ cup granulated sugar
pinch cream of tartar
2 tablespoons heavy cream
1 tablespoon butter
1 ∕8 teaspoon salt
1 tablespoon pear liqueur
Juice pears through the low pulp screen. Strain through a fine mesh sieve to remove any large chunks or skins. You should have about 1 cup of juice.
In a small saucepan, cook juice, stirring occasionally, over medium-high heat until thick and butterscotch in color and reduced to ¼ cup, about 10 minutes. Set aside.
In a small, high-sided saucepan, combine sugar, 2 tablespoons water, and cream of tartar, stirring until sugar has dissolved. When the mixture starts to boil, stop stirring and cover the pan for 2 minutes (the steam buildup will dissolve any stray sugar crystals on the side of the pan). Remove cover and cook, without stirring, for about 8 to 10 minutes or until sugar caramelizes to the color of light beer, swirling the pan as needed to ensure an even color throughout.
Remove from heat and whisk in reduced pear juice, cream, butter, and salt until smooth (mixture will bubble vigorously, so pour carefully to prevent spattering). Stir in pear liqueur and let cool. Caramel sauce will keep, refrigerated in a glass jar or airtight container, for up to 2 weeks. Re-warm prior to serving
Spiced Apple Pear Sauce
Makes 4 cups
A twist on a classic, this apple pear sauce is tasty stirred into hot oatmeal or served as a quick weeknight dessert. To ensure a nice texture, make sure to peel the apples before saucing.
2 pounds apples, peeled, cored and quartered
1 pound pears, cored and quartered
¼ cup brown sugar
1 teaspoon cinnamon
½ teaspoon grated nutmeg
¼ teaspoon ground cloves
Fit your KitchenAid® Juicer Stand Mixer attachment with the saucing screen and run the apples and pears through the attachment. Pour the apple pear pulp into a saucepan and add the brown sugar, cinnamon, nutmeg and cloves. Simmer until the sauce thickens.
To store, cool to room temperature and spoon into a container with a tight-fitting lid. It will keep for 2-3 weeks in the fridge.
Jams and jellies
Pineapple Orange Jelly
Makes 3 half pints
This jelly is a hit with lovers of tropical fruit. If you’re finding that you’re not getting enough juice from the your pineapple, try running the pulp through the machine a second time.
1 large pineapple, peeled, cored and cut into eighths
2 navel oranges, peeled
2 cups granulated sugar
3 tablespoons powdered pectin
Run the pineapple and oranges through the high pulp screen. Measure out four cups of pineappleorange juice and pour it into low, wide pan that holds at least 5 quarts.
Whisk the sugar and powdered pectin together and add to the pineapple-orange juice. Place the pan over high heat and bring to a rolling boil.
Cook the jam at a boil, stirring regularly, for 15 to 20 minutes, until it thickens. When the jam has reached the set point, it will form a thick layer on the sides of the pan. Another way to judge set it by using a candy or instant read thermometer. When the cooking jelly reaches 221°F (105°C), it is done.
Once the jam is finished, funnel it into clean, hot mason jars. Wipe the jar rims and apply new lids and rings. Lower the jars into a stockpot of hot water just off the boil, making sure that the jars fully covered with water. Once the water returns to a boil, set a timer for 10 minutes.
When the time is up, remove the jars from the stockpot and place on a folded kitchen towel to cool. Sealed jars are shelf stable for up to a year.
Strawberry Vanilla Jam
Makes 4 half pints
This is a smooth jam that is always a hit with kids. Using a vanilla bean instead of an extract will give the jam better flavor.
3 pounds strawberries, washed and hulled
2 cups granulated sugar
1 vanilla bean, split and scraped
2 tablespoons powdered pectin
1 teaspoon lemon juice
Run the strawberries through the high pulp screen. Measure out four cups of strawberry pulp and pour it into low, wide pan that holds at least 5 quarts.
Whisk the sugar, vanilla bean seeds, and powdered pectin together and add to the strawberry pulp. Place the pan over high heat and bring to a rolling boil.
Cook the jam at a boil, stirring regularly, for 15 to 20 minutes, until it thickens. Add the lemon juice in the last five minutes of cooking. When the jam has reached the set point, it will form a thick layer on the sides of the pan.
Once the jam is finished, funnel it into clean, hot mason jars. Wipe the jar rims and apply new lids and rings. Lower the jars into a stockpot of hot water just off the boil, making sure that the jars fully covered with water. Once the water returns to a boil, set a timer for 10 minutes.
When the time is up, remove the jars from the stockpot and place on a folded kitchen towel to cool. Sealed jars are shelf stable for up to a year.
Main dishes
Tofu Carrot Curry
Yield: 4 servings
This light curry is packed with fresh carrot flavor and a hint of tang and spice. Serve with tofu or shredded chicken, rice, bean sprouts, and baby bok choy for a fulfilling meal.
Total Time: 30 minutes
1 pound fresh carrots
2 medium sweet potatoes (about 3/4 pound), peeled
1 inch piece fresh ginger
1 garlic clove
1 apple, seeded
2 teaspoons olive oil
1 tablespoon Thai red curry paste
3 cups vegetable broth
1 cup light coconut milk
1 tablespoon lime juice
1 tablespoon soy sauce
1 pound tofu, cut into cubes
Run carrots and sweet potatoes through the low pulp screen, followed by ginger, garlic, and apple. You should end up with about 1 cup of liquid.
In a saucepan, heat olive oil over medium heat. Add curry paste and stir until fragrant, about 1 minute. Add carrot juice mixture and vegetable broth and bring to a simmer. Stir in coconut milk, lime juice, and soy sauce to taste. Add tofu cubes and cook until heated through. Serve warm.
Vegetable Pulp and Quinoa Cakes
Yield: 16 cakes (5-6 servings)
Put that leftover vegetable pulp to good use with these savory quinoa cakes, packed with flavor and protein. These cakes are great on their own, served with tartar sauce or aioli, or as a veggie burger patty between slider-sized buns. A pulp mix of starchy root vegetables such as carrots, beets, or sweet potatoes, with some added fruit (such as apples) is the best foundation for this recipe. When saving leftover pulp for later use, remove any inedible skins, cores, or seeds from the fruit or vegetables prior to juicing.
Total Time: 45 minutes
4 large eggs
1 cup quinoa, rinsed and cooked according to package directions (about 3 cups cooked)
2 cups vegetable pulp
1 cup panko breadcrumbs
1 large onion, finely chopped
4 garlic cloves, minced
1∕3 cup packed fresh parsley leaves, chopped
½ teaspoon kosher salt ½ teaspoon freshly ground black pepper
Whisk eggs in a large mixing bowl. Add quinoa, vegetable pulp, breadcrumbs, onion, garlic, parsley, salt, and pepper and mix until incorporated. Fold in crumbled goat cheese.
Form into ½-inch thick patties using ¼ cup of quinoa mixture per cake. To ensure even sizing, tightly pack into a lightly oiled measuring cup. Arrange on a lightly oiled plate and repeat with remaining quinoa mixture. Refrigerate cakes for 15 minutes before cooking.
Heat 2 tablespoons of olive oil in a large nonstick skillet over medium heat. When oil begins to shimmer, gently lay cakes into the skillet, taking care not to overcrowd the pan. Cook for 4 to 5 minutes per side or until golden brown and crispy. Transfer to a baking sheet and place in the oven to keep warm while you cook the remaining cakes, adding more oil to the pan as needed. Serve warm.
CARE AND CLEANING
Cleaning the Juicer
IMPORTANT: To avoid damaging the juicer, do not wash or immerse the drive assembly in water or other liquids. All other parts are top rack dishwasher safe.
1. To disassemble: Remove the lid. Remove the auger. Lift the assembled screen and screen wiper basket out of the bowl, and separate. Disassemble the pulp chute.
2. Wipe the drive assembly with a warm, damp cloth, and wipe clean with a damp cloth. Avoid using abrasive cleaners or scouring pads as they may scratch the drive assembly’s finish. Thoroughly dry with a soft cloth. To avoid damaging the juicer, do not wash or immerse the drive assembly in water or other liquids.
3. Use the brush with warm soapy water to clean out any stuck food or residue in the screens.
4. All juicer parts except for the drive assembly are top rack dishwasher safe..
TROUBLESHOOTING
Juicer does not operate
WARNING: Electrical Shock Hazard
Plug into a grounded 3 prong outlet.
Do not remove ground prong.
Do not use an adapter.
Do not use an extension cord.
Failure to follow these instructions can result in death, fire, or electrical shock.
Check to see whether the Stand Mixer is plugged into a grounded 3 prong outlet. If it is, check the fuse or circuit breaker on the electrical circuit the Stand Mixer is connected to and make sure the circuit is closed.
Check to make sure the Juicer attachment was assembled correctly.
If the problem cannot be corrected:
See the “Warranty” section. Do not return the Juicer attachment to the retailer; retailers do not provide service. The serial number for service is on the bottom of the drive assembly
Juice does not flow sufficiently, or is flowing out of the pulp ejector
1. Check the rubber gasket:
Check to see whether the rubber gasket on the bottom of the juicer is placed properly. If you do want juice to flow into the pulp ejector, make sure the rubber gasket is removed.
2. Make sure you are using fresh fruits or vegetables.
All carrots, including baby carrots, should only be fed through the small chute one at a time.
Clutch engages
Check to make sure there are not too many items in the Juicer.
Make sure any hard seeds are removed.
Makes a squeaking or clicking noise or shakes when making juice
A squeaking noise is normal. It is the sound of juice being squeezed by the auger.
Shaking is normal. It is the sign of the motor working properly.
A clicking noise means the auger has stopped rotating. This is not normal. Turn off the Stand Mixer, then unclog the auger.