Loading ...
Loading ...
Loading ...
4
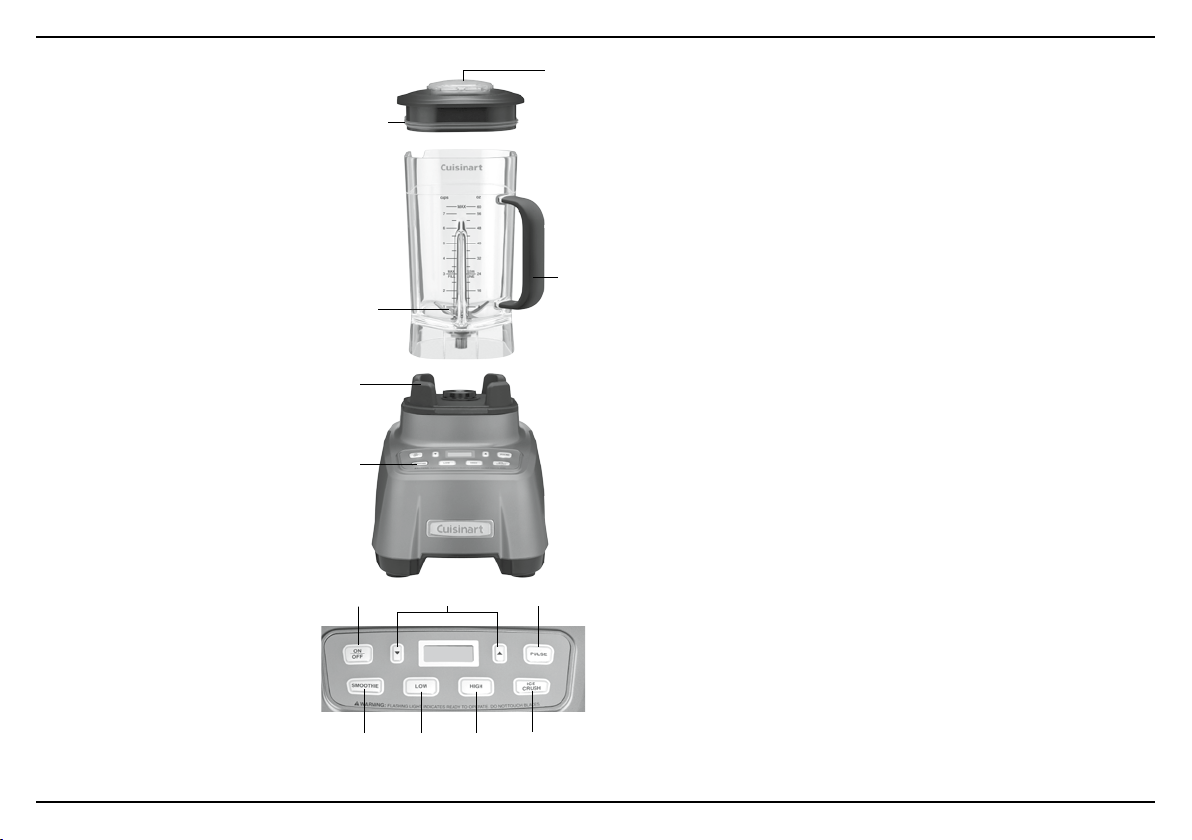
FEATURES AND COMPONENTS
A.
2.0-Ounce Removable Measuring Cup
B. Tight-Seal 2-Piece Blender Cover
C. Blender Jar with Soft-Grip Handle
60 oz., BPA-free Eastman Tritan
™
copolyester jar, includes English and
metric graduations.
D. 4-Prong Blade/Ball-Bearing
Assembly
Commercial-quality stainless steel con-
struction.
E. Removable Jar Pad
F. Control Panel (see below for
detailed description)
CONTROL PANEL
1. LCD Screen with Timer
Brightly lit window displays functions
and blending time.
2. POWER ON/OFF
Flashing red LED indicates when the
power is on.
3. SMOOTHIE
Lets you select preset Smoothie setting.
4. LOW
Choose Low speed to blend ingredi-
ents to desired consistency. Blue LED
light indicates Low speed is active.
5. HIGH
Choose High speed to blend ingre-
dients to desired consistency.
Blue LED lights indicate which
speed you are using once
selected.
6. ICE CRUSH
Preset to crush ice in seconds.
7. PULSE
Allows you to pulse at High or
Low speeds. LED will flash blue
when selected.
8. COUNT UP/DOWN TIMER
Controls and displays operating times.
HELPFUL REMINDERS
• Cover should always be in place while the unit is on. Make sure the cover
is properly aligned.
• Warning: Do not place blender jar onto jar pad while motor is running.
• Add liquid ingredients first, then follow with solid ingredients, then frozen
ingredients. This will provide more consistent blending and prevent
unnecessary stress on the motor.
•
Boiling liquids should cool for 5 minutes before being placed in blender jar.
• Follow Cleaning and Maintenance instructions on page 6 prior to your
first use.
OPERATION
1.
Place the motor base of your Cuisinart
®
Hurricane
™
on a flat, sturdy surface.
It is important that the surface be clean and dry. Fit the blender jar on the
jar pad. Once the jar is assembled and is in position on the jar pad, plug
the Cuisinart
®
Hurricane
™
into an electrical outlet.
2.
Add all necessary ingredients to the blender jar and replace the cover.
You may add more ingredients by removing the removable measuring cup
in the cover and dropping ingredients through the opening. Replace the
measuring cup after adding ingredients. Do not put hands in blender jar
with blender plugged in.
Note: To remove blender jar cover, lift edge of cover at jar spout area
upward. Lifting removable measuring cup will not remove cover.
3. START BLENDING: Press the On/Off button. The red LED indicator light
will illuminate and flash, indicating that the blender is turned on, but no
speed has been selected. The Up and Down arrows will also illuminate.
This is Standby mode.
4. CHOOSE BLENDING SPEED: Press desired function or speed. The
indicator light for the activated function or speed will Illuminate, and the
blender will begin to run at the chosen speed or function. It is possible
to switch speeds without pressing the On/Off button by simply pushing
another speed or function button.
5. TO PAUSE OR STOP BLENDING PROCESS
a) To Pause the Blending Process: Push the button corresponding to
the speed at which you are currently blending. For example: If you are
blending on High speed, push the High speed button again and the
F.
E.
A.
B.
D.
C.
2.
3. 4. 5. 6.
7.8.
1.
Loading ...
Loading ...
Loading ...