Documents: Go to download!
User Manual
- Owner's manual - (English)
Owner Manual Gas Hob
Product overview
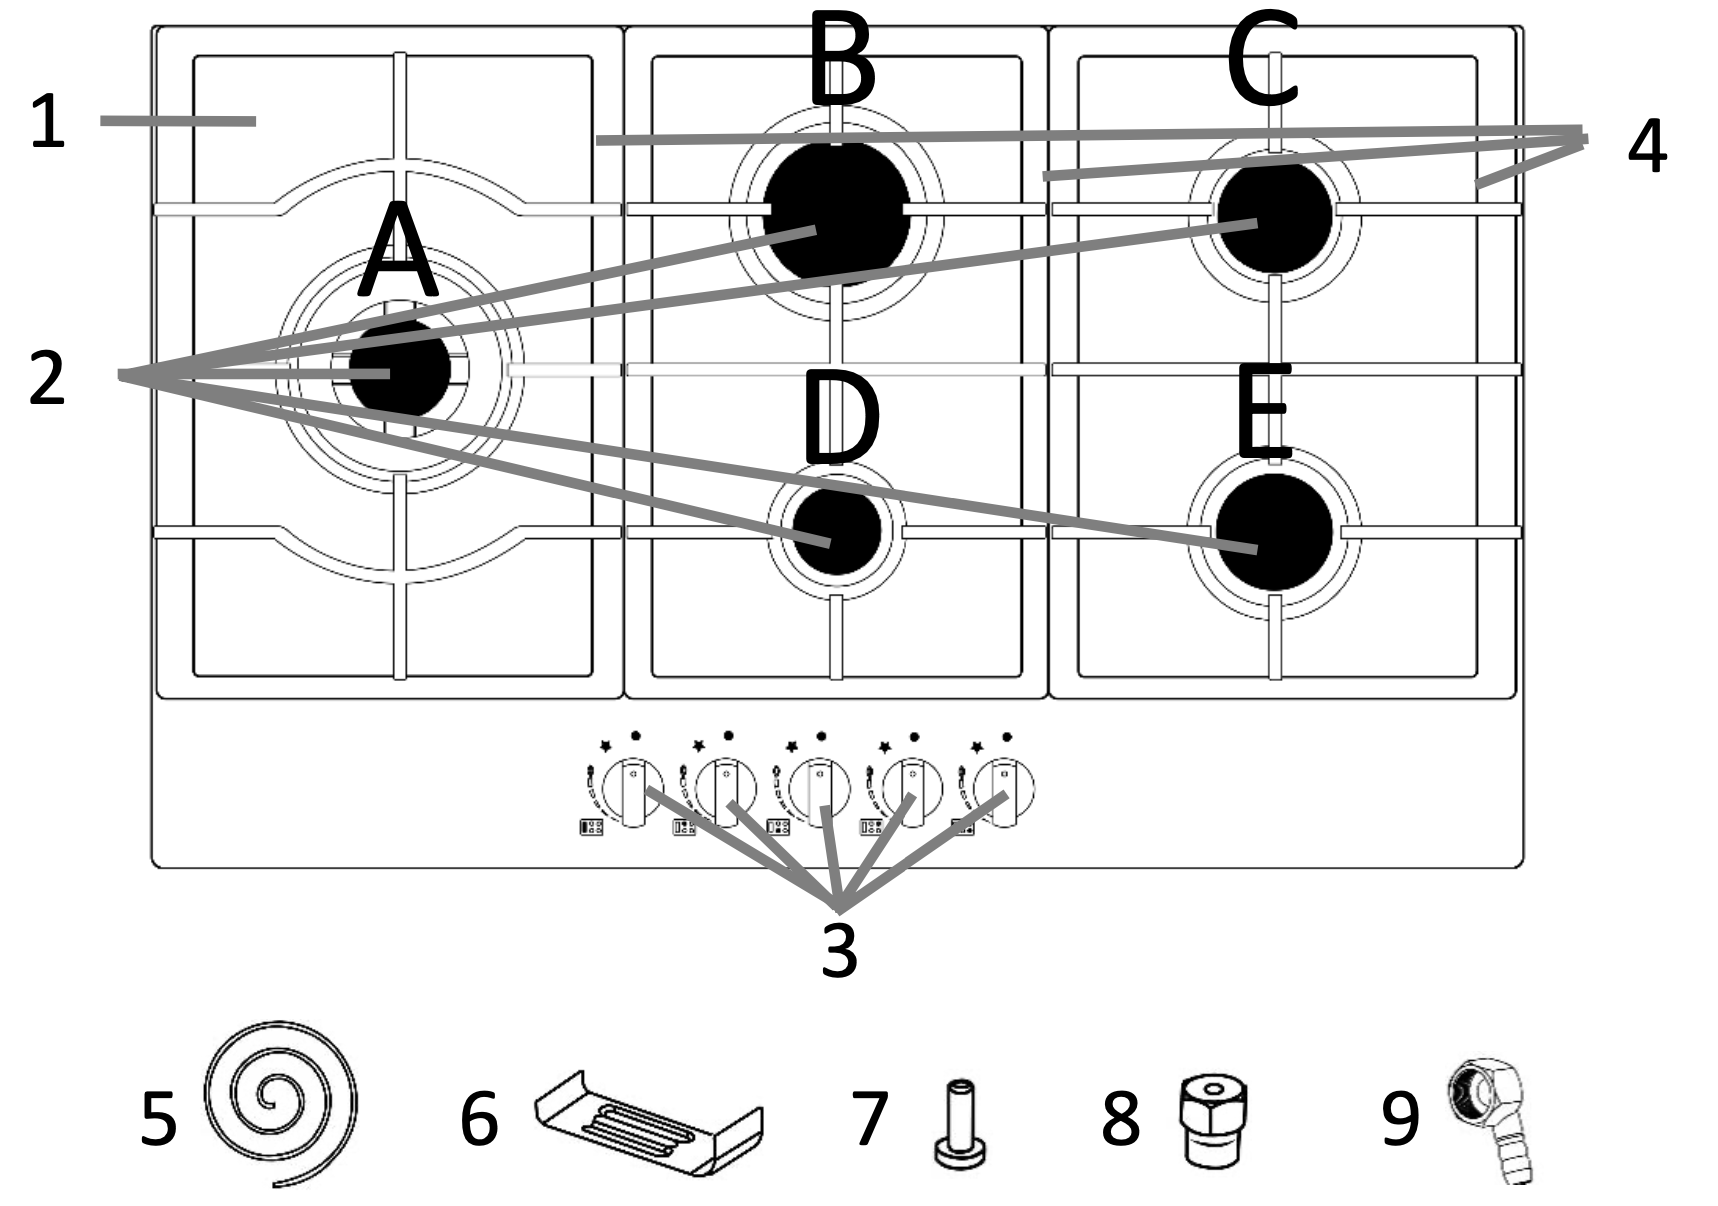
- Hob
- Burners
A. Triple burner
B. Rapid burner
C. Semi rapid burners
See other models: RH714WM1W 24191 RHEKB6003 24580 RHEO6501B
D. Auxiliary burner
E. Semi rapid burners - Dials
- 3 x Pan support
- 4 x Sponge
- 4 x Bracket
- 4 x Screws
- 5 x Injector
- Gas pipe bend
Positioning
- This appliance is to be installed in a counter top.
- Avoid damaging the product during installation.
- The appliance can only be used safely if it is correctly installed according to the safety instructions. The installer is responsible for ensuring that the appliance works correct when installed.
- Gas appliances must be disconnected and installed by a Gas Safe registered engineer. This scheme has replaced the Corgi registration scheme. Failure to do so will invalidate your guarantee, liability claims and could lead to criminal prosecution.
- The edges of the hob must be a minimum of 60mm from a side or rear wall.
- The highest point of the hob (including the burners) must be a minimum of 700mm from the underside of any surface directly above it.
- The highest point of the hob (including the burners) must be a minimum of 400mm from the underside of any surface either side of the hob. If any surface either side of the hob is lower than 400mm, then it must be at least 50mm from the outer edges of the hob.
- There must be a minimum of 50mm of clearance around the hob and any combustible materials.

- You must have a minimum gap of 25mm and a maximum gap of 74mm between the underside of the appliance and any surface below it.

Note:
- Select heat-resistant work surface material to avoid larger deformation caused by the heat radiation from the appliance.
- To install a hob above an oven, the oven must have forced ventilation.
- Check the dimensions of the oven when being installed with the hob.
Usage
Note: The appliance is fitted with a flame failure safety device on each burner, which is designed to stop the flow of gas to the burner head in the event of the flame going out.
Dials
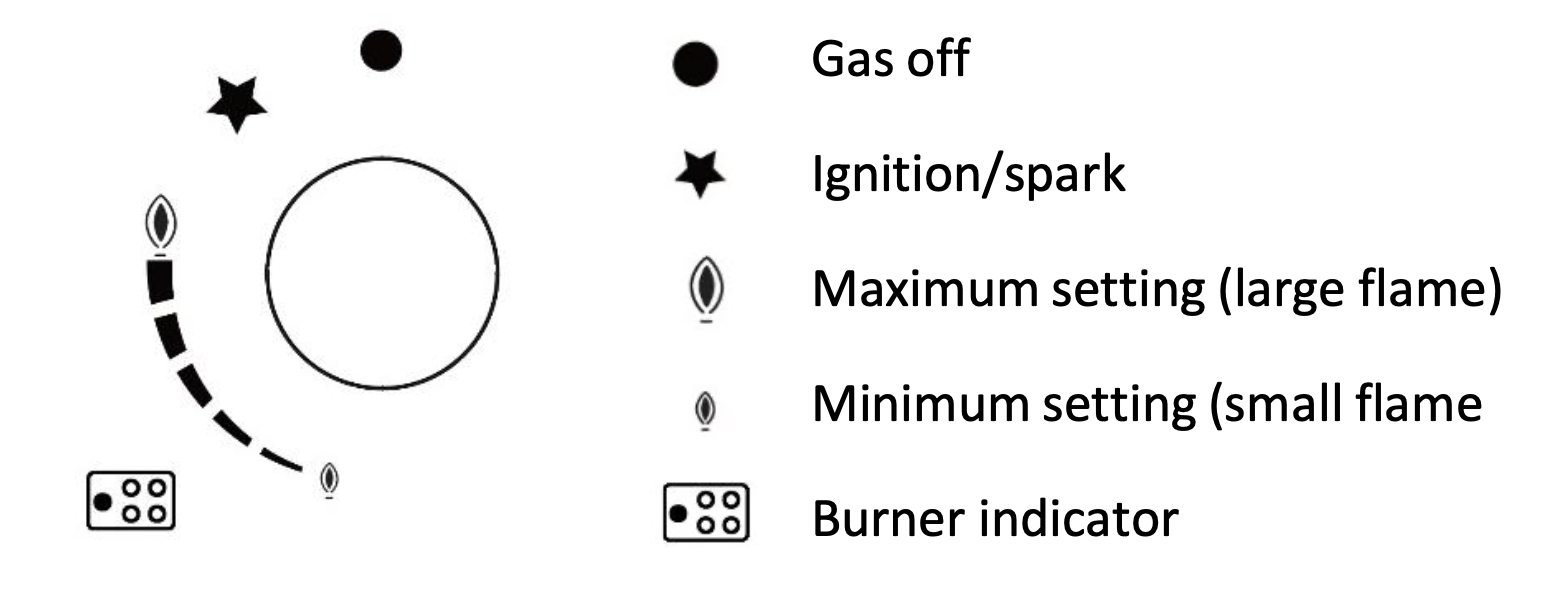
The appliance has 5 dials and these control the 5 burners, at the bottom left of each dial there is an illustration that shows the burner that each dial controls:

Each dial has 4 icons, these are explained below:
To use a burner
- Turn on the appliance at the plug.
- Place a suitable pan on the pan support that is over the burner you wish to use. Make sure the bottom of the pan and the surface of the pan support are clean and dry.
- Press the dial of the burner that you wish to light downwards and turn it anticlockwise to the maximum setting (large flame).
You must keep the dial depressed so that the automatic ignition for the burner operates. - You should hold down the control knob for 15 seconds after the flame has ignited on the burner. If after 15 seconds the burner has not lit, stop operating the device and wait at least 1 min before trying to ignite the burner again.
- After this 15-second interval, you will be able to release the dial and set the flame to your required level by turning the dial anti-clockwise.
- The operating position MUST be at a position between the maximum and minimum position.
- To switch the burner off, turn the control dial clockwise to the gas off position.
Note: In case of power cut, the burners can be lit carefully by using a match.
Warnings:
- It is normal to hear a slight whistling noise while the burner is operating.
- When it is first used, it is normal for the burner to give off odours; this does not pose any risk and does not indicate a malfunction; they will disappear in time.
- A few seconds after the burner is switched off, a sound (thud) will be produced. This is not a fault - this means that the safety device is no longer operating.
- Keep the burner as clean as possible. If the ignition sparkers are dirty they will not light properly. Clean them periodically using a small non-wire brush. Bear in mind that the ignition sparkers must not suffer any serious impacts.
- An orange-coloured flame is normal. This is caused by the presence of dust in the atmosphere, spilt liquids, etc.
- The kitchen will become hot and humid when this gas appliance is used. You must therefore ensure that the kitchen is well ventilated: either keep the natural ventilation apertures open, or install a ventilation system (extractor hood).
- If using the appliance intensively for prolonged periods, you may require additional ventilation (e.g. by opening a window) or more effective ventilation (e.g. by increasing the hob's ventilation, if possible).
- If the burner flames are accidentally blown out, switch off the burner operating control knob and do not try to relight it for at least one minute.
Pans & energy saving
The following advice is to prevent damage to pans and help you save energy:

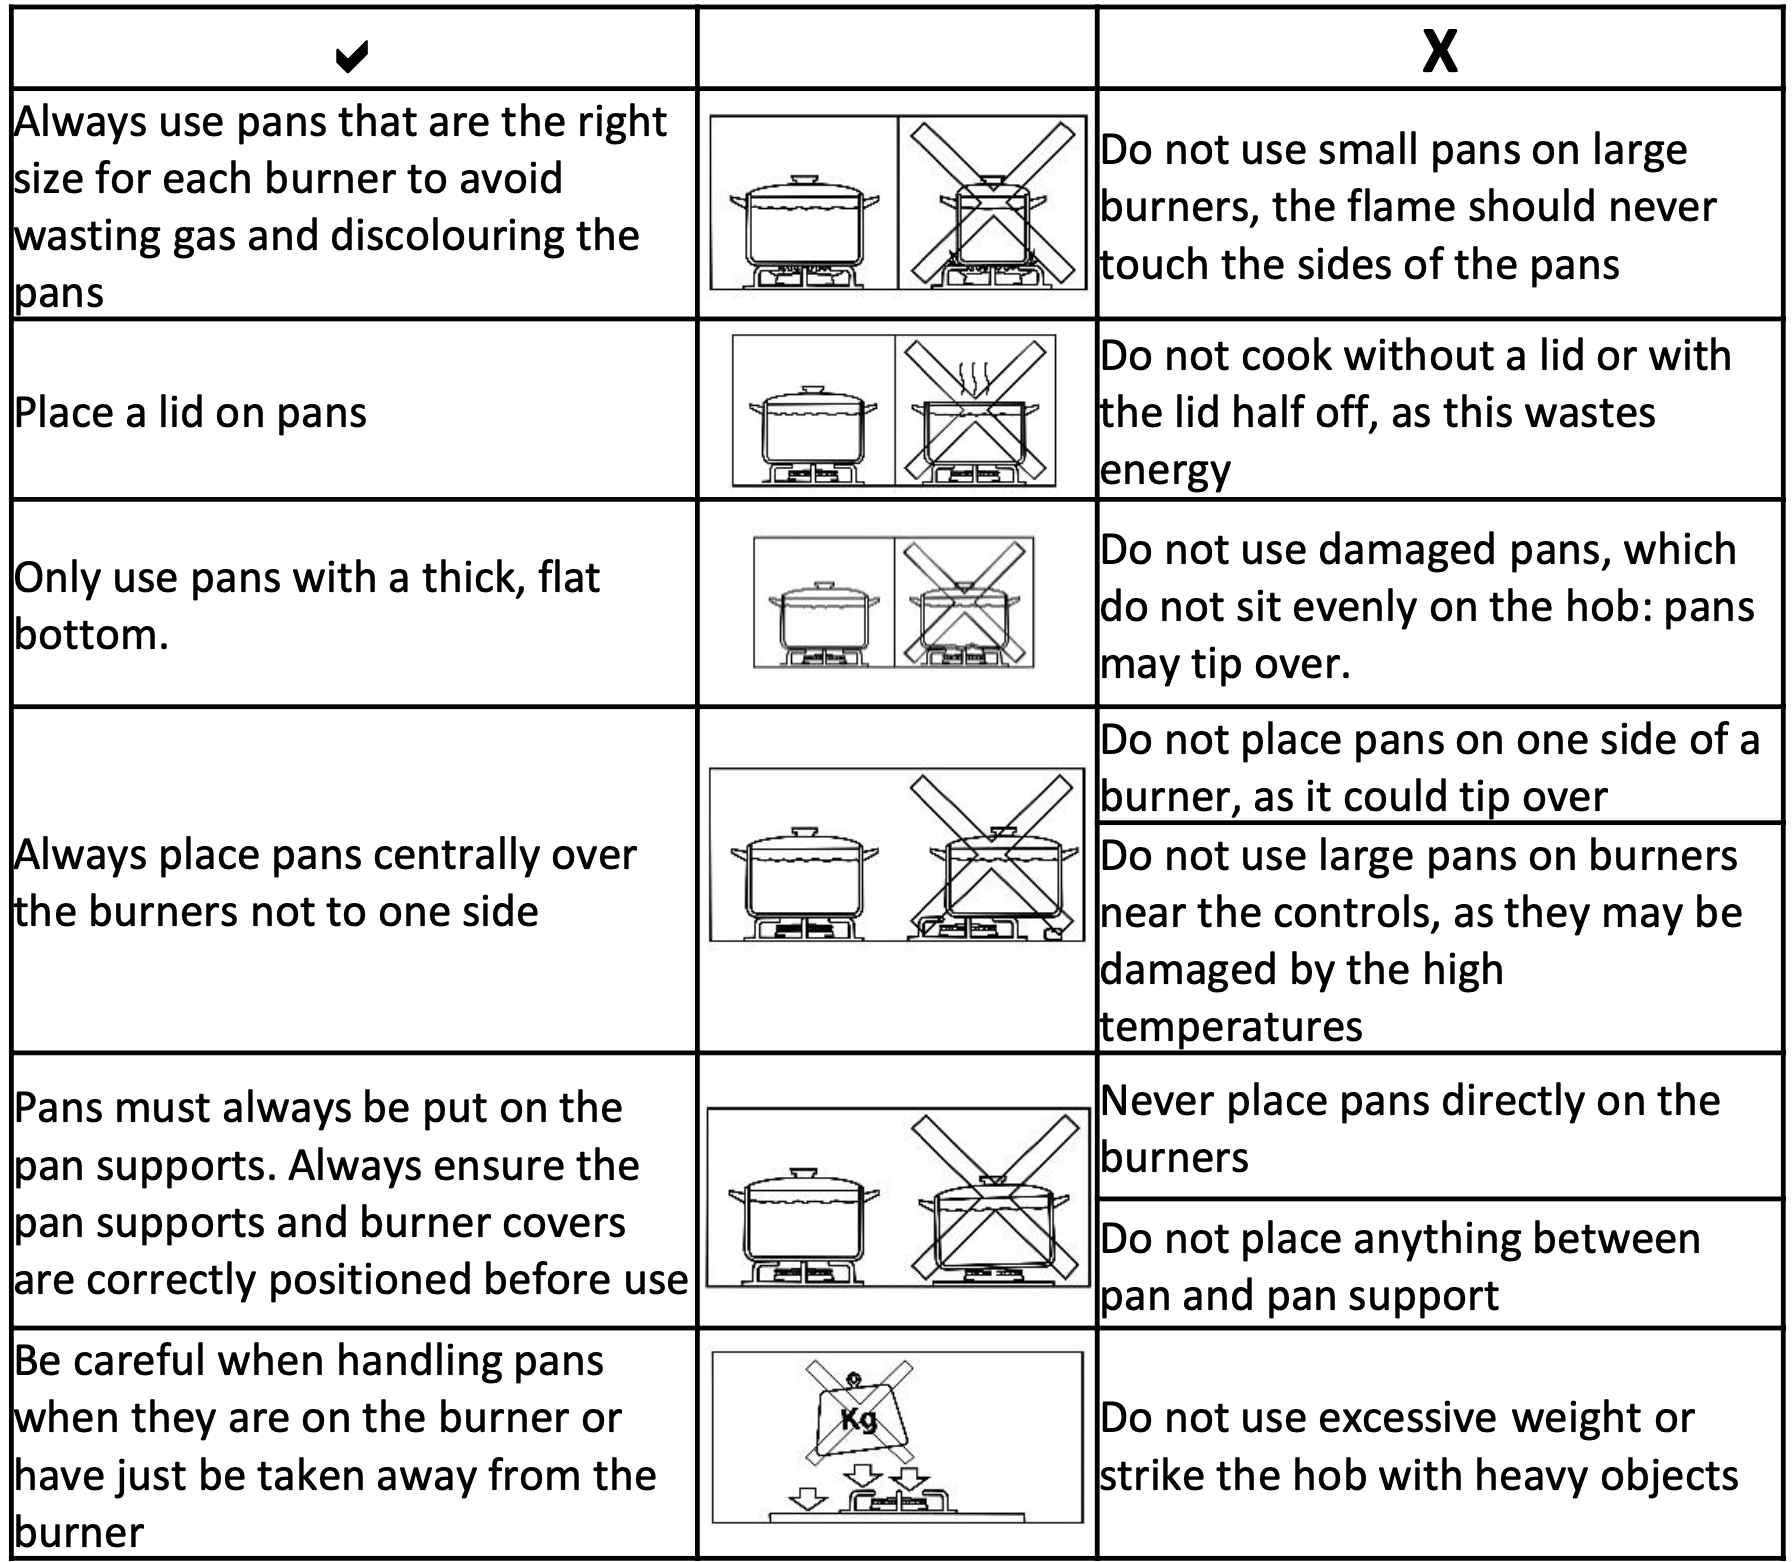
Cooking recommendations:
The following advice is to help you get the best cooking performance/results:

Pan supports:
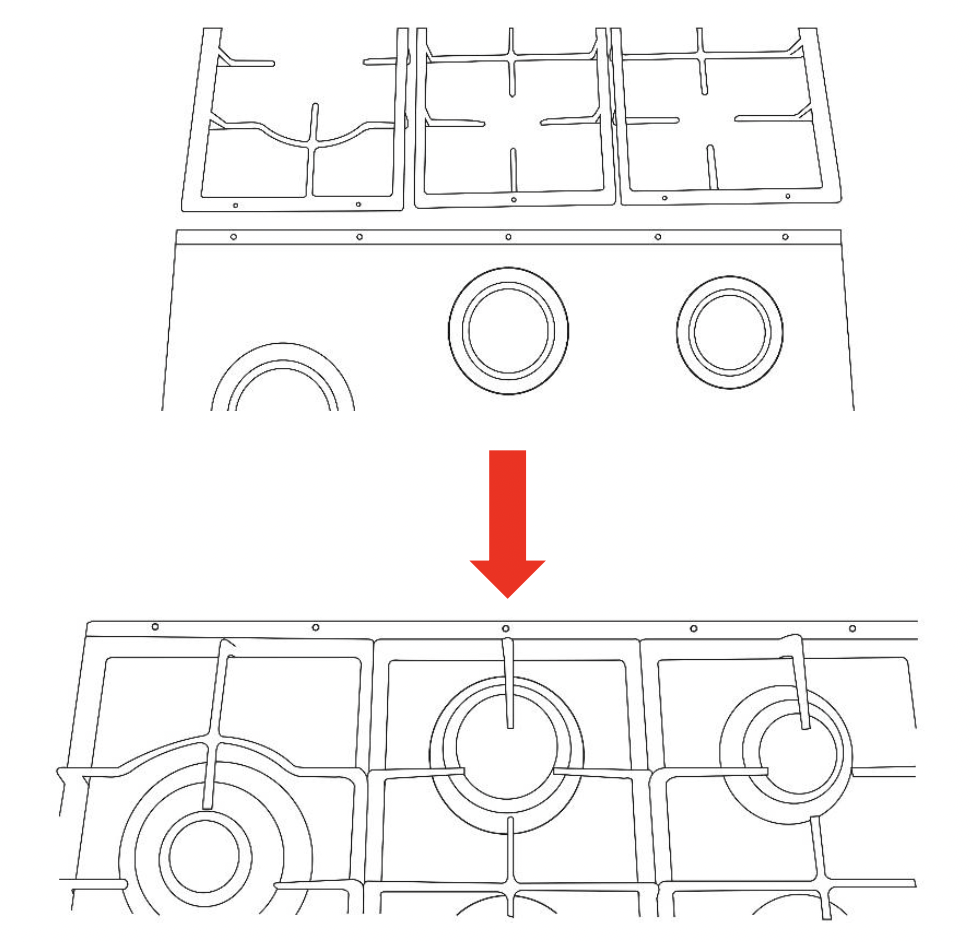
The pan supports will only align with the burners if they are put on the hob correctly. To ensure this is done at the top of the hob there is a metal strip that has raised notches on it; 2 on the left, 1 in the middle and 2 on the right. These notches relate directly to the holes/indentations that are on the underside of the 3 pan supports. The left pan support which is for the triple burner or wok burner has 2 holes/indentations on its underside (this will be easy to identify as it can only support a single large pan and the other pan support can support 2). The middle pan support has a single hole/indentation on the underside and the right pan support has 2 holes/indentations. Align the correct pan supports with the correct notches and place the pan supports on to them and the hob.
Cleaning and Maintenance
Important notes:
- The appliance will become hot during operation, allow the appliance to cool down before cleaning.
- Do not use any high-pressure cleaners or steam cleaners.
- Wash new sponge cloths thoroughly before use.
- Follow all instructions and warnings included with the cleaning agents.
How to clean
Observe the information in the table below to ensure that the different surfaces are not damaged by using the wrong type of cleaning agent. Do not use:
- Harsh or abrasive cleaning agents,
- Cleaning agents with a high concentration of alcohol,
- Hard scouring pads or sponges,
- High-pressure cleaners or steam cleaners.
| Surface type |
How to clean |
|---|---|
| Stainless Steel |
Hot soapy water: Clean with a dish cloth and dry with a soft cloth. Clean stainless steel surfaces in the direction of the grain only. Special stainless steel cleaning products are available from specialist retailers. Apply a very thin layer of the cleaning product with a soft cloth. |
|
Painted surfaces |
Hot soapy water: Clean using a damp dish cloth and dry with a soft cloth/towel. Do not use any stainless steel cleaners. |
|
Aluminium and plastic |
Glass cleaner: Clean with a soft cloth. |
|
Glass |
Glass cleaner: Clean with a soft cloth. Do not use a glass scraper. |
How to clean:
- After each use, clean the surface of the respective burner parts once they have cooled down. If any residue is left (baked-on food, drops of grease etc.), however little, it will become stuck to the surface and more difficult to remove later. The holes and grooves must be clean for the flame to ignite properly.
- The movement of some pans may leave metal residue on the pan supports.
- Clean the burners and pan supports using soapy water and scrub with a nonwire brush.
- If the pan supports are fitted with rubber rests, ensure that these are also cleaned. The rests may come loose and the pan support may scratch the hob.
- Always dry the burners and pan supports completely.
- Water droplets or damp patches on the hob at the start of cooking may damage the enamel.
- After cleaning and drying the burners, make sure the burner covers are correctly placed on the diffuser.
- Always clean off any liquid as soon as it is spilt: you will save yourself any unnecessary effort.
- Do not leave acidic liquids (e.g. lemon juice, vinegar, etc.) on the hob.
- The ring cover of the double or triple flame burner and stainless steel parts such as hotplate rings, top sheet and the area around the burners may become discoloured over time. This is normal because of the high temperatures. Each time the appliance is used these parts should be cleaned with a product that is suitable for stainless steel.
CAUTION: The use of a gas cooking appliance results in the production of !heat, moisture and products of combustion" in the room in which it is installed. Ensure that the kitchen !is well ventilated especially when the appliance is in use": keep natural ventilation holes open or install a mechanical ventilation device (mechanical extractor hood).
Cleaning the burners:
- Remove the burner cover and spreader by pulling them upwards and away from the hob.
- Soak them in hot soapy water.
- Clean them before drying them carefully, ensuring that the flame holes are clean and completely dry.
- Wipe the fixed parts of each burner with a damp cloth and dry them afterwards.
- Gently wipe the ignition device and a damp cloth and dry them carefully, ensuring they are clean and completely dry.
- Before placing the burners back on the hob you must ensure that the injector is not blocked.

- Place the flame spreader on to the burner cup so that the ignition device and the flame failure device extend through their respective holes in the flame spreader (the flame spreader must click into place correctly).
- Position the burner cover onto the flame spreader so that the retaining pins fit into the their respective recesses.
Troubleshooting
| Problem |
Solution |
|---|---|
| Not ignited |
The plug is not plugged in Connect the appliance to the electricity supply |
|
Power cut or faulty fuse Check whether other kitchen appliances are working or check in the fuse box to make sure that the fuse for the appliance is working |
|
|
The burner cover is badly assembled Assemble the burner cover correctly |
|
|
The gas supply is closed Open the gas supply |
|
| Badly ignited |
The burner cover is badly assembled Assemble the burner cover correctly |
|
The gas supply is closed Open the gas supply |
|
|
The burners are wet Dry the burner cup, flame spreader and burner cover |
|
|
The holes in the burner spreader are clogged or the igniter is clogged Clean the burner spreader and igniter |
|
| Flame goes out when in use |
The flame failure device is clogged Clean the flame failure device |
|
Food that is being cooked has boiled over and extinguished the flame Turn off the burner, wait for 1 minute and reignite the zone |
|
|
The burner cover is badly assembled Assemble the burner cover correctly |
|
|
Flame has been blown out by a strong draught Turn off the burner, check the cooking area for the source of the draught (open window, etc.). Stop the source of the draft, wait 1 minute and reignite the burner |
|
| Excessive noise |
The burners make a noise during ignition and use This is normal |
|
The noise during operation is excessive The burner cup, flame spreader or burner cover may be badly assembled: Assemble correctly |
|
| Unstable flame |
The burner cup, flame spreader or burner cover may be badly assembled Assemble correctly |
| Yellow/orange flame |
The holes in the burner spreader are clogged or the igniter is clogged Clean the burner spreader and igniter |
|
Orange flame This is caused by the presence of dust in the atmosphere, spilt liquids, etc. |
|
|
A different type of gas is being used Check gas supply |
|
| Gas smell |
Gas leakage Stop using the appliance, close the gas supply and open a window or windows for ventilation Vacate the area and contact customer services |
