
Model number:
RH60EDOEH6001 (B) (S)
Multifunctional Electric Fan Double
Oven Instruction Manual
IMPORTANT:
RETAIN FOR FUTURE REFERENCE
For Customer Services & Spare Partsplease call 0345 208 8750
or visit us at https://mda.russellhobbs.com
CONTENTS
Page(s)
Safety instructions 3-7
Installation & Positioning 8-13
Product Overview 14
How To Use Your Oven 15-27
Cleaning & Maintenance 28-33
Trouble shooting 34-35
Guarantee 36
Product Information 37
Disposal information 37
Notes 38
Customer Service Information 39
2
3
Important Note:
Please read this booklet before installing and switching on this appliance.
The manufacturer assumes no responsibility for incorrect installation and
usage as described in this booklet.
This appliance can be used by children aged from 8 years and above and
persons with reduced physical, sensory or mental capabilities or lack of
experience and knowledge if they have been given supervision or
instruction concerning use of the appliance in a safe way and understand
the hazards involved. Children shall not play with the appliance.
Electric ovens and hobs must be hard-wired to a suitably rated electrical
cooker power point – it is recommended that you consult a qualified
electrician. Failure to do so will invalidate your guarantee, liability claims,
and could lead to criminal prosecution.
• Children should be supervised to ensure that they do not play with the
appliance. Please keep children and animals away from this appliance.
• If the supply lead is damaged it must be replaced by a qualified person
using the correct lead, which is available from our customer helpline on
0345 208 8750.
• Packaging material is dangerous to children. Never allow children to play
with packaging material.
• Check the appliance for damage after unpacking it. Do not connect the
appliance if it has been damaged in transport.
• The appliance can only be used safely if it is correctly installed according
to the safety instructions. The installer is responsible for ensuring that
the appliance works correctly after installation.
• All operations relating to installation and regulation must be carried out
by an authorised installation engineer, respecting applicable regulations,
standards and the specifications of the local electricity providers.
SAFETY INSTRUCTIONS

4
• This appliance can only be installed in a well-ventilated place in
accordance with existing regulations and ventilation specifications.
• This appliance is intended for domestic use and the household
environment only. The appliance is not intended for use outside.
• Do not tamper with the appliance's interior. If necessary, call our
customer helpline.
• Do not switch on the appliance if it is damaged in any way. Contact our
customer helpline at the number on the front of the booklet.
• This appliance is only intended for cooking purposes, not as a heating
system.
• The manufacturer is not liable for damage which is caused by improper
use or incorrect operation.
• Combustible items stored in or on top of the appliance may catch fire.
Never store combustible items in or on top of the appliance. Never
open the appliance doors if there is smoke inside. Switch off the
appliance and unplug it from the mains or switch off the circuit breaker
in the fuse box.
• A draught is created when the appliance doors are opened.
Greaseproof paper may come into contact with the heating element
and catch fire. Do not place greaseproof paper loosely over accessories
during preheating. Always weigh down greaseproof paper with a dish or
a baking tin. Only cover the surface required with greaseproof paper.
Greaseproof paper must not protrude over the accessories.
• Always slide accessories into the cooking compartment.
• The appliance and its accessible parts become very hot when in
operation. Never touch the interior surfaces of the cooking
compartments or the heating elements while hot. Always allow the
appliance to cool down first. Keep children at a safe distance.
• Accessories and ovenware become very hot. Always use oven gloves to
remove accessories or ovenware from the cooking compartment.
• Shelves must only be placed and used between the side supports.
• The grill pan must only be placed on the shelves.
SAFETY INSTRUCTIONS
5
• The grill pan or any other kind of baking tray should not be placed on the
bottom of the oven cavities.
• Alcoholic vapours may catch fire in the hot cooking compartments. Never
prepare food containing large quantities of drinks with a high alcohol content.
Only use small quantities of drinks with a high alcohol content. Open the
appliance doors with care.
• When you open the appliance doors, hot steam may escape. Open the
appliance doors with care. Keep children at a safe distance.
• Water in a hot cooking compartment may create hot steam. Never pour water
into the hot cooking compartments.
• Scratched glass in the appliance doors may develop into a crack. Do not use a
glass scraper, sharp or abrasive cleaning aids or detergents when cleaning your
appliance. Never use strong and abrasive cleaning agents as they will cause
surface damage.
• The appliance gets hot. Do not keep combustible objects or aerosol cans in
drawers and cupboards directly besides the appliance.
• A defective appliance may cause electric shock. Never switch on a defective
appliance. Disconnect the appliance from the mains or switch off the circuit
breaker in the fuse box. Contact the customer services.
• The cable insulation on electrical appliances may melt when touching hot parts
of the appliance. Never bring electrical appliance cables into contact with hot
parts of the appliance.
• Penetrating moisture may cause an electric shock. Do not use any high
pressure cleaners or steam cleaners.
• When replacing the cooking compartment bulb, the bulb socket contacts are
live. Before replacing the bulb, disconnect the appliance from the mains or
switch off the circuit breaker in the fuse box.
• Incorrect repairs are dangerous. Repairs may only be carried out by a qualified
electrician.
• In the event of a malfunction, turn off the appliance’s electricity supply. For
repairs, call customer services.
• Carrying the appliance: do not carry or hold the appliance by the door handles.
Please use the handles present on the side casing.
SAFETY INSTRUCTIONS

6
• This cooker is intended for heating food and beverages only. The drying of food
or clothing, and heating of warming pads, wheat bags, slippers, sponges, damp
cloths and similar is extremely dangerous & may lead to risk of injury, ignition
or fire.
• Never put objects into the openings on the outer case.
• Food containing a mixture of fat and water (e.g. stock), should stand for 30 to
60 seconds in the oven after it has been turned off. This is to allow the mixture
to settle and to prevent it from bubbling when a spoon is placed in it, or a stock
cube is added.
• When heating or cooking food or liquid, remember that there are certain
foods (such as jam, Christmas pudding, and mincemeat), which heat up very
quickly.
• Do not cook any food surrounded by a membrane in the oven cavities, such as
egg yolks, potatoes, chicken livers,sausages, ready meals and so on without
piercing them several times with a fork.
• Do not overcook food.
• When heating food in plastic or paper containers, keep an eye on the oven due
to the possibility of ignition.
• If materials inside the oven smoke or catch fire, keep the oven doors closed to
stifle the flames, and turn the oven off at the wall switch or shut the power off
at the fuse or circuit-breaker panel. If smoke is emitted , switch off or unplug
the appliance and keep the doors closed in order to stifle any flames.
• Please remember that as food or liquids heat up, they will release steam or
may be spitting. Never cover any container fully, always leave a gap for steam
to escape.
• Do not use plastic containers when heating or cooking foods that contain a lot
of fat or sugar.
• When using the shelves and baking tray, be aware that these will become HOT
during cooking as they aren’t heatproof. Please use suitable oven gloves when
removing these.
• WARNING: Danger of fire - Do not store items on the cooking surfaces.
SAFETY INSTRUCTIONS

7
SAFETY INSTRUCTIONS
WARNING: The appliance and its accessible parts become hot during use. Care
should be taken to avoid touching heating elements. Keep children less than 8
years of age away unless they are continually supervised.
WARNING: Unattended cooking on a hob zone with fat or oil can be dangerous
and may result in fire. NEVER try to extinguish such a fire with water. Instead,
switch off the appliance and cover the flame with a lid or a fire blanket.
WARNING: If the hob surface is cracked, switch off the appliance to avoid the
possibility of electric shock.
• Do not operate the appliance with an external timer or separate remote-
control system.
• Under no circumstances should the oven be lined with aluminium foil as
overheating may occur.
• Always position pans over the centre of the cooking zone, and turn the handles
to a safe position so they cannot be knocked.
• Make sure the appliance control knobs are always in the “0” (stop) position
when the appliance is not in use.
• The trays incline when pulled out. Take care not to spill or drop hot food when
removing it from the oven.
• Do not remove the control knobs to clean the control panel.
• To maintain the efficiency and safety of your appliance, we recommend you
always use original spare parts and to call our authorised service agents when
needed.
WARNING: To prevent the appliance tipping, the stabilising brackets must be
installed. (For detailed information refer to the anti-tilting kit set guide.)
• Before connecting your appliance, make sure that the local distribution
conditions (electricity voltage and frequency) and the specifications of the
appliance are compatible. The specifications for this appliance are stated on
the label.

Preparation & Installation
WARNING : This appliance must be installed by an authorised service person or
qualified technician, according to the instructions in this guide and in
compliance with the current local regulations.
WARNING : Ensure that there are no electric wires, gas or water pipes in the
area where holes are to be made.
WARNING : Components of the appliance may have sharp edges. Wear
protective gloves.
Preparing for installation:
• After removing the packaging material from the appliance and its
accessories, ensure that the appliance is not damaged. If you suspect any
damage, do not use it and contact an authorised service person or qualified
technician immediately.
• Make sure that there are no flammable or combustible materials in the
close vicinity, such as curtains, oil, cloth etc. which may catch fire.
• The worktop and furniture surrounding the appliance must be made of
materials resistant to temperatures above 100°C.
• The appliance should not be installed directly above a dishwasher, fridge,
freezer, washing machine or clothes dryer.
• The appliance can be placed close to other furniture on condition that, in
the area where the appliance is set up, the furniture’s height does not
exceed the height of the cooktop.
Electrical Connection Instructions:
WARNING : This appliance must be installed by an authorised service person or
qualified technician, according to the instructions in this guide and in
compliance with the current local regulations.
8
INSTALLATION & POSITIONING
WARNING : THIS APPLIANCE MUST BE EARTHED.
• Before connecting the appliance to the power supply, the voltage rating of the
appliance (marked on the rating label), must be checked for correspondence to
the available mains supply voltage, and the mains electric wiring should be
capable of handling the appliance’s power rating (also indicated on the rating
label).
• During installation, please ensure that isolated cables are used. An incorrect
connection could damage your appliance. If the mains cable is damaged and
needs to be replaced this should be done by a qualified personnel.
• Do not use adaptors, multiple sockets and/or extension leads.
• The supply cord should be kept away from hot parts of the appliance and must
not be bent or compressed. Otherwise the cord may be damaged, causing a
short circuit.
• If the appliance is not connected to the mains with a plug, an all-pole
disconnector (with at least 3 mm contact spacing), must be used in order to
meet the safety regulations.
• The appliance is designed for a power supply of 220-240 Vac. If your supply is
different, contact the authorized service personnel or qualified electrician.
• The power cable (H05VV-F) must be long enough to be connected to the
appliance.
• The fused switch must be easily accessible once the appliance has been
installed.
• Ensure all connections are adequately tightened.
• Fix the supply cable in the cable clamp and then close the cover.
• The terminal box connection is placed on the terminal box.
ENSURE THE WIRES ARE CONNECTED ACCORDING TO BELOW:
• For this connection, a ‘Twin and Earth 6242Y’ type cable should be used.
9
INSTALLATION & POSITIONING
Green/Yellow (Earth) wire to the terminal marked "E".
Brown (Live) wire to the terminal marked "L".
Blue (Neutral) wire to the terminal marked "N".
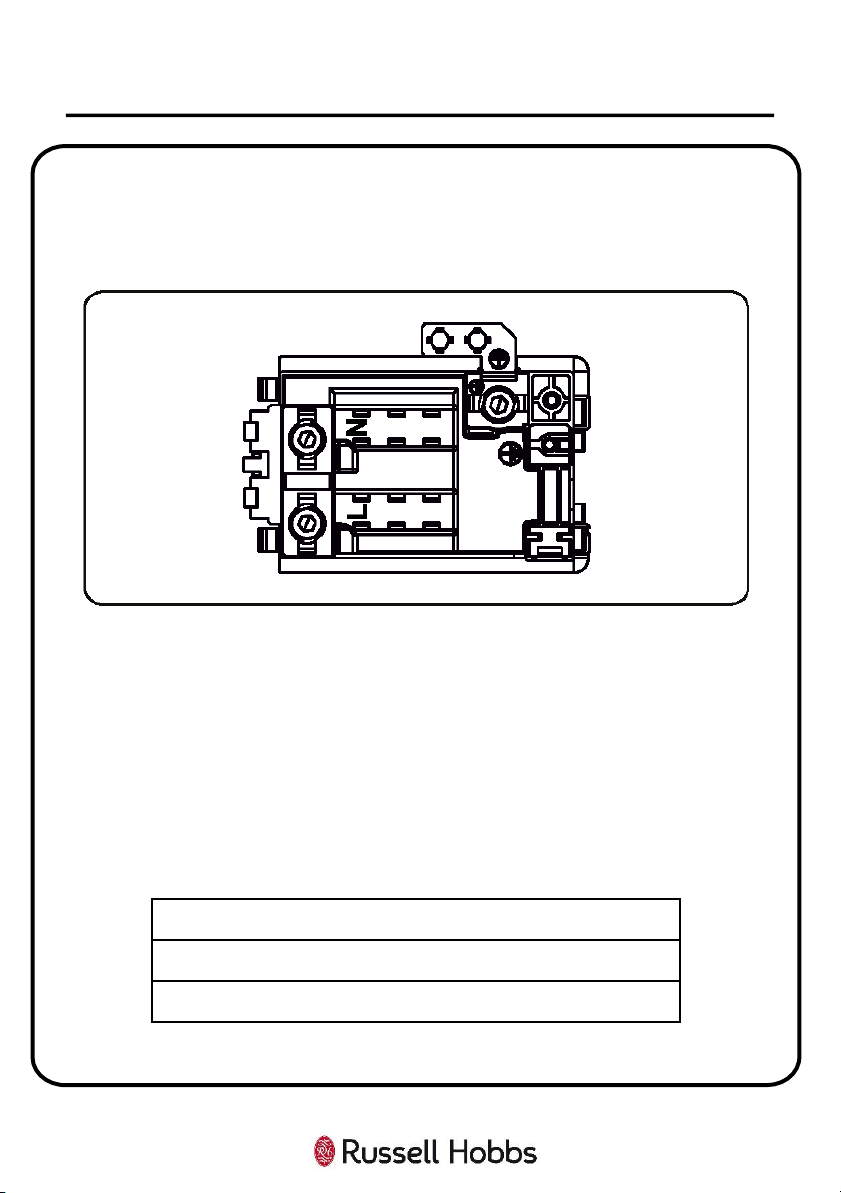
WARNING : THIS APPLIANCE MUST BE EARTHED.
10
INSTALLATION & POSITIONING
Green/Yellow (Earth) wire to the terminal marked "PE".
Brown (Live) wire to the terminal marked "L".
Blue (Neutral) wire to the terminal marked "N".
11
INSTALLATION & POSITIONING
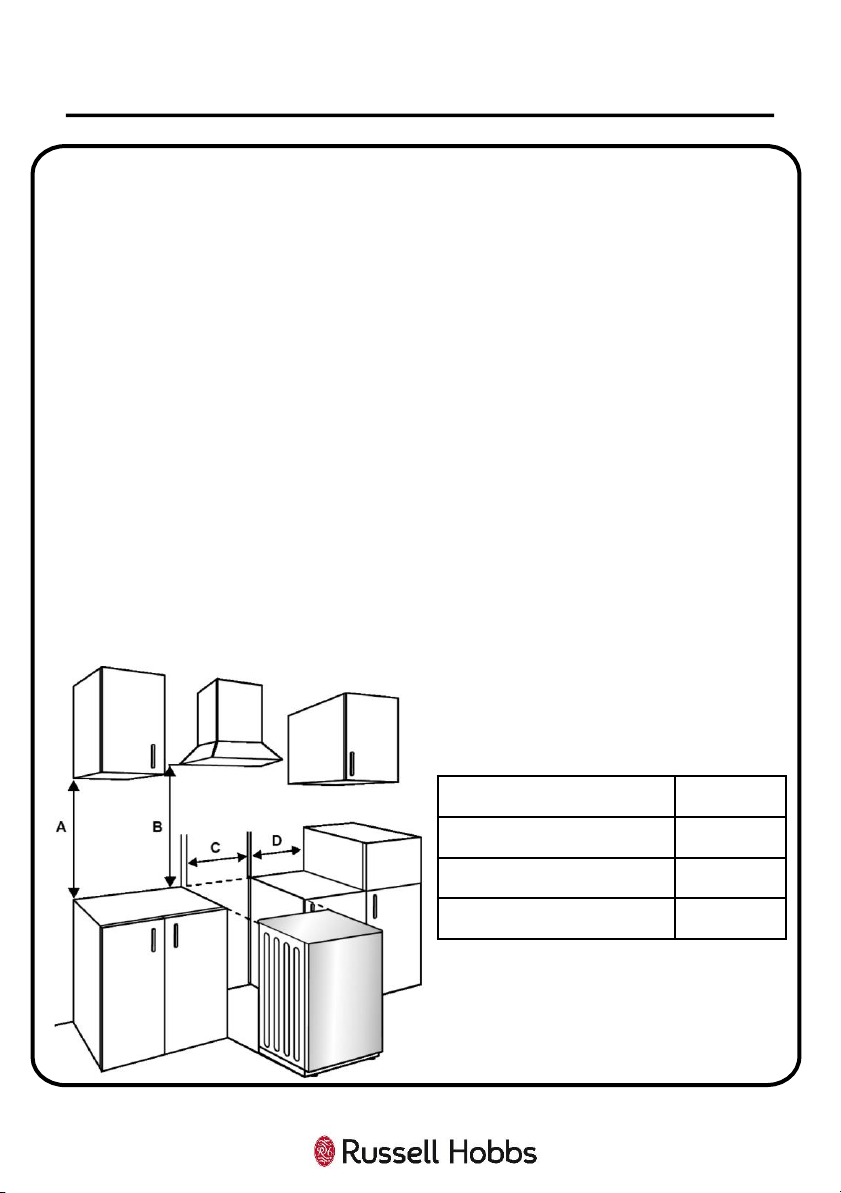
A (mm) Cupboard 420
B (mm) Cooker Hood 650/700
C (mm) Product Width 594
D (mm) 50
Installing the appliance:
1. Ensure that there will be an electrical power point within adequate distance of
the oven after it has been installed.
2. Ensure the space where the appliance will be situated measures at least
(W)594 x (D)650mm, and is in compliance with the instructions on the previous
page.
3. Install the anti-tilting bracket to the wall following the directions given on the
next page, and then carefully and gently put the oven into the space, making
sure that the power cable can still be accessed.
4. Connect the oven to the electrical power point before attaching the oven to
the anti-tilting bracket fully. Your oven is now installed.
NOTE:
• If the kitchen furniture is higher than the cooktop, the kitchen furniture must be
at least 10 cm away from the sides of appliance for air circulation.
• If a cooker hood or cupboard is to be installed above the appliance, the safety
distance between cooktop and any cupboard/cooker hood should be as shown
below.
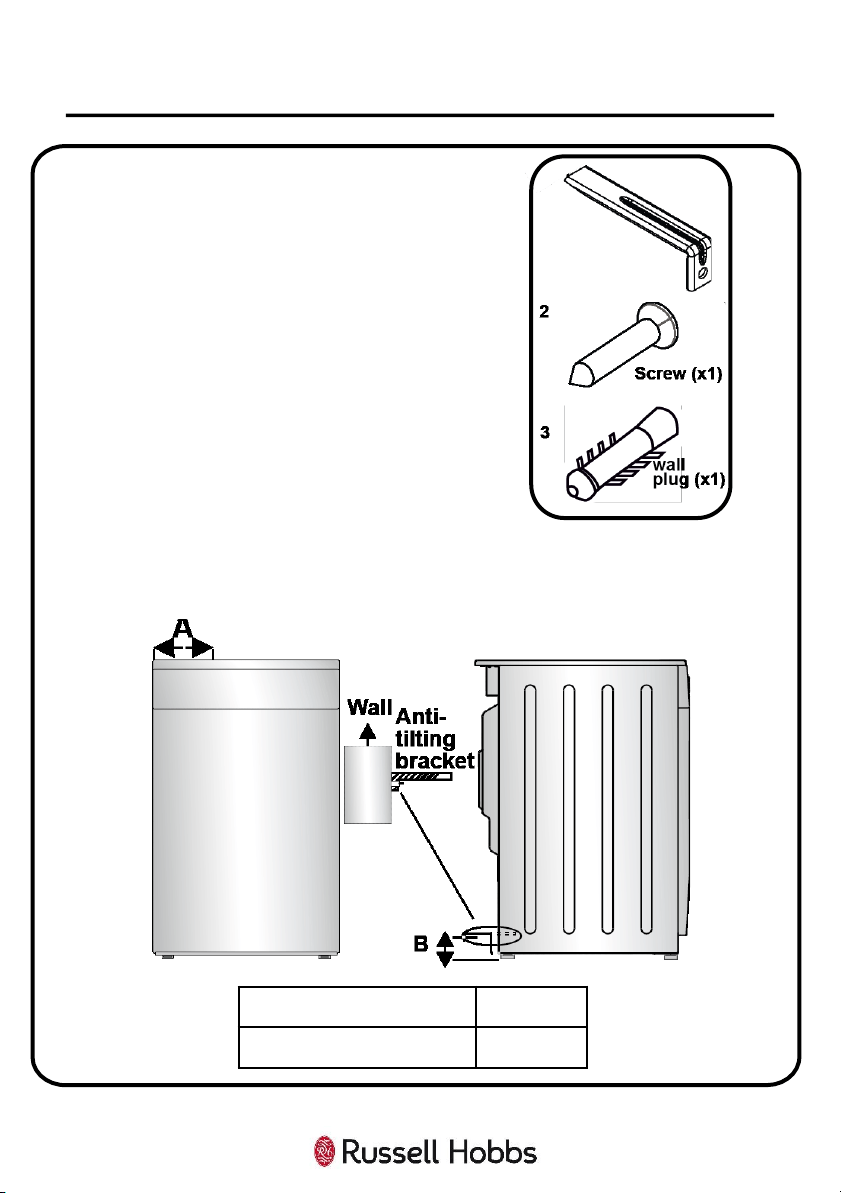
Anti-Tilting Kit:
• The appliance comes with an anti-tilting kit
in the document bag.
• This is to ensure that the oven is secure and
will not fall over due to poor balance.
• Loosely attach the anti-tilting bracket (1) to
the wall using the screw (2) and wall plug
(3), following the measurements and
directions shown below.
12
INSTALLATION & POSITIONING
1
A (mm) 297.5
B (mm) 52
Directions:
1. Adjust the height of the anti-tilting bracket
so that it lines up with the slot on the cooker and tighten the screw.
2. Push the appliance towards the wall making sure that the anti-tilting
bracket is inserted into the slot on the rear of the appliance.
Adjusting the Feet:
• Your product stands on four adjustable feet.
• For safe operation, it is important that your appliance is correctly balanced.
• Make sure the appliance is level prior to cooking.
• To increase the height of the appliance, turn the feet anti-clockwise. To
decrease the height of the appliance, turn the feet clockwise (as seen in the
diagram below).
• It is possible to raise the height of the appliance up to 30 mm by adjusting
the feet.
• The appliance is heavy and we recommend that a minimum of 2 people lift
it.
• Never drag the appliance.
13
INSTALLATION & POSITIONING
14
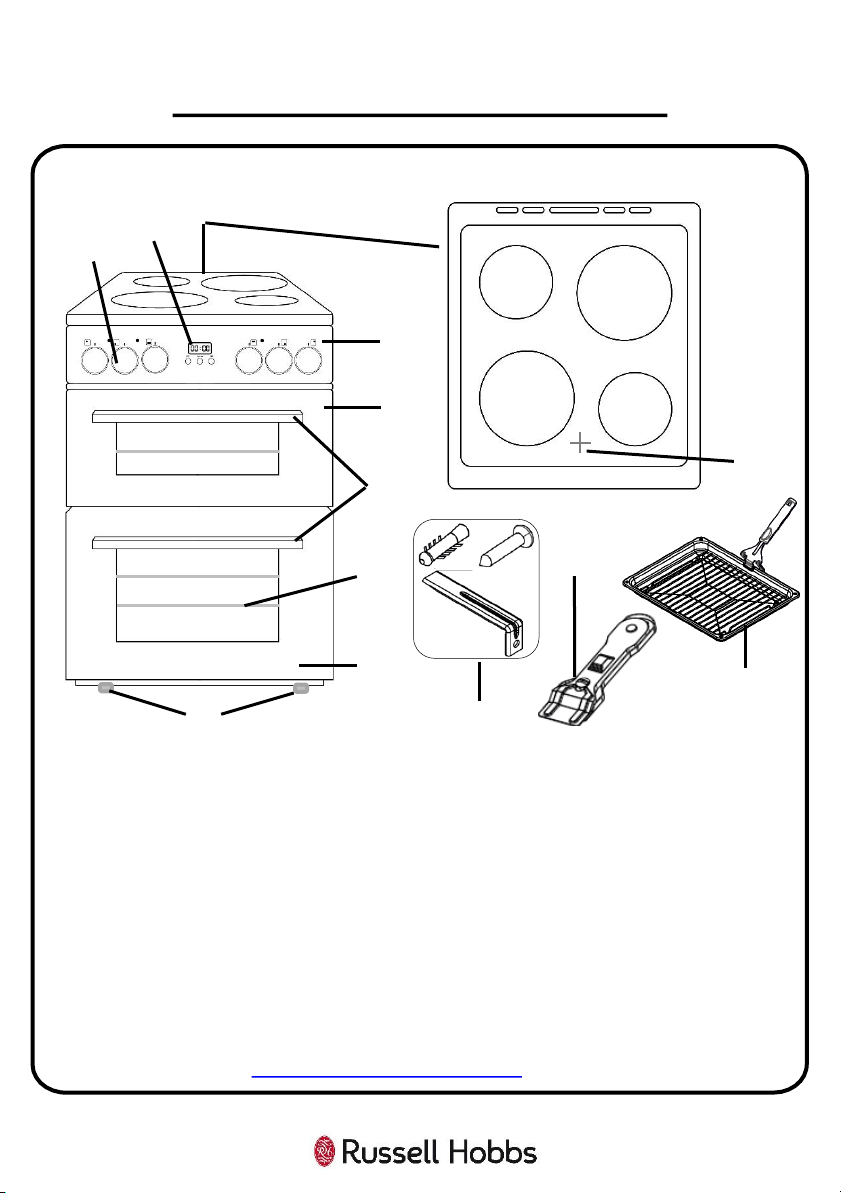
1. Ceramic hob with 4 zones
2. Control panel
3. Grill compartment
4. Oven Compartment
5. Door handle
6. Large hob zone
7. Small hob zone
8. Hob heat warning lights
9. Adjustment Dials
10.Clock/Programmer
11.3 x Wire shelf
12. Anti-tilting kit
13.Vitroceramic Glass Scraper
14.Grill pan with handle
15.Adjustable feet
Unit & Spare Parts
If any of the above parts are missing please contact the customer service team on
0345 208 8750 or visit https://mda.russellhobbs.com
PRODUCT OVERVIEW
Front View:
Top View:
1
2
3
4
5
9
11
12
14
15
7
6
7
6
10
8
13

Control Panel
The appliance has six dials and clock/digital timer. See explanations below:
HOW TO USE YOUR OVEN
1 Top Left Hob Zone Dial Turn to change the temperature of the hob zone
2 Bottom Left Hob Zone Dial Turn to change the temperature of the hob zone
3 Bottom Oven Cavity Dial Dial to change the function of the bottom oven
4 Clock/Digital Timer
Displays the time, and can be used to set various
cooking timers.
5 Top Oven Cavity Dial Dial to change the function of the top oven
6 Bottom Right Hob Zone Dial Turn to change the temperature of the hob zone
7 Top Right Hob Zone Dial Turn to change the temperature of the hob zone
8 Hob Zone Warning Light
This will be lit whenever any of the hob zones are
switched on, or if they are still hot after use
9 Oven Cavity Warning Light
Light will be on when function and temperature has
been set
10 Grill Cavity Warning Light Light will be on when the grill is on
15
1
2
3
4
5
6
7
10
9
8

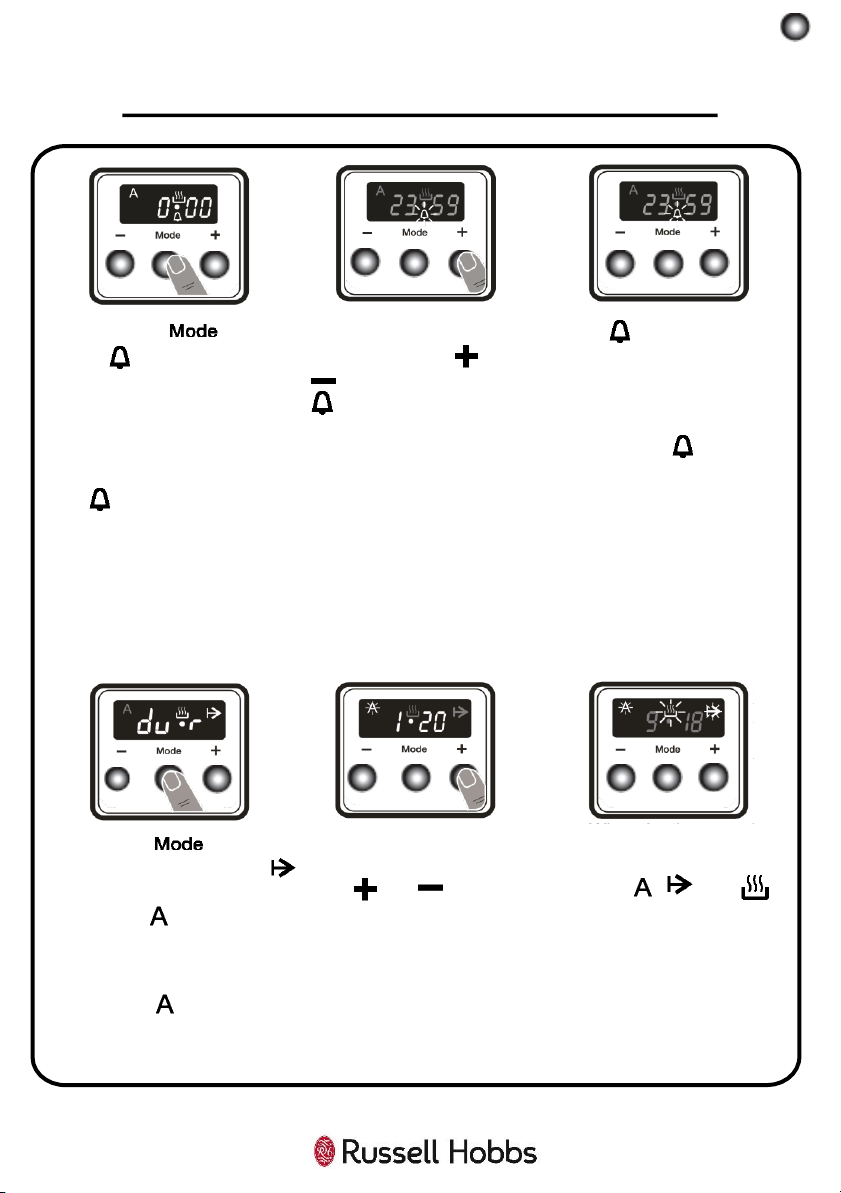
Clock/Digital Timer
This display has multiple functions. See explanations below:
HOW TO USE YOUR OVEN
16
Function Descriptions
Auto cooking Minute minder
Manual cooking Mode function
Cooking time Decrease timer
Cooking end time Increase timer
Dot Timer display
Time Adjustment
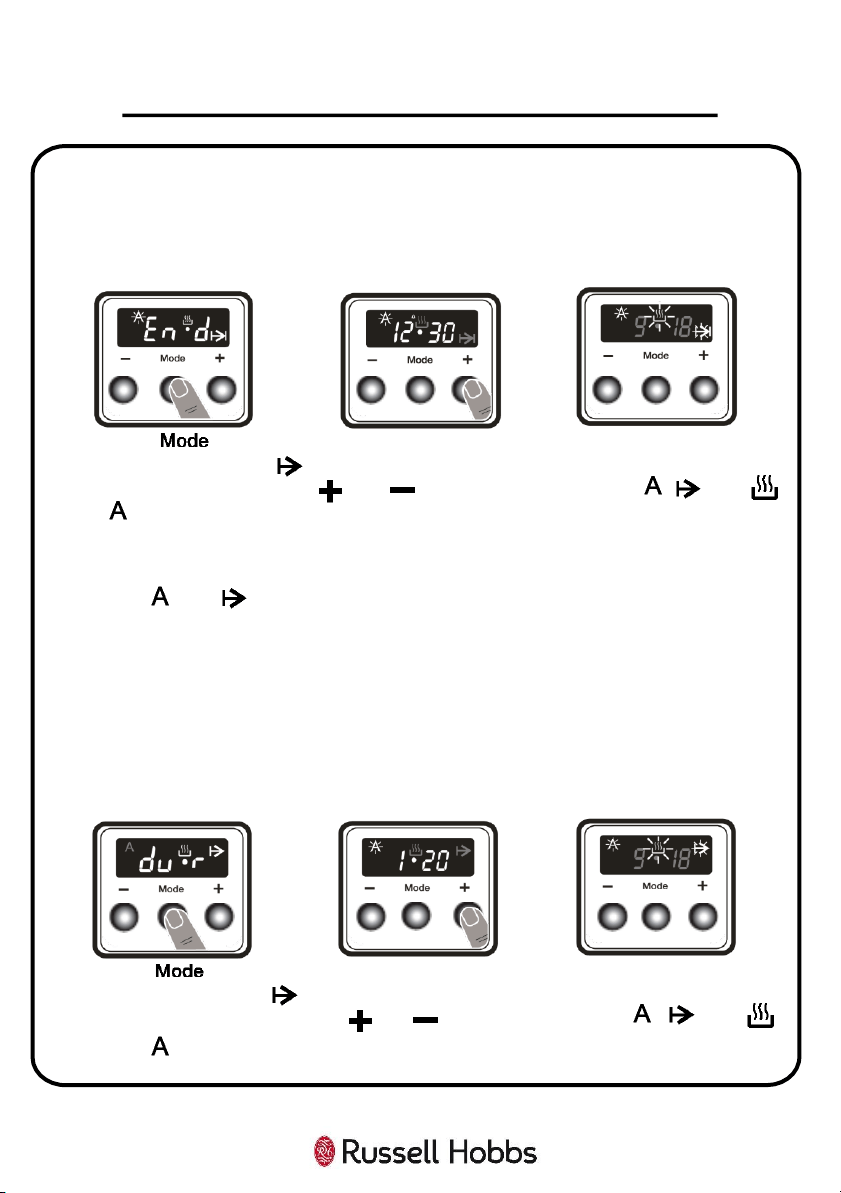
The time MUST be set before you start using the oven. After the oven has been
connected to the power supply, both the symbol and “000” will flash on the
display.
1. Press the and
buttons simultaneously.
The symbol will
appear, and the dot in the
middle of the display will
start to flash.
2. Adjust the time whilst
the dot is flashing by using
the and buttons.
3. After a few seconds, the
dot will stop flashing and
will remain illuminated. The
time you set should also be
illuminated. The time is
now set.
Setting a Timer
Your appliance has a built in timer, which is to be used for warning purposes only.
The timer can be set for any time period between 0:00 and 23:59 hours. The oven
will not be activated with this function.
HOW TO USE YOUR OVEN
17
1. Press the button.
The symbol will begin
to flash and “000” will be
displayed.
2. Select the desired time
period using the and
buttons while the
symbol is flashing.
3. The symbol will remain
illuminated. This means that
the time is saved and the
warning is set.
When the timer reaches zero, an audible warning will sound and the symbol
will flash on the display. Press any button to stop the audible warning and to make
the symbol will disappear.
Setting a Fixed Cooking Period
This function helps you to cook for a fixed period of time. A time range between 0
and 10 hours can be set. Prepare the food for cooking and put it in the oven. Then,
set the desired cooking function and temperature using the control dials.
1. Press the button
until you see “dur” and the
symbol is displayed on the
screen. The symbol will
flash.
2. Select the desired
cooking time period using
the and buttons.
3. The current time will
reappear on the screen, and
the , , and
symbols will remain
illuminated.
When the timer reaches zero, the oven will switch off and an audible warning will
sound. The symbol and will flash. Turn both control dials to the “0” position and
press any button on the timer to stop the warning sound. The symbols will
disappear and the timer will switch back to the regular function.
HOW TO USE YOUR OVEN
18
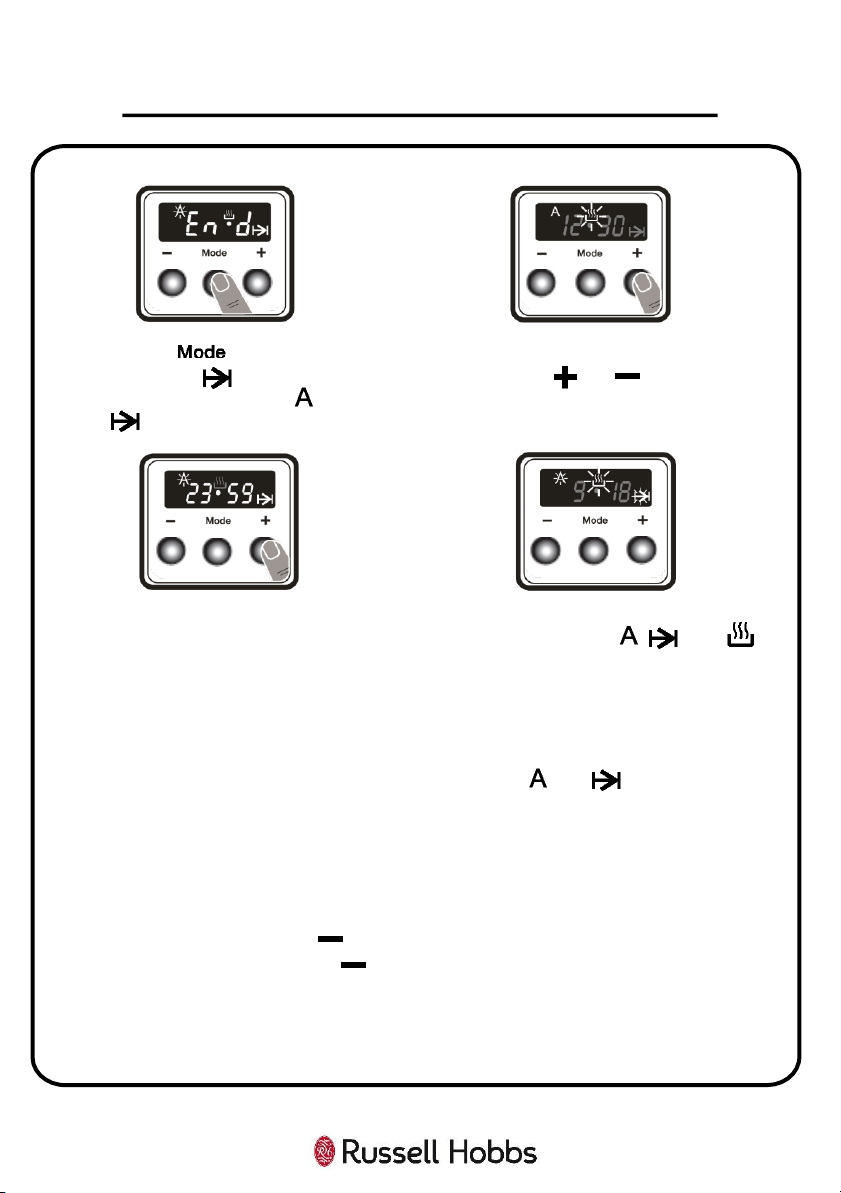
Setting a Cooking Finishing Time
This function automatically starts the oven so that cooking will finish at a set time.
You can set an end time of up to 10 hours after the current time of day. Prepare
the food for cooking and put it in the oven. Then, set the desired cooking function
and temperature using the control dials.
1. Press the button
until you see the “end” and
symbol on the display screen.
The symbol and the
current time of day will flash.
2. Select the desired
finishing time using the
and buttons.
3. The current time will
reappear on the screen,
and the , , and
symbols will remain
illuminated
When the timer reaches zero, the oven will switch off and an audible warning will
sound. The and symbols will flash on the display. Turn both control dials to
the “0” position and press any button to stop the audible warning and to make the
symbol will disappear. The timer will switch back to the regular function.
Setting a Delayed Cooking Timer
This function is used to start cooking after a certain period of time and for a certain
duration. A time of up to 10 hours after the current time of day can be set. Prepare
the food for cooking and put it in the oven. Then, set the desired cooking function
and temperature using the control dials.
1. Press the button
until you see “dur” and the
symbol is displayed on the
screen. The symbol will
flash.
2. Select the desired
cooking time period using
the and buttons.
3. The current time will
reappear on the screen,
and the , , and
symbols will remain
illuminated.
HOW TO USE YOUR OVEN
19
4. Press the button until you
see “end” and symbol on the
screen. The time and the and
symbols will flash.
5. Select the desired finishing time
using the and buttons.
The operating time will be calculated and the oven will automatically start so that
cooking will finish at the set finishing time. When the timer reaches zero, the oven
will switch off, an audible warning will sound and the and symbols will flash.
Turn both control dials to the “0” position and press any button to stop the sound.
The symbols will disappear and the timer will switch back to the regular function.
Adjusting the Volume of the Warning Sound
To adjust the volume of the audible warning sound, while the current time of day is
displayed, press and hold the button for 1-2 seconds until an audible signal
sounds. After this, each time the button is pressed, a different signal will
sound. There are three different types of signal sounds. Select the desired sound
and do not press any other buttons. After a short time, the selected sound will be
saved.
6. Add the cooking period to the
current time of day. You can set a
time of up to 23 hours and 59
minutes after this.
7. The current time will reappear on
the screen, and the , , and
symbols, will remain illuminated.
Hob Zones
• The hob zones are controlled by dials with 6 positions, and can be operated by
switching a control dial to one of these positions.
• Near each hob control dial, there is a small symbol that shows which hob zone
is controlled by that dial.
• Please follow the chart below to advise what position to turn a dial to for
cooking different foods:
WARNING: When operating the hob zone for the first time, or after it has not been
used for a prolonged period of time, it is necessary to eliminate any humidity
which may have accumulated around the electrical elements of the hob zone. To
do this, operate the hob zone on its lowest setting for about 20 minutes.
WARNING: Never operate a hot zone without pans on. Otherwise, form defects
may occur on the cooktop.
WARNING: Only use flat-bottomed pans with thick bases.
WARNING: Make sure the bottom of the pan is dry before placing it on a hob zone.
20
HOW TO USE YOUR OVEN
Dial Position Function
0 Off position
1 To melt butter etc. and to warm small
quantities of liquid
2 To warm bigger quantities of liquid & to
prepare creams and sauces
3 To defrost food for cooking
4 To cook delicate meat and fish
5 To roast meat and steak
6 To boil big quantities of liquid or to fry

21
HOW TO USE YOUR OVEN
WARNING: When a hob zone is in operation, make sure that the pan is centred
correctly on it.
• Never use a pan with a smaller or larger diameter than that of the hob zone as
this will waste energy.
• If possible, always place lids on the pans to avoid heat loss.
• The temperature of accessible parts may become high while the appliance is
operating. It is imperative to keep children and animals well away from the
hob during use and until it has fully cooled after use.
WARNING: If you notice a crack on the cooktop, it must be immediately switched
off and replaced by an authorized service personnel or technician.
WARNING: When it is first used, the oven may give off odours; this does not
pose any risk and does not indicate a malfunction. They will disappear in time.
This is perfectly normal and is caused by the insulation materials on the heating
elements. We suggest that, before using your oven for the first time, you leave
it empty and set it at maximum temperature for 45 minutes. Make sure that
the environment in which the product is installed is well ventilated.
Top Oven Cavity
• The top oven cavity is controlled by the dial labelled 5 (page 14).
• This compartment has 4 different oven functions; static cooking, lower
heating, upper heating, and grilling.
• The dial goes from 0 (off position), then 50 to 200 degrees Celsius (highest
oven temperature) for static oven cooking, followed by the other 3 functions.
• NOTE: The top oven door must be fully open when the grilling function is
selected.
• When the top oven cavity is on, the warning light labelled 10 (page 14), will be
switched on.
• This cavity does not contain an internal oven light.
• There are side rack supports either side of the compartment that accessories
such as the wire shelves, grill tray, etc. can be inserted in to.
• The coating of the oven cavity is enamel.
• Before you use the oven and the accessories for the first time, clean them
with hot soapy water and a soft dish cloth. Clean all accessories by hand, do
not clean in the dishwasher.

22
HOW TO USE YOUR OVEN
Bottom Oven Cavity
• The bottom oven cavity has 2 different functions available, which are listed
and explained in table on the next page. These can be set by turning the dial
labelled 3 (page 14).
• The function and temperature are altered using the same dial.
• Once a mode and its relative temperature have been selected, the warning
light labelled 9 (page 14), will be switched on.
• The oven will start to heat up and the light will turn off when the temperature
inside has reached the temperature that has been selected.
• Depending on what function is selected, the oven has a different temperature
range e.g. the defrost function has a set temperature in order to not cook your
food, but with the turbo function, the temperature can be amended to your
preference.
• An oven light is located in the cooking compartment. The light turns on
automatically when an oven function has been selected.
• A cooling fan protects the oven from overheating. The cooling fan switches on
and off as required.
• So that the cooking compartment cools down quickly after operation, the
cooling fan continues to run for a certain period afterwards.
Note: Always pre-heat the oven to the required temperature before cooking.
Making Changes During Cooking
• It is possible to change the heating mode and temperature during cooking.
Simply turn the oven function dial to change the programme, or adjust the
temperature. After the changes have been made, the oven will cook at the
changed function and temperature. However in order to have the best
cooking results, we recommend to choose the right settings at the beginning,
prior to cooking.
Types of Heating Modes
This oven has a number of modes. Below is an overview to enable you to find
the suitable heat settings required for certain dishes/cooking.
Top Oven Cavity:
HOW TO USE YOUR OVEN
Symbol
Temperature
Range
Function
-
Grill: The whole area below the grill heating element
becomes hot. Top oven door must be fully open for
this function to work.
This function can be used to grill burgers, bacon,
sausages, fish or bread.
50°C - 200°C
Top & Bottom Heating: Heat is emitted evenly from
the top and bottom elements, which work together to
provide convectional cooking. Preheating the oven for
10 minutes is recommended.
This function is best suited for single items that are
centred in the oven i.e. cakes and pizzas on baking
trays, lean joints of beef, etc.
-
Bottom Heating: Heat is emitted evenly from the
bottom heating elements only. The temperature will
be set to the highest level for this function.
This function is ideal for warming pizza as the heat
rises up from the bottom of the oven. This function is
more suitable for food heating instead of cooking.
-
Top Heating: Heat is emitted evenly from the top
heating elements only. The temperature will be set to
the highest level for this function.
This function is ideal for heating or browning the top
of food that has already been cooked. This is because
heat radiates from the upper heating element, closest
to the top of the food.
23
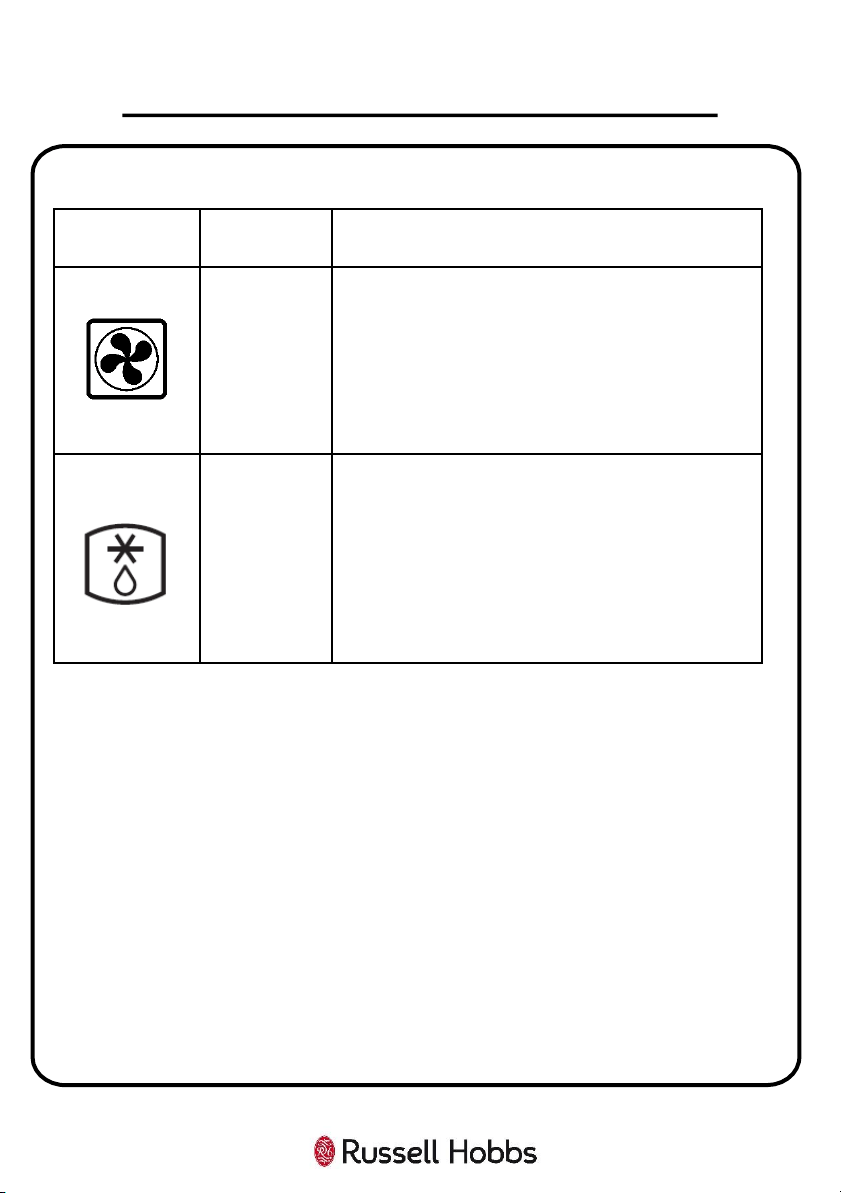
Bottom Oven Cavity:
HOW TO USE YOUR OVEN
Symbol
Temperature
Range
Function
50°C - 220°C
Convection Heating: Turn the bottom oven control
dial past the defrost symbol to use this function. The
fan distributes the heated air that is emitted by the
rear
heating elements around the food. Preheating the
oven for 10 minutes is recommended.
This function is best suited for baking, roasting all
meat, vegetables, and pre-cooked meals.
-
Defrost: Turn the bottom oven control dial to the
defrost symbol. This function circulates air in the oven
at room temperature (without the use of any heat)
enabling quicker thawing of frozen food. Place your
frozen food on a shelf in the middle of the oven. Place
an oven tray under your defrosting food to catch the
accumulated water.
Use this to defrost food only.
24
Accessories
WARNING:
• Correct placement of the shelves between the side supports is imperative.
This will ensure that food does not fall off or slide out when in the oven or
being carefully removed from the oven.
• Ensure that you always insert the accessories into the cooking compartment
the right way round.
• Shelves and the grill pan must only be placed and used between the side
supports.
• The grill pan or any other kind of baking tray should not be placed on the
bottom of the oven cavity.
The accessories can be inserted in the oven at 5 different levels, and in the grill
cavity at 2 different levels. Always make sure that the accessories are inserted
properly, orientated correctly, and are not touching the oven door.
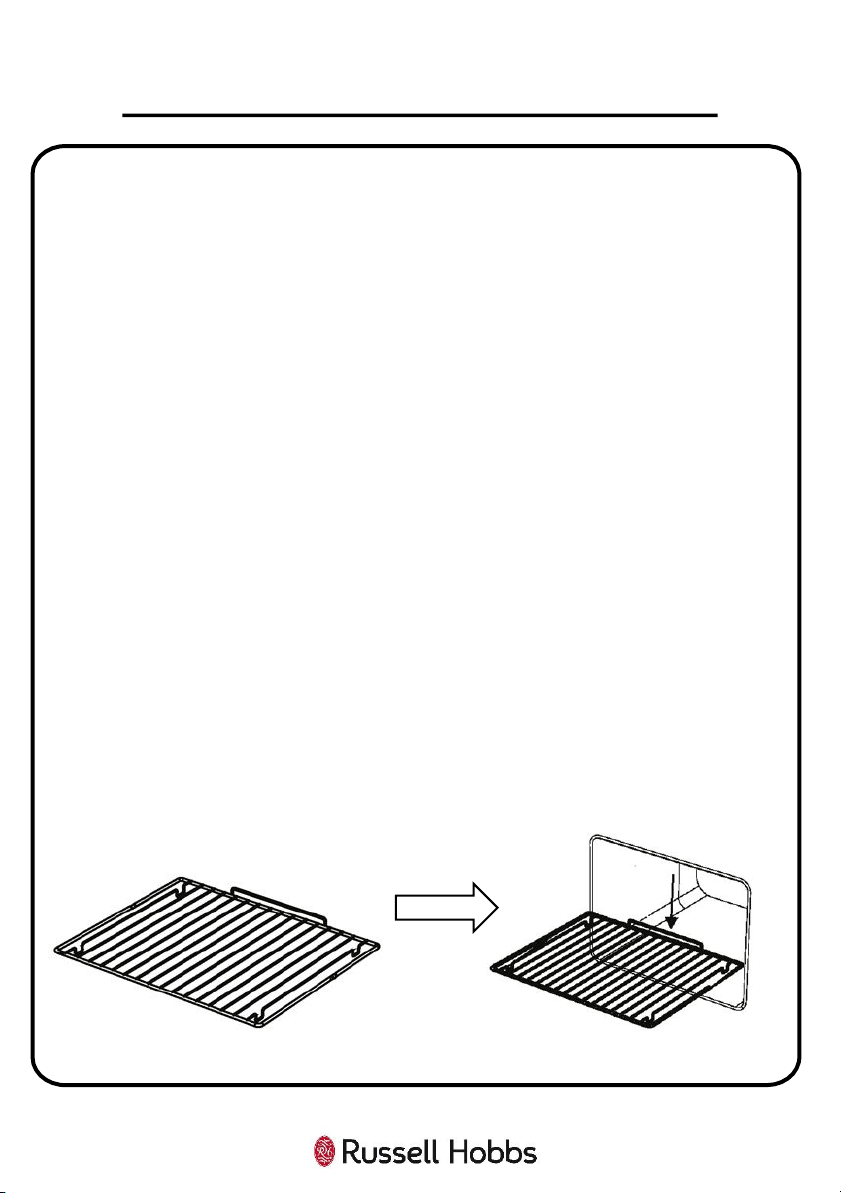
Wire Shelf – Use for ovenware, cake tins, roasts, grilling, and frozen meals. Slide
the wire rack into the oven with the raised part at the back and at the top.
The wire shelves can be pulled out halfway until they are locked in place. The
locking function prevents the shelves from tilting when they are pulled out. The
wire shelves must be inserted into the cavity correctly to avoid tilting. When
inserting the wire rack, please make sure the wire rack is as shown on the
illustration below.
25
HOW TO USE YOUR OVEN
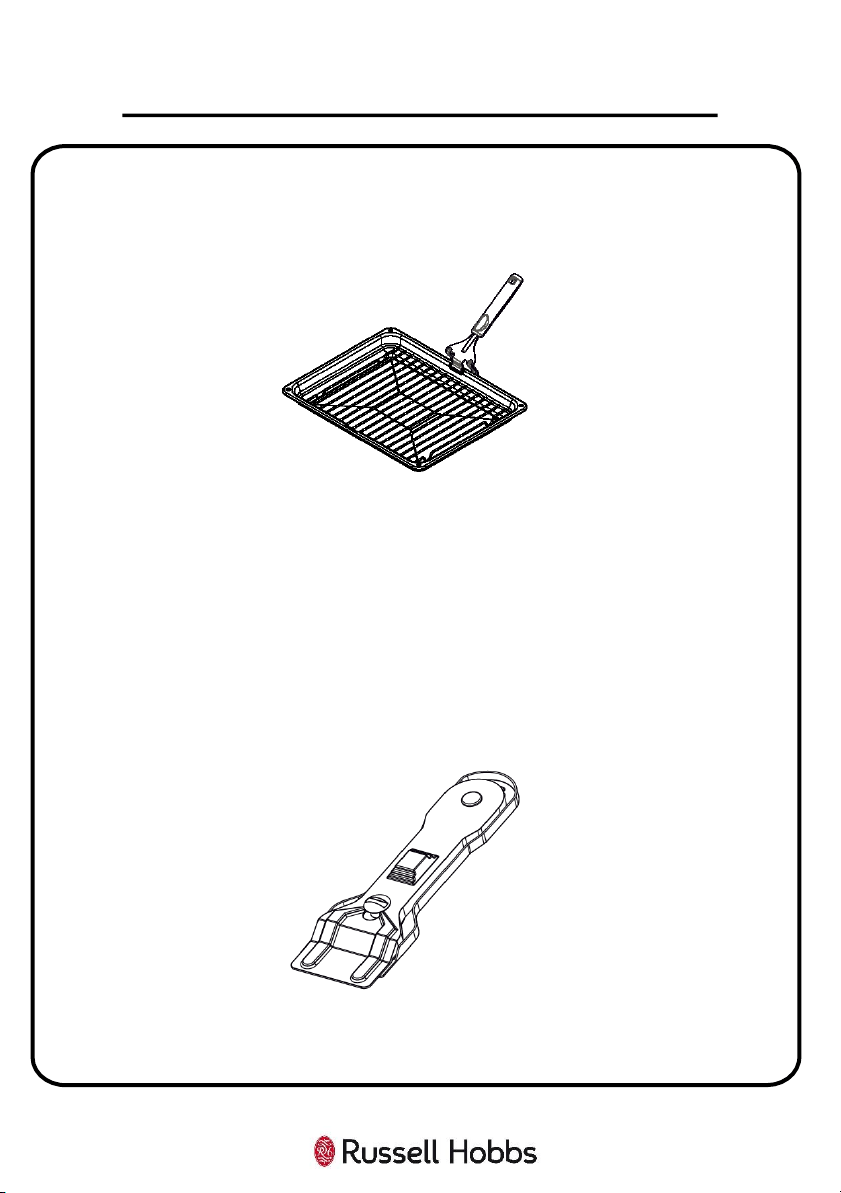
Grill Pan and Handle – Use for grilling steaks and similar foods, such as bacon and
sausages. You can also use this for toasting bread, and broiling dishes to brown the
top of them e.g. pasta bake, cheese on toast etc. The grill pan can also be used
under the wire racks in the oven to catch fat from food while cooking.
WARNING:
• DO NOT place the grill pan on the bottom of the oven cavities. Always place
the grill pan on top of a wire rack to use.
• The grill pan has a detachable handle. Make sure that when using the grill pan
handle that it is centralised and secure, as shown in the figure above. DO NOT
leave the handle in position while grilling is in operation.
The Vitroceramic Glass Spatula - Always use the glass spatula to remove spillages
or deposits from the hob before trying chemical cleaning agents. This is the ideal
method for removing even the smallest deposits from the hob, and for removing
spillages from hot cooking zones before they burn onto the hob.
WARNING:
• ALWAYS push the safety cover back over the razor blade after use. Take care
when using the spatula and keep it out of the reach of children.
26
HOW TO USE YOUR OVEN
Energy Saving
The following advice is to help you save energy.
When using your oven:
• Only preheat the oven if this is specified in the recipe.
• Keep the pre-heating time short.
• Open the oven door as infrequently as possible.
• Use black enamelled baking trays, tins etc., as they absorb the heat well.
• If you need to cook, bake, or roast a number of different foods then it is best to
do this one after the other. The oven will be at temperature, reducing the need
to pre-heat the oven again.
• Cook more than 1 item at a time using the different accessories provided.
• Do not overcook your food; this will only elongate the cooking time.
• Remember to turn off the oven once cooking is completed.
When using your hob:
• Use cookware that has a flat base, as this distributes heat to your food quickly
and more evenly.
• Use the appropriate size hob zone for the size of your pan e.g. do not use the
large hob zone for a small pan. This only wastes energy.
• Use a lid on your cookware to keep in heat.
• Minimise the amount of liquid or fat in your cooking.
• If you’re heating liquids on the hob, once the liquid starts to boil, reduce the
heat setting.
27
HOW TO USE YOUR OVEN
28
Important Notes:
• The appliance will become hot during operation, so allow the appliance to cool
down before cleaning.
• Do not use any high-pressure cleaners or steam cleaners.
• Wash new sponge cloths thoroughly before use.
• Do not leave acidic substances (e.g. lemon juice, vinegar), on stainless steel parts.
• Do not clean the stainless steel parts while they are still hot from cooking.
• Do not use cleaners that contain particles, as they may scratch the glass,
enamelled and/or painted parts of your appliance.
• Follow all instructions and warnings included with the cleaning agents.
How to Clean
Observe the information in the table below to ensure that the different surfaces are
not damaged by using the wrong type of cleaning agent. Clean all accessories by
hand, do not clean in the dishwasher.
Do not use:
• Harsh or abrasive cleaning agents.
• Cleaning agents with a high concentration of alcohol.
• Hard scouring pads or sponges.
• High-pressure cleaners or steam cleaners.
• Cream or liquid cleaners that contain particles.
Surface Type How to Clean
Stainless Steel Use hot water and clean with a dish cloth and dry with a soft cloth.
Clean stainless steel surfaces in the direction of the grain only.
Special stainless steel cleaning products are available from specialist
retailers. Apply a very thin layer of the cleaning product with a soft cloth.
Painted Surfaces Use hot soapy water and clean using a damp dish cloth and dry with a soft
cloth/towel. Do not use any stainless steel cleaners.
Aluminium and
Plastic
Use glass cleaner and clean with a soft cloth.
Glass Use glass cleaner and clean with a soft cloth. Do not use a glass scraper.
Enamel Clean with some washing-
up liquid and a damp cloth. Dry with a soft cloth.
CLEANING & MAINTENANCE

How to Clean:
• To clean the hob, wait until it has cooled. Then, wipe the hob with a soft cloth
dampened with water, and then run the hob for a short time to dry it
completely.
• After each use, clean all surfaces once they have cooled down. If any residue is
left (baked-on food, drops of grease etc.), however little, it will become stuck
to the surface and more difficult to remove later.
• Always clean off any liquid as soon as it is spilt. You will save yourself any
unnecessary effort.
• Where possible, do not allow salt to come into contact with the surfaces of the
appliance.
Causes of Damage:
• Accessories, foil, greaseproof paper or ovenware on the cooking
compartment floor: Do not place accessories on the cooking compartment
floors. Do not cover the cooking compartment floors with any sort of foil or
greaseproof paper. Do not place ovenware on the cooking compartment floors
if a temperature of over 50ºC has been set. This will cause heat to accumulate.
The baking and roasting times will no longer be correct and the enamel will be
damaged.
• Water in a hot cooking compartment: Do not pour water into the cooking
compartments when they are hot. This will cause steam. The temperature
change can cause damage to the enamel.
• Moist food: Do not store moist food in the cooking compartments when it is
closed for prolonged periods. This will damage the enamel.
• Fruit juice: When baking particularly juicy fruit pies, do not pack the baking
tray too generously. Fruit juice dripping from the baking tray leaves stains that
cannot be removed. If possible, use the deeper universal pan.
• Cooling with the appliance door open: Only allow the cooking compartments
to cool when it is closed. Even if the appliance doors are only open a little,
front panels of adjacent units could be damaged over time.
29
CLEANING & MAINTENANCE
• Very dirty door seal: If the door seals are very dirty, the appliance doors will
no longer close properly when the appliance is in use. The fronts of adjacent
units could be damaged. Always keep the door seals clean.
• Never use the appliance hob as a seat, shelf, or worktop: Do not sit on the
hob , or store anything on it when it is not in use.
• Never use the appliance door as a seat, shelf, or worktop: Do not sit on the
appliance door, or place or hang anything on it. Do not place any cookware or
accessories on the appliance door.
• Inserting accessories: Accessories can scratch the door panels when closing
the appliance doors. Always insert the accessories into the cooking
compartments as far as they will go.
Changing the Bulb
WARNING: The maintenance of this appliance should be carried out by an
authorised service person or qualified technician ONLY.
WARNING: Switch off the appliance and allow to cool before any maintenance is
performed on the appliance.
• Ensure that the oven is turned off at the mains prior to changing the bulb.
• The replacement bulb must be resistant to at least 300 °C, (Specification: 230
V, 15-25 Watt, Type E14).
• Remove the glass lens, then remove the bulb.
• Insert the new bulb to replace the bulb that you removed.
• Replace the glass lens, and your oven is ready for use.
Important Note: The lamp is designed specifically for use in household cooking
appliances. It is not suitable for household room illumination.
30
CLEANING & MAINTENANCE
31
CLEANING & MAINTENANCE
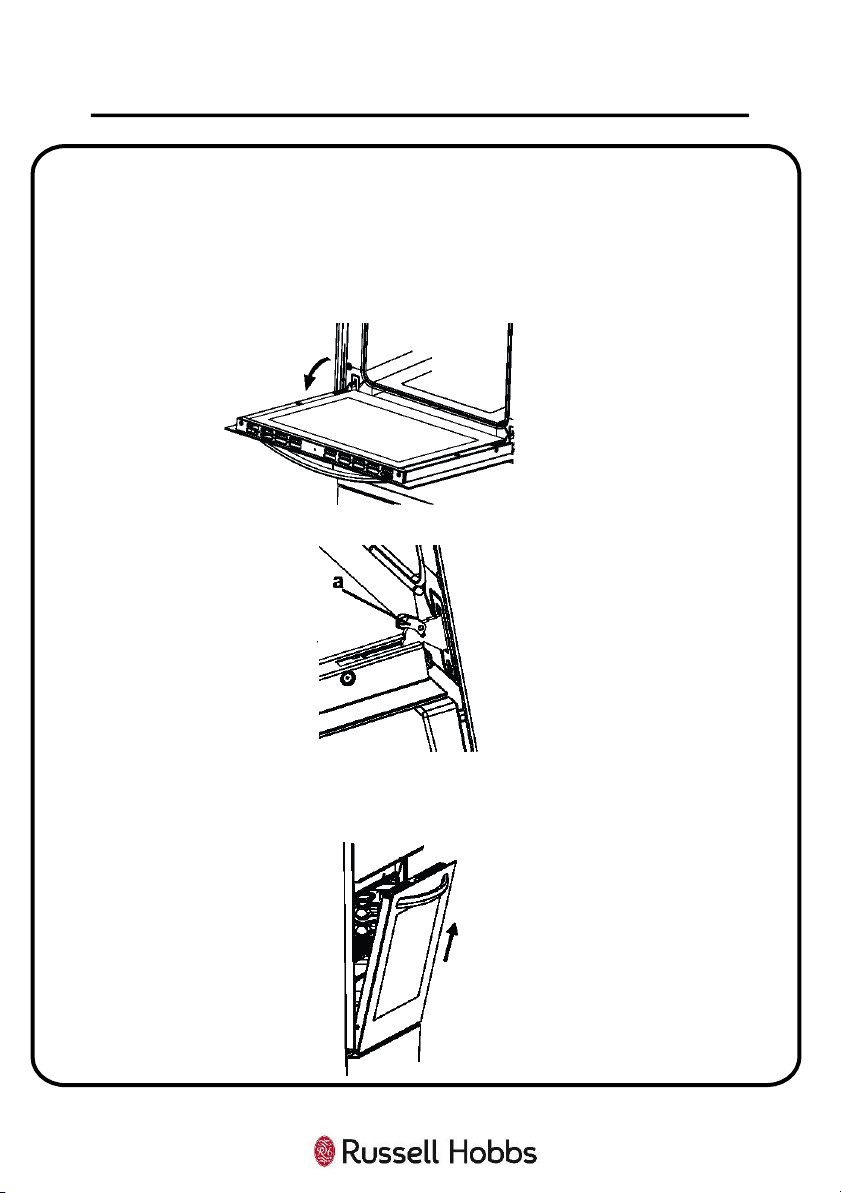
Removing the Door
Before you can deep clean the oven glass door, you must remove the oven
door by following the steps below.
1. Open the door fully, you will see the door hinges on either side of the door.
The hinges have locking levers which will be in the closed position.
2. Open the locking catch (a) with the aid of a screwdriver. Open it up to the
end position.
3. Still supporting the door, partly close the door until you feel resistance.
Then holding the door on both sides, pull it up and outwards to detach the
door from the oven.
Door Assembly
To reattach the door, please follow the below steps:
1. When installing the door, you must make sure that both hinges at the
bottom of the oven door are aligned and fully inserted with the 2 small
holes at the bottom of the front panel on the oven.
2. Once the door hinges are inserted, check if the door can be opened and
closed fully, and the door is aligned correctly with the control panel. If not,
please check if the hinges are inserted fully and in the correct position.
3. Once the door has been reattached correctly then reattach the locking
catch on the hinges on both sides.
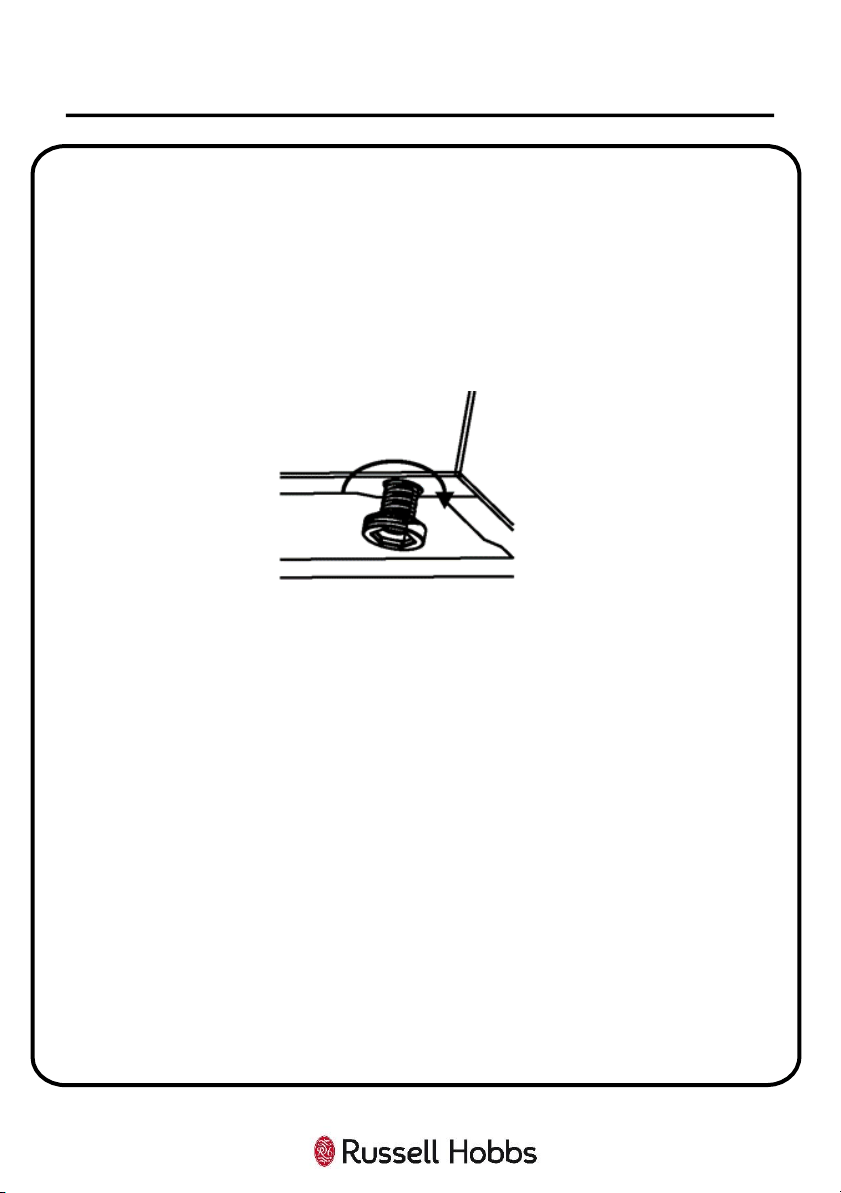
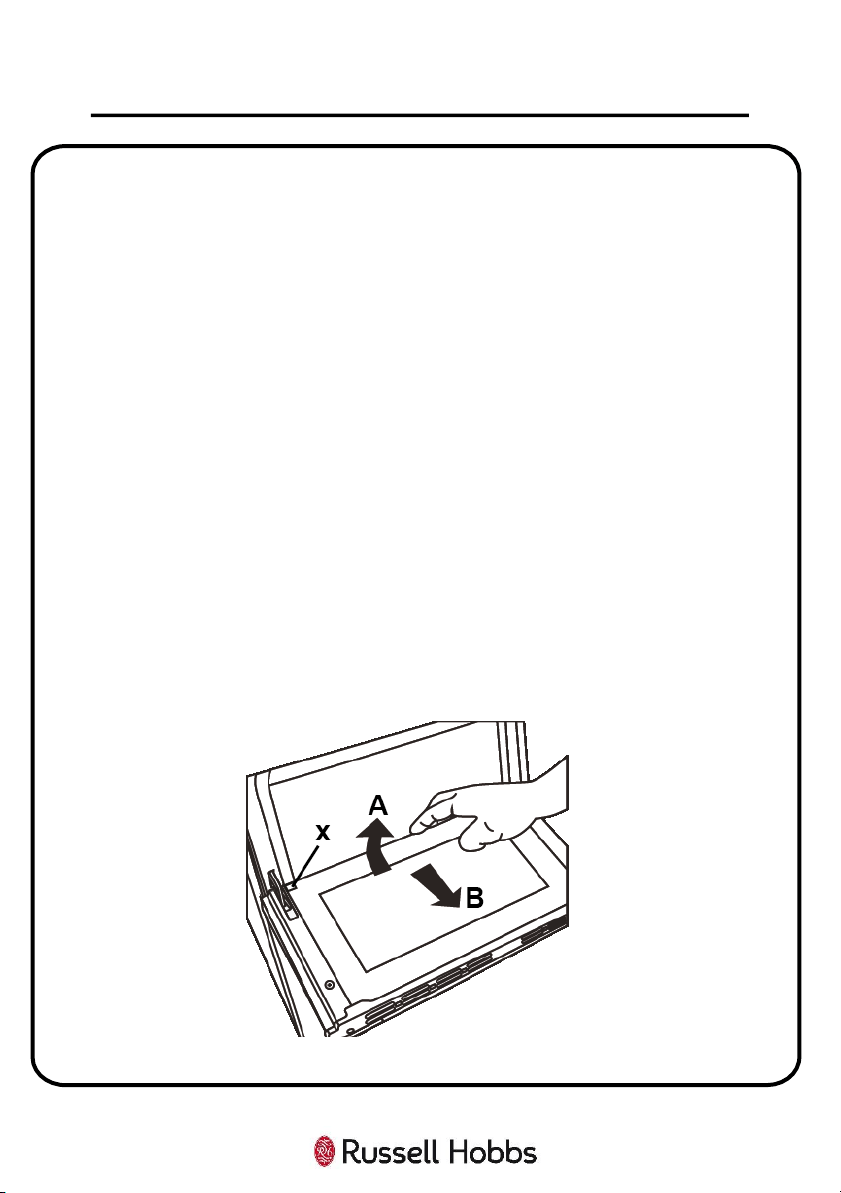
Removing Glass from Door
1. Push the glass towards the top of the oven door (direction of B), and
release from the location bracket (X).
2. Then pull the glass up and away from the oven (in the direction of A).
32
CLEANING & MAINTENANCE
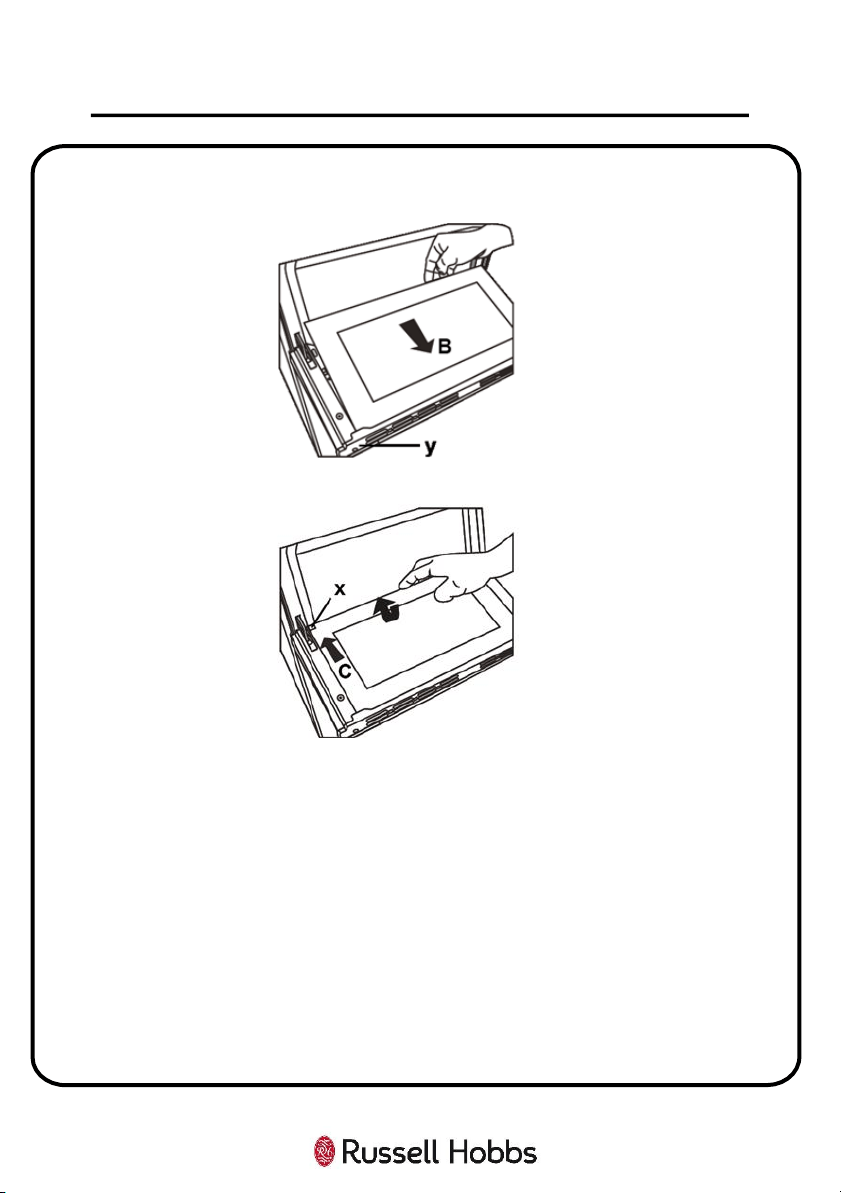
To replace the inner glass:
1. Push the glass towards and under the location bracket (y), in the direction of
B.
2. Place the glass under the location bracket (X) in the direction of C.
If the oven door is a triple glass oven door, the third glass layer can be removed
the same way as the second glass layer.
33
CLEANING & MAINTENANCE
34
Problem Possible Cause Solution
The hob or oven
cavities can’t be
switched on
The circuit break is
defective or turned off
Check circuit breaker is in working
order and that it is not switched
off
Power cut or faulty
fuse
Check whether other kitchen
appliances are working or c
heck in
the fuse box to make sure that the
fuse for the appliance is working
The hob
produces an
odour during the
first cooking
sessions
The appliance is new
Heat a saucepan full of water on
each cooking zone for 30 minutes.
The oven doesn’t
heat up
The
oven temperature
control is incorrectly
set
Check the oven temperature dial
has been set correctly.
Oven light does
not work
Electrical supply has
disconnected or
switched off
Check circuit breaker is in working
order and that it is not switched
off
The light is faulty or
has been damaged
Replace the light according to the
instructions featured earlier in this
instruction manual
TROUBLE SHOOTING
35
Problem Possible Cause Solution
Cooking is
uneven within
the oven or f
ood
is being burnt
Location of the
shelves are incorrect
Check that the temperature has
been set correctly and/or adjust
the shelf positions
Do not frequently open the door
unless you are cooking things that
need to be turned. Opening the
oven door often means the oven
temperature can drop, possibly
affecting the result of your cooking
The oven fan is
noisy
Oven shelves are
vibrating
Check that the oven is level
Check that the shelves and
cookware being used in the oven
are not vibrating or in contact with
the oven back panel
The clock/timer
buttons cannot
be pressed
properly
There is foreign
matter caught
between the
clock/timer buttons
Remove the foreign
matter and try
again
TROUBLE SHOOTING
36
This product is guaranteed for 12 months from the date of the
original purchase. If any defect arises due to faulty materials or
workmanship you must contact Customer Services with the original
proof of purchase so a replacement or refund can be arranged.
Refund or replacement is at the discretion of Customer Services.
The following conditions apply:
• Customer Services will require a valid proof of purchase at the
point of replacement or refund.
• The product must be installed and used in accordance with the
instructions contained within this instruction guide and any
other instructions for use which have been supplied.
• It must be used for domestic purposes only and for its intended
use.
• This guarantee does not cover wear and tear, damage, misuse or
consumable parts.
This does not affect your statutory rights.
GUARANTEE
37
Model Number RH60EDOEH6001 (B) (S)
Rated Voltage 230V ~ 50Hz
External Dimensions(HxWxD) 890mm x 594mm x 650mm
PRODUCT INFORMATION
Imported by
G2S LIMITED
WIGAN
WN2 4AY
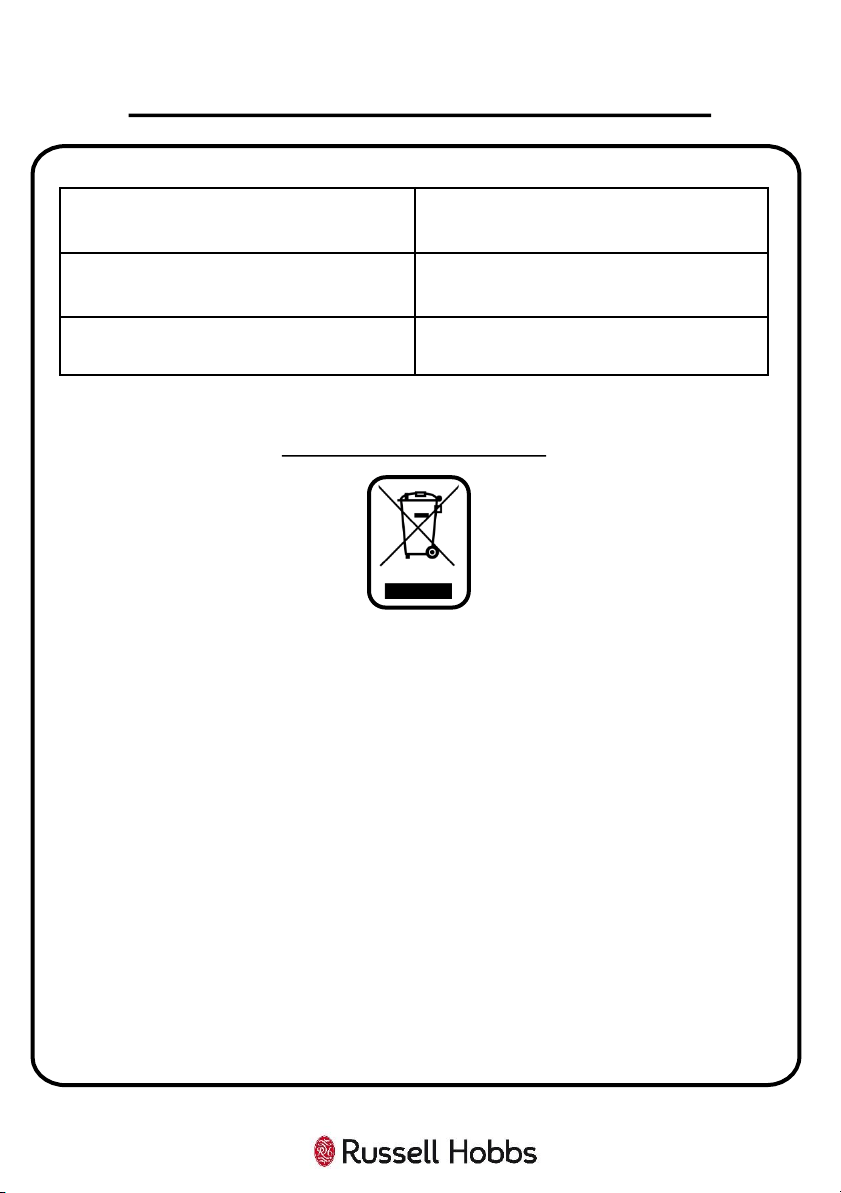
Disposal of your old machine
• This symbol on the product or on its packaging indicates that this
product should not be treated as household waste. Instead it should be
handed over to the applicable collection point for the recycling of
electrical and electronic equipment.
• By ensuring this product is disposed of correctly, you will help prevent
potential negative consequences for the environment and human
health, which could otherwise be caused by inappropriate waste
handling of this product.
• For more detailed information about recycling of this product, please
contact your local city office, your household waste disposal service or
the retailer who you purchased this product from.
38
NOTES
This symbol is known as the 'Crossed-Out Wheelie Bin Symbol'. When this
symbol is marked on a product/batteries, it means that the
product/batteries should not be disposed of with your general household
waste. Only discard electrical/electronic/battery items in separate collection
schemes, which cater for the recovery and recycling of materials contained
within. Your co-operation is vital to make sure the success of these schemes
and for the protection of the environment. For your nearest disposal facility,
visit www.recycle-more.co.uk
or ask in store for details.
We reserve the right due to possible changes to design, to alter
the instruction manual without prior notice.
For Customer Services & Spare
Parts please call 0345 208 8750
or visit us at
https://mda.russellhobbs.com
Revision 1.5
39